
(Image credit: Future)
On Windows 11 (and 10), the «.NET Framework» («dot net») is a development platform made up of programming languages, libraries, and tools for programmers to build different types of programs for desktops, laptops, tablets, servers, web apps, and games.
The .NET platform is not limited to Windows since it is open-source and cross-platform, which means it’s also supported on macOS and Linux devices.
Although regular users rarely have to worry about the version of .NET installed on their devices, some apps require specific releases to install and run as properly. In addition, developers usually have to use multiple versions of the development platform to build and test their apps. As a result, knowing the version of .NET installed on the computer can come in handy in many scenarios.
Whether you are a developer or a standard user, Windows 11 (and 10) provides several methods to determine the .NET Framework version through File Explorer, Registry, Command Prompt, and PowerShell.
This how-to guide will walk you through the steps to determine the .NET Framework version installed on Windows 11.
How to check .NET version using File Explorer
To use File Explorer to check the .NET Framework version on Windows 11, use these steps:
- Open File Explorer.
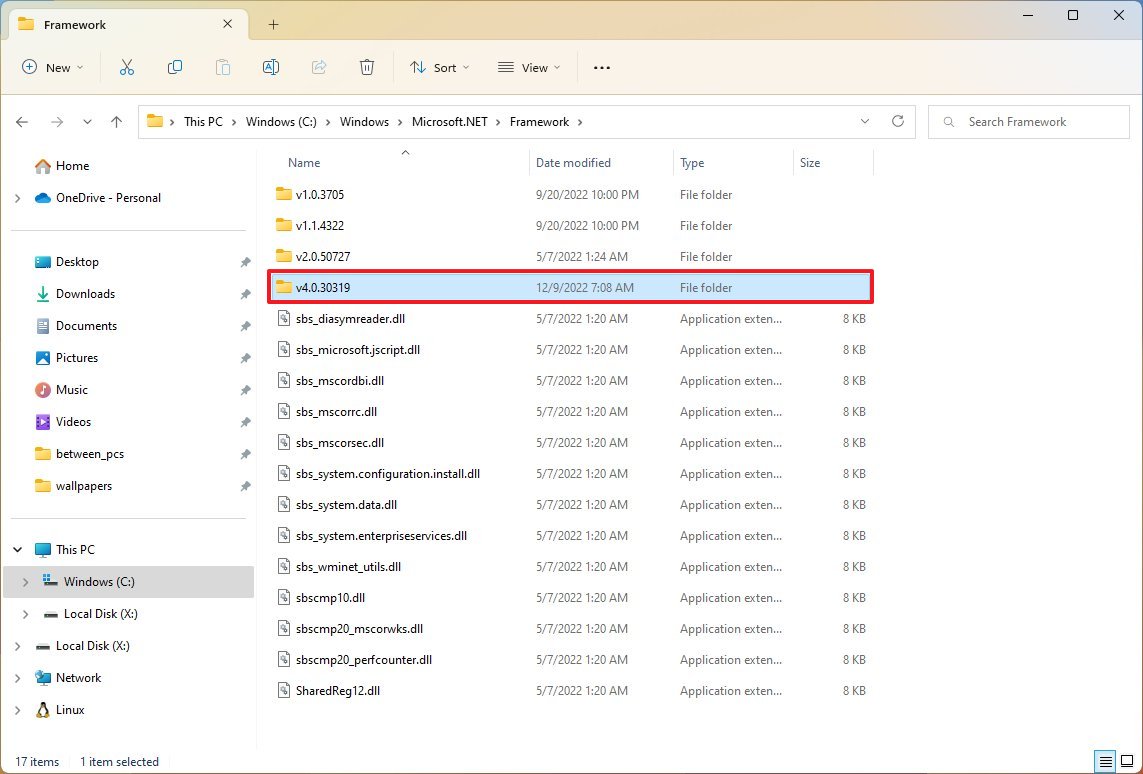
- Browse the following path: C:\Windows\Microsoft.NET\Framework
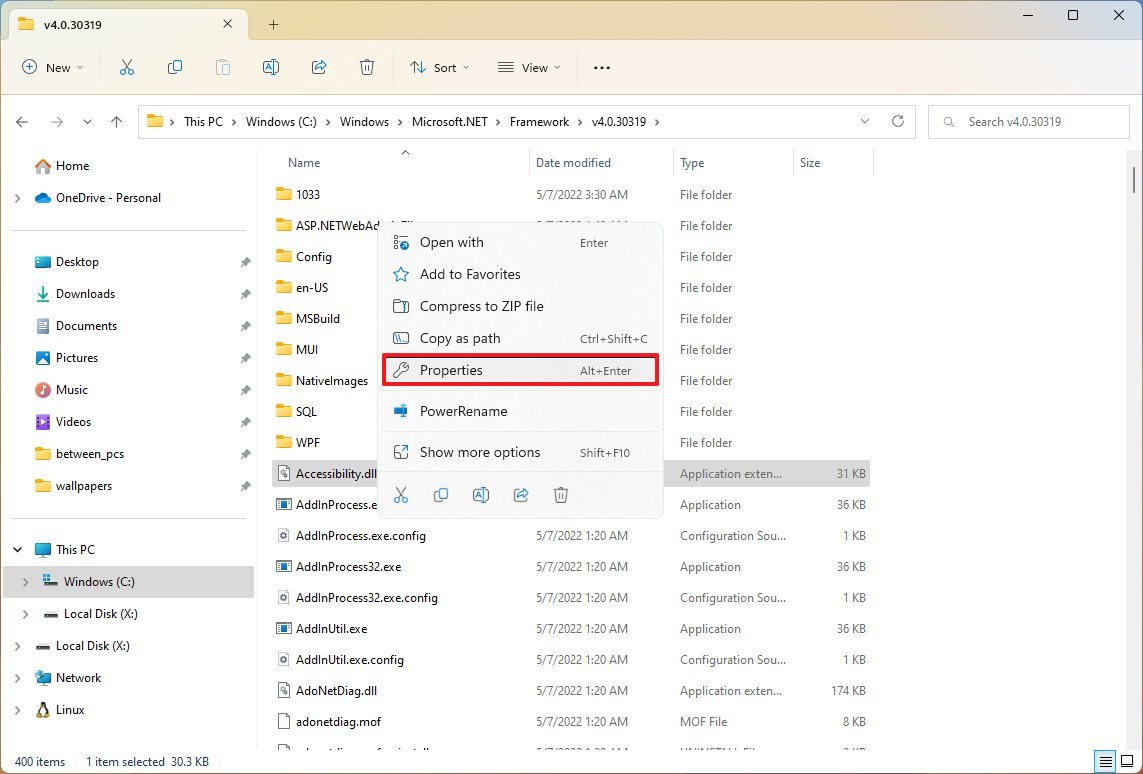
- Open the folder with the latest version – for example, v4.0.30319.
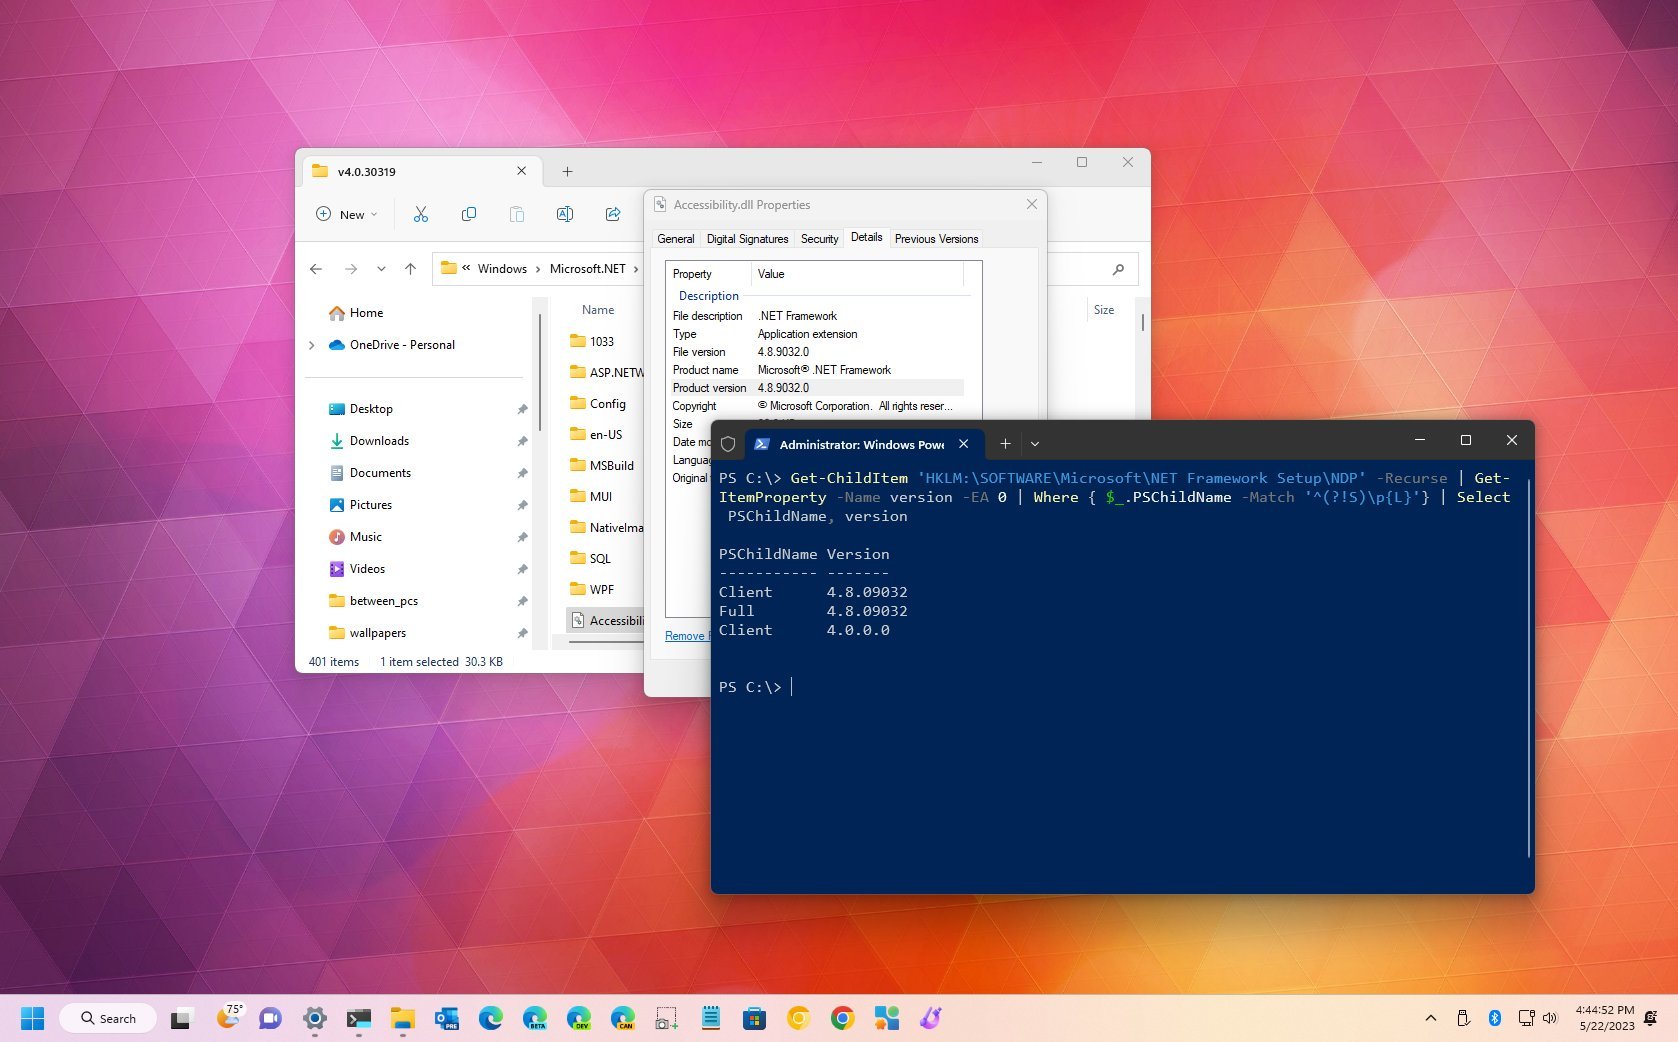
- Right-click any of the «.dll» files and select the Properties option.
- Click the Details tab.
- In the «Product version» section, confirm the version of .NET – for example, 4.8.9032.0.

Once you complete the steps, the file details will unveil the framework platform’s version installed on Windows.
All the latest news, reviews, and guides for Windows and Xbox diehards.
How to check .NET version using Registry
To determine the .NET Framework version through the Registry, use these steps:
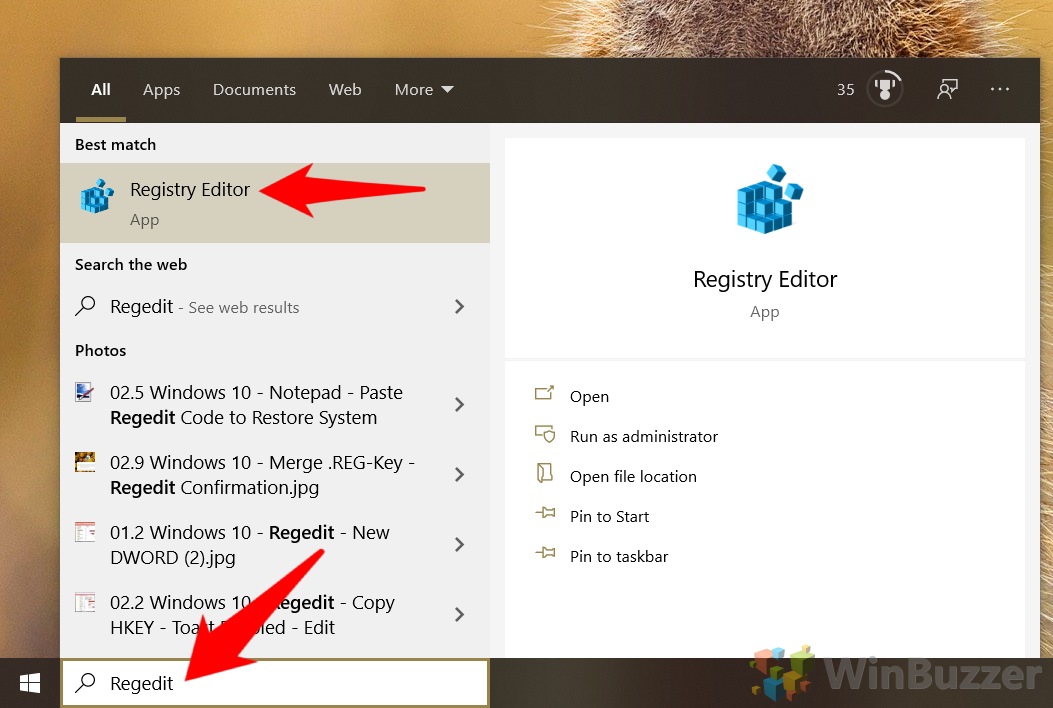
- Open Start.
- Search for regedit and click the top result to open the Registry.
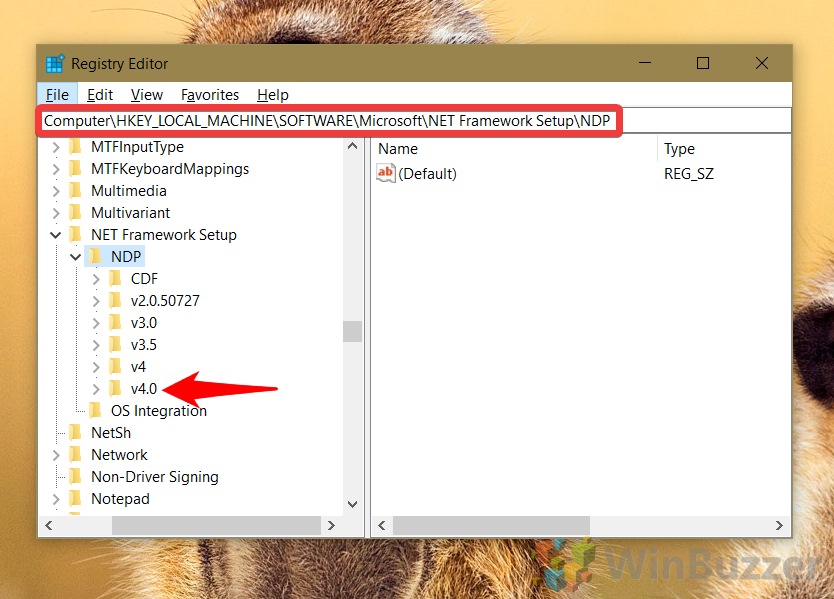
- Browse the following path: HKEY_LOCAL_MACHINE\SOFTWARE\Microsoft\NET Framework Setup\NDP
- Expand the main version key – for example, v4 or v4.0.
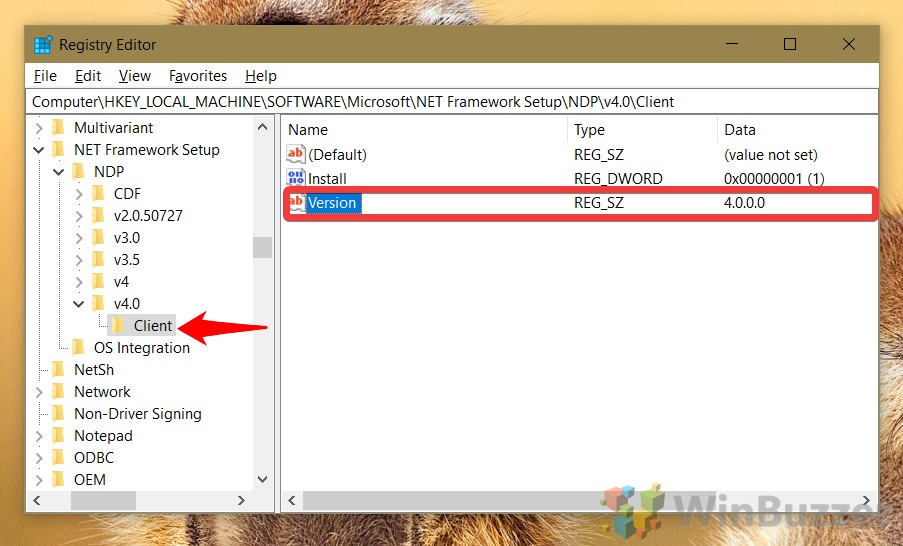
- Select the Client key.
- Quick tip: In releases older than version 4, the key will be a number or «Setup.» For example, .NET version 3.5 includes the version number under the 1033 key.
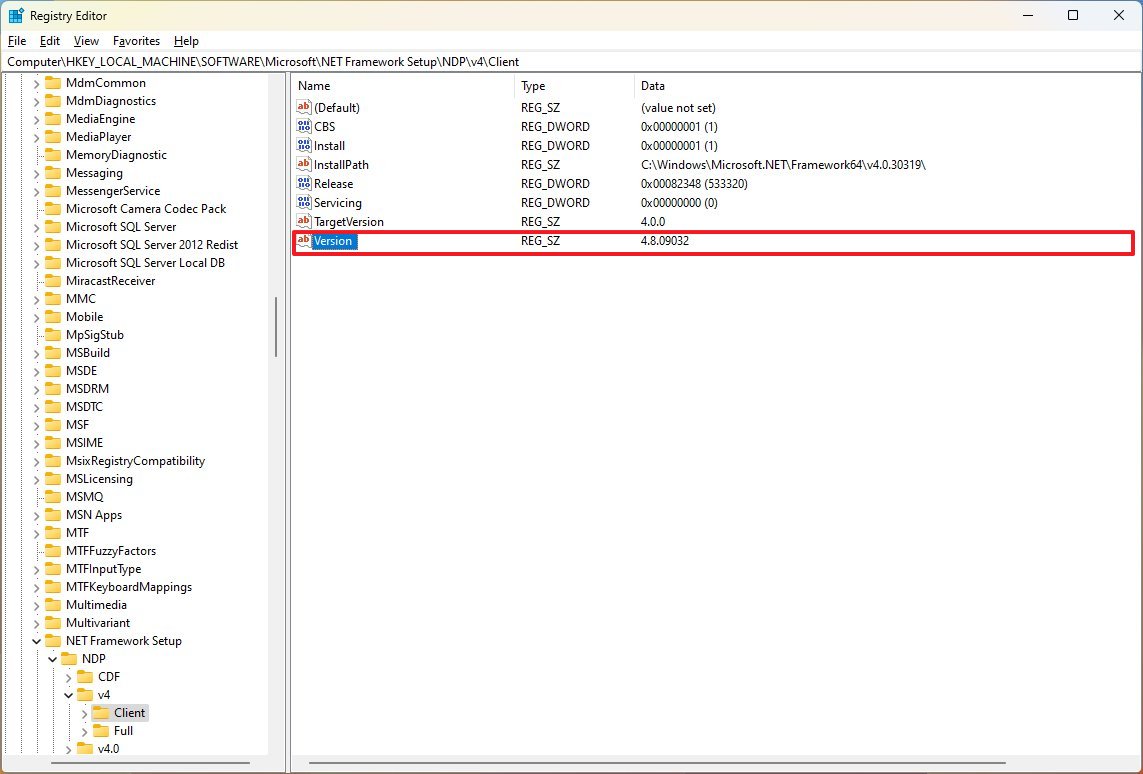
- On the right, check the «Version» string to determine the release of the .NET Framework.
After you complete the steps, you will know the releases of the Microsoft framework available on your version of Windows.
How to check .NET version with Command Prompt
To check the version of the .NET Framework with Command Prompt on Windows 11, use these steps:
- Open Start.
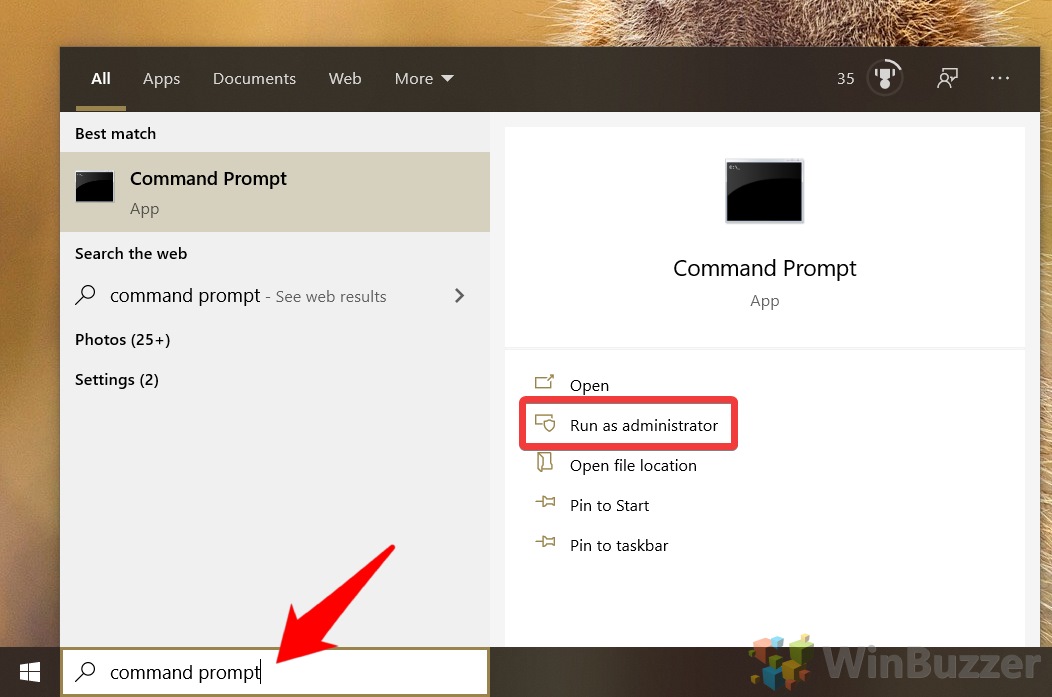
- Search for Command Prompt, right-click the top result, and select the Run as administrator option.
- Type the following command to determine the version of .NET installed on Windows and press Enter: reg query «HKLM\SOFTWARE\Microsoft\Net Framework Setup\NDP» /s
To make sure that version 4.x is installed, use this variant of the command: reg query «HKLM\SOFTWARE\Microsoft\Net Framework Setup\NDP\v4» /s
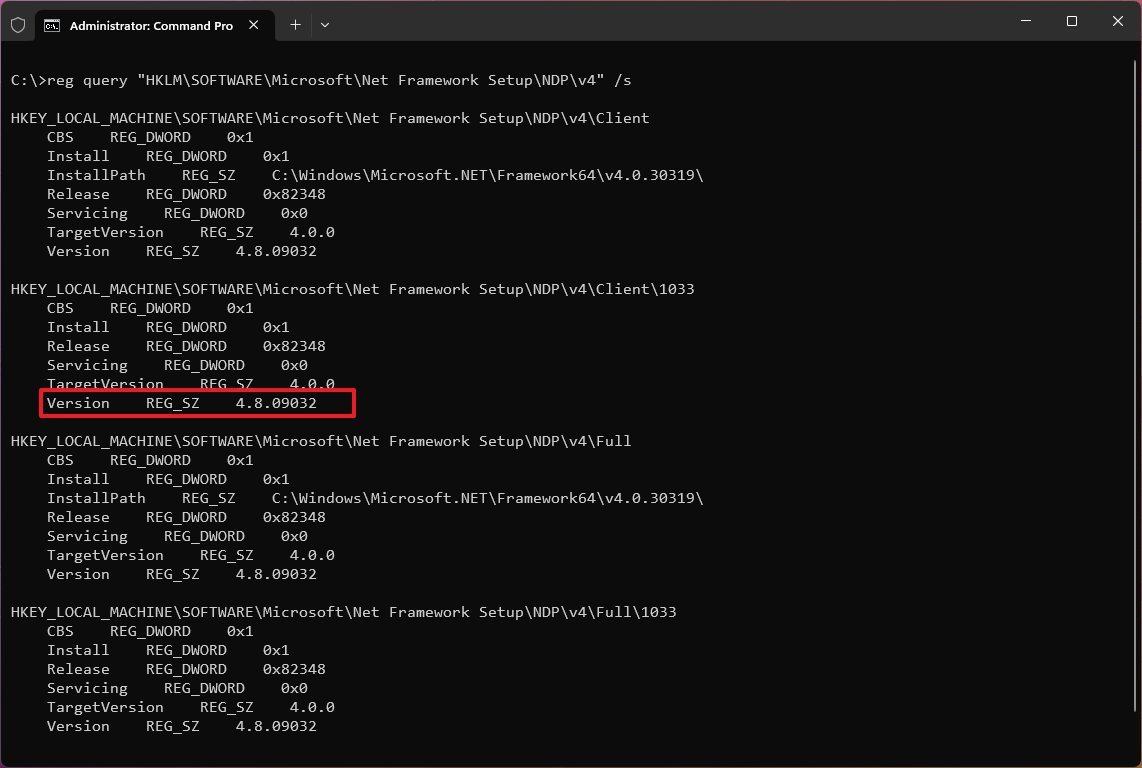
- Check the «Version» field to confirm the releases of the .NET Framework installed on Windows 11.
Once you complete the steps, the versions of .NET running on the computer will be revealed.
How to check .NET version with PowerShell
To check the .NET version with PowerShell on Windows 11, use these steps:
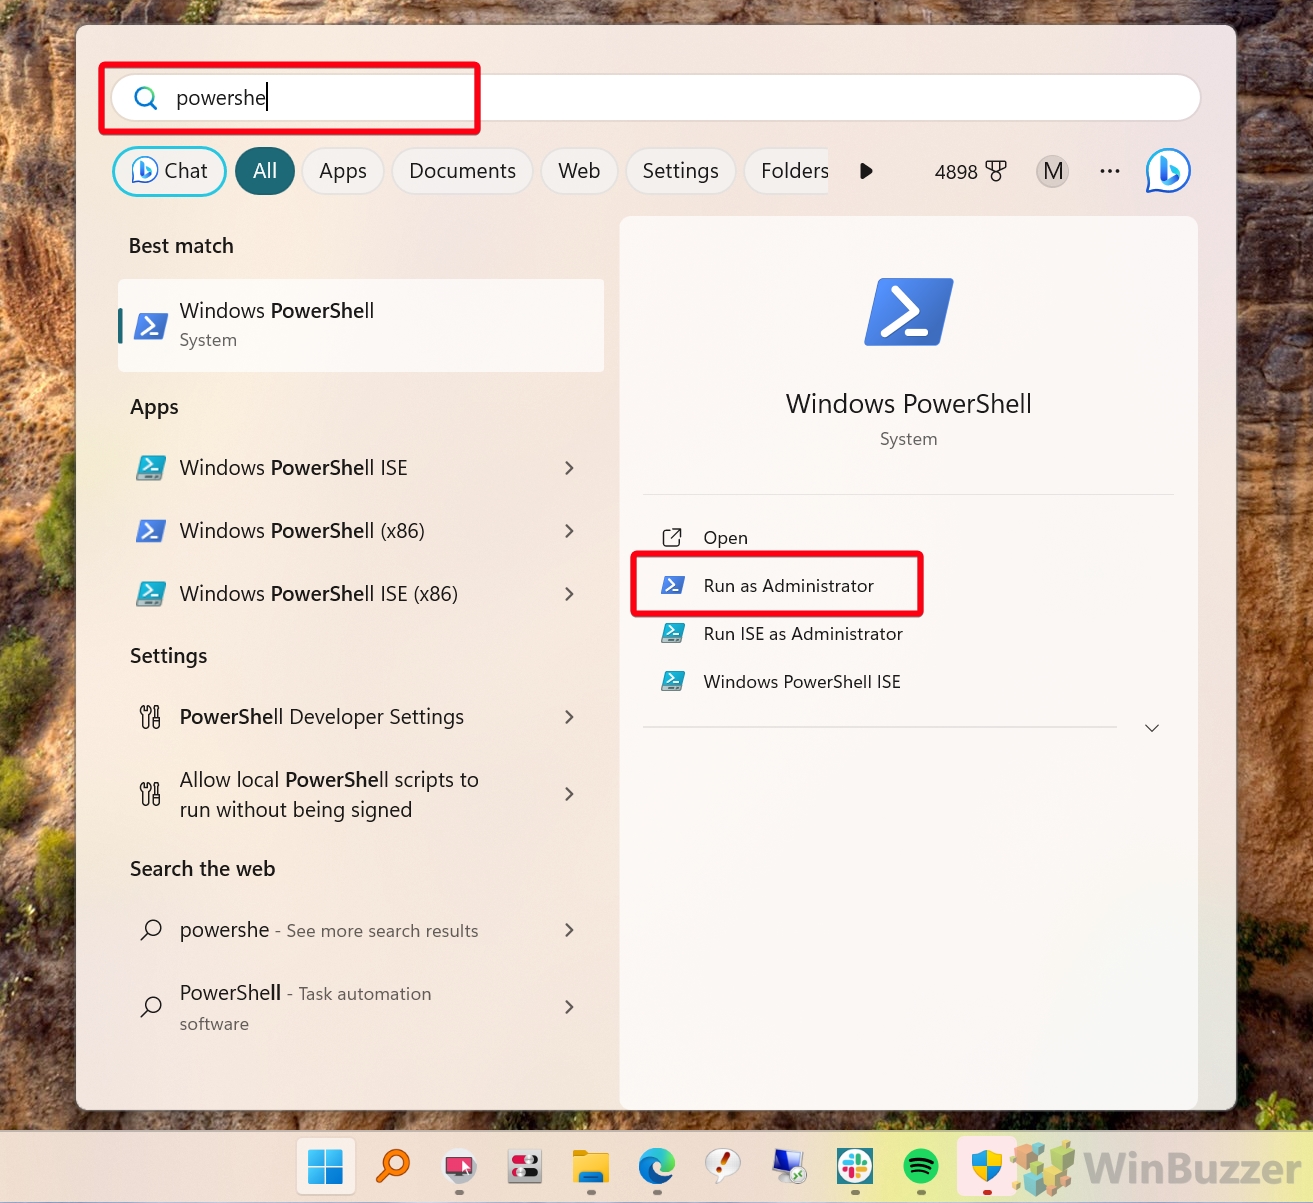
- Open Start.
- Search for PowerShell, right-click the top result, and select the Run as administrator option.
- Type the following command to check the version of .NET installed and press Enter: Get-ChildItem ‘HKLM:\SOFTWARE\Microsoft\NET Framework Setup\NDP’ -Recurse | Get-ItemProperty -Name version -EA 0 | Where { $_.PSChildName -Match ‘^(?!S)\p{L}’} | Select PSChildName, version
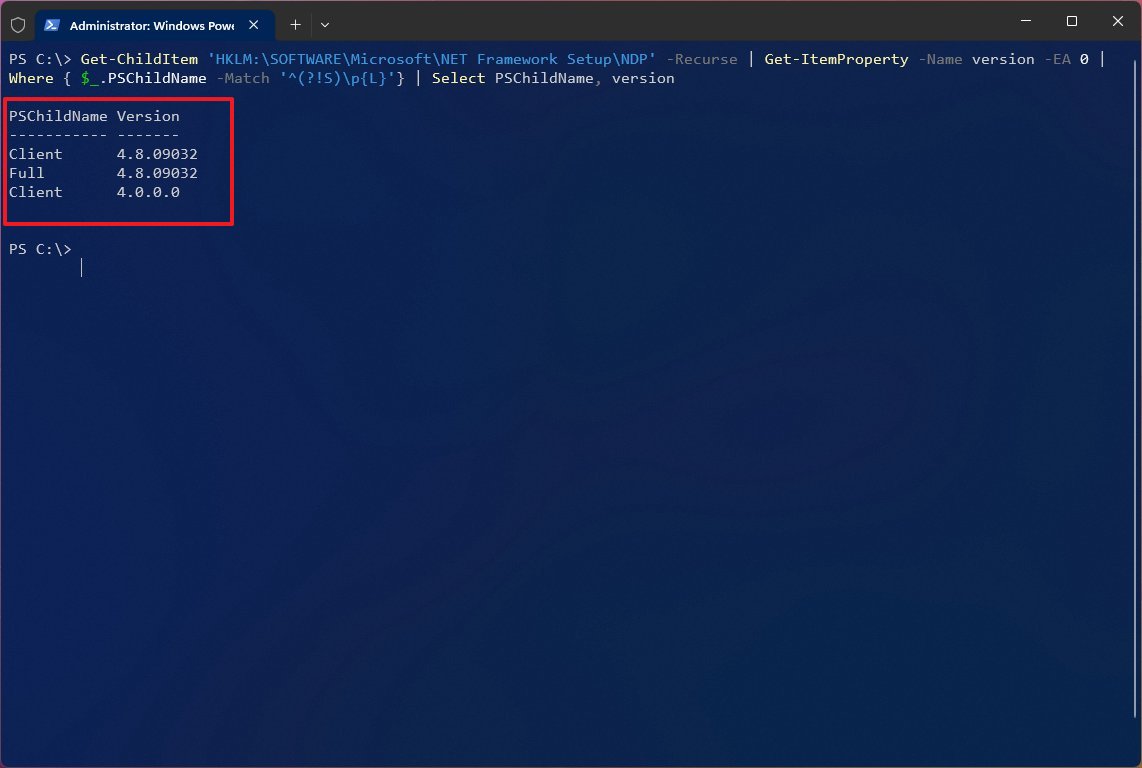
- Confirm the version of the .NET Framework installed on the computer.
After you complete the steps, PowerShell will return the information for both the client and the full version of .NET installed on Windows 11 (or 10) (if applicable).
More resources
For more helpful articles, coverage, and answers to common questions about Windows 10 and Windows 11, visit the following resources:
- Windows 11 on Windows Central — All you need to know
- Windows 10 on Windows Central — All you need to know
Mauro Huculak has been a Windows How-To Expert contributor for WindowsCentral.com for nearly a decade and has over 15 years of experience writing comprehensive guides. He also has an IT background and has achieved different professional certifications from Microsoft, Cisco, VMware, and CompTIA. He has been recognized as a Microsoft MVP for many years.
Maybe you’ve heard of a shiny new update for .NET Framework, seen a vulnerability disclosure, or hit a frustrating error. In all of these cases, you’ll want to check your .NET Framework version and ensure you’re on the latest release.
The process to do so isn’t particularly intuitive. There’s no “version” button to click, as .NET isn’t an application, and it won’t show up in your Apps & Features menu.
Instead, you’ll have to use the command-line (CMD), PowerShell or registry to check what version of .NET you have. While this can be intimidating for those who aren’t familiar with those tools, the upside is that it only takes a few seconds once you know. In this guide we show you how to check your .NET framework version with Command Prompt, PowerShell, and the Registry Editor.
How to Check .NET Framework Versions with Command Prompt
This method involves using the Command Prompt to query the registry for installed .NET Framework versions. It’s a quick and straightforward approach for those comfortable with command-line interfaces.
- Open Command Prompt as AdministratorPress the Start button, type “Command Prompt”, right-click on it, and select “Run as administrator”.

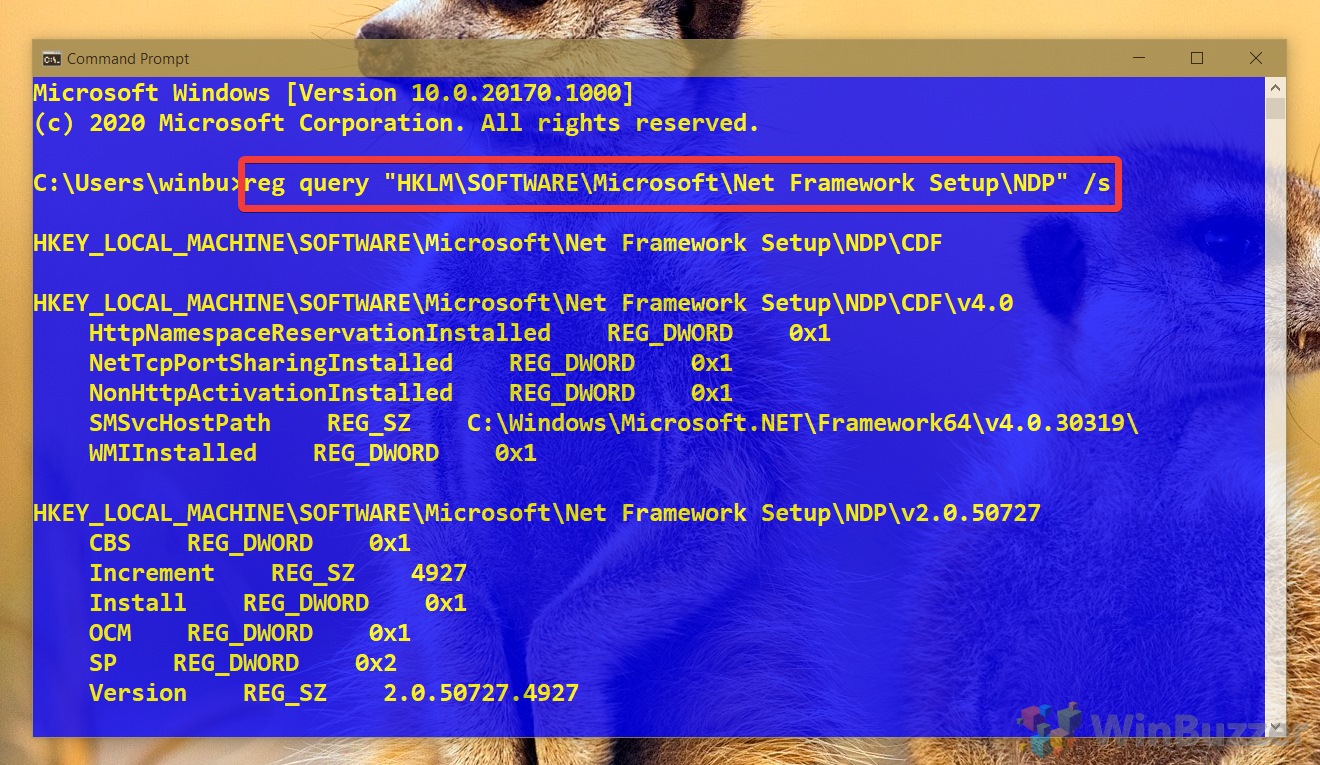
- Run the Registry Query CommandType the following command and press Enter:
reg query "HKLM\SOFTWARE\Microsoft\Net Framework Setup\NDP" /s
This will list all the .NET Framework versions installed on your system.

- Check the Exact .NET VersionFor detailed information about .NET Framework 4.x versions, use the following command:
reg query "HKLM\SOFTWARE\Microsoft\Net Framework Setup\NDP\v4" /s
This provides the full version number for comparison against the latest version available.


How to Find .NET Framework Version in the Registry Editor
For those who prefer a graphical user interface, the Registry Editor allows you to visually find our the installed .NET Framework versions. This takes a little longer, but still won’t be more than a minute.
- Open the Registry EditorPress Start and type “Regedit”, then press Enter or click on the top result.

- Navigate to the .NET Registry KeyIn the Registry Editor, navigate to:
HKEY_LOCAL_MACHINE\SOFTWARE\Microsoft\NET Framework Setup\NDP
In the sidebar under the “NDP” key, you’ll see the various versions you have installed. Click the main version key, in our case v4 or v4.0.

- Check Your .NET VersionSelect the “Client” key in your sidebar, then check the data field of your “Version” entry for the version number. If you need a more specific number, check the “v4” key rather than “v4.0“.

How to Check .NET Framework Version with PowerShell
If you prefer the syntax of PowerShell, you can also use that to determine which version you have. We’ll be doing so via a registry query and a community GitHub tool which you can read about here. This will give you a nice, clear readout of which versions you have installed and which are missing.
- Open PowerShell as AdministratorPress the Windows key, write “PowerShell“, and select “Windows PowerShell (Admin)“.

- Get the .NET Version via Registry QueryUse the following command to list the available .NET Framework versions:
Get-ChildItem 'HKLM:\SOFTWARE\Microsoft\NET Framework Setup\NDP ' -Recurse | Get-ItemProperty -Name version -EA 0 | Where { $_.PSChildName -Match '^(?!S)\p{L}'} | Select PSChildName, versionPowerShell will return a list of .NET versions. It gets the job done, but as you can see the readout is a bit confusing and the command very complex and unmemorable. You can continue to the next steps for a more intuitive method.

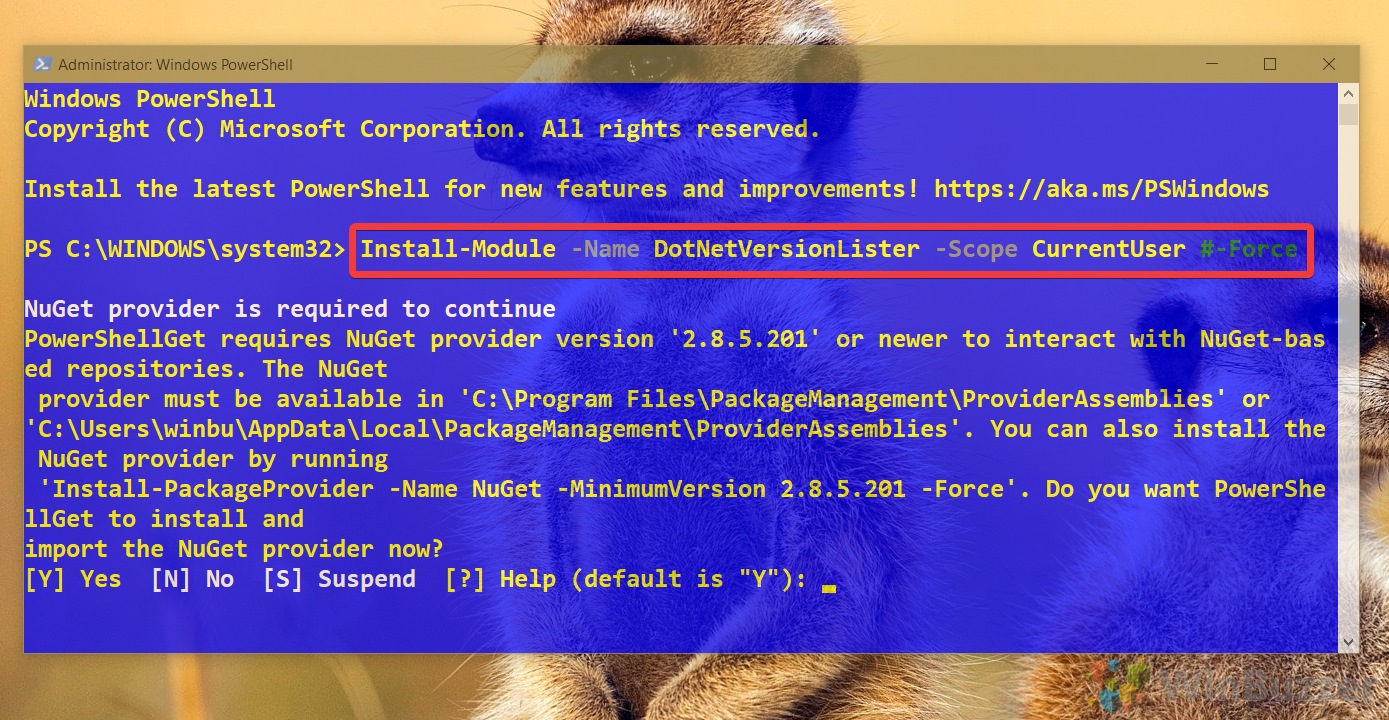
- Install the DotNetVersionLister ModuleRun
Install-Module -Name DotNetVersionLister -Scope CurrentUserto install the DotNetVersionLister tool.
Press Y and then Enter to install it.
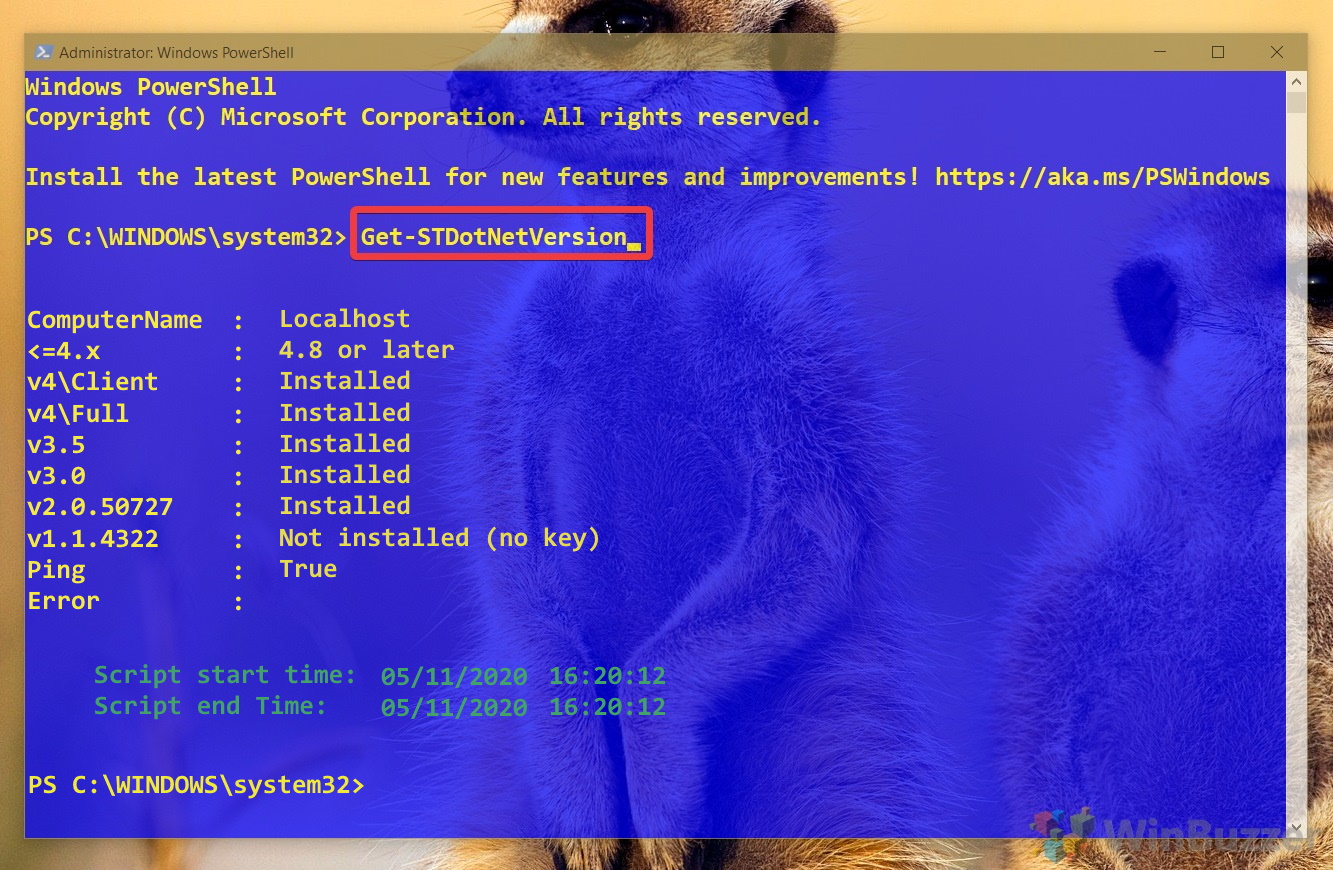
- Find the .NET Framework VersionWith DotNetVersionLister installed, use
Get-STDotNetVersionto check your .NET Framework version. This command provides a clear list of installed and missing versions.

FAQ – Frequently Asked Questions About .NET Framework
How can I find out the latest .NET Framework version available?
The most reliable way to find out the latest .NET Framework version is to visit the official Microsoft .NET download page at https://dotnet.microsoft.com/download/dotnet-framework. This website lists all versions of the .NET Framework, including release notes and download links. Keeping abreast of the latest version ensures that you can take full advantage of new features and security improvements.
Does installing a new .NET Framework version remove older versions?
Generally, when you install a new .NET Framework version, it doesn’t replace or remove older versions. Each version of the .NET Framework is designed to coexist alongside others, allowing different applications to rely on specific versions they need. However, there are exceptions, such as .NET Framework 4.5 and its point releases (4.5.1, 4.5.2, etc.), which replace earlier versions of .NET 4.
Can PowerShell be used to install missing .NET Framework versions?
Yes, PowerShell can be instrumental in managing .NET Framework versions, including installation. While PowerShell itself does not directly install the .NET Framework, it can invoke the installer and manage its execution. For example, you can use PowerShell to download the installer package via a script and then execute the installer in silent mode. This approach is particularly useful for automating the setup process across multiple systems or ensuring that the necessary .NET Framework versions are installed for specific applications.
What is the difference between .NET Framework and .NET Core?
The .NET Framework is Microsoft’s traditional platform for building desktop and web applications on Windows. It is a comprehensive, feature-rich development framework that includes everything from an extensive class library to development tools. On the other hand, .NET Core is a cross-platform, open-source framework designed for creating modern applications that can run on Windows, Linux, and macOS. .NET Core is built to handle cloud-based, server-side applications and provides a more modular, lightweight platform for building high-performance apps.
How can developers ensure their application is compatible with multiple .NET versions?
Developers can ensure application compatibility across multiple .NET versions through multi-targeting. This technique involves configuring their application project file to specify different target frameworks, thus enabling the application to be built against multiple .NET Framework versions. It also involves rigorous testing against each targeted .NET Framework version. Tools like the .NET Portability Analyzer can also help assess compatibility issues and identify necessary changes for cross-version compatibility.
What if the Command Prompt or PowerShell method doesn’t show all installed .NET Framework versions?
If the Command Prompt or PowerShell doesn’t list all installed .NET Framework versions, it could be due to incorrect command syntax or insufficient privileges. Ensure you are running these tools as an administrator. Additionally, cross-referencing with other methods, such as examining the Registry Editor or checking installed updates in the Control Panel, can provide a more comprehensive view. It’s also worth noting that some versions of .NET Framework may not be listed if they are part of the operating system and considered integral components, such as .NET 3.5 on Windows 10.
Can I check for .NET Framework updates without using Windows Update?
Yes, you can manually check for and download .NET Framework updates without relying on Windows Update. This can be done by visiting the Microsoft Update Catalog website at https://www.catalog.update.microsoft.com/Home.aspx, where you can search for specific updates related to the .NET Framework. This method is particularly useful for obtaining updates to deploy in an offline environment or when facing issues with Windows Update.
Is there a way to check the .NET Framework version on a macOS or Linux machine?
Since the traditional .NET Framework is Windows-only, checking its version is not applicable to macOS or Linux machines. For cross-platform development, Microsoft offers .NET Core (now part of the unified .NET 5 and onwards). The version of .NET Core or .NET 5 (and later) can be checked on macOS and Linux by opening the terminal and typing dotnet --info. This command provides detailed information about the SDKs and runtimes installed, including their versions.
Can I use these methods to check the .NET version on a Windows Server?
Yes, the methods described for checking the .NET Framework version on Windows client operating systems also apply to Windows Server. Whether you’re using the Command Prompt, Registry Editor, or PowerShell, these tools and the commands provided function the same way on both Windows Server and Windows client systems. It’s essential for system administrators to verify the .NET Framework versions on servers to ensure compatibility and security compliance for hosted applications.
Can I check the .NET Framework version on a remote computer?
Checking the .NET Framework version on a remote computer can be achieved through PowerShell remoting. By using the Invoke-Command cmdlet, you can execute the version checking scripts or commands on the remote machine, provided you have the necessary permissions. This method is efficient for system administrators who need to check versions across multiple machines in a network.
How can I uninstall a specific .NET Framework version?
Uninstalling specific .NET Framework versions can be carefully done through the “Programs and Features” section in the Control Panel for versions that appear as standalone installations. For integral versions tied to the operating system, such as .NET Framework 3.5 in newer versions of Windows, you can enable or disable them via the “Turn Windows features on or off” option. However, exercise caution as removing essential .NET Framework versions can lead to application instability or system issues.
What does ‘EA 0’ mean in the PowerShell command used in the tutorial?
In the PowerShell command mentioned in the tutorial, -EA 0 stands for -ErrorAction SilentlyContinue. This parameter instructs PowerShell to proceed with the command execution without halting or displaying errors encountered during the process. Utilizing -EA 0 is particularly useful when running scripts that may trigger non-critical errors you wish to ignore for the script’s smooth execution.
Is it necessary to restart the computer after installing or updating the .NET Framework?
Following the installation or update of the .NET Framework, a system restart is often recommended and sometimes required. Restarting ensures that all components of the .NET Framework are correctly initialized and that any applications depending on it can recognize the changes. In some cases, the installer will prompt for a restart, which is a clear indicator that a restart is necessary to complete the installation process fully.
Can I check the .NET Framework version without administrative privileges?
While the methods detailed in the tutorial require administrative privileges to access certain system information or modify settings, users without administrative rights have alternatives. One approach is to check the list of installed programs through the Control Panel or Settings app, where some .NET Framework versions may be listed. However, this method might not reveal all installed .NET Framework versions and typically offers less detail.
How can I automate the process of checking .NET Framework versions on multiple machines?
To automate the checking of .NET Framework versions across multiple machines, you can utilize PowerShell scripting combined with remote execution capabilities. Scripts can be written to query the registry, process the information, and output .NET Framework versions installed on each machine. These scripts can then be run remotely via PowerShell remoting or deployed through Group Policy, providing a scalable solution for managing and auditing .NET Framework versions within an organization.
Related: How to Check Powershell Version in Windows 11 or Windows 10
PowerShell, a critical component of the Windows ecosystem, undergoes regular updates to introduce new features, fix bugs, and enhance security. Keeping your PowerShell version current is pivotal for leveraging the latest capabilities and ensuring scripts run smoothly. In our other guide, we show you how to get your PowerShell version using two different commands.

Related: How to Check Your Windows Version, Edition and Build Number
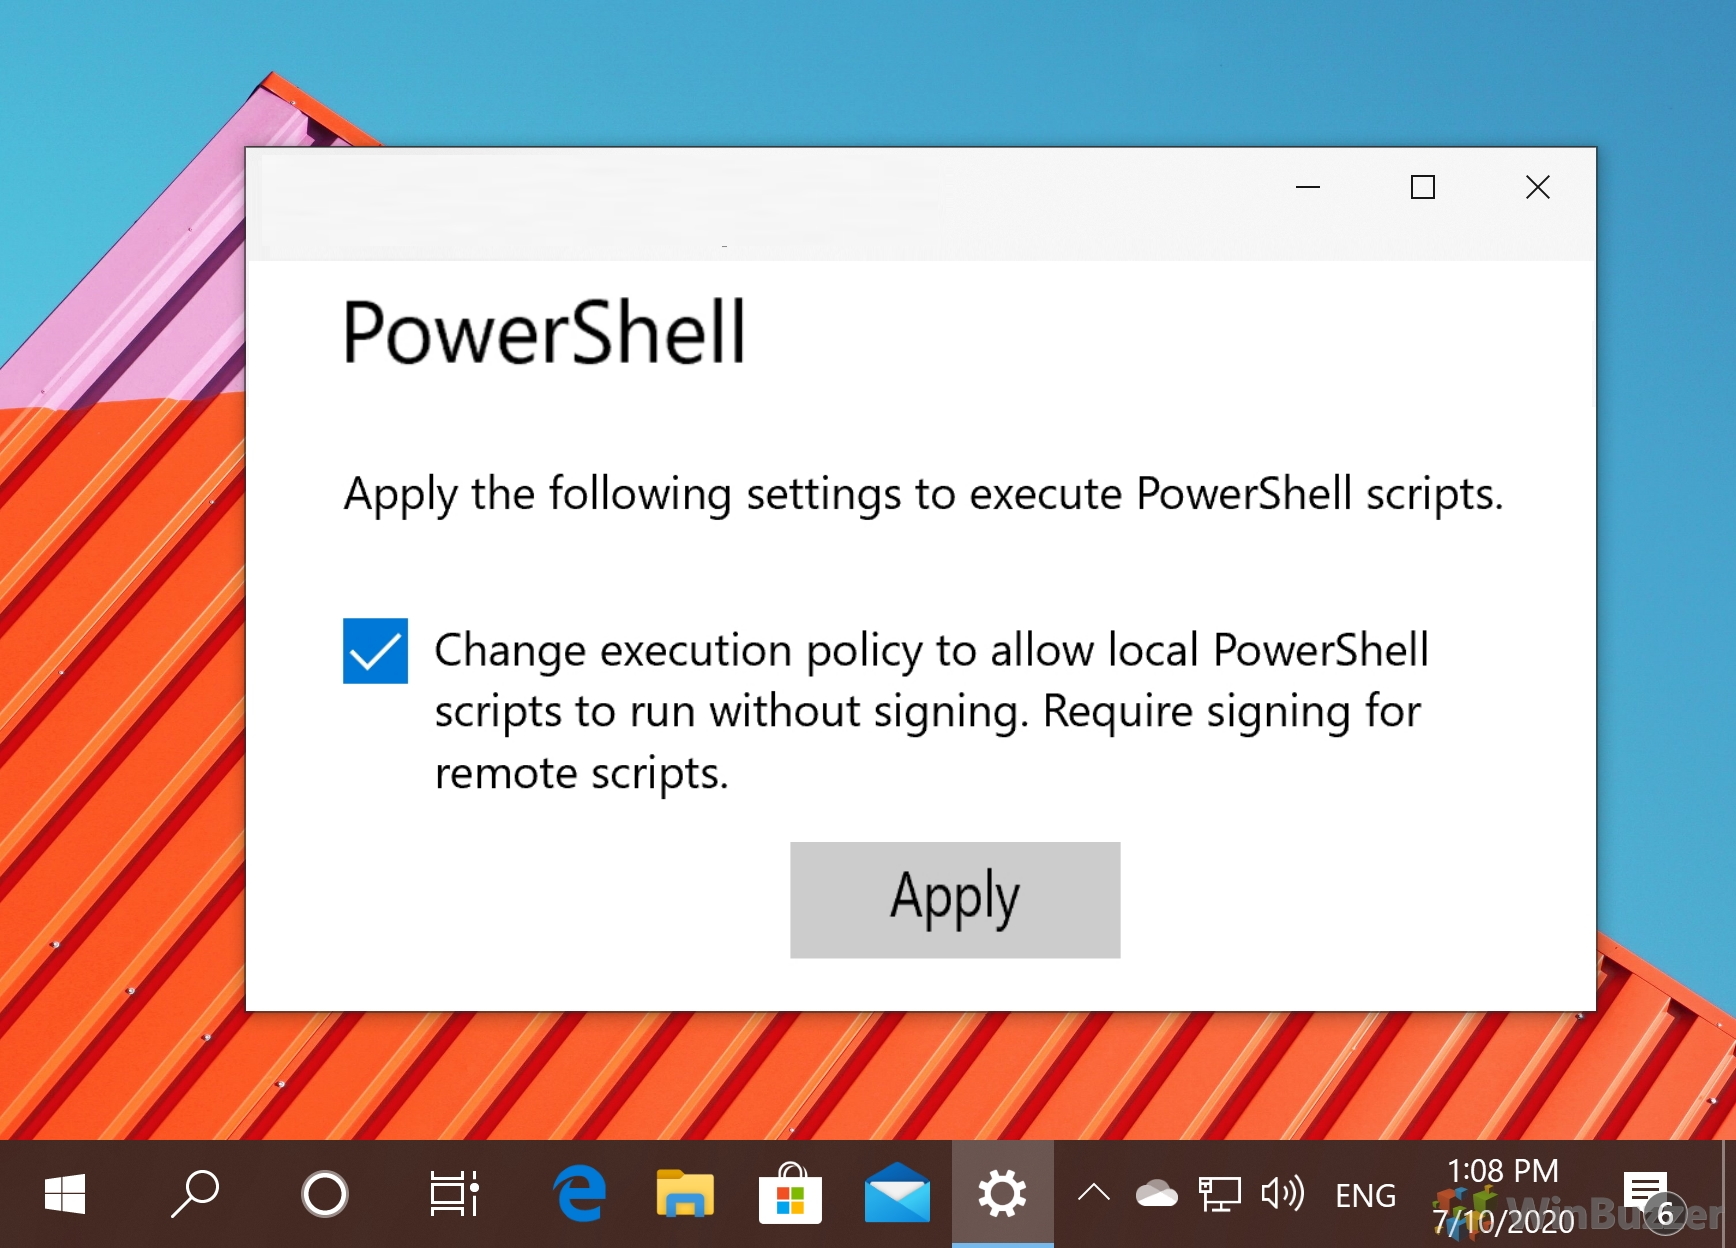
Related: How to Enable PowerShell Scripts via PowerShell Execution Policy
PowerShell is a powerful tool that many, including myself, don’t use to its full potential. That’s why most of us rely on PowerShell scripts crafted by others, but this can have its own hurdles. Often, you’ll see errors like “PowerShell: running scripts is disabled on this system”. To Enable PowerShell scripts in Windows, you must first set the execution policy. In our other guide, we show you how to enable PowerShell scripts in Windows by setting your execution policy via the command-line.
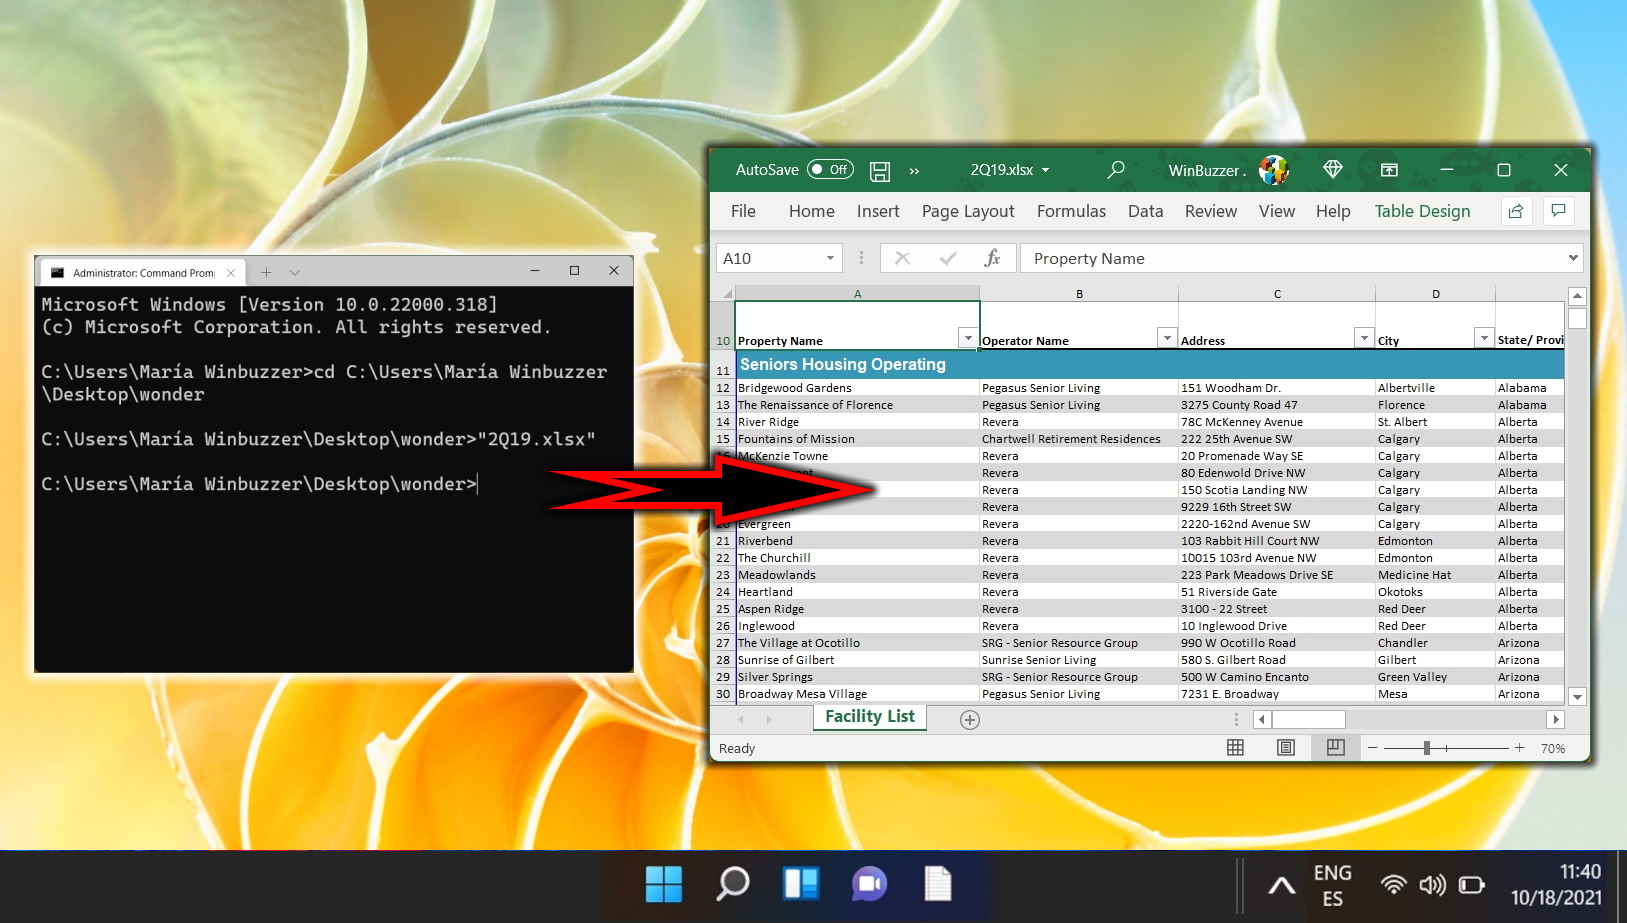
Related: How to Open a File or Folder in Terminal in Windows 11
Navigating the Windows Terminal to open files and folders is a skill that enhances productivity and efficiency, particularly for those who prefer command-line interfaces (CLI) over graphical user interfaces (GUI). Windows Terminal, a modern application in Windows 11, integrates traditional command-line environments like Command Prompt (CMD) and PowerShell, providing a robust platform for performing a variety of tasks. In our other guide, we show you how to open a file or folder in Command Prompt or PowerShell and how to change directory from there in Windows 11 using a series of commands.
Last Updated on November 7, 2024 9:00 pm CET
Download Windows Speedup Tool to fix errors and make PC run faster
For the most part, you don’t need to worry about the version of .NET installed on your Windows 11/10 computer. Some applications require a specific release to run. Programmers usually need to run multiple versions of the platform to develop and deploy apps, and this is when understanding the versions of .NET Framework available on your device can come in handy. In this post, we will show you the 5 known ways to check .NET Framework version installed on Windows 11/10 PC.
You can check the .NET Framework version installed on your Windows 11/10 computer in any of the following ways:
- Using Command Prompt
- Using Registry Editor
- Using PowerShell
- Using .NET Version Detector tools
- Via File Explorer.
Let’s take a look a the description of the necessary step in relation to each of the methods.
1] Check .NET version using Command Prompt

To check the version of the .NET Framework installed on Windows 10 using Command Prompt, do the following:
- Press Windows key + R to invoke the Run dialog.
- In the Run dialog box, type cmd and then press CTRL + SHIFT + ENTER to open Command Prompt in admin/elevated mode.
- In the command prompt window, copy and paste the command below and hit Enter.
reg query "HKLM\SOFTWARE\Microsoft\Net Framework Setup\NDP" /s
2] Check .NET version using Registry Editor

To check the version of the .NET Framework installed on Windows 10 using Registry Editor, do the following:
- Press Windows key + R to invoke the Run dialog.
- In the Run dialog box, type regedit and hit Enter to open Registry Editor.
- Navigate or jump to the registry key path below:
HKEY_LOCAL_MACHINE\SOFTWARE\Microsoft\NET Framework Setup\NDP
- Select the main version key – for example, v4 or v4.0.
- Select the Client key.
Note: In releases older than version 4, the key will be a number or “Setup.” For example, .NET version 3.5 includes the version number under the 1033 key.
3] Check .NET version using PowerShell

To check the version of the .NET Framework installed on Windows 10 using PowerShell, do the following:
- Press Windows key + X to open Power User Menu.
- Then press A on the keyboard to launch PowerShell in admin/elevated mode.
- In the PowerShell console, copy and paste in the command below and hit Enter.
Get-ChildItem 'HKLM:\SOFTWARE\Microsoft\NET Framework Setup\NDP' -Recurse | Get-ItemProperty -Name version -EA 0 | Where { $_.PSChildName -Match '^(?!S)\p{L}'} | Select PSChildName, version
Once the command executes, the output should reveal the information for both client and the full version of .NET installed on your device (if applicable).
Read: Troubleshoot .NET Framework Installation Issues.
4] Check .NET version using .NET Version Detector tools
DotNetVersionLister
There’s a community tool at GitHub that makes it easy to query a list of installed .NET versions on your computer.

To use this DotNetVersionLister to check the .NET version installed on Windows 10 PC, do the following:
- Open PowerShell in admin/elevated mode.
- In the PowerShell console, copy and paste in the command below and hit Enter to download and install this tool on your device.
Install-Module -Name DotNetVersionLister -Scope CurrentUser #-Force
- Type Y and hit Enter.
- Next, type the following command to determine the version of .NET installed and hit Enter:
Get-STDotNetVersion
Once the command executes, the output should reveal the information for the version of .NET installed on your device.
ASoft .NET Version Detector
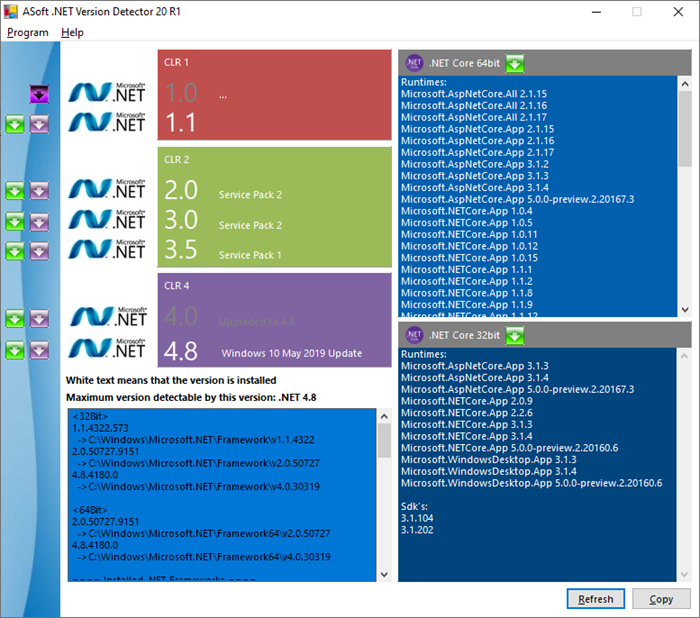
ASoft .NET Version Detector is a lightweight tool that gives information on the different versions of Microsoft .NET and .NET Core that are installed on a Windows computer. You can download it from here.
5] Via File Explorer
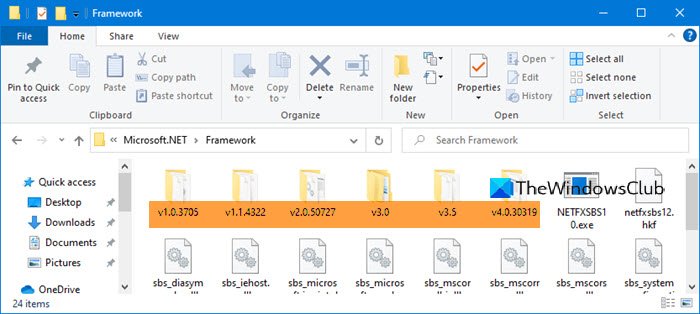
Open File Explorer and navigate to the following folder:
%windir%\Microsoft.NET\Framework\
Here, you can see all the versions that are installed.
That’s it on the ways to check the .NET version on your Windows 11/10 PC.
Read: Microsoft .NET 9.0 is now generally available for download.
Obinna has completed B.Tech in Information & Communication Technology. He has worked as a System Support Engineer, primarily on User Endpoint Administration, as well as a Technical Analyst, primarily on Server/System Administration. He also has experience as a Network and Communications Officer. He has been a Windows Insider MVP (2020) and currently owns and runs a Computer Clinic.
В Windows одновременно можно одновременно установить и запустить несколько версий .NET Framework. При разработке или развертывания нового приложения, основанного на библиотеках .NET, иногда нужно предварительно узнать какие версии и пакеты обновления .Net Framework уже установлены на компьютере пользователя или на сервере. Вы можете получить список версий .NET Framework, установленных на компьютере, несколькими способами.
Содержание:
- Информация об установленных версиях .NET Framework в реестре
- Как узнать версию .NET Framework с помощью PowerShell?
- Проверить версию .Net Framework на удаленных компьютерах
- Вывести версии .NET Framework в командной строке
Информация об установленных версиях .NET Framework в реестре
При установке или обновлении любой версии .NET Framework, изменения записываются в реестр Windows.
Откройте редактор реестра (regedit.exe) и перейдите в раздел HKLM\ SOFTWARE\Microsoft\NET Framework Setup\NDP. В этой ветке хранится информация обо всех версиях .NET на компьютере. Разверните любой раздел и обратите внимание на следующие параметры (для .Net 4.x нужно развернуть ветку Full):
- Install — флаг установки (если равен 1, значит данная версия .Net установлена на компьютере);
- Install Path — каталог, в который установлена данная версия .Net;
- Release — номер релиза .Net;
- Version — полный номер версии .Net Framework.

Примечание. Для .NET 4.0 и выше, если подраздел Full отсутствует, это значит, что данная версия Framework на компьютере не установлена.
К примеру, в данном примере видно, что на компьютере установлены .NET Framework v2.0.50727, 3.0, 3.5 и 4.7 (релиз 460805).
Обратите внимание, что в серверных ОС начиная с Windows Server 2012, все базовые версии .Net (3.5 и 4.5) является частью системы и устанавливаются в виде отдельного компонента (Установка .NET Framework 3.5 в Windows Server 2016, в Windows Server 2012 R2), а минорные (4.5.1, 4.5.2 и т.д.) устанавливаются уже в виде обновлений через Windows Update или WSUS.
С помощью следующей таблицы вы можете установить соответствие между номером релиза и версией .NET Framework (применимо к .NET 4.5 и выше).
| Значение DWORD параметра Release | Версия .NET Framework |
| 378389 | .NET Framework 4.5 |
| 378675 | NET Framework 4.5.1 на Windows 8.1 / Windows Server 2012 R2 |
| 378758 | .NET Framework 4.5.1 на Windows 8, Windows 7 SP1, Windows Vista SP2 |
| 379893 | .NET Framework 4.5.2 |
| 393295 | .NET Framework 4.6 на Windows 10 |
| 393297 | .NET Framework 4.6 |
| 394254 | .NET Framework 4.6.1 на Windows 10 1511 |
| 394271 | .NET Framework 4.6.1 |
| 394802 | .NET Framework 4.6.2 на Windows 10 1607 |
| 394806 | .NET Framework 4.6.2 |
| 460798 | .NET Framework 4.7 на Windows 10 1703 |
| 460805 | .NET Framework 4.7 |
| 461308 | .NET Framework 4.7.1 на Windows 10 1709 |
| 461310 | .NET Framework 4.7.1 |
| 461808 | .NET Framework 4.7.2 на Windows 10 1803 |
| 461814 | .NET Framework 4.7.2 |
| 528372 | .NET Framework 4.8 на Windows 10 2004, 20H2, и 21H1 |
| 528040 | .NET Framework 4.8 на Windows 10 1903 и 1909 |
| 528449 | .NET Framework 4.8 в Windows Server 2022 и Windows 11 |
| 528049 | .NET Framework 4.8 (остальные версии Window) |
.NET Framework 4.8 сегодня — самая последняя доступная версия .NET Framework.
Как узнать версию .NET Framework с помощью PowerShell?
Можно получить информацию об установленных версиях и релизах NET Framework на компьютере с помощью PowerShell. Проще всего получить эти данные напрямую из реестра с помощью командлетов
Get-ChildItem
и
Get-ItemProperty
(подробнее о работе с записями реестра из PowerShell).
Чтобы вывести таблицу по всем версиям .Net Framework на компьютере, выполните команду:
Get-ChildItem ‘HKLM:\SOFTWARE\Microsoft\NET Framework Setup\NDP’ -Recurse | Get-ItemProperty -Name version -EA 0 | Where { $_.PSChildName -Match ‘^(?!S)\p{L}’} | Select PSChildName, version
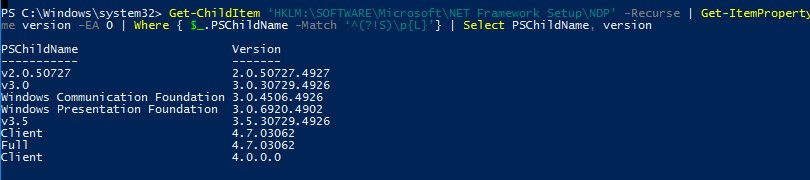
На этом компьютере установлены версии .Net 2.0, 3.0, 3.5 и 4.7.
Начиная с версии .Net v4.0 более новая версия Framework перезаписывает (заменяет) старую версию. Т.е. если на компьютере был установлен .NET Framework 4.7, то при установке .NET Framework 4.8, старая версия пропадет.
Можно вывести только номер релиза (для версий .Net 4.x):
(Get-ItemProperty ‘HKLM:\SOFTWARE\Microsoft\NET Framework Setup\NDP\v4\Full’ -Name Release).Release

Согласно таблице, номер 528449 соответствует версии .Net Framework 4.8 в Windows 11.
Проверить версию .Net Framework на удаленных компьютерах
Вы можете удаленно получить список версий .Net Framework, установленных на компьютерах в вашей сети помощью PowerShell.
Ниже представлен небольшой PowerShell скрипт, который получает список компьютеров из текстового файла и проверяет на всех версию .Net Framework. Для запуска команд на удаленных компьютерах используется WinRM командлет Invoke-Command.
Function GetNetFramework {
Get-ChildItem 'HKLM:\SOFTWARE\Microsoft\NET Framework Setup\NDP' -recurse |
Get-ItemProperty -name Version,Release -EA 0 |
Where { $_.PSChildName -match '^(?![SW])\p{L}'} |
Select PSChildName, Version, Release, @{
name="Product"
expression={
switch -regex ($_.Release) {
"378389" { [Version]"4.5" }
"378675|378758" { [Version]"4.5.1" }
"379893" { [Version]"4.5.2" }
"393295|393297" { [Version]"4.6" }
"394254|394271" { [Version]"4.6.1" }
"394802|394806" { [Version]"4.6.2" }
"460798|460805" { [Version]"4.7" }
"461308|461310" { [Version]"4.7.1" }
"461808|461814" { [Version]"4.7.2" }
"528040|528049|528449|528372" { [Version]"4.8" }
{$_ -gt 528449} { [Version]"Undocumented version (> 4.8)" }
}
}
}
}
$result=@()
$servers= Get-Content C:\PS\servers.txt
foreach ($server in $servers)
{
$result+=Invoke-Command -ComputerName $server -ScriptBlock $function:GetNetFramework
}
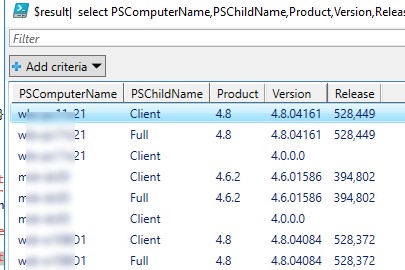
$result| select PSComputerName,@{name = ".NET Framework"; expression = {$_.PSChildName}},Product,Version,Release| Out-GridView
Скрипт выводит табличку (через Out-GridView) со списком версий .Net Framework, установленных на удаленных компьютерах.
Также вы можете задать список компьютеров, на которых нужно проверить .NET так:
$servers= @("pc1","pc2","pc3","pc4","pc5")
Или выбрать список компьютеров из домена с помощью командлета Get-ADComputer из модуля AD PowerShell. Следующая команда выберет все активные хосты Windows Server в домене:
$servers= Get-ADComputer -Filter 'operatingsystem -like "*Windows server*" -and enabled -eq "true"'
Вывести версии .NET Framework в командной строке
Все версии.NET Framework устанавливаются в следующие каталоги Windows:
-
%SystemRoot%\Microsoft.NET\Framework -
%SystemRoot%\Microsoft.NET\Framework64
Вы можете просто открыть этот каталог и увидеть список установленных версий .NET. Каждой версии соответствует отдельный каталог с символом v и номером версии в качестве имени папки. Можно вывести список установленных версий .NET Framework из команды строки:
dir %WINDIR%\Microsoft.Net\Framework\v* /O:-N /B

Команда выведет все установленные версии кроме 4.5, т.к. .NET Framework 4.5 устанавливается в подкаталог v4.0.xxxxx.
Command Prompt proved to be one of the best tools for running basic commands that allow you to work with files and folders from Windows. However, the Command Prompt is much more powerful than just that. You can take things to the next level by learning and using a couple of advanced commands, including a range of handy network-related commands. Today, we’re going to learn how to use Command Prompt to check the internet connection, and your PC’s network connections, view information about network devices and watch the connections between your PC and other devices. So without further ado, let’s begin:
NOTE: The commands shared in this tutorial apply to Windows 11, Windows 10, and even older Microsoft operating systems such as Windows 7. Before going any further, if you don’t know how to open the Command Prompt, read: How to open Command Prompt (14 ways).
1. How to check the internet connection in CMD
To check whether your internet connection works, you can use Command Prompt to test the connection to a particular website or internet location. To do that, you can use the ping network command, followed by a web address or IP address. For instance, you can check the connectivity to Digital Citizen without opening a web browser by typing the command:
ping www.digitalcitizen.life
Then press Enter on your keyboard.
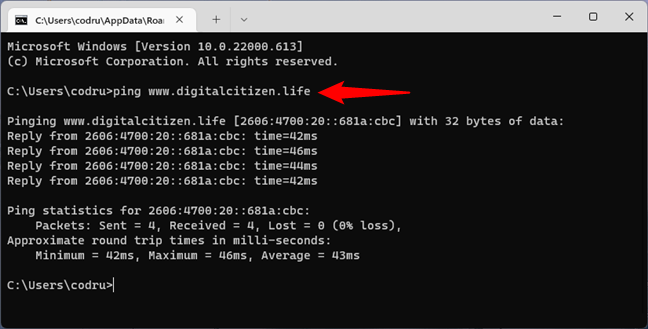
How to ping a website in CMD
If the ping statistics don’t show any loss of packets, your internet connection is working as it should. However, if you get lost packets, either your internet connection is broken or the website you pinged is not online. To double-check your internet connection, ping at least another website, preferably one that’s always on, such as www.google.com.
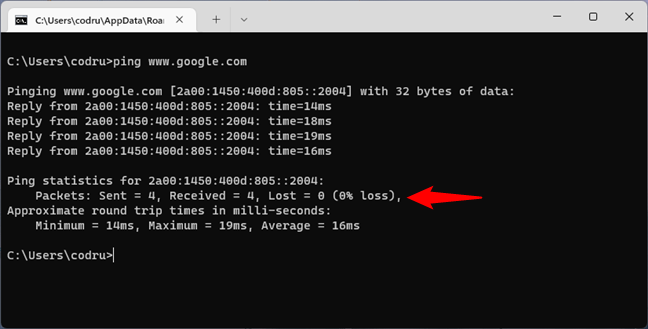
Double-check by pinging a popular website
The ping command also allows you to use the handy -t parameter, which enables you to ping the specified address forever until it’s manually stopped. For instance, we typed
ping -t www.digitalcitizen.life
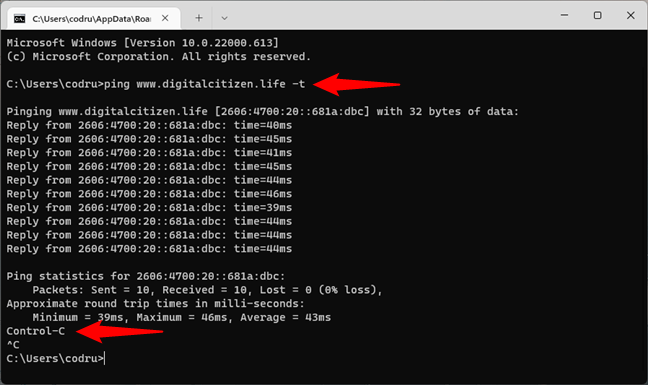
How to run a continuous ping in a CMD prompt
After some time, we wanted to see some connection statistics, and we used the keyboard combination: CTRL + Break. This shows the averages of the ping commands run until then. However, it only works in the default Command Prompt. If you run Command Prompt inside the Windows Terminal, there’s a bug that makes CMD treat Ctrl + Break as Ctrl + C ending the command instead of pausing it. Obviously, if you want to terminate the command, use the keyboard combination:
CTRL + C
That makes CMD stop the endless cycle of ping commands to the specified address.
TIP: If you want to delve deeper into what the ping command is and what it does, we’ve covered it in detail here: What is the ping command? What is ping in apps and games? How to use ping in Windows?.
2. How to traceroute in CMD (tracert command) to troubleshoot network and internet problems
Tracert might be the best command to use in CMD if you want to check your network and internet connection. Why do we say that? Well, tracert is a command that works much like the ping command but provides you with additional information. While ping only tells you whether a network device, a website, or an internet resource is available, tracert also tells you the route taken by packets over the network/internet. For example, when loading a website in your web browser, the data packets aren’t transferred directly from its server to your computer. Instead, those packets follow a path via multiple servers before arriving on your PC. Tracing the route to it allows you to see which are those servers and identify where the line of communication breaks. To trace the route to a network or internet resource, run:
tracert [website or network location or IP address]
Here’s what the tracert command looks like and what it outputs in CMD when we check the route of data packets to digitalcitizen.life from one of our computers:
tracert www.digitalcitizen.life
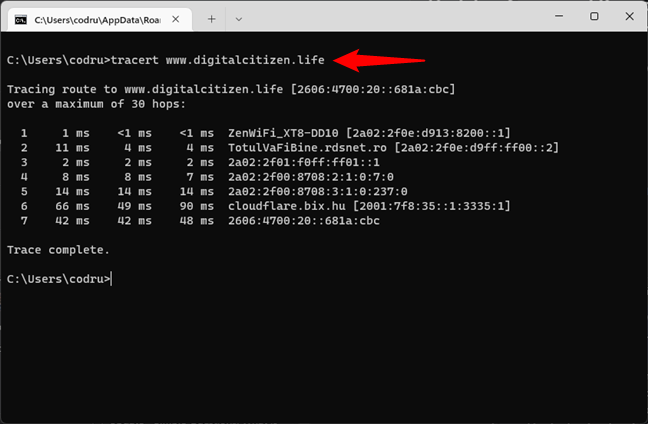
How to traceroute in CMD (tracert)
As you can see, for our PC to load digitalcitizen.life, data goes through the router (ZenWiFi_XT8-DD10 in the screenshot), then through a server from our internet provider, and then through other servers out in the world.
This information can help troubleshoot network and internet problems. For example, if the communication stops after packets leave your router and don’t make it to one of your ISP’s servers, the problem is somewhere in between your network and the internet provider. Or, if the packets are lost before the last hop, the website you’re trying to load is probably down.
3. How can I see all the network adapters on my computer using CMD?
To obtain detailed information about your network adapters and connections, use the ipconfig command. Open Command Prompt, type:
ipconfig
… and press Enter. As you can see in the screenshot below, when you run this command, Windows displays the list of active network devices, whether they’re connected or disconnected, and their IP addresses. You also get details such as their default gateway IP addresses, subnet masks, and the state of each network adapter.
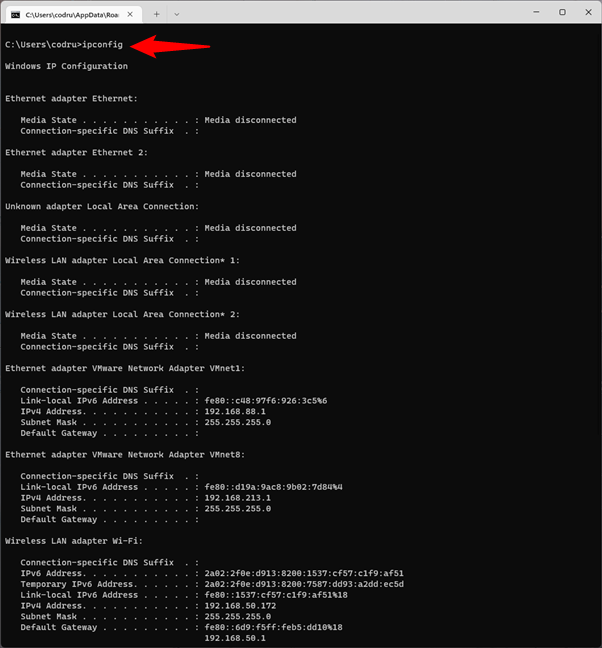
Getting CMD NIC info (information about the Network Interface Card) by running ipconfig
If you add the /all switch to the ipconfig command, you can get to a whole new level of detail: DNS information, the MAC (Media Access Control) (in the Physical Address field), and other information about each network component. Check out the picture below to see a sample of what you get from this command:
ipconfig /all
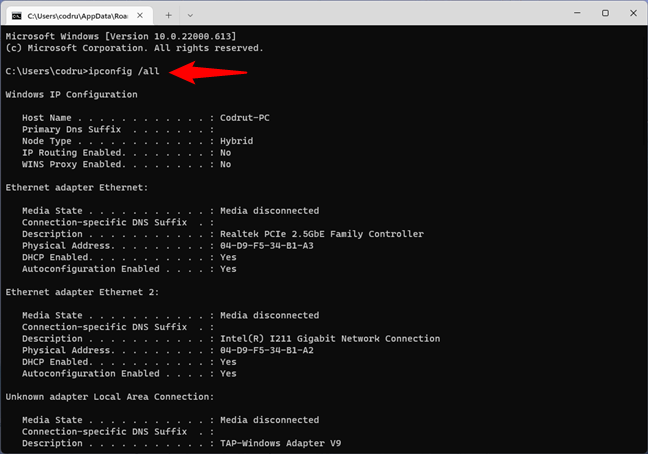
Running ipconfig with the all parameter to get detailed NIC information
4. How to check your network connection in CMD
If you want to check whether your network connection to the router is operating as it should, you can use a combination of the commands ipconfig and ping. First, get some CMD NIC info about your adapter. In other words, open Command Prompt and run ipconfig. In the results list, identify the network adapter used for connecting to the network you want to test. Then, in its details, find your router’s IP address and note it down. For example, if we’d want to check our Ethernet network connection, we’d run ipconfig and see that our router’s IP address is 192.168.50.1.
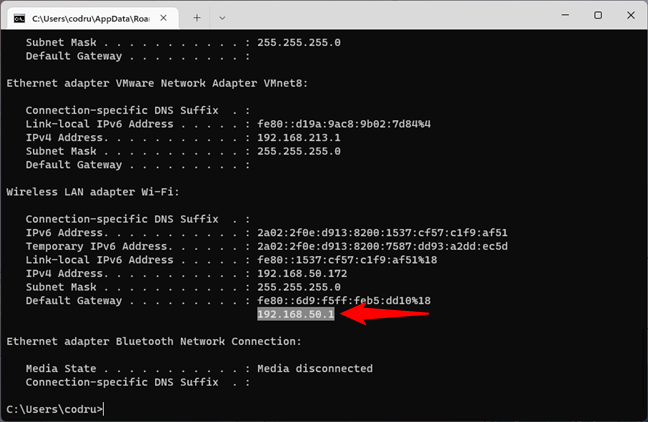
Running ipconfig to identify the IP address of the router
The next step is to check that the network connection between the router and the computer is OK. To do that, it’s enough to run the ping command on the router’s IP address. In our example, that would mean that we have to run this command in CMD:
ping 192.168.50.1
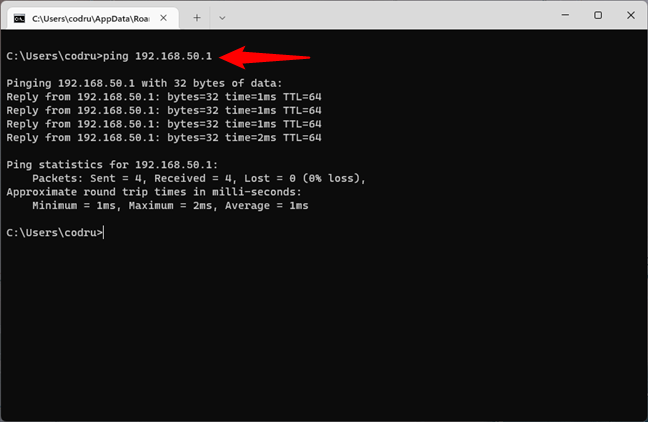
Pinging the router to check the network connection
If no packets are lost, the network connection tested is running well. Otherwise, there’s a problem somewhere between your computer and the router. You should check that your PC’s network adapter is configured correctly, the Ethernet cable is OK (if you’re using a wired connection) and that the router is configured correctly.
5. How to renew the IP address of your network adapter
When your network connection doesn’t work as it should, your network adapter might not have the correct IP address assigned. A quick way of solving this issue is to renew its IP address, and, fortunately, you can do that quickly, straight from the Command Prompt. Open CMD and run the following commands:
ipconfig /release
ipconfig /renew
The first one — ipconfig /release — forces your network adapter to drop its assigned IP address, while the second command — ipconfig /renew — renews the network adapter’s IP address.
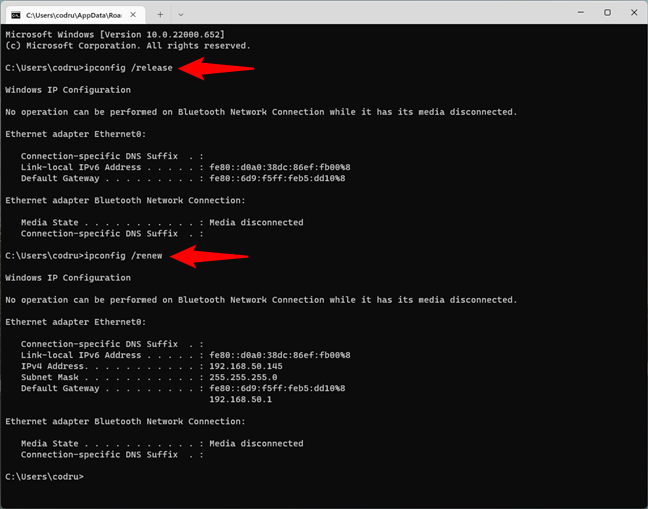
Running ipconfig commands in CMD to reset the IP address
Note that you can also instruct CMD to run both commands in one line by typing:
ipconfig /release & ipconfig /renew
If you type them like this, Command Prompt executes the first command, and when it’s done, it automatically runs the second one. Cool, right? 🙂
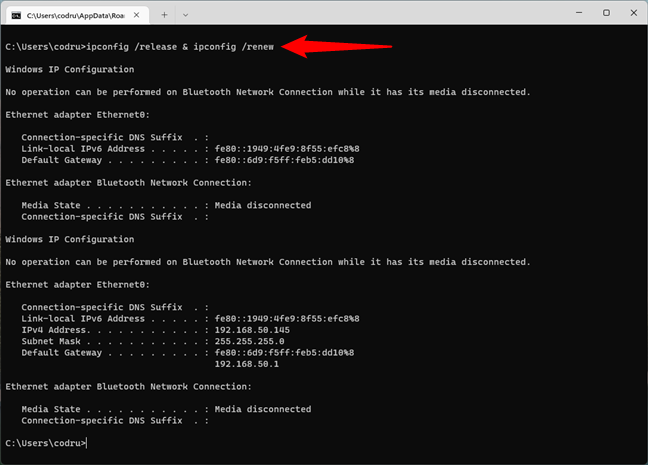
How to reset IP in CMD in one line
The release and renew parameters are useful in networks that use DHCP (Dynamic Host Configuration Protocol) to distribute IP addresses automatically. Your system gives up its current address and requests a new one from the DHCP server, and that can help you troubleshoot certain network issues.
6. How to get NIC info about your network adapter’s MAC addresses
One of the fastest and easiest ways to obtain the MAC addresses of your network adapters is to use the getmac command. In Command Prompt, type
getmac
… and press Enter, as seen in the image below.
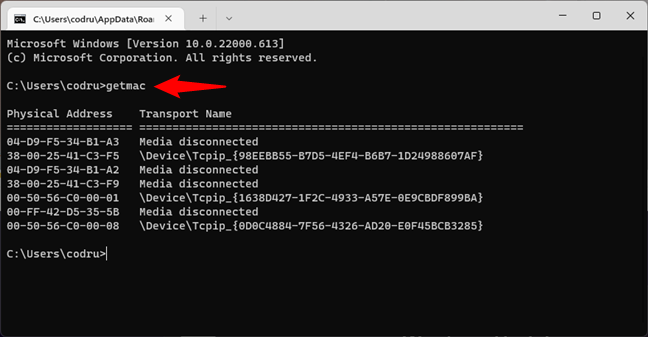
Getmac displays the physical addresses of all the network adapters
7. How can I see the computers and devices connected to my network using CMD?
In some cases, you might want to see what computers and devices are connected to the same network as you are. One of the easy and friendly ways to do that is to use the net view command. Launch Command Prompt and run
net view
After a while, you should see a list of the computers and devices in your network.
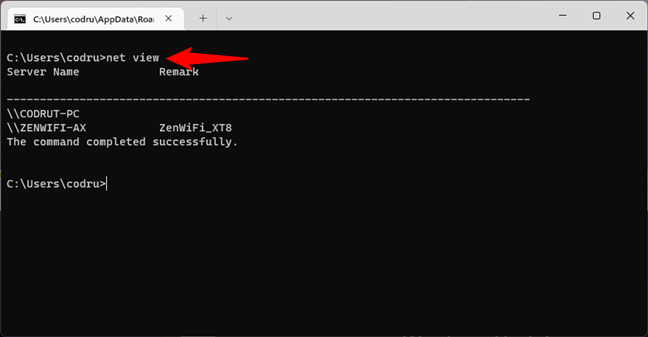
Net view can show the computers and devices connected to the same network
However, there’s a caveat about this command. Net view doesn’t show all the computers and devices in the same network as you. Although it works well enough for private networks, it fails to identify devices such as smartphones or printers and has issues with computers running different operating systems. If you want to get a clear view of everything connected to your network, you should also check the following command.
8. How to list all the devices on the network using CMD?
The best way to list all IP addresses on the network in CMD is to use the arp command. Open Command Prompt and run:
arp -a
The IP address shown first, next to Interface, displays your network adapter’s IP address. Then, there’s a list of IP addresses and MAC addresses (Physical Addresses). All the IP addresses that start with the same numbers as your network adapter are in the same network or subnet as you are. They are all devices connected to your network.

Arp shows all the devices connected to the same network
The next ones are not real devices but IP addresses used for multicasting. Your real devices commonly use them for streaming media on your network. In our example, the devices connected to the same network as our computer are all the ones that have IP addresses starting with 192.168.50.
If you want to see what those devices are, in a more human-friendly way, copy their MAC addresses and look them up on the internet using Google or on websites that let you check which vendors assign specific MAC addresses, such as DNS Checker. For instance, if you’re looking for the MAC address 04-d9-f5-b5-b1-f0, you find that it’s a device made by ASUS. In truth, it’s an ASUS ZenWiFi mesh system.
9. How to check your computer’s network connections and open ports
You can get other helpful CMD NIC info from this command:
netstat
It lets you see the network connections between your system and any other systems on your network or the internet, except for those in a Listening state.
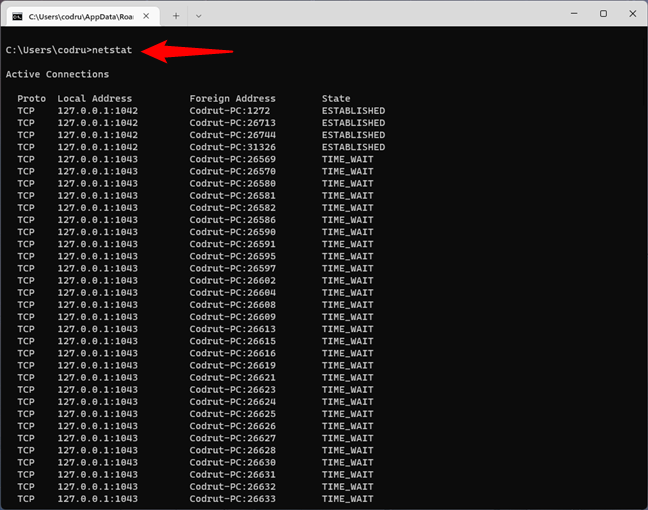
Netstat shows the active network connections and open ports
If you add the -a parameter to the netstat command, you can get the complete list of open ports, including idle ones (the ones marked as Listening), like in the image below.
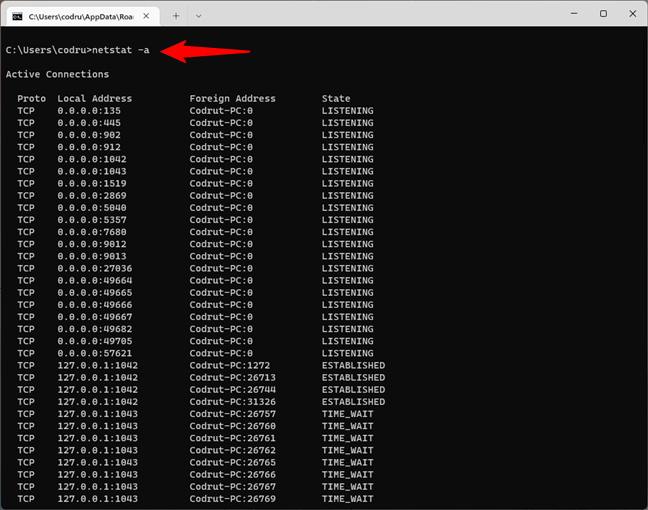
Netstat with the -a parameter shows the active network connections, including the ones in a listening state
10. How to check the network traffic in Windows’ command line
Windows allows you to see the network traffic easily in the Task Manager. However, that’s a visual tool, and some users might want to get network utilization from the command line. Fortunately, there’s a command for that too. It’s called typeperf and lets you check the network traffic from CMD, although not in a friendly manner. Here’s the full command with arguments that you must run in Command Prompt:
typeperf “\Network Interface(*)\Bytes Total/sec”
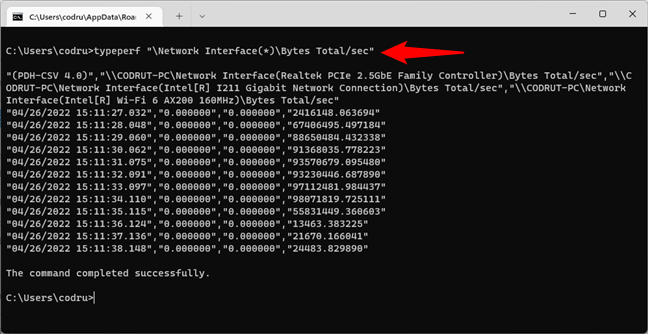
How to check the network traffic in Command Prompt
The typeperf command will then start to show the number of bytes sent and received each second, for all the network cards available on your Windows computer. The first line of the command’s output tells you the order in which the network interfaces are listed, while the next lines of text update each second with new measurements. Unfortunately, this command can’t show the network traffic in percentage.
TIP: The typeperf command can be used for gathering other types of network information too. Here are other useful variations of it with different counters you can monitor:
typeperf “\Network Interface(*)\Current Bandwidth
typeperf “\Network Interface(*)\Bytes Received/sec
typeperf “\Network Interface(*)\Bytes Sent/sec
typeperf “\Network Interface(*)\Packets/sec
typeperf “\Network Interface(*)\Packets Received/sec
typeperf “\Network Interface(*)\Packets Sent/sec
As you can see, the names of the counters are self-explanatory, monitoring bandwidth, as well as bytes and packages sent and received on your PC. Have fun playing with them!
NOTE: If you want to learn more about this command, check the official documentation from Microsoft: typeperf — Microsoft Docs.
Do you know other useful CMD network commands?
The networking commands that you can run in the Command Prompt can be helpful when you need to find information about devices connected to your network or when you want to test your network connection state. They’re also convenient when you have networking issues and you’re trying to troubleshoot them yourself. If you have questions about these networking commands, if you need help, or if you want us to add others to the list, leave us a comment below.