
NET HELPMSG 2182 Error is one complicated issue that usually restricts the system from installing and updating any Windows apps. The same fatal code may also show up while updating the operating system or using Windows update troubleshooter. Though the error appears in various instances, broken BITS service is found guilty in most cases. Other probable causes that can trigger NET HELPMSG 2182 are corrupted system files, damaged store caches, faulty update components, and installation glitches.
Fixing NET HELPMSG 2182 Error in Windows 11 or 10 is not as intricate as it seems. Most of the time, the issue goes away after resetting Background Intelligent Transfer Service or using the dedicated troubleshooter. If not, there are other ways too like running system file checker, making use of DISM scan, clearing store cache, and so on. Before jumping into the troubleshooting process, reboot your PC in order to refresh the OS and remove any corrupt data that could be triggering the error. Also, disable your antivirus tool for the time being whether it’s a built-in or third-party one. See: How to Fix An error occurred while loading the troubleshooter in Windows 11 or 10 (Solved!).
NET HELPMSG 2182 Error in Windows
Here is how to fix NET HELPMSG 2182 Error in Windows 11 or 10 –
Step-1: Manually start BITS service
Background Intelligent Transfer Service is pretty crucial in Windows since it extensively helps the updating process. BITS is primarily used by Windows Update, Windows Server Update Services (WSUS), and other applications for downloading files in the background.
Since its work is to transfer files between clients and servers, any trouble with the dedicated service is likely to result in serious update errors like NET HELPMSG 2182. To fix the issue, make sure the status of BITS service is Running and configurations of its Properties are proper. To do so, enact below steps precisely –
- Press Win+R.
- In the Run Dialog box, type services.msc.
- Press Enter.
- When the Services window appears, look for Background Intelligent Transfer Service.
- Right-click the same and choose Properties.
- Click the drop-down menu present beside Startup type and select Automatic.
- If the Service status is showing Stopped, click on Start button.
- Save the changes by clicking Apply followed by OK.
- Reboot your Windows computer.
Once you have started the BITS service, it should be running in the background and you can now use features or applications that rely on this functionality.
Step-2: Use the BITS troubleshooter
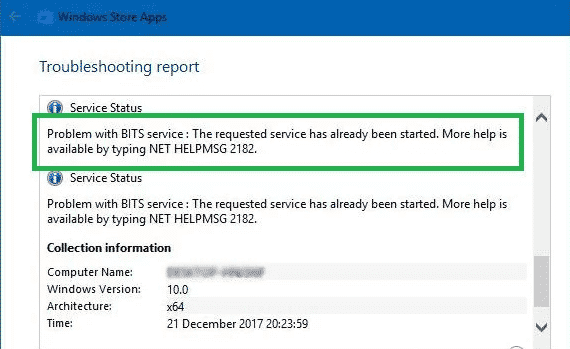
Commonly when the error message appears, it says “Problems with BITS service: The requested service has already been started. System.Management.Automation.RemoteException More help is available by typing NET HELPMSG 2182”.
Since error “NET HELPMSG 2182” is directly associated with BITS service, troubleshooter is likely to help in resolving the problem. To fix any problem connected to Background Intelligent Transfer Service, go through the steps described below.
- Press the Windows key.
- Type troubleshooter.
- Press Enter.
- When Settings open, click on – Other troubleshooters.
- Find Background Intelligent Transfer Service and click on Run.
- A new window will appear; select Yes on that.
- The tool will check security descriptors, missing or corrupt files, and registry keys. Follow the instructions shown on the window.
After imitating the steps correctly, the troubleshooter will start scanning for issues that are triggering NET HELPMSG 2182 also preventing BITS from working. Once detected, the tool will fix the problem automatically.
Step-3: Restart Windows Update Services
Windows Update Service (WUAUSERV) manages the delivery of updates, patches, and other software releases to Windows operating systems along with Microsoft products. It is commonly used in environments to centrally manage and distribute updates across multiple Windows-operated machines.
Any issue with this service may trigger Windows update errors. To deal with the problems, perform the following steps:
- Press Windows key.
- Type services.
- Hit Enter.
- When Services window shows up, look for Windows Update.
- Right-click the same and choose Properties.
- Set the Startup type to Automatic.
- If the service is not running, click Start.
- Shift to Log on tab.
- Select the radio button present before Local System account.
- Uncheck Allow service to interact with desktop.
- Click Apply and then OK.
- After that, do the same for Background Intelligent Transfer Service, Event Log, and Remote Procedure Call (RPC) services.
Step-4: Troubleshoot Windows Update issues
Windows Update troubleshooter is a built-in tool that helps in diagnosing and resolving NET HELPMSG 2182. The tool can also automatically solve any abnormality generated by Windows Update components.
Windows 11
- Press Windows + I.
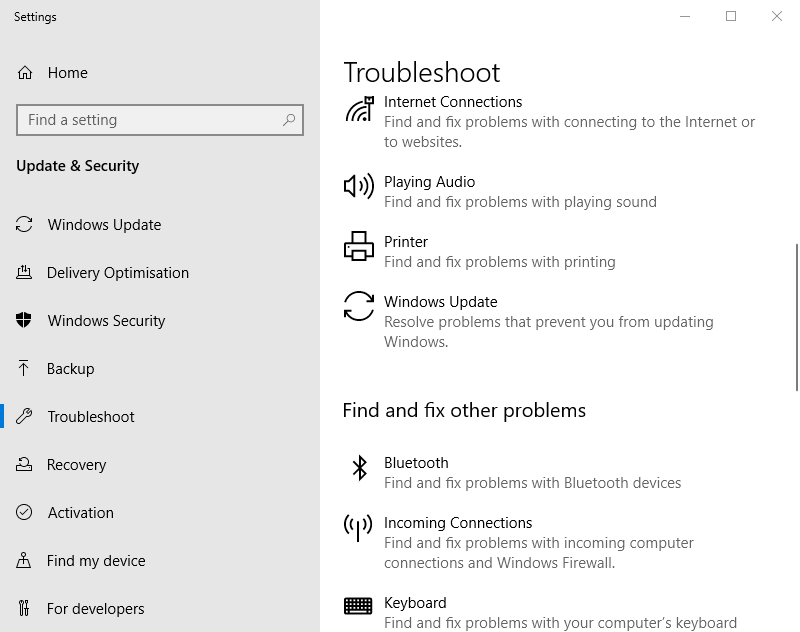
- From the right pane of Settings app, select Troubleshoot.
- Once on the next page, click Other troubleshooters.
- Select Run present beside Windows update.
- The troubleshooter will now start detecting problems related to Windows Update. Wait patiently as the process may take a few moments.
- Once the troubleshooter completes the process, it will display a summary of the problems found and fixed (if any).
- If the utility suggests an automatic fix, click Apply this fix.
- Close the Troubleshoot.
- Restart Windows.
- When the system powers up, retry to do the thing that was causing NET HELPMSG 2182 Error.
Windows 10
- Right-click on the Start button and choose Settings.
- Select Update & Security.
- From the left sidebar, click on Troubleshoot.
- Move to the right-hand side.
- Click Additional troubleshooters.
- Next, select Windows update.
- From the expanded tray, click Run the troubleshooter.
Step-5: Run DISM to fix NET HELPMSG 2182 Error
DISM is mainly used for tasks related to the deployment, maintenance, and repair of Windows installations. Furthermore, this utility can be utilized to perform various operations such as image servicing, image management, component cleanup, and system mending. Because the tool plays a vital role in managing and maintaining Windows installations, repairing the same can be helpful to fix NET HELPMSG 2182 error.
Before you run DISM scan, make sure your computer is connected to the internet and check your network settings to ensure proper connectivity.
- Press Windows + X.
- Choose Run.
- Type in cmd.exe.
- Press Ctrl+Shift+Enter altogether.
- Click Yes when UAC prompts.
- Copy the following lines and paste them into the elevated command prompt one after another. Press Enter after each line –
dism /online /cleanup-image /checkhealth
dism /online /cleanup-image /scanhealth
dism /online /cleanup-image /restorehealth- Now DISM tool will start scanning the Windows image, which may take some time depending on the size and complexity of the system files.
- Once the scan is complete, reboot the computer
Step-6: Repair corrupted system files
The System File Checker (SFC) verifies the integrity of critical components and attempts to repair any files that are found to be corrupt or modified. The tool is effective to help resolve various issues related to system stability, application crashes, or other problems caused by damaged files.
- Click on Start.
- Type cmd.exe.
- When a UAC wizard appears, click Yes.
- In the Command Prompt window, type
sfc /scannowand press Enter.
- The System File Checker will now start scanning for integrity violations and corruption.
- Once the scan is finished, restart the device.
Read: How to Repair Corrupted System Files on Windows 10, 8.1.
Step-7: Reset Microsoft Store cache
If you are facing NET HELPMSG 2182 Error with store app on Windows, clearing the cache may help. This method basically resolves issues related to app downloads, updates, and general functionality of the Microsoft Store. Here’s how you can do it –
- Close the Microsoft Store app if it’s currently open.
- Press Windows key + R to open Run dialog box.
- Type wsreset.exe and press Enter. Doing so will launch the Windows Store reset tool.
- Shortly, a Command Prompt window will open, and then Microsoft Store app. The process of resetting cache will start, which may take a few moments.
Step-8: Check for Windows updates manually
Windows updates are significant as they keep your computer up to date with the latest security patches, bug fixes, and feature updates released by Microsoft. However, in rare cases, issues may arise due to specific configurations or compatibility problems.
.NET HELPMSG 2182 Error in Windows 11 or 10 is often caused by installation glitches or buggy Windows updates which usually get fixed automatically later on. Therefore, check for updates manually and see if the issue is resolved.
Windows 10
- Open the Settings app by pressing Windows key + I.
- Select Update & Security.
- Click Check for updates button present in right pane.
- Windows will start checking for available updates right away.
- If updates are found, they will be displayed in the Windows Update settings window. Click Download button to start downloading and installing.
- The downloading process may take some time depending on the size and number.
- Once the updates are installed, Windows will prompt you to restart your computer if necessary. If so, click Restart now button to complete the update process fully.
Windows 11
- Open Settings app.
- From left column, select Windows Update.
- Move to right and then click Check for update.
Methods:
Step-1: Manually start BITS service
Step-2: Make use of BITS troubleshooter
Step-3: Restart Windows Update Services
Step-4: Troubleshoot Windows Update issues
Step-5: Run DISM
Step-6: Resolve corrupted system files
Step-7: Reset Microsoft Store cache
Step-8: Check for Windows updates manually
That’s all!!
Introduction
The Background Intelligent Transfer Service (BITS) is a crucial component of the Windows operating system, responsible for transferring files in the background. It is used by various features such as Windows Update, Windows Defender, and other applications that require background file transfers. However, users may encounter issues with the BITS service, such as the error message «NET HELPMSG 2182,» which indicates a problem with the service. In this tutorial, we will explore how to fix the NET HELPMSG 2182 problem with the BITS service in Windows 11/10.
Understanding the NET HELPMSG 2182 Error
The «NET HELPMSG 2182» error message typically appears when there is a problem with the BITS service on a Windows 11/10 system. This error indicates that the BITS service is not running or encountering issues that prevent it from functioning properly. As a result, users may experience difficulties with Windows Update, Windows Defender, and other applications that rely on BITS for background file transfers.
Common Causes of the NET HELPMSG 2182 Error
There are several reasons why users may encounter the NET HELPMSG 2182 error with the BITS service in Windows 11/10. Some of the common causes include:
- Corrupted system files: System files related to the BITS service may become corrupted, leading to issues with its functionality.
- Incorrect service settings: Changes to the BITS service settings or dependencies may cause it to malfunction.
- Security software conflicts: Antivirus or firewall software may block the BITS service, preventing it from running properly.
- Outdated software: Running outdated versions of Windows or software may lead to compatibility issues with the BITS service.
- Malware infections: Malicious software may interfere with the BITS service, causing errors and malfunctions.
Now that we understand the potential causes of the NET HELPMSG 2182 error, let’s explore the solutions to fix the issue and restore the BITS service to its normal functioning state.
Fixing the NET HELPMSG 2182 Problem with BITS Service
There are several methods to resolve the NET HELPMSG 2182 error and restore the BITS service in Windows 11/10. We will discuss each solution in detail to help users troubleshoot and fix the issue effectively.
Method 1: Restart the BITS Service
The first step in resolving the NET HELPMSG 2182 error is to restart the BITS service. This simple solution can often fix minor issues that prevent the service from running properly. Follow these steps to restart the BITS service:
- Press the Windows key + R to open the Run dialog box.
- Type «services.msc» and press Enter to open the Services window.
- Scroll down and locate the Background Intelligent Transfer Service in the list of services.
- Right-click on the BITS service and select Restart from the context menu.
- Wait for the service to restart and check if the NET HELPMSG 2182 error is resolved.
If restarting the BITS service does not fix the issue, proceed to the next method to troubleshoot further.
Method 2: Reset BITS Service Settings
If the BITS service settings are incorrect or corrupted, resetting them can help resolve the NET HELPMSG 2182 error. Follow these steps to reset the BITS service settings:
- Open the Command Prompt as an administrator by right-clicking on the Start menu and selecting Command Prompt (Admin).
- Type the following command and press Enter:
net stop bits - Next, type the following command and press Enter:
net start bits - Wait for the BITS service to restart and check if the error has been resolved.
Resetting the BITS service settings can often fix issues related to its configuration and restore its functionality.
Method 3: Run SFC and DISM Scans
System File Checker (SFC) and Deployment Image Servicing and Management (DISM) scans can help identify and repair corrupted system files that may be causing the NET HELPMSG 2182 error. Follow these steps to run SFC and DISM scans:
- Open the Command Prompt as an administrator.
- Type the following command and press Enter to run the SFC scan:
sfc /scannow - Wait for the scan to complete and follow any on-screen instructions to repair corrupted system files.
- Once the SFC scan is complete, run the DISM scan by typing the following command and pressing Enter:
DISM /Online /Cleanup-Image /RestoreHealth - Wait for the DISM scan to finish and restart your computer.
- Check if the NET HELPMSG 2182 error has been resolved after running the SFC and DISM scans.
Running SFC and DISM scans can help fix underlying system file issues that may be affecting the BITS service.
Method 4: Check Service Dependencies
The BITS service relies on other services and components to function properly. Checking its dependencies can help identify any issues that may be causing the NET HELPMSG 2182 error. Follow these steps to check the service dependencies:
- Open the Services window by pressing the Windows key + R, typing «services.msc,» and pressing Enter.
- Locate the Background Intelligent Transfer Service in the list of services.
- Right-click on the BITS service and select Properties from the context menu.
- Click on the Dependencies tab to view the services that BITS depends on.
- Make sure that the dependencies are running and set to Automatic startup type.
- Restart the BITS service and check if the error has been resolved.
Verifying the dependencies of the BITS service can help ensure that all necessary components are functioning correctly.
Method 5: Disable Third-Party Security Software
Antivirus or firewall software may sometimes conflict with the BITS service, causing the NET HELPMSG 2182 error. Temporarily disabling third-party security software can help identify if it is the cause of the issue. Follow these steps to disable security software:
- Locate the antivirus or firewall software running on your system.
- Open the software and look for options to disable real-time protection or firewall features.
- Temporarily disable the security software and check if the NET HELPMSG 2182 error persists.
- If the error is resolved after disabling the security software, consider adding an exception for the BITS service or contacting the software provider for further assistance.
Disabling third-party security software can help determine if it is causing conflicts with the BITS service and the NET HELPMSG 2182 error.
Method 6: Perform a System Restore
If the NET HELPMSG 2182 error started occurring after a recent system change or update, performing a system restore can help revert your system to a previous state where the BITS service was functioning correctly. Follow these steps to perform a system restore:
- Press the Windows key + R to open the Run dialog box.
- Type «rstrui» and press Enter to open the System Restore wizard.
- Follow the on-screen instructions to choose a restore point before the NET HELPMSG 2182 error occurred.
- Confirm your selection and wait for the system restore process to complete.
- Check if the BITS service is functioning properly after the system restore.
Performing a system restore can help undo recent changes that may have caused the NET HELPMSG 2182 error and restore the BITS service to its normal state.
Conclusion
In this tutorial, we explored various methods to fix the NET HELPMSG 2182 problem with the BITS service in Windows 11/10. By following the steps outlined in this guide, users can troubleshoot the error and restore the BITS service to its normal functioning state. Whether it involves restarting the service, resetting its settings, running SFC and DISM scans, checking service dependencies, disabling third-party security software, or performing a system restore, there are several effective solutions available to resolve the NET HELPMSG 2182 error. By following these steps, users can ensure that the BITS service operates smoothly and supports background file transfers for Windows Update, Windows Defender, and other applications that rely on it.
What You Should Know About the NET HELPMSG 2182 Problem with BITS Service
Updated: December 22, 2023
5 min to read
Windows
Windows is a popular operating system with numerous features and functionalities, but it is not immune to errors and issues. The “Problem with BITS Service” error has been reported by some Windows users while updating Windows or accessing the Windows Store.
What is the error all about and what triggers it to appear? Read on to learn more.
What Causes the NET HELPMSG 2182 Error?
Many factors can trigger the NET HELPMSG 2182 error to occur. But we’ve gathered the most common ones reported by users. They are listed below:
- Corrupt Files – In some cases, crucial system files become corrupted after a Windows Update. As a result, the error message is triggered.
- Broken Services – There are specific services designed for managing, installing, and downloading new Windows updates. But sometimes, they become broken or glitched, causing the entire operating to stop and the error message to appear.
- Faulty Update – Although rare, Microsoft may roll out problematic updates that trigger plenty of issues on the computers of users.
- Malware Attacks – Malware entities may also cause the NET HELPMSG 2182 error to occur. They wreak havoc on your system files and processes, causing various error messages to pop up.
How to Fix NET HELPMSG 2182 Problem with BITS Service
What should you do about the NET HELPMSG 2182 problem with BITS service? In this section, we will share with you some solutions that worked for many affected users. Be sure to follow them step by step to avoid more conflict. And before you try any of the solutions listed, disable your antivirus program first as it may block you taking further steps.
Solution #1: Restart your system services
If you suspect that your system services are at fault, restart them. To do that, you need to use the Command Prompt. Here’s how:
- Press the Windows + R keys to launch the Run utility.
- Type cmd into the text field. Do not hit Enter. Instead, press SHIFT + CTRL + Enter to launch Command Prompt with administrator rights.
- Into the command line, enter the following commands to stop some services. Make sure to hit the Enter button after each one of them:
- net stop wuauserv
- net stop cryptSvc
- net stop bits
- net stop msiserver
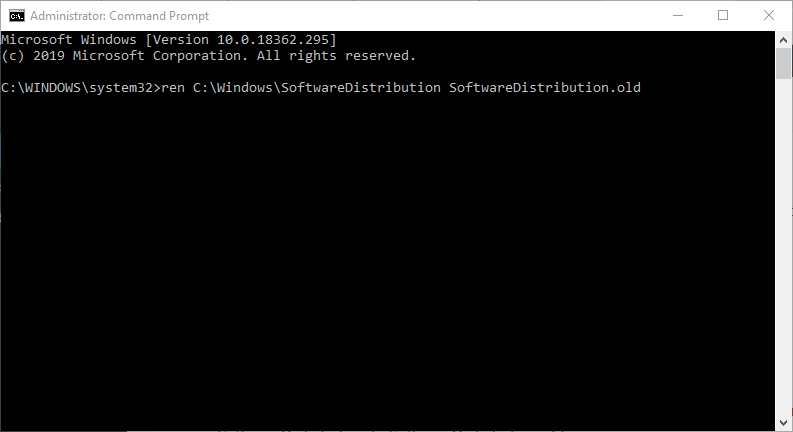
- Next, enter the following commands to rename certain folders. Again, press Enter after each one:
- ren C:\Windows\SoftwareDistribution SoftwareDistribution.old
- ren C:\Windows\System32\catroot2 Catroot2.old
- Finally, enter these commands to restart the services you stopped previously and press Enter after each one:
- net start wuauserv
- net start cryptSvc
- net start bits
- net start msiserver
- Now, check if the error persists.
Solution #2: Use the System File Checker utility
If your system files have been corrupted causing the error message to show, then we recommend trying this solution. Use the System File Checker utility to check any damaged or corrupted system files.
Here’s a detailed guide on what to do:
- Press the Windows + R keys to open the Run prompt.
- Type cmd into the text field and press the SHIFT + CTRL + Enter keys altogether to launch Command Prompt with administrator rights.
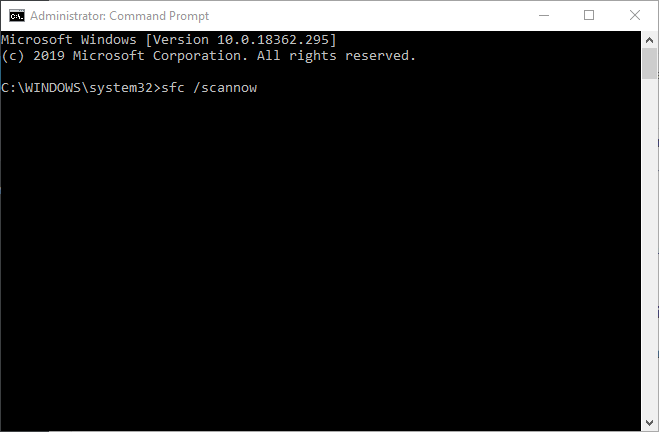
- Enter the sfc /scannow command and hit Enter.
- Wait for the entire scan to be completed and see if the error message still appears.
Solution #3: Run a DISM Scan
Sometimes, a DISM scan is confused with an SFC scan. Though they are more or less similar, a DISM scan checks the online database of Microsoft for any Windows update or operating system errors. It also fixes them automatically.
To run a DISM scan, follow these steps:
- Press the Windows + R keys to launch the Run utility.
- Enter cmd into the text field and press the SHIFT + CTRL + Enter keys to open Command Prompt with administrator privileges.
- Next, enter the following command and hit Enter: DISM.exe /Online /Cleanup-image /Scanhealth.
- After which, enter this command: DISM.exe /Online /Cleanup-image /Restorehealth.
- Hit Enter.
- Once the scan is completed, check if the error message still appears.
Solution #4: Check for new Windows updates
As mentioned above, Microsoft may release problematic updates that once installed, may trigger error messages to appear. However, if that is the case, they are also quick to roll out fixes through another update as well. So, it is worth checking for any pending updates from Microsoft.
Here’s what you should do:
- Press the Windows + I keys to open Settings.
- Go to Update and Security and click the Check for Updates button.
- Once new updates are detected, they will be automatically downloaded and installed. This may take time so be patient.
Solution #5: Use the BITS Troubleshooter
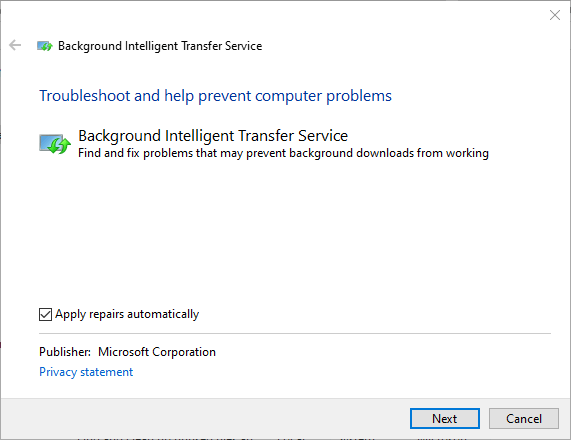
If you are not that tech-savvy, you can download and use the Background Intelligent Transfer Service (BITS) Troubleshooter to scan your system for any problems. If it finds any, it will show them to you.
Here’s how to use the BITS Troubleshooter:
- Assuming you have already downloaded the BITS Troubleshooter, click the bitsdiagnostic.diagcab file to launch it.
- Untick the box next to the Apply repairs automatically option.
- Hit Next. The troubleshooter should now scan your system. Once the scan is complete, review the results.
- Click Next and let the troubleshooter fix the problems for you.
- Restart your PC.
Solution #6: Check if the BITS service is running
Perhaps the BITS service on your Windows device is not running at all, hence the error message. Make sure it is running to avoid problems associated with it.
Follow these steps:
- Into the Cortana search field, input services.msc and hit Enter. This will open the Services Manager.
- Locate the Background Intelligent Transfer Service.
- If it is not running, right-click on it and choose Start. If it is active, right-click on it and choose Restart.
- Next, double-click on the BITS service to access Properties.
- Make sure that the Startup Type is set to Manual.
- Close the Services Manager.
Summary
There you go! Here’s everything you need to know about the NET HELPMSG 2182 error. Should you come across this problem in the future, you already know what steps to take. But if you are hesitant about what to do, feel free to get in touch with experts.
Has this article been of help to you? Let us know in the comments!
Give us some love and rate our post!
Net Helpmsg 2182: Microsoft has been one of the leading operating systems in the market. With its amazing features and ease of use, it has now become the most-suitable operating system for personal use. Microsoft added a Windows Store application on their system when Windows 8 was released. The store has a wide collection of apps that can be downloaded on any system with ease.
But not everyone is able to enjoy the fabulous features of the Microsoft Store. Some users often see errors stating “Problem with BITS Service: The requested service has already been started“, and often wonder What is the Net Helpmsg 2182 error?
The Net Helpmsg 2182 error is a common Windows error caused by broken services, corrupted files, or bad Windows updates. Users can easily fix the error by restarting all the services, running an SFC and DISM scan, using troubleshooter, or just by reverting back their latest Windows Update.
If you have bumped into the same situation and are unable to get rid of it, then do not worry. As here in this article we are going to discuss everything related to the Net Helpmsg 2182 errors, why does it occur, and how to fix it permanently.
Contents
As mentioned above, the Net Helpmsg 2182 error is a common Microsoft error that states “Problem with BITS Service: The requested service has already been started“.
This error is associated with the BITS (Background Intelligent Transfer Service) which is responsible for updates and downloads from the Microsoft server.
As the statement suggests, this error is caused by a misconfiguration in any system service. Users generally bump into this error while trying to update their system or while installing an app from the Windows Store.
Whatever the situation be, this error can be frustrating, and fixing it can be time-consuming. To fix the error efficiently, one needs to know what caused this error in the first place.
What Causes Net Helpmsg 2182 Error
There are a number of reasons for the Net Helpmsg 2182 Error. Below we have mentioned some of the most obvious ones for your information.
Damaged Services
As you might know, the Windows Operating system is comprised of small services that run together to ensure the smooth working of the machine. Sometimes, a service gets glitched and causes errors. The Net Helpmsg is one of the many errors caused by damaged services.
Corrupted Files
Files and data play a huge role in the working of the Windows Operating System. If a core file gets corrupt, it might create a misfit in the whole system. To fix this error, the user needs to scan their disks for corrupt files and folders.
Bad Windows Update
Microsoft releases updates several times a year. There might be a case that you have installed an update on your system that wasn’t configured correctly. Such updates can tamper with the system and cause annoying errors like the Net helpmsg.
Note
If you have a slow and unresponsive computer, check out this article on Win32 Priority Separation where we have mentioned ways to make a system fast.
How To Fix Net Helpmsg 2182 Error
Now that you know what causes the error, it is time to get practical and fix this error permanently.
Keeping the potential causes in mind, we have mentioned 7 working solutions that might help you in fixing the Net helpmsg 2182 error on your system.
Feel free to implement any method you find suitable, however, we recommend you to follow the guide in a linear fashion.
1. Using Windows Update Troubleshooter
Windows has an in-built troubleshooter that allows the user to check for errors in1. their system.
To troubleshoot errors on your system, follow the steps below.
- Press Win + S to open the Start Menu Search bar.
- Type in
troubleshooterand press Enter. - Select the Troubleshoot Settings from the list of results.
- Click on the option titled Windows Update.

- The Windows troubleshoot will initialize.
Note
Do not forget to check your system for Network or DNS errors. Refer to this guide to fix these issues permanently on your desktop.
Wait for the program to finish, restart your computer, and check if the problem persists.
2. Using BITS Troubleshooter
The Background Intelligent Transfer Service is a system service responsible for downloading and updating the applications from the Microsoft store. The Net Helpmsg 2182 error is closely related to this service and the BITS Troubleshooter can help us identify the possible cause.
To use the BITS Troubleshooter, follow the guide given below.
- Press the Win + R button on your keyboard to open the Run Dialog box.
- Type in
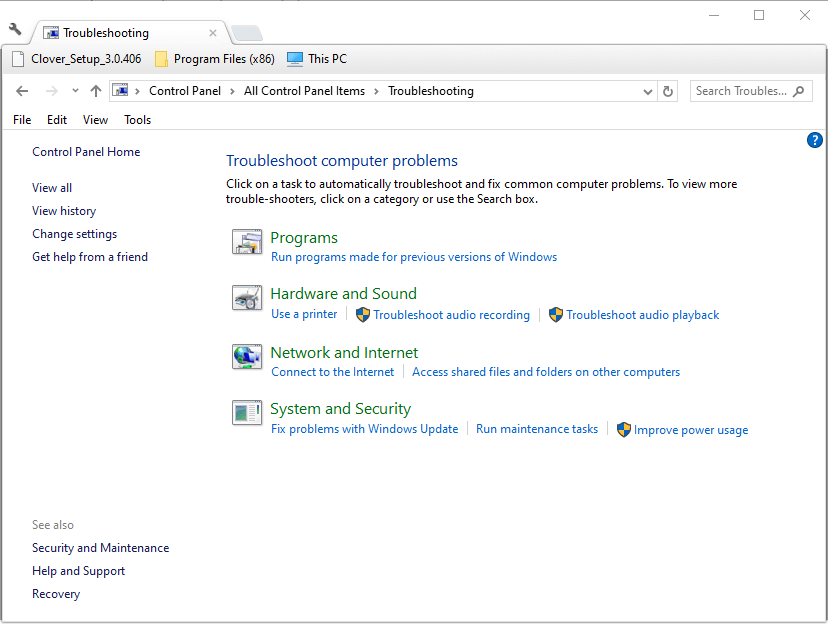
Control Paneland press Enter. - Select Troubleshooting from the list of options.
- Click on the View All option located at the left-hand sidebar.

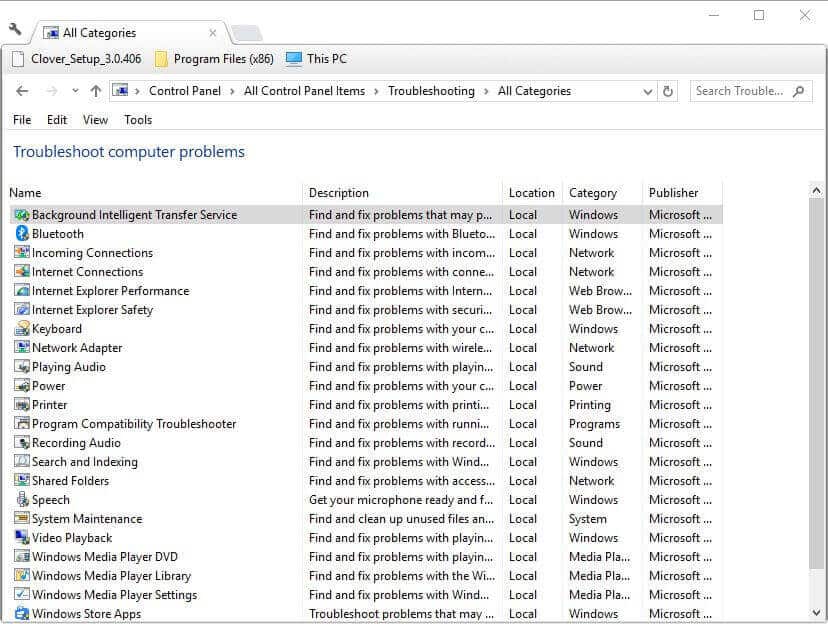
- Select the Background Intelligent Transfer Service troubleshooter from the list.
- Let the troubleshooter identify errors. Click Advanced, and then select the option that says Apply Repairs Automatically.

3. Restarting Services
If you think that the error is caused by any broken service, you can fix the issue by restarting all the services on your system.
Follow the steps provided below to restart service in Microsoft Windows.
- Press Win + R key on your keyboard to open the Run dialog box.
- Type in
cmdand press Enter to open Command Prompt. - Grant admin privileges to Command Prompt by pressing Shift + Ctrl + Enter at the same time.
- Type in the command given below. Press Enter after each.
net stop wuauserv
net stop cryptSvc
net stop bits
net stop msiserver
ren C:\Windows\SoftwareDistribution SoftwareDistribution.old ren C:\Windows\System32\catroot2 Catroot2.old

net start wuauserv
net start cryptSvc
net start bits
net start msiserver
- Restart your computer and check if the problem still exists.
Restarting all your services might be of use if the error is caused by broken services on your system.
4. Using System File Checker Scan
SFC scan, or System File Checker Scan checks for damaged files on your system. Scanning your disks can be quite helpful if the error is caused by corrupted files.
To run an SFC scan, follow the steps given below.
- Press Win + R key on your keyboard to open the Run dialog box.
- Type in
cmdand press Enter to open Command Prompt. - Type in
sfc/scannowand press Enter.
- Wait for the scan to finish.
- SFC scan will fix all the corrupted files on your system after the scan is completed.
Reboot your PC and check if the error still persists.
5. Running DISM Scan
DISM scan is similar to an SFC scan. Instead of checking your local file system, the DISM scan checks the online Microsoft database for errors and fixes them on your system.
If you want to run a DISM scan on your system, follow the step-by-step guide mentioned below.
- Press Win + R key on your keyboard to open the Run dialog box.
- Type in
cmdand press Enter to open Command Prompt. - Type in the following commands. Press Enter after each.
DISM.exe /Online /Cleanup-image /Scanhealth DISM.exe /Online /Cleanup-image /Restorehealth - After the scan completes, restart your computer.
There are high chances that the error might be fixed on your computer. If not, follow the solutions mentioned below.
6. Reset Windows Update
A number of times your system might have a bad or corrupted update installed on it. To fix this, all you need to do is reset the latest Windows Update installed on your system.
To do the same, follow the steps given below.
-
- Press Win + R key on your keyboard to open the Run dialog box.
- Type in
cmdand press Enter to open Command Prompt. - Type in the following commands. Press Enter after each.
net stop wuauserv net stop cryptSvc net stop bits net stop msiserverren C:\Windows\SoftwareDistribution SoftwareDistribution.old ren C:\Windows\System32\catroot2 Catroot2.old net start wuauserv net start cryptSvc net start bits net start msiserver

4. These commands will reset the latest Windows Update and revert your system back.
Restart your system to check if the issue persists.
7. Reset Microsoft Store Cache
The Windows Store stores cache files required for its working. Sometimes, the cache files get corrupt and cause the Net Helpmsg 2182 error on a system.
To fix this issue, all you need to do is reset the Microsoft Store Cache.
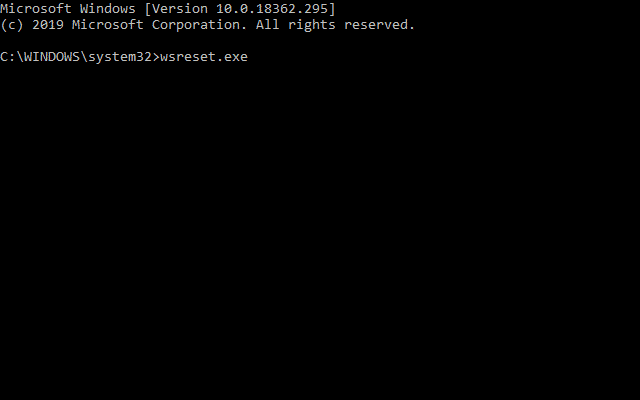
- Press Win + R key on your keyboard to open the Run dialog box.
- Type in
cmdand press Enter to open Command Prompt. - Grant admin privileges to Command Prompt by pressing Shift + Ctrl + Enter at the same time.
- Type in
wsreset.exeand press Enter.
- Restart your computer after the process completes.
Final Words
So that was our take on the Net Helpmsg 2182 error. We discussed a number of things associated with the topic such as what causes the error and how to fix it permanently. We provided 7 working solutions to get rid of the error forever.