
Повышаем производительность системы и снижаем нагрузку на диск.
Одна из проблем, часто возникающая у пользователей Windows 10, — это 100-процентная загрузка диска. В Windows 10 есть неполадки, которые затрагивают как жёсткие диски, так и твердотельные накопители. При этом производительность системы резко падает. Вплоть до полного зависания.

Есть несколько способов исправить это. Попробуйте их один за другим, пока не увидите положительных результатов.
Отключите Windows Search

Служба индексирования Windows 10 позволяет быстро искать ваши файлы, но она же может создавать высокую нагрузку на жёсткий диск.
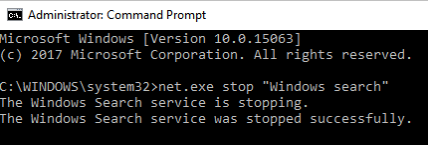
Чтобы остановить службу на время текущего сеанса (до перезагрузки), откройте командную строку. Для этого нажмите «Пуск» → «Все программы» → «Стандартные». Щёлкните пункт «Командная строка» правой кнопкой мыши и выберите «Запуск от имени администратора». Затем введите следующую команду:
net.exe stop “Windows search”
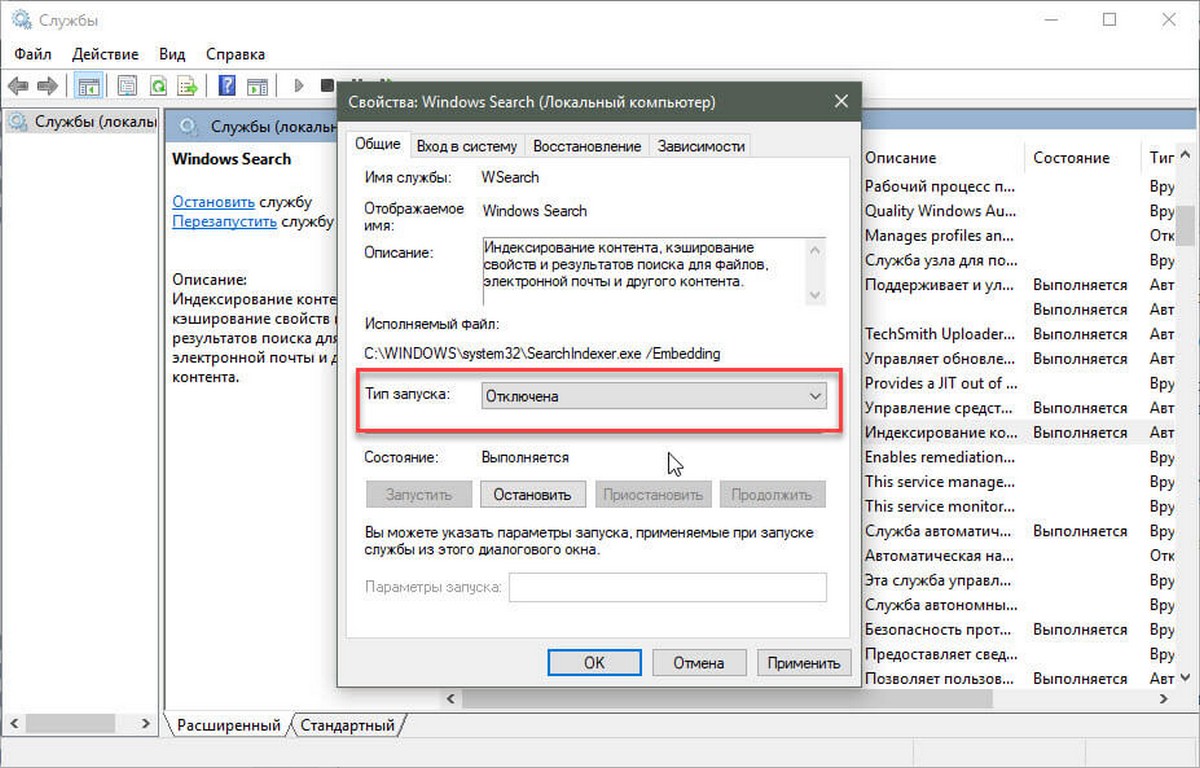
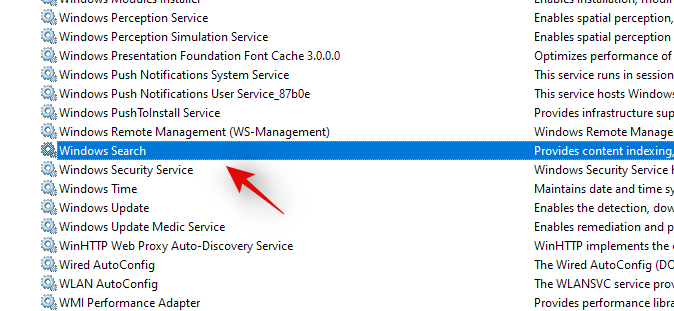
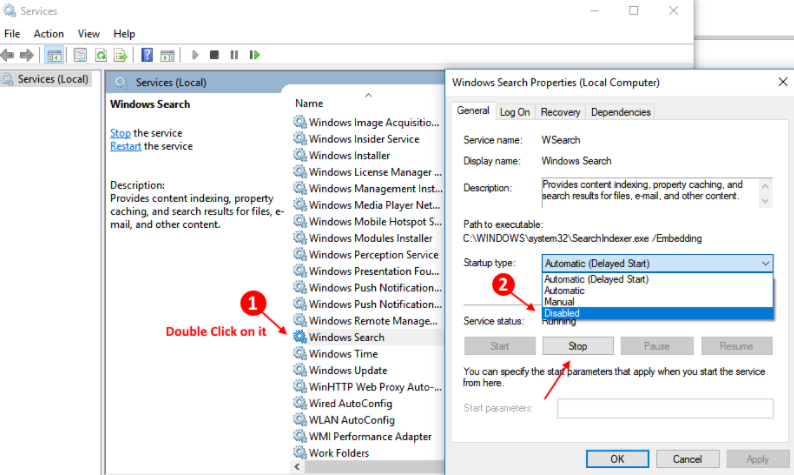
Чтобы окончательно выключить службу индексирования, нажмите Windows + R, введите services.msc и нажмите Enter. В открывшемся окне «Службы» найдите Windows Search и дважды щёлкните на неё. В разделе «Тип запуска» выберите «Отключено» и «Остановить», чтобы прервать работу службы. Нажмите «ОК», для сохрания изменений.
Через несколько секунд после отключения Windows Search производительность Windows 10 должна значительно улучшиться.
Отключите Windows Update
Обновление Windows тоже загружает диск на полную. Обычно это происходит при проблеме с загрузкой патчей. У вас есть несколько вариантов:
- Просто оставьте компьютер обновляться. Подождите, пока все файлы обновлений будут загружены, затем перезапустите Windows и позвольте ей установить их. Это может занять много времени.
- Перезапустите компьютер и дождитесь, пока Windows Update решит проблему.
- Отключите обновления Windows 10, чтобы убедиться, что именно Windows Update загружает диск на 100%.
Если после обновления диск всё ещё перегружен, попробуйте следующие способы.
Отключите телеметрию Windows
Отключить телеметрию можно не только для экономии системных ресурсов, но и для увеличения вашей приватности. Нажмите Windows + R и введите regedit, чтобы открыть «Редактор реестра». В реестре откройте HKEY_LOCAL_MACHINE/SOFTWARE/Policies/Microsoft/Windows/DataCollection.
Щёлкните на пункт DataCollection правой кнопкой и создайте новое значение DWORD (32-bit). Назовите его Allow Telemetry. Затем дважды щёлкните по нему и установите значение 0. Перезагрузите Windows.
Отключите диагностику
Ещё одна распространённая причина высокой загрузки диска — служба диагностики Windows 10. Вы можете отключить её.
Откройте командную строку с правами администратора и выполните:
sc config “DiagTrack” start= disabled
sc stop “DiagTrack”
Кроме того, вы также можете открыть «Параметры» → «Система» → «Уведомления и действия» и отключить функцию «Получить советы, рекомендации и предложения при использовании Windows». Это тоже может снизить нагрузку на диск.
Виртуальная память

Windows записывает в виртуальную память часть данных из RAM, чтобы уменьшить расход оперативной памяти. Разрастание файла виртуальной памяти также увеличивает нагрузку на диск.
Откройте «Панель управления» → «Параметры системы» и выберите «Расширенные системные параметры». В появившемся окне выберите вкладку «Дополнительно». Затем в разделе «Производительность» нажмите «Настройки».
Здесь вы найдёте другую вкладку «Дополнительно», в которой есть раздел с надписью «Виртуальная память». Нажмите «Изменить» и снимите флажок «Автоматически управлять размером файла подкачки для всех дисков».
Выберите свой диск Windows (C:) и укажите «Пользовательский размер». Лучше всего ввести значение в 1,5 раза больше вашей оперативной памяти. Затем нажмите «Установить» и «ОК».
Теперь вам нужно очистить временные файлы в виртуальной памяти. Нажмите Windows + R и введите temp. Когда откроется каталог temp, выберите все файлы (Ctrl + A) и удалите их.
Отключите SuperFetch
Служба SuperFetch в Windows 10 должна повышать производительность системы, оптимизируя запуск наиболее часто используемых вами приложений. На практике же она может провоцировать высокую нагрузку на диск.
Вы можете её отключить и посмотреть, как это повлияет на загрузку диска. Откройте командную строку и введите:
net.exe stop superfetch
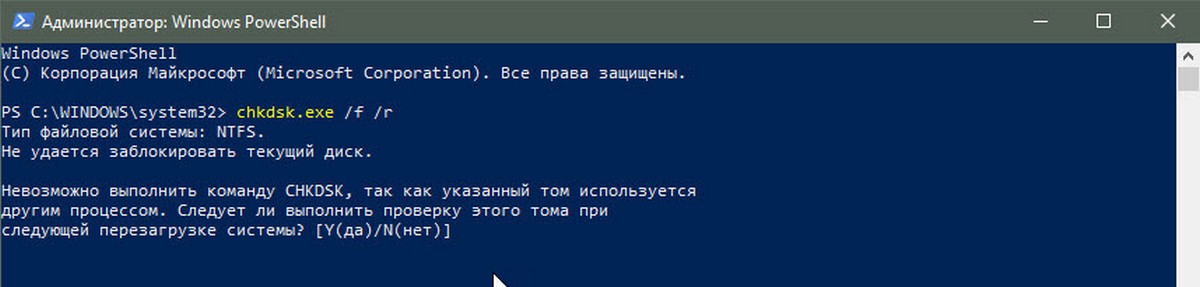
Подождите несколько секунд, чтобы проверить, улучшилась ли производительность вашего диска. Затем запустите его проверку командой:
chkdsk.exe / f / r
Для завершения проверки диска ваш компьютер должен быть перезагружен.
Проблема с PCI-Express
100-процентная загрузка диска может быть связана и с некорректной работой драйвера PCI-Express. Откройте «Диспетчер устройств» и разверните список «Контроллеры IDE ATA / ATAPI». Дважды щёлкните на контроллер AHCI, откройте вкладку «Драйвер» и выберите «Сведения о драйвере».
Если путь к драйверу имеет вид C:/Windows/system32/DRIVERS/storahci.sys, значит, проблема может быть в нём.
Откройте вкладку «Сведения» и выберите «Путь экземпляра устройства» в раскрывающемся меню. Щёлкните правой кнопкой мыши и выберите «Копировать». Скопируйте путь к устройству, например, в «Блокнот».
Затем нажмите Windows + R и введите regedit. В «Редакторе реестра» отыщите адрес HKEY_LOCAL_MACHINE/System/CurrentControlSet/Enum/PCI/ваш_путь_экземпляра_устройства. В нём разверните Device Parameters/Interrupt Management/MessageSignaledInterruptProperties.
Вы увидите параметр MSISupported в правой панели. Дважды щёлкните и задайте ему значение 0. Нажмите «ОК» для подтверждения и перезапустите Windows.
Учтите, что перед внесением изменений в реестр неплохо бы сделать его копию.
Высокая производительность

Последняя попытка. Попробуйте изменить настройки питания Windows 10. При стандартном режиме питания диск часто бывает загруженным на 100%. Переход в режим высокой производительности может решить эту проблему. При этом ваш компьютер будет использовать больше энергии, отчего может снизиться время работы ноутбука от батареи.
Нажмите Windows + X, и откройте «Дополнительные параметры питания». Выберите «Высокая производительность». Через пару минут нагрузка на диск должна уменьшиться.
Надеемся, что одна из этих рекомендаций вам поможет. Если знаете другие способы решения проблемы, делитесь в комментариях.
Windows search can be a huge time-saver for people who use their computer for work and also need to conduct quick searches for information. However, Windows search can also be a huge time-saver for people who use their computer for their personal use. For example, if you need to find a file that you know is on your computer, but you don’t know where it is, you can use Windows search to quickly find it.
How to Disable Web Results in Windows 10 Search
How to stop NET.EXE process in Windows
Net exe stop is the command which can be used to stop the process of a Net exe file. You can use this command to stop the process of a .exe file on your computer. This command allows you to stop the process of a .exe file without affecting the file’s contents or the computer’s state.
What is the NET.EXE process in Windows
Windows searches for executables (.exe) in certain locations. The most common executables that Windows looks for are those that come bundled with Windows. Windows also looks for executables that are installed on your computer.
You can use the net exe stop command to stop a specific search in Windows. For example, if you want to stop Windows from looking for executables that are installed on your computer, you can use the net exe stop “Windows Search” command.
If you want to stop Windows from looking for executables that are bundled with Windows, you can use the net exe stop “System” command.
If you want to stop Windows from looking for executables that are installed on your computer, you can use the net exe stop “Local Files” command.
How to fix high CPU usage by NET.EXE process in Windows
If you are seeing high CPU usage by the NET EXE process, there is a good chance that this is causing problems with your Windows system.
The NET EXE process is responsible for running certain common Windows tasks, such as search and file management. If this process is using a lot of CPU resources, it can cause your system to slow down noticeably.
There are a few things you can do to try to fix this problem. First, try to reduce the amount of work the NET EXE process is doing. This can be done by disabling certain features or services, or by changing the settings for the application.
If that doesn’t resolve the issue, you may need to disable the NET EXE process altogether. This can be done by using a program like Task Manager, which can be found in the Start menu. Once the process is disabled, you can re-enable it if necessary.
Whatever solution you choose, make sure to check back periodically to see if it has had any effect on the CPU usage. If the issue persists, you may need to contact your system administrator for further assistance.
How to disable Windows Search
Windows search is a feature of Windows that helps you find files and folders. Unfortunately, it can also be a source of problems. Windows search can index your entire computer, and it can index files that you don’t want it to.
To disable Windows search, follow these steps:
1. Open the Control Panel.
2. Click the System and Security button.
3. Click the Search tab.
4. Click the Change button.
5. In the Change Search Settings dialog box, click the Remove option.
6. Click the OK button.
7. Click the OK button in the System and Security dialog box.
8. Close the Control Panel.
How to re
First and foremost, always remember to back up your data before performing any maintenance!
1. Open Windows Search, and in the search box, type “net exe stop windows search.”
2. Click the search result that says “Stop windows search.”
3. Click the “Start” button.
4. In the “Advanced Options” window, click the “Restart” button.
5. In the “Restart Options” window, click the “Troubleshooting” tab.
6. Click the “Command Prompt” button.
7. Type “net stop windows search” and press the Enter key.
8. Type “net start windows search” and press the Enter key.
9. Restart your computer.
enable Windows Search
Windows search is a powerful tool that lets you quickly find files and information on your computer. If you’re not using it, you can disable it in the Control Panel.
To disable Windows search:
1. In the Search box, type “Windows search.”
2. In the Windows search results, click the “Disable” button.
3. Click “OK.”
Now you’ll need to restart your computer to make the change take effect.
Conclusion
When troubleshooting a Windows Search issue, it can be helpful to use the net exe stop command to temporarily stop the service.
Если ваш компьютер под управлением Windows 10 работает медленно, и вы обнаружите, что жесткий диск работает на уровне около 100%, выполните следующие действия, чтобы устранить данную проблему.
Иногда ваша система Windows 10 будет работать медленно, несмотря на то у вас мощный процессор, много оперативной памяти и всего лишь несколько приложений. Многие факторы могут вызвать медленную работу ПК, один из них заключается в том, что жесткий диск работает на уровне около 100%. Он не имеет запасных циклов для выполнения обычных задач ОС. В результате все замедляется. Простая перезагрузка, которая часто решает многие проблемы с ОС, не исправит загрузку диска. Существует рад моментов, которые вы можете сделать, чтобы исправить проблему 100% использования диска в Windows 10.
Устранение загрузки диска 100% в Windows 10.
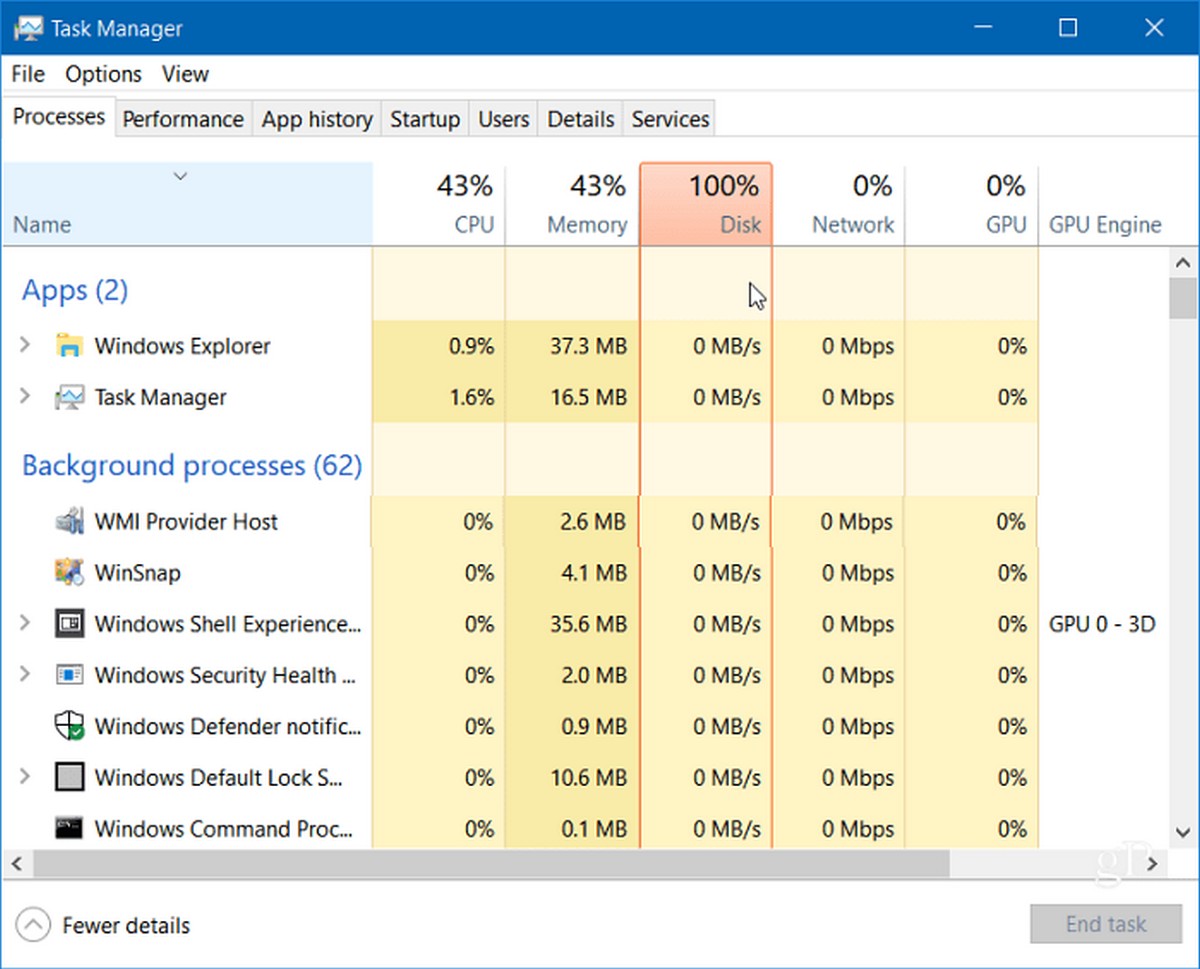
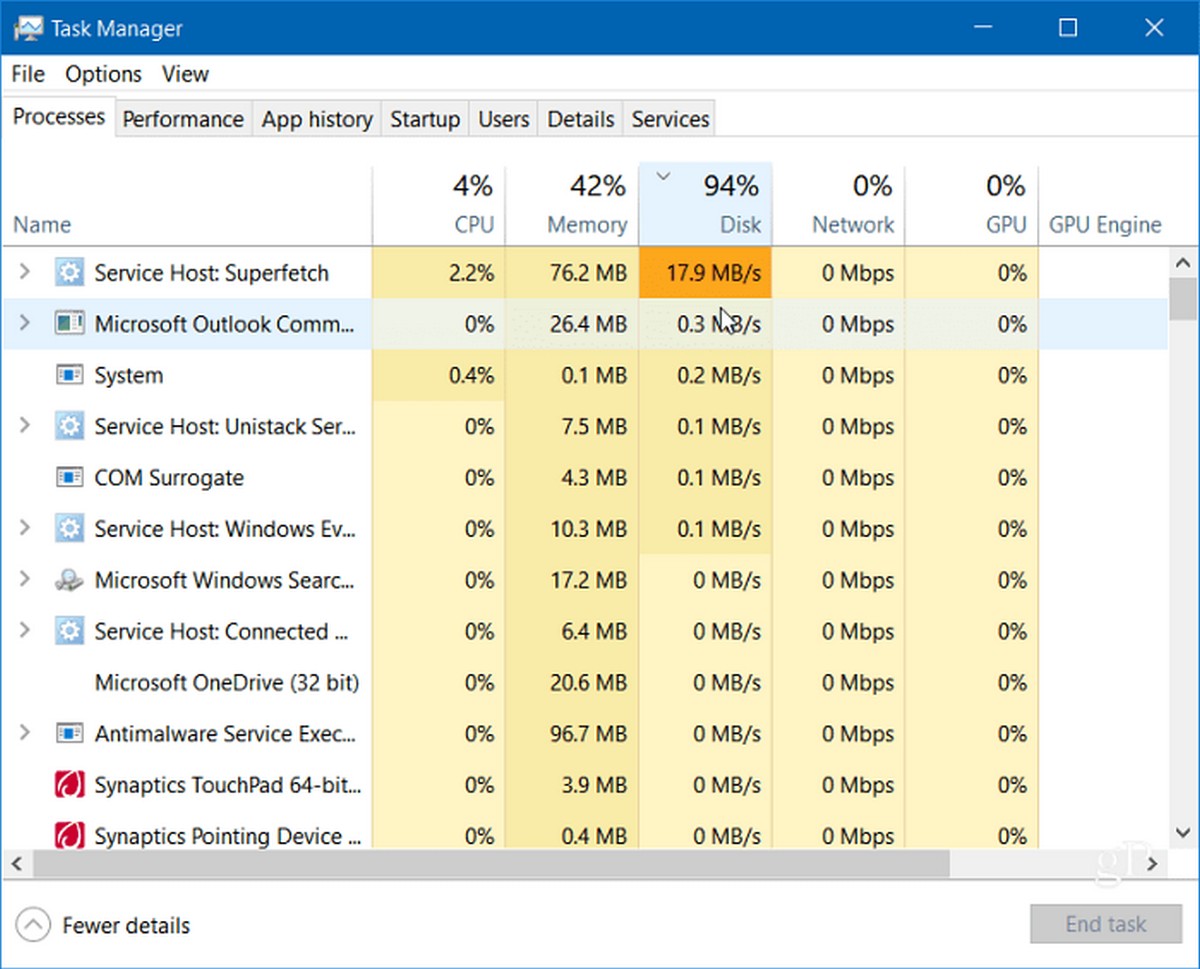
Когда вы пытаетесь выяснить, почему компьютер тормозит, вы могли заметить, что использование Диска в диспетчере задач составляет 100%.
Один из самых простых способов найти виновника — кликнуть столбец Диск в диспетчере задач, чтобы элементы, которые потребляют больше ресурсов, отображались в верху столбца. Как и в примере, показанном ниже, вы можете видеть, что виновником является SuperFetch.
Отключить Windows Search.
Функция поиска Windows всегда индексирует все файлы на вашем диске и предназначена для ускорения поиска файлов на вашем ПК. Однако это может вызвать проблему, когда диск перегружен работой и не имеет ресурсов для выполнения других задач.
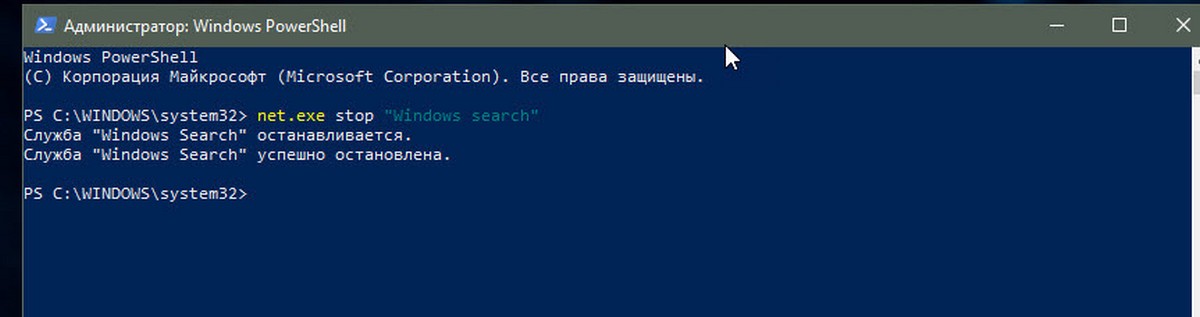
Нажмите правой кнопкой мыши меню Пуск и выберите Windows PowerShell (администратор).
Затем в командной строке введите: net.exe stop «Windows search» и нажмите Enter. После этого проверьте диспетчер задач, чтобы посмотреть, как это повлияло на использование вашего диска. Если изменений нет, вы можете перезапустить службу поиска из командной строки, введите: net.exe start «Windows search» и нажмите Enter.
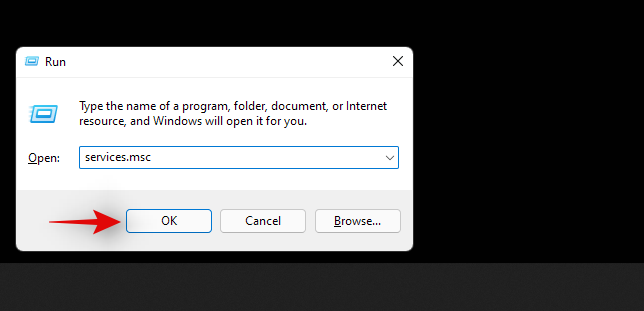
Отключив поиск Windows временно, вы можете увидеть, улучшится ли производительность. Если это устраняет проблему, вы можете отключить ее навсегда. Нажмите комбинацию клавиш Win + R и введите: services.msc и нажмите «ОК» или Enter.
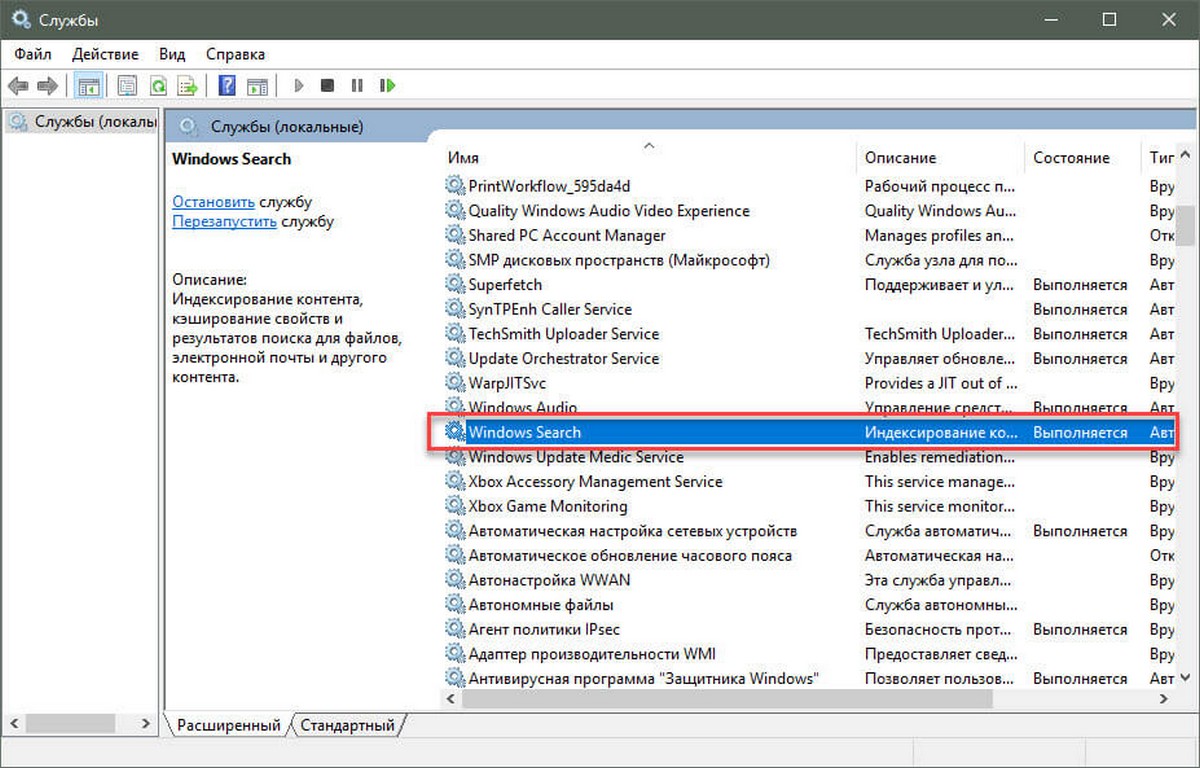
Прокрутите список служб и дважды кликните службу «Windows Search», а на вкладке «Общие» установите для параметра «Тип запуска» значение «Отключено» и нажмите кнопку «ОК».
Запустите проверку диска.
В Windows есть встроенный инструмент, который сканирует ваш диск на наличие ошибок и пытается их исправить. Откройте PowerShell в качестве администратора и введите: chkdsk.exe /f /r и нажмите Enter. Затем в следующем приглашении введите: Y и нажмите Enter.
Отключите функцию SuperFetch.
SuperFetch — это функция, которая помогает уменьшить время загрузки, повышая эффективность приложений. Однако она может вызвать проблемы с вашим диском. Чтобы отключить его, запустите PowerShell от имени администратора и введите: net.exe stop superfetch и нажмите Enter. Дождитесь выполнения команды и посмотрите, уменьшился ли процент использования диска в диспетчере задач.
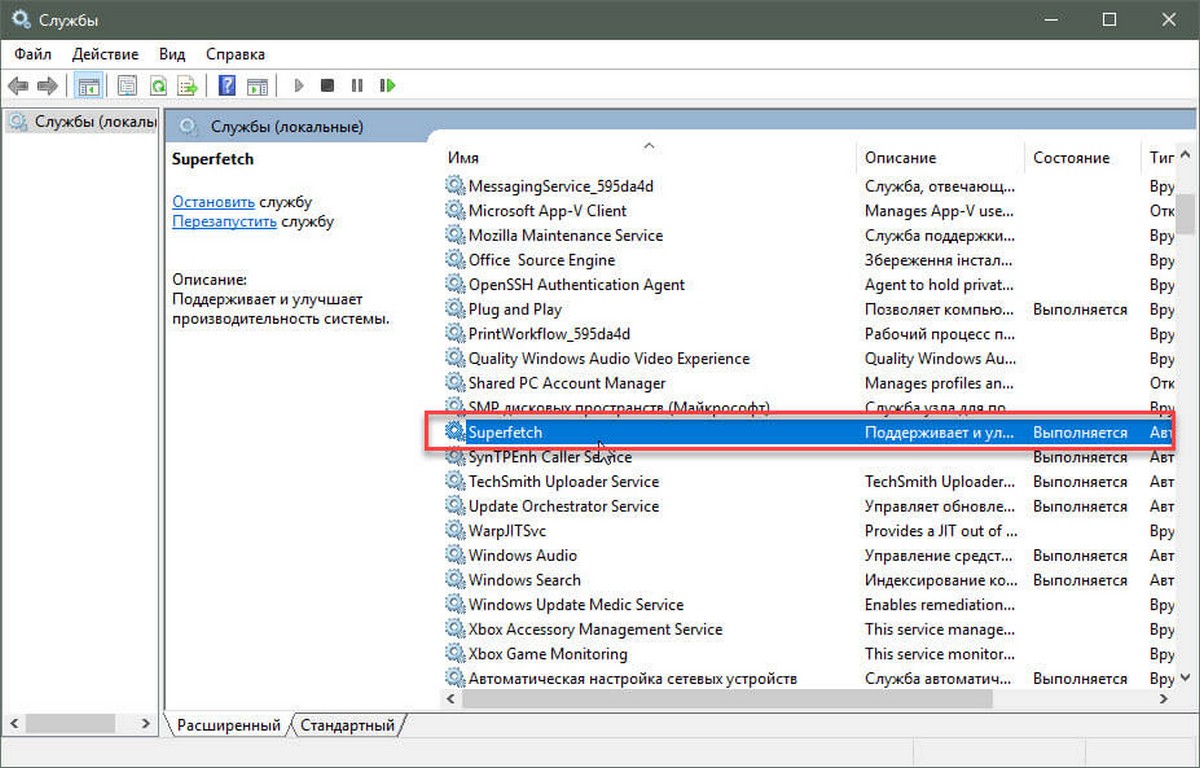
Если это исправило ситуацию, вы можете навсегда отключить его, как и в случае с Window Search (показано выше), отключив службу SuperFetch.
Нажмите комбинацию клавиш Win + R и введите: services.msc и нажмите «ОК» или Enter.
Прокрутите список служб и дважды кликните службу «SuperFetch», а на вкладке «Общие» установите для параметра «Тип запуска» значение «Отключено» и нажмите кнопку «ОК».
Отключите Windows Performance Recorder.
Выполните следующую команду, чтобы решить эту проблему с загрузкой жесткого диска.
WPR -cancel

Что Делает Команда WPR -cancel?
WPR относится к Windows Performance Recorder. Это инструмент Windows, который записывает, насколько хорошо ваша система работает. Инструмент записи системных событий увеличивает обращение к вашему диску благодаря чему иногда загрузка превышает 90%. Команда WPR -cancel остановит текущий сеанс записи инструмента. Данные не будут сохранены. Как правило, они сохраняется на диск, и вы позже можете смотреть их.
Каждый раз при загрузке системы Windows 10 инструмент работает в фоновом режиме, поэтому вам нужно будет выполнить эту команду каждый раз при загрузке системы. После применения исправления, мое использование дискового пространства понизилось с 92% до 10%.
Вполне возможно, что использование диска является подлинной или что она была вызвана чем-то другим. Если после выполнения этой команды, вы получите сообщение » There are no trace profiles running.Error code: 0xc5583000 «, это означает, что инструмент Windows Performance Recorder не работает, и не является причиной этой проблемы.
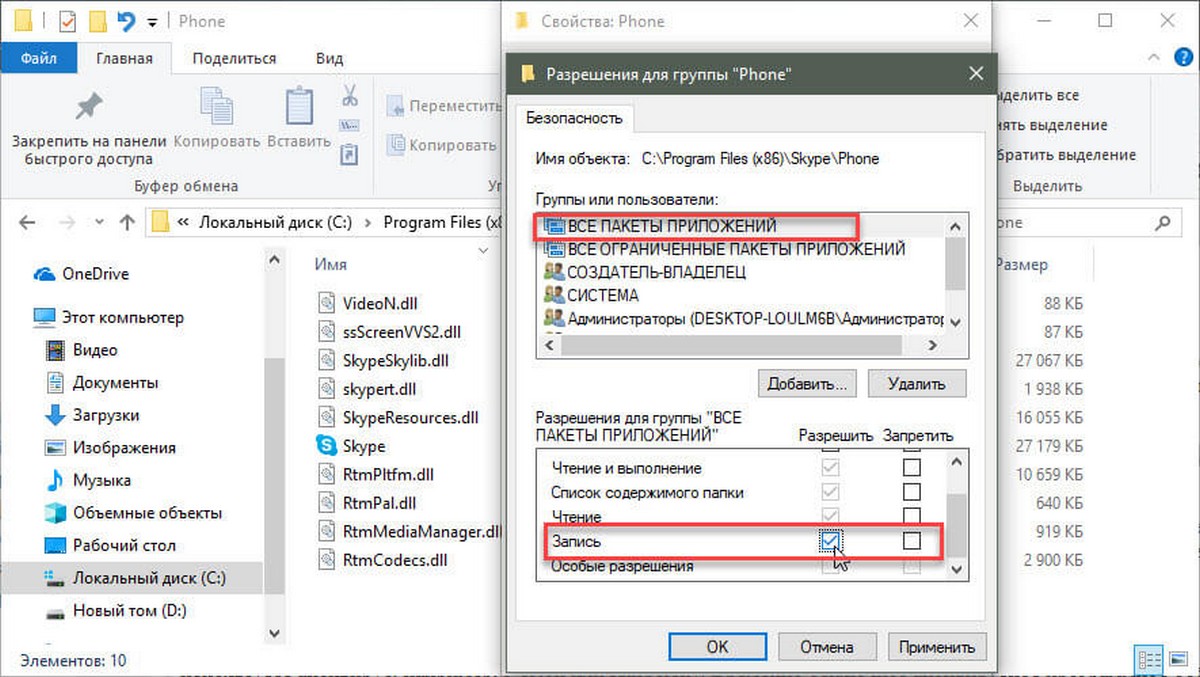
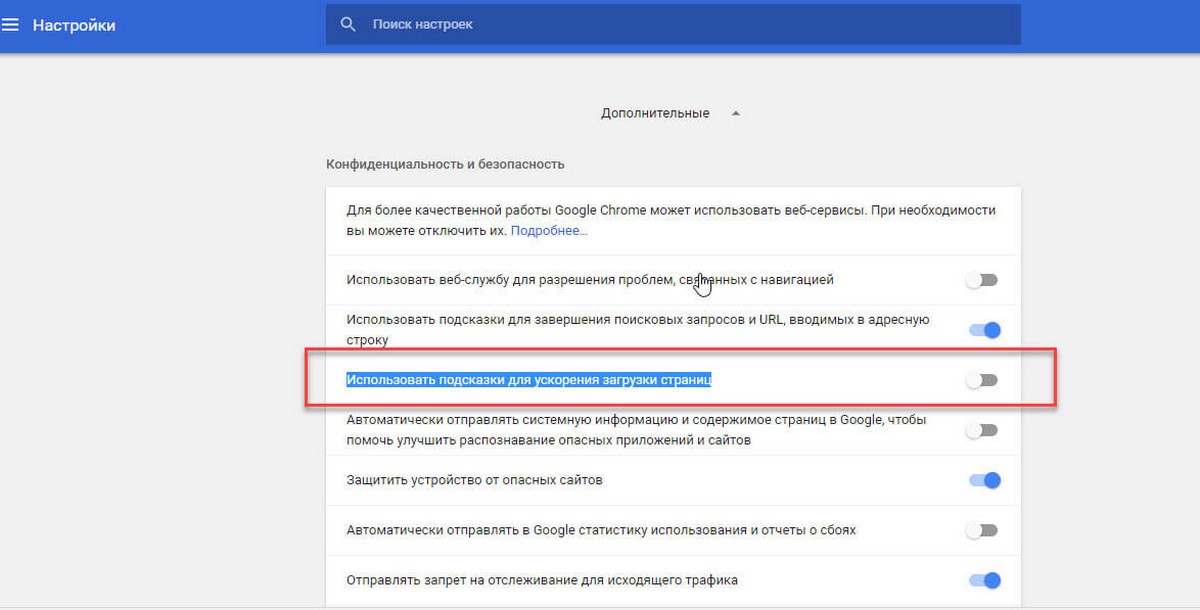
Chrome или Skype.
Пара других программ, которые часто вызывают 100% загрузку диска, — это Skype и Chrome. Если вы обнаружите, что Skype вызывает проблему, полностью закройте его. Затем перейдите в папку C:\Program Files (x86)\Skype\Phone и кликните правой кнопкой мыши по файлу Skype.exe и выберите «Свойства».
Перейдите на вкладку «Безопасность» и нажмите кнопку «Изменить». Убедитесь, что выделены Все пакеты приложений и установите флажок Разрешить запись и нажмите «ОК».
Для Chrome наиболее распространенной проблемой является использование слишком большого количества ресурсов из за службы прогнозирования используемой для более быстрой загрузки страниц. Чтобы отключить его, перейдите в раздел «Дополнительные настройки» и в разделе «Конфиденциальность и безопасность» отключите «Использовать подсказки для ускорения загрузки страниц» и перезапустите браузер.
Обычно один из вышеперечисленных вариантов поможет вам исправить перегруженный жесткий диск, но не всегда. Если вы используете антивирус, например, Norton или Kaspersky. Временно отключите антивирусное программное обеспечение, чтобы убедиться, что оно не влияет на загрузку диска. Если это так, обратитесь в службу поддержки компании. Кроме того, убедитесь, что все драйверы устройств обновлены, также проверьте — виртуальную память. Если вы вносили в нее изменения в прошлом, верните настройки по умолчанию.
Если Вы столкнулись с этой проблемой на своем ПК с ОС Windows? Сообщите нам шаги, которые вы предприняли, чтобы исправить это.
Windows Search has been a much welcome addition for many users. It allows you to find programs, files, folders, and other items on your PC with a simple search term. However, having search active indexes all your files regularly, that can result in more power consumption and higher resource usage which wouldn’t be ideal for users with lower-end PCs.
If you are in the same boat and would like to get rid of Windows Search, then here is all you need to know about it. Let’s get started.
Disabling Windows Search can help you in many ways. Here are some common reasons why most users disable Windows Search.
- Unused feature
- Reclaim resources
- Reclaim drive space
- Reduce power consumption
- Increase privacy by disabling cloud and local indexing
- Reduced background tasks and processes
And more. Disabling Windows Search is especially helpful on lower-end PCs that are struggling with various features of Windows 11. Disabling Search will help reduce your system workload which should in turn make your PC feel snappier.
Related: How to Search in Windows 11
Should you disable Windows Search?
No, unless your system is extremely low on resources, there is no point in disabling Windows Search. Windows Search is the most efficient search utility for Windows 11. Most third-party and open source alternatives take longer to index files and consume more resources when compared to Windows Search. Hence you already have the most efficient utility on your system.
So there is no point disabling Search unless you are extremely low on resources. Additionally, we recommend lowering indexing locations for Windows Search to reclaim your resources as this will limit resource usage and power consumption of Windows Search efficiently. If you would still like to disable Search in Windows 11 then you can use the following methods.
How to disable Windows Search on Windows 11
You can either disable Windows Search temporarily or permanently depending on your preferences. If you are looking to test out a feature or install a program that is interfering with Windows Search then you can temporarily disable it until your task is done.
However, if you do not wish to use Windows Search altogether, then you can use the permanent ways of disabling it listed below. Let’s get started.
Case #1: How to Disable Search Temporarily
You can temporarily disable Windows Search on your Windows 11 PC by either stopping the search service in the background or by using CMD. Use one of the methods below that best fits your current needs and requirements.
Method #01: Using Services
Disable Windows Search
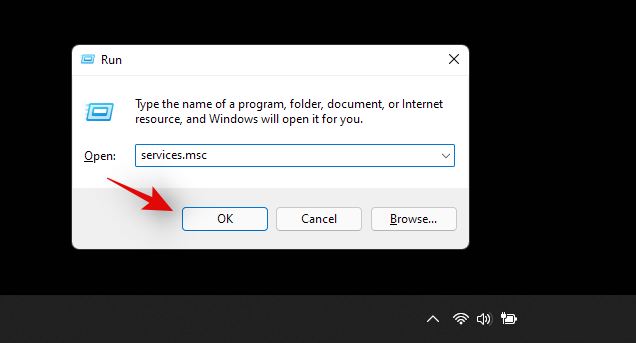
Press Windows + R on your keyboard, type in the following command and press Enter on your keyboard.
services.msc
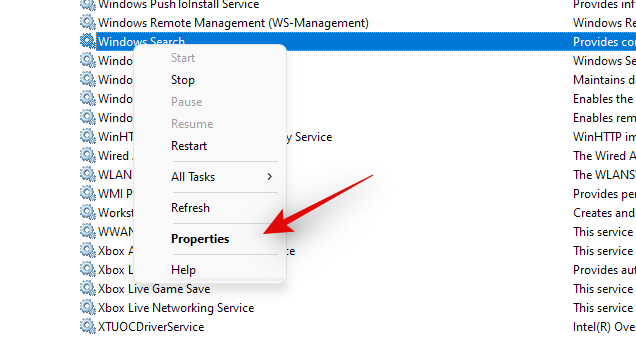
Once the services dialog box launches, identify ‘Windows Search’ in the list and right-click on it.
Select ‘Properties’.

Now click on ‘Stop’.
Click on the drop-down menu and select ‘Manual’.
Click on ‘Ok’ to save your changes.
The Windows Search service will now be stopped and automatic restart for it should now be disabled. Windows Seach should no longer work on your PC and you can now do the necessary task on your PC. Use the guide below to re-enable Windows Search once you are done.
Enable Windows Search
Press Windows + R on your keyboard and type in the following. Click on ‘Ok’ or press Enter on your keyboard once you are done.
services.msc
Right-click on ‘Windows Search’.
Select ‘Properties’.
Click on the drop-down menu and select ‘Automatic (delayed)’.
Now click on ‘Start’.
Click on ‘Ok’ to save your changes.
And that’s it! Windows Search should now be re-enabled on your PC.
Method #02: Using CMD
You can also disable and re-enable Windows Search using CMD on your PC. Follow the steps below to guide you through the process.
Disable Windows Search
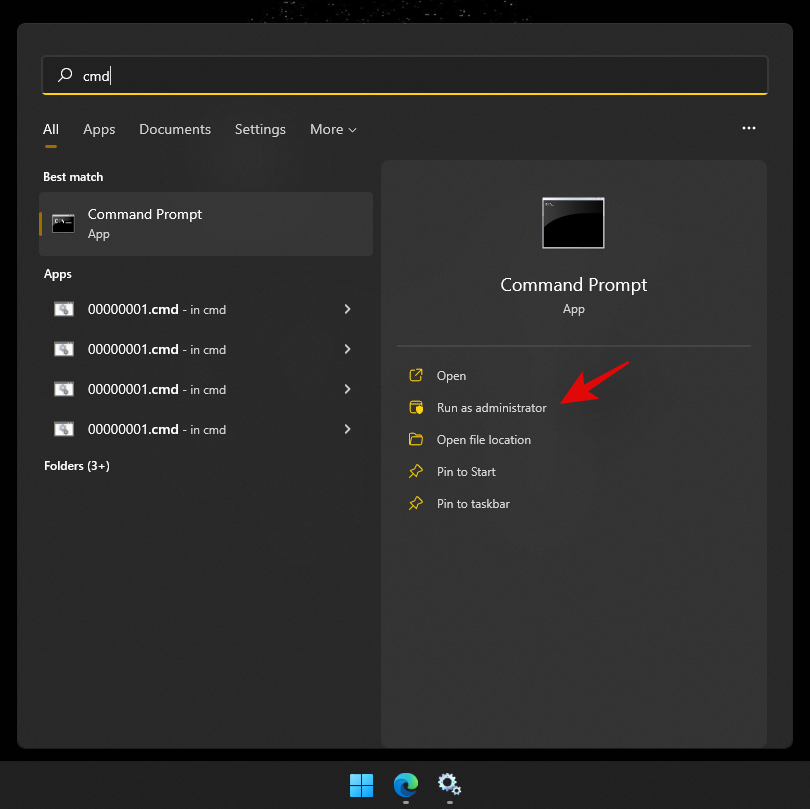
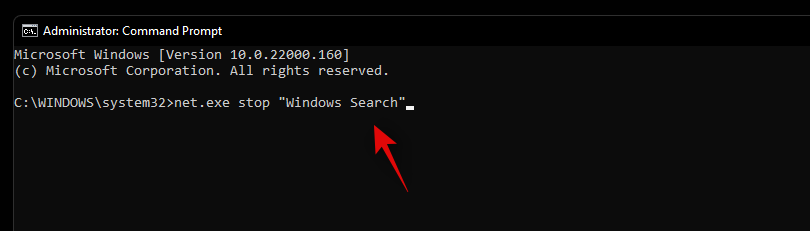
Press Windows + S on your keyboard and search for CMD. Click on ‘Run as administrator’ once it shows up in your search results.
Type in the following command to stop the Windows Search service. Press Enter on your keyboard once you are done.
REG UPDATE HKLM\SYSTEM\CurrentControlSet\Services\WSearch\Start=3

Once done, execute the command below.
net.exe stop "Windows Search"
And that’s it! Windows Search should now be temporarily disabled on your system. Please keep in mind that the search service will be activated after a restart as soon as you try searching for something. However, we recommend you re-enable it on your system using the guide below instead to avoid any background or startup conflicts.
Re-enable Windows Search
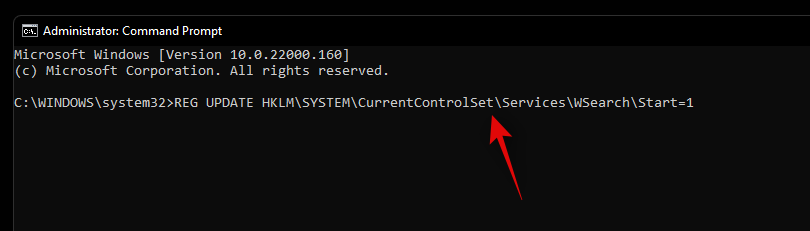
Press Windows + S on your PC and search for CMD. Click on ‘Run as administrator’.
Now type in the following command and press Enter on your keyboard.
REG UPDATE HKLM\SYSTEM\CurrentControlSet\Services\WSearch\Start=1
Now enter the following command and press Enter again.
net.exe start "Windows Search"
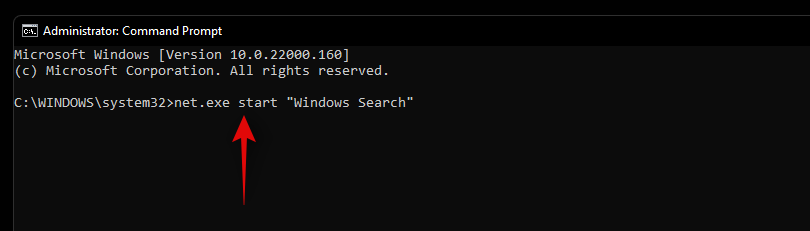
Windows Search should now be re-enabled on your PC. We recommend you restart your system for good measure to enable Search properly.
Case #2: How to Disable Search Permanently
If you are looking to disable search permanently, then there is no one sure shot way to do so. Instead, you will need to disable various aspects of Windows Search to ensure that it is not working and indexing files in the background. This includes disabling its service, scheduled tasks, renaming the folder, and editing the Registry. Another way to permanently disable Windows Search is by using the Group Policy Editor. However, this is only available to users with Windows 11 Pro or higher. Hence you can use one of the guides below depending on your current edition of Windows 11 installed on your PC.
Disable services:
Let’s start by disabling the Windows Search service first. Follow the guide below to get you started.
Press Windows + R on your keyboard and type in the following to open the Services app. Click on ‘Ok’ once you are done.
services.msc
Now right-click on ‘Windows Search’ and select ‘Properties’.
Click on ‘Stop’.
Click on the drop-down menu and select ‘Disabled’.
Now click on ‘Ok’ to save your changes.
Windows Search should now be disabled on your system. Use the guide below to disable Windows Search tasks on your system.
Rename folder
We will now rename the folder for Windows Search which will prevent Windows from accessing the same path to launch Windows Search. This will break Windows Search functionality and should, in theory, help you disable Windows Search on your PC. Follow the guide below to get you started.
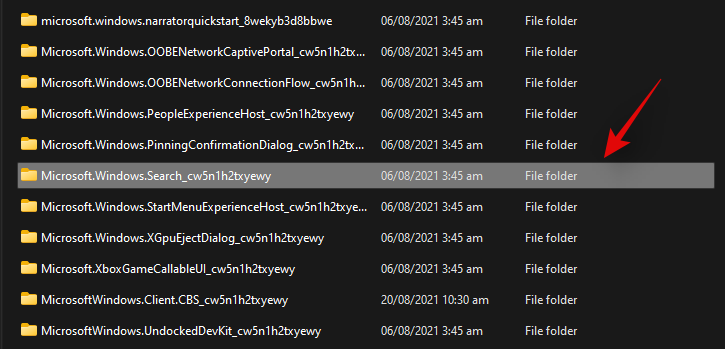
Press Windows + E on your keyboard and navigate to the following path. You can also copy-paste the same in your address bar.
C:\Windows\SystemApps\
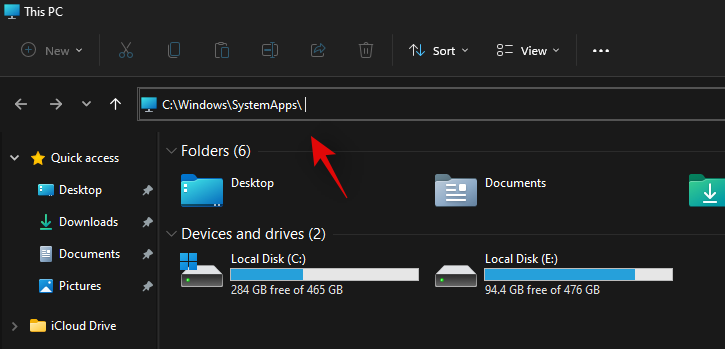
Find a folder named ‘Microsoft.Windows.Search_cw5n1h2txyewy’ and right-click on it.
Select ‘Show more options’.
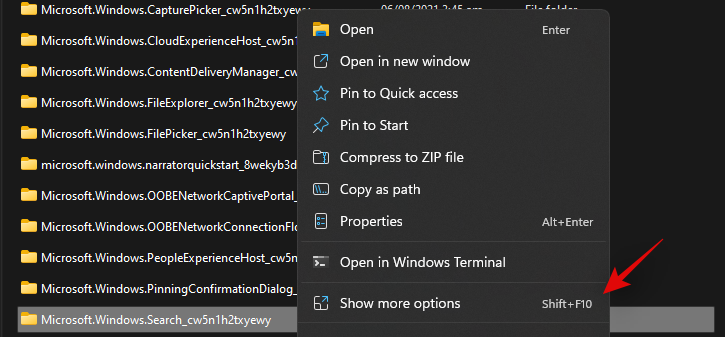
Click on ‘Rename’.
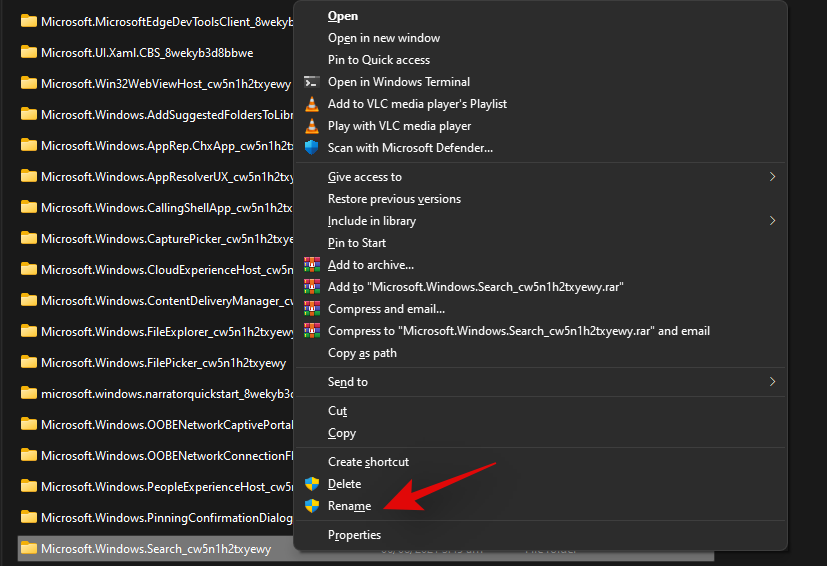
Now rename the file to the following. Just add ‘.back’ at the end of the file.
Microsoft.Windows.Search_cw5n1h2txyewy.back

Grant the necessary administrator permissions when requested. Double click and open the folder once done.

Right-click on ‘SearchApp.exe’ and click on ‘Show more options’.
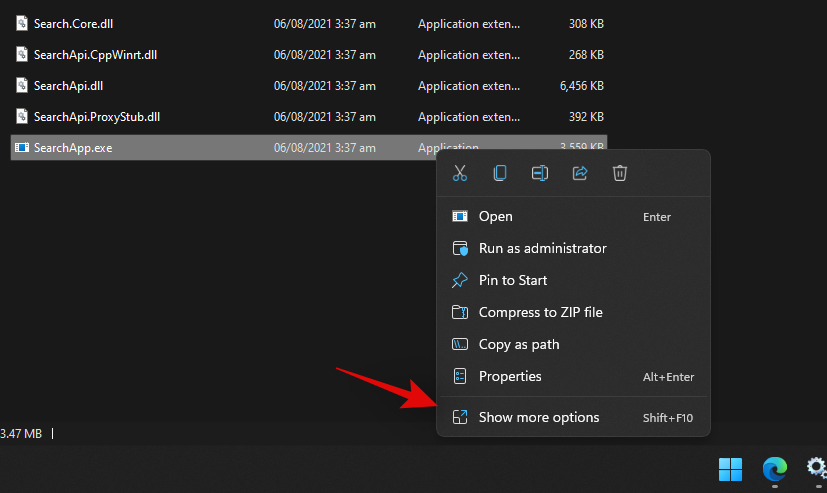
Select Rename.
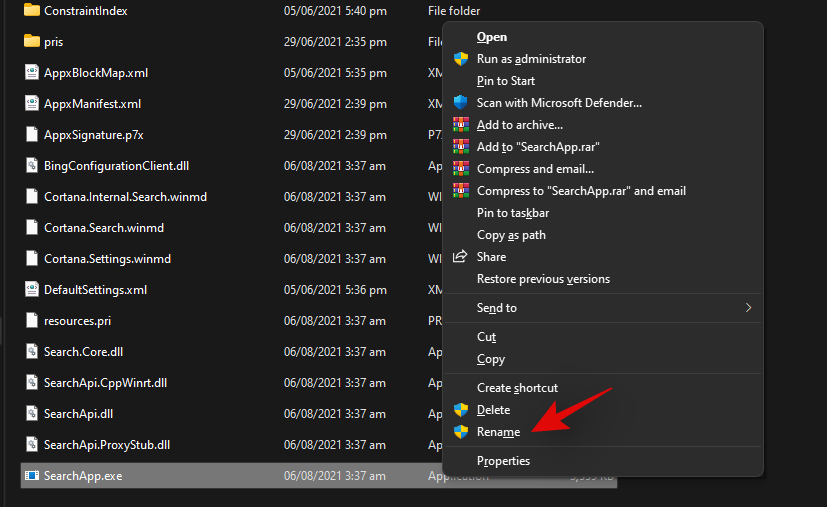
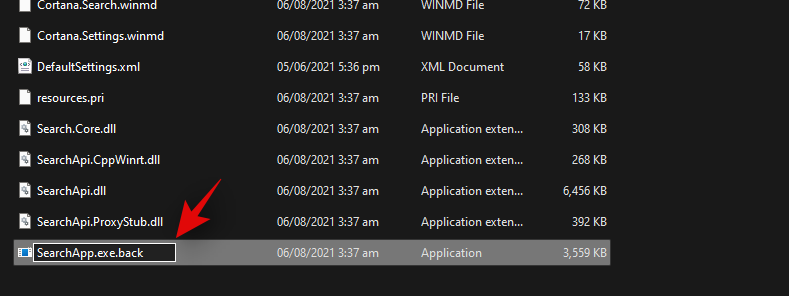
Enter the following name and press Enter on your keyboard.
SearchApp.exe.back
Now navigate to the following path. Right-click on ‘SearchHost.exe’ and select ‘Show more options’.
C:\Windows\SystemApps\MicrosoftWindows.Client.CBS_cw5n1h2txyewy
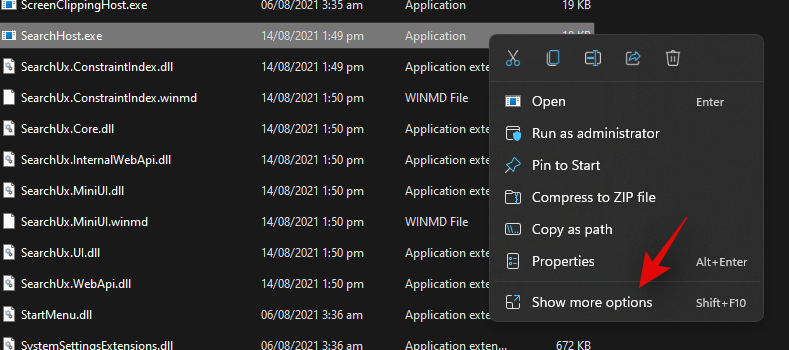
Rename the file to the following and press Enter on your keyboard.
SearchHost.exe.back

Grant the necessary permissions if prompted.

Close the File Explorer and restart your PC for good measure.
And that’s it! Renaming files and folders in conjunction with disabling the Windows Search service should help disable Windows Search on your system. Already indexed files will still be used to display search results on your PC in case you happen to use Search in the future. You can clear your indexed file cache in Windows 11 to disable this as well on your system.
How to disable web results in Windows Search
Windows Search can sometimes be annoying with its web results and it might be the reason why you are trying to disable Search on your PC. In such cases, you can selectively disable Web results in Windows Search using a registry change. Use the guide below to help you along with the process.
Press Windows + S on your keyboard and search for ‘regedit’. Click and launch the Registry Editor from your search results.
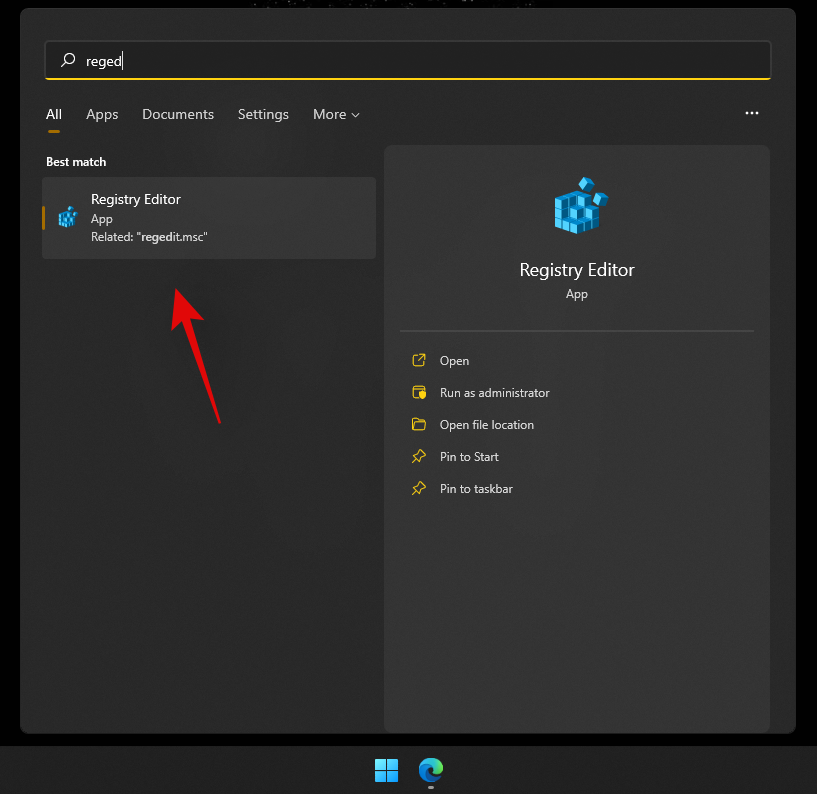
Navigate to the following path or copy-paste it in your address bar.
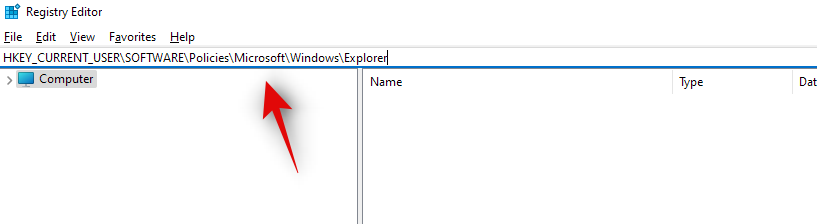
HKEY_CURRENT_USER\SOFTWARE\Policies\Microsoft\Windows\Explorer
Right-click on your right and select ‘New’.

Select ‘DWORD (32-bit) value’.

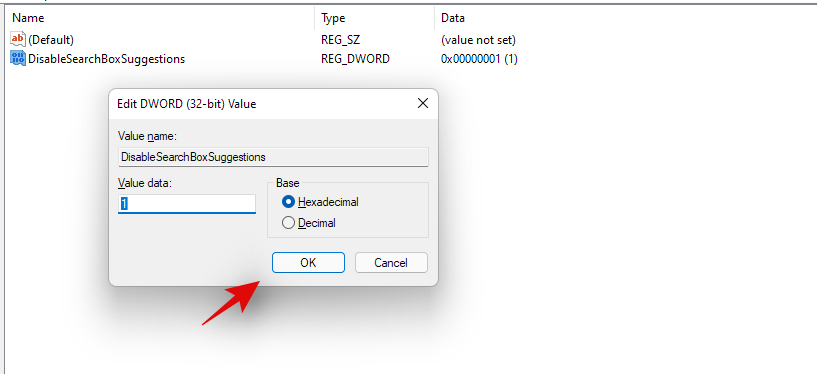
Name it the following and press Enter on your keyboard. Double click on it once done.
DisableSearchBoxSuggestions

Set the value data as ‘1’ and click on ‘Ok’.
Restart your PC for good measure.
And that’s it! Web results within Windows Search should now be disabled on your PC.
How to remove the search icon from your taskbar
This is a simple one and you can use the Windows Settings app to get rid of the Search icon. Follow the guide below to get you started.
Press Windows + i on your keyboard and click on ‘Personalization’ on your left.
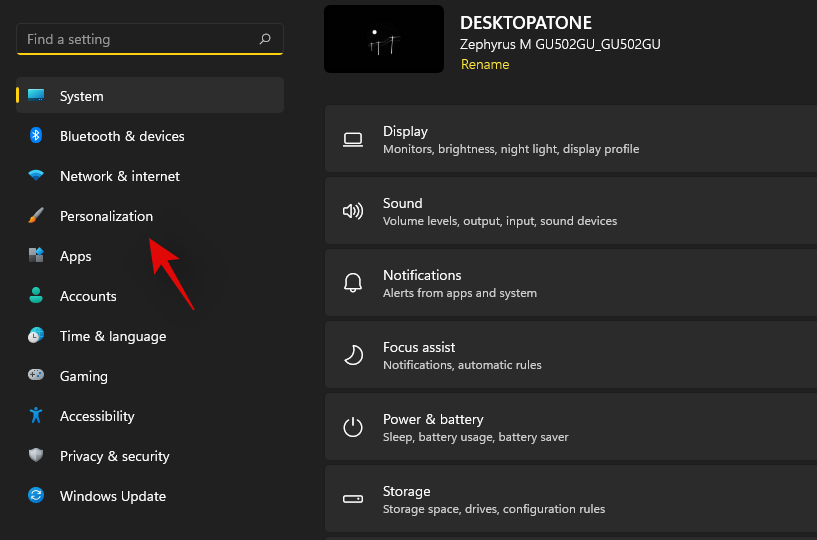
Now click on ‘Taskbar’.

Click and expand ‘Taskbar items’. Turn off the toggle for ‘Search’ as shown below.
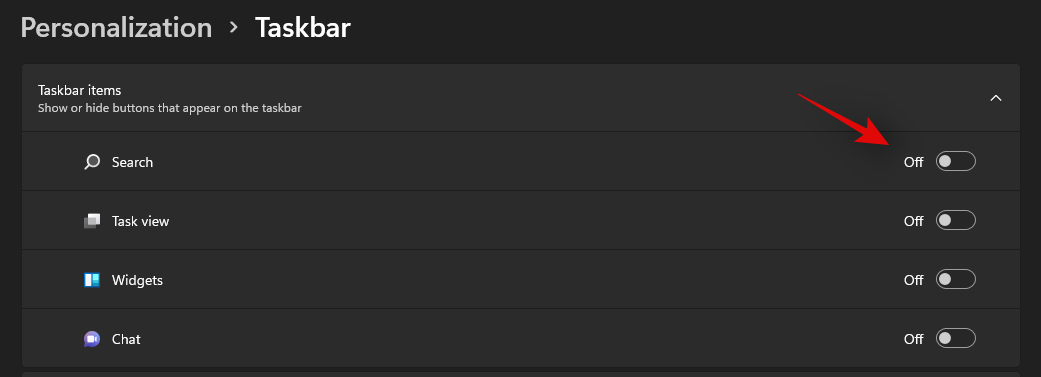
And that’s it! The Search icon should no longer be visible in your taskbar.
How to exclude a folder from indexing
Windows allows you to exclude a folder from being indexed easily. Use the guide below to help you out.
Press Windows + i on your keyboard and click on ‘Privacy & security’.
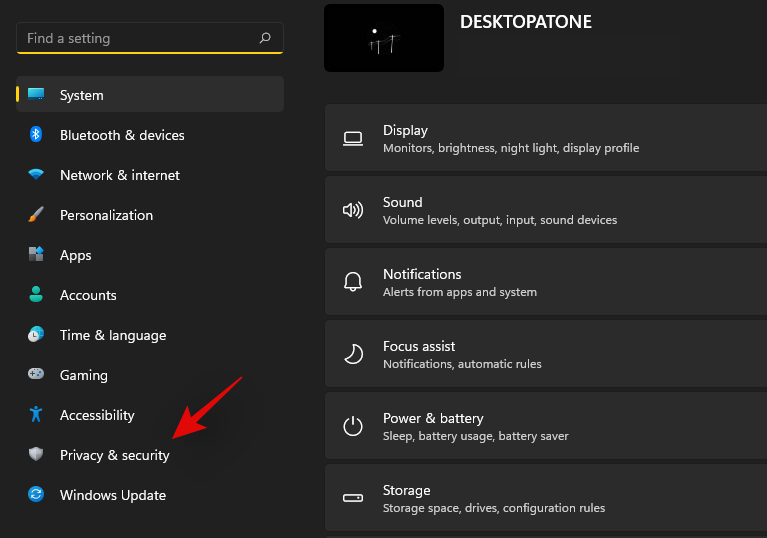
Now click on ‘Searching Windows’.

Click on ‘Add an excluded folder’.

Now browse to the desired folder and click and select it. Once selected, click on ‘Select folder’.
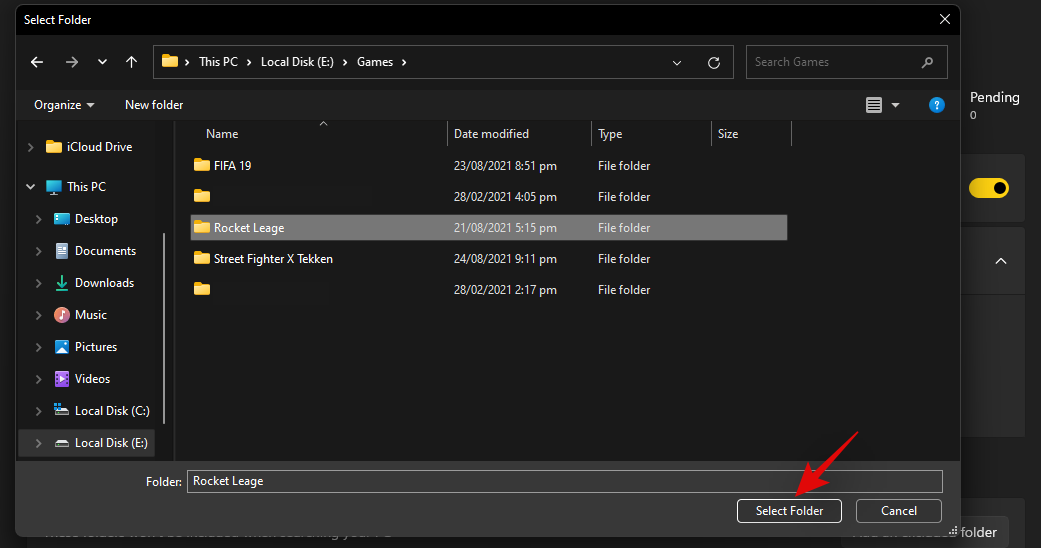
The selected folder will now be added to the exceptions list and its contents will no longer be indexed by Windows on your Pc.

How to allow Windows to index all your drives
You can easily allow Windows to index additional drives and partitions on your PC. Use the guide below to get you started.
Press Windows + i on your keyboard and click on ‘Privacy & security’ on your left.
Click on ‘Searching Windows’.
Now click on ‘Additional indexing options’ at the bottom of your screen.

Click on ‘Modify’.
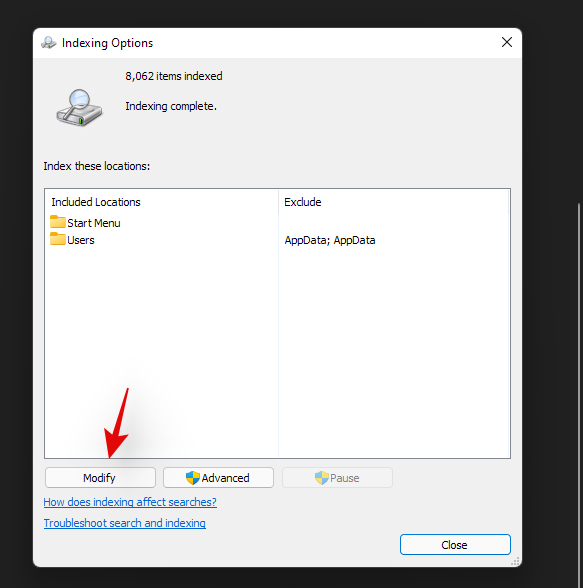
Check the boxes for all the drives and partitions you wish to be indexed.
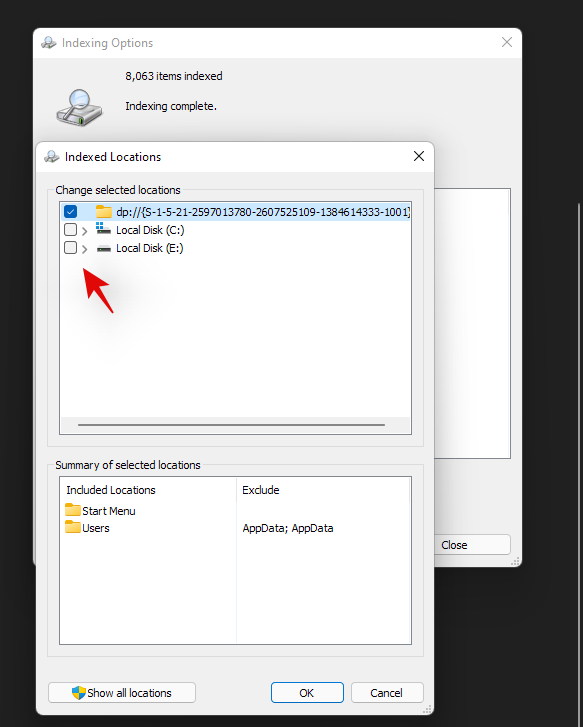
Click on ‘Ok’ once done.
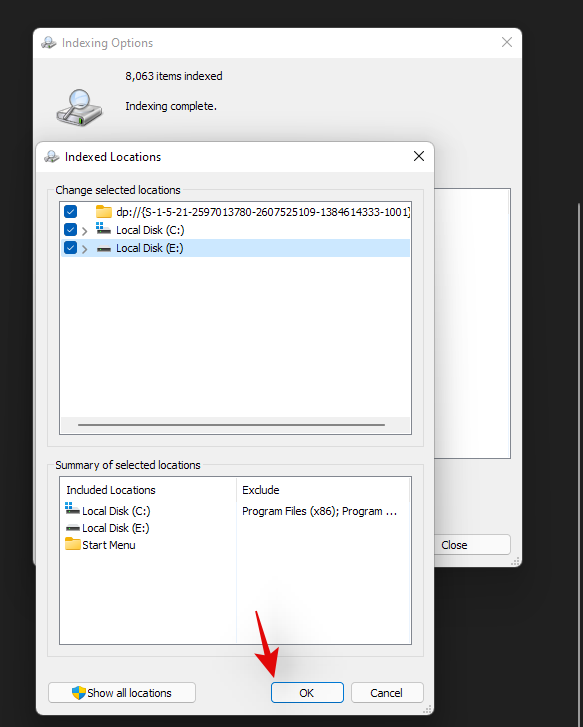
Click on ‘Close’.
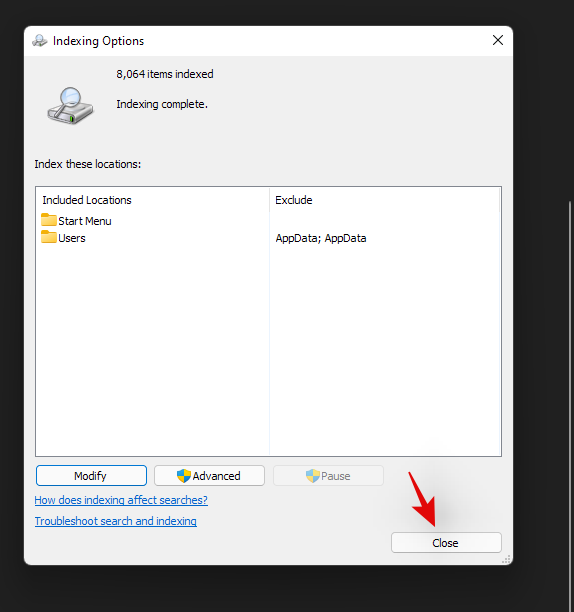
Windows will now index all the selected partitions and drives on your PC.
How to make Windows Search power-efficient (laptops only)
You can have Windows Search indexing respect your power plan which will prevent it from indexing files when on battery power. This will help reduce your overall power consumption which should result in increased battery life on your laptop. Use the guide below to get you started.
Press Windows + i on your keyboard and select ‘Privacy & security’ from the sidebar.
Click on ‘Searching Windows’.
Enable the toggle for ‘Respect power settings when indexing’.

And that’s it! Windows Search will now minimize or disable indexing based on your power plan when your laptop is running on battery power.
We hope this guide helped you get familiar with disabling Windows Search in Windows 11. If you face any issues or errors, feel free to reach out to us using the comments section below.
Related:
- How to Forget a Network on Windows 11
- How to Download and Install Official Windows 11 ISO
- How to Check Battery Health Windows 11
- How to Unblock Adobe Flash Player on Windows 11
Here in this article, we will tell you how to disable Windows search. If you disable Windows 10 Search, the search functionality will be disabled. Although Windows 10 Search will still work. Most of the times, this is done to improve the performance of Windows 10 as the Windows 10 search services eat up a lot of memory in the background. Let’s see how to disable it.
If you really don’t use Windows Search much, you can disable indexing completely by turning off the Windows Search service. If you’re thinking about disabling search because it’s slowing things down, we recommend checking which files and folders are getting indexed and see if that works for you. You should also note that other apps—notably Microsoft Outlook—use Windows Search to allow searching within those apps, so you’ll have to do a fast search in them as well.
Disable Windows search services it easy here we go -Hit Start, type “services,” and then click the result. On the right-hand side of the “Services” window, find the “Windows Search” entry and double-click it. In the “Startup type” drop-down menu, select the “Disabled” option. This will prevent Windows Search from loading the next time you start your computer.
Windows Search is an important tool when using your Windows PC. It works using your preferred indexing options to get what you need. The indexing process runs in the background, just as you write a table of contents for files placed on your computer. It does this so that when you go and type something in the search bar, it will know what you need.
While indexing speeds up the search process, it can take up a lot of system resources from your computer, so you may want to consider disabling Windows Search for this and probably other reasons. Continue reading to learn how to disable Windows Search in Windows. There are two types of disable like temporarily and permanently:
Disable windows search temporarily:
You can temporarily disable Windows Search on your Windows PC by either stopping the search service in the background or by using CMD. Use one of the methods below that best fits your current needs and requirements.
Open command prompt as administrator. To Open Command prompt as admin, search cmd in windows search and right click on the search result and click on run as administrator.
- Execute the command given below:
net.exe stop “Windows search”
This only disables it temporarily and it starts itself again as soon as windows reboot next time.
Disable Windows Search Using Services:
- Press Windows + R on your keyboard, type in the following command and press Enter on your keyboard.
- Once the services dialog box launches, identify ‘Windows Search’ in the list and right-click on it.
- Select ‘Properties’.
- Now click on ‘Stop’.
- Click on the drop-down menu and select ‘Manual’.
- Click on ‘Ok’ to save your changes.
- The Windows Search service will now be stopped and automatic restart for it should now be disabled.
Disable Windows Search Using CMD:
Press Windows + S on your keyboard and search for CMD. Click on ‘Run as administrator’ once it shows up in your search results.
Type in the following command to stop the Windows Search service. Press Enter on your keyboard once you are done.
REG UPDATE HKLM\SYSTEM\CurrentControlSet\Services\WSearch\Start=3
Once done, execute the command below.
net.exe stop “Windows Search”

And that’s it! Windows Search should now be temporarily disabled on your system.
Disable windows search permanently:
If you are looking to disable search permanently, then there is no one sure shot way to do so. Instead, you will need to disable various aspects of Windows Search to ensure that it is not working and indexing files in the background. This includes disabling its service, scheduled tasks, renaming the folder, and editing the Registry. Another way to permanently disable Windows Search is by using the Group Policy Editor. However, this is only available to users with Windows Pro or higher. Hence you can use one of the guides below depending on your current edition of Windows installed on your PC.
Steps to disable windows search permanently:
- Search services.msc in windows 10 taskbar search.
- Click on services.
- Now, find windows search entry from the list.
- Double click on it. Choose startup type as disabled from the dropdown.
- Click on stop. Finally press OK.
Here in this article, we “how to Disable Windows Search?” discussed about. If You Disable Windows 10 Search, Search the functionality will be disabled. We hope this guide has helped you get acquainted with disabling Windows Search in Windows.