
Уровень сложностиСредний
Время на прочтение10 мин
Количество просмотров6.7K
Введение
После перехода Microsoft с .NET Framework на .NET Core программирование на C# стало более увлекательным, хотя некоторые аспекты изменились.
В частности, шаблон проекта Служба Windows (.NET Framework) создаёт класс, наследник от ServiceBase в пространстве имен System.ServiceProcess. Прогеру предлагается реализовать виртуальные методы базового класса OnStart и OnStop, которые задают действия, подлежащие выполнению при запуске (остановке) службы, что собственно и есть суть и назначение Службы Виндовз. Регистрация Службы в этом случае производится с помощью утилиты installUtil.exe, в .Net Core это делается утилитой SC.exe.
Реализовать службу на .NET Core (в моем случае .NET 9) не сложнее, но по другому, шаблон проекта теперь называется Worker Service (Microsoft), а рабочий класс наследуется от BackgroundService.
В этой статье я подробно опишу процесс создания, публикации и регистрации Службы в .Net 9 на примере службы для Telegram-бота (сокращенно — Телебот). Почему бот? Во-первых, писать Телебота на C# — это действительно приятно. Во-вторых, чтобы обеспечить его круглосуточную доступность на сервере под управлением Windows, логично использовать именно Службу Windows, которая будет поддерживать его работу в фоновом режиме и запускаться может сама при перезагрузке сервера.
В заключении рассмотрим как добавить логирование в стандартный виндовый EventLog и немного обсудим функционал самого Телебота.
1. Создание проекта
И так, поехали. В Visual Studio (у меня Community 2022, версия 17.12.1) выбираем шаблон проекта Worker Service (Microsoft). Жмем Далее, пишем имя проекта у меня Svc2, снова Далее и получаем пустой проект Рабочего сервиса.


В шаблонном проекте Рабочего сервиса нам уже добавили зависимость Microsoft.Extensions.Hosting и два файла Program.cs и Worker.cs. В первом дается подсказка как правильно внедрять зависимости (Dependency Injections), второй это сам Воркер, то место, где будем запускать Телебота. Для простоты восприятия я почищу файл класса Worker от лишних подробностей касательно логирования.
namespace Svc2;

public class Worker : BackgroundService
{
    protected override async Task ExecuteAsync(CancellationToken stoppingToken)
    {
        while (!stoppingToken.IsCancellationRequested)
        {
            var time = DateTime.Now.ToString("yyyy-MM-dd HH:mm:ss");
            Console.WriteLine($"Worker running at: {time}");
            await Task.Delay(1000, stoppingToken);
        }
    }
}
Запустим, просто F5, проверим.

Все отлично, работает. Работает как обычное консольное приложение, теперь надо сделать из этого Службу.
2. Добавление пакета поддержки службы Windows
Класс Worker наследован от BackgroundService и наш проект запускается и работает как консольное приложение но это еще не служба. Что бы сделать из него Windows Service надо добавить в зависимости пакет Microsoft.Extensions.Hosting.WindowsServices, это сделает наш класс Worker способным реагировать на команды запуска и остановки сервиса через стандартную консоль.

В поиске менеджера пакетов NuGet, по запросу WindowsServices находим то что нам надо. Microsoft.Extensions.Hosting.WindowsServices. Хороший пакет, 44 миллиона скачиваний, солидно, заслуживает доверия.

Вот эти два пакета, это все что нам нужно для реализации Службы.
3. Редактирование кода
3.1 Programm.cs
После добавления пакета Microsoft.Extensions.Hosting.WindowsServices поле Services объекта builder было расширено методом AddWindowsService. Сделаем вызов этого метода указав имя нашей Службы, так как оно должно будет отображаться в общем списке Служб.
using Svc2;

var builder = Host.CreateApplicationBuilder(args);
builder.Services.AddHostedService<Worker>();

builder.Services.AddWindowsService(options =>
    options.ServiceName = "AM Telebot"
);

var host = builder.Build();
host.Run();
Это у нас так Microsoft реализует Внедрение Зависимости (Dependency Injection).
3.2 Worker.cs
Класс Worker изменим следующим образом, добавим кое что
namespace Svc2;

public class Worker : BackgroundService
{
    protected override async Task ExecuteAsync(CancellationToken stoppingToken)
    {
        // Service started
    }
    public override async Task StopAsync(CancellationToken cancellationToken)
    {
        // Service stoped

        await base.StopAsync(cancellationToken);
    }
}
К имеющемуся изначально в шаблоне методу ExecuteAsync, добавим переопределение метода StopAsync. Именно эти два метода будут получать управление при запуске и остановке службы соответственно.
4. Публикация сервиса
Собственно код для сервиса у нас готов, теперь надо его выложить куда то, где он будет работать, то есть Опубликовать (Publish) наш проект.

В контекстном меню проекта выберем Опубликовать… в Папку и жмем далее.

Пропишем удобную для нас папку.

Ну и жмем Опубликовать.

Если публикация прошла успешно в папке D:\Projects\CoreService\_pub появится большая куча файлов. Что бы привести в порядок эту кучу добавим кое что в файл проекта. Вот эти несколько строк в тэге PropertyGroup сделают папку с публикацией более компактной
<RuntimeIdentifier>win-x64</RuntimeIdentifier>
<PlatformTarget>x64</PlatformTarget>
<PublishSingleFile Condition="'$(Configuration)' == 'Release'">true</PublishSingleFile>
<DebugType>embedded</DebugType>
<IncludeNativeLibrariesForSelfExtract>true</IncludeNativeLibrariesForSelfExtract>
Файл проекта теперь должен выглядеть вот так:
<Project Sdk="Microsoft.NET.Sdk.Worker">

  <PropertyGroup>
    <TargetFramework>net9.0</TargetFramework>
    <Nullable>enable</Nullable>
    <ImplicitUsings>enable</ImplicitUsings>
    <UserSecretsId>dotnet-Svc2-d4d482f3-62dd-4f7d-99cd-b6c3c130f446</UserSecretsId>

    <RuntimeIdentifier>win-x64</RuntimeIdentifier>
    <PlatformTarget>x64</PlatformTarget>
    <PublishSingleFile Condition="'$(Configuration)' == 'Release'">true</PublishSingleFile>
    <DebugType>embedded</DebugType>
    <IncludeNativeLibrariesForSelfExtract>true</IncludeNativeLibrariesForSelfExtract>
  </PropertyGroup>

  <ItemGroup>
    <PackageReference Include="Microsoft.Extensions.Hosting" Version="9.0.0" />
    <PackageReference Include="Microsoft.Extensions.Hosting.WindowsServices" Version="9.0.0" />
  </ItemGroup>
</Project>
Еще раз пересоберем и опубликуем проект. Теперь видим, что в папке с публикацией всего 3-и файлика.

Да, думаю так удобнее.
5. Регистрация сервиса
Для того, что бы наш сервис был виден в Консоли Управления Службами Windows воспользуемся утилитой SC.EXE. Откроем окно командной строки под админской учеткой и выполним следующую команду:
sc create "AM Telebot" binPath=D:\Projects\CoreService\_pub\Svc2.exeТут написано: create значит создать сервис с именем AM Telebot, и вот там, куда указывает binPath, лежит его исполняемый файл. Выполним это в окне командной строки (запущенной под админской учеткой).

Отлично, полный успех, теперь смотрим что у нас в консоли управления службами.

И таки да, наш AM Telebot появился в списке служб. Тут уже, в свойствах Службы, можно поменять ему пользователя и тип запуска, например на Автомат, что бы сам запускался при перезагрузке сервера. Еще можно задать режим восстановления при непредвиденной ошибке и падении, в общем там есть полезные настройки.
Теперь проверим как она запустится.

Вроде как все норм, работает служба.
Кстати, для удаления службы используем ту же утилиту SC.exe с опцией delete и указав имя службы, вот так.
sc delete "AM Telebot"6. Добавление Тедебота в проект
Телебот у меня уже реализован в отдельной dll и я просто добавляю его в решение. Как реализован сам Телебот покажу как нибудь подробнее в следующем опусе, а для добавления его в наш сервис я просто включаю зависимость от этого проекта, вот так как на картинке.

Телебот сам по себе тоже зависит от трех проектов: amSecrets, amLogger и amFireWall. В последнем зашита как раз полезная часть функционала бота, именно там происходит взаимодействие с Брэндмауаром сервера. С его помощью можно добавить IP в белый список для доступа к серверу по RDP, удалить IP адрес из белого списка, получить список всех разрешенных IP адресов, а еще можно полностью отрубить правило доступа по RDP, это на случай когда надо срочно закрыть доступ к серверу вообще всем, такой вот Аларм батон.
amSecrets скрывает от посторонних глаз ключи, пароли и другие коннекшен стринги, не очень интересно, а вот amLogger прикольная штука, про него ниже расскажу подробнее.
Класс Worker службы чуть изменим, добавим строки запуска и остановки Телебота вот так.
namespace Svc2;

public class Worker : BackgroundService
{
    protected override async Task ExecuteAsync(CancellationToken stoppingToken)
    {
        // Service started
        await amTelebot.Worker.Start("Телебот запущен");
    }
    public override async Task StopAsync(CancellationToken cancellationToken)
    {
        // Service stoped
        await amTelebot.Worker.Stop("Телебот выключен");

        await base.StopAsync(cancellationToken);
    }
}
Теперь можно пересобрать и заново опубликовать Службу. Не забываем перед публикацией выключать Службу, иначе файлики не обновятся и студия выдаст ошибку, так как не сможет скопировать файлы в папку где Служба запущена.
7. Запуск и тестирование Телебота
После публикации проекта службы идем в Консоль Управления Службами windows и запускаем наш Телебот.

В телеграмм появилось сообщение – Бот запущен.

Остановим службу.

Пришло сообщение, что Телебот выключен. Все отлично работает.
8. Добавим логирование
Служба Windows это стандартное средство этой операционной системы, поэтому для логирования, с учетом того, что мы пишем приложение определенно под Windows, будем использовать стандартный Журнал Событий Windows (Windows Event Log). Всего три небольшие правки в коде помогут нам это сделать легко и непринужденно.
Во первых в файле appsettings.json надо добавить секцию
“EventLog”: {
     “LogLevel”: {
          “Default”: “Information”
     }
}
В результате файл должен выглядеть примерно как то так
{
  "Logging": {
    "LogLevel": {
      "Default": "Information",
      "Microsoft.Hosting.Lifetime": "Information"
    },
    "EventLog": {
      "LogLevel": {
        "Default": "Information"
      }
    }
  }
}
Во вторых, в файле Program.cs добавим внедрение зависимости (Dependency Injection) для сервиса EventLog следующим образом
builder.Logging.AddEventLog(c => {
    c.LogName = "AM Telebot LN";
    c.SourceName = "AM Telebot SRC";
});
таким образом, создаем журнал AM Telebot LN и источник AM Telebot SRC.
Файл Program.cs теперь будет выглядеть так
using Svc2;

var builder = Host.CreateApplicationBuilder(args);
builder.Services.AddHostedService<Worker>();

builder.Services.AddWindowsService(options =>
    options.ServiceName = "AM Telebot"
);

builder.Logging.AddEventLog(c => {
    c.LogName = "AM Telebot LN";
    c.SourceName = "AM Telebot SRC";
});

var host = builder.Build();
host.Run();
После того как отработает этот код в Консоли Просмотра Событий в папочке Журналы приложений и служб появится новый журнал AM Telebot.

В этот журнал и будут писаться наши логи. Писать в лог будем в классе Worker в файле Worker.cs, для этого поменяем код в этом файле следующим образом
namespace Svc2;

public class Worker : BackgroundService
{
    private readonly ILogger<Worker> _logger;

    public Worker(ILogger<Worker> logger)
    {
        _logger = logger;
    }

    protected override async Task ExecuteAsync(CancellationToken stoppingToken)
    {
        // Service started
        var msg = "Телебот запущен";
        _logger.LogInformation(msg);
        await amTelebot.Worker.Start(msg);
    }
    public override async Task StopAsync(CancellationToken cancellationToken)
    {
        // Service stoped
        var msg = "Телебот выключен";
        _logger.LogInformation(msg);
        await amTelebot.Worker.Stop(msg);

        await base.StopAsync(cancellationToken);
    }
}
Если откомпилируем и опубликуем этот код, то при запуске и остановке сервиса получим сообщения Телебот запущен и Телебот выключен не только уже в Телеграм, но и в Консоли Просмотра событий Windows, в Журнале AM Telebot LN появятся те же сообщения.

С помощью своей библиотечки amLogger.dll (которую более подробно опишу в отдельной статейке, а тут покажу только как его можно использовать) изменю файлик Worker.cs в проекте службы следующим образом.
using amLogger;

namespace Svc2;

public class Worker : BackgroundService
{
    private readonly ILogger<Worker> _logger;

    public Worker(ILogger<Worker> logger)
    {
        _logger = logger;
    }

    protected override async Task ExecuteAsync(CancellationToken stoppingToken)
    {
        // Service started
        Logger.Instance.Init(log => OnLog(log));

        var msg = "Телебот запущен";
        await amTelebot.Worker.Start(msg);
        Log.Info(1, "Svc2.Worker.ExecuteAsync", msg);
    }
    public override async Task StopAsync(CancellationToken cancellationToken)
    {
        // Service stoped
        var msg = "Телебот выключен";
        await amTelebot.Worker.Stop(msg);
        Log.Info(1, "Svc2.Worker.StopAsync", msg);

        await base.StopAsync(cancellationToken);
    }
    void OnLog(Log log)
    {
        // Писать лог для внешнего просмотра будем тут
        // удобнее всего писать в журнал событий windows (Windows Event Log)
        switch (log.lvl)
        {
            case Level.Info:
                _logger.LogInformation(log.id, log.msg, log.src);
                break;
            case Level.Error:
                _logger.LogError(log.id, log.msg, log.src);
                break;
            case Level.Debug:
                _logger.LogDebug(log.msg);
                break;
        }
    }
}
Более подробно опишу идею такого логгера в отдельной статейке, а тут покажу только как его можно использовать.
Для начала при старте службы надо инициализировать наш Logger вот так.
Logger.Instance.Init(log => OnLog(log));Лямбда в параметре Init указывает куда будет переходить управление при логировании. В моем случае это будет метод OnLog, и в него будет передаваться объект log вот такой структуры:
public class Log
{
    public int id;          // Some ID
    public int type;        // Type of message
    public Level lvl;
    public string src = ""; // Source
    public string msg = ""; // Message
}
У класса Log есть еще набор статических методов, которые после инициализации можно вызывать в любой части, любого модуля солюшена, одинаково во всех DLL. Все эти методы соответствуют определенному уровню логирования:
-
Trace
-
Info
-
Warn
-
Error
-
Fatal
Весь код логера можно посмотреть тут
https://github.com/amizerov/CoreService/blob/master/amLogger/Logger.cs
После инициализации в проекте Службы, использовать amLogger можно в любом модуле решения, и запись выглядит довольно локанично.
Log.Info("Svc2.Worker.ExecuteAsync", msg);Имя метода Info соответствует уровню логирования Info, первый параметр это сорс, второй сам мессэдж. При этом вызов этого метода передает управление в OnLog, указанный при инициализации, это единая точка входа для всех вызовов логирования, и тут мы будем выводить лог наружу, часть сообщений в телеграм, а основные в Windows Event Log.
В модуле Телебота логирование ошибки может выглядеть так.
static Task HandleErrorAsync(ITelegramBotClient botClient, Exception exception, CancellationToken token)
{
    Log.Fatal("Telebot error", $"An error occurred: {exception.Message}");
    return Task.CompletedTask;
}
Весть код Телебота можно посмотреть тут
https://github.com/amizerov/CoreService/tree/master/amTelebot
Заключение
Надеюсь кому то поможет эта инструкция, ну и способ логирования, возможно, будет интересен широким массам в узком кругу программистов самоучек.
На всякий случай, кому интересно ниже ссылка на проект целиком.
https://github.com/amizerov/CoreService.git
Если эта публикация вас вдохновила и вы хотите поддержать автора — не стесняйтесь нажать на кнопку
In a previous version of a Professional C# book I’ve written a complete chapter on how to create Windows Services with the .NET Framework. Using .NET Core 3.0, it’s a lot easier to create Windows Services: just a single line of code is needed to convert a background worker to a Windows Service.
See Creating a Windows Service with .NET 6 for a new version!

Create a Worker
With .NET Core 3.0, a background worker can be created using Visual Studio or the dotnet CLI command dotnet new worker.
With this template, a Program class is created that uses the Host class. The method CreateDefaultBuilder is used to setup the dependency injection container, configuration, and logging. The dependency injection container managed by the Host class is configured by invoking the method ConfigureServices. In the generated code, the extension method AddHostedService is used to register a background class that implements the interface IHostedService. This interface is indirectly implemented by the Worker class by deriving from the base class BackgroundService. The interface IHostedService defines the methods StartAsync and StopAsync. Adding a hosted service, invoking the Run method of the host starts the host and in turn invokes the startup of the IHostedService.
public class Program { public static void Main(string[] args) { CreateHostBuilder(args).Build().Run(); } public static IHostBuilder CreateHostBuilder(string[] args) => Host.CreateDefaultBuilder(args) .ConfigureServices((hostContext, services) => { services.AddHostedService<Worker>() .Configure<EventLogSettings>(config => { config.LogName = "Sample Service"; config.SourceName = "Sample Service Source"; }); }); }The
Hostclass is also used by ASP.NET Core 3.0 Web projects. TheWebHostclass from .NET Core 2.0 is replaced by the more genericHostclass.The
Workerclass derives from the classBackgroundService.BackgroundServiceimplements the interfaceIHostedServiceand defines the abstract methodExecuteAsync. This abstract method is called by theStartAsyncmethod in theBackgroundService.StartAsyncis defined by theIHostedServiceinterface. With the implementation of theWorkerclass,ExecuteAsyncuses an endless loop (until cancellation is requested) and writes a log message once a second.public class Worker : BackgroundService { private readonly ILogger<Worker> _logger; public Worker(ILogger<Worker> logger) { _logger = logger; } protected override async Task ExecuteAsync(CancellationToken stoppingToken) { while (!stoppingToken.IsCancellationRequested) { _logger.LogInformation("Worker running at: {time}", DateTimeOffset.Now); await Task.Delay(1000, stoppingToken); } } }The main functionality for the
Hostclass is creating the dependency injection container, configuration, and logging. UsingCreateDefaultBuilder, configuration is read from the configuration files appsettings.json, appsettings.{env.EnvironmentName}.json, environmental variables, and the command line.Source Code Host class
Logging configuration is read from the section Logging within the configuration settings. Using the worker template, the configuration file appsettings.json defines logging based on the log level – with Microsoft sources to turn on logging for the Warning level, with the exception of Microsoft.Hosting.Lifetime: here logging is turned on for the Information level. The default configuration is also for the Information level:
{ "Logging": { "LogLevel": { "Default": "Information", "Microsoft": "Warning", "Microsoft.Hosting.Lifetime": "Information" } } }If the application runs on a Windows system, the method
CreateDefaultBuilderalso adds logging to the Windows event log and sets a filter provider to only log warnings and more critical issues to this provider.Running the application, log information is written to the console. The worker writes a message every second.
info: WindowsServiceSample.Worker[0] Worker running at: 10/13/2019 10:21:14 +02:00 info: Microsoft.Hosting.Lifetime[0] Application started. Press Ctrl+C to shut down. info: Microsoft.Hosting.Lifetime[0] Hosting environment: Development info: Microsoft.Hosting.Lifetime[0] Content root path: C:\github\MoreSamples\DotnetCore\WindowsServiceSample\WindowsServiceSample info: WindowsServiceSample.Worker[0] Worker running at: 10/13/2019 10:21:15 +02:00 info: WindowsServiceSample.Worker[0] Worker running at: 10/13/2019 10:21:16 +02:00 info: WindowsServiceSample.Worker[0] Worker running at: 10/13/2019 10:21:17 +02:00 info: WindowsServiceSample.Worker[0] Worker running at: 10/13/2019 10:21:18 +02:00 info: WindowsServiceSample.Worker[0]Convert to a Windows Service
To make a Windows Service of this, you just need to add the NuGet package Microsoft.Extensions.Hosting.WindowsServices, and add the method invocation UseWindowsService to the IHostBuilder fluent API:
public static IHostBuilder CreateHostBuilder(string[] args) => Host.CreateDefaultBuilder(args) .ConfigureLogging( options => options.AddFilter<EventLogLoggerProvider>(level => level >= LogLevel.Information)) .ConfigureServices((hostContext, services) => { services.AddHostedService<Worker>() .Configure<EventLogSettings>(config => { config.LogName = "Sample Service"; config.SourceName = "Sample Service Source"; }); }).UseWindowsService();To see information level logging in the Windows event log, the filter is explicitly applied with the
ConfigureLoggingmethod used with the host builder.Installing and Managing the Windows Service
After building the application, the new Windows Service can be published using dotnet publish (or using Visual Studio):
dotnet publish -c Release -o c:\sampleservice
To control Windows Services, the sc command can be used. Creating a new Windows Service is done using sc create passing the name of the service and the binPath parameter referencing the executable:
sc create “Sample Service” binPath=c:\sampleservice\WindowsServiceSample.exe
The status of the service can be queried using the Services MMC, or with the command line sc query:
sc query “Sample Service”
After the service is created, it is stopped and need to be started:
sc start “Sample Service”
To stop and delete the service, the sc stop and sc delete commands can be used.
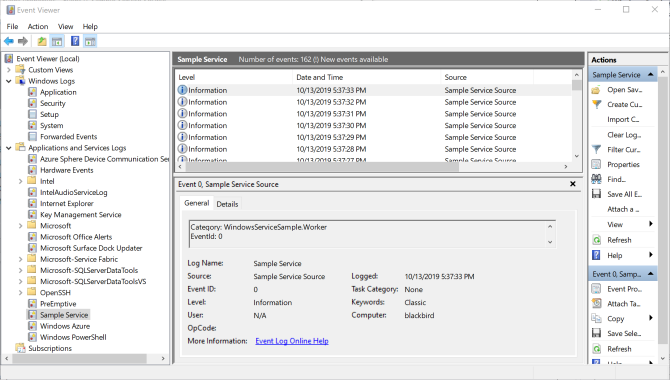
After starting the service, log information can be seen with the Windows Event Viewer:

Web Application as Windows Service
What about hosting Kestrel as a Windows Service? There’s not a lot difference – the package Microsoft.Extensions.Hosting.WindowsServices needs to be added, and the API UseWindowsService invoked.
A Web API project can be created using dotnet new api. This template creates an API returning random weather information.
What’s changed to run the API as a Windows Service is a call to UseWindowsService, and a configuration to what port number the server should listen to. Port 80 is not used to not get in conflict with a local IIS configuration.
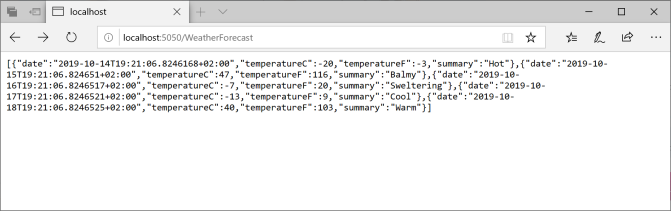
public class Program { public static void Main(string[] args) { CreateHostBuilder(args).Build().Run(); } public static IHostBuilder CreateHostBuilder(string[] args) => Host.CreateDefaultBuilder(args) .ConfigureServices(services => { services.Configure<EventLogSettings>(config => { config.LogName = "Sample API Service"; config.SourceName = "Sample API Service Source"; }); }) .ConfigureWebHostDefaults(webBuilder => { webBuilder.UseStartup<Startup>(); }) .ConfigureWebHost(config => { config.UseUrls("http://*:5050"); }).UseWindowsService(); }Now the service can be build, published, and configured as a Windows Service. Opening a browser to reference the configured port with the controller route WeatherForecast returns JSON information from the API service:
http://localhost:5050/WeatherForecast
Accessing the Windows Service from a different system, the Firewall needs to be configured to allow accessing this port from the outside.
Take away
The
Hostclass which allows configuration, logging, and dependency injection services configuration in one place, also offers an easy way to create Windows Services. Adding the NuGet package Microsoft.Extensions.Hosting.WindowsServices along with the extension method UseWindowsService practically is all what’s needed.This way, background functionality based on the worker template, but also hosting a Kestrel server for offering ASP.NET Core Web applications is an easy task.
While Windows Services are only offered on Windows Systems, similar functionality can be offered on Linux systems. On Linux, the NuGet package Microsoft.Extensions.Hosting.SystemD along with the extension method UseSystemD can be used. Using the UseWindowsService API call on a Linux system doesn’t break the server throwing an exception, but instead it just does nothing on a Linux system. Similarly invoking UseSystemD on Windows, nothing is done. This way it’s easy to create both a Windows Service and a SystemD daemon.
If you’ve read this far, consider buying me a coffee which helps me staying up longer and writing more articles.
You can get the complete sample code.
Enjoy learning and programming!
Christian
Links
Hosting DI Container with .NET Core 3.0
Source Code Host class
More information on C# and programming .NET Core applications is in my book Professional C# 7 and .NET Core 2.0, and in my workshops.
Windows Cleaners Image ID 24554590 © Andrey Koturanov | Dreamstime.com
Microsoft MVP for Developer Technologies, software architect, developer, book author, trainer and consultant
View all posts by Christian Nagel
In this article, we are going to learn how to create a .NET Core Worker Service and run it as a Windows Service.
To download the source code for the video, visit our Patreon page (YouTube Patron tier).
So let’s get started.
VIDEO: Create Windows Service Applications in .NET.
Support Code Maze on Patreon to get rid of ads and get the best discounts on our products!
Windows Services in .NET Core
We may want to create long-running background services in .NET in specific scenarios. For instance, we might want to perform some processor-intensive tasks, queue some operations in the background or schedule some operations to execute at a later time. For all these purposes, we can make use of the BackgroundService class in .NET, which implements the IHostedService interface.
For implementing long-running services, we can create a class inheriting from the BackgroundService abstract class. Along with that, we’ll have to provide an implementation for the ExecuteAsync() method, which runs when the service starts. While implementing the ExecuteAsync() method, it should return a Task that represents the lifetime of the long-running operation. There is also an option to create our custom background service class by implementing the IHostedService interface if we wish to have more control over the background service functionality.
The background services that we create in .NET are cross-platform and support the inbuilt .NET features like logging, configuration, dependency injection, etc.
Creating the Project
For creating background services, we can use the Worker Service Template that is available with both the .NET CLI and Visual Studio. Worker Services allows for running background services through the use of a hosted service.
While creating a new project in Visual Studio, we can choose the Worker Service template.
On the other hand, If we are using the dotnet CLI, we can use the dotnet new command and specify the project type as worker:
dotnet new worker --name <project name>
Both these approaches will create a new project using the worker service template. Let’s examine the project in detail.
The Worker Service Template in .NET
A project we create using the worker service template will consist of 2 files – the Program class and the Worker class.
The Program class will contain the code to add the Worker class as a hosted service and run it:
var builder = Host.CreateApplicationBuilder(args);
builder.Services.AddHostedService<Worker>();

var host = builder.Build();
host.Run();
As we mentioned while explaining the windows services, any service that we implement should either inherit from the BackgroundService class or a custom implementation of it. Here, the Worker class contains the code for the service and it inherits from the BackgroundService class, which in turn implements the IHostedService interface:
public class Worker : BackgroundService
{
    private readonly ILogger<Worker> _logger;

    public Worker(ILogger<Worker> logger)
    {
        _logger = logger;
    }

    protected override async Task ExecuteAsync(CancellationToken stoppingToken)
    {
        while (!stoppingToken.IsCancellationRequested)
        {
            if (_logger.IsEnabled(LogLevel.Information))
            {
                _logger.LogInformation("Worker running at: {time}", DateTimeOffset.Now);
            }
            await Task.Delay(1000, stoppingToken);
        }
    }
}
An instance of ILogger is injected into the Worker class for the logging support. Additionally, there is the ExecuteAsync() method, which runs when the service starts. The default implementation of this method in the project template runs in a loop every second, logging the current date and time.
The Worker Service Template will provide the code for a simple background service and we can modify it to suit our requirements.
Configuring the Project
To have the support to host our application as a Windows service, first, we need to install the Microsoft.Extensions.Hosting.WindowsServices NuGet package:
dotnet add package Microsoft.Extensions.Hosting.WindowsServices
After that, we need to modify the Program class by adding the AddWindowsService() class:
var builder = Host.CreateApplicationBuilder(args);
builder.Services.AddWindowsService(options =>
{
    options.ServiceName = "Code-Maze Service";
});

LoggerProviderOptions.RegisterProviderOptions<EventLogSettings, EventLogLoggerProvider>(builder.Services);

builder.Services.AddHostedService<Worker>();

builder.Logging.AddConfiguration(
    builder.Configuration.GetSection("Logging"));

var host = builder.Build();
host.Run();
The AddWindowsService() extension method configures the application to work as a windows service. Along with that, we have set the service name using the options.ServiceName property. Notice that we have configured the EventLogLoggerProvider as well.
Similarly, let’s modify the ExecuteAsync() method of the Worker class to customize the log message:
protected override async Task ExecuteAsync(CancellationToken stoppingToken)
{
    while (!stoppingToken.IsCancellationRequested)
    {
        _logger.LogInformation("Code-Maze Service running at: {time}", DateTimeOffset.Now);
        await Task.Delay(60000, stoppingToken);
    }
}
Along with that, we change the logging interval to 1 minute as well. Now the service will log the message once every minute.
By default, the Windows service will write logs into the Application Event Log and we can use the Event Viewer tool for viewing those. Also, by default, a Windows service will write only logs of severity Warning and above into the Event Log. That said, we can configure this behavior in the appsettings file:
{
  "Logging": {
    "LogLevel": {
      "Default": "Information",
      "Microsoft.Hosting.Lifetime": "Information"
    },
    "EventLog": {
      "LogLevel": {
        "Default": "Information"
      }
    }
  }
}
By adding a new section for the Event Log, we can change the default Log Level to Information, which will log the information as well.
With that, our windows service project is ready.
Publishing the Project
The next step is publishing the app.
For publishing the app, we can right-click the project in the solution explorer and then click on the Publish option. For this example, we can choose to publish our app to a local folder. This will create a Publish Profile and we can provide the following settings:
- For the Configuration setting, we can choose
Release|Any CPU - We can choose the appropriate .NET version for the Target Framework setting
- From a portability standpoint, it is better to choose Deployment Mode as
Self-Contained - We can choose the appropriate Target Runtime. In this example, since we are using a 64-bit Windows system, we can choose
win-x64 - By using the Target Location setting, we can specify where to publish the output
In the File Publish Options, we are going to check several checkboxes:
- Produce Single File – This will produce the output combined into a single file
- Enable ReadyToRun Compilation – This will produce the output in Ready-to-Run format
After providing these settings, we can leave any other setting with the default values. Now we can publish the project by clicking the Publish button.
This will produce a standalone executable output of the service in the specified folder location.
Creating the Windows Service
For creating a Windows Service, we can use the Windows Service Control Manager (sc.exe) tool. The service control manager operations require higher permissions as we are working directly with the operating system and hence we need to run the commands in a Windows PowerShell console with Administrator privilege.
In the PowerShell console, we can use the sc.exe create command and provide the service name and path as arguments:
sc.exe create "Code-Maze Service" binpath="C:\service\CodeMazeWorkerService.exe"
Once the command executes successfully, it will create a new windows service with the name Code-Maze Service and return the output:
[SC] CreateService SUCCESS
We can verify the newly created service in the Windows Service Management Console:
By default, the service might be in the stopped state and we will have to start it manually by using the sc.exe start command:
sc.exe start "Code-Maze Service"
Once the command executes successfully, it will provide an output similar to this one:
SERVICE_NAME: Code-Maze Service
        TYPE               : 10  WIN32_OWN_PROCESS
        STATE              : 2  START_PENDING
                                (NOT_STOPPABLE, NOT_PAUSABLE, IGNORES_SHUTDOWN)
        WIN32_EXIT_CODE    : 0  (0x0)
        SERVICE_EXIT_CODE  : 0  (0x0)
        CHECKPOINT         : 0x0
        WAIT_HINT          : 0x7d0
        PID                : 6720
        FLAGS
This will start the Windows service and it will continue to run in the background.
Verifying the Windows Service
Now we are going to verify that the Windows service works as expected. For that, let’s open the Event Viewer.
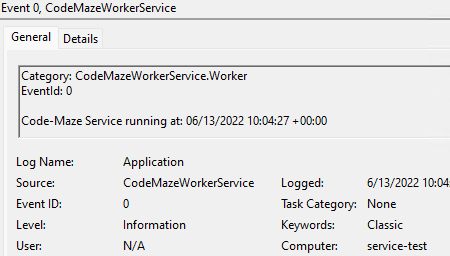
Remember that we implemented the service to write a log once every minute. Within the Event Viewer, we can find the logs in the Windows Logs -> Application node. We are going to see a bunch of events related to our service there:
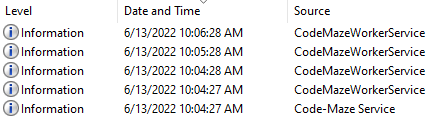
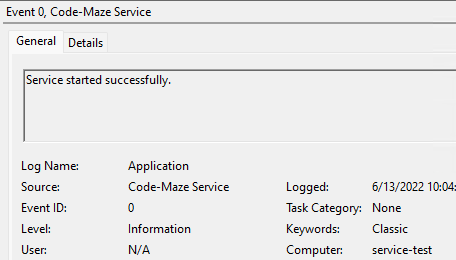
As soon as the service starts, the Windows Service Manager logs an event with the source as the service name. The first event with the source name Code-Maze Service corresponds to that. We can verify this by opening that event. The event details will contain the corresponding message and details:
Apart from that, while the service is running, it logs an event every minute with the source matching the app’s namespace. All the subsequent events with the source name CodeMazeWorkerService correspond to those. We can verify this by opening those events. Those events will contain the message that the service logs:
Great! We have verified that the windows service works as expected.
Removing the Windows Service
Once we create a Windows service, it keeps on running in the background. To remove a Windows service from the system, we have to first stop it and then delete it.
To stop a Windows service, we can use the sc.exe stop command:
sc.exe stop "Code-Maze Service"
This will stop the service and provide a similar response:
SERVICE_NAME: Code-Maze Service
        TYPE               : 10  WIN32_OWN_PROCESS
        STATE              : 3  STOP_PENDING
                                (STOPPABLE, NOT_PAUSABLE, ACCEPTS_SHUTDOWN)
        WIN32_EXIT_CODE    : 0  (0x0)
        SERVICE_EXIT_CODE  : 0  (0x0)
        CHECKPOINT         : 0x0
        WAIT_HINT          : 0x0
Even though this will stop the service, we can still find the service in the Services Console. This is particularly useful when we just need to stop the service temporarily and may want to start it later.
On the other hand, if we no longer need the service, we can delete it using the sc.exe delete command:
sc.exe delete "Code-Maze Service"
This will remove the service from the system and give the response:
[SC] DeleteService SUCCESS
Now if we check the Services Console, we cannot find the service as it will be completely removed from the system.
Conclusion
In this article, we discussed the Worker Service template in .NET Core and how to create a Windows Service Project using it. Additionally, we learned how to create and configure a Windows Service.
Liked it? Take a second to support Code Maze on Patreon and get the ad free reading experience!
Данное руководство устарело. Актуальное руководство: Руководство по ASP.NET Core 7
Последнее обновление: 12.06.2018
ASP.NET Core можно развертывать в виде обычной службы Windows без каких-либо веб-серверов, в частности, IIS.
Создадим новый проект ASP.NET Core 2.1 любого типа. Прежде всего, нам надо добавить в проект через Nuget пакет
Microsoft.AspNetCore.Hosting.WindowsServices.
После создания проекта обратимся к файлу Program.cs, который во всех проектах выглядит идентично:
using System;
using System.Collections.Generic;
using System.IO;
using System.Linq;
using System.Threading.Tasks;
using Microsoft.AspNetCore;
using Microsoft.AspNetCore.Hosting;
using Microsoft.Extensions.Configuration;
using Microsoft.Extensions.Logging;

namespace ServiceHostingApp
{
    public class Program
    {
        public static void Main(string[] args)
        {
            CreateWebHostBuilder(args).Build().Run();
        }

        public static IWebHostBuilder CreateWebHostBuilder(string[] args) =>
            WebHost.CreateDefaultBuilder(args)
                .UseStartup<Startup>();
    }
}
Изменим его следующим образом:
using System.Diagnostics;
using System.IO;
using Microsoft.AspNetCore;
using Microsoft.AspNetCore.Hosting;
using Microsoft.AspNetCore.Hosting.WindowsServices;

namespace ServiceHostingApp
{
    public class Program
    {
        public static void Main(string[] args)
        {
            // получаем путь к файлу
            var pathToExe = Process.GetCurrentProcess().MainModule.FileName;
            // путь к каталогу проекта
            var pathToContentRoot = Path.GetDirectoryName(pathToExe);
            // создаем хост
            var host = WebHost.CreateDefaultBuilder(args)
                    .UseContentRoot(pathToContentRoot)
                    .UseStartup<Startup>()
                    .Build();
            // запускаем в виде службы
            host.RunAsService();
        }
    }
}
Чтобы запустить приложение в виде службы у объекта IWebHost вызывается метод RunAsService().
Публикация
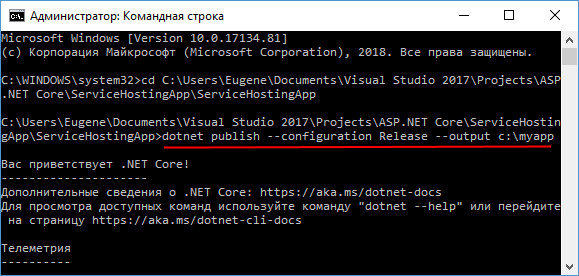
Теперь нам надо опубликовать приложение в файловой системе. Мы можем это сделать через консоль с помощью команды dotnet publish.
Для этого вначале в командной строке/терминале надо перейти к папке проекта и из нее запустить команду:
dotnet publish --configuration Release --runtime win10-x64 --output c:\myapp
Поскольку приложение будет устанавливаться в виде службы Windows и должно иметь исполняемый файл, то указывается
параметр --runtime. В данном случае служба будет устанавливаться на Windows 10 с 64-битной архитектурой. Поэтому
для этого параметра указано значение win10-x64.
Параметр --output указывает, где будет опубликовано приложение — то есть в данном случае в папке c:\myapp.
Также можно поизвести публикацию с помощью графических средств в Visual Studio.
Создание службы
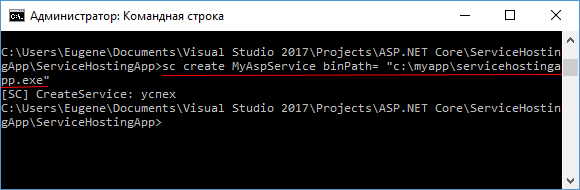
После публикации с помощью консольной утилиты sc.exe создадим службу:
sc create НАЗВАНИЕ_СЛУЖБЫ binPath= "ПУТЬ К ИСПОЛНЯЕМОМУ ФАЙЛУ EXE"
После команды create указывается имя службы. Службу можно назвать как угодно.
Параметр binPath указывает на путь к исполняемому файлу (в том числе имя самого файла).
Причем между знаком равно и путем к файлу в кавычках должен идти пробел.
Например, ранее приложение было опубликовано в папке c:\myapp. Как правило, название исполняемого файла соответствует названию проекта, то есть в моем случае
в папке c:\myapp после публикации находится исполняемый файл ServiceHostingApp.exe. И, допустим, служба буде называться
MyAspService. В этом случае команда на создание службы будет выглядеть следующим образом:
sc create MyAspService binPath= "c:\myapp\servicehostingapp.exe"
Запуск службы
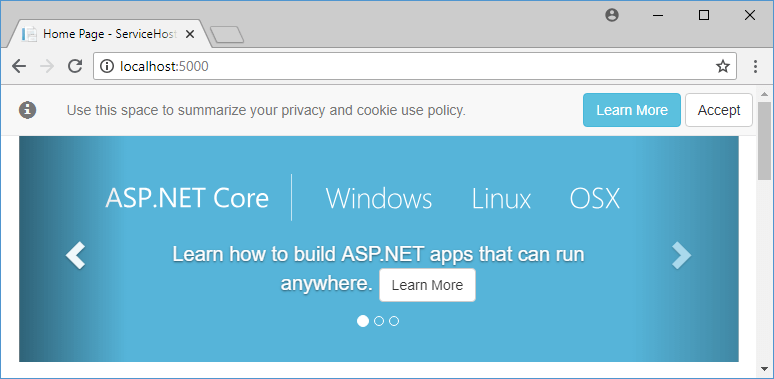
После установки службы запустим ее с помощью команды:
Команде start передается имя ранее установленной службы — в моем случае это MyAspService.
После установки мы можем обратиться обратиться к нашему веб-приложению из браузера по адресу http://localhost:5000:
In this tutorial, we will explore how to create a Windows Service with .NET Core. .NET Core is a versatile and powerful framework that allows developers to build a variety of applications, including Windows Services. The creation of Windows Services can be crucial for developing systems that require continuous background processes, such as system monitoring or data processing tasks.

Here’s the step-by-step guide to creating a Windows Service with .NET Core:
Step 1: Setting Up the .NET Core Console Application
First, you need to set up a new .NET Core console application. Open the command prompt and create a new directory for your project. Navigate into the directory and run the following command:
dotnet new console -n MyWindowsServiceThis command creates a new console application with the name ‘MyWindowsService’.
Step 2: Implementing the Main Functionality
Next, you need to implement the main functionality of your service. Open the ‘Program.cs’ file and add the following code:
using System;
using System.Threading;

namespace MyWindowsService
{
    class Program
    {
        static void Main(string[] args)
        {
            while(true)
            {
                Console.WriteLine("Windows Service is running...");
                Thread.Sleep(1000);
            }
        }
    }
}
This code will make the service print a message «Windows Service is running…» every second.
Step 3: Converting the Console App to a Windows Service
To convert the console app to a Windows Service, we will use the Microsoft.Extensions.Hosting package. First, add the package to your project with the following command:
dotnet add package Microsoft.Extensions.HostingNow, update the ‘Program.cs’ file:
using Microsoft.Extensions.Hosting;
using System;
using System.Threading;
using System.Threading.Tasks;

namespace MyWindowsService
{
    public class Program
    {
        public static void Main(string[] args)
        {
            CreateHostBuilder(args).Build().Run();
        }

        public static IHostBuilder CreateHostBuilder(string[] args) =>
            Host.CreateDefaultBuilder(args)
                .ConfigureServices((hostContext, services) =>
                {
                    services.AddHostedService<MyService>();
                });
    }

    public class MyService : IHostedService
    {
        public Task StartAsync(CancellationToken cancellationToken)
        {
            Console.WriteLine("Service starting...");
            return Task.CompletedTask;
        }

        public Task StopAsync(CancellationToken cancellationToken)
        {
            Console.WriteLine("Service stopping...");
            return Task.CompletedTask;
        }
    }
}
This code will make your console application run as a Windows Service.
Step 4: Installing the Windows Service
To install the Windows Service, publish your application first:
dotnet publish --configuration Release --output ./publishThen, install the service using the New-Service cmdlet from PowerShell:
New-Service -Name "MyService" -BinaryPathName "C:\path\to\your\app\publish\MyWindowsService.exe"Your Windows Service is now installed and will start automatically with Windows.
If you’re looking to hire .NET remote developers to assist with similar projects, consider reaching out to experienced professionals.
Conclusion
Creating a Windows Service with .NET Core is a straightforward process that involves setting up a console application, implementing the main functionality, converting the app to a service, and installing the service. With this guide, you should be able to create your own Windows Services using .NET Core.
Remember, if you need professional help, don’t hesitate to hire .NET remote developers.