

Yash Kadaru
Posted on
• Edited on
When I first ran into this problem of managing multiple git accounts, I had done a ton of research online. There were a lot of helpful sources of information, but they all had something missing. I had to patch together information from a variety of places. I’m bringing all my learning together here, to pass the baton I was given.😅
Before we get started, let me outline a few of the questions I will be answering in this article. I’ll be addressing:
- Where are SSH keys stored on a Mac? What’s an RSA key?
- What is an SSH config and how can I set one up?
- What is a known_hosts file and what is an id_rsa file?
- How can I manage all my SSH keys? What are SSH keys anyway?
If you’re wondering what SSH is, we won’t be covering the answer to that here, but you are welcome to take a look at the official page from the organization behind SSH. This page is quite helpful and concise.
MacOS ships with the OpenSSH implementation of SSH. You’ll notice this particular statement from the site:
The OpenSSH client program is called ssh. The SSH client generally uses information in the .ssh directory in the user’s home directory. It also reads
/etc/ssh/ssh_config, which contains its system-wide configuration.
For the purposes of this article, we won’t worry about the system-wide configuration in this article. In most Unix / Linux systems, the local configuration is found in the user’s home directory under .ssh.
📚 Soaking up some knowledge
Okay, let’s find it! Boot up your terminal, and head on over to ~/.ssh like so:

In this folder, you might see a couple of files, or none at all. For me, this is what it looks like below. What is this nonsense?

To explain what these are, we need to talk about keys first. There are a few types:
- Authorized keys and Identity keys are user keys. Authorized keys are public keys, similar to a lock. (🔒) Identity keys, are private keys, similar to a key that opens that lock. (🔑)
- Host keys are for host authentication, i.e. the entity you are trying to connect to. They are public keys. (🔒)
- The
known_hostsfile is where OpenSSH stores or remembers hosts that it has connected to previously. It only remembers host keys. - Session keys encrypt the data in a connection. They change every session and use the host key to generate or use a mutual shared key.
We’ll get into how the key exchange works in a later article.
We’re primarily concerned with Identity keys and Host keys. Your identity keys when generated with no options look like id_<algorithm it was made with> by default and are usually in this .ssh folder. RSA is the most common algorithm in use, and the most widely supported, so you’ll see keys that look like id_rsa. RSA also happens to be the default algorithm. (Click here if you want to know more about the other algorithms)
However, it is possible to specify any file name, and any location when creating a private key. You can also provide a custom path pointing to a key somewhere else, with the -i option to the SSH client. For example, ssh -i /home/me/somepath/my-awesome-key ec2-user@awshost.amazon.com would use a private key from the file my-awesome-key for authentication when opening a secure shell to awshost.amazon.com as ec2-user.
💻 Setup
It’s time to generate a key! To do this, we’ll need to use the ssh-keygen command to make a key with a certain algorithm. Here’s what we’re going to run:
ssh-keygen -t rsa -f personal_key -b 2048
Enter fullscreen mode
Exit fullscreen mode
-t specifies the algorithm that makes the key. -f specifies a custom name for the key, and an alternate location if it’s in the form of a path. -b specifies how many bits long the key will be. By default, ssh-keygen will use the RSA algorithm with 2048 bit length. So, all we really need to do is specify a custom name!
⚠️ Make sure an existing id_rsa and id_rsa keypair don’t exist already. If they do, keygen will ask if you want to overwrite. This will permanently delete that old key you might have used elsewhere! Back it up, make a key with a different name, or if you’re sure, overwrite it.

Make sure you enter a simple passphrase (🔐) that you can keep safe elsewhere.

This will generate two files: personal_key and personal_key.pub. The first is your private key (🔑), the second is your public key (🔒).
Now, repeat the same process for your work account. In this manner, you can make as many keys as you want. But for this article, let’s make one more.

It’s time to make two hosts files for each of your profiles. You don’t have to make two, but it’s nice to keep the profiles completely separate. Run the following commands to generate the two files:
touch known_hosts
touch known_hosts_work
Enter fullscreen mode
Exit fullscreen mode
❗️NOTE: if you have a known_hosts file here already, there’s no need to make another one. If you want to rename it, you can do that — just make sure you use that name for the following steps.
🛠 Connect the dots with a config file
Finally, let’s bring it all together in a config file. There’s two of them, one for local, and one for global. As mentioned before, we’re focussing on the local. Use the following command to make a config file:
touch config
Enter fullscreen mode
Exit fullscreen mode
Here’s what your final config file will look like:

The config file is organized by hosts. Each host definition has a set of connection options:
- Comments can be made with
#at the start of a line. These are for your eyes. - The URL on the
HostNameline is the exact base URL at which your repository resides. This is your destination. For example, if you have a personal account on github, with personal projects, the URL will begithub.com. In my case, I have my work version-control host URL, and my personal account atgithub.com. -
Hostis a pattern matcher that is used to differentiate between these sets of configurations. Keep it the same as theHostNameso it matches hosts in connections correctly without additional specification. If you want to use thepersonal_keyas a fallback for every other URL, use an asterix*as the Host. TheHost *configuration set is usually at the bottom of the config file, so it tests very configuration set until it gets to this one, if none of the previous Host patterns match. -
Userfor most git based systems will just begit. It will be different based on what you’re connecting to. E.g.ec2-userif you’re connecting to an Amazon AWS EC2 instance atec2-user@some_server.amazonaws.com. -
IdentityFileasks for the location of the identity key we made. Type in the respective paths here. -
UserKnownHostsFilespecifies an exact location to store all hosts you connect to when you’re using that profile. Provide the respective paths here. -
IdentitiesOnlyspecifies that only these keys provided must be used to connect to a host, even if another service, like the ssh-agent, offers a key for use. -
Portspecifies what port number to use when connecting through SSH.
♻️ Cleanup
Let’s do some cleanup before we move on to the final step. We need to make the keys only readable by you, that way no one else can modify or tamper with your private keys.
Run ls -l to check the file permissions for everything in this folder:

You want every file in here to be readable / writable by you, and only readable by everyone else — which means each file will have this: -rw-r--r-- on the far left column. Let me illustrate how permissions work:

As you can see in the picture above, there’s 2 ways to set permissions. Either one of the following commands in your terminal work.
chmod go-wx, u=rw personal_key
Enter fullscreen mode
Exit fullscreen mode
or
chmod 600 personal_key
Enter fullscreen mode
Exit fullscreen mode
With letters
go-wx removes write and execute permissions from the group and others. u=rw sets the user (you) to only have read and write permissions.
+ adds permissions that follow. — removes permissions that follow. = sets the permissions to exactly what follows.
You can separate as many sets of these as you want, with commas ,.
With numbers
644 sets (4+2) read and write for you, and (4) read permission for everyone else. This should be done on the public keys only.
600 sets (4+2) read and write permissions for you, and no permissions for everyone else. This should be done on all the secret keys.
Either method you use, make sure all the public keys show rw for you and r for everyone else, while the secret keys show rw for you and nothing for everyone else.
✅ Ready all the systems
Almost there!
The last step is to add the keys to an ssh-agent so you don’t have to enter the passphrase and specify the key to use every time you ssh to a host. The agent essentially acts like your personal assistant; a butler of sorts. Take this quote from github.com:
When you
git clone,git fetch,git pull, orgit pushto a remote repository using SSH URLs, you’ll be prompted for a password and must provide your SSH key passphrase.
Why type the passphrase everytime, when the ssh-agent can do it for you?
Let’s add both our keys to the agent using the following command:
ssh-add -K personal_key
ssh-add -K work_key
Enter fullscreen mode
Exit fullscreen mode
✋you might be asked for your passphrase when adding your keys.
✋the -K option might not work for you. This is a Mac only command that adds the key passphrase to your OS keychain. If you forget your passphrase, you can access it through Keychain Access. If you have trouble using this option, check the troubleshooting section at the end of this article.


To list the keys you just added:
ssh-add -l
Enter fullscreen mode
Exit fullscreen mode
To delete all keys from just the agent, use:
ssh-add -D
Enter fullscreen mode
Exit fullscreen mode
⚠️ Note that your keys are on an agent, so a passphrase isn’t required. Make sure no one else has access to your computer!
🔗 Test your connection
Now it’s time to add your keys to your accounts. Use the following to copy your respective key:
pbcopy < personal_key.pub
cat personal_key.pub | pbcopy # alternative command!
Enter fullscreen mode
Exit fullscreen mode
⚠️ Notice how the .pub key is used. This is the public (🔒) identity key that you want to provide to your git service. Don’t use your private (🔑) key! (the other file without the .pub extension)
Now paste it in the appropriate account, where SSH keys can be added. For github, you can get there through your personal settings:

Say you want to clone your repo locally. This is what the URL would look like:
Github says git@github.com:some_cool_project is what you want to use when cloning this project with the command: git clone git@github.com:some_cool_project.
Now, instead of git@github.com, if you used a different User and Host in the config file, you’d replace those parts of the clone command. For example, say you used another_user for User and personal.github.com for the Host you’d write:
git clone another_user@personal.github.com:some_cool_project
Enter fullscreen mode
Exit fullscreen mode
⚠️ Your git user name and email must be configured locally for every project, or you’ll end up making commits on work and personal accounts with the global user name and email you’ve set for git!
💡 I’ll do a deep-dive into the git config in a later article. Stay tuned!
You’re all done! No need to manually specify the key you want to use, every-time you connect with SSH. The config and agent will automatically determine what key to use based on the host you’re connecting to.
I hope that this article helped you today. If you feel like it’ll help others, or if you have a correction or suggestion, I would love to hear from you. If you want to replicate this article for other operating systems, I would love to hear from you as well. Cheers!
Troubleshooting links
https://medium.com/r/?url=https%3A%2F%2Fhelp.github.com%2Fen%2Farticles%2Ferror-ssh-add-illegal-option—-k
Further exploration
https://medium.com/r/?url=http%3A%2F%2Fwww.snailbook.com%2Ffaq%2Fabout-agent.auto.html
Understand ssh-agent and ssh-add - http://blog.joncairns.com/2013/12/understanding-ssh-agent-and-ssh-add/
SSH Key types (read about the better ed25519 key algorithm that is now in use)- https://chealion.ca/2016/06/20/ssh-key-types-and-cryptography-the-short-notes/
How to follow this guide
- Don’t type or run anything until I told you so.
- This guide uses linux commands. For windows users, you can use
win-bash- https://sourceforge.net/projects/win-bash/files/shell-complete/latest/
- http://win-bash.sourceforge.net/
The problem
I have one computer and two different github accounts. One is for work, the other is for my personal stuff. I can’t use the same ssh key twice, so I have to use different ssh key for each of my accounts. How do I do that? How do I switch between these ssh keys?
Generate SSH keys
Open your terminal / CMD PROMPT and type the following command:
ssh-keygen -t rsa -b 4096 -C "your_email@example.com"
The command will ask ssh to generate a key for you. After running the command, you will see the following feedback:
Generating public/private rsa key pair.
The next line you will see would be:
Enter file in which to save the key (/Users/sprlwrks/.ssh/id_rsa):
Here, you can specify a directory and filename for the ssh key that will be generated. The default is /Users/sprlwrks/.ssh/id_rsa. It will be saved in /Users/sprlwrks/.ssh/ with the file name id_rsa.
It will generate two files. id_rsa and id_rsa.pub. The id_rsa.pub contains your public key which you will use, you can give this to your team leader or to other people that you want. The id_rsa is the private key, don’t want to give this key to anyone.
In this case, since we are going to generate two ssh keys, we don’t want to keep the default file name, set it to whatever name you want by giving it /Users/sprlwrks/.ssh/file_name. I named mine id_rsa_personal.
The next line you will see would be:
Enter passphrase (empty for no passphrase):
If you type a passphrase here, you will have to remember that and type the same passphrase again everytime you use this key. I’ll leave it up to you to decide. For me, I did not add any passphrase so I simply pressed enter. The next line would ask you to retype the passphrase again, of course if you left it empty then just press enter.
With all that you should have gotten something that looks like this:
aprilmintacpineda-MacBook-Pro:PWA-W88 aprilmintacpineda$ ssh-keygen -t rsa -b 4096 -C "me@example.com"
Generating public/private rsa key pair.
Enter file in which to save the key (/Users/sprlwrks/.ssh/id_rsa): /Users/sprlwrks/.ssh/id_rsa_personal
Enter passphrase (empty for no passphrase):
Enter same passphrase again:
Your identification has been saved in /Users/sprlwrks/.ssh/id_rsa_personal.
Your public key has been saved in /Users/sprlwrks/.ssh/id_rsa_personal.pub.
The key fingerprint is:
0b:0a:9f:58:2d:c8:a3:87:f7:44:17:f6:2c:d8:b7:3a me@example.com
The key's randomart image is:
+--[ RSA 4096]----+
|                 |
|                 |
|      o          |
| . . = +         |
|  = = * S        |
| o B = + o       |
|o + =   o        |
| o o  E.         |
|    . ..         |
+-----------------+
That’s your first key. Now run cd ~/.ssh and then run ls. ls would list all files in the directory. You should see the keys that have been generated.
id_rsa_personal id_rsa_personal.pub
Now try to generate another one by following the same procedure again. I named my second key id_rsa_work. Once you’re done you should have the following files (respective to the filename you gave it):
id_rsa_personal id_rsa_personal.pub id_rsa_work id_rsa_work.pub
Adding ssh keys to github accounts (or whatever you use)
First, I’ll add my id_rsa_personal ssh key.
1
Go to your github account then go to settings -> SSH and GPG keys. Click on New SSH key button.
2
Go to your terminal again and run this command: cat ~/.ssh/<yourfilename>.pub replacing <yourfilename> with whatever file name you gave it, in this case mine is id_rsa_personal.pub.
After running the commands above, you’ll see something like this:
ssh-rsa AAAAB3NzaC1yc2EAAAADAQABAAACAQCha2J5mW3i3BgtZ25/FOsxywpLVkx1RgmZunIACBxV5V1lUm9I6J8uP8sP4xst/WwTWzjUY8svey1FRSNghOwtZvYZyD7lEy4FCdTn3InbRq4xXHNSVEdpG0Bbr1MEr/QWin/Q87oabQZo3wyRRJ3KjsO9xCDcwH8xcxUM+I4f3b5zSulpArjBsjkkkMsXih7L35FtzrW241mKjoA5g9/cfbqF7F6Gqwi23eUMCxwbEjgsUdFAKNbSmf9b4b7dAmfwjljM23m6FYGN75r72RH5bSuSoPdNfRwbqtHmvY0dPjcsnBRAkVokNPnvUXx4FMe7ra7T2vFOjfuyrHNVNi82TiOKRbtSxzReyNUOtpAukw833iy0hLyDy/Oo4/9aFXQEg4QSFdb/cZcTUdKE2XWIlstGApXgoy19VfJHJLjFZ7QRQQbd+8l53bZ0vUqpWINpf1UwpgKLLuCKWMqXUlaTfWSTLS+7LAM9PhsSD8FmzwFMJiSlC6ZYmT5W8c74SxRrw0EB8u/UA2UdWaOB7bj66aydOt8i+tu5HhB5eNQGDUh/19seW+48f6Qf5kcwcO/KlEn9hujJbCZA8owbzyT0KFjo5slnvEtH46EKGlaWOrRk4nuDoi3nF87TkLB8yedVxki2dvh8dmTLgGU0Dzb8NpZ+6gq3X+xnXqo92989tQ== me@example.com
3
Copy paste that to the key on your new ssh key form then give it whatever title you like. I gave mine macbook.
4
Done! Now you have added your first ssh key to your github account, now add the other one to another github account or to the same github account giving it a different title so you can differentiate between the two.
Configure SSH
1
On your terminal / CMD PROMPT, run this command: touch ~/.ssh/config this will create a file with the file name of config on the ~/.ssh folder. Now Go to that folder and open that file with your text editor of choice.
2
Copy paste the following on it:
Host gh_work
    HostName github.com
    IdentityFile ~/.ssh/id_rsa_personal
The Host is how you would referrence this credentials on your terminal. The HostName is whatever platform you use, in this case github.com. The IdentityFile is the ssh key to be used for this credential.
Now add another one. By the end you should have something like these:
Host gh_work
    HostName github.com
    IdentityFile ~/.ssh/id_rsa_work

Host gh_personal
    HostName github.com
    IdentityFile ~/.ssh/id_rsa_personal
Testing connection
On your terminal / CMD PROMPT, run ssh -T git@<myHost> replacing myHost with the host you wrote on the config file. Mine is ssh -T git@id_rsa_personal.
After running that command, you should see something like this: Hi <username>! You've successfully authenticated, but GitHub does not provide shell access.. Now you know it’s working. Go ahead and test the other key you added.
Cloning repository using a specific ssh key
For this example I will clone this repository: https://github.com/aprilmintacpineda/chat-with-people-backend. To test if yours keys work, you should your own test repository.
Run git clone git@<myHost>:aprilmintacpineda/chat-with-people-backend.git. Replacing myHost with the Host you want that was specified on your config. Ones it’s done, you can run git remote -v and you’ll see something like this:
origin	git@gh_personal:aprilmintacpineda/chat-with-people-backend.git (fetch)
origin	git@gh_personal:aprilmintacpineda/chat-with-people-backend.git (push)
You see now that it would use my gh_personal keys everytime. Now make changes and commit and push the changes. If all worked well you should get no errors.
Note that if you already have an existing clone in your machine, you can do this:
git remote add origin git@<myHost>:aprilmintacpineda/chat-with-people-backend.git
then simply push to that remote.
Now you’re all set, you can test the other key too!
Other Resources
- https://help.github.com/articles/connecting-to-github-with-ssh/
- https://help.github.com/articles/generating-a-new-ssh-key-and-adding-it-to-the-ssh-agent/
Help me improve this guide by adding comments
Edits and corrections
- Point out mistakes (even grammatical mistakes).
- Suggest edits.
Tell me about it
- Did I missed something?
- Experiencing an error?
Created with <3 by April Mintac Pineda
Если вы работаете с множеством GitHub или Bitbucket аккаунтов, то вам может понадобится создать несколько SSH-ключей.
1) Просмотр имеющихся SSH-ключей
Неплохо бы проверить (просто чтобы знать) есть ли у вас в системе уже сгенерированные SSH-ключи, для этого нужно просмотреть содержимое папки ~/.ssh:
$ ls -al ~/.ssh
# Lists the files in your .ssh directory, if they exist
2) Создание нового SSH-ключа
Для начала откроем Git Bash и создадим новый SSH-ключ:
$ ssh-keygen -t rsa -b 4096 -f ~/.ssh/personalid -C «personalid»
Вместо personalid может быть например, your_email@example.com.
Или вы можете указать имя в формате сервис-логин, например, github.com-activehacker или github.com-jexchan. Имя может быть любым, например, account-one или account-two. Главное требование это чтобы оно было friendly-name. Если у вас всего два аккаунта (личный и рабочий), то можно использовать personal и company соответственно, или personalid и workid, или personal.bitbucket.org и work.bitbucket.org.
Если не задавать имя файла, то SSH-ключ по умолчанию при использовании rsa сохранится по пути: /Users/you/.ssh/id_rsa. Могут быть и другие варианты, в зависимости от алгоритма: id_dsa.pub, id_ecdsa.pub, id_ed25519.pub.
Примеры имен файлов для опции -f:
- ~/.ssh/id_rsa_activehacker
- ~/.ssh/id_rsa_jexchan
- ~/.ssh/key-one
- ~/.ssh/key-two
- ~/.ssh/private_ssh_file
- ~/.ssh/id_rsa_personal
- ~/.ssh/id_rsa_company
Также для защиты SSH-ключа вам нужно будет ввести секретную фразу (passphrase). В дальнейшем вам не придется вводить её каждый раз т.к. её запомнит утилита ssh-agent.
В результате выполнения этой команды вы должны получить пару public/private key. Пример:
Your identification has been saved in /Users/manthony/.ssh/personalid.
Your public key has been saved in /Users/manthony/.ssh/personalid.pub.
3) Настройка SSH конфигурации
Далее после того как все необходимые ключи созданы нужно отредактировать config-файл по пути ~/.ssh/config.
Host workid
HostName bitbucket.org
IdentityFile ~/.ssh/workid
Host personalid
HostName bitbucket.org
IdentityFile ~/.ssh/personalid
После этого ссылка на репозиторий вида git@bitbucket.org:<accountname>/<reponame>.git преображается в ссылку вида git@alias:<accountname>/<reponame>.git.
Через опцию User можно прописать имя пользователя на удаленной машине в config-файл.
Host account-one
HostName server.example.com
User git
IdentityFile ~/.ssh/key-one
Host account-two
HostName server.example.com
User git
IdentityFile ~/.ssh/key-two
Тогда в ссылках не нужно будет в начале указывать git@.
$ git remote add one account-one:repository.git
$ git remote add two account-two:repository.git
4) Добавление SSH-ключа на хостинг проектов
Далее нужно добавить публичный ключ на хостинг.
Под Git Bash его можно скопировать сразу в буфер обмена:
$ clip < ~/.ssh/id_rsa.pub
# Copies the contents of the id_rsa.pub file to your clipboard
В Linux его можно вывести на консоль и скопировать командой cat:
$ cat ~/.ssh/id_rsa.pub
А в Mac OS X можно сразу скопировать в буфер обмена с помощью команды pbcopy:
$ pbcopy < ~/.ssh/id_rsa.pub
5) Настройка ssh-agent для безопасного хранения и использования SSH-ключей
Далее нужно добавить ключ в ssh-agent. Сначала нужно убедиться, что ssh-agent запущен, для этого под Git Bash нужно выполнить команду:
А под Mac OS X и Linux:
$ ps -e | grep [s]sh-agent
Чтобы запустить ssh-agent под Git Bash нужно выполнить команду:
# start the ssh-agent in the background
$ eval «$(ssh-agent -s)»
Agent pid 59566
Он будет оставаться запущенным до тех пор пока вы не выйдите из своей учетной записи, или выключите компьютер или убьете процесс.
Просмотреть добавленные в ssh-agent ключи можно командой:
$ ssh-add -l
Сам ключ добавляется командой:
$ ssh-add ~/.ssh/id_rsa
Ключи добавляются кратковременно и при перезапуске агента будут удалены.
Если нужно чтобы ssh-agent «забыл» ключ спустя какое-то время, то нужно использовать команду:
$ ssh-add -t <seconds>
Чтобы ssh-agent запускался автоматически надо в ~/.profile добавить:
env=~/.ssh/agent.env

agent_load_env () { test -f "$env" && . "$env" >| /dev/null ; }

agent_start () {
    (umask 077; ssh-agent >| "$env")
    . "$env" >| /dev/null ; }

agent_load_env

# agent_run_state: 0=agent running w/ key; 1=agent w/o key; 2= agent not running
agent_run_state=$(ssh-add -l >| /dev/null 2>&1; echo $?)

if [ ! "$SSH_AUTH_SOCK" ] || [ $agent_run_state = 2 ]; then
    agent_start
    ssh-add
elif [ "$SSH_AUTH_SOCK" ] && [ $agent_run_state = 1 ]; then
    ssh-add
fi

unset env
В данном скрипте команда ssh-add добавляет ключ, который расположен по пути по умолчанию ~/.ssh/id_rsa. Чтобы добавить свой ключ нужно написать
ssh-add path/to/your/private/key
Тогда ssh-agent запросит пароль на добавление ключа.
ssh поддерживает добавление SSH-ключа к агенту при первом использовании. Для этого надо в файл ~/.ssh/config добавить строку:
AddKeysToAgent yes
6) Тестирование подключения
ssh -T git@github.com
# Attempts to ssh to GitHub
В этой статье мы настроим SSH аутентификацию в Windows по RSA или EdDSA ключам для безопасного доступа к удаленным компьютерам/серверам. Рассмотрим, как сгенерировать открытый и закрытый ключи (сертификаты) в Windows и настроить сервер OpenSSH в Windows 10/11 и Windows Server 2019/2022 для аутентификации по ключам (без паролей).
Аутентификация по SSH ключам широко используется в мире Linux, а в Windows этот функционал появился относительно недавно. Идея заключается в том, что на SSH сервере добавляется открытый ключ клиента и при подключении сервер проверяет наличие соответствующего закрытого ключа у клиента. Таким образом удаленный пользователь может аутентифицироваться в Windows без ввода пароля.
Содержание:
- Генерация SSH ключей на клиенте Windows
- Настройка OpenSSH в Windows для авторизации по ключам
- Вход по SSH ключу для локальных администраторов Windows
Генерация SSH ключей на клиенте Windows
На клиентском, компьютере, с которого вы будет подключаетесь к удалённому серверу Windows с OpenSSH, вам нужно сгенерировать пару ключей (открытый и закрытый). Закрытый ключ хранится на клиенте (не отдавайте его никому!), а открытый ключ нужно скопировать в файл authorized_keys на SSH сервере. Чтобы сгенерировать SSH ключи на клиенте Windows, вы должны установить клиент OpenSSH.
В Windows 10/11 и Windows Server 2019/2022 клиент OpenSSH устанавливается как отдельный встроенный компонент с помощью PowerShell:
Add-WindowsCapability -Online -Name OpenSSH.Client~~~~0.0.1.0
Запустите обычную (непривилегированную сессию PowerShell) и сгенерируйте пару ED25519 ключей:
ssh-keygen -t ed25519
По умолчанию утилита ssh-keygen генерирует ключи RSA 2048. В настоящий момент вместо RSA ключей рекомендуется использовать именно ED25519.
Утилита попросит вас указать пароль для защиты закрытого ключа. Если вы укажете пароль, то каждый раз при использовании этого ключа для SSH авторизации, вы должны будете вводить этот пароль. Я не стал указывать пароль для ключа (не рекомендуется).
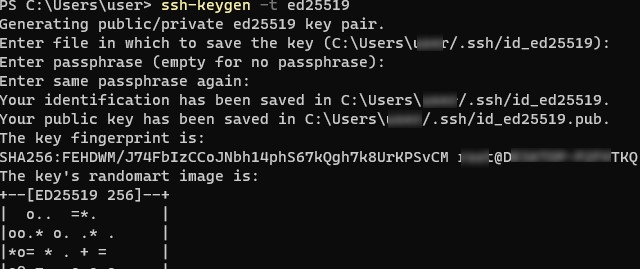
Generating public/private ed25519 key pair. Enter file in which to save the key (C:\Users\myuser/.ssh/id_ed25519):

Enter passphrase (empty for no passphrase): Enter same passphrase again: Your identification has been saved in C:\Users\myuser/.ssh/id_ed25519. Your public key has been saved in C:\Users\myuser/.ssh/id_ed25519.pub. The key fingerprint is: SHA256:C2wXeCQSUcJyq0 myuser@computername The key's randomart image is: +--[ED25519 256]--+ | ..*O=..o. | +----[SHA256]-----+
Утилита ssh-keygen создаст каталог .ssh в профиле текущего пользователя Windows (%USERPROFILE%\.ssh) и сгенерирует 2 файла:
-
id_ed25519
– закрытый ключ (если вы сгенерировали ключ типа RSA, файл будет называться
id_rsa
) -
id_ed25519.pub
– публичный ключ (аналогичный RSA ключ называется
id_rsa.pub
)
После того, как ключи созданы, вы можете добавить закрытый ключ в службу SSH Agent, которая позволяет удобно управлять закрытыми ключами и использовать их для аутентификации.
SSH Agent может хранить закрытые ключи и предоставлять их в контексте безопасности текущего пользователя. Запустите службу ssh-agent и настройте автоматический запуск с помощью PowerShell команд управления службами:
Set-service ssh-agent StartupType ‘Automatic’
Start-Service ssh-agent
Добавьте ваш закрытый ключ в базу ssh-agent:
ssh-add "C:\Users\user\.ssh\id_ed25519"
Identity added: C:\Users\kbuldogov\.ssh\id_ed25519 (kbuldogov@computername)

Или так:
ssh-add.exe $ENV:UserProfile\.ssh\id_ed25519
Настройка OpenSSH в Windows для авторизации по ключам
SSH сервер (в этом примере это удаленный компьютер с Windows 11 и настроенной службой OpenSSH).
Скопируйте файл id_ed25519.pub в каталог .ssh профиля пользователя, под которым вы будете подключаться к SSH серверу. Например, у меня в Windows 11 создан пользователь user1, значит я должен скопировать ключ в файл C:\Users\user1\.ssh\authorized_keys.
В данном примере подразумевается, что user1 это обычная учетная запись пользователя без прав локального администратора на компьютере с сервером SSH.
Если каталог .ssh в профиле отсутствует, его нужно создать вручную.
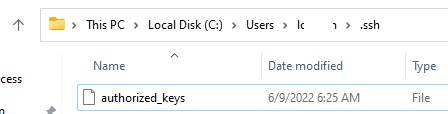
Можно скопировать ключ на SSH сервер с клиента с помощью SCP:
scp C:\Users\youruser\.ssh\id_rsa.pub [email protected]:c:\users\user1\.ssh\authorized_keys
В один файл authorized_keys можно добавить несколько открытых ключей.
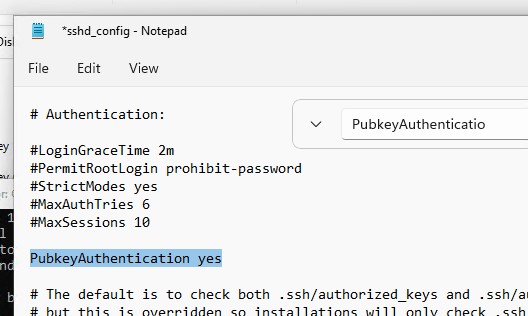
По умолчанию в OpenSSH сервере в Windows отключена аутентификация по ключам. Вы можете проверить это в конфигурационном файле sshd_config. Проще всего получить список разрешенных способов аутентификации в OpenSSH с помощью такой PowerShell команды (Select-String используется как аналог grep в PowerShell):
cat "C:\ProgramData\ssh\sshd_config"| Select-String "Authentication"
#PubkeyAuthentication yes
#HostbasedAuthentication no
# HostbasedAuthentication
 PasswordAuthentication yes
#GSSAPIAuthentication no

В этом примере строка PubkeyAuthentication закомментирована, значит этот способ аутентификации отключен.
Откройте файл sshd_config с помощью блокнота, раскоментируйте строку:
Notepad C:\ProgramData\ssh\sshd_config
PubkeyAuthentication yes
Также в конфигурационном файле sshd_config придется отключить режим StrictModes. По умолчанию этот режим включен и запрещает аутентификацию по ключам, если закрытый и открытый ключ недостаточно защищены. Раскомментируйте строку
#StrictModes yes
, измените на
StrictModes no
.
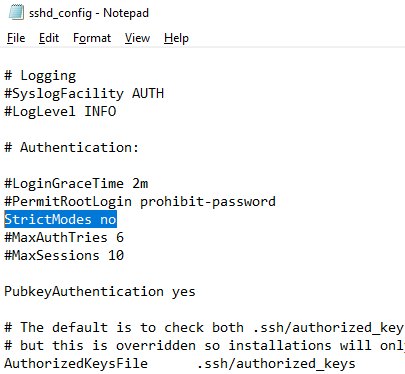
Сохраните файл и перезапустите службу sshd:
Restart-Service sshd
Теперь вы можете подключиться к SSH серверу без ввода пароля пользователя. А если вы не задали пароль (passphrase) для закрытого ключа, вы сразу автоматически подключитесь к вашему удаленному серверу Windows.
Для подключения через SSH к удаленному хосту используется следующая команда:
ssh (username)@(имя или IP адрес SSH сервера)
Например,
ssh [email protected]
Это означает, что вы хотите подключиться к удаленному SSH серверу с адресом 192.168.1.90 под учетной записью admin. Служба SSH Agent автоматически попытается использовать для авторизации сохраненный ранее закрытый ключ.
- Если вы не хотите использовать ssh-agent для управления ключами, вы можете указать путь к закрытому ключу, который нужно использовать для SSH аутентификации:
ssh [email protected] -i "C:\Users\user\.ssh\id_ed25519" - Для подключения с помощью учетной записи пользователя из домена Active Directory используется формат:
ssh [email protected]@168.1.90 -i <private_key_absolute_path>

При первом подключении нужно добавить отпечаток ключа SSH сервера в доверенные. Наберите yes -> Enter.
The authenticity of host '192.168.1.90 (192.168.1.90)' can't be established.
ECDSA key fingerprint is SHA256:LNMJTbTS0EmrsGYTHB3Aa3Tisp+7fvHwZHbTA900ofw.
Are you sure you want to continue connecting (yes/no/[fingerprint])? yes
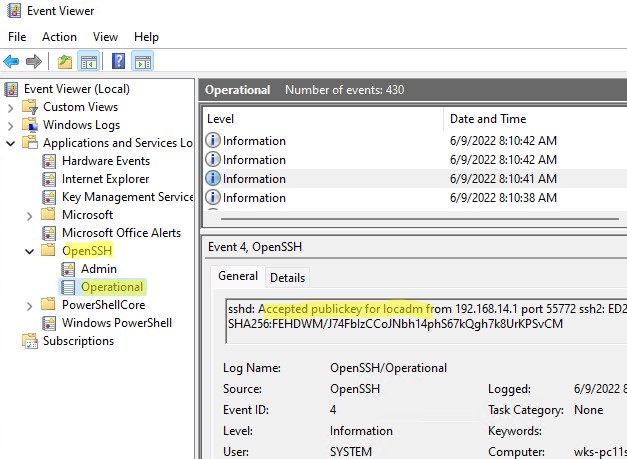
Информацию по аутентификации в Windows с помощью SSH ключей можно найти в журнале события. В современных версиях OpenSSH логи пишутся не в текстовые файлы, а в отдельный журнал Event Viewer (Application and services logs -> OpenSSH -> Operational).
При успешном подключении с помощью ключа в журнале появится событие:
EventID 4
sshd: Accepted publickey for locadm from 192.168.14.1 port 55772 ssh2: ED25519 SHA256:FEHDWM/J74FbIzCCoJNbh14phS67kQgh7k8UrKPSvCM
Если вы не смогли подключиться к вашему SSH серверу по RSA ключу, и у вас все равно запрашивается пароль, скорее всего пользователь, под которым вы подключаетесь, входит в группу локальных администраторов сервера (SID группы S-1-5-32-544). Об этом далее.

Вход по SSH ключу для локальных администраторов Windows
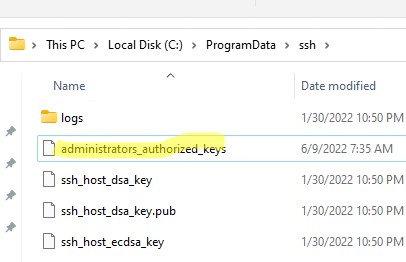
В OpenSSH используются особые настройки доступа по ключам для пользователей с правами локального администратора Windows.
В первую очередь, вместо ключа authorized_keys в профиле пользователя нужно использовать файл с ключами C:\ProgramData\ssh\administrators_authorized_keys. Вам нужно добавить ваш ключ в этот текстовый файл (в целях безопасности права на этот файл должны быть только у группы Administrators и SYSTEM).
Вы можете изменить NTFS права на файл с помощью:
- утилиты icacls:
icacls.exe "C:\ProgramData\ssh\administrators_authorized_keys" /inheritance:r /grant "Administrators:F" /grant "SYSTEM:F - или с помощью PowerShell командлетов get-acl и set-acl:
get-acl "$env:programdata\ssh\ssh_host_rsa_key" | set-acl "$env:programdata\ssh\administrators_authorized_keys"

После этого SSH аутентификация по ключам работает даже при отключенном режиме StrictModes
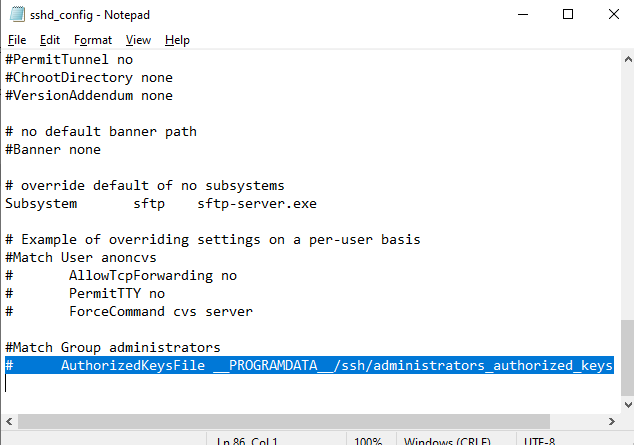
alert]Чтобы использовать ключ authorized_keys из профиля пользователя, и не переносить данные открытого ключа в файл administrators_authorized_keys, вы можете закомментировать строку в файле конфигурации OpenSSH (C:\ProgramData\ssh\sshd_config).
Закомментируйте строки:
#Match Group administrators
# AuthorizedKeysFile __PROGRAMDATA__/ssh/administrators_authorized_keys
Дополнительно в файле sshd_config вы можете запретить SSH подключение по паролю по паролю:
PasswordAuthentication no
После сохранения изменений в файле sshd_config не забудьте перезапустить службу sshd.
restart-service sshd
Если вы установили PasswordAuthentication no, и некорректно настроите аутентификацию по ключам, то при подключении по ssh будет появляться ошибка:
[email protected]: Permission denied (publickey,keyboard-interactive).

В OpenSSH на Linux доступна опция PermitRootLogin, позволяющая ограничить доступ к SSH серверу под аккаунтом root. В Windows OpenSSH эта директива не доступна и для ограничения доступа администраторов нужно использовать параметр DenyGroups.
Итак, вы настроили SSH аутентификацию в Windows по открытому RSA-ключу (сертификату). Теперь вы можете использовать такой способ аутентификации для безопасного доступа к удаленным северам, автоматического поднятия проброса портов в SSH туннеле, запуска скриптов и других задачах автоматизации.