
Windows позволяет назначить несколько IP адресов (алиасов, псевдонимов) на один физический сетевой адаптер. Это может пригодиться, когда вы хотите запустить несколько веб сайтов с уникальными IP адресами на одном сервере IIS, хотите привязать приложение к определенному IP или готовитесь к смене IP адресации. В Windows можно назначить дополнительные статический адрес на сетевой интерфейс через графический интерфейс или из командной строки.
Содержание:
- Добавить дополнительный IP адрес через панель управления Windows
- Параметр SkipAsSource и основной IP адрес сетевого адаптера
- Назначить второй IP адрес сетевому интерфейсу из командной строки/PowerShell
Добавить дополнительный IP адрес через панель управления Windows
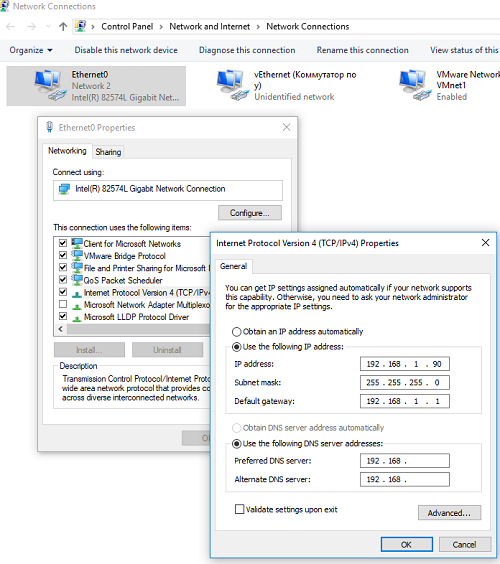
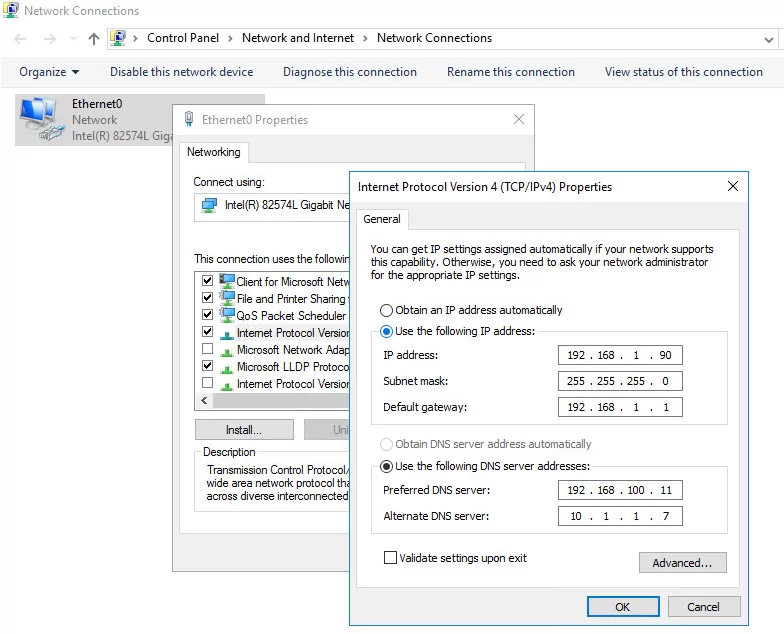
Дополнительный IP адрес можно назначить на сетевой интерфейс через графический интерфейс панели управления Windows.
- Откройте панель управления сетевыми подключениями (выполните команду
ncpa.cpl
). - Откройте свойства вашего сетевого интерфейса.
- В списке протоколов выберите TCP/IP v4 и нажмите Свойства.

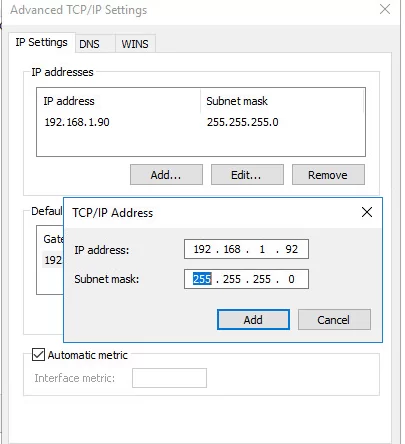
- Нажмите на кнопку Advanced (Дополнительно) и в секции «IP адреса» нажмите кнопку Добавить.
- Укажите дополнительный IP адрес и маску подсети и нажмите Добавить.
- Сохраните изменения.
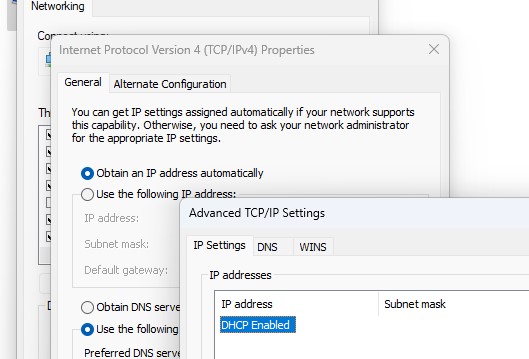
Дополнительный IP адрес можно добавить только для сетевого адаптера, для которого первый IP адрес настроен вручную, а не получен от DHCP сервера. Если для интерфейса включено автоматическое получения IP адреса (DHCP enabled), вам не удастся добавить дополнительный IP.
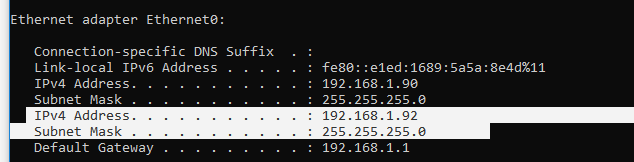
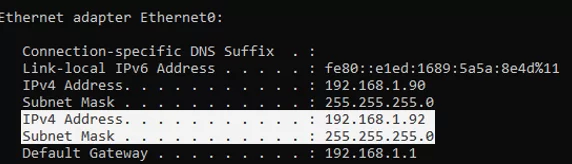
Выполните команду
ipconfig
и проверьте, у интерфейса появился второй IP адрес.
Проверьте доступность второго IP адреса по сети с других компьютеров командой ping. Он должен отвечать.
Параметр SkipAsSource и основной IP адрес сетевого адаптера
Когда вы назначаете дополнительный IP из панели управления, такой IP адрес будет использоваться для исходящих соединений. Дело в том, что в современных версиях Windows отсутствует понятие основного IP адреса. Если вы хотите запретить отправку исходящего трафика со всех дополнительных IP адресов, нужно включить для них опцию SkipAsSource.
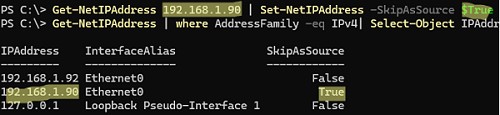
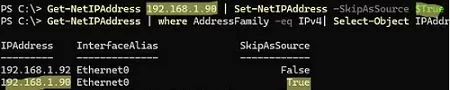
С помощью PowerShell выведите список IPv4 адресов, назначенных сетевым адаптерам:
Get-NetIPAddress | where AddressFamily -eq IPv4| Select-Object IPAddress, InterfaceAlias, SkipAsSource
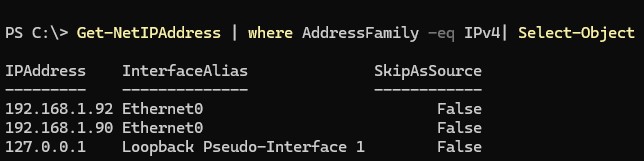
В этом примере SkipAsSource =False установлен для всех IP адресов компьютера. Если вы хотите сделать определенный IP адрес основным, выполните команду:
Get-NetIPAddress 192.168.1.90 | Set-NetIPAddress -SkipAsSource $True
Теперь указанный IP не будет использоваться в качестве источника исходящих подключений, кроме случаев его явного задействования определенным приложением. Так же при включенном флаге второй IP адрес не регистрируется в DNS (при включенной динамической регистрации).
Назначить второй IP адрес сетевому интерфейсу из командной строки/PowerShell
При добавлении дополнительного IP адреса из командной строки вы можете сразу включить для него флаг SkipAsSource. Например, с помощью netsh:
Netsh int ipv4 add address name="Local Area Connection" 192.168.1.92 255.255.255.0 SkipAsSource=True
Вывести список назначенных IP адресов и значение опции SkipAsSource:
netsh int ipv4 show ipaddresses level=verbose
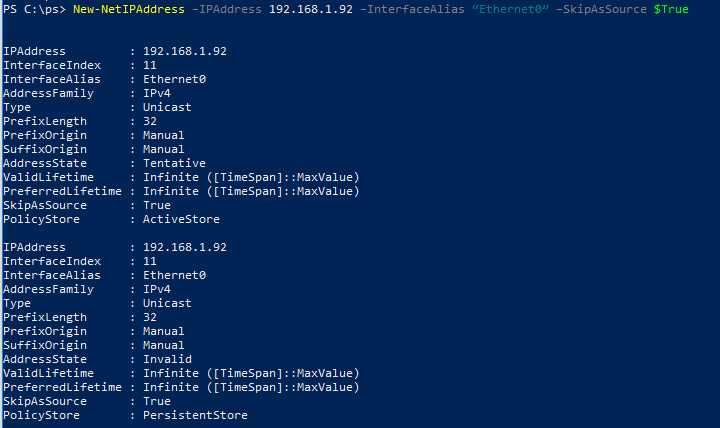
Также можно настроить второй IP для сетевого интерфейса с именем Ethernet0 с помощью PowerShell:
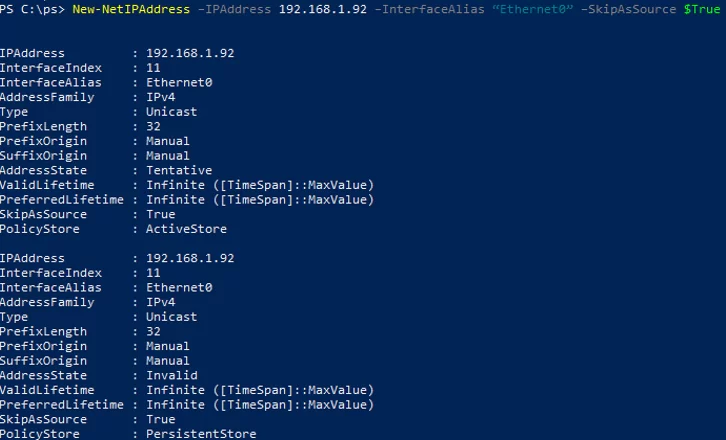
New-NetIPAddress –IPAddress 192.168.1.92 –PrefixLength 24 –InterfaceAlias “Ethernet0” –SkipAsSource $True
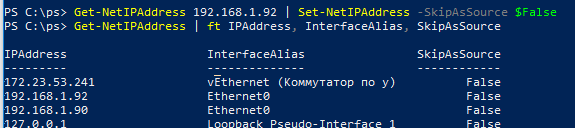
Чтобы разрешить исходящий трафик с данного IP адреса сетевого интерфейса воспользуйтесь командой:
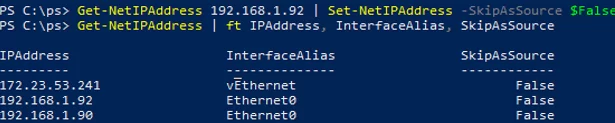
Get-NetIPAddress 192.168.1.92 | Set-NetIPAddress -SkipAsSource $False
Удалить дополнительный IP:
Get-NetIPAddress 192.168.1.92| Remove-NetIPAddress
В некоторых случаях, например, на веб-серверах, требуется настроить на одном сетевом адаптере более одного IP адреса. Если это один сервер и в нём одна или две сетевые карты и небольшое количество дополнительных IP адресов, то, как правило, настройка через графический интерфейс проблем не вызовет. Но что делать, если серверов больше десяти и на каждом несколько сетевых адаптеров и у каждого несколько IP адресов? Настройка через графический интерфейс в данном случае займёт очень немало времени. В таком случае на помощь придут средства автоматизации Windows — PowerShell.
Далее будет рассмотрен процесс настройки для версии ОС Windows Server 2016/2019.
Запускаем Powershell от имени администратора.
Сделать это можно, кликнув правой кнопкой по меню «Пуск» и выбрав «Windows PowerShell (Admin)» в случае английской версии ОС.
Далее откроется окно Powershell. Теперь необходимо определить, на каком интерфейсе необходимо добавить требуемые IP-адреса. Используя команду ниже определяем требуемый сетевой интерфейс:
Get-NetAdapter

В данном случае один сетевой адаптер с именем «Ethernet» , его и будем использовать. Узнаем вначале, какие уже настроены IP на данном адаптере :
Get-netIpAddress -ifalias Ethernet -addressFamily Ipv4 | ft

Для добавления нового адреса, например 192.168.10.10, необходимо использовать следующую команду:
New-NetIPAddress -addressfamily Ipv4 -IPAddress 192.168.10.10 -PrefixLength 24 -InterfaceAlias “Ethernet” -SkipAsSource $True
Проверим результат:
Get-netIpAddress -ifalias Ethernet -addressFamily Ipv4 | ft -AutoSize -Wrap

Как видно, адаптеру присвоен ещё один IPv4 адрес — 192.168.10.10.
Если необходимо, чтобы исходящий трафик отправлялся с нового IP адреса, необходимо параметру SkipAsSource присвоить значение false:

Get-NetIPAddress 192.168.10.10 | Set-NetIPAddress -SkipAsSource $False
В случае, если необходимо добавить большее число адресов, например 5 , то можно воспользоваться следующим скриптом.
Используя массив чисел, например, от 11 до 16 и цикл, добавляем ещё 5 IP адресов:
11..16 | foreach-object {New-NetIpAddress -ifalias Ethernet -AddressFamily IPv4 -PrefixLength 24 -IPAddress "192.168.10.$_" -verbose}

После выполнения команды проверим знакомой уже командой :
Get-NetIPAddress

Заключение: в данной статье мы рассмотрели возможности использования Powershell для автоматизации назначения нескольких IP адресов на одном сетевом интерфейсе.
- VPS сервер с Windows — цены
- Облачные серверы
- Инструкции по работе с Windows Server
220140
Минск
ул. Домбровская, д. 9
+375 (173) 88-72-49
700
300
ООО «ИТГЛОБАЛКОМ БЕЛ»
220140
Минск
ул. Домбровская, д. 9
+375 (173) 88-72-49
700
300
ООО «ИТГЛОБАЛКОМ БЕЛ»
Readers help support Windows Report. We may get a commission if you buy through our links.
Read our disclosure page to find out how can you help Windows Report sustain the editorial team. Read more
Yes, you can add a secondary IP address in Windows 11 and it’s very useful when you are hosting various SSL websites. Having multiple IP addresses also helps when you have to send bulk emails in a short duration, or to avoid being blacklisted under the spamming filter.
How can I add secondary & multiple IP addresses in Windows 11?
1. Via Network Connections
- Press Windows + R to launch the Run command, enter ncpa.cpl in the text field, and either click OK or hit Enter to launch the Network Connections window.

- Now, right-click on the relevant network adapter, and select Properties from the context menu.

- Either double-click on the Internet Protocol Version 4 (TCP/IPv4) entry here or select it and click on Properties.

- Now, select the Use the following IP address and Use the following DNS server addresses options and enter the desired addresses in the fields under both.

- Once done, click on the Advanced button.
- Next, click on the Add button.

- You can now enter the IP address and Subnet in the relevant fields here and then click on Add.

- Once done, click on OK at the bottom of every window to save the changes.
- Similarly, you can add multiple IP address by clicking on the Add button and entering the other IP’s.


2. Via Command Prompt
- Press Windows + S to launch the Search menu, enter Windows Terminal in the text field at the top, right-click on the relevant search result, and select Run as administrator from the context menu.

- Click Yes on the UAC (User Account Control) prompt that pops up.

- Next, click on the downward-facing arrow at the top, and select Command Prompt from the list of options. Alternatively, you can hit Ctrl + Shift + 2 to launch Command Prompt in a new tab.

- Next, execute the following command while replacing the NIC (Network Interface Card) name, IP address, and subnet:
netsh int ipv4 add address "NIC name" 192.168.21.102 255.255.255.0


That’s it! The secondary IP address will now be added, and you can verify the same in the network properties or use the ipconfig /all command.
There are several users who prefer executing commands, rather the going with the conventional GUI (Graphic User Interface) method, and this method will help them do that.
Also, check the next section to find out how to add multiple IP addresses in Windows 11.
3. Add multiple IP addresses using Command Prompt
- Launch an elevated Windows Terminal, and then open the Command Prompt tab in it.
- You will now have to execute the the following command to automatically add multiple IP addresses while replacing the relevant entries here, as you did earlier:
FOR /L %variable IN (Start,Increase/Decrease,Stop) DO netsh interface ipv4 add address "NIC name" IP address (with variable) Subnet - If you want to add the IP addresses 192.168.21.101 to 192.168.21.103 to the required network adapter, here is what the command would look like:
FOR /L %x IN (101,1,103) DO netsh interface ipv4 add address "NIC name" 192.168.21.%x 255.255.255.0
- The command may take a few seconds to execute, depending on the number of IP addresses to be added, so wait patiently.

- Once done, you can check the new IP addresses using the following command:
ipconfig /all


This method is somewhat tricky and requires the use of For loop, often used in computing languages. But it will save considerable time when adding multiple IP addresses at once in Windows 11.
- FIX: Can’t change static IP address & DNS server Windows 10/11
- PC won’t acquire IP address: Here’s how to solve the issue
- 5+ best software to hide IP address in Windows 10/11
- Fix: The default gateway is not available on Windows 10/11
How do I remove a secondary IP address in Windows 11?
- Press Windows + S to launch the Search menu, enter View network connections in the text field, and click on the relevant search result that appears.

- Right-click on the relevant network adapter, and select Properties from the context menu.
- Double-click on the Internet Protocol Version (TCP/IPv4) entry to launch its Properties.

- Now, click on the Advanced button near the bottom.
- Finally, select the IP address not required anymore, and click on the Remove button
- Once done, click on OK at the bottom for every window to save the changes.


The process to remove a secondary IP address is as simple as adding it. But do make sure not to remove a critical address or even enter any random one, since it could lead to problems connecting to the Internet.
What are the various versions/types of IP address?
If you navigate to the network properties, you will find both IPv4 and IPv6, which are different versions of an IP address, with the latter being more advanced.
The need for IPv6 arises due to an increase in the number of devices connected to the Internet. Since IPv4 could only cater to 4.29 billion addresses, there’s IPv6 now that can support 1028 times more devices.
Then comes the concept of static and dynamic IP addresses. As the name suggests, the former remains the same throughout while the latter keeps changing periodically. A normal user will likely have a dynamic IP address since the static ones cost more.
To fully understand the concept, check our guide on IP addresses. Though it’s for Windows 10, the ideas and steps listed there also work the same on Windows 11.
How can I hide or mask my IP address on a LAN (Local Area Network)?
There are a couple of arguments in favor of hiding or masking your IP address, but they certainly don’t apply to a large number of users. Many argue that it maintains anonymity and safety, two of the most critical things on the Internet.
Apart from that, certain websites or data are not accessible to the people of a particular country due to geographical restrictions, but by masking the IP address, you can easily access that, since that’s the only way to identify your location on the web.
So, if you are keen on hiding your IP address, check out this guide to learn all the ways you can do it. Though it’s for Windows 10, we have verified that it works just as effectively on the latest iteration.
As you can see, it’s easy to add secondary or multiple IP addresses in Windows 11, and all that you have to do is to check network connection details, and adjust your network settings to do so.
Along with that, you now also know how to remove or hide your IP address. Use this information to make your presence on the web safer and avoid being located or scammed. Also, find out how to connect to a DHCP server in Windows 11.
Tell us your experience of adding a secondary IP address and the need for it, in the comments section below.
Kazim Ali Alvi
Windows Hardware Expert
Kazim has always been fond of technology, be it scrolling through the settings on his iPhone, Android device, or Windows PC. He’s specialized in hardware devices, always ready to remove a screw or two to find out the real cause of a problem.
Long-time Windows user, Kazim is ready to provide a solution for your every software & hardware error on Windows 11, Windows 10 and any previous iteration. He’s also one of our experts in Networking & Security.
Windows allows to assign multiple IP addresses (aliases) to a single physical network adapter. This can be useful when you want to run multiple websites with unique IP addresses on the same IIS server, if you want to bind an application to a specific IP, or if you are preparing to change IP addresses on your network. In Windows, you can add a secondary (virtual) static IP address to an existing network adapter using the GUI or the command prompt.
Contents:
- Assigning an Additional IP Address to a Network Adapter on Windows
- The SkipAsSource Flag and the Primary NIC IP Address
- How to Add a Second IP Address From CMD/PowerShell
Assigning an Additional IP Address to a Network Adapter on Windows
The Control Panel GUI can be used to add an additional IP address to the network adapter.
- Navigate to the Control Panel –> Network and Internet –> Network and Sharing Center -> Change adapter settings (or just run the
ncpa.cplcommand); - Open the network interface properties;
- Select TCP/IP v4 from the list of protocols and click Properties;
- Click the Advanced button and then click Add in the IP Addresses section;
- Specify an additional IP address, subnet mask, and click Add;
- Save the changes.
Multiple IP addresses can only be added for a network adapter whose first IP address is set manually (not assigned by a DHCP server). If DHCP is enabled on the interface, you won’t be able to add a second IP .
Run the ipconfigcommand and check that there are now two IP addresses assigned to the network interface.
To check the availability of the second IP address over the network from other computers, use the ping command.
The SkipAsSource Flag and the Primary NIC IP Address
If you assign an additional IP from the Control Panel GUI, this IP address will be used for outgoing connections. There is no such thing as a primary IP address in Windows. To prevent Windows from using a specific IP address for outbound connections, you need to enable the SkipAsSource option for it.
Use PowerShell to list the IPv4 addresses assigned to network adapters on Windows:
Get-NetIPAddress | where AddressFamily -eq IPv4| Select-Object IPAddress, InterfaceAlias, SkipAsSource

In this example, SkipAsSource is set to False for all computer IP addresses. If you want to make a particular IP address the primary source, disable the SkipAsSource option for all the other IP addresses.
Get-NetIPAddress 192.168.1.90 | Set-NetIPAddress -SkipAsSource $True
Now the specified IP will not be used by Windows as a source for outgoing connections, except the cases where it is explicitly used by a specific app. Also, if the SkipAsSource flag is enabled, the second IP address will not be registered in DNS (if dynamic registration is enabled).
How to Add a Second IP Address From CMD/PowerShell
You can enable the SkipAsSource flag when adding an additional IP address from the prompt. For example, using netsh:
Netsh int ipv4 add address name="Local Area Connection" 192.168.1.92 255.255.255.0 SkipAsSource=True
List all assigned IP addresses and their SkipAsSource values:
netsh int ipv4 show ipaddresses level=verbose
Also, you can also use PowerShell to configure a second IP for an Ethernet0 network adapter:
New-NetIPAddress –IPAddress 192.168.1.92 –PrefixLength 24 –InterfaceAlias Ethernet0 –SkipAsSource $True
To allow outgoing traffic from a specific NIC IP address, change SkipAsSource to False.
Get-NetIPAddress 192.168.1.92 | Set-NetIPAddress -SkipAsSource $False
Remove the additional IP address:
Get-NetIPAddress 192.168.1.92| Remove-NetIPAddress
In some situations you may want to specify several IP addresses at once on a single network interface. For example, you can assign addresses from different subnets with different masks. Thus it will be possible to access your PC using any of those addresses.
How to assign multiple IP addresses to network adapter in Windows 10, 8, 7
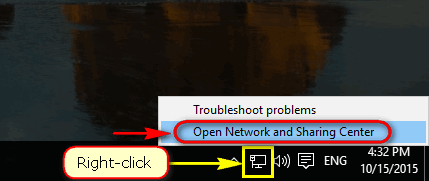
Right-click the network icon in the Taskbar and click Open Network and Sharing Center:
Double click the Ethernet or Wi-Fi connection:
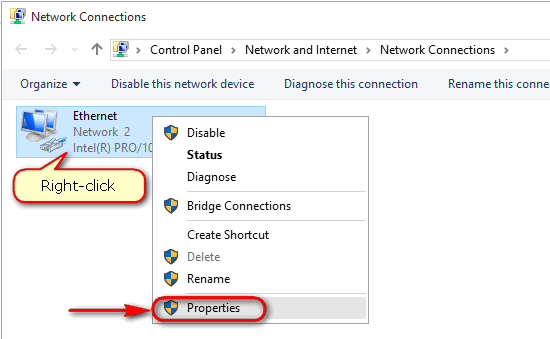
In the status windows press Properties:
Select Internet Protocol Version 4 (TCP\IPv4) in the list and press Properties:
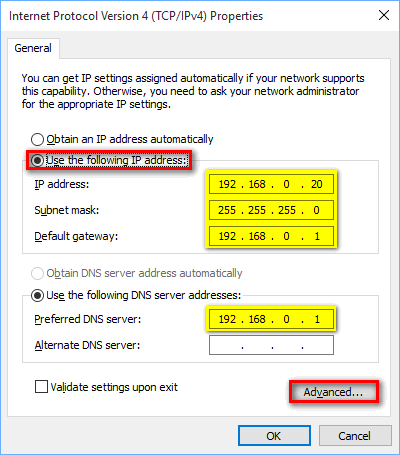
Switch the selector to Use the following IP address.
Manually specify IP, Subnet mask, Default gateway and Preferred DNS server.
Then press Advanced:
Click Add… button:
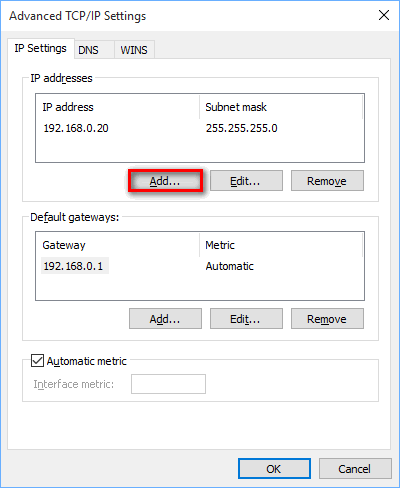
Specify additional IP addresses with subnet masks and press Add:
Press OK:

Press OK once more:
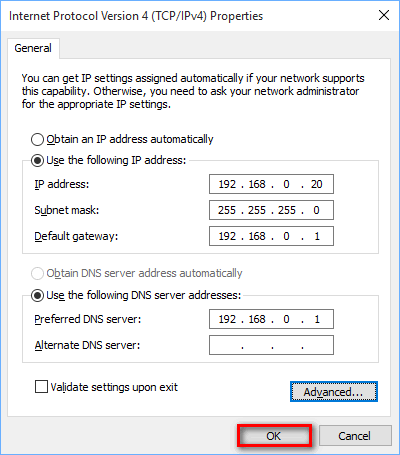
Press Close:
In such a way you can add a bunch of IP addresses to a single Network Interface Card (NIC) in Windows 10, 8.1 or 7.