
Пользователи Windows 11 и Windows 10 иногда сталкиваются с ошибками 0x800f0983, а также схожими кодами — 0x800f0982, 0x800f0984, 0x800f0986, 0x800f0988, 0x800f0989 — при попытке установить обновления через Центр обновления Windows. Эти ошибки указывают на сбои в процессе установки, и их причины могут быть разными. В этой инструкции мы подробно разберём простые и дополнительные способы устранения таких проблем, чтобы вернуть вашему ПК возможность обновляться.
Причины ошибок
Ошибки с кодами 0x800f098x обычно связаны с одной из следующих проблем:
— Повреждение файловой системы: ошибки на диске мешают корректной записи обновлений.
— Повреждение системных файлов: ключевые компоненты Windows отсутствуют или испорчены.
— Сбой кэша обновлений: повреждены временные файлы Центра обновления.
— Изменение прав доступа: некорректные разрешения на системные папки блокируют установку.
— Недостаток места: мало свободного пространства на системном диске (C:).
Зная причины, можно выбрать подходящий способ решения.
Простые способы исправления
Начните с базовых методов — они часто решают проблему без сложных манипуляций.
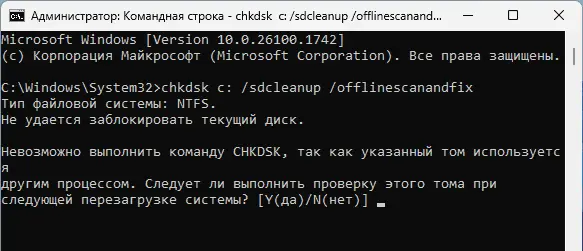
1. Проверка и исправление диска:
— Откройте командную строку от имени администратора (Win + X → Командная строка (Администратор)).
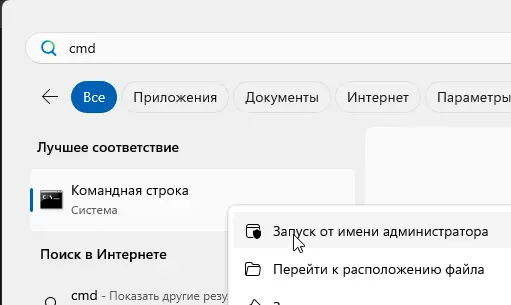
Введите:
chkdsk c: /sdcleanup /offlinescanandfix
— На запрос о проверке при перезагрузке введите Y и нажмите Enter.
— Перезагрузите ПК. Во время загрузки не нажимайте клавиши, даже если появится сообщение «Нажмите любую клавишу».
— После проверки попробуйте установить обновление снова.
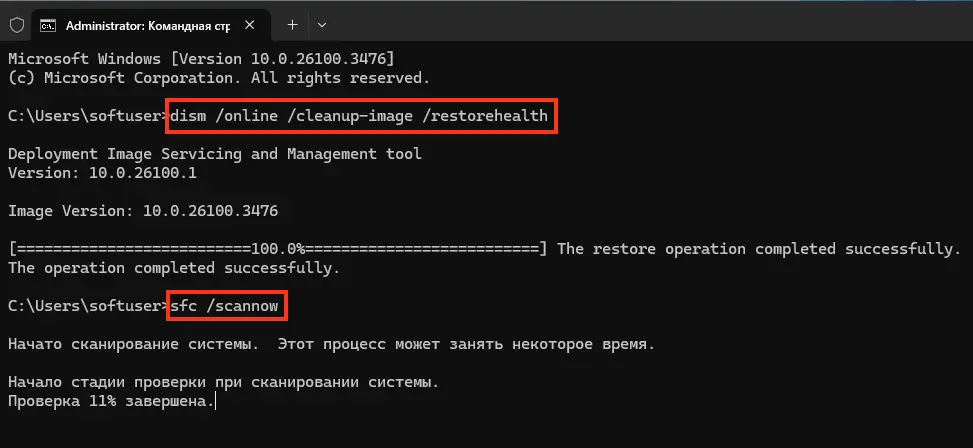
2. Восстановление системных файлов:
— В командной строке от имени администратора выполните по очереди:
dism /online /cleanup-image /restorehealth
sfc /scannow
— Дождитесь завершения обеих команд (DISM восстанавливает образ системы, SFC проверяет и чинит файлы).
— Перезагрузите компьютер и проверьте Центр обновления.
3. Сброс кэша Центра обновления:
— Запустите командную строку от имени администратора и выполните команды по порядку:
net stop bits
net stop wuauserv
net stop appidsvc
net stop cryptsvc
ren C:\Windows\SoftwareDistribution SoftwareDistribution.old
ren C:\Windows\System32\catroot2 catroot2.old
net start bits
net start wuauserv
net start appidsvc
net start cryptsvc
— Перезагрузите ПК. Это очищает кэш обновлений, устраняя повреждённые файлы.
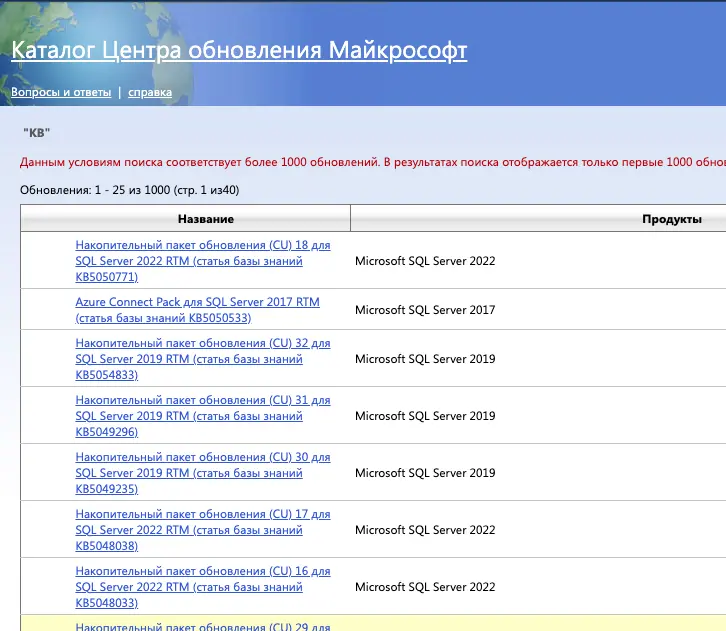
4. Ручная установка обновления:
— Найдите номер обновления (KBxxxxxxx) в Центре обновления.
— Перейдите на сайт Microsoft Update Catalog.
— Введите номер KB, скачайте файл для вашей версии Windows (x64 или x86) и установите его вручную.
— Этот метод не всегда работает для ошибок 0x800f098x, но стоит попробовать.
5. Отключение стороннего ПО:
— Если у вас установлен сторонний антивирус или файрвол, временно отключите их и проверьте обновления.
— Некоторые программы могут блокировать доступ к системным файлам.
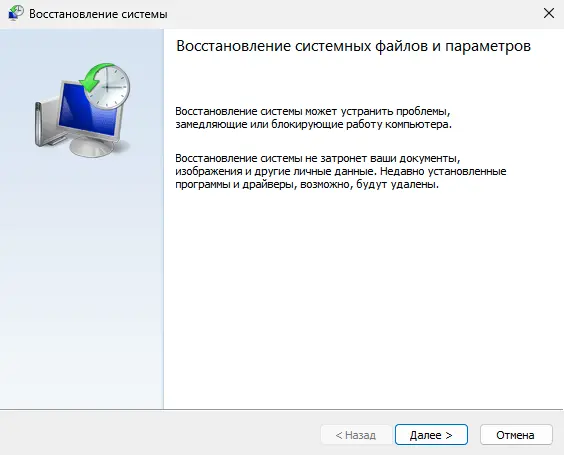
6. Восстановление системы:
— Если ошибка появилась после изменений в системе (установка ПО, настройка прав), используйте точку восстановления:
— Win + R → rstrui → выберите точку до появления проблемы.


7. Очистка диска:
— Проверьте свободное место на диске C: через Проводник → Этот компьютер.

— Если осталось менее 10 ГБ, очистите диск:
— Щёлкните правой кнопкой по C: → Свойства → Очистка диска → Очистить системные файлы.
— Удалите временные файлы, старые обновления и корзину.
Дополнительные способы
Если простые методы не помогли, попробуйте более глубокие подходы:
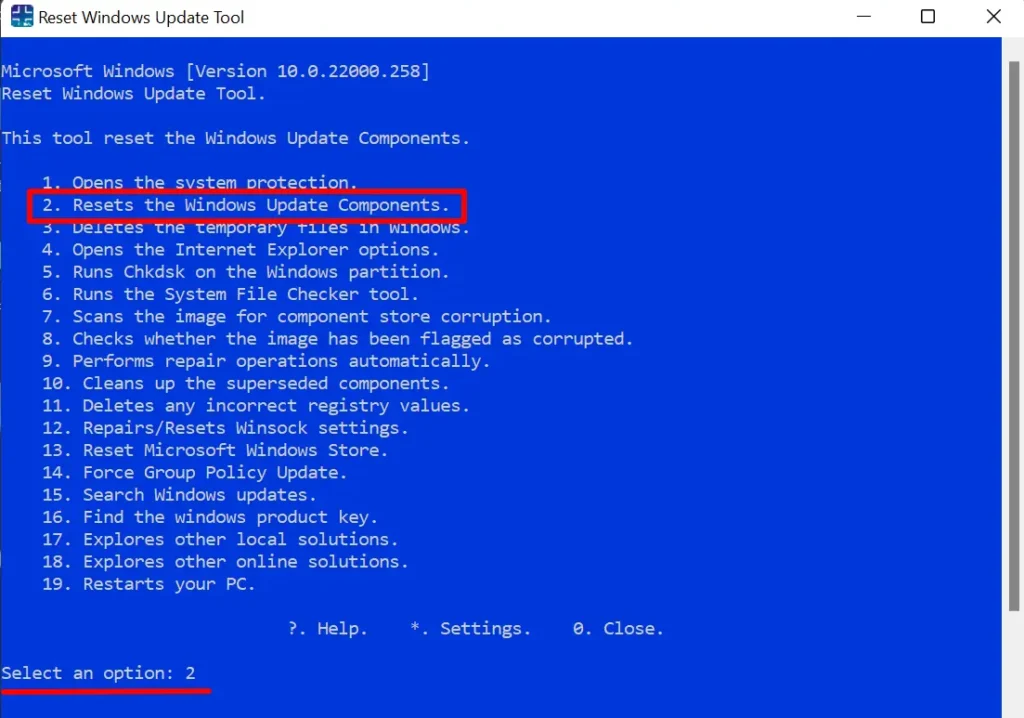
1. Сброс компонентов Центра обновления:
— Используйте утилиту Reset Windows Update Tool:
— Запустите её, выберите опцию сброса и следуйте инструкциям.
— Или вручную через PowerShell:
— Откройте PowerShell от администратора (Win + X → Windows PowerShell (Администратор)).

— Выполните команды из пункта 3 выше, добавив:
wuauclt.exe /detectnow
wuauclt.exe /reportnow
— Перезагрузите ПК.

2. Обновление на месте (In-Place Upgrade):
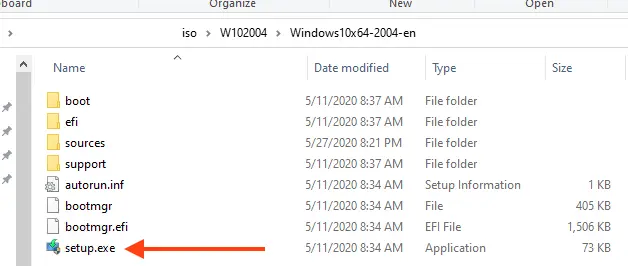
— Скачайте ISO-образ актуальной версии Windows 11/10 с нашего каталога.
— Подключите образ (правый клик → Подключить) и запустите setup.exe.

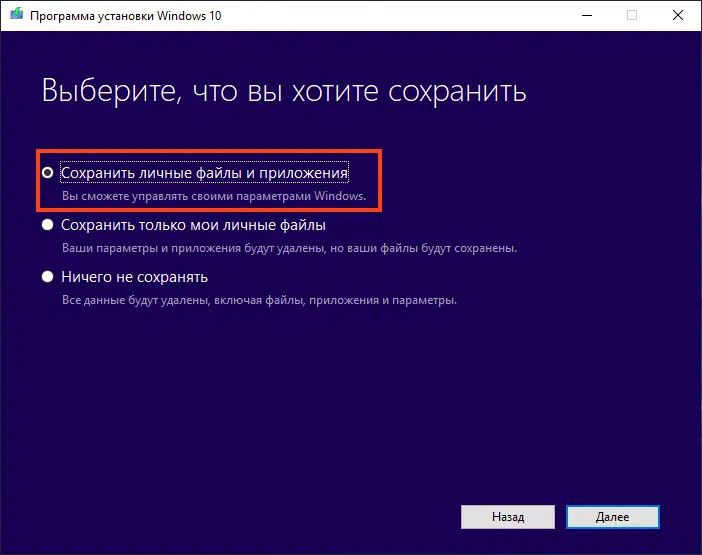
— Выберите «Сохранить файлы и приложения» — это обновит систему без потери данных.
— Метод работает почти всегда, но занимает 1-2 часа.
3. Восстановление через Центр обновления (только Windows 11):
— Зайдите в Параметры → Система → Восстановление → Переустановить Windows.


— Учтите: при ошибках 0x800f098x этот способ может не сработать из-за сбоя компонентов.
Ошибки 0x800f0983–0x800f0989 при обновлении Windows 11 и 10 связаны с повреждением файлов, диска или кэша обновлений. Начните с проверки диска (chkdsk), восстановления файлов (DISM и SFC) и сброса кэша. Если это не помогает, используйте ручную установку или обновление на месте с ISO. Эти шаги устранят проблему в большинстве случаев, вернув вашему ПК актуальные обновления и безопасность!
During the download of the latest Windows 10 build, the process may abruptly stop, resulting in an error and preventing the completion of the update.
We know how frustrating this situation can be. So, if you are on the lookout for a way to resolve the error, then this is the right place. We have created this guide just for you.
What Is the Error Code 0x800f0982?
Windows Update is important in maintaining your computer’s security. It is a utility that finds, downloads, and installs the latest updates for your operating system. However, no matter how crucial its role is, it can sometimes get stuck or break during the process. Consequently, it may display the Error Code 0x800f0982.
The Windows Update Error Code 0x800f0982 is a problem that may arise when users are installing or downloading updates. This can happen for any number of reasons, but it’s often due to the user not having enough hard disk space available on their machine. The issue may also happen because of the following:
- The Windows Update service is offline.
- You’re using an outdated version of Windows 10/11.
- There are corrupted files in your system directory.
According to affected users, the issue is usually associated with the KB4493509, KB4489899, and KB4493509 updates. It sometimes comes with a message which says, “There were problems installing some updates, but we’ll try again later.”
How to Fix the Error 0x800f0982 on Windows 10
What if Windows Update ends with the Error 0x800f0982? What should you do? Below are some verified fixes that other affected users have tried, allowing them to install the pending update successfully.
Fix 1: Run the Windows Update Troubleshooter
The Windows Update troubleshooter is a great tool that can fix any problems related to update components. It will automatically scan your system and find the issue. So, all you need to do is click on the correct option and it will take care of everything for you.
However, it is worth noting that Windows 10/11 has a lot of other tools that are designed to resolve common update failures. Although running the troubleshooter does not guarantee that the problem is resolved, it surely is a good starting point.
To use the Windows Update Troubleshooter to fix the 0x800f0982 error code, follow these steps:
- Launch the Run utility by pressing the Windows + R keys.
- Type “ms-settings:troubleshoot” (no quotes) into the text field and hit Enter. This will take you to the Troubleshooting tab of the Settings app.
- Here, navigate to the right section and scroll down to the “Get up and running” section. Hit the Windows Update button.
- In the menu that appears, click the “Run the Troubleshooter” button.
- The troubleshooter will then launch and automatically start to scan your system for any problems. Wait until the scan is complete.
- Once the scan is finished, the troubleshooter will suggest repair strategies that may help with the error you’re currently dealing with. If you agree with a recommendation, click the “Apply This Fix” button.
- Once the action is completed, restart your computer and check if the issue is resolved.
Fix 2: Reset the WU Component
If you suspect that the issue is triggered by a glitch in the Windows Update utility itself, then resetting the WU component may do the trick.
The WU component, also called the WU service, is a part of the Windows Update utility. It is responsible for checking available updates, downloading them if necessary, and then installing them on your computer. When this service has issues or isn’t running properly on your computer there can be consequences such as errors while trying to download an update or install new software which would require a restart of the process.
To reset this component, here’s a quick guide:
- Press the Windows + R keys to open the Run utility.
- Type “cmd” (no quotes) into the text field and press the Ctrl + Shift + Enter keys simultaneously. This will launch an elevated Command Prompt.
- Into Command Prompt, enter the commands below in their recommended order to reset the WU component.
- net stop wuauserv
- net stop cryptSvc
- net stop bits
- net stop msiserver
- ren C:\Windows\SoftwareDistribution SoftwareDistribution.old
- ren C:\Windows\System32\catroot2 catroot2.old
- net start wuauserv
- net start cryptSvc
- net start bits
- net start msiserver
- Once done, exit the Command Prompt and restart your computer.
- Check if the issue has been fixed.
Fix 3: Force Install the Update Using PowerShell
If resetting the WU component does not get rid of the 0x800f0982 error, then you can use PowerShell to force install the update.
Windows PowerShell is a powerful command-line scripting and automation utility that enables you to control the Windows OS. You can use it for system administration, network programming, task automation, and others. You can also use it to resolve Windows Update-related errors.
Here’s how to use it to download and install any available Windows update:
- Launch the Run dialog box using the Windows + R keys.
- Type “powershell” (no quotes) into the text field and press the Ctrl + Shift + Enter keys. This will open an elevated PowerShell window.
- On Windows PowerShell, type “wuauclt.exe /UPDATENOW” (no quotes) command and hit Enter to force the installation of the update.
- Once the update is installed, restart your computer and check if the update is still pending in the Windows Update utility.
Fix 4: Use the System File Checker
In some cases, the error occurs because system files are damaged. To fix these files, all you need is the System File Checker.
The System File Checker is a tool in Windows that can identify and replace missing, corrupted, or improperly installed system files. If there are problems with the registry, it may also be of use. This utility can help troubleshoot issues without having to take drastic measures like re-installing Windows.
To use this utility to resolve the 0x800f0982 error code, here are the steps to take:
- Type “command prompt” (no quotes) into the search bar and right-click on the most relevant result.
- Select Run as Administrator.
- If asked to confirm your action, hit the Yes button.
- Now, the Command Prompt window should appear. Type “sfc /scannow” (no quotes) and hit the Enter key.
- At this point, the System File Checker should start the scan and repair process. Once done, restart your computer and try to install the update once again.
Fix 5: Perform a DISM Scan
If performing an SFC scan doesn’t help, then try running a Deployment Image Servicing and Management (DISM) scan. This is an equally handy utility that can detect and repair any issues with your system’s image files. It is a command-line tool that can be used for both diagnostic and repair purposes on Microsoft Windows systems.
Follow the steps below to perform a DISM scan:
- Right-click on the Windows menu and select Run.
- Into the text box, input “cmd” (no quotes) and hit the Ctrl + Shift + Enter keys simultaneously.
- If prompted by the User Access Control wizard, hit the Yes button.
- Now, on Command Prompt, type “DISM /Online /Cleanup-Image /RestoreHealth” (no quotes) and hit Enter.
- The DISM tool will now begin scanning your system for any damaged system image and apply the necessary fixes.
- Once it’s done, restart your computer and install the update one more time.
Fix 6: Install the Update Manually
If you think that a specific KB is causing the problem, you can download it manually from the official Microsoft Update Catalog. It is a repository of software updates, both security and non-security related. It’s an easy way to make sure you’re using the latest versions of installed applications on your PC or device. You can also find new apps in this catalog that are available for download.
To download the problematic KB here, follow these instructions:
- Visit the official Microsoft Update Catalog.
- Input the KB number into the search field.
- A new web page will be displayed with all the updates related to your search. Hit the Download button next to the patch you need.
- Once downloaded, install it on your device.
- Restart your computer and see if the error has been resolved.
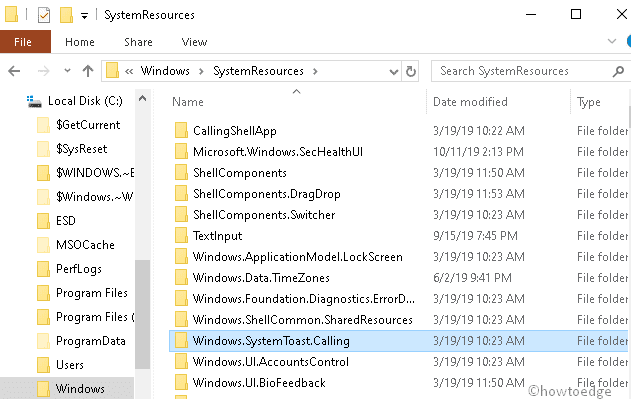
Fix 7: Clear the SoftwareDistribution and System Resources folders.
It is possible that the error code 0x800f0982 is showing because there are undeleted update files on your system. They may be interfering with the installation process, confusing the Windows update service. That is why experts suggest deleting them every now and then to avoid conflict.
However, before you can proceed and delete these unneeded files, you need to stop to important Windows services: the Windows Update Service and the Background Intelligent Service. For a detailed guide on what to do, see below:
- Press the Windows + X keys to launch the Power User menu.
- Select Command Prompt (Admin) from the list.
- Hit the Yes button when prompted by the UAC.
- Run the following commands:
net stop wuauserv
net stop bits commands
Note: Make sure to hit the Enter key after each one of them.
- Next, minimize the Command Prompt window and launch the Windows Explorer.
- Navigate to the SoftwareDistribution folder by going to the Windows folder and selecting SoftwareDistribution.
- Delete everything in this folder.
- Next, go back to the main Windows folder and click System Resources. Delete everything inside the folder. If you get a warning, just ignore it or hit the Yes button.
- After deleting the contents of both folders, restart the two services you disabled earlier. Do this by opening the Command Prompt window and running the following commands:
net start wuauserv
net start bits
Note: Make sure you hit Enter after each one.
- At this point, reboot your computer and check if the error persists.
Fix 8: Uninstall and Reinstall the Language Packs
A language pack can be used when you are using an app or typing into the search bar of any application on Windows 10/11. It allows users to input text with their desired language’s characters instead of having them replaced by symbols or numbers.
Now, how is a language pack associated with the error? According to some affected users, the 0x800f0982 error code may be caused by a missing language pack. So, it’s something that you may want to test and verify.
Here’s how to proceed with this fix:
- Go to the Start menu and select Settings.
- Navigate to Time and Language and click Language.
- Expand the Preferred Language section and select a language that you want to remove.
- Hit the Remove button next to it.
- Close Settings.
- Open the Settings window again and go to Time and Language.
- Choose Language.
- Next, go to Preferred Languages and click Add a Language.
- Select the language you have recently removed.
- Click Options and hit the Download button to begin installing the language.
- Exit the Settings app and install the update again.
Fix 9: Enable the Windows Module Installer Service
If you’ve exhausted all possible means but still to no avail, you can enable the Windows Module Installer service instead. This is an important Windows component that fetches updates and installs them. If you have accidentally disabled it, then the Windows update process may fail.
Here’s how to enable this service:
- Launch an elevated Command Prompt by typing “cmd” (no quotes) into the search box and right-clicking on the most relevant result. Click Run as Administrator.
- When prompted by the UAC, hit Yes to proceed.
- On Command Prompt, type “SC config trustedinstaller start=auto” (no quotes) command.
- Hit Enter.
- Now, you have just enabled the Windows Update Installer service. The update process should now start.
- Restart your system to apply the changes.
Regular System Maintenance
In addition to the steps outlined for resolving the Error Code 0x800f0982, it’s essential to emphasize the importance of regular system maintenance. Keeping your system updated, performing disk cleanups, and regularly checking for malware can prevent many common errors, including update issues. Tools like Windows Security are integral to maintaining your system’s health and should be used regularly to keep your system running smoothly.
Compatible Drivers and System Compatibility
Another crucial aspect to consider when facing update errors is ensuring that all your system drivers are up to date and compatible with the latest Windows 10/11 build. Outdated or incompatible drivers can cause various issues, including update failures. Users should regularly check the Device Manager for any exclamation marks indicating driver issues and use the Windows Update or manufacturer’s website to download the latest drivers.
Preventative Measures and Best Practices
Lastly, adopting preventative measures and best practices can significantly reduce the likelihood of encountering update errors. This includes regularly backing up important data, avoiding the use of unsupported software, and staying informed about known issues and solutions through official Windows Update release notes and advisories.
Wrapping Up
If you are getting the Error Code 0x800f0982 when trying to install a new update on Windows 10/11, then don’t worry! There are many ways that this problem can be eliminated and we’ll walk you through some of them right now.
The first thing that most people try is using the Windows Update troubleshooter, which may work depending on your version of OS. If it still doesn’t work after running the troubleshooter multiple times without success, resetting the WU component might do the trick. Of course, there are a plethora of other fixes you can try! Refer to the solutions above for a detailed guide.
Give us some love and rate our post!
Many users report problems with February 2024’s Windows 11 KB5034765 security update. Installing it often fails with cryptic error codes 0x800f0922, 0x800f0982, or 0x80070002.
Even if installed, it may cause File Explorer to crash on reboot or the taskbar to vanish entirely. So, this critical patch is far from seamless for many.
Microsoft strives for universal automated updates without disrupting work, but KB5034765 misses the mark and interrupts productivity for many Windows 11 users. Whether failing the install or enabling nasty post-update bugs, the February 2024 patch frustrates more than helps.
With reboot errors and disappearing interface elements post-install, this proposed “fix” ends up causing new issues like rubbing salt in update wounds. Here’s hoping debugging efforts can reshape KB5034765 into the passive and helpful background update Windows patches aim to be.
Problems installing update KB5034765
Many users report that the security update will start to install but then abruptly fails mid-process. Specifically, the patch successfully downloads and prompts a reboot to finalize the installation. However, during the reboot, Windows Update itself unexpectedly stops. Users are kicked back to the desktop with an error that the update could not complete.
People have tried repeating this process several times, but each attempt shows this same pattern – the patch begins installation after a reboot, then Windows Update encounters an internal error. No specific details show regarding where things went wrong. Ultimately, the OS fails to finalize applying the update and boots the user back into a still-vulnerable unpatched Windows environment.
This pattern of initially successful download followed by failed mid-install during reboot creates great update frustration. Despite troubleshooting efforts and repeated manual update initiation, the essential security patch remains unable to finalize and take effect as Windows’s own update manager raises issues.
Solution to KB5034765 update installation issue
It seems like there’s a workaround available for installing the KB5034765 update by deleting the hidden folder called $WinREAgent. Here are three methods you can try to remove this folder from your Windows 11 installation:
Method 1: Run Disk Cleanup as administrator, select the system drive, and check the boxes for “Temporary Files” and other relevant options. Click “OK” to delete system files, including Windows Update files. This action will remove unnecessary files within $WinREAgent.
Method 2: Open File Explorer, navigate to the system drive, and ensure that you’ve enabled the option to view hidden items in the folder settings. Locate $WinREAgent and remove it from the system.
Method 3: Open the Command Prompt as Administrator and execute the following command: `rmdir /S /QC:$WinREAgent`
You can choose any of these methods that you find most convenient, and hopefully, this will resolve the issue with installing the KB5034765 update.
Problems with File Explorer when restarting
Some PC users face a recurring issue where File Explorer crashes upon rebooting or shutting down the system. This problem initially surfaced with the optional Windows 11 January 2024 update and has unfortunately persisted into the mandatory security patch.
The error message points to an application error with explorer.exe, highlighting a specific memory address and stating, “The memory could not be written.” Despite various troubleshooting attempts, including running the System File Checker tool (sfc /scannow), testing RAM with Windows tools and memtest86+, and even clean reinstallations of Windows 11, the error remains unresolved.
Interestingly, many affected users share a common factor: the presence of a controller accessory like an Xbox 360 controller for Windows connected to their PC. Although this connection has been noted, it’s unclear if it directly contributes to the issue.
Microsoft’s release notes for update KB5034765 indicated a fix for an issue where explorer.exe might stop responding when a PC with a connected controller accessory is restarted or shut down. However, despite this supposed solution, users continue to encounter the problem.
Today, in this article, we discuss Windows 10 Update Error 0x800f0982, its probable reasons and a few ways to resolve this bug. The above error message appears primarily while applying the recent Windows 10 Builds. This bug may also arise while installing the latest cumulative updates (specific KB) in both x64-based or x84-based PCs.
Run the troubleshooter is the first workaround to deal with the update Error 0x800f0982. Alternatively, repair the corrupt system core files using SFC and DISM may also help to manage these update issues. If there are indeed corrupt files inside SoftwareDistribution and SoftwareResources, try to remove its obsolete contents. You may even try Reset Windows Components and clean boot your system to download the updates without any interruption.
Ways to solve Windows Update Error 0x800f0982
Here are the step-wise workarounds to resolve the Windows Update Error 0x800f0982 on your PC-
1} Run the Windows Update Troubleshooter
Running troubleshooter is a built-in app of Windows 10 that can repair damaged files while updating. Hence, follow the below guidelines to run this tool-
Step-1: First of all click on Windows and hit the Gear icon (Settings) from the left pane.
Step-2: When the app appears, select Update & Security thereafter Troubleshoot from the left column.
Step-3: Jump to the right pane, scroll down and tap the Windows Update option.
Step-4: Next, hit Run the troubleshooter button and let Windows detect and repair the pertaining issue.
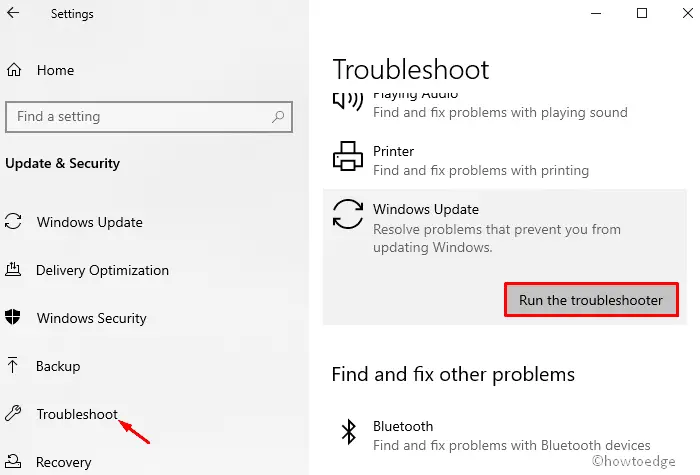
Step-5: Once the above task finishes, Reboot your computer and check the pending updates again.
Step-6: Hope this time, you do not experience Windows Update Error 0x800f0982 on your system.
2} Perform System File Utility command
In case, somehow any of the system files got damaged, it leads to the above error. The SFC scan will detect these faults and repair them if possible. Here are the essential steps-
- Type Command Prompt in the search bar and right-click on the well-suited result.
- From the context menu, choose the Run as administrator option.
- This process requires administrator rights, so press Yes to authenticate.
- Now on the blank surface, type
sfc/scannowand hit Enter key to let the process begin.
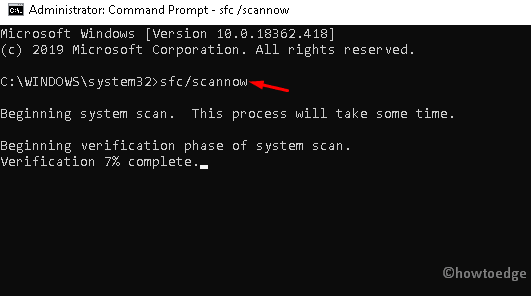
- Once the task reaches 100%, Restart your computer and update your computer without experience Update Error 0x800f0982.
3} Run DISM scan
Similar to the SFC scan, Deployment Image Servicing & Management (DISM) can also detect the faulty system’s image files and rebuild these files. Let’s see how to proceed-
- Perform a right-click on Windows and select Run using the Power menu.
- In the text surface, type cmd and simultaneously hit Ctrl + Shift + Enter keys.
- Now on the administrative wizard, tap the Yes option.
- Near the blinking cursor, copy/paste the following codes and press the Enter key at the end.
DISM /Online /Cleanup-Image /RestoreHealth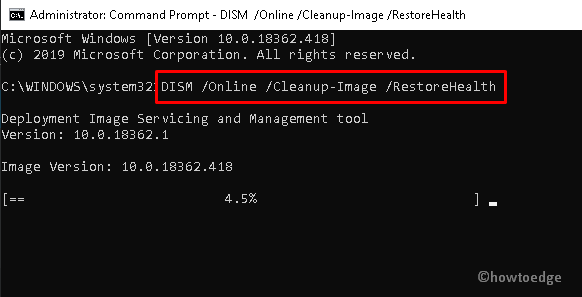
- Keep patience till the task completes henceforth Restart your computer.
- When the OS reloads, install the pending updates without any hassle Error 0x800f0982.
4} Download the Required Updates Manually
If any specific KB is causing the trouble, you should re-install the patch-up file manually from Microsoft Update Catalog. Here are the steps to follow-
- Firstly visit Microsoft Update Catalog and type the KB number (eg: KB4522741) in the search box.
- A new web page comprising compatible cumulative updates for x64 or x86 based systems will appear instantly. Here, press the Download button next to a particular patch.
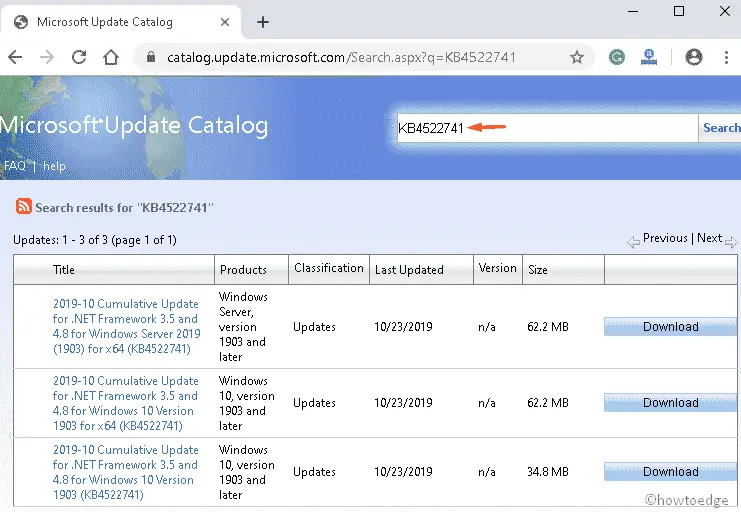
- When the file is downloaded completely, install this setup on your PC.
- Once over, Reboot your computer and see if the Update error 0x800f0922 has resolved or not.
5} Start the Windows Modules Installer Service
If the error code continues to persist, make sure Windows Modules Installer Services is enabled on your system. If not, turn this feature on and update the platform again following these simple steps-
- Click on the Search box and type cmd in the text box.
- When the Command Prompt option appears, right-click on the same and choose Run as Administrator.
- When the User Account Control wizard pops up, press Yes to permit the access.
- Now copy and paste the following code and hit Enter key at the end of each line.
SC config trustedinstaller start=auto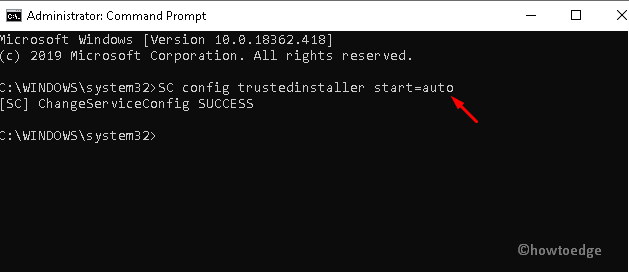
- Lastly, Reboot your PC to save the changes performed so far.
6} Clear the SoftwareDistribution and SystemResources Folder
The unnecessary cache stored in the SoftwareDistribution or SystemResources folder may also arise from Update error 0x800f0922. It is thereby recommended to clear the contents of these documents. To do so, follow these easy steps-
- At first, click on the Start menu and type cmd in the void area.
- From the appeared list, right-click on Command Prompt and select Run as administrator.
- If UAC prompts, tap Yes to sanction the access.
- Next, input the below command codes separately on the elevated command prompt and hit the return key at the end.
net stop wuauserv net stop bits
- Succeeding that minimize the command prompt and press Win and E jointly to launch File Explorer.
- Navigate to the following path: C:> Windows > SoftwareDistribution
- Once you reach the above directory, press Ctrl + A to select all the contents inside the SoftwareDistribution folder.
- Thereupon, press the Delete key using the keyboard.
- Afterward, move to the home page on file explorer and copy/paste the following path at its address bar-
C:\Windows\SystemResources
- Make sure to delete all the items inside this folder.
- Succeeding that, open the command prompt and restart the services that you have earlier disabled.
net start wuauserv net start bits
- After going through the above steps successfully, Restart your computer and update your System without facing any interrupting issue.
7} Reset all Update Components
Another probable reason to cause error 0x800f0982 while installing the latest patch is the presence of faulty update components. Resetting these files manually helps to resolve this update-related issue. To perform this task, you are required to login as an administrator then execute a few codes.
Step-1: At first, cite the Command Prompt as an Admin.
Step-2: If UAC prompts, tap Yes to proceed.
Step-3: Before repairing the components, you should temporarily disable certain services. Here is the complete list of such services-
net stop bits
net stop wuauserv
net stop appidsvc
net stop cryptsvc
Step-4: Subsequently, clear the qmgr*.dat directory using the below command line-
Del “%ALLUSERSPROFILE%\Application Data\Microsoft\Network\
Downloader\qmgr*.dat
Step-5: Going ahead, you need to rename the SoftwareDistribution and Catroot2 folder with the help of the following codes-
-
rename %windir%\SoftwareDistribution SoftwareDistribution.bak -
xcopy %systemroot%\system32\catroot2 %systemroot%\system32\
catroot2.bak /s

Step-6: Now, Restart the pending turned-off services.
net start bits
net start wuauserv
net start appidsvc
net start cryptsvc
Step-7: At last, Restart your system and download the pending available cumulative updates.
8} Try Clean Boot
If the above process does not solve the update error 0x800f0982, this may interrupt the smooth working performance of the system. The clean boot may help to resolve this bug. Here are the steps to follow-
- At first, sign in to your PC as an administrator; If you do not have this account create it manually.
- Next, press Win + R and type MSConfig near the blinking cursor followed by the Enter key.
- When the System Configuration windows appear, hit the Services tab.
- Here, mark the box Hide all Microsoft services henceforth Disable all button.
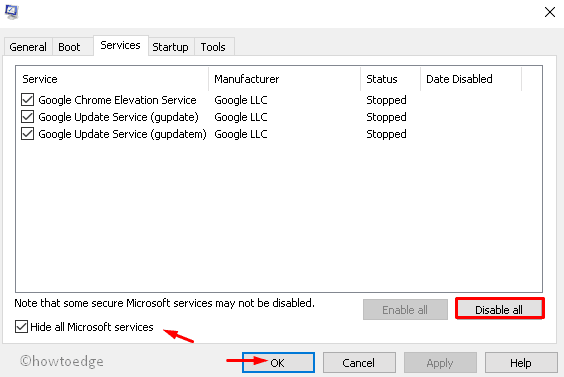
- Thereupon, switch to the Startup tab and open the Task Manager link.
- Succeeding that select each item separately and hit the Disable button (if enabled).
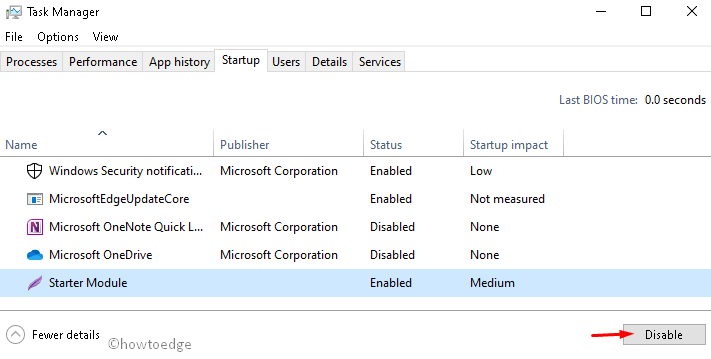
- Next, close the Task Manager. Click OK on the System Configuration window and Restart your system.
- Finally, update your computer and check this time whether you succeed to solve this bug.