
5 January 2021 Senior Program Developer
Summary
Windows password is set an expiration time. Users may forget the frequently changed login password. But what should we do if Windows 10 password expires or password expiration time needs to be changed. Some practical methods will help you solve the problem you encounter.
Generally speaking, we frequently update Windows password to get a protection personal privacy. But sometimes it’s easy to forget the constantly changed correct password and even Windows doesn’t accept password because it has expired. What we have to do is to reset password. Firstly, let’s get to know the reason of Windows password will expire.
- Methods about how to fix Windows 10 password expiration
Reasons of Windows 10 Password Expired
Local Users and Groups sometimes will lead to Windows loign password expire. This is because the password was set an expiration time. And Windows will remind you to change the password when it is invalid or it has expired.With default configuration, the maximum password age is 42 days. For two weeks in advance, you will receive an alert message “Your password will be expired in 14 days”. If you’ve ignored this message, please refer to the following instructions on how to check the password validity.
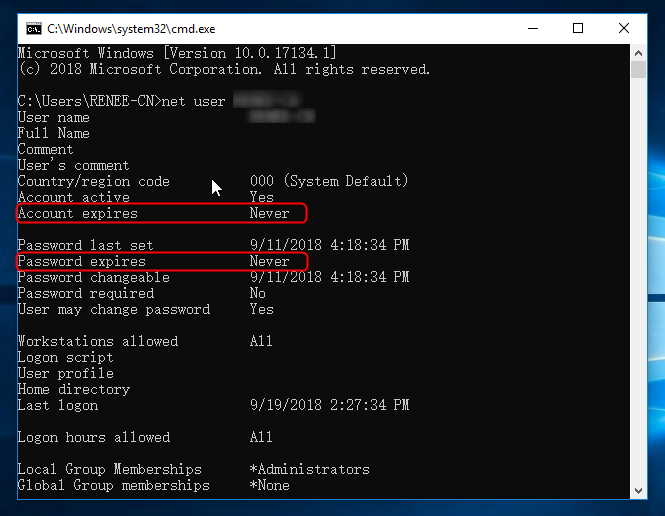
Tips: Instructions on how to check the password age: 1. Use shortcut “Win + R” to open “Run”. 2. Type in cmd, and press “Enter” to open Command Prompt. 3. Type in net user xxxx (xxx refers to your user name of your account).
It’s believed that now you have a better understanding of Windows 10 password expiration. If your Windows 10 password expired and you don’t have a permission to access your PC, you can try the following solutions to fix it.
Solution #1: Change Password on Windows 10 Login Screen
Step 1: When you get the message “Your password has expired and must be changed”, just click “OK” to go on.
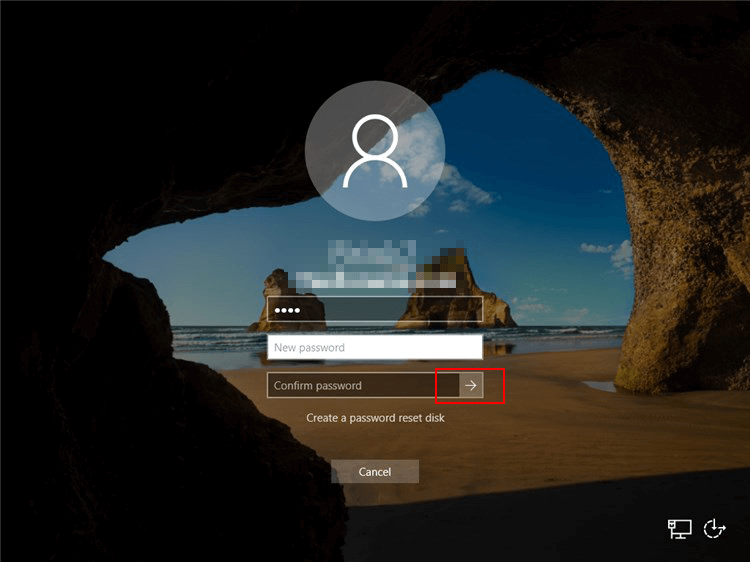
Step 2: Type your old password and new password. Then click the right arrow.
Step 3: After the password has been changed, click “OK”. Now you can use the new password to access Windows 10.
If you forget your old password or the password cannot be changed, it is suggested to use the second solution to reset password. The whole process just takes five minutes, and you can sign in your computer again.
Solution #2: Remove Password with Professional Passwrod Reset Tool – Renee Passnow
More about Renee Passnow
Whole password reset process takes only 4 simple steps without damaging data inside! Do not require any professional knowledge or possible password combinations.
For local account and administrator, Renee Passsnow will remove the password directly.
For Microsoft account, Renee Passnow will turn the Microsoft account into local one and reserve all data inside the account.
Renee Passnow can help to recover data or transfer data inside the disk without running Windows.
Compatible with: Windows 10, 8.1, 8, 7, Vista, XP.
Download Now
people has downloaded and reset the password successfully!
Here are detailed steps on how to reset login password with Renee PassNow.
Step 1: Download and install Renee PassNow in any workable Windows computer.
Step 2: Choose creation method, USB or CD/DVD.
Select one option from [Crate a Live USB] and [Create a Live CD]. Then, select [x64] or [x86] according to your computer. Next, click on [Download Now] to download the licensed ISO. Remember to activate the software beforehand. After that, click on [Create USB] to create the boot media.

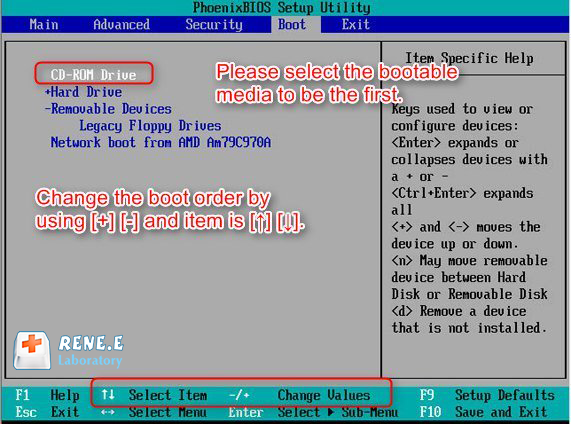
Step 3: Boot the target PC from the created password reset USB/CD/DVD.
You will boot the target computer via a new created reset disk. Firstly, please hold a hot key to enter the BIOS menu and put CD-ROM or Removable Devices as the first choice. Please click here to know about how to change the boot order of your computer. After changing it successfully, please remember to save your setting and then restart your PC.
Step 4: Select “PassNow!”.
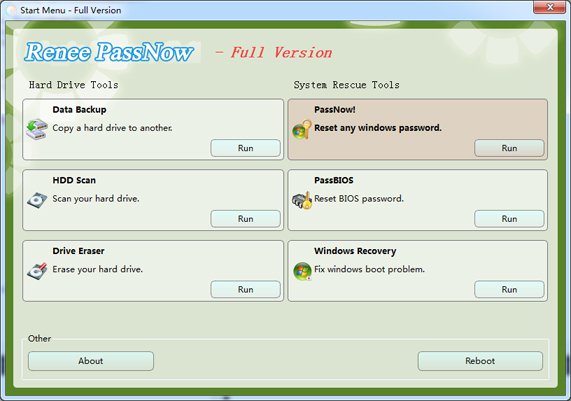
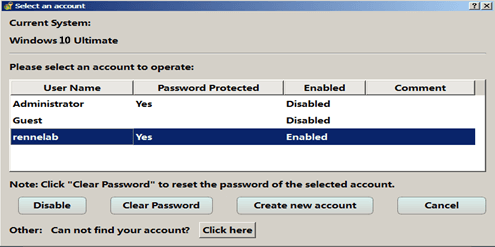
Step 5: Choose target account and then click “Clear Password”.
You can also recover Microsoft account in Windows 10/8.1/8. That is, Renee PassNow will convert the Microsoft account to a local account and the data or files inside it will still exist. After the software says that password is reset successfully, you can directly press “Enter” key to access Windows.
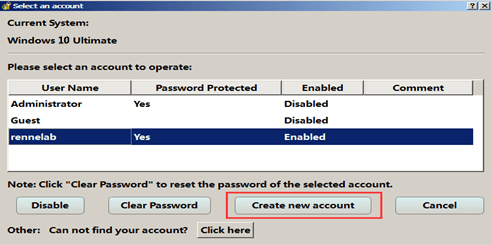
Besides, you can also create a new administrator to quickly access your PC. Please click “Create new account”.
The created administrator account named “Reneelab” with administrator rights, and its default password is “123456789”. You are able to change the password of target account with this new created administrator.
After applying the methods mentioned above, it’s believed that your computer will finally sign in safe mode and will not receive an error message. If you forget the password to access Windows, you can also use Renee PassNow to recover it. It just takes 5 minutes!
How to Disable or Change Windows 10 Password Expiration Time?
Disable Target User Account’s Password Expiration
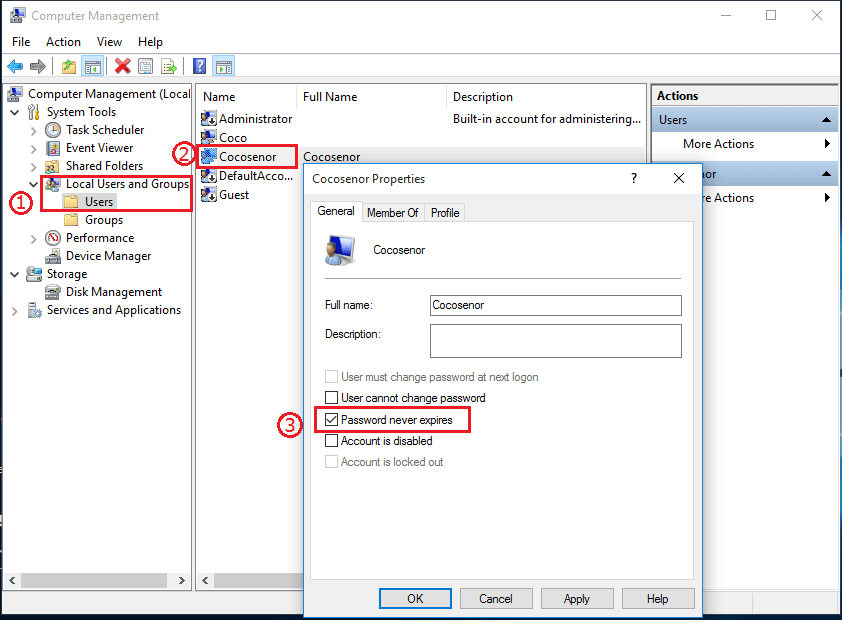
1. Right click on “This computer”. Then click on “Manage” to open “Computer Management”. 2. Click on “Local Users and Group” on the left side and select “Users”. 3. Double click the target user account, select “Password never expires” and then click “OK”.
Change Target User Account’s Password Expiration Time
1. Press “Win + R” to open “Run” and then type in “gpedit.msc” in the pop up window. Click “OK” to open Local Group Policy Editor. 2. Select them in order: Computer Configuration → Windows Settings → Security Settings →Account Policies → Password Policy. 3. Double click the “Maximum password age” and “Minimum password age” and then change the password expiration time. Tips: It’s suggested to set password expiration time between 30 and 90 days, depending on your environment.

Auto-expiration of passwords is one of the security features baked into your Windows 10/11 PC. This feature forces you to change your password every 72 days. As vital as this process is, it is also a bit redundant if no one else has physical access to your PC. Encountering the password expiry screen every couple of months can get annoying. But here’s the real kicker – you may see this screen even when you haven’t set up a password for your PC. Today, we show you how to reset your expired password and disable the password expiry feature on your Windows 10/11 PC.
Read Also: Best Foldable Smartphones in 2024 (July 2024)
Before you begin
The password expiry problem is more prevalent on Windows PCs with local accounts. A ‘local account’ is exclusive to your PC and is not linked to your Microsoft Account whatsoever. This means that any data or login info on your PC cannot be accessed by your Microsoft Account. If you log into your Microsoft Account on another device, you will need to log into your preferred services again.
Your Microsoft Account also offers the option to prompt you to change your password every 72 days. If you turn on this option at the time of setting up your password, you will encounter the ‘password expiry’ screen on your PC as well. Luckily, there is an option to remove this feature for local accounts as well as Microsoft Accounts.
Reset your expired password on Windows 10/11

Step 1: Click OK on the ‘Your password has expired and must be changed’ screen.
Step 2: Enter your current password in the topmost field. If you don’t have a password, leave this field empty.
Step 3: Type in the new password in the following field and re-enter it in the next field.
Step 4: Hit Next.
Disable password expiry for local accounts on Windows 10/11

Step 1: Right-click the Windows/This PC icon and select Computer Management.
Step 2: Click on the downward arrow next to the Local Users and Groups category in the sidebar.
Step 3: Double-click Users.
Step 4: Right-click your username and select Properties.
Step 5: Select the checkbox for Password never expires.
Step 6: Select Apply then hit OK.
Disable password expiry for your Microsoft Account
Step 1: Go to account.microsoft.com. Log in using your Microsoft Account.
Step 2: Click on Change password at the top right corner of the screen.

Step 3: Type your current password in the first field. Enter your new password and confirm it in the following fields.

Step 4: Uncheck the box for Make me change my password every 72 days. Hit Save.
Frequently Asked Questions (FAQs)
How do I sign into my Windows PC using my expired password?
While it is not possible to sign into your Windows PC using an expired password, you can use it to set up a new password. Hit ‘OK’ in the expired password screen, then enter your current password followed by the new password.
How do I disable password expiry on my Windows 10/11 PC?
Right-click the Windows/This PC icon and select Computer Management. Expand the menu for ‘Local Users and Groups’ and select Users. Right-click your username and select Properties. Select the checkbox for ‘Password never expires’ and save your settings.
How frequently does the password for my local account expire on my Windows PC?
Unless the setting is disabled, the local password to your Windows PC expires every 72 days.
Read Also: How to change the chat bubble colour in Google Messages (App & Web)?
Conclusion
This is how you can reset your expired password and disable password expiry on a Windows 10/11 PC. Check out this article to learn how to disable BitLocker on your Windows computer. If you have any other questions, feel free to let us know in the comments!
Support Us
We are a humble media site trying to survive! As you know we are not placing any article, even the feature stories behind any paywall or subscription model. Help us stay afloat, support with whatever you can!

Utkarsh Joshihttps://www.gadgetbridge.com/
Utkarsh is a seasoned writer who seeks to simplify complex concepts and bring the latest in technology to a broader audience. You can catch his exhaustive ‘How to’ guides, deep-dive feature articles, cutting edge news stories, and comprehensive tech reviews on Gadgetbridge.com. Apart from dabbling in all things tech, Utkarsh also enjoys watching club football, adding to his TBR pile of books, and making Spotify playlists. Automobile enthusiasts and motorheads can also catch his articles on Motorbridge.com.
Not many know this, but Windows 10 has a Password Expiry feature that discontinues your password after a certain number of days. Microsoft believes that periodic password expiration protects the user from unauthorized access. While the feature surely sounds good, but most of the time, it ends up being a hassle to many users. So in this article, we bring you a one-stop guide to fix the “Windows 10 password expired” error once and for all. And in case, you want to customize the number of days for password expiry then you can do that as well. With all that said, let’s now go ahead and learn about the steps.
Resolve Expired Password on Windows 10
1. First of all, if you are getting “Your password has expired and must be changed” error then there is nothing to worry. Just click on the “OK” button and Windows will allow you to change the password then and there. Keep in mind, you will have to enter the old password.

2. Once you are logged in with a new password, now disable the Windows password expiry feature so that it does not occur again. Right-click on “My Computer” or “This PC” and open “Manage”.

3. It will open the Computer Management window. Here, expand the “Local Users and Groups” menu and open “Users”. Now, right-click on your username and open “Properties”.

4. Now simply, untick the “Password never expires” checkbox and click on the “OK” button. That’s it. Now onwards, your password on Windows 10 will not expire.

5. In case, you don’t want to outright disable this feature then you can extend the number of days after which the password will expire on Windows 10. Press the Windows key once and type “group” in the search bar. Now open “Edit Group Policy”.
Note: This option is only available to Windows 10 Pro users.

6. Here, navigate to Computer Configuration -> Windows Settings -> Security Settings -> Account Policies -> Password Policy.

7. Now, double-click on “Maximum password age” and increase the number of days according to your preference. After that, click on the “OK” button and you are done.

Fix Your Password has Expired and Must be Changed Error
So that is how you can resolve the password expiry error on Windows 10. The good part is that Windows allows you to change the password if you remember the old password. This ensures that you don’t have to go through any hacky solution. After that, you are free to disable the feature or customize the number of days. In this article, we have mentioned both the methods so you can easily make the changes, according to your preferences. Anyway, that is all from us. If you found this guide helpful then do comment down below and let us know.
Некоторые пользователи Windows 11 и Windows 10 при входе в систему могут столкнуться с сообщением «Пароль просрочен и должен быть заменен», а за несколько дней до этого — с уведомлением «Рекомендуется изменить ваш пароль» в области уведомлений. В некоторых случаях возможно появление сообщения «Пароль пользователя необходимо изменить перед входом в систему».
Если вам не хочется каждый раз менять пароль, а речь идёт о вашем личном компьютере, вы можете убрать ограничение на его срок действия. В этой инструкции подробно о способах отключить срок действия пароля в Windows 11 и Windows 10 и дополнительная информация, которая может оказаться полезной.
Изменение просроченного пароля

При отсутствии других учетных записей, прежде чем выполнять какие-либо действия по отмене срока действия паролей, вам придётся его изменить. Необходимо выполнить следующие простые и очевидные шаги:
- Нажмите клавишу «Ок» в окне «Пароль просрочен и должен быть заменен».
- Введите новый пароль и его подтверждение.

- Войдите в систему с новым паролем, нажав по значку с изображением «стрелки» справа в поле подтверждения пароля.

Теперь можно приступать к отключению срока действия пароля, чтобы в дальнейшем его изменение не потребовалось. Учитывайте: все действия требуют прав администратора и, если обязательная смена пароля требуется на компьютере организации, а не личном ПК или ноутбуке, у вас может не быть возможности что-то сделать, не привлекая системного администратора.
Отключение срока действия пароля в командной строке
Возможно, самый простой и быстрый метод отключения срока действия пароля для всех учетных записей — использование командной строки:
- Запустите командную строку от имени администратора (как это сделать).
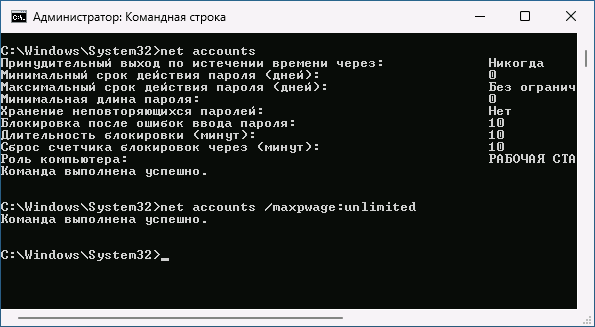
- Введите команду net accounts и нажмите Enter. В результате вы сможете увидеть текущий максимальный срок действия пароля в днях. Если он отличается от 0, это говорит об установленных ограничениях, которые можно отменить следующей командой.
- Введите команду
net accounts /maxpwage:unlimited
и нажмите Enter.

- Если команда была выполнена успешно, максимальный срок действия пароля будет установлен на 0, а сообщения о просроченном пароле в будущем не должны появиться.
Отключение срока действия пароля для учётной записи
Второй метод — установить неограниченный срок действия пароля для конкретной учетной записи пользователя, метод не доступен в Домашней редакции системы. Необходимые шаги:
- Нажмите правой кнопкой мыши по кнопке «Пуск», выберите пункт «Выполнить», введите lusrmgr.msc и нажмите Enter.
- В открывшемся окне «Локальные пользователи и группы» откройте раздел «Пользователи», нажмите правой кнопкой мыши по вашему имени пользователя, откройте пункт «Свойства».

- Установите отметку «Срок действия пароля не ограничен» и примените сделанные настройки.


В результате для выбранного пользователя не будут применяться ограничения на срок действия пароля.
Локальная политики безопасности
Ещё один метод отменить ограничения срока действия пароля — использовать политики безопасности, для этого:
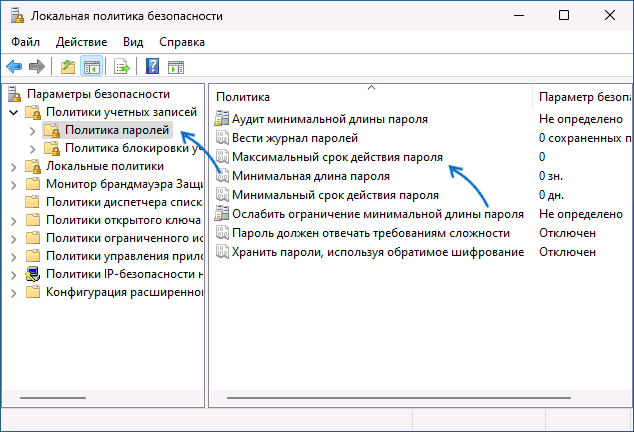
- Нажмите клавиши Win+R на клавиатуре, введите secpol.msc и нажмите Enter.
- Перейдите к разделу «Политики учетных записей» — «Политика паролей».
- Дважды нажмите по параметру «Максимальный срок действия пароля».

- Установите значение срока действия равным 0, что означает без ограничения срока действия.

- Примените сделанные настройки.

В дальнейшем сообщения о просроченном пароле появляться не будут.
Пара дополнительных нюансов, которые могут оказаться полезными в контексте рассматриваемой темы:
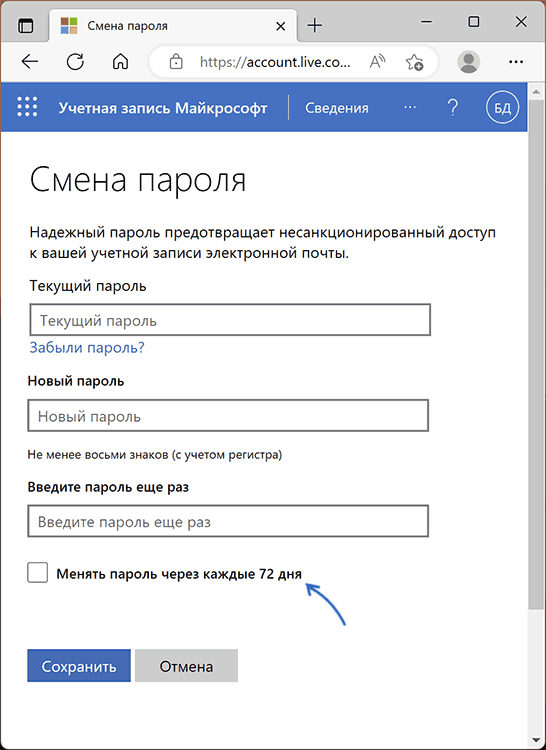
- Для учетных записей Майкрософт ограничение срока действия пароля задается на сайте https://account.microsoft.com/ в разделе «Безопасность» — «Смена пароля». Если вы хотите отключить обязательную смену пароля каждые 72 дня, зайдите в этот раздел и снимите соответствующую отметку.

- Если вы не имеете возможности отключить ограничение срока действия пароля (например, из-за отсутствия прав администратора на компьютере), по крайней мере, вы имеете возможность отключить уведомления о необходимости скорой его смены, нажав по трем точкам в всплывающем уведомлении и выбрав пункт «Отключить все уведомления Напоминание входа в Windows».
Readers help support Windows Report. We may get a commission if you buy through our links.
Read our disclosure page to find out how can you help Windows Report sustain the editorial team. Read more
Is your user account expired on Windows 10? In this guide, we’ll be showing you what to do if and when you see, The password for this account has expired in Windows 10.
Basically, a local user account on Windows 10 is accompanied by a password, which, by default, is designed to expire after a specific period of time (usually 30 days).
When this happens, you would have to change or reset your password to regain access to your PC. And for convenience, you can even set your password to Never expire.
However, if a user account expires, what do you do? We’ll be bringing you some proven solutions in this article.
How do I fix an expired Windows password?
1. Disable password expiration
1.1 Via Local Users and Groups
- On the desktop window, press Windows + R to open the Run dialog box.
- Enter lusrmgr.msc and press Enter to open the Local Users and Groups Manager.
- Locate and select Users.
- Click on the user account you want to disable its password expiration.
- On the Properties window of the selected user account, go to the General.
- Locate the Password never expires option and check the box next to it.

- Save changes and restart the PC.

1.2 Via Command Prompt
- Open the Start menu and select All Apps.
- Go under Windows System and click on it (to expand it).
- On the displayed options, right-click on Command Prompt.
- Select Run as administrator.
- In the Command Prompt, type the following command and hit Enter:
wmic UserAccount where Name='username' set PasswordExpires=False
- Once you get a confirmation, you are all set!

This action will ensure the user account‘s password is never expired and you shouldn’t receive The password for this account has expired error anymore.
- Fix: PRIMARY_TRANSPORT_CONNECT_FAILED Error
- ERROR_IO_PRIVILEGE_FAILED: How to Fix
2. Disable user account expiration
- Open the Start menu.
- Locate and then select Administrative Tools.
- On the displayed window, select Active Directory Users and Computers.
- Locate and expand your user account (domain) name.
- Go under the Users tab, and then right-click on the user name.
- On the list of options, select Properties.
- Navigate to the Account tab, and select Never under Account Expires.
- Click Apply and then OK.
- Exit the window.
While password expiration requires you only to reset/change the password to access your PC, user account expiration wholly restricts your access. Once this process is complete, your user account can now run unhindered (without expiring).
If your user account is expired, you might have some issues logging in to your user account and using your PC. But you should be able to fix The password for this account has expired by using one of these solutions.
Before you leave, do check the best password recovery tools and get one today!
Tell us which fix worked for you in the comments section below.
Ivan Jenic
Windows Hardware Expert
Passionate about all elements related to Windows and combined with his innate curiosity, Ivan has delved deep into understanding this operating system, with a specialization in drivers and driver troubleshooting.
When he’s not tackling diverse driver-related problems, Ivan enjoys watching good movies and spending time hiking with his family and friends.