
A blurry screen in Windows 11 can be frustrating and difficult to fix. Fortunately, Microsoft has included several methods in the Windows 10 and 11 operating systems to optimize display settings and fix blurry screen issues.
This article will explain the five best ways to fix Windows 11 blurry text.

1. Check Your Resolution Settings
Low-resolution displays tend to be “fuzzy” since reduced resolutions will generate bigger visible pixels. So, appropriately setting the scaling and display resolution settings can help resolve usability and image quality issues, such as a blurry screen.
To change these settings:
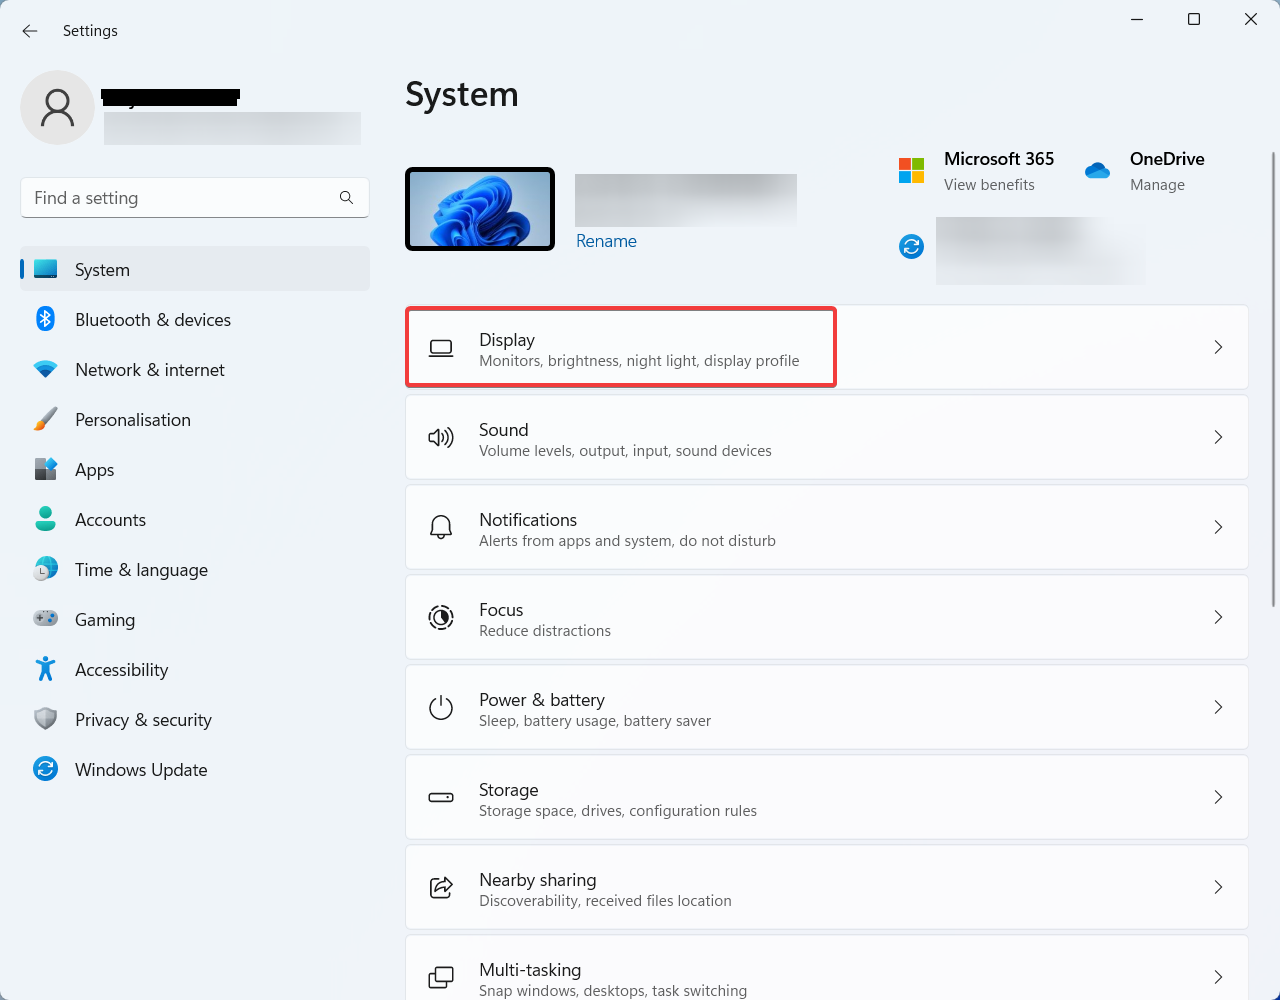
- Right-click the Start menu and select Settings.
- Select System, then choose Display.

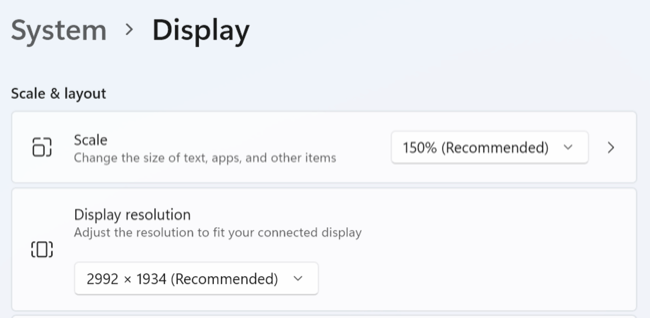
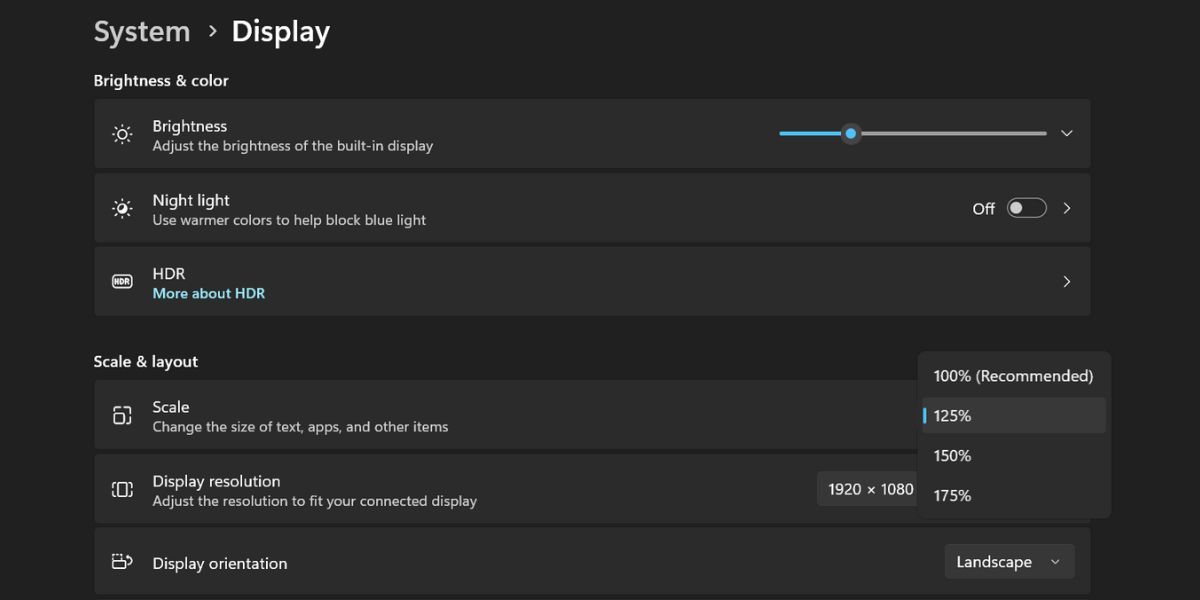
- Here, increase your screen resolution settings to match your monitor’s output. For example, if your monitor is 1920 x 1080 resolution, then set it to that for the best appearance. This should be the recommended option.

- Select Keep changes if the screen looks good or select Revert if not and try another resolution.
2. Optimize Your DPI Scaling Settings
The dots per inch (DPI) value determines how crisp your display appears. The lower your DPI, the lower your pixel density. A DPI that is too low or isn’t optimized for your display can cause blurry screen problems.
Windows can use scaling settings to modify the UI according to the monitor’s pixel density, so the UI elements will not look too small on a monitor with a high pixel density. To change your scaling settings:
- Right-click the Start menu and select Settings.
- Select System then choose Display.
- Next, under Scale and Layout, select the drop-down box and choose a scaling setting. You may have to play around a little to find the perfect setting for your monitor.

You can also adjust the DPI differently for each app. This is useful if a single app appears blurry rather than the entire display. To adjust this:
- Right-click the app. This should be the .exe file that opens the app.
- Select Properties, then choose the Compatibility tab.

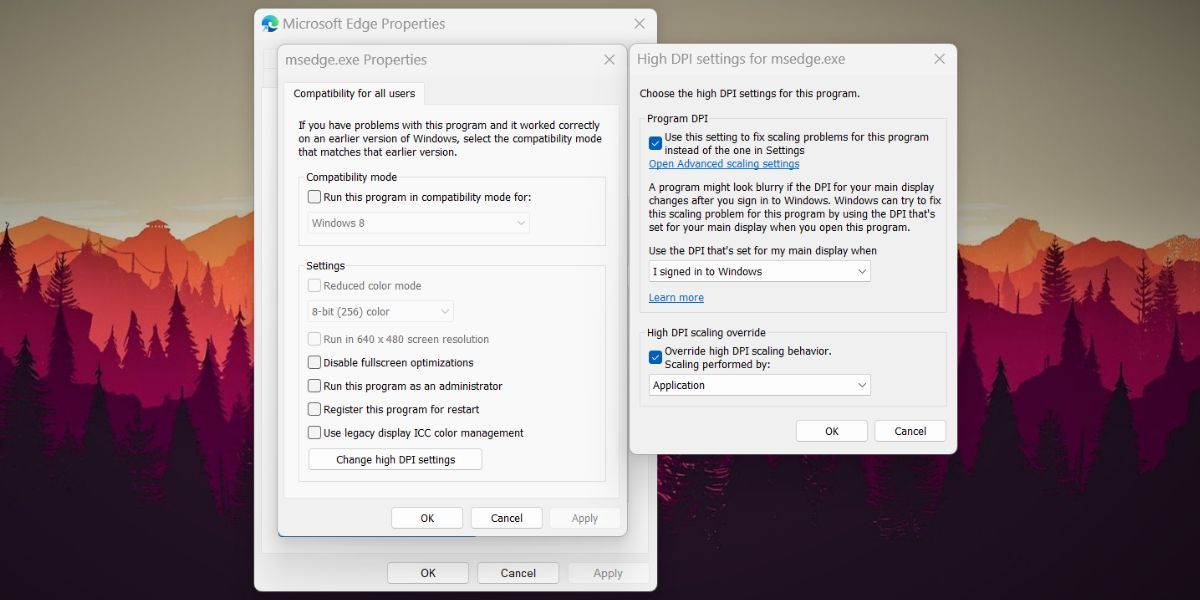
- Select Change high DPI settings.

- Tick the box next to Use this setting to fix scaling problems for this program instead of the one in Settings and experiment with the options to determine which setting renders that app best.

3. Turn on ClearType
ClearType may not be enabled if you have difficulty reading text on Windows 11. In most cases, ClearType should be enabled by default, but it is still worth checking. Enabling this setting should help improve the clarity of the text, making it easier to read.
To do so:
- Open the Settings app by pressing the Windows key + I.
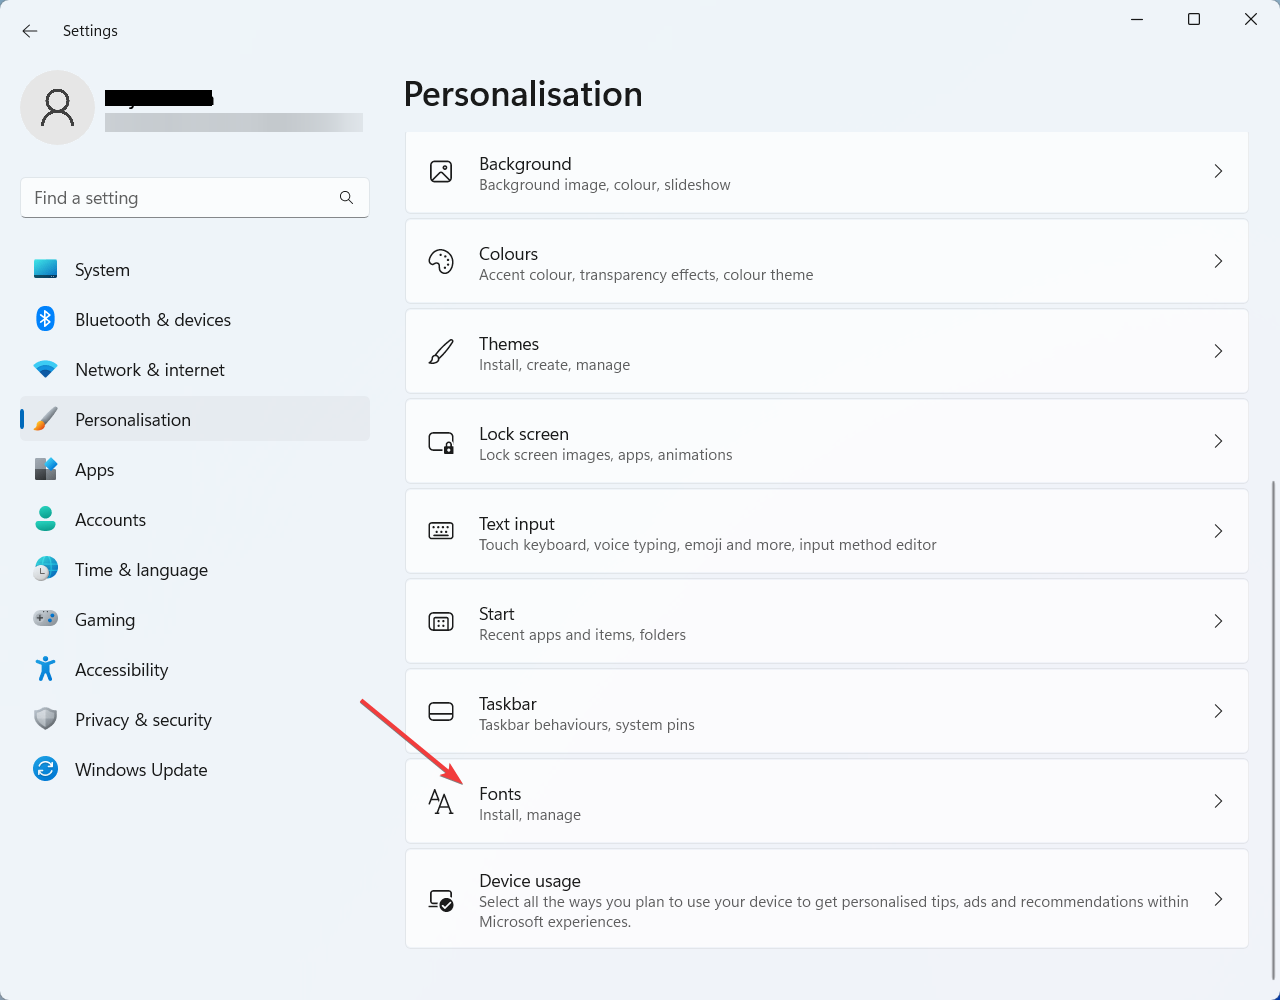
- Choose Personalization, then select Fonts.

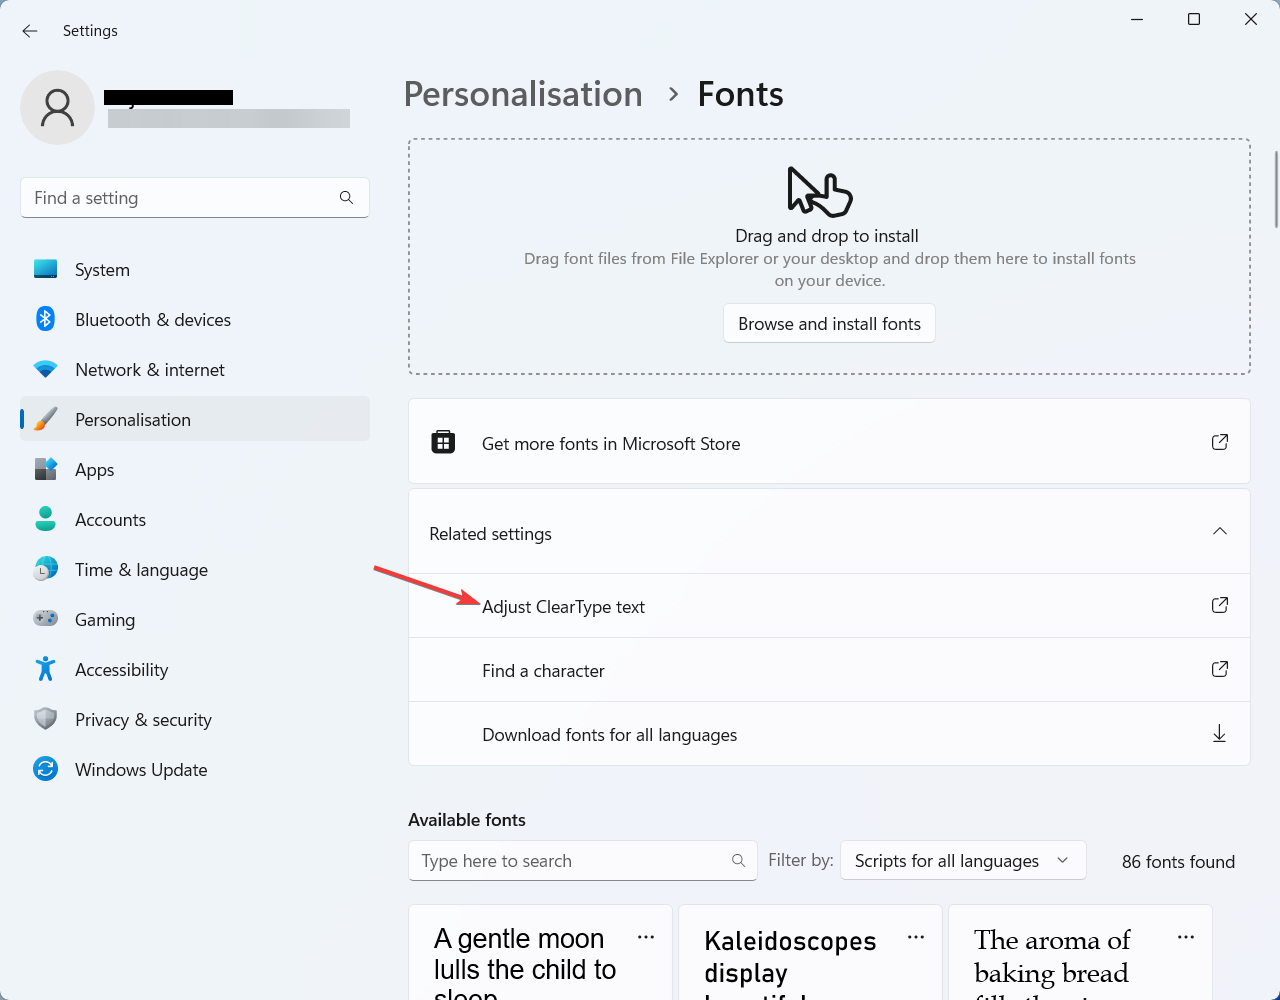
- Select the Related Settings drop-down menu and choose Adjust ClearType text.

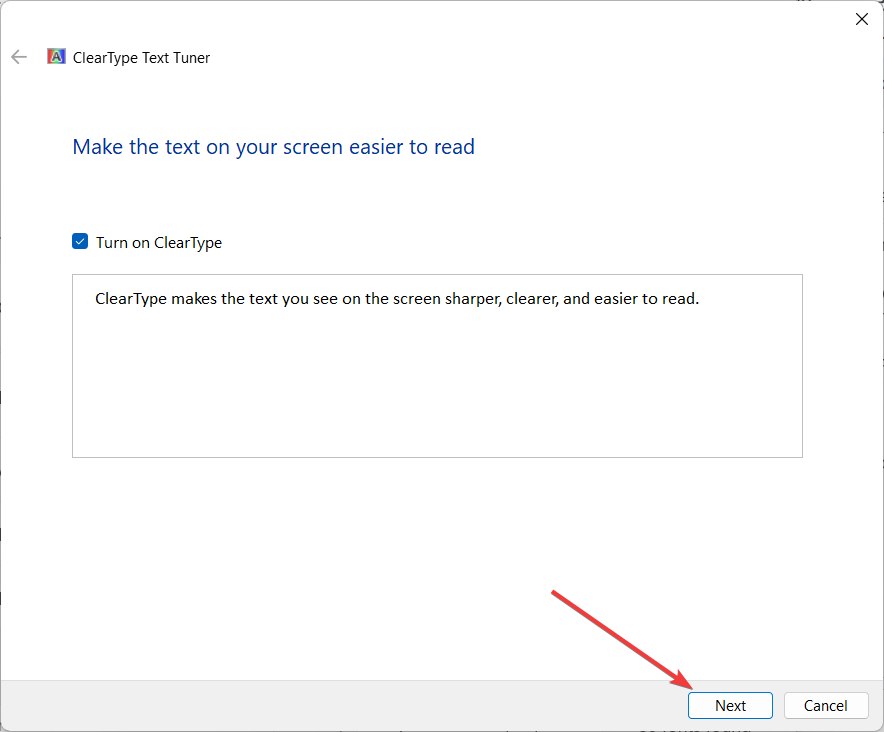
- Here, make sure Turn on ClearType is checked.

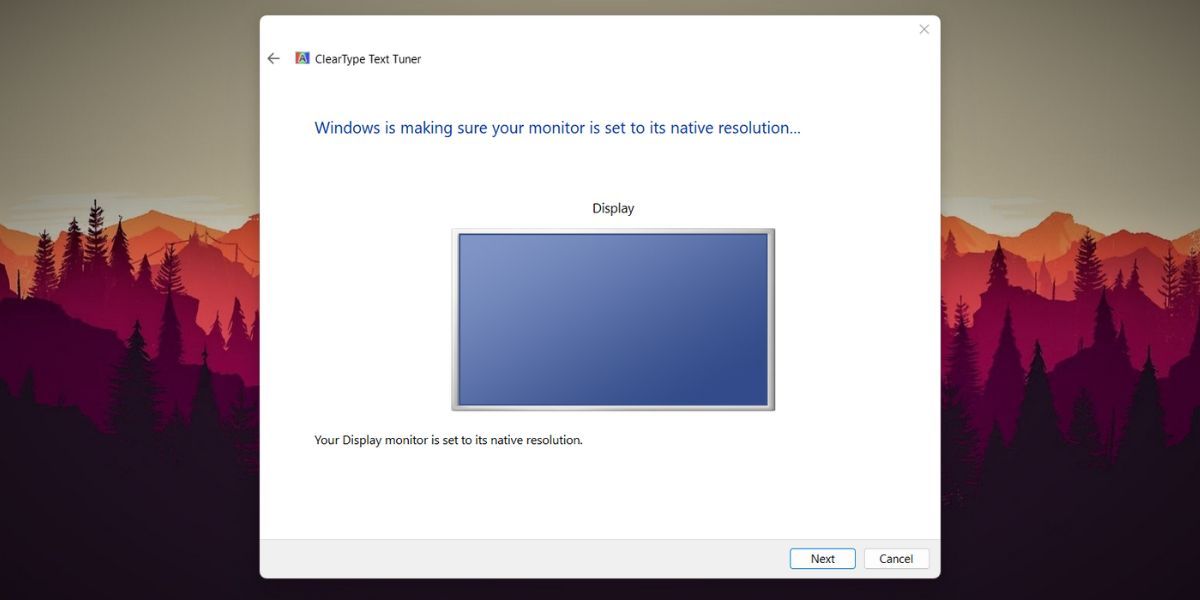
- Select Next and work through the ClearType Text Tuner instructions to optimize your screen. You’ll need to choose the text sample that is the least blurry.
4. Change the Performance Settings
If you’re experiencing certain blurry apps, but the rest of the display is fine, you can set high-performance graphics settings to improve the quality when using that app. To do so:
- Right-click the Start menu and select Settings.
- Select System and choose Display.
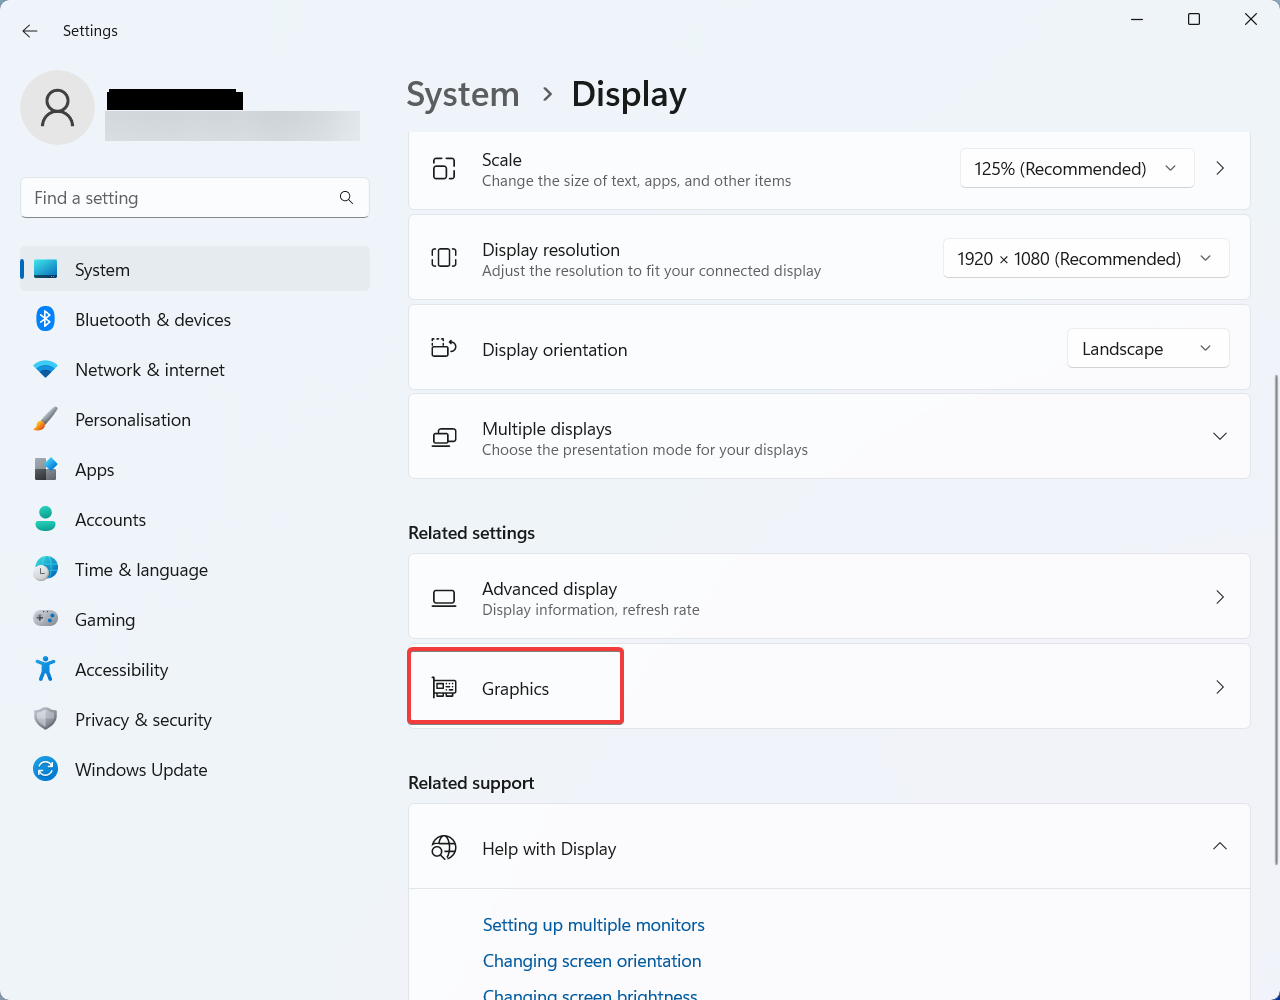
- Select Graphics.

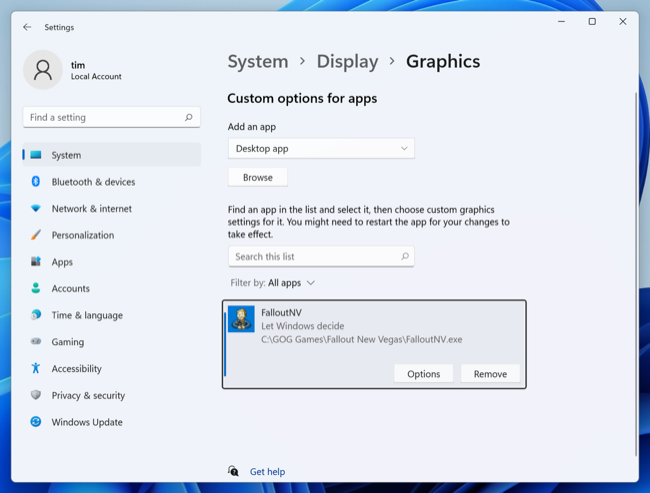
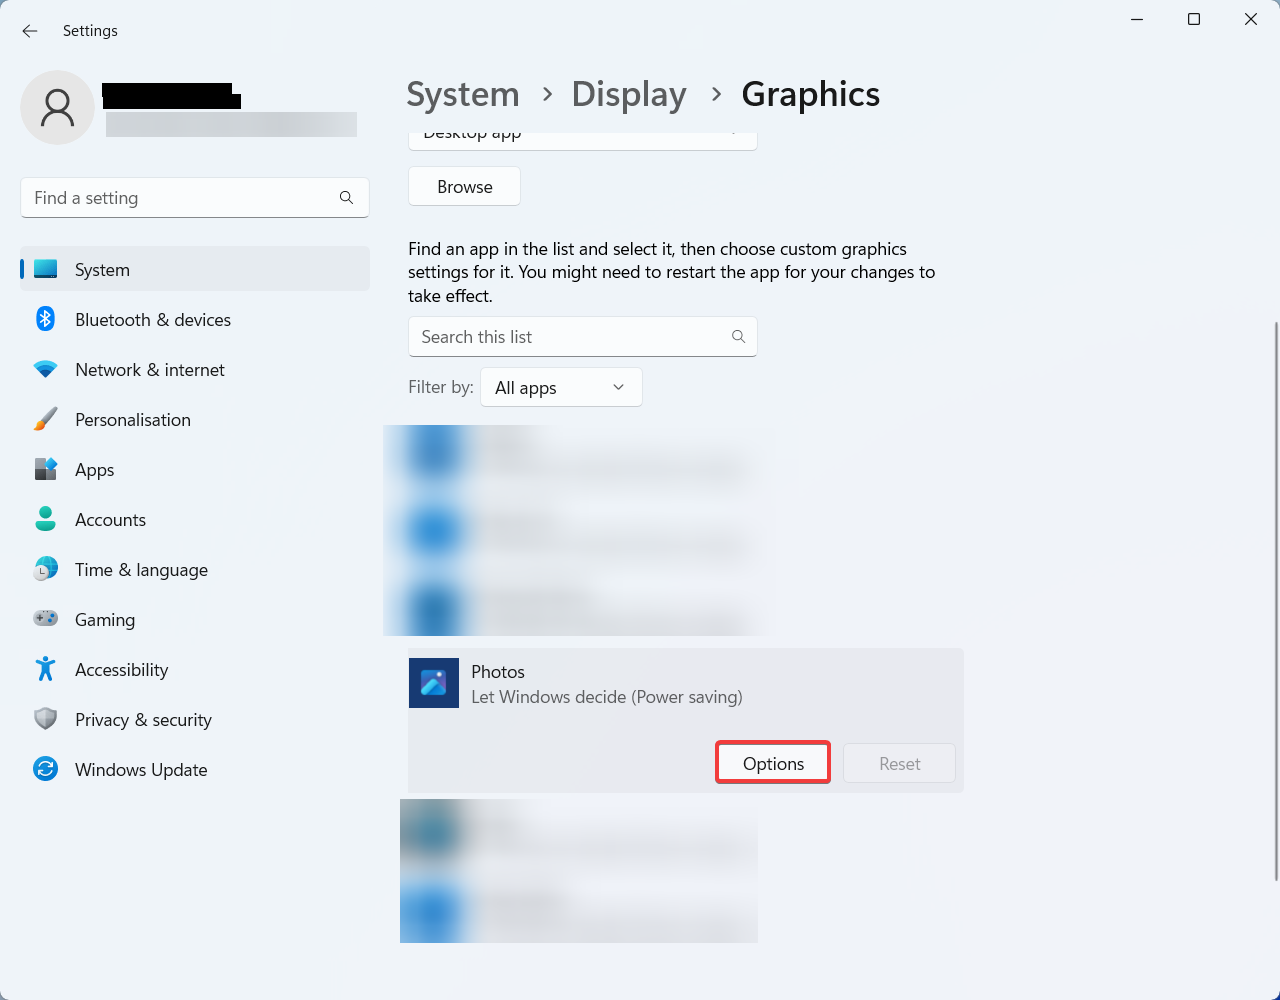
- Use the search bar to find the app in question, then select it.
- Press Options.

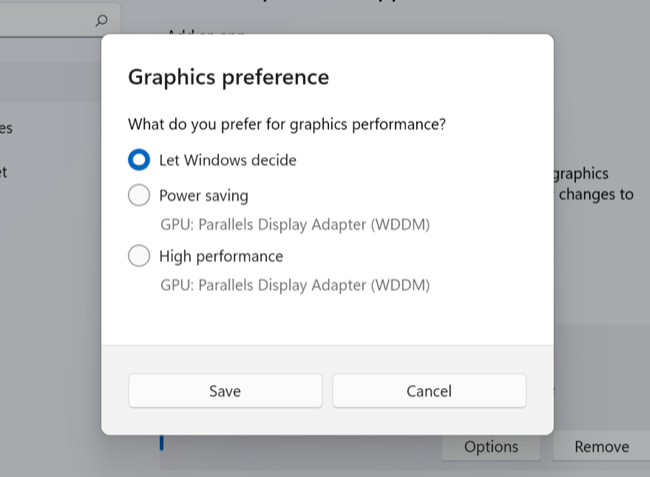
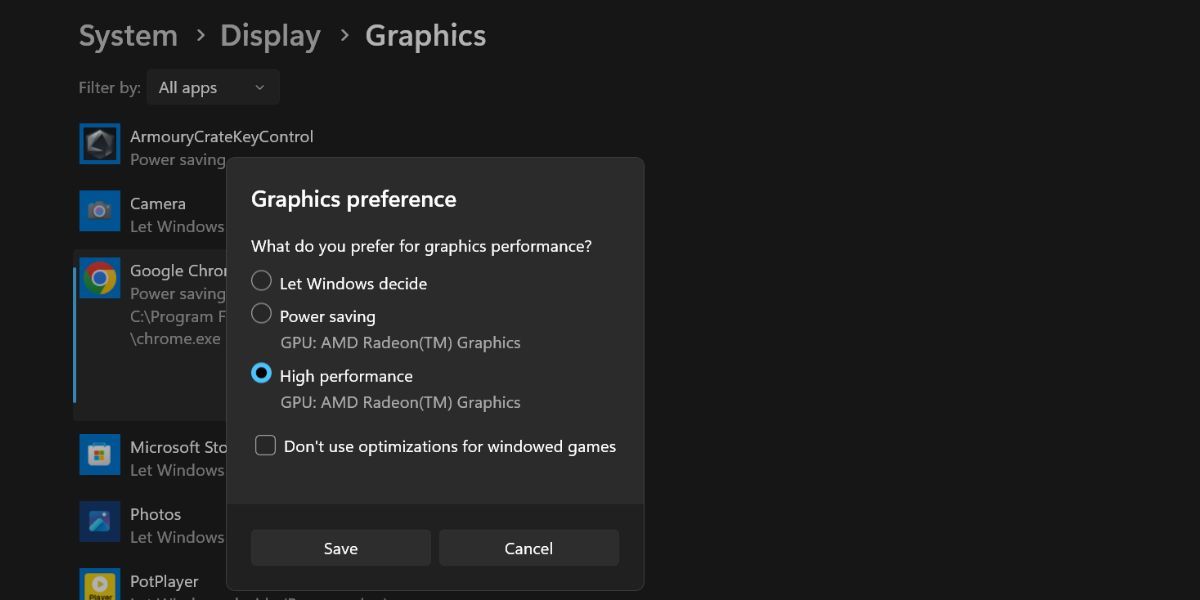
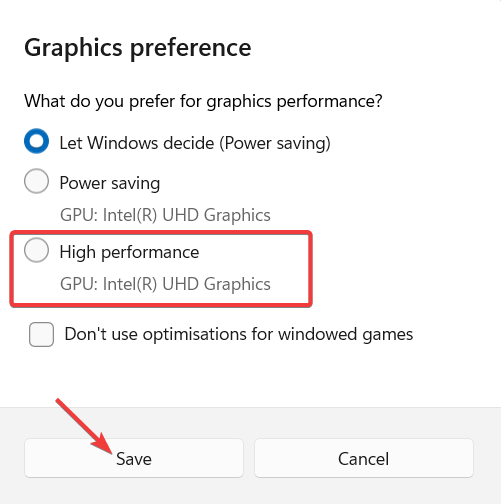
- In the Graphics preference window, select High performance.

- Select Save.
You can also force Windows to adjust the display for the best appearance in the performance settings:
- Open the Start menu and type “view advanced system settings,” then select the first result.
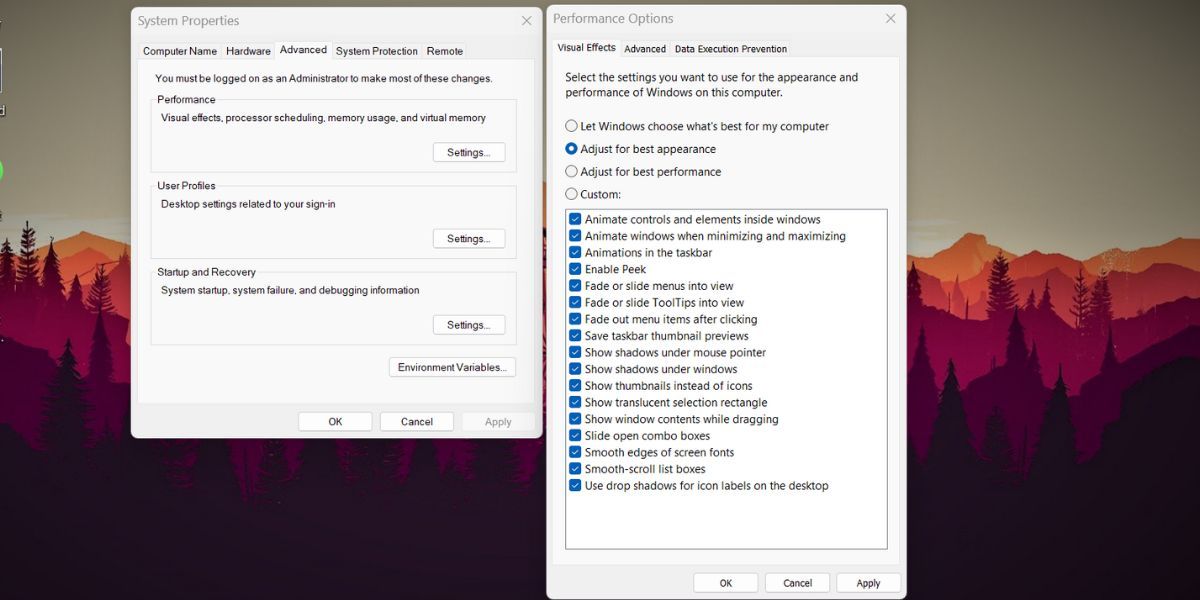
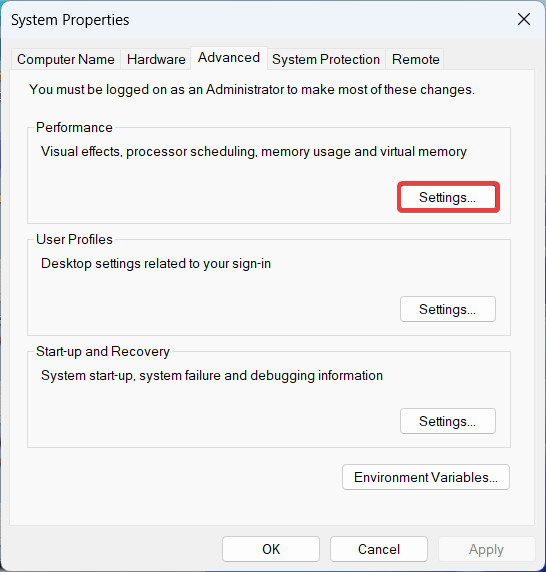
- In the System Properties window, select the Advanced tab. Then, under “Performance,” select Settings.

- In the Visual Effects tab, toggle on Adjust for best appearance.

5. Check Your Graphics Card Driver
Graphics card drivers ensure that your GPU is up-to-date with the latest software. Occasionally, old drivers can introduce bugs or be incompatible with newer apps and programs. Updating your drivers can resolve these issues and improve screen rendering.
You can easily update your NVIDIA graphics card by opening NVIDIA GeForce Experience and selecting Drivers > Download.
To update an AMD graphics card, open AMD’s Auto-Detect and Install utility and let it discover and install any new drivers for your GPU.
Finally, to update an Intel ARC or Intel Extreme Graphics card, use Intel’s Driver & Support Assistant.
If you aren’t sure which graphics card you have, you can easily update any as follows:
- Press the Windows key + R to open Run.
- Type “devmgmt.msc,” and press Enter to open the Device Manager.

- Right-click Display adapter and select Update driver.

- Follow the on-screen instructions to complete the wizard and update your display driver.
Clear as Day
Trying to read blurry text or make sense of a blurry screen can strain your eyes, so it’s definitely something you want to fix as soon as possible. Hopefully, one of the solutions in this article has helped you fix the blurry screen problem on your Windows 11 PC.
Related Posts
- How to Fix a “This file does not have an app associated with it” Error on Windows
- How to Add OneDrive to Windows File Explorer
- How to Fix an Update Error 0x800705b4 on Windows
- How to Resolve “A JavaScript error occured in the main process” Error on Windows
- How to Fix the Network Discovery Is Turned Off Error on Windows
Владельцы ПК и ноутбуков с высоким разрешением монитора и использующие масштабирование в параметрах дисплея могут обратить внимание, что в некоторых программах шрифты и другие элементы интерфейса выглядят размытыми.
В этой инструкции о том, чем это вызвано и как исправить ситуацию с нечётким текстом и элементами управления отдельных программах Windows 11 и Windows 10.
Поддержка определения DPI в программах
Прежде чем начать, одно примечание: в этом материале рассмотрена ситуация, когда речь идёт лишь об отдельных программах. Если проблема наблюдается в целом, независимо от того, какое приложение используется, на эту тему есть отдельная инструкциях про размытое изображение на экране и размытые шрифты в Windows.
Проблема с нечёткими шрифтами в отдельных программах обычно связана с тем, что используется какое-то старое ПО, либо приложение, в котором задействованы нестандартные библиотеки для отрисовки интерфейса и оно не поддерживает определение DPI (уровня масштабирования) в современных версиях Windows.
Вы можете посмотреть, поддерживает ли запущенная программа определение DPI с помощью диспетчера задач:
- Откройте диспетчер задач, сделать это можно из меню по правому клику на кнопке «Пуск», в Windows 11 перейдите на вкладку «Сведения», в Windows 10 — «Подробности».
- Нажмите правой кнопкой мыши по заголовку любого столбца и нажмите по пункту «Выбрать столбцы».
- Включите показ столбца «Поддержка определения DPI».

- В результате, если для процесса, соответствующего программе, с которой возникла проблема, в столбце отображается «Неизвестно» или «Недоступно», причина, вероятно, именно в отсутствии поддержки определения DPI.


Попробовать решить проблему можно с помощью параметров совместимости программы, изменив параметры высокого DPI:
- Нажмите правой кнопкой мыши по исполняемому файлу или ярлыку программы, выберите пункт «Свойства».
- Перейдите на вкладку «Совместимость» и нажмите кнопку «Изменить параметры высокого DPI».

- Отметьте пункт «Переопределите режим масштабирования высокого разрешения» и выберите опцию «Система (Расширенная)».

- Примените настройки и перезапустите программу.


Пример результата для старой версии текстового редактора, запущенного в Windows 11 при 4k разрешении и с масштабированием 200%: сверху — до переопределения параметров, внизу — после:

На скриншоте результат может быть не совсем явным, но проблема с чёткостью текста была решена.
Переопределить те же параметры можно в реестре:
- Откройте редактор реестра: нажмите клавиши Win+R, введите regedit и нажмите Enter
- Перейдите к разделу реестра
HKEY_LOCAL_MACHINE\SOFTWARE\Microsoft\Windows NT\CurrentVersion\Image File Execution Options
- Создайте новый подраздел с тем же именем, которое имеет исполняемый файл программы и выберите его.
- Нажмите правой кнопкой мыши в правой панели редактора реестра и создайте новый строковый параметр с именем DpiAwareness
- Дважды нажмите по созданному параметру и установите значение system. Также можно попробовать результат со значением PerMonitorV2
Выполнив изменения, закройте редактор реестра и попробуйте снова запустить программу.
Дополнительная информация
Некоторые дополнительные нюансы, касающиеся размытых и нечётких элементов в программах:
- Иногда может помочь запуск программы в режиме совместимости с предыдущей версией Windows.
- В некоторых случаях описанные выше действия решают проблему только со шрифтами, но не со значками и графическими элементами. Причина чаще всего в том, что в программе не предусмотрены ресурсы с изображениями в более высоком качестве и при их масштабировании появляется размытость, «лесенки» и другие артефакты.
- Если вы только что меняли масштабирование в Windows, некоторые элементы могут масштабироваться неправильно до перезагрузки компьютера.
- Если вы настраивали масштабирование вручную (не выбирая из предустановленных вариантов в параметрах дисплея, а вручную вводя значение в поле «Настраиваемое масштабирование»), учитывайте, что этот вариант работает иначе, чем масштабирование в параметрах дисплея. Решить проблему может отключение настраиваемого масштабирование с ручным указанием масштаба и выбор из доступных значений.
Надеюсь, информация будет полезной, а проблема с размытыми элементами решится.
Sign in to your How-To Geek account
Quick Links
-
Change Resolution and Scaling Settings
-
Enable ClearType for Blurry Text
-
Blurry App? Enable High-Performance Graphics Settings
-
Consider a Graphics Driver Update
Summary
Change your Windows display resolution and scaling settings if you have a blurry screen in normal desktop conditions. Enable ClearType if text looks blurry, or throw more power at the problem by enabling «High Performance» graphics mode in affected apps. A driver update also can help remedy visual problems.
A blurry or fuzzy screen can make using the Windows 11 desktop and your applications a miserable experience. Fortunately, there are a few things you can try to fix the problem, from changing settings to updating your drivers.
Change Resolution and Scaling Settings
There’s a difference between scaling and resolution settings in Windows. Setting both correctly can fix usability and render quality problems, like a blurred screen.
A low-resolution display could be described as «blurry» since lower resolutions result in larger visible pixels. Scaling settings allow Windows to scale up or down the UI (user interface) depending on pixel density so that UI elements don’t appear too small on a monitor with high pixel density.
Both can be adjusted under Settings > System > Display. First, increase your screen resolution to increase pixel density (Windows will have a «recommended» setting for your display). You can then set scaling independently on any of your attached monitors.
Enable ClearType for Blurry Text
If text appears blurry, pixelated, or hard to read on Windows 11, adjusting your font settings to make sure ClearType is enabled can help. This should be enabled by default, but it’s worth checking if you’re having problems with font rendering.
Head to Settings > Personalization > Fonts and click on the «Related Settings» dropdown button. In the menu that appears, click on the «Adjust ClearType text» option then make sure «Enable ClearType» is checked in the window that appears.
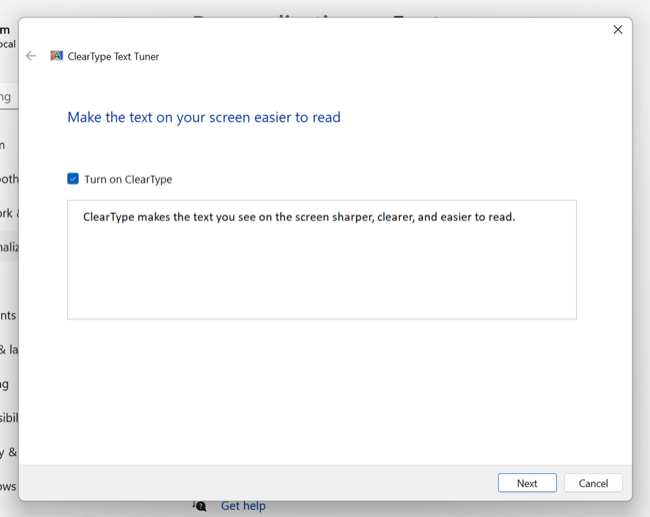
Hit «Next» and run through the ClearType Text Tuner to make sure that your display is set up for the best results. You’ll need to pick the text samples that look best to you to tune the way Windows renders fonts on your display.
Blurry App? Enable High-Performance Graphics Settings
If your screen looks blurred in a particular app, you can try forcing Windows to use high performance settings at all times. To do this, head to Settings > System > Display > Graphics and nominate an app. You can either select from the list of pre-populated apps, or hit «Browse» and find the EXE file you want to target.
Now hit «Options» and choose «High performance» in the window that appears. Hit «Save» and try launching the app again. This should cause Windows to throw everything it has at the app, even if you’re using a laptop connected to battery power.
Primarily this will affect performance, but it may affect image clarity too. You should be able to increase graphical settings like resolution and detail levels without worrying about Windows holding back on performance.
Consider a Graphics Driver Update
Updating your graphics drivers is essential to stay up to date with the latest releases. New drivers can fix issues like poor performance, frequent crashes, glitches, and rendering issues like blurry visuals.
You can do this using the utility that came with your graphics card like NVIDIA GeForce Experience (or perform driver updates without GeForce Experience) and AMD’s Auto-Detect and Install utility. If you have Intel ARC or Intel Extreme graphics you can use Intel’s Driver & Support Assistant.
New driver updates can improve the performance of features you’re already using, especially upscaling solutions like NVIDIA’s Deep Learning Super Sampling (DLSS). This was especially true when AMD FidelityFX Super Resolution (FSR) move from spatial to temporal upscaling, yielding a better quality image.
Sometimes graphics card driver updates don’t go to plan, leaving you in a worse state than before you started. Learn how to recover from a bad GPU driver update. Lastly, if your display is blurry because it’s covered in gunk, make sure you avoid damage by cleaning it properly.
Windows supports up to 128 million pixels of desktop resolution. So, theoretically, you can use multiple high-resolution displays and still not encounter any issues. But many users report blurry screen issues on Windows 11. The problem ruins their overall visual experience because the screen elements appear distorted.
If you face the same problem, don’t worry. We will list out all the possible methods to remove the screen blurriness and make the screen elements sharp and easy to read.
How to Fix Blurry Screen Issues on Windows 11
Here are the following methods you can try to remove the blurry screen issue on your Windows 11 system.
1. Restart Your System
Before trying out any major troubleshooting method, restart your system. Restarting your computer can fix common issues with services and background programs. Press Alt + F4 and select the Restart option from the list. After the computer restarts, launch any program and check if the blurriness issue is still there.
2. Tweak the Display Resolution and Scaling
Lower screen resolution settings can make the screen element look grainy. However, low scaling settings on a high-resolution display can make matters even worse. So, you need to adjust these two display settings.
To adjust the display resolution and scaling on Windows 11, do as follows:
- Press Win + R to open the Run command box. Type ms-settings:display and press the Enter key.
- Click on the Display Resolution option and set it to the resolution Windows recommends for your display.
-
Apply the resolution and if the blur is still noticeable, click on the Scale option.

- If the recommended scale settings look very small and unreadable, pick the higher scaling percentage option from the list.
3. Enable ClearType Text
Microsoft bundles the ClearType technology which reduces the visible pixelation in fonts. If you experience blurry screen elements including text, you can use ClearType Text Tuner to fix the issue.
To enable ClearType Text on Windows 11, repeat the following steps:
- Press Win + S and type ClearType. Click on the Adjust ClearType text option in the search results.
- Click on the Turn on ClearType checkbox. Then click on the Next button.
-
Pick the text sample that looks the best on your display and click on the Next button.
- Repeat this process for all text samples.
- Lastly, click on the Finish button to apply the new text rendering settings.
4. Change Application Graphics Preference
If you experience blurriness with a specific app, you can adjust the graphics settings to solve the issue. It will drive more GPU power to the app and improve its visual appearance.
Here’s how to change graphics settings for an app on Windows 11:
- Press Win + I to launch the Settings app.
- Navigate to System > Display > Graphics.
- Select the app to change its graphics settings and click on the Options button.
-
Now, click on the High Performance radio button.
- Lastly, click on the Save button to save the new graphics settings.
- Run the app and check if the screen element appears blurry or not.
5. Switch to the Best Appearance Settings
Windows offers three visual effects modes. If you use the «Best Performance» mode, it removes all visual effects and the result looks washed out and grainy. However, switching to the «Best Appearance» mode can offer the best possible visual experience and remove blur.
Repeat the following steps to apply the best appearance settings on your system:
- Press Win + R to open the Run dialog box. Type sysdm.cpl and press the enter key to open the System Properties utility.
- Navigate to the Performance section and click on the Settings button.
-
Select the Adjust for best appearance radio button. Click on the Apply button.
- Finally, click on the OK button and exit the System Properties window.
6. Adjust App DPI Settings
Another method to remove blurry text on Windows is using the Program DPI settings. If an app or program doesn’t automatically scale up to the default settings, you can override the high DPI scaling to improve the clarity and text sharpness.
Retrace the following steps to adjust the app DPI settings:
- Press Win + E to launch the File Explorer and navigate to the program executable file location.
- Click on the program icon and then press Alt + Enter to open the Properties window.
- Switch to the Compatibility tab and click on the Change high DPI settings button.
- Now, click on the Use this setting to fix scaling problems for this program instead of the one in Settings checkbox.
-
Next, enable the Override high DPI scaling behavior checkbox as well.
- Lastly, click on the OK button and close the Properties window.
7. Update Your Graphics Driver
An outdated GPU driver can run into compatibility issues with programs. Updating the GPU drivers can resolve the issue. Here’s how to update the GPU drivers on your system:
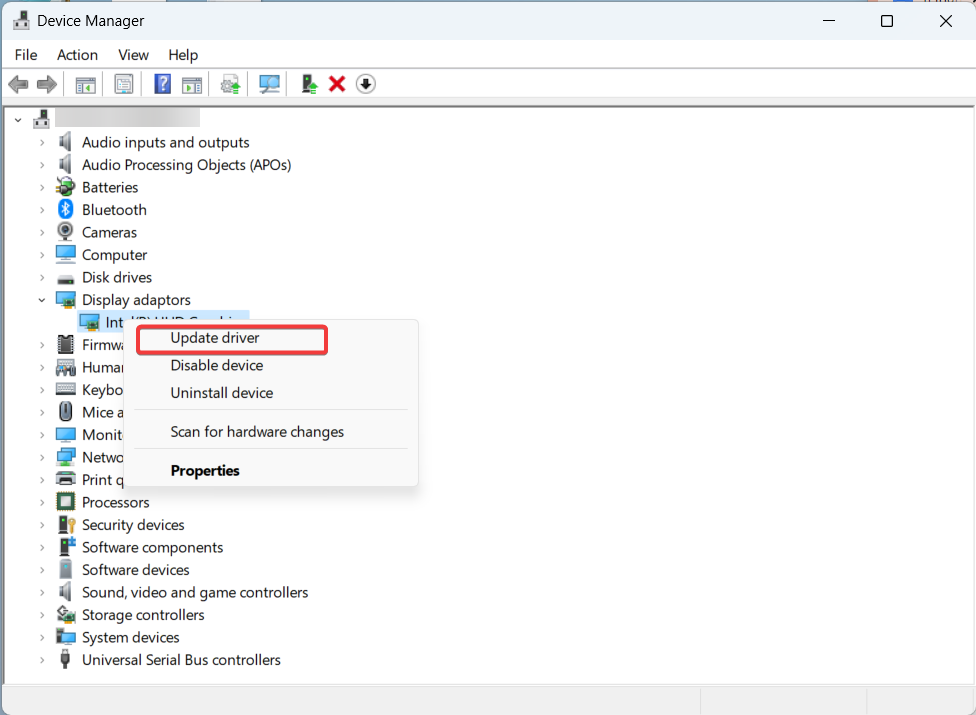
- Press Win + X to launch the Power user menu and click on the Device Manager option.
- Scroll down and expand the Display Adapters section.
-
Right-click on the GPU and select the Update driver option from the list.
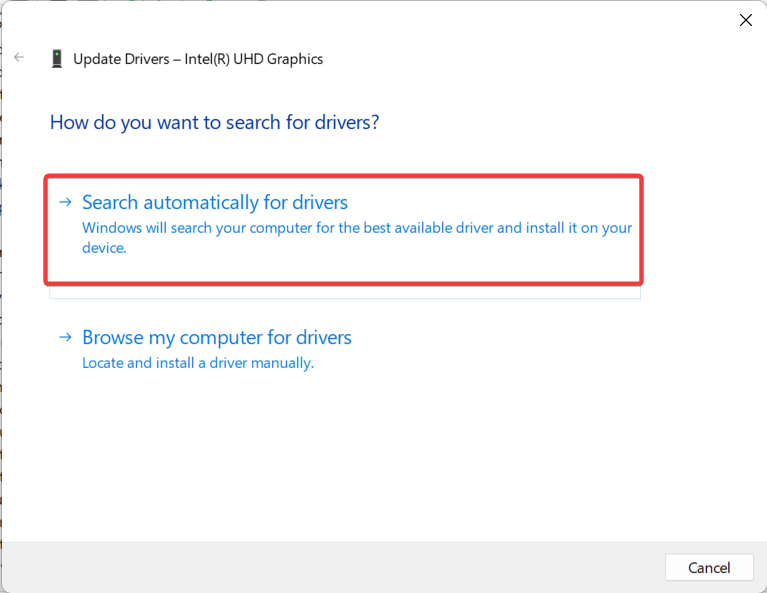
- Click on the Search automatically for drivers option and wait for the utility to download and install the latest GPU drivers.
- Restart your system and run an app to check if the screen elements appear sharp or not.

Device Manager isn’t the best for finding new drivers, so if the above trick doesn’t work out, check out how to update AMD graphics cards or how to update Nvidia graphics cards, depending on your GPU’s model.
8. Roll Back the Latest Windows Update
If the blurry screen issue appears after a recent Windows update, you can try rolling back to the previous version. New updates can have bugs that wreck your system’s performance.
Here’s how to roll back a recent Windows update:
- Press Win + R to launch the Run command box.
- Type appwiz.cpl and press the enter key to launch the Programs and Features utility.
- Click on the View installed updates option.
- Scroll down and locate the most recent update installation.
- Then, click on the Uninstall button and follow the onscreen prompts to remove the update from your system.
9. Use System Restore or Reset Your PC
System Restore lets you roll back Windows to a previous state. If you encounter a screen blur issue after a recent program installation or update, you can use system restore to roll back to a state where things worked better. However, your system needs to have existing restore points saved to use this feature.
If you don’t see any restore points available in the System Restore utility, then resetting Windows 11 is your last resort. Ensure that you back up all your data or use the in-place upgrade to keep all your files intact.
You can check out how to do both of these in our guide on how to factory reset Windows or use System Restore.
A Blurry Windows 11 Blur Issue, Fixed
Screen blurriness can impede work productivity. Start by adjusting the display scaling and enable the ClearText Type on your system. After that, override the High DPI settings and set the system for the best visual appearance. Lastly, update the GPU driver or perform a system restore to revert the system to a normal viewing experience.
If you are using Windows 10 or 11, you might have noticed blurry screens at times. Most users face it while opening pages or documents.
The text on the screen goes blurry and keeps flickering as you scroll down. The reason can be the latest Windows update or an outdated graphics card driver.
However, some users also face the issue while attaching a second monitor. As the pages or images don’t automatically adjust to the native display resolution, you see a pixelated screen.
No matter why you’re facing this issue, you can try a handful of workarounds to fix blurry screens on Windows 10/11.
First, try adjusting your DPI settings and scaling to see if that helps. In case of blurry text, consider enabling ClearType to improve text clarity.
Alternatively, you can activate the “High Performance” graphics mode within affected apps to fix the issue. Finally, updating your drivers may also prove helpful in resolving any visual problems you’re experiencing.
We have jotted down the step-by-step process for each solution mentioned above. Try them out until you get a clear screen on your Windows PC.
Restart Your PC
Before you try any troubleshooting method, restart your PC. For many users, simply restarting the Windows PC has worked. Restarting your computer will work if you’re facing this issue because of a program running in the background or too much content on RAM. To restart your computer, follow the below steps.
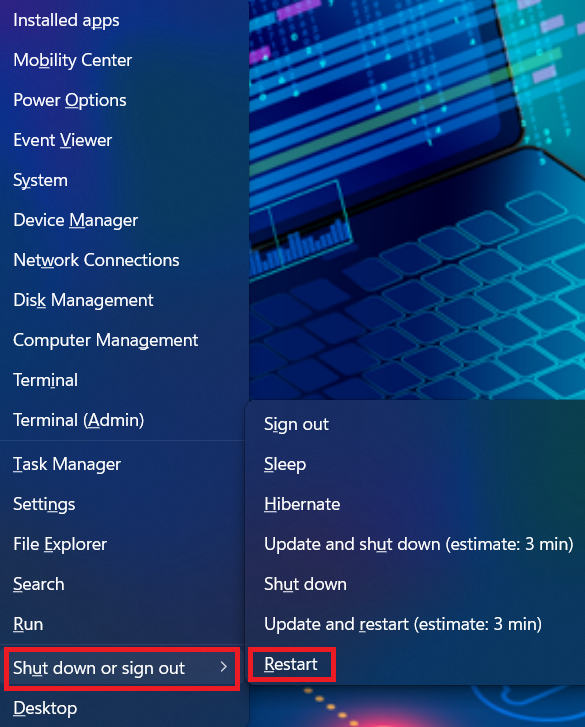
1. Press the Windows logo key along with the X button.
2. Then, expand the Shut down or sign out option.
3. An extended menu will pop up now; click Restart.
Alternatively, you can also restart your PC by using a shortcut method. Go through the steps below to do so.
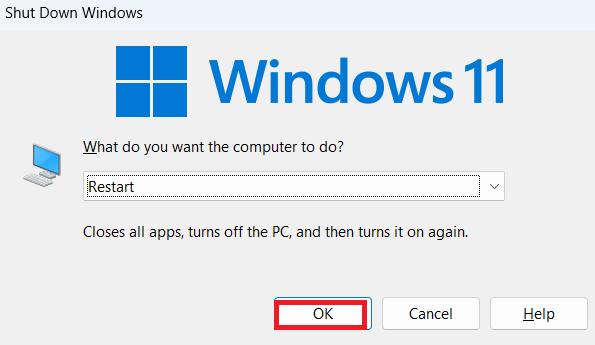
1. Press the ALT + F4 keys to prompt the Shut Down Windows.
2. Hit the down arrow right to Switch user.
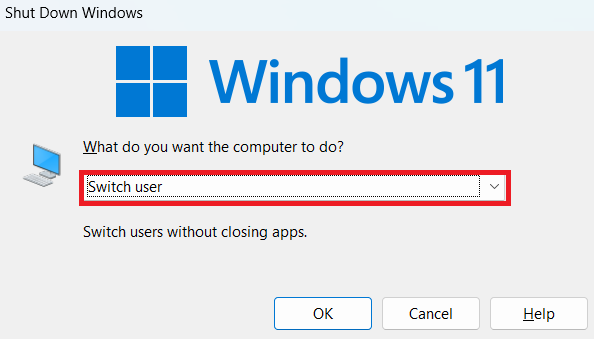
3. Select Restart from the drop-down menu.
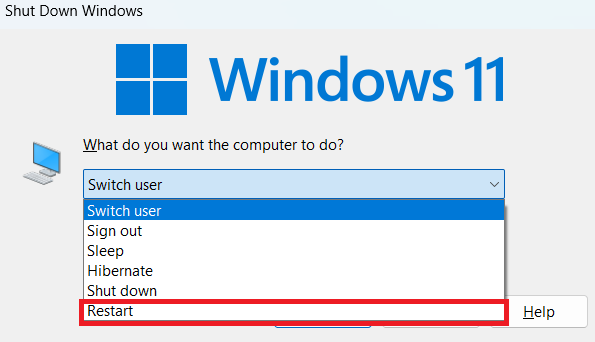
4. Tap OK to Restart your PC.
Adjust Display Resolution
If you use a second monitor, ensure the display resolution and scaling are correctly set to fit the native resolution. Otherwise, the images will get pixelated, and texts will feel too small on the screen. The recommended resolution and scaling are already set on Windows 10 and 11. You need to change it manually to get the compatible settings. Follow the below steps to do so.
1. Press the Windows logo key along with the I button to open Settings.
2. Next, click Display from the right-side tab.
3. Under Scale & layout, expand the Display resolution drop-down.
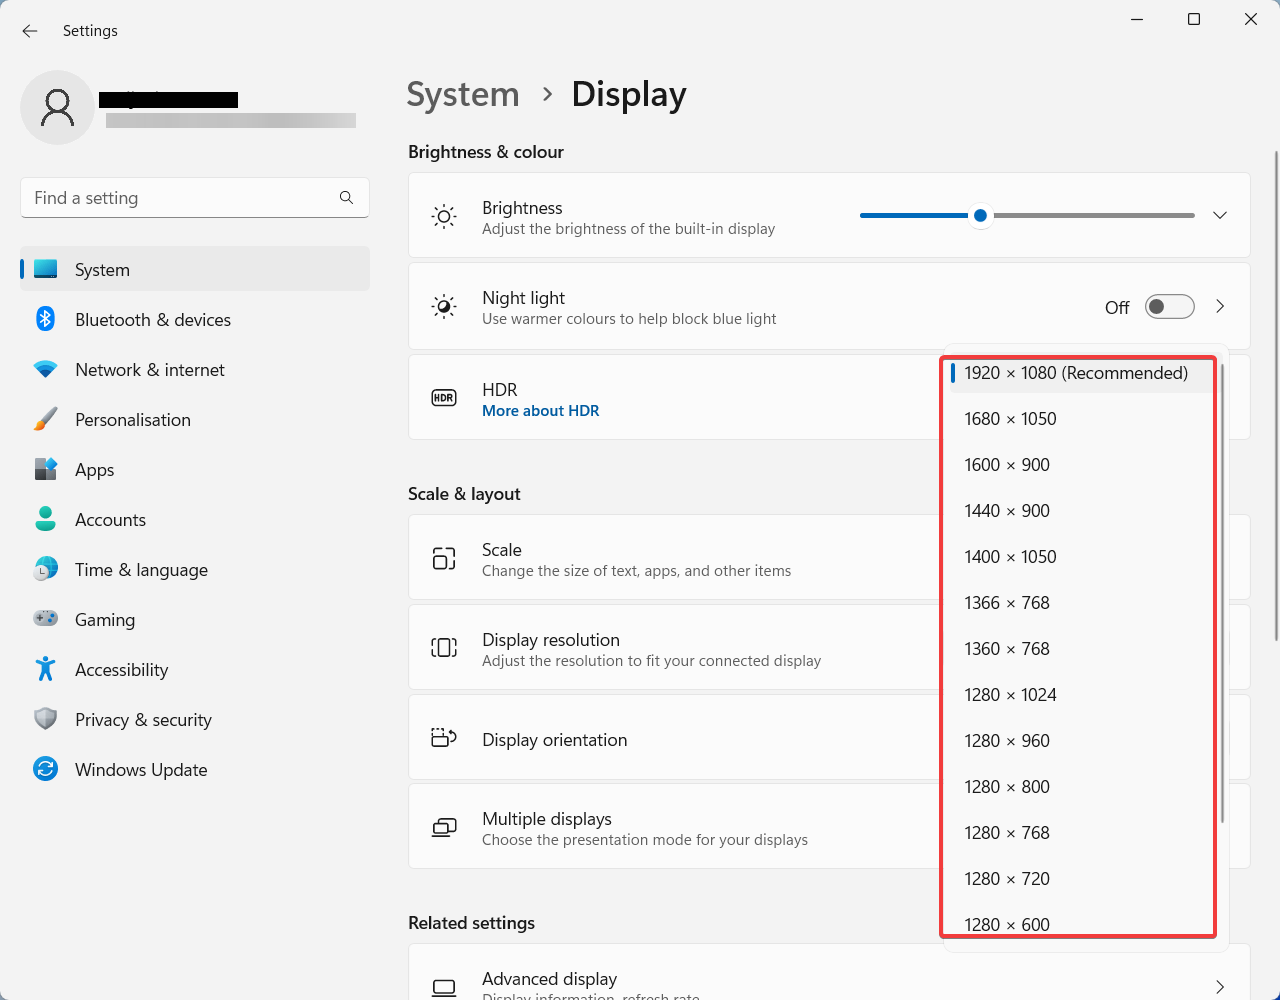
4. Now, choose the resolution fittest to your monitor or laptop screen.
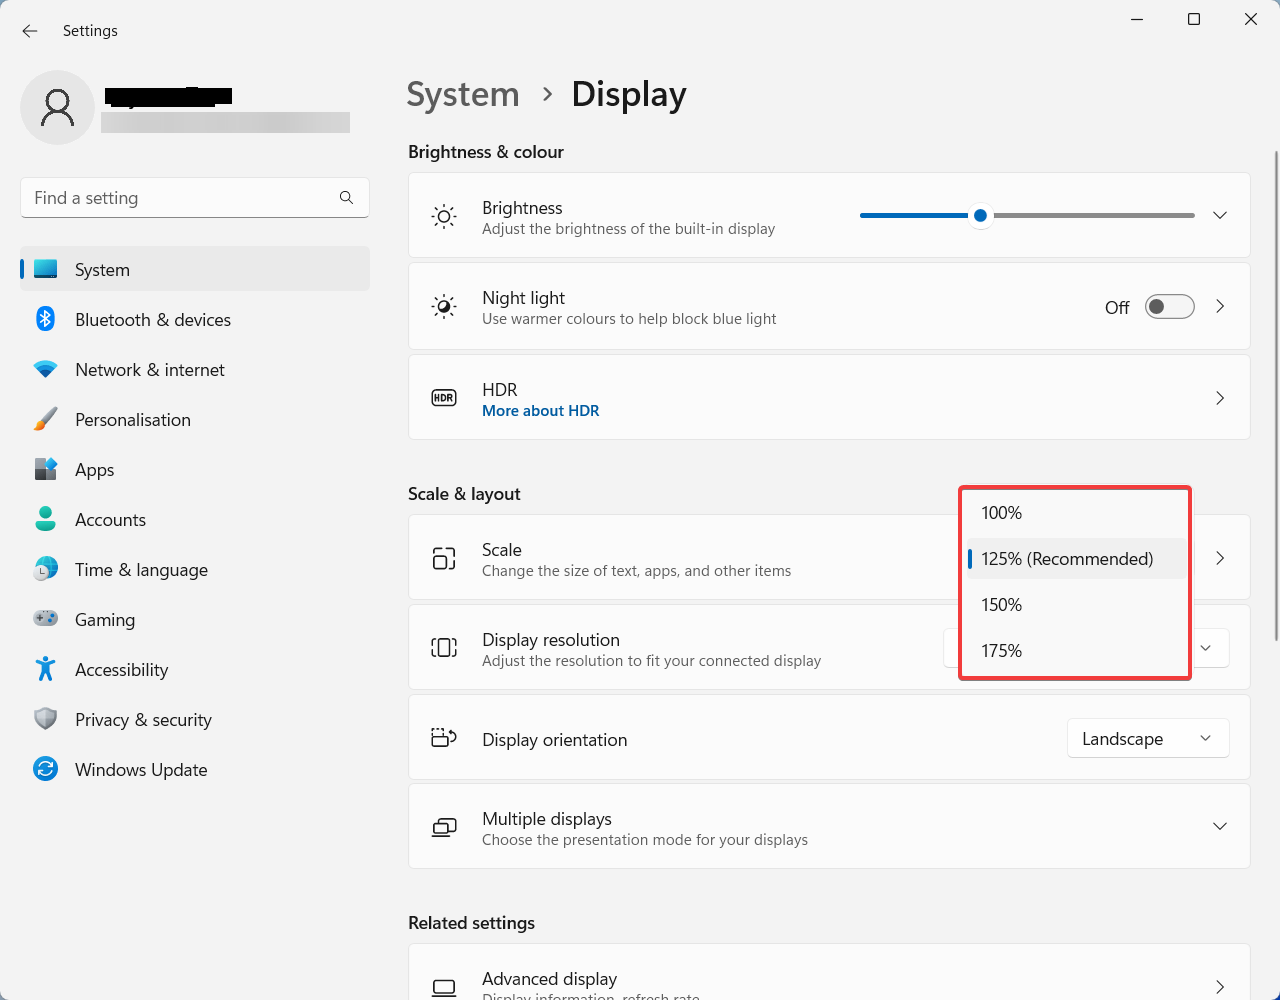
5. Next, click the drop-down next to Scale.
6. Select the correct scaling percentage to change the text size, apps, and other items.
7. Finally, the screen should appear clear.
Enable ClearType Text
ClearType Text is a system tool that offers a clearer and more sharp view of the text on the screen. So, you can read those easily without any pixelated view. This solution is ideal for users getting blurry text on Windows 10/11. Follow the below steps to enable ClearType.
1. Press the Windows logo key + I to open Settings.
2. Next, select Personalization from the left pane.
3. On the right tab, scroll down and click Fonts.
4. Now, expand the Related Settings section from the Fonts window.
5. Click Adjust ClearType text.
6. The ClearType Text Tuner window will open now.
7. Click Next, and keep following the on-screen instructions.
8. Once you enable ClearType text, blurry texts shouldn’t appear further.
Change the APP DIP Settings
When a particular app UI appears blurry on the screen, try this solution. Changing the DPI settings of the problematic app will help it fit into the native resolution of the screen. Hence the app widgets or windows won’t appear blurry anymore. We have mentioned the detailed process of it below.
1. First, open File Explorer by pressing the Windows logo key + E button.
2. Next, click Downloads from the left pane.
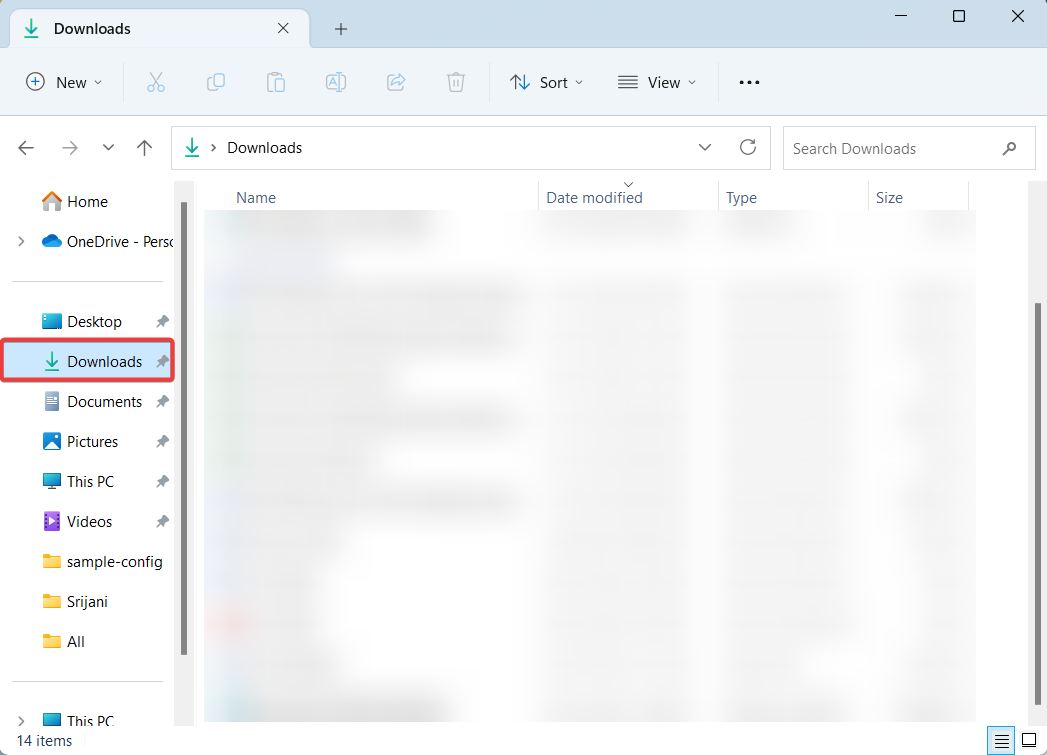
3. Alternatively, you can access the path where you have saved the setup file of the application that you want to change DPI for.
4. Now, right-click on the executable (.exe) file and choose Properties from the context menu.
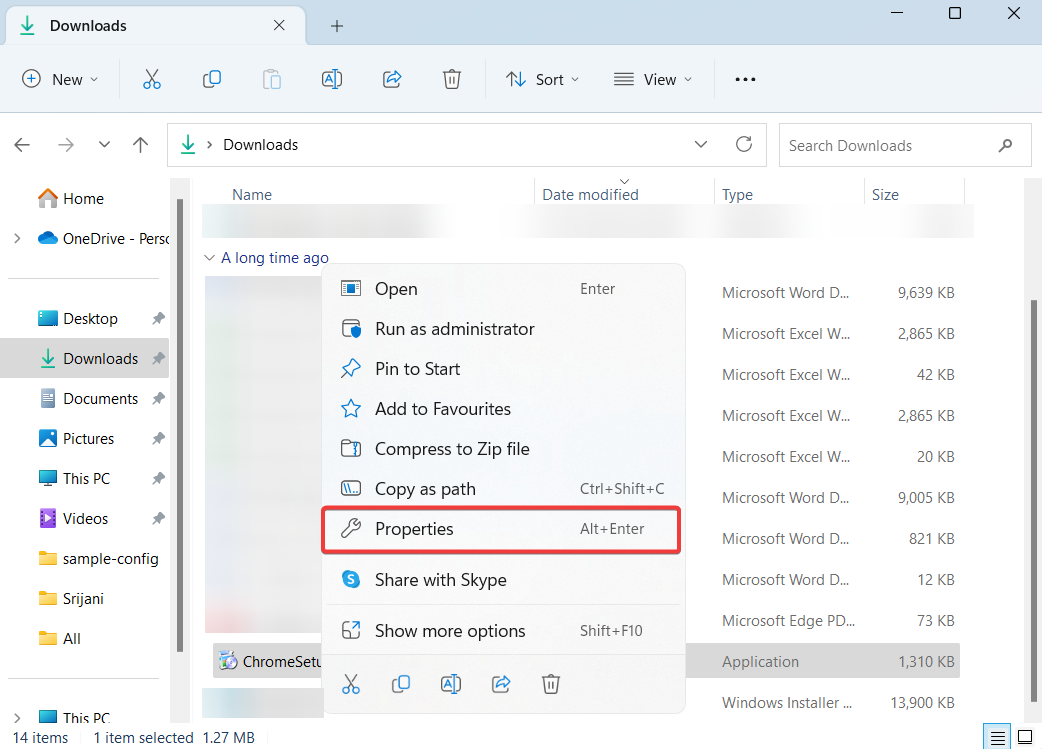
5. On the Properties window, navigate to the Compatibility tab.
6. Next, scroll down and click the Change high DPI settings button under the Settings section.
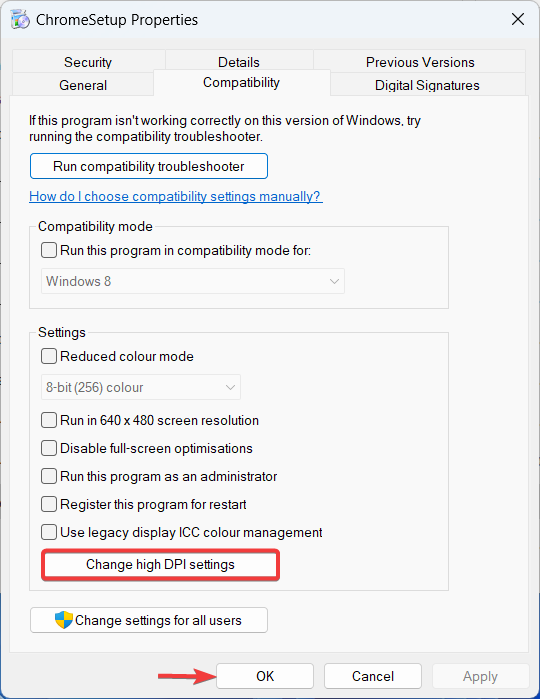
7. The High DPI Settings window will open now; check the boxes below options.
- Use these settings to fix scaling problems for this program instead of the ones in Settings.
- Override high DPI scaling behavior.
8. Once done, click OK to close the tab.
Enable Best Appearance Settings
You might know Windows offers three settings for visual effects. You can set it to perform best, appear best, or let it automatically pick the effect. But if you’re getting a blurry screen, you have to drop the first two options. Otherwise, the screen appearance won’t be prioritized by your system. Check how to enable the best appearance settings on Windows 10 and 11 below.
1. Press the Windows logo key + R to open the Run dialogue box.
2. Next, type in sysdm.cpl and click Enter to open System Properties.

3. In the System Properties window, navigate to the Advanced tab.
4. Under the Performance section, click Settings.
5. A pop-up window will open next.
6. Choose the Adjust for best appearance option from the Visual Effects tab.
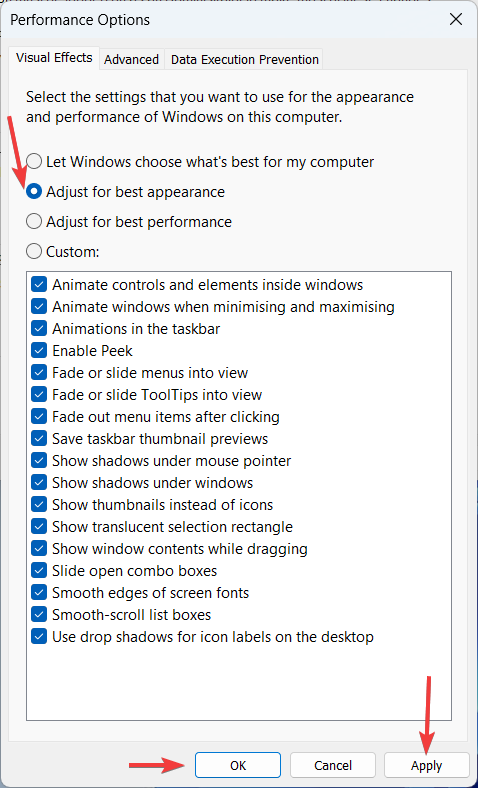
7. Now, click OK to apply the changes.
8. Your screen should appear fine now.
Change Graphics to High Performance
This solution is for specific apps with pixelated UI issues. Changing the graphic performance for the app showing a blurry screen will help you resolve it. Here is the detailed method to set the graphic preference to high performance for individual apps.
1. Press the Windows logo key + I button to open Settings.
2. Next, click System from the left pane and choose Display on the right tab.
3. On the Display window, click Graphics under Related settings.
4. Now, on the Graphics window, click on the app you want to change your graphics preference for.
5. Click the Options button, and the Graphics Preference window will open.
6. Now, choose High performance from the list of options and click Save.
7. Once you save the preference, the related app will work fine.
Run Windows Memory Diagnostic
If your PC is facing any RAM problem or storage issue, it might fail to launch an app properly and load the screen. Running the Windows memory diagnostic will help you fix the existing issue and clear RAM for better app performance. Take a look at the steps to run this diagnostic tool.
1. Press the Windows logo key + S to open Search.
2. Next, type in Windows Memory Diagnostic and open the program.
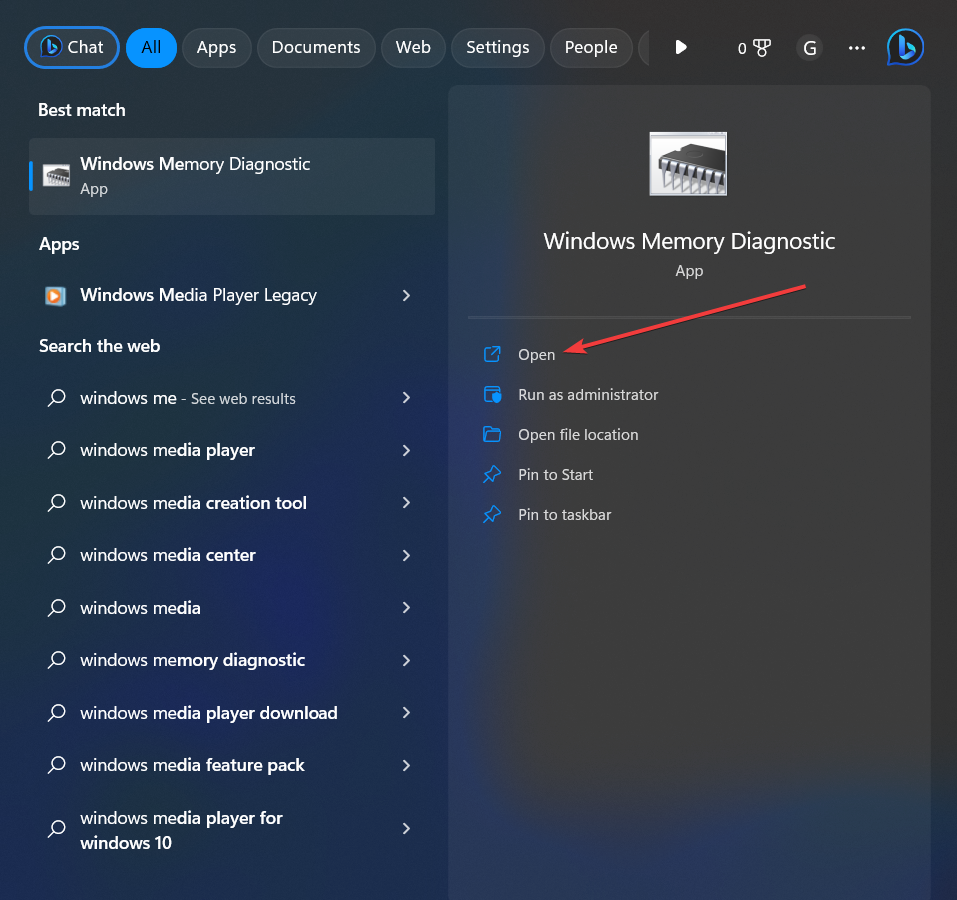
3. You will get two options now.
- Restart now and check for problems.
- Check for problems the next time I start my computer.

4. Choose your preferred option.
5. Once you get the diagnostic data, take the suggested action to fix blurry screens.
Update Graphics Card Driver
Updating your graphics card driver will help you fix any compatibility errors. When you use an outdated or corrupted display driver, the apps don’t get enough resources to fit screen resolution or work properly. That’s why updating the graphics card driver in use will fix the problem.
1. Press the Windows logo key + S to open Search.
2. Enter Device Manager in the search box and open the application.
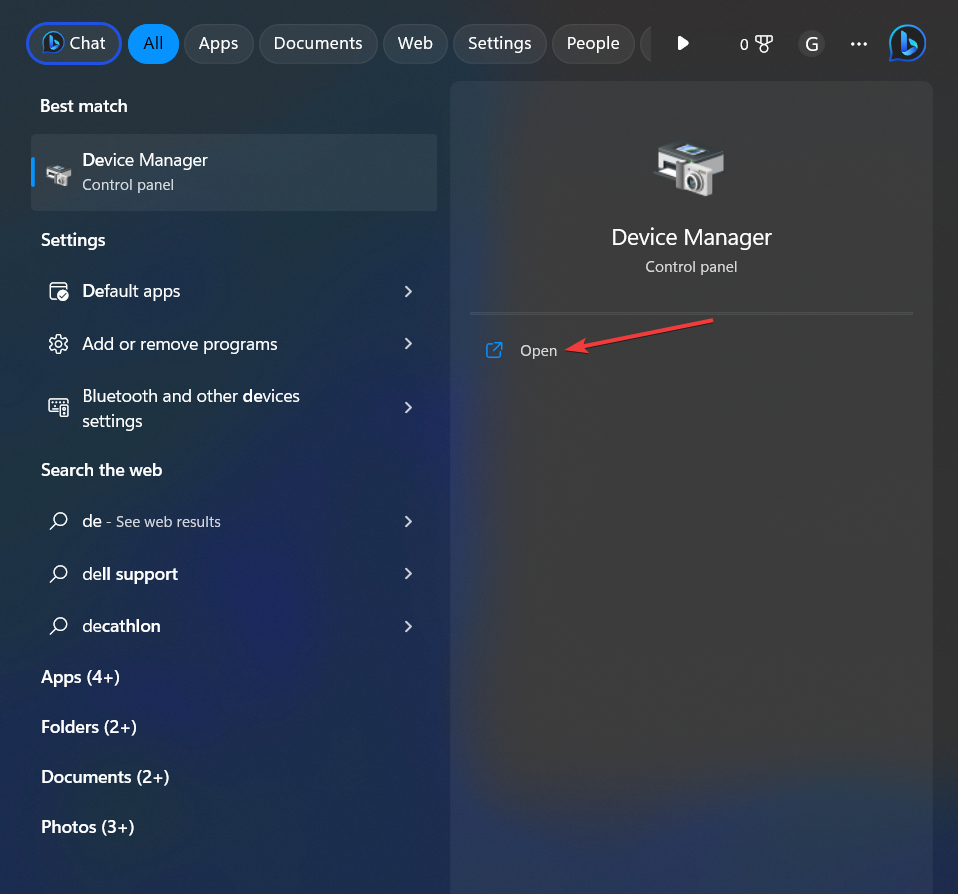
3. On the Device Manager window, double-click on Display adapters to expand it.
4. You will find the graphics card driver in use.
5. Right-click on it and choose the Update driver option.
6. Now, click on Search automatically for drivers and wait for some time to finish the driver update.
7. Once done, restart your PC.
Conclusion
We have mentioned all the troubleshooting methods you can follow to fix blurry screens on Windows 10/11. Make sure to perform each technique carefully, as shown here, to avoid any system glitches. Whether it’s just a pixelated app UI or blurry text, you can fix it with the methods shared here. Additionally, keep your Windows OS up-to-date.
You may also be interested in reading about these tweaks to improve Windows performance.