
Существует множество причин, по которым при обновлении или установке Windows 11 может появиться сообщение об ошибке, но распространенные ошибки можно исправить с помощью нескольких действий, которые можно выполнить самостоятельно. Примечание. При обновлении устройство с более старой версии Windows, например Windows 7, Windows 8.1 или Windows 10, будет Windows 11.
Прежде чем искать определенный код ошибки, воспользуйтесь советами в разделе Общие решения. Если они не помогут решить проблему с обновлением или установкой, воспользуйтесь таблицей кодов ошибок в конце этой статьи.
Общие решения
Вот несколько советов, которые помогут вам исправить ошибки обновления и установки:
Отсоедините все ненужные устройства. Это могут быть наушники, принтеры, сканеры, динамики, USB-устройства флэш-памяти и внешние жесткие диски.
Если вы используете ноутбук, подключенный к стыковочному узлу, отстыкуйте его.
Прежде чем пытаться обновить Windows, убедитесь, что на устройстве установлены все важные обновления, в том числе обновления драйверов оборудования.
Чтобы убедиться, что на устройстве установлены все обновления, просмотрите статью Центр обновления Windows: вопросы и ответы.
Используйте Защитник Windows для защиты своего устройства во время обновления — антивирусное программное обеспечение не от Майкрософт может вызывать проблемы с обновлением. Если у вас есть установочный носитель и вся необходимая информация для активации, вы можете переустановить программное обеспечение после обновления.
Чтобы удалить антивирусное приложение, перейдите в раздел Панель управления\Программы\Программы и компоненты. Выберите программу и нажмите Удалить. Нажмите кнопку Да, чтобы подтвердить операцию.
Устаревшее программное обеспечение может мешать обновлению Windows, поэтому попробуйте удалить старые или ненужные приложения.
Если вы хотите переустановить приложение позже, перед удалением убедитесь, что у вас есть установочный носитель и вся необходимая информация для активации.
Чтобы удалить программное обеспечение, перейдите в раздел Панель управления\Программы\Программы и компоненты. Выберите программу и нажмите Удалить. Нажмите кнопку Да, чтобы подтвердить операцию.
Чтобы выполнить обновление до Windows 11, на жестком диске требуется достаточно места для установки.
Чтобы просмотреть объем свободного места на жестком диске на компьютере, выберите проводник на панели задач (в Windows 7 она называется Обозреватель Windows) или нажмите клавишу с логотипом Windows + E.
Затем выберите Компьютер или Этот компьютер и найдите раздел Жесткие диски или Устройства и диски. Системным считается диск, на значке которого есть логотип Microsoft Windows. Количество свободного места будет указано под диском.
Если свободное место на диске заканчивается, ознакомьтесь с советами по освобождению места на диске компьютера.
Ошибки 0xC1900101
Ошибка, начинающаяся с 0xC1900101 — это, как правило, ошибка драйвера. При отображении какого-либо из этих кодов ошибок, попробуйте сначала выполнить следующие действия, чтобы устранить проблему. Если эти действия не помогли, дополнительные технические сведения см. в статье Устранение ошибок обновления Windows .
-
0xC1900101 — 0x2000c
-
0xC1900101 — 0x20017
-
0xC1900101 — 0x30018
-
0xC1900101 — 0x3000D
-
0xC1900101 — 0x4000D
-
0xC1900101 — 0x40017
-
Убедитесь, что на вашем устройстве достаточно свободного места. На вашем устройстве требуется не менее 16 ГБ свободного места для обновления 32-разрядной ОС или 20 ГБ для 64-разрядной ОС. Дополнительные сведения см. в статье Освобождение места на диске в Windows.
-
Запустите Центр обновления Windows несколько раз. Скачайте и установите все доступные обновления в Центре обновления Windows, в том числе обновления программного обеспечения, обновления для оборудования и некоторые сторонние драйверы. Используйте средство устранения неполадок клиентский компонент Центра обновления Windows для исправления ошибок обновления Windows 11.
-
Проверьте сторонние драйверы и скачайте все обновления. Сторонние драйверы и инструкции по установке для любого оборудования, которое вы добавили к устройству, можно найти на веб-сайте изготовителя.
-
Отключите дополнительное оборудование. Удалите все внешние устройства хранения данных и диски, док-станции и другое оборудование, подключенное к устройству, которое не нужно для основных функций.
-
Проверьте диспетчер устройств на наличие ошибок. В поле поиска на панели задач введите диспетчер устройств. Выберите в результатах Диспетчер устройств. В появившемся окне найдите все устройства с желтым восклицательным знаком рядом (может потребоваться выбрать каждую категорию, чтобы перейти в список устройств). Нажмите и удерживайте (или щелкните правой кнопкой мыши) имя устройства и выберите один из вариантов Обновить драйверы или Удалить, чтобы исправить ошибки.
-
Удалите программы безопасности сторонних разработчиков. Убедитесь, что вы знаете как переустановить программы, а все необходимые ключи под рукой. Защитник Windows защитит ваше устройство на это время.
-
Исправьте ошибки жесткого диска. В поле поиска на панели задач введите командная строка. Выберите из списка результатов Командная строка. В появившемся окне введите chkdsk/f C: и нажмите клавишу ВВОД. Исправление ошибок на жестком диске начнется автоматически, и вам будет предложено перезапустить устройство.
Примечание: Чтобы выполнить это действие, у вас должны быть разрешения администратора.
-
Выполните корректный перезапуск в Windows. См. раздел Выполнение «чистой» загрузки в Windows.
-
Восстановление и восстановление системных файлов. В поле поиска на панели задач введите командная строка. Выберите из списка результатов Командная строка. В появившемся окне введите DISM.exe /Online /Cleanup-image /Restorehealth и нажмите клавишу ВВОД. (Узнайте, как восстановить образ Windows)
Примечание: Чтобы выполнить это действие, у вас должны быть разрешения администратора.
Другие распространенные ошибки
В следующей таблице перечислены наиболее распространенные ошибки обновления и установки, а также некоторые действия, которые можно попытаться исправить. Если у вас по-прежнему возникают проблемы с обновлением или установкой Windows, обратитесь в службу поддержки Майкрософт.
|
Ошибка |
Что она означает и как ее исправить |
|---|---|
|
0xc1900223 |
Это означает, что возникла проблема с загрузкой и установкой выбранного обновления. Центр обновления Windows повторит попытку позже, при этом вам не потребуется выполнять никаких действий. |
|
0xC1900208 — 0x4000C |
Эта ошибка может означать, что на компьютере установлено несовместимое приложение, которое не позволяет завершить процесс обновления. Удалите все несовместимые приложения, а затем попробуйте выполнить обновление снова. |
|
0xC1900107 |
Операция очистки предыдущей попытки установки по-прежнему ожидает завершения, для продолжения обновления требуется перезагрузка системы. Перезагрузите устройство и снова запустите программу установки. Если перезапуск устройства не решил проблему, воспользуйтесь программой очистки диска для удаления временных и системных файлов. Дополнительные сведения см. в статье Очистка диска в Windows. |
|
0x80073712 |
Файл, необходимый Центру обновления Windows, поврежден или отсутствует. Попробуйте восстановить системные файлы. В поле поиска на панели задач введите командную строку. Выберите из списка результатов Командная строка. В появившемся окне введите DISM.exe /Online /Cleanup-image /Restorehealth и нажмите клавишу ВВОД. |
|
0xC1900200 — 0x20008 0xC1900202 — 0x20008 |
Это может означать, что ваш компьютер не соответствует минимальным требованиям для скачивания или установки обновления до Windows 11. Узнайте больше о минимальных требованиях для Windows 11. |
|
0x800F0923 |
Это может означать, что драйвер или другое программное обеспечение на компьютере несовместимо с обновлением до Windows 11. Чтобы узнать, как устранить эту проблему, обратитесь в службу поддержки Майкрософт. |
|
0x80200056 |
Эта ошибка может означать, что процесс обновления был прерван, поскольку вы случайно перезагрузили компьютер или вышли из системы. Попробуйте снова выполнить обновление и убедитесь, что компьютер подключен к электросети и остается включенным. |
|
0x800F0922 |
Эта ошибка может означать, что вашему компьютеру не удалось подключиться к серверам Центра обновления Windows. Если вы используете VPN для подключения к рабочей сети, отключитесь от сети и выключите программное обеспечение VPN (если применимо), а затем попробуйте снова выполнить обновление. Эта ошибка также может означать, что в разделе, зарезервированном системой, недостаточно свободного места. Возможно, эту проблему удастся решить, используя стороннее программное обеспечение для увеличения размера раздела, зарезервированного системой. |
|
Ошибка: нам не удалось завершить обновления. Отмена изменений. Не выключайте компьютер. Ошибка: не удалось настроить обновления Windows. Отмена изменений. |
Это общие ошибки, которые могут возникать в случае сбоя обновления Windows. Чтобы выбрать оптимальный способ решения проблемы, необходимо определить конкретный код ошибки. Код ошибки, вызвавшей сбой обновления, можно найти в журнале обновлений. Найдите обновление, которое не было установлено, запишите код ошибки и обратитесь в службу поддержки Майкрософт. Чтобы просмотреть журнал обновлений в Windows 11, выполните приведенные далее действия.
|
|
Ошибка: обновление не применимо к этому компьютеру. |
Эта ошибка может означать, что на компьютере не установлены обязательные обновления. Убедитесь, что на вашем компьютере установлены все важные обновления, прежде чем пытаться выполнить обновление. |
|
0x80070070 — 0x50011 0x80070070 — 0x50012 0x80070070 — 0x60000 |
Эта ошибка может означать, что на компьютере недостаточно свободного места для установки обновления. Освободите место на диске и повторите попытку. Советы по освобождению места на диске |
|
0x80300024 |
Конечный диск, раздел или том не поддерживает указанную операцию с диском. Убедитесь, что компьютер соответствует минимальным требованиям для установки Windows. |
|
0x80070002 0x20009 |
Системе не удается найти указанный файл. Если у вас есть диск или диски, на которых вы не устанавливаете Windows 11, удалите эти диски. |
|
0xC1900101 0x20017 0xC1900101 0x30017 |
Драйвер вызвал проблему. Отключите или удалите все сторонние антивирусные или антишпионские программы в системе. Отключите все периферийные устройства, подключенные к системе, за исключением мыши, клавиатуры и дисплея. Обратитесь к поставщику оборудования за обновленными драйверами устройств. |
|
0x8007042B 0x4000D |
Программа установки Windows непредвиденно завершена из-за другого процесса, запущенного в фоновом режиме. Во время загрузки Windows в штатном режиме автоматически запускается несколько приложений и служб, которые потом работают в фоновом режиме. К ним относятся основные системные процессы, антивирусные программы, системные служебные программы и другое ранее установленное ПО. Эти приложения и службы могут вызвать помехи при попытке обновления до последней версии Windows 11. Чтобы определить, мешает ли фоновая программа обновлению, может потребоваться «чистая загрузка». См . статью Как выполнить чистую загрузку в Windows. |
|
0x800700B7 0x2000a |
Программа установки Windows непредвиденно завершена из-за другого процесса, запущенного в фоновом режиме. Удалите антивирусное или антишпионское программное обеспечение и повторите попытку обновления. |
Windows Media Creation Tool is a very useful tool that can help you upgrade your Windows system to the latest version or install the latest Windows 10/11 on your device. However, if Windows Media Creation Tool is not working, do you know how to fix it? You can find some easy solutions here.
Windows Media Creation Tool is an official tool from Microsoft. You can use it to upgrade your system to the latest version or install the latest Windows 10/11 on your device. MiniTool Software has talked about Windows 10 Media Creation Tool in this article: A Complete Guide to Windows 10 Media Creation Tool: How to Use.
However, the usage of Windows 10 Media Creation Tool and Windows 11 Media Creation Tool is slightly different.
For example,
You can use Windows 10 Media Creation Tool to:
- Upgrade your PC to the latest version.
- Create a Windows 10 installation USB drive.
- Download a Windows 10 ISO file.
You can use Windows 11 Media Creation Tool to:
- Create a Windows 11 installation USB drive.
- Download a Windows 11 ISO file.
You see the only difference is that you can’t use Windows 11 Media Creation Tool to directly upgrade your PC now. But it is not a big problem. You can use Windows 11 Installation Assistant to update your system. The effect is the same.
Windows 10/11 Media Creation Tool is not preinstalled on your PC. You need to download it from the Microsoft software download site.
- Download Windows 10 Media Creation Tool
- Download Windows 11 Media Creation Tool
After downloading Windows 10/11 Media Creation Tool, you can directly open and run it to do what you want to do. However, some users report that their Windows Media Creation Tool is not working.
There are multiple scenarios for this problem. For example:
- Windows 11 Media Creation Tool not working
- Windows 10 Media Creation Tool not working
- Windows Media Creation Tool won’t run
- Windows Media Creation Tool won’t open
- Windows Media Creation Tool couldn’t run on a PC
- And more….
We propose some solutions to these problems. You can try them to help you out.
If Windows Media Creation Tool is not working or you can’t open it on your PC, you can delete the tool and download it again. This is the quickest way to solve this issue: you need to make sure your downloaded Media Creation Tool is complete.
Your internet connection should be enabled and work smoothly during the download process. This is also to ensure the integrity of the download. On the other hand, it also requires a good network connection when using Windows Media Creation Tool.
If the above method doesn’t work for you, you can run the tool as administrator to have a try. You can right-click the Media Creation Tool and select Run as administrator. If the User Account Control interface pops up, you need to click the Yes button to continue.
Fix 3: Create an AllowOSUpgrade Registry Key
Windows Registry is an administrative tool that saves information about your installed programs and services on your Windows PC. It contains an OSUpgrade registry key and it is related to your Windows update. You can create an AllowOSUpgrade Registry key to allow Windows Media Creation Tool to run and upgrade your system.
Tips:
You should back up the registry key in advance to protect your system.
Step 1: Click the search icon from the taskbar, then search for Registry Editor. Select Registry Editor to open this tool. If you receive the User Account Control interface, click the Yes button to continue.
Step 2: Go to the following path. You can directly copy and paste this path to the address bar and press Enter to open the path.
Computer\HKEY_LOCAL_MACHINE\SOFTWARE\Microsoft\Windows\CurrentVersion\WindowsUpdate\OSUpgrade
Step 3: Right-click the OSUpgrade key and go to New > DWORD (32-bit) Value to create a new key. Then, rename the new key to AllowOSUpgrade.
Step 4: Double-click the newly created value to open it. Then, change the value data to 1.
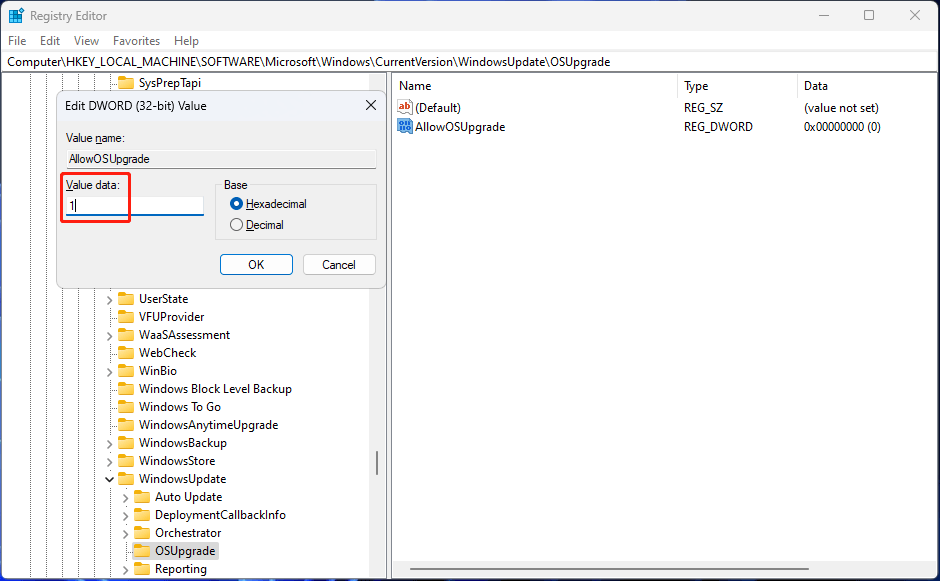
Step 5: Click OK to save the change.
Step 6: Restart your computer.
After these steps, you can run Windows Media Creation Tool again and check if it runs normally.
Fix 4: Enable the Relevant Services
If Windows Media Creation Tool is not working on your PC, you also need to check if the Windows update relevant services are enabled.
You may disable one or more of the following services by mistake but you don’t it:
- Background Intelligent Transfer Service (BITS)
- Server
- TCP/IP NetBIOS Helper
- Workstation
- IKE and AuthIP IPsec Keying Modules
- Windows Update
Any service being shut down will affect Windows 10/11 Media Creation Tool. You can open Services to check.
Step 1: Press Windows + R to open Run.
Step 2: Type services.msc in the Run dialog and press Enter to open the Services app.
Step 3: Check if the above services are enabled. If one service is disabled, you can double-click that service and select Automatic for Status type. Then, click Apply and OK to save the change.
Step 4: Close Services.
After these steps, you can run Media Creation Tool again and see if it can run successfully.
Fix 5: Check the Available Space on Your System Disk
You should have at least 8 GB of free space on the C drive to run Media Creation Tool on your PC. You can go to File Explorer to check if the free space is enough. If not, you can delete unimportant files on the C drive to free up more space. You can also run Disk Cleanup to get more available space.
Here are 10 ways to free up disk space on Windows 10/11.
Fix 6: Use another Way to Upgrade Your PC
Using Media Creation Tool is not the only way to upgrade your PC. If you can’t use this tool to perform a Windows 10/11 update, you can use another way to do the job.
For example, you can check for updates in Windows Update, then download and install the available update on your device.
You can also download a Windows 10/11 disk image (ISO), create a Windows 10/11 installation USB drive using Rufus, and then install Windows 10/11 from USB.
Fix 7: Use another Way to Create a Windows 10/11 Installation USB Drive
If you can’t use Windows Media Creation Tool to create an installation USB drive, you can try another tool like Rufus to create a Windows installation USB drive. This method is free: Rufus is free for download, and Windows 10/11 ISO file is free for download. You just need to prepare a USB drive that has at least 8 GB of space.
Fix 8: Use another Way to Download a Windows 10/11 ISO File
If you can’t use Windows Media Creation Tool to download an ISO file due to Media Creation Tool not working or opening, you still have other choices to download a Windows 10/11 ISO file.
Microsoft allows you to directly download a Windows 10 ISO file (all editions) on a non-Windows device from the Windows 10 software download page. You can set a non-Windows agent in Chrome and then download a Windows 10 ISO file.
Windows 11 ISO download is different. You can download the Windows 11 disk image directly from Microsoft’s official site.
So, it is not a big deal if Windows Media Creation Tool is not working on your PC. You see, there are many ways to replace this tool.
Click to Tweet
Recover Your Lost and Deleted Files on Windows 10/11
Usually, Windows 10/11 updates via Media Creation Tool will not delete files on your device. But to protect your files and system, you’d better use MiniTool ShadowMaker to back up your computer to an external hard drive. If a Windows update destroys your system or deletes your files, you can restore them using your backup.
MiniTool ShadowMaker TrialClick to Download100%Clean & Safe
However, if there is no available backup to restore your files, what can you do to save your losses? You can try professional data recovery software like MiniTool Power Data Recovery.
It is a free file recovery tool that is specially designed to recover files from different types of data storage devices. This MiniTool data recovery software can work in different situations. For example:
- When you permanently delete a file from your computer, you can recover it using this software as long as that file is not overwritten by new data.
- When you can’t open a data storage drive, you can use this tool to rescue your files and then fix the inaccessible drive.
- If you want to recover data from an SD card, you can also try this tool.
- When your Windows system corrupts, you can boot your device from the bootable edition of this software and then recover data. After that, you can feel free to reinstall Windows or use other methods to fix the system.
- If you can’t find some of your important files after upgrading Windows 10/11 to the latest version, you can run this software to scan the drive that previously saved the files and recover them.
You can first run the MiniTool Power Data Recovery trail edition to see if it can find your needed files and then decide whether to use this tool to recover data.
MiniTool Power Data Recovery TrialClick to Download100%Clean & Safe
You can follow these steps to recover data using this MiniTool software.
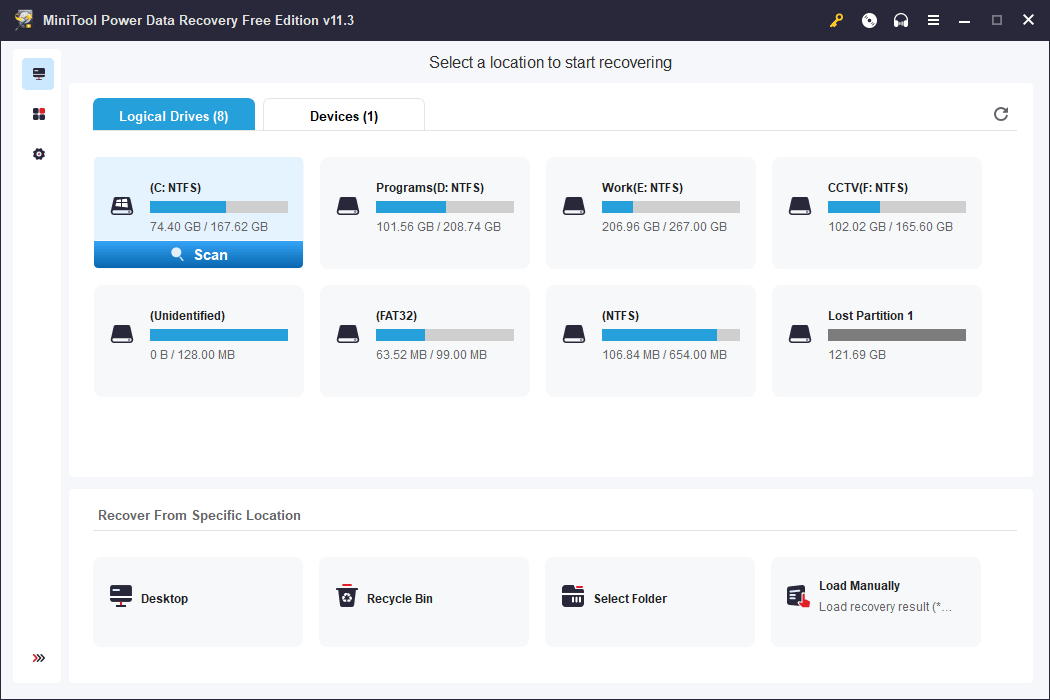
Step 1: Launch MiniTool Power Data Recovery.
Step 2: You need to find the drive where the lost files were previously saved, hover over that drive, and then click the Scan button to start scanning.
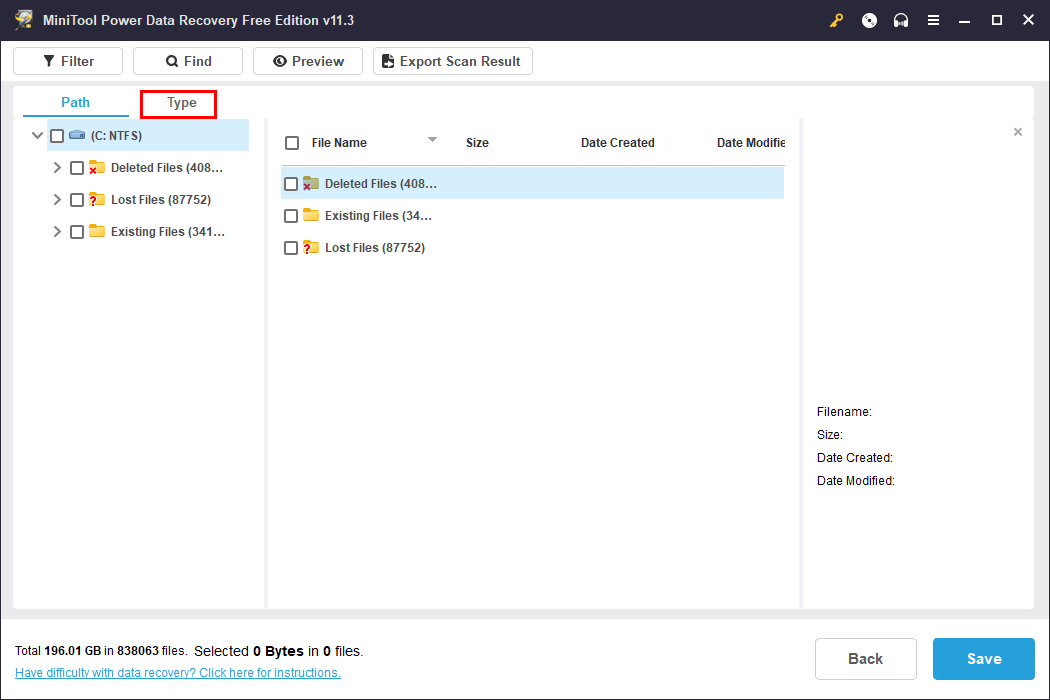
Step 3: After scanning, this software will show you the files it finds. These files are listed by path by default. You can open each path to look for your needed items. If you want to find certain types of files, you can switch to Type to make this software display files by type, then you can find files by type.
To recover data using this software, you need to use a full edition of this software. You can get a license key from the MiniTool official site, then click the key icon from the above ribbon menu, enter the license key, and press Enter to register the software.
After registering the software, you can select all your needed files once, then click the Save button, and select a suitable path to save them. To avoid data from being overwritten, the destination folder should not be the original location of the lost files.
Wrap Things up
By reading this, you should know the things you can do to fix the issue if Windows Media Creation Tool is not working on your PC. You can take steps to resolve the problem. You can also use another way to do the same thing that Media Creation Tool should do for you.
Additionally, if you are looking for a data recovery program to retrieve your files, you can try MiniTool Power Data Recovery.
Should you have other related issues that need to be fixed, you can let us know in the comments. You can also contact us via [email protected].
Updated on Apr 28, 2025
The Media Creation Tool is a useful tool on Windows 10 that can help upgrade the Windows system to the latest version and install the latest Windows on another device. But what should you do when the Windows Media creation tool doesn’t work? EaseUS will share the fixes with you in this article.
- Option 1. Use EaseUS Partition Master as an Alternative [👍]
- Option 2 — 6 Fixes for Windows 10 Media Creation Tool Not Working
The most efficient way to fix Windows media creation tool errors is to turn to reliable third-party software.
Option 1. Use EaseUS Partition Master as an Alternative
EaseUS Partition Master Professional allows you to create a Windows installation USB/disk without a Windows 10 creation tool. It can directly burn your Windows 10 ISO to USB, allowing you to install Windows 10 on any PC at any time.
Compared to the Windows 10 Media Creation Tool, this tool is more suitable for beginners. During the entire burning process, almost no errors occurred. It can ensure that you successfully complete the entire installation process.
Here is how:
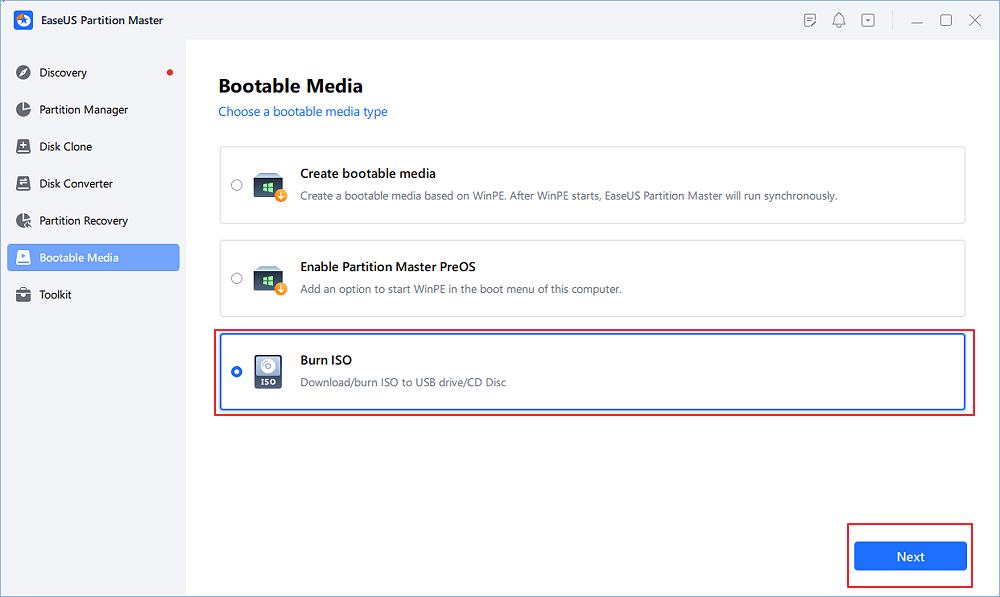
Step 1. Launch EaseUS Partition Master and go to the Bootable Media section. Click «Burn ISO» and click «Next».
Step 2. Select the ISO image that you have downloaded on your PC, and click «Open».
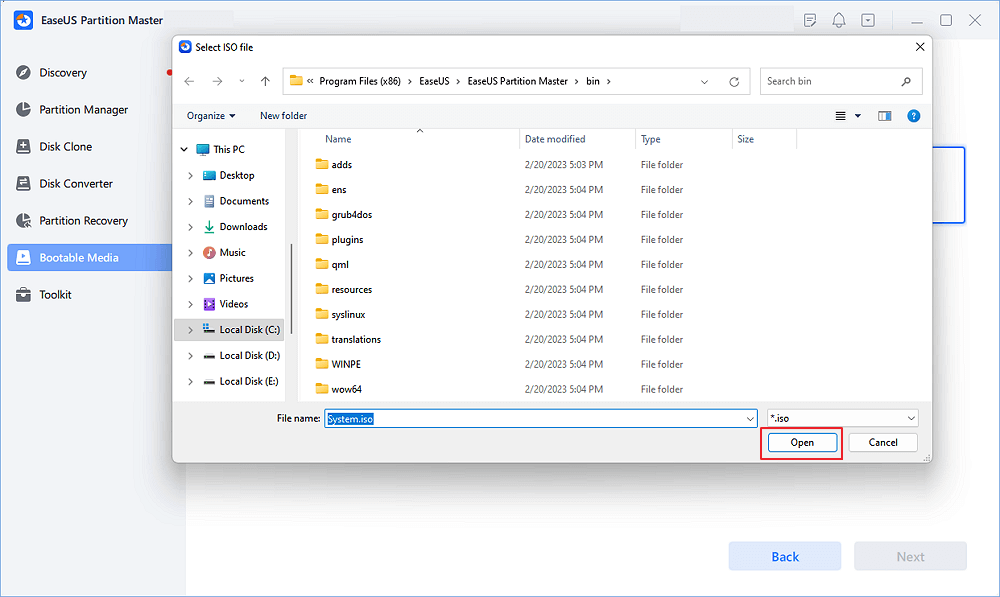
Step 3. Click «Next» and select the target USB as destination and click «Burn» to execute the operation.
This tool is more friendly for beginners. If you want to make a Windows 10 bootable installation disk or burn Windows 10 iso to USB without using the Windows 10 media creation tool or the media creation tool is not working, you should not miss this tool.
Option 2 — 6 Fixes for Windows 10 Media Creation Tool Not Working
If you don’t want to try third-party tools, you can also fix this tool through the following methods. However, this will take more time, and individual repair solutions require computer operating experience. Please follow the steps below to try to fix the Media Creation Tool Not Working error on Windows 10/11.
Fix 1. Run Windows 10/11 Media Creation Tool as Administrator
You can try it out by running the tool as an administrator. Plug in the bootable USB, right-click on the Media Creation Tool, and choose the Run as administrator option. If the «User Account Control» interface pops up, you need to click the «Yes» button to continue. Microsoft also suggests it’s the solution for most similar cases.
Fix 2. Modify the Windows Registry
To run the Media Creation Tool successfully, you also need to modify the Registry Editor slightly. Here’s how:
Step 1. Press Win + R to open Run.
Step 2. Type regedit in Run and click Enter.
Step 3. Click «Yes» on the confirmation prompt.
Step 4. In the Registry Editor, go to the location mentioned below:
HKEY_LOCAL_MACHINE\\SOFTWARE\\Microsoft\\Windows\\Current Version\\WindowsUpdate\\OSUpgrade
Step 5. Right-click the OSUpgrade key and select New > DWORD (32-bit) ) Value option.
Step 6. Name this value AllowOSUpgrade.
Step 7. Double-click AllowOSUpgrade and type 1 under Value data.
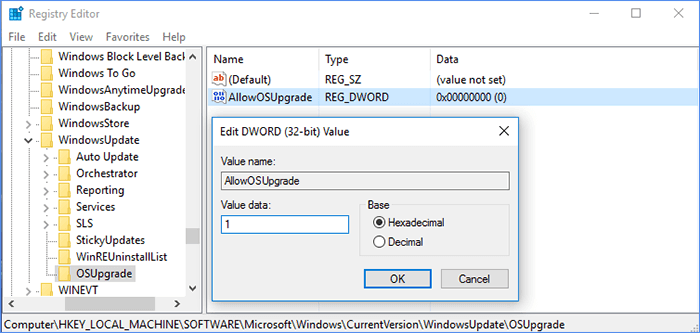
Step 8. Click OK to close Registry Editor and restart your PC.
The Windows registry contains an OSUpgrade registry key, which is related to Windows Update. Create an AllowOSUpgrade registry entry to allow Windows Media Creation Tool to run and upgrade your system.
Fix 3. Enable Related Services
If you disable certain required services in Windows, it may prevent the media creation tool from working. Before running the Media Creation Tool, you must enable the required services and keep them running while using the Media Creation Tool. Here are the steps:
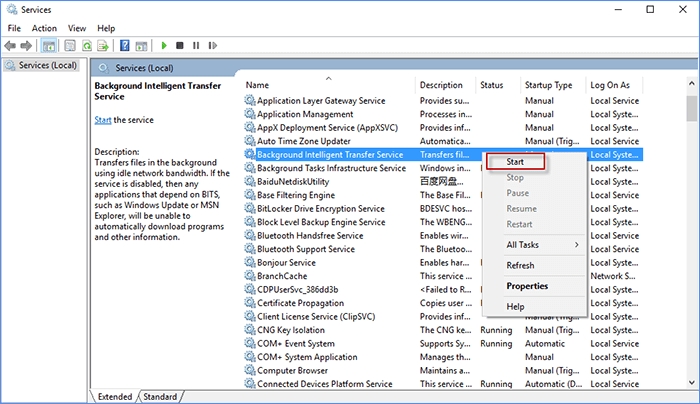
Step 1. Press the Windows + R keys and type services. msc, and press Enter.
Step 2. Right-click on each service as shown below and select «Start» to enable them.
- Background Intelligent Transfer Service (BITS)
- Server
- IKE and AuthIP IPsec key module
- TCP/IP NetBIOS Helper
- Workstation
- Windows Update or Automatic Updates
- Windows Firewall
After completing these steps, you can run the Media Creation Tool again to see if it runs successfully.
Fix 4. Check the Free Space on Your System Disk
You should have at least 8 GB of free space on your computer system’s hard drive to use the media creation tool. Also, your USB should have about the same amount of free space to prevent any storage issues during the process. Here’s how to check your storage space and free up storage space.
Fix 5. Clean Windows Update Cache
The Windows update cache may also cause the Windows 10 media creation tool not to work. In order to clear the Windows Update cache in Windows 10/8/7:
- Press Win + R, then type services.msc and press Enter.
- Find and double-click Windows Update, and then click the Stop button.
- To delete the update cache, go to the — C:\Windows\SoftwareDistribution\Download folder.
- Press CTRL+A and then Delete to delete all files and folders.
- Press Win + R again, then type services. msc and press Enter.
- Find and double-click Windows Update, and then click the Start button.
Fix 6. Redownload the Media Creation Tool
If the media creation tool still doesn’t work, you can try downloading the tool again. First, search for the Media Creation Tool file on your computer and delete it explicitly. You can then download and run the tool again to see if it works.
Remember to share these methods with others. Let them know what to do when the Windows 10/11 media creation tool is not working.
Conclusion
Windows Media Creation Tool cannot run on USB flash drives or .exe files due to various reasons, such as lack of required permissions, interference from antivirus software, insufficient storage space, etc. You may receive the following error message:
- Windows 10 Media Creation Tool Not Working Error Code 0x80072f8f – 0x20000.
- Windows 10 media creation tools are not compatible.
- There was a problem running this tool.
- Windows 10 Media Creation Tool not working on Windows 7.
- Media Creation Tool 21h2 not working on Windows 7.
- We’re not sure what’s going on, but we can’t run this tool on your computer.
This article has given you seven options to help you fix this error. If it helps you a little bit, please share this article with more people.
Windows 10/11 Media Creation Tool FAQs
Do you fix the Windows 10 media creation tool failure? This part lists some further related questions and answers. Check them out if you need help.
1. How can I fix error code 0x80072f8f 0x20000?
Incompatible system requirements, unstable internet connection, or lack of administrator rights can cause this error. You can reconnect to the Internet, check system compatibility, and open the Windows media creation tool as an administrator.
2. How can I download and install the Windows 10 media creation tool?
Here is the guide on downloading and installing the Windows 10 media creation tool:
Go to the Microsoft website and click Download tool now to download the Windows 10/11 installation media tool.
Navigate to the downloaded folder of the tool, then double-click the Media Creation Tool file to install it on your PC.
3. How do I fix the Media creation tool that won’t load error on Windows 10/11?
If the Windows Media Creation Tool does not work or you can’t open it on your Windows PC, you can uninstall the tool and redownload it. This is the fastest way to solve this issue. Note that you need to make sure your downloaded Media Creation Tool is complete.
Windows Media Creation tool comes to our immediate rescue while trying to repair operating system errors or upgrading to Windows 10. But users have often reported an error message while trying to run the tool preventing the same from being loaded. So, if Media Creation tool not working or opening, don’t worry. This article is going to take a look at some of its troubleshooting mechanisms.
Fix 1: Run Windows Media Creation Tool As Administrator
Running Windows Media Creation Tool as an administrator can provide you with an upper hand over all problems. For this you need to follow the below mentioned steps:
Step 1. Download the installation file of Media Creation Tool and right click on the same to open properties.
Step 2. Select ‘Run this program in compatibility mode’ from the Compatibility tab.
Step 3. Choose your preferred Windows version and check the ‘Run this program as an administrator’ box.
Step 4. Confirm all the changes you have made and run the tool again.+
Fix 2. Use A Third-Party Software
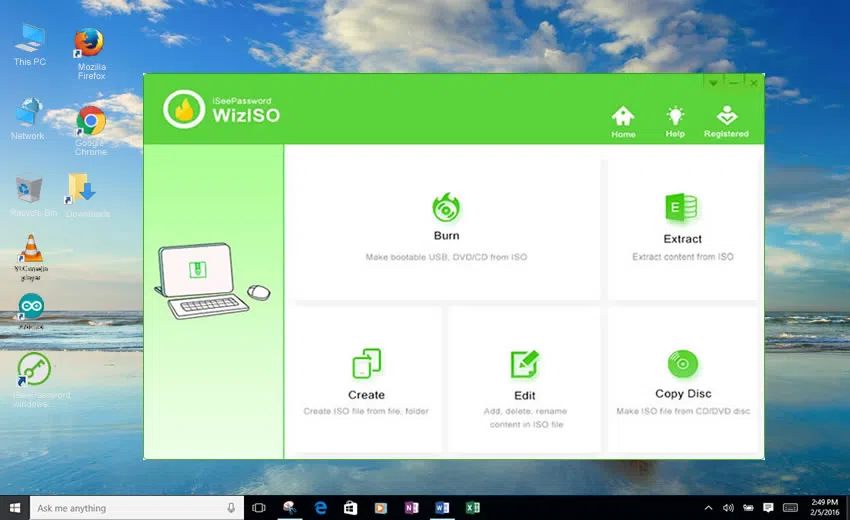
If your media creation tool is not working, then you can readily create a bootable media using WizISO. It is a seemingly simple, but very excellent tool that could do a lot of work including burn ISO, extract ISO, create ISO, edit ISO and copy disc. Most notably it can be able to burn all Windows ISO files to USB very efficiently without creating errors, the ISO file can be burned to a USB or DVD/CD through sector-by-sector copying. This 5 features makes it a very valuable tool for users who need to deal with ISO file. The core of this program is it supports two starting mode: MBR and UEFI mode, because nowadays, UEFI has replaced the traditional BIOS on PCs, so,WizISO should be your best choice as it can create a uefi bootable usb for windows 10.
Don’t miss: How to Create A Windows 10/8/7 Bootable USB or DVD on Mac OS
Fix 2. Enable All Necessary Services
If different services are disabled, then you might come across the 0x80070015 error code. Thus, it becomes essential to check the status of the same by following the steps mentioned below: Firstly, you will have to press the Windows key and R together and type in services.msc before pressing Enter. Now check the status of the below mentioned services from the available list and set their type to ‘Automatic.’
– Server
– Windows Update
– TCP/IP NetBIOS Helper
– Background Intelligent Transfer Service
– IKE and AuthIP IPsec Keying Modules
– Workstation
Fix 3. Make Changes To The Registry Editor
This method is not recommended for amateurs as even a minor mistake can lead to grave results in terms of OS damage. To keep things safe, you can back up your registry to proceed with the changes by following the steps mentioned below:
- Type ‘regedit’ in Windows Search bar to open the Registry Editor.
- Now click on ‘File’ appearing underneath the ‘Menu bar’ before clicking ‘Export.’
- In this step, you will also be required to select the location from the left pane and type in the ‘File Name.’
- On completion of the backup, you need to navigate to DDHKEY_LOCAL_MACHINE\SOFTWARE\Microsoft\Windows\Current Version\WindowsUpdate\OSUpgrade key from the left pane.
- Now you will have to right-click on the empty space for selecting New -> DWORD. You can change its name to AllowOSUpgrade before setting its value to 1.
- Ultimately, you will have to close Registry Editor before restarting your PC.
Fix 4.Check For Available Updates
The Windows Media Creation Tool serves as the ultimate nirvana for people on the lookout for a potent option which can speed up the whole update drill. This tool makes massive use of update-related services for unleashing its greatest potential. It thus becomes necessary to ensure that all services related to updates are running properly. if Media Creation Tool not recognizing your USB,You can do the same by following the steps mentioned below:
Step 1. Type services.msc in the Windows Search bar and open Services.
Step 2. Ensure that the following services are running:
- Server
- Background Intelligent Transfer Service (BITS)
- TCP/IP NetBIOS Helper
- Server
- Workstation
- IKE and AuthIP IPsec Keying Modules
- Automatic Updates or Windows Update
Step 3. You can right click on the services which have stopped and start each one individually.
Step 4. Lastly you need to restart Windows Media Creation Tool and things will hopefully go back to normal.
Fix 5. Checking The Language Settings
Instances of the Windows 10 setup file and system language not matching with each other are not rare. However, such cases can also cause your system to flash messages like “There was a problem running this tool” while working with Windows Media Creation. You can get over these problems by changing the language of your laptop or PC to English.
- This can be done by navigating to ‘Control Panel’ and choosing the ‘Clock, Language and Region’ option.
- In the next step, you will have to click on ‘Change date, time or number format’ from the ‘Region’ section.
- Now you need to open the ‘administrative’ tab and choose ‘Change system locale’ option.
- The ‘Locale’ has to be set to ‘English’ followed by pressing OK.
- Now you will have to toggle back once again to the ‘Administrative’ tab and click on ‘Copy settings.’
- You need to check both ‘New user accounts’ and ‘Welcome screen and system accounts’ boxes if the same is not checked already.
- Ultimately you need to save the changes by clicking on ‘Apply’ and ‘OK’ before rebooting the system.
Fix 6. Checking Storage Space & Trying Out Another Device
If you have more than one PC at your home, make it a point to try out your other options before coming to a conclusion. You will have to create a bootable ISO file or USB having at least 6 GB storage space using your alternative PC. Setting up main Windows requires approximately 4 GB storage. But this won’t be of much help once your device starts taking updates. Your problem with the Media Creation Tool is most likely to get solved once you format your USB flash drive to NTFS format rather than FAT32.
Fix 7. Deactivate Your Antivirus
We all are well versed about the relationship between third party antivirus solutions and Windows 10 which in most cases might block some of the Windows features and even detect false treats. If your Windows Media Creation Tool has not been showing positive results off late, then it is advisable to disable your antivirus temporarily.
- You can do the same by clicking on ‘Alt+ Ctrl+ Delete’ from the Task Manager and locating your antivirus process before clicking on End Task.
- Ultimately you will have to locate the icon from the taskbar and right click on the same before ultimately clicking on ‘Disable.’
The error code displayed varies in accordance with the real culprit behind the problem. But in most of the cases, you can fix them all by applying the troubleshooting tips mentioned above. So, try them out today and don’t forget to share your experience in the comments section below.
Несколько дней назад пользователи из России столкнулись с невозможностью скачать образы ОС Windows 10 и Windows 11 с официального сайта Microsoft. Попытка скачать средство загрузки образов Media Creation Tool выдает ошибку «404 — File or Directory not found». То, что блокировка касается именно российских пользователей подтверждается тем, что при использовании VPN расширения в браузере Media Creation Tool прекрасно скачивается.
Некоторые пользователи жалуются на то, что даже скаченный Media Creation Tool отказывается загружать образы Windows, если в системе не установлен внешний VPN сервис. Видимо, такие нюансы зависят от ip-адреса пользователя. Microsoft пока не делала никаких заявлений, но, видимо, мы их и не дождемся, ведь еще в марте 2022 года Microsoft приняла решение о приостановке своей деятельности на территории России.

Сказать, что запрет на скачивание образов Windows, это большая проблема — нельзя, ведь раньше мы прекрасно обходились без официального сайта Microsoft. А вот новости о том, что Microsoft заблокировала установку обновления для инсайдерской версии Windows 11 — это уже серьезно. При попытке найти обновление KB5014668 на системе с российским ip-адресом через Центр обновления Windows пользователей ждет неудача, а при использовании VPN соединения оно появляется в Центре обновления Windows и корректно устанавливается.
Судя по всему, это был пробный шаг перед полной блокировкой обновлений Windows для пользователей из России и это уже серьезная проблема, ведь в современном мире система без обновлений крайне уязвима. Такого огромного количества троянов, ворующих аккаунты от различных сервисов и платежные данные и файловых шифровальщиков-вымогателей не было никогда, а обновления постоянно закрывают дыры и уязвимости в системах, через которые они проникают на наши ПК и ноутбуки.

Не стоит забывать и то, что через Центр обновления Windows в Windows 10 и Windows 11 устанавливаются все необходимые драйвера на наши компьютеры и мы настолько привыкли к этой удобной функции, что потерять ее будет очень неприятно. Ситуация усугубляется еще и тем, что многочисленные зарубежные VPN-сервисы, с помощью которых мы решаем проблемы с доступом к сайтам, массово блокируются, а скорость у оставшихся оставляет желать лучшего. В этом блоге я расскажу, как решить проблемы со скачиванием образов и с обновлениями.
Скачиваем образы Windows
На своей системе я попробовал скачать средство Media Creation Tool для Windows 10 с официального сайта и получил ошибку «404 — File or Directory not found». Но через браузер с VPN расширением средство Media Creation Tool скачалось, а затем корректно скачало свежий образ Windows 10 нужной редакции.

Но, поскольку Media Creation Tool работает теперь не у всех пользователей, мы разберем пару способов скачивания образов Windows без него. Microsoft заблокировала прямые ссылки на скачивание образов Windows нужных редакций на своем сайте, принуждая пользователей использовать средство Media Creation Tool. При этом официальный сайт поддержки Microsoft использует возможность определения вашей операционной системы – если вы используете Windows 10 и 11, то прямых ссылок на сайте для скачивания Windows вы не увидите.
А вот если зайти на сайт Microsoft с системы Apple или Android, то ссылки на сайте отображаются, как и раньше. И чтобы скачать образ Windows с официального сайта мы заставим его думать, что зашли на сайт с системы Apple или Android, для чего нам нужно будет подменить идентификатор браузера. Но простая подмена идентификатора все равно не даст скачать образ Windows с российского ip-адреса, поэтому в браузер нужно установить и активировать VPN-расширение.

Способ подмены идентификатора будет отличаться в зависимости от того браузера, который вы используете. Как обычно, самый простой способ доступен пользователям Mozilla Firefox, которым нужно лишь установить расширение для изменения идентификации браузера, например, User-Agent Switch или Random User-Agent. Выбрать в нем браузер Safari и систему Apple, перейти на страницу загрузки, выбрать нужную редакцию Windows и скачать ее.

Для браузеров Google Chrome, Яндекс.Браузер и Opera Chromium действия будут чуть сложнее. Вам нужно перейти страницу загрузки, нажать сочетание клавиш Сtrl+Shift+I и открывшихся инструментах разработчика выбрать меню «три точки» (справа вверху), а затем в выпадающем меню перейти в «More tools» — «Network conditions».


В разделе «User agent» уберите галочку «Select automatically». В выпадающем списке выберите первый из списка, например Android (4.0.2) Browser – Galaxy Nexus и обновите страницу.

Теперь на сайте Microsoft появляются ссылки на прямое скачивание нужных образов Windows, если в браузере работает VPN-расширение.

В браузере Microsoft Edge на Chromium алгоритм действий будет похож, только в инструментах разработчиков нужно выбрать меню «три точки», затем в выпадающем меню перейти в «Дополнительные средства» — «Состояние сети».
Второй способ
Второй способ скачать нужные образы Windows 11 и Windows 10 — это воспользоваться помощью сервиса TechBench by WZT. Для чего перейти на сайт сервиса и в нужном меню выбрать требуемую редакцию Windows. Например, для загрузки Windows 11 окно будет выглядеть так.

Сервис не хранит образы Windows, а лишь генерирует ссылки на их скачивание с сайтов Microsoft, в чем можно убедиться, проверив ссылку, по которой идет скачивание. Для примера выше она будет иметь вот такой адрес:
https://software.download.prss.microsoft.com/dbazure/Win11_Russian_x64v1.iso?t=1d243a53-2131-49e5-9060-585cf573579c&e=1655766177&h=2c81daa275b6670424c0ea1c7e74d9d558241f5face2fabf97e9957ff9e23456
Скачиваем у устанавливаем обновления Windows вручную

Даже если Microsoft перейдет к полной блокировке обновлений Windows для российских пользователей, выход, конечно, есть. Проще всего будет пользователям старых систем на Windows 7, для которых есть удобнейший оффлайн установщик обновлений UpdatePack7R2 от simplix, которым продвинутые пользователи пользуются много лет.
Пользователям Windows 10 и Windows 11 придется повозиться, но ради защищенной системы это стоит сделать. Для этого следует перейти на сайт Microsoft, в раздел журнала обновлений. Для Windows 10 это будет выглядеть вот так.

Далее нужно выбрать последнее обновление от 14 июня — KB5014699, и скопировать его название. Затем перейти в Каталог Центра обновления Майкрософт, ввести название нашего обновления в поиск.

Выбрать нужно обновление в списке и скачать его.


На моей системе обновление корректно скачалось без использования VPN.
Драйвера устройств

Что же касается драйверов для ваших устройств, то не помешает заранее скачать их с сайтов производителей и держать их на жестком диске, как в старые времена, когда интернет был дорого и медленен. Места они занимают совсем немного, а вы будете уверены, что при новой установке Windows не получите сюрприз от Microsoft в виде неработающей системы установки драйверов.
Похоже, что теперь для корректной работы Windows нам понадобится не только VPN-расширение в браузере, но и возможность настройки VPN-соединения в роутере для всего трафика вашего ПК и ноутбука. Для этого понадобится современный и качественный роутер, например, от TP-LINK. В Ситилинке роутеры от TP-LINK стали лидерами по популярности среди пользователей, и на первом месте модель TP-LINK Archer AX73.

На втором — TP-LINK Archer C80.

А на третьем, гораздо более доступная по цене модель TP-LINK Archer C54.

Пишите в комментарии, столкнулись ли вы с невозможностью загрузки образов или обновлений Windows?
Более 450 блогов автора Zystax обо всем, что связано с компьютерами и играми.
Telegram-канал @overclockers_news — теперь в новом формате. Подписывайся, чтобы быть в курсе всех новостей!