
Среди частых проблем на компьютерах и ноутбуках с видеокартами GeForce — ситуация, когда панель управления NVIDIA не открывается. Происходить это может по-разному: вообще никакой реакции на попытку открыть, открывается и сразу закрывается, пишет «Настройки дисплея NVIDIA недоступны. Используемый дисплей не подключен к ГП NVIDIA».
В этой инструкции подробно о том, что делать, если не получается запустить панель управления NVIDIA в Windows 11 и Windows 10 в разных ситуациях, возможных причинах проблемы и способах исправить ситуацию. На близкую тему: Доступ запрещен в панели управления NVIDIA, Что делать, если нет вкладки Дисплей в панели управления NVIDIA.
Простые способы исправить запуск панели управления NVIDIA
Проблемы с открытием панели управления NVIDIA могут быть вызваны разными причинами, но в большинстве случаев исправить ситуацию сравнительно просто. Сначала — быстрые и наиболее часто срабатывающие способы решения проблемы:
- Проверьте, запускается ли панель управления NVIDIA сразу после перезагрузки Windows 11 или Windows 10 (используем именно пункт «Перезагрузка», а не завершение работы с последующим включением). Если в этом случае всё работает исправно, попробуйте отключить быстрый запуск.
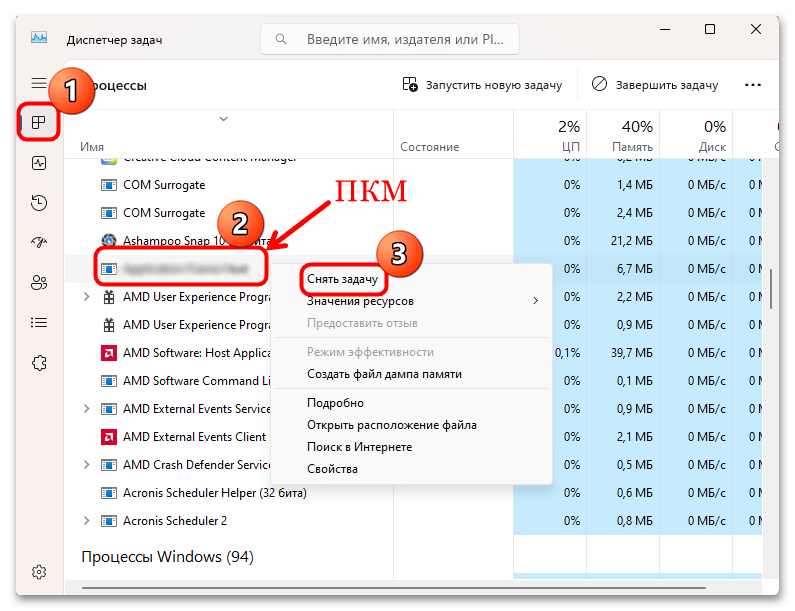
- Загляните в диспетчер задач (правый клик по кнопке «Пуск» — «Диспетчер задач»). Если в диспетчере задач на вкладке «Подробности» висит процесс nvcplui.exe, выберите его и нажмите «Снять задачу», потом попробуйте запустить панель управления NVIDIA снова.

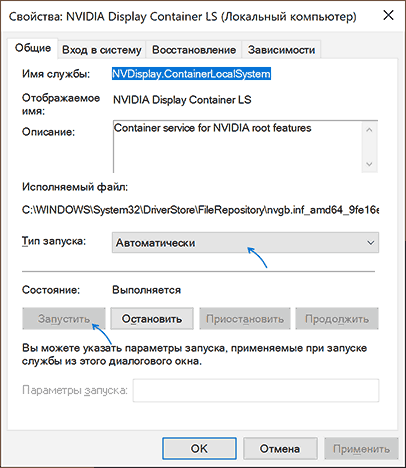
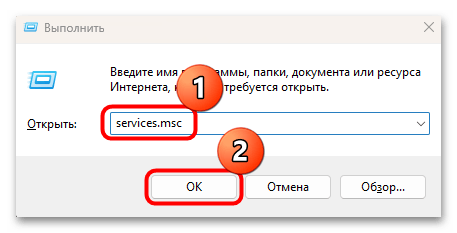
- Нажмите клавиши Win+R на клавиатуре (Win — клавиша с эмблемой Windows), введите services.msc и нажмите Enter. В открывшемся списке служб обратите внимание на службы, имена которых начинаются с «NVIDIA». Убедитесь, что эти службы не отключены. Иначе — двойной клик по службе, устанавливаем «Тип запуска» в «Автоматически», применяем настройки и нажимаем кнопку «Запустить».

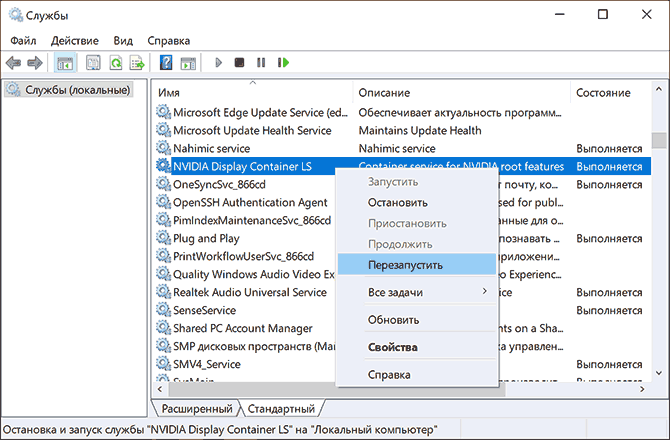
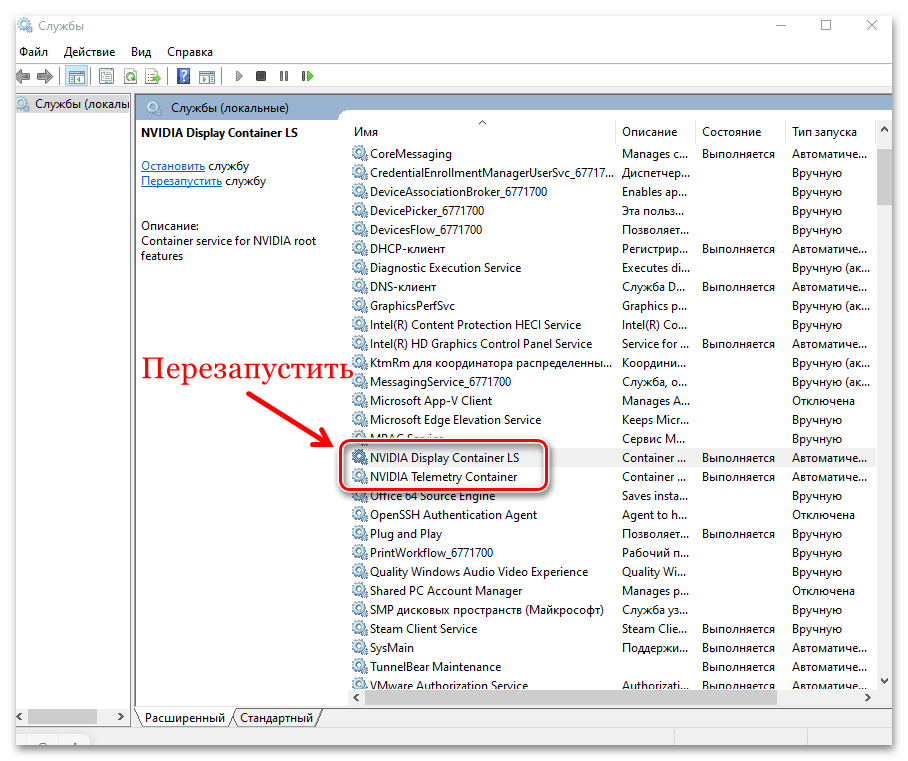
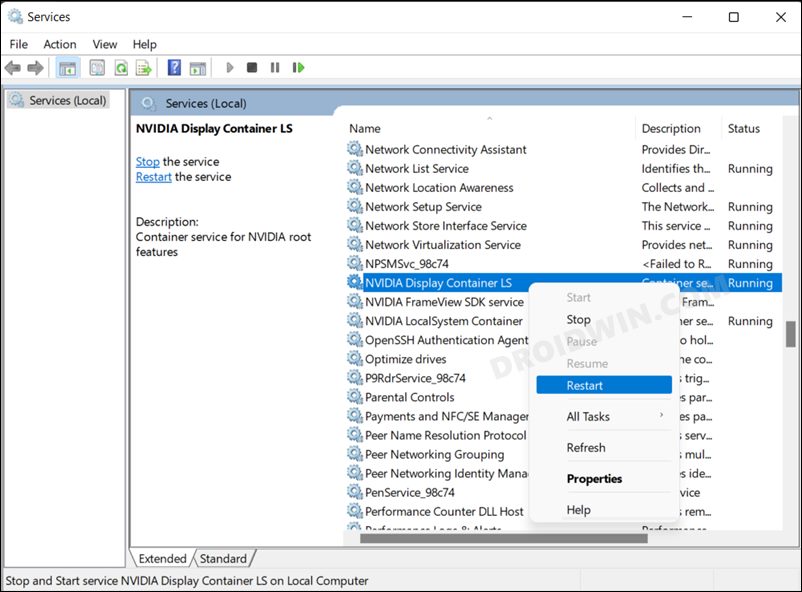
- Если службы уже запущены, попробуйте их перезапустить, особенно — NVIDIA Display Container LS (но лучше — все имеющиеся): правый клик по имени службы — перезапустить. Этот способ (перезапуск службы) часто помогает, если панель управления NVIDIA перестает открываться при входе под другим пользователем.

- Если на вашем ПК, а особенно на ноутбуке также присутствует интегрированное видео, например, Intel HD — скачайте и установите драйверы и на него: в диспетчере устройств не должно быть никаких видеокарт «Базовый видеоадаптер Майкрософт».

Как правило, один из указанных способов срабатывает, но не во всех случаях: бывает, что все службы NVIDIA исправно работают, Панель управления NVIDIA всё также сразу закрывается или не открывается вовсе.
Исправление или переустановка NVIDIA Control Panel
Причиной того, что запуск панели управления NVIDIA не выполняются могут быть ошибки соответствующего приложения. Их можно попробовать исправить, для этого:
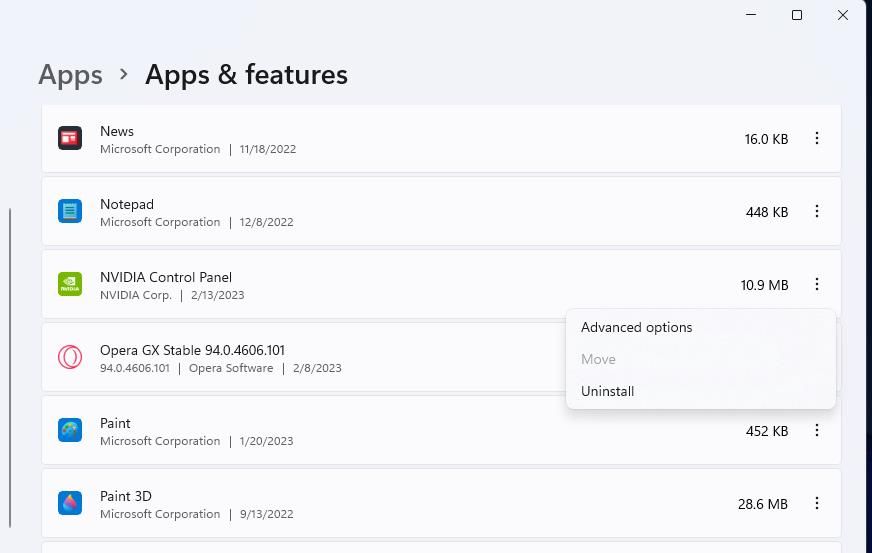
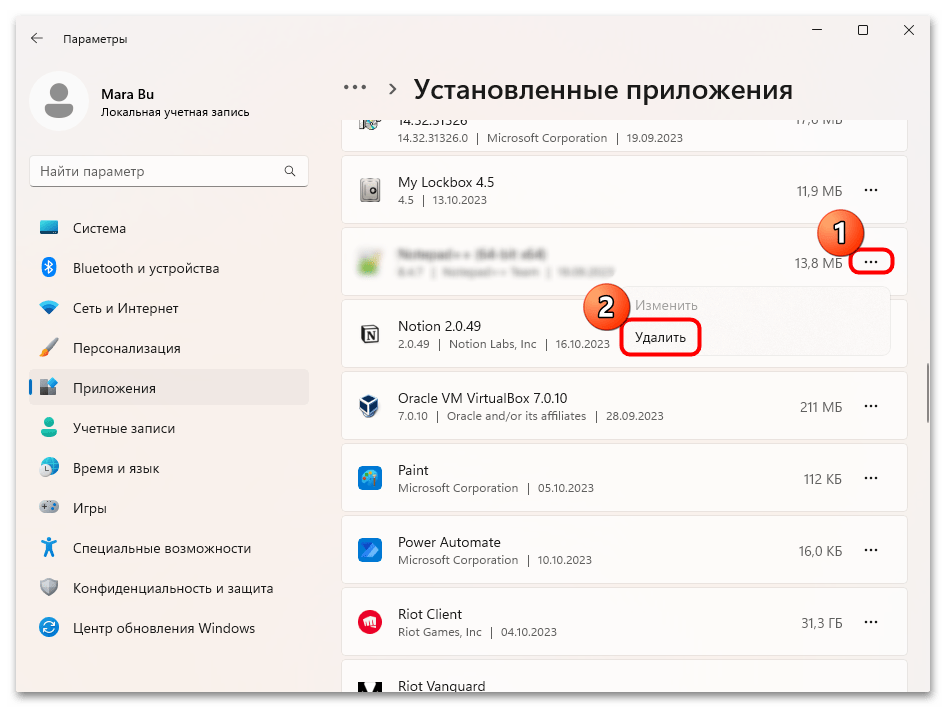
- Зайдите в Параметры — Приложения — Установленные приложения (в Windows 11) или Параметры — Приложения — Приложения и возможности (в Windows 10). Найдите NVIDIA Control Panel в списке.
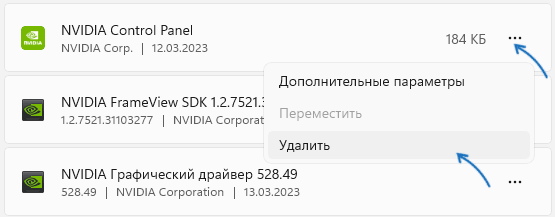
- Нажмите по трем точкам справа от имени приложения (в Windows 11) или по имени приложения (в Windows 10) и выберите пункт «Дополнительные параметры».

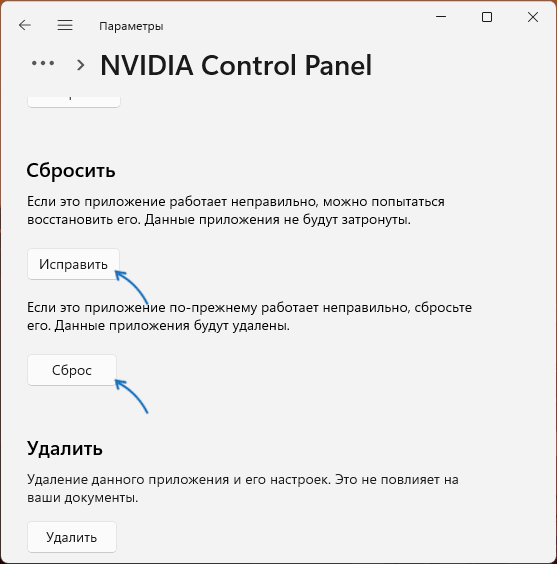
- Используйте кнопку «Исправить», а если она не поможет — «Сброс» для сброса приложения.

- Проверьте, запускается ли панель управления NVIDIA теперь.

Если описанные шаги не помогли, попробуйте вручную переустановить приложение, причем установку следует выполнять на системный раздел диска:
- Зайдите в список установленных приложений в Параметрах Windows (как было описано выше) и удалите NVIDIA Control Panel.

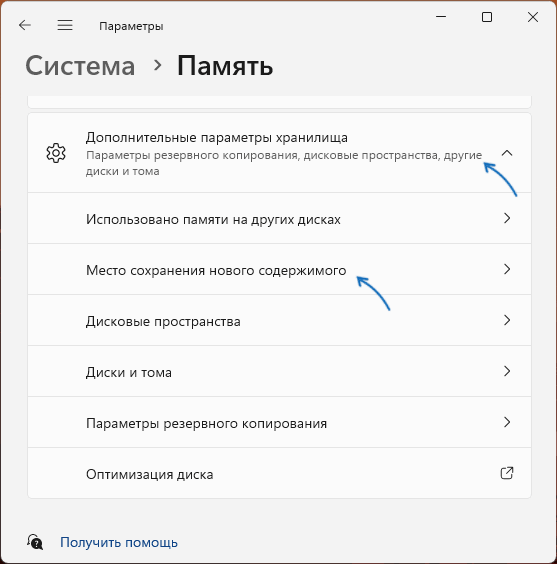
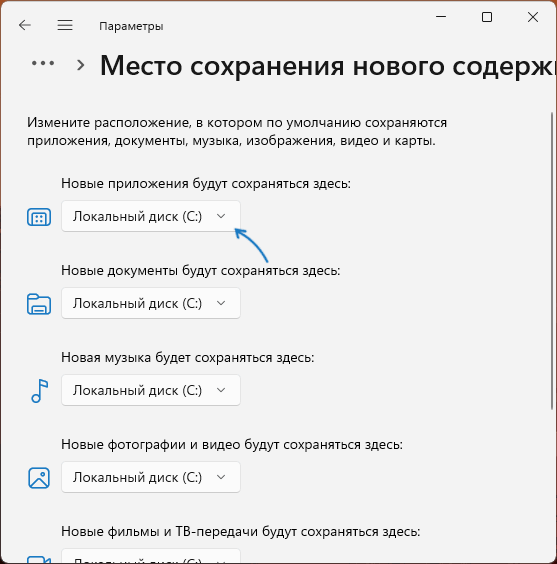
- Перейдите в Параметры — Система — Память и перейдите в пункт «Место сохранения нового содержимого» в дополнительных параметрах хранилища.
- Убедитесь, что новые приложения сохраняются на диск C:, если это не так — измените место сохранения (есть сообщения, что установка на другие разделы может приводить к рассматриваемой проблеме при запуске).
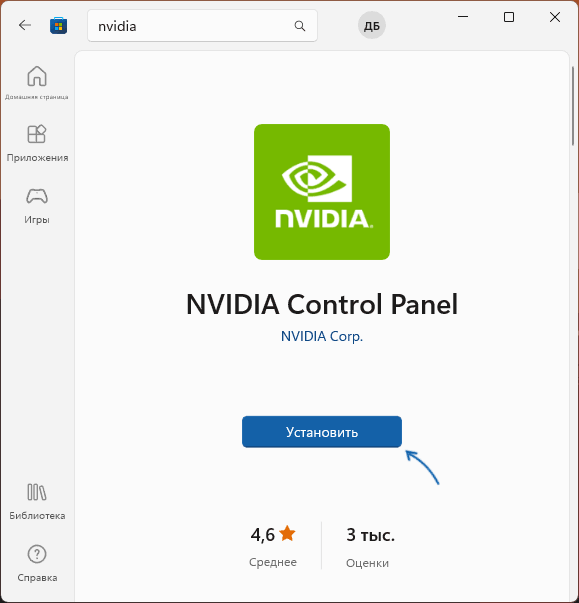
- Зайдите в Microsoft Store, выполните поиск по слову «NVIDIA» и установите NVIDIA Control Panel. Если у вас отсутствует Microsoft Store, вы можете установить его.

Проверьте, была ли решена проблема: с большой вероятностью теперь всё будет работать исправно.
Чистая установка драйвера NVIDIA
Следующий вариант — попробовать полностью переустановить драйверы NVIDIA с официального сайта, выполнив их чистую установку. Шаги будут следующими:
- Зайдите на официальную страницу загрузки драйверов NVIDIA и выберите драйвер для вашей видеокарты в версии Windows, скачайте его к себе на компьютер.
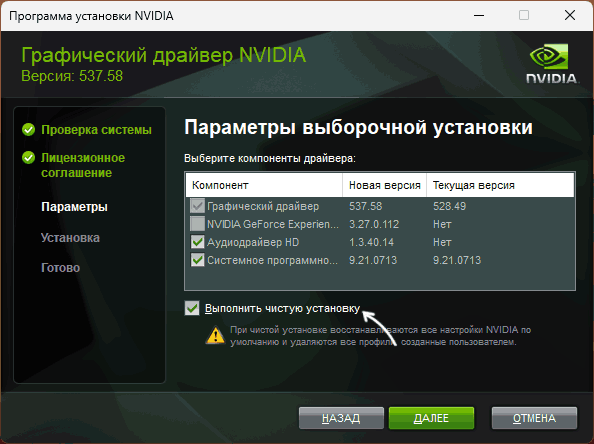
- Запустите скачанный файл установщика и, после выбора: установить только драйвер NVIDIA или графический драйвер и GeForce Experience, отметьте пункт «Выборочная установка».

- Отметьте пункт «Выполнить чистую установку» и нажмите «Далее».
- Дождитесь завершения установки.

После установки драйвера и перезагрузки компьютера проверьте, выполняется ли запуск панели управления NVIDIA.
В случае, если проблемы с запуском сохраняются, следует учесть следующие нюансы, а также попробовать некоторые модификации ранее описанных способов:
- Панель управления NVIDIA может не запускаться при использовании нескольких мониторов, особенно если для организации их работы используется стороннее ПО. Если у вас также несколько мониторов, проверьте, будет ли выполняться запуск, если выключить компьютер, отключить все мониторы кроме одного, снова включить компьютер.
- Драйверы USB-мониторов (например, для работы планшета в качестве второго монитора), инструменты наподобие DisplayLink (при наличии можно найти в «Программы и компоненты») также могут приводить к проблеме.
- Если до недавнего времени всё работало исправно, попробуйте использовать точки восстановления системы на дату, когда проблемы не наблюдались.
- Некоторые отзывы сообщают о том, что при рассматриваемой проблеме помогло удаление сторонних антивирусов, отмечая, что причиной были AVG и Avast.
- В случае, если проблема возникла на ноутбуке можно попробовать такой вариант: скачать с сайта производителя ноутбука драйверы для интегрированной и дискретной видеокарты (даже если они далеко не новые и предназначены для предыдущей версии системы), скачать DDU (Display Driver Uninstaller), отключиться от Интернета (чтобы Windows не успела установить драйверы сама), удалить имеющиеся драйверы с помощью DDU, установить драйверы, ранее скачанные с официального сайта. После проверки работоспособности панели управления NVIDIA можно обновить драйверы NVIDIA.
Надеюсь, один из предложенных методов исправить проблему сработает в вашем случае. Если же остаются вопросы или у вас есть собственные способы — оставляйте их в комментариях ниже.
Sign in to your MUO account
The NVIDIA Control Panel is an important app for managing your NVIDIA GPU, but sometimes it won’t open. In many such reported cases, nothing happens when users select to open the NVIDIA Control Panel; however, sometimes an error message will pop up.
If the NVIDIA Control Panel is not opening in Windows 11, don’t fret. Here’s how to get it working again.
1. Run the NVIDIA Control Panel With Admin Rights
Most users usually select to open the NVIDIA Control Panel from Windows 11’s desktop context menu. However, you can select to run that app as an administrator in the following steps:
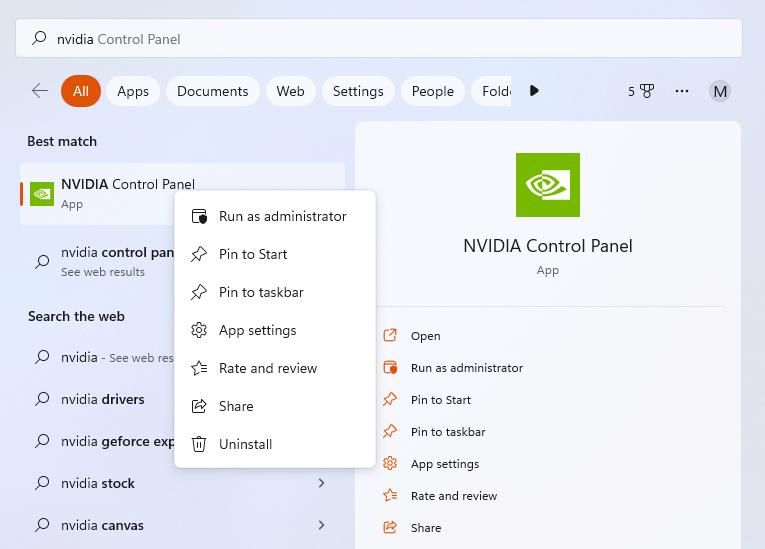
- Right-click your taskbar’s Start menu button and select the Search shortcut.
- Type NVIDIA Control Panel in the search box.
-
Right-click the NVIDIA Control Panel result to select a Run as administrator on that app’s context menu.

Setting NVIDIA Control Panel to always run as administrator is tricky because that UWP app is installed within a restricted access folder. You’ll need to take ownership of the WindowsApps folder to open that directory. Then select the «Run as administrator» option for the nvcplui.exe file. The default path for the file is:
C:\Program Files\WindowsApps\NVIDIACorp.NVIDIAControlPanel_8.1.963.0_x64__56jybvy8sckqj\nvcplui.exe
2. End NVIDIA Background Processes
Sometimes you can’t see NVIDIA Control Panel when multiple instances of it are already running. Ending NVIDIA background processes will enable you to restart the app. This is how you terminate background NVIDIA background processes:
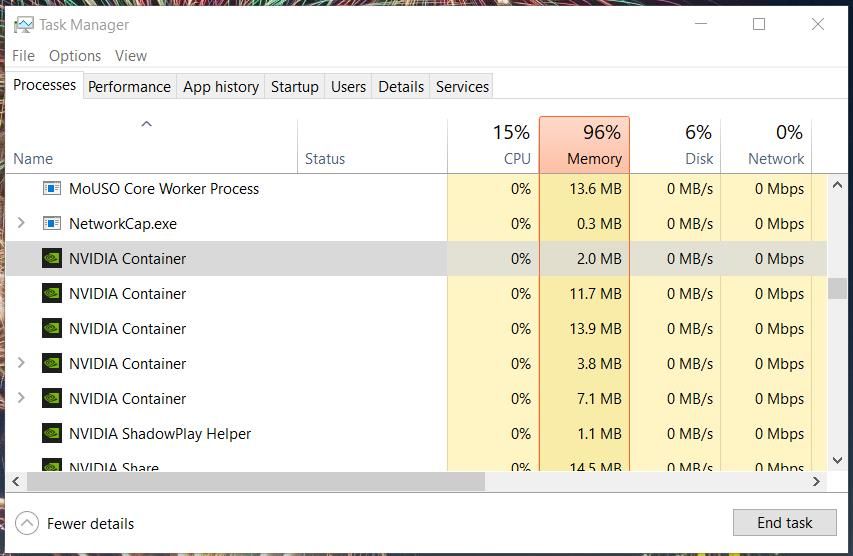
- Bring up the Task Manager tool (pressing Ctrl + Shift + Esc) is the quickest method for opening it).
- Select Processes if a different tab opens with Task Manager.
- Next, scroll down the Processes tab to find NVIDIA processes.
-
Select all NVIDIA processes and click their End task buttons.

-
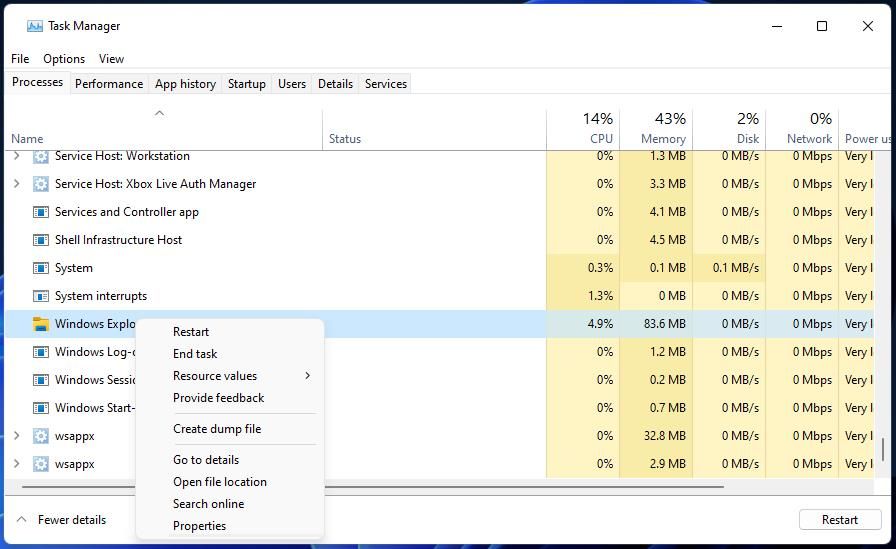
Click the Windows Explorer process with the right mouse button and select Restart.

- Try opening the NVIDIA Control Panel again.
3. Start (or Restart) the NVIDIA Display Container Service
A common reason for the NVIDIA Control Panel not opening is a disabled NVIDIA Display Container service. Other NVIDIA services also need to be enabled for the app to work right. So, you should check that service and others are enabled and running like this:
- Bring up Windows 11’s file search utility.
- Type Services into the file search box and select to run that app from there.
-
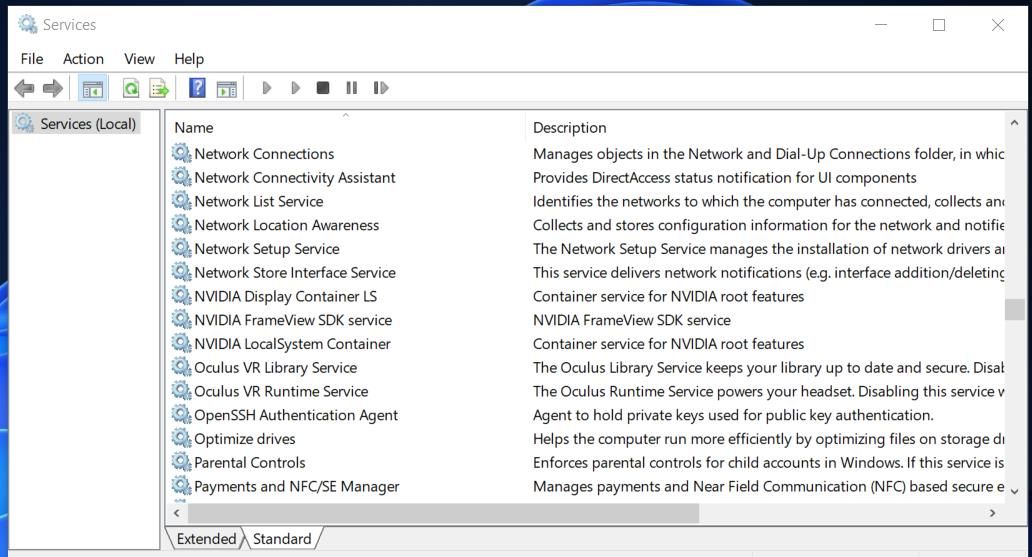
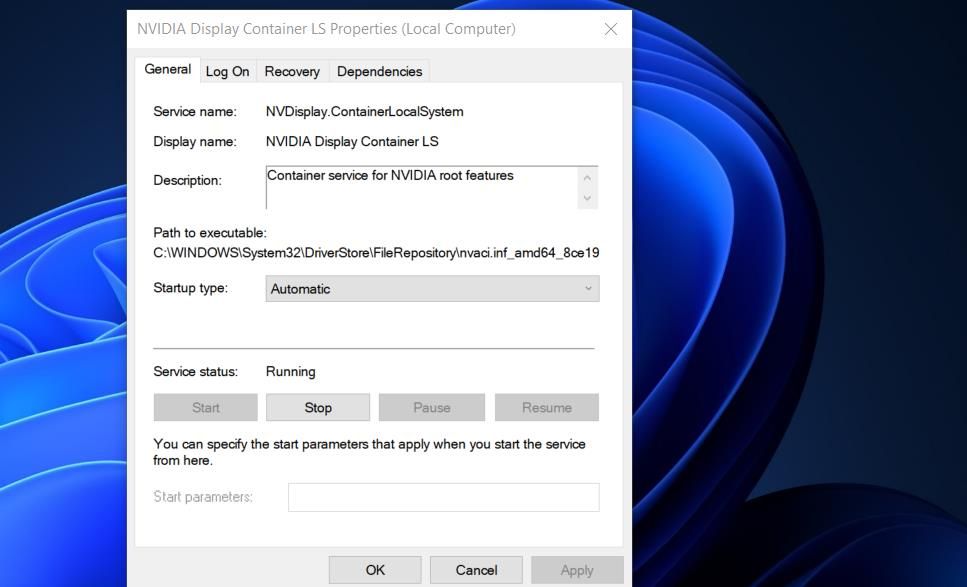
Scroll to and double-click NVIDIA Display Container LS.

-
Next, select the Automatic option if the Startup menu setting is set to anything else.

- Select Start (in the properties window) to run the service if it’s stopped.
- Make sure you click Apply for saving the settings.
- Select OK to exit the NVIDIA Display Container LS Properties window.
- Repeat steps three to seven for the NVIDIA LocalSystem and NetworkService Container services.
4. Repair the NVIDIA Control Panel App
Windows 11’s standard Repair and Reset app options are available for NVIDIA Control Panel. So, those troubleshooting options might help you fix that app not opening. You can select the Reset and Repair options in the same place within the NVIDIA Control Panel settings. Our guide on about resetting Windows 11s apps includes step-by-step instructions for how to apply do this.
5. Update Your PC’s NVIDIA Graphics Driver
Updating the NVIDIA graphics driver on your PC will also update the control panel app for it. So, that’s a potential solution worth trying if your graphics card’s driver is outdated. You can apply this potential fix by following the instructions within our guide to updating NVIDIA GPUs.
6. Install Missing Visual C++ Redistribute Packages
Another possibility is that the NVIDIA Control Panel doesn’t open because your PC is missing a required Visual C++ Redistributable package to run it. You can eliminate this possible cause by updating Visual C++ packages on your PC if needed. This is how to install a missing Visual C++ Redistributable in Windows:
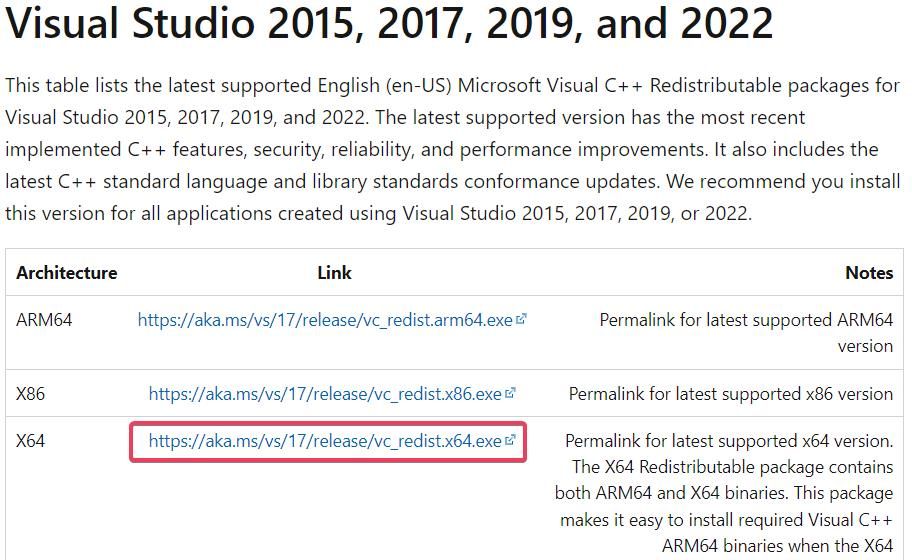
- Open up the Microsoft Visual C++ download page in your browser software.
-
Click the X64 link for the latest Visual Studio 2015, 2017, 2019, and 2022 packs.

- Double-click the VC_redist.arm64.exe (Visual C++ installer) file once it’s downloaded.
- Go through the install process.
7. Edit the Windows Registry
This Windows Registry tweak creates a new context menu option for opening the NVIDIA Control Panel. As this solution involves deleting a key, we recommend you learn how to back up the Windows Registry before proceeding.
To apply this fix, edit the Registry as follows:
- Open Registry Editor by pressing the Win + R keyboard shortcut, typing regedit in the Run dialog, and clicking OK.
-
Input this key location in the registry address bar and press Return:
Computer\HKEY_LOCAL_MACHINE\SOFTWARE\Classes\Directory\background\shellex\ContextMenuHandlers - Click the NvCplDesktopContext subkey with the right mouse button and select Delete.
- Select Yes to confirm that you’re sure about deleting the NvCplDesktopContext key.
-
Erase the path currently in the registry bar, and input this different location:
Computer\HKEY_CLASSES_ROOT\Directory\Background\shell - Next, right-click Shell and select New.
- Click Key to add a new subkey to Shell.
- Type Nvidia Control Panel to be the new key’s name.
- Then right-click the Nvidia Control Panel subkey and select its New and Key context menu options.
- Input command for the subkey’s title.
- Select command and double-click its (Default) string.
-
Next, input the following path in the Value data box:
C:\Windows\System32\nvcplui.exe - Select OK to save the string value.
- Now select to reboot your Windows 11/10 PC.
8. Reinstall the NVIDIA Control Panel
The NVIDIA Control Panel is a UWP app you can uninstall, download, and reinstall. If none of the other fixes in this guide work for you, that app might have corrupted or missing files. To do so, remove the NVIDIA Control Panel in Settings, as outlined in our guide for how to uninstall apps on Windows.
When you’ve uninstalled NVIDIA Control Panel, restart your PC. Then click Get in Store app on the NVIDIA Control Panel Microsoft Store page. Select Open Microsoft Store, and click Get to reinstall the app.
Tweak Graphics Settings in the NVIDIA Control Panel Again
Those potential solutions will usually fix the NVIDIA Control Panel not opening in Windows. However, there are many potential causes for the NVIDIA Control Panel not opening; and it is not guaranteed those resolutions will resolve that issue in all scenarios. If you need any more resolutions for fixing that app not starting, consider submitting a help ticket on the NVIDIA support page.
Все способы:
- Способ 1: Обновление драйвера графического адаптера
- Способ 2: Выключение контейнерных процессов
- Способ 3: Перезапуск служб
- Способ 4: Удаления кеша данных
- Способ 5: Консоль
- Способ 6: Отключение «Быстрого запуска»
- Способ 7: Удаление сторонних антивирусов
- Способ 8: Переустановка фирменного софта
- Дополнительные причины
- Вопросы и ответы: 0
Способ 1: Обновление драйвера графического адаптера
Если «Панель управления NVIDIA» не запускается, то в первую очередь стоит вручную обновить драйвер графического адаптера, используя встроенные возможности. Вероятно, предыдущая версия программного обеспечения была повреждена, а функции ОС позволят установить базовое ПО для компонента, после чего получится скачать актуальный фирменный софт через панель управления:
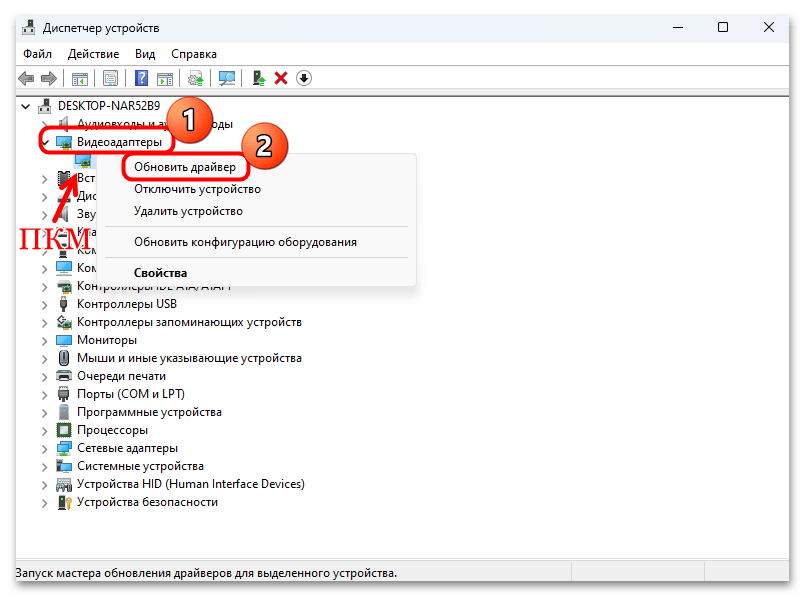
- Нажмите правой кнопкой мыши по «Пуску» и в появившемся меню выберите запуск «Диспетчера устройств».
- Разверните меню «Видеоадаптеры» и, если у вас две видеокарты (например, интегрированная от Intel и дискретная NVIDIA, что чаще всего встречается в ноутбуках), то найдите проблемный адаптер, кликните по его названию правой кнопкой мыши и из контекстного меню выберите опцию «Обновить драйвер».
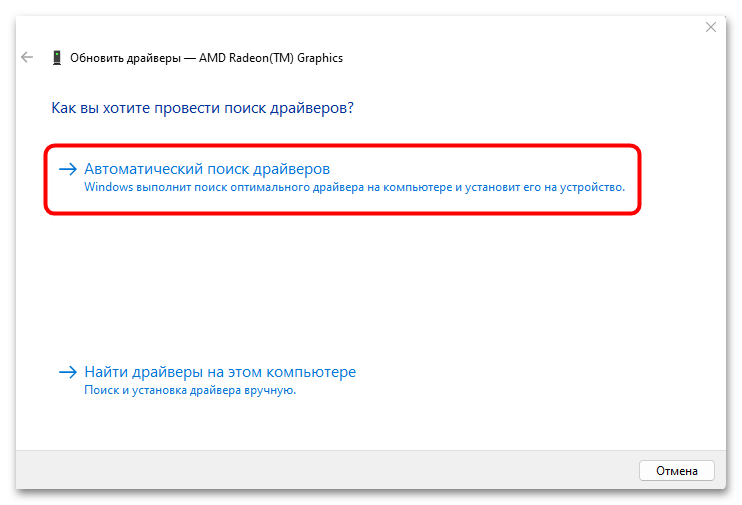
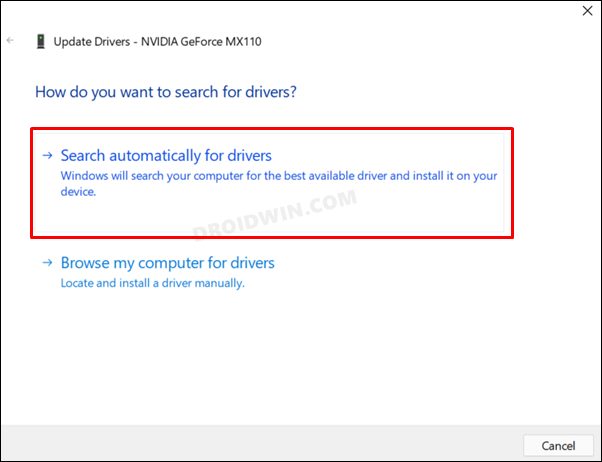
- В новом окне кликните по строке «Автоматический поиск драйверов».
Следует отметить, что для обновления ПО потребуется доступ в интернет. Если актуальные и неповрежденные драйверы будут найдены на официальных серверах Microsoft, то вы увидите соответствующее уведомление. Останется скачать и установить софт, после чего пробовать запустить «Панель управления NVIDIA».
Способ 2: Выключение контейнерных процессов
Для эффективной работы приложения от НВИДИА в фоновом режиме работают контейнерные процессы. Если в их функционировании произошел сбой, тогда панель управления может вовсе не запуститься. Попробуйте перезапустить такие процессы вручную:
- Щелкните правой кнопкой мыши по панели задач и запустите «Диспетчер задач».
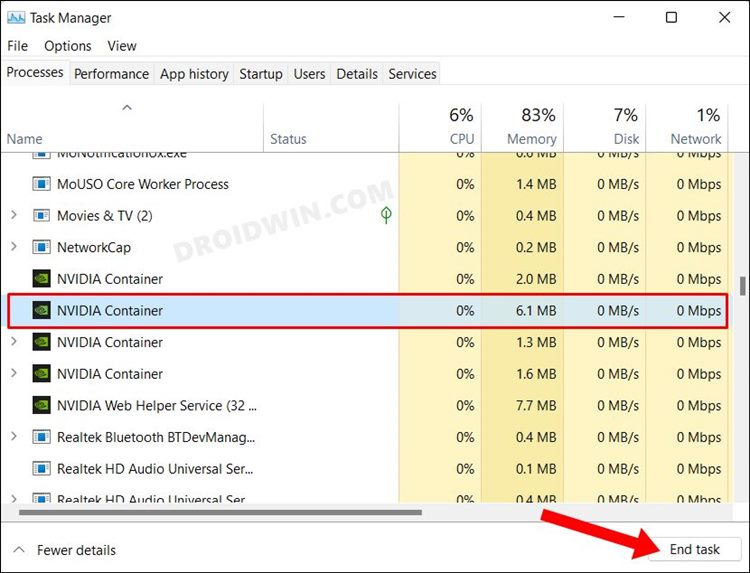
- На вкладке «Процессы» найдите все процессы, которые связаны с NVIDIA. В названии должно быть слово «Container». Выделите строку и нажмите на кнопку «Снять задачу».
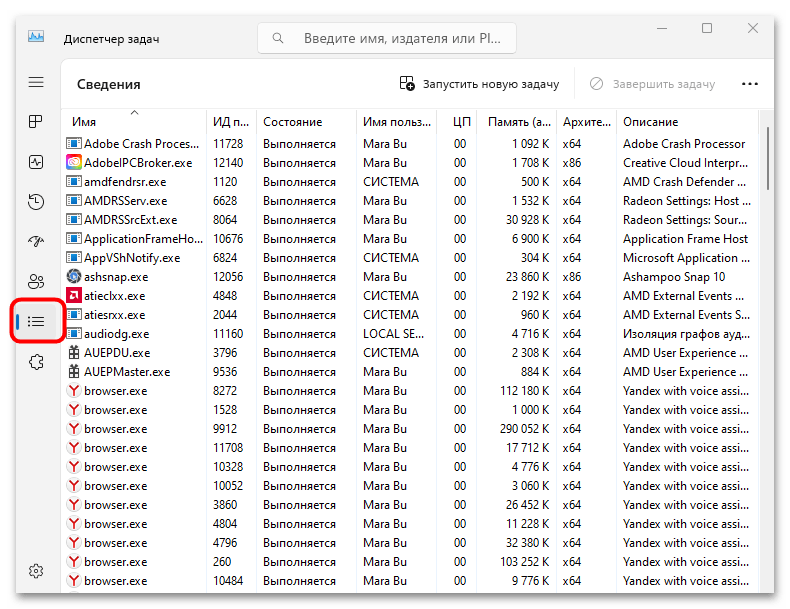
- Для удобства при поиске процесса можете переключиться на вкладку «Сведения».
Запускать вручную фоновые процессы не нужно – если проблема была действительно связана с ними, то они будут запущены самостоятельно, а «Панель управления NVIDIA» начнет стабильно работать.
Способ 3: Перезапуск служб
Как известно, за работу приложений и процессов отвечают специальные службы в Windows 11. «Панель управления NVIDIA» – не исключение, поэтому есть смысл вручную перезапустить работу связанных с ней служб:
- Одновременно нажмите на клавиши «Win + R», чтобы вызвать диалоговое окно «Выполнить», затем введите команду
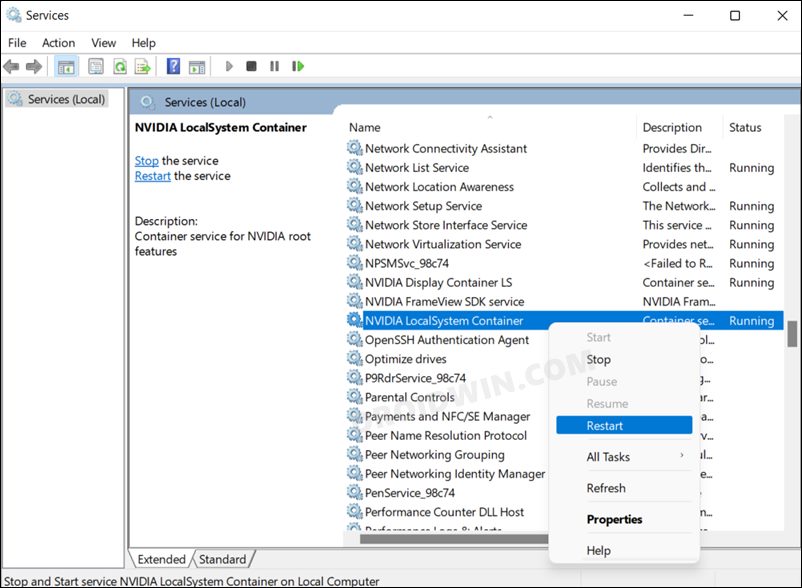
services.mscи кликните по кнопке «ОК». - В центральной части окна оснастки найдите службу «NVIDIA Display Container LS» и щелкните по ней правой кнопкой мыши, затем из меню выберите опцию «Перезапустить». Также следует аналогичным образом перезапустить службы под названием NVIDIA LocalSystem и «NVIDIA Telemetry Container».
Как только важные серверные службы перезапущены, можете закрывать оснастку и запустить панель управления.
Способ 4: Удаления кеша данных
Иногда переполненный кеш приводит к конфликту программного обеспечения, в частности к проблемам в работе самого фирменного софта NVIDIA. В случае с этой программой можно попытаться вручную удалить временные данные в кеше, отыскав их на локальном диске, куда она установлена.
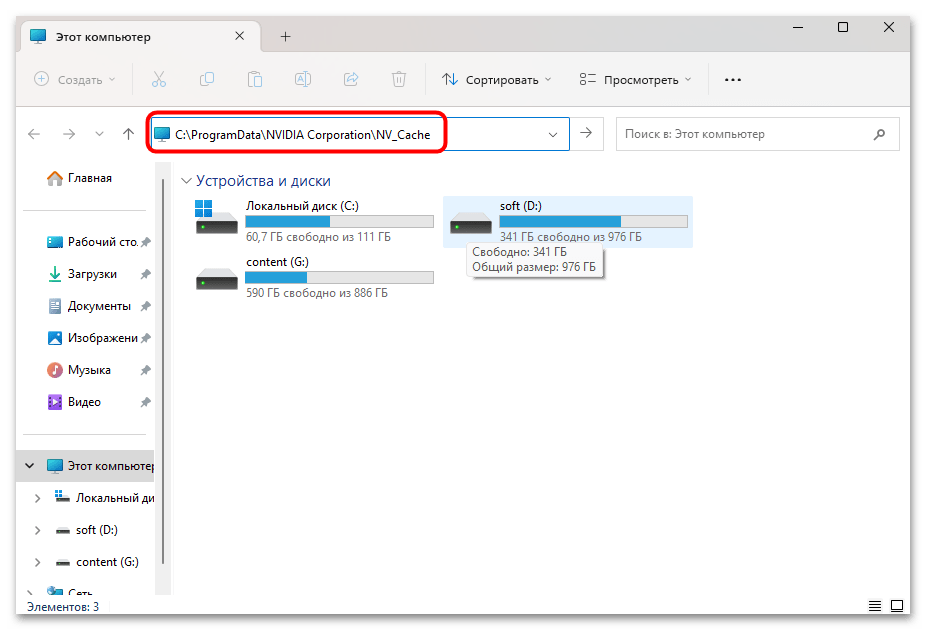
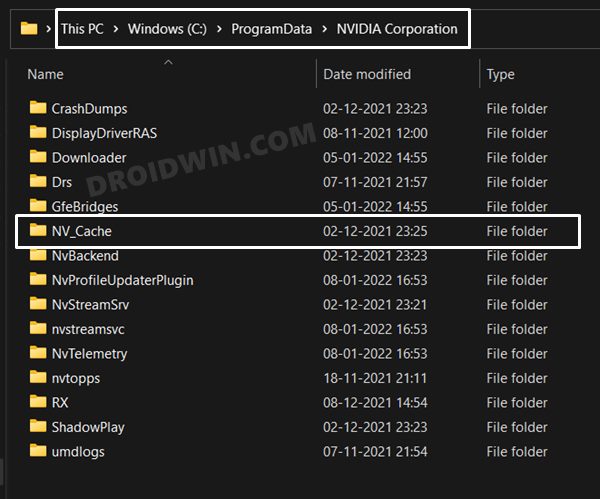
- Как правило, ПО от НВИДИА инсталлируется на системный локальный диск, поэтому рассматривать инструкцию будем с учетом этого. Запустите «Проводник», а в адресную строку скопируйте следующий путь:
C:\ProgramData\NVIDIA Corporation\NV_Cache. - Если каталог «NV_Cache» отсутствует, тогда можете его поискать по другому адресу —
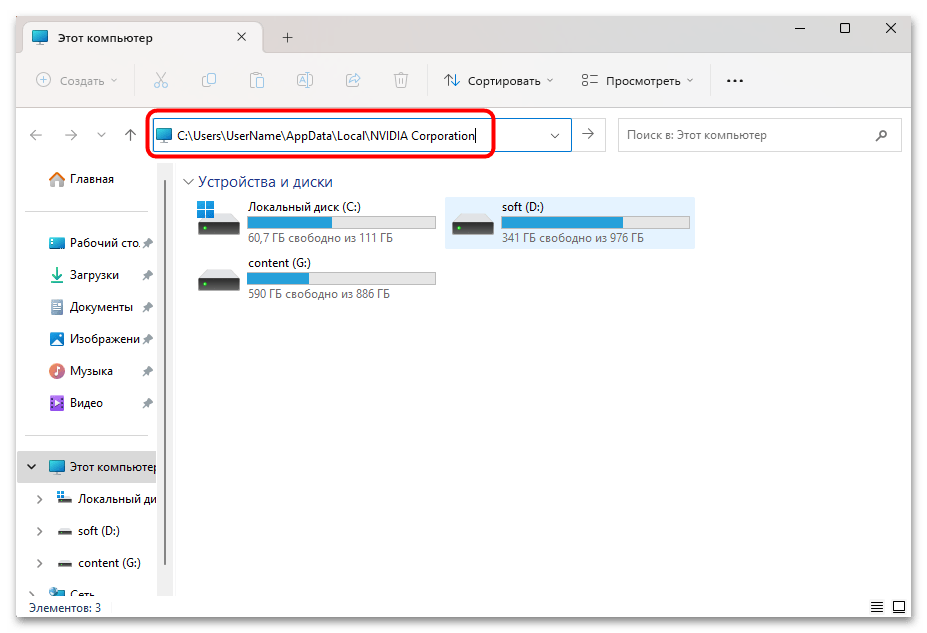
C:\Users\UserName\AppData\Local\NVIDIA Corporation, где под UserName подразумевается имя пользователя.
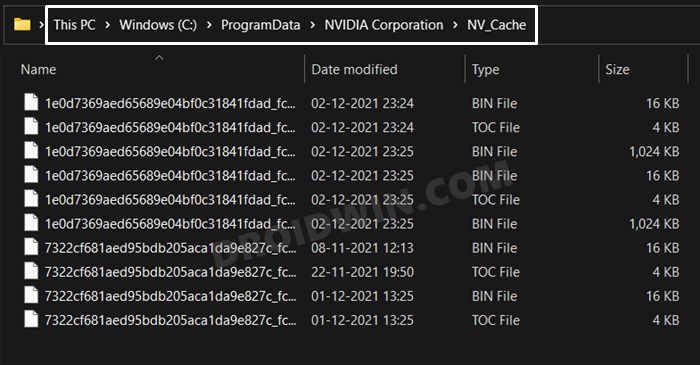
Если здесь есть искомая папка с кешем, то все ее содержимое нужно удалить. Для этого выделите все файлы (одновременно нажав клавиши «Ctrl + A») и воспользоваться контекстным меню и соответствующей функцией или клавишей «Delete». Чтобы удалить данные безвозвратно, можете использовать сочетание «Shift + Delete».
Способ 5: Консоль
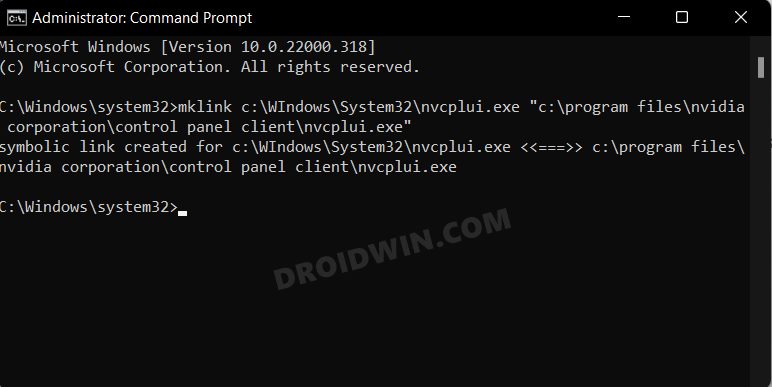
С помощью «Командной строки» или «Терминала» можно создать альтернативную ссылку в виде исполняемого файла, который будет отвечать за запуск «Панели управления NVIDIA». Этот вариант мы также разберем на примере пути к корневой директории приложения, выбранного по умолчанию. Сразу следует отметить, что если каталог был выбран вручную, то в консольной команде нужно использовать его:
- Запустите «Терминал» от имени администратора. Для этого в Windows 11 можно щелкнуть правой кнопкой мыши по «Пуску» и выбрать соответствующий пункт.
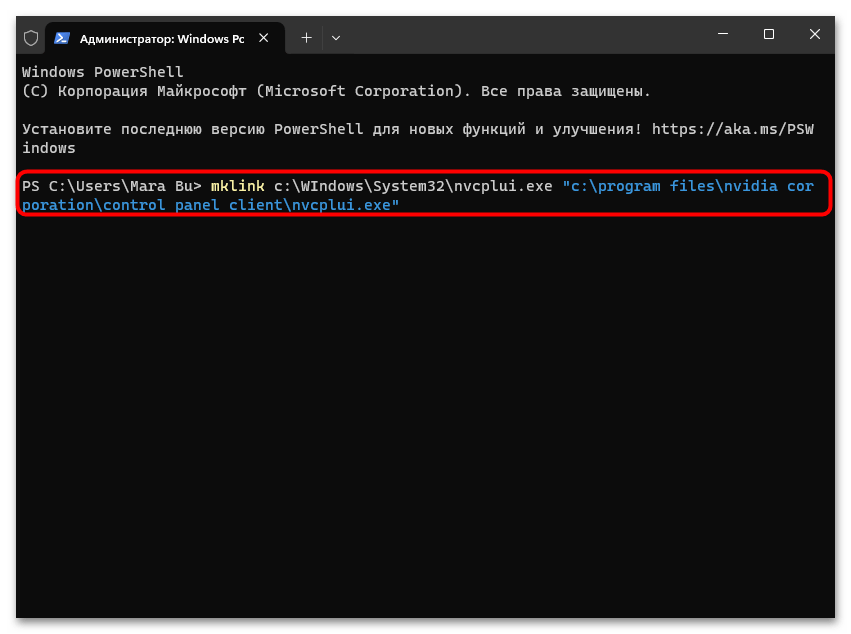
- Введите команду
mklink c:\WIndows\System32\nvcplui.exe "c:\program files\nvidia corporation\control panel client\nvcplui.exe"и нажмите на клавишу «Enter», чтобы ее выполнить.
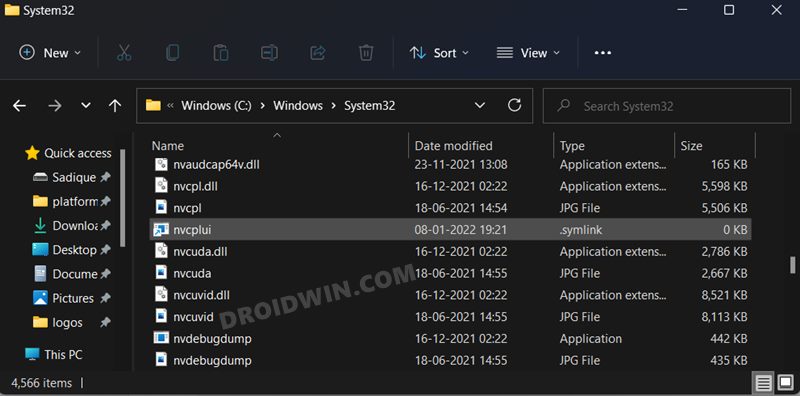
Если в окне консоли отобразилось уведомление об успешном создании символической ссылки, то можно попытаться получить доступ к «Панели управления NVIDIA» через нее. Для этого запустите штатный «Проводник», затем перейдите по пути C:\Windows\System32. В списке содержимого отыщите файл «nvcplui.exe» и попытайтесь запустить его, дважды кликнув по нему левой кнопкой мыши.
Если открыть панель управления удалось, тогда в дальнейшем можете использовать созданную символическую ссылку для открытия приложения. Для более быстрого доступа к ней можете создать ярлык и поместить его на панель задач или на рабочий стол.
Способ 6: Отключение «Быстрого запуска»
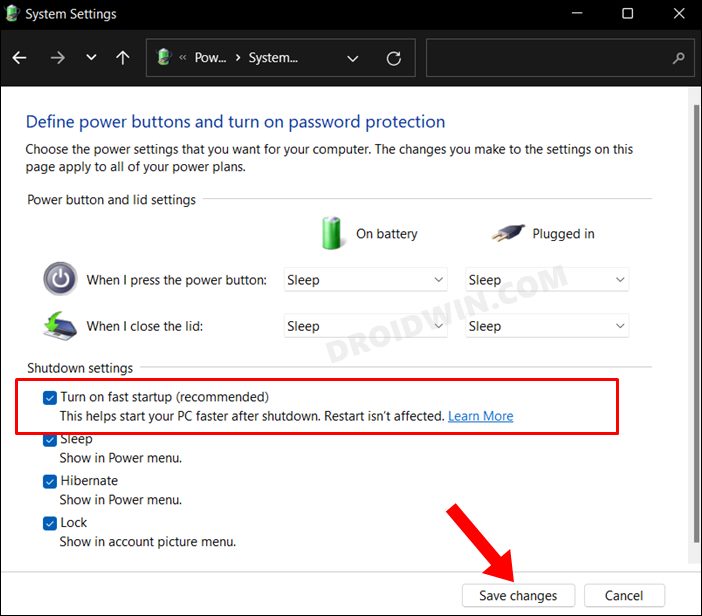
Не исключено, что проблема с запуском софта является следствием работы «Быстрого запуска». Вообще функция предназначена для ускорения загрузки Windows при включении ПК, но замечено, что ввиду особенностей ее реализации иногда происходит негативное влияние на некоторые системные и сторонние процессы. Попробуйте отключить «Быстрый запуск» в Windows 11:
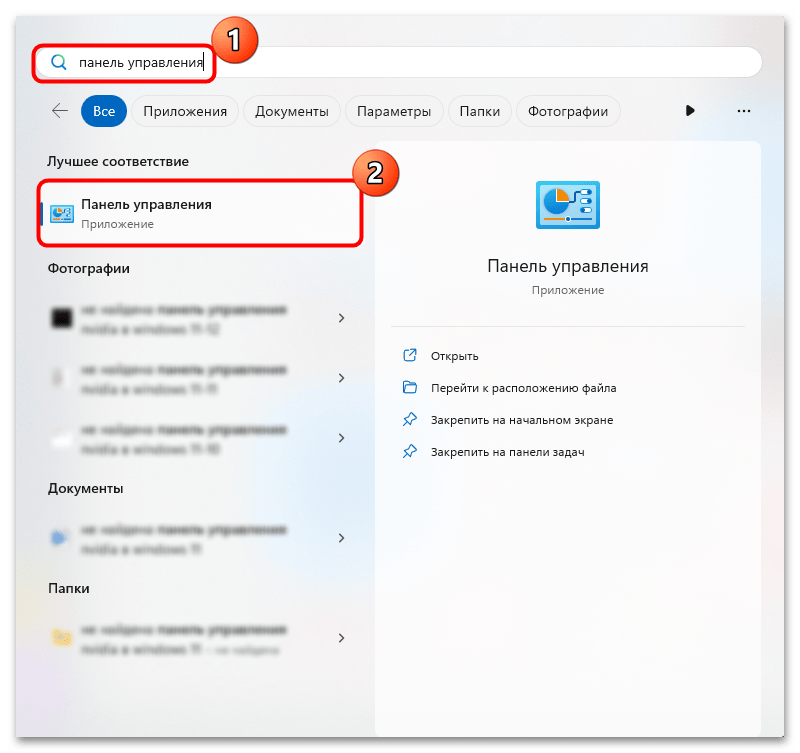
- Через поиск или «Пуск» найдите и вызовите классическую «Панель управления».
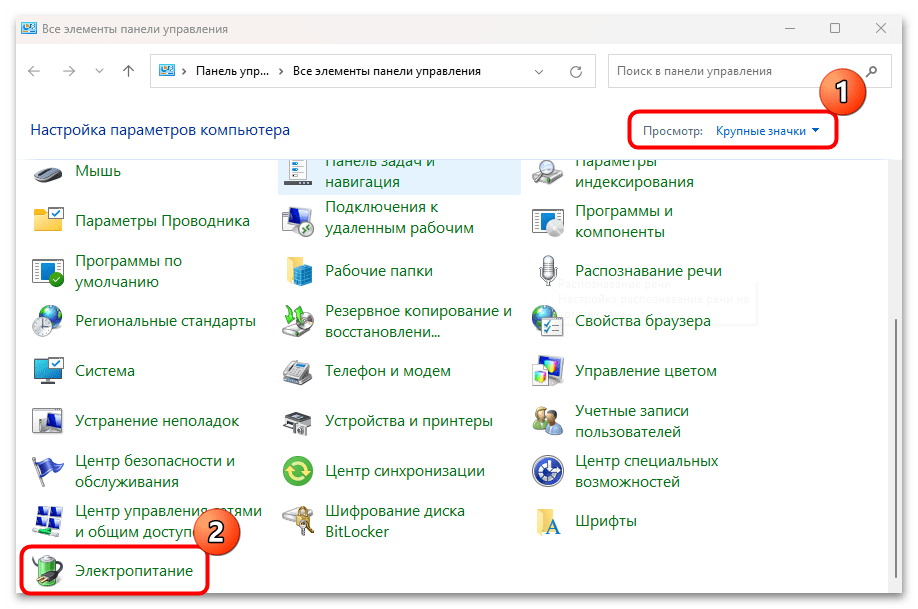
- В меню «Просмотр» выберите способ отображения разделов как крупные или мелкие значки для удобства. Перейдите в раздел «Электропитание».
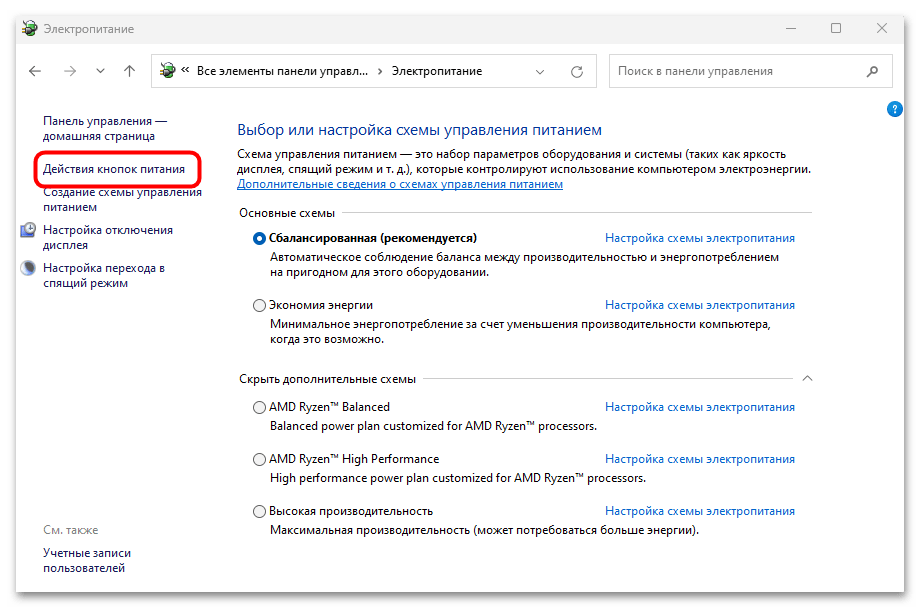
- На панели слева кликните по ссылке «Действия кнопок питания».
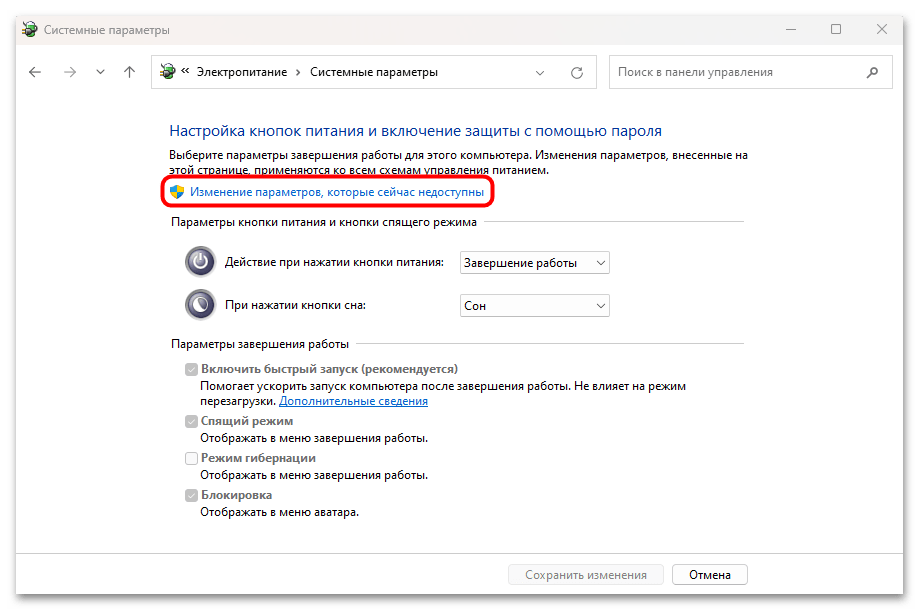
- Щелкните по строке «Изменение параметров, которые сейчас недоступны».
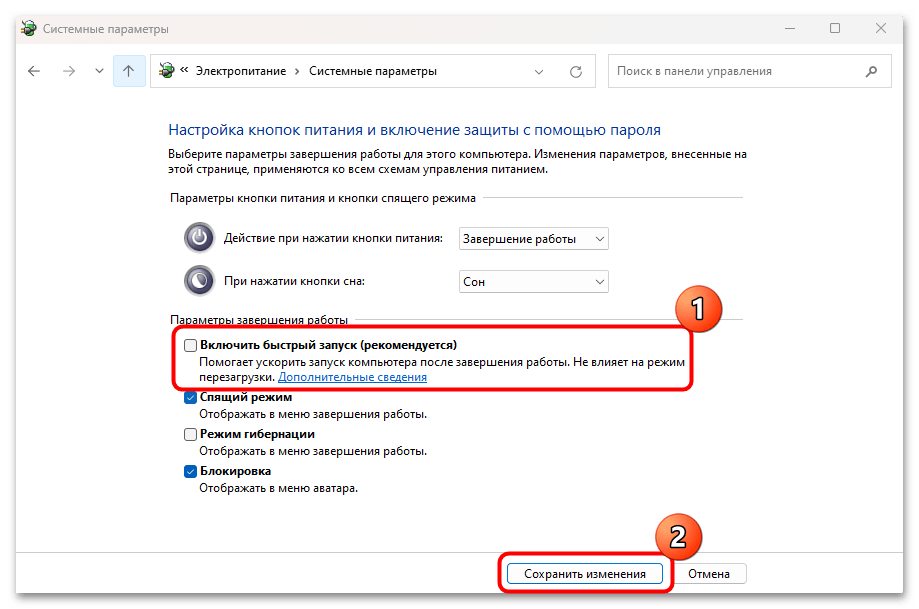
- Ниже станут активны несколько дополнительных возможностей, среди которых есть функция «Быстрого запуска». Снимите у нее отметку и нажмите на кнопку «Сохранить изменения».
Способ 7: Удаление сторонних антивирусов
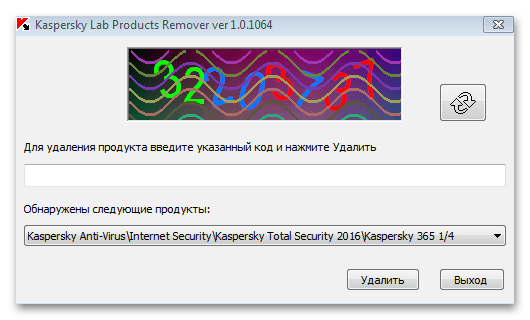
Некоторые пользователи утверждают, что решить проблему с запуском «Панели управления NVIDIA» помогает удаление сторонних антивирусов. Чаще всего рассматриваемая ошибка возникала при использовании таких программ, как AVG или Avast. Даже если вы используете другое антивирусное решение от сторонних разработчиков, можете полностью удалить такой софт с компьютера и проверить, ушла ли проблема. В нашем отдельном материале есть алгоритмы действий на примере наиболее популярных антивирусных продуктах.
Подробнее: Удаление антивируса с компьютера
Способ 8: Переустановка фирменного софта
Если ничего не помогло, то вполне вероятно, что ошибка связана с самим программным обеспечением, например с повреждением его файлов в результате системных сбоев или вирусных атак. Тогда может помочь переустановка фирменного софта с предварительным удалением старых файлов.
В Windows 11 удаление программ осуществляется несколькими способами, в том числе и через классическую «Панель управления» и соответствующий раздел в «Параметрах»:
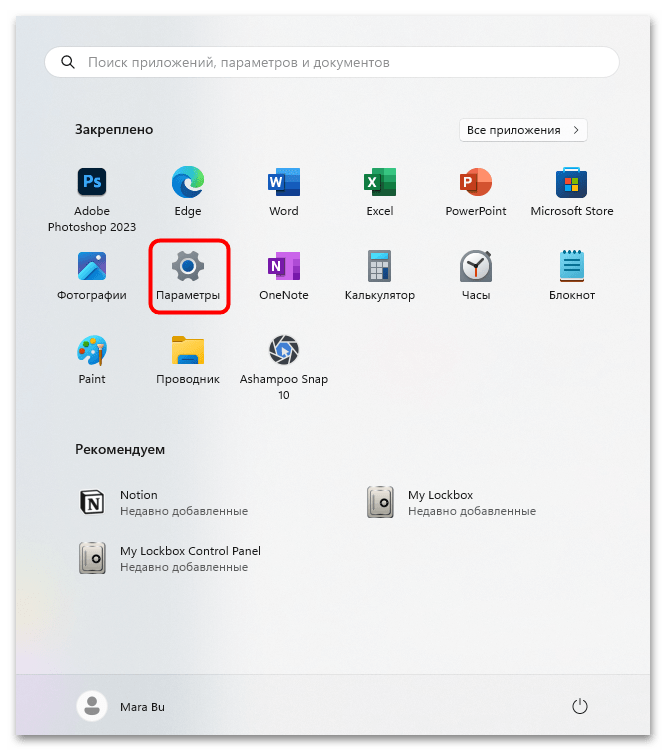
- Нажмите на кнопку «Пуск» и выберите «Параметры».
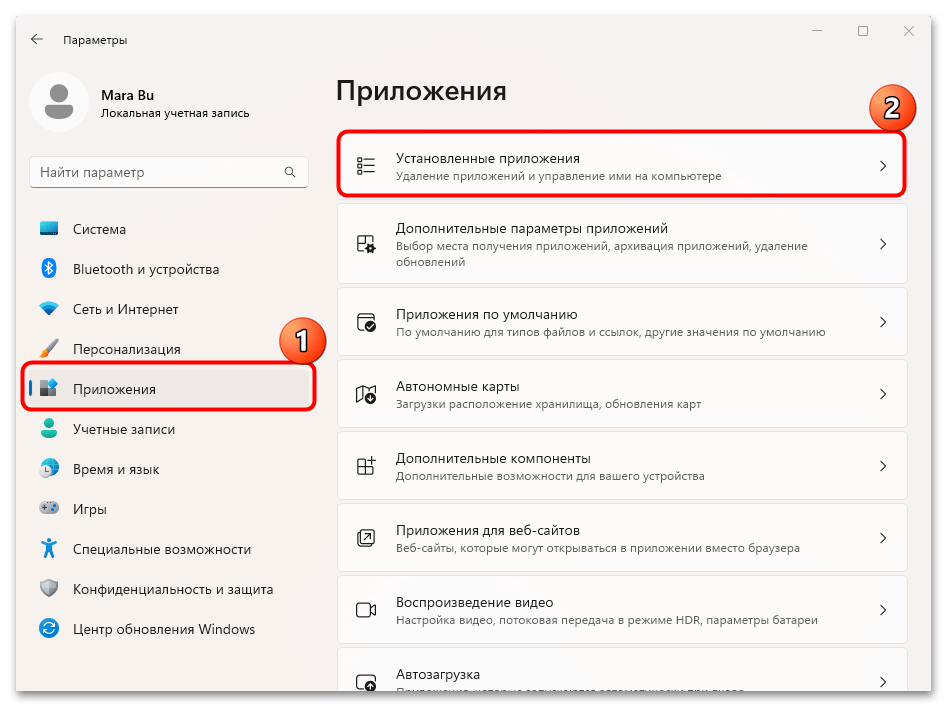
- На панели слева переключитесь в «Приложения», а в центральной части окна нажмите по строке «Установленные приложения».
- Останется в списке программ отыскать ПО от NVIDIA, кликнуть по трем горизонтальным точкам и выбрать пункт «Удалить», после чего действуйте согласно инструкциям пошагового мастера удаления.
Как только все файлы программы будут удалены, скачайте актуальную версию программного обеспечения с официального сайта. О том, как это сделать, наш автор писал более подробно в отдельном материале. Несмотря на то что инструкция предназначена для предыдущей операционной системы («десятки»), она подойдет и для Windows 11.
Подробнее: Установка NVIDIA GeForce Experience
Дополнительные причины
Существует еще несколько дополнительных причин, которые могут препятствовать корректной работе «Панели управления NVIDIA». Приведем в качестве примера наиболее распространенные:
- Использование сразу нескольких мониторов может затруднить запуск фирменного софта от НВИДИА, в особенности если также применяется и стороннее программное обеспечение для организации их работы. Чтобы исправить проблему, попробуйте выключить все дисплеи кроме основного, перезагрузить компьютер.
- Обратите внимание, что в «Диспетчере устройств» в меню «Видеоадаптеры» не должно быть пункта с базовыми видеоадаптерами Майкрософт. Даже если у вас две видеокарты, например одна из них интегрированная, то обновите программное обеспечение и для нее.
- Некоторые сторонние инструменты, которые непосредственно связаны с работой графического адаптера, также могут приводить к рассматриваемой проблеме. К таким инструментам относятся средства для использования планшета в качестве второго монитора (тогда устанавливаются дополнительные драйверы, а саму программу можно отыскать в разделе с приложениями в «Параметрах», после чего удалить такой софт).
Наша группа в TelegramПолезные советы и помощь
In this guide, we will show you various methods to fix the Nvidia Control Panel not opening on your Windows 11 PC. This application is used to efficiently manage display settings and gaming-specific features. Along the same lines, it also beholds quite a few nifty features. These include the ability to tweak 3D settings, adjust image settings, configure surround sound, change resolution, adjust desktop color settings, set up G-Sync, adjust the video color and image settings, among others.
However, not many users are able to make full use of these features. This is because the app is refusing to open on their latest iteration of the OS build. While all the app’s data are still present in their default place and the app still shows up in the Start menu, clicking on it doesn’t do any good. If you are also currently getting bugged with this issue, then this guide is here to help you out. In this tutorial, we will show you various methods to fix the Nvidia Control Panel not opening in Windows 11.
Table of Contents
Do note that there’s no universal fix as such. You will have to try out each of the below-mentioned workarounds and see which one works best in your favor. So with that in mind, let’s get started.
Update Graphics Drivers
Your first course of action should be to verify that you are using the latest graphics drivers. If that is not the case, then you should update these drivers to the latest build right away. Here’s how:
- Right-click on the Start Menu and select Device Manager.
- Then expand the Display Adapter section.
- After that, right-click on your graphics drivers and select Update Drivers.

- Now select Search automatically for drivers.

- Windows will now search for the latest drivers and will subsequently install them.
- Once done, restart your PC and then check if it fixes the Nvidia Control Panel not opening in Windows 11.

Restart NVIDIA Container Processes
The NVIDIA Container and NVIDIADisplay Container are the two processes that are constantly running in the background for the efficient running of the app. Any issues with either of these processes and their repercussions would directly be faced with the Nvidia app. Therefore, you should consider restarting both these processes and then let it start off from a fresh instance. Here’s how it could be done:
- Use the Ctrl+Shift+Esc shortcut keys to bring up the Task Manager.
- Then go to the Background Process section and select NVIDIA Container.

- After that, hit the End Task button situated at the bottom right.
- Then go to the Details tab and select NVDisplay Container.

- Again click on the End Task button. Now wait for a few seconds and let both these processes restart.
- Once that happens, verify if the Nvidia Control Panel not opening in Windows 11 has been fixed or not.

Restart Nvidia Services
Similar to the processes, Nvidia also has a few important services running in the backend and handling all the important stuff round the clock. If for some reason it isn’t functioning along the expected lines, then its negative consequences will be faced by the Nvidia app itself. Therefore, you should consider giving these services a fresh restart, using the instructions given below.
- Bring up the Run dialog box via Windows+R shortcut keys.
- Then type in the below command and hit Enter to open the Services menu:
services.msc
- Now scroll to NVIDIA Display Container LS, right-click on it and select Restart.

- Likewise, restart the NVIDIA LocalSystem Container service as well.

- Once done, check if it fixes the Nvidia Control Panel not opening in Windows 11
Delete Nvidia Cache
If a lot of temporary data gets accrued over the due course of time, then it might conflict with the proper functioning of the app. Therefore, you should consider deleting these cached files at regular intervals, and now could be the perfect time for that. So refer to the below instructions steps to try it out:
- Bring up the File Explorer via Windows+E shortcut keys.
- Then head over to the Nvidia’s cache folder using the below address:
C:\ProgramData\NVIDIA Corporation\NV_Cache

- If the NV_Cache folder is not present there, then check out this directory (replace UserName accordingly):
C:\Users\UserName\AppData\Local\NVIDIA Corporation
- Once you reach the NV_Cache folder, select all the files via Ctrl+A and hit Shift+Del to permanently delete them.

- Now check if you are able to open the Nvidia Control Panel on your Windows 11 PC or not.
Manually Start Nvidia Control Panel
Your next course of action should be to manually start the Nvidia Control Panel app using its executable file. Here’s how it could be done:
- Launch File Explorer via Windows+E shortcut and go to the below location:
C:\Program Files\NVIDIA Corporation\Control Panel Client
- There you should see the nvcplui.exe file, double click to open it.
- It shall open the Nvidia Control Panel app on your Windows 11 PC.
Create Symbolic Link for nvcplui.exe
If the nvcplui.exe is missing from the Control Panel Client directory or it isn’t able to invoke the Nvidia app, then you could also manually create a symbolic link for that file and then access Nvidia via that link. Here’s how:
- Head over to the Start Menu, search CMD, and launch it as an administrator.
- Then type in the below command and hit Enter:
mklink c:\WIndows\System32\nvcplui.exe "c:\program files\nvidia corporation\control panel client\nvcplui.exe"

- If you have installed Nvidia in any directory (other than the default one), then make sure to replace its address under double quotes accordingly.
- Once the command has been executed successfully, you will be notified that the symbolic link for nvcplui has been created. So let’s access it now by heading over to the below location:
C:\Windows\System32

- Now double click on the nvcplui.exe file and check it is able to open Nvidia Control Panel on your Windows 11 PC or not.
Disable Fast Startup
For some users, it was disabling the Fast Startup that did the trick. So let’s put this tweak to test and see if it gives out the desired results or not:
- Launch Control Panel and go to Hardware and Sound > Power Options.
- After that, click on Choose what the Power button does from the left menu bar.
- Then click on Change Settings that are currently unavailable.

- Now uncheck Turn on fast startup (recommended) and click on Save changes.
- Check if it fixes the Nvidia Control Panel not opening on your Windows 11 PC or not.
Install Nvidia GeForce Game Ready Driver
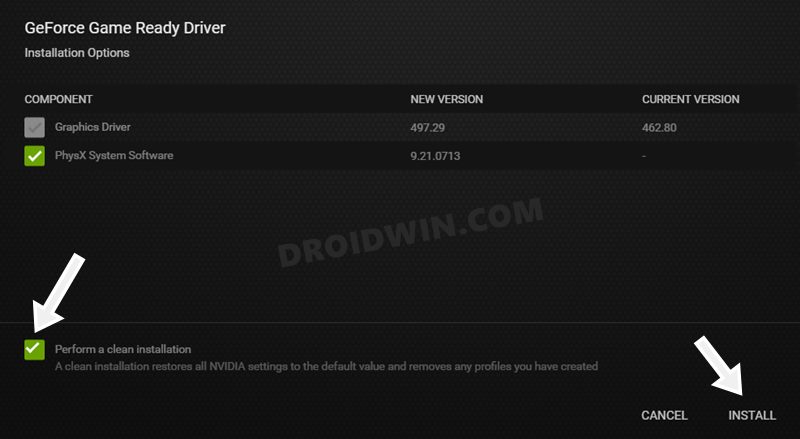
For me, it was performing a clean install of the Nvidia GeForce Game Ready Driver that worked out, so I decided to document it here as well. Doing so will restore all Nvidia settings to the factory default state and will remove all the profiles that you have created. For me, it was a small sacrifice to make and if you echo this thought as well, then let’s get started with the steps:
- To begin with, download the GeForce Game Ready Driver from the official site.
- Then launch the setup and checkmark the Perform a Clean Install option situated at the bottom.

- Hit the Install button and wait for the process to complete.

- Once done, check whether it fixes the Nvidia Control Panel not opening on your Windows 11 PC
Reinstall Nvidia Control Panel
If none of the aforementioned methods did the job, then you will have to opt for the nuclear route of uninstalling the currently installed build and then reinstalling its latest version. Here’s how it could be done:
- Head over to the Start Menu, search Nvidia Control Panel, and hit Uninstall.

- Again click Uninstall in the confirmation dialog box that appears.
- Wait for the process to complete. Once done, launch File Explorer via Windows+E shortcut.
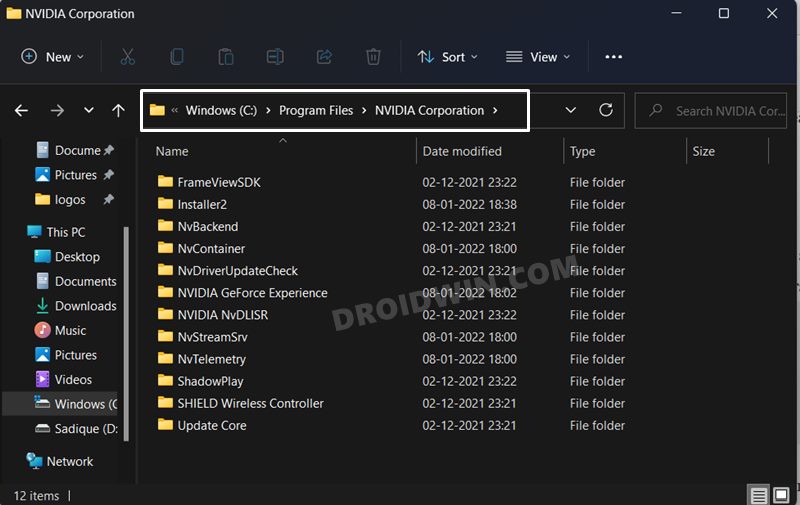
- Then go to the following locations and delete the Nvidia Corporation/Nvidia folders, if you find any:
C:\Program Files\NVIDIA Corporation
C:\Program Files (x86)\NVIDIA Corporation
C:\NVIDIA

- Now that all the old traces of Nvidia has been removed, it is recommended to restart your PC.
- Then go to the official site and download the latest version of the Nvidia Control Panel.

- Launch the setup and proceed with the on-screen instructions to install it. That’s it, the underlying issue should now have been resolved.

With this, we round off the guide on how you could fix the Nvidia Control Panel not opening on your Windows 11 PC. We have listed different methods for the same. Do let us know in the comments section which one spelled out success for you. Likewise, all your queries are welcomed in the comments section below.
- Nvidia GeForce Experience not working in Windows 11 [Fixed]
- How to Delete and Disable Shader Cache in Windows 11
- How to Remove Ads on Nvidia Shield and other Android TVs
- Install a Third-Party Custom Launcher on Nvidia Shield TV
Skip to content
Are you currently dealing with the frustration of the NVIDIA Control Panel not opening on your Windows 11 PC? This common issue might be attributed to outdated drivers, Windows updates, or lingering processes. The NVIDIA Control Panel, a crucial tool for managing graphics card settings, becomes inaccessible, potentially impacting customization and performance optimization at a system level.
For users relying on NVIDIA-branded graphics cards, the Control Panel is indispensable. The inability to access it could mean missing out on optimization opportunities, customization features, and potential performance gains. This situation may also indicate underlying problems with NVIDIA installations or the system itself.
In this article, we’ll explore effective solutions to address the widespread problem of the NVIDIA Control Panel not opening on Windows 11. By implementing these fixes, you can ensure the seamless functioning of your graphics card and maintain an optimized system.

UPDATE YOUR DRIVER
in Windows 11, 10 and 7
Use Driver Easy to update all the missing & outdated device drivers on PC for free.
If the NVIDIA Control Panel is not opening in Windows 11, don’t fret. Here’s how to get it working again.
Unhide the NVIDIA Control Panel
If you mistakenly hid the NVIDIA Control Panel, making it disappear from your system tray, or if a third-party application or Windows 11 itself hid the icon, you can easily unhide it:
- Go to the Windows 11 Control Panel.
- Change the view mode to “Large icons.”
- Click on “NVIDIA Control Panel” from the items.
- In the opened NVIDIA Control Panel, click on the Desktop menu at the top.
- Ensure there’s a checkmark next to “Add Desktop Context Menu” and “Show Notification Tray Icon.” If not, click on them to add the checkmarks.
- Close the NVIDIA Control Panel.
- Try opening it again by right-clicking on your desktop or using the system tray.
Restart the NVIDIA Control Panel
If the NVIDIA Control Panel fails to open, try quitting the task and reopening the application.
- Right-click on a space in your taskbar and select “Task Manager.”
- In the Task Manager, find and select the “NVIDIA Control Panel.”
- Click the “End task” button in the bottom-right of the window.
- Wait for a few seconds, then attempt to open the NVIDIA Control Panel again.
Restart NVIDIA Display Container Service
When facing issues with the NVIDIA Control Panel not opening, it may be due to a disabled NVIDIA Display Container service. To resolve this, ensure that essential NVIDIA services are enabled and running by following these steps
- Open Windows 11’s file search utility.
- Type “Services” into the search box and launch the app.
- Locate and double-click “NVIDIA Display Container LS” in the Service window.
- In the Startup type menu, select “Automatic” if it’s set to a different option.
- Click “Start” in the properties window to initiate the service if it’s stopped.
- Apply the changes to save settings.
- Select “OK” to exit the NVIDIA Display Container LS Properties window.
- Repeat steps three to seven for the “NVIDIA LocalSystem” and “NetworkService Container” services.
Repeat the step above for the following services: NVIDIA LocalSystem Container, NVIDIA NetworkService Container, and NVIDIA Telemetry Container.
Repair the NVIDIA Control Panel App
To address the issue of the NVIDIA Control Panel not opening, you can utilize Windows 11’s standard Repair and Reset options for apps. Follow these steps to access these troubleshooting options in Windows 11:
- Press Win + I to open the Settings app.
- Navigate to Apps > Installed apps in the Settings menu.
- Scroll through the list of apps and locate the NVIDIA Control Panel. Click on the three horizontal dots on the right and choose Advanced options from the menu.
- In the Advanced options, scroll down to the Reset section. Alternatively, you can attempt to repair the Windows app without losing any data by following the steps outlined in the guide on repairing apps on Windows.
- If repair doesn’t resolve the issue, click the Reset button.
- Confirm the reset by clicking Reset again in the pop-up window.
Update your NVIDIA Graphics Drivers
If you’re encountering issues with the NVIDIA Control Panel, consider updating your PC’s NVIDIA graphics driver, as this action also updates the associated control panel app.
To try this potential solution, follow the steps outlined in our guide on updating NVIDIA GPUs. Keeping your graphics driver current may resolve problems caused by outdated versions.
Install Missing Visual C++ Redistribute Packages
If the NVIDIA Control Panel isn’t opening, a potential cause might be the absence of a required Visual C++ Redistributable package on your PC. You can address this issue by ensuring that the necessary Visual C++ packages are up-to-date.
Here’s how to install a missing Visual C++ Redistributable in Windows:
- Click here to open the Microsoft Visual C++ download page in your web browser.
- Click on the X64 link corresponding to the latest Visual Studio 2015, 2017, 2019, and 2022 packages.
- Once the download is complete, double-click the downloaded VC_redist.arm64.exe (Visual C++ installer) file.
- Follow the installation process prompted by the installer.
Edit Windows Registry
If the NVIDIA Control Panel isn’t opening, you can create a new context menu option using a Windows Registry tweak. Before proceeding, it’s crucial to back up the Windows Registry.
Follow these steps to apply the fix:
- Open Registry Editor by pressing Win + R, typing “regedit” in the Run dialog, and clicking OK.
- Input the following key location in the registry address bar and press Return:
Computer\HKEY_LOCAL_MACHINE\SOFTWARE\Classes\Directory\background\shellex\ContextMenuHandlers - Right-click the NvCplDesktopContext subkey and choose Delete. Confirm by selecting Yes to delete the NvCplDesktopContext key.
- Erase the current path in the registry bar, and input the new location:
Computer\HKEY_CLASSES_ROOT\Directory\Background\shell - Right-click “Shell” and select New. Click Key to add a subkey, naming it “Nvidia Control Panel.”
- Right-click the new subkey, select New and Key, and input “command” as the subkey’s title.
- Double-click the (Default) string in the command subkey, input the following path in the Value data box:
C:\Windows\System32\nvcplui.exeSelect OK to save the string value. - Reboot your Windows 11/10 PC to apply the changes.
This Registry edit creates a new context menu option for opening the NVIDIA Control Panel, potentially resolving the issue. Always exercise caution when editing the Registry and ensure you have a backup before making changes.
Reinstall the NVIDIA Control Panel
If you’re still facing issues with the NVIDIA Control Panel, consider reinstalling it as the app may have corrupted or missing files. Follow these simplified steps:
- Uninstall the NVIDIA Control Panel:
- Open Settings.
- Go to “Apps” or “Apps & Features.”
- Find the NVIDIA Control Panel and click “Uninstall.”
- Restart your PC after uninstallation.
- Go to the NVIDIA Control Panel Microsoft Store page.
- Click on “Get” to open the Microsoft Store.
- Click “Get” again to reinstall the app.
Disable Fast Startup in Windows 10
Users on Reddit suggested that Fast Startup settings may cause the NVIDIA control panel not to open. Follow these steps to reload the necessary files and services to fix this issue.
- Press the Windows + R keys then type in control and press Enter to open the Control Panel.
- Click on the Hardware and Sound
- Click on the Choose what the power buttons do link
- Here click on Change settings that are currently unavailable.
- Make sure that Turn on Fast Startup is unchecked, then click the Save Changes button.
- Restart your device and see if the NVIDIA Control Panel not working issue is resolved.
Disable the Antivirus Temporarily
Most of the time NVIDIA control panel does not work issue arises if you have installed third-party antivirus software on your PC. You need to disable it from running in the background.
The Windows Defender can also be the culprit so you also need to disable it on your PC.
- Click the Start button, type security, and click on Windows Security from the results.
- Select Virus & Threat Protection.
- Now, if you don’t have a third-party antivirus installed, you can deactivate the protection of Windows Defender. If you do, you can select Open app and disable your antivirus from its menu.