
Quick Links
-
Restart Notepad and Your PC
-
Use an Alternative Method to Open Notepad
-
Remove Conflicting Applications
-
Set Notepad as the Default Text Editor
-
Repair or Reset the Notepad App
Summary
- Press Win+i to open Settings and go to Apps > Installed Apps. Find Notepad, click the ellipsis, and select «Advanced Options.» From the next screen, click «Repair.»
- Try alternative methods to open Notepad, like accessing it through the Start menu, Run command, or File Explorer.
- Use Task Manager to close unnecessary programs and uninstall any third-party text editors, as these may cause conflict.
While Notepad is a lightweight and generally bug-free application, sometimes it refuses to open on Windows 11. If this is happening to you, here are all the fixes you should try.
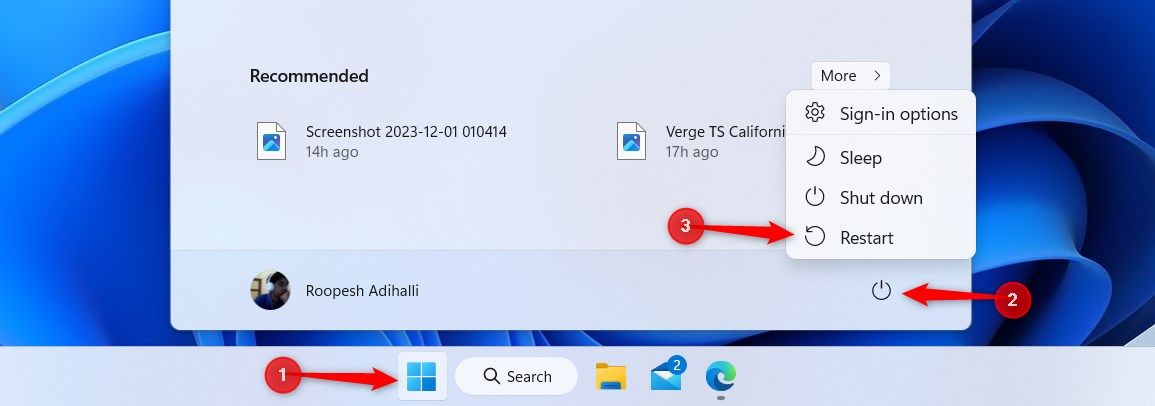
1. Restart Notepad and Your PC
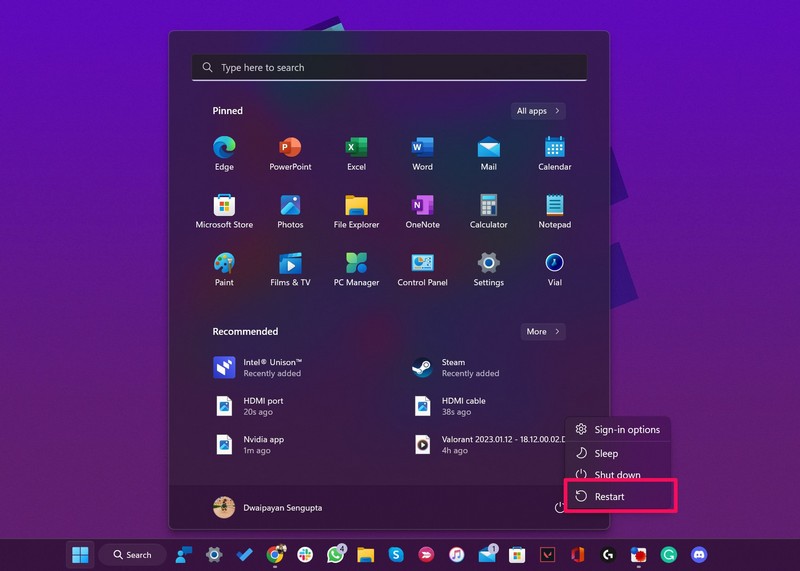
The first thing to do is restart Notepad. Close any open Notepad sessions, then re-open the application. If this fails, restart your Windows computer via Start > Power button > Restart.
2. Use an Alternative Method to Open Notepad
There are plenty of ways to open Notepad in Windows, so try an alternative method if your usual way isn’t working. For example, you could access it through the Start menu, use a Run command, or open in File Explorer.
3. Remove Conflicting Applications
Conflicting applications can cause Notepad to not open, so you should close anything that isn’t essential. To do this, right-click the taskbar and select «Task Manager.» Select a program to close, click «End Task», and repeat as necessary.
Also, if you have downloaded any third-party text editors, uninstall them. To do this, pres Win+i to open Settings, then select Apps > Installed Apps. Select the ellipsis next to an app and click «Uninstall.»
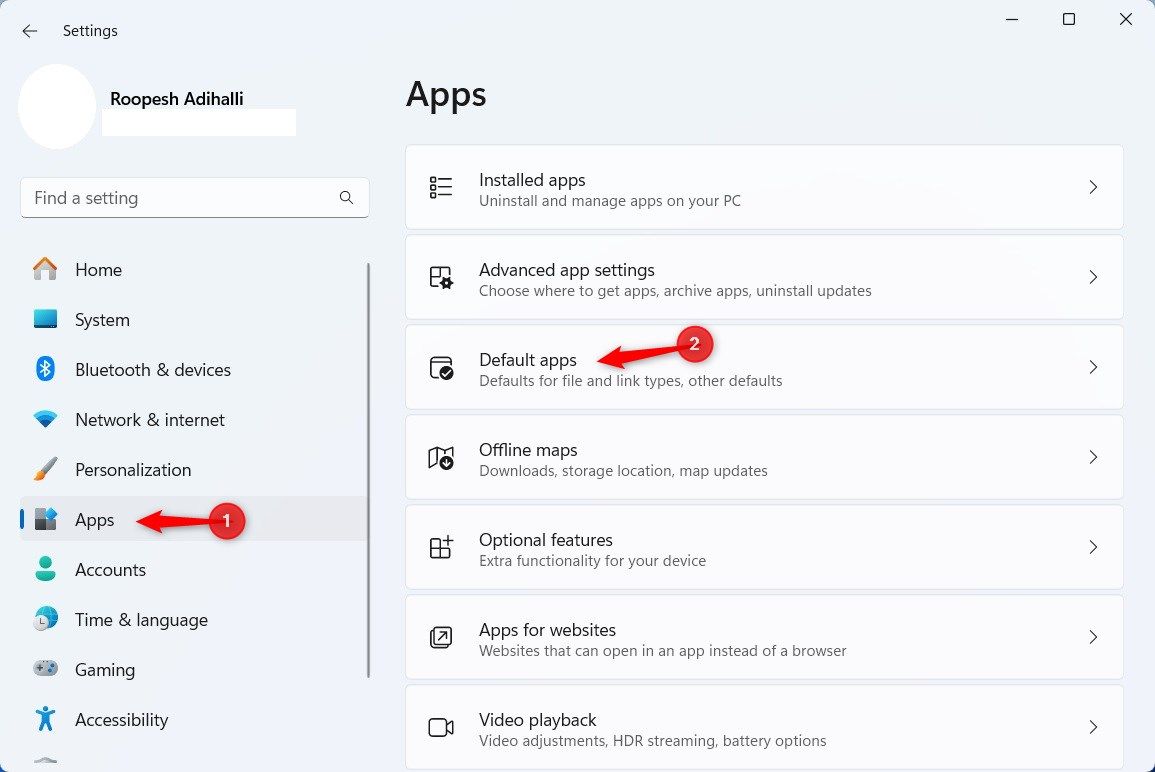
4. Set Notepad as the Default Text Editor
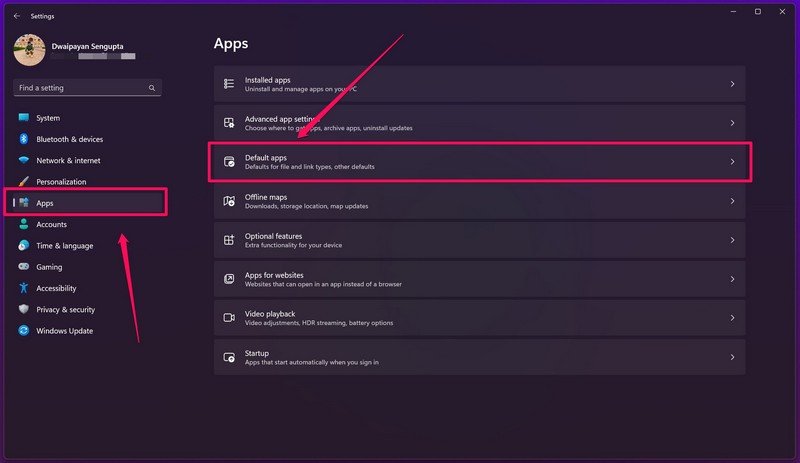
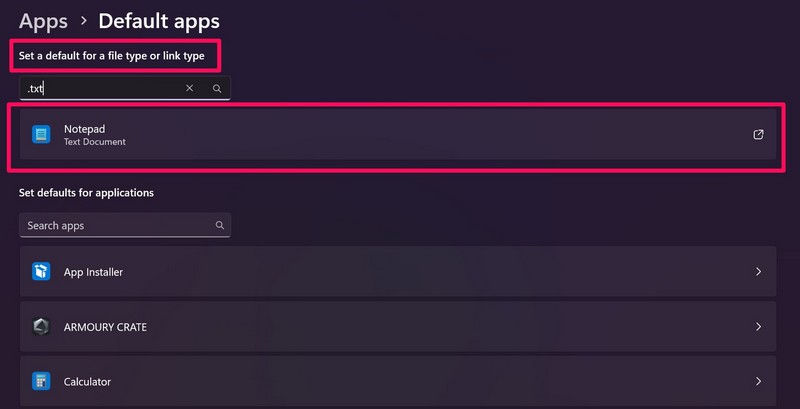
If you don’t have Notepad set as the default text editor, text files will open in another application. To set Notepad as the default, press Win+i to open Settings and select Apps > Default Apps.
Within the field beneath «Set a default for a file type or link type», enter the file type you wish to adjust, like .TXT. Click the displayed default app.
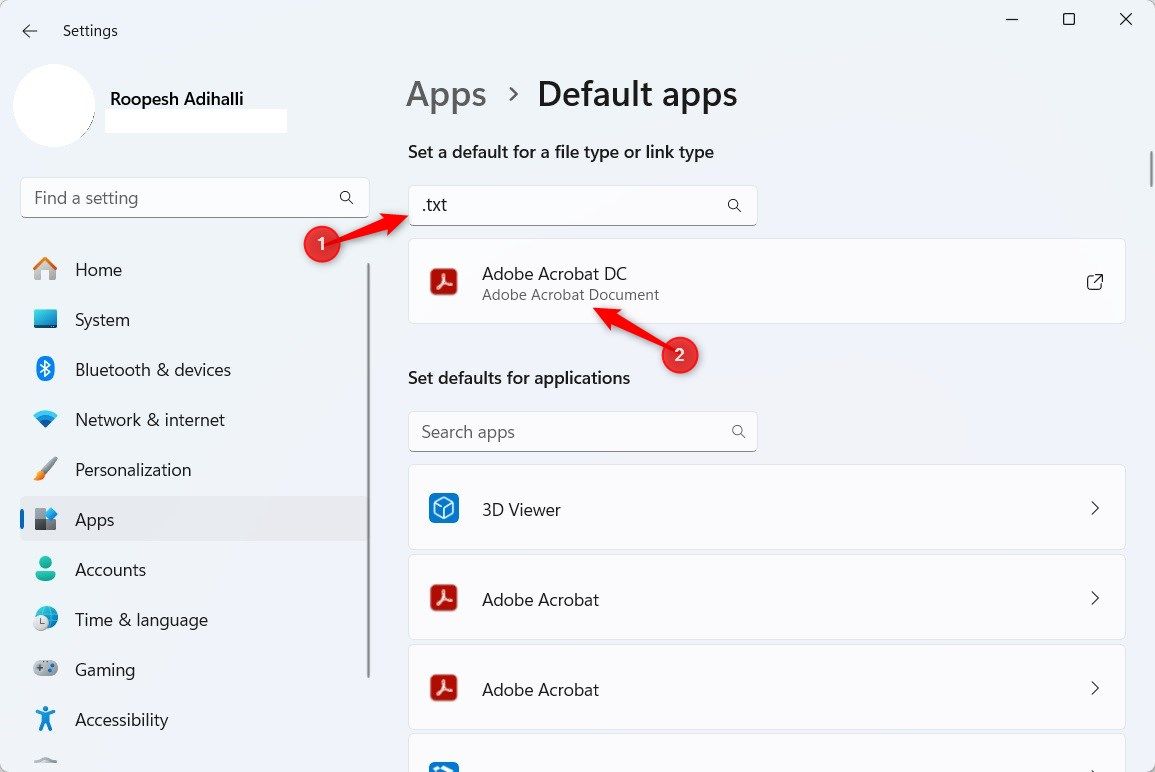
Select Notepad and click «Set Default.»

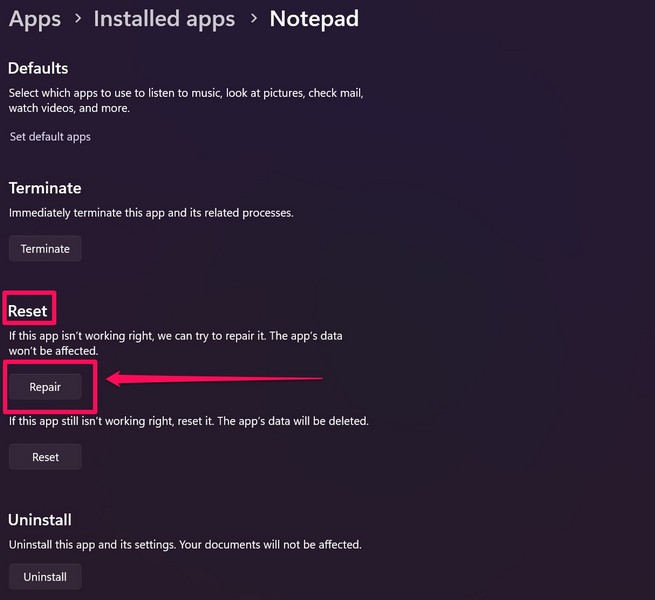
5. Repair or Reset the Notepad App
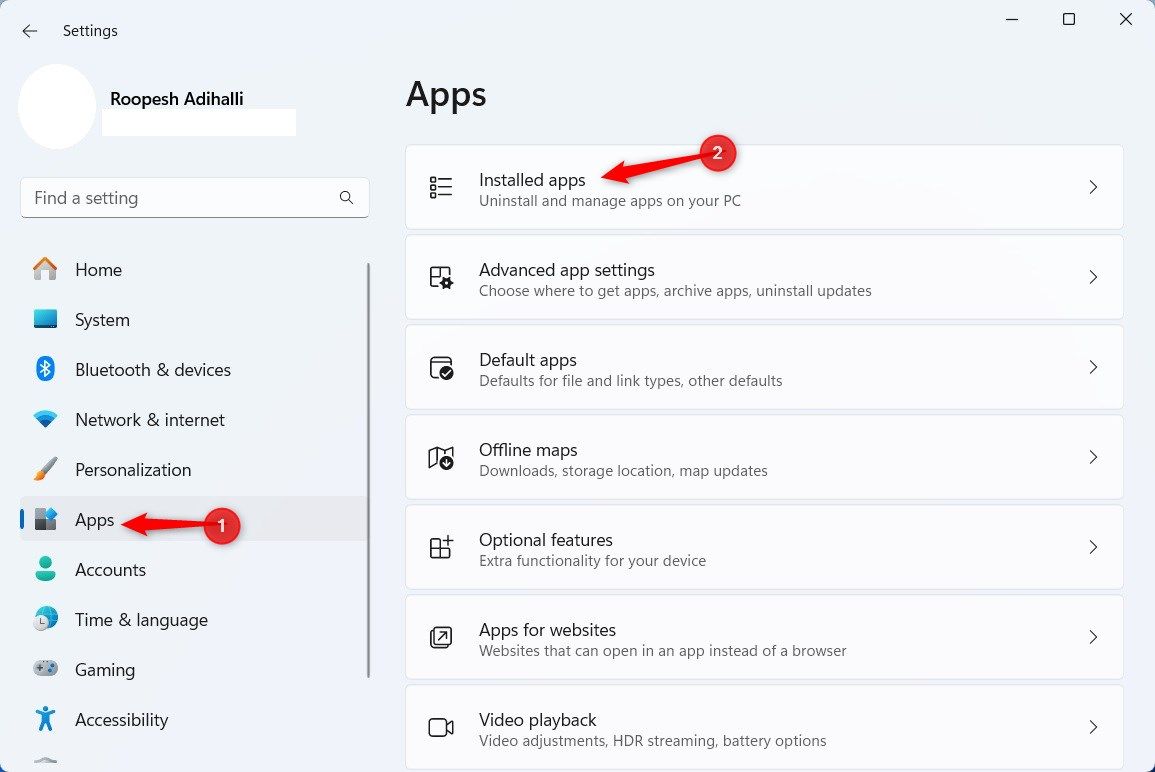
An easy fix for Notepad not opening is to use Windows 11’s app repair and reset functionalities. Press Win+i to open Settings and go to Apps > Installed Apps.
Locate Notepad, click the ellipsis, and select «Advanced Options».
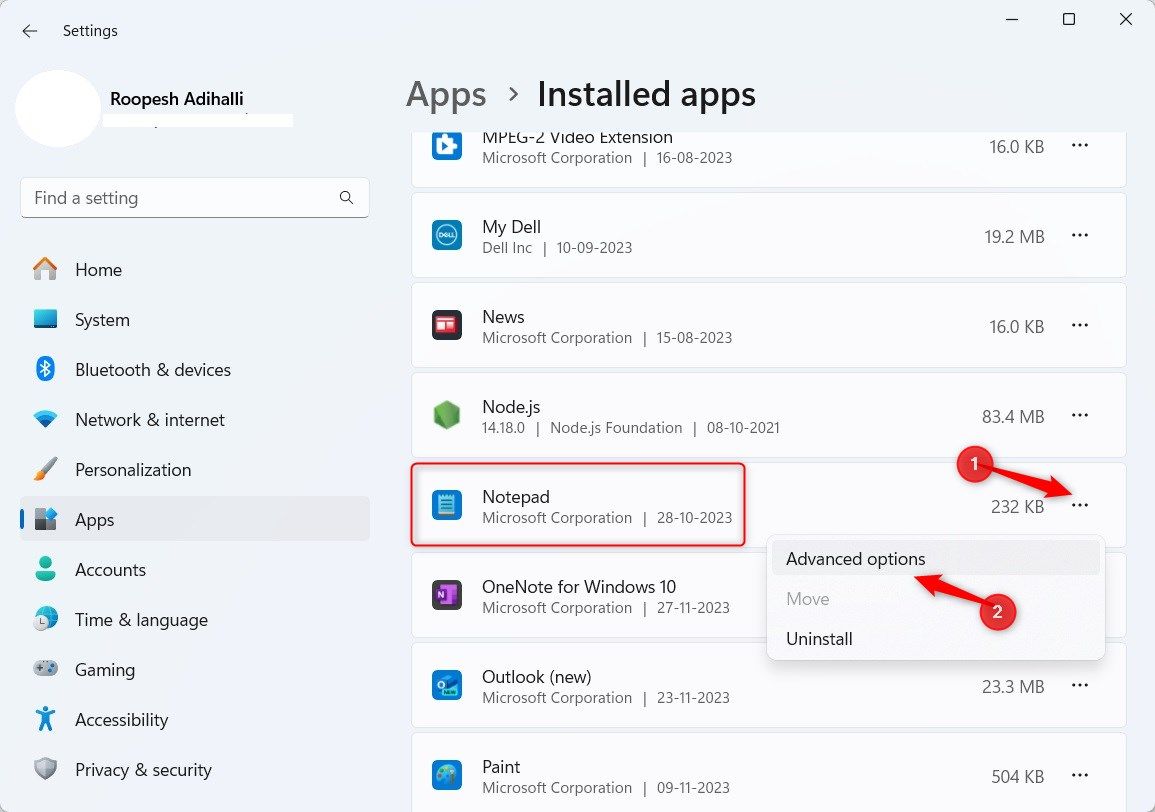
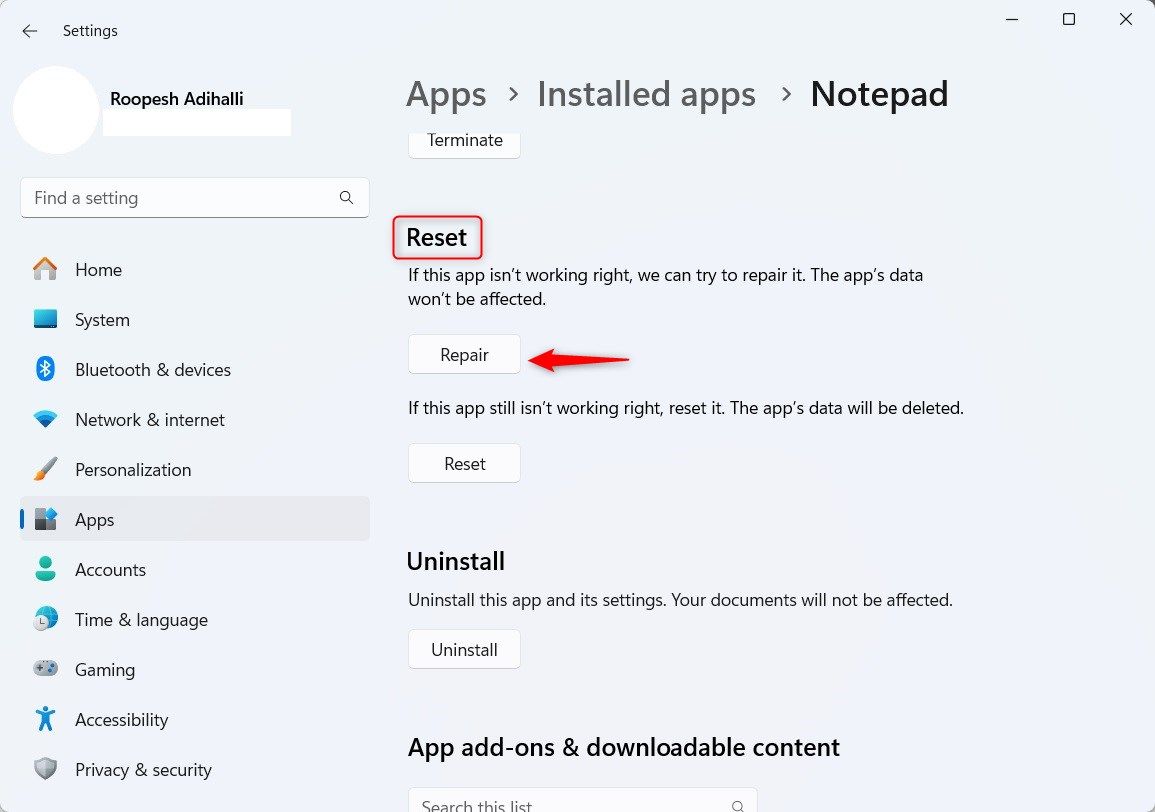
Scroll down to the Reset section and click «Repair.» This initiates a repair for Notepad, with a progress bar indicating the progress.
Once the repair is completed, a checkmark appears next to the Repair button.
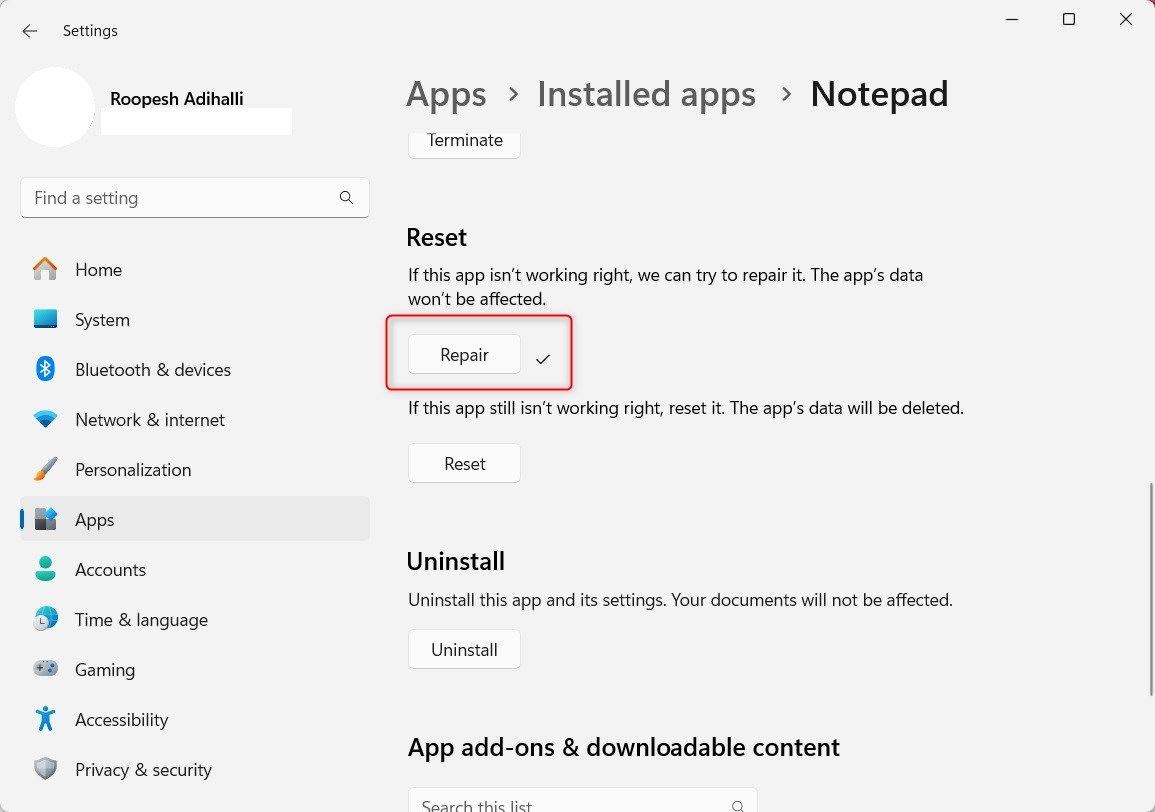
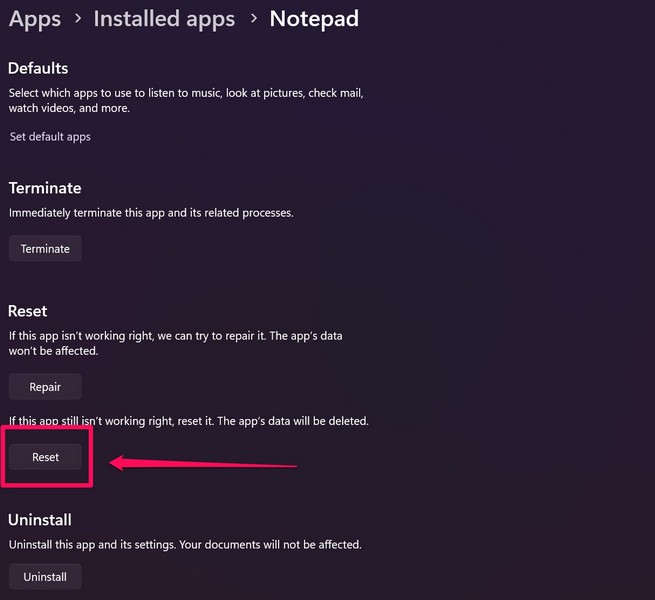
Try to open Notepad now. If you are still facing issues, return to the same screen, but this time select «Reset.»
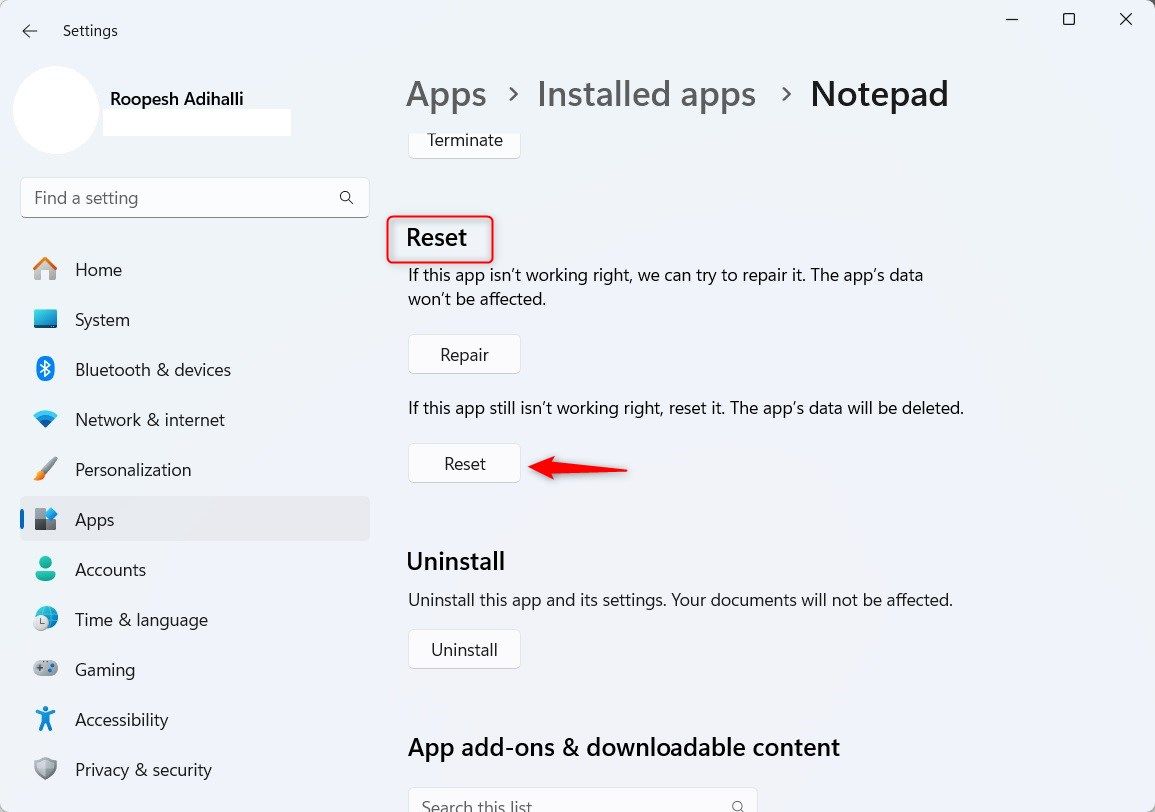
A pop-up warns you about the action, as it permanently deletes the data from the app. Click «Reset» in the pop-up message to confirm.
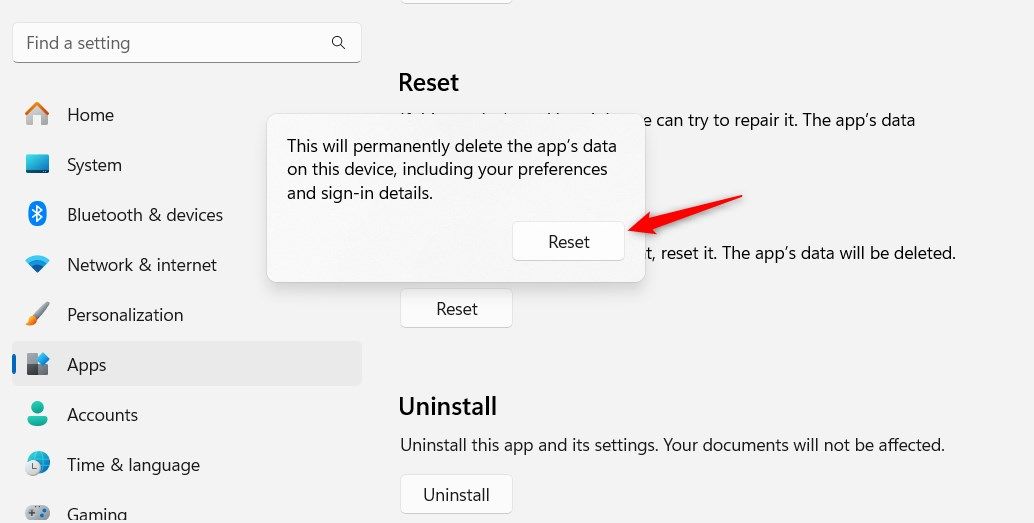
Now, hopefully Notepad is back to its default state and error-free.
6. Reinstall Notepad
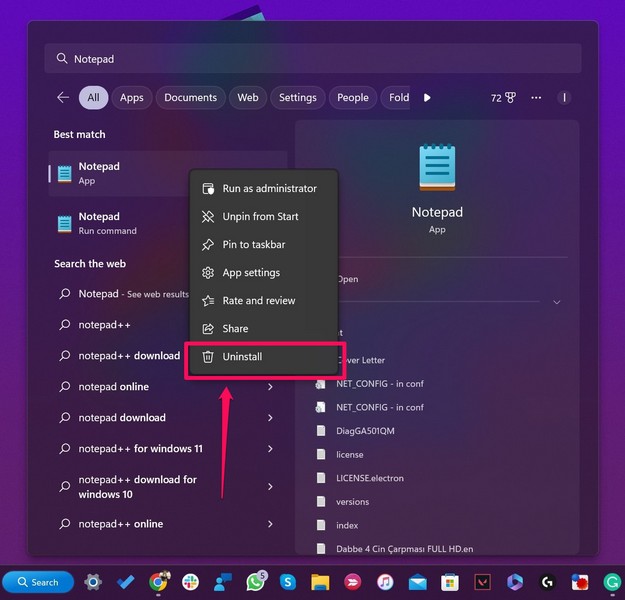
If repair and reset actions fail to help you with opening Notepad, try reinstalling the app. First, you need to uninstall Notepad from your computer.
Press Win+i to open Settings and go to Apps > Installed Apps. Select the ellipsis next to Notepad and click «Uninstall.»
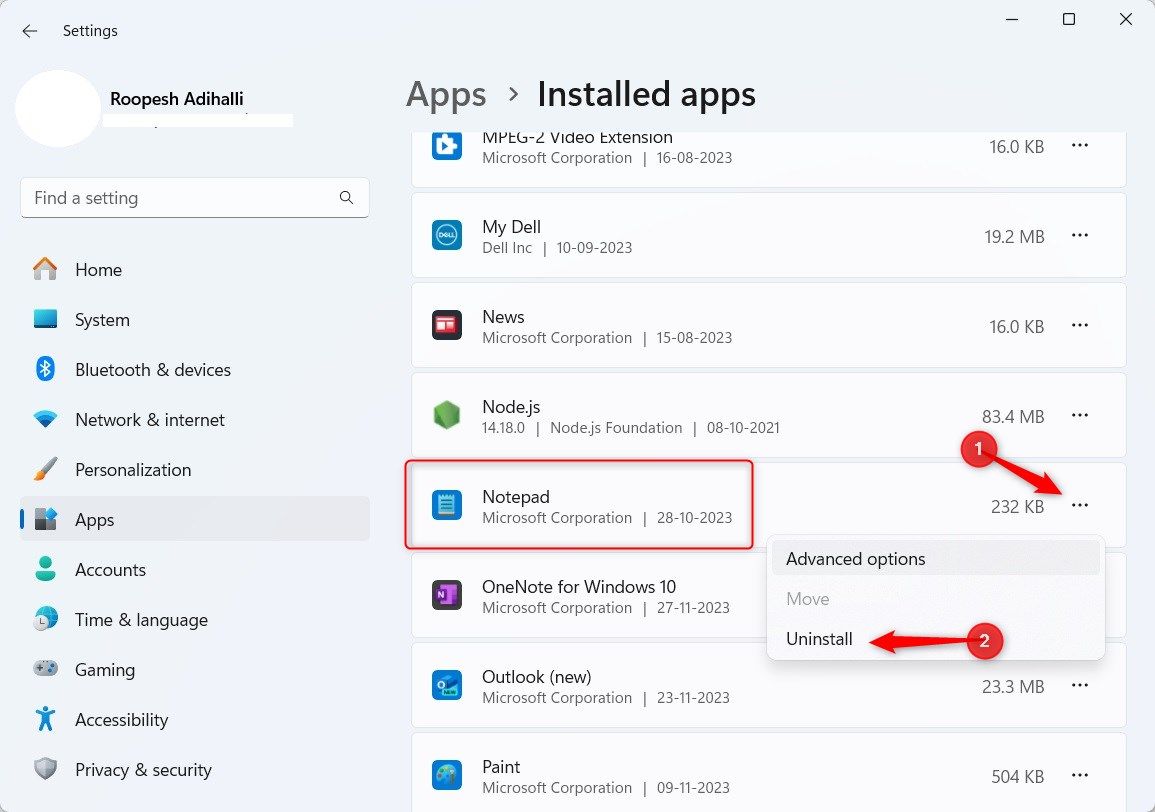
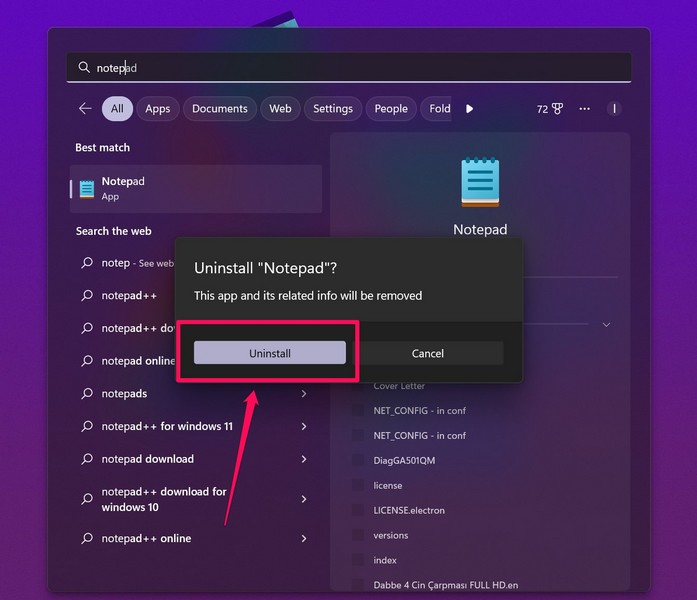
A pop-message warns you about deleting the app data and related information if the app is uninstalled. Once again, click «Uninstall.»

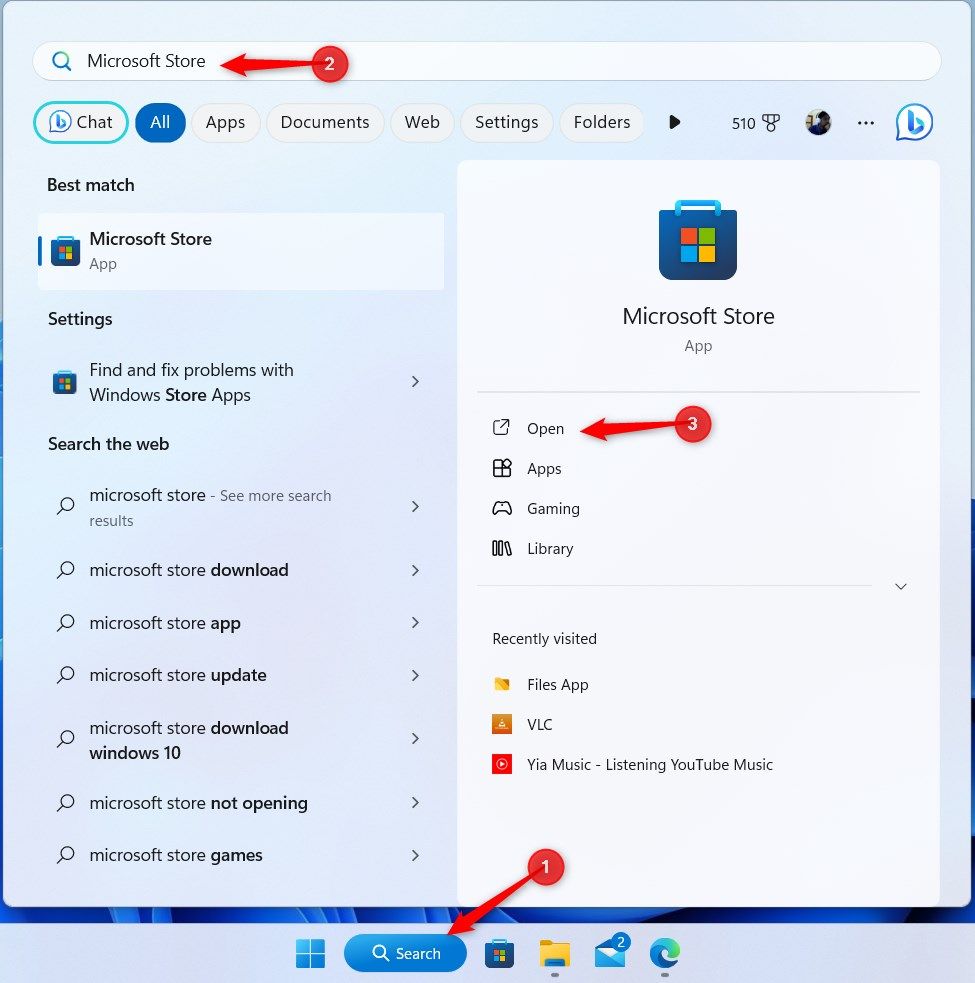
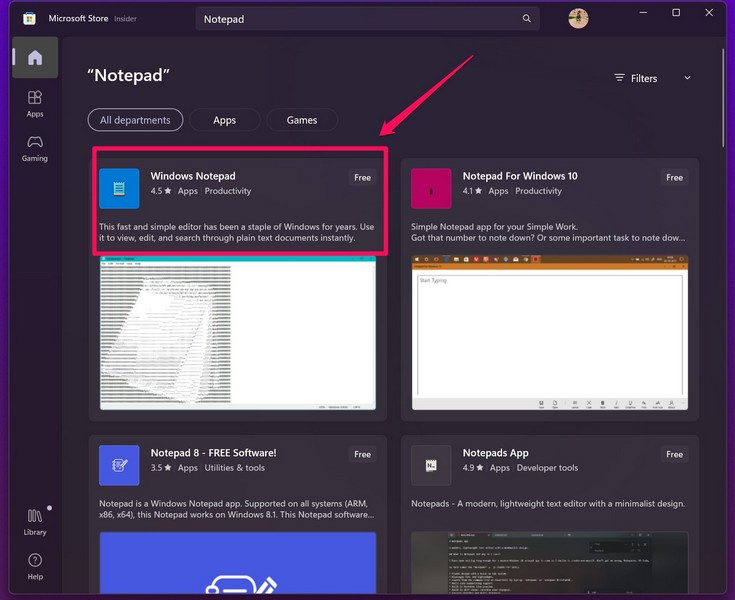
Next, reinstall Notepad on your computer using the Microsoft Store. Find and open the Store through the Start search.
In the Microsoft Store, type «Notepad» in the search bar, and select the «Windows Notepad» result.
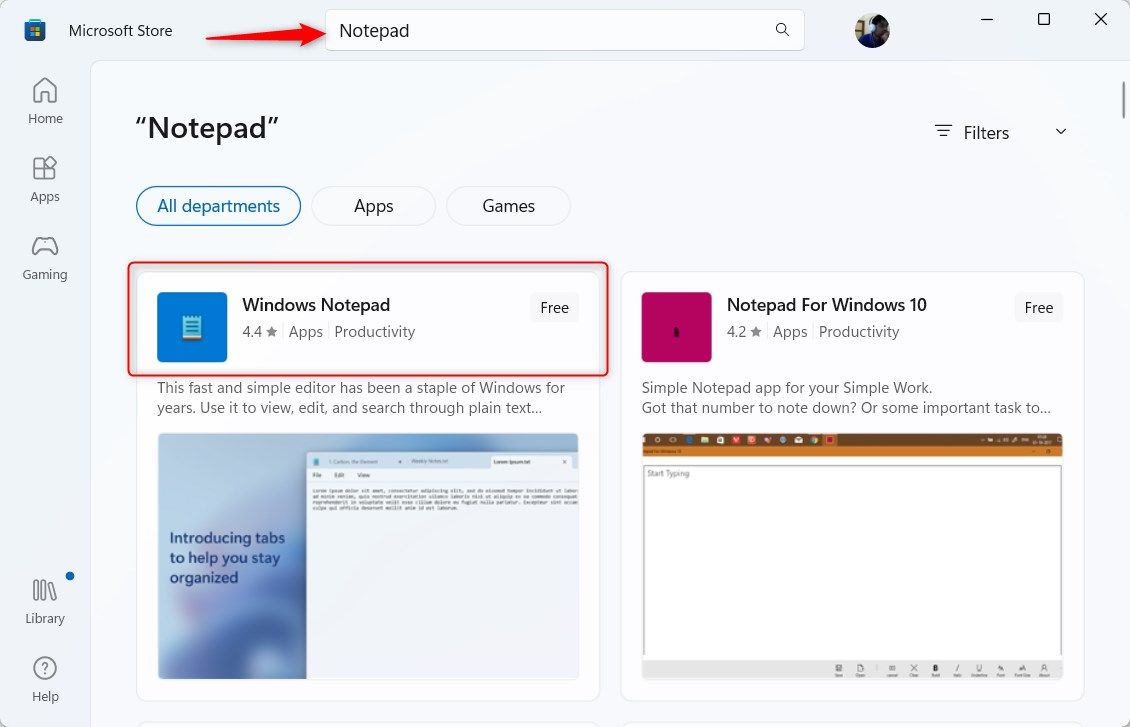
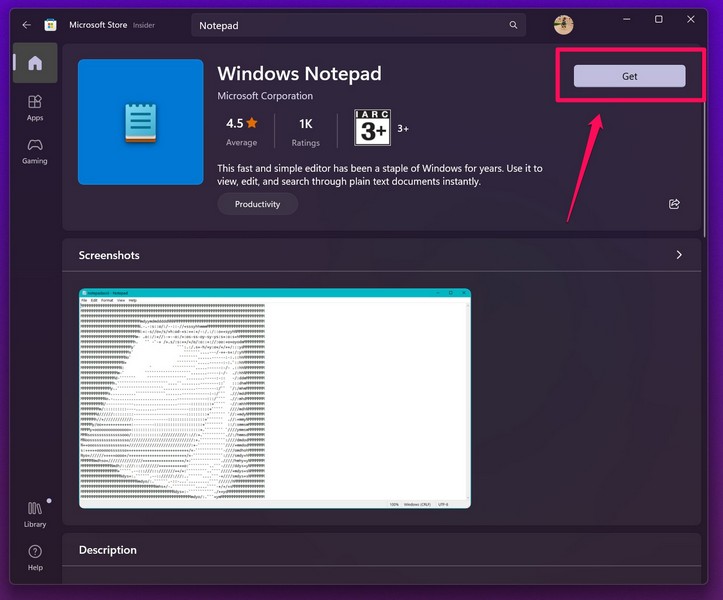
Click «Get» in the top-right to install the app.

The download should take only a few moments. Once done, try opening Notepad.
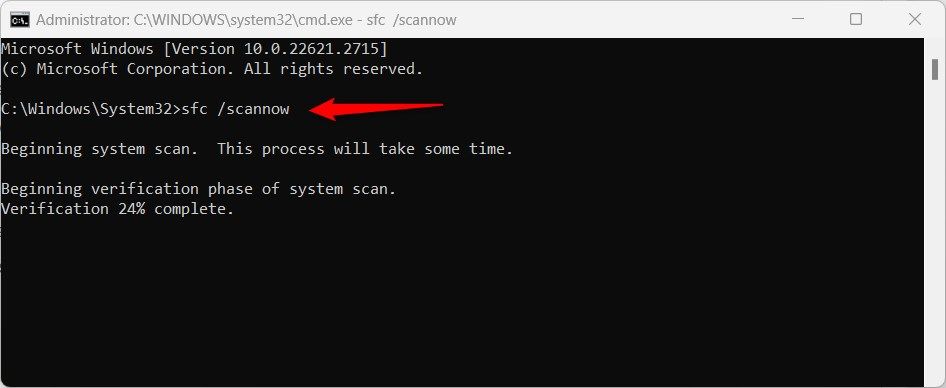
7. Run SFC and DISM Scans
Corrupted system files hinder the operation of Windows in many ways. If Notepad is not opening, run an SFC and DISM scan. These repair corrupted, missing, or broken files.
Search the Start menu for «Command Prompt» and select «Run As Administrator.»
Within Command Prompt, type the following command and press Enter:
sfc /scannow
Once completed, run DISM. Type the following command, followed by the Enter key:
DISM /Online /Cleanup-Image /RestoreHealth
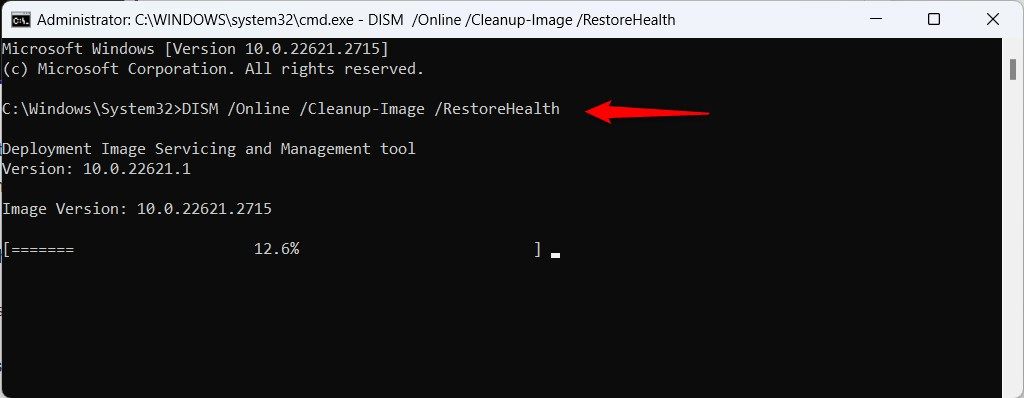
Close Command Prompt once the process is completed, and check if you can successfully open Notepad.
8. Perform a Clean Boot
Background services can interfere with Windows processes, causing Notepad to not open. To resolve this issue, perform a clean boot of Windows, which only runs crucial apps and services.
Once done, see if Notepad opens as usual. If it does, it likely means that an interfering service or third-party app is to blame. Boot your computer as normal, then disable your non-essential startup services and programs in turn to identify the culprit.
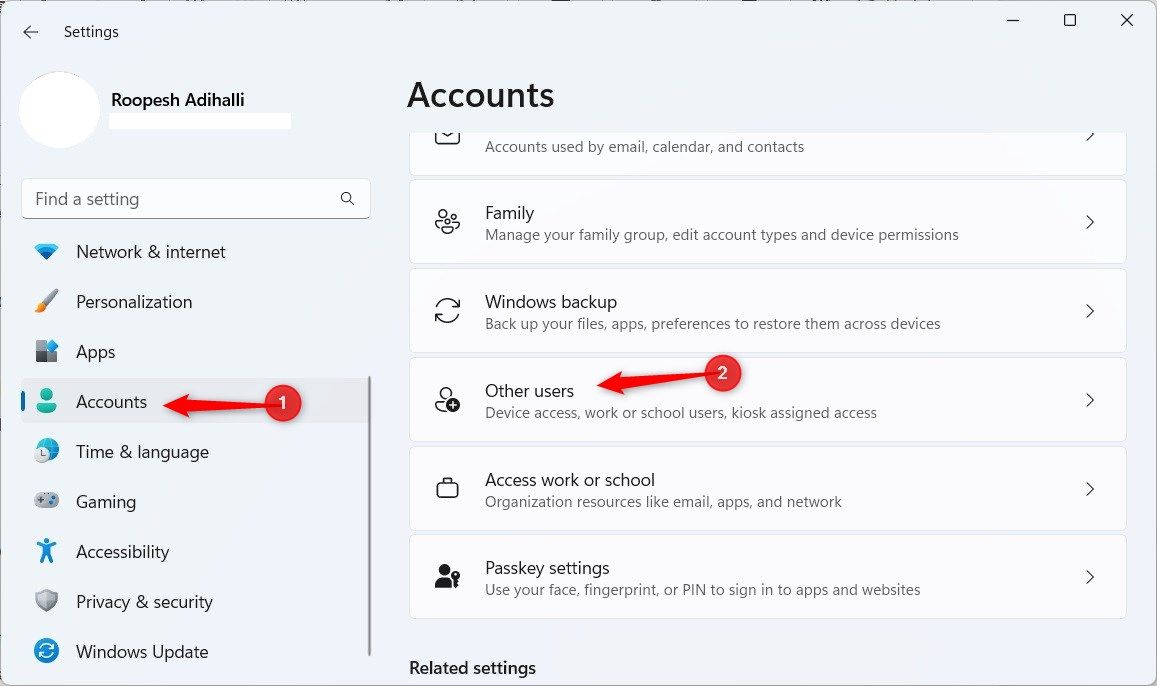
9. Use Another User Account
Notepad may be failing for your account only, so consider switching to another user account. If you don’t have one, it’s easy to create a new account. Press Win+i to open Settings, go to Accounts > Other Users, and select «Add Account.»
10. Use Notepad Alternatives
If Notepad is still not opening, it might be time to try a different text editor. There are plenty of great Notepad alternatives, including Sublime Text, Vim, and Notepad++.
Despite its age, Notepad remains an excellent tool for note-taking. Microsoft has been consistently updating Notepad for Windows 11 with many useful features to aid productivity, such as automatic file save and the addition of tabs.
Microsoft представила новую версию Блокнота для Windows 11. Новый Блокнот выглядит по-другому и имеет интерфейс с вкладками. Хотя новое приложение «Блокнот» для Windows 11 полезно, многие пользователи сталкиваются с проблемами при его использовании.
Недавно многие пользователи Windows 11 заявили, что Блокнот не открывается. По словам пользователей, открытие приложения «Блокнот» из поиска Windows или меню «Пуск» ничего не дает. Если у вас также возникла проблема с тем, что Блокнот не открывается в Windows 11, узнайте, что вы можете сделать, чтобы решить эту проблему.
1. Перезагрузите компьютер с Windows 11.

Первое, что вам нужно сделать, чтобы решить проблему, с которой Блокнот не открывается, — это перезагрузить компьютер. Иногда из-за ошибок и сбоев приложение «Блокнот» может не открываться на вашем устройстве.
Вы можете устранить такие временные ошибки и сбои, просто перезагрузив компьютер с Windows 11. Чтобы перезапустить Windows 11, нажмите кнопку «Пуск» Windows 11 > Меню питания . В меню питания выберите «Перезагрузить» .
Либо нажмите клавишу ALT + F4 на экране рабочего стола. Откроется меню выключения; выберите «Перезагрузить» в раскрывающемся списке и нажмите «ОК». Это немедленно перезагрузит ваш компьютер с Windows 11.
После перезагрузки снова откройте приложение «Блокнот». На этот раз вы можете без проблем использовать текстовый редактор.
2. Перезапустите процесс Проводника Windows.
Проводник Windows не имеет прямой связи с Блокнотом в Windows 11, но этот процесс может мешать работе многих приложений. Если Проводник Windows не отвечает, независимо от того, как часто вы пытаетесь это сделать, приложения не запускаются или не отвечают.
Перезапуск процесса Проводника Windows помог многим пользователям решить проблему, с которой Блокнот не открывается в Windows 11. Итак, прежде чем попробовать следующие методы, выполните следующие действия, чтобы перезапустить Проводник Windows в Windows 11.
1. Введите «Диспетчер задач» в поиске Windows 11. Затем откройте приложение «Диспетчер задач» из списка соответствующих приложений.

2. Когда откроется диспетчер задач, перейдите на вкладку «Процессы» .

3. Найдите и щелкните правой кнопкой мыши Проводник Windows . В контекстном меню выберите «Перезапустить» .

3. Закройте альтернативные приложения Блокнота.
Если вы используете другие инструменты обработки текста, такие как Notepad++ или аналогичные приложения, лучше закрыть их и попробовать.
Как только вы обнаружите, что какая-либо альтернатива Блокноту работает в фоновом режиме, щелкните правой кнопкой мыши приложение и выберите « Завершить задачу» . После закрытия подобных приложений снова запустите приложение «Блокнот» из поиска Windows 11.
4. Запустите Блокнот из папки System32/SysWOW64.
Если вы не можете запустить Блокнот из контекстного меню, поиска Windows или любым другим способом, необходимо запустить его из папки System32 . Если вы используете 32-битную ОС, вам необходимо добраться до папки System32.
Пользователи 64-разрядных компьютеров должны перейти в папку SysWOW64 на установочном диске ОС.
1. Откройте проводник на компьютере с Windows 11. Теперь перейдите по этому пути:
C:\WINDOWS\System32


3. Найдя приложение «Блокнот», дважды щелкните его, чтобы запустить.
5. Выполните чистую загрузку
Возможно, фоновые службы и процессы не позволяют открыть Блокнот на вашем компьютере. Если это проблема, вам необходимо выполнить чистую загрузку.
Если Блокнот открывается после чистой загрузки, вам необходимо найти и устранить проблему, конфликтующую с Блокнотом. Вот что вам нужно сделать.
1. Нажмите кнопку Windows Key + R , чтобы открыть диалоговое окно «Выполнить». Когда откроется диалоговое окно «Выполнить», введите msconfig.msc и нажмите Enter.
2. В конфигурации системы переключитесь на Службы .

3. Установите флажок «Скрыть все службы Microsoft» и нажмите «Отключить все» .

4. Откройте диспетчер задач и перейдите на вкладку «Автозагрузка». Щелкните правой кнопкой мыши программы запуска и выберите «Отключить» .

5. После внесения изменений перезагрузите компьютер.
Это выполнит чистую загрузку. Теперь вам нужно проверить, открывается ли Блокнот; если он откроется, вам нужно найти и удалить конфликтующую программу.
6. Обновите Windows 11.

Если Блокнот по-прежнему не открывается на вашем компьютере, вам следует обновить компьютер. Поддерживать актуальность Windows 11 очень важно, поскольку она содержит множество новых функций, исправлений безопасности и исправлений ошибок.
Постоянное обновление операционной системы и приложений — хорошая практика, и вам следует сделать это привычкой. Скорее всего, Windows 11 не может открыть Блокнот только из-за ошибки или сбоя на системном уровне.
Итак, откройте приложение «Настройки» в Windows 11 и перейдите в «Центр обновления Windows» > «Проверить наличие обновлений» . Будут загружены и установлены все ожидающие обновления Windows 11.
7. Запустите команду SFC и DISM.
Windows 11 не открывает Блокнот. Проблема также может возникнуть из-за повреждения системных файлов. Вы можете исправить все поврежденные системные файлы, выполнив команды SFC/DISM. Вот команды, которые вам нужно использовать.
1. Введите «Командная строка» в кнопке «Пуск» Windows 11. Щелкните правой кнопкой мыши приложение CMD и выберите «Запуск от имени администратора» .

2. Когда откроется командная строка, введите sfc /scannow и нажмите Enter.

3. Если команда SFC возвращает ошибку, выполните эти команды по отдельности.
DISM /Online /Cleanup-Image /CheckHealth DISM /Online /Cleanup-Image /ScanHealth DISM /Online /Cleanup-Image /RestoreHealth

После выполнения всех этих команд перезагрузите компьютер с Windows 11. Это должно решить проблему, с которой Блокнот не открывается в Windows 11.
8. Восстановите или перезагрузите приложение «Блокнот».
Поскольку «Блокнот» является собственным приложением, вы можете его восстановить или сбросить, если он не работает. Вот как восстановить или сбросить настройки приложения «Блокнот» на компьютере с Windows 11.
1. Нажмите кнопку «Пуск» Windows 11 и выберите «Настройки» .

2. Когда откроется приложение «Настройки», перейдите в раздел «Приложения» > «Установленные приложения» .


4. Нажмите на три точки рядом с блокнотом и выберите «Дополнительные параметры» .

5. На следующем экране нажмите кнопку «Восстановить» .

6. После завершения восстановления запустите Блокнот. Если восстановление не помогло, нажмите кнопку «Сбросить» .

9. Переустановите приложение «Блокнот».
Если до сих пор ничего не помогло вам исправить «Блокнот», который не открывается в Windows 11, последний вариант — переустановить приложение «Блокнот». Вот как можно переустановить приложение «Блокнот» в Windows 11.
1. Нажмите «Поиск Windows 11» и введите «Дополнительные функции». Затем откройте дополнительные функции в разделе «Результаты лучшего совпадения».

2. Теперь найдите Блокнот (система). Разверните его и нажмите « Удалить» .

3. После удаления нажмите кнопку «Просмотреть функции» в разделе «Добавить дополнительные функции».


5. Выберите Блокнот (системный) и нажмите « Далее» .
6. На следующем экране нажмите кнопку «Установить» .

Еще несколько вещей, которые вы можете сделать, чтобы решить проблему, когда Блокнот не открывается в Windows, — это восстановить операционную систему до предыдущей точки. Вы можете сделать это, если у вас есть точки восстановления системы в Windows 11 . Альтернативно, перезагрузка компьютера с Windows 11 является последним вариантом.
Блокнот, который не открывается в Windows 11, может расстраивать, особенно если вам нужны инструменты обработки текста. Однако вы можете воспользоваться нашими общими методами, чтобы легко решить проблему, с которой Блокнот не открывается в Windows 11. Сообщите нам, какой метод помог вам исправить «Блокнот», который не открывается в Windows 11.
Похожие статьи:
Время на прочтение4 мин
Количество просмотров5.5K
Журналисты Windows Latest рассказали, как восстановить классическую версию «Блокнота» в Windows 11 24H2 без функций искусственного интеллекта с помощью нескольких настроек.

Шаг 1. Проверьте, установлен ли на ПК классический «Блокнот».
Для этого нужно открыть приложение «Параметры», нажать «Система» и прокрутить экран вниз, чтобы найти «Дополнительные функции».

В поле поиска потребуется ввести «Блокнот».

Если приложение не установлено, то требуется нажать «Просмотр функций» в меню «Добавить дополнительную функцию» вверху. После этого можно найти «Блокнот» и установить его.
Шаг 2. Удалите связь notepad.exe с новым «Блокнотом».
Чтобы убедиться, что notepad.exe перенаправляется на старый «Блокнот», нужно внести изменения в псевдонимы выполнения приложений. Для этого потребуется:
-
щёлкнуть меню «Приложения» в «Параметрах»;
-
открыть «Дополнительные параметры приложения» и нажать «Псевдонимы выполнения приложений»;


-
прокрутить страницу вниз до Store Notepad и выключить переключатель.

Теперь старый «Блокнот» стал приложением по умолчанию для notepad.exe. Чтобы проверить это, можно открыть диалоговое окно «Выполнить», нажав клавиши Windows + R. Затем нужно ввести «notepad».

Шаг 3. Добавьте ассоциацию файла .txt к устаревшему «Блокноту».
Для этого потребуется:
-
открыть диалоговое окно «Выполнить» (Win + R), ввести «regedit» и нажать Enter;

-
нажать «Да», когда появится всплывающее окно с вопросом, стоит ли разрешить этому приложению вносить изменения в раздел;
-
скопировать путь «HKEY_LOCAL_MACHINE\SOFTWARE\Classes\txtfilelegacy» и вставить его в адресную строку. Нажать Enter, и слева появится папка «txtfilelegacy»;


-
щёлкнуть правой кнопкой мыши по папке; в опции «New» выбрать «Key»;

-
назвать новый ключ «Shell». Он содержит команды, связанные с типом файла .txt;

-
кликнуть правой кнопкой мыши «Shell», навести указатель мыши на опцию «New» и выбрать «Key»;

-
назвать его «Open». Цель этого ключа — указать действие, которое следует выполнить при открытии файла типа .txt;

-
чтобы задать команду для выполнения при открытии файла .txt, нужно щёлкнуть правой кнопкой мыши ключ «Open», выбрать «New», затем «Key». Переименовать ключ в «Command»;

-
дважды кликнуть значок с (по умолчанию) на панели ключей «Command»;
-
появится всплывающее меню. В текстовой области под «Значение:» нужно вставить следующее: «c:\windows\system32\notepad.exe». Затем добавить пробел и ввести «%1», как показано на изображении ниже. Нажать «ОК»;

-
значение по умолчанию для клавиши Command установлено на «c:\windows\system32\notepad.exe %1». Таким образом, ПК теперь будет открывать устаревший «Блокнот» (notepad.exe) с выбранным файлом («%1») в качестве параметра при открытии файла .txt.
Шаг 4. Сделайте классический «Блокнот» приложением по умолчанию для открытия файлов .txt.
Для этого потребуется:
-
создать случайный текстовый документ в «Блокноте» и сохранить его. Это можно сделать как в старой, так и в новой версии;
-
закрыть приложение. Щёлкнуть правой кнопкой мыши по текстовому файлу. Выбрать «Открыть с помощью» и нажать «Выбрать другое приложение»;

-
появится меню, предлагающее выбрать между старой и новой версиями «Блокнота». При выборе старой потребуется нажать «Всегда».

Теперь, если дважды кликнуть по файлу .txt, то он будет открываться в классическом «Блокноте». Но даже в этом случае нужно будет искать приложение в командной строке.
Шаг 5. Создайте ярлык в меню «Пуск» для старого «Блокнота».
Для этого:
-
кликаем правой кнопкой мыши по обоям рабочего стола, выбираем «Создать» и нажимаем «Ярлык»;

-
вставляем «файл C:\Windows\System32\notepad.exe» в поле пути. Нажимаем «Далее». Называем ярлык «Блокнот» и нажимаем «Ввод»;

-
нажимаем Win + R, вводим «shell:Common Start Menu». Нажимаем «Ввод»;

-
появится «Проводник» с папкой под названием «Программы». Нужно открыть её по двойному клику;

-
возвращаемся к ярлыку, который создан для «Блокнота». Вырезаем его и вставляем в папку «Программы». Нажимаем «Продолжить»;

-
открываем меню «Пуск», прокручиваем его вниз, до старого «Блокнота». Он получит метку «Новый» внизу.

Теперь можно использовать как новый, так и старый Notepad. Однако текстовые файлы будут открываться непосредственно в старой версии.

Как вернуть новый «Блокнот»?
Тем, кто захочет пересмотреть установку «Блокнота», может потребоваться восстановить версию по умолчанию в Windows 11.
Для этого нужно:
-
перейти в «Проводник» и вставить в адресную строку следующий путь: «C:\ProgramData\Microsoft\Windows\Start Menu\Programs». Это откроет папку «Программы», в которую скопировали старый ярлык «Блокнота». Его нужно удалить;

-
нажать Win + R, ввести regedit и нажать Enter. В адресной строке редактора реестра вставить путь: «HKEY_LOCAL_MACHINE\SOFTWARE\Classes\txtfilelegacy». Затем удалить подраздел «Open»;
-
открыть приложение «Параметры» и перейти в раздел «Приложения». Выбрать «Дополнительные параметры приложения» и открыть «Псевдонимы выполнения приложений». Включить переключатель «Блокнот».
Между тем Microsoft выпустила обновление для «Блокнота» с поддержкой функции Rewrite во всех регионах. Это опция, которая использует ChatGPT для перефразирования контента, настройки тона и изменения длины текстов. Функция Rewrite работает только при наличии подписки на Microsoft 365 Personal и Family.
Ever since incepting the market back in 1983 to popularize the computer mouse in MS-DOS at the time, the Notepad application in Windows has come a long way in its life cycle. While the application continues to be the default plain text editor on the Windows platform, it sometimes runs into issues that prevent it to operate properly.
So, if you are someone who is experiencing the Notepad not working in Windows 11 issue on your PC or laptop, we have got you covered! In this in-depth fix guide, we have listed some of the best solutions that you can try when the Windows Notepad application stops working on your Windows 11 device. Check them out right below.
Fix Notepad Not Working in Windows 11
Now, below you will find the top fixes for the Notepad not working in Windows 11 issue. Try them out on your Windows 11 PC or laptop one by one until one of them works and you are able to get the Notepad application up and running on your device again.
1. Restart Your Windows 11 PC or Laptop
This is the most generic solution when you face an issue on PCs and laptops and more often than not, it does work! So, when you see that the Notepad application is not opening on your Windows 11 PC or laptop, give your device a quick restart. There is a chance that a background app or process is creating conflicts for the Notepad app and preventing it to operate properly.
A restart essentially force-closes all opened applications and background processes and clears out the RAM of your device. Hence, restarting your Windows 11 PC or laptop could surely fix the Notepad app and get it up and running on your device. Give it a go right away and check whether the issue is fixed or not. If it persists, proceed to the next fix.
2. Use the Command Prompt to Open Notepad in Windows 11
Now, if you are trying to open the Notepad app in Windows 11 through traditional methods and it is not working, you can try using the handy Command Prompt tool in Windows 11 to launch the application. Follow the steps right below to launch Notepad via Command Prompt in Windows 11:
1. Use Windows + S to open Windows search and search for cmd.
2. Once the Command Prompt tool shows up in the search results, click the Run as administrator button.

3. Click Yes on the following Windows Security prompt.
4. Now, simply type “notepad” (without quotes) within the tool and press Enter.
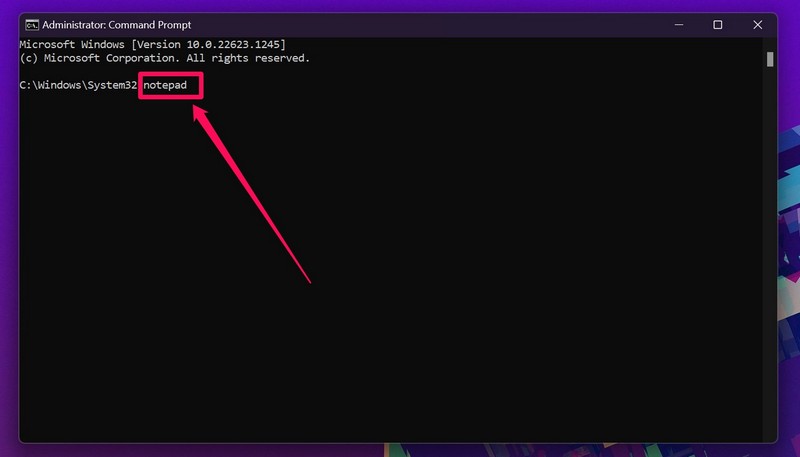
After entering the above command and pressing Enter, if the Notepad application does not open in Windows 11, proceed to the next solution right away!
3. Repair/ Reset Notepad in Windows 11
The next thing you can try to fix the Notepad not working in Windows 11 issue on your PC or laptop is to repair or reset the Notepad application. Repairing or resetting an application often fixes minor issues and glitches that might be causing it to malfunction in Windows 11.
Hence, if you repair and/ or reset the Notepad app on your device, there is a high chance that it will be fixed. So, to repair or reset Windows Notepad in Windows 11, follow the steps right below:
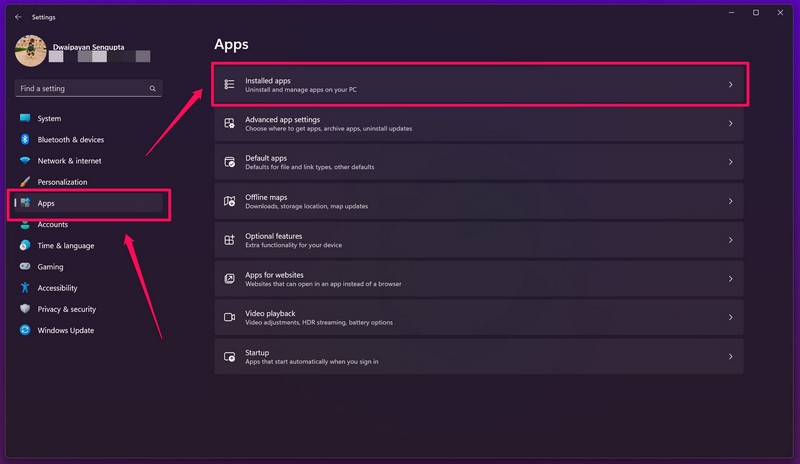
1. Use Windows + I to launch the Settings app in Windows 11.
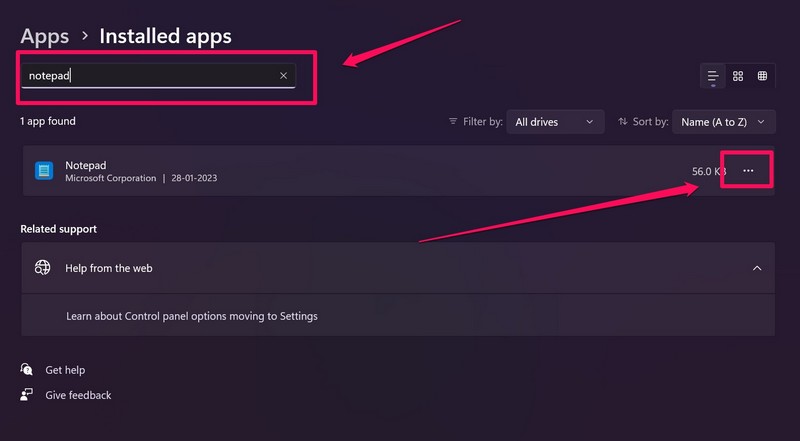
2. Under the Apps tab, go to the Installed apps menu.
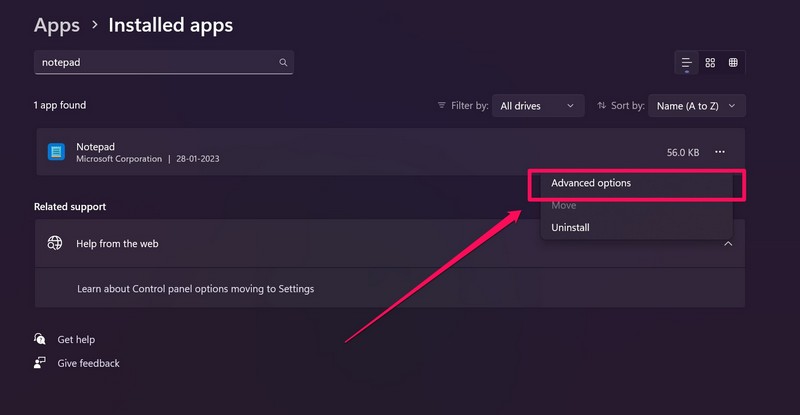
3. Use the search bar to find Notepad and click the three-dot button beside it.
4. Click the Advanced options button on the context menu.
5. Scroll down to the Reset section and click the Repair button first.
6. Wait for the Repair process to complete.
7. Following completion, check whether the Notepad app is opening or not.
8. If it does not open, use the above steps to go to the Advanced options page for the Notepad app and click the Reset button.
9. After resetting the Notepad application, restart your Windows 11 PC or laptop.
Following the restart, launch the Notepad application on your Windows 11 device and check whether it is opening and working properly or not. If, unfortunately, the issue persists, move on to the next fix.
4. Re-Install Windows Notepad in Windows 11
If the reset trick did not work and you are still stuck with the Notepad not working issue on your Windows 11 laptop or PC, your next option is to reinstall the application. You see, after the introduction of the Microsoft Store, Microsoft added some of its legacy apps, including the Notepad app, to its digital marketplace.
The move allowed Microsoft to push standalone updates for these apps regularly without bundling them with Windows updates and patches. The point of this is that you can easily uninstall the Notepad application on your Windows 11 and get it back from the Microsoft Store right away. So, to re-install the Notepad app in Windows 11, use the following steps:
1. Use Windows + S to open Windows search in Windows 11.
2. Search for the Notepad app and right-click on it to open the context menu.
3. Click the Uninstall option on the context menu.
4. Click the Uninstall button on the following prompt to confirm your action. It will be uninstalled from your device immediately.
5. Now, open the Microsoft Store app on your Windows 11 laptop or PC.
6. Use the search bar above to search for Notepad and press Enter.

7. Click on the Windows Notepad (Free) app listing to open it.
8. Click the Get button at the top right to install the app on your Windows 11 device.
9. Wait for the download and installation process to complete.
10. Now, click the Open button to launch the Notepad app in Windows 11.

Re-installing the Notepad application could fix bugs and glitches that affect the performance of the application in Windows 11. So, after the re-installation of the Notepad app, it should work fine.
If, however, the app does not open after the re-installation, check out the next fix.
5. Set Notepad as the Default App for Text Files in Windows 11
Now, the if you have the Notepad app installed on your device and it is not set as the default app for .txt files, it might cause some issues on your Windows 11 device. So, setting the Notepad app as the default text editing program on your Windows 11 device may fix the issue you are facing, although the chances are low.
Nonetheless, it is always better to try than not try and regret it, right? So, to set Notepad as the default text editor in Windows 11, follow the steps right below:
1. Use Windows + I to open the Settings app in Windows 11.
2. Go to the Apps tab on the left pane and click the Default apps option.
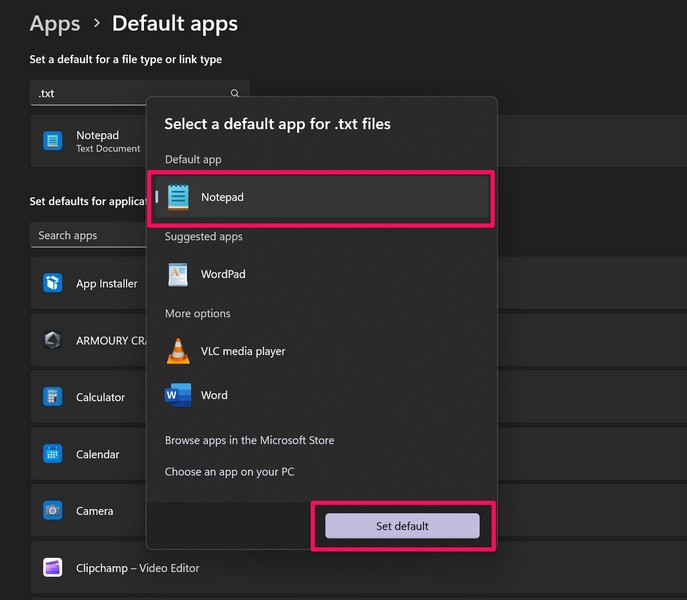
3. Now, use the search bar below the Set a default for a file type or link type and search for .txt.
4. If the default application for .txt files is not set to Notepad on your device, click on the option.
5. Choose Notepad from the provided list of applications and click the Set default button below.
After setting the Notepad app as the default program for opening text documents in Windows 11, check whether the Notepad not working in Windows 11 issue has been fixed or not. Proceed to the next fix, if the issue persists.
6. Run SFC Scan in Windows 11
Now, the Notepad app not working in Windows 11 issue can be caused by missing or corrupt system files on your device. In this case, the SFC scan or the System File Checker scan is the best option you got. The SFC scan is essentially a command-line tool that scans all your system files and replaces the ones that have gone missing or have become corrupt.
Hence, running this scan often fixes system issues such as the one you are experiencing right now. So to run an SFC scan in Windows 11 and fix the Notepad application, follow the steps right below:
1. Use Windows + S to open Windows search and search for cmd.
2. On the search results page, click the Run as administrator button for the Command Prompt tool.
3. Click Yes on the following Windows Security prompt.
4. Once the Command Prompt tool launches, type in the following command and press Enter:
sfc /scannow
5. Wait for the scan to complete.
6. Restart your Windows 11 PC or laptop.
Following the restart, launch the Notepad app on your Windows 11 PC or laptop and check whether the issue has been fixed or not. If it is not yet fixed, proceed to the next one.
7. Run DISM Scans in Windows 11
The DISM or Deployment Image Servicing and Management scans are a few command-line tools that scan and fix issues in the disk images on your Windows 11 device. These scans, much like the SFC scan, often fixes system issues and issues in system applications like the Notepad app.
Follow the steps right below to run the DISM scans on your Windows 11 PC or laptop to fix the Notepad app not working issue:
1. Press Windows + S to use Windows search and find the Command Prompt tool.
2. Run the Command Prompt tool as administrator on your device.
3. Click Yes on the Windows Security prompt.
4. Once the tool opens up, type in the following commands and press Enter one by one:
DISM /Online /Cleanup-Image /CheckHealthDISM /Online /Cleanup-Image /ScanHealthDISM /Online /Cleanup-Image /RestoreHealthNote: Do not run the above scans simultaneously in Command Prompt. Initiate the first scan and move on to the next ones only when the previous one gets completed.

5. After all the DISM scans, restart your Windows 11 PC or laptop.
Following the restart, launch the Notepad app on your Windows 11 PC or laptop and check whether it is opening and working properly or not. If it does not work, proceed to the next fix.
8. Check for Viruses/ Malware in Windows 11
The next option that we have got that can help you fix the Notepad not working in Windows 11 issue on your device is to scan for viruses or malware. Digital threat actors like viruses or malware can get into your system without your knowledge and can cause issues for system applications like Notepad, File Explorer, and others.
Hence, at this point, you should use the built-in Windows Security tool to check for viruses or malware that might be preventing the Notepad app to run on your device. Use the steps below to do it:
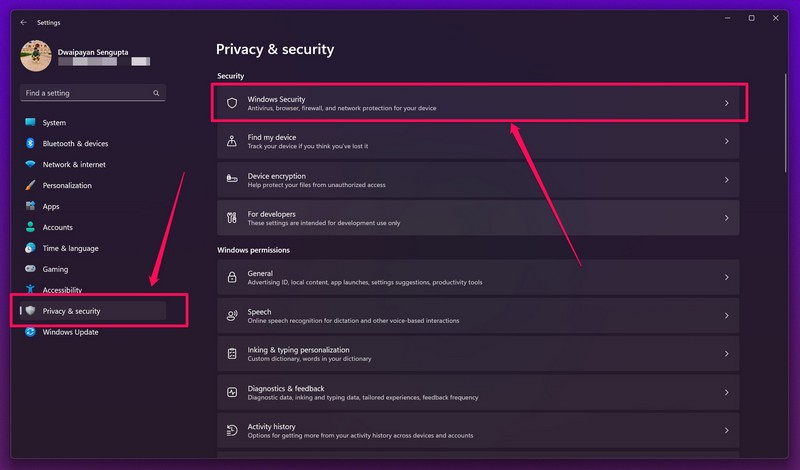
1. Launch the Settings app in Windows 11 by pressing Windows + I.
2. Under the Privacy and security tab, click the Windows Security option.
3. Next, click the Virus and threat protection tool on the list.
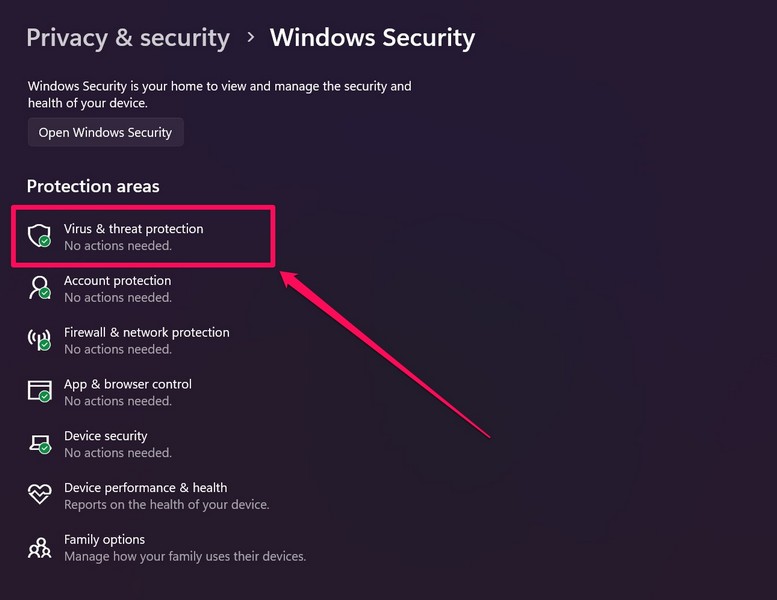
4. On the following page, click the Quick scan button to initiate the scan.
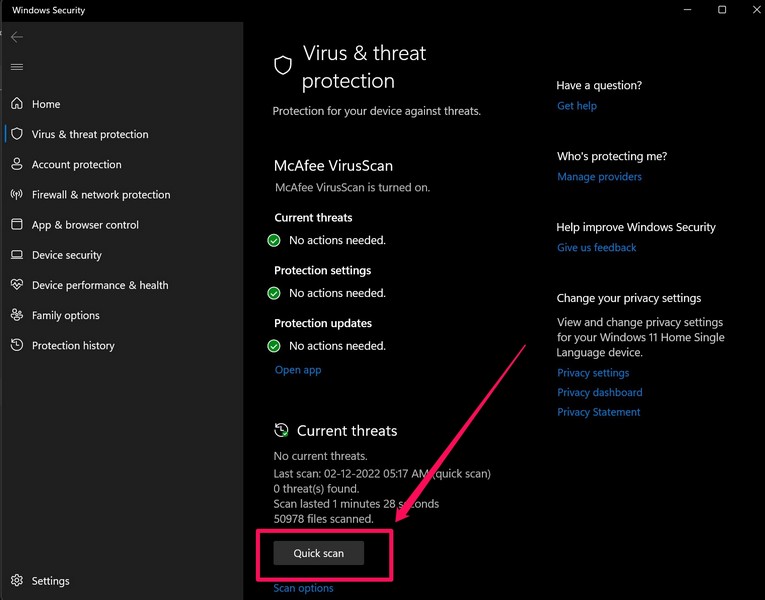
5. Wait for the scan to complete.
Now, after the scan is completed, if the Windows Security tool finds threat actors, it will ask you to delete or uninstall third-party programs that contain the threat actors. Delete those applications from your PC or laptop and give it a quick restart. Following the restart, launch the Notepad app on your Windows 11 device and check whether the issue has been fixed or not.
9. Check for Windows 11 Updates
An outdated Windows version is another possible factor that can cause the Notepad app not working issue in Windows 11. Unusual bugs and glitches in Windows 11 often create issues for system applications and lead them to malfunction. So, to update the Windows version on your Windows 11 PC or laptop and hopefully fix the Notepad not working issue, follow the steps right below:
1. Use Windows + S to launch the Settings app in Windows 11.
2. Go to the Windows Update tab from the left pane and click the Check for updates button.

3. Once the latest available updates show up, click the Download and install button.
4. Wait for the updates to get installed on your device.
5. After completion, restart your Windows 11 laptop or PC.
Following the restart, launch the Notepad app on your updated Windows 11 PC or laptop and check whether it is opening or not. If a Windows bug was causing it to malfunction on your device, it should be fixed at this point.
10. Use a Local User Account to Run Notepad in Windows 11
Now, if the above methods did not help you fix the Notepad not working in Windows 11 issue on your PC or laptop, you can try creating a local user account in Windows 11 to use the app.
You see, minor issues with the current Microsoft account that you are currently using to log into Windows might cause system apps like Notepad to malfunction. So, to create a local user account in Windows 11, follow the steps right below:
1. Press Windows + I to launch the Settings app in Windows 11.
2. Under the Accounts tab on the left pane, click the Family and other users option.
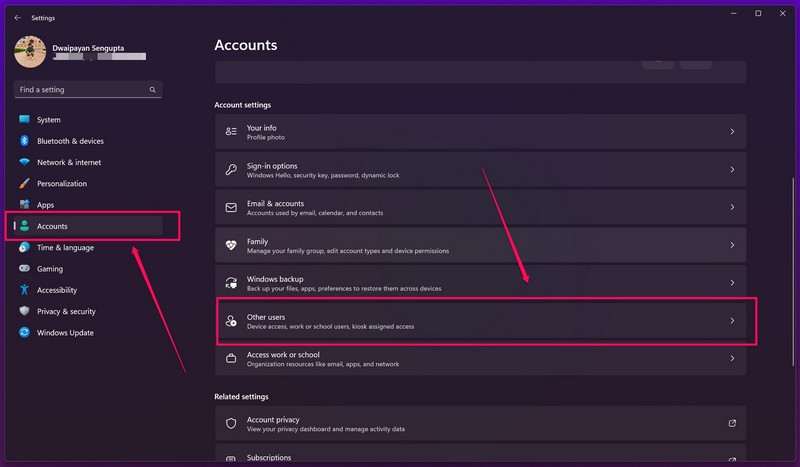
Note: The option might also be listed as Other users.
3. On the following page, click the Add account button.
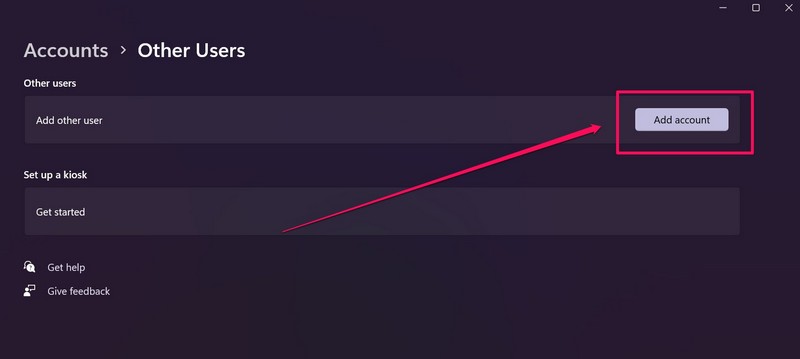
4. Once the sign-in prompt opens up, click the I don’t have this person’s sign-in information option.
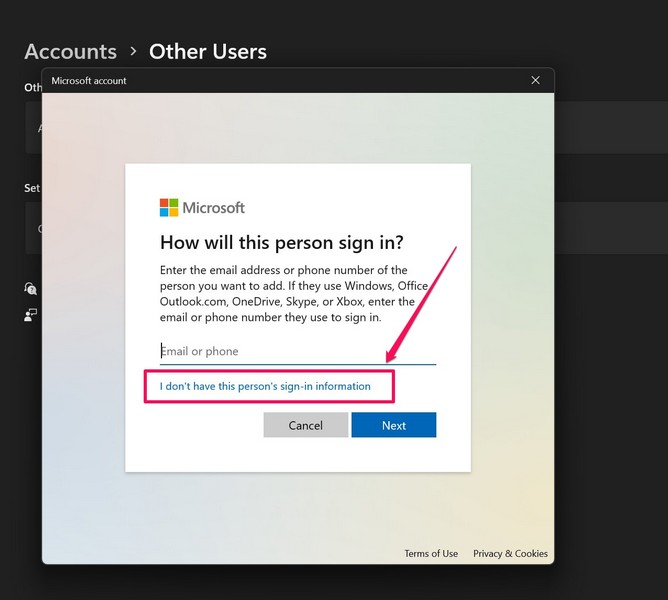
5. Next, choose the Add a user without a Microsoft Account option.
6. Then, follow the on-screen instructions to set up your local user account in Windows 11. Be sure to enable administrative privileges for the newly-created account to allow the transfer of files and data from your primary account to this one.
Now that you have created a local user account on your Windows 11 PC or laptop, the Notepad app should be fixed at this point. However, you will have to use the local user account to launch and use the Notepad app on your Windows 11 PC or laptop.
11. Use Notepad Alternatives in Windows 11
Now, this is not a solution for the Notepad not working issue in Windows 11 but an alternative. If you tried out all the above fixes on your device but could not get the Notepad app up and running again, you can try using alternative apps with features similar to the Notepad app in Windows 11.
You see, there are a ton of text editor applications available on the internet as well as on the Microsoft Store that you can use on your device instead of Notepad. Check out some of the best Notepad alternatives listed right below:
- EditPad Lite
- Notepad++
- Atom
- Get Diz
- Emacs
- QOwnNotes
- PSPad
- gedit
- Sublime Text
- Kate
- Vim
FAQs
From where can I get the Notepad app in Windows 11?
The Windows Notepad app is listed on the Microsoft Store and can be easily downloaded and/ or updated by users from the said digital marketplace.
How to open the Notepad app in Windows 11?
There are many ways to open or launch the Notepad app on your Windows 11 PC or laptop. You can use Windows search (Windows + S) to find and launch the Notepad app or even use the Command Prompt tool to open it on your Windows 11 device.
Why is the Notepad app not opening on my Windows 11 laptop?
There can be various reasons why the Notepad application is not opening or launching on your Windows 11 laptop or PC. Some of the common ones include bugs or glitches in the app itself, outdated Windows versions, misconfigured settings, and a few others.
Wrapping Up
So, this was all about fixing the Notepad application not working in Windows 11 issue. We hope one of the above methods works for you and that you are able to get the Notepad app up and running on your Windows 11 laptop or PC in no time.
If one of the above fixes did solve the issue on your device, do let us know about it in the comments. You can also check out other in-depth fix guides like this one on a range of Windows 11 issues from right here!
Все способы:
- Способ 1: Поиск в меню «Пуск»
- Способ 2: Пустой текстовый документ
- Способ 3: Утилита «Выполнить»
- Способ 4: «Диспетчер задач»
- Способ 5: Значок в меню «Пуск»
- Способ 6: «Терминал Windows» или «Командная строка»
- Способ 7: Ярлык быстрого доступа
- Способ 8: Пункт в контекстном меню «Проводника»
- Изменение приложения по умолчанию
- Вопросы и ответы: 0
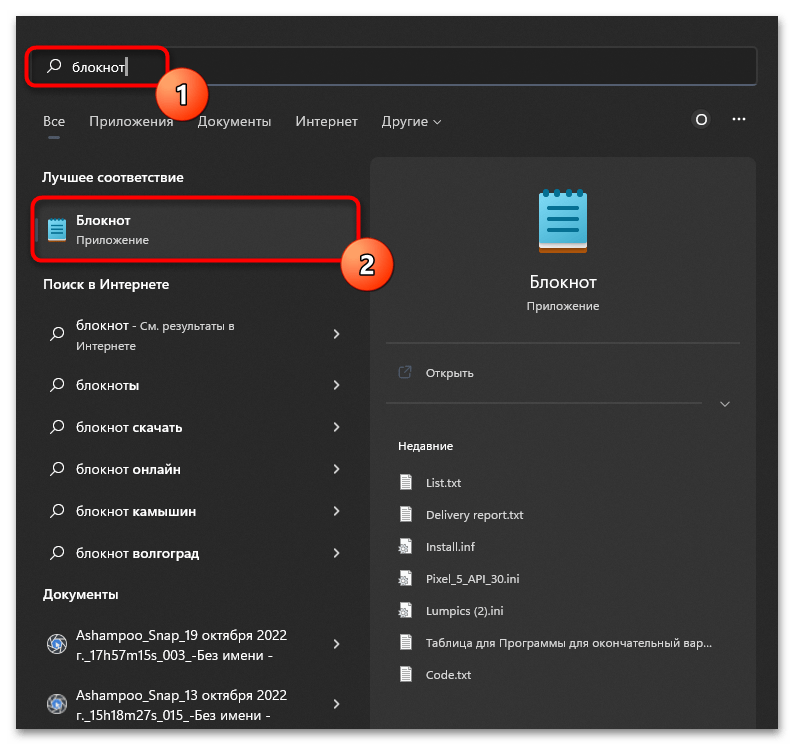
Способ 1: Поиск в меню «Пуск»
Приложение «Блокнот» установлено в Windows 11 по умолчанию, поэтому для его открытия не понадобится выполнять каких-то излишних действий. Самый просто способ перейти к текстовому редактору — отыскать его через поиск в меню «Пуск», что осуществляется довольно легко. Понадобится только вызвать это самое меню, активировать строку поиска и ввести в ней запрос. Дождитесь появления соответствия и кликните по нему левой кнопкой мыши для запуска программы.
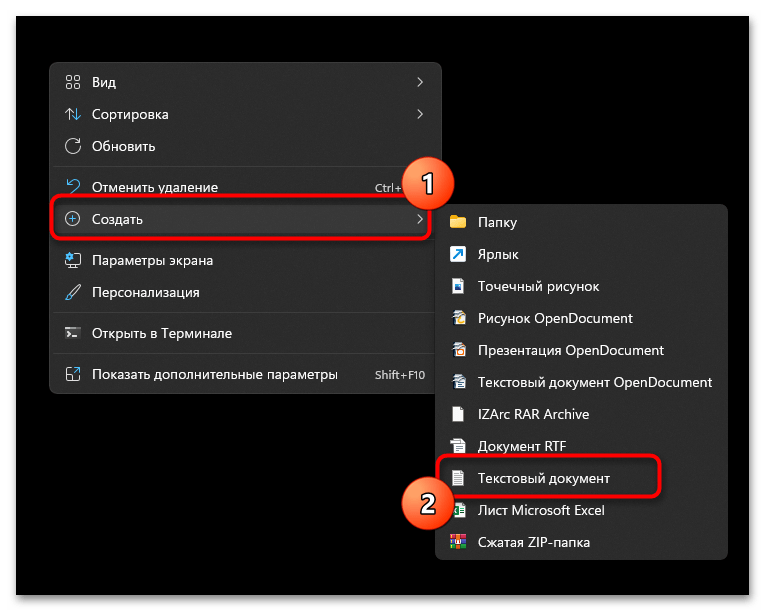
Способ 2: Пустой текстовый документ
Скорее всего, вы хотите открыть «Блокнот» для создания нового текстового документа. Можно пойти другим путем, создав сначала текстовый файл, а затем открыв его через нужное приложение для заполнения содержимого.
- Для этого нажмите правой кнопкой мыши на рабочем столе или в активной папке. В контекстном меню наведите курсор на «Создать» и выберите пункт «Текстовый документ».
- Можете сразу поменять его название или оставить по умолчанию. Дважды кликните по файлу, чтобы открыть его.
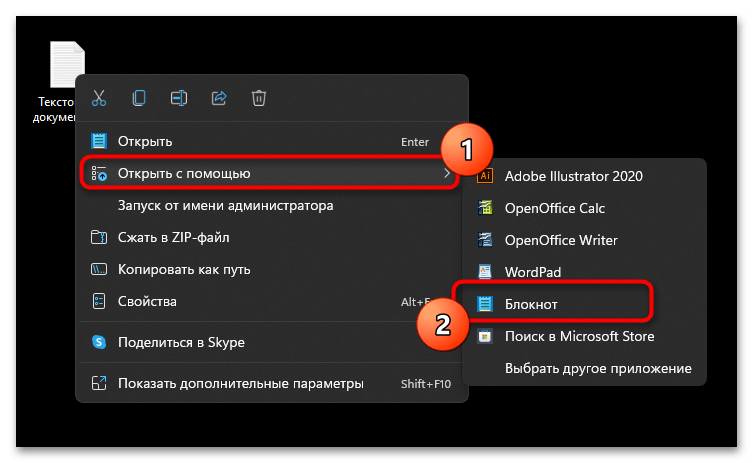
- Если в качестве программы по умолчанию выбран не «Блокнот», понадобится щелкнуть по данному файлу правой кнопкой мыши, навести курсор на «Открыть с помощью» и выбрать соответствующее приложение из списка.
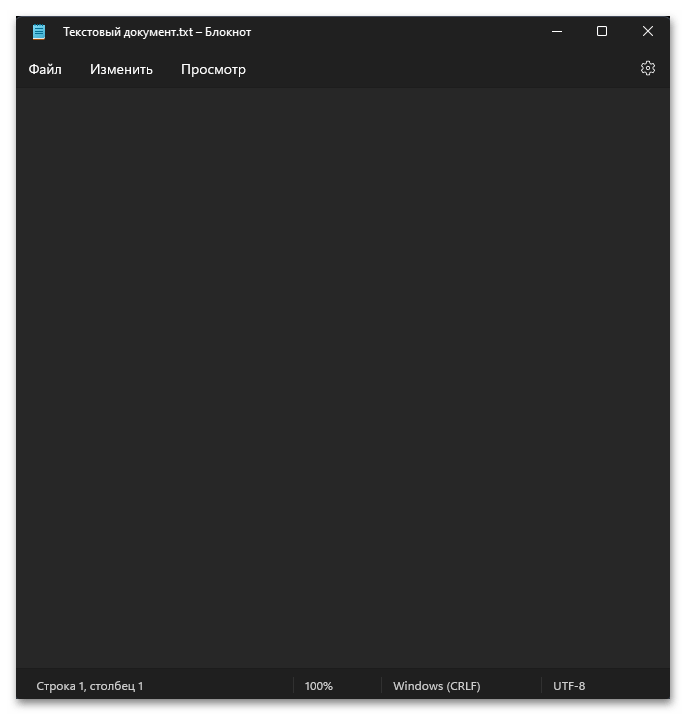
- Как видите, на экране появился пустой текстовый документ. Можете приступать к работе с ним, добавляя необходимое содержимое. По завершении выполните сохранение в требуемом формате и в нужном месте на диске.
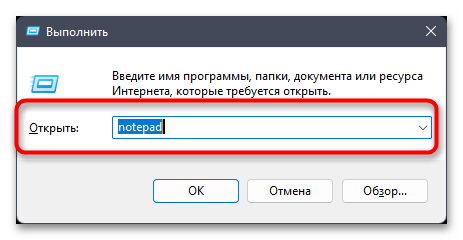
Способ 3: Утилита «Выполнить»
Рассмотрим еще один довольно простой метод выполнения поставленной задачи, подразумевающий ввод команды через стандартную утилиту «Выполнить», чье окно вызывается сочетанием клавиш Win + R. В нем понадобится указать notepad и нажать по клавише Enter, чтобы подтвердить ввод данной команды. Через секунду на экране появится новое окно «Блокнота». Вводите в нем необходимое содержимое и перед выходом не забудьте сохранить новый текстовый документ на компьютере.
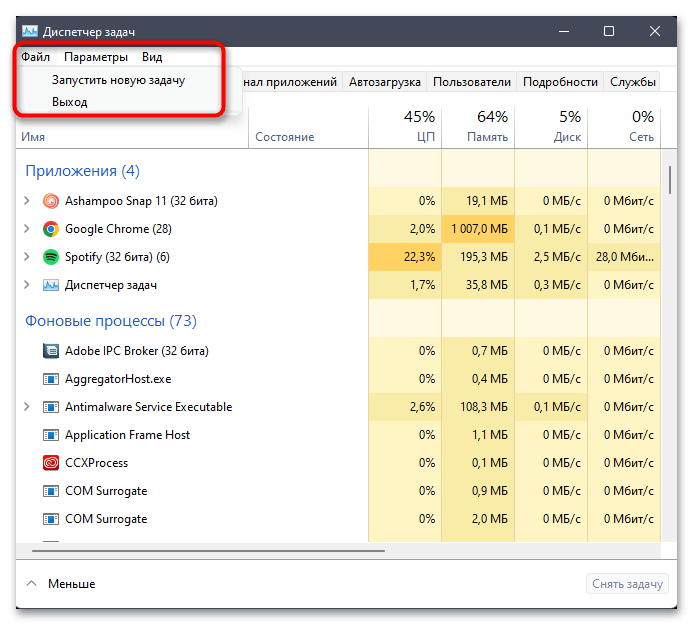
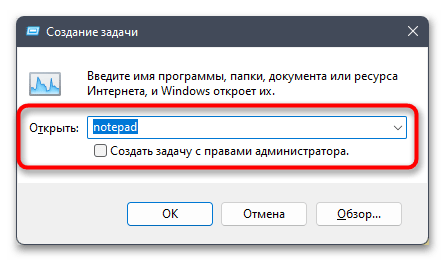
Способ 4: «Диспетчер задач»
Метод с использованием «Диспетчера задач» немного похож на предыдущий, поскольку тоже подразумевает ввод такой же команды. Однако он выполняется сложнее и не всегда будет актуален. Впрочем, можете ознакомиться со следующей инструкцией, а затем уже решать, подходит ли вам такой вариант.
- Щелкните правой кнопкой мыши по меню «Пуск» и из появившегося контекстного меню выберите пункт «Диспетчер задач».
- Вызовите меню «Файл» и нажмите по строчке «Запустить новую задачу».
- Введите команду
notepadи нажмите Enter для запуска данного приложения. - Вы сразу же будете перенаправлены в новый документ, созданный через «Блокнот». Начинайте с ним взаимодействие так, как это было задумано.

Способ 5: Значок в меню «Пуск»
В «Пуске» можно найти список всех стандартных и сторонних приложений, а также закрепить любой из значков для быстрого запуска через стартовое меню. У текстового редактора «Блокнот» тоже есть свой значок, который можно использовать для запуска программы.
- Для начала советуем просто открыть меню «Пуск» и обратить внимание на список закрепленных значков. Если среди них находится «Блокнот, просто кликните по иконке для запуска редактора.
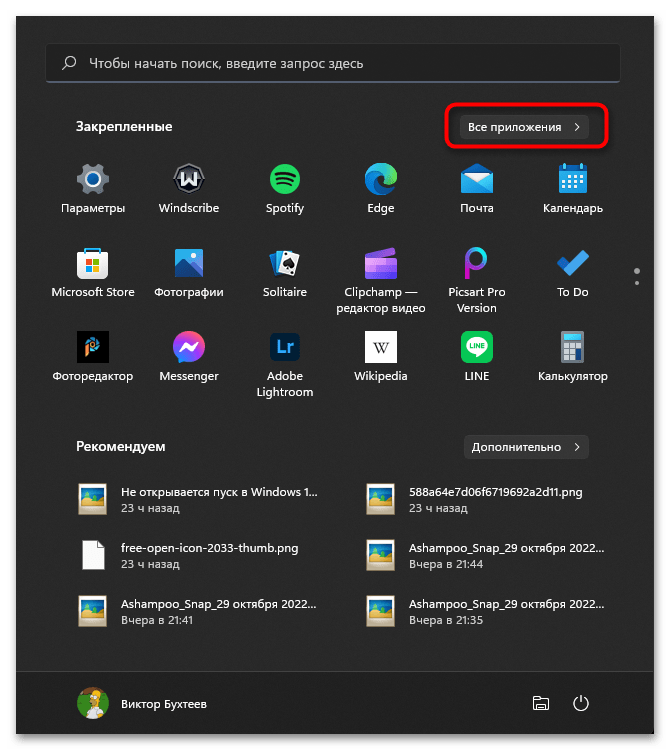
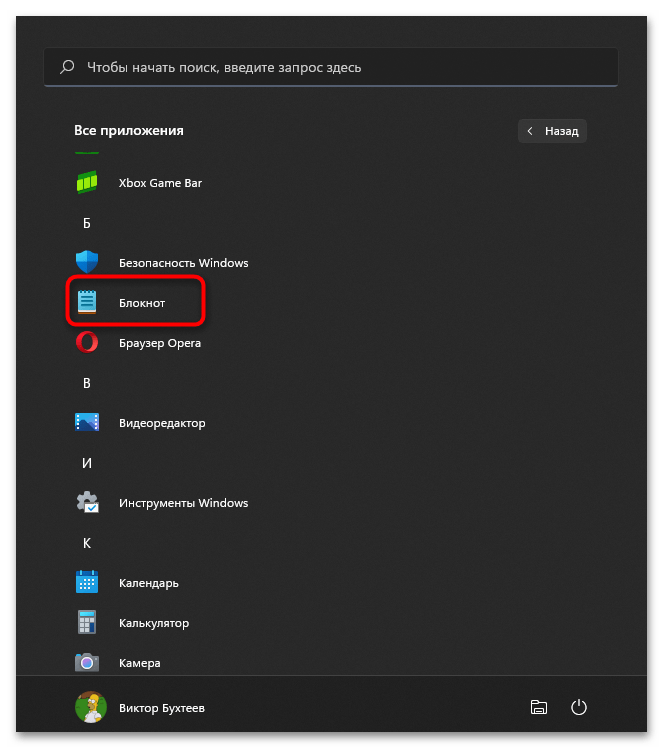
- Если значок отсутствует, разверните список «Все приложения».
- В нем по алфавиту найдите приложение «Блокнот» и щелкните по нему левой кнопкой мыши для запуска.
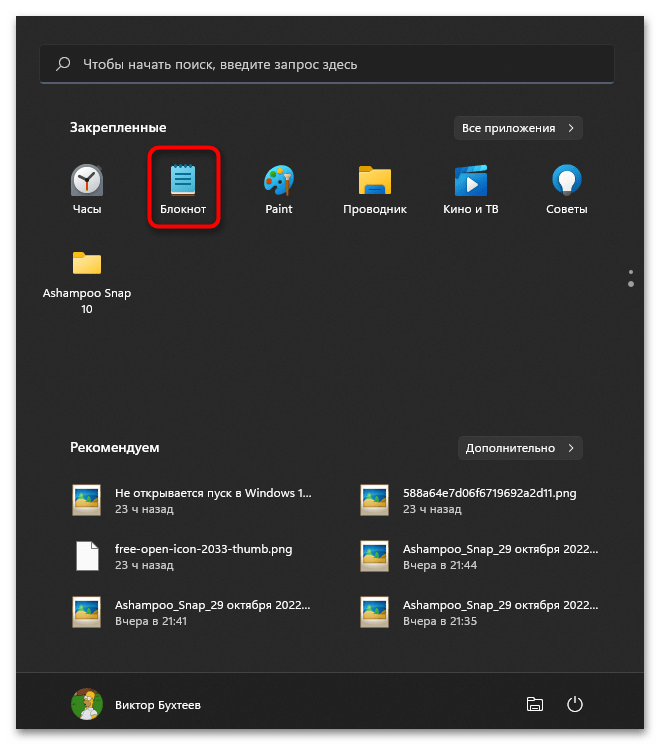
Нажатие правой кнопкой мыши вызывает контекстное меню, через которое приложение можно закрепить на начальном экране «Пуска».
Способ 6: «Терминал Windows» или «Командная строка»
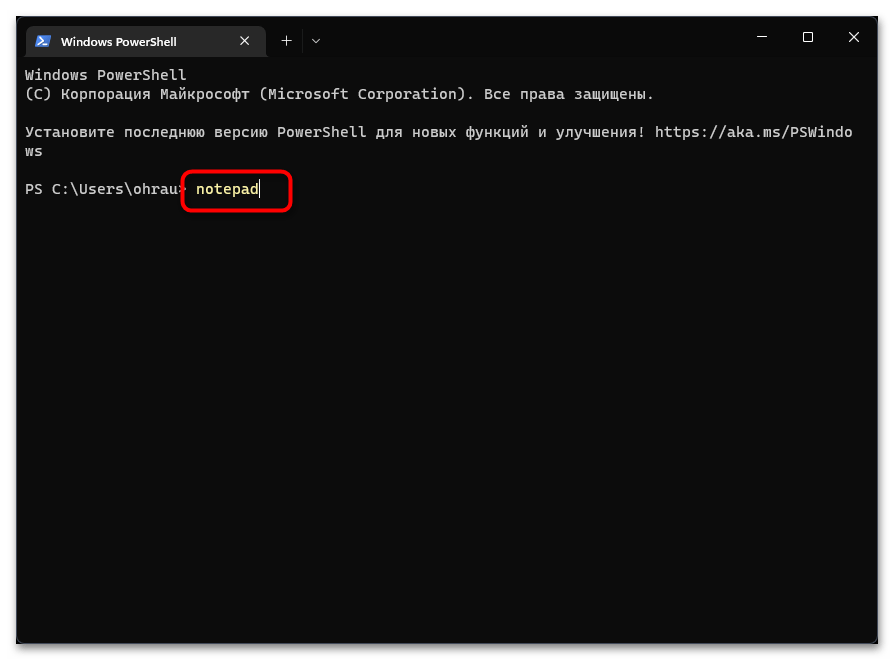
В некоторых случаях у пользователя нет возможности обратиться к графическому меню операционной системы, чтобы запустить определенное приложение для работы. Это может коснуться и «Блокнота», поэтому нужен альтернативный вариант открытия программы. В такой ситуации на помощь приходит стандартная консоль, в которой нужно ввести всего одну команду.
- Запустите «Терминал Windows» или «Командную строку» любым удобным для вас методом.
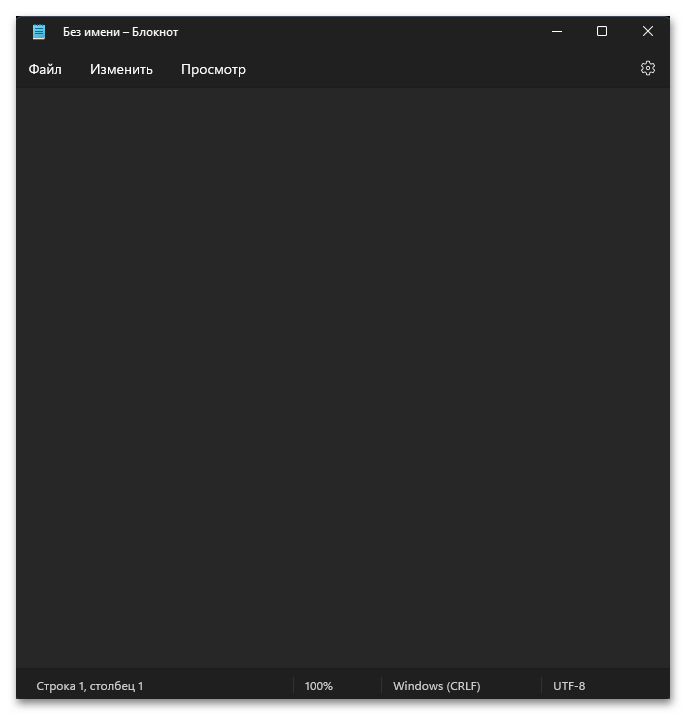
- Введите команду
notepadи нажмите Enter для ее применения. - Уже через секунду будет открыто новое окно «Блокнота», в котором вы можете начать вводить содержимое, а по завершении сохранить документ в требуемом формате и запускать его через консоль, если это какой-то скрипт или исполняемый файл другого типа.
Способ 7: Ярлык быстрого доступа
Все предыдущие методы подразумевают выполнение дополнительных действий, которые приводят к тому, что пользователь задействует команду для запуска «Блокнота» или находит его значок. Однако если нужно запустить программу быстрее (когда обращение к ней происходит гораздо чаще), тогда лучше создать ярлык быстрого доступа и поместить его на рабочем столе или в любой папке.
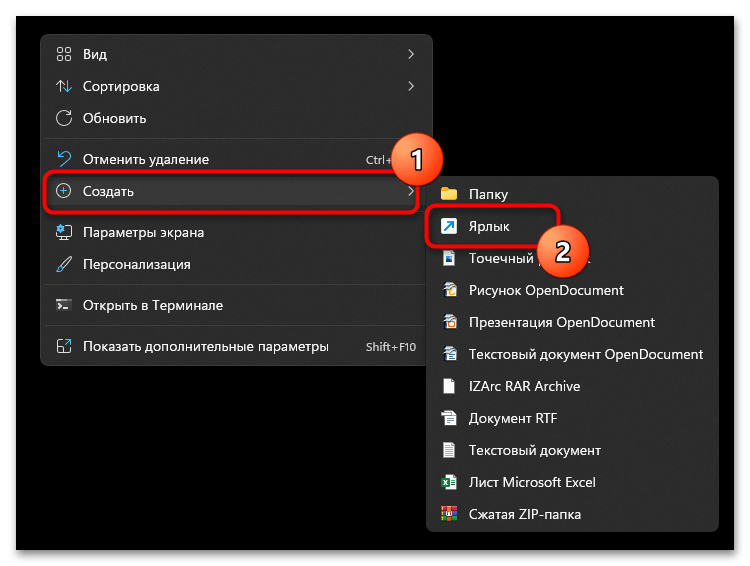
- Перейдите на рабочий стол или в нужную директорию, щелкните по пустому месту правой кнопкой мыши, наведите курсор на «Создать» и выберите пункт «Ярлык».
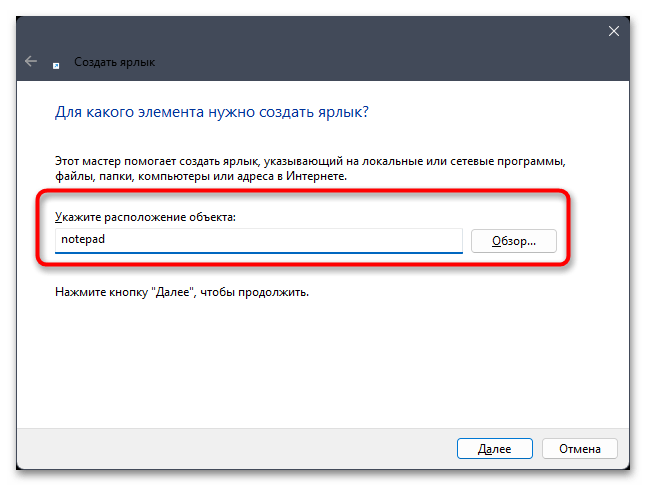
- Укажите расположение объекта как
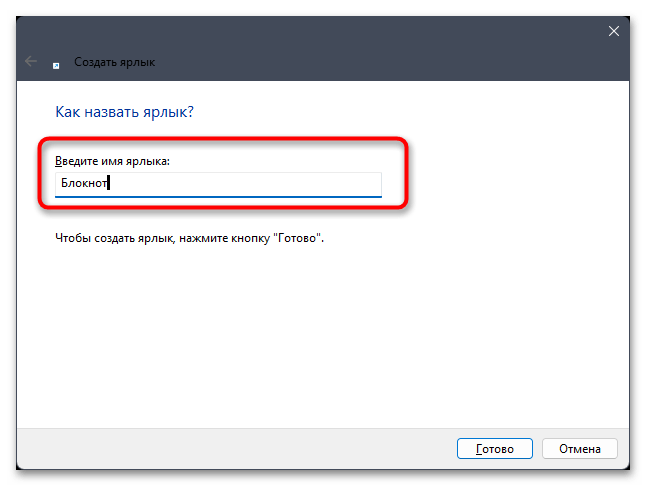
notepadи переходите к следующему шагу. - В качестве имени ярлыка введите «Блокнот», чтобы понимать, за запуск какой программы он отвечает.
- Подтвердите внесение изменений и посмотрите, создался ли ярлык в выбранном расположении. Щелкните по нему дважды левой кнопкой мыши для запуска.
- Теперь вы можете создавать неограниченное количество текстовых документов или просто использовать «Блокнот», когда нужно что-то записать.
Способ 8: Пункт в контекстном меню «Проводника»
Реализация этого метода требует внесения изменений в реестре, а результатом будет добавление пункта в контекстное меню «Проводника», нажатие по которому запускает приложение «Блокнот». Вы сможете использовать контекстное меню в любом месте на компьютере, чтобы быстро вызвать новое окно текстового редактора и приступить к набору текста.
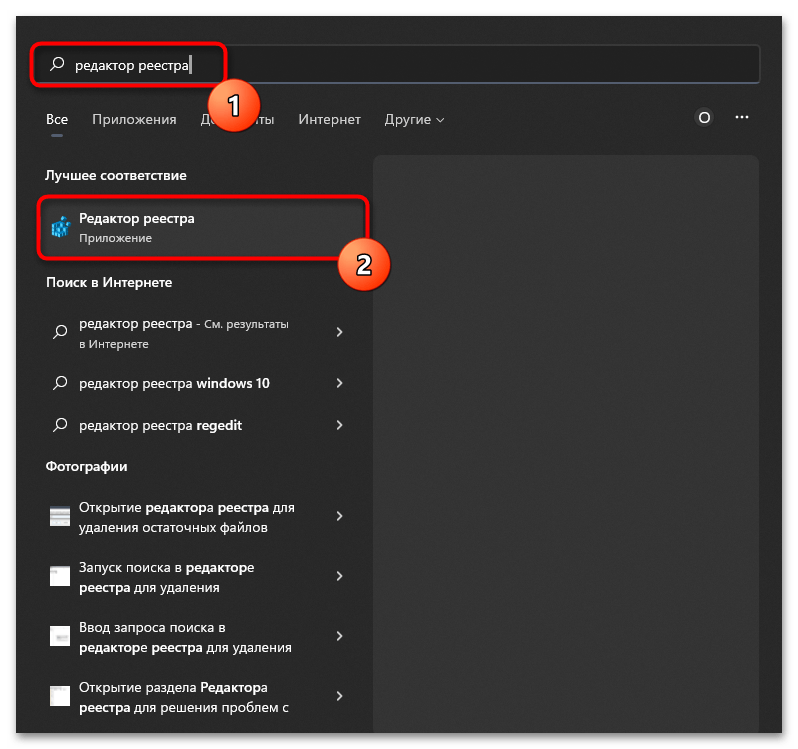
- Для начала перейдите в «Редактор реестра», отыскав приложение через поиск в «Пуске».
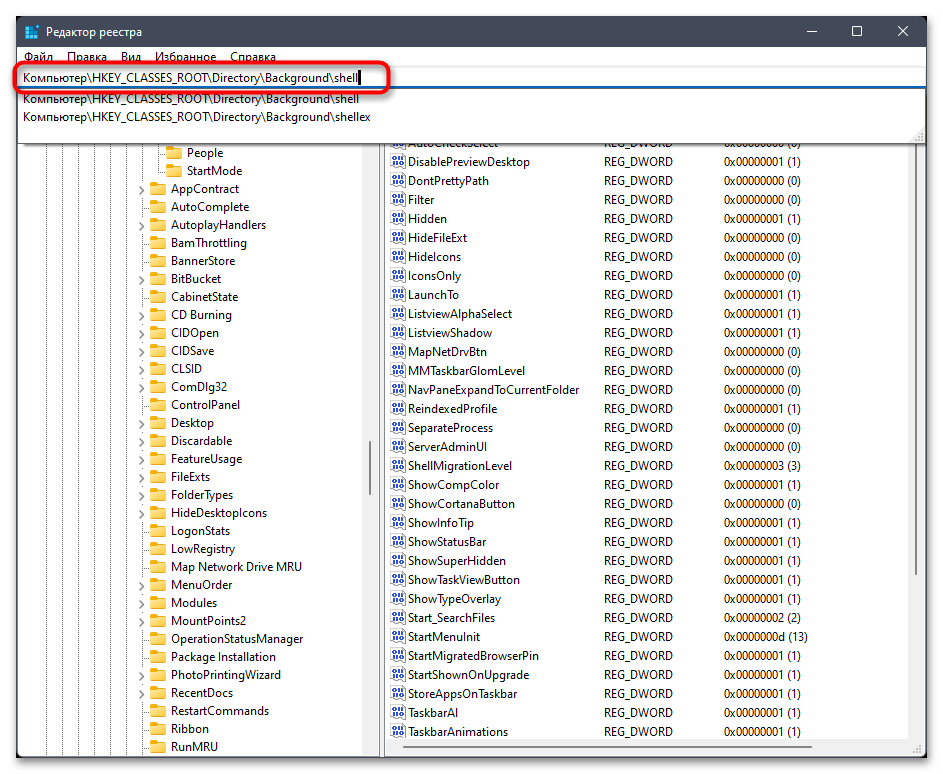
- В адресную строку вставьте
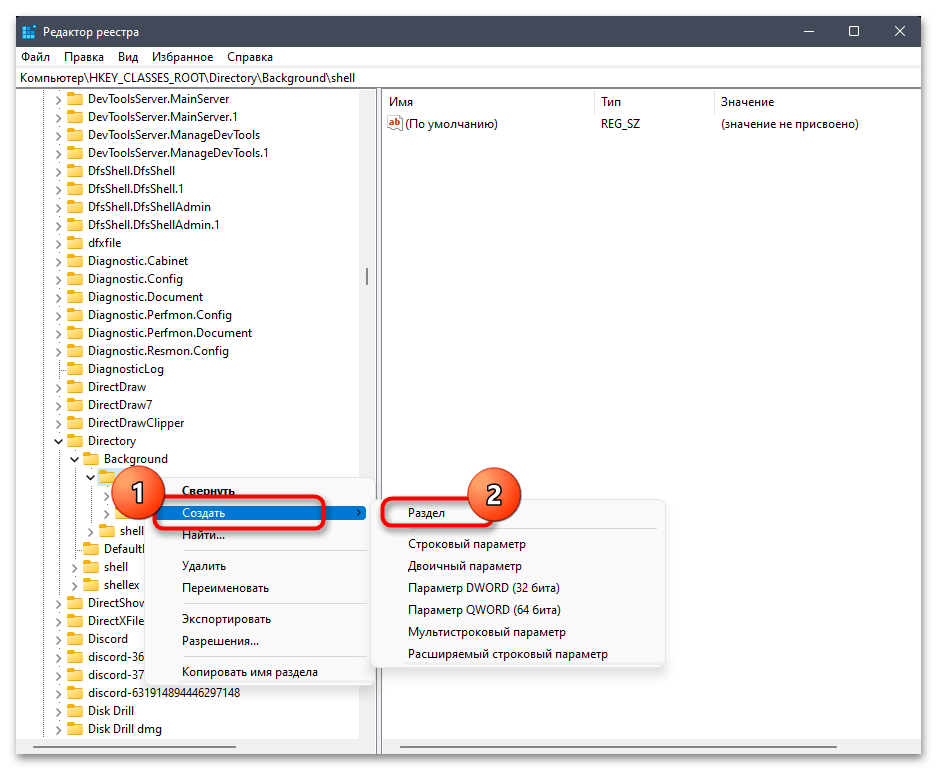
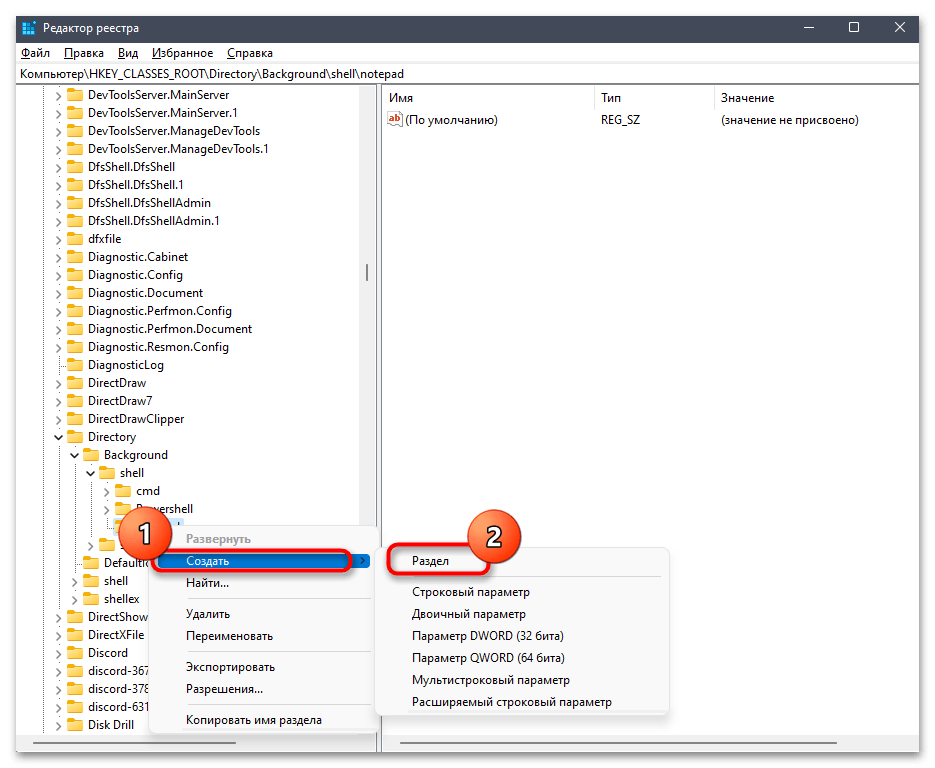
Компьютер\HKEY_CLASSES_ROOT\Directory\Background\shellи перейдите по данному расположению. - Щелкните по последней папке в данном пути правой кнопкой мыши, наведите курсор на «Создать» и выберите пункт «Раздел».
- Название для раздела укажите «Notepad» или «Блокнот», чтобы с таким названием и создался пункт в контекстном меню.
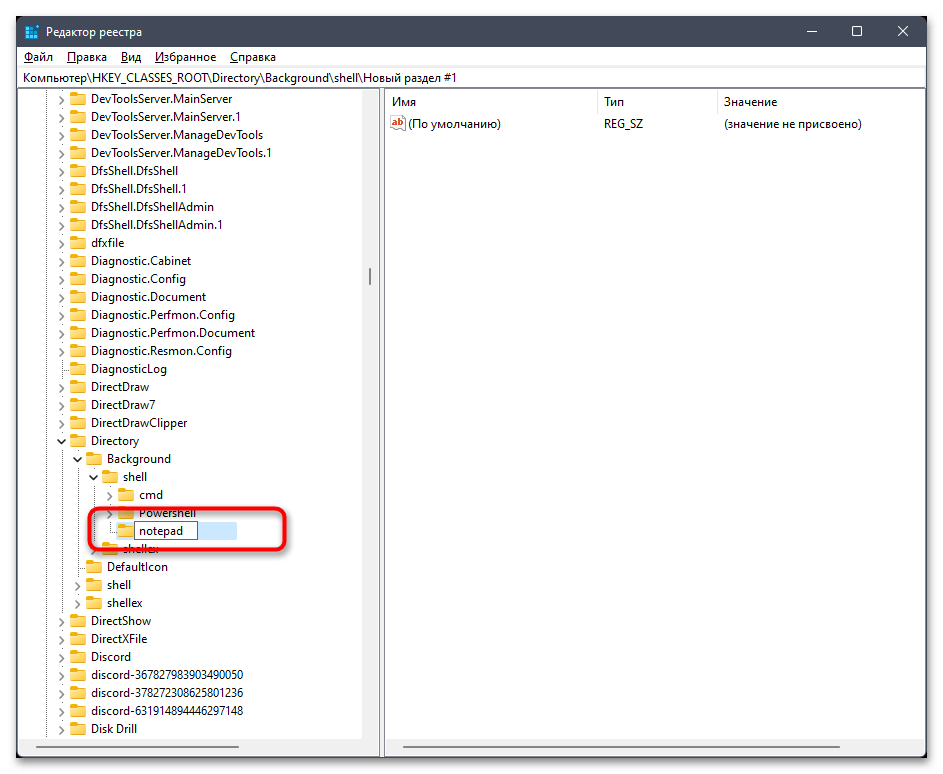
- Щелкните по данному разделу ПКМ и точно так же создайте еще один новый раздел.
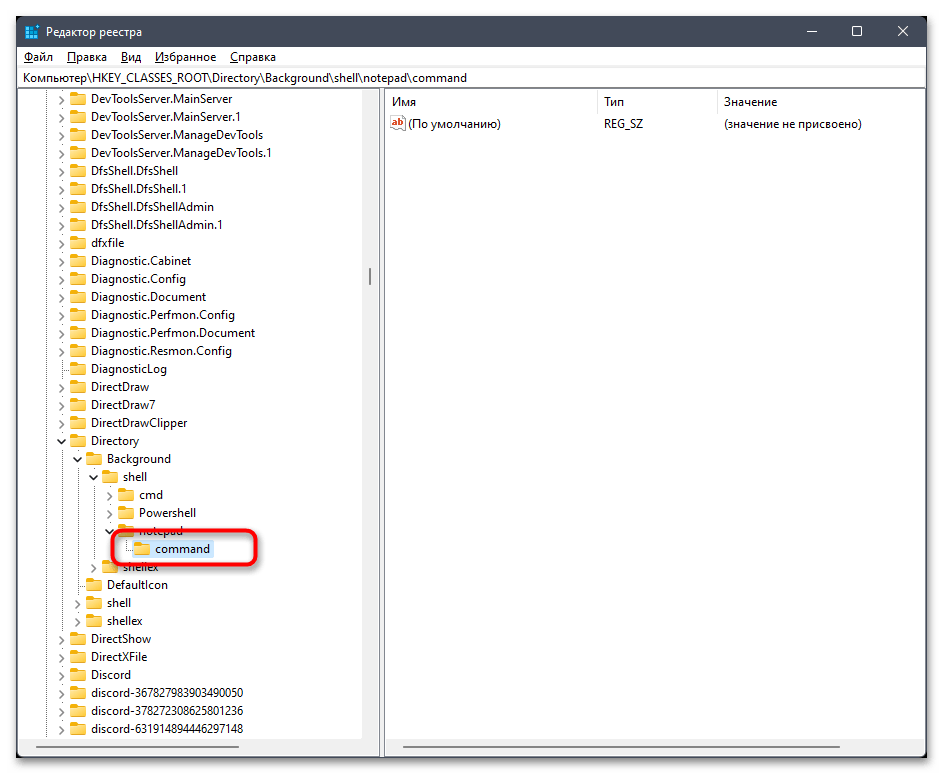
- На этот раз укажите его название как
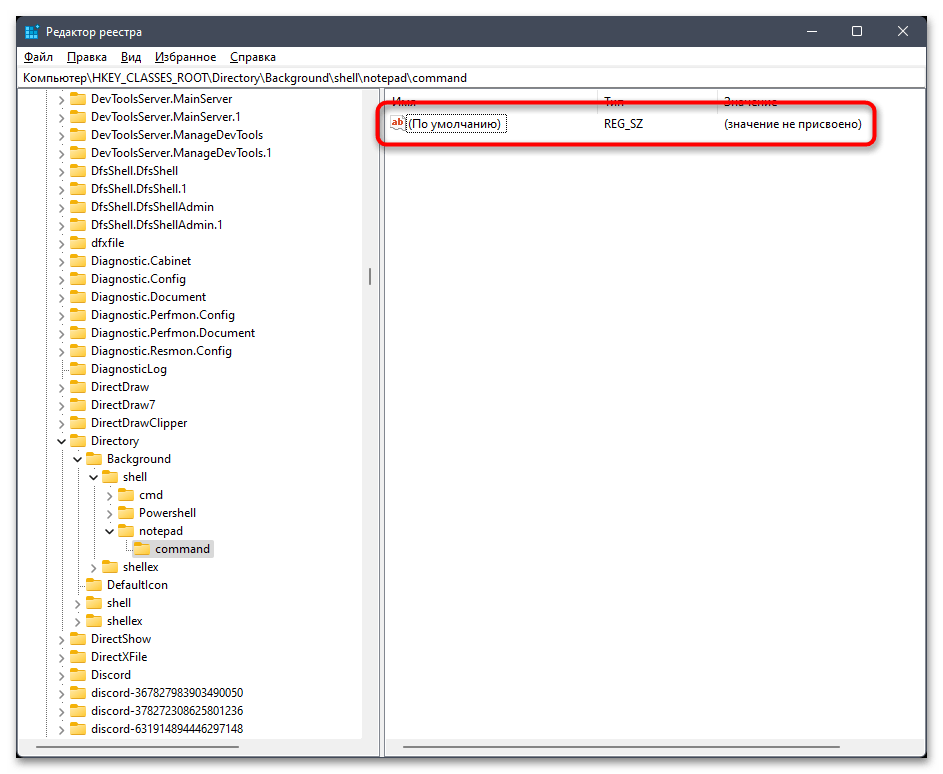
command. - В этой директории уже будет один параметр, созданный по умолчанию. Щелкните по нему дважды ЛКМ для открытия редактирования значения.
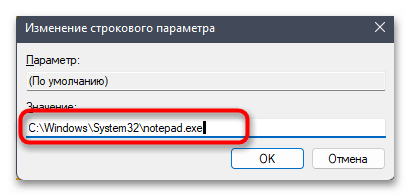
- Введите
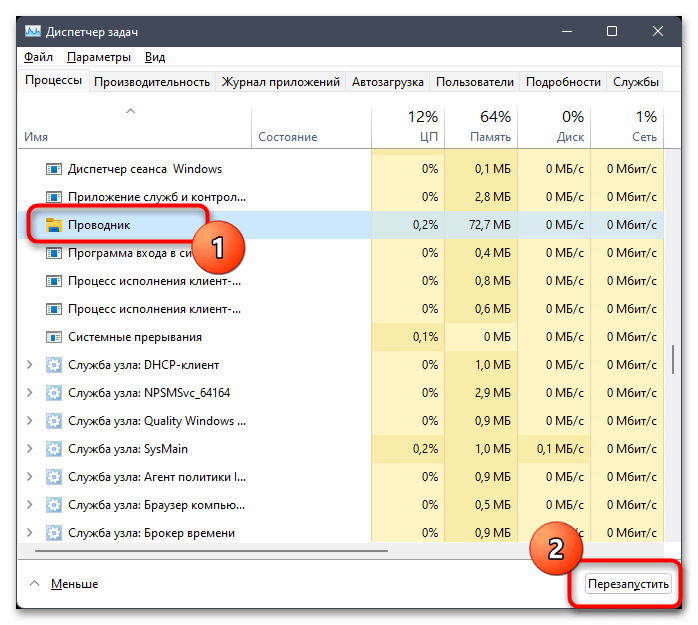
C:\Windows\System32\notepad.exe, чтобы при вызове пункта в контекстном меню запускалось соответствующее приложение. - Изменения вступают в силу исключительно после перезагрузки компьютера или перезапуска «Проводника». Давайте выполним второй вариант, поскольку это будет быстрее. Откройте «Диспетчер задач».
- В списке с процессами отыщите «Проводник», выделите строку левой кнопкой мыши и нажмите «Перезапустить».
- Теперь вы можете вызвать контекстное меню и нажать «Показать дополнительные параметры».
- В списке вы найдете «Notepad» или «Блокнот» в зависимости от того, какое название для раздела указали.
- Нажатие по данному пункту открывает новый документ в «Блокноте».


Изменение приложения по умолчанию
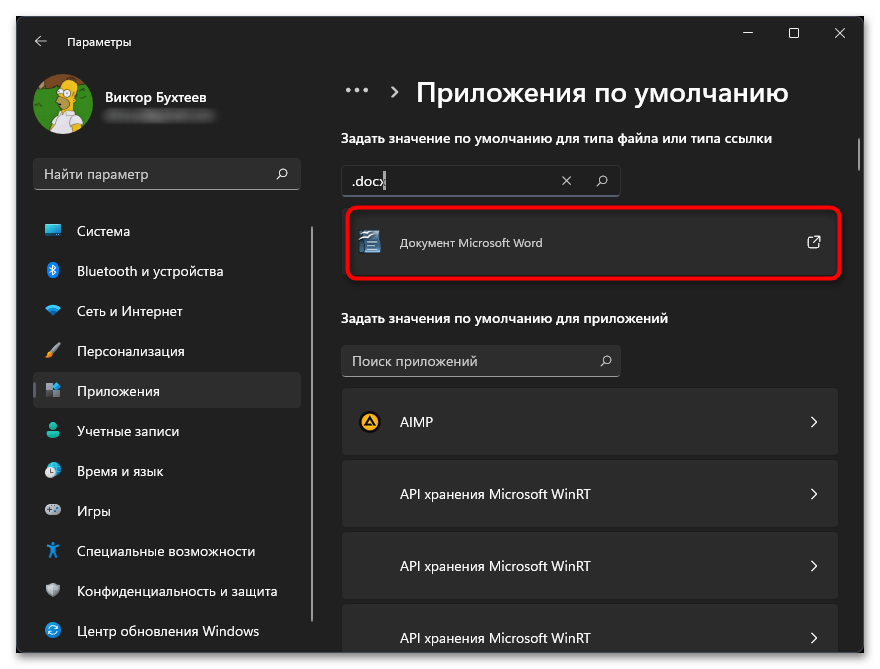
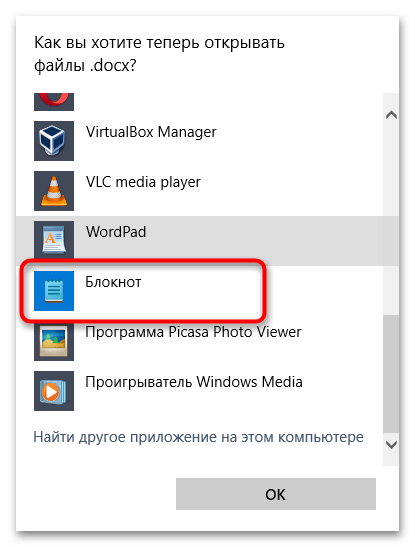
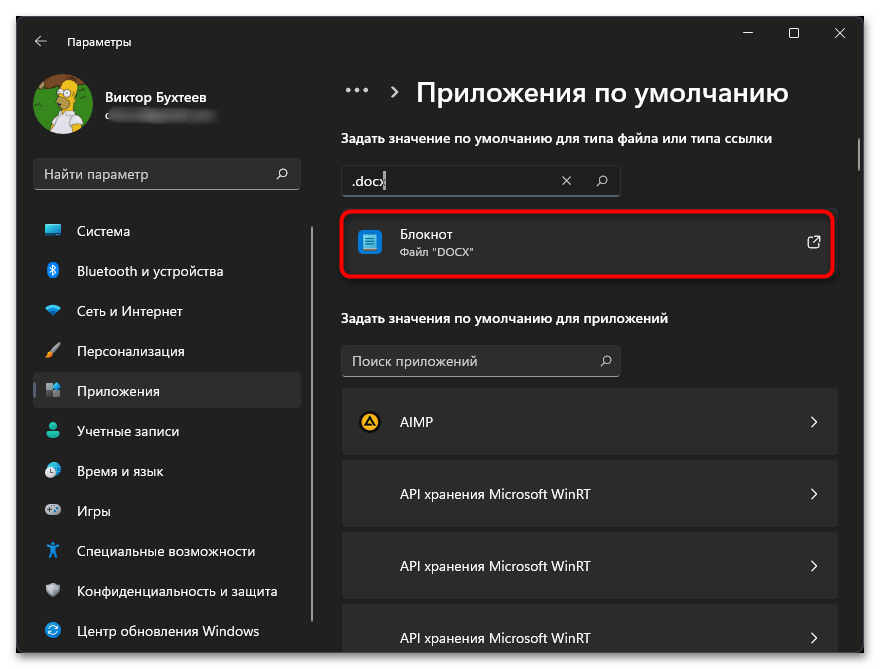
В завершение разберем ситуацию, с которой сталкиваются пользователи при попытке открыть конкретные текстовые документы через «Блокнот». Если на компьютер были установлены сторонние текстовые редакторы, они могут быть выбраны в качестве программы по умолчанию для открытия всех подходящих типов файлов. Если такой вариант вас не устраивает и вы хотите запускать определенные документы сразу через «Блокнот», можно изменить настройку для приложения по умолчанию, что осуществляется так:
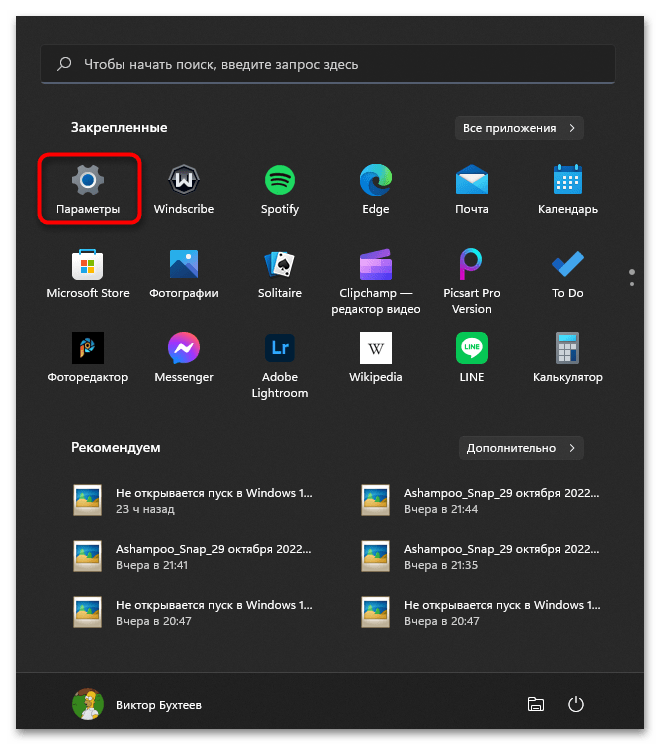
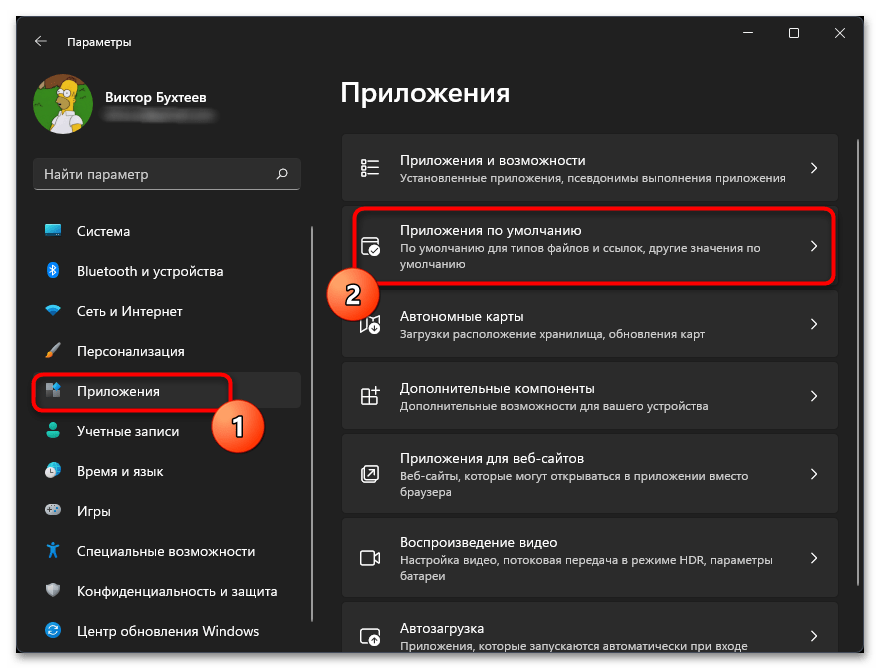
- Откройте меню «Пуск» и перейдите в «Параметры».
- На панели слева выберите раздел «Приложения», затем откройте категорию «Приложения по умолчанию».
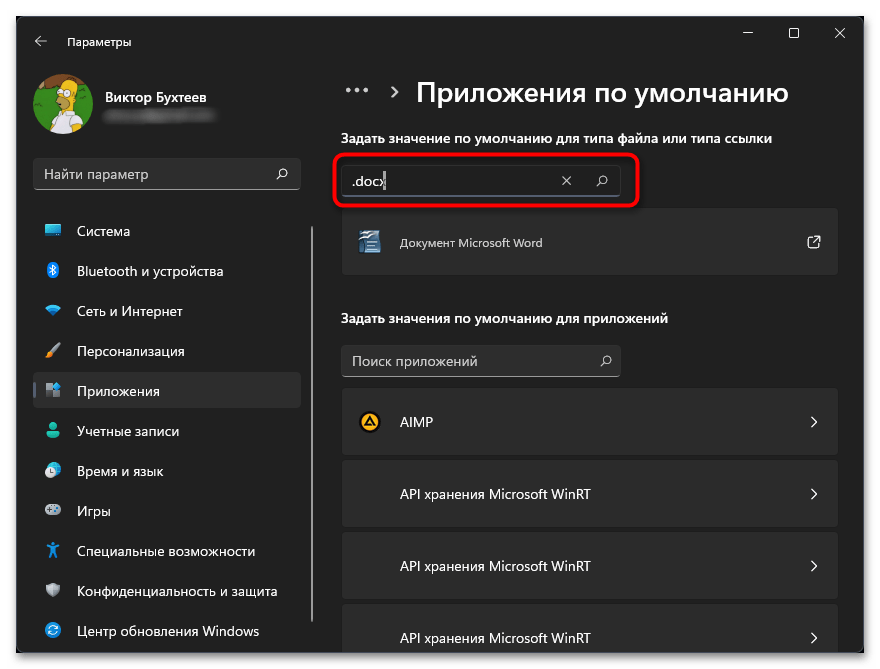
- Введите искомый формат файла, обязательно поставив точку перед названием.
- Вы увидите, какое сейчас приложение выбрано в качестве по умолчанию. Если это не «Блокнот», кликните по результату левой кнопкой мыши.
- В списке отыщите нужное вам приложение и установите его для данного формата.
- Проверьте внесенные изменения и приступайте к такому же редактированию для других текстовых форматов, если в этом есть необходимость.
Наша группа в TelegramПолезные советы и помощь