
AMD Software Adrenalin Edition, formerly AMD Radeon Software, is a utility tool that allows you to control basically everything about your AMD graphics card. But after several iterations, AMD programs are still showing issues on Windows, and the most common one is AMD Adrenalin Software not opening.
But don’t worry if you’re having the same issue. Here we’ve gathered some fixes that have worked for many gamers. Try them and get your Adrenalin Software working in a jiff.
Try these fixes:
You might not need to try all of them. Simply go down the list until you find the one that does the charm.
- Check and exit the hung process
- Check for system updates
- Scan and repair your drivers
- Perform a clean boot
- Rebuild the Radeon profiles
- Use the reinstall utility
- Check for corrupted system files
Fix 1: Check and exit the hung process
If Adrenalin Software is already launched but you can’t see the window, chances are the process is hanging in the background. In that case, a reboot tend to fix the issue right up. If you don’t want to reboot at the moment, you can try to check and exit the hung process manually.
The sreenshots below are taken on Windows 11, but the steps apply to Windows 10 as well.
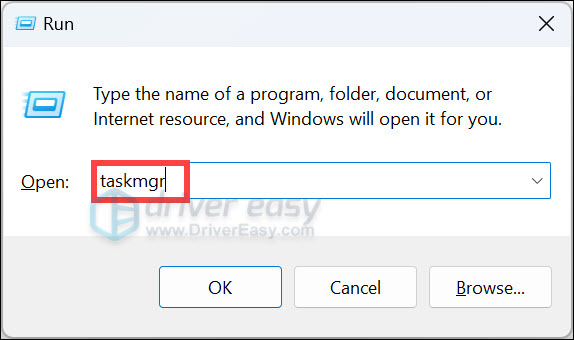
- On your keyboard, press Win+R to invoke the Run box. Enter taskmgr and click OK.

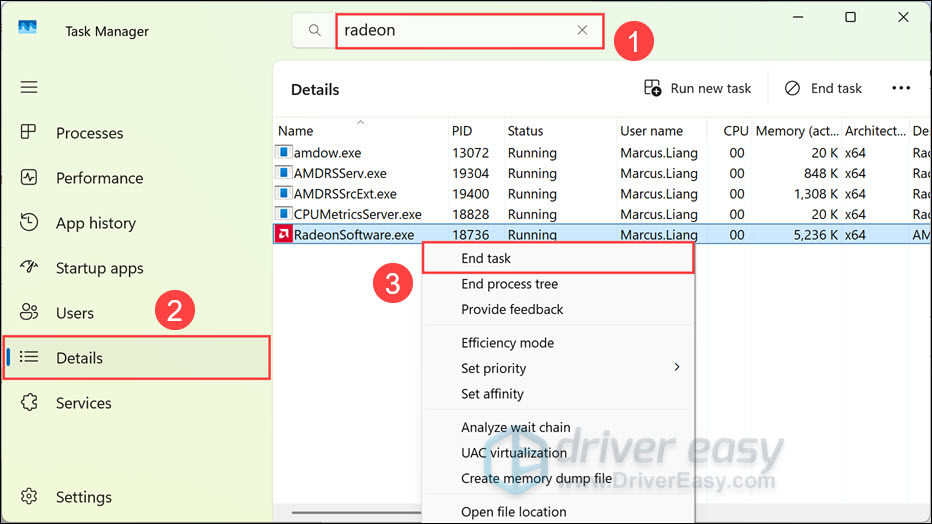
- Look for the process with radeon in the name. Then seletct the Details tab in the left pane. Right click RadeonSoftware.exe and select End task.

Now you can try to launch Adrenalin Software again and see if it opens.
If this fix doesn’t work for you, move on to the next one.
Fix 2: Check for system updates
A large part of users facing this issue have recently updated their system. Since you can’t stop Windows from updating, you can check for updates manually and see if there’s a newer patch targeting the Adrenalin Software issue.
On Windows 10:
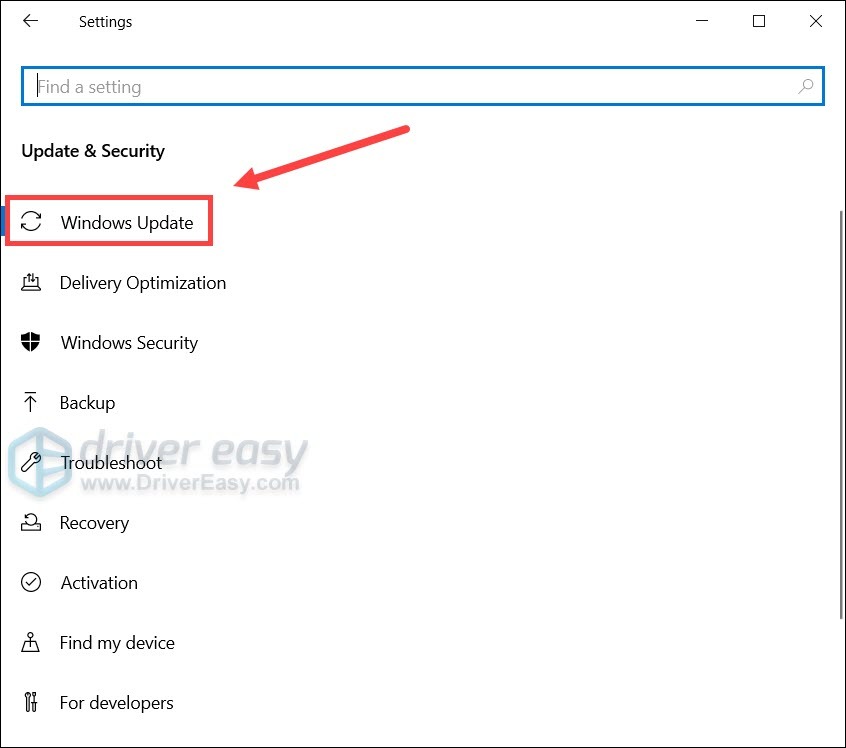
- On your keyboard, press Win (the Windows logo key). At the bottom left corner of your screen, click the gear icon to open Settings.

- Scroll down and select Update & Security.

- Click Windows Update.
- Click Check for updates. Then wait for the process to complete. After that, restart your PC.

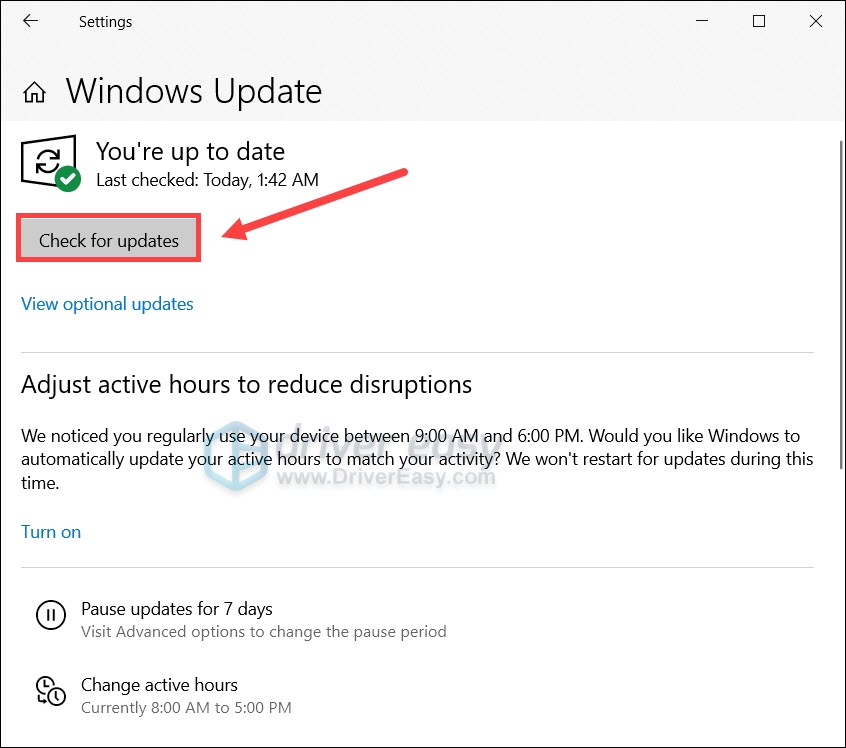
To make sure you’ve installed all the system updates, repeat these steps until it prompts “You’re up to date” when you click Check for updates again.
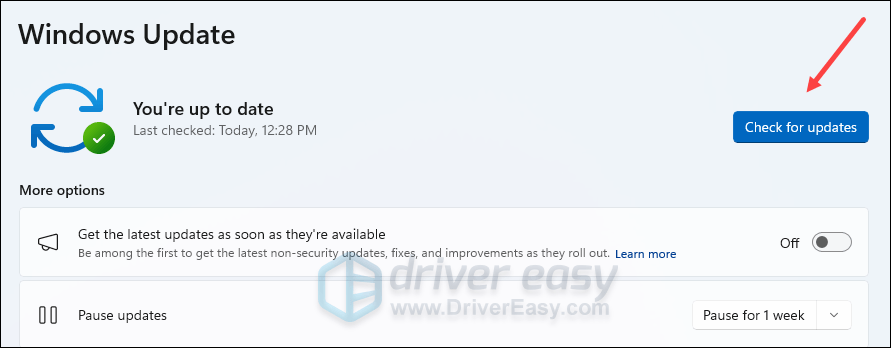
On Windows 11:
- On your keyboard, hit the Windows key, then type check for updates, then click Check for updates.

- Click Check for updates, and Windows will scan for any available updates.

- If there are available updates, Windows will automatically download them for you. Restart your computer for the update to take effect if needed.

- If there are no available updates, you’ll see You’re up to date like this.


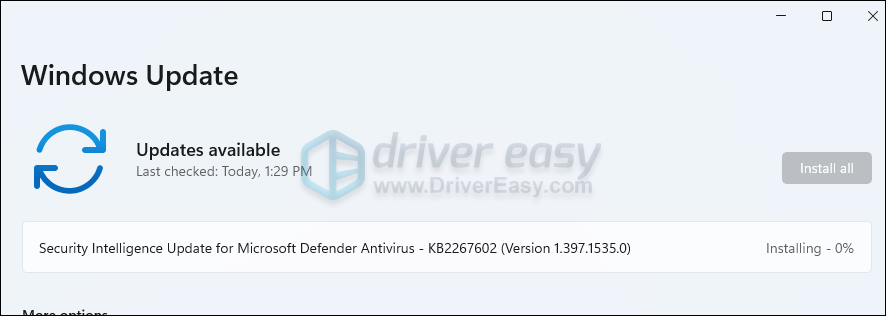
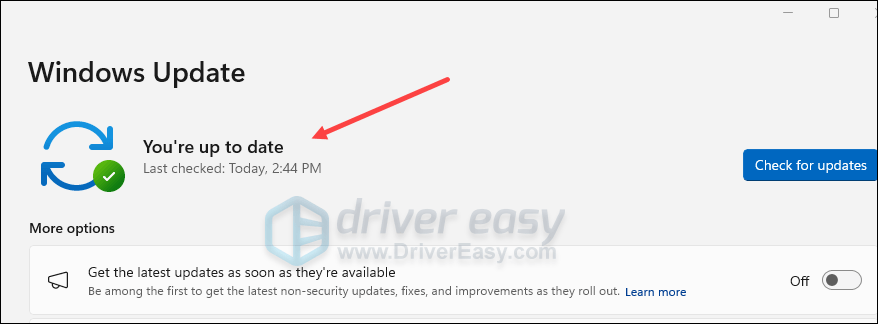
After installing all the system updates, do a restart and check if Adrenalin Software is working now.
If this doesn’t help you, take a look at the next fix.
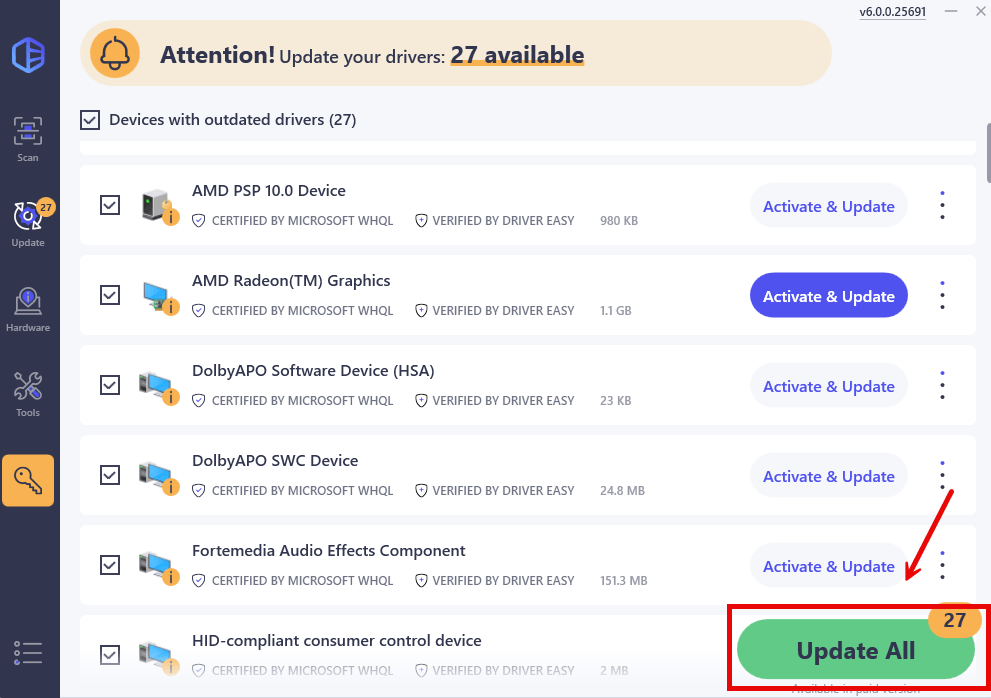
Fix 3: Scan and repair your drivers
This issue could indicate that you’re using a buggy or outdated graphics driver. So if you don’t remember when was the last time you checked for driver updates, you should definitely do it now. The latest GPU driver usually overwrites the faulty settings and fixes most of the compatibility issues.
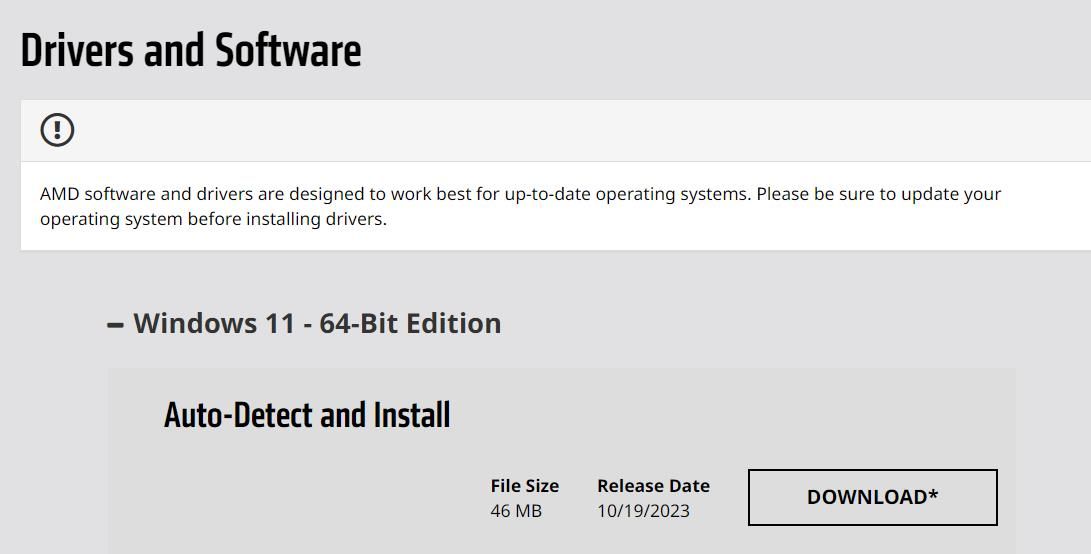
You can update your drivers manually, by visiting the AMD website, finding the latest correct installer and installing step by step. But if you’re not comfortable playing with device drivers, you can update your drivers automatically with Driver Easy. And its restore point feature will help you safely recover from buggy driver updates.
If your PC is having persistent display issues, we recommend you use a third-party driver updater. A professional tool not only updates drivers on your PC, it also fixes those that are either broken or missing altogether.
- Download and install Driver Easy.
- Run Driver Easy and click the Scan Now button. Driver Easy will then scan your computer and detect any problem drivers.

- Click Update All to automatically download and install the correct version of all the drivers that are missing or out of date on your system.
(This requires the Pro version which comes with full support and a 30-day money-back guarantee. You’ll be prompted to upgrade when you click Update All. If you’re not ready to buy the Pro version, Driver Easy offers a 7-day free trial which includes access to all the Pro features such as high-speed download and one-click install. You won’t be charged anything until your 7-day trial has ended.)

- Restart your computer for the changes to take effect.

If you need assistance, please contact Driver Easy’s support team at support@drivereasy.com.
After updating your drivers, restart your PC and check if Adrenalin Software is working.
If the latest graphics driver doesn’t do the trick, you can try the next method. (Or you can use this tutorial to completely reinstall your AMD graphics driver with DDU.)
Fix 4: Perform a clean boot
We all have different setups, so it’s possible that some programs or services on your PC are conflicting with Adrenalin Software. A clean boot disables background tasks that can interfere with your Adrenalin Software.
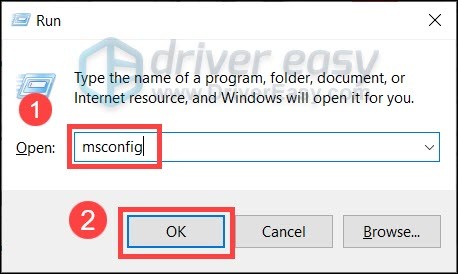
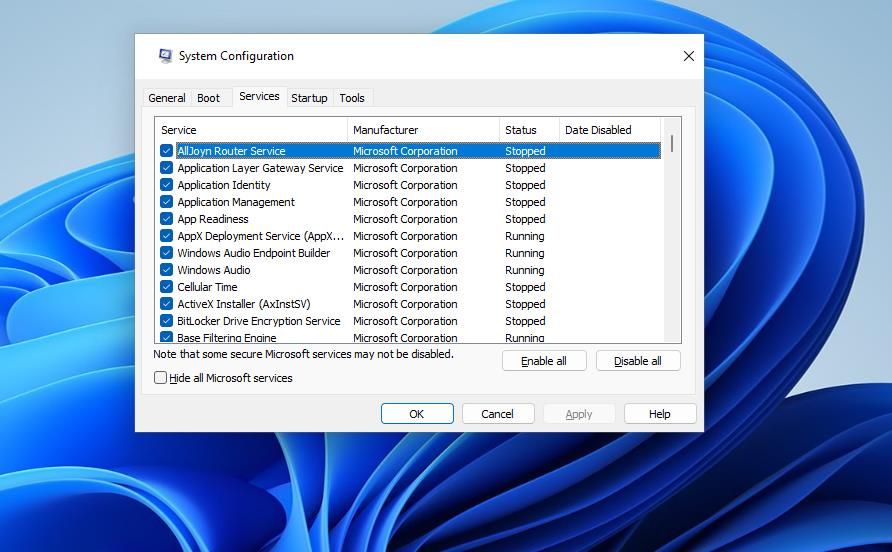
- On your keyboard, press Win+R (the Windows logo key and the r key) at the same time to invoke the Run box. Type or paste msconfig and click OK.

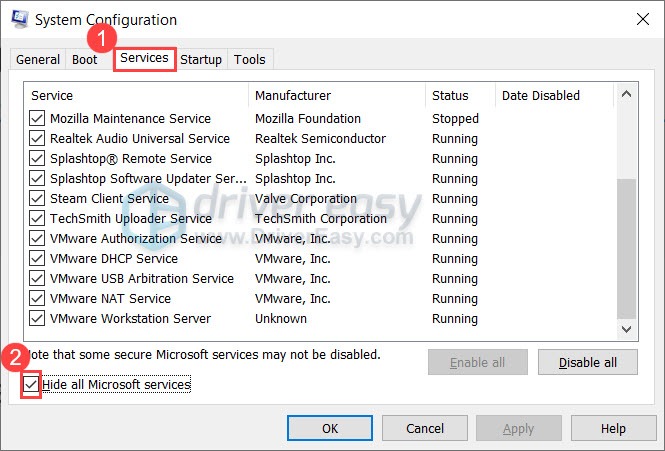
- In the pop-up window, navigate to the Services tab and check the box next to Hide all Microsoft services.
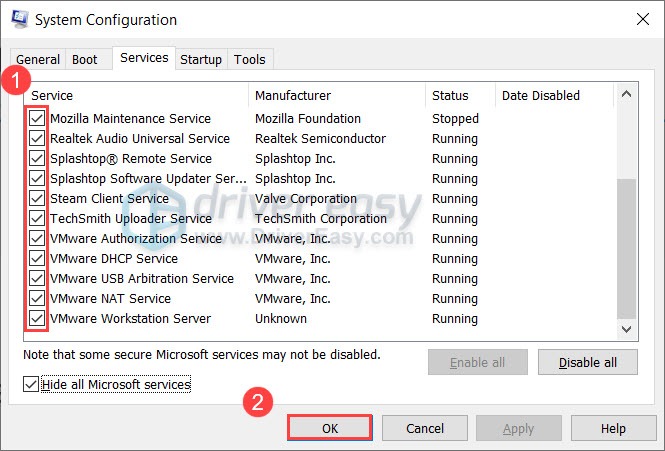
- Uncheck all the services EXCEPT those belong to your hardware manufacturers, such as Realtek, AMD, NVIDIA, Logitech and Intel. Then click OK to apply the changes.
- On your keyboard, press Ctrl, Shift and Esc at the same time to open Task Manager, then navigate to the Startup tab.
- One at a time, select any programs you suspect might be interfering, and click Disable.
- Restart your PC.
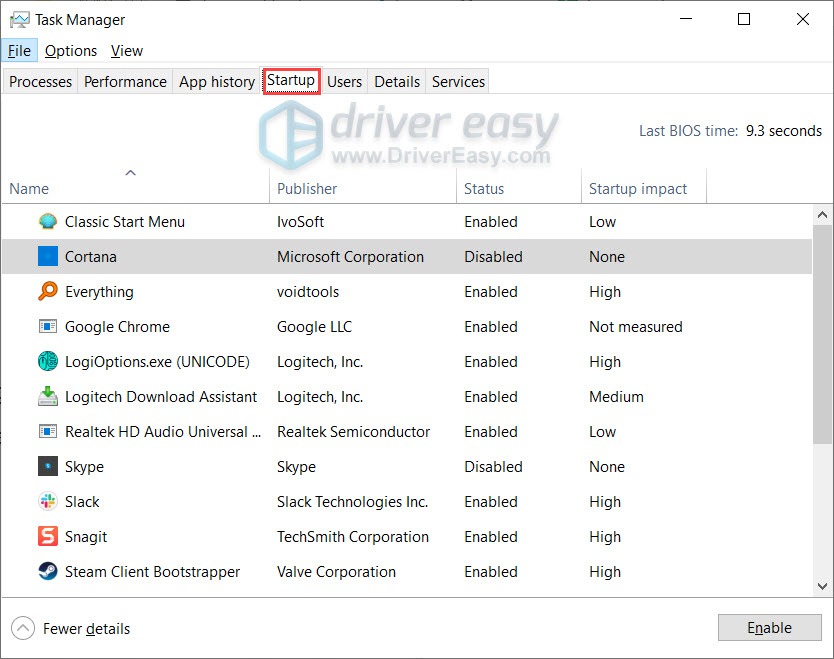
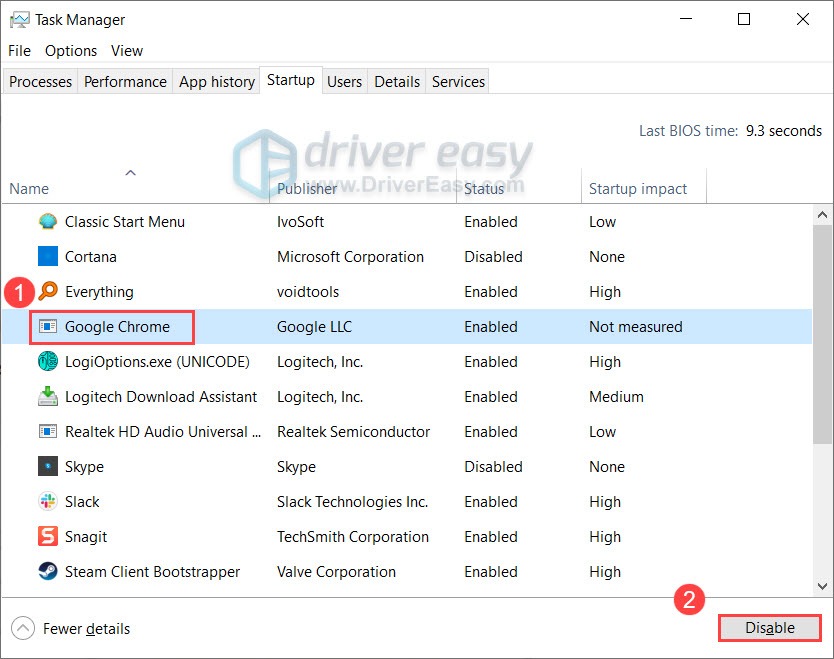
Now you can try to launch Adrenalin Software. If it’s working now, repeat the steps above and disable half of the services and programs to locate the troublemaker.
If this trick doesn’t give you luck, simply move on to the next fix.
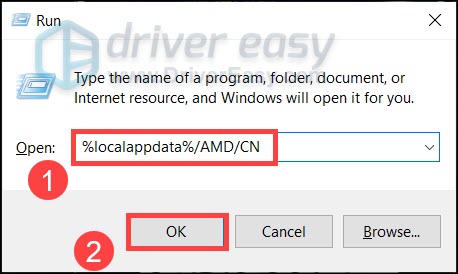
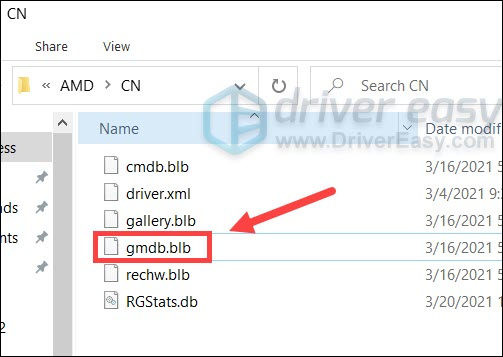
Fix 5: Rebuild the Radeon profiles
Some users reported that instead of reinstalling the graphics driver, there’s another potential fix that could get Adrenalin Software working again. All you need to do is delete a file. You can try this and see how things go.
- On your keyboard, press Win+R (the Windows logo key and the R key) to open the Run box. Type or paste %localappdata%/AMD/CN and click OK. (Remember to backup the files that will be deleted.)

- Delete a file named gmdb.blb. Then restart your PC and check if Adrenalin Software works now.

- If this doesn’t work for you, repeat the steps but delete the entire CN folder.
If this method doesn’t help your case, take a look at the next one below.
Fix 6: Use the reinstall utility
Some users reported that they fixed the issue by reinstalling Adrenalin Software Package with the official reintsall utility, so you can give it a try and see if it helps your case.
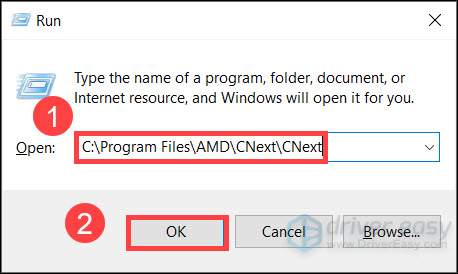
- On your keyboard, press the Windows logo key and the R key to open the Run box. Type or paste C:\Program Files\AMD\CNext\CNext and click OK.
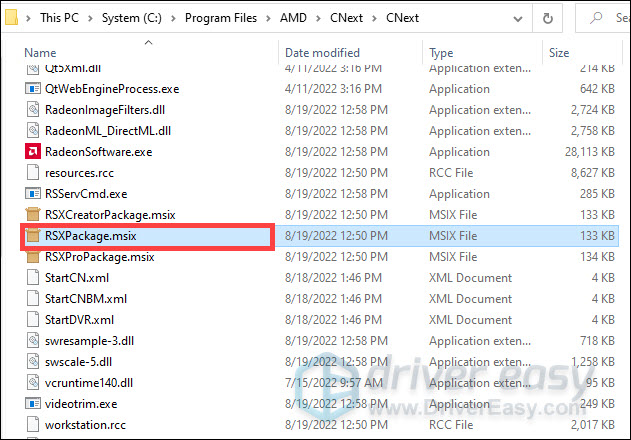
- Double-click RSXPackage.msix to open the reinstall utility.

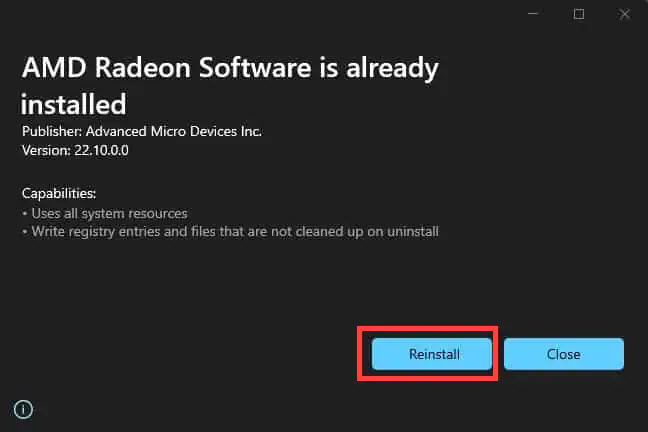
- In the pop-up window, click Reinstall and follow the on-screen instructions to reinstall Adrenalin Software.

Fix 7: Check for corrupted system files
If none of the fixes above work for you, it could imply a critical system issue. But before trying the nuclear option of reinstalling Windows, you can use a Windows repair tool to scan for corrupted system files.
Step 1. Scan corrupt files with System File Checker
1) On your keyboard, press the Windows logo key and R at the same time to open the Run box. Type cmd and press Ctrl+Shift+Enter to run Command Prompt as administrator.
Click Yes when prompted for permission to make changes to your device.
2) In the Command Prompt, type the following command and hit Enter.
sfc /scannow
3) System File Check will begin to scan all system files and repair any corrupted or missing ones it detected. This may take 3-5 minutes.
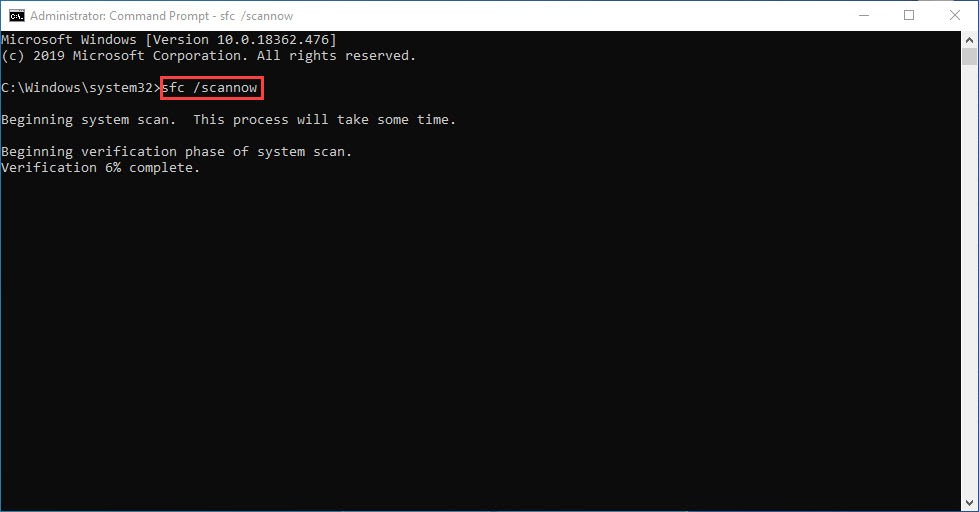
4) You may receive something like the following messages after the verification.
- no errors
- it fixed some errors
- could not fix all errors
- could not fix errors at all
- ……
No matter what message you receive, you can try running dism.exe (Deployment Image Servicing and Management) to further scan the health of your PC.
Step 2. Run dism.exe
1) Run Command Prompt as admin and enter the following commands.
- This command line will scan the health of your PC:
dism.exe /online /cleanup-image /scanhealth
- This command line will restore the health of your PC:
dism.exe /online /cleanup-image /restorehealth
2) After the restore health process finishes, you may get some error messages.
- If restore heath gave you errors, you can always try this command line. This will take up to 2 hours.
dism /online /cleanup-image /startcomponentcleanup
- If you get Error: 0x800F081F with the restore health scan, reboot your PC and run this command line.
Dism.exe /Online /Cleanup-Image /AnalyzeComponentStore
If the System File Check finds any files corrupted, follow the on-screen instructions to repair them, and then restart your computer for the changes to take full effect.
Hopefully this post helps you fix the Adrenalin Software not opening issue. If you have any questions or ideas, feel free to leave a comment down below.
@kaminari wrote:
I had a quick look at the registry. For some reason, the last Windows 10 update has moved my video port from:
Computer\HKEY_LOCAL_MACHINE\SYSTEM\CurrentControlSet\Control\Class\{4d36e968-e325-11ce-bfc1-08002be10318}\0000
to:
Computer\HKEY_LOCAL_MACHINE\SYSTEM\CurrentControlSet\Control\Class\{4d36e968-e325-11ce-bfc1-08002be10318}\0001
which is enough to throw the Radeon software off balance. Since I don’t see an official hotfix coming any time soon, I used the AMD Cleanup Utility (no need for DDU) to remove the Radeon driver and reinstall it from scratch. The GUI is now operational again with the latest Windows version. Of course you’ll loose all your graphic settings, unless you made a previous backup.
I had the same problem with the Radeon software that would not open even if i tried reinstalling the driver.
I also had the above 0001 in my registry and I think this is what prevents the radeon software from starting. So then I took one step at the time and kept my eye on this registry. The graphicscard stays in the 0001 folder even after AMD uninstall and AMD Cleanup Utility
The 0000 folder only had 2 seemingly unimportant settings in it.
This is what i did:
1. Uninstalled Radeon Software and rebooted
2. Run AMD cleanup Utility and it wants to reboot in safemode
3. Completed AMD Cleanup Utility in safemode (The 0001 is still there in registry)
4. Back in normal win, I went to Device manager and removed the microsoft basic gfx card, and now the 0001 folder was gone so i also backed up and deleted the 0000 folder in the registry and rebooted.
5. Looked in the registry and now the 0000 was clearly the folder for my basic microsoft gfx driver and then I installled the lastest Radeon Driver 21.5.2 and IT WORKED
6. Be sure to find the correct key in the registry as this can be a dangerous place to make mistakes
Computer\HKEY_LOCAL_MACHINE\SYSTEM\CurrentControlSet\Control\Class\{4d36e968-e325-11ce-bfc1-08002be10318}\0000
There are a lot of simular ones but the number that changes is 4d36e968. It is the number 68 one. Double check the entire folder name.
I hope this helps someone
Quick Tips
- You will need an administrator account to fix this problem.
- AMD Radeon Software is the same as AMD Adrenalin Edition.
- Create a Restore point before making changes to the Registry.
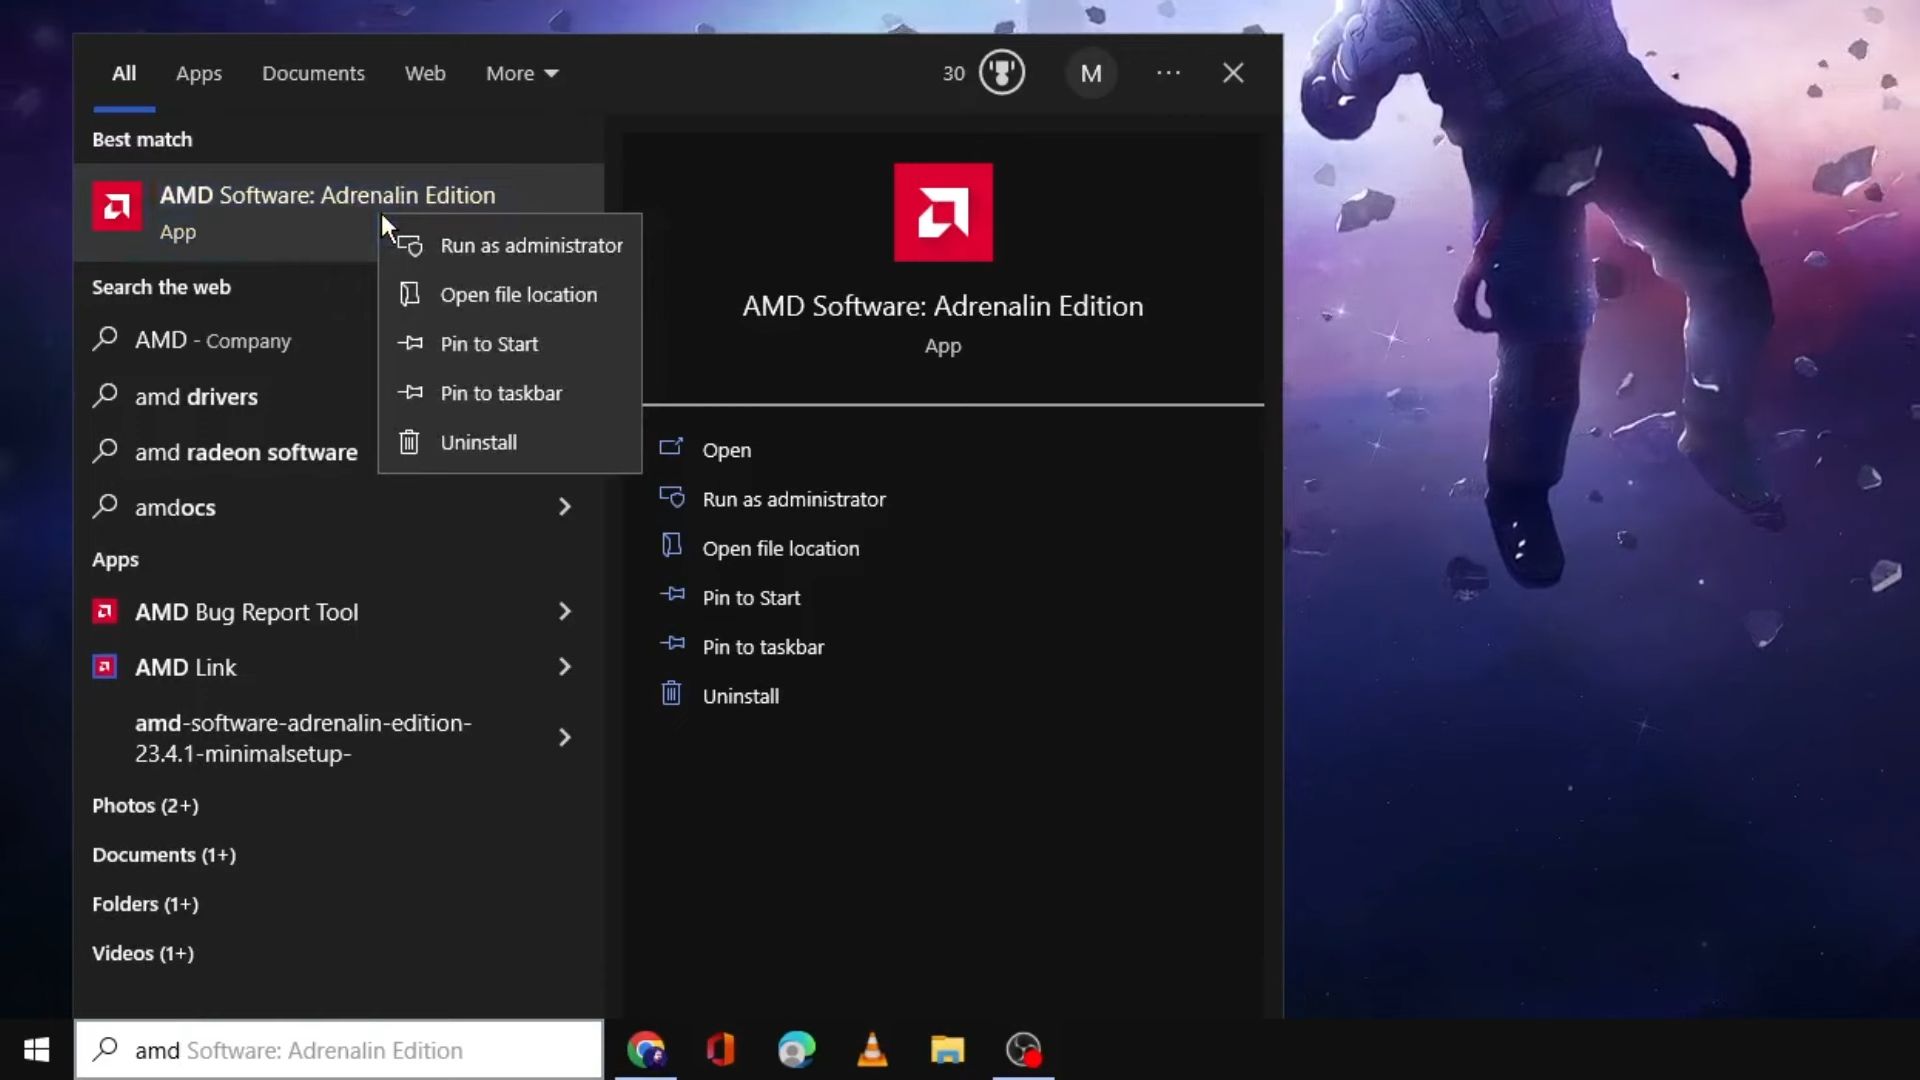
Fix 1: Run AMD Radeon Software With Admin Privileges
If your AMD Adrenalin software is not working or opening, one of the initial fixes to perform is to run it as an administrator to ensure there is no restriction.
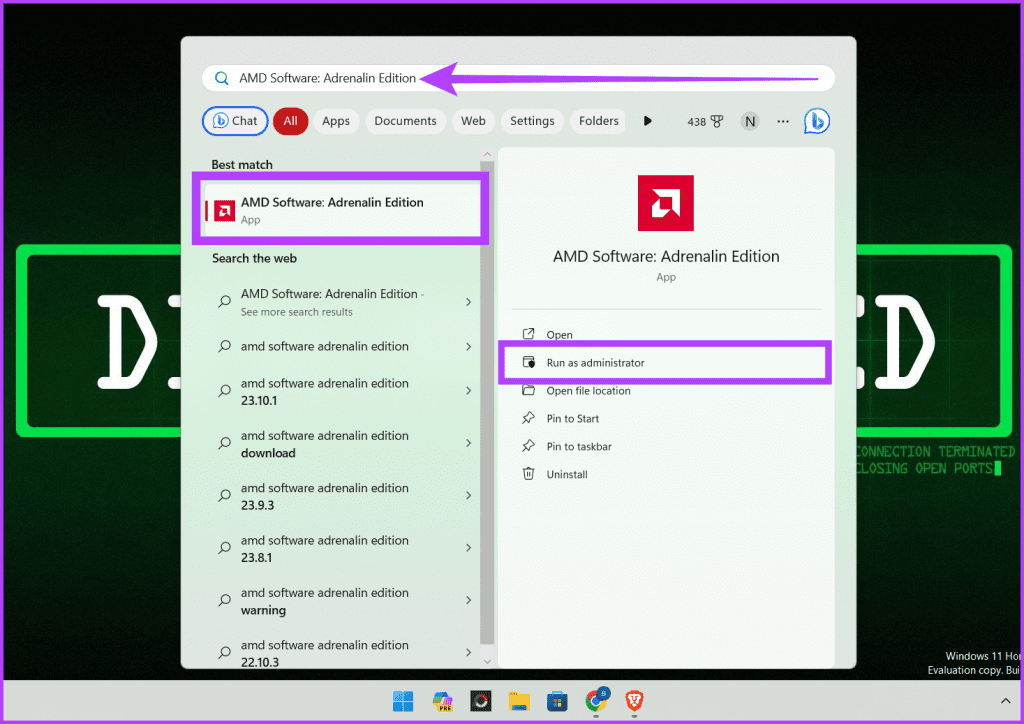
Step 1: Press Win + S and type AMD Software: Adrenalin Edition.
Step 2: Once it appears on the list, click Run as administrator. In the UAC prompt, choose Yes.
If you open the software often, create a shortcut to launch it with admin permission or create a task to launch after the PC starts with the required permission.
Fix 2: Terminate Radeon Software Processes
If the AMD Radeon Software is running in the background but not responding, opening the app will make it look as if it is not opening. It’s best to terminate the app and relaunch it.
Step 1: Launch the Task Manager by pressing Ctrl + Shift + Esc and switch to the Processes tab.
Step 2: Locate the AMD software in the Apps section; right-click on it and choose End Task to stop it.
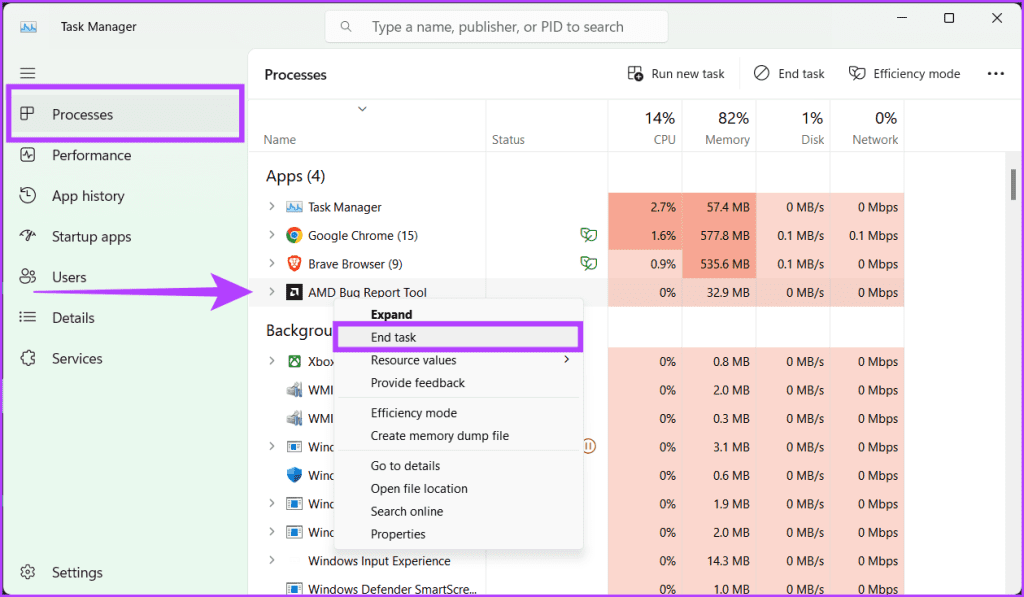
Step 3: Check the Background processes section for any AMD-related processes and close them by right-clicking and choosing End Task.
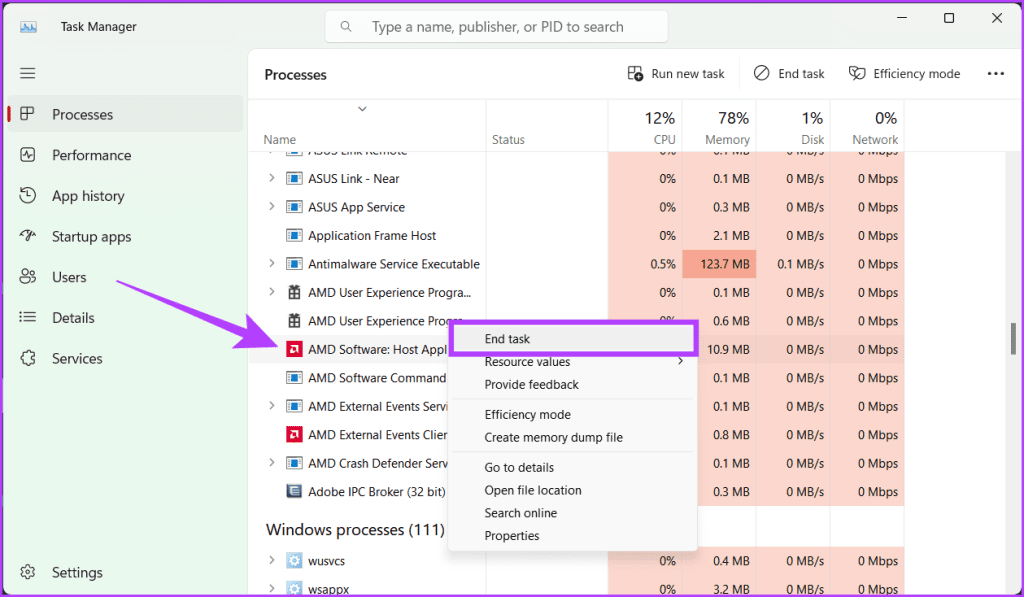
Step 4: Relaunch the AMD Radeon Software, which should start fresh without glitches.
Fix 3: Update or Reinstall the Graphics Driver
The driver may be outdated, so the first check is to update it by downloading it from the AMD driver page and then running the installer.
If this doesn’t solve the problem, uninstall the driver and reinstall everything.
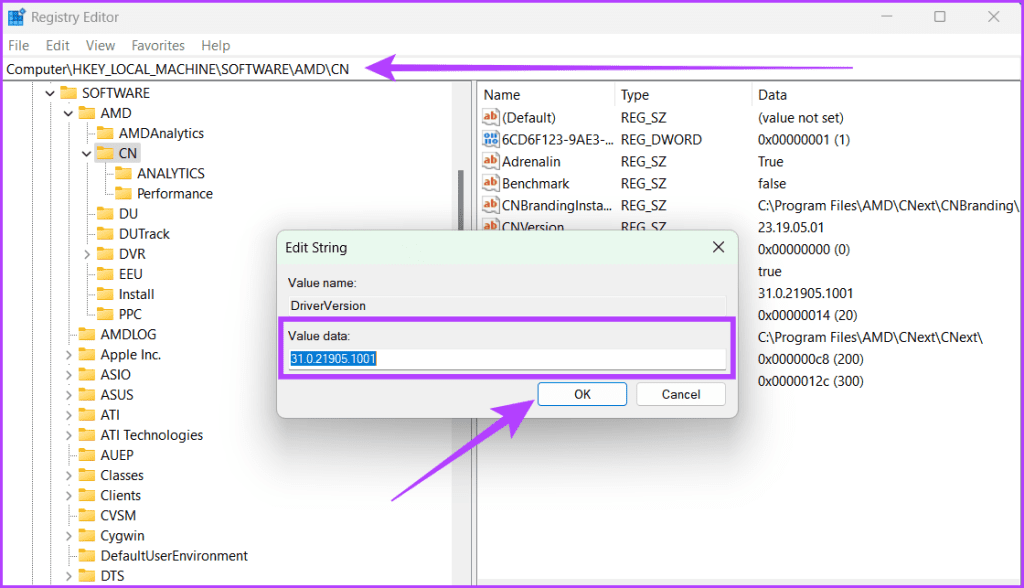
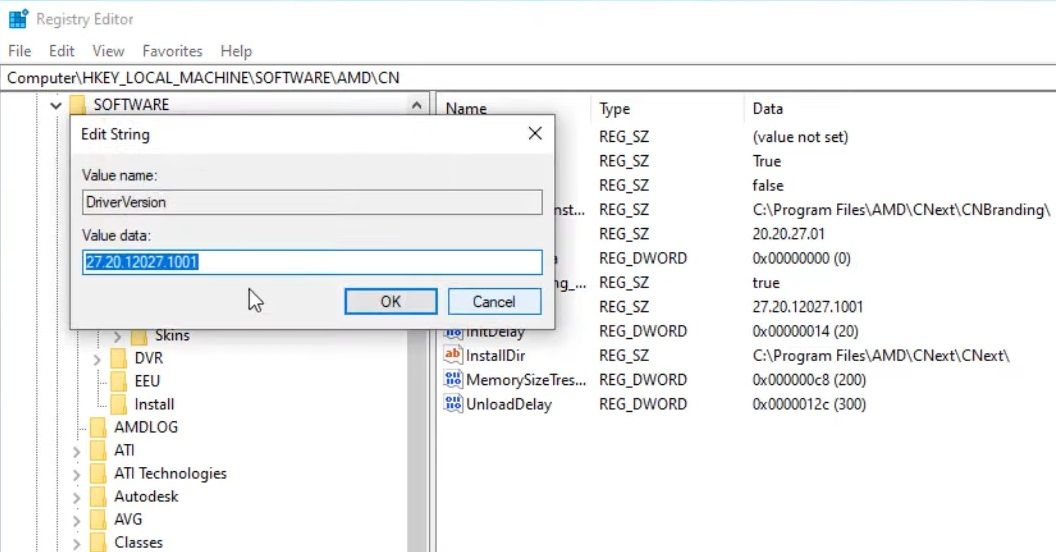
Fix 4: Modify CN Registry Key
Modifying the CN Registry Key is a quick and effective fix for the AMD Radeon software not working on Windows error. This method involves editing a specific registry entry to synchronize the software’s version with the installed drivers.
This mismatch often causes the software to malfunction, preventing you from accessing its features.
Step 1: Press Windows + X on your keyboard and select Device Manager. If prompted, select yes to launch the app and make modifications.
Alternatively, you can right-click the Windows icon and choose Device Manager.
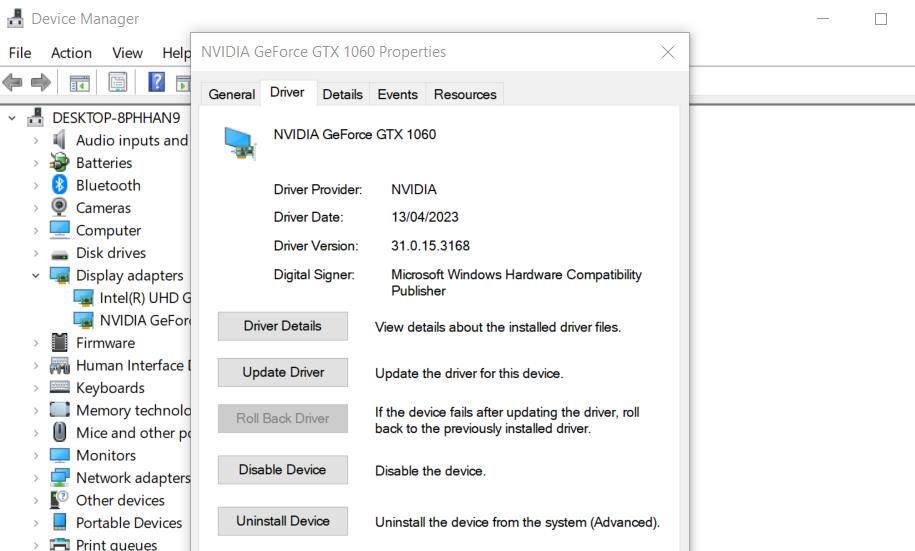
Step 2: Expand the Display adapters listing and double-click on AMD Radeon.

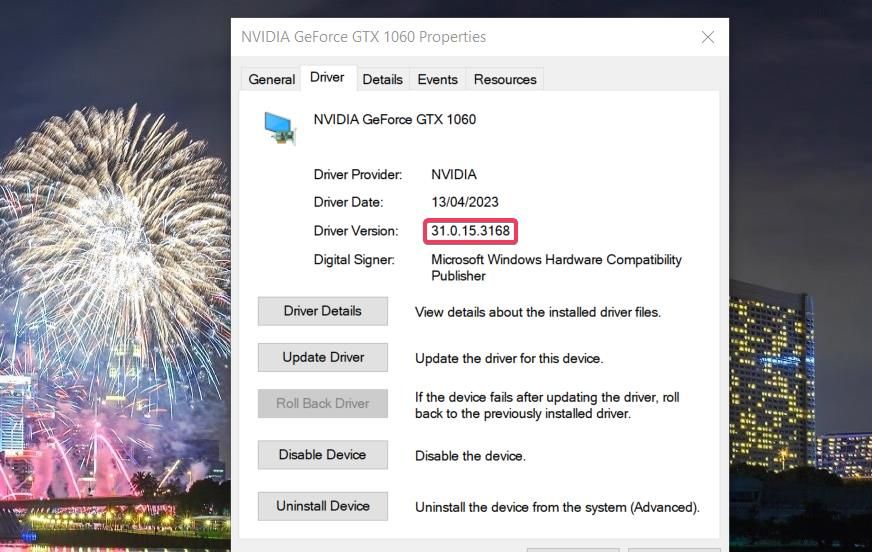
Step 3: Go to the Driver tab. Copy the number next to the Driver version and close the properties window and the Device Manager tool.

Step 4: Open Registry Editor using the Start menu and navigate to the below-mentioned path:
HKEY_LOCAL_MACHINE\SOFTWARE\AMD\CN
Step 5: Double-click the DriverVersion string on the pane’s right side. Hit backspace on your keyboard to clear the existing data.
Step 6: Paste the driver version number in that box and click OK to save changes.
Fix 5: Delete CN Folder
The CN folder contains the configuration files and settings for the Radeon Software, and if it gets corrupted or misconfigured, the software will malfunction. However, deleting this folder can reset the Radeon software’s default settings, eliminating any glitches or conflicts causing the issue.
Step 1: Open the Run box by pressing the Windows + R key on your keyboard.
Step 2: Type %localappdata% and click OK.
Step 3: Head to the AMD folder, select the CN folder, and click the Delete button (trash icon).
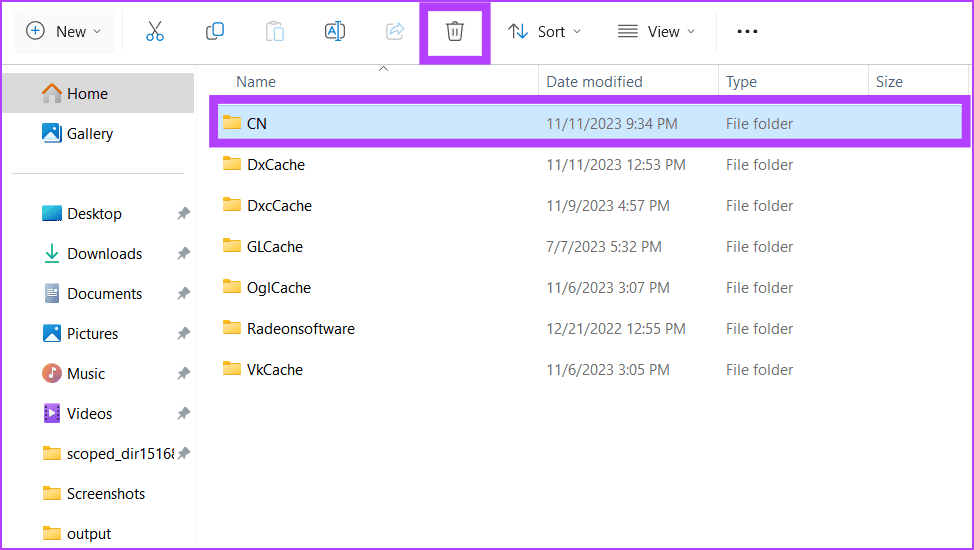
Restart your PC and relaunch the AMD Radeon software, and it will rebuild the CN folder.
Fix 6: Rebuild Radeon Profiles
AMD Radeon profiles in Windows are predefined settings that can be applied to your AMD Radeon graphics card to optimize its performance for specific tasks or applications.
However, if you’re facing issues with your software and don’t want to delete the entire CN folder from your computer, rebuilding the Radeon profile from scratch is a good option.
Step 1: Open the Run prompt, type %localappdata%/AMD/CN, and click OK.
Step 2: Select gmdb.blb and delete the file.

Fix 7: Rename Epic Games Launcher Log Files
Many forum users have reported that renaming the log file in the Epic Games launcher can fix the issue.
Step 1: Close all instances of Epic Games Launcher.
Step 2: Go to the following folder location in File Explorer:
explorer%localappdata%\EpicGamesLauncher\SavedStep 3: Rename the Logs folder to anything else like Logsbk, and open the Radeon Software.
It should work if the reason for you was AMD Radeon Graphics software interfering with the Epic Games launcher.
Was this helpful?
Thanks for your feedback!
The article above may contain affiliate links which help support Guiding Tech. The content remains unbiased and authentic and will never affect our editorial integrity.
AMD Software manages the AMD GPU installed on your system, whether it is a dedicated GPU or an integrated one. And, if your system fails to launch the AMD software, you are restricted to several GPU configurations that the application offers.
Usually, the application fails to start when there is a complication with the AMD GPU. But an outdated application or a corrupted profile folder could also cause the issue that you currently face. Regardless of the reason, here are a few things you can do to fix the issue with AMD software.
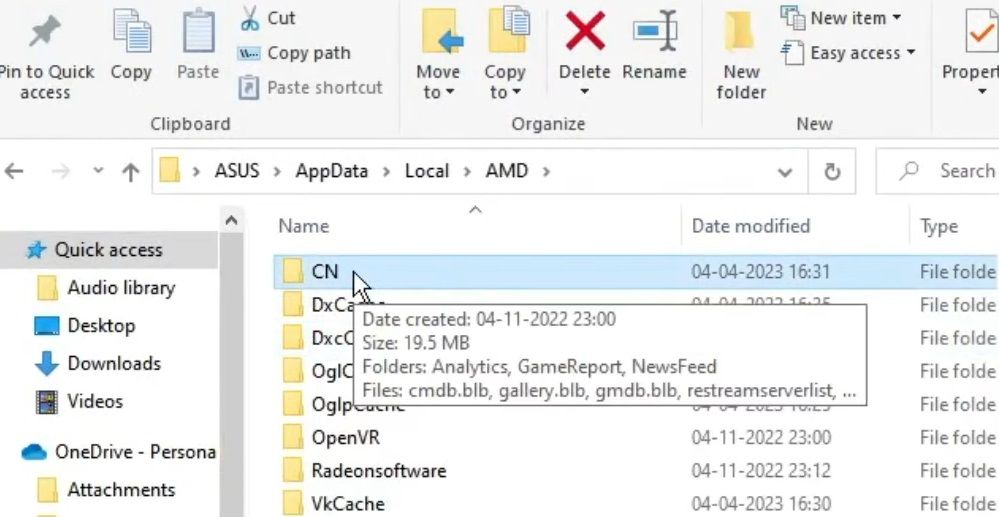
Delete AMD Profile Folder
Any changes you make to the AMD software are saved in a specific folder named CN. It also saves settings in the application for specific games and profile settings. These files can get corrupted and might cause issues with the AMD Software.
You can try deleting the entire CN folder and the application will automatically create a fresh folder—getting rid of the corrupted file.
- Open Run by pressing the Windows and R key simultaneously.
- Type
appdataand press Enter. - Go to Local > AMD.

- Select the CN folder and then press Shift + Delete to permanently delete said folder
- Click on OK if it asks for any confirmation.

- If Windows says AMD software is open, check Do this for all current items and then click on Skip.
- Try opening the AMD software. The application will create a new CN folder fixing any previous issues.


Reinstall Radeon Software Package
Users across the AMD community forum reported that reinstalling Radeon Software Package fixed the issue. When you reinstall the Radeon software package, it creates a fresh batch of AMD files located in the C drive, removing any bugs or errors in the application.
- Open File Explorer by pressing the Windows + E key.
- Navigate to
C:\Program Files\AMD\CNext\CNext - Scroll down and search for a file named RSXPackage with extention
.msix.
- Double-click on this file, and select Reinstall. Windows should notify you saying the new AMD software is ready.
- Try opening the AMD software.


Reinstall AMD Software/Driver
The problem you face with AMD Software could be due to an error in the driver. These complications could be anything from a corrupted driver file to minor bugs in the AMD Software itself.
First, you need to uninstall the AMD software on your PC.
- Open Run, type
appwiz.cpl, and press Enter. - Here, double-click on AMD Software and click on Yes.

- Select Uninstall.

- Once the uninstall process is complete, download Display Driver Uninstaller and install it.
- Boot the PC in safe mode and Run Display Driver Uninstaller.
- Set Select device type to GPU and Select Device as AMD.
- Click on Clean and restart.

- Now once the system boots to Windows in normal mode.
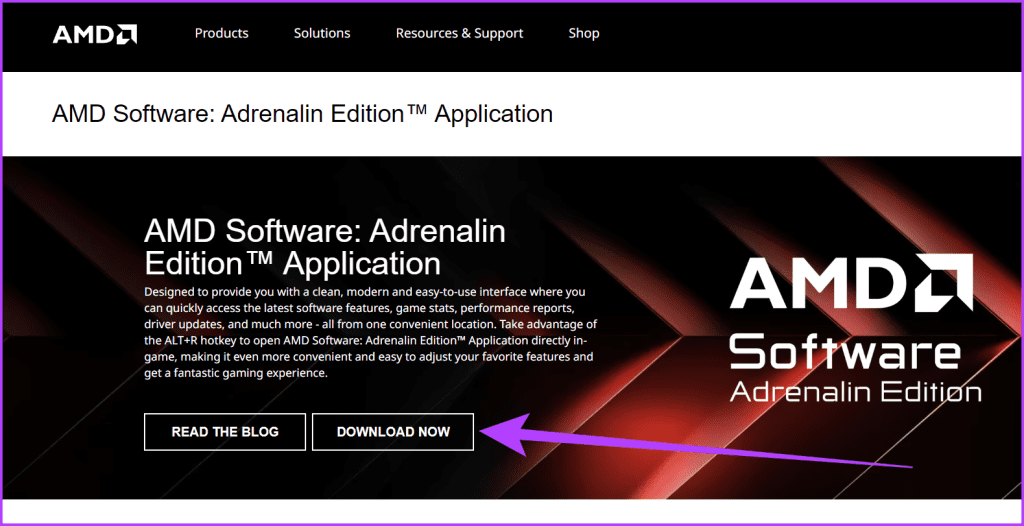
- Open the browser and go to the official AMD Software download center.
- Click on Download now.

- Open the downloaded file to start the installation.
- Now, follow the installation process.
- After the installation is complete, open AMD Software to see if it starts.


Alternatively, you can also use AMD Cleanup Utility to uninstall any AMD display driver on your system instead of the DDU.
Enable Integrated GPU
If you are using an AMD CPU with an integrated GPU, the AMD software may refuse to launch if you have disabled it. So, you can try enabling the integrated GPU in your system.
- Press Windows and X keys simultaneously.
- Select Device Manager.
- Expand Display adapters.
- Right-click on the integrated GPU and select Enable Device.

- Click on OK.

If your CPU has an iGPU but does not display in the Display adapter, it might be disabled from the BIOS.
- Restart the PC and repeatedly press the BIOS key to Enter the BIOS.
- Here, search for settings named Integrated GPU or CPU graphics and enable it.

- Save and exit the BIOS and boot into Windows.
- Now, launch AMD software.

Update Windows
If your system is running an older version of Windows, it is possible that AMD Software runs into issues while launching. Try updating Windows to see if it fixes the problem with AMD software.
- Press Windows and I key simultaneously. This will open Windows Settings.
- Go to Windows update.
- Click on Download and install or Check for updates.

- Once the installation is complete, restart the PC.

Uninstall Hidden Devices
If enabling the integrated GPU does not work, it could be that the hidden driver is what’s causing the issue. Sometimes, Windows may download incorrect drivers through a driver update. In our case, an incorrect display adapter driver is known to cause issues with the AMD software.
- Open Device Manager.
- Click on View, and check Show hidden Devices.
- Expand display adapters.
- Double-click on the grayed-out graphics driver.
- Go to the Driver tab and click on Uninstall.

- Select Uninstall.

Windows could again download these unwanted drivers from Windows update, so it is best that you disable driver auto-update. However, take this as a temporary solution, as you are required to update your Windows at a certain point in time.
- Open Run and type
gpedit.mscand press Enter. - On the left panel, navigate to Computer Configuration > Administrative Templates > Windows Components > Windows Update.
- Now on the right panel, double-click on Manage updates offered from Windows Update.

- Open Do not include drivers with Windows Updates.
- Check Enabled.

- Click on Apply, then OK.


Note: Local Group policy is only available on Windows Pro and Enterprise edition.
Users who need to fix AMD Radeon Software not working can’t open that app and access its settings. Are you among those users? If so, you can fix AMD Radeon Software not opening on a Windows PC with the resolutions below.
1. Run AMD Radeon Software as an Administrator
Users typically select to run AMD Radeon Software without admin rights from the context menu. Instead, try running AMD Radeon Software as an administrator to see if that helps. You can do that by pressing the Windows logo button + S, inputting AMD in the search box, and selecting Run as administrator for the AMD app found.
If that works, permanently set AMD Radeon Software to run with elevated privileges. To do so, follow the steps in this article about always running apps as an administrator. However, note that you can’t permanently set the AMD Radeon Software MS Store app to run as administrator.
2. End the RadeonSoftware Process Tree
First, check if Task Manager shows a process for AMD Radeon Software. If it does, that effectively means the app is already running in the background. Terminating the process tree for AMD Radeon Software might then fix the issue. You can close the RadeonSoftware process tree like this:
- Press the Ctrl + Shift + Esc keyboard key combination to activate Task Manager.
- Select Task Manager’s Details tab.
-
Look for and right-click RadeonSoftware.exe to select the End process tree option.

- Click on the End process tree button to confirm.

3. Delete the CN Folder
Corrupted profile data often causes the AMD Radeon Software to stop working. You can fix that by deleting the CN folder, which contains Radeon profile data. Erasing that folder rebuilds the profile. This is how you can delete the CN folder:
- Utilize the Windows key + R keyboard shortcut to access the Run dialog.
- Type %appdata% into Run and click OK to access a Roaming directory.
- Click AppData in Explorer’s folder location bar.
- Open the Local subfolder inside the AppData folder.
-
Click the AMD folder to go inside it.

- Right-click the CN folder and select Delete.
Alternatively, you can try erasing a specific file within the CN folder, which users have also confirmed works. To do that, open the CN folder to view its contents. Right-click the gmdb.blb file in that directory and select Delete.
4. Disable and Re-enable the AMD Radeon Graphics Adapter
Disabling and re-enabling the AMD graphics adapter is another potential resolution users confirm can kick-start AMD Radeon Software. You can disable and re-enable the AMD graphics adapter on your PC as follows:
- First, open Device Manager (press the Windows key + X hotkey and select the shortcut for that tool).
- Double-click the Display adapters category to extend it.
-
Right-click the AMD Radeon graphics card to select Disable device.

- Click on Yes when asked to confirm the selected option.
- Wait a minute and right-click the AMD Radeon graphics card again to select Enable device.

5. Update AMD Graphics Driver
A faulty or old AMD driver on your PC could be a possible cause for the Radeon software not working. You can fix that by installing the latest AMD driver for your PC’s graphics card.
Check out our guide to updating graphics drivers on Windows for further details about how to apply this potential fix.
6. Restore the Previous AMD Driver Installed on Your PC
Sometimes buggy new graphics drivers can cause issues, which is why NVIDIA and AMD release hotfixes. If your PC already has the latest AMD driver, restoring the previous one installed could be a viable solution for some users.
You can do that by selecting a Roll Back Driver option, as covered in our guide on rolling back graphics drivers on Windows.
7. Set Windows 11/10 to Clean Boot
A conflicting background program could be another factor for AMD Radeon not opening. The best way to remedy this possible cause is to configure your PC to clean boot and restart it. This will disable third-party apps and services automatically starting with Windows.
To apply a clean boot, you’ll need to remove apps and services from the startup with Task Manager and MSConfig. Our article about performing a clean boot on Windows includes specific instructions for how you can disable the required startup items. Restart your PC after disabling the startup items and select to open AMD Radeon.
8. Edit the CN Registry Key
Editing the CN registry key is resolution confirmed to fix the “Radeon Settings and Driver versions do not match” error message some users see when they try to start AMD Radeon. This registry fix involves entering a new value for the DriverVersion string in the CN key. These are the steps for applying this registry fix:
- First, open the Display adapters category within Device Manager, as instructed for steps one and two of this guide’s fourth resolution.
- Click the AMD graphics card with the right mouse button and select Properties.
- Select Driver on the tab bar.
-
Drag the cursor over the driver number on that tab and press Ctrl + C to copy.

- Close the properties window and Device Manager tool.
Now, open the Registry Editor on Windows before continuing.
-
Clear the registry address bar to input the following key location there:
Computer\HKEY_LOCAL_MACHINE\SOFTWARE\AMD\CN -
Double-click the DriverVersion string in the CN registry key.

- Clear the Value data box.
-
Press the Ctrl + V hotkey to paste the copied driver version number into the Value data box.
- Select OK in the Edit String window.
9. Reinstall the AMD Radeon Software
Reinstalling AMD Radeon Software can also fix variable issues that prevent that app from starting. You can remove AMD Radeon with the Control Panel or Settings methods in our guide to uninstalling Windows software. Or you can utilize a third-party uninstaller app to remove that software and thoroughly erase its leftovers.
To reinstall that app, open this AMD Radeon Software Microsoft Store page. Click the Install and Open in Microsoft Store buttons; select Get to install the AMD Radeon Software.

Utilize Your AMD Radeon Software Again
AMD Radeon Software is undoubtedly important to access for configuring graphical settings. The potential resolutions in this guide have enabled many users to fix AMD Radeon not working and access its settings again. So, applying those Windows 11/10 fixes will probably kick-start AMD Radeon on your PC.