
Readers help support Windows Report. We may get a commission if you buy through our links.
Read our disclosure page to find out how can you help Windows Report sustain the editorial team. Read more
Recording sound on a computer is an essential function we take for granted due to its simplicity. This, plus the availability of some of the best voice and sound recording apps on Windows 10 makes the process seamless.
However, configuring and troubleshooting it cannot be accessible when it doesn’t work out of the box. Users have faced problems recording sound in every version of Windows or any other operating system. And Windows 10 is no exception.
Today we’ll go through some easy ways to quickly fix this issue on your device.
Why does my screen recording have no sound on Windows 10?
A number of factors may trigger issues with the Windows voice recorder. On the top of the list, we have the following factors:
- Outdated device drivers – A simple update will fix the error in this case.
- Wrongly configured settings – If the voice recorder is not working on Windows 10/11, it might be because you have not enabled the recording device you want to use.
- Microphone levels – If these are not properly set, the mic may not pick up sound properly. You should adjust these settings too.
- Disabled audio recording permission – You should as well enable this to ensure the system can record.
You can effectively fix this by updating your drivers with a dedicated tool. However, no matter the cause, we have prepared the surefire ways to improve it in this guide.
How to fix the Windows voice recorder not working?
1. Enable microphone/recording device
-
- Right-click the sound icon on the Taskbar and Sounds.
-
2. Click the Recording tab at the top.

-
3. Right-click your recording device and select Enable.
If your computer uses more than one recording device, some of them might be disabled. This might lead to the Windows recorder not working issue.


2. Update your drivers
- Press the Windows key + X and select Device Manager.
- Click the arrow next to the Sound, video, and game controllers option to expand it.

- Right-click the driver there and select Update driver.
- Select the Search automatically for drivers option.
- Wait for the scan to complete and install the available updates.


Drivers are the pieces of software that help the OS communicate with the hardware components and are usually the first thing to check. Using the built-in updater is a reliable method of updating the drivers in most cases.
If this fails, you’ll need to download them from the manufacturers’ website. You’ll usually find a Support or Download section where you’ll find the latest drivers.
We highly recommend a professional tool to download all outdated drivers to your PC automatically. This type of tool helps you find the right driver updates and automatically installs them.
Most common Windows errors and bugs can result from faulty or incompatible drivers. An outdated system can lead to lags, system issues, or even BSoDs.
You can prevent these problems by using an automatic tool that will search and install the correct drivers on your computer with just a few clicks. That’s why we recommend you use Outbyte Driver Updater.
Here’s how to do it:
- Download and install the Outbyte Driver Updater app.
- Launch the software.
- Wait for the app to detect all incompatible drivers.

- Afterward, it will show you a list of the drivers found to select the ones to Update or Ignore.
- Click on Update & Apply Selected to download and install the newest versions.
- Restart your PC to ensure the applied changes.

Outbyte Driver Updater
Use this software and solve all driver-related issues from your PC.
Disclaimer: You may need to upgrade the app from the free version to perform specific actions.
3. Grant audio recording permission
- Press the Windows key + I to launch the Settings app.
- Select the Privacy option.

- Choose Microphone in the left pane.
- Toggle the switch for Allow apps to access your microphone forward to enable it.
- Now, you can scroll down to control the apps that can access your microphone.


The privacy option gives more control over the data you share and how you, and other users, access the installed hardware. One of them is the option to grant access to the microphone or not.
If this privacy feature is disabled, you might face the Windows voice recorder not working issue.
4. Adjust microphone levels
- Right-click the sound icon on your Taskbar and choose the Sounds option.
- Click the Recording tab at the top.
- Now, right-click the recording device you have plugged in and select Properties.
- Switch the Levels tab and make the necessary changes.


Each device has input and output levels which can be adjusted depending on your needs. For example, you can effectively fix the Windows voice recorder issue by setting the sound level correctly.
5. Select the correct recording device
- Repeat Steps 1 and 2 in the previous solution.
- Right-click on your recording device.
- Now, choose Set as Default Device.
- Finally, click the Apply button, followed by OK.

If you have multiple recording devices installed on your machine, Windows might not know which one to use, and you’ll have to select it manually as the default recording device.
This will let Windows know which of the installed devices you want to use and make it the default one for all situations.
If you switch between recording devices, like the microphone and stereo mix, you’ll have to change it each time you want to use one or the other.
6. Try a different recorder application

Sound recording applications are a dime a dozen, and some can work differently from others. However, the fact that one of them doesn’t work for you doesn’t mean that all of them won’t work, and sometimes the problem might be with the application and not with your PC.
Depending on how they connect to the recording device, some applications might also need to be updated to work with recent versions of Windows.
Before you look for faults in your system, you might want to try a different recording application. A good choice is WavePad since it’s got all the professional features you require.
WavePad has many audio editing and recording features. You can use it to restore audio, reduce noise, sample single voices, and more.
⇒ Get WavePad
7. Run the built-in audio troubleshooter
- Press the Windows key + I to open Settings.
- Select Update & Security.
- Choose Troubleshoot in the left pane.
- Click the Additional troubleshooters option.
- Select Recording Audio.
- Finally, click the Run the troubleshooter button and follow the onscreen instructions.


If you still can’t record sound on Windows 10, try running Microsoft’s dedicated audio recording troubleshooter. This tool automatically detects and repairs audio issues that may prevent you from recording sound on your computer.
- Fix: An Error Occurred While Loading a Higher Quality Version of This Video
- iTunesMobileDevice.dll is Missing From Your Computer [Solved]
- SYNSOACC.DLL Could Not Be Located: How to Fix in Cubase
- Fix: Omen Gaming Hub Undervolting Not Working
8. Clean boot your computer
- Press the Windows key + R, type msconfig, and click OK.
- Uncheck the Load startup items under Selective startup.
- Click the Services tab at the top.

- Check the box for Hide all Microsoft services and click the Disable all button.
- Now, click the Startup tab at the top.
- Select, Open Task Manager.
- From here, right-click each of the startup programs and select Disable.

- Now, go back to the System Configuration window and click Apply, followed by OK.


If certain apps and programs are preventing you from recording audio on your computer, try performing a clean boot. Placing your machine in Clean Boot allows you to identify any third-party apps causing this problem.
How do I enable audio recording on Windows 10?
- Get the Windows Voice Recorder from the Microsoft Store if you don’t have it.

- Press the Windows button and type voice recorder.
- Select the top result to open the recorder app.

- Finally, click the record button, and you can start recording with your recording device.


There you have it: A list of the best solutions to fix the Windows voice recorder not working issue. With this, we believe you should be able to resolve the issue for good.
NOTE
If the Windows voice recorder is not working on Windows 11, you might need to enable the recording device before using it.
Another solution to try is to run the audio recording troubleshooter. We have shown how to do all these in the above solutions list, plus more.
Do you need a list of the best vocal recording software you can use today? Then, check our excellent guide for the top picks available.
If you re-record audio, use the comments below to tell us which solution worked for you.
Ivan Jenic
Windows Hardware Expert
Passionate about all elements related to Windows and combined with his innate curiosity, Ivan has delved deep into understanding this operating system, with a specialization in drivers and driver troubleshooting.
When he’s not tackling diverse driver-related problems, Ivan enjoys watching good movies and spending time hiking with his family and friends.
Have you ever encountered a frustrating situation where your screen recording no sound on Windows 10? You meticulously record an important presentation or capture a thrilling gameplay session, only to realize later that the audio is completely missing. You’re not alone. Many users encounter the issue of screen recording no sound, which can be quite inconvenient, especially when you’re trying to capture important audio alongside your video.
But worry not, as we’ve got you covered! In this blog, we’ll explore the reasons behind screen recording no sound and provide 6 practical methods to fix the problem.
- Part 1. Why Does My Screen Recording Have No Sound?
-
Part 2. How to Fix a Screen Recording with No Sound?
- Method 1. Update Windows Drivers
- Method 2. Permit Audio Recording
- Method 3. Run Audio Troubleshooter
- Method 4. Use Video Repair ToolHOT
- Method 5. Clean Boot the PC
- FAQs about Scrееn Rеcording No Sound
- Q1: How do I еnablе audio rеcording on Windows 10?
- Q2: Why does my screen recording have no sound on Windows 11?
Part 1. Why Does My Screen Recording Have No Sound?
There can be several reasons why your screen recording no sound. Let’s delve into some common culprits:
-
Incorrect Recording Settings
Inaccurate configuration of recording settings can lead to silent screen recordings. -
Incorrect Audio Output Device Selection
If the wrong audio output device is chosen, the sound won’t be captured during the recording process. -
Microphone Issues
A malfunctioning or muted microphone can cause your screen recordings to be soundless. -
Outdated or Corrupt Sound Drivers
Outdated or corrupted sound drivers may hinder the proper functioning of audio recording, resulting in recordings without sound.
Part 2. How to Fix a Screen Recording with No Sound?
Now that we understand the potential causes let’s explore effective solutions to resolve the issue of how to fix a screen recording with no sound:
Method 1. Update Windows Drivers
The first step in troubleshooting screen recording no sound is to update drivers. These software components facilitate communication between the operating system and your hardware. Follow these simple steps to update drivers in Windows 10:
- Click on the «Start» menu and access «Settings.»
- Choose «Update and Security,» then select «Windows Update» from the left pane.
-
Click on «Check for Updates» in the right window.
-
If no updates are available through «Windows Update,» download the latest sound card and recording hardware drivers from the manufacturer’s website.
Method 2. Permit Audio Recording
Enabling the privacy option provides greater control over access to installed hardware for both yourself and others. However, if recording apps are not granted access to the microphone, you may encounter the «screen recording no sound» issue. To resolve this, simply follow the steps below to enable audio recording.
- Open the «Settings» menu by either using the hotkey «Windows + I» or accessing it from the «Start» menu.
- Within «Settings,» navigate to the «Privacy» section. In the left pane, locate the «Microphone» tab.
- Toggle on the «Allow apps to access your microphone» option.
-
Scroll down to find the list of recording apps and toggle on their access to your microphone.
Method 3. Run Audio Troubleshooter
If you’re still unable to record the screen with sound, you can utilize the dedicated audio recording troubleshooter provided by Microsoft. This troubleshooter can automatically detect and repair audio issues preventing screen recording with sound. Follow these steps to run the audio troubleshooter:
- Press «Windows + I» to open Settings and select «Update & Security.»
- Choose «Troubleshoot» in the left pane, then click «Additional troubleshooters.»
-
Select «Recording Audio» and click «Run the troubleshooter.»
Method 4. Use Video Repair ToolHOT
If the above methods fail to resolve the issue of when my screen recording has no sound, you can try using 4DDiG File Repair. This powerful tool repairs inaccessible, corrupted, or damaged videos and photos on Windows devices. Here’s how to repair corrupted/damaged videos using 4DDiG File Repair:
-
Launch 4DDiG File Repair on your Windows PC and click the «Video Repair» tab. Then, choose «Fix Video Errors» and click the Start button.
-
Add the no sound screen record video(s) to the repair queue.
-
Start repairing the corrupted video(s).
-
Review and export the repaired video(s) once the repair process is complete.
Mеthod 5. Clean Boot the PC
When you encounter a situation where there is no audio while recording your computer screen, it is possible that certain apps or programs are obstructing the audio recording process. In such cases, you can try conducting a «Clean Boot» to isolate any third-party apps that could be the root cause of the «screen recording no sound» issue.
Here are the steps to follow:
-
Press «Windows + R» and type «msconfig» in the Run dialog box. Click «OK» to open the «System Configuration» window.
- In the «General» tab, select «Selective startup» and uncheck «Load startup items».
- Switch to the «Services» tab, enable the «Hide all Microsoft services» checkbox, and then click «Disable all».
- Go to the «Startup» tab and click «Open Task Manager». From there, you can disable any startup programs.
- Go back to the «System Configuration» window, click «Apply», and then select «OK».
- Finally, restart your computer and try recording the screen again.
FAQs about Scrееn Rеcording No Sound
Whilе wе havе covеrеd various mеthods to fix scrееn rеcording without sound on Windows 10, thеrе arе still a fеw common quеstions that usеrs oftеn ask.
This sеction will address two frеquеntly askеd questions for further clarity and guidancе. Wе aim to еxplain thе answеrs in a human-friеndly manner, avoiding complеx tеchnical jargon and еnsuring a usеr-friеndly еxpеriеncе when my screen recording has no sound.
Q1: How do I еnablе audio rеcording on Windows 10?
To enable audio recording on Windows 10, follow these steps:
- Right-click on the speaker icon in the system tray located at the bottom right corner of the screen and select «Open Sound settings.»
- In the Sound settings window, scroll down to the «Related Settings» section and click on «Sound Control Panel.»
- In the Sound window, click on the «Recording» tab. Right-click on an empty space in the list of recording devices and select «Show Disabled Devices.»
- Right-click on «Stereo Mix» and select «Enable.»
- Right-click on «Stereo Mix» again and select «Set as Default Device.» Click «OK» to save the changes.
With these steps, you should now be able to record audio on your Windows 10 computer.
Q2: Why does my screen recording have no sound on Windows 11?
If you are experiencing no sound on screen recording on Windows 11, the underlying reasons can be similar to those on Windows 10.
The causes may include incorrect recording settings, audio output device selection, microphone issues, or outdated sound drivers. By verifying and addressing these factors using the methods outlined earlier in this blog, you should also be able to resolve the issue on Windows 11.
Conclusion
Screen recording no sound can be a frustrating experience, but armed with the right knowledge and solutions, you can overcome this issue on your Windows 10 device. In this blog, we have explored the common reasons behind my screen recording has no sound problems and provided step-by-step methods to fix them.
Remember to update Windows drivers, grant audio recording permission, run the audio troubleshooter, or consider using the 4DDiG File Repair tool. With these effective solutions, you can ensure your screen recordings are visually appealing and accompanied by clear and synchronized sound. Happy recording!
⛳ You May Also Like: Why Is DaVinci Resolve No Audio & How to Fix It
4DDiG Photo/Video Repair
4DDiG File Repair is your second to none choice to repair any damaged or corrupted photos & videos on Windows and Mac.
Free Download
Free Download
BUY NOW
BUY NOW
В наше время у многих людей возникает необходимость записывать видео, но при этом они неизбежно сталкиваются с некоторыми сложными проблемами. Многие из них задаются вопросом: почему запись экрана без звука? Давайте разберемся в этой проблеме и решим ее.

- Содержание
-
Причина
-
Как исправить запись экрана без звука:
Причина
Отсутствие звука может быть вызвано различными причинами, но наиболее распространенные из них следующие:
1. Прежде чем подтвердить остальные условия, убедитесь, что звук есть в самом записанном видео и не отключен. Если само видео воспроизводится с выключенным звуком, то, конечно же, звук отсутствует.
2. при условии, что на самом видео есть звук, на записанном видео нет звука, чтобы проверить, находится ли система в беззвучном режиме.
Как исправить запись экрана без звука:
Многие люди, записывающие экран в Windows, обычно выбирают как встроенную в систему запись, так и запись с помощью программ. Далее мы проанализируем эти два направления по очереди.
Встроенная в систему запись без звука — Xbox Game Bar
1. Прежде всего, обратите внимание на то, включен ли звук в вашей системе и установлен ли беззвучный режим. Если он установлен в беззвучный режим, выключите его.
2. Откройте Mix, настройте звук и громкость системы. Иногда громкость записи слишком мала, что может привести к отсутствию звука.
3. если настройки звука не в норме, то можно проверить, не неисправно ли аудиоустройство компьютера. Вы можете использовать внешнее аудиоустройство для самостоятельной проверки, если подтвердится, что проблема в оборудовании, то нужно как можно скорее отнести его в ремонт.
Программа для записи экрана без звука — iTop Screen Recorder
iTop Screen Recorder — это очень удобная программа для записи. Если при использовании iTop Screen Recorder для записи экрана нет звука
Шаг 1: Откройте программу записи экрана, выберите «Только звук» и включите динамики. При необходимости включите микрофон.
Записывайте видео & аудио с экрана бесплатно
- Записывайте высококачественное видео с экрана вашего ПК, а также звук с системы или устройства ввода синхронно с видео.
- Упростите количество шагов и кликов мыши, для более комфортного использования. Управляйте всем процессом записи без усилий.
- Поддержка вывода в несколько форматов и преобразование с использованием новейших технологий сжатия. Лучшее качество и меньший размер.
Шаг 2: Убедитесь, что системный звук включен, нажмите кнопку rec, чтобы начать запись.

Шаг 3. После завершения записи видеофайл будет сохранен в файле, и в это время вы сможете проверить, нет ли звука.

Если после выполнения всех вышеперечисленных действий звук не пропадает, рекомендуется выяснить, не повреждено ли аппаратное устройство, и своевременно принять меры.
Вывод
Если вы обнаружили, что в записанном видео нет звука, пожалуйста, не паникуйте, сначала ищите источник среди общих причин, приведенных выше, а затем один на один решайте проблему.
Информация автора

Snow
Snow — редактор веб-сайтов, специализирующийся на информационных технологиях. Она обладает богатым опытом и знаниями в области программного обеспечения для записи экрана. Ее задача — предоставить пользователям самую свежую и точную информацию и помочь им решить любые проблемы, связанные с записью экрана.
Запись экрана без звука может быть неприятной, особенно когда вы пытаетесь запечатлеть важный момент или поделиться обучающим материалом. Будь то запись игровой сессии или документирование проблемы с программным обеспечением, отсутствие звука может значительно снизить эффективность и качество вашего контента.
Но не стоит бояться, поскольку существуют различные причины, по которым запись с экрана может быть без звука, и, к счастью, множество решений этой распространенной проблемы.
В этой статье мы рассмотрим потенциальные причины отсутствия звука в ваших записях и изучим шаги по устранению неполадок, которые помогут вам восстановить этот важный аудиокомпонент.
Почему при записи экрана нет звука?
Понимание различных факторов, которые могут привести к отсутствию звука в записи, необходимо для эффективного устранения неполадок.
Мы рассмотрим различные причины, по которым в вашем видео может отсутствовать звук. Они охватывают различные области, включая программные конфигурации, аппаратные настройки и формат файлов.
Зная эти причины, вы сможете определить первопричину видео без звука и принять соответствующие меры по ее устранению.
1. Настройки программы для записи экрана
Когда речь идет о проблемах, связанных с программой для записи видео с экрана, несколько факторов могут способствовать записи экрана без звука.
Неправильная настройка параметров в программе может привести к отсутствию захвата звука.
Очень важно убедиться, что приложение настроено на одновременную запись видео и звука.

Для записи экрана со звуком обычно требуется доступ к системным ресурсам, таким как микрофон.
Если программа для записи видео не имеет необходимых разрешений, она не сможет записывать звук.
Проблемы совместимости между видеорегистратором и операционной системой или аудиоаппаратурой также могут привести к записи экрана без звука.
Устаревшие версии приложений или программы для записи экрана, не оптимизированные для конкретных конфигураций, могут не обеспечивать корректную запись звука.
2. Настройки ПК
Проблемы, связанные с настройками ПК, могут существенно повлиять на процесс записи звука при захвате экрана.
- Такие проблемы, как отключенный микрофон, могут привести к отсутствию звука при записи экрана.
Если микрофон работает неправильно или отключен, звук не будет захвачен во время сеанса съемки экрана.
- Устаревшие или неправильные аудиодрайверы могут вызвать сбои в записи звука.
Если драйверы не обновлены или неисправны, микрофон может работать некорректно, что приведет к записи экрана без звука.

- Неправильные настройки громкости на компьютере также могут быть причиной почему на записи экрана нет звука.
Если громкость установлена слишком низко или выключена, микрофон не обнаружит никакого звука.
3. Устройства ввода
Проблемы, связанные с устройствами ввода, в частности с микрофонами, могут привести к отсутствию звука при записи с экрана.
Если микрофон не выбран в качестве устройства ввода, то голос не будет улавливаться.
Пользователям следует убедиться, что микрофон правильно включен и выбран в настройках программы записи или системы.

Аппаратные проблемы с микрофоном также могут приводить к записи экрана без звука.
Сломанный или неисправный микрофон может не захватывать звук во время сеансов записи экрана. Пользователям следует проверить физическое состояние микрофона и при необходимости заменить его, чтобы решить эту проблему.
4. Формат файла
Выбор расширения файла может повлиять на то, будет ли запись экрана содержать звук.
Некоторые форматы файлов могут поддерживать только видео, без звука.
Например, такие форматы, как GIF или BMP, обычно предназначены для изображений и не содержат звука. Аналогично, некоторые видеоформаты могут не поддерживать звук по умолчанию, в зависимости от кодека и настроек, используемых при записи.

Как сделать запись экрана со звуком в Windows?
Решение 1: Обновите драйвер
Драйверы — это программное обеспечение, которое помогает компьютеру взаимодействовать с его аппаратными компонентами, включая аудиосистему.
Чтобы решить проблему, вы можете попробовать обновить драйверы. Для начала определите, какой аудиодрайвер установлен на вашем компьютере, а затем проверьте сайт производителя на наличие обновлений. Если таковые имеются, загрузите и установите их.

Обновляя драйверы, вы также можете заметить увеличение общей производительности компьютера, а не только записи звука. Так что даже если это не устранит проблему, это все равно будет полезно. Вы также можете настроить автоматическое обновление, чтобы не проверять обновления вручную.
Решение 2: Перезагрузите компьютер
Если вы столкнулись с проблемой отсутствия звука при записи экрана, решить ее можно, выполнив чистую загрузку компьютера. Это поможет устранить любые конфликты программного обеспечения, которые могут быть причиной проблемы.
Пошаговая инструкция:
-
- Откройте диалоговое окно «Выполнить», нажав клавиши Windows + R.
- Введите «msconfig» и нажмите клавишу Enter.
- В окне «Конфигурация системы „ перейдите на вкладку «Службы» и выберите «Скрыть все службы Microsoft».
- Нажмите «Отключить все», чтобы отключить все службы, не относящиеся к Microsoft.
- Перейдите на вкладку «Запуск» и нажмите «Открыть диспетчер задач». Отключите все элементы запуска, щелкнув на каждом из них правой кнопкой мыши.
- После этого закройте «Диспетчер задач „ и нажмите «ОК».
- Перезагрузите компьютер и попробуйте записать экран снова. Если причиной проблемы был конфликт программного обеспечения, теперь он должен быть устранен..
Решение 3: Проверьте микрофон
Вы проверили все настройки, и вроде бы все в порядке, но звука все равно нет. Не волнуйтесь, у нас есть еще одна вещь, которую вы можете попробовать, прежде чем сдаваться.
Без использования микрофона ваши видеоролики не будут содержать звука.
Во-первых, убедитесь, что микрофон работает правильно. Иногда неисправный микрофон может быть виновником отсутствия звука в ваших записях. Проверьте его, записав короткий звук и воспроизведя его.
Затем проверьте, предоставлен ли микрофону доступ в системных настройках вашего устройства. Иногда обновление или установка нового приложения могут нарушить эти настройки и заблокировать разрешение.
Если все в порядке, попробуйте перезагрузить и устройство, и приложение, которое вы используете для захвата экрана со звуком.
Решение 4: Используйте средство устранения неполадок
Устранение проблем с аудио — это встроенный инструмент, который помогает определить и устранить распространенные проблемы со звуком на вашем компьютере.
Он проверяет любые проблемы с настройками звука, драйверами или средствами и предлагает решения для их устранения. Это быстрый и простой способ найти ответ на вопрос «Почему при записи с экрана нет звука».
Чтобы включить инструмент, просто зайдите в настройки вашего устройства и найдите «Устранение неполадок». Нажмите «Воспроизведение звука», а затем нажмите «Запустить средство устранения неполадок». Утилита выявит все возможные проблемы и даст четкие указания по их устранению.

Почему при записи экрана нет звука: вопросы
- Что делать, если программа для записи экрана не захватывает звук, несмотря на правильные настройки?
- Если ваша программа правильно настроена, но все равно не захватывает звук, попробуйте переустановить или обновить ее. Убедитесь, что оно совместимо с вашей операционной системой и оборудованием. Если проблема сохраняется, попробуйте использовать альтернативные приложения для дальнейшего устранения неполадок.
- Могут ли фоновые приложения или процессы влиять на захват звука?
- Да, убедитесь, что другие приложения активно используют микрофон, и закройте ненужные программы, чтобы оптимизировать производительность записи.
- Существуют ли особые требования для захвата звука при записи экрана?
- Хотя большинство современных ПК и ноутбуков оснащены встроенными микрофонами, использование внешнего микрофона иногда может обеспечить лучшее качество звука. Убедитесь, что ваш микрофон соответствует необходимым аппаратным требованиям и совместим с вашей системой записи.
- Существуют ли точные программы записи с экрана, известные проблемами со звуком?
- Некоторые программы для записи видео могут иметь более частые проблемы со звуком из-за проблем совместимости с определенными операционными системами или оборудованием. Изучите отзывы и опыт пользователей о конкретных программах для захвата экрана, чтобы найти те, которые надежно записывают звук.
- Какой формат аудио следует использовать для наилучшего качества записи аудио?
- Для оптимального качества звука используйте форматы без потерь, например WAV, или высококачественные сжатые, например AAC. Выходное расширение обычно можно настроить в настройках программы для записи экрана.
- Можно ли записывать звук с нескольких источников одновременно?
- Чтобы включить эту функцию, необходимо проверить параметры программы. Найдите в настройках опции вроде «Стереомикс» или «Несколько аудиовходов».
Почему запись экрана без звука: заключение
Решение проблемы бесшумной записи экрана может быть сложным, но понимание факторов, связанных с ней, поможет вам устранить неполадки и решить проблему.
Будьте бдительны, регулярно обновляйте программное обеспечение и используйте такие ресурсы, как документация и форумы поддержки, для эффективного устранения неполадок.
Набравшись терпения и технических знаний, вы сможете создавать высококачественные записи с экрана с чистым звуком, которые улучшат ваш контент для зрителей.
PAGE CONTENT:
- An Overview of Windows 10 Screen Recorder — Xbox Game Bar
- Why Is Xbox Game Bar Not Working on Windows 10
- How to Fix Xbox Game Bar Not Working on Windows 10
- Wrapping Up
- FAQs
Are you facing trouble while trying to screen record on your Windows 10 computer? You’re not alone. Many users are finding that their screen recording tools have stopped working or malfunctions, resulting in poor-quality recordings.
While this can be extremely frustrating, it’s important to understand why your screen recording might not be working and where you can find the right solutions to get back up and running again. In this blog post, we’ll provide a comprehensive guide for resolving issues related to screen recording on Windows 10 computers. Read on to learn more!
| Methods | Effectiveness | Time Cost | Difficulty |
| Check and Enable Xbox Game Bar | High | 1 Min | ⭐ |
| Enable the Microphone Device | High | 1 Min | ⭐ |
| Spare More Space for Recordings with the Task Manager | Medium | 2 Min | ⭐⭐ |
| Update the Graphics Driver with Device Manager | Medium | 3-5 Min | ⭐⭐⭐ |
| Restart Your Windows 10 Computer | High | 1 Min | ⭐ |
| Try Xbox Game Bar Alternative ❤ | Super High | 1 Min | ⭐ |
An Overview of Windows 10 Screen Recorder — Xbox Game Bar
Xbox Game Bar is the built-in Windows 10 screen recorder that allows its users to capture screen activities, like game processes, online meetings, streaming videos, etc.
The Xbox Game Bar offers a wide range of features and settings that allow users to customize their screen recording experience and get high-quality results. The easy-to-use and powerful feature makes the Xbox Game Bar the first choice to record screen for Windows 10 users.
Why Is Xbox Game Bar Not Working on Windows 10
Why is my screen recording not working? Well, although Xbox Game Bar does bring great convenience for screen recording on Windows 10, it doesn’t mean that the utility works each time perfectly. There are still some issues that may occur when you use the Xbox Game Bar screen recorder, and «Screen Recording Not Working in Windows 10» is the most common one.
According to users’ feedback, while recording, they will receive a notice showing that «Recording isn’t working error. 0x82323007» or «Recording isn’t working error. 0x82323619», etc.
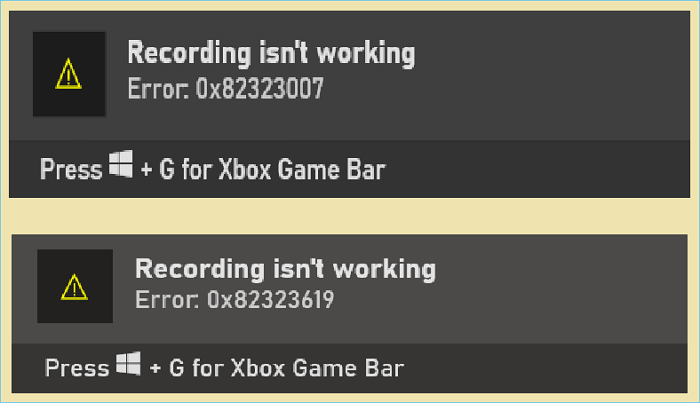
The reason why these errors appear may be caused:
- The permission for screen recording or microphone isn’t enabled
- The microphone level isn’t adjusted correctly
- The microphone is disabled
- There isn’t enough storage space on your computer
- The copyright issues
- ……
Whatever the reason, you can refer to the following solutions to fix screen recording not working on Windows 10.
You may be interested:
How to Fix Xbox Game Bar Not Working on Windows 10
Fix 1. Check and Enable Xbox Game Bar
Screen Recording is not working on Windows 10 may be because the Xbox Game Bar isn’t enabled on your Windows computer.
Step 1. Follow the path to enable the Xbox Game Bar recording settings: Start — Settings — Gaming — Xbox Game Bar.
Step 2. There is a button under the text «Enable Xbox Game Bar for things like recording game clips, chatting with friends, and receiving game invites. (Some games require Xbox Game Bar for receiving).»
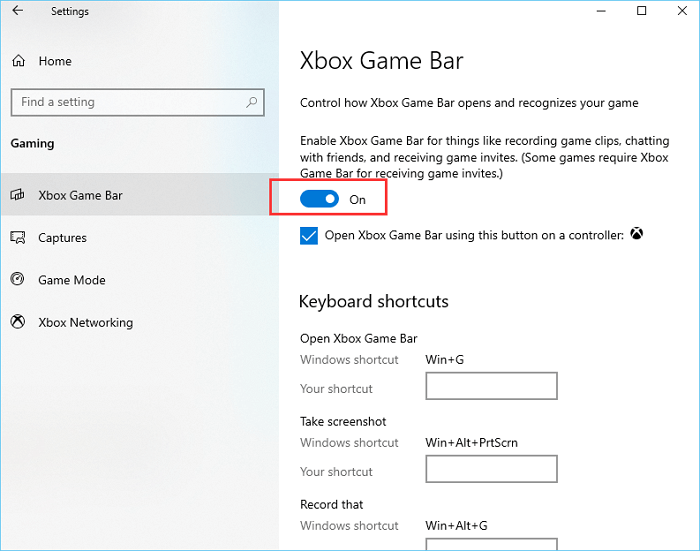
If it shows «Off«, you should slide the button to ensure it shows «On«. If it shows «On», you need to try the following solutions.
Fix 2. Enable the Microphone Device
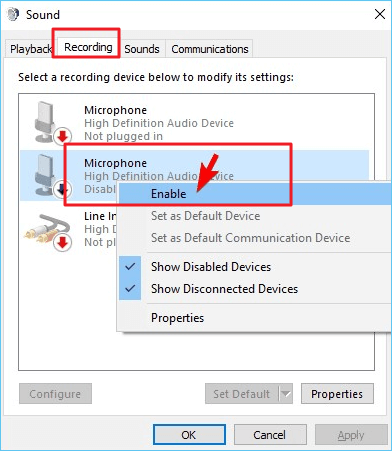
The screen recording may not work due to the disabled microphone.
Step 1. Right-click the Volume icon at the Windows taskbar in the bottom-right corner, and select the «Recording» option.
Step 2. Find the Microphone device, and check if it is enabled. If not, right-click it and click «Enable«, then click «OK» to save the settings.
Fix 3. Spare More Space for Recordings with the Task Manager
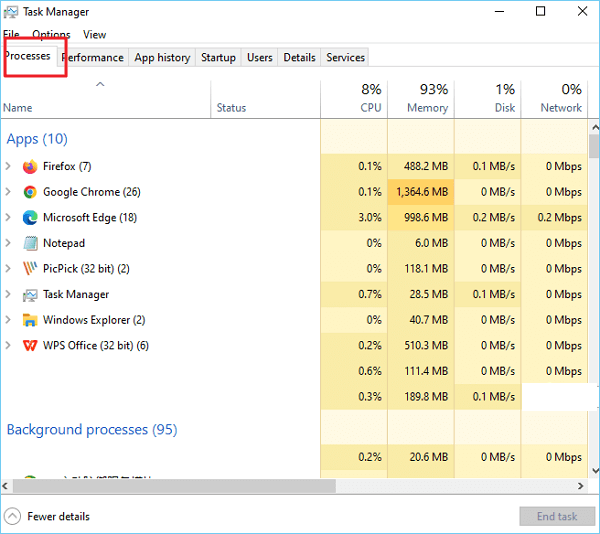
Too many programs running in the background of your computer may affect screen recording.
Step 1. Open the Task Manager by right-clicking the Taskbar, then select «Task Manager«.
Step 2. Click the «Processes» tab and check if there are too many processes running in the background. If so, end them to free up more space for screen recordings.
Fix 4. Update the Graphics Driver with Device Manager
The screen recording may not work because of the outdated graphics driver. Updating the graphics driver will solve most Windows utilities not working issues.
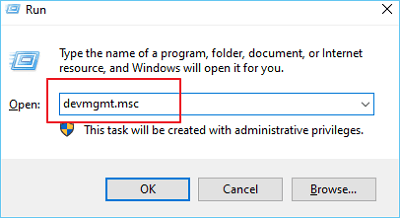
Step 1. Press the «Windows + R» simultaneously to open the Run box, type in «devmgmt.msc» and click «OK» to open Device Manager.
Step 2. Find and click «Display Adapter«, find your graphics adapter device, and right-click it > select «Update Driver«.

Step 3. Select «Search automatically for updated driver software«.
Fix 5. Restart Your Windows 10 Computer
If all the above solutions cannot solve screen recording not working on Windows 10, you can try restarting your computer.
Step 1. Press «Ctrl + Alt + Delete» to open the Security options window.
Step 2. Select «Restart» and wait for it to restart, then try the Xbox Game Bar again.
Fix 6. Try Xboc Game Bar Alternative — Hot
Suppose the screen recording still doesn’t work after the restart. In that case, you may need to try an alternative screen recorder like EaseUS RecExperts, which is a Mac and Windows screen recorder with powerful screen recording and editing functions.
With an intuitive and straightforward interface, EaseUS RecExperts is capable of screen recording for multiple displays and screen capture, screencasting webcam feed, and making screen recordings with customized hotkeys or mouse click effects.
Follow the steps below to record screen with EaseUS RecExperts:
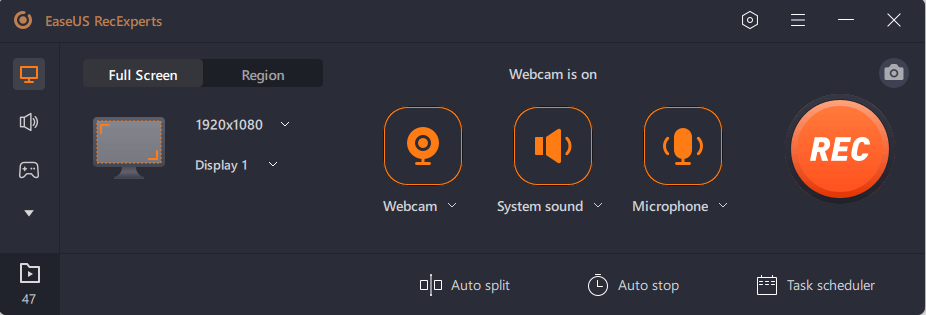
Step 1. Launch EaseUS RecExperts. There are two modes for screen recording. Choose «Full Screen», this tool will capture the whole screen; choose «Region», you will need to select the recording area manually.

Step 2. After that, you can choose to record the webcam, system sound, or microphone as you like. Of course, you can turn them off if you only need to record the silent screen.
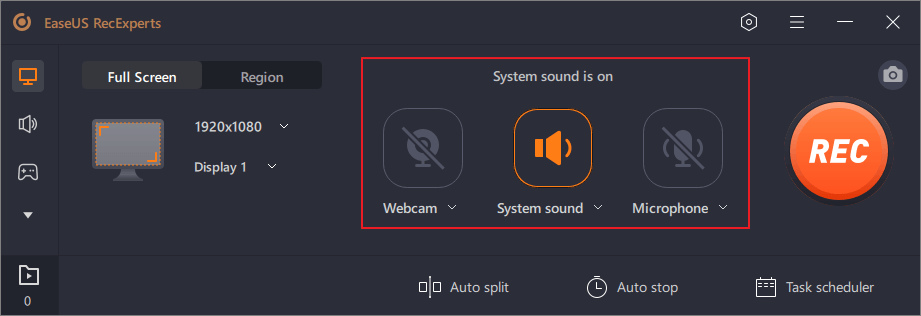
Step 3. Then, you can click the red «REC» button to start recording. Now you will see a menu bar on your screen. If you want to pause the recording, click on the white «Pause» button; to end the recording, click on the red «Stop» button.
Step 4. After recording, you will be led to the recording list interface. Here you can view or edit your recordings easily.

Wrapping Up
Various issues may cause screen recording not to work on Windows 10, and it can be fixed by following the above solutions. I hope these fixes are helpful.
If none of them works, you may need to try an alternative screen recorder like EaseUS RecExperts, with powerful screen capturing and editing functions.
FAQs
1. Why is screen recording not working in Windows 10?
Xbox Game Bar not working in Windows 10 may be caused by various issues, such as the disabled microphone device, disabled application, outdated graphics driver, or too many programs running in the background.
2. How do I enable screen recording in Windows 10?
To enable screen recording in Windows 10, you can follow the path to find and enable it: Start — Settings — Gaming — Xbox Game Bar — slide the button On.
3. Where are the screen recording settings?
The screen recording settings are located in the Xbox Game Bar. You can open the Xbox Game Bar by pressing the «Windows + G» keys, and then you can access the screen recording settings.