
Удостоверься что проблема именно в биосе а не неправильно созданная флешка, идет ли загрузка с нее если физически выключить диски?
Перебирай usb порты, так как старые материнки могли по разному работать с разными своими же контроллерами в момент загрузки, скорее всего лучше использовать порты позади компьютера а не впереди, лучше не использовать порт сверху, рядом с pc2 портом для клавиатуры/мыши, мне рассказывали что там может оказаться usb1, сам не встречал но не лишено логики (эти порты для мышек и клавиатур)
2009 возможно usb3 еще не было, синие, но если есть — не вставляй в них загрузочную флешку.
Можно попытаться создать флешку не с помощью windows download tool а с помощью посекторного копирования образа iso — windd, это имеет смысл если в биосе есть пункт меню загрузки с usb cdrom, так же можно по перебирать разные типы загрузки usb hdd, usb fdd (да да я такие видел) и т.п.
Не использовать флешки больше 8 гигабайт, это странно но старые компьютеры часто не хотят с 16 и выше флешек грузить windows (при этом грузят linux).
Можно не лезть в сам биос а использовать меню загрузки, обычно оно по кнопке F8/F11/F12 вызывается, смотри стартовое окно загрузки компьютера (можно отключить логотип в биосе), иногда оно дает больше информации и контроля
* проверь наличие в биосе пункта efi (uefi) загрузчика, и включи его, в 99% случаев это может помочь (для работы этого режима обычно достаточно чтобы флешка в принципе определялась и ее формат был fat/fat32, а бут сектор нет)
* наоборот для legacy же загрузки, это для случая когда загрузка начинается, но в момент установки уже в сетапе система не видит флешки и просит вставить cdrom, можно создать второй раздел или использовать дополнительный hdd диск, и скопировать на него прямо в корень содержимое iso (если его считать как архив), в этом случае сетап найдет все файлы самостоятельно и продолжит установку с диска.
Еще экзотический способ — загрузиться с livecd ubuntu (я ни разу не видел чтобы нельзя было загрузить linux, можно поперебирать разные usb загрузчики, например unetbootin), установить virtualbox или qemu/kvm и используя системный диск целиком как диск виртуальной машины, запустить начало установки из виртуалки (самый первый процесс копирования файлов до первой перезагрузки), но продолжить установку после этой перезагурзки уже с реальной машины, перезагрузив ubuntu и вынув флешку.
Этот способ подразумевает только legacy режим загрузки (виртуалки не умеют нормально uefi и не имеют доступа к редактированию меню загрузки), так же виртуальные машины имеют инструменты по защите MBR таблицы и загрузчика от виртуальной машины, записывая изменения в отдельный файл, но на сколько я знаю это не опция по умолчанию. Так как внутри виртуалки ‘железо’ стандартное и отлаженное на ура, а так же cdrom там ‘настоящий’ — установщик без проблем загрузится.
Windows bootable USB drive, mainly contains Windows official ISO files, is mainly used as an OS installation media. With it, you can boot PC from the bootable USB and install Windows OS successfully regardless the computer is running or dead. You can also use the bootable USB to repair some PC errors by setting PC to boot from the USB.
However, some users complain that the bootable USB is not working and the don’t know why. Check out the reasons and follow to make your Windows bootable USB work again:
Error — Windows 10 Bootable USB Not Working
«My laptop is not booting from a bootable USB drive, help. I have a Seagate 1TB hard drive on my computer with Windows 7 on it, but I want to install Windows 10 on the through a Windows 10 bootable USB drive.
Here is the thing that my laptop isn’t booting form the USB. The BIOS setting is correct, the priority is the USB bootable drive. Why is my USB not bootable?»
A Windows bootable USB memory stick holds everything which enables a computer to boot up so as to reinstall Windows or fix some system errors. Sometimes, your created bootable USB may not work in your hand, it’s worth your while to stop by this article.
Here, you’ll learn why is your USB not bootable and how to turn USB back into bootable again on Windows 10/8/7.
Also read: Boot Drive Not Showing Up in BIOS
Causes — Why Is Your USB Boot Drive Not Working
When you set PC to boot from the bootable USB but it’s not working, it’s important for you to figure out the exact causes first. Then, pick up the right fix to make your USB bootable again with ease.
Find out the reason that make your bootable USB not working:
- USB format is not supported.
- USB is not bootable.
- Bootable USB is not detected as a boot device.
- Bootable USB not showing up or recognized in bios.
- Stuck on the boot menu screen and won’t proceed.
- Can’t boot from USB, even select the right boot option.
Troubleshoot — Fix Windows Bootable USB Not Working (4 Fixes)
You may want to know how do I fix this error, attempting boot from USB, right? In this part, we’ll discuss and show you the exact steps to turn USB back into bootable again on Windows 10/8/7 in * effective methods:
- #1. Change USB Format
- #2. Create a New Windows Bootable USB
- #3. Set USB as Boot Drive — Setting Boot Priority to USB Drive
- #4. Disable Secure Boot Control, Enable CSM or Legacy Boot Mode
Before you start, we suggest you test the bootable USB drive on another computer first. It the USB boot up on the other computer, the problem is with your computer.
Let’s start fixing your bootable USB not working error on Windows 10/8.1/8/7 with ease now.
Fix 1. Change USB Format to FAT32
As many external USB drives are formatted as NTFS and computers won’t be able to detect or even boot from your USB if it’s not formatted as FAT32.
Then, here comes the issue, USB unbootable. So make sure that your USB is using FAT32 currently.
If not, format it to FAT32 with the following steps:
Step 1. Connect the USB drive to your PC.
Step 2. Press Windows + E keys to open File Explorer.
Step 3. Right-click on USB and select «Format».
Step 4. Set the file system as «FAT32», tick «Quick Format» and click «Start».
Wait for the process to complete. After this, you’ll need to re-create a new bootable drive with Windows ISO files. If your USB is bigger than 64GB, Windows File Explorer may not be able to execute the formatting.
In the case, you may follow to Format 128GB USB to FAT32 for help.
Now, you need to move to the next fix, creating a new Bootable USB.
Fix 2. Create a New Windows Bootable USB
Mostly, the reason why your bootable USB not working is that it’s not correctly created. You can reformat the USB and create a new bootable USB for Windows installation or computer repair.
USB specifications: 1. Empty; 2. 8GB or bigger capacity.
Steps to Create Windows 10 Bootable USB:
Step 1. Download Windows Media Creation Tool.
Step 2. Connect USB to PC and double-click to install MediaCreationTool.
Step 3. Select «USB flash drive» and click «Next» to continue.
🔎Read Also: Windows 10 Media Creation Tool Not Working
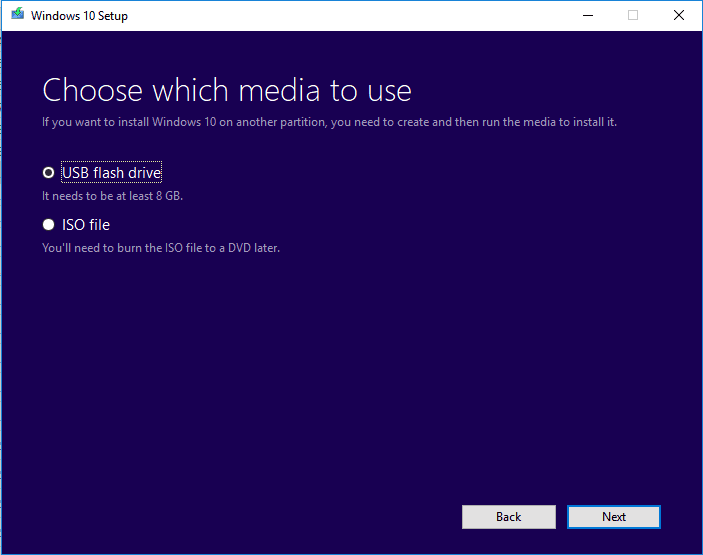
For the onscreen tutorial to complete the process.
Steps to Create Windows Bootable USB on Windows 8/7:
Step 1. Download Windows 8 or Windows 7 ISO file.
- Don’t open the downloaded ISO image
- Don’t unzip the IOS image
Step 2. Burn or flash the Windows ISO image to USB using a third-party tool.
After this, the USB is bootable and you can follow the Fix 3, 4, 5 to set up USB so as to allow the PC run from it smoothly.
Fix 3. Set USB as Boot Drive — Setting Boot Priority to USB Drive
Another reason why USB not working is that sometimes people connected the USB drive to the PC but forgot to set up the USB as a boot device. Windows cannot detect it. So the best way is to set up the USB.
Here are the steps:
Step 1. Connect USB Bootable drive to PC.
Step 2. Restart PC, press F2/F8, or Del to enter BIOS.
Step 3. Go to the Boot option, set USB as the first boot drive.
Step 4. Save the changes, run PC to boot from the bootable USB.
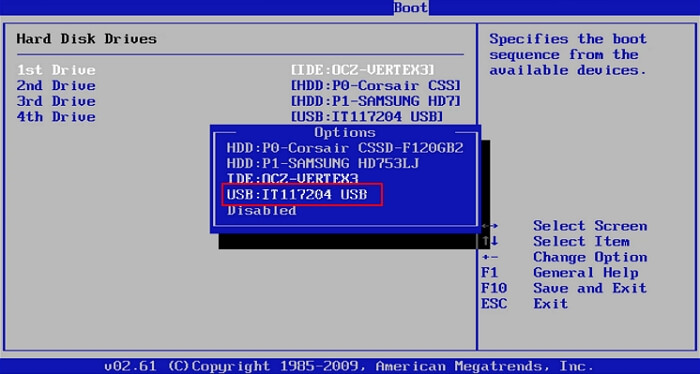
If this still not work, continue with Fix 4.
Fix 4. Disable Secure Boot Control, Enable CSM or Legacy Boot Mode
Most new computers and laptops would use UEFI/EFI to boot from USB. So, by enabling Legacy Boot Mode and disabling Secure boot will help to configure your computer to boot from the UBS drive.
Here are the steps:
Step 1. Keep the bootable USB to PC.
Step 2. Restart PC and press F2/F8 or Del to enter BIOS.
Step 3. Click «Secure Boot Control» and select «Disabled».
Step 3. Click «Boot» and select «Launch CSM», change «Disable» to «Enabled».
Step 4. Click «UEFI/BIOS Boot Mode» and select «Legacy».
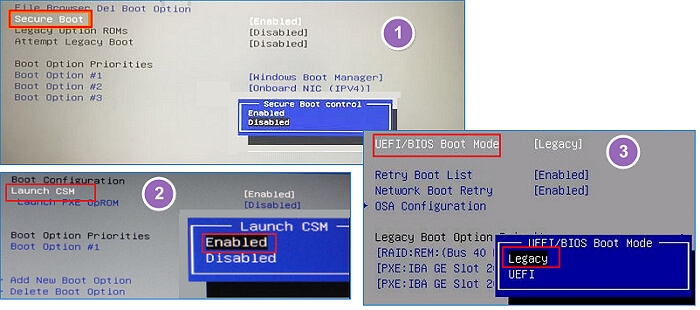
After this, save all the changes and restart PC. Now, your computer may be able to run from the Bootable USB again. After entering the bootable USB, you are now good to go installing Windows or repairing PC.
Bonus Tip — Create Windows Emergency Disk — Bootable USB Alternative
Sometimes, you may not want to install a new Windows OS but need a Windows recovery disk that can bring you back to a healthy state of your current Windows OS.
If this is what you want, stay here. In this part, you’ll show you how to create a Windows emergency disk with reliable third-party USB bootable software.
EaseUS Todo Backup, a reliable Windows backup software, with its System Backup and Emergency Disk feature presents you an excellent option to restore your computer OS back to a healthy state anytime:
When your computer encounters a problem or the Windows system fails to boot up, here is how to restore your computer from the bootable USB mergencncy disk:
- 1. Connect EaseUS emergency bootable disk to PC.
- 2. Restart PC and press F2/F8, Del to enter BIOS.
- 3. Set EaseUS bootable USB as the boot drive.
- 4. Save the changes to restart PC and enter EaseUS Todo Backup.
- 5. Click Recovery, browse to find the system image and restore it to your current PC.
If your computer hard drive is dead, you can also use this option to backup data wtihout booting into Windows.
Conclusion
On this page, we explained why is your bootable USB not working and how to fix this issue with 4 practical fixes.
If you are with this issue, the most effective way is to reformat the USB and create a Windows installation USB drive again. Then follow Fix 3, 4 to set up the USB, making it bootable again.
After this, you can use it to fresh install Windows 10/8/7 or repair computer or system errors via the bootable USB.
However, if you prefer to stay with the current OS but need a emergency disk that can help you revert the OS back to a healthy state, EaseUS Todo Backup is the best option.
First, back up the OS. Next, create a Windows bootable USB. Last, restore OS from the bootable USB whenever the OS goes wrong.
The option to boot your PC with Windows 11 bootable USB drive is quite effective in multiple ways. The two most common uses of this feature on a Windows 11 PC are clean install Windows 11 OS and troubleshooting any issue related to the OS. Another important use of Windows 11 bootable USB media is to recover data from a non-booting or crashed Windows PC using professional data recovery software.
However, if you are stuck in a situation where your Windows 11 won’t boot from a bootable USB flash drive, you need not worry. This article will walk you through multiple ways to resolve the problem of Windows 11 won’t boot from USB flash drive’. But before we go for the solutions, let us first check out the major reasons why you can’t boot PC from Windows 11 bootable USB.
Why you can’t boot Windows 11 from USB flash drive
There are multiple reasons that may hamper the booting of a PC from a Windows 11 bootable USB drive. However, the most probable causes behind this issue are:
- Not all USB flash drives are bootable, so you need to convert a USB drive into bootable format before using it for the Windows 11 booting purpose.
- Your system BIOS can’t find the bootable USB drive because of a faulty port or cable. It may also happen if the USB drive is corrupt or damaged.
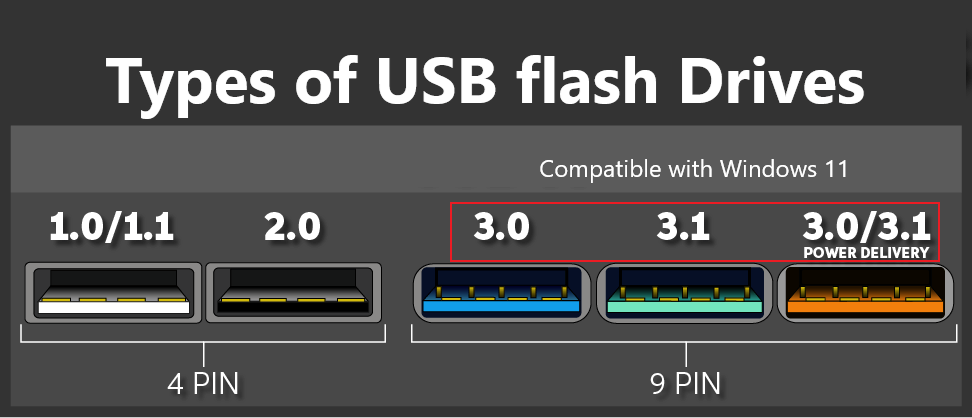
- If the USB drive is too old, Windows 11 might not recognize it. For example, USB 1.0 or 2.0 is not compatible in this situation.
- The Windows 11 bootable USB drive might not have been created properly or was corrupted in the process. As a result, you may see Boot Device Not Found or a similar message.
- If the bootable USB drive format is not in line with the requirements of your system, your PC might not support it. For example, if your computer uses legacy BIOS mode, the USB flash drive must be formatted with an NTFS file system. But, if it’s using UEFI boot mode, the USB drive should be formatted with the FAT32 file system.
- If you haven’t set up the Windows 11 bootable USB as the preferred boot option in your PC’s BIOS setup, Windows 11 won’t boot from the bootable USB drive.
Now that you know why you can’t boot Windows from a Windows 11 bootable USB drive, let’s proceed to the solutions.
How to resolve Windows 11 won’t boot from USB drive issue?
Each of the above reasons is potent enough to forbid your PC from booting from a Windows 11 bootable device. However, you’ll find multiple DIY methods to eliminate the problem and boot Windows from USB.
Method 1: Ensure that the USB drive is bootable
Before applying any solutions to resolve ‘Windows 11 won’t boot from a bootable USB drive’ issue, make sure that the drive is bootable. The simplest method to check it is using the File Explorer.
Connect the USB drive to your Windows 11 PC and open File Explorer. If your USB flash drive is bootable, it will show as a blue monitor shape with an inverted curved arrow, as shown in the image below.
You can also use the Quick Boot Menu to check if Windows 11 can boot from the USB. Here is how to check it.
- Click Start > Power. Press and hold Shift and click Restart from the power options.
- Your Windows 11 PC will boot into Advanced Options.Click the Use a device option to continue.
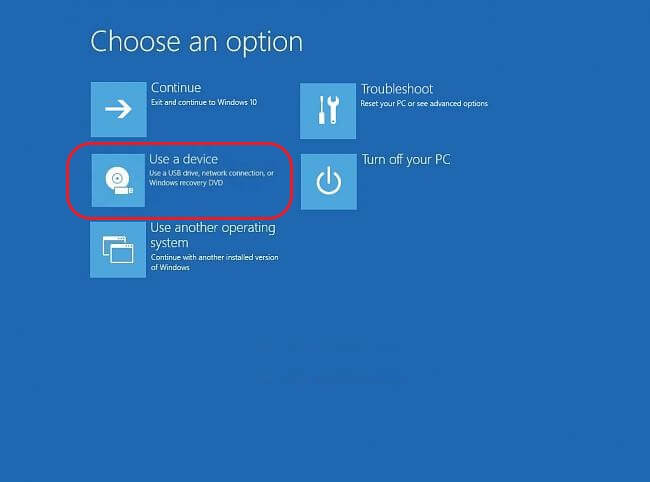
- Select the USB drive you want to check and see if your PC boots from it.
If your system booted from the drive, your Windows 11 bootable USB drive is bootable; otherwise, not.
Note: If your Windows PC has crashed or is completely unbootable, you must act immediately and recover your data using the bootable recovery option of a professional data recovery software.
Method 2: Try other USB ports on your PC
If you have confirmed that you are using a Windows 11 bootable USB drive and your Windows 11 won’t boot from it, you should check the USB port on your PC.
Try connecting the Windows 11 bootable USB through another port and check if your PC is booting from it. You may also connect another USB flash drive to the same port to check if something is wrong with your bootable USB drive’s connecting terminal.

Method 3: Check for Windows 11 bootable USB drive corruption
While creating a bootable USB drive, if the process is interrupted for any reason, it causes corruption of installation files on it.
It may be why your PC can’t boot Windows from USB flash drive. Check the USB drive for corruption by connecting it to a working system and see if the system boots from the Windows 11 bootable USB drive. You can easily repair a corrupt USB drive and make it usable.
Method 4: Use another USB flash drive
If you use an old USB flash drive, check if it’s USB 1.0 or 2.0. If so, use USB 3.0 or later. As the Windows 11 installer, as well as OS, are not compatible with the older USB drives, you need to create a Windows 11 bootable USB drive with the previous versions.
Method 5: Check and change the file system format of the bootable USB drive
Depending on your system’s firmware, you must use the USB with a suitable file system format. If your PC has legacy BIOS firmware, the suitable file system is NTFS. On the other hand, the FAT 32 format is suitable for UEFI firmware.
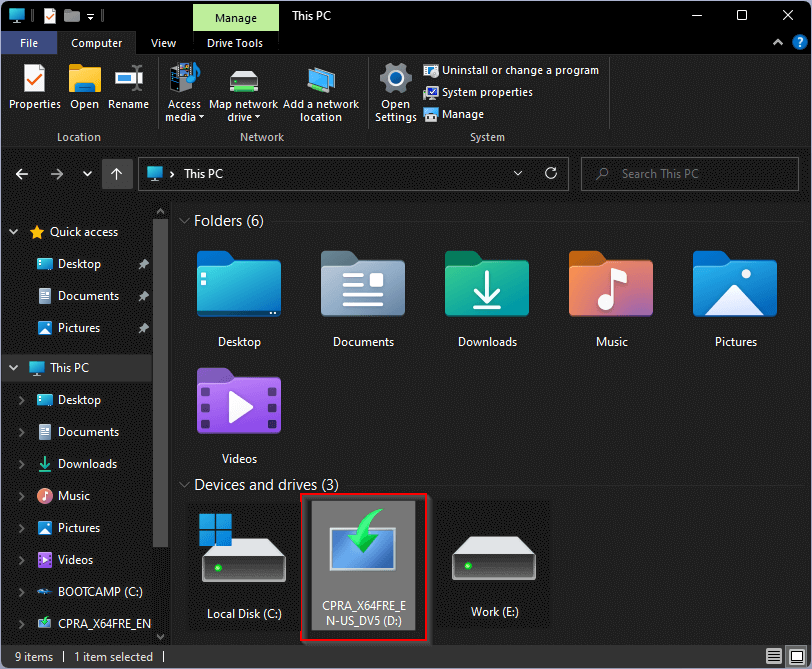
Connect the USB drive to Windows 11 PC. The USB will appear in the This PC or My Computer section—Right-click on the USB icon and select Properties. The file system will be displayed in the Properties dialog box.
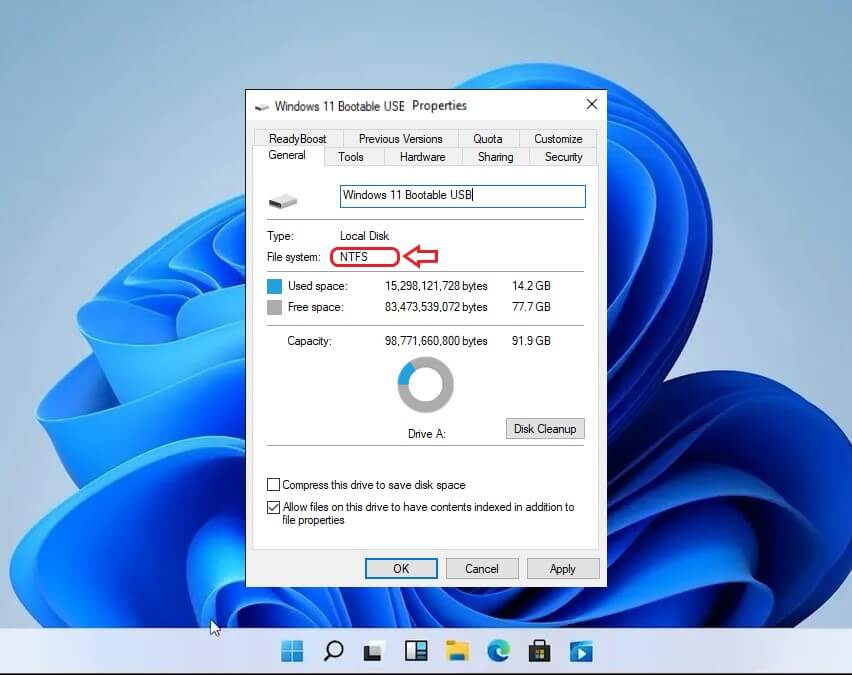
If the file system of USB is not as per the requirement of firmware discussed above, you can easily change the USB file system format to a suitable one using the built-in utilities of Windows.
Method 6: Choose the USB flash drive as the preferred boot option in BIOS
Connect the Windows 11 bootable USB drive to your PC and restart your PC. If your system doesn’t automatically boot from USB, you must enter the BIOS settings and set the Windows 11 bootable USB drive as the preferred boot option. To do so, follow the steps below.
- Restart your PC and press a key designated for entering BIOS (F2/F12/Del/Esc key depending on the make of your PC).
- If you don’t see the Windows 11 bootable USB drive listed under the boot option, you need to disable Secure Boot on your computer.
- If you can see the bootable USB drive under the boot options, select it using the up-down arrows and exit BIOS.
- Your system will boot from the Windows 11 bootable USB drive now.
Note: Don’t forget to enable the Secure boot option once you’ve started your PC using the Windows 11 bootable USB drive.
Conclusion
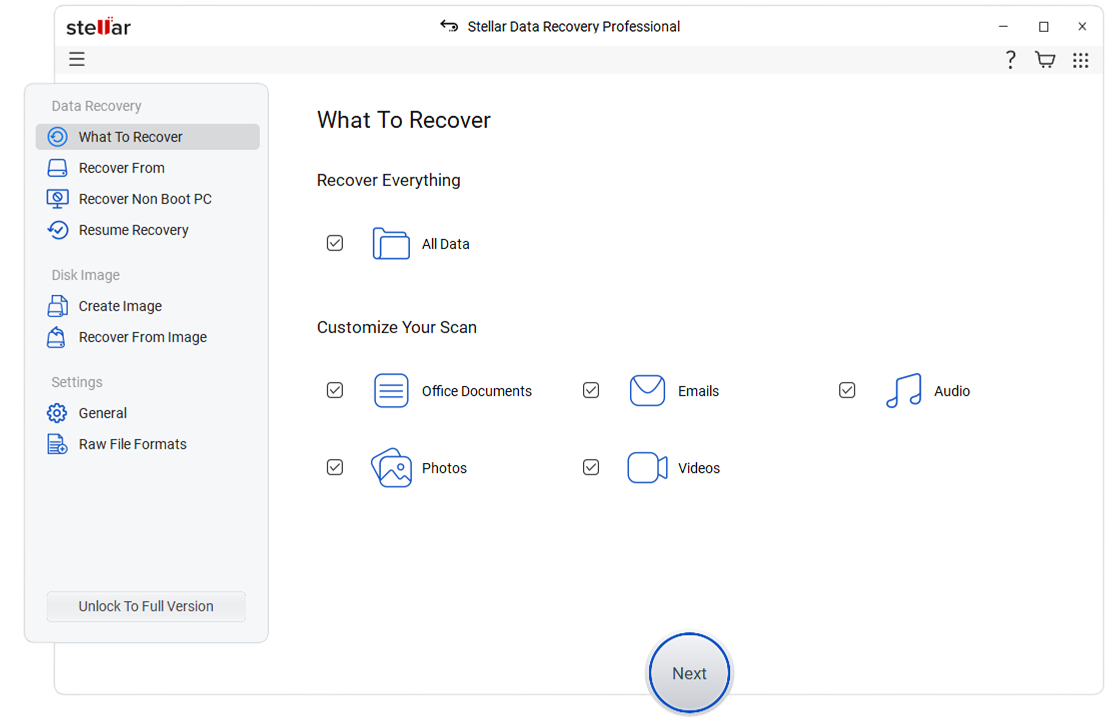
If your PC can boot from a bootable USB drive, it will primarily help you install Windows OS and troubleshoot particular issues related to the OS. It will further allow you to recover data using Stellar Data Recovery Professional for Windows in case of crashed or non-booting PC. The powerful software effectively retrieves data even in the most complex situation while ensuring 100% secure recovery. We hope you can boot your PC from Windows 11 bootable USB drive. Don’t forget to share your thoughts and suggestions in the comments below.
Was this article helpful?
FAQs
Why does my PC say it can’t run Windows 11?
If you’re facing the trouble where your PC can’t run Windows 11, it might be because the Secure Boot or the TPM 2.0 option is disabled on your PC. You can try to resolve the issue by enabling Secure Boot and TPM 2.0 on Windows 11.
Why is my bootable USB drive not booting?
If your PC cannot boot from bootable USB drive, it may be because the USB boot priority is disabled on your system. You can enable it from the Boot Options menu in BIOS settings.
Can I use Rufus to create a Windows 11 bootable USB media?
Yes. Rufus is a utility used to format and create a Windows bootable USB drive. It is compatible with Windows 11. You can use it to burn the ISO files to a USB flash drive and boot Windows 11 from the bootable USB flash drive created.
What is the minimum size of USB drive required to create a Windows 11 bootable USB drive?
The minimum capacity of a USB flash drive should be 16 GB. However, a capacity of 32 GB is recommended to avoid any complexities while creating the bootable drive.
Can you boot Windows from USB flash drive?
Yes, you can easily boot and install Windows from a USB flash drive. To do so, you’ll need to download Windows ISO file and create a Windows 11 bootable USB drive. Then, plug the USB flash drive into your PC and choose it as the preferred boot media from BIOS settings. Once done, your PC will boot from the bootable drive. You can also use the bootable USB drive to install Windows and troubleshoot media for various purposes.
Всем привет! Сегодня мы разбираем еще одну популярную проблему, когда Windows 10 или 11 не запускается во время установки. То есть вы подключаете флешку, пытаетесь загрузиться с неё, но ничего не происходит. В лучшем случае на экране можно увидеть конкретную ошибку. Ниже мы рассмотрим основные моменты и решения.
Содержание
- Первые действия
- Неправильно созданная флешка
- Структура разделов
- Защитная функция BIOS (UEFI)
- Неисправность флешки
- Видео
- Задать вопрос автору статьи
Первые действия

В первую очередь попробуйте отключить от ноутбука и компьютера все внешние носители кроме флешки. Если это не поможет, можно попробовать отключить USB-мышку. Попробуйте подключить флешку в другой USB-порт. Желательно при этом не использовать порты на передней панели системного блока – подключаем в задний порт ПК.
Неправильно созданная флешка
Если Виндовс не загружается с флешки, попробуем выяснить – а правильно ли вообще она создана. Самый верный вариант – использовать официальный дистрибутив для создания загрузочной флешки с Windows 10 и 11. С помощью этого же дистрибутива можно скачать официальный образ Виндовс 10 или 11. А уже потом с помощью того же Rufus сделать флешку. Более подробно про то – как правильно это сделать, читаем в инструкции по ссылке ниже.
Читаем – как создать загрузочную флешку с Виндовс 10 или 11.
ПРИМЕЧАНИЕ! Если у вас есть сомнение в дистрибутиве или образе, то стоит её переделать. И если проблема останется – читаем остальные главы этой статьи.
Если до того, как превратить флешку в загрузочную, она также выполняла подобную функцию – верните ей сначала нормальный вид, а уже потом с помощью официального дистрибутива – превращаем её в загрузочную.
Читаем – как превратить загрузочную флешку в обычную.
Структура разделов
При установке, можно встретить ошибку с текстом:
Установка Windows на данный диск невозможна. Выбранный диск имеет стиль разделов GPT (MBR)
В конце может быть или GPT или MBR. Если говорить проще, то GPT – это более продвинутая структура разделов диска, которую использует БИОС и ОС. Простите, но сама суть проблема не уместится в одну статью, поэтому вам придется разобраться с ней. Но переживать не стоит, так как я подготовил для вас ряд статей – где все подробно объяснено. Советую не лениться и внимательно ознакомиться с этими инструкциями.
- Решение ошибки «Установка Windows на данный диск невозможна».
- GPT и MBR при установке Виндовс.
- Как узнать какой какая структура стоит у ваших дисков (GPT или MBR).
Защитная функция BIOS (UEFI)
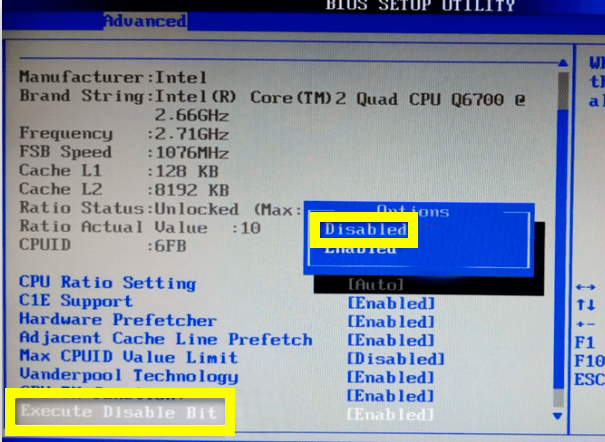
В современных БИОС есть функция, которая запрещает выполнять код в области для хранения информации. Таким образом можно избежать ошибок, которые часто возникают с переполнением буфера. Кстати, некоторые вредоносные программы пользуются этим, но мы немного отошли от сути проблемы.
Иногда эта функция запрещает выполнение запуска с загрузочной флешки. Сама функция может иметь разное название в зависимости от производителя:
Intel – XD-bit
AMD – NX-bit
- Заходим в БИОС – для этого перегружаем комп, ноутбук и во время начальной загрузки зажимаем вспомогательную кнопку:
Delete или F2
Читаем – как попасть в БИОС.
- Обычно настройка находится в разделе «Advanced». Название у конфигурации тоже может отличаться – «Execute Disable Bit», «No-Execute Memory Protect», «Execute Bit Support» и т.д. Точное наименование можно посмотреть в руководстве пользователя для вашей версии БИОС.
- После изменения настройки, не забудьте сохранить БИОС перед тем, как выйти.
Неисправность флешки
Возможно, есть более серьезная проблема с самой флешкой и БИОС не может её прочитать. Советую глянуть по этому поводу – данную инструкцию (переходим по ссылке). Там рассмотрены основные методы восстановления работоспособности флешки.
На этом все, дорогие друзья. Пишите свои дополнительные вопросы в комментариях. Ждем вас снова на портале WiFiGiD.RU. Всем добра и берегите себя!