
Readers help support Windows Report. We may get a commission if you buy through our links.
Read our disclosure page to find out how can you help Windows Report sustain the editorial team. Read more
Windows 11 has the option to turn off the display after a set duration of inactivity. This feature saves power when users are away from their computer and don’t manually put it to sleep.
Users have reported issues with their display not turning off even after the set duration. Luckily, there are some simple solutions to this problem.
If you are having issues with your Windows 11 display not turning off after the set time, it could result from a faulty application or external device. Keep reading this article to find the solution.
How do I adjust sleep and screen settings?
- Click on Start and go to Settings (or press Windows + I).

- Under System go to Power & battery.

- Under Screen and sleep, adjust the times you want your display to go to sleep or turn off.


Users can adjust the time their device goes to sleep when plugged in and on battery power. They can also adjust the duration for their screen to turn off.
There is a difference between turning the screen off and going to sleep. Sleep mode turns off unused programs and applications to save energy after the set duration of inactivity. Turning the screen off does just as it states and only turns off the monitor, but all used programs or applications are still running.
For some of our readers, a background app such as Steam, was running in the background preventing the screen from turning off. Therefore, make sure that you close these apps or adjust their settings to allow this option.
In Steam, go to Desktop mode, and set the Display Properties to turn off the display after a suitable amount of time.
If you’re having issues with sleep mode not working in Windows 11, there are some quick solutions for that problem.
How do I fix Windows 11 not turning off display?
1. Check screen settings
- Click on Start and go to Settings (or press Windows + I).
- Under System go to Power & battery.
- Under Power, expand Screen and sleep.
- Ensure that the screen and sleep settings are not set to Never.

If the screen and sleep options are set to never, then that will prevent your display from turning off. Check to ensure you have set times selected for your screen and sleep settings.
2. Remove USBs
- Unplug any external devices (keyboard, controllers, etc.).
- Shut down your PC.

- If you’re using a PC with a monitor, unplug the display cable.
- After five minutes, plug the display cable back in and turn on your PC.

Sometimes, external devices connected to your PC via USB or Bluetooth can keep your monitor from turning off even after set sleep times. Remove any devices and restart your PC to see if that solves the issue.
Many users have reported the issue to be caused by an external controller. Disconnecting the device can fix the problem of your display not turning off.
3. Run hardware and device troubleshooter
- Click on Start and search Command Prompt.
- Right-click and select Run as administrator.

- Type msdt.exe -id DeviceDiagnostic and hit enter.

- Select Next to run the troubleshooter.

- Any issues with your devices will be displayed.


If solution 2 didn’t solve the issue, running the troubleshooter can give you a more detailed look at your devices and which might be causing the problem.
4. Check applications that hinder the display
- Click on Start and search Command Prompt.
- Right-click and select Run as administrator.
- Type powercfg -requests and hit enter.
- If there is an application listed under Display that means that the app is affecting your display and preventing it from turning off.
- Uninstall the problematic application from Control Panel.

- If you don’t want to uninstall the program, open Task Manager.
- Select the program and click End task.


An application running in the background that affects your display may be the culprit. After identifying the culprit, users can remove the application if it’s not a necessary program.
If it is a necessary application, users can end the task in Task Manager which will allow the PC display to turn off.
5. Run power troubleshooter
- Click Start and open Settings (or press Windows + I).
- In System, scroll down to Troubleshoot and select it.
- Click Other troubleshooters.
- Find Power and select Run.
- Locate any issues.


Issues with the screen not turning off may be related to issues with your PC’s power. Running the troubleshooter will quickly help you locate any found issues and make the necessary adjustments.
6. Adjust power plan
- Right-click on Start and select Run (or press Windows + R).
- Type control.exe powercfg.cpl,,3 and click OK.
- Expand USB settings, then expand USB selective suspend setting.
- In the drop-down menu, next to On battery and Plugged in select disabled for both.

- Click Apply, then OK.

Hopefully, one of the solutions above helped solve the issue of your screen not turning off after the set duration in Windows 11. Ensure that your sleep and screen duration is not set to never, so you don’t run into the issue again.
If you’re having difficulties connecting a wireless monitor to your PC, then we have solutions for that issue as well.
Let us know which solution worked for you in the comments below.
Megan Moore
Megan is a Windows enthusiast and an avid writer. With an interest and fascination in all things tech, she enjoys staying up to date on exciting new developments in the computer and gaming world.
When not falling down a rabbit hole of tech news and information, she enjoys painting, watching movies, and taking her dramatic husky for long walks.
Все способы:
- Вариант 1: Настройки электропитания
- Способ 1: «Параметры»
- Способ 2: «Панель управления»
- Вариант 2: Отключение экранной заставки
- Вариант 3: Отключение выключения экрана после блокировки ПК
- Вопросы и ответы: 7
Вариант 1: Настройки электропитания
За выключение экрана в системе отвечает таймер, который пользователь может изменить или отключить вовсе. Настройки управления экраном находятся в разных Windows 11, поэтому далее покажем два метода, ведущих к одному и тому же результату, а вы выбирайте подходящий.
Способ 1: «Параметры»
Через современное приложение для управления операционной системой отключить таймер довольно просто:
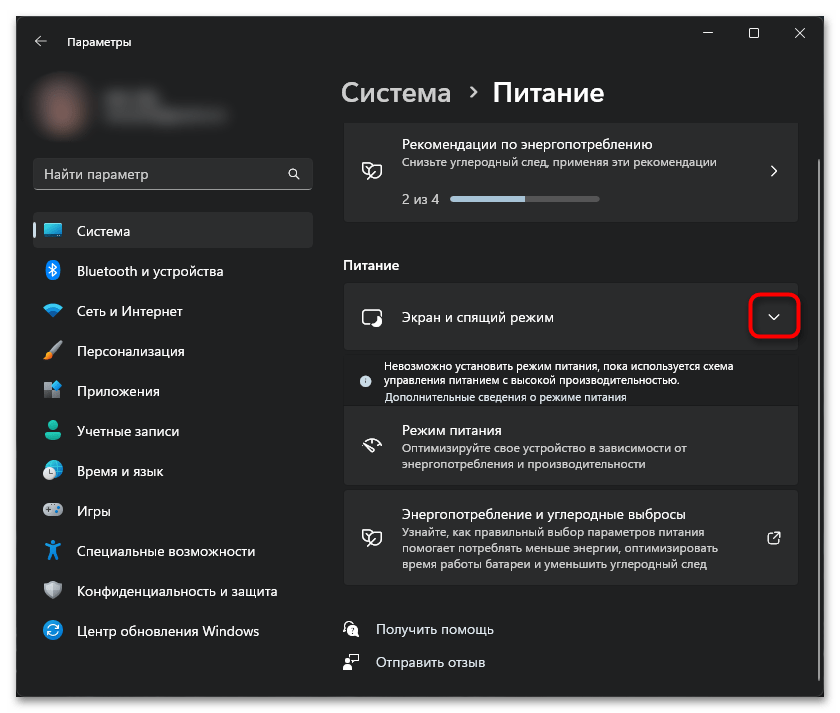
- Нажмите по «Пуску» правой кнопкой мыши и через меню быстрых ссылок перейдите в «Управление электропитанием». Туда же можно попасть можно, запустив «Параметры» и перейдя в «Система» > «Питание».
- В блоке «Питание» щелкните по стрелке вниз у пункта «Экран и спящий режим».
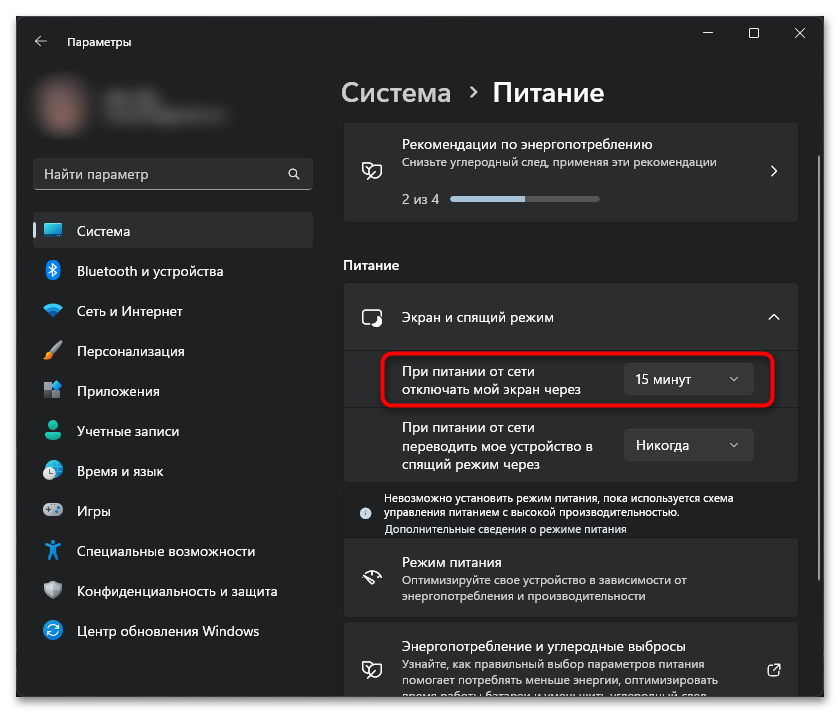
- Тут вам нужен пункт «При питании от сети отключать мой экран через». Если вы пользуетесь ноутбуком, то дополнительно будет и пункт про питание от аккумулятора.
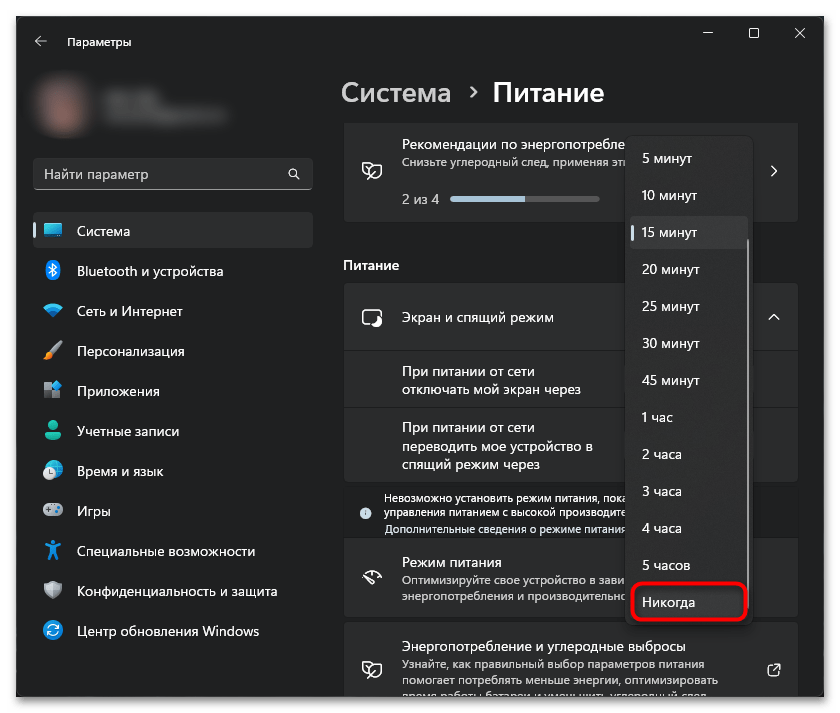
- Через выпадающее меню выставьте значение «Никогда» в одного или двух параметров. Окно можно закрыть, настройка будет применена сразу же.
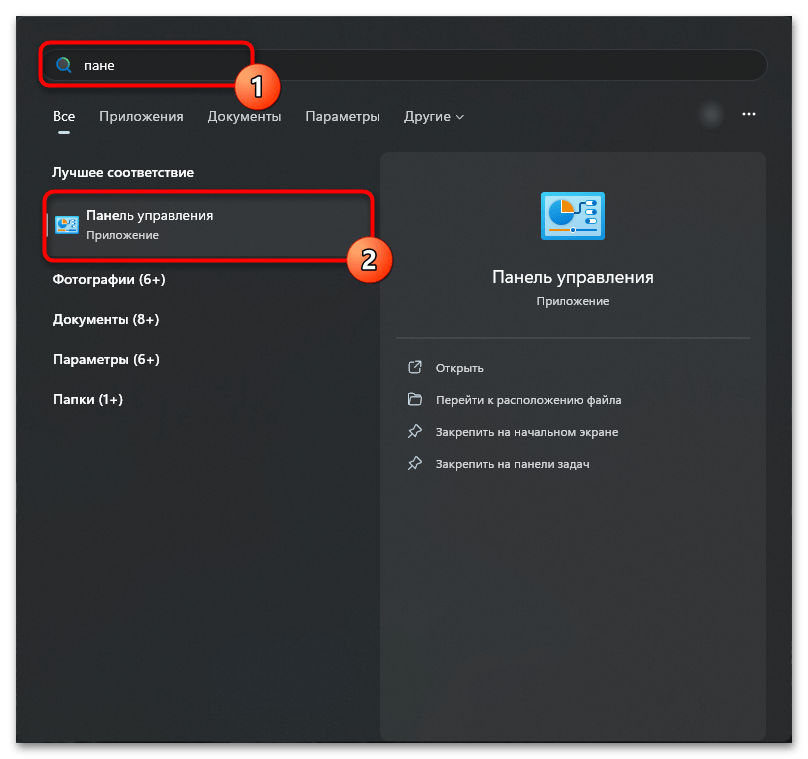
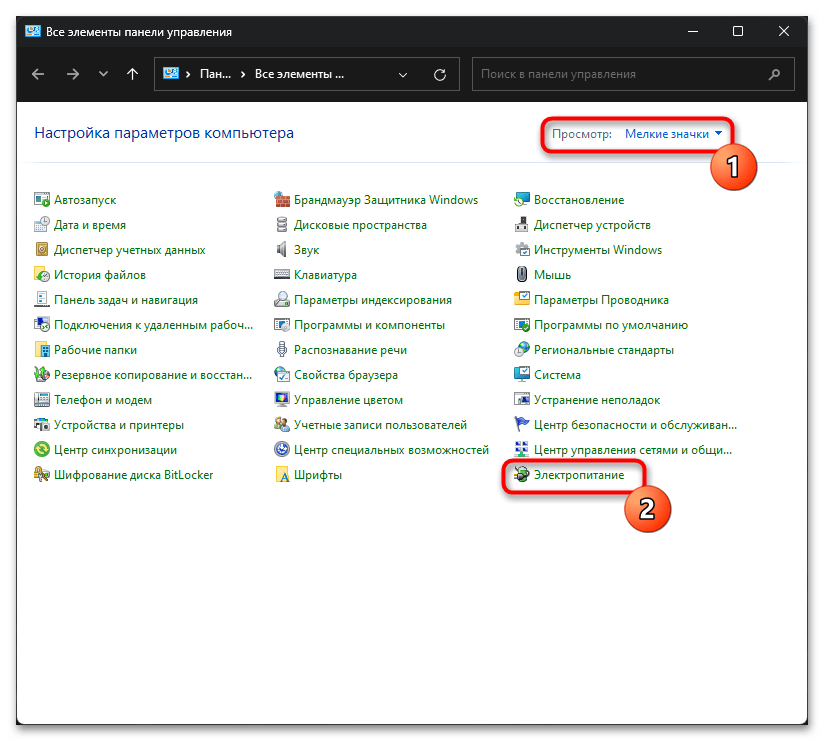
Способ 2: «Панель управления»
Если вам привычнее пользоваться «Панелью управления», то для нее также есть инструкция.
- Запустите это приложение любым удобным способом, например через поиск в «Пуске».
- Задайте просмотр как значки и нажмите по строке «Электропитание».
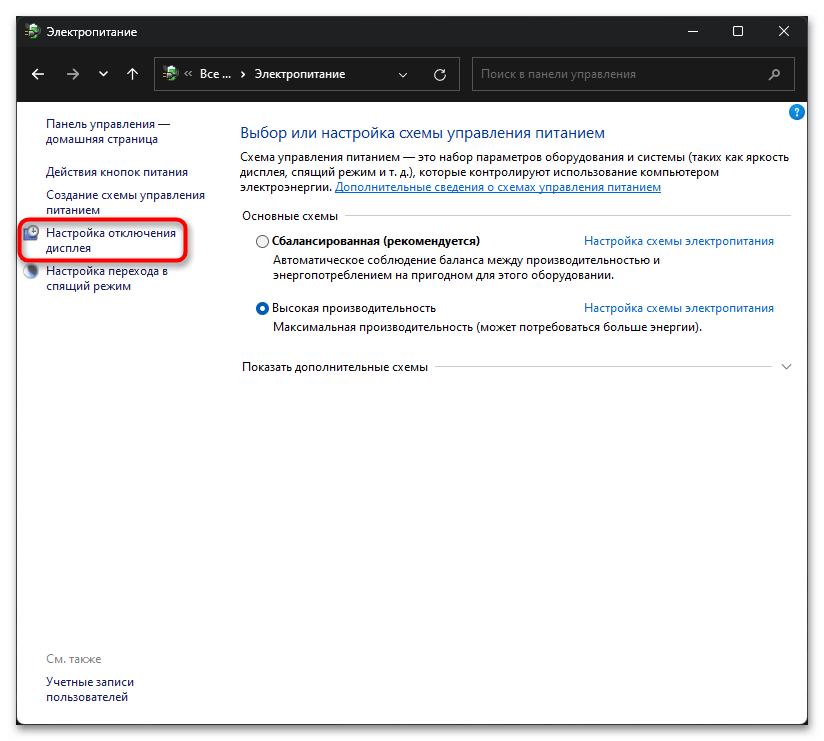
- На панели слева воспользуйтесь ссылкой «Настройка отключения дисплея».
- У владельцев ПК будет только одна строчка «Отключать дисплей», а если у вас ноутбук, то будет деление на работу от сети и от аккумулятора. Редактируйте какой-то один или оба значения на ваше усмотрение.
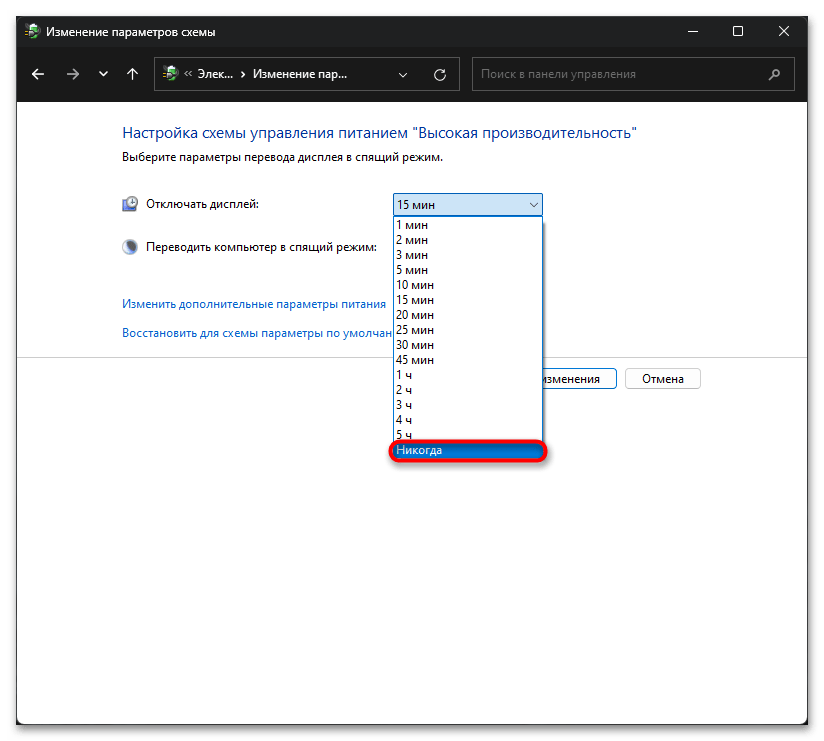
- Разверните меню и выставьте «Никогда», после чего сохраните изменения одноименной кнопкой.

Вариант 2: Отключение экранной заставки
Возможно, в вашем случае экран не отключается, а включает заставку, которая просто отображает черный цвет. В этой ситуации процесс отключения будет несколько иным.
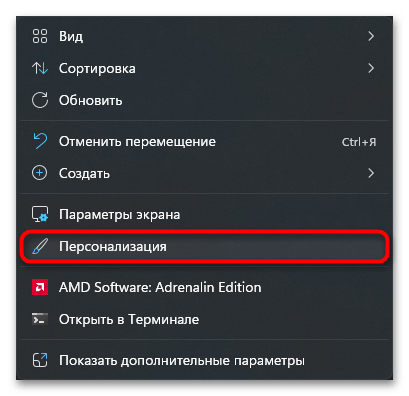
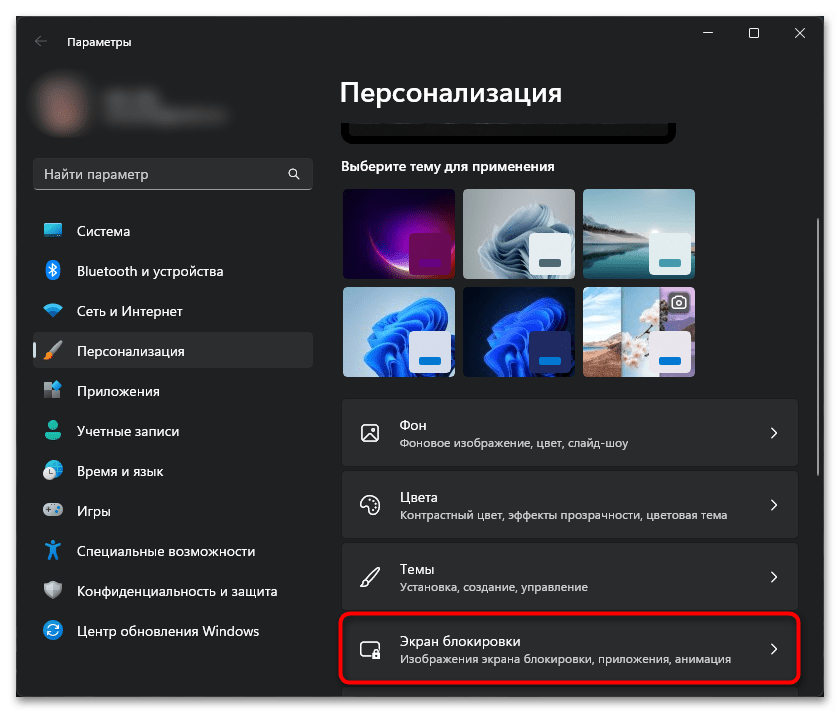
- Нажмите по пустому месту на рабочем столе и перейдите в «Персонализацию».
- Прокрутите основную часть окна до пункта «Экран блокировки» и нажмите на него.
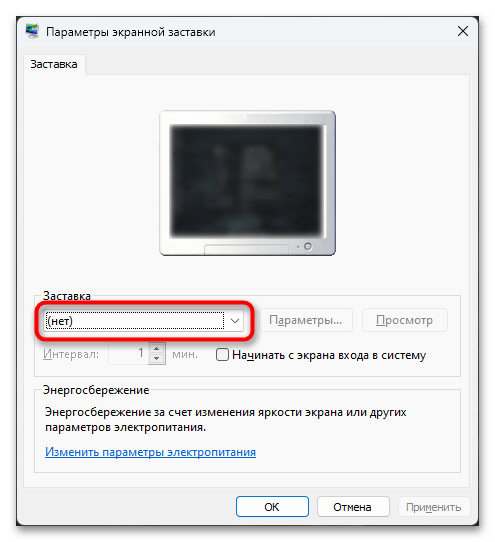
- Найдите тут плитку «Заставка» и кликните по ней.
- Откроется новое окно, в котором выставьте значение «(нет)» и сохранитесь кнопкой «ОК».

Вариант 3: Отключение выключения экрана после блокировки ПК
Эта инструкция подойдет только для тех пользователей, кто прибегает к блокировке компьютера, при которой отображаются время и дата, уведомления от приложений (плееры и др.), но воспользоваться компьютером без пин-кода (или другого настроенного способа входа) не получится.
По умолчанию в этом режиме экран гаснет через минуту, что может не устроить некоторых юзеров. Эту опцию можно с легкостью изменить.
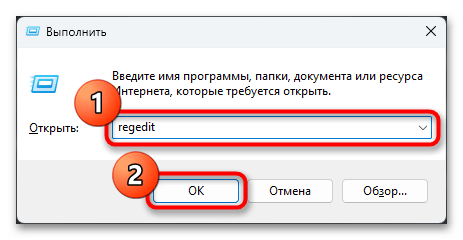
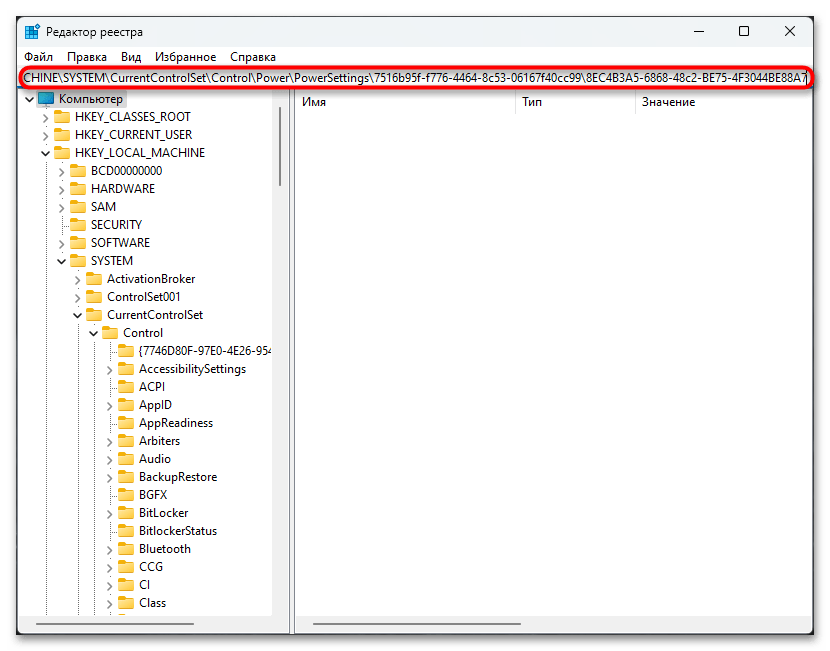
- Вызовите «Редактор реестра», найдя его через поиск в «Пуске» или нажав клавиши Win + R, написав команду
regeditи выполнив ее клавишей Enter либо кнопкой «ОК». - В адресную строку вставьте путь
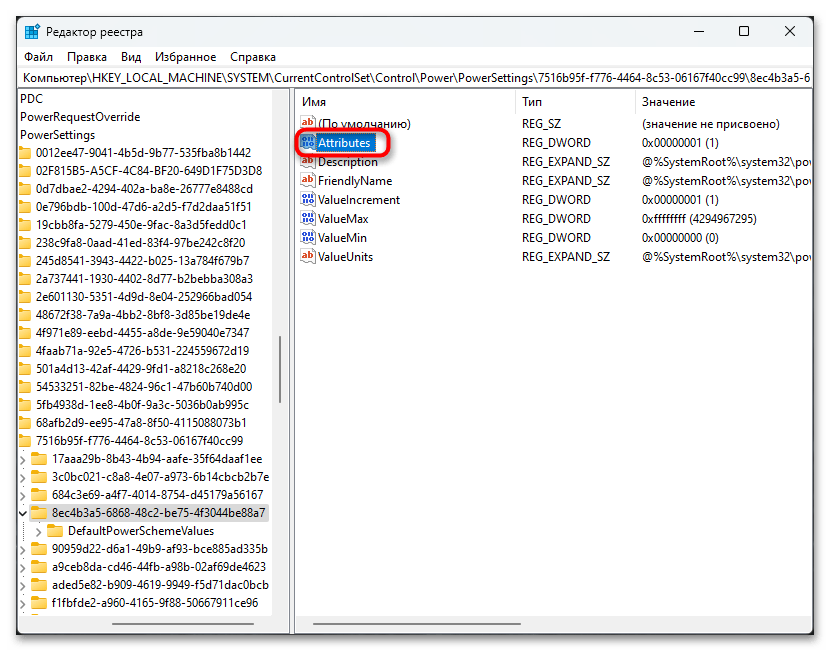
HKEY_LOCAL_MACHINE\SYSTEM\CurrentControlSet\Control\Power\PowerSettings\7516b95f-f776-4464-8c53-06167f40cc99\8EC4B3A5-6868-48c2-BE75-4F3044BE88A7и нажмите Enter для перехода. - В основной части экрана найдите параметр «Attributes» и дважды кликните по нему ЛКМ для открытия окна редактирования.
- В поле «Значение» измените цифру на «2» и нажмите «ОК».
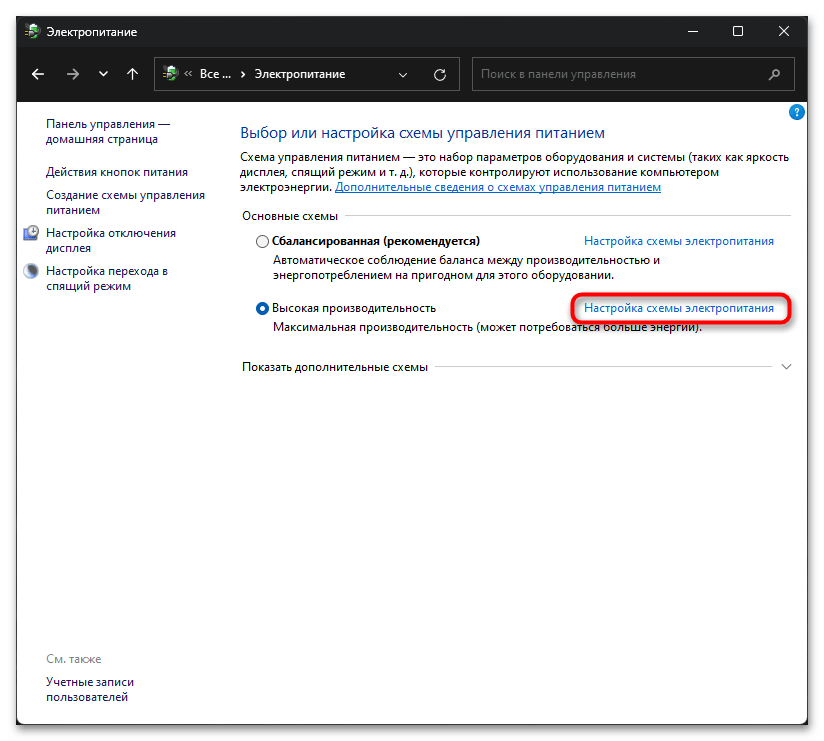
- Откройте «Панель управления», перейдите в «Электропитание» (выше уже было показано, как это сделать) и около выбранного режима производительности кликните по ссылке «Настройка схемы электропитания».
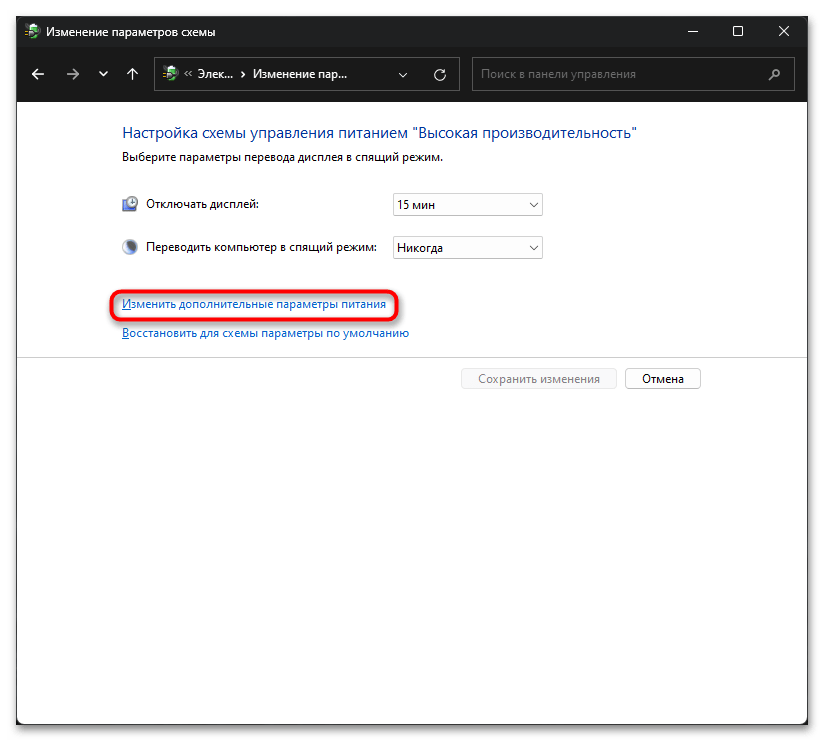
- Щелкните по ссылке «Изменить дополнительные параметры питания».
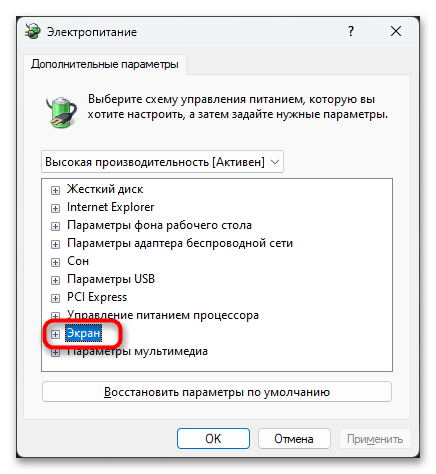
- Откроется новое окно, в котором найдите и разверните раздел «Экран».
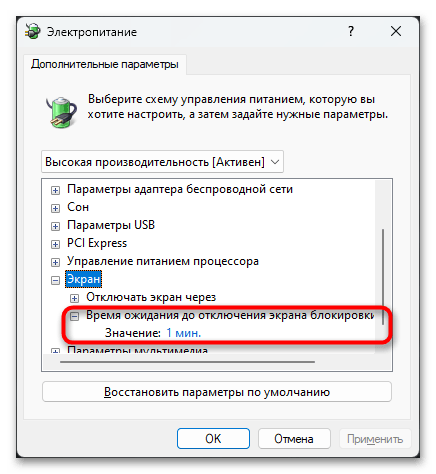
- В результате изменения параметра реестра должен был появиться новый пункт — «Время ожидания до отключения экрана блокировки консоли». Как видите, в его значении по умолчанию установлена минута, после которой экран и гаснет. Чтобы это исправить, нажмите по строке «Значение».
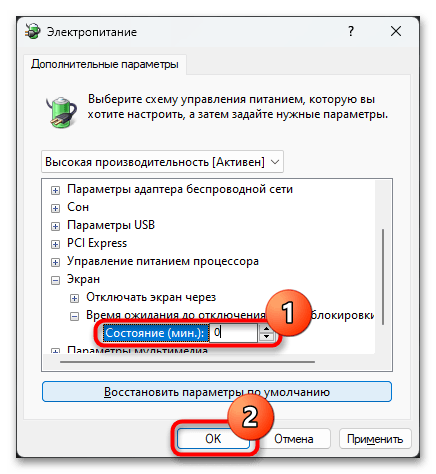
- Поставьте цифру «0» и кликните по кнопке «ОК».
Наша группа в TelegramПолезные советы и помощь
Чем асинхронная логика (схемотехника) лучше тактируемой, как я думаю, что помимо энергоэффективности — ещё и безопасность.
Hrethgir 14.05.2025
Помимо огромного плюса в энергоэффективности, асинхронная логика — тотальный контроль над каждым совершённым тактом, а значит — безусловная безопасность, где безконтрольно не совершится ни одного. . .
Многопоточные приложения на C++
bytestream 14.05.2025
C++ всегда был языком, тесно работающим с железом, и потому особеннно эффективным для многопоточного программирования. Стандарт C++11 произвёл революцию, добавив в язык нативную поддержку потоков,. . .
Stack, Queue и Hashtable в C#
UnmanagedCoder 14.05.2025
Каждый опытный разработчик наверняка сталкивался с ситуацией, когда невинный на первый взгляд List<T> превращался в узкое горлышко всего приложения. Причина проста: универсальность – это прекрасно,. . .
Как использовать OAuth2 со Spring Security в Java
Javaican 14.05.2025
Протокол OAuth2 часто путают с механизмами аутентификации, хотя по сути это протокол авторизации. Представьте, что вместо передачи ключей от всего дома вашему другу, который пришёл полить цветы, вы. . .
Анализ текста на Python с NLTK и Spacy
AI_Generated 14.05.2025
NLTK, старожил в мире обработки естественного языка на Python, содержит богатейшую коллекцию алгоритмов и готовых моделей. Эта библиотека отлично подходит для образовательных целей и. . .
Реализация DI в PHP
Jason-Webb 13.05.2025
Когда я начинал писать свой первый крупный PHP-проект, моя архитектура напоминала запутаный клубок спагетти. Классы создавали другие классы внутри себя, зависимости жостко прописывались в коде, а о. . .
Обработка изображений в реальном времени на C# с OpenCV
stackOverflow 13.05.2025
Объединение библиотеки компьютерного зрения OpenCV с современным языком программирования C# создаёт симбиоз, который открывает доступ к впечатляющему набору возможностей. Ключевое преимущество этого. . .
POCO, ACE, Loki и другие продвинутые C++ библиотеки
NullReferenced 13.05.2025
В C++ разработки существует такое обилие библиотек, что порой кажется, будто ты заблудился в дремучем лесу. И среди этого многообразия POCO (Portable Components) – как маяк для тех, кто ищет. . .
Паттерны проектирования GoF на C#
UnmanagedCoder 13.05.2025
Вы наверняка сталкивались с ситуациями, когда код разрастается до неприличных размеров, а его поддержка становится настоящим испытанием. Именно в такие моменты на помощь приходят паттерны Gang of. . .
Создаем CLI приложение на Python с Prompt Toolkit
py-thonny 13.05.2025
Современные командные интерфейсы давно перестали быть черно-белыми текстовыми программами, которые многие помнят по старым операционным системам. CLI сегодня – это мощные, интуитивные и даже. . .
When you leave your Windows computer idle, its screen turns off automatically after a specific time. Windows turns off the screen in order to save power. If a task is running on your laptop, it will remain active after the screen gets turned off. The screen turn-off timeout may be different for different users. If you want to increase or decrease the time to turn off your screen, you can do so via Windows 11/10 Settings. However, there are other ways too by which you can change the screen turn-off timeout. In this article, we will see how to change the screen turn-off timeout on Windows 11/10.

In Windows 11/10, you can set a different time to turn off your screen for the following two cases:
- When your laptop is on battery power.
- When your laptop is plugged in or charging.
You can change the screen turn-off timeout on Windows 11/10 by using:
- Settings app
- The Control Panel
- Command Prompt
Let’s see all these methods in detail.
1] How to change screen turn-off timeout on Windows 11/10 by using the Settings app
The following steps will help you change the screen turn-off timeout on Windows 11 and Windows 10.

- Open Windows 11/10 Settings.
- Go to “System > Power & battery.” In Windows 10, you will find Power & sleep in place of Power & battery.
- Now, click on the drop-down menus under the Screen section to set a different screen turn-off time for the following two cases. In Windows 11, you have to expand the Screen and sleep tab to view the screen turn-off time settings.
- When your laptop is on battery power.
- When your laptop is plugged in or charging.
2] How to change screen turn-off timeout on Windows 11/10 via the Control Panel
This method has one advantage over the method we described above. You can create multiple custom power plans in the Control Panel and define different custom screen turn-off times. Name the custom power plans accordingly. Now, when you want to change the screen turn-off time, simply switch to that particular power plan in the Control Panel.

The following steps will guide you on how to change the screen turn-off time in Windows 11/10 using the Control Panel.
- Press the Win + R keys to open the Run command box.
- Type Control Panel and click OK. This will open the Control Panel.
- Now, go to “Hardware and Sound > Power Options.” Alternatively, you can also use the Control Panel search for the same. Type power in the Control Panel search bar and select Power Options.
- On the Power Options page, click on the Change plan settings link. Or click on the “Choose when to turn off the display” link on the left side.
- Now, click on the drop-down menus next to the Turn off the display option to change the screen turn-off time for the following two cases:
- When your laptop is on battery.
- When your laptop is charging or plugged in.
- Click Save Changes.
3] How to change screen turn-off timeout on Windows 11/10 by using the Command Prompt
You can also change the time to turn off your screen by using the Command Prompt. This method has an advantage over the two methods we described above. Suppose you want to set a custom time, say 7 minutes, 12 minutes, etc., to turn off your screen. You cannot do so by using the above two options because you will not find these custom times in the drop-down. The following instructions will help you change or set a custom time to turn off the screen of your laptop.
Click on the Windows Search and type cmd. After that, select the Command Prompt from the search results. This will open the Command Prompt.

Now, copy the following command and paste it into the Command Prompt. After that, hit Enter. The following command will change the time to turn off the screen for “When your laptop is on battery” mode. You can use the right-click of your mouse to paste the copied command in the Command Prompt.
powercfg -change -monitor-timeout-dc X
If you want to change the time or set a custom time for “When your laptop is plugged in or charging” mode, copy the following command and paste it into the Command Prompt. After that, press Enter.
powercfg -change -monitor-timeout-ac X
In the above commands, replace the letter X with time. The value that you type here is the time in minutes. For example, if you want to turn off your screen after 7 minutes, you should type 7 in place of X. If you want to turn off your screen after 1 hour, you have to type 60 in place of X.

After performing the above steps, when you open Windows 11/10 Settings or the Control Panel, you will see the custom screen turn-off time there.
TIP: You can set a custom sleep time by executing the following commands in the Command prompt.
On Battery
powercfg -change -standby-timeout-dc X
Plugged in
powercfg -change -standby-timeout-ac X
Replace X with the time (in minutes) after which you want your laptop to go into sleep mode.
Read: How to turn off Windows laptop screen with a click using ScreenOff.
How to make my screen not turn off in Windows 11?
If you do not want your screen to be turned off in Windows 11, follow the steps written below:

- Open Windows 11 Settings.
- Go to “System > Power & battery.”
- Click on the Screen and sleep tab to expand it.
- Click on the drop-down menus next to the following two options and select Never.
- On battery, turn off my screen after.
- When plugged in, turn off my screen after.
How do I get my screen to stay longer on Windows 11/10?
To make your screen stay longer on WIndows 11/10, open the Power & battery page in your Windows 11 Settings and select the maximum time in the drop-down menus next to the following two options:
- On battery, turn off my screen after.
- When plugged in, turn off my screen after.
In Windows 10, the Power & battery page is named as Power & sleep. If you want a custom time to turn off your screen, say 5 hours, 6 hours, etc., you have to execute a command in the Command Prompt. We have described this above in this article.
Hope this helps.
Read next: How to change Sleep settings on Windows 11/10.
При нахождении на экране блокировки в Windows 11/10 экран автоматически выключается через 30 секунд или 1 минуту. Если вам требуется изменить это время или сделать так, чтобы экран не выключался, нужного параметры вы не найдёте, но возможность настройки существует.
В этой инструкции подробно о том, как добавить возможность настройки времени выключения экрана на экране блокировки в Windows 11 и Windows 10 в параметры электропитания и настроить этот промежуток времени.
Как добавить настройку времени отключения монитора в параметры схемы электропитания
В Windows 11 и Windows 10 предусмотрен параметр для настройки выключения экрана на экране блокировки, но он скрыт по умолчанию.
Соответственно, первое, что потребуется сделать — добавить опцию настройки времени отключения экрана на при заблокированной Windows в параметры электропитания, для этого придётся прибегнуть к использованию редактора реестра. Шаги будут следующими:
- Запустите редактор реестра. Для этого нажмите клавиши Win+R, либо нажмите правой кнопкой мыши по кнопке «Пуск» и выберите пункт «Выполнить». Введите regedit и нажмите Enter.
- Перейдите к разделу реестра
HKEY_LOCAL_MACHINE\SYSTEM\CurrentControlSet\Control\Power\PowerSettings\7516b95f-f776-4464-8c53-06167f40cc99\8EC4B3A5-6868-48c2-BE75-4F3044BE88A7
- В правой панели редактора реестра дважды нажмите по параметру с именем Attributes, замените его значение с 1 на 2 и примените настройки.

- Закройте редактор реестра.

Следующий шаг — настройка времени до выключения экрана на экране блокировки, для этого:
- Зайдите в Панель управления и откройте пункт «Электропитание», либо нажмите клавиши Win+R на клавиатуре, введите powercfg.cpl и нажмите Enter.
- Нажмите «Настройка схемы электропитания» справа от используемой схемы.

- В следующем окне нажмите «Изменить дополнительные параметры питания».
- Перейдите в раздел «Экран» и настройте нужные параметры в подразделе «Время ожидания до отключения экрана блокировки консоли». Время задается в минутах, если указать 0, выключение экрана выполняться не будет.
- Примените сделанные настройки


Учитывайте, что работать настройка будет только после уже выполненного входа в Windows 11/10 (т.е. когда мы заблокировали систему после входа или она заблокировалась сама), но не, например, после перезагрузки компьютера ещё до входа.
Изменение времени отключения экрана при блокировке Windows 10 с помощью powercfg.exe
Еще один способ изменить это же поведение — использовать утилиту командной строки для установки времени отключения экрана.
В командной строке от имени администратора выполните следующие команды (в зависимости от задачи):
-
powercfg.exe /setacvalueindex SCHEME_CURRENT SUB_VIDEO VIDEOCONLOCK время_в_секундах
(при питании от сети)

-
powercfg.exe /setdcvalueindex SCHEME_CURRENT SUB_VIDEO VIDEOCONLOCK время_в_секундах
(при питании от батареи)

Надеюсь, найдутся читатели, для которых информация из инструкции будет востребована.