
Haven’t developed with PHP for a while but now I got a need to do some updates to an older project. The project is based on PHP, MYSQL and HTML (+ jquery) and it also uses TCPDF library for generating PDF files.
After installing XAMPP with PHP 8 and editing some settings, I managed to get stuff working.
However, I noticed that the TCPDF won’t work with default XAMPP installation as it rquires GD or ImageMagick library installed.
So I received an error when trying to create a PDF:
TCPDF requires the Imagick or GD extension to handle PNG images with alpha channel.
Installing ImageMagick
It seems that I forgot how annoying installing PHP libraries can be.
I tried many guides, including https://ourcodeworld.com/articles/read/349/how-to-install-and-enable-the-imagick-extension-in-xampp-for-windows without success.
There is good discussion here too: https://stackoverflow.com/questions/39609951/cannot-load-imagick-library
I always ended with the following error inside Apache error.log even though the file was there:
PHP Warning: PHP Startup: Unable to load dynamic library 'imagick' (tried: C:\\xampp\\php\\ext\\imagick (The specified module could not be found), C:\\xampp\\php\\ext\\php_imagick.dll (The specified module could not be found)) in Unknown on line 0
Then I noticed that I had x86 version installed, but my phpinfo() told that I have x64 php installation. However, installing x64 versions didn’t help, the same problem was still there.
Final solution (for me)
- Delete ImageMagick if installed previously
- Check using
phpinfo()what version is installed- x64 or x86?
- Thread safety enabled / disabled
- PHP version

- Download latest version from https://windows.php.net/downloads/pecl/releases/imagick/
- I had x64 PHP, thread safety enabled and PHP 8
- Latest imagick version was 3.6.0rc2
- So my file was:
php_imagick-3.6.0rc2-8.0-ts-vs16-x64.zipfrom https://windows.php.net/downloads/pecl/releases/imagick/3.6.0rc2/
- Copy
php_imagick.dlltoC:\xampp\php\ext - Copy all other files to
C:\xampp\php - Edit
php.iniand add the following line underDynamic Extensionsextension=imagick- NOTE: In PHP8 the
php_and.dllare not longer used in extension filename
- Restart Apache
ImageMagick is a powerful free and open-source software for image manipulation. It is fully cross-platform and mainly used by many websites for processing images. ImageMagick has a PHP extension that makes it easy to use, powerful and is usually preferred more than PHP GD extension.
This tutorial will guide you on how to install ImageMagick on Windows operating system and make it works properly as a PHP extension.
Note: This article is solely focused on installing and getting ImageMagick to work with PHP in Windows system, and will not explain non-related PHP parts into details.
Tutorial StartsPrerequisites
This article assumes that you already got a webserver running properly with PHP installed and enabled.
Windows System Requirements
As mentioned on official ImageMagick download page, the software is fully compatible with most Windows version, from Windows Server 2008 R2 (x64) to Windows 11. Unless you wanted to install it on ancient versions as Windows 95 (!), we are good to go.
A single core Windows computer with minimum 512MB of RAM should be suffice to run ImageMagick, although having more will provide better performance. Both 32-bit, 64-bit and ARM64 system is compatible.
1. Download ImageMagick Windows package
Go to the Official ImageMagick download page and scroll to the Windows Binary Release section. You will see a table with plenty of versions to download.
To keep things simple, choose the recommended version that is listed at the first of the list to download:
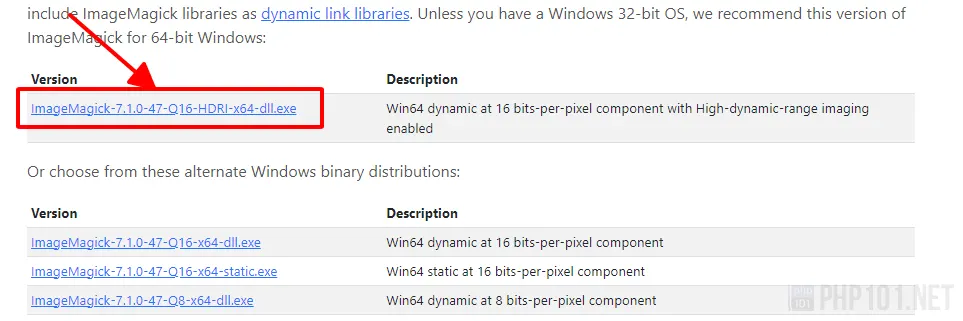
Otherwise, in case you wanted more customized version for your system, choose version that has the filename that suits your system to download:
- Choose dynamic version with dll in filename, which is more preferred for using PHP to work with.
- Version with Q8 is for 8 bits-per-pixel image processing, while Q16 provides 16 bits-per-pixel.
The latter uses more resources, but will have much better image precision. Usually, with 1GB+ memory, it’s fine to use Q16 version. - Version with HDRI will enable High Dynamic Range Imaging processing, and is recommended.
- For 64-bit system, choose the version with x64 in filename.
For 32-bit, choose x32, and for ARM64, choose arm64. - Choose installer version with exe extension, which will setup and configure the paths automatically for you (again, let’s keep things simple). If you choose portable version, you will have to set the environment paths manually.
2. Install ImageMagick on Windows
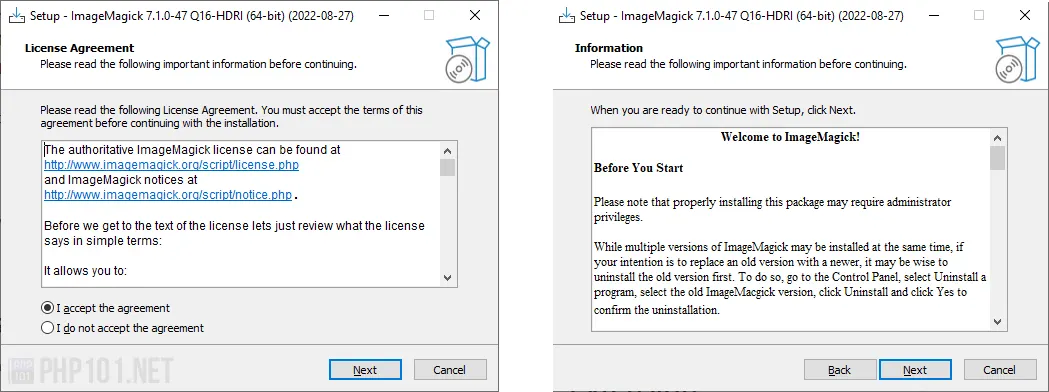
After downloaded the preferred version (which is installer version having exe extension), run the file to start the installation.
Accept the license and information:
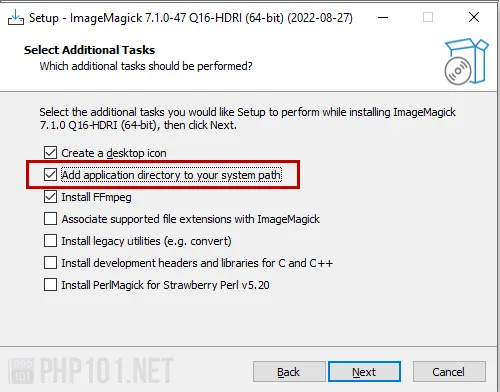
Ensure “Add application directory to your system path” is checked, so the installer can configure the environment paths for you, making things easier. If you want to process FFmpeg video, check the Install FFmpeg option, else it can be left unchecked.
Click Install on the next screen, and ImageMagick will be installed. You can view the index.html introduction page or uncheck it and finish the installation.
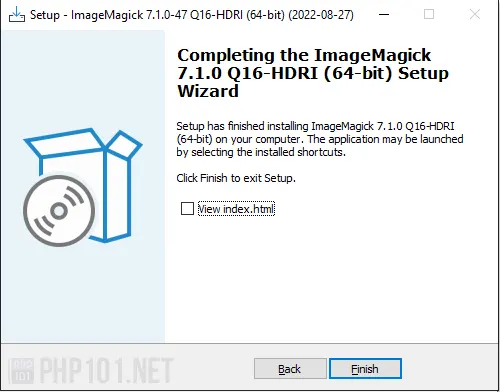
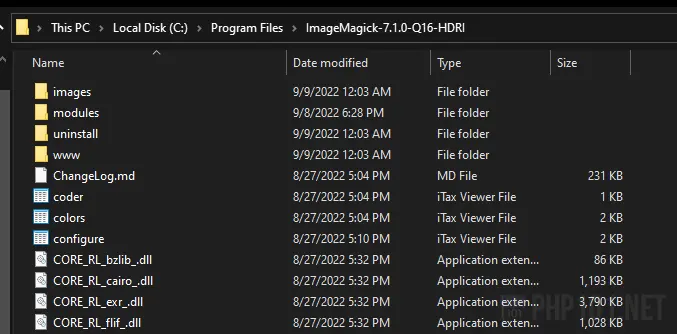
By default, it is installed on C:\Program Files\ImageMagick-{version}, which contains all of the Windows executable files that are ready to use with PHP.
Verify ImageMagick installation
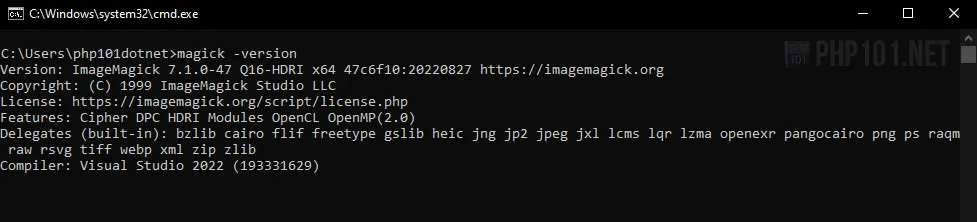
To verify if ImageMagick is installed on Windows, open a terminal console as cmd and run the command:
magick -versionOn successful installation, the command will return with ImageMagick version, and built in modules:
Now we have ImageMagick on Windows installed, in the next steps, we will also get the ImageMagick PHP extension installed for them to work together.
3. Download ImageMagick PHP extension
Depends on your installed PHP version, the recommended version for ImageMagick PHP extension will be different accordingly.
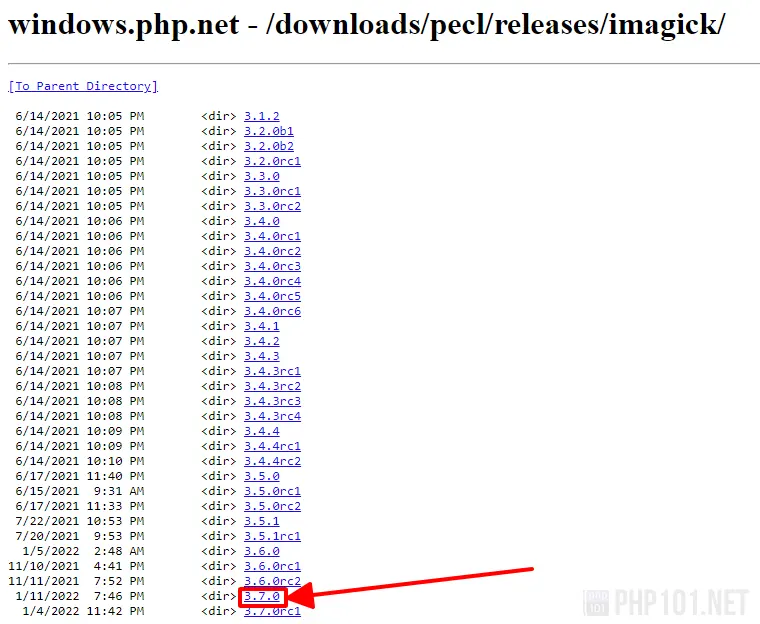
First, head to the Official Windows PHP PECL extension for ImageMagick release page. Then, choose the download according to the installed PHP version, or else the extension will not work properly.
- For PHP 7.4 to 8.1, choose the 3.7.0 version of the extension.
- For PHP 7.3, choose 3.6.0 extension version.
- For PHP 7.1 to 7.2, choose the 3.4.4 extension version.
- For PHP 7.0 and below, choose the 3.4.3 extension version.
- Any extension version below 3.4.3 is not recommended.
For example, to choose version 3.7.0 of the extension, click the 3.7.0 version URL:
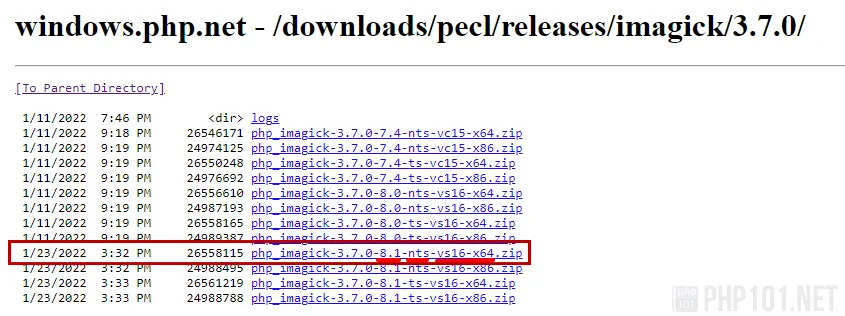
Then, pick the recommended download for your system and PHP version.
- For non-thread-safe version, choose
ntsfilename, for thread-safe version, choosetsversion.
Quick recommendation: If you use XAMPP or Laragon to host the webserver, choosentsversion.
If you use IIS for webserver, choosetsversion. - For 32-bit version, choose
x86filename, for 64-bit version, choosex64filename. - It’s recommended to pick the higher Visual Studio compiled version, which is
vs16.
For example, the recommended extension download for for PHP 8.1, 64-bit system, non-thread-safe version:
After downloading, extract the package to a folder. We are ready to install the ImageMagick extension to the existing PHP installation.
4. Install ImageMagick PHP extension
After extracting the downloaded extension zip file, we can install them to our PHP installation.
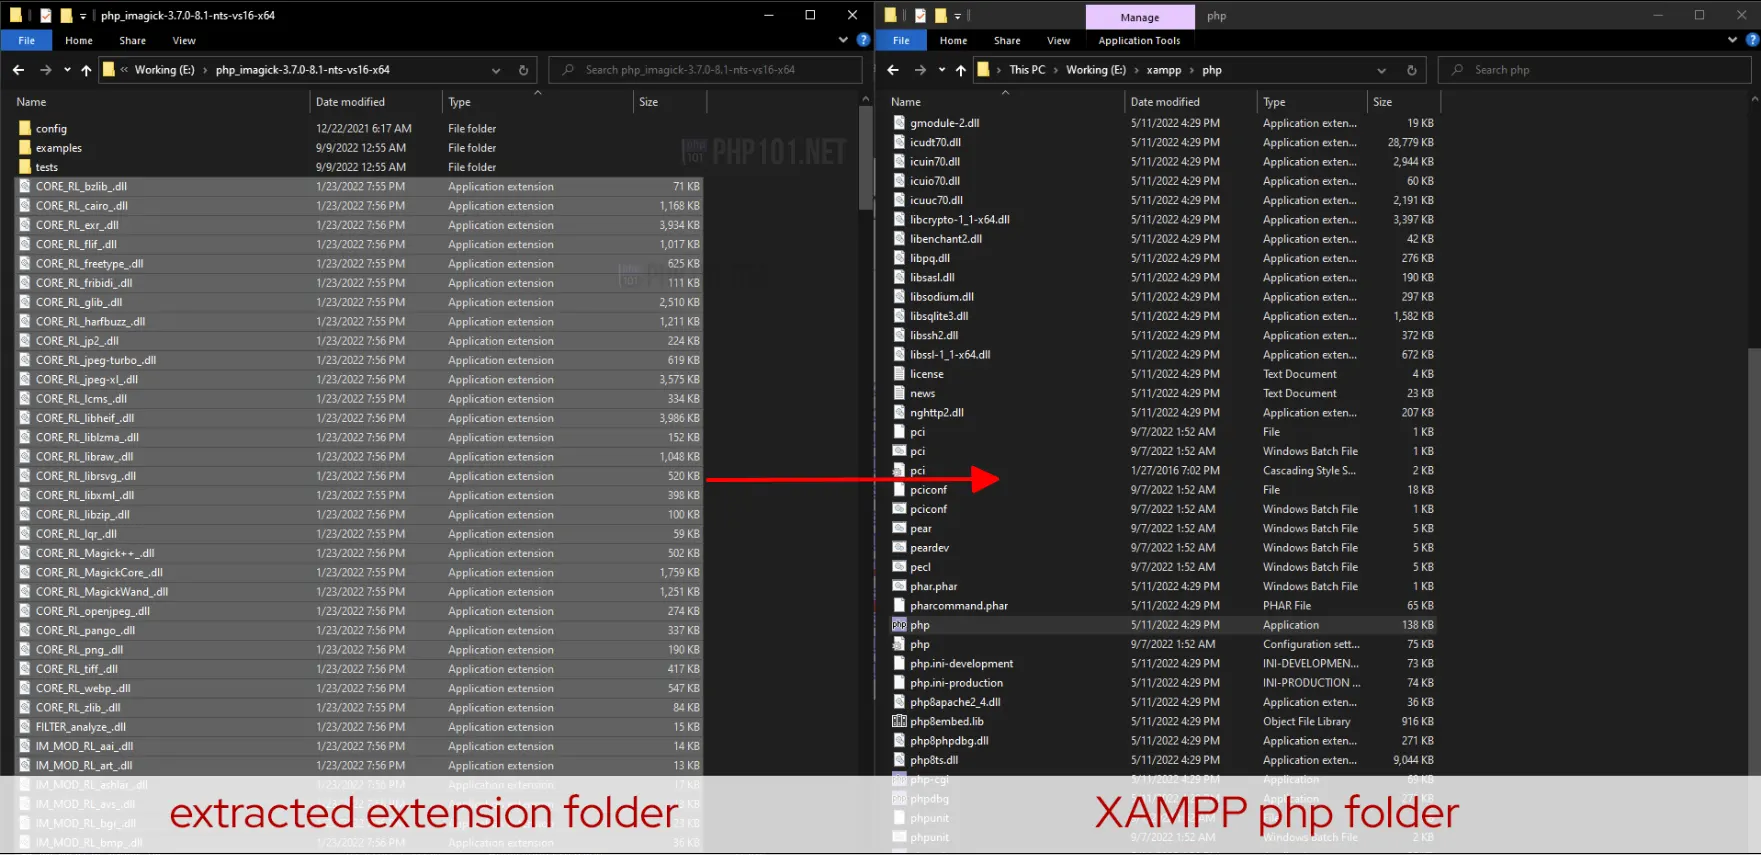
First, copy all of the .dll file in the extracted folder to the PHP installation folder where php.exe is located.
For example, with XAMPP (php folder in [XAMPP folder]/php):
For example, with Laragon (php folder in [Laragon folder]/bin/php/[php version folder]:
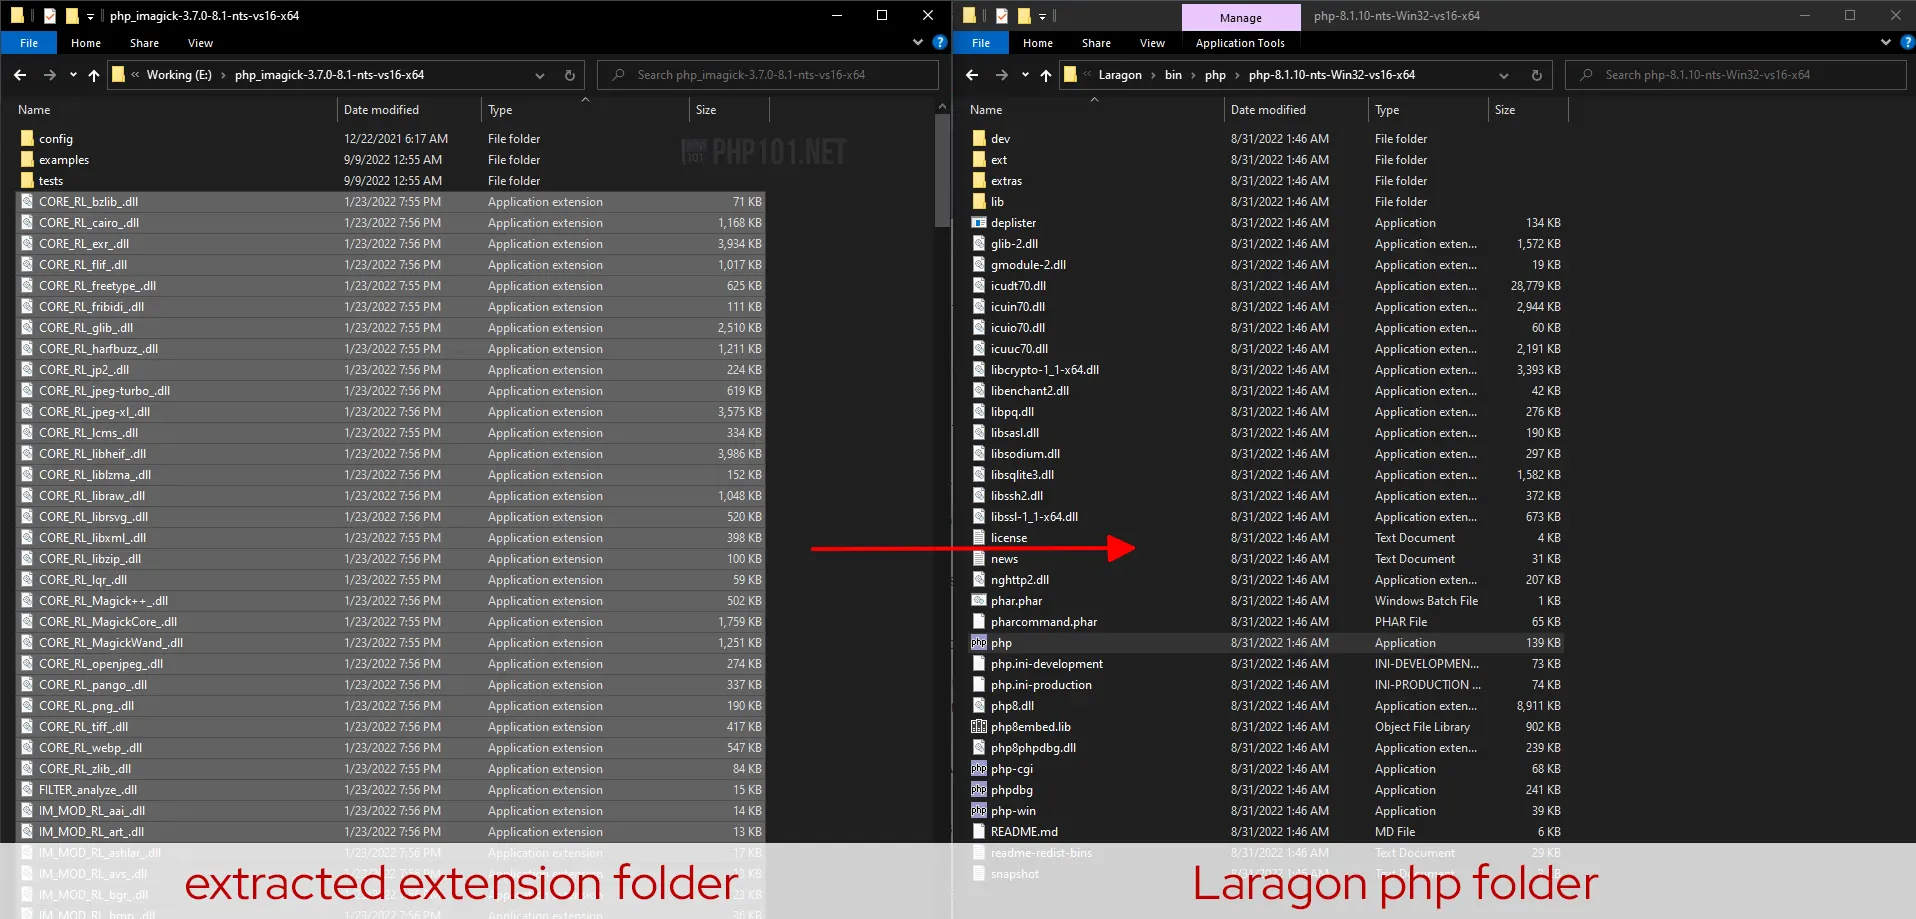
Then, copy/move the php_imagick.dll file to the ext folder of PHP installation folder:
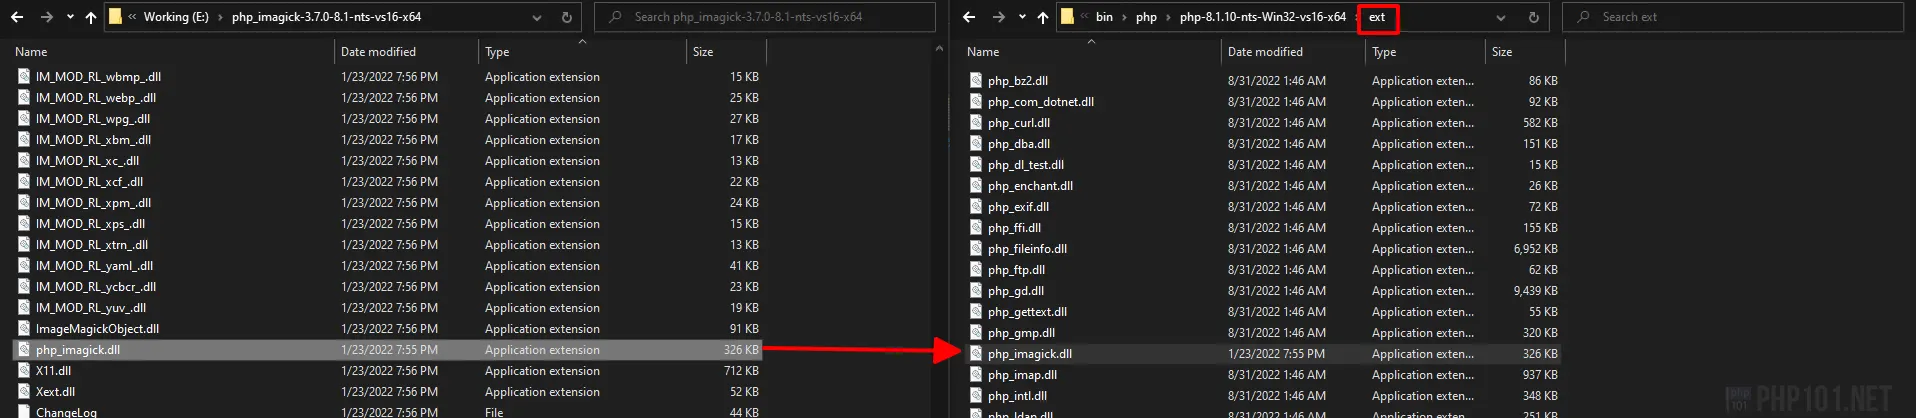
The installation is now finished. Remember to restart the webserver for it to take effect.
5. Verify PHP ImageMagick extension working
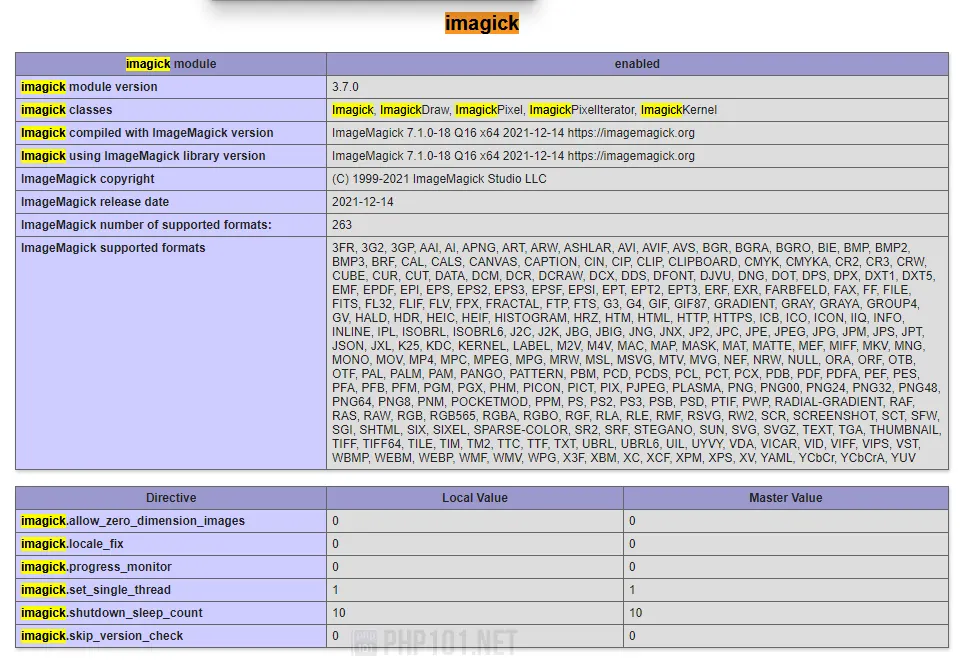
To verify that the PHP ImageMagick extension is working properly in Windows, we have multiple methods. The easiest way is to view PHPInfo and check whether the ImageMagick PHP extension is displayed.
Create a php file with the following lines:
<?php
// phpinfo.php file

phpinfo();
Open the file on your browser, and search for imagick. If this section exists, the PHP extension for ImageMagick on Windows is fully installed and should be working properly (with the condition that ImageMagick package is also installed):
The tutorial is now over.
Final thoughts
We hope this detailed tutorial can help you to get ImageMagick on Windows and its PHP extension to be installed and working properly on Windows operating system. There will be other tutorials and how-to articles on using ImageMagick properly and efficiently, as it is a very powerful yet simple to use in PHP for manipulating images.
You might also like
- How to display image from file using PHP
- How to convert image to base64 using PHP
References
- ImageMagick official website
- PHP.net Official Documentation – ImageMagick
I’m on Windows 7 and have installed ImageMagick-6.7.4-8-Q16-windows-x64-dll.exe
I’m running a batch script that loops through a folder of images, and calls ImageMagick to crop them. However, sometimes ImageMagick crashes and I get an error message «ImageMagick Studio library and utility programs has stopped working» (a pop-up windows message, not a message in the command prompt). This can happen multiple times as the script loops through the images, or sometimes all the images are processed successfully.
You can download the script and files I am using here: http://www.iliveinabin.com/ImageSlicer.zip
Usage is test.cmd «C:\Path\to\test» (or you should be able to just drag the test folder onto the test.cmd file in Windows Explorer)
In the script I am checking the %errorcode% and it appears to always be 0, even when ImageMagick crashes. Presumably this is because if ImageMagick crashes then it can’t set an exit code, and errorcode contains the value from before ImageMagick was called?
I have tried adding a 1s timeout in the loop, but this didn’t make any difference, so it doesn’t seem like the script is calling ImageMagick too quickly in repetition to cause the error.
Since the error is intermittent, I’m not sure what the problem is, and since ImageMagick crashes rather than exiting with an error, I don’t know how I could get any debug information on what might be causing the error?
Dave
5748
Так уж вышло, что понадобилось для для одного проекта такое расширение, как ImageMagick. Ну а раз понадобилось, то надо устанавливать.
На рабочем макинтоше всяческие апачи и пэхэпэшки проинсталлированы у меня через MacPorts, потому и установка разрешилась поиском по интернету и парой команд, что ниже
sudo port install ImageMagick sudo port install php5-imagick |
Минут 45 ожидания (и наблюдения за компьютерной жизнью в консоли) и готово. Так долго вышло потому, что порты давно не обновлялись, а с установкой расширения попутно пересобралось всё, что только можно.

В операционной системе Windows, где я работаю дома, ситуация вышла более печальная, чем в Mac OS X. Для начала скачала и установил новейшую версию ImageMagick c официального сайта. Первая проблема заключалась в том, что это PECL-расширение не поставляется вместе с необходимой DLL, но это ерунда, т.к. я не первый и не единственный php-разработчик, сидящий под виндой (или на винде?). Нужную dll-ку компилировали уже миллионы раз, нашлась она тут, например → http://valokuva.org/builds/, далее в php.ini
extension=php_imagick.dll |
Естественно, dll надо закинуть в папку к другим расширениям, учитывая сборку самого PHP — thread-safe или non-thread-safe. Можно и экспериментальным путём подобрать, с «неправильной» апач всё равно не запустится.
Вторая проблема оказалась не такой явной. Вроде бы и imagick подключился, наблюдается в phpinfo, по крайней мере, а вот на сайте всё равно 500-я ошибка вместо обработки изображений. Гугление прояснило, что эти неприятности начались с тех пор, как ImageMagick стали собирать компилятором VC10. Последняя версия, скомпилированная VC9 — это ImageMagick-6.6.4-1. Архив большой кучи разных старых версий можно обнаружить тут → http://image_magick.veidrodis.com/image_magick/binaries/. Себе установил ImageMagick-6.6.4-1-Q16-windows-dll.exe, не забыв удалить старую-новую  И готово!
P.S. Тем, у кого выскакивает ошибка вида «Запуск программы невозможен, так как на компьютере отсутствует CORE_RL_eand_.dll» при запуске apache — необходимо прописать в системных настройках путь к установленному ImageMagick. Или перезагрузиться, если путь уже прописан.
версия движка 1dcdc6b
Posts: 8
Threads: 2
Joined: Jun 2019
Reputation:
0
Gimp version:
- 2.10
Operating system(s): Windows (Vista and later)
Hello & Thanks ,
Windows 10 x64
I just installed «ImageMagick-7.0.8-48-portable-Q16-x64.zip»
When I click on «magick.exe»
all I get back is a momentary flash of something , then nothing .
How to startup ImageMagick ?
Thanks
Posts: 6,697
Threads: 291
Joined: Oct 2016
Reputation:
590
Gimp version:
- 2.10
- 3.0
Operating system(s): Linux
ImageMagick is a command line utility. It runs in a command prompt (aka «black screen»). So, normally:
- You start a command prompt (seach for «command» in the Start menu).
- You use the «CD» command to navigate to the folder where you keep your files: cd c:\Users\{your_id}\My Documents\Pictures
- You issue «commands»: magick convert the_file.png the_file.jpg or even worse magick convert the_file.png {a_whole_lot_of_parameters_you_have_to_figure_out} the_file.jpg`. The documentation, Google, DuckDuckGo, your favorite forums are your friends.
Sounds complicated? Perhaps. But not that hard, this was how things worked before the invention of windows-based interfaces. And there is a huge advantage. Once you figure out an incantation that works you can put it in a file (aka «script», a .BAT file in Windows) and can then repeat it at will, and this will be much faster that doing (and reembering) all the clicks again in a window-based app. For instance I have a short script to make a smaller version of my photos, with a bit of added contrast and some sharpening where the «core» is:
Code:
magick convert "$f" -modulate 100,120 -geometry 3000 -sharpen 0x1.0 -quality 85 "$dir/$(basename "$f" .JPG).jpg"
Of course it took me a while to figure out, but Id did that only once… and used it many times since.
Some more information on the command prompt:
https://www.bleepingcomputer.com/tutoria…roduction/
https://red-dot-geek.com/basic-windows-c…-commands/
Posts: 7,477
Threads: 158
Joined: Oct 2016
Reputation:
1,040
Gimp version:
- 2.10
- 3.0
Operating system(s): Linux
ImageMagick is primarily a command line application run in a Windows ‘cmd’ terminal. There is not even a half-decent Windows GUI that I know of.
You have made things slightly more difficult using the portable version, the installer has an option to add IM to the Windows path. Just means a bit more typing on your part.
This is a very quick look at starting IM — 3 minutes of video https://youtu.be/Za1SRXoiVHM
What do you want to do with IM?The best place for questions is usually their own forum https://www.imagemagick.org/discourse-server/ in the users section.
However, if you can give details of what you intend maybe someone here can assist.