
BitLocker — встроенная функция шифрования дисков в Windows 7, 8 и Windows 10, начиная с Профессиональных версий, позволяющая надежно зашифровать данные как на HDD и SSD — системных и нет, так и на съемных накопителях.
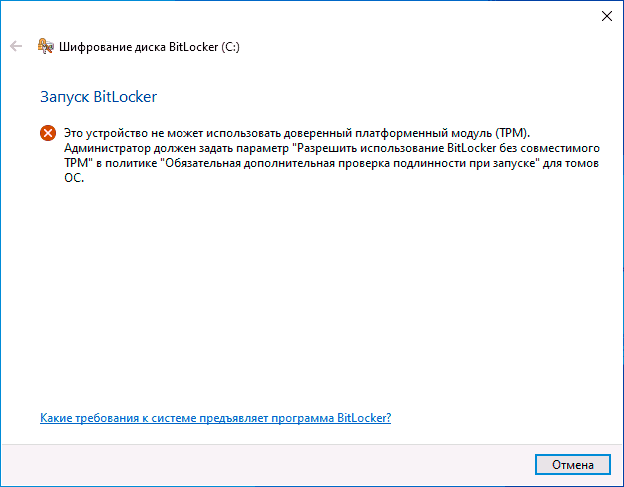
Однако, при включении шифрования BitLocker для системного раздела жесткого диска, большинство пользователей сталкиваются с сообщением о том, что «Это устройство не может использовать доверенный платформенный модуль (TPM). Администратор должен задать параметр Разрешить использование BitLocker без совместимого TPM». О том, как это сделать и зашифровать системный диск с помощью BitLocker без TPM и пойдет речь в этой короткой инструкции. См. также: Как поставить пароль на флешку с помощью BitLocker.
Краткая справка: TPM — специальный криптографический аппаратный модуль, использующийся для задач шифрования, может быть интегрирован в материнскую плату или подключаться к ней. Примечание: если ваш компьютер или ноутбук оснащен модулем TPM, а вы видите указанное сообщение, это может означать, что по какой-то причине TPM отключен в БИОС или не инициализирован в Windows (нажмите клавиши Win+R и введите tpm.msc для управления модулем).
Разрешить BitLocker без совместимого TPM в Windows 10 последней версии
В последней версии Windows 10 (1903 May 2019 Update) расположение политики, отвечающей за разрешение использования BitLocker для шифрования системного раздела диска без модуля TPM несколько изменилось (для предыдущих версий расположение описывается в следующем разделе).
Для включения шифрования BitlLocker без TPM в новой версии ОС проделайте следующие шаги:
- Нажмите клавиши Win+R на клавиатуре, введите gpedit.msc и нажмите Enter.
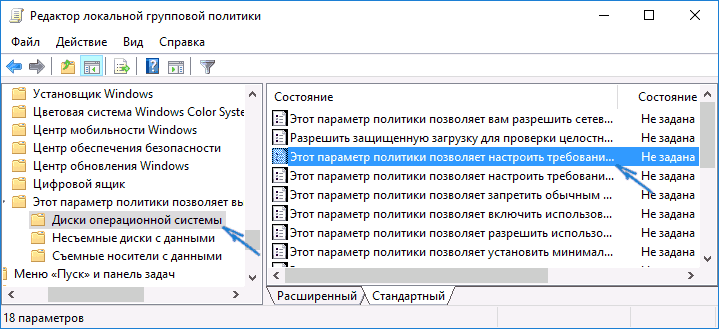
- Откроется редактор локальной групповой политики. Перейдите к разделу: Конфигурация компьютера — Административные шаблоны — Компоненты Windows — Шифрование диска BitLocker — Диски операционной системы.
- В правой панели редактора локальной групповой политики найдите параметр «Этот параметр политики позволяет настроить требование дополнительной проверки подлинности при запуске» и дважды кликните по нему мышью. Обратите внимание, что в списке есть два параметра с таким именем, нам требуется тот, который без указания Windows Server.

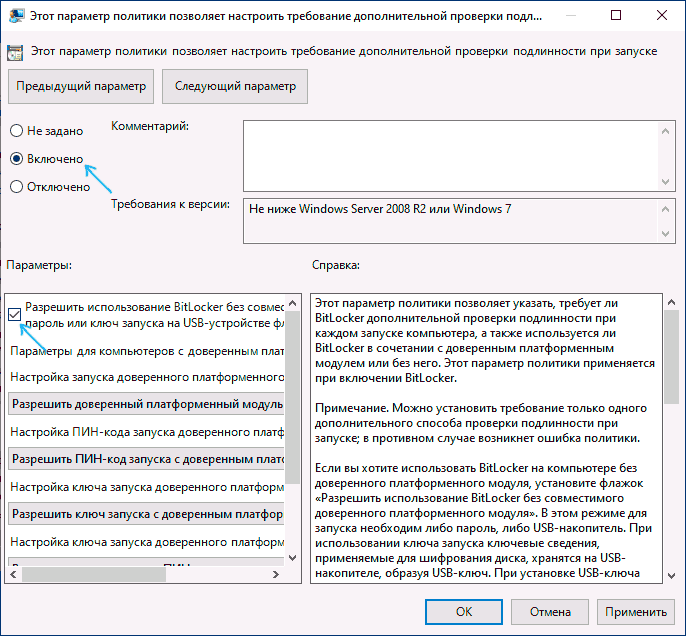
- В открывшемся окне выберите пункт «Включено» и убедитесь, что пункт «Разрешить использование BitLocker без совместимого TPM включен». Примените сделанные настройки.


На этом процесс завершен и теперь вы можете включить шифрование BitLocker для системного раздела диска Windows 10.
Это же разрешение вы можете включить и с помощью редактора реестра: для этого в разделе HKEY_LOCAL_MACHINE\SOFTWARE\Policies\Microsoft\FVE создайте параметр DWORD с именем EnableBDEWithNoTPM и установите для него значение 1.
Разрешение использования BitLocker без совместимого TPM в Windows 10, 8 и Windows 7
Для того, чтобы возможно было зашифровать системный диск с помощью BitLocker без TPM, достаточно изменить один единственный параметр в редакторе локальной групповой политики Windows.
- Нажмите клавиши Win+R и введите gpedit.msc для запуска редактора локальной групповой политики.

- Откройте раздел (папки слева): Конфигурация компьютера — Административные шаблоны — Компоненты Windows — Этот параметр политики позволяет выбрать шифрование диска BitLocker — Диски операционной системы.

- В правой части дважды кликните по параметру «Этот параметр политики позволяет настроить требование дополнительной проверки подлинности при запуске.
- В открывшемся окне, установите «Включено», а также убедитесь, что стоит отметка «Разрешить BitLocker без совместимого доверенного платформенного модуля» (см. скриншот).
- Примените сделанные изменения.


После этого вы можете использовать шифрование дисков без сообщений об ошибках: просто выберите системный диск в проводнике, кликните по нему правой кнопкой мыши и выберите пункт контекстного меню «Включить BitLocker», после чего следуйте указаниям мастера шифрования. Также этом можно сделать в «Панель управления» — «Шифрование диска BitLocker».
Вы сможете либо задать пароль для получения доступа к зашифрованному диску, либо создать USB-устройство (флешку), которая будет использоваться в качестве ключа.

Примечание: в ходе шифрования диска в Windows 10 и 8 вам будет предложено сохранить данные для расшифровки в том числе в вашей учетной записи Майкрософт. Если она у вас должным образом настроена, рекомендую это сделать — по собственному опыту использования BitLocker, код восстановления доступа к диску из учетной записи в случае возникновения проблем может оказаться единственным способом не потерять свои данные.
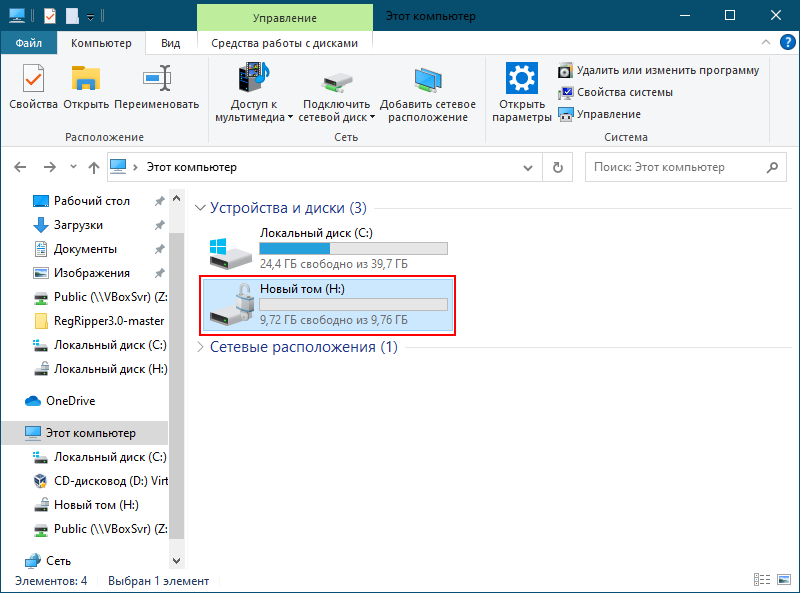
Функция BitLocker впервые появилась в Vista максимальной и корпоративной редакций, а затем успешно была унаследована всеми последующими версиями операционной системы Windows. BitLocker представляет собой средство шифрования данных на локальном диске, а также службу, обеспечивающую защиту этих данных без непосредственного участия пользователя. В Windows 10 BitLocker поддерживает шифрование с использованием алгоритма AES 128 и AES 256, для защиты данных служба может использовать работающий в связке с данными учётной записи текстовый пароль, а также специальный набор данных, хранящийся на внешнем устройстве — так называемой смарт-карте или токене, которые, между прочим, также используют защиту паролем, в роли которого выступает пин-код.
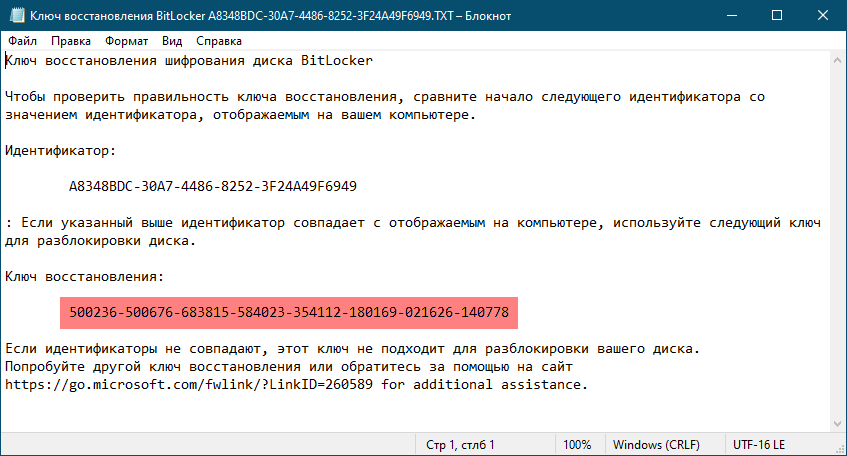
При активации BitLocker перед процедурой шифрования создаётся идентификатор и ключ восстановления — строка из 48-символов, с помощью которой можно разблокировать доступ к зашифрованному тому в случае утере утери пароля или смарт-карты. После того как том будет заблокирован, получить к нему доступ можно будет только подключив к ПК токен и введя его PIN-код или введя обычный пароль либо воспользовавшись ключом восстановления, если токен или пароль были утеряны. Процедура проста и не требует никаких технических навыков.
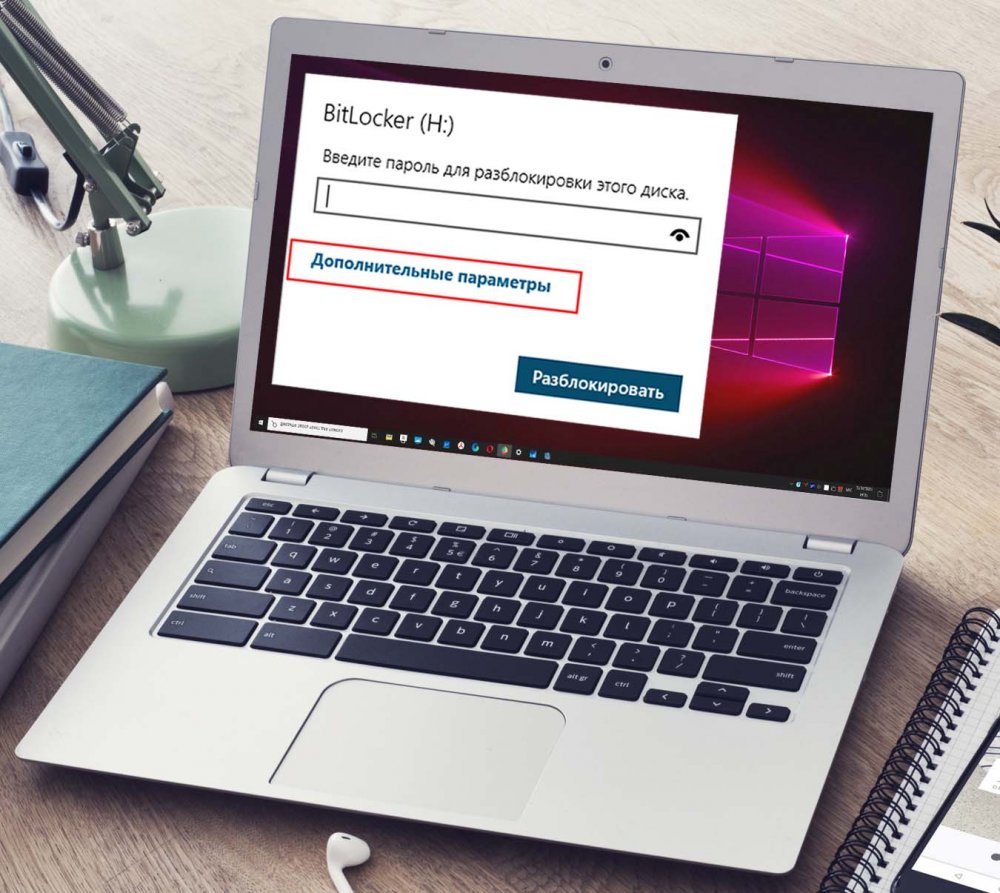
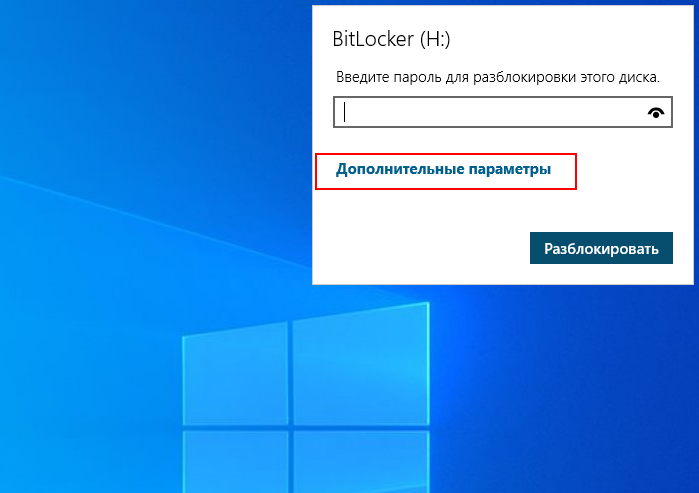
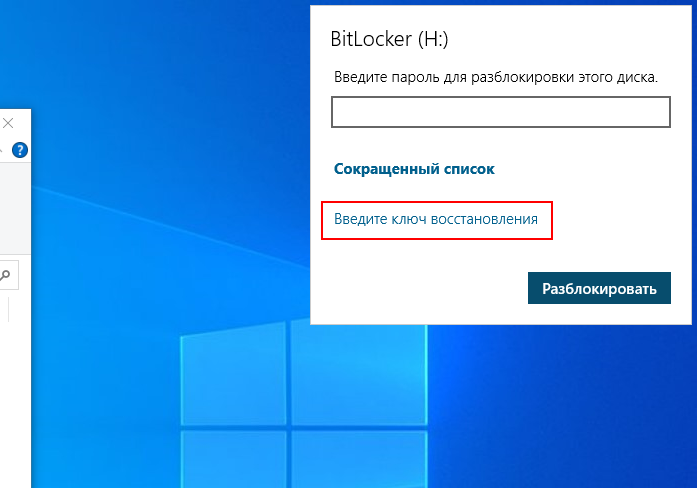
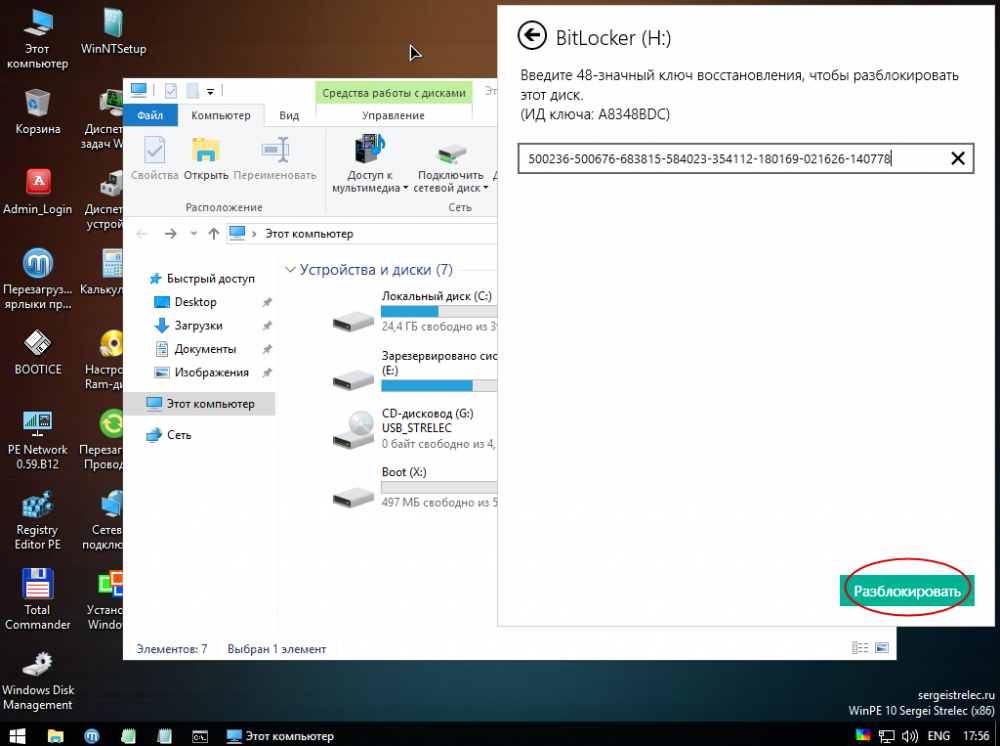
Кликните дважды по заблокированному разделу, а когда в верхнем правом углу появится приглашение вести пароль, нажмите в окошке «Дополнительные параметры» → «Введите ключ восстановления».
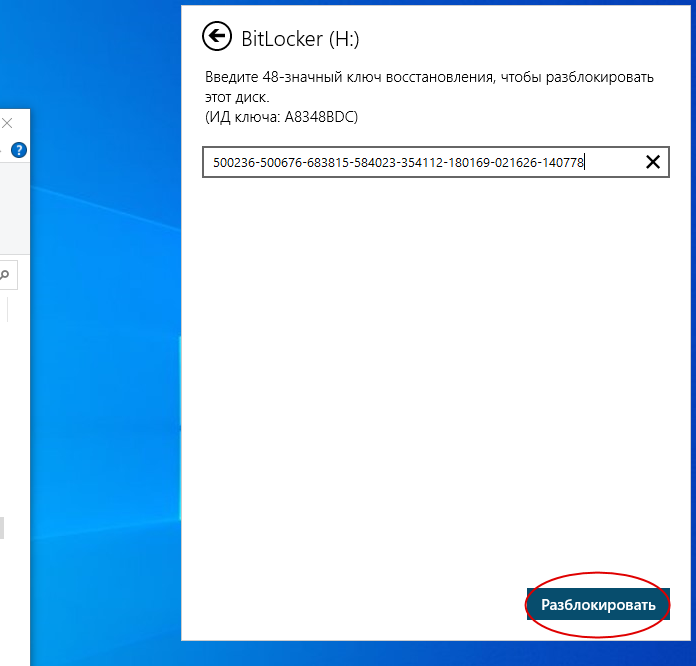
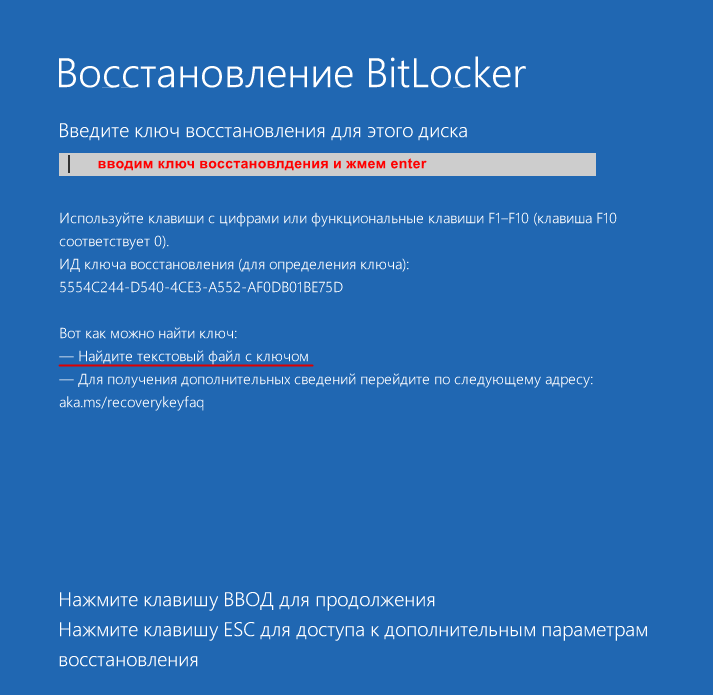
Скопируйте из файла «Ключ восстановления BitLocker» 48-значный ключ, вставьте его в соответствующее поле и, убедившись, что первые восемь символов ID ключа совпадают с первыми восьмью символами идентификатора ключа в файле «Ключ восстановления BitLocker», нажмите «Разблокировать».
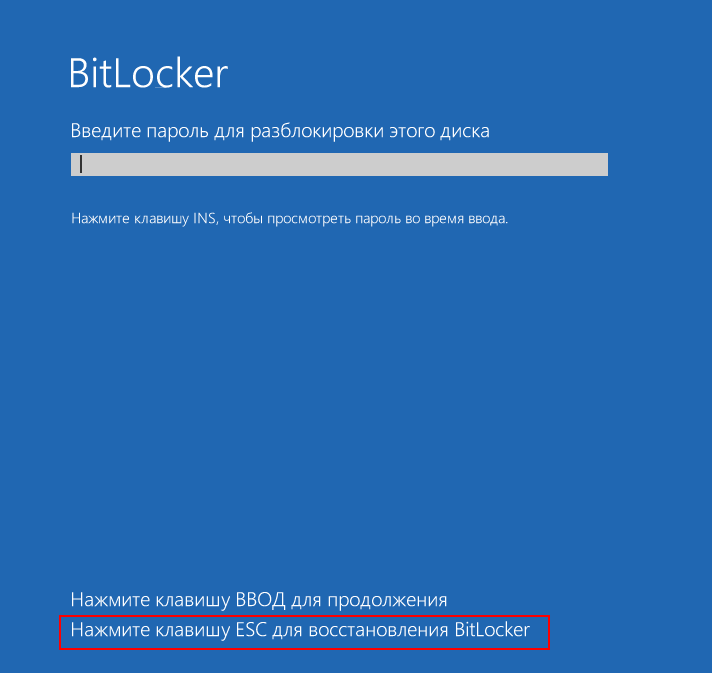
Раздел будет разблокирован точно так же, как если бы вы ввели пароль или воспользовались токеном. Если вы зашифровали системный том, на экране ввода пароля нужно будет нажать клавишу ECS и ввести в ключ восстановления.
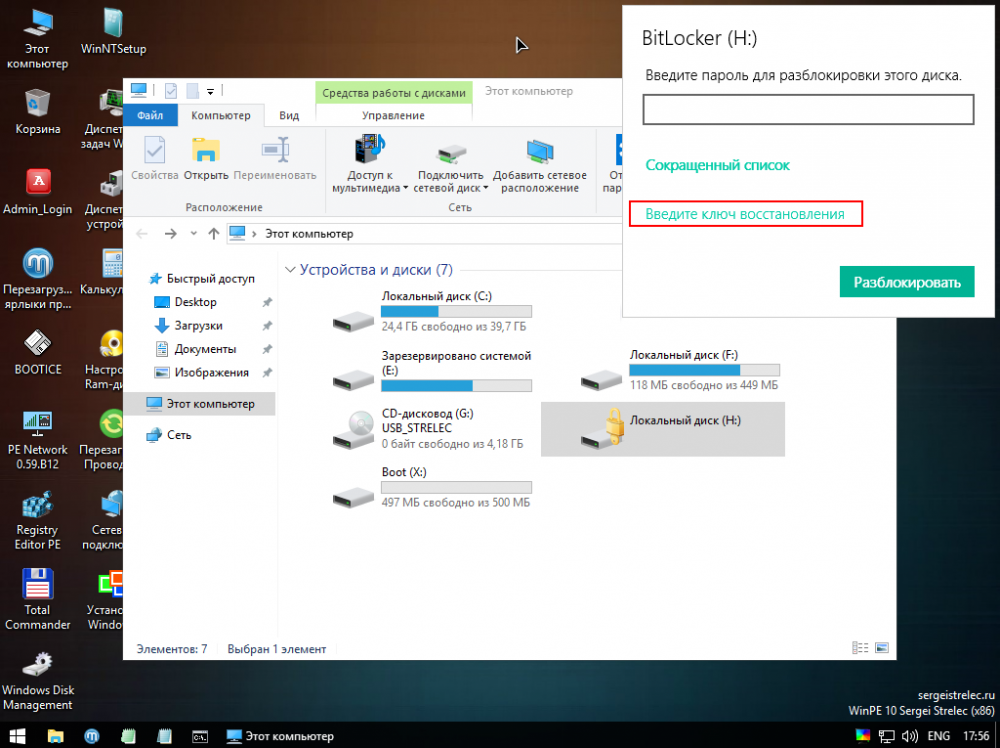
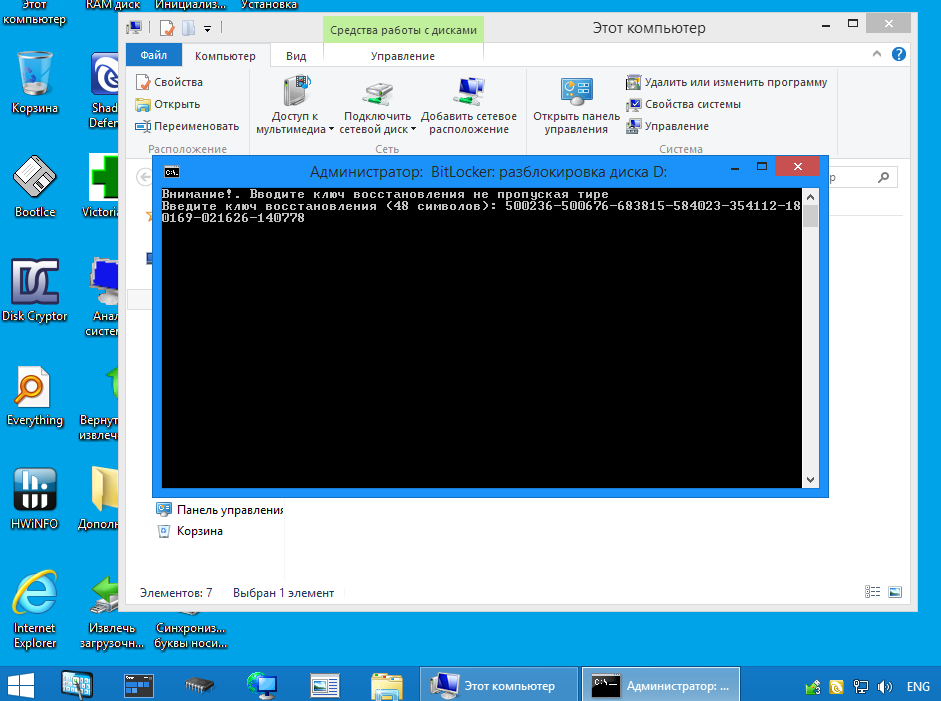
До этого мы имели дело с работающей системой, но давайте представим, что по какой-то причине Windows не может загрузиться, а получить доступ к данным нужно. В этом случае можно воспользоваться спасательным диском на базе WinPE, тем же WinPE 10-8 Sergei Strelec, о котором мы уже не раз писали. Всё очень просто. Загрузившись с диска, выполняем те же действия, что и в рабочей Windows:
кликаем дважды по зашифрованному диску, жмём «Дополнительные параметры» → «Введите ключ восстановления», вводим ключ и нажимаем «Разблокировать».
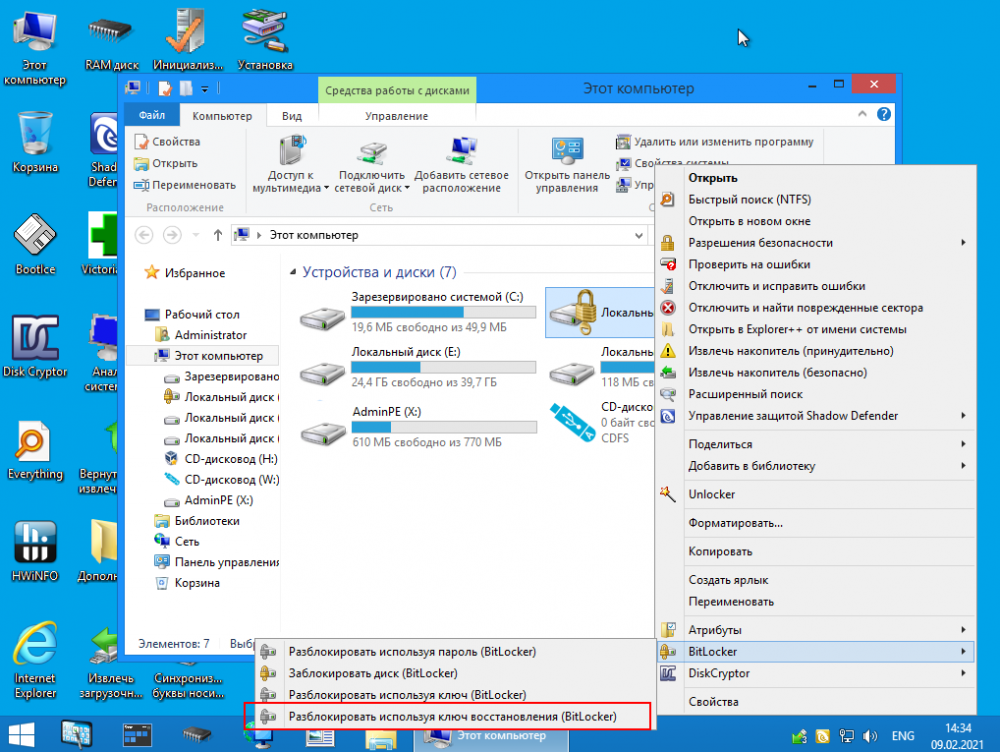
В другом спасательном диске — AdminPE для разблокировки BitLocker в контекстном меню предусмотрена опция «Разблокировать, используя ключ восстановления».
Да, можно, но для этого вам всё равно понадобятся ключи шифрования, для извлечения которых хакеры пользуются уязвимостями, которые оставила в криптографической система сама Microsoft, сознательно пойдя на компромисс между надёжностью и удобством. Например, если ваш ПК присоединён к домену, ключи BitLocker автоматически отправляются в Active Directory на случай их утери. Кстати, получение копий ключей из учётной записи или Active Directory является основным способом взлома BitLocker.
А ещё открытые копии ключей сохраняются в оперативной памяти компьютера, а значит и в файле дампа ОЗУ, и в файле гибернации, из которых их также можно извлечь, получив физический доступ к жёсткому диску. Получается так, что каким бы ни был надёжным сам алгоритм шифрования, весь результат его работы нивелируется организацией работы с ключами. Поэтому пользоваться BitLocker есть смысл только вместе с другими механизмами безопасности, в частности, с шифрованной файловой системой и службой управления правами доступа.
-
Home
-
News
- Best Fixes: BitLocker Is Missing or Not Showing on Windows 10/11
By Stella | Follow |
Last Updated
What is BitLocker on Windows? What to do if BitLocker is missing or not showing in Control Panel. In this post, MiniTool Software will introduce the methods you can try to fix the problem. In addition, if you want to recover deleted files on Windows, you can try MiniTool Power Data Recovery.
What Is BitLocker on Windows 10/11?
BitLocker is a full volume encryption feature that was initially introduced in Windows Vista and the later Windows versions. It is also called BitLocker Drive Encryption. It provides encryption for the whole volume to protect data on the drive. By default, it uses the AES encryption algorithm in cipher block chaining (CBC) or XTS mode with a 128-bit or 256-bit key. CBC is not used over the whole disk. It is applied to each individual sector.
What if BitLocker Is Missing or Not Showing
You can click the search box in the taskbar, search for BitLocker, and select the best match result to open BitLocker.
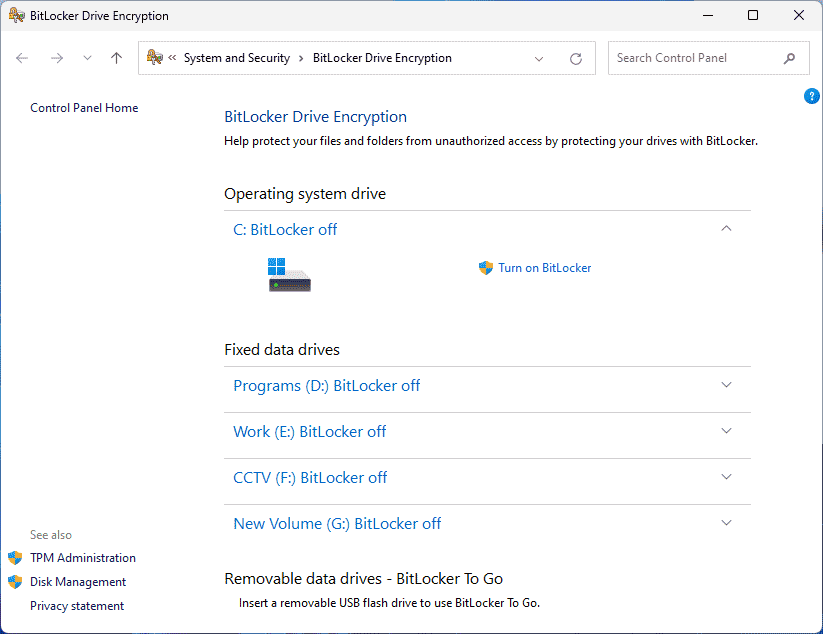
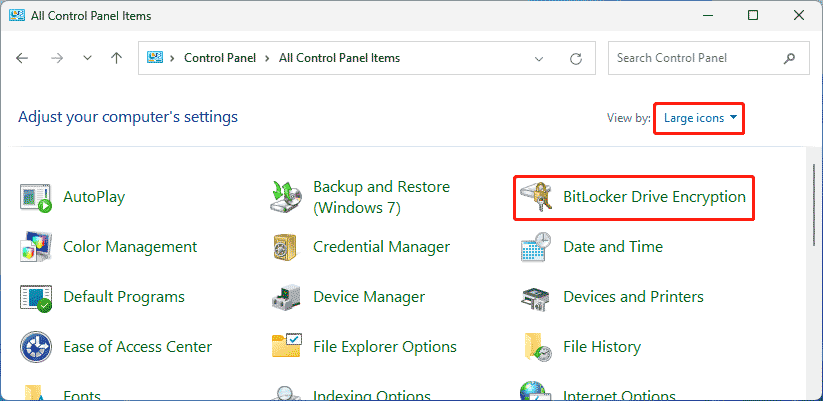
You can also go to Control Panel, choose to view by large icons, and select BitLocker Drive Encryption to open the setting interface.
However, some users report that BitLocker is missing or not showing on Windows, or BitLocker Drive Encryption is missing from Control Panel. Here are 4 easy fixes can help you solve the problems.
Fix 1: Check the BitLocker Drive Encryption Service
The startup type of the BitLocker Drive Encryption Service should be set as Manual. If BitLocker is not showing, you can open Services to check if that service is disabled and make some changes if needed.
Step 1: Click the search box in the taskbar and search for Services. Then, select Services from the search results to open it.
Step 2: Find the BitLocker Drive Encryption Service, then double-click it to open Properties.
Step 3: Expand the options next to Startup type and select Manual.
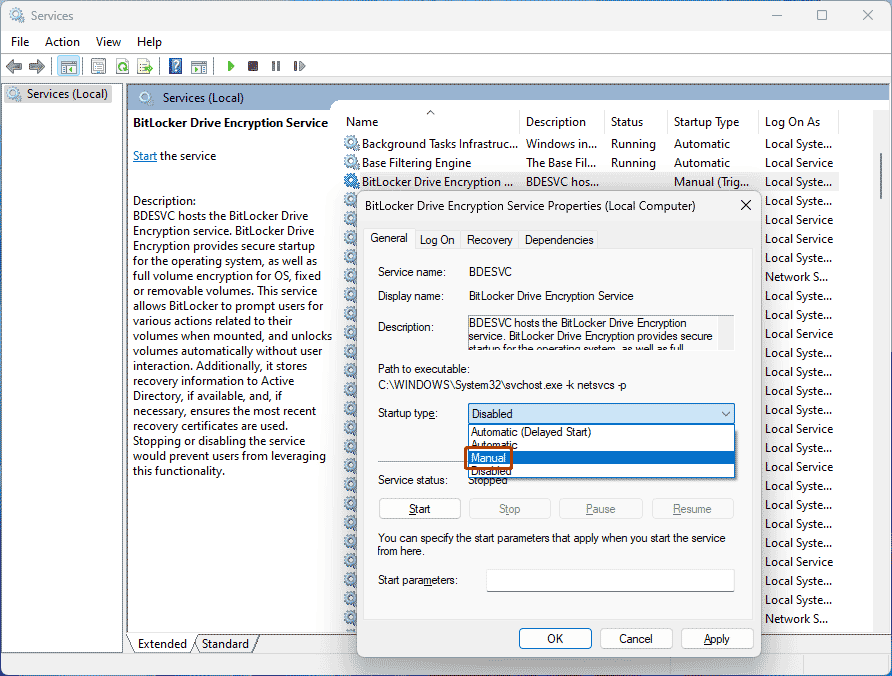
Step 4: Click Apply.
Step 5: Click OK.
Fix 2: Open BitLocker Using Command Prompt
Step 1: Click the search box and search for cmd. Then, click Run as administrator from the right panel of the search result interface. This will run Command Prompt as administrator.
Step 2: Copy this command line to Command Prompt and run it:
control /name Microsoft.BitLockerDriveEncryption
Step 3: If the above command can’t generate BitLocker Drive Encryption, you can run this command to check the status of this drive encryption tool.
manage-bde -status
Fix 3: Perform an In-Place Upgrade
If you are not running the latest version of Windows, you may also encounter the problem of BitLocker is missing from Control Panel. In a situation like this, you can perform an in-place upgrade on your PC.
Here are two related guides:
- Windows 11 in-place upgrade
- Windows 10 in-place upgrade
Fix 4: Repair Windows 10/11 by Resetting Your PC
If all of the above methods can’t help you find BitLocker Drive Encryption, you need to reset PC to repair the system. During the reset process, you can choose to keep your files or not according to your situation.
Recover your lost files
If you choose t keep your files, the reset process will not delete your files. But accidents always happen unexpectedly: your data is lost after resetting your PC. Or for some other reason, you want to recover your lost or deleted files. To do this, you can try the best free data recovery software: MiniTool Power Data Recovery.
MiniTool Power Data Recovery FreeClick to Download100%Clean & Safe
This software can help you recover all kinds of files from external hard drives, internal hard drives, SD cards, USB flash drives, SSDs, and more. If your storage drive is inaccessible, you can use this tool to rescue your files. If your files get lost or deleted, you can use this software to recover them if they are not overwritten by new data.
You can first try the free edition of this software and check if it can find your needed files. You can even use this software to recover up to 1 GB of files without paying any cent.
If you want to recover more files using this software, you can go to MiniTool’s official store to select a suitable full edition for data recovery.
Bottom Line
If BitLocker is not showing or missing from Control Panel on your Windows, you can use the methods mentioned in this post to make everything go back to normal. In addition, if you are looking for data restore tool to help you recover data, you can try MiniTool Power Data Recovery.
About The Author
Position: Columnist
Stella has been working in MiniTool Software as an English Editor for more than 8 years. Her articles mainly cover the fields of data recovery including storage media data recovery, phone data recovery, and photo recovery, videos download, partition management, and video & audio format conversions.
You might be wondering about seeing BitLocker screen even when this protection tool was never turned on. Bitlocker is an effective tool to safeguard files and folders from unauthorized access by encrypting the drive in which they are located. However, sometimes, this becomes a matter of concern because of the generation of errors and bugs. One such problem is the topic of this post which keeps displaying BitLocker Recovery screen on startup of the computer or Surface device nevertheless it was never enabled. See – Fix: BITLOCKER_FATAL_ERROR BSOD Windows 10.
BitLocker Recovery screen on Startup is a bug in Windows 10, 11 Microsoft is analyzing however any resolution is not offered till now. The error is commonly found to appear on the devices installed KB5012170 (Secure Boot DBX). Several Windows 11 users also inform that this screen prompted after receiving KB5016629. In forums’ discussions, multiple users have complained that each time they launch Windows 10 or 11, they are required to enter a BitLocker recovery key. This is due to UEFI bootloader’s vulnerability. While encountering the issue you can try How to Get BitLocker Recovery Key from CMD in Windows 11 or 10.
BitLocker Recovery Screen on Startup
Here is how to fix BitLocker Recovery screen on Startup in Windows 11 or 10 –
Way-1: Uninstall Faulty Update
To deal with this issue Microsoft provided a UEFI Revocation List having Secure Boot Forbidden Signature Database (DBX). So Once you come across the problem, first of all, recall whether any update is installed on the device recently. Most people encounter BitLocker Recovery Screen because of faulty Windows updates like KB5016629 and KB5012170. If confused with what ‘update’ then check in the View update history area.
- Press – Windows key.
- Type – Updates.
- Hit – Enter.
- Click – View update history. In Windows 11, select – “Update history“.
- Now, select – Uninstall updates.
- Find the faulty update, then double-click it to uninstall.
- Click Yes on the prompt.
Way-2: Activate the Secure Boot
Typically, the screen, which requires an encryption key, shouldn’t be requested when a PC boots up during a normal startup process. When a motherboard hardware change occurs, a computer crashes, or if the software suspects an attack on the data, Windows may request the BitLocker recovery key, but this shouldn’t happen frequently. Activation of Secure Boot helped many people to get rid off this screen so follow the steps to enable this feature –
- Once you are on the blue screen, Press – Esc. This will bring up additional BitLocker recovery options.
- Click – Skip this drive.
- Choose Troubleshoot from the next screen.
- Then, Select – Advanced options.
- Click on – UEFI Firmware Settings.
- Now, go with – Restart.
- The system will be booted to the UEFI screen; go to Security.
- Select – Change Configuration from the Secure Boot options.
- Choose – Microsoft Only.
- Click – OK.
- Exit the window and then Restart your computer again.
KB4575994 – List of Secure Boot DBX revocation to invalidate vulnerable modules
Way-3: Turn off and then back on BitLocker Protection
Sad thing is the BitLocker recovery screen on startup error may persist occasionally after following the previous method. In this case, try turning off and on your BitLocker protection. However, you must enter desktop in order to perform these tasks which seems impossible at this span of time. Using this trick may help you; log in to Microsoft account on any other device and find the 48-digit BitLocker recovery key. This is also given in – Finding your BitLocker recovery key in Windows. Insert the ‘key’ and reach the desktop.
- Click on – Start.
- Type – Control.
- Hit – Enter.
- Change View by to ‘Large icons’ or ‘Small icons’.
- Select – BitLocker Drive Encryption.
- Select “Turn off BitLocker” for the C drive.
- A dialog box window will pop up.
- Select – Yes option to confirm suspension of BitLocker protection.
- After suspending, give it some time (minutes) before selecting Resume protection. This will update BitLocker TPM.
- Select – Change password to reset the unacceptable BitLocker “password”.
- Reboot your computer.
Way-4: Remove Protectors from the Boot Drive
Follow these instructions to exit the BitLocker recovery screen if you have repeatedly input the key but are still unable to move across the ‘screen’.
- Press – Esc key for more BitLocker recovery options.
- When the BitLocker recovery screen appears…
- Choose – Skip this drive.
- Click – Troubleshoot.
- Then, choose – Advanced options on the Troubleshoot window.
- Pick- Command prompt on the Advanced options screen.
- Enter the following command at the WinRE command prompt:
manage-bde -unlock C: -rp recoverypassword, to unlock the drive. - Enter the command:
manage-bde -protectors -disable C:to discard the protectors from the boot drive. - Exit the command prompt and continue to boot into your OS.
Way-5: Deactivate Secure Boot to fix BitLocker screen on startup
Opposite to enabling the Secure boot, disabling the same worked for multiple users to fix frequent BitLocker recovery screen. Therefore, move with the steps below:
- Try to Start the system and when the bitlocker blue screen appears, press Esc.
- Choose – Skip this drive.
- Next, click – Troubleshoot.
- Go to – Advanced options.
- Choose – UEFI Firmware Settings.
- Then, click – Restart.
- Locate the Secure Boot setting and disable it.
Way-6: Update BIOS
BIOS is an important part of the system which when becomes obsolete causes weird problems on Windows 11 or 10. Repeatedly appearing BitLocker password prompt screen might be the result of the outdated program. This is not an integral part of Windows and manufacturer of the device or motherboard handles its versions. So navigate to the manufacturer’s website and try upgrading your bios to the most recent version. You may have to enter model number of your computer to reach the Software and driver’s page. Check your motherboard’s manual for more information when updating your BIOS. See – Windows 10 – 5 Ways To Know BIOS Version of MotherBoard
Way-7: Make Use of Legacy Boot
The new graphical boot menu in Windows 10 might result in a BitLocker password screen infrequently. Therefore, going back to legacy boot can fix this issue.
- Enter – “cmd” in the search box of Windows Taskbar.
- Next, Right-click – Command prompt.
- Select – Run as Administrator.
- After the Command Prompt window appears, type without quotes – “
bcdedit /set {default} bootmenupolicy legacy“. - Press – Enter.
Way-8: Remove Installed Hardware
The BitLocker may trigger problems if you installed new hardware or peripherals. Remove the accessories or hardware one by one and then restart your computer to check if the error goes away.
Way-9: Install Windows update
Whenever Microsoft will officially resolve the BitLocker problem and push the fix through any patch then you will not have to do anything except installing the update.
- Press – Winkey+I.
- Select – Update & Security. On Windows 11, select “Windows update”.
- Click on – Check for updates.
- When you’re asked, click on – Restart now.
Way-10: Format the C: Drive
This method will work if everything failed to solve BitLocker Recovery screen on Startup in Windows 11 or 10. Reformatting the boot drive will easily and rapidly resolve this issue if you don’t care about data loss.
- Press – Esc key for more BitLocker recovery options.
- Click – Skip this drive.
- Next, choose – Troubleshoot.
- Then, pick – Advanced options.
- Choose – Command prompt.
- Type in the command –
list disk. - Hit – Enter from the WinRE command prompt.
- Enter –
select disk X. - Then, hit – Enter.
- Enter –
list volume command. - Press – Enter.
- Enter –
select volume X(Replace X with the volume number of your operating system drive). - Press – Enter.
- Enter –
format fs=ntfs label=volume label quick. - Hit – Enter to run the format.
- Reinstall Windows using an external installer or a USB device.
If you are stuck with the problem then find the BitLocker Recovery key at – https://aka.ms/myrecoverykey
Methods:
Way-1: Uninstall Faulty Update
Way-2: Activate the Secure Boot
Way-3: Turn Off & Then Back on BitLocker Protection
Way-4: Take Off Protectors from the Boot Drive
Way-5: Deactivate Secure Boot
Way-6: Update BIOS
Way-7: Make Use of Legacy Boot
Way-8: Remove Newly Installed Hardware
Way-9: Install Windows update
Way-10: Format the C: Drive
That’s all!!