
It can be really frustrating to find that your VR headset has not been detected and refuses to work when you plug it into your computer. There are a number of common causes for this problem, but thankfully, most are easily fixed. This article is going to walk you through the steps you should take to get your VR headset working perfectly.
The most common reasons why your VR headset is not detected are a loose cable connection, incorrectly installed software, USB port problems, or out-of-date drivers. Check SteamVR, driver, and VR headset software installations, and ensure good cable connections to fix most issues.
Why Won’t My PC Recognize My VR Headset?
The best way to fix a VR headset that is not being detected is to work through the list of common problems, fixing any problems as you go. Let’s look at each issue, in turn, to help you get your VR headset working. I’ll be covering many issues that will apply to all headsets, as well as a number of issues that are specific to particular headsets or software.
Step By Step Help To Fix VR Headset Not Detected Errors
If you’ve plugged your VR headset into your computer, but SteamVR is refusing to detect its presence, it can be a pretty frustrating experience. The good news is that most problems have a simple solution. Work through the following issues and you are highly likely to resolve the issue.
- Check Steam VR is installed correctly. If you haven’t already, search for SteamVR on the Steam store and install the SteamVR software. If you have already installed this, verify the file integrity to ensure it is installed correctly.
- If you have an Oculus headset, you’ll need to ensure the Oculus software is installed and updated correctly.
- If you have a WMR headset such as the HP Reverb G2 or Samsung Odyssey+, you’ll need to go through the Windows Mixed Reality setup, and also install Windows Mixed Reality For SteamVR in Steam.
- Check the connection of all cables for your headset, to ensure they are seated correctly.
- Try plugging the VR Headset cable into a different USB port on your computer. Make sure it is USB 3.0 or higher.
- Try a different USB cable, in case the current one is faulty.
- Update your graphics card and audio drivers.
- Turn off Windows power management for your USB ports (step by step guide below).
- Review any specific SteamVR error codes to help you determine what the problem is (more detail below).
Let’s move on to look at some of these issues in more detail to help you work through the solutions and get the problems fixed.
SteamVR Not Installed Correctly
Your VR headset won’t function with SteamVR unless the SteamVR software is correctly installed. Open up Steam and search for SteamVR. This is a free piece of software that is essential to make your VR headset function properly with any software through Steam.
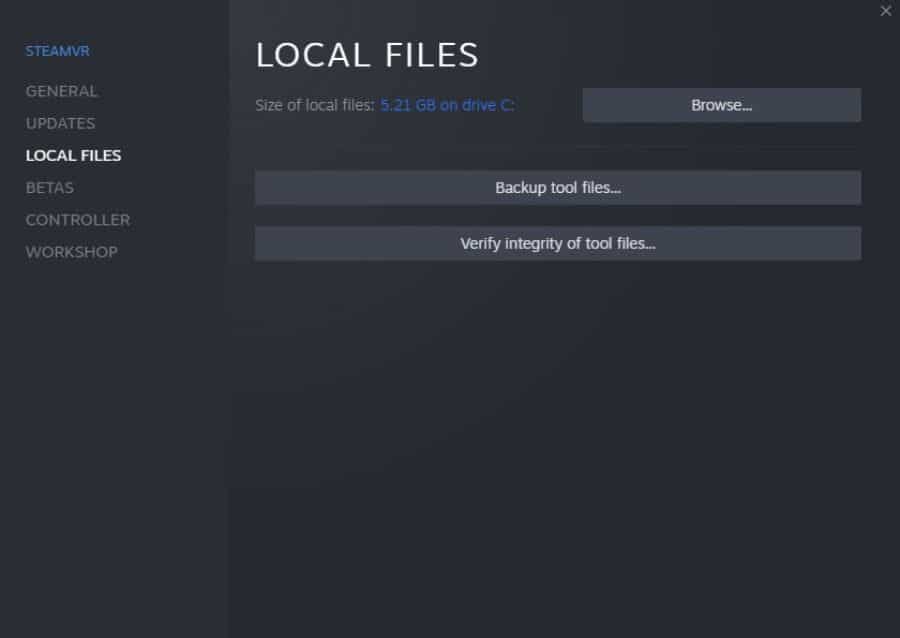
Simply search for SteamVR on the Steam store and install this program. If you have already done this, it is usually a good idea to check the integrity of the files.
Navigate to the “Library” tab within Steam and right-click on SteamVR. Select “properties”, then “local files”, and then click on “verify integrity of tool files”. This will ensure that SteamVR is properly installed. The other option is to delete SteamVR and reinstall it.
WMR Software Not Installed Or SteamVR Not Detecting WMR Headset
If you have a Windows Mixed Reality (WMR) headset, such as the HP Reverb G2 or Samsung Odyssey+, there are a few other steps you need to take to ensure that your headset will work properly.
Make sure that you have correctly set up the Mixed Reality Portal for Windows. Navigate to the Start Menu and type “mixed reality portal”. This should locate the mixed reality portal app that comes pre-installed with Windows 10 and higher.
Once it has loaded, click on “start setup and check your PC” in the bottom right corner. This will guide you through the setup of your WMR headset.
After this, here are a few things you should do
- Open Steam and search for “Windows Mixed Reality For SteamVR”. This is the software that is required to make WMR headsets work with SteamVR. Install this program on Steam.
- If you have already done this step, but are having problems, verify the integrity of local files in the same way as I described for the SteamVR software, to ensure that it is installed correctly.
- Check that you have the latest drivers for your headset and that Windows is up to date. Go to the settings menu in Windows, then “Update & Security”, then check for updates. Install any pending updates.
Oculus Software Not Installed Or Updated
If you have a wired Oculus headset such as the Rift S, or if you are using the Quest 2 with an Airlink cable, you will normally need to ensure the Oculus software is installed to allow your headset to function. Whilst there are a few situations where you can use the Oculus software, or SteamVR alone, for most people, it is best to have both. You can download the Oculus software here.
- Check that the Oculus software is installed correctly and up-to-date.
- Make sure that SteamVR is properly installed.
Check The Cable Connections If Your VR Headset Isn’t Detected
One of the simplest issues, and the easiest to fix, is when the cable connecting your VR headset to your computer is loose. Depending on your headset, there may be a number of cable connections that you need to check.
For example, on the HP Reverb G2 there are two cables that connect to the computer (DisplayPort 1.3 and USB 3.0 cable), a power cable that connects to a “breakout box” mid-way along the cable, and a DisplayPort 1.3 cable that attaches to the headset.
It is normally best to remove each cable in turn and firmly reinsert them, ensuring that there is a good connection. Once you have done this, you can test the headset to see if it is working.

Try A Different USB Port On Your Computer
There are a number of VR headsets that have issues using certain USB ports on your computer. The most obvious point is that the USB port must be USB 3.0 or higher, so make sure you don’t have your headset plugged into a USB 2.0 port, as the headset will not work.
Equally, there are a multitude of reasons why VR headsets refuse to work with specific USB ports, so it is normally a good idea to try each of the available USB 3.0 ports available on your computer.
If your headset starts to work, but then cuts out after a few seconds, or if the tracking fails unpredictably, then it may be a conflict with the USB port you are using. I have previously had success getting a separate, powered USB PCIe card for my computer. It is normally a good idea to exclude all other issues first before resorting to this.
Try A Different USB Cable
There have been numerous reports of people having problems with faulty USB cables, so consider this option if your VR headset is not detected. This has occurred with brand-new, first-party cables for Quest 2, Valve Index, HP Reverb G2, as well as 3rd party USB cables.
The quality of the USB cable you use does matter, as you need to have one that is capable of data transfer speeds of 5Gbps for most headsets.
Update Your Graphics Card And Audio Drivers
Graphics and audio drivers can cause conflicts with a number of VR headsets, and it can be difficult to pin down the exact problem at times. For this reason, it is best to keep your graphics and audio drivers up-to-date to minimize the risk of any issues.
Turn Off Windows Power Management For Your USB Ports
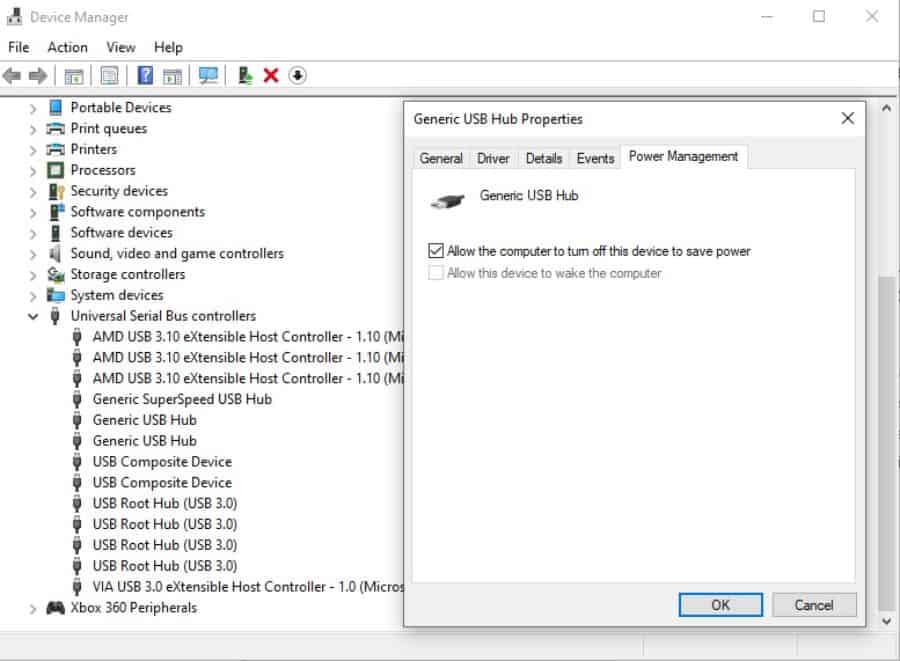
Windows can sometimes cause issues with VR headsets due to problems with the power management settings for USB ports. If your VR headset is refusing to work, you should follow these steps to change the power management settings and rule this out as a cause of your VR headset not working:
- Navigate to “Control Panel”, then “System and Security”, then “System”.
- Select “Device Manager” from the list on the right, then click on “Universal Serial Bus controllers” to expand the list.
- Right-click “Generic USB Hub” (there may be more than one) and then select “Properties”.
- Click the “Power Management” tab, and then de-select “Allow the computer to turn off this device to save power”.
- Repeat this for any other “Generic USB hub” listings.
- Unplug the USB cable from your VR headset to your computer and then plug it in again.
SteamVR Error Codes And Solutions
SteamVR may produce an error code if there is a problem when you plug your VR headset in, to help you determine the reason why your VR headset is not detected. This next section covers some of the more common SteamVR error codes, and how to fix them.
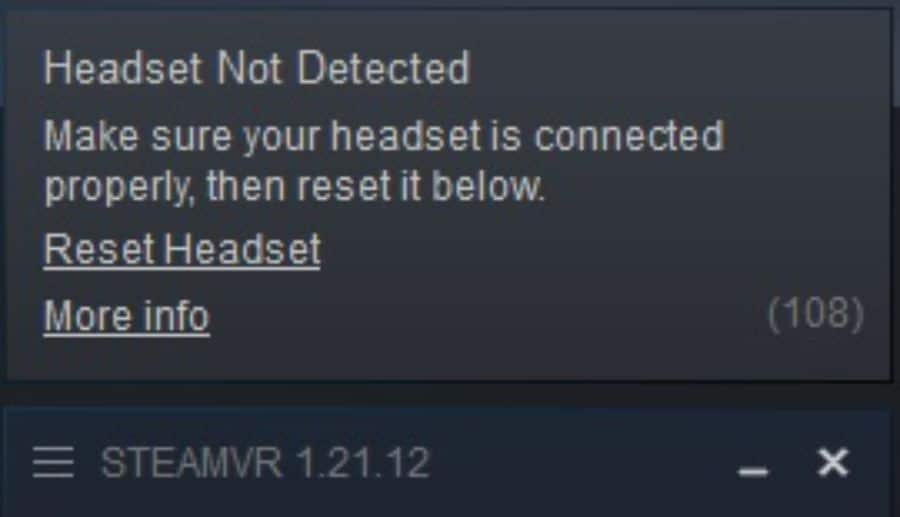
Error 108 (Headset Not Detected)
Error 108 is the most common error code, but it is a non-specific error that means your VR headset has not been detected. This can be due to a wide range of issues, so you are best to start by going through the guidance earlier in this article.
Error 208 (HMD Display Not Found)
Error 208 means that your headset has been detected, but the display on your VR headset has not been recognized or configured. This can be due to a poor cable connection, so check that these are firmly secured. If this doesn’t work, it can often be fixed by restarting both your headset and computer.
Error 113 (Path Registry Not Writable)
This error code refers to a problem with SteamVR’s user write rights. Check your permissions for writing to your PC’s user directory to ensure SteamVR can save to the necessary locations.
Error 200 (Driver Failed)
Error 200 is caused when there is a problem with the OpenVR driver, or when there are conflicts in the SteamVR driver directory. If you have manually added any files or drivers to this library, they should be deleted.
Windows 10 updates can also cause problems with the OpenVR driver, resulting in error 200. You can fix this by installing the Windows Media Pack for Windows 10.
Occasionally, error 200 can be caused by a faulty USB cable, so you should try an alternate cable if possible to see if this fixes the issue.
Error 301 (Connect Failed)
Error 301 is usually caused by missing or corrupt files within SteamVR. The most common fix is to make sure SteamVR is correctly installed by verifying the integrity of the files.
If this doesn’t work, try uninstalling and then reinstalling SteamVR.
Error 302 (Init Failed)
Error 302 is caused by problems with Vrserver starting up. This can normally be fixed by restarting your computer and relaunching SteamVR.
Contact Your VR Headset Manufacturer for More Help With VR Headset Not Detected Errors
If you have been through all these steps and are still no closer to resolving the cause of your VR headset not being detected, I would strongly advise you to contact the customer service department of your VR headset manufacturer.
Each individual headset will have a number of specific issues that affect small numbers of headsets and the VR headset manufacturer may be able to give further advice. Support forums for individual VR headsets are also a good source of help from other users of your individual headset.
If you are still getting nowhere despite ruling out all the common hardware and software issues, you should consider the possibility that you have a faulty headset. Ask your headset manufacturer if they are able to provide a replacement device to see if this is the cause of the problem.
Last Word
I hope by the end of these steps you have resolved the reason why your VR headset is not being detected. Although this article covers most of the common issues, there are no doubt a lot of rare issues that can also cause problems.
With compatible head-mounted displays, Windows Mixed Reality provides an end-to-end solution for augmented reality and virtual reality experiences. The 3D interface combines the physical and digital worlds, enabling natural and intuitive interactions between humans, computers, and their environment.
Unfortunately, there are some issues with windows updates such as the motion controller’s inactivity, the controller getting stuck, or disappearing in the mixed reality, and obviously the controller’s connection problem.
We will discuss more issues related to WMR controllers and know how to deal with these.

There are some common issues with the gadget along with the app. So, it is a must to know about the problems first as if you have seen the symptoms then you would know that it is a sign of a technical issue. The notable problems are –
- The WMR controllers don’t appear in the VR yet after pairing. Just the headset is visible. Also, they are absent from the mixed reliability site. Moreover, it has no troubleshooting options anywhere.
- The controllers are no longer connecting as usual. The buzzing stopped abruptly mid-game. After reconnecting to Bluetooth, it operated once. It used to stop in the same manner, but now it won’t connect.
- The controllers never appear in the Add a new device menu in Bluetooth settings when trying to pair them.
- Motion controllers jitter or flicker randomly. The MR Portal is operational, however, the controller tracking is weak.
Why Windows Mixed Reality Controllers Are Not Connecting?
You can find several reasons behind causing such issues. But not all of them are responsible in your case. The reasons vary from user to user. These are the most common ones that are to blame –
- Windows Bluetooth settings get faulty.
- Temporary unavailability of the controller.
- Mixed Reality driver is outdated or corrupted.
- The controller’s firmware is outdated.
- The controller is out of charge, etc.
Solutions for ‘Windows Mixed Reality Controllers Not Connecting
As you have known about the relatable problems, it is high time to the solutions.
Solution 1: Update Bluetooth Driver
If your computer’s Bluetooth settings not functioning properly, it can cause this problem. Therefore, try updating the Bluetooth driver. So –
Step 1: Press Win + X and select Device Manager.
Step 2: Expand the Bluetooth section and right-click on the driver.
Step 3: Then click on Update driver.

Step 4: Now, update the driver the way you want.
Solution 2: Reconnect Controllers
It is quite possible that maybe at this time it fails somehow, but reconnecting it can establish a perfect connection.
Step 1: Each controller can be turned on by pressing and holding the Windows button for five seconds. Upon activation, they will buzz.
Step 2: Make sure the controllers are in pairing mode. Battery compartments have pairing buttons. Hold down the button until the controller’s lights begin to flash.
Step 3: Now, on the computer, open the Start menu.
Step 4: Select Settings.
Step 5: Choose Devices.

Step 6: Click on Bluetooth & other devices.
Step 7: Choose Add Bluetooth or other device.

Step 8: Select Bluetooth.

Step 9: Check for controllers. If it is visible then make the pair.
Solution 3: Reinstall Drivers
When your Mixed Reality driver is corrupted or outdated, it will not work as expected and as a result, you have to face this issue. It is better to reinstall it with its latest version. In this case –
Step 1: Go to the Device Manager.
Step 2: Then look for the Mixed Reality devices driver.
Step 3: After that, right-click on it and uninstall it
Step 4: Restart the computer.
Step 5: Download the latest drivers. To download, you can go to the manufacturer’s website.

Step 6: To install the drivers, execute the setup file and follow the prompts on the screen.
Solution 4: Overall Maintenance
There are some basic things that you need to check before connecting your controller. Ensuring these can let you overcome this problem. Have a look at them –
Step 1: Check if your controllers are turned on, the battery is at full capacity, paired properly, LED is fully functional.Step 2: Check if the motion controllers are listed with the status message from the Mixed Reality Portal app.
Step 3: Remove Bluetooth headphones and speakers from the Bluetooth settings for the optimum audio experience, use the MR headset’s in-built speakers or headphone jack. To do so,
- Go to the Bluetooth settings.
- Now, select those devices one by one then go for Remove device.

Step 4: To restart WMR, unplug the USB wire from the headset and re-plug it into the computer.
Step 5: Tracking might be impacted by lighting. Ensure that there are not any point light sources visible to the helmet-mounted display. Avoid being in direct sunlight.
Step 6: To make motion controllers visible properly in SteamVR,
- The motion controllers should both be turned on. Verify that they are properly paired.
- Search for Device Manager. Go to Human Interface Devices and check for Motion Controller.
- Navigate to the Driver tab by double-clicking each Motion Controller device. Verify which of these versions the given driver version corresponds to.
Solution 5: Restore Factory Settings
Our final effective solution is restoring the controller in order to update its firmware with the newest one. Follow the steps to accomplish this –
Step 1: Disconnect the controllers.
Step 2: Apply new batteries.
Step 3: Use and hold down the pairing button.
Step 4: Now, Press the Windows button for five seconds to turn on the controller.
Step 5: Wait for the controller to turn on before releasing the buttons. Up to fifteen seconds are needed for this. When a gadget is recovering, there are no visible signs. The recovery button series is not registered if the device turns on right away after the button is released. Then you must attempt once more.
Step 6: Re-pair the controller after removing it. To do so,
- Go to the Bluetooth settings.
- Then click on Motion Controller and select Remove device.
- Finally, pair the controllers again.
The device will upgrade to the most recent version of the software after making a connection with the host and headset.

Frequently Asked Questions
How can I pair the WMR controller with my computer?
By holding down the Windows button for two seconds, you can turn on the WMR controllers. The LEDs will start to glow. The little pairing button may be found at the edge of the controller after removing the battery cover. To pair with your computer, tap and hold this button. With the headset, launch MR Portal.
How to recover the WMR tracking?
Recover the WMR tracking by plugging the headset back in after unplugging it. Moreover, check that there are no obstructions in the way of the internal tracking cameras on the front of the headset and that the lights are on. It can take a few moments for tracking to start up again if it stops. Tracking does not restart when the WMR Portal is restarted.
Does Windows 11 have the Mixed Reality feature?
Yes, it has the feature. Basically, MR Portal is an essential aspect of the Windows 10 OS. It gets updated through windows update. Same goes for Windows 11. The MS store app is the medium to update the portal for version 11.
Conclusion
Windows Mixed Reality is a popular technology that offers many different organizations a great opportunity to take the plunge and replicate physical presence in both the real world and the virtual world. It is very important to emerging in this reality appropriately so that you can feel the reality properly. The given solutions will help to you to overcome the obstacles and give you an excellent VR (Virtual reality) experience.
Исправление типичных ошибок HP Reverb G2: Руководство по исправлениям и устранению неисправностей
Актуальные советы и рекомендации, которые помогут вам найти и исправить некоторые наиболее распространенные ошибки, возникающие при работе Reverb G2.
Ошибка 1-4: убедитесь, что кабель дисплея подключен правильно
Одна из наиболее частых проблем с Reverb G2: Windows не может обнаружить гарнитуру. Это происходит, если у адаптера дисплея нарушен контакт с видеокартой либо он неправильно подключен к гарнитуре — чаще всего не полностью вставлен в разъем. Код ошибки: 1-4 «Проверьте кабель дисплея».
Бывает, что возникают трудности со вставкой адаптера — он застревает в каком-то одном положении и его невозможно дальше сдвинуть. В таких случаях его нужно попробовать слегка расшатать: иногда легкого покачивания оказывается достаточно, чтобы его полностью продвинуть и закрепить. Но делать это нужно очень осторожно, не допуская чрезмерного воздействия на адаптер, чтобы не повредить его.
Совмещение направляющего отверстия с выступом верхнего края гарнитуры является признаком того, что разъем дисплея полностью вставлен.
Ошибка 7-12: проверьте кабель USB
Эта ошибка является типичной для материнских плат, основанных на чипсете X570, подробнее об этом поговорим чуть позже. Windows может не распознать порт USB C и совсем не видит порт Type C.
Если вы столкнулись с подобным, попробуйте использовать адаптер, поставляемый в комплекте с устройством.
Если проблема возникла при использовании порта USB, расположенного на передней панели компьютера, попробуйте задействовать порт USB 3.0 или 3.1 на задней панели компьютера. Перебирайте порты, пока не попадется тот, который будет работать исправно. Если такой не нашелся, попробуйте отключить все USB-устройства, оставив подключенной одну гарнитуру. В ряде случаев это помогает устранить все конфликты, возникающие в системе.
Если проблемы с USB по-прежнему возникают, проверьте и обновите Windows 10. После этого убедитесь, что у вас установлены последние версии драйверов USB. Чтобы сделать это, нужно с помощью функции поиска Windows перейти в «Диспетчер устройств». Затем откройте список «Контроллеры универсальной последовательной шины», щелкните правой кнопкой мыши пункт «Intel (R) eXensible Host Controller» для Microsoft и нажмите «Обновить драйвер», выбрав параметр «Автоматический поиск». После успешного обновления драйвера нужно обязательно перезагрузить компьютер.
Те же самые действия следует выполнить, если произошел сбой и вы видите «Неизвестное USB-устройство». Можно также попробовать отключить USB-устройство, а затем снова включить его. Либо выполните сканирование на предмет изменений оборудования — обычно это помогает. Затем перезагрузите компьютер.
Ошибка 7-14: Проблемы с USB
Убедитесь, что у вас установлены самые последние драйверы для устройства Mixed Reality, а также для контроллеров USB. Если проблема остается, попробуйте подключить кабель к другому порту USB-3.0 на вашем компьютере.
HP рекомендует использовать только контроллеры USB, встроенные в материнскую плату, а не порты на передней панели корпуса. Если попытка подключения к другим портам не помогла решить проблему, попробуйте установить карту адаптера PCIe.
Пожалуйста, обратите внимание. Код ошибки 7-12 означает, что eXtensible Host Controller обновлен.
Ошибка 13-14: что-то пошло не так
Иногда в процессе загрузки графическая карта не может установить соединение, поэтому отключение адаптера USB Type C от ПК и его повторное подключение может помочь восстановить соединение, в качестве альтернативы используйте прилагаемый к устройству адаптер — подключите его к USB 3 порту. Этот вариант является более надежным. Если работу возобновить не удалось, перезагрузите компьютер.
Установка карты расширения USB — PCIe
Если ничего из вышеперечисленного не помогло и проблемы с USB сохраняются, можно попробовать установить концентратор USB-адаптера либо, что еще лучше, карту расширения USB-PCI Express.
Эта карта полностью совместима с интерфейсом eXtensible Host Controller. Она способна обрабатывать до 5 гигабайт в секунду, потому о скорости обработки информации вам не придется беспокоится.
Карта расширения PCIe USB 3.0 имеет 4 порта USB с поддержкой стандартов 3.1, 3.0, 2.0, а также 1.1. Самое приятное, что вам не придется возиться с ее подключением к источнику питания. Мощность каждого отдельного порта составляет 2 ампера. Эти 4 интерфейса работают независимо друг от друга, в сумме давая 8 ампер. Сама карта получает необходимое питание от слота PCI Express.
Альтернативой плате расширения PCIe является адаптер-концентратор. Но мы считаем, что карта расширения — более подходящий вариант, особенно при решении проблем, связанных с ошибками USB у Reverb G2.
Гарнитура переходит в режим 60 Гц
Если гарнитура ранее без проблем работала на частоте 90 Гц, и однажды вы получили сообщение об ошибке, в котором говорится, что теперь гарнитура работает на частоте 60 Гц, это означает, что с видеокартой произошел какой-то сбой. То же самое будет происходить и при недостаточной мощности видеокарты — она попросту окажется неспособна работать на частоте 90 Гц.
При использовании RTX 3070, 3080 или 3090 возникновение такой проблемы маловероятно, но если она все же произошла, простая перезагрузка поможет исправить ее. После возвращения в Mixed Reality Portal, убедитесь, что частота обновления установлена на уровне 90 Гц. Но для тех, кто пользуется более слабыми графическими процессорами, частота 60 Гц может оказаться единственным стабильным вариантом.
Совет: Перед запуском VR убедитесь, что вы закрыли все программы, работающие в фоновом режиме, которые вам не потребуются. Завершение таких задач сделает работу VR более стабильной.
При использовании более простой видеокарты советуем обновить драйверы. Подождите, пока Nvidia выпустит для нее новые драйверы. Подробнее об этом мы рассказывали здесь: Заикания при использовании HP Reverb G2.
P.S. Если у вас возникли проблемы с отслеживанием контроллера, вы можете заменить существующие контроллеры G2 на контроллеры от Valve Index.
В любом случае, при получении сообщения об ошибке 60 Гц, отсоедините кабель питания от разветвителя и перезапустите Windows. После того, как ваша система полностью перезагрузится, подключите устройство снова — скорее всего, его работа придет в норму.
Ошибка 7-14: Проблемы USB с материнской платой на чипсете X570
При использовании материнской платы на X570 чипсете, либо любой другой с PCIe 4 (B550), может возникнуть проблема, указывающая на несовместимость с PCIe 4 (PCIe 3.0). Попробуйте обновить BIOS и драйверы материнской платы, если производитель выпустил их обновленные версии.
Пользователь форума Reddit поделился собственным способом решения данной проблемы. Он зашел в расширенные настройки BIOS, выбрал конфигурацию встроенных устройств и произвел следующие изменения:
Видимо, это рабочий, однако, на наш взгляд, хлопотный вариант. В любом случае, для тех, кого он заинтересовал, вот ссылка на данное обсуждение на форуме Reddit.
Нам не известны случаи, когда качественная карта расширения PCIe 3 или хаб USB-адаптера не могли решить проблему. Потому, если вам ничего из описанного выше не помогло и остаются проблемы с USB-соединением, попробуйте установить карту расширения PCI Express или концентратор USB. Оба упомянутых устройства показаны в данной статье, подробнее с ними вы можете ознакомиться, пройдя по ссылкам внизу страницы.
Mixed Reality Portal самостоятельно открывается
Те из вас, кто ранее пользовался Oculus Rift или Rift S, скорее всего, привыкли к открытию портала Oculus вручную — обычно при помощи ярлыка на рабочем столе. Однако Reverb G2 работает немного иначе, поскольку портал смешанной реальности открывается автоматически сам по себе, как правило, после перезагрузки или когда компьютер выходит из спящего режима. Хотя некоторым это может показаться странным, но таким образом Windows Mixed Reality Portal работает с Reverb G2. Пользователь может просто закрыть приложение, если оно ему не требуется. Производитель HP рекомендует отключать адаптер питания, если вы не собираетесь использовать устройство.
Надо признать, что немного хлопотно каждый раз вставать на четвереньки, чтобы отключить адаптер. Но, пожертвовав небольшим количеством кабеля, вы можете прикрепить блок разделителя к боковой стороне корпуса с помощью липкой ленты Velcro и пары зажимов кабеля, чтобы все выглядело аккуратно. На наш взгляд, это отличная идея!
Недостаточное разрешение в игре
В настройках SteamVR зайдите в раздел «Общие» и убедитесь, что для параметра «Разрешение на глаз» установлено значение «Авто». Либо в настройках «Пользовательский» поставьте значение 100%.
Не вдаваясь в технические подробности работы линз VR, скажем, что в таких настройках нет ничего плохого. SteamVR автоматически определяет оптимальные значения производительности графического процессора и разрешения гарнитуры. Потому, выбрав в настройках значение «Авто» или установив 100%, вы получите наилучшие результаты.
При возникновении неудобств разрешение можно уменьшить, но это затронет глобальные настройки. Если вы хотите изменить разрешение для определенного приложения или игры, выберите «Видео», затем «Настройки видео для каждого приложения». В этом разделе вы сможете устанавливать разрешение для приложение и игр по отдельности, на свое усмотрение.
Джойстик на контроллере иногда залипает на одну сторону
Если джойстик контроллера стал залипать в одну сторону, вы можете исправить проблему, аккуратно нажимая на джойстик, пока не услышите щелчок. После этого действия он перестанет прилипать и начнет корректно работать.
Контроллер не отображается в Mixed Reality Portal или Steam VR
Эти действия помогут исправить ситуацию, когда один или оба контроллера не отображаются в WMR или Steam VR. Обычно это происходит, если вы поставили новый контроллер, заменив им «родной» контроллер от HP, и, несмотря на успешное сопряжение, он не отображается в виртуальной среде.
Вы заметите, что на рабочем контроллере светодиоды ярко горят, а на неисправном — они тусклые. И хотя он по-прежнему будет функционировать, вы его не увидите в своей руке, когда будете находиться в WMR или Steam VR.
Для решения проблемы с невидимым контроллером, нужно выполнить следующие действия:
- Используя функцию поиска Windows, введите CMD. Windows должна найти приложение «Командная строка».
- Щелкните правой кнопкой мыши приложение «Командная строка» и выберите «Запуск от имени администратора».
- Скопируйте и вставьте следующую команду в окно командной строки, затем нажмите клавишу ввода («Enter»).
- rmdir /S /Q C:\Windows\ServiceProfiles\LocalService\AppData\Local\Microsoft\Windows\MotionController\Calibration
- Выполнив указанную выше команду, перезагрузите компьютер и включите контроллеры, чтобы восстановить файлы калибровки.
Конечно, хотелось бы, чтобы все это было бы более простым и интуитивно понятным, но путь к папке калибровки недоступен из проводника Windows и может быть изменен только через командную строку администратора.
Примечание: После выполнения вышеуказанных действий, вы сразу увидите результат у включенного контроллера — на нем загорятся светодиоды. Но это не является показателем того, что проблема полностью устранена, потому мы настоятельно рекомендую вам перезагрузить компьютер и повторно подключить контроллеры, чтобы восстановить файлы калибровки.
Микрофон слишком громкий
Если вы играете с друзьями и ваш голос звучит слишком громко, а в некоторых приложениях и играх наблюдаются искажения звука, то вам необходимо изменить уровень микрофона. Это происходит из-за того, что уровень громкости, установленный по умолчанию на 100%, является слишком высоким.
Чтобы изменить показатель громкости, сначала убедитесь, что Mixed Reality Portal активен, затем перейдите в правый нижний угол рабочего стола, щелкните правой кнопкой мыши значок динамика и выберите «Открыть настройки звука». Затем нажмите «Панель управления звуком» справа, в появившемся окне щелкните на вкладку «Запись» и выберите микрофон с зеленой галочкой. Теперь выберите кнопку свойств, щелкните вкладку «Уровни» и переместите ползунок громкости в любое место между значениями 40 и 45. На наш взгляд, идеальный баланс звука достигается при показателе громкости, равном 45. Для завершения нажмите «ОК», потом «ОК» еще раз.
На веб-сайте Microsoft есть полезная информация как по гарнитуре G2, так и по программному обеспечению Mixed Reality, поэтому обязательно ознакомьтесь с ней по этой ссылке.
Как улучшить качество изображения в играх
Вы можете улучшить качество изображения в некоторых играх, изменив параметр VRSS в Панели управления Nvidia. Актуальный список поддерживаемых игр:
Чтобы улучшить качество изображения для любого из этих приложений или игр, вам необходимо включить «Виртуальная реальность — Variable Rate Supersampling» — AKA «VRSS».
Для этого откройте панель управления NVIDIA и выберите «Управление настройками 3D», затем щелкните вкладку «Настройки программы». После чего выберите приложение или игру для настройки, при условии, что оно или она входит в список, приведенный выше. Прокрутите вниз до пункта «Виртуальная реальность — Variable Rate Supersampling» и измените настройку VRSS на «Адаптивная».
Отметим, что VRSS поддерживается драйвером, потому интеграция с играми не требуется и может применяться к играм и приложениям DX11 VR, которые поддерживают Forward Rendering и MSAA, и прошли тестирование компанией NVIDIA.
VRSS поддерживается только графическими процессорами Turing и выше, требует наличия драйвера NVIDIA Game Ready 441.87 или выше.
Все вышеизложенное касается устранения неисправностей G2, и мы очень надеемся, что данная статья оказалась для вас полезной. Если у вас есть собственные советы и вы хотите поделиться ими с другими, добавьте свои комментарии или предложения в поле для комментариев ниже.
mixed-reality
My Headset will not wake up
If your headset is sleeping and clicking the wake up button does not work, restart your PC.
My computer does not have an HDMI and/or Display Port
You may need to use an adapter. Go here for a list of supported adapters.
Can I use USB or HDMI and/or DisplayPort extension cables with Windows Mixed Reality headsets
Windows Mixed Reality headsets don’t officially support the use of USB, HDMI, or DisplayPort extension cables. If you’re using these cables, the Mixed Reality experience may be affected because of variances in signal integrity and bus power between your PC’s USB controller and the Mixed Reality headset. Try using your headset without extension cables if:
- The headset display briefly shows a blue screen and then turns black and Mixed Reality Portal restarts or completely de-enumerates during use
- The headset audio cuts out or becomes glitchy
- The headset flickers between black and the correct display
I am getting a “Check your display cable” error
- If you’re using any adapters to connect your headset to your PC, make sure they support Windows Mixed Reality and are 4K capable. Also try connecting the adapter to the PC before connecting the headset to the adapter.
- Try using a different HDMI or DisplayPort port.
- Connect your headset to a DisplayPort 1.2 or later, or HDMI 1.4 or later. Make sure the port corresponds with the most advanced graphics card on your PC.
- If your PC has both integrated and discrete graphics, make sure you’re using the HDMI or DisplayPort port on your active graphics card. This may mean that you’ll need to connect your PC display to a non-HDMI port.
- If your PC has both integrated and discrete graphics, and the integrated graphics are older and doesn’t support Windows Mixed Reality, try disabling the integrated GPU.
- Connect a PC monitor to your PC’s HDMI or DisplayPort port. Make sure your graphics drivers are up to date. Download and install the drivers directly from AMD, Nvidia, or Intel, as they’ll likely be newer than what’s published to Windows Update.
- If you have an external monitor plugged into an HDMI port, try plugging it into a DisplayPort instead, and use the HDMI port for your headset.
- Make sure that you plugged your headset’s HDMI cable into an “HDMI out” port on your PC, not an “HDMI in” port.
- Windows may be unable to detect the display cable connection. Open the Device Manager and see if the headset is listed under “Monitors”. If not, select Action > Scan for hardware changes.
A message says “Put on your headset” but I have my headset on
When you put on your headset, Windows Mixed Reality may need a few seconds to reload your space. If this message doesn’t go away, make sure the protective sticker has been removed from the proximity sensor on the inside of the headset between the lenses. Contact your headset manufacturer if the problem persists.
A message says “Connect your headset” but I’ve plugged in my headset
-
Make sure the headset’s USB and HDMI or DisplayPort cables are connected to the correct ports on your PC. Here’s how to identify the correct ports:
- USB 3.0 ports have a special logo with an “SS” mark (indicating “SuperSpeed”). The port’s inside piece is normally blue, but older USB 2.0 ports are typically black or white on the inside.
- If your computer has two HDMI or DisplayPort ports, use the one that connects to the graphics card, not the computer’s motherboard. It’s not always obvious, which is which, though discrete ports are often located in an expansion slot on the computer. If you try one port and it doesn’t work, try the other.
- Unplug and plug in the USB and HDMI or DisplayPort cables from your headset to make sure they’re securely connected. When plugging in the USB cable, try not to pause during insertion of the USB cable.
- Try an externally powered USB 3.0 hub if you’re seeing partial enumeration of the headset, for example, a series of USB devices enumerate, but nothing under “Mixed Reality headsets” in Device Manager.
- Go to the headset manufacturer’s website and update the drivers and firmware for your headset.
- Connect your headset to another PC and open Device Manager. Even if that PC isn’t fully compatible with Windows Mixed Reality, you can check to see if your headset enumerates. If your headset doesn’t enumerate on multiple PCs, it could have a hardware issue.
[!NOTE]
For Surface users: Earlier versions of the Surface Dock and Surface Book USB Hub firmware update software are incompatible with Mixed Reality headsets. If you get a “Connect your headset” message on a Surface PC, check if any devices are reporting a “Code 10: The device can’t start” error in Device Manager. If so, remove the conflicting driver. You should only need to do this once.
Note for Windows 10-N and Windows 11-N users: If your PC is running Windows 10-N or Windows 11-N, you’ll see a “Code 28: The install class isn’t present or is invalid” error in Device Manager after plugging in your Mixed Reality headset. N editions of Windows 10 and Windows 11 are not supported by Windows Mixed Reality. Follow these instructions for more information.
A message says “Check your USB cable” or “Insufficient USB speed”
-
Make sure that you’re using a supported USB 3.0 port on your PC:
- Make sure that your headset’s USB cable is plugged in all the way.
- Run the Windows Mixed Reality Portal to make sure your PC’s USB 3.0 controller is supported.
- Connect your headset to the other USB 3.0 ports on your PC. Some PCs have more than one USB 3.0 controller.
- Temporarily disconnect all of the USB devices attached to your PC, and only connect your headset.
- On custom-built PCs, even though a port may be marked as a USB 3.0 port, it may be connected to a USB 2.0 controller. With your headset connected, open Device Manager, locate, and single click any of the devices enumerated from your headset, then go to View > Devices by connection.
- Try your headset on another PC. If that other PC isn’t fully compatible with Windows Mixed Reality, check in Device Manager to see if you see the “insufficient USB speed” message. If it doesn’t enumerate properly on multiple PCs, your headset could be defective.
- Remove any extenders or hubs between the headset and the computer.
The Mixed Reality Portal did not launch after I plugged in my headset
Your headset might not have been detected properly because of an underlying issue. Launch the Mixed Reality Portal manually and look for any error messages that appear.
My headset stopped working when my PC goes into sleep or hibernation mode, or when restarting my PC with my headset attached
- Open Device Manager and confirm that your headset is listed under “Mixed Reality devices”.
- Select your headset under “Mixed Reality devices” and confirm that the device status indicates “This device is working properly”.
- If you see a “Code 43” error saying the device has stopped working, or if you don’t see your headset listed under “Mixed Reality devices”, unplug and replug in your headset’s USB cable. Microsoft is investigating a potential software/driver interoperability issue, which may result in this error. This issue affects a small number of PCs, and is expected to be resolved in a future update to the Mixed Reality headset driver.
My headset causes my PC to generate a Bug Check (blue screen) when I put my PC to sleep or when it is in hibernation mode
Make sure you are on the 10.0.19041.2034 driver or newer.
The headset driver did not install automatically when I plugged in the headset
On new PCs, or PCs with a newly installed copy of Windows 10 or Windows 11, the headset driver could be queued behind other Windows updates and may not install immediately.
- Go to Start > Device Manager and look under “Mixed Reality devices” for your headset. The device status should indicate that “The device is working properly”.
- Right-click on the device and select “Update driver”.
If that didn’t work, try to uninstall the driver:
- Go to Start > Device Manager and look under “Mixed Reality devices” for your headset. The device status should indicate that “The device is working properly”.
- Right-click on the device and select “Uninstall Device”.
- In the new popup that appears, select the check box “Delete the driver software for this device” and then select “Uninstall”.
- When that completes, unplug the headset from your PC, and plug it back in. Windows Update will now download and install a new driver.
Note: If you have an N edition of Windows, you’ll need to switch to a regular edition of Windows 10 or Windows 11 to use Windows Mixed Reality.
Setting up my Windows Mixed Reality Headset and Controllers turned out to be the most difficult hardware to get working I’ve used in at least 20 years. It took me about a week after I received my controllers to finally get my setup working correctly. (Mostly due to waiting for parts) None of the troubleshooting was easy to figure out or well documented so I hope if you have found this article that it helps you get up and running more quickly.
I should mention that I build my own machines, and my current hardware is a 3 year old gaming machine upgraded with the latest and greatest graphics. The age of my machine did contribute to these issues.
USB 3.0 Hell
Not enough USB controller resources

“Not enough USB controller resources” was the first error I got immediately when I plugged in my headset. The headset still worked although all of my Bluetooth devices stopped functioning. This turns out to be a showstopper since the controllers are Bluetooth, and the controllers are essential. My initial research suggested that this meant my usb 3.0 port was unable to provide enough power to the headset. I attempted to solve this problem with a powered USB hub. This was a false lead, although the hub was useful later on for putting a USB port in an easy to reach location for plugging and unplugging the headset.
The solution was much more complicated. I have the Asus Maximus VI Motherboard, which is an early Z87 chipset based motherboard. This motherboard contains an early implementation of USB 3.0 (not 3.1). It turns out that a sacrifice the engineers made to get more performance resulted in a limitation of 96 endpoints. This sounds like a lot but each device can take up many endpoints. When you reach 96 endpoints you receive the above error message and things stop working.
Check out USB Tree Viewer at http://www.uwe-sieber.de/usbtreeview_e.html for a great diagnostic tool to help you understand what is going on. After many modifications this is what my final, working setup looked like:

The solution to my USB 3.0 resource shortage was to add a PCI Express USB 3.1 card which does not share the limitations of 3.0:
ASUS PCE-AC55BT B1 Wireless-AC1200 Bluetooth 4.2 PCIe/mPCIe adapter
This card requires both an open PCI Express slot as well as a power connector (SATA style). I disabled XHCI in my bios turning all of my motherboard ports into USB 2.0 ports as well.
“Something Went Wrong” error 2181038087-12
After I had tested my new USB 3.1 ports and found them working with other devices, I plugged in my mixed reality headset and got the “Something Went Wrong” error. I had installed the latest Asmedia drivers for the card, and learned that only Microsoft drivers (!?!) work with Mixed Reality headsets. The solution to this error was to downgrade my driver to the Microsoft driver. Here is a screenshot with the correct driver installed:

Notice that the Asmedia USB 3.1 ends with (Microsoft). The (Microsoft) at the end means you have one of the drivers that works with Windows Mixed Reality headsets. If you need to change drivers open the properties of the Extensible Host Controller in Device Manager and click Update Driver:

Click Browse my computer for driver software, followed by Let me pick from a list of available drivers. Look for the newest driver on the list that ends with (Microsoft).
Other Issues
For other issues and general hints take a look at Microsoft’s troubleshooting guide: https://developer.microsoft.com/en-us/windows/mixed-reality/troubleshooting_windows_mixed_reality
The second part of this article will cover troubleshooting Bluetooth to get the controllers to work, unfortunately this was only half the battle!