
Если у вас уже есть оригинальный образ Windows 11 и вы захотите выполнить установку с него в виртуальную машину Hyper-V, VirtualBox или другую, то с большой вероятностью после выбора версии системы вы получите информацию о том, что запуск Windows 11 на этом компьютере невозможен и компьютер не соответствует минимальным требованиям к системе.
В этой инструкции пошагово описано, как быстро и не меняя образ ISO установить Windows 11 в виртуальной машине, пропустив проверку наличия модуля TPM 2.0 и безопасной загрузки Secure Boot.
Решение «Запуск Windows 11 на этом компьютере невозможен» при установке в виртуальной машине

Обычная причина того, что установщик Windows 11 сообщает о несоответствии минимальным требованиям при установке — отсутствие модуля TPM 2.0. Даже если он есть в основной ОС, виртуальная машина не имеет к нему доступа. В некоторых случаях дополнительной причиной может быть отключенная безопасная загрузка (Secure Boot) в виртуальной машине. Для того, чтобы это обойти, достаточно выполнить следующие шаги:
- В программе установки Windows 11 в виртуальной машине нажмите клавиши Shift+F10, иногда — Shift+Fn+F10, это откроет командную строку.
- Для отключения проверки наличия модуля TPM 2.0, введите команду
REG ADD HKLM\SYSTEM\Setup\LabConfig /v BypassTPMCheck /t REG_DWORD /d 1
- Если необходимо (в виртуальной машине может быть и включена безопасная загрузка), введите следующую команду для отключения проверки статуса Secure Boot
REG ADD HKLM\SYSTEM\Setup\LabConfig /v BypassSecureBootCheck /t REG_DWORD /d 1

- В редких случаях, если нужно отключить проверку на наличие нужного объема оперативной памяти, может пригодиться команда
REG ADD HKLM\SYSTEM\Setup\LabConfig /v BypassRAMCheck /t REG_DWORD /d 1
- Закройте командную строку и продолжайте установку как обычно, аналогично тому, как описано в инструкции Установка Windows 11 с флешки.


После описанных действий чистая установка Windows 11 в виртуальной машине будет выполнена успешно, несмотря на несоответствие системным требованиям.
Применим ли этот метод на реальном оборудовании, а не в виртуальной машине? Его можно использовать и на обычном ПК или ноутбуке: некоторые пользователи сообщают, что установка проходит успешно, но есть и обратные отзывы.
Существуют и другие способы. Например, с помощью скрипта Universal Media Creation Tool, описанного в материале Как обновиться до Windows 11 на неподдерживаемом компьютере, можно не только выполнить обновление, но и создать ISO-образ Windows 11, при установке с которого не выполняются проверки TPM 2.0, безопасной загрузки, поколения процессора, что позволяет использовать его практически на любых устройствах, в том числе в виртуальной машине.
В случае, если остаются вопросы, связанные с установкой Windows 11 в виртуальной машине, их можно задать в комментариях, не исключено, что решение есть.
В этой публикации, друзья, рассмотрим недавно взволновавшую тестирующих Windows 11 новость: компания Microsoft в блоге инсайдерской программы Windows Insider заявила, что начиная со сборок 22458 на Dev-канале и 22000.194 на Beta-канале к виртуальным машинам для установки на них Windows 11 применяются такие же системные требования, что и для физических компьютеров. В компании изъяснились как всегда расплывчато, мы же имеем факт — у Windows 11 много пунктов системных требований. И виртуальные машины с тем функционалом гипервизоров, что есть сейчас, по условию не смогут соответствовать всем этим требованиям. Как теперь работать с виртуальными машинами в программах VirtualBox, VMware Workstation Pro, VMware Workstation Player и Hyper-V?
Итак, друзья, Microsoft внедрила для виртуальных машин уравниловку с физическими компьютерами в плане системных требований к Windows 11. Эта уравниловка действует начиная с инсайдерских сборок, с 22458 на Dev-канале и с 22000.194 на Beta-канале. И также это правило касается стабильной Windows 11. В ранних же инсайдерских сборках Windows 11 для виртуальных машин никаких требований нет. Но если мы захотим на виртуальной машине обновить более раннюю сборку вручную с использованием свежего установочного ISO, либо через центр обновлений,
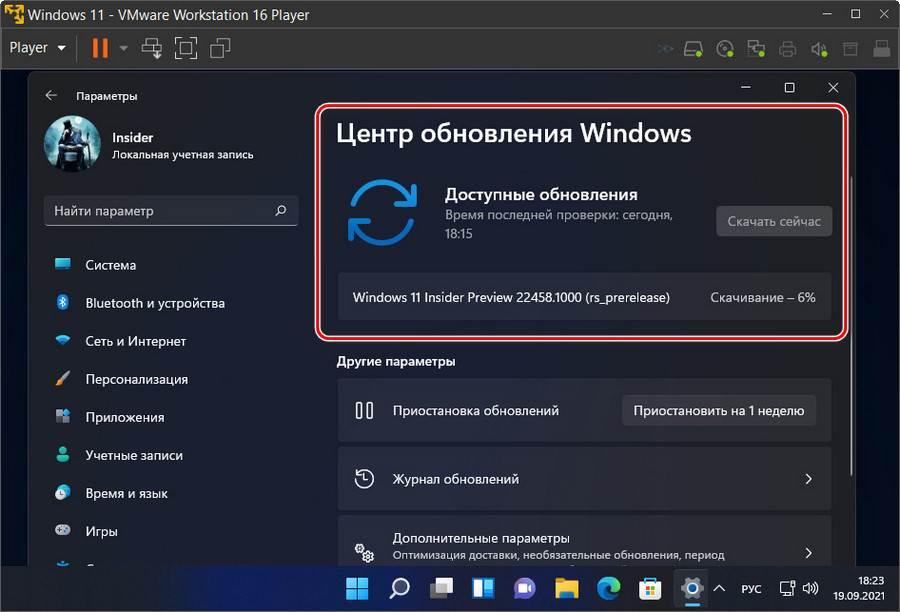
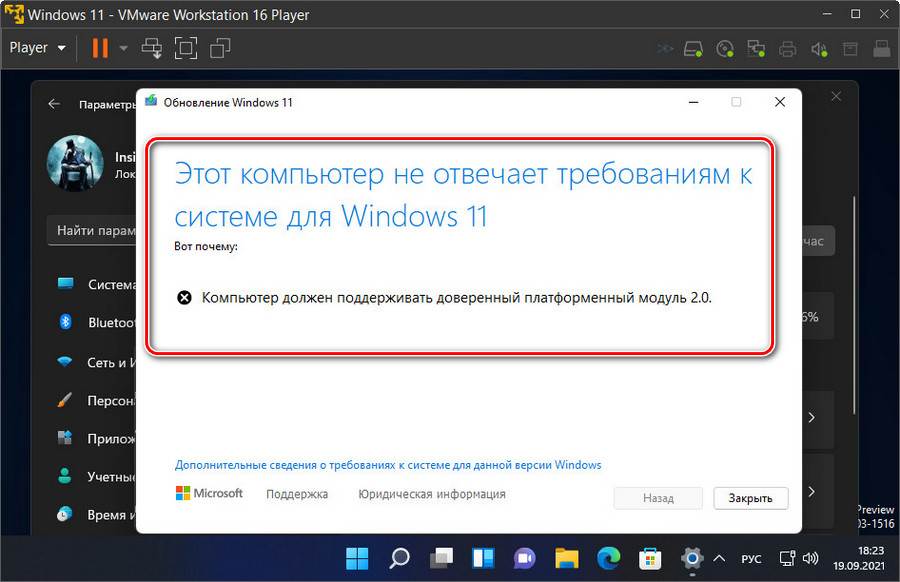
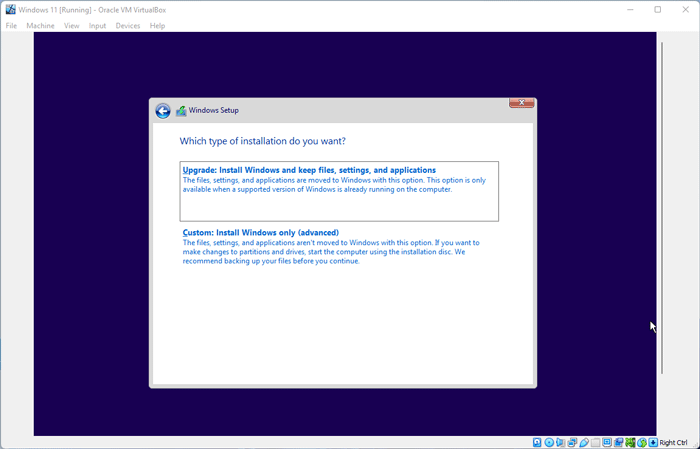
в процессе обновления получим этап проверки на совместимость с Windows 11 и неудовлетворительный результат этой проверки. Машина получит пресловутое уведомление «Этот компьютер не отвечает системным требованиям Windows 11» с констатацией, какому требованию именно не соответствует, либо без констатации вовсе.
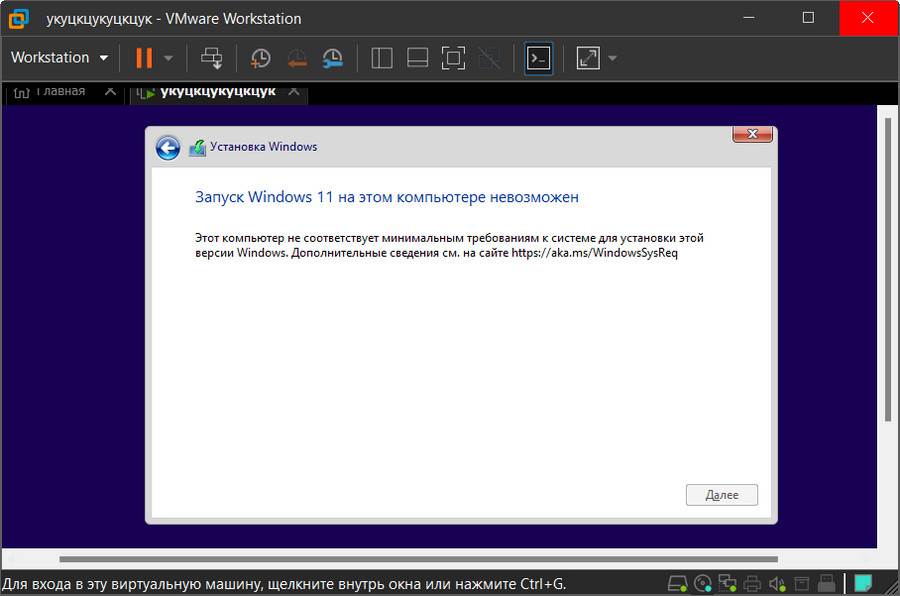
При новой установке на виртуальные машины Windows 11 в окне системного установщика будем видеть уведомление «Запуск Windows 11 на этом компьютере невозможен».
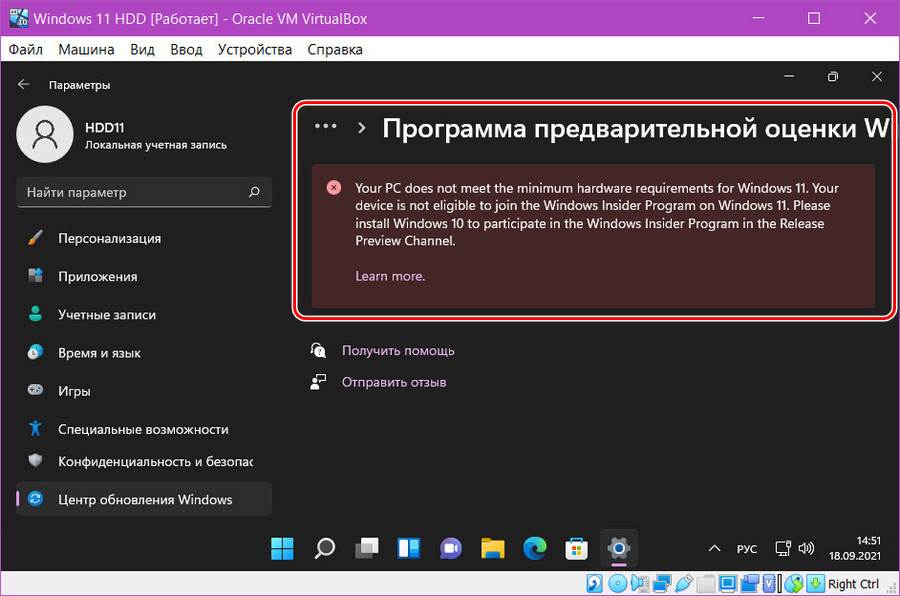
А на виртуальных машинах VirtualBox нам даже не будет доступна программа Windows Insider. При попытке подключиться к ней увидим уведомление «Your PC does not meet the minimum hardware requirements for Windows 11». Что значит, что машина не соответствует минимальным системным требованиям Windows 11.
Всё это, друзья, результат политики Microsoft. На деле пока что требования Windows 11 для виртуальных машин коснулись числа ядер процессора – не менее 2-х, объёма оперативной памяти – не менее 4 Гб, эмуляции прошивки UEFI и модуля безопасности TPM 2.0. А это значит, что официально установить свежие сборки Windows 11 и участвовать в её программе Windows Insider можно только в Hyper-V и актуальной версии программы VMware Workstation Pro (не ниже 14), ибо только они поддерживают эмуляцию TPM 2.0. Возможно, в будущем требования коснутся и самого процессора, т.е. чтобы используемый виртуальной машиной процессор был из перечня официально поддерживаемых. Друзья, если у вас несовместимый с Windows 11 процессор, и у вас с ним на виртуальной машине есть проблемы, отпишитесь в комментариях с описанием проблемы. Ну и давайте разбираться, что можно сделать с виртуальными машинами, чтобы на них можно было установить новые сборки Windows 11.
Обновлено: бесплатный гипервизор VirtualBox поддерживает эмуляцию всех необходимых устройств и технологий для официального использования Windows 11 только начиная с версии программы 7. Детали в статье «Как установить Windows 11 на VirtualBox 7 и выше».
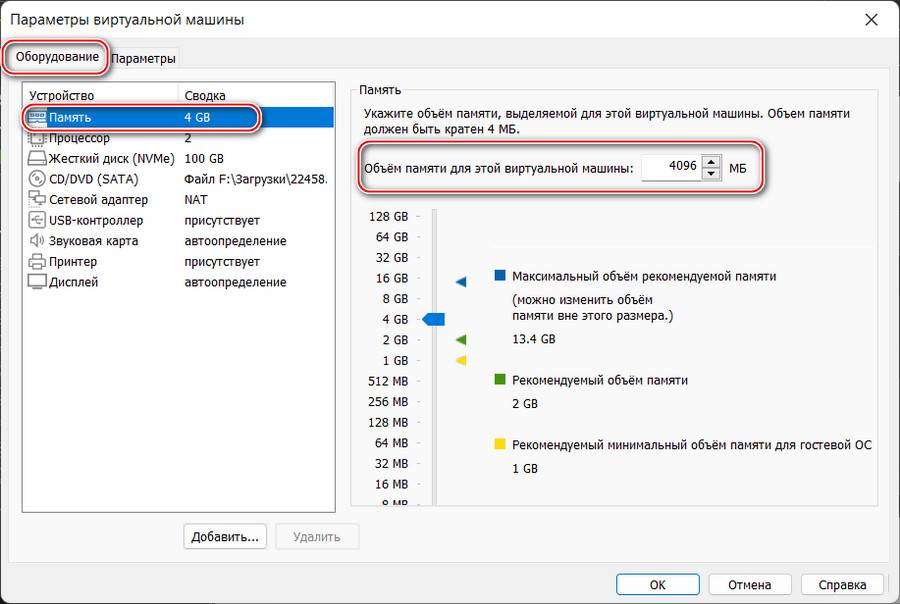
Чтобы благополучно работать с виртуальной машиной с официально установленной Windows 11 в программах VMware Workstation Pro и Workstation Player, нужны их версии не ниже 16.2. А параметры у виртуальной машины должны быть следующие. Во вкладке «Оборудование» в графе оперативной памяти её должно быть не меньше 4 Гб, т.е. не меньше 4096 Мб.
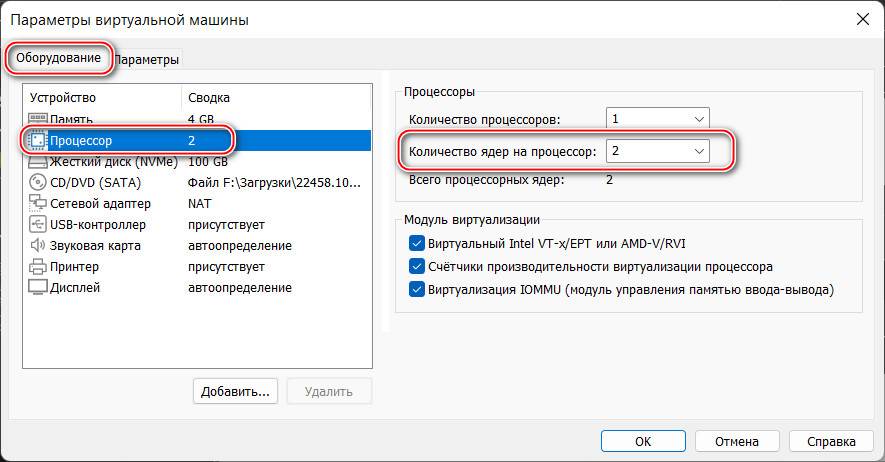
Во вкладке «Оборудование» в графе процессора должно стоять не менее 2-х ядер.
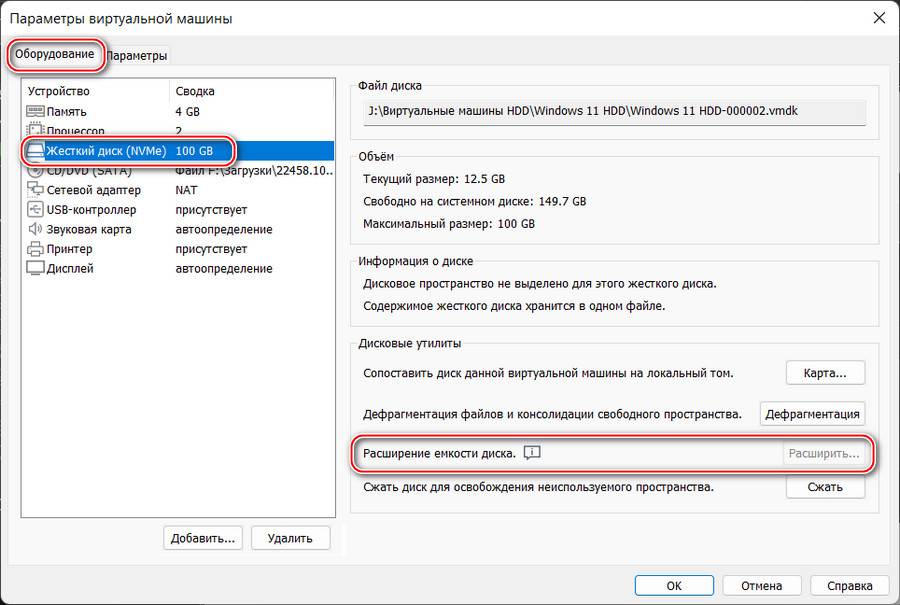
Во вкладке «Оборудование» в графе жёсткого диска должен быть указан виртуальный жёсткий диск с объёмом не меньше 64 Гб. Если у вас меньше, уберите снапшоты виртуальной машины и расширьте жёсткий диск, если он вас динамический.
Во вкладке «Параметры» в графе «Дополнительно» должна быть активна эмуляция UEFI. Можете также выставить галочку безопасной загрузки. Пока что это не требуется, но в дальнейшем, возможно, эта настройка будет играть роль.
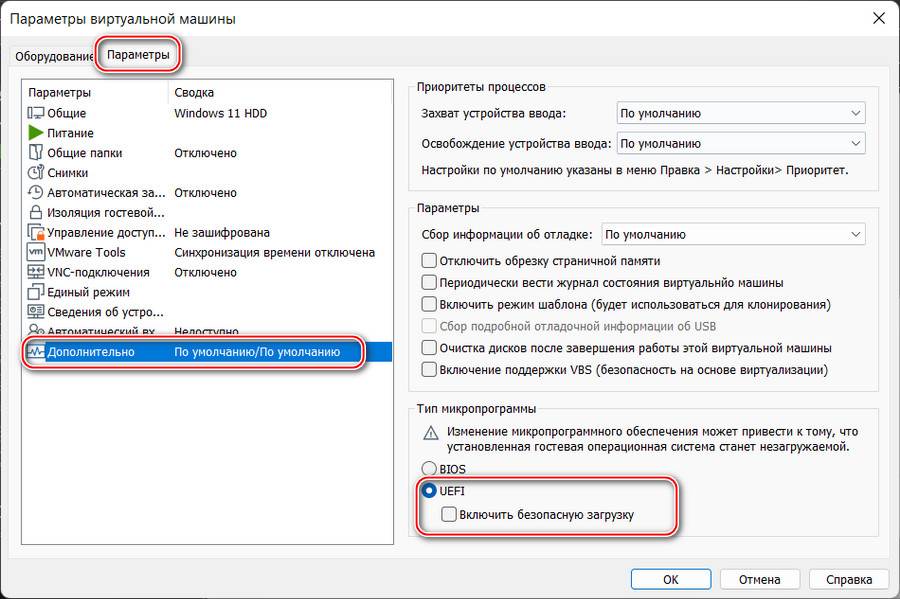
И необходимо в число оборудования виртуальной машины добавить эмуляцию TPM 2.0. Для этого не нужно, чтобы TPM 2.0 поддерживал ваш физический компьютер.
Обновлено: друзья, в версии VMware Workstation Player 17 и выше реализован улучшенный способ эмуляции TPM 2.0 на виртуальных машинах. Используйте его.
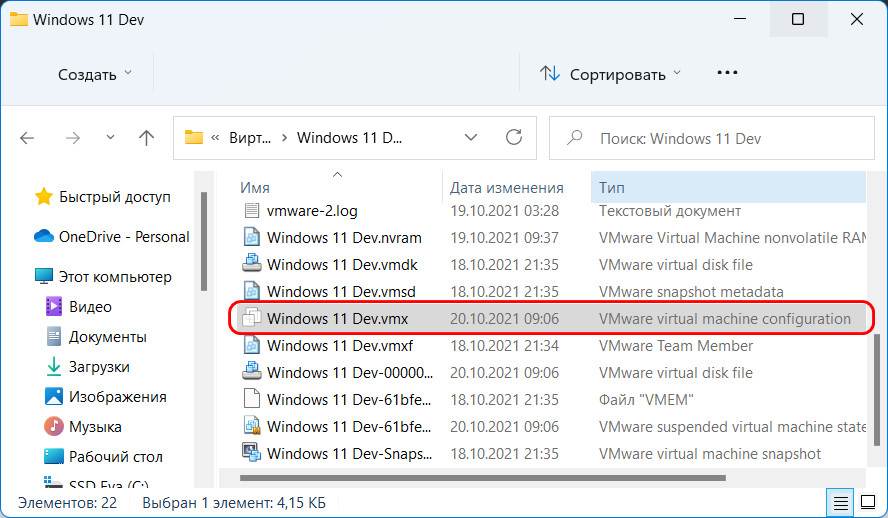
Выключаем виртуальную машину, на которой хотим добавить программный TPM 2.0. Идём по пути нахождения её файлов на жёстком диске. Здесь нам нужен файл конфигурации виртуальной машины с расширением «.wmx».
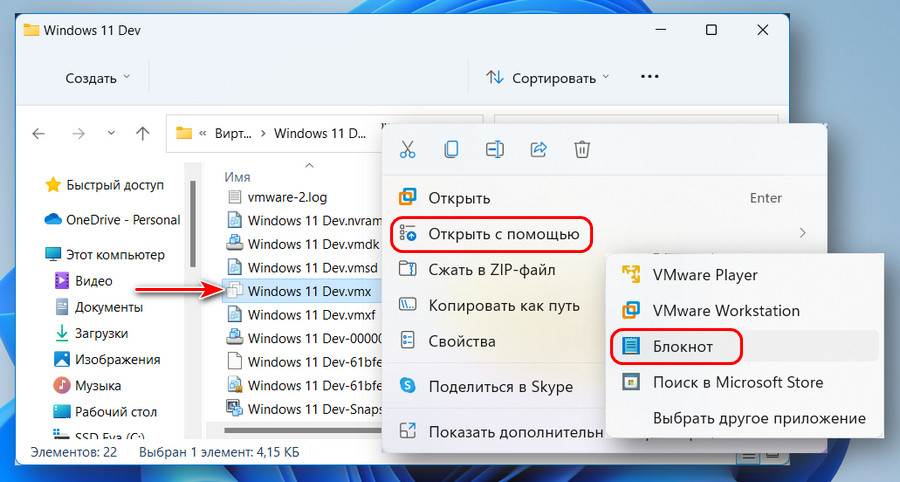
Открываем на этом файле контекстное меню, выбираем «Открыть с помощью» и открываем файл в блокноте Windows.
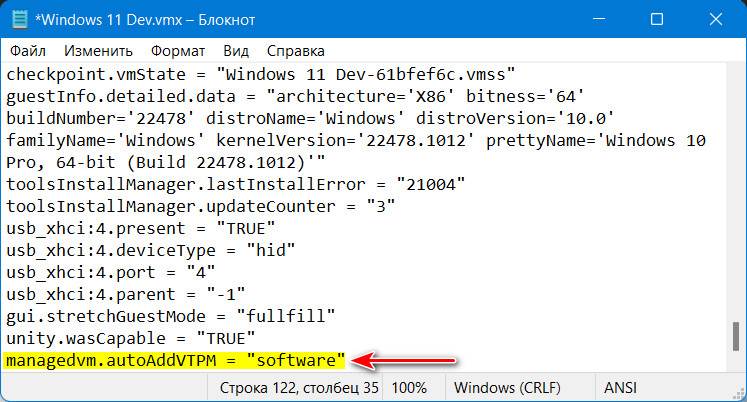
В конце файла вносим:
managedvm.autoAddVTPM = «software»
Жмём Ctrl+S и сохраняем внесённые изменения.
Друзья, комплексный мануал по созданию в этой программе виртуалки для установки на неё Windows 11 смотрите в статье «Как установить Windows 11 на виртуальную машину в программе VMware Workstation Pro».
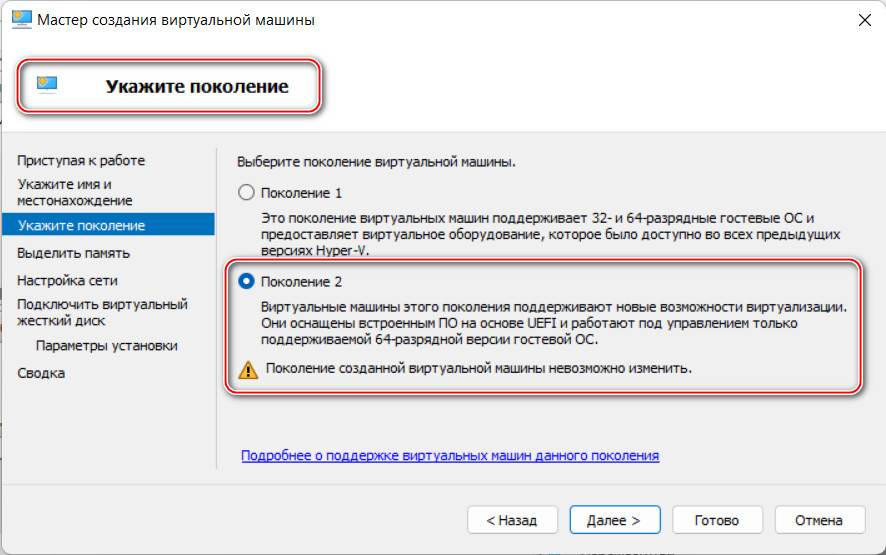
Чтобы без лишней волокиты работать с Windows 11 на виртуальной машине Hyper-V, нужен этот гипервизор с поддержкой машин 2-го поколения на базе UEFI. А это Hyper-V, входящий в состав серверных Windows Server не ранее 2012 R2, а также 64-битных редакций от Pro и выше клиентских Windows начиная с 8.1. В Hyper-V для работы с Windows 11 параметры виртуальной машины должны быть следующими. Сама машина должна быть 2-го поколения, это выбирается при создании машины и не может быть изменено впоследствии.
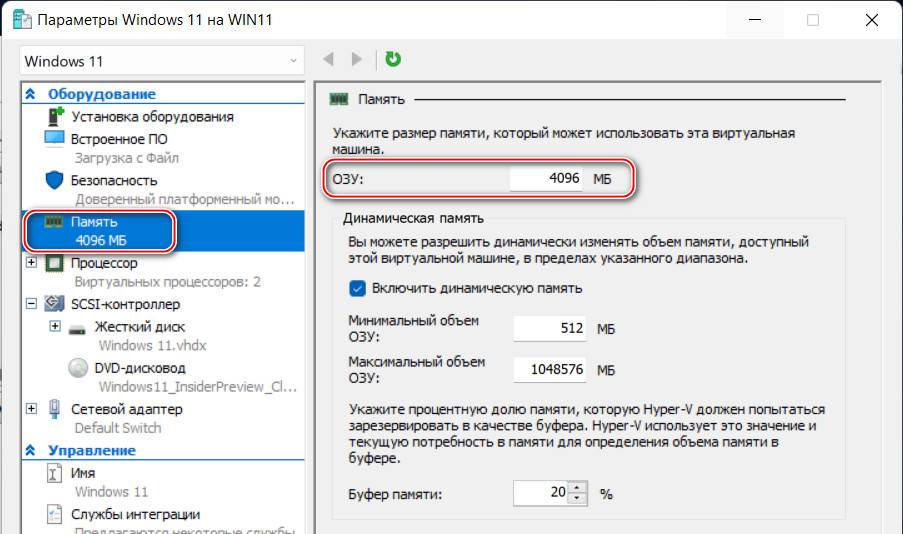
В параметрах оборудования «Память» у машины должно быть оперативной памяти не менее 4 Гб, соответственно, 4096 Мб.
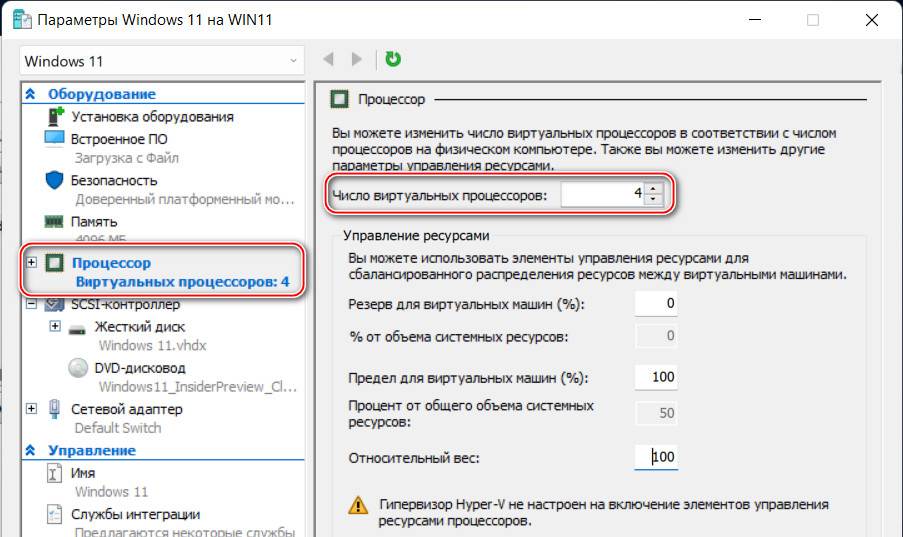
В параметрах оборудования «Процессор» число виртуальных процессоров, т.е. ядер процессора должно быть не менее 2-х.
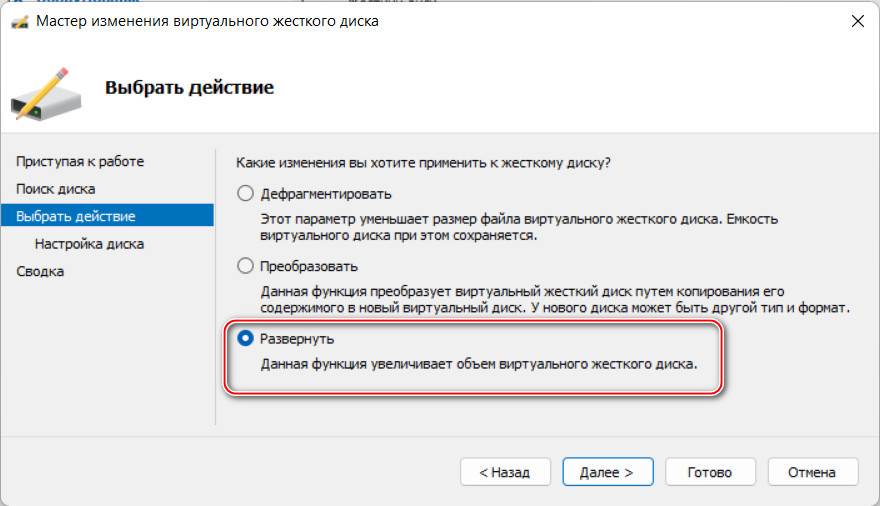
В параметрах оборудования «SCSI-контроллер» должен быть подключён виртуальный жёсткий диск с объёмом не меньше 64 Гб. Если у вас меньше, жмите «Правка».
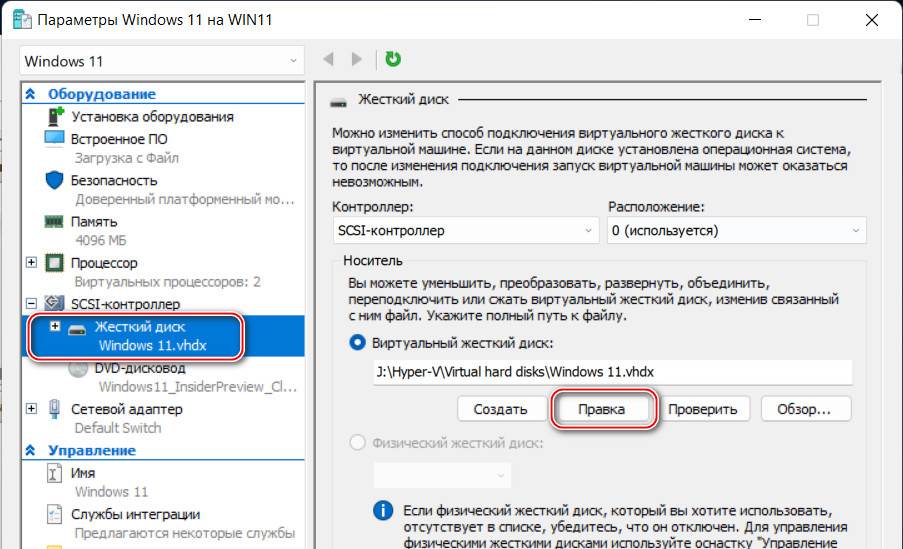
И увеличьте объём с помощью функции «Развернуть».
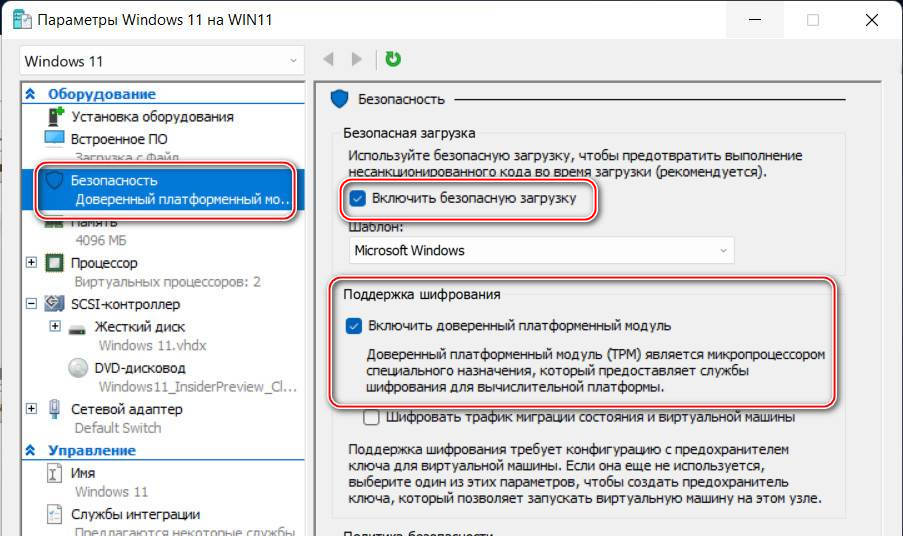
В параметрах оборудования «Безопасность», если у вас не включена настройка безопасной загрузки, можете включить её. Пока что она не является принципиальной, но в будущем может стать такой. Ну и, наконец, эмуляция TPM 2.0: ставим галочку функции «Поддержка шифрования». Это и есть добавление машине доверенного платформенного модуля TPM 2.0, даже если у вас его физически на компьютере нет.
Не забываем сохранить параметры, и на этом всё. Комплексный мануал по созданию виртуальной машины Hyper-V для установки Windows 11 смотрите в статье «Как создать виртуальную машину с Windows 11 в Hyper-V».
If you are unable to install Windows 11 in VirtualBox and getting This PC doesn’t meet the minimum system requirements to install this version of Windows error, here is how you can fix the issue with the help of this step-by-step tutorial. You can bypass TPM requirements to install Windows 11 in VirtualBox even if your host computer doesn’t have the Trusted Platform Module.
Windows 11 requires Trusted Platform Module or TPM 2.0 and Secure Boot to be installed on your computer. However, let’s assume that you are still using Windows 11 without upgrading your PC to the latest version and want to try Windows 11 in VirtualBox. In the initial days, Microsoft allows people to install Windows 11 in VirtualBox without TPM and Secure Boot. However, things are different now as they have lifted the relaxation. Now, your host computer must have TPM 2.0 and Secure boot to install Windows 11 in Virtual Box.
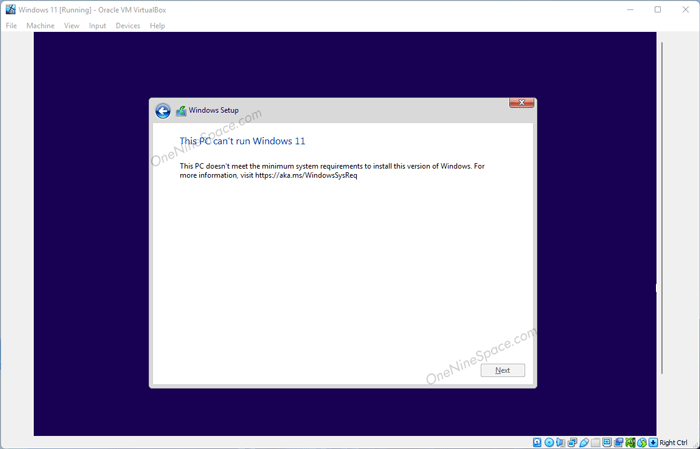
If you try to install Windows 11 in VirtualBox without TPM and Secure Boot, you will end up getting an error message saying:
This PC can’t run Windows 11
This PC doesn’t meet the minimum system requirements to install this version of Windows. For more information, visit https://aka.ms/WindowsSysReq
However, it is possible to bypass TPM requirement and install Windows 11 without any error in Oracle VirtualBox.
Unable to install Windows 11 in VirtualBox
To fix unable to install Windows 11 in VirtualBox error, follow these steps:
- Restart Windows 11 installation in VirtualBox.
- Press Shift+F10 to open the Command Prompt.
- Type regedit and press the Enter button.
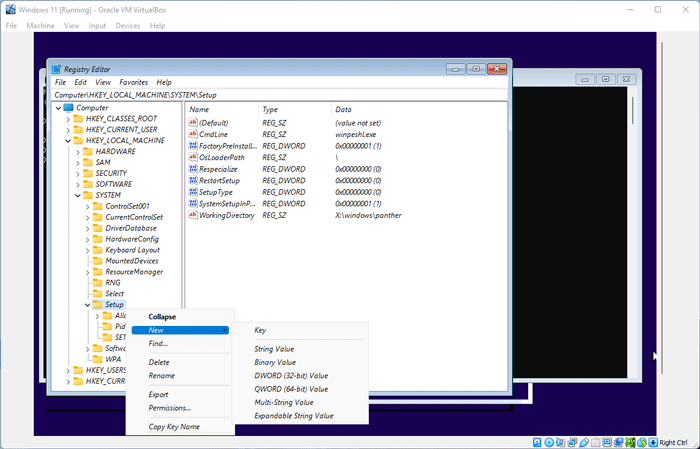
- Navigate to HKEY_LOCAL_MACHINE\SYSTEM\Setup.
- Right-click on Setup > New > Key.
- Name it as LabConfig.
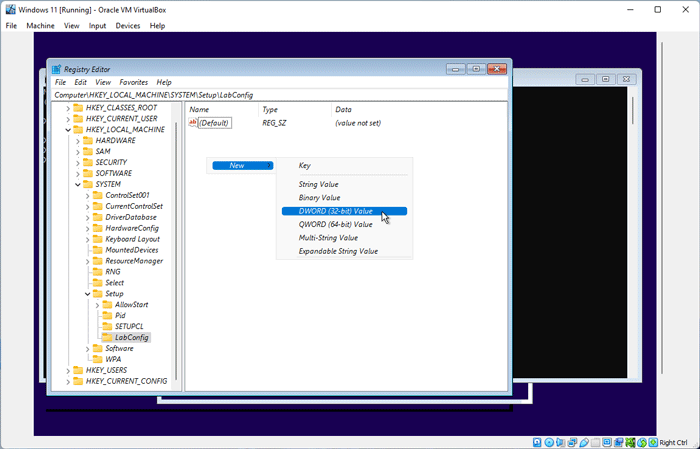
- Right-click on LabConfig > New > DWORD (32-bit) Value.
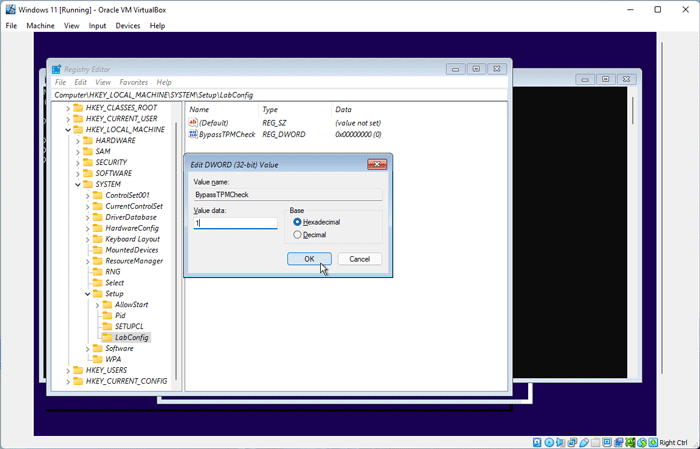
- Name it as BypassTPMCheck.
- Double-click on it to set the Value data as 1.
- Create another DWORD value named BypassSecureBootCheck.
- Set the Value data as 1.
- Click the OK button.
To learn more about these steps, continue reading.
At first, you need to restart the Windows 11 installation. However, you do not need to go further than the first window displaying the Install and Repair your computer options. Once you get this window, press Shift+F10 to open the Command Prompt. Type regedit and hit the Enter button.
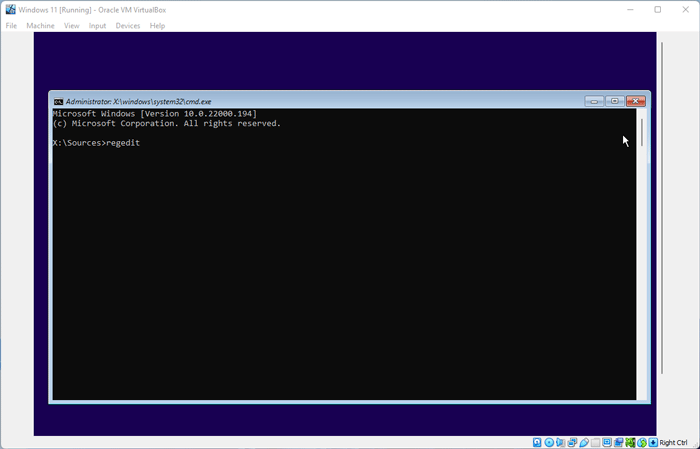
It opens the Registry Editor on your virtual machine. You need to navigate to the following path:
HKEY_LOCAL_MACHINE\SYSTEM\Setup
In the Setup key, you need to create a sub-key. For that, right-click on the Setup key, select New > Key, and name it as LabConfig.
After that, you need to create two DWORD values in the LabConfig key. To do so, right-click on the LabConfig key or the empty space on the right-hand side, select New > DWORD (32-bit) Value.
Name it as BypassTPMCheck. Then, double-click on it to set the Value data as 1.
Click the OK button to save the change. Following that, you have to repeat these steps to create another DWORD value in the same key and name it as BypassSecureBootCheck.
Then, double-click on this DWORD value to set the Value data as 1 like before. Once done, close the Registry Editor and Command Prompt window.
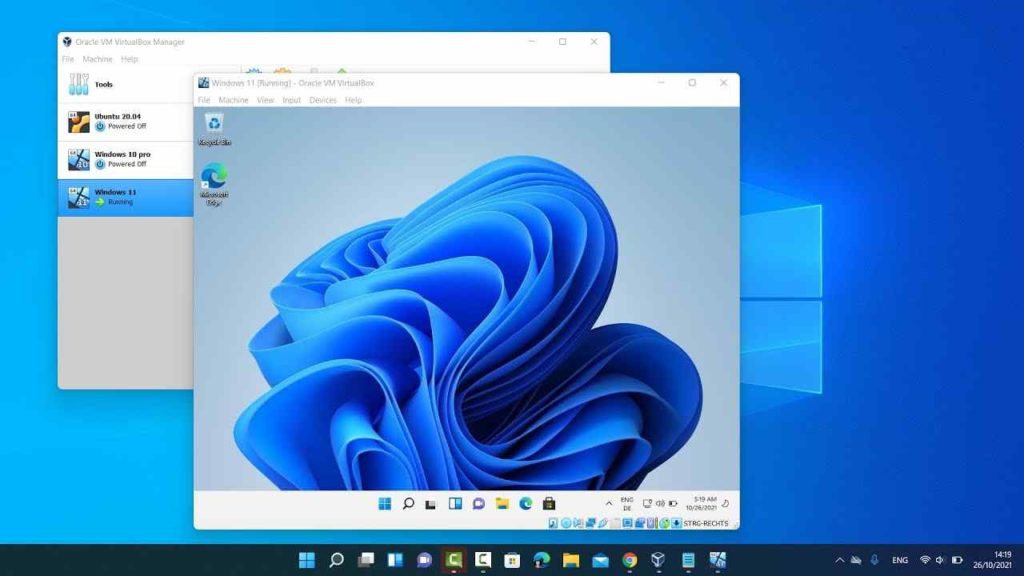
Now, you can install Windows 11 in VirtualBox without any TPM and Secure Boot errors.
How do you fix Cannot install Windows 11 on VirtualBox?
To fix Cannot install Windows 11 on VirtualBox error, you need to create one key and two DWORD values in the Registry Editor. For that, navigate to the HKEY_LOCAL_MACHINE\SYSTEM\Setup, and create a key named LabConfig. Then, create two DWORD values in this key and name them as BypassTPMCheck and BypassSecureBootCheck. At last, you need to set the Value data as 1.
That’s all! Hope this guide will help you bypass the TPM requirement and install Windows 11 in VirtualBox without any problem.
Related:
- How to enable TPM 2.0 in Gigabyte motherboard
- How to enable TPM 2.0 in BIOS MSI Motherboard
Sudip Majhi
The article, you are reading, is written by Sudip, who starts and ends the day with computer. He contributes to some top media publications after gathering 12 years of experience in content writing in technology field. Email him to say hello!
-
Home
-
News
- This PC Can’t Run Windows 11 on VirtualBox? Here Are 3 Fixes!
By Daisy | Follow |
Last Updated
It’s annoying to encounter the “This PC can’t run Windows 11 on VirtualBox” issue. Luckily, this post can help you solve the problem. You can follow this guide from MiniTool to get rid of the issue. Now, keep on your reading.
This PC can’t run Windows 11 on VirtualBox
When you try to install Windows 11 on your VirtualBox, you may receive the “This pc can’t run Windows 11 on VirtualBox” error message. This issue can also occur on Windows 10/11 hosts and Vmware Workstation.
Then, let’s see how to get rid of the “This PC can’t run Windows 11 on VirtualBox” issue.
How to Fix This PC can’t run Windows 11 on VirtualBox
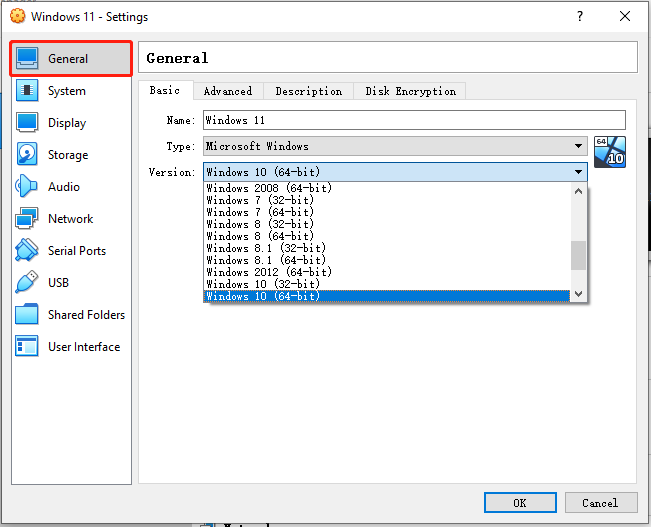
Fix 1: Change the Windows Version You Choose
Virtualbox allows you to choose which version of Windows to install and set the virtual machine’s resources accordingly. You can change the Windows 11 version to Windows 10 or others. This method is proved useful to fix the “Windows 11 not installing on Virtualbox” issue.
Step 1: Open the VirtualBox and click the Settings icon and go to the General tab.
Step 2: Scroll down the menu next to the Version line and change the Windows version.
Related articles: Fixed: This PC Can’t Run Windows 11 on Vmware Workstation
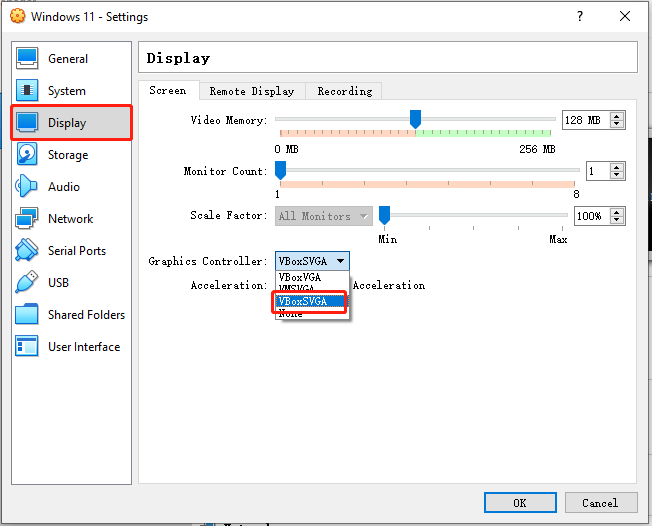
Fix 2: Select VBoxSVGA as Your Video Adapter
If you are unable to install Windows 11 on VirtualBox, you can also try to select VBoxSVGA as your video adapter.
Step 1: Open the VirtualBox and click the Settings icon and go to the Display tab.
Step 2: Scroll down the menu next to the Acceleration line and choose VBoxSVGA.
Fix 3: Bypass the Check
If the previous methods are not working, you should try to bypass the check. Follow the guide below:
Step 1: After you receive the “This PC can’t run Windows 11” on VirtualBox, you need to restart the VirtualBox.
Step 2: Then, press the Shift + F10 keys together to open the command line window on the first page of windows 11 installation.
Step 3: Type regedit and press the Enter key to open Registry Editor.
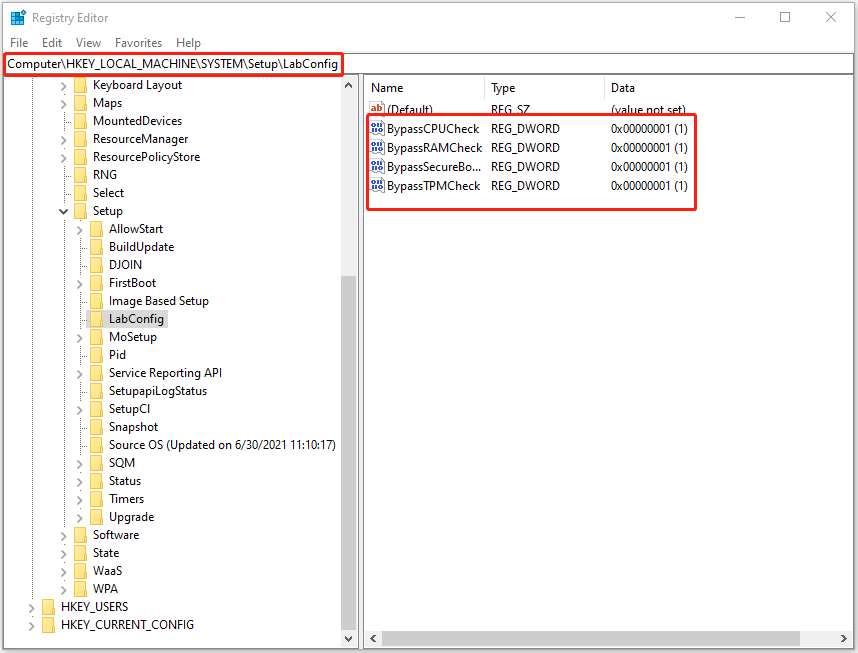
Ste 4: Then, go to this path – Computer\HKEY_LOCAL_MACHINE\SYSTEM\Setup.
Step 5: Right-click the Setup key, then, choose New and click Key. Name it as LabConfig. Step 6: Click LabConfig and right-click the empty space to select the DWORD (32-bit) Value option. Name it as BypassTPMCheck. Double-click it to change the value data to 1, and press OK.
Step 7: Right-click the empty space to select the DWORD (32-bit) Value option. Name it as BypassCPUCheck. Double-click it to change the value data to 1, and press OK.
Step 8: Right-click the empty space to select the DWORD (32-bit) Value option. Name it as BypassRAMCheck. Double-click it to change the value data to 1, and press OK.
Step 9: Right-click the empty space to select the DWORD (32-bit) Value option. Name it as BypassSecureBootCheck. Double-click it to change the value data to 1, and press OK.
Final Words
Here is how to fix the “This PC can’t run Windows 11 on VirtualBox” issue. Should you have any related issues, you can let us know in the comment.
About The Author
Position: Columnist
Having been an editor at MiniTool since graduating college as an English major, Daisy specializes in writing about data backups, disk cloning, and file syncing as well as general computer knowledge and issues. In her free time, Daisy enjoys running and going with friends to the amusement park.
An improper configuration of the Virtualbox setup can lead to this issue. Third-party antivirus apps or programs can also interfere with the functioning of VirtualBox. Also, if you are device is unable to meet minimum system requirements, you may not be able to install Windows 11.
Wondering how to fix this issue? You’ve come to the right place. So, if you are unable to install Windows 11 on VirtualBox, here are a few workarounds that might help.
Before we proceed, here’s a quick brief on what VirtualBox is and how it works.
Also read: 10 Best Virtual Machine Software For Windows PC (2022)
What is a VirtualBox?
Owned by Oracle since 2010, VirtualBox is cross-platform virtualization software that allows you to run different operating systems on a single device simultaneously. So, you can simultaneously run other OS like Windows, macOS, and Linux on a single device using the VirtualBox.
VirtualBox is an open-source software in technical parlance that uses an x-86 architecture that enables users to deploy operating systems as virtual machines. Hence, the VirtualBox software extends the capabilities of your system and allows you to configure multiple operating systems on your device with no limitations.
Also read: How to Install macOS On Windows 10 in VirtualBox.
How to fix the “Windows 11 Won’t Install on VirtualBox” Issue?
Before you begin the troubleshooting, make sure that your PC meets the minimum system requirements to install Windows 11. The basic needs include a 1 GHz (or faster) processor, 4 GB RAM, 64 GB (or more) free storage space, TPM 2.0, and a compatible graphics card.
Solution 1: Edit the Registry
Once you edit the Windows registry, you can easily bypass the minimum system requirements constraints on your device. Here’s what you need to do:
1. Press the Windows + R key combination to open the Run dialog box, type “Regedit,” and hit Enter to launch the Registry Editor app.

2. In the Registry Editor window, navigate to the following folder location:
Computer\HKEY_LOCAL_MACHINE\SYSTEM\Setup
3. Now, right-click on the Setup folder and select “New> Key.” Name the new folder “LabConfig.” Double-tap on the “LabConfig” folder.

4. Right-click on the right pane and select “New> 32-bit DWORD Value”.

5. Name the new key “BypassSecureBootCheck” and enter “1” in the Value Data field.
6. Now, repeat the same set of steps and create 3 more entries:
- BypassTPMCheck
- BypassCPUCheck
- BypassRAMCheck

7. Set the Value Data field as “1” for all the entries.
8. Exit the Registry Editor, reboot your device, and launch VirtualBox to install Windows 11 to check if the issue persists.
Solution 2: Run VirtualBox as Admin
1. Here comes another workaround to fix the “Windows 11 won’t install on VirtualBox” issue.
2. Locate the “VirtualBox” icon in File Explorer. Right-click on it and select “Run as Administrator.”

3. Reboot your device and try installing the app again with admin privileges to see if the issue was resolved.
Solution 3: Disable the Windows Security App
Interference of antivirus software or the Windows Security app can also be a common cause of why VirtualBox won’t install Windows 11 on your device. Hence, you can try temporarily disabling the Windows Security app and see if it helps. Here’s what you need to do:
1. Tap on the search icon placed on the Taskbar and type “Windows Security.” Hit Enter to launch the app.

2. Select “Virus and threat protection.”

3. Tap on “Manage Settings.”

Toggle OFF the “Real-time protection” option to disable the Windows Security app on your device. Reboot your Windows PC, launch the VirtualBox app to install Windows 11, and check if the issue persists.
Conclusion
If you want Windows 11 to operate smoothly in the VirtualBox environment, you can try any of these workarounds to get past the hindrance. I tried the above-listed solutions and still had no luck. You can try switching to an alternative virtualization software if nothing helps. Was this post helpful? Do let us know which method did the trick for you!