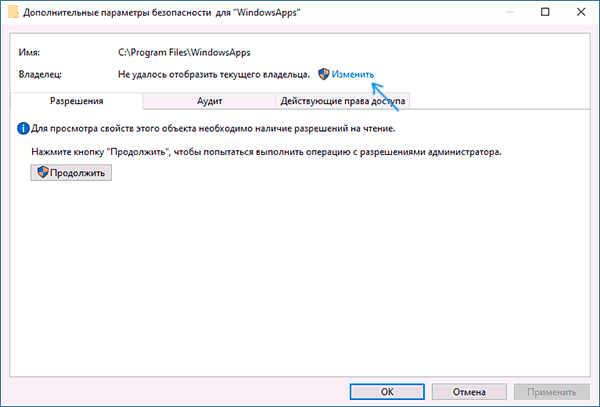
Папка WindowsApps — стандартная папка Windows 10, в которой хранятся приложения из магазина (UWP приложения). По умолчанию, она присутствует как скрытая папка C:\Program Files\WindowsApps\, но когда вы пользуетесь функциями установки или переноса приложений из магазина на другой диск, аналогичная папка появляется также в корне этого диска — обычно пользователи хотят удалить именно её.
Простое удаление этой папки невозможно, вследствие отсутствия доступа к ней. Однако, если по той или иной причине вам нужно удалить WindowsApps, особенно если речь идет об этой папке на диске D или другом не на системном разделе, вы можете это сделать, настроив права доступа соответствующим образом, об этом — в инструкции.
Удаление папки WindowsApps на диске D или в Program Files
Вне зависимости от того, из какого расположения вам требуется удалить папку WindowsApps, действия будут одинаковыми. Учитывайте, что, удаляя папку вы также удалите и установленные в ней приложения и, если для папки на не системном разделе диска (например, диске D) это относительно безопасно, при удалении WindowsApps из Program Files могут быть проблемы (делайте это только на свой страх и риск) и часть вложенных папок удалены не будут.
- Нажмите правой кнопкой мыши по папке WindowsApps и откройте её свойства, а затем перейдите на вкладку «Безопасность» и нажмите кнопку «Дополнительно».
- Нажмите «Изменить» в пункте «Владелец».
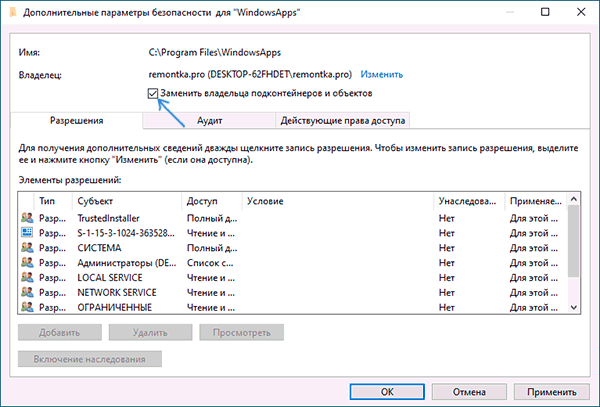
- В поле «Введите имена выбираемых объектов» введите имя вашего пользователя, а затем нажмите кнопку «Проверить имена». Если имя было введено верно, к имени пользователя добавится имя компьютера, как на скриншоте. Для учетной записи Майкрософт можно ввести соответствующий ей E-Mail в качестве имени. Нажмите «Ок».
- Отметьте пункт «Заменить владельца подконтейнеров и объектов» и нажмите «Применить». Дождитесь окончания применения изменений.
- Нажмите «Ок». Вы вернетесь в окно свойств папки. В нем снова нажмите кнопку «Дополнительно» на вкладке «Безопасность».
- Нажмите «Изменить разрешения», а затем — кнопку «Добавить». В поле «Субъект» укажите вашего пользователя, также как вы это делали на 3-м шаге, а затем установите отметку «Полный доступ» и нажмите «Ок».
- Установите отметку «Заменить все записи разрешений дочернего объекта» и нажмите «Ок». Дождитесь завершения применения параметров безопасности. Учитывайте, что при их изменении для системных приложений (если вы удаляете WindowsApps на диске C), могут быть сбои, придется нажать «Продолжить» (права на указанную вложенную папку изменены не будут).
После применения параметров безопасности удалите папку WindowsApps обычным способом. Учитывайте: в случае если какие-то из приложений, находящихся в папке WindowsApps работают в настоящий момент времени, вы можете получить сообщение о том, что удаление невозможно, так как эти папка или файл открыты в другой программе.
В этом случае вы можете начать удалять папки внутри WindowsApps, пока не будет ясно, какая из папок не удаляется (а по её имени можно установить соответствующее приложение).
Если после удаления вы снова будете скачивать приложения из магазина Windows 10, при этом в качестве места сохранения будет использоваться папка на не системном разделе диска, папка WindowsApps будет снова создана автоматически.
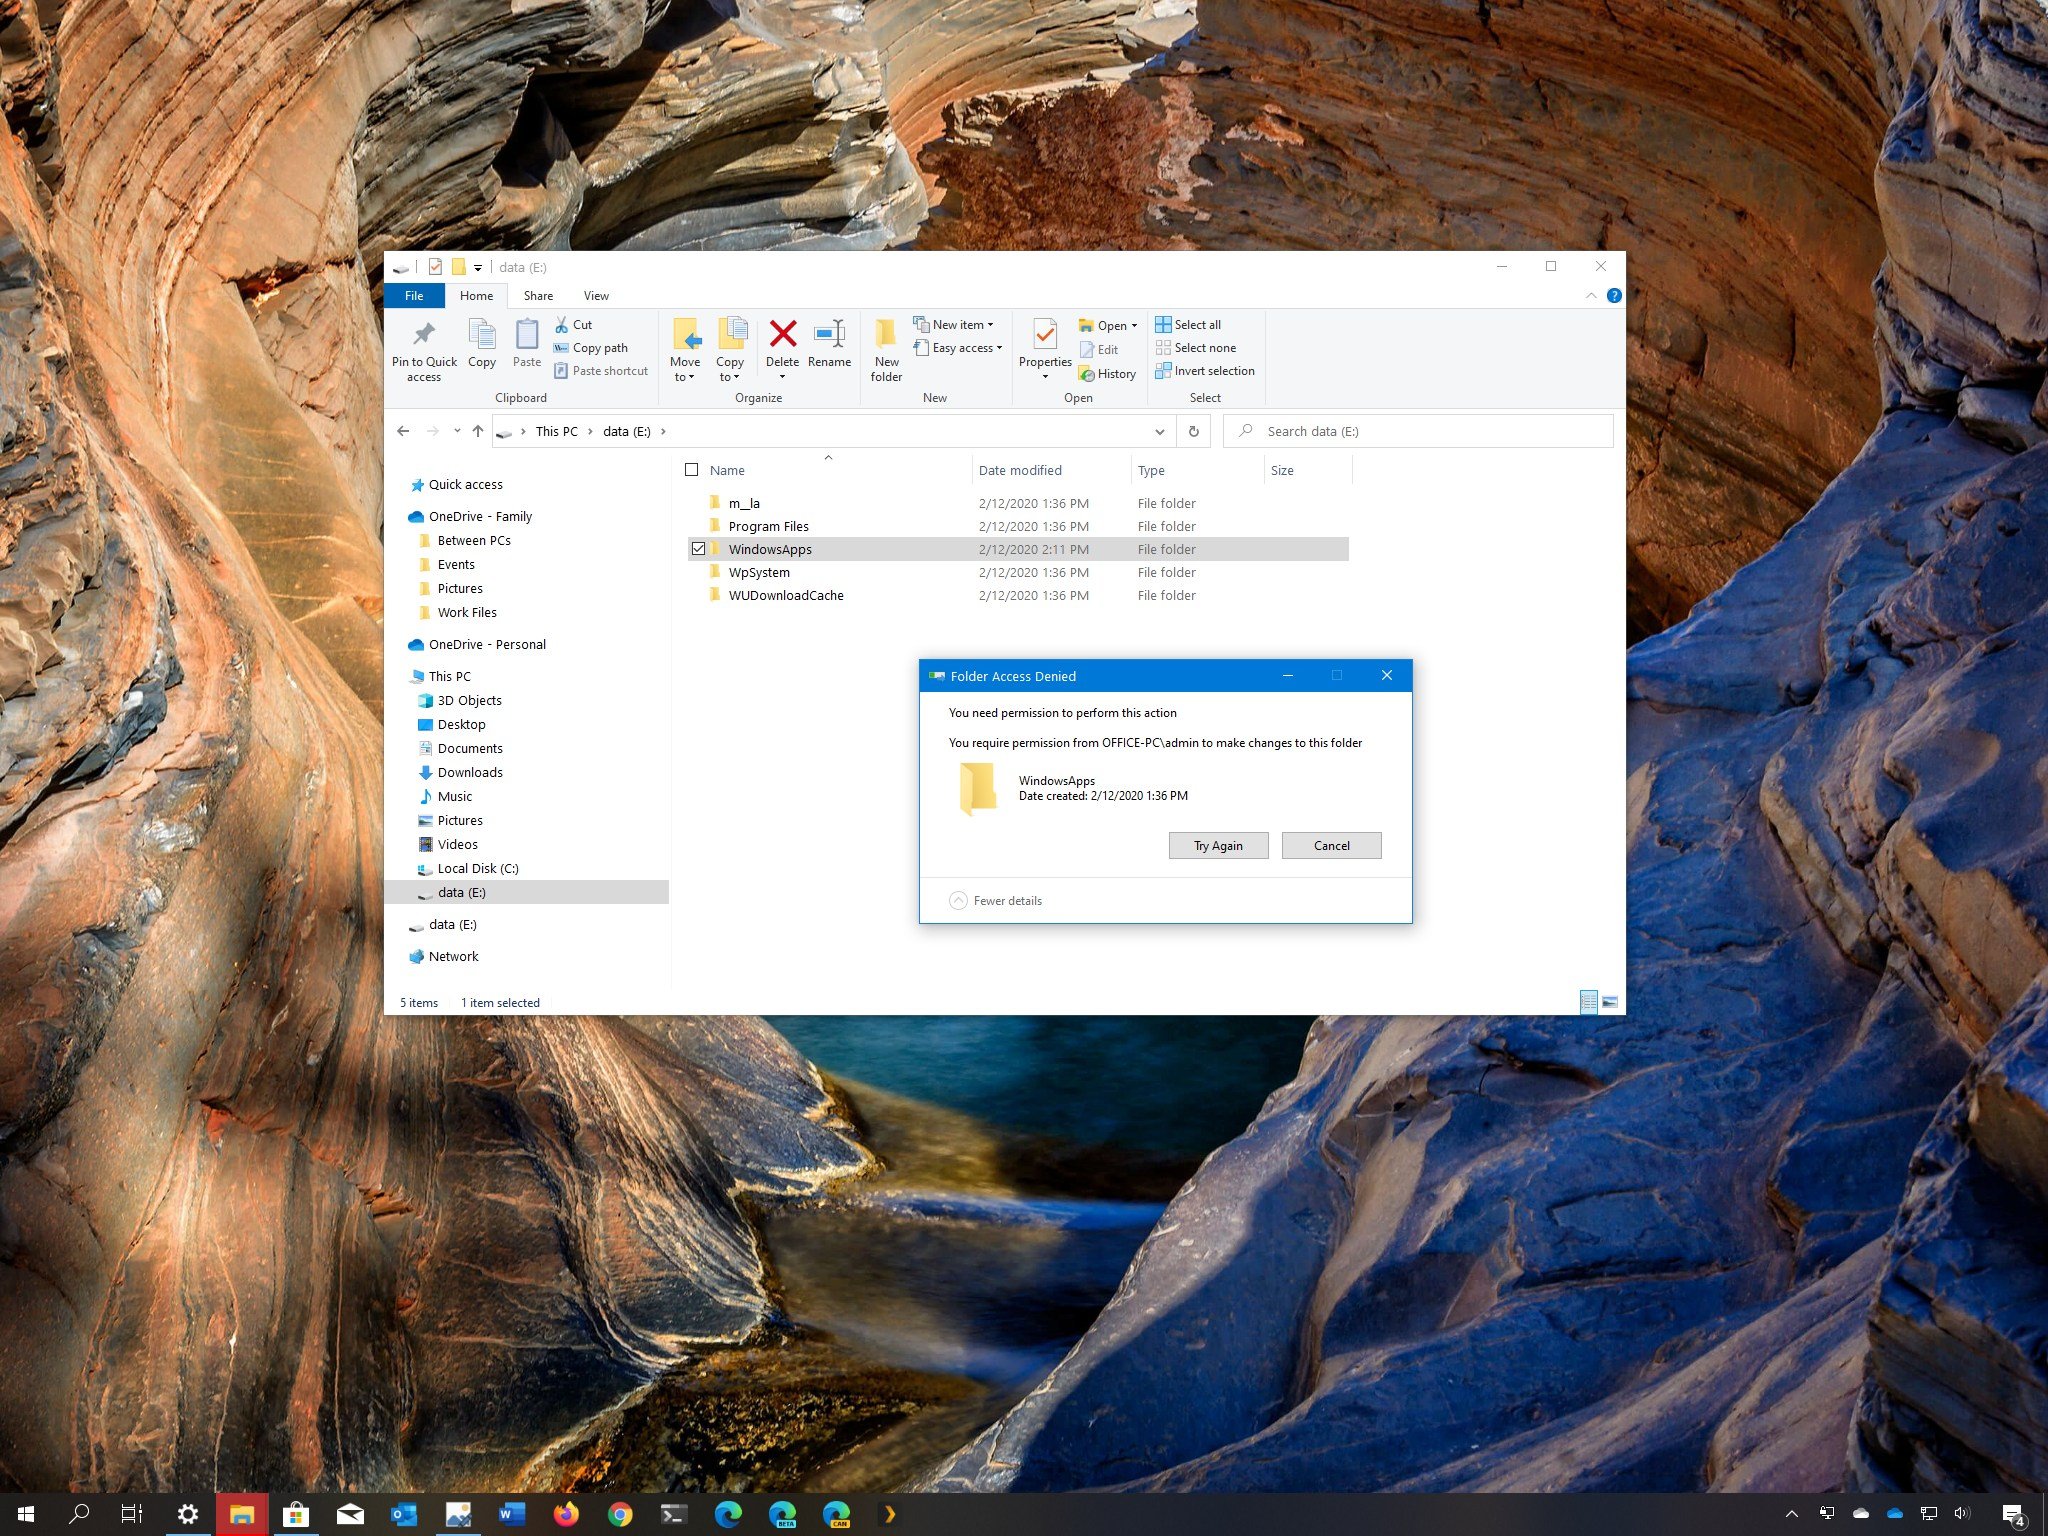
(Image credit: Windows Central)
On Windows 10, the «WindowsApps» hidden folder is available in the «Program Files» folder that contains the files that make up all the default applications, and it stores every app that you download from the Microsoft Store.
If you choose to save apps on an external hard drive, Windows 10 will also create another WindowsApps folder to store the files along with several other folders, including another folder with your account name, «WpSystem,» «WUDownloadCache,» and «Program Files» folder to enable the ability to run apps from a secondary storage.
The only problem is that the WindowsApps folder is protected, and if you try to revert the changes, the folder will stay on the external drive, and you won’t be able to delete it. However, there are a few ways to delete it and any remaining folders.
In this Windows 10 guide, we walk you through the steps to delete the WindowsApps and the remaining folders part of the system to save Microsoft Store apps on an external storage.
- How to delete WindowsApps folder using File Explorer
- How to delete WindowsApps folder using Format
How to delete WindowsApps folder using File Explorer
To delete the WindowsApps folder from an external hard drive, you must first remove the apps, restore the storage default settings, and then change some folder permissions to delete the folder successfully.
Quick note: These steps are meant to delete the «WindowsApps» folder from an external storage. We don’t recommend trying to remove the same folder from the Windows 10 installation drive.
Uninstalling apps
To uninstall the apps on an external drive, use these steps:
All the latest news, reviews, and guides for Windows and Xbox diehards.
- Open Settings.
- Click on Apps.
- Click on Apps & features.
- Under the «Apps & features» section, use the Filter by menu, and select the drive containing the «WindowsApps» folder.
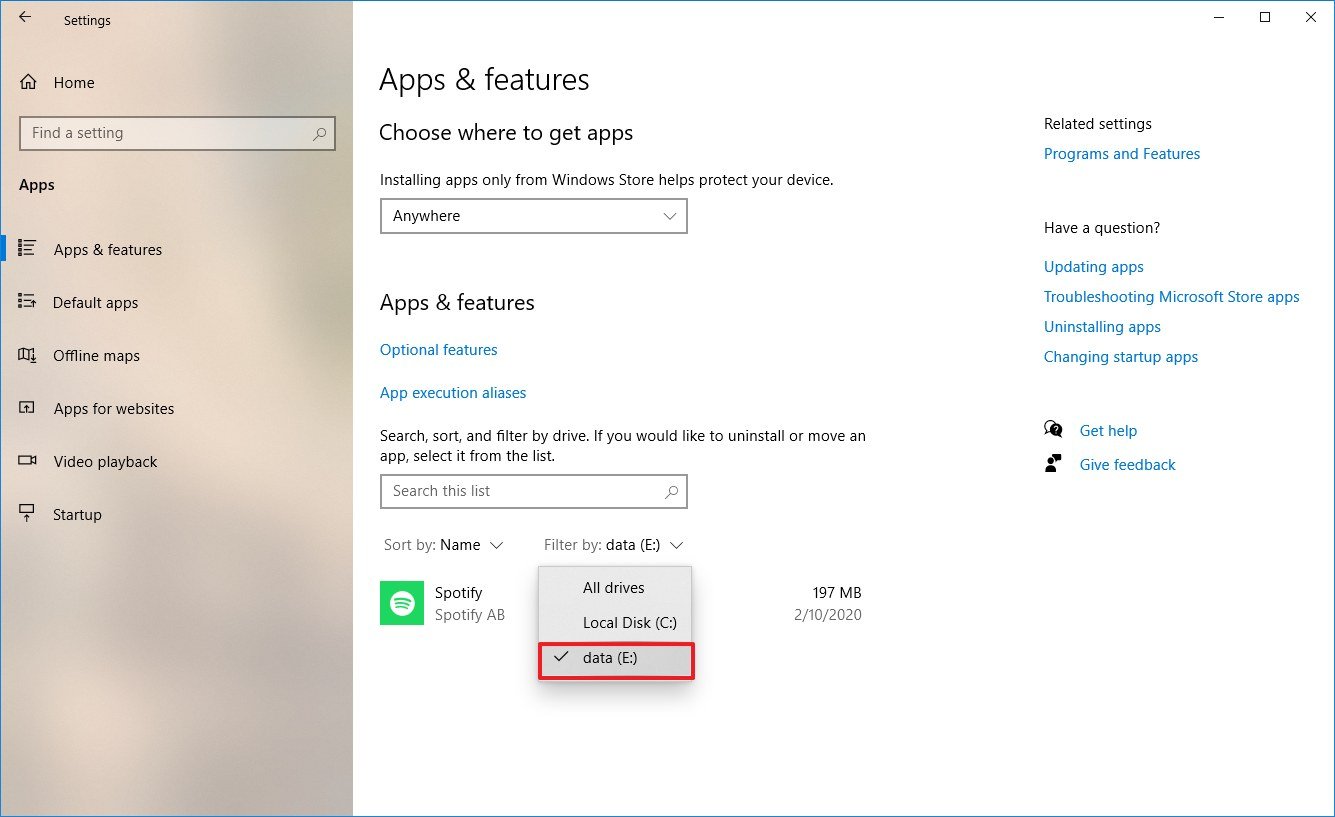
- Select the app and click the Uninstall button.
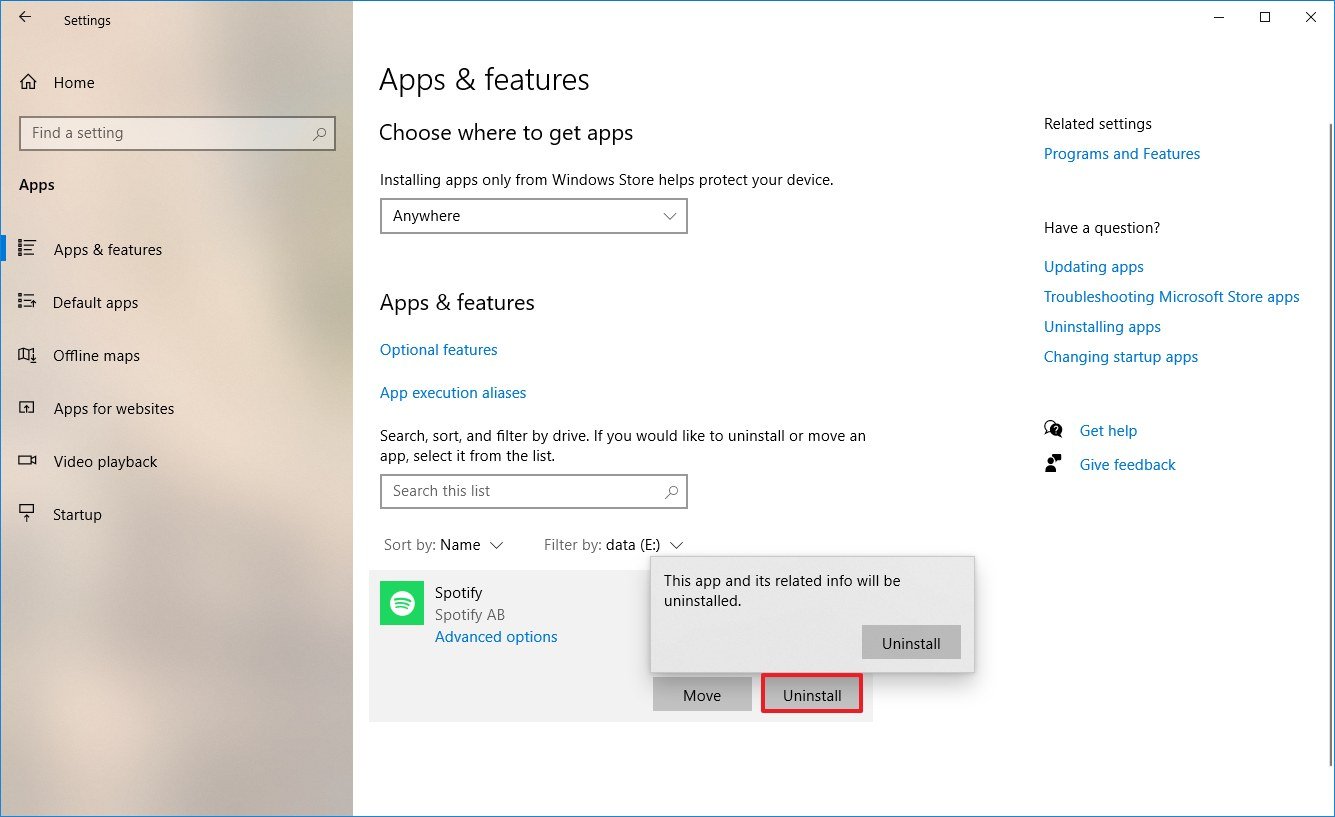
- Click the Uninstall button again.
Once you complete the steps, you may need to repeat them to remove all the apps from the external storage. If one or more apps are still installed on the external drive, you won’t be able to delete the folder.
Restoring default saved content settings
To restore the default settings to store new apps, use these steps:
- Open Settings.
- Click on System.
- Click on Storage.
- Under the «More storage settings» section, click the Change where content is saved option.
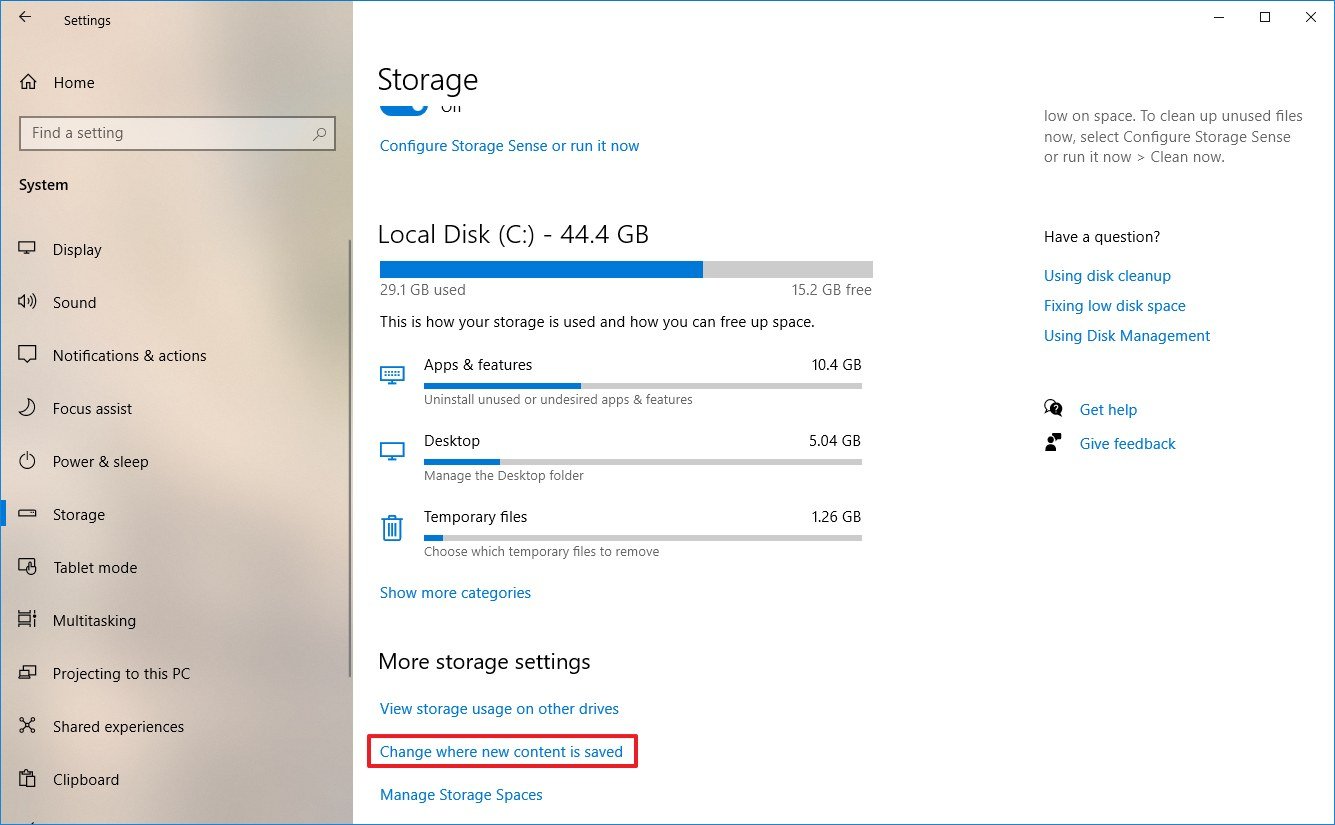
- Use the «New apps will save to» drop-down menu to select the Local Disk option.
- Click the Apply button.
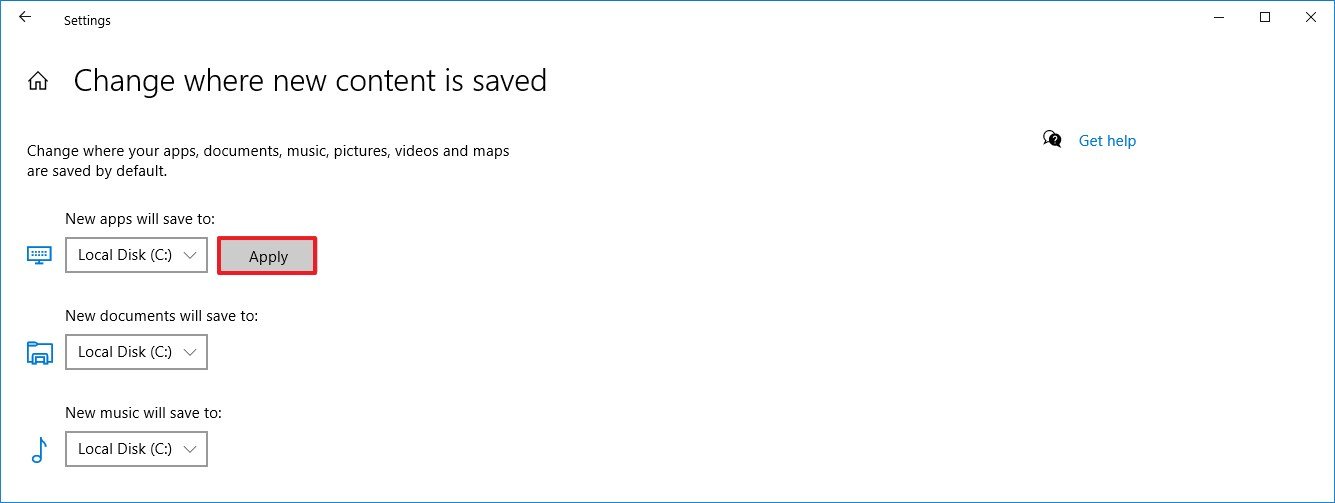
After you completese the steps, you can proceed to delete the WindowsApps folder.
Deleting WindowsApps folder
To delete the WindowsApps folder on Windows 10, use these steps:
- Open File Explorer.
- Navigate to the drive containing the folder.
- Right-click the WindowsApps folder and select the Properties option.
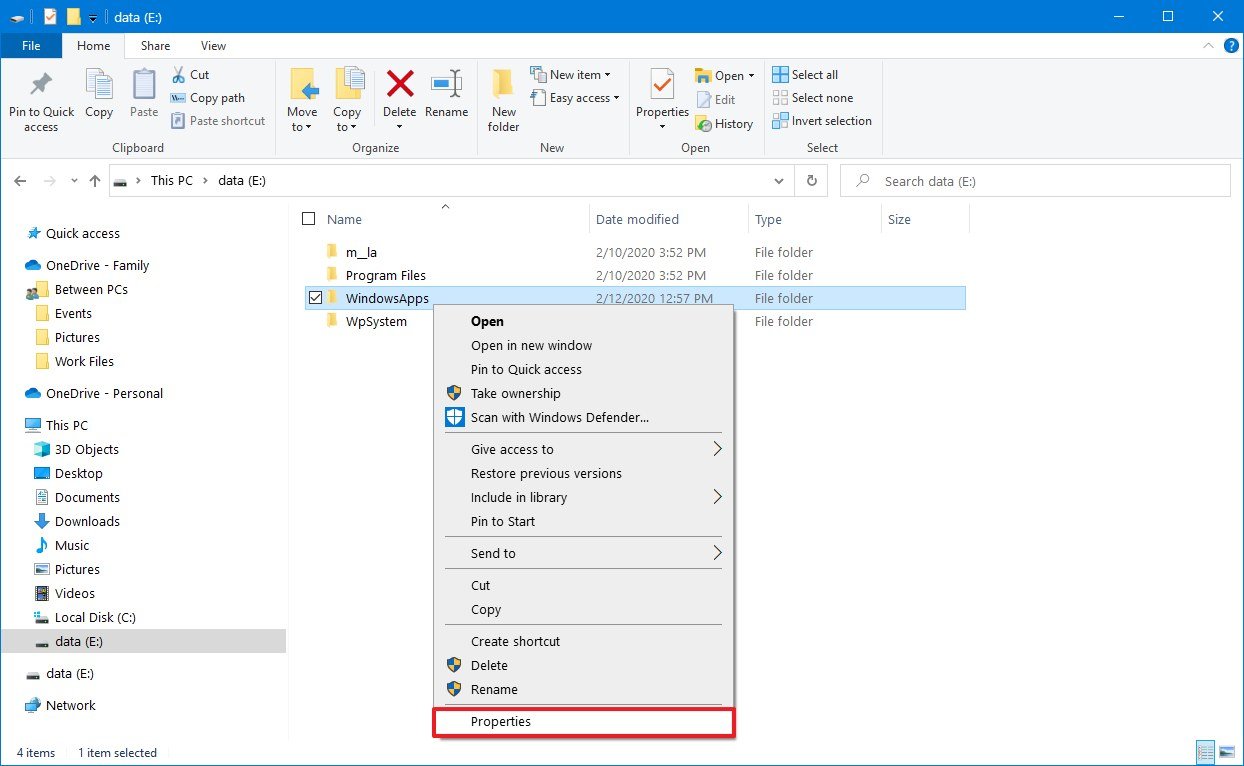
- Click the Security tab.
- Click the Advanced button.
- Click the Change option.
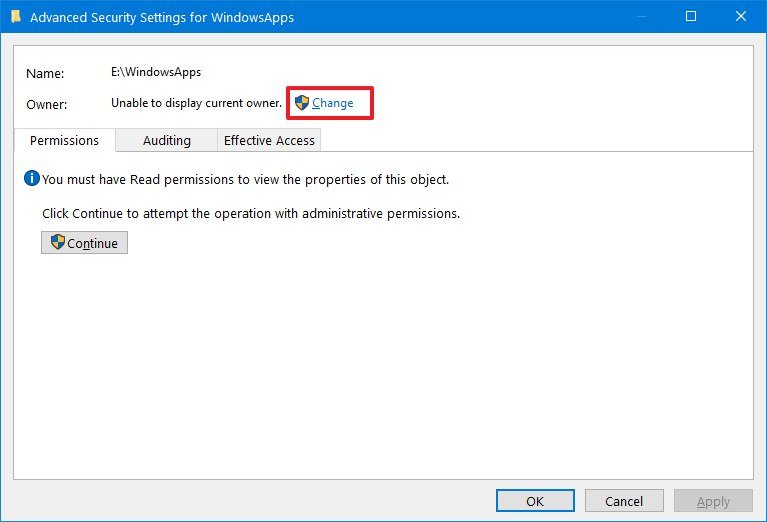
- Specify your account name (or the full email address associated with the account).
- Click the Change Name button.
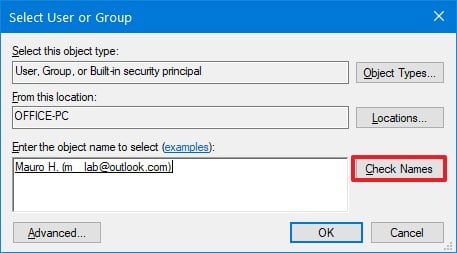
- Click the OK button.
- Check the Replace owner on subcontainers and objects option.
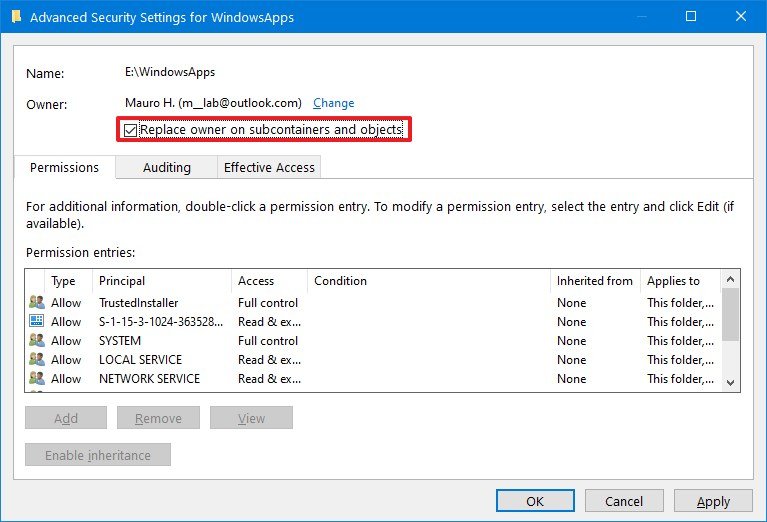
- Click the Apply button.
- Click the OK button.
- Click the OK button again.
- Click the Advanced button from the «Security» tab.
- Click the Change permissions button.
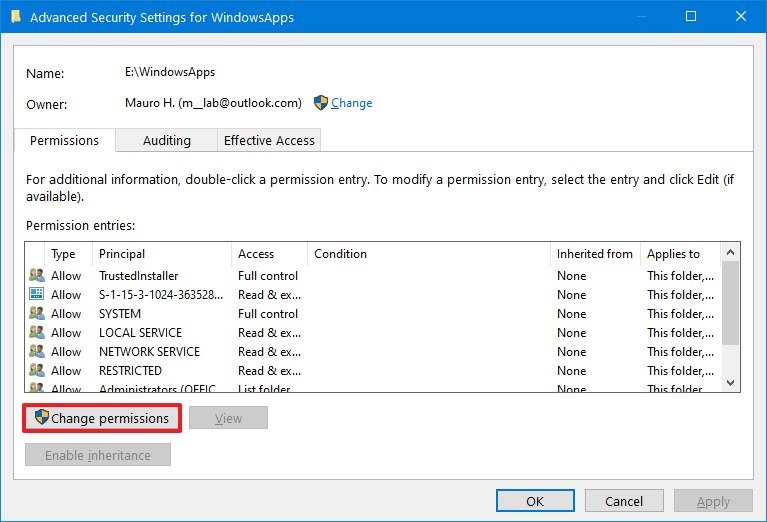
- Click the Add button.
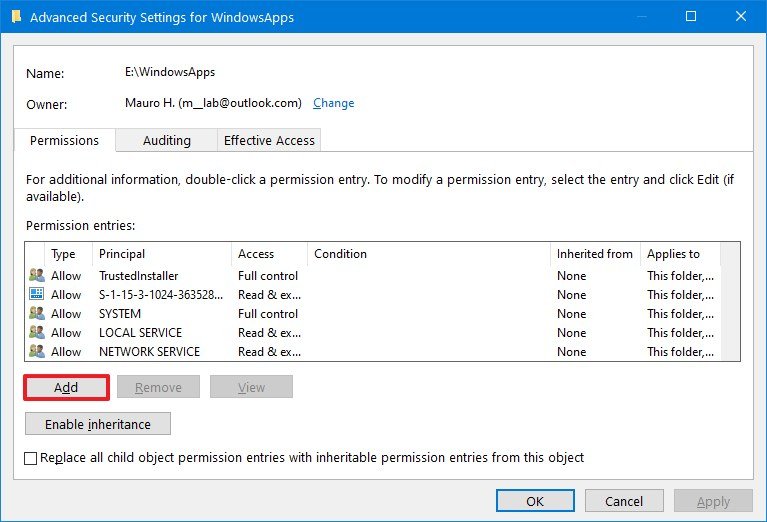
- Click the Select a principal option.
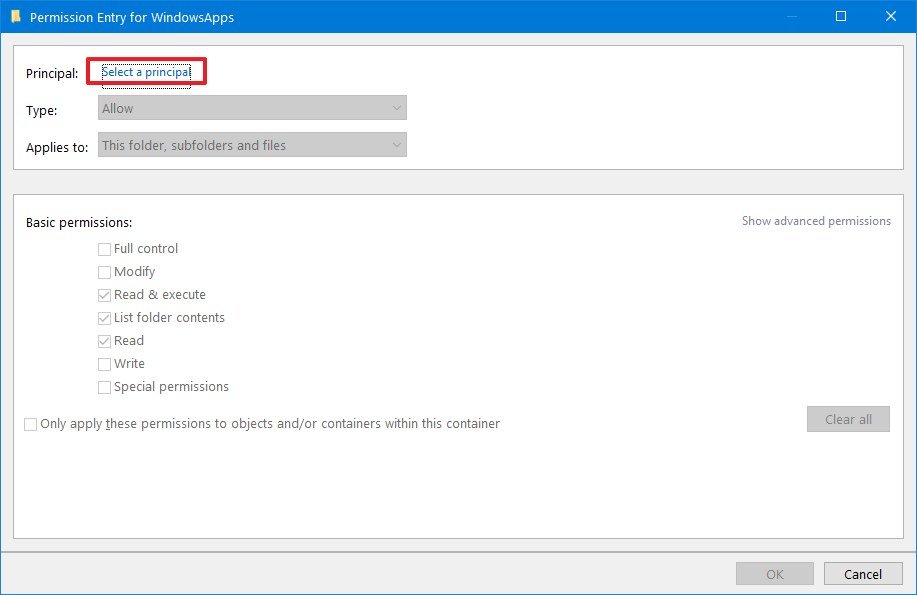
- Specify your account name (or the full email address associated with the account)
- Click the OK button.
- Under the «Basic permissions» section, check the Full control option.
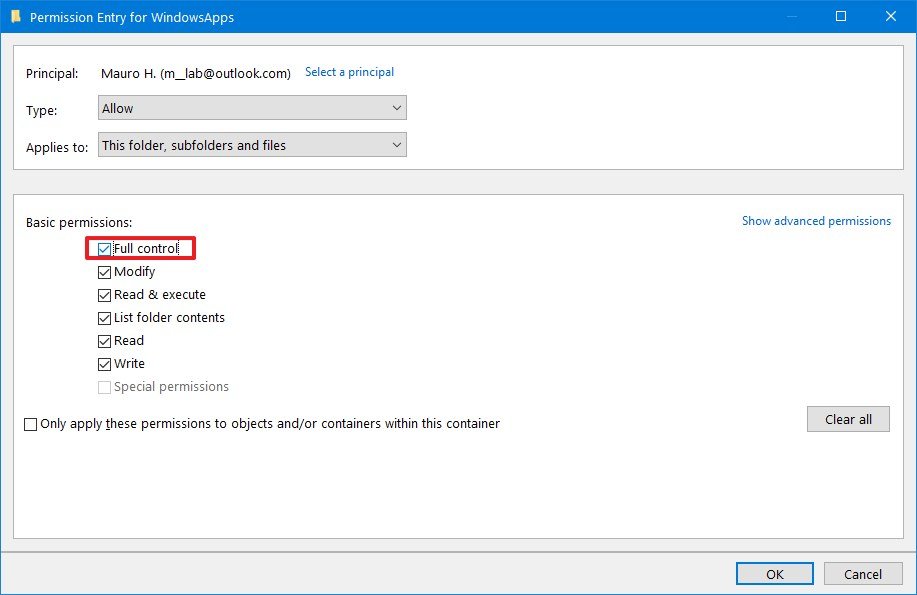
- Click the OK button.
- Click the Apply button.
- Click the OK button.
- Click the OK button one more time.
- Right-click the WindowsApps folder and select the Delete option.Quick tip: If you get a message trying to delete the folder, try one or two times again until the folder is deleted.
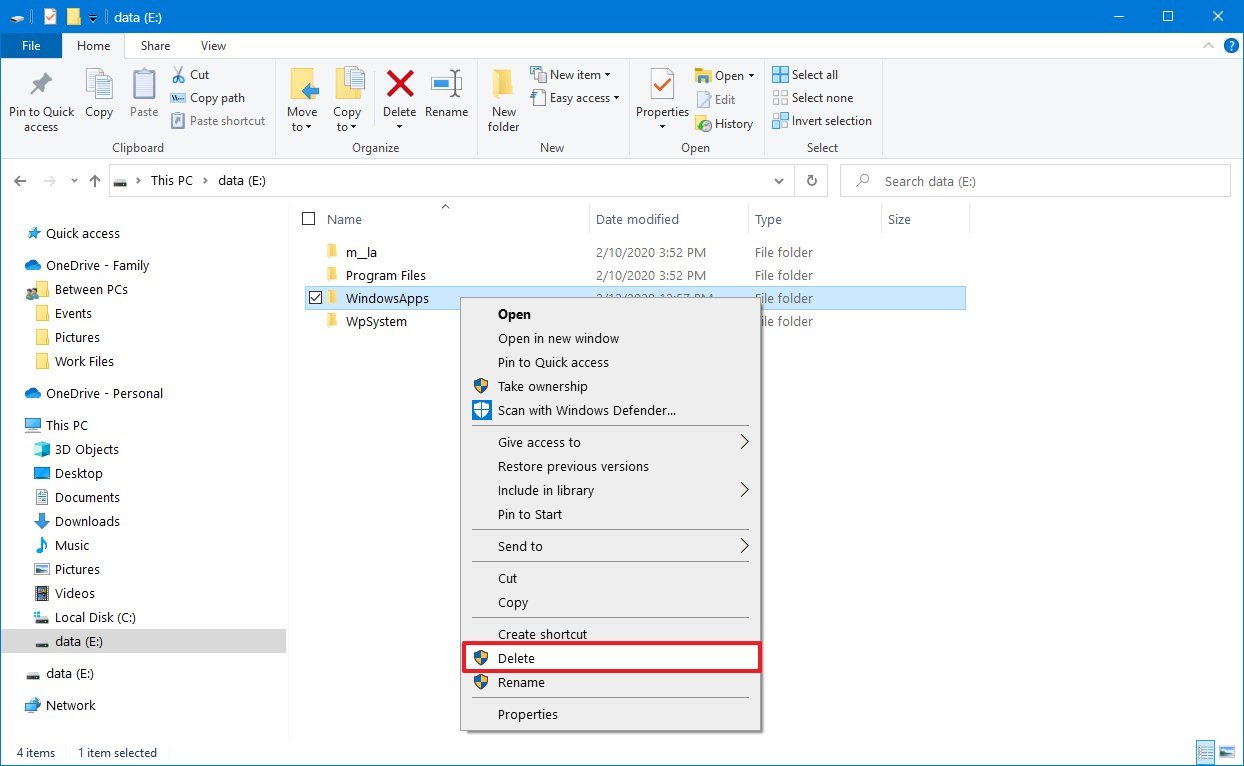
Once you complete the steps, there are several other leftover folders that are part of the system that stores apps on an external storage, including your user account folder, WpSystem and WUDownloadCache, which you can delete by right-clicking the folder and selecting the Delete option. If you also want to delete the «Programs Files» folder, you’ll have to use the same steps mentioned above as this is another folder protected by the system.
How to delete WindowsApps folder using Format
If you don’t have any important files stored in the drive, the fastest way to delete the WindowsApps folder is to format the drive.
Uninstalling apps
Although formatting the drive will delete the WindowsApps folder, you first need to uninstall the apps to prevent leaving behind system entries.
- Open Settings.
- Click on Apps.
- Click on Apps & features.
- Under the «Apps & features» section, use the Filter by menu, and select the drive containing the «WindowsApps» folder.

- Select the app and click the Uninstall button.

- Click the Uninstall button again.
Once you complete these steps, repeat the above steps to remove any other apps installed in the external storage.
Formatting external storage
To format a drive to delete the WindowsApps folder, use these steps:
Warning: The following steps will remove everything on the selected drive. You should make sure to back up any important files before proceeding.
- Open File Explorer.
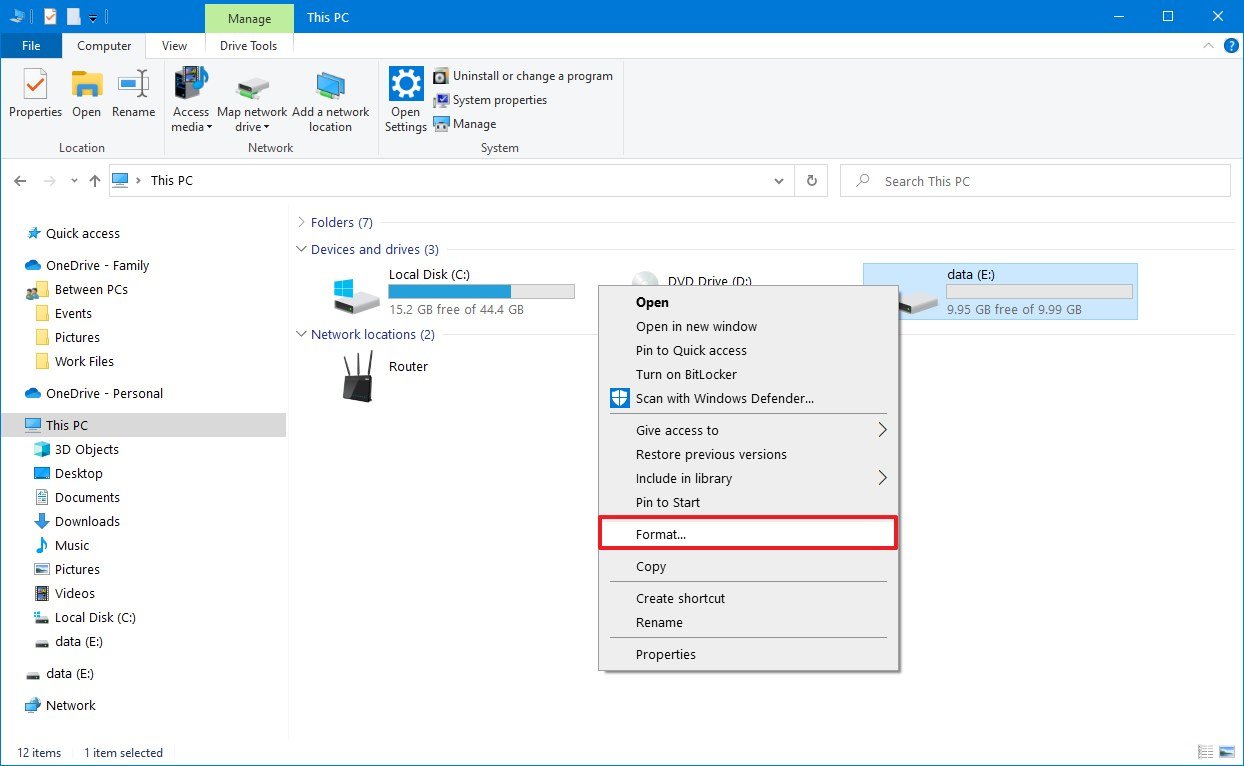
- Click on This PC from the left pane.
- Under the «Devices and drives» section, right-click the drive storing the Microsoft Store apps, and select the Format option.
- (Optional) Use the «Capacity» drop-down menu to make sure the drive to be formatted is the correct one.
- Use the «File system» drop-down menu and select the NTFS option.
- Use the «Allocation unit size» drop-down and select the 4096 bytes option.
- Under the «Format options» section, check the Quick Format option.
- Click the Start button.
- Click the OK button.
- Click the OK button one more time.
- Click the Close button.
After you complete the steps, the drive will be erased, deleting the WindowsApps and any other folder.
Mauro Huculak has been a Windows How-To Expert contributor for WindowsCentral.com for nearly a decade and has over 15 years of experience writing comprehensive guides. He also has an IT background and has achieved different professional certifications from Microsoft, Cisco, VMware, and CompTIA. He has been recognized as a Microsoft MVP for many years.
People find they can’t delete the WindowsApps folder directly. When they are trying to do so, they will be informed that permission is needed to delete the folder in the pop-up window. In this post, useful methods will be delivered to help you resolve this problem.
People always delete what they don’t need on their computers. But they will find some files or folders can’t be deleted as they often do, for example, the WindowsApps folder. Some Windows users don’t even know the existence of the WindowsApps folder since it is usually hidden by Windows. Is it safe to delete the WindowsApps folder? How can you delete this folder? MiniTool will give you answers in the following content.
Is It Safe to Delete WindowsApps Folder
Some users would like to know whether it is safe to remove the WindowsApps folder from their computers. There are two situations:
- If the WindowsApps folder is located in C drive (the system drive), you’d better not delete it.
- If the WindowsApps folder is contained in another drive, you can remove it anytime you want.
As a result, it is completely safe to delete the WindowsApps folder from any drive on your PC except the system drive. However, if you need to delete the WindowsApps folder included in your C drive, you must make sure the apps contained in it are no longer useful and other programs will not use it. Otherwise, your computer may encounter problems after the WindowsApps folder cleanup.
How to Delete WindowsApps Folder
When you’re trying to delete the WindowsApps folder, you may find you can’t access the WindowsApps folder. In this case, it requires you to have administrative rights to delete this folder. You can follow the next steps to take control of this folder.
Method 1: Delete WindowsApps Folder with File Explorer
Step 1: Press Win + E to open File Explorer.
Step 2: Look for the WindowsApps folder on your computer.
Some folders are hidden by your computer automatically. If you can’t find the folder, please switch to the View section and check Hidden items to show the hidden folders.
Step 3: Right-click on the folder and select Properties.
Step 4: Turn to the Security section and click on Advanced.
Step 5: Click on Change in the pop-up window.
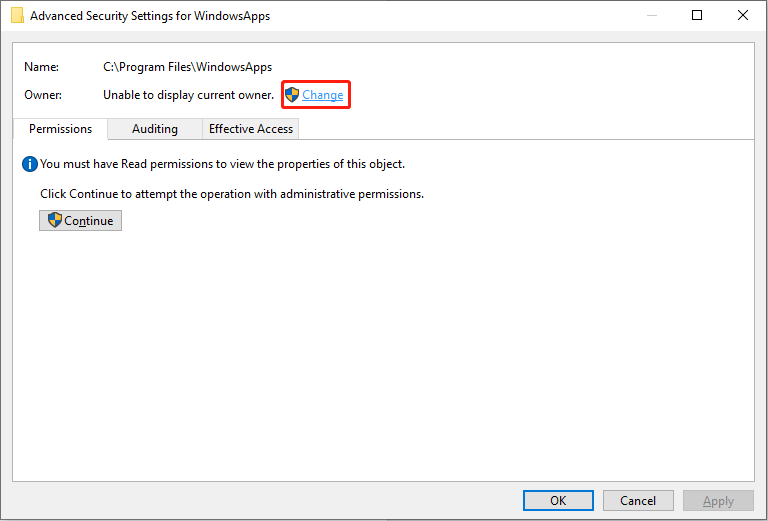
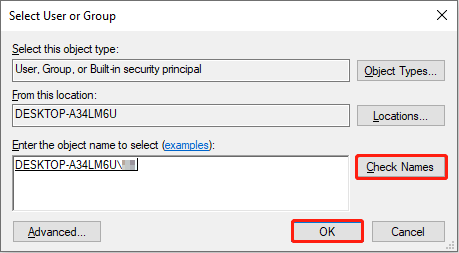
Step 6: Specify your account name or the full email associated with your account.
Step 7: Click on the Check Names button, then click OK.
Step 8: Check Replace owner on subcontainers and objects in the pop-up window.
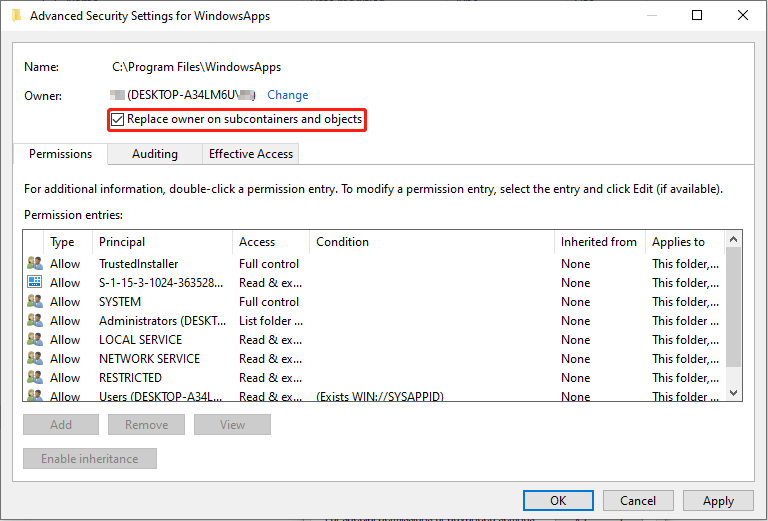
Step 9: Click on Apply and OK buttons.
Step 10: Back to the WindowsApps Properties window and click on the Advanced button.
Step 11: Click the Change permissions button.
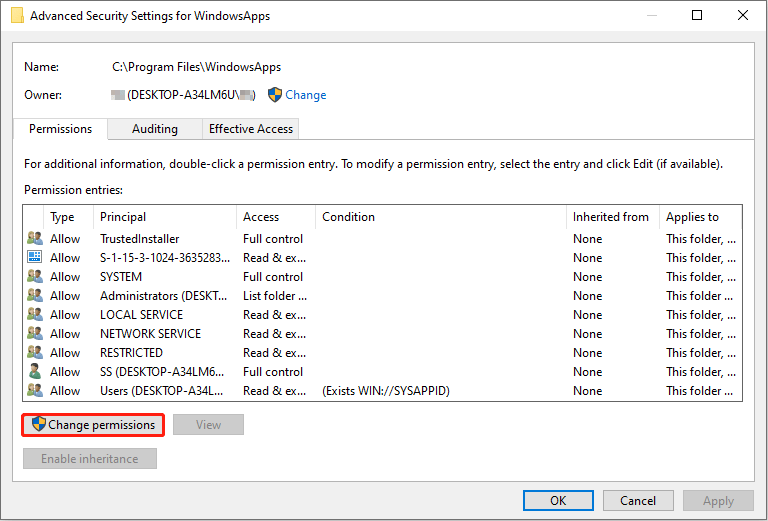
Step 12: Click Add, then click Select a principal in the following window.
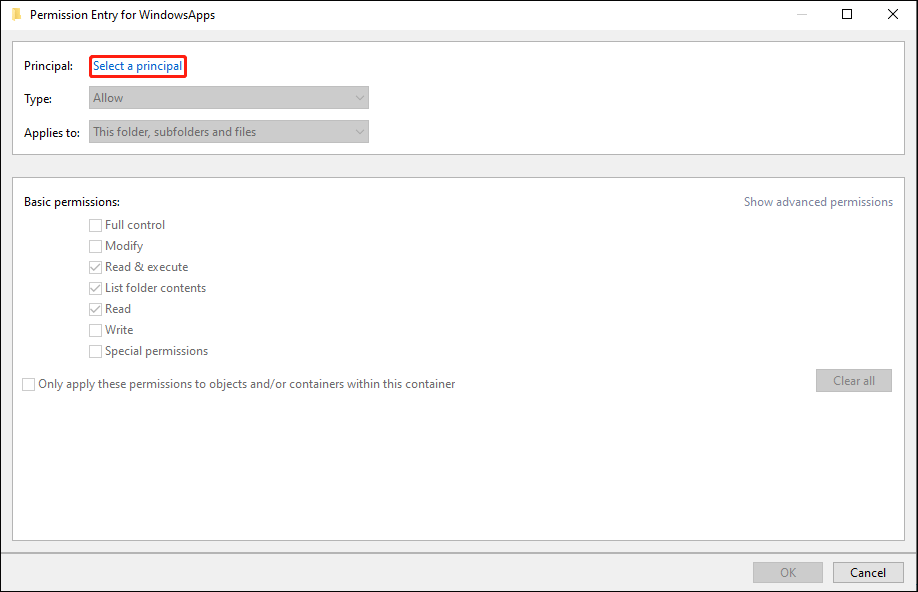
Step 13: Specify your account name or the full email associated with your account.
Step 14: Click the OK button.
Step 15: Check the Full control choice and click OK.
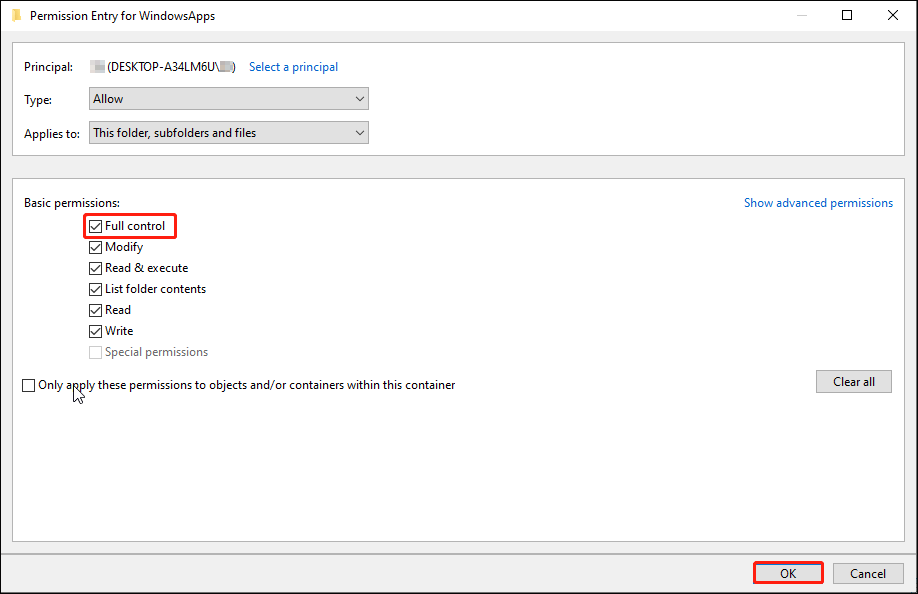
Step 16: Click on Apply.
Step 17: Wait for the process to finish, then click OK to close the window.
Step 18: Right-click on the WindowsApps folder, then you can delete it directly.
If you want to access the WindowsApps folder, this method also works. (Ignore the last step.)
Method 2: Delete WindowsApps Folder by Formatting
If you save the WindowsApps folder on your external hard drive or other non-system drives, you can also try this method. But before you start, you are supposed to back up your data on the external hard drive or the drive.
Part 1: Back Up Data
To find reliable backup software, MiniTool ShadowMaker should be the first choice. This freeware can back up your files, folders, partitions, disks, and operating systems. As a functional backup software, it prevents duplicated backups with differential and incremental backup functions. Besides, if you want to back up your data regularly, MiniTool ShadowMaker allows you to set time points to back up automatically.
You can download the trial edition to have a try.
MiniTool ShadowMaker TrialClick to Download100%Clean & Safe
For specific information about how to back up your vital data, please refer to this post: How to Backup Files on Windows 10? Try These Top 4 Ways
Part 2: Format via Disk Management
Step 1: Press Win + X and select Disk Management on the context menu.
Step 2: Choose the drive you need to format and right-click on it.
Step 3: Select Format.
Step 4: Set the Volume label and File system according to your requirements and click OK.
Part 2: Recover Lost/Deleted Data
How to Recover Deleted/Lost Data
If you format your external hard drive without backing up data, it is extremely needed to recover files. MiniTool Power Data Recovery is heartily recommended. As the best free data recovery software, it supports all Windows systems and allows you to recover files from external and internal hard drives.
Additionally, it is powerful in different recovery situations like recovering files from formatted, unidentified, or RAW drives. MiniTool Power Data Recovery will cause no damage to your data in the recovery process. Isn’t it a worthy choice?
Step 1: Download and install MiniTool Power Data Recovery by clicking the button below. Please do not save it to the drive you need to recover data from.
MiniTool Power Data Recovery FreeClick to Download100%Clean & Safe
Step 2: Connect your external hard drive and run the software.
Step 3: Select a partition to scan. If you want to recover files on the whole drive, you can turn to the Devices tab to scan the entire drive.
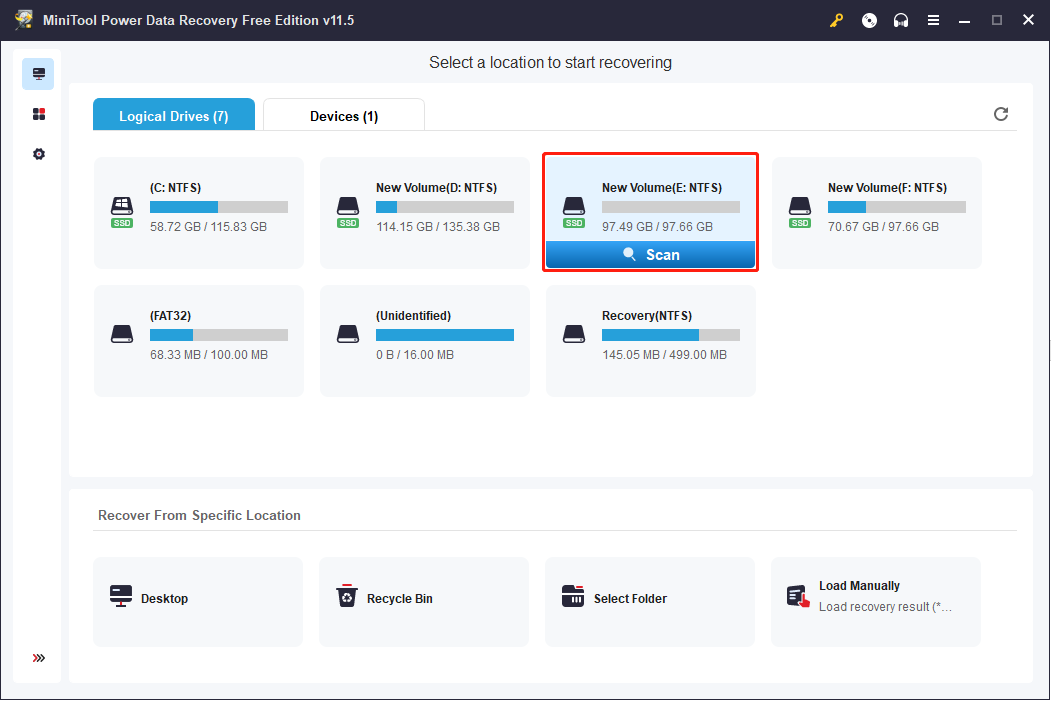
Step 4: Please wait for a few minutes patiently. After the scan process is completed, you can look through the result page to find your desired files.
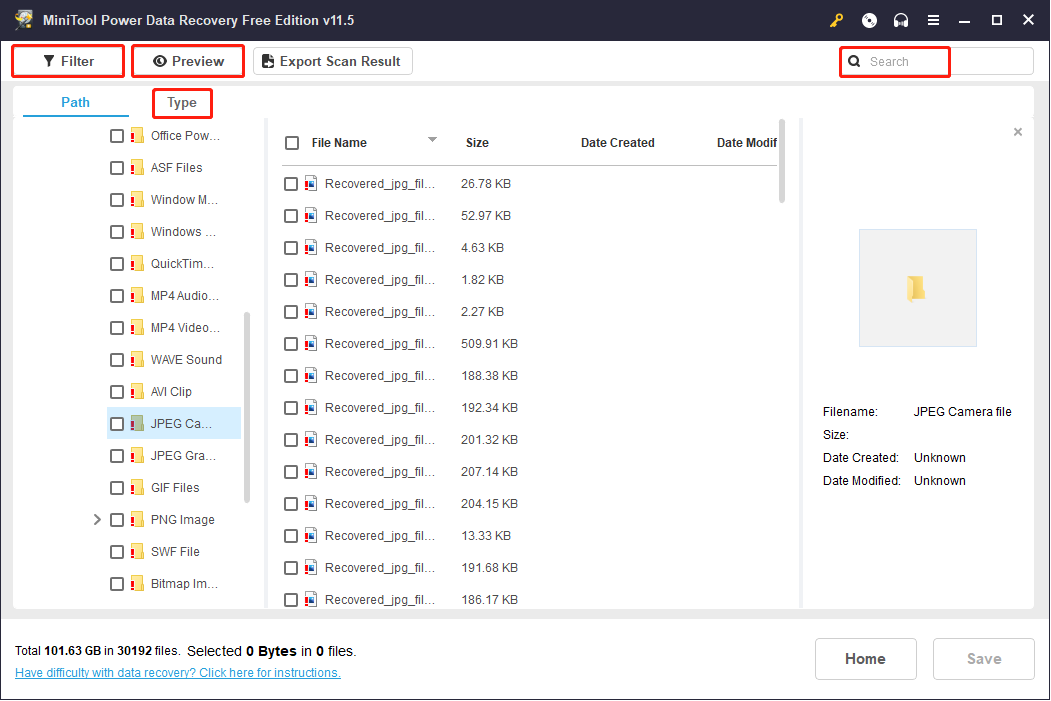
Some utilized functions can be used in this interface:
- Filter: This function works well in reducing unnecessary options. You can filter files by file size, file type, file category, and date modified.
- Search: This function helps you locate your wanted files quickly if you remember their names.
- Type: This function mainly classifies files according to their types, such as documents, photos, videos, audio, etc.
- Preview: This function is practical in confirming whether the files you choose are what you want.
Step 5: Check the files and click the Save button.
Step 6: Choose an appropriate path to save the restored data and click OK.
Do not save your data to the external hard drive. Otherwise, the recovery may be failed due to overwriting.
How to Recover Data When Your PC Won’t Boot
As we said above, deleting the WindowsApps folder may cause many problems. Some people fail to boot into their PCs after deleting the folder. How to help them retrieve files from the unbootable computer? MiniTool Power Data Recovery can make it.
MiniTool Power Data Recovery is equipped with a snap-in WinPE Bootable Builder, which is used to create a bootable disc. Then you can boot your computer with this created Bootable Media to restore your data successfully. You can get a suitable edition with a snap-in WinPE Bootable Builder through this page.
Step 1: Create a Bootable Media
1. Download and install MiniTool Power Data Recovery on a well-performing computer.
MiniTool Power Data Recovery FreeClick to Download100%Clean & Safe
2. Launch the software and turn to the Utilities interface.
3. Click on the Download button in the Power Data Recovery Bootable section to get the full edition. Please choose an edition with a snap-in WinPE Bootable Builder.
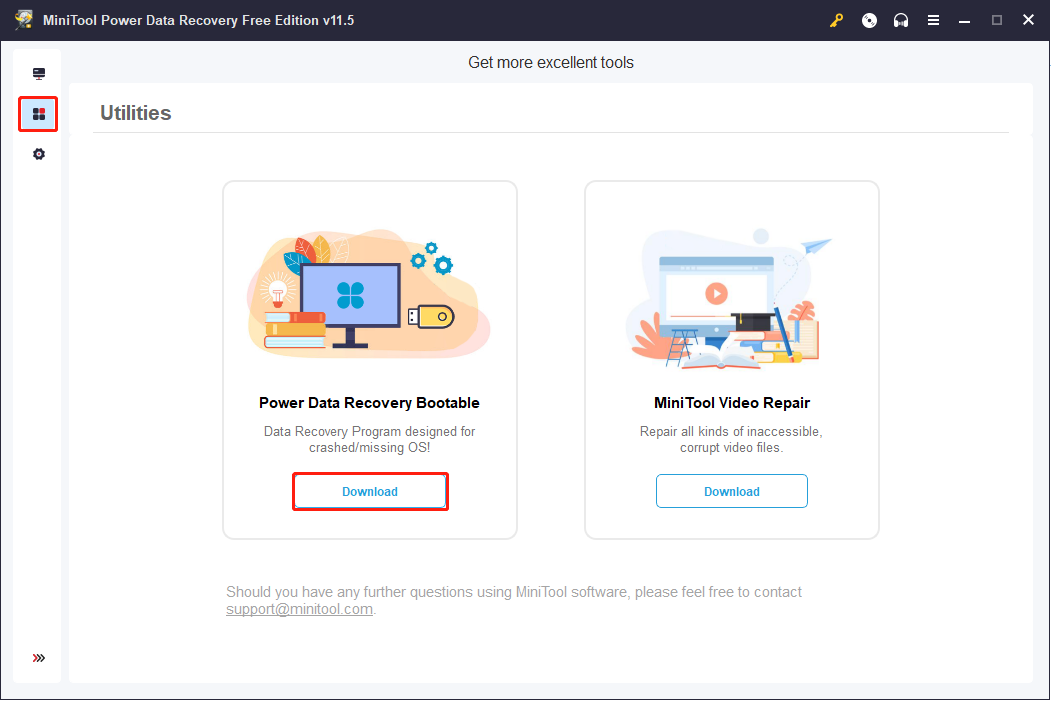
4. Register the software with your license key by clicking the key icon on the top right of This PC interface.
5. Connect a USB flash drive and click the Bootable Builder on the top right. The recommended size of the connected USB flash drive is 4GB to 64GB.
6. Follow the instructions to create a bootable drive.
7. Wait until the process is completed and click Finish.
Step 2: Recover Data from Unbootable Computer
1. Connect the USB drive to the unbootable computer, then you’re suggested to connect an external hard drive or another USB drive to the computer to save your files.
2. Restart your PC to enter the BIOS.
3. Adjust the boot sequence to make your PC boot from the disk you created.
4. Wait patiently and your computer will open MiniTool Power Data Recovery automatically.
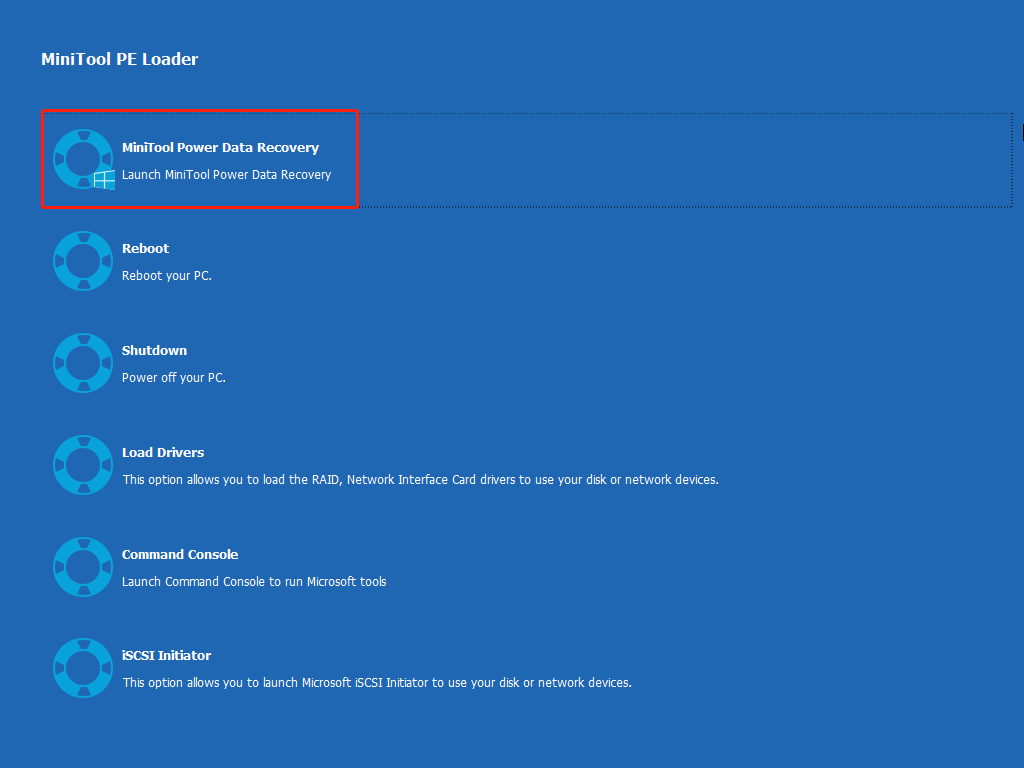
5. After entering the software, you can select a partition to scan.
6. Check your wanted files on the result page and click the Save.
7. Choose the connected drive to save your data and click OK.
Part 3: Verdict
If you try to delete the WindowsApps folder on the system drive, please be careful enough. Follow the steps one by one in this post. If you find the WindowsApps folder missing or other important files lost, please rescue them immediately with MiniTool Power Data Recovery.
MiniTool Power Data Recovery FreeClick to Download100%Clean & Safe
Welcome to share your puzzles about MiniTool Power Data Recovery with us via [email protected].
Все игры, скачанные из Xbox приложения, в итоге не удаляются, а остаются в WindowsApps.
UPD: Вопрос не решился, тех.поддержка Майков ответила стандартными «Попробуйте удалить через утилиту Очистка диска или папку вручную». Но в итоге из-за отсутствия альтернатив просто форматнул этот диск, что избавило от проблемы
Пытался менять права даже с изменением наследования и прочего, итог один и тот же — при попытке удалить любую подпапку пишет «Получите разрешение от %USERNAME», хотя разрешение выдано, да собственно я и есть юзернейм.
Через CCleaner тоже ничего не удалилось. На форумах Майкрософта, само собой, ни одного совета, который бы решал проблему, нет. Чат тоже недоступен. Пересмотрел кучу индусских видео на ютубе, но тоже не помогло. Теоретически, можно было бы попробовать заново добавить игру через приложение и попытаться еще раз удалить, но на харде не хватает места из-за чего до этого шага просто не дойти.
У кого-нибудь есть удачный опыт удаления файлов из этой папки?

