При входе в Windows 10 и Windows 11, а иногда — при работе в системе или запуске программ вы можете столкнуться с сообщением об ошибке: «Не удалось запустить службу. Ошибка 1053: Служба не ответила на запрос своевременно». В некоторых случаях в сообщении фигурирует название службы. Иногда — нет.
В этой инструкции подробно о том, чем бывает вызвана ошибка и как исправить ошибку 1053 «Служба не ответила на запрос своевременно».
Причины и основные способы исправить ошибку 1053 «Служба не ответила на запрос своевременно»
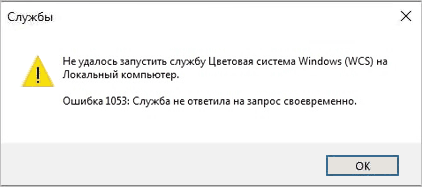
При запуске Windows 10 или Windows 11, входе в систему, некоторых действиях в системе, а иногда — при запуске сторонних программ может производиться запуск необходимых служб. При этом ОС ждёт их запуска определенное время и, если в течение этого времени сообщение об успешном запуске не было получено, вы видите ошибку 1053 «Служба не ответила на запрос своевременно».
Основные способы исправить ошибку:
- Изменить (увеличить) время ожидания запуска службы
- Отключить запуск службы, если она не является обязательной
Начнём с первого варианта. При необходимости вы можете увеличить время ожидания запуска службы с помощью редактора реестра, для этого:
- Нажмите правой кнопкой мыши по кнопке «Пуск», выберите пункт «Выполнить», введите regedit и нажмите Enter — запустится редактор реестра.
- Перейдите в раздел реестра
HKEY_LOCAL_MACHINE\SYSTEM\CurrentControlSet\Control
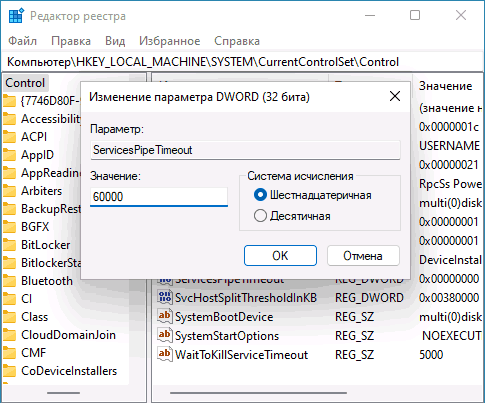
- Нажмите правой кнопкой мыши в пустом месте правой панели реестра и создайте новый параметр DWORD, задайте имя ServicesPipeTimeout для него.
- Дважды нажмите по вновь созданному параметру, переключите систему счисления в десятичный вид и укажите значение времени ожидания. 60000 будет соответствовать одной минуте (60 секунд), можно выставить и более высокое значение, например — 180000.
- Нажмите «Ок», закройте редактор реестра, перезагрузите компьютер и проверьте, появляется ли ошибка вновь.
В случае, если в сообщение об ошибке отображается имя службы, с которой возникла проблема, при этом это сторонняя, а не системная служба и не является необходимой для работы Windows или программ, её можно попробовать отключить:
- Нажмите клавиши Win+R на клавиатуре, введите services.msc и нажмите Enter (подробнее — Способы открыть службы Windows).
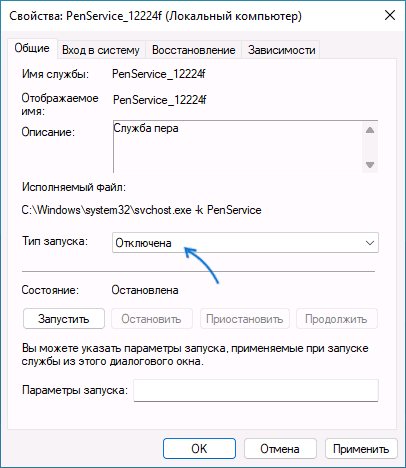
- В списке служб найдите нужную службу и дважды нажмите по ней.
- В поле «Тип запуска» установите «Отключена», нажмите «Ок».
- Закройте окно служб и перезагрузите компьютер.
Проверьте, всё ли работает исправно и перестала ли появляться ошибка. Учитывайте, что не следует отключать системные службы, особенно если вы не знаете, обязательны ли они для работы Windows.
Дополнительные способы решения проблемы
Если предыдущие простые варианты не помогли, можно попробовать следующие подходы:
- Если служба относится к какой-то сторонней программе, а отключение службы мешает её запуску, можно попробовать выполнить переустановку программы.
- Если вы меняли права доступа к папкам на компьютере, это также может привести к ошибке. Среди примеров — службы Autodesk. Если к папкам с файлами службы нет доступа для «Пользователи» и «Локальная служба», можно получить ошибку 1053.
- Если ошибка стала появляться после того, как вы изменили параметры запуска каких-либо системных служб Windows, попробуйте восстановить исходные параметры. Подробнее: Службы по умолчанию в Windows 10
- В случае, если неизвестна служба, вызывающая проблему, использовать чистую загрузку Windows, чтобы её определить, затем попробовать вариант с её отключением.
- Если проблема стала появляться недавно, использовать точки восстановления системы на дату, когда ошибки не было. Об этом в статьях: Точки восстановления системы Windows 11, Точки восстановления системы Windows 10.
- В некоторых случаях запуску служб (или получению сообщений об успешном запуске) может мешать повреждение системных файлов Windows. Попробуйте выполнить их восстановление: Восстановление целостности системных файлов Windows 11, Восстановление системных файлов Windows 10.
В случае, если проблема не была решена, опишите ситуацию в комментариях, с указанием имени службы и в каких случаях появляется ошибка. Я буду рад помочь.
Ошибка 1053 «Служба не ответила на запрос своевременно» возникает в ряде ситуаций:
- при изначальном запуске компьютера;
- при запуске некоторых приложений;
- в случайные моменты во время работы системы.
Полное сообщение ошибки говорит пользователю следующее:
Не удалось запустить службу [НАЗВАНИЕ СЛУЖБЫ] на Локальный компьютер.
Ошибка 1053: Служба не ответила на запрос своевременно.
Проблема свойственна Windows 10 и Windows 11, однако появление ошибки возможно и на более ранних версиях ОС Майкрософт.
В сегодняшней статье мы расскажем, что вызывает ошибку 1053 и как ее можно исправить.
Почему служба не ответила на запрос?
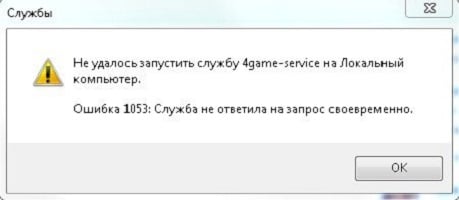
На запуск тех или иных служб выделяется определенное количество времени. Если по истечению этого времени служба запущена не была, пользователю демонстрируется соответствующее сообщение, а в нашем случае — это ошибка 1053 «Служба не ответила на запрос своевременно». Проще говоря, проблема и не проблема вовсе, всего лишь небольшая заминка в работе системы.
Как избавиться от ошибки 1053?
Первое и самое логичное решение — это увеличение времени ожидания отклика службы. Выполнить это можно с помощью редактора реестра Windows следующим образом:
- нажмите WIN+R для вызова диалогового окошка «Выполнить»;
- пропишите в пустой строке regedit и нажмите ENTER;
- через адресную строку редактора перейдите в ветку HKEY_LOCAL_MACHINE\SYSTEM\CurrentControlSet\Control;
- создайте в разделе «Control» новый DWORD-параметр с названием ServicesPipeTimeout и значением в 120000 (2 минуты);
- закройте все открытые окошки и перезагрузите ПК.
Второе решение — это отключение службы, с которой возникает ошибка 1053. Делать так стоит только в том случае, если это несистемная служба. Если попытаться деактивировать системную службу, вы практически наверняка наживете себе кучу всевозможных проблем.
- Нажмите WIN+R для вызова окошка «Выполнить»;
- пропишите в пустой строке services.msc и нажмите ENTER;
- найдите в списке службу, которая указывается в ошибке 1053, и дважды кликните на нее ЛКМ (откроется окошко свойств);
- в ниспадающем меню типа запуска установите значение «Отключена»;
- сохраните внесенные изменения и закройте все окошки;
- перезагрузите ПК.
Небольшая корректировка реестра и отключение «вредной» службы — ничего другого не нужно, как правило.
Что делать, если ошибка 1053 не была решена?
К сожалению, в некоторых случаях вышеуказанные действия не помогают в решении ошибки 1053. Что же делать? Ну, есть еще несколько вещей, которые вы можете попробовать у себя на компьютере:
- полностью переустановите программу, к которой относится проблемная служба;
- убедитесь, что у папки, где располагается служба, имеются права доступа в разделах «Пользователи» и «Локальная служба»;
- выполните чистую загрузку системы, чтобы определить проблемный элемент в системе;
- выполните в PowerShell либо командной строке (WIN+X) команду sfc /scannow для поиска поврежденных системных файлов и их восстановления;
- воспользуйтесь точкой восстановления, чтобы вернуть систему в более стабильное состояние, когда ошибки 1053 не существовало.
Разумеется, 100% решение — это возвращение ПК в исходное состояние, т.е. переустановка Windows 10 и Windows 11 с сохранением личных данных. До такого редко доходит, но в сети можно найти случаи.
Если у вас так и не получилось разобраться с ошибкой 1053, и вы все еще видите сообщение о несвоевременном ответе на запрос, пожалуйста, опишите свою ситуацию более детально в комментариях. Возможно, мы или другие посетители сайта сможем вам чем-то помочь.
When you try to start a service on your PC, but if your service refuses to respond in the time window, you will face Error 1053: The service did not respond to the start or control request in a timely fashion. You may encounter the error in numerous variations where you might not be able to launch the custom services. Unfortunately, few developers have reported service error 1053 often occurs in their PC when they try to develop any custom software. In this guide, you will learn the reasons that cause the error message, along with the troubleshooting methods to get rid of the problem. So, continue reading!

Table of Contents
Error 1053: The service did not respond to the start or control request in a timely fashion occurs in Windows 10 whenever there is a timeout response for a particular request.
- If your applications or services do not meet Timeout settings’ default preferences, you will face service error 1053. Tweaking registry keys could manipulate the settings, thereby fixing the problem.
- If your PC does not have the essential DLL & System data files, you may face service error 1053. Corrupt or altered files, and whenever a vital data piece is unavailable, you will face service error 1053.
- The presence of malware may lead to the loss of data, thereby causing service error 1053. Running an antivirus scan might demolish all the harmful data from your PC and prevent your data from being altered or damaged.
- Affected system files could be due to a corrupt Windows update. If you have an outdated Operating System, corrupt data and bugs (if any) will stay back in your PC, causing service error 1053. Always ensure you are using an updated version of Windows to resolve any kind of issue.
- If there are corrupt installation files, incorrect configuration of files & folders, issues in admin rights of apps might cause service error 1053. To resolve this, reinstall any particular application causing the error.
Still, if you are confused about procedures to be followed to eradicate Error 1053: The service did not respond to the start or control request in a timely fashion, you are not alone! Follow the troubleshooting methods to fix the said error as discussed in the next section.
This section has compiled a complete list of methods to fix error 1053: the service did not respond. Make sure you follow the listed methods in the same order to attain the best results.
Method 1: Perform Clean Boot
Issues concerning error 1053: the service did not respond and can be fixed by a clean boot of all essential services and files in your Windows 10 system, as explained in this method.
Note: Make sure you log in as an administrator to perform Windows clean boot.
1. Launch the Run dialog box by hitting the Windows + R keys together.
2. Type msconfig and click the OK button to open System Configuration.

3. The System Configuration window will appear. Next, switch to the Services tab.
4. Check the box next to Hide all Microsoft services and click on Disable all button as shown highlighted.

5. Now, switch to the Startup tab and click the link to Open Task Manager as depicted below.

6. The Task Manager window will now pop up. Switch to the Startup tab.
7. Next, select the startup tasks that are not required and click Disable displayed in the bottom right corner.

8. Exit the Task Manager and System Configuration window.
9. Now, press Alt+ F4 keys simultaneously. You will see a pop-up window as shown below.

10. Now, click on the drop-down box and select the Restart option.

11. Finally, hit Enter or click on OK to reboot your system.
Method 2: Tweak Timeout Settings
To resolve service error 1053, the primary step is to alter the timeout settings via Registry editor. Whenever you try to start a service, a time frame will start of its own with default values. If the response time does not meet this time frame, you will face Error 1053: The service did not respond to the start or control request in a timely fashion. Now, in this troubleshooting method, you can change the registry value of the time frame and if it is not present, you will create the same. Here is how to do it.
1. Press and hold Windows + R keys together to open the Run dialog box.
2. Now type regedit and hit Enter key to launch Registry Editor.

3. Navigate to the following key folder path from the address bar.
Computer\HKEY_LOCAL_MACHINE\SYSTEM\CurrentControlSet\Control\SecurePipeServers
4A. If you did not find SecurePipeServers in the Control folder, right-click on the space in the right pane and click on New > DWORD (32-bit) Value.

4B. If you have SecurePipeServers in the Control folder, right-click on the Default key in the right pane and select the Modify option.

5. Set the Value data to 18000 as shown.

6. Save the changes and reboot the PC.
Now check if you have fixed Error 1053: The service did not respond to the start or control request in a timely fashion.
Also Read: Fix Device Not Migrated Error on Windows 10
Method 3: Repair System Files
Corrupt files and folders in PC often lead to service error 1053. Analyze if your PC has any corrupt files contributing to the error by SFC, DISM commands as instructed in this method. As a result, if there are any discrepancies, all the corrupt files will be automatically removed or replaced. In addition, it is a built-in tool that lets the user delete files and fix service error 1053. Also, follow the below-mentioned steps to implement the same.
1. Hit the Windows key, type Command Prompt and click on Run as administrator.

2. Click on Yes in the User Account Control prompt.
3. Type chkdsk C: /f /r /x command and hit Enter key.

4. If you are prompted with a message, Chkdsk cannot run…the volume is… in use process, then, type Y and hit the Enter key.
5. Again, type the command: sfc /scannow and press Enter key to run the System File Checker scan.

Note: A system scan will be initiated and it will take a couple of minutes to finish. Meanwhile, you can continue performing other activities but be mindful of not accidentally closing the window.
After completing the scan, it will show either of these messages:
- Windows Resource Protection did not find any integrity violations.
- Windows Resource Protection could not perform the requested operation.
- Windows Resource Protection found corrupt files and successfully repaired them.
- Windows Resource Protection found corrupt files but was unable to fix some of them.
6. Once the scan is finished, restart your PC.
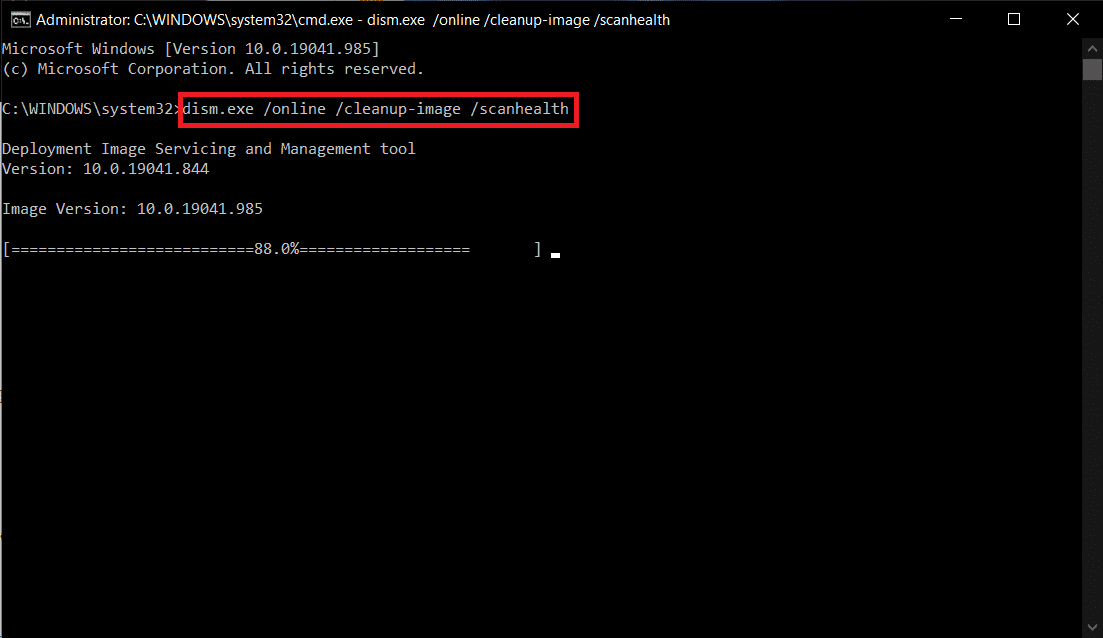
7. Again, launch Command Prompt as administrator and execute the given commands one after the other:
dism.exe /Online /cleanup-image /scanhealth
dism.exe /Online /cleanup-image /restorehealth
dism.exe /Online /cleanup-image /startcomponentcleanup
Note: You must have a working internet connection to execute DISM commands properly.
Method 4: Run Malware Scan
Windows Defender can help you in getting rid of malicious software. It routinely scans and safeguards your system. Therefore, to avoid service error 1053, run an antivirus scan in your system and check if the problem is solved. Then, follow the below-mentioned steps to do so.
1. Hit Windows + I keys simultaneously to launch Settings.
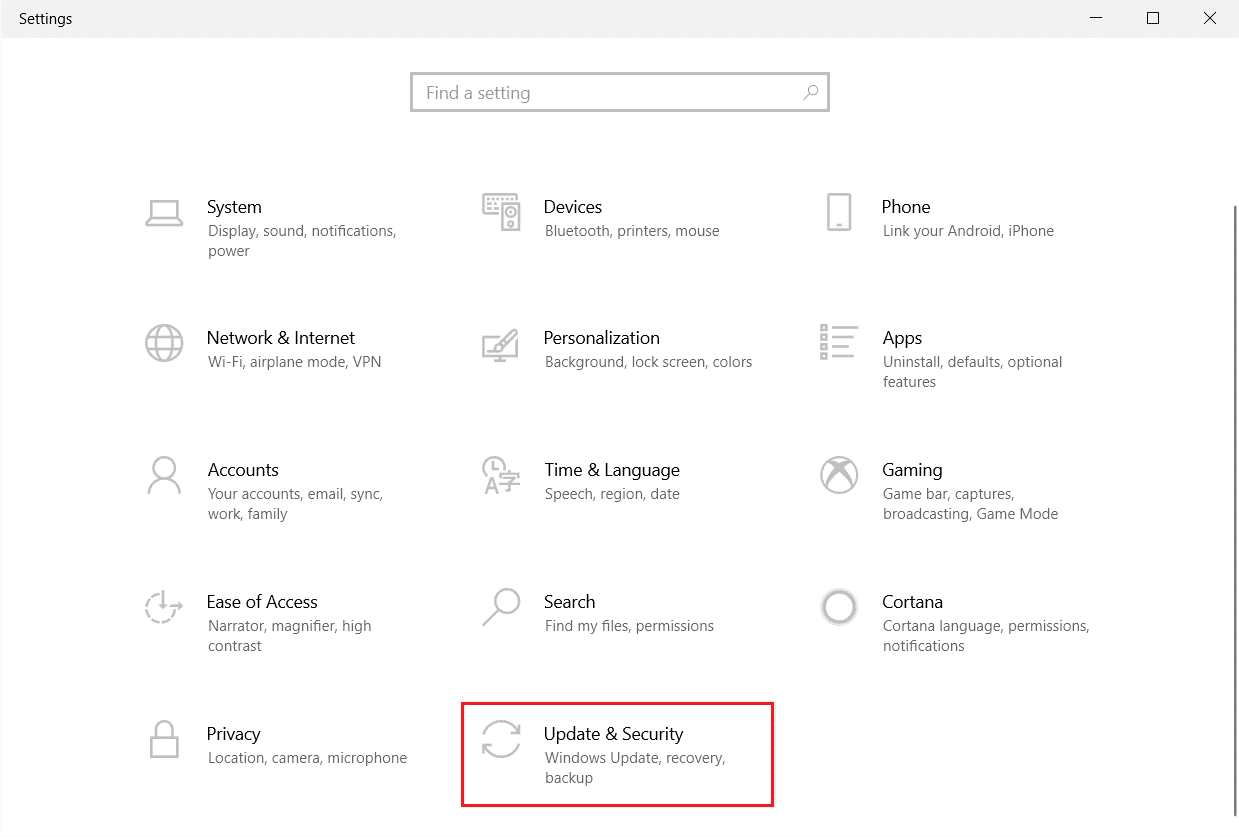
2. Here, click on Update & Security settings as shown.
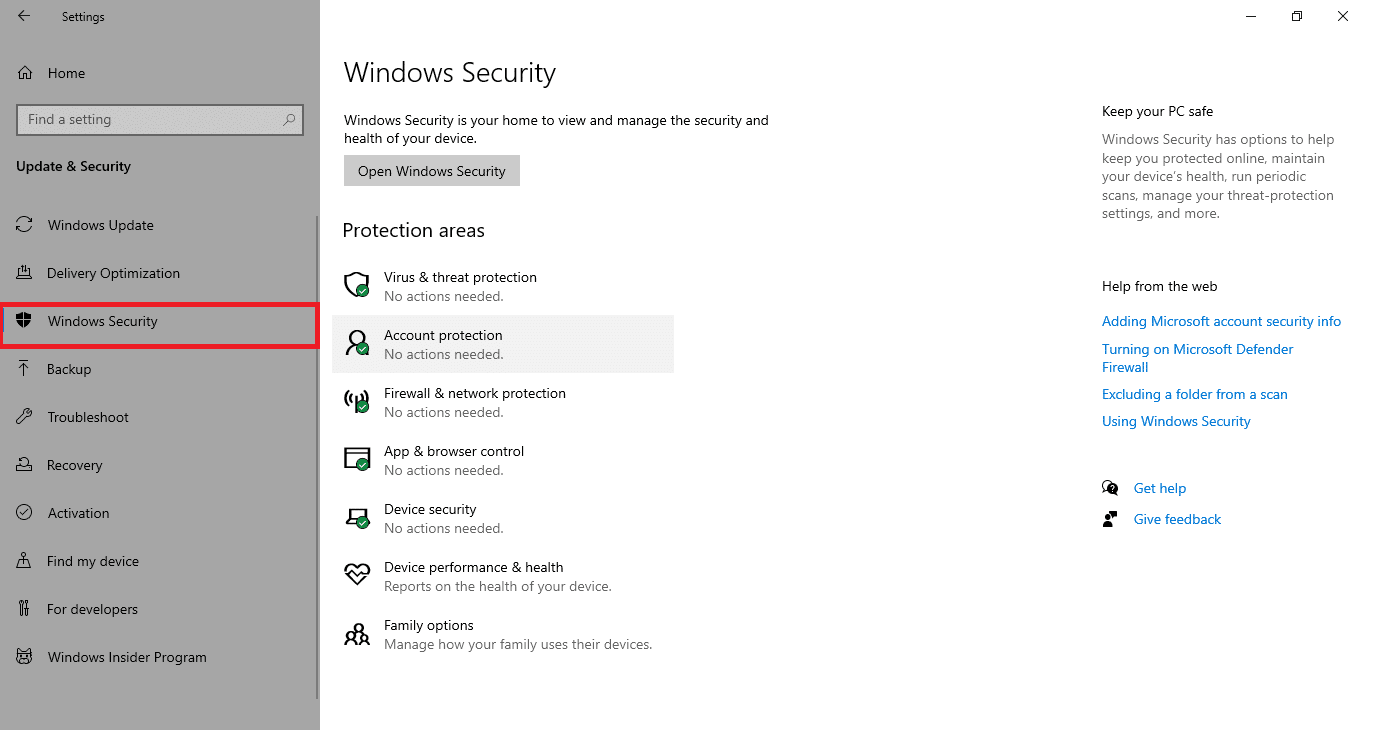
3. Go to Windows Security in the left pane.
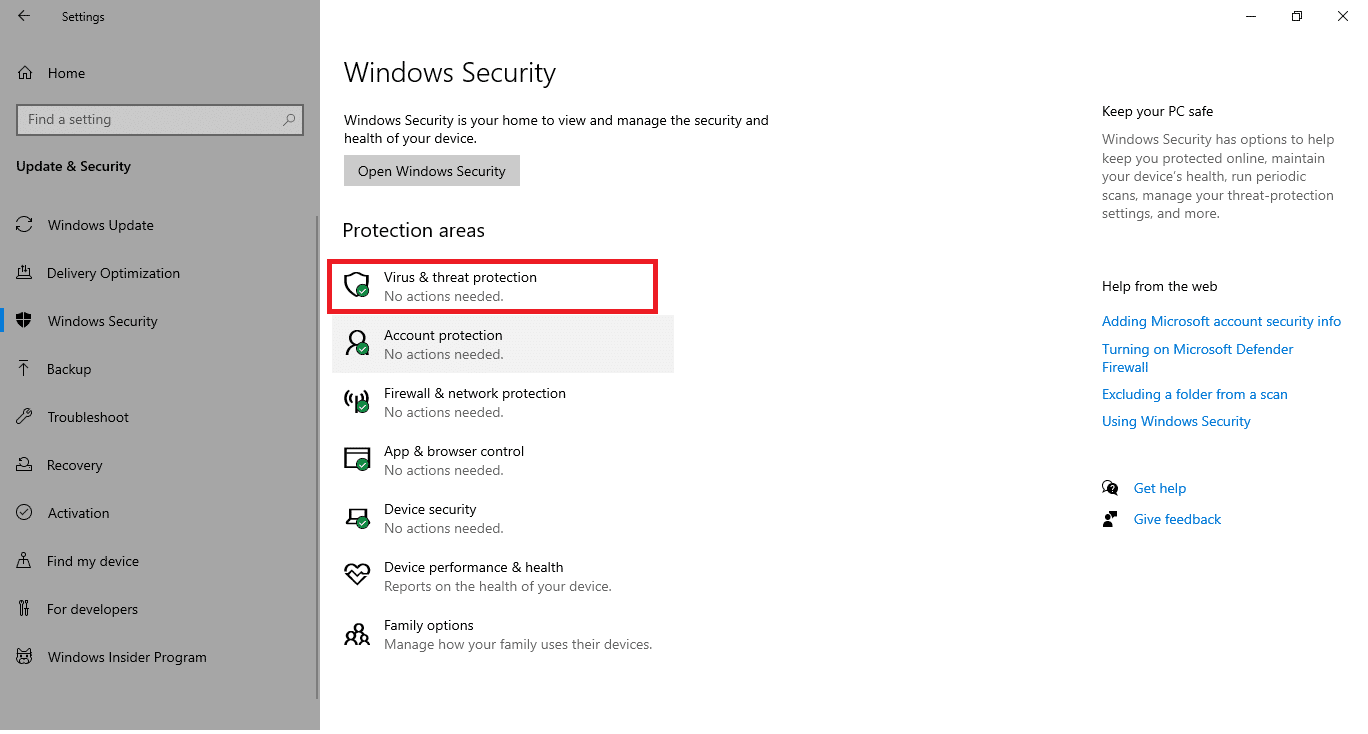
4. Click on the Virus & threat protection option in the right pane.
5. Click on the Quick Scan button to search for malware.
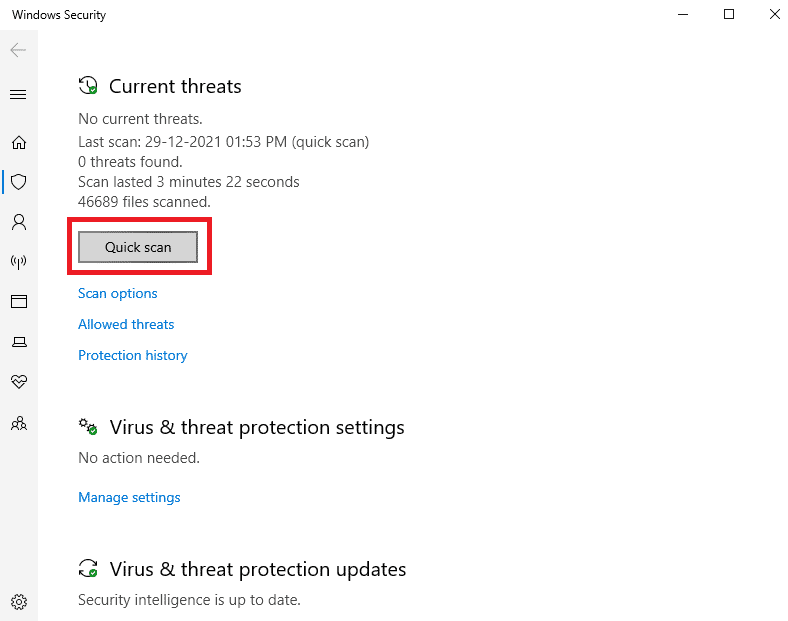
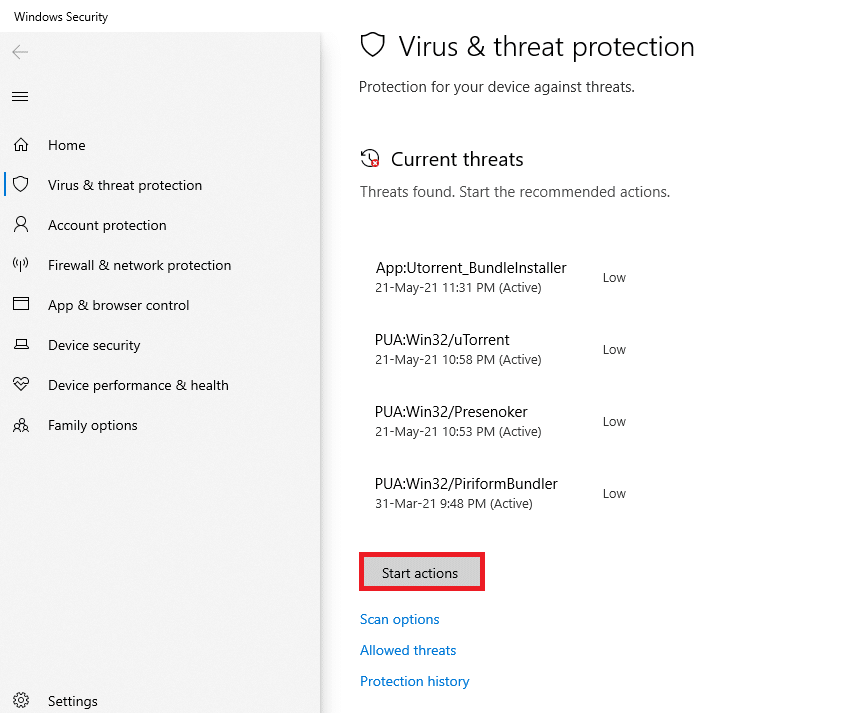
6A. Once the scan is done, all the threats will be displayed. Click on Start Actions under Current threats.
6B. If there is no threat in your device, the device will show the No current threats alert.

Windows Defender will remove all viruses and malware programs once the scanning process is complete. First, check if you have fixed error 1053: the service did not respond.
Also Read: How to Fix Error 0x80300024
Method 5: Reset Network Configurations
If you are trying to start a service that connects to the internet for its function, you may try to reset network configurations to fix error 1053: the service did not respond. In some cases, internet connectivity problems might contribute to the said error, and thus resetting them might help you fix the same. Here are a few instructions to reset network configurations.
1. Hit the Windows key, type Command Prompt, and click on Run as administrator.

2. Now, type the following commands one by one in the command window and hit Enter after each command.
ipconfig /flushdns
ipconfig /registerdns
ipconfig /release
ipconfig /renew
netsh winsock reset

3. Finally, wait for the commands to be executed and reboot your PC.
Check if you have fixed Error 1053: The service did not respond to the start or control request in a timely fashion.
Also Read: Fix Failed to Enumerate Objects in the Container error on Windows 10
Method 6: Change Ownership of Application
This is a rare case where you might face Error 1053: The service did not respond to the start or control request in a timely fashion when you do not have proper ownership of any particular application. If you do not have all the elevated accesses to the application, you will not be able to read a response from a (system) service or send a response to a (system) service. This contributes to error 1053: the service did not respond. You can get rid of the error by changing the ownership of the application as follows.
1. Find the application causing the error and navigate to its installation location. Right-click on the file/folder and select Properties.

2. Now, switch to the Security tab and select the Advanced option as highlighted below.

3. Now, click on the Change option as shown.

4. Now, type the user account name in Enter the object name to select field and select the Check Names option as highlighted. Once you have found your account, click on OK.

Note: When you could not find your account name on the list, manually select it from the user groups list. To do this, click on the Advanced option followed by Find Now. Then, choose your account from the list and click on OK.
5. Now, check the following boxes in the preceding window, and click on Apply>>OK to save the changes.
- Replace owner on subcontainers and objects
- Replace all child object permission entries with inheritable permission entries from this object

6. Click on Yes to proceed with the Windows Security prompt.

7. Again, click on OK to proceed as depicted.

8. Close the existing window and navigate to the Properties window. In the Security tab, click on the Advanced option as highlighted.

9. Here, in the Permissions tab, click on Add as highlighted.

10. In the next window, click on Select a principal as shown.

11. Now, type the user account name in Enter the object name to select field and select the Check Names option as you did earlier, and click on OK.

12. Now, check all the boxes under Basic permissions as shown and click on OK.

13. Now, check the Replace all child object permission entries with inheritable permission entries from this object box in the preceding window.

14. Click on Apply > OK to save the changes and close all the windows, reboot your PC.
Check if this fixes service error 1053 for you.
Also Read: How to Fix Error Code 0x80004005
Method 7: Update Windows
Installing new updates will help you to fix the bugs in your system. Hence, always ensure that you are using your system in its updated version. Otherwise, the files in the system will not be compatible with the service files leading to error 1053: the service did not respond. Follow the steps mentioned below to update Windows to the latest version.
1. Press Windows + I keys simultaneously to launch Settings.
2. Click on the Update & Security tile, as shown.

3. In the Windows Update tab, click on Check for updates button.

4A. If a new update is available, then click Install Now and follow the instructions to update.

4B. Otherwise, if the Windows is up-to-date, then it will show You’re up to date message.

Method 8: Reinstall Apps
The last chance to fix the problem is reinstalling the particular application, which throws the error 1053. However, if you install any third-party applications excluding those from the MS store, chances of missing or corrupt components will lead to the said problem. Hence, you may not be responded to your request for the corresponding Windows services. Therefore, uninstall the application from your PC and re-download the latest version of it from its official site.
1. Launch the Run dialog box and type appwiz.cpl. Then, click on OK.

2. In Programs and Features window, search for your application.
3. Now, click on Application and select Uninstall option.

4. Now, confirm the Are you sure want to uninstall Application? prompt by clicking Yes.
5. Restart your computer once you have completed all the steps mentioned above. Then, reinstall the app from its respective official site and check if you have fixed the issue.
Recommended:
- Fix Google Chrome STATUS BREAKPOINT Error
- Fix 0x80004002: No Such Interface Supported on Windows 10
- Fix The Feature You Are Trying to Use is on a Network Resource That is Unavailable
- Fix Square Enix Error Code i2501
We hope that this guide was helpful and you could fix service error 1053 on Windows 10. Let us know which method worked for you the best. Also, if you have any queries/suggestions regarding this article, then feel free to drop them in the comments section.
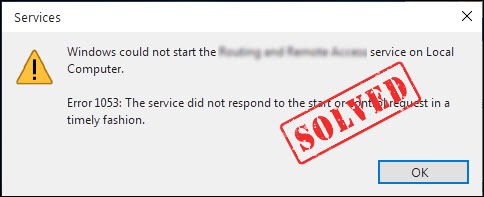
If you keep getting the error message saying “Error 1053: The service did not respond to the start or control request in a timely fashion“, don’t panic. While this message may seem daunting, we’re here to help.
The error 1053 occurs when you’re trying to start or control a service on your computer, but it doesn’t respond within the expected time frame. Let’s delve into this issue and explore some solutions.
Causes of Error 1053
- Insufficient system resources: If your computer is low on resources such as memory or processing power, services may struggle to start promptly, resulting in Error 1053.
- Service dependencies: Some services rely on other services to function correctly. If a required service fails to start, it can lead to the 1053 error.
- Malware or third-party software conflicts: Malicious software or incompatible third-party applications can interfere with service startup processes and cause delays or failures.
- Corrupted system files: System files necessary for service operation may become corrupt, preventing the service from responding promptly.
- Outdated or incompatible drivers: Faulty or outdated drivers can disrupt service operations, leading to the occurrence of Error 1053.
Fixes to try
- 1. Restart your PC
- 2. Increase service timeout
- 3. Scan for malware and conflicts:
1. Restart your PC
Sometimes, a simple system restart can fix temporary glitches and free up system resources. Restart your computer and try starting the service again.
2. Increase service timeout
If the service is taking longer to start due to resource constraints, you can adjust the service timeout setting.
Please proceed with extrem cautions. Faulty modifying settings in Registry Editor could damage your Windows installation beyond repair. Don’t change any registry entries without knowing exactly what you’re about to edit. Also, before you make any changes, make sure that you have backed up your Registry first.
Seek assistance from a more experienced user or a technical professional if you’re uncomfortable making changes to the Registry.
Here is how to do it:
Step 1: On your keyboard, press the Windows logo key and R at the same time to open the Run dialog.
Step 2: Type regedit in the box, then click OK.
If you’re prompted about permissions, select Continue.
Setp 3: Navigate to HKEY_LOCAL_MACHINE\SYSTEM\CurrentControlSet\Control\.
Step 4: Right-click the blank area on the right pane, then select New > DWORD.
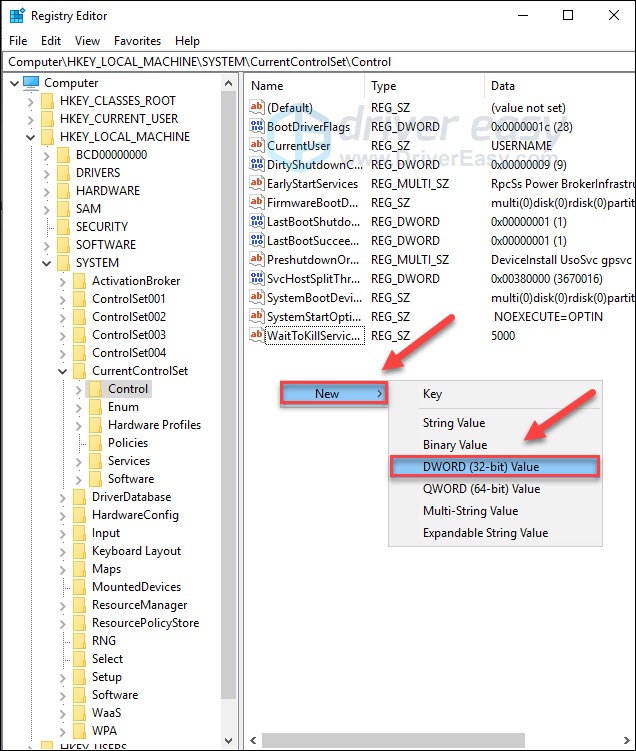
Step 5: Name the new DWORD: ServicesPipeTimeout.
Step 6: Right-click ServicesPipeTimeout, then click Modify.
Step 7: Click the option button next to Decimal, then type 180000 below Value data.
Step 8: Click OK, then restart your computer.
3. Scan for malware and conflicts:
Perform a thorough scan for malware using a reliable antivirus program. Additionally, check for any recently installed third-party software that might be causing conflicts. Uninstall any suspicious or incompatible programs and try starting the service again.
Hopefully, this article helped in resolving your issue. If you have any questions or suggestions, please feel free to leave a comment below.
20
20 people found this helpful

