
Ошибка 0x800700b7 означает, что возникла неопределенная проблема, которая препятствует выполнению приложения. В нашем случае, это приложение Восстановления системы(rstrui). Это утилита, которая возвращает систему назад во времени, в то состояние в котором она была стабильна.
Эта ошибка обычно возникает когда Брандмауэр Windows или антивирус(обычно стороннего происхождения) не позволяет Восстановлению получить доступ к файлам, которые они пометили как защищенные или не изменяемые. Так как в сообщении ошибки 0x800700b7 говорится, что она не определена, то мы можем только лишь предполагать о том, что же могли ее вызвать. Например, это могло быть повреждение файловой системы или реестра.
В этой статье будет описан метод для удаления Кеша задач из Реестра Windows, что в большинстве случае помогает исправить ошибку 0x800700b7.
Удаление Кеша задач из Реестра Windows
- Нажмите комбинацию клавиш Win+R и впишите в появившуюся строку regedit.
- С помощью левой навигационной панели пройдите путем HKEY_LOCAL_MACHINE -> SOFTWARE -> Microsoft -> Windows NT -> CurrentVersion -> Schedule
- Нажмите правой кнопкой мыши по «TaskCache» и выберите «Экспортировать». Сохраните выбранный ключ на ваш рабочий стол в случае того, если что-то пойдет не по плану.
- Удалите ключ HKEY_LOCAL_MACHINE\SOFTWARE\Microsoft\Windows\NT\CurrentVersion\Schedule\TaskCache\Tree\Microsoft\Windows и выполните перезагрузку своего компьютера.
После выполнения этих действий ошибка 0x800700b7 больше не должна вас беспокоить при выполнении Восстановления системы.
Symptoms
Consider the following scenario:
-
You try to create an Operating System Deployment Task Sequence in Microsoft System Center Configuration Manager 2007 Service Pack 2 (SP2).
-
You add multiple operating system images that are each more than 4 gigabytes (GB).
-
You create the task sequence media and then select the Stand Alone media option.
In this scenario, the media creation attempt fails, and you receive the following error message:
Failed to create media (0x800700b7)
Resolution
Hotfix information
A supported hotfix is available from Microsoft. However, this hotfix is intended to correct only the problem that is described in this article. Apply this hotfix only to systems that are experiencing the problem described in this article. This hotfix might receive additional testing. Therefore, if you are not severely affected by this problem, we recommend that you wait for the next software update that contains this hotfix.
If the hotfix is available for download, there is a «Hotfix download available» section at the top of this Knowledge Base article. If this section does not appear, contact Microsoft Customer Service and Support to obtain the hotfix.
Note If additional issues occur or if any troubleshooting is required, you might have to create a separate service request. The usual support costs will apply to additional support questions and issues that do not qualify for this specific hotfix. For a complete list of Microsoft Customer Service and Support telephone numbers or to create a separate service request, visit the following Microsoft website:
Prerequisites
To apply this hotfix, you must have Microsoft System Center Configuration Manager 2007 SP2 installed.
Restart information
You do not have to restart the computer after you apply this hotfix.
Note We recommend that you close Configuration Manager Administration Console before you apply this hotfix package.
Hotfix replacement information
This hotfix does not replace any previously released hotfix.
File information
The English version of this hotfix has the file attributes (or later file attributes) that are listed in the following table. The dates and times for these files are listed in Coordinated Universal Time (UTC). When you view the file information, it is converted to local time. To find the difference between UTC and local time, use the Time Zone tab in the Date and Time item in Control Panel.
|
File name |
File version |
File size |
Date |
Time |
Platform |
|---|---|---|---|---|---|
|
Createtsmediaadm.dll |
4.0.6487.2235 |
1,601,712 |
01-Feb-2010 |
20:10 |
x64 |
Status
Microsoft has confirmed that this is a problem in the Microsoft products that are listed in the «Applies to» section.
References
Learn about the terminology that Microsoft uses to describe software updates.
Need more help?
Want more options?
Explore subscription benefits, browse training courses, learn how to secure your device, and more.
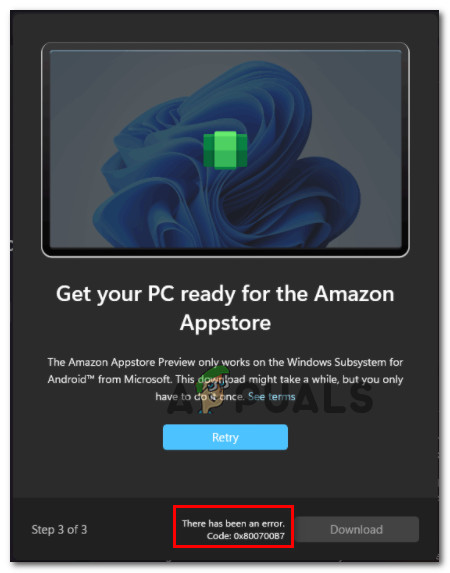
Some Windows 11 users are reporting that every time they attempt to download the Amazon AppStore Preview and use the new Windows Subsystem for Android they end up seeing the 0x800700B7 error as the installation fails. The error typically appears when the user clicks on Download.
After we’ve investigated this issue thoroughly, we realized that there are several different common scenarios that will make this error message appear whenever you attempt to use the Windows Subsystem for Android powered by the Amazon Appstore. Here’s a list of possible culprits:
- Corrupted Windows Store cache – As it turns out, you might end up seeing the 0x800700B7 when attempting to use the Windows Subsystem for Android due to some temporary files that are affecting the launch of Amazon AppStore apps. If the local Windows Store cache is to blame, resetting it should allow you to fix the issue and use the Windows Subsystem for Android normally.
- Corrupted Windows Store installation – Keep in mind that the new version of the Windows Store is still in preview mode. Inconsistencies related to the installation are to be expected, and your inability to use the Windows Subsystem for Android might be related to such an event. To fix this, you’ll need to reset the entire Windows Store app from a Windows Terminal app.
- Corrupted data inside the Local cache folder – Keep in mind that the Windows Subsystem for Android uses a local cache that keeps temporary files related to the apps that you run through the Amazon AppStore. If this functionality used to work but suddenly isn’t working, you can attempt to clear every temp file related from the WindowsSubsystemForAndroid cache folder and see if the problem gets resolved.
- System file corruption – Under more serious circumstances, you can expect to see this issue occurring due to some kind of system file corruption that is affecting a Windows Subsystem for Android dependency. In scenarios like this one, the best course of action is to do a repair install or go for a clean install if the issue is still not fixed.
Now that you know every scenario that might be viable, let’s go over every troubleshooting method that’s worth pursuing if you’re encountering the 0x800700B7 error when trying to use the Windows Subsystem for Android functionality on Windows 11:
Reset the Windows Store cache
When you start troubleshooting this error, the first thing you should do is make sure that the Windows Subsystem for the Android component is not actually affected by some temporary files belonging to a botched Amazon AppStore installation.
If this scenario is applicable, you should be able to fix the 0x800700B7 error entirely by clearing the Windows Store cache with a simple procedure – this will ensure that the next time you start Windows Store, no-cache files will be used.
Follow the instructions below to clear the Windows Store cache:
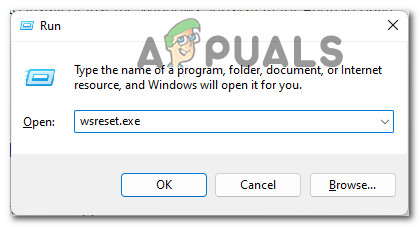
- Press Windows key + R to open up a Run dialog box.
- Next, type ‘wsreset.exe’ inside the text box of the Run prompt.

Running wsreset.exe - Press Ctrl + Shift + Enter to ensure that this command runs with administrative privileges.
- Once the procedure is complete, reboot your PC and see if the issue has been fixed once the next startup is complete.
In case you’re still dealing with the same 0x800700B7 error, move down to the next potential fix below.
Reset the Windows Store app
If clearing just the Windows Store cache was not an effective fix in your case, you should also consider the fact that an installation inconsistency might be preventing you from using the Windows Subsystem for Android functionality.
Note: Keep in mind that the Windows Store version on Windows 11 is still in preview mode, so inconsistencies related to its installation (particularly after an upgrade) are to be expected.
In case you suspect that a bat Windows Store installation might be causing the 0x800700B7 (particularly if you are encountering similar issues with other apps), you should take the time to reset the Windows Store app.
This procedure is the equivalent of reinstalling the app and can be done swiftly with a Powershell command and run from the Windows Terminal app.
Follow the instructions below to reset the Windows Store app from the Windows Terminal app:
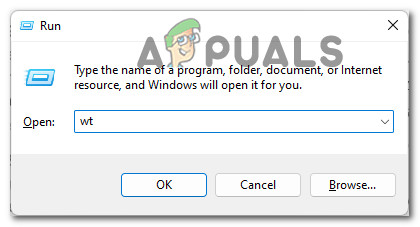
- Press Windows key + R to open up a Run dialog box.
- Next, type ‘wt’ inside the text box of the Run dialog box.
Opening up the Windows Terminal app - Press Ctrl + Shift + Enter to open up a WindowsTerminal prompt with admin access.
- When you’re prompted by the User Account Control (UAC) windows, click Yes to grant administrative privileges.
- Once you’re finally inside the Windows Terminal app, type or paste the following Powershell command to effectively reset the entire Windows Store component:
Get-AppxPackage *Microsoft.WindowsStore* | Reset-AppxPackage
- Wait until the operation is complete, then close the elevated Windows Terminal app and reboot your PC.
- Once your computer boots back up, repeat the action that was previously producing the 0x800700B7 error and see if the problem is now fixed.
If you’re still dealing with the same kind of issue, move down to the next potential fix below.
Delete the WindowsSubsystemForAndroid Local Cache folder
If you already tried resetting the entire Windows Store app and you’re still dealing with the same type of error (0x800700B7), the next thing you should focus on is the local cache folder that’s reserved for the Windows Subsystem for Android.
Note: Keep in mind that this local folder is stored separately and won’t be deleted when you try resetting the Windows Store component or clearing the generic cache folder (methods above).
If you haven’t done this already, you should also try deleting every temporary file related to the Amazon AppStore from the WindowsSubsystemForAndroid package folder. This method is typically effective in those situations where the Windows Subsystem for Android worked just fine before breaking completely.
Follow the instructions below to delete every file present in the Microsoft.WindowsStore_8wekyb3d8bbwe local cache folder and resolve the 0x800700B7:
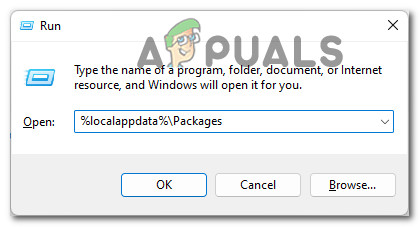
- Press Windows key + R to open up a Run dialog box.
- Inside the text box of the Run command, type ‘%localappdata%\Packages’.
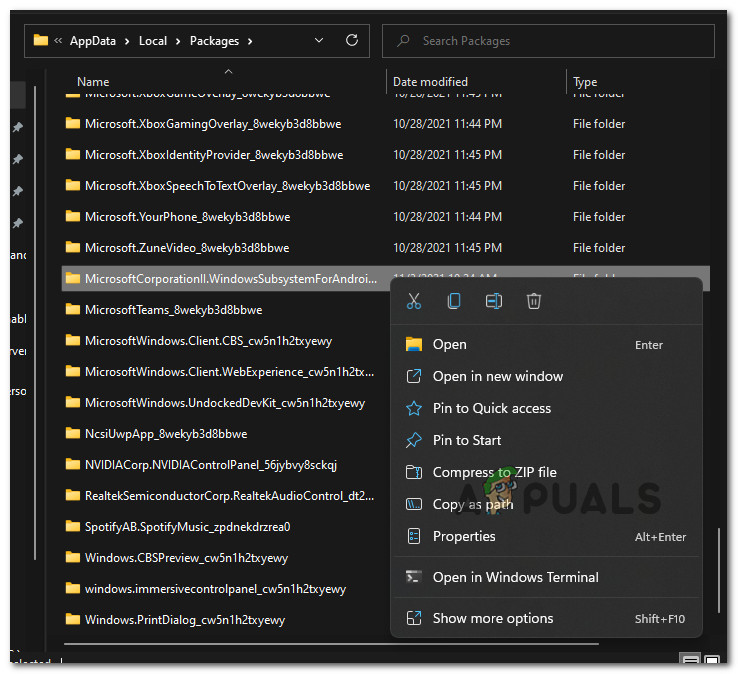
Accessing the hidden packages tab - Once you’re inside the Packages folder, look around for the MicrosoftCorporationII.WindowsSubsystemForAndroid_8wekyb3d8bbwe folder.

Finding the MicrosoftCorporationII.WindowsSubsystemForAndroid_8wekyb3d8bbwe folder Note: You can either look around and search manually or you can use the search function (top-left corner).
- Once you manage to locate the problematic folder, right-click on it and click on Delete from the context menu that just appeared.
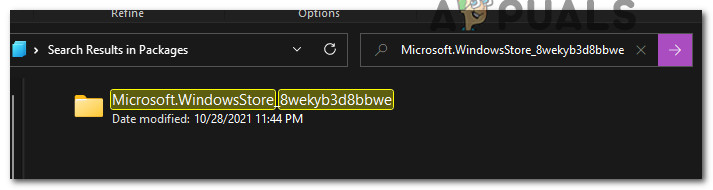
- After you’ve done this, the next thing you should do is look for the local cache folder of the Microsoft Store (Microsoft.WindowsStore_8wekyb3d8bbwe).

Finding the Local cache folder - But instead of deleting this folder, double-click on it, then double-click on LocalCache folder.

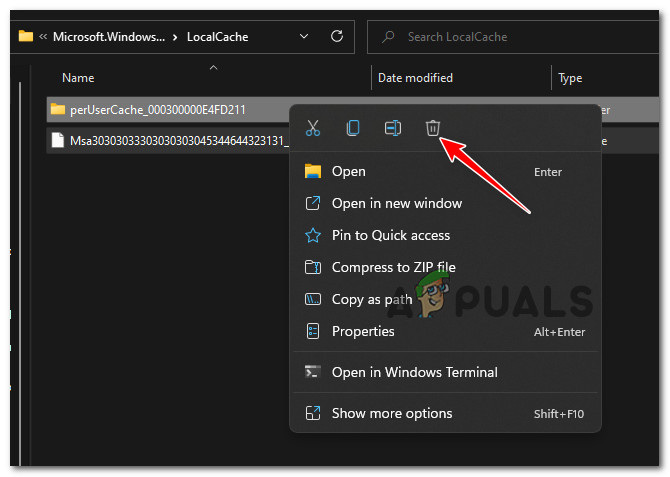
Accessing the Local Cache folder - Once you’re inside the LocalCache folder, press Ctrl + A to select everything inside, then right-click on a selected item and click on the Delete button to clear the folder.

Deleting the contents of the local cache folder - Finally, reboot your PC and perform a DISM scan once the next startup is complete before checking if the issue is now fixed.

In case you’re still seeing the 0x800700B7 error when attempting to use the Windows Subsystem for Android on Windows 11, move down to the next potential fix below.
Perform an In-Place Repair
If none of the methods presented in this article so far have proven to be effective in your case, you can start assuming that you might actually be dealing with some kind of system file corruption that prevents your system to run the subsystem for Android.
In this case, the first thing you should try is performing a repair install.
Note: This operation will only touch the system files of your operating system. You get to keep your personal files, applications, games, media, and every other file present on the same partition as your operating system.
In case you already tried repair installing (in-place repairing) and you’re still dealing with the same 0x800700B7 error, move down to the next potential fix below.
Perform a Clean Install
In case you already tried repair installing and the end result was the same 0x800700B7 when you attempt to run the Windows Subsystem for Android, the last result solution is to do a clean install to ensure that no system file corruption is actually causing this problem.
But keep in mind that by doing a clean install on Windows 11 you will essentially do a complete wipe on the partition where Windows 11 is currently installed.
Note: If you have any important data currently stored on the same partition as where your OS is installed, take the time to back up the data in advance before you start the clean install process.
Kamil Anwar
Kamil is a certified MCITP, CCNA (W), CCNA (S) and a former British Computer Society Member with over 9 years of experience Configuring, Deploying and Managing Switches, Firewalls and Domain Controllers also an old-school still active on FreeNode.
The 0x800700b7 error code on Windows 10/11 is affecting users’ daily routines. However, there are ways to fix it and prevent it from happening again in the future. In this article, we will discuss the meaning of the error code and the steps to resolve it.
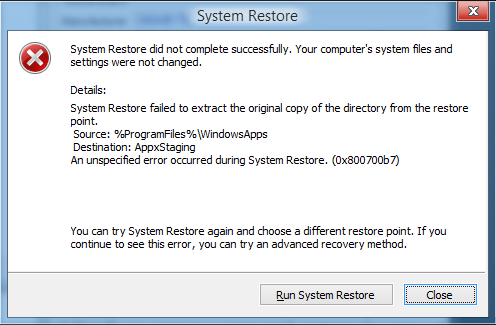
System Restore is an important tool that works by restoring Windows to an earlier and functional state. It is especially useful when you encounter issues with your Windows device that cannot be fixed. By using this tool, you undo the recent system changes.
However, as any other Windows tool, the System Restore utility can encounter problems. The provisioning failure 0x800700b7 error is just one of those problems.
The System Restore 0x800700b7 error is generally associated with corrupted or missing system files. It may be a result of an incomplete uninstallation of software programs and components. However, system file corruption may also be caused by malware attacks or hardware issues.
The System error 0x800700b7 may manifest itself in various ways. But most of the time, it comes with the error message “an unspecified error occurred during system restore 0x800700b7” or “app container profile failed with error 0x800700b7.”
What Causes Error Code 0x800700b7?
The error code 0x800700b7 on Windows can be triggered by different things. We’ll enumerate some of them below:
- Network issues – If your network connection is not properly established while installing an update or doing an action, the error 0x800700b7 can appear. To fix this, double-check your connection and ensure you are connected to the internet. Check the Ethernet cables and ensure your connection is stable.
- Damaged system files – System files play an integral role in the Windows 10/11 environment. If they get damaged, errors such as 0x800700b7 code may show. Fix these damaged system files by running an SFC scan.
- Temporary and junk files – As you use your computer on a day-to-day basis, temporary and junk files accumulate, potentially using significant system space. This can limit resources available for more critical tasks. Getting rid of these files can sometimes resolve issues such as 0x800700b7 error.
- Incorrectly uninstalled programs – Sometimes, we just uninstall a program by hitting the Delete button. But doing so will not suffice. It will only leave files that hide in your system and interfere with essential processes. Uninstall programs properly to avoid issues like this.
- Hardware issues – When a hardware component is not compatible with some software programs or vice versa, problems may arise. An example is the error 0x800700b7.
- Overly sensitive security suite – Antivirus and security suites may block processes, which they think are a threat to your device. Disabling them temporarily can resolve problems such as error 0x800700b7.
- Registry problems – The Windows registry is home to many instructions and information needed to run the operating system efficiently. When there are problems with the registry, errors such as 0x800700b7 can surface.
- Malware entities – And lastly, malware entities can mess with the processes on Windows. They can even corrupt system files, which results in more complicated problems. Getting rid of these malware entities can fix the most common Windows errors.
Ways to Fix System Restore and Xbox Error Code 0x800700b7
If you are among those who find dealing with the error 0x800700b7 on Xbox or System Restore, the fixes below should be of great help. You don’t have to test all the fixes, though. You can go ahead and try the best one which you think works best for you.
Fix #1: Check Your Network Settings
The error 0x800700b7 may appear because of problems with your network settings. Thus, make sure that your Wi-Fi or Ethernet settings are enabled and allow both computers to share files. Here’s how to do it:
- You can access Network Settings in Control Panel.
- From there, open Network and Sharing Center, choose Change Adapter Settings and select your adapter from Network Connections.
- In the Advanced Settings for that connection, check File and Printer Sharing for Microsoft Networks. If you don’t see it there, you’ll need to install it by clicking Install from a list or specific location (Advanced).
- Finally, restart your computer and try again.
Fix #2: Run System File Checker
The System File Checker (SFC) utility can scan your computer’s registry and hard drive for errors and recover damaged files.
To run the SFC utility, follow these steps:
- Search your Start menu for Command Prompt, right-click on it, and select Run as administrator.
- Once you’re in Command Prompt, type sfc /scannow and hit Enter.
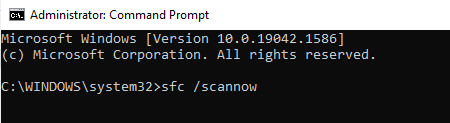
- After waiting a few minutes for SFC to complete its scan, you should see a prompt at the bottom of your screen confirming that all repairs were successful.
- Once done, check if the error 0x800700b7 persists.
Fix #3: Clear Temporary Files
Many programs create temporary files and folders that are stored in your user directory. Clearing these out can help alleviate problems when you’re updating a program or installing new software.
To repair these corrupt system files, you need to clear them out first to generate new ones. Follow these steps:
- Type %LocalAppData%\Temp into a search box and then click Select Folder.
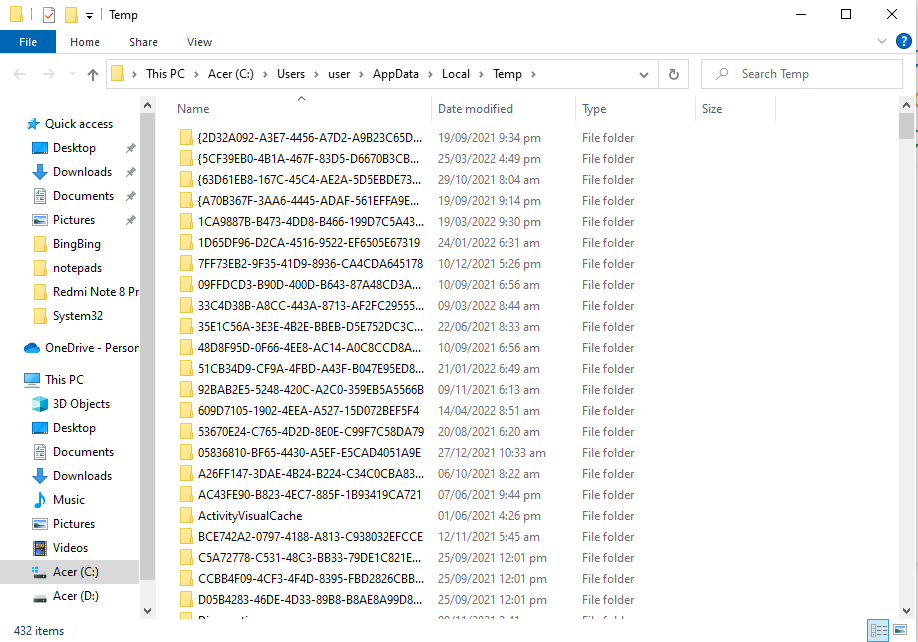
- From there, select everything inside of Temp and delete it.
- And then, repeat with %LocalAppData%. That should clear out all of your temporary files.
- Now, restart your Windows PC and check if the error 0x800700b7 is gone.
Fix #4: Uninstall and Reinstall Programs
The first step in figuring out why you’re getting the error code 0x800700b7 is to find out what software or action is causing it. If you’re not sure how that works, here’s a quick explanation:
When you install a program, Windows creates special files (called registry entries) to record where its files are and other information about it. If there are problems with your registry, you might get error messages when you try to use certain programs. To fix them, all you have to do is remove and reinstall those problematic programs – which should fix any errors that have been caused by a bad registry entry.
To uninstall programs on Windows 10/11, do the following:
- Type Control Panel into the search box. Click the top-most result.
- Next, select Programs and navigate to the Programs and Features section.
- Find the problematic program where the error 0x800700b7 appears. Click on it.
- Select the Uninstall button.
- Confirm your actions by hitting Yes then follow the instructions on your screen.
Fix #5: Delete Junk Files
The first solution that is commonly recommended when you get the 0x800700b7 error code is to delete junk files. This will almost always fix your issue, so it’s definitely something you should try if you are having such trouble.
Here is your guide on how to fix it:
- Head into Disk Cleanup by going through Control Panel and then clicking Free up disk space by deleting unnecessary files under System and Security.
- Once there, choose all of your drive options (C: in most cases) and check all of the boxes in front of Temporary Files.
- Wait for it to scan and then delete what it finds before rebooting your computer. You’ll likely see an immediate improvement when you log in again. If not, move on to some other solutions.
Alternatively, some users find third-party PC repair tools useful in getting rid of junk files on their system.
Fix #6: Enable Automatic Updates
To fix the 0x800700b7 error, you may want to enable automatic updates on Windows 10/11. The easiest way to do that is by following these instructions:
- Go to Settings in your Start menu, then head over to Update & Security and choose Windows Update from there.
- In that menu, just make sure you’ve got it set so that it automatically downloads and installs any updates it finds for Windows.
- Restart your computer once you’re done doing that, and check again – the update should now be downloaded without the error! If not, continue to another fix.
Fix #7: Look for Solutions Online
When you run into the error 0x800700b7 while installing a Windows update, you may want to check Microsoft’s support website. Specifically, look for articles about your error code.
For example, if you have an error that reads 0x800700b7, then open up Google and search for 0x800700b7. This should direct you to some pages that provide additional information on how to troubleshoot or fix your error code.
If there are no specific articles related to your particular error code, try searching for a related general problem. Chances are good that it has already been identified and a solution has been posted.
Fix #8: Check for Hardware Problems
Another troubleshooting step you must not skip is to check if there are any problems with your hardware. If a device has an issue, such as a faulty driver or corrupted software, it may not be properly communicating with Windows.
You can check for hardware issues by restarting your computer and then pressing F8 when you see Starting Windows on your screen. This will take you to a menu where you can choose advanced options that allow you to run different tools, including Device Manager and System Restore.
You can also open Device Manager directly by typing Device Manager into Cortana’s search box and then clicking Device Manager when it appears in her search results.
Fix #9: Disable Your Antivirus or Security Suite
Antivirus and security suites are quite infamous for causing error codes to appear, and the error 0x800700b7 is no exemption. Thus, to rule out the possibility of having an overly protective antivirus, try to disable it first.
To do that, head over to the system tray icon in the taskbar and find the icon of your antivirus. Right-click on it and select Disable. This should disable your antivirus temporarily. Then re-do the action where the error 0x800700b7 appears. If the error is gone, then you can re-enable the antivirus again since you need it to ensure your device remains protected.
Don’t worry about threats while your antivirus is disabled, though. You still have Windows Defender up and running in your background.
Fix #10: Modify the Registry
This fix may appear technical, but with careful steps, it’s manageable for many users. As long as you follow the steps thoroughly, you should get by and be able to resolve the error 0x800700b7 like many affected users.
To modify the Windows registry and fix the error 0x800700b7, do the following:
- Press the Windows + R keys simultaneously to launch the Run utility.
- Input regedit and hit Enter.
- Scan the left pane of the window and navigate to this location: HKEY_LOCAL_MACHINE\SOFTWARE\Microsoft\Windows NT\CurrentVersion\Schedule\TaskCache\Tree\Microsoft.
- Then right-click Windows and choose Export. This will create a backup of the primary contents of the folder in case something happens in the process.
- Give the folder a name and save it.
- Next, right-click on Windows and choose Delete.
- Exit the Registry Editor and restart your computer.
- Upon restart, launch System Restore.
- If the error 0x800700b7 persists, double-click on the registry backup file you created to restore it.
Fix #11: Restore Windows in Safe Mode
If all else fails, you can restore Windows 10/11 in Safe Mode. Here’s how:
- Press the Power button to access the Start menu.
- Now, hold the Shift key on your keyboard and choose Restart.
- Windows will now reboot with the Advanced Startup Options window. Select Troubleshoot.
- Go to Advanced Options to access more settings.
- Choose Startup Settings and tap Restart.
- Then press the number 4 key to start Windows in Safe Mode.
- Once Windows restarts, input System Restore into the text box. Choose the Create a restore point option.
- Hit the System Restore button.
- After that, select the Choose a different restore point option.
- Tap Next to continue.
- Select a system restore point and press Next.
- Then tap Finish.
Summary
The 0x800700b7 error code can be frustrating to deal with if you aren’t sure how to fix it. Luckily, this guide will walk you through the process of resolving this error, step by step, so that you can get back to using your computer!
The fixes also include checking your network settings and running the System File Checker utility. If that doesn’t resolve the error, try to delete temporary and junk files. These files are quite notorious for messing with crucial system processes and programs. Enabling automatic updates may also work at times because we all know that Windows updates often contain fixes to known errors such as 0x800700b7.
You may also disable your antivirus temporarily to see if it resolves the error 0x800700b7. However, if you choose this option, remember to enable it again promptly as your antivirus suite plays a vital role in maintaining your computer’s security.
If you have encountered other reasons for the 0x800700b7 error or have alternative solutions to resolve it, we’d like to hear from you. Please share your experiences and suggestions in the comments section below!
Give us some love and rate our post!
The error 0x800700b7 may occur during the system restore process. This post shows how to fix the system restore error 0x800700b7 with 6 solutions. In addition, you can also visit MiniTool to find more system restore problems and solutions.
System Restore is a useful tool, used to restore your computer to an earlier state. However, sometimes, the System Restore may fail to work during the restoring process. It usually sends an error message System Restore did not complete successfully with some error code. For instance, you may encounter the system error 0x800700b7 when performing system restore.
The system restore error 0x800700b7 may be caused by various reasons, such as the antivirus software, incomplete software installation leaving invalid registry entries, corrupted system files and so on
Meanwhile, in this post, we will show how to solve the error code 0x800700b7. If you have encountered the same error during system restore, try the following solutions.
Solution 1. Run System Restore in Safe Mode
The system restore error 0x800700b7 may be caused by the third-party programs. So in order to solve this system restore error, you can run System Restore in safe mode.
Now, here is the tutorial.
Step 1: Press Windows key and R key together to open Run dialog, then type msconfig in the box and click OK to continue.
Step 2: In the pop-up window, then go to the Boot tab and check the option Safe boot. Then click OK to continue.
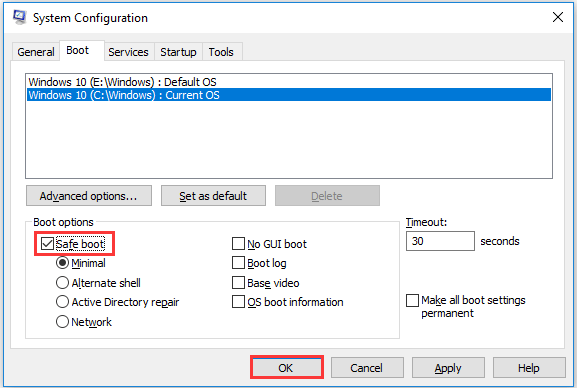
Then restart your computer in Safe mode and run System Restore again to check whether the error 0x800700b7 is solved.
Solution 2. Disable or Uninstall Antivirus Software
The second solution to fix the system restore error 0x800700b7 is to disable or uninstall antivirus software temporarily.
In general, the antivirus software will lead to system restore failure. So, in order to fix this error, you can try to disable or uninstall it temporarily. To uninstall it, you can go to Control Panel, choose Programs and Features, and then select the antivirus software to uninstall it.
After uninstalling the program, run System Restore again to check whether the error code 0x800700b7 is solved.
Solution 3. Run System File Checker
Corrupted system files may also give rise to the system restore error 0x800700b7. So, in order to solve it, you can run System File Checker to scan and repair the corrupted system files.
Now, here is the tutorial.
Step 1: Type Command Prompt in the search box of Windows and choose the best-match one. Then right-click it choose Run as administrator to continue.
Step 2: In the pop-up window, type the command sfc /scannow and hit Enter to continue.
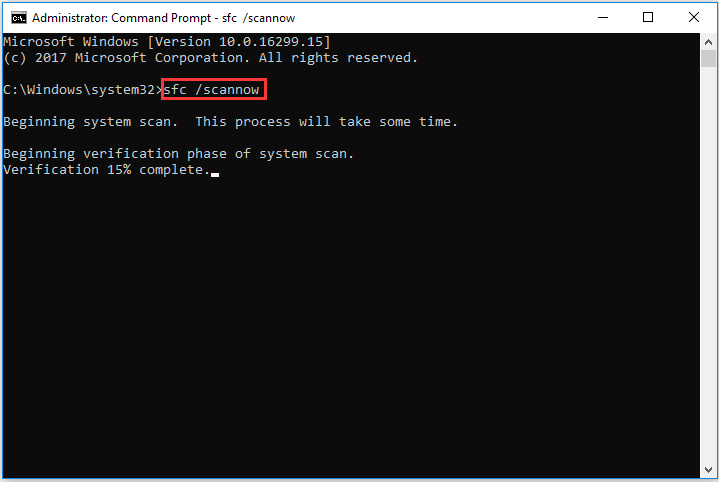
Note: If the System File Checker fails to work, try to read the post: Quickly Fix – SFC Scannow Not Working (Focus on 2 Cases).
Then the scanning process will begin. Do not close the command line window until you see the message verification 100% completed. When the process is finished, reboot your computer and run System Restore again to check the system restore error 0x800700b7 is solved.
Solution 4. Delete Task Cache
The fourth solution to fix the system restore error 0x800700b7 is to delete task cache from the registry.
Now, here is the tutorial.
Step 1: Press Windows key and R key together to open Run dialog, type regedit in the box and click OK to continue.
Step 2: In the Registry Editor window, navigate to the following folder:
HKEY_LOCAL_MACHINE\SOFTWARE\Microsoft\Windows NT\CurrentVersion\Schedule\TaskCache
Step 3: You need to back up the TaskCache registry key. Right-click to choose Export to save the registry key.
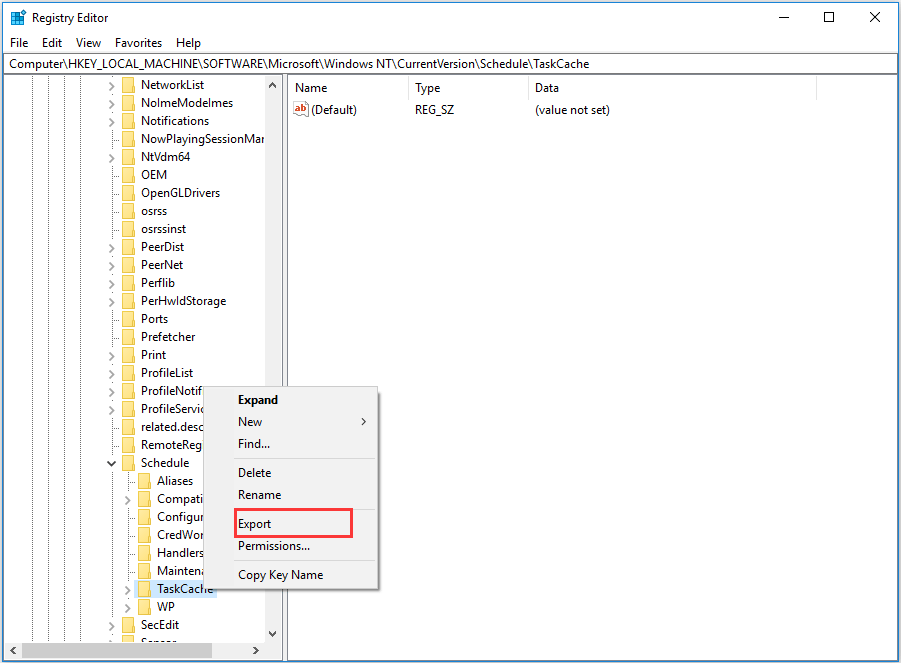
Step 4: Then navigate to the HKEY_LOCAL_MACHINE\SOFTWARE\Microsoft\Windows NT\CurrentVersion\Schedule\TaskCache\Tree\Microsoft\Windows.
Step 5: Right-click the Windows key and choose Delete to continue.

After that, you can reboot your computer and run System Restore again to check whether the system restore error 0x800700b7 is solved.
In the following section, we will show some available ways for you to solve the system restore error 0x800700b7, especially when your computer can’t boot.
Solution 5. Run System Restore in WinPE
If your computer can’t boot normally, you can try to perform system restore in WinPE.
Now, here is the tutorial.
Step 1: Since your computer can’t boot, you need to boot computer from the installation media. If you don’t have it, click here to know how to create it.
Step 2: After booting your computer from it, set language, then choose Repair your computer > Troubleshoot > Advanced Options > System Restore to continue.
After that, check whether the error 0x800700b7 is solved.
Solution 6. Rename WindowsApp Folder
The sixth way to fix the system restore error 0x800700b7 is to rename WindowsApp folder. But note this way only can be used to Windows 10.
Step 1: You need to boot your computer from the installation media and then go to the Troubleshoot page. Then choose Advanced options and Command Prompt to continue.
Step 2: Navigate to the Windows drive, type its drive letter and hit Enter to continue.
Step 3: Type the following commands and hit Enter after each command.
- cd Program Files
- attrib –h WindowsApps
- ren WindowsApps WindowsApps.BAK
Step 4: After that, type the rstrui to run system restore again.
When all steps are finished, reboot your computer to check whether the system restore error 0x800700b7 is solved.
Further reading:
Besides creating system restore point, you can also create a system image when the computer is in a normal state. In this situation, you can restore your computer to a previous state with the system image and would not encounter the system restore error 0x800700b7.
Final Words
To sum up, this post has introduced 6 ways to fix the system restore error 0x800700b7. If you have come across the same restore error, try these solutions. In addition, it is recommended to create a system image to safeguard your PC.