
Windows 10: Event45, volmgr The system could not sucessfully load the crash dump driver. please help me…
Discus and support Event45, volmgr The system could not sucessfully load the crash dump driver. please help me… in Windows 10 BSOD Crashes and Debugging to solve the problem; Log Name: System
Source: volmgr
Date: 23-Sep-20 3:46:02 PM
Event ID: 45
Task Category: None
Level: Error
Keywords:…
Discussion in ‘Windows 10 BSOD Crashes and Debugging’ started by Tarunya1011, Sep 23, 2020.
-
Event45, volmgr The system could not sucessfully load the crash dump driver. please help me…
Log Name: System
Source: volmgr
Date: 23-Sep-20 3:46:02 PM
Event ID: 45
Task Category: None
Level: Error
Keywords: ClassicDescription:
The system could not sucessfully load the crash dump driver.
Event Xml:
<Event xmlns=»http://schemas.microsoft.com/win/2004/08/events/event»>
<System>
<Provider Name=»volmgr» />
<EventID Qualifiers=»49156″>45</EventID>
<Version>0</Version>
<Level>2</Level>
<Task>0</Task>
<Opcode>0</Opcode>
<Keywords>0x80000000000000</Keywords><EventRecordID>14158</EventRecordID>
<Correlation />
<Execution ProcessID=»4″ ThreadID=»21400″ />
<Channel>System</Channel>
<Computer>Isis</Computer>
<Security />
</System>
<EventData>
<Data>\Device\HarddiskVolume4</Data>
<Binary>0000000001000000000000002D0004C003200000BB0000C000000000000000000000000000000000</Binary>
</EventData>
</Event>
-
Windows cannot sleep or shutdown, volmgr Error 45 The system could not sucessfully load the crash dump driver. and Error 46 Crash dump initialization failed!
So my Windows just prevented me from sleep (and shutdown). I have traced the problem and read many many posts in Google to just fix my pagefile or memory dump. All the solutions do not work.
Whenever I do sleep or hibernate (shutdown /h), the screen turns off but the PC does not (all the LEDs are still on, my mouse is still powered). I can move my mouse and the screen goes back on again, and I got into the login screen again.
In my current setup, I have two NVMe drives. Both are M.2, and one is plugged into the M.2 slot, and the other one is plugged into the PCIe card using PCIe to M.2 card. I also have a GTX 1660 in the first PCIe slot. Both are dynamic disks because my D: is
a striped volume. I also have a E: volume which is a simple volume. With this setup, I have 3 volumes, C, D, and E, which are listed in DISKPART as Volume 0 — 3 (including EFI system partition, which makes it 4 volumes).I have used it with no problem. I have been using an external harddrive which apparently was not wiped clean and have two volumes (two partitions) in it, an ESP, and a normal NTFS partition. This makes them listed in disk part as Volume 4 and Volume 5. I
have used this setup without problem. Until one day, I realized that I plugged out the drive without safely ejecting the drive. I have been using it without ejecting it once, shutting down and turning my computer on without ejecting it once. Then I wanted
to use it for my laptop but I can’t eject it safely because Windows kept saying that it was being used. So I forced ejected it anyway by plugging it out. This is when the problem began, I think.After that I can’t sleep or shutdown the PC. Restart works perfectly. When I saw the event viewer, there are three events that I always see when I do standby:
1. User-mode process attempted to change the system state by calling SetSuspendState or SetSystemPowerState APIs.
Source: Kernel-Power, Event ID: 187, Information
I think this indicates that the user initiates sleep.
2. The driver \Driver\pci for device PCI\VEN_1022&DEV_43C7&SUBSYS_33061B21&REV_01\5&20ab19aa&0&08020B stopped the power transition.
Source: Kernel-Power, Event ID: 40, Information
This one I do not understand. In device manager it’s one of the «PCI-to-PCI bridge» device. It can be my SSD or the Nvidia. But I think it is related to the volmgr problem which comes 1 second after.
3. The system could not sucessfully load the crash dump driver.
Source: volmgr, Event ID: 45, Error, EventData \Device\HarddiskVolume5
What I realized is that, in the EventData, there is an information regarding where the error comes from, I think. It’s HarddiskVolume5. However
there is no such volume in DISKPART. I have not plugged in the external harddrive back. HarddiskVolume5 may be from the external harddrive, or, one of my SSD drives which were numbered 5 when my external harddrive were plugged
in. Either way, the error persists even though I plug my external harddrive back.During startup, after rebooting, I do always get volmgr error, but this time it’s Event 46, which is Crash dump initialization failed! which I think come from the same source. The EventData contains the same entry which is \Device\HarddiskVolume5
which is non-existent.For extra information, doing shutdown /h will take me through the same process when sleeping and the command prompt then shows
Incorrect function.(1) message on the screen, which I think does not help at all since it’s a very generic error.Standby, hibernate, and shutdown, all three will generate the exact same messages. They all behave exactly the same. All i can do is just reboot.
How to fix this problem, or at least reset the volmgr somehow so that it no longer refers to the non-existent drive? Of course changing memory dump or pagefile options do not work if this is the case.
I have tried fixing Windows files with dism and sfc, does not work.
Is there a way to fix this without having to reinstall Windows?
-
PC randomly restarts.
This error in the Event Logs just prior to a crash suggests a dump file is trying to be written:
Log Name: System
Source: volmgr
Date: 5/27/2019 2:39:16 PM
Event ID: 45
Task Category: None
Level: Error
Keywords: Classic
User: N/A
Computer: MAXS-DESKTOP
Description:
The system could not sucessfully load the crash dump driver.
Can you provide the msinfo file?
-
Event45, volmgr The system could not sucessfully load the crash dump driver. please help me…
Windows cannot sleep or shutdown, volmgr Error 45 The system could not sucessfully load the crash dump driver. and Error 46 Crash dump initialization failed!
Hi Ryan,
Great find! No wonder why you get the «volmgr error Event 45», as your dump file is located in volume C. Also, if you trigger a PC to sleep mode, by design, it turns off almost all devices except for your RAM module as that’s where it will temporarily store
your system state. However, if you go on hibernate mode, it will supposedly not turn off your system drive C as that’s where it will store your system state, specifically in C:\hyberfil.sys file. With that, kindly update both of your XPG Spectrix SSD & Sandisk
SSD drivers, instead of the GPU, and continue with the steps I previously sent.If the issue persists, then kindly send me a screenshot of each result from the commands below in a Command Prompt (run as administrator). Thank you.
powercfg/lastwake
powercfg/waketimers
powercfg -devicequery wake_armed
powercfg -requests
I hope this helps. Let me know how you go. Thank you!
Sincerely,
Paul A.
Independent Advisor

Event45, volmgr The system could not sucessfully load the crash dump driver. please help me…
-
Event45, volmgr The system could not sucessfully load the crash dump driver. please help me… — Similar Threads — Event45 volmgr system
-
Windows 11 — PC Crashing — The system could not sucessfully load the crash dump driver.
in Windows 10 Gaming
Windows 11 — PC Crashing — The system could not sucessfully load the crash dump driver.: Hello,My computer keeps crashing and I cannot determine the cause because it is not creating a dump file. Things ive tried:1. Check for Windows updates2. Ran antivirus protocol3. Checked for driver updates4. Checked health of ram and hdd5. Ran SFC /scannow, it did find… -
Windows 11 — PC Crashing — The system could not sucessfully load the crash dump driver.
in Windows 10 Software and Apps
Windows 11 — PC Crashing — The system could not sucessfully load the crash dump driver.: Hello,My computer keeps crashing and I cannot determine the cause because it is not creating a dump file. Things ive tried:1. Check for Windows updates2. Ran antivirus protocol3. Checked for driver updates4. Checked health of ram and hdd5. Ran SFC /scannow, it did find… -
Event 45 Error: Could Not Load Crash Dump Driver; Then Event 46 Error: Crash dump…
in Windows 10 Gaming
Event 45 Error: Could Not Load Crash Dump Driver; Then Event 46 Error: Crash dump…: I have not been able to solve these errors in my System Log since my upgrading my PC in order to be able to run Windows 11.I successfully upgrading my Windows 10 Pro PC by replacing the motherboard with an Asus ROG Strix Z690 R Gaming WiFi D4.After upgrade, Windows 10… -
Event 45 Error: Could Not Load Crash Dump Driver; Then Event 46 Error: Crash dump…
in Windows 10 Software and Apps
Event 45 Error: Could Not Load Crash Dump Driver; Then Event 46 Error: Crash dump…: I have not been able to solve these errors in my System Log since my upgrading my PC in order to be able to run Windows 11.I successfully upgrading my Windows 10 Pro PC by replacing the motherboard with an Asus ROG Strix Z690 R Gaming WiFi D4.After upgrade, Windows 10… -
Event ID 45 : The system could not sucessfully load the crash dump driver.
in Windows 10 BSOD Crashes and Debugging
Event ID 45 : The system could not sucessfully load the crash dump driver.: Hello,I have been having issues shutting down my PC. It doesn’t shut down, just reboots immediately after I press «shut down»
I took a look in event viewer and found the following:
[ATTACH]
The details for event ID 45 are : The system could not sucessfully load the…
-
The system could not sucessfully load the crash dump driver.
in Windows 10 Ask Insider
The system could not sucessfully load the crash dump driver.: Keep receiving this error in my event viewer when my computer will not put itself to sleep? any help?submitted by /u/SeniorWaugh
[link] [comments]https://www.reddit.com/r/Windows10/comments/mjxa1o/the_system_could_not_sucessfully_load_the_crash/
-
Windows 10 unable to hibernate — The system could not sucessfully load the crash dump driver.
in Windows 10 Performance & Maintenance
Windows 10 unable to hibernate — The system could not sucessfully load the crash dump driver.: Sometimes, not every time, my computer is not able to enter hibernate. When I close the laptop lid or select hibernate from the start menu, the laptop screen will go dark not off, backlight is still visible for a few seconds and then the screen comes back on and shows the… -
Windows cannot sleep or shutdown, volmgr Error 45 The system could not sucessfully load the…
in Windows 10 Performance & Maintenance
Windows cannot sleep or shutdown, volmgr Error 45 The system could not sucessfully load the…: So my Windows just prevented me from sleep and shutdown. I have traced the problem and read many many posts in Google to just fix my pagefile or memory dump. All the solutions do not work.Whenever I do sleep or hibernate shutdown /h, the screen turns off but the PC does…
-
Windows 10 will not go to sleep. «Event 45: The system could not sucessfully load the crash…
in Windows 10 Performance & Maintenance
Windows 10 will not go to sleep. «Event 45: The system could not sucessfully load the crash…: So, apparently this problem has been around since Windows 7 and none of the searching I’ve done has lead to any thread with a solid solution. So I guess I’ll toss my hat into the ring. When I attempt to put my desktop computer into sleep mode, it simply puts the screen into…
Users found this page by searching for:
-
The system could not sucessfully load the crash dump driver
,
-
volmgr could not load crash dump driver 45
|
|
|
313 / 50 / 3 Регистрация: 22.08.2010 Сообщений: 311 |
|
Не удалось загрузить драйвер аварийного дампа09.10.2010, 14:23. Показов 15579. Ответов 6 Приветствую всех! Не знаю точно, в какой раздел адресовать свой вопрос. -Не удалось загрузить драйвер аварийного дампа» — добавлю, что синего экрана не было, только зависание.
0 |
|
Почетный модератор 28047 / 15783 / 983 Регистрация: 15.09.2009 Сообщений: 67,753 Записей в блоге: 78 |
|
|
10.10.2010, 09:19 |
|
|
сколько оперативки, сколько места на винте?
0 |
|
313 / 50 / 3 Регистрация: 22.08.2010 Сообщений: 311 |
|
|
10.10.2010, 10:59 [ТС] |
|
|
На диске C (ОС)= 40 гигов свободно, занято 7. На D — 96 свободно, 4 занято. Оперативная — 512.
0 |
|
Фрилансер 3709 / 2082 / 567 Регистрация: 31.05.2009 Сообщений: 6,683 |
|
|
10.10.2010, 23:04 |
|
|
А файл подкачки на С есть?
0 |
|
313 / 50 / 3 Регистрация: 22.08.2010 Сообщений: 311 |
|
|
11.10.2010, 02:28 [ТС] |
|
|
Жесткий диск — один, на 2 раздела С и D, на С установлена XP. D: свободно 99778МБ,без ф. подкачки, ——————————————————————————- ничего не понимаю,(МБ, ГБ). ))Спасибо.
0 |
|
Почетный модератор 28047 / 15783 / 983 Регистрация: 15.09.2009 Сообщений: 67,753 Записей в блоге: 78 |
|
|
11.10.2010, 11:45 |
|
|
попробуйте жестко задать например 1Гб.
0 |
|
313 / 50 / 3 Регистрация: 22.08.2010 Сообщений: 311 |
|
|
11.10.2010, 13:14 [ТС] |
|
|
На «Эвересте» проверяла — вот что получилось: «Физическая память Всего 478 Мб Свободно 231 Мб Всего 2204 Мб Занято 380 Мб Свободно 1824 Мб Всего 2683 Мб Занято 627 Мб Свободно 2055 Мб Поддерживается ОС Да Поддерживается ЦП Да Активный Да Совет Чтобы повысить скорость работы приложений, увеличьте объем системной памяти.»
0 |
|
Новые блоги и статьи
Все статьи Все блоги / |
||||
|
Как использовать OAuth2 со Spring Security в Java
Javaican 14.05.2025 Протокол OAuth2 часто путают с механизмами аутентификации, хотя по сути это протокол авторизации. Представьте, что вместо передачи ключей от всего дома вашему другу, который пришёл полить цветы, вы. . . |
Анализ текста на Python с NLTK и Spacy
AI_Generated 14.05.2025 NLTK, старожил в мире обработки естественного языка на Python, содержит богатейшую коллекцию алгоритмов и готовых моделей. Эта библиотека отлично подходит для образовательных целей и. . . |
Реализация DI в PHP
Jason-Webb 13.05.2025 Когда я начинал писать свой первый крупный PHP-проект, моя архитектура напоминала запутаный клубок спагетти. Классы создавали другие классы внутри себя, зависимости жостко прописывались в коде, а о. . . |
Обработка изображений в реальном времени на C# с OpenCV
stackOverflow 13.05.2025 Объединение библиотеки компьютерного зрения OpenCV с современным языком программирования C# создаёт симбиоз, который открывает доступ к впечатляющему набору возможностей. Ключевое преимущество этого. . . |
POCO, ACE, Loki и другие продвинутые C++ библиотеки
NullReferenced 13.05.2025 В C++ разработки существует такое обилие библиотек, что порой кажется, будто ты заблудился в дремучем лесу. И среди этого многообразия POCO (Portable Components) – как маяк для тех, кто ищет. . . |
|
Паттерны проектирования GoF на C#
UnmanagedCoder 13.05.2025 Вы наверняка сталкивались с ситуациями, когда код разрастается до неприличных размеров, а его поддержка становится настоящим испытанием. Именно в такие моменты на помощь приходят паттерны Gang of. . . |
Создаем CLI приложение на Python с Prompt Toolkit
py-thonny 13.05.2025 Современные командные интерфейсы давно перестали быть черно-белыми текстовыми программами, которые многие помнят по старым операционным системам. CLI сегодня – это мощные, интуитивные и даже. . . |
Конвейеры ETL с Apache Airflow и Python
AI_Generated 13.05.2025 ETL-конвейеры – это набор процессов, отвечающих за извлечение данных из различных источников (Extract), их преобразование в нужный формат (Transform) и загрузку в целевое хранилище (Load). . . . |
Выполнение асинхронных задач в Python с asyncio
py-thonny 12.05.2025 Современный мир программирования похож на оживлённый мегаполис – тысячи процессов одновременно требуют внимания, ресурсов и времени. В этих джунглях операций возникают ситуации, когда программа. . . |
Работа с gRPC сервисами на C#
UnmanagedCoder 12.05.2025 gRPC (Google Remote Procedure Call) — открытый высокопроизводительный RPC-фреймворк, изначально разработанный компанией Google. Он отличается от традиционых REST-сервисов как минимум тем, что. . . |
Наверх
After upgrading to Windows 10, you might receive the “driver WudfRd failed to load” error. The causes of this error are not complicated and it can be fixed easily. MiniTool will show you how to remove this problem with simple methods in this post.
About Driver WudfRd Failed to Load
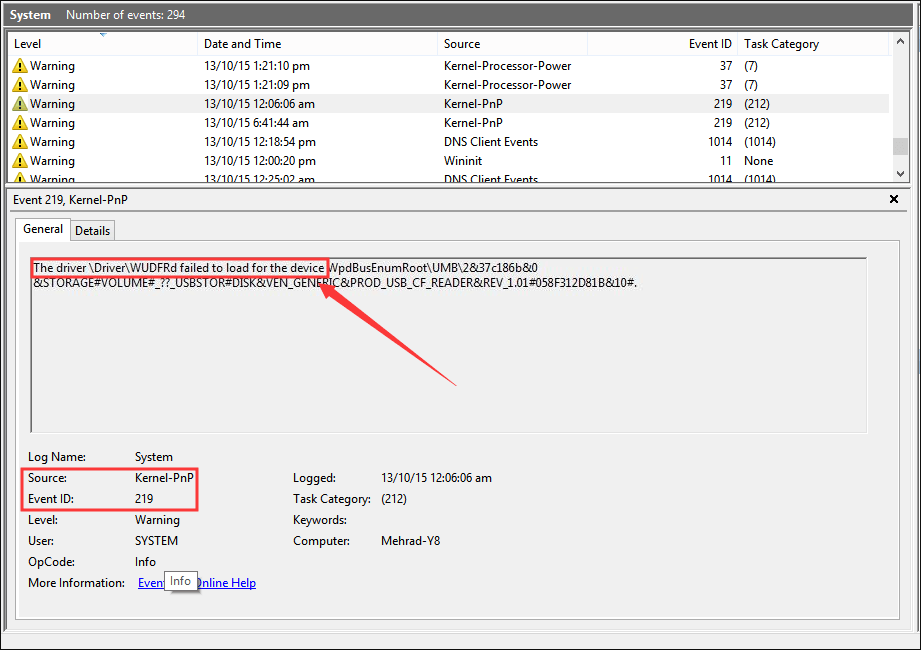
“Driver WudfRd failed to load” error has been reported by most users who have upgrade their computers to Windows 10. The error has an Event ID 219 and its Source is Kernel-PnP. So, this issue is also known as error 219.
Once this error occurs, you will get a warning in System Log every time you boot your computer. Just as the following screenshot shows, you can see the description of the error 219 in the Event Viewer: The driver Driver WudfRd failed to load for the device.
Why does this error appear? When you upgrade to Windows 10, your drivers will also be updated. This will lead to a conflict between the drivers and hardware, and thus cause the error 219. Besides, even if you didn’t upgrade your computer to Windows 10, the issue could also occur when a certain service is disabled.
To fix the “driver WudfRd failed to load” error, you can try the solutions displayed below.
Method 1: Update Windows
Windows updates could also update your drivers, so you can try checking for new updates manually to resolve this problem.
Step 1: Press Windows + I to open Settings.
Step 2: Go ahead to Update & Security > Windows Update.
Step 3: In the right pane, click Check for updates and install all the pending updates.
After updating your Windows, restart your computer to check if it fixes the error 219.
Method 2: Enable Windows Driver Foundation Service
Windows Driver Foundation is an essential service for drives. If the service is disabled, you might receive “driver WudfRd failed to load” error. Just follow the steps below to enable it.
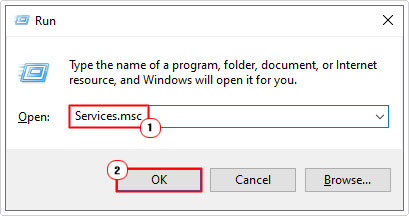
Step 1: Press Windows + R to open Run window. Input services.msc in the dialog and click OK.
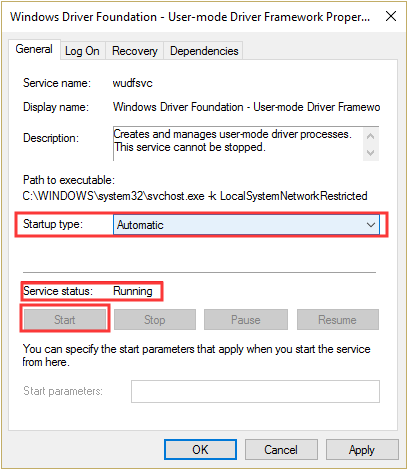
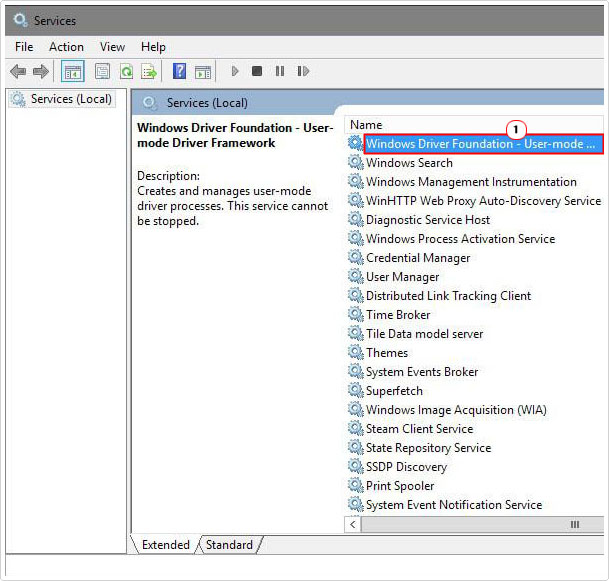
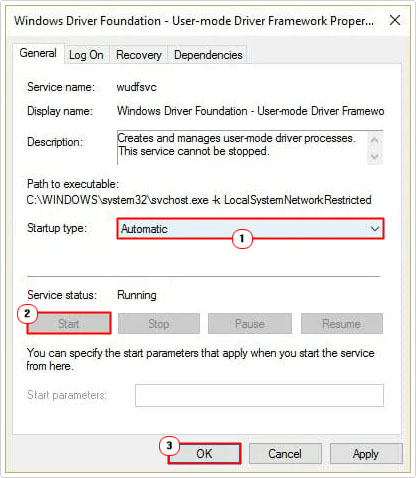
Step 2: In the main interface of Services, find Windows Driver Foundation – User-mode Driver Framework service and double-click it to open its Properties window.
Step 3: Under General tab, set the Startup type to Automatic. Make sure the Service status is Running. If not, you need click Start button to enable the service. Then, click Apply and OK to save the changes.
Now, you can reboot your computer and the error should have been removed.
Method 3: Disable Hard Disk Hibernation
Disabling hard disk hibernation is another proven solution and plenty of users have fixed the “driver WudfRd failed to load” error with it. So, you can take a shot at it.
Step 1: Press Windows + X and choose Power Options from the Start menu.
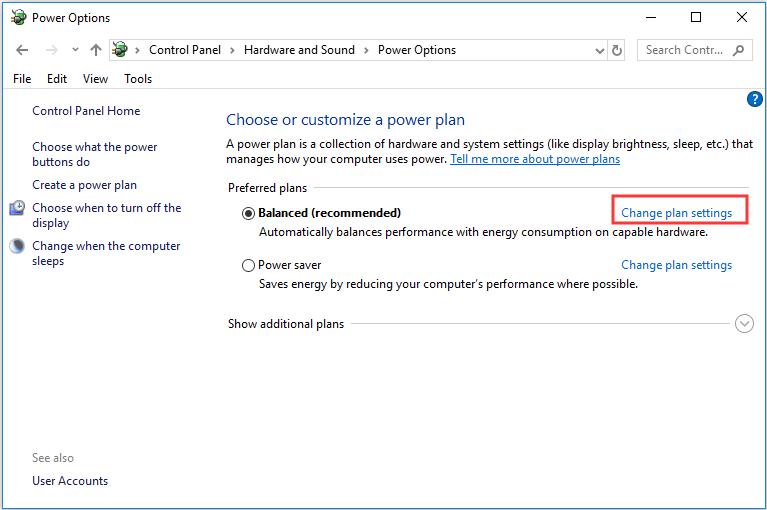
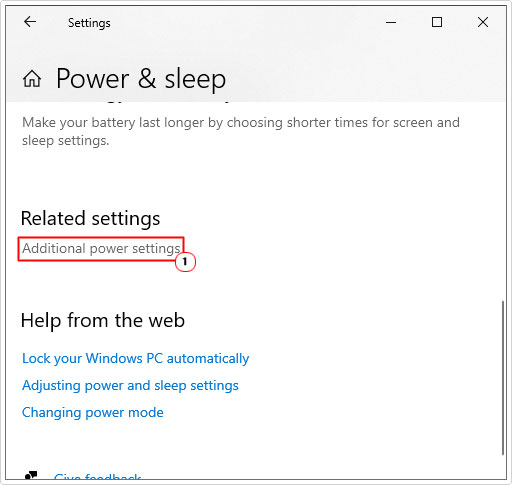
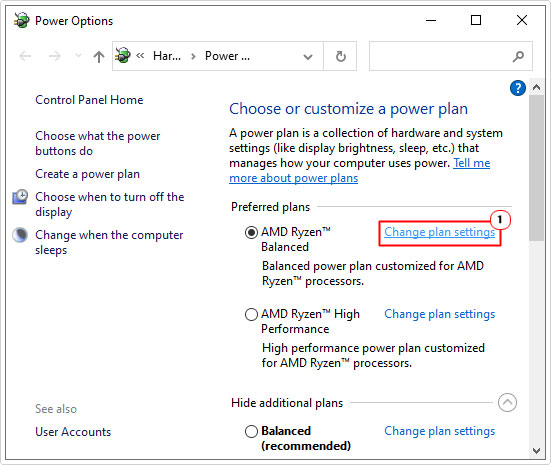
Step 2: Click Additional Power settings in the right pane and this will open Control Panel as the following picture shows. Then, click Change plan settings for your current power plan.
Step 3: Click Change advanced power settings in the new page.
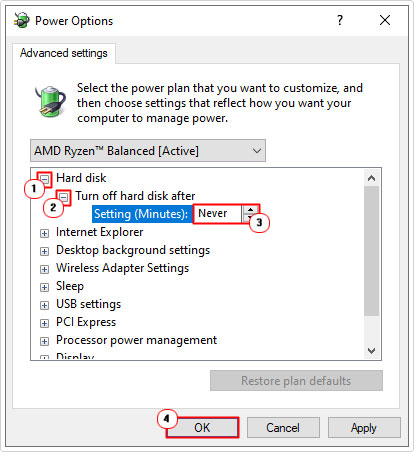
Step 4: In the Power Options window, expand Hard disk and Turn off hard disk after. Set both the On battery and Plugged in to Never.
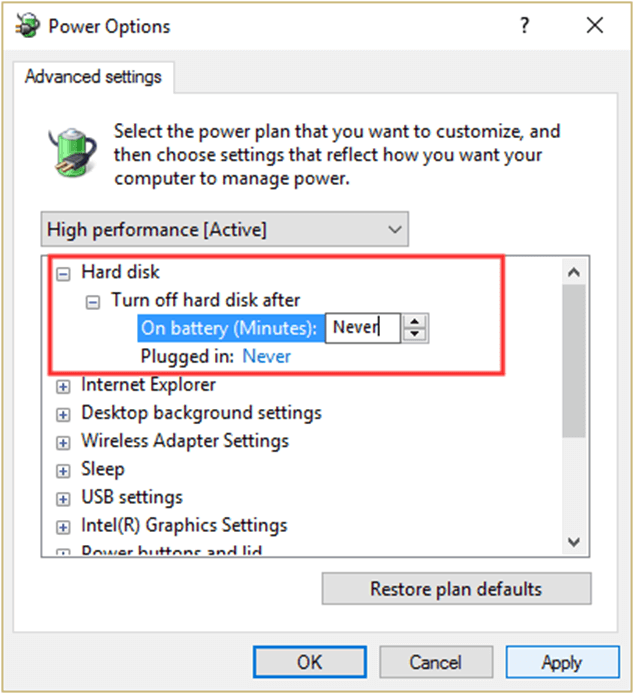
Step 5: Click Apply and OK
Once it’s done, restart your computer. Now you should be able to run your computer without the error 219.
Method 4: Update Incompatible Drivers
Alternatively, you can also try updating incompatible drivers to fix this issue. You can easily locate the incompatible drivers in Device Manager as there will be an exclamation mark beside them. If all your drivers are compatible, just skip this method. If any incompatible drivers exist, follow the instructions to update them.
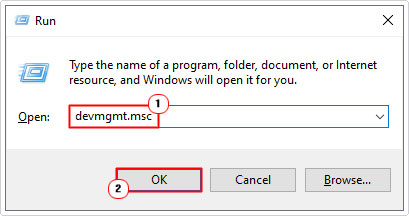
Step 1: Input devmgmt.msc in the Run dialog and click OK to open Device Manager.
Step 2: Right-click the driver with an exclamation mark and select Update driver from the context menu.
Step 3: Choose Search automatically for updated driver software.
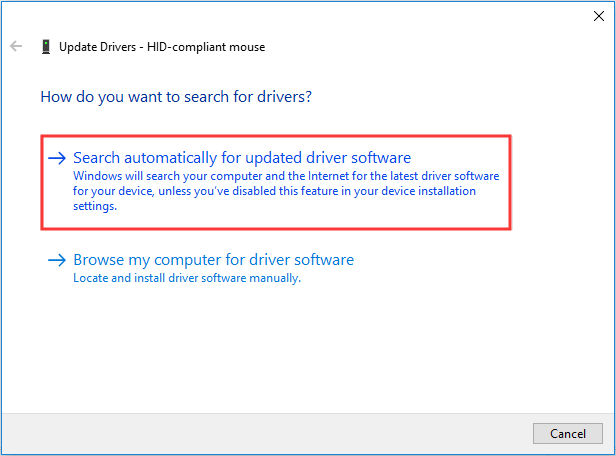
Then, follow the onscreen instruction to complete the driver update. If your Windows cannot find the latest driver software for your device, you can download the latest version from the official website of the driver and install it manually.
Finally, restart your computer to see if the error has been fixed.
Method 5: Reinstall USB Controllers
In most cases, USB drivers should be responsible for the “driver WudfRd failed to load” error. Therefore, if all the methods mentioned above fail to fix the problem, you can feel free to try reinstalling your USB controllers. Here are the detailed steps.
Step 1: Open Device Manager.
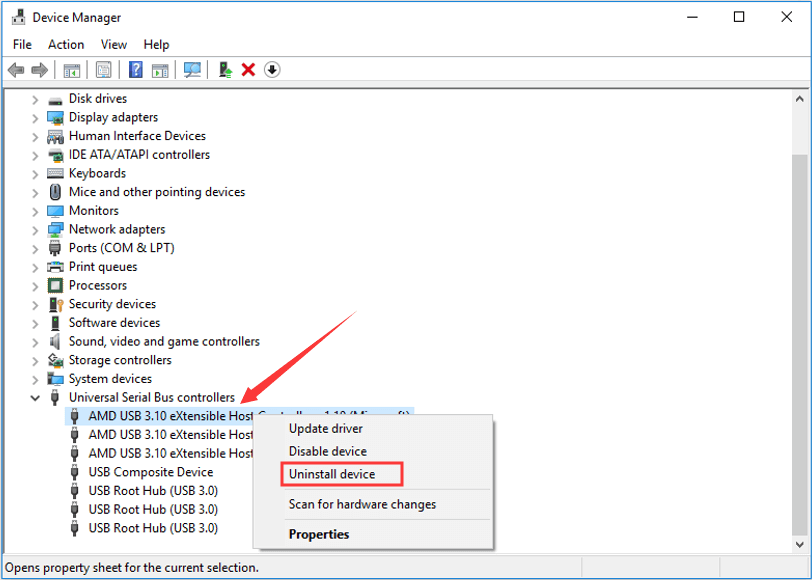
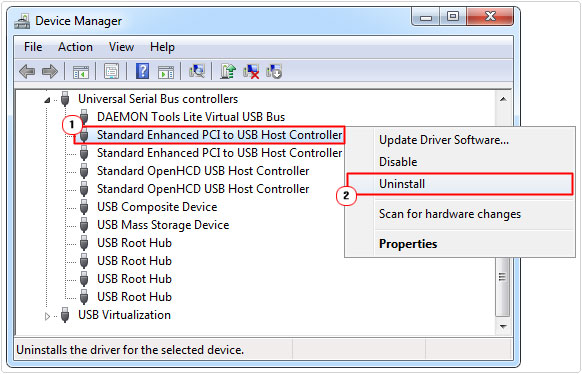
Step 2: Double-click Universal Serial Bus controllers to expand it.
Step 3: Right-click a USB controller and choose Uninstall device. In the confirmation window, click OK to continue. Then, perform the same operation to uninstall all the USB controllers.
Step 4: After uninstalling all the USB controllers, restart your computer. The Windows will automatically reinstall the USB controllers uninstalled just now.
That’s all about the solutions to resolving “driver WudfRd failed to load” error. Hope this post is of help for you.
Все способы:
- Что это такое
- Вариант 1: Удаление мусорных файлов
- Вариант 2: Отключение дампа памяти
- Вариант 3: Исправление ошибки дампа памяти
- Способ 1: Восстановление системных файлов
- Способ 2: Проверка диска
- Способ 3: Автоматическое восстановление
- Анализ дампа памяти
- Вопросы и ответы: 0
Что это такое
Для начала следует разобраться, что такое дамп памяти и в каких ситуациях пользователи сталкиваются с ним. В зависимости от этого и применяются различные способы устранения неполадки. Дамп памяти – это файл, который автоматически создается при возникновении критических ошибок в работе операционной системы.
Если вкратце, наверняка каждый юзер Windows получал «синий экран смерти» (BSOD), который по своей сути является результатом различных сбоев. Он появляется на любой стадии использования ОС, а сама система при возникновении такого экрана автоматически создает один или несколько файлов. Они содержат в себе отладочную информацию о компьютере, включая данные, которые при критической ошибке, повлекшей BSOD, находились в ОЗУ. Такие сведения позволяют понять причину проблемы, которая вызывает «синий экран смерти». То есть система генерирует дамп, а аварийным он называется, потому что формируется при возникновении аварий в работе ОС.
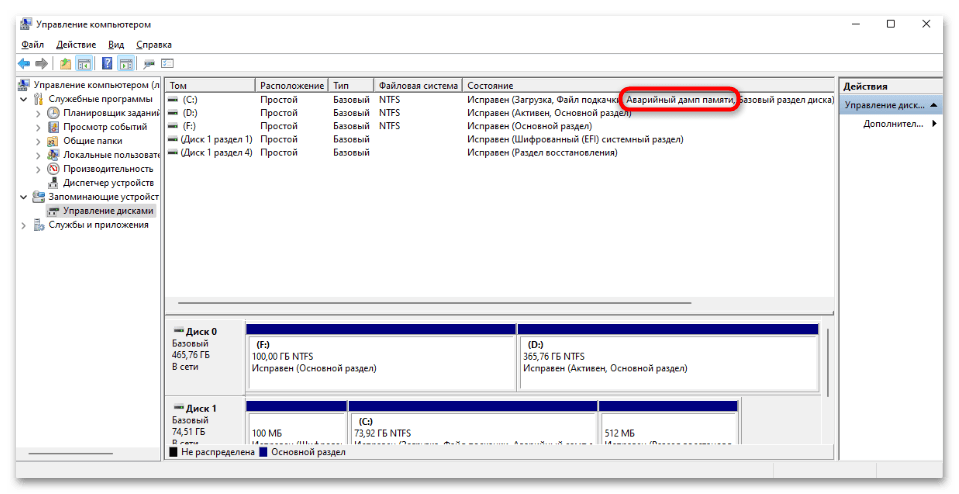
Теперь стоит понять, как нужно действовать при появлении дампа памяти. Например, если рядом с названием диска в утилите «Управление дисками» появляется надпись «Аварийный дамп памяти», тогда это не является ошибкой. Тут указана информация о том, что файлы со сведениями о системной проблеме попросту хранятся на этом томе. Соответственно, исправлений никаких не требуется, но можно убрать данную надпись, о чем мы написали в Вариантах 1 и 2.
В случае если BSOD появляется периодически, тогда может потребоваться решение проблемы на системном уровне, а дамп памяти лишь поможет выяснить, что случилось. В Варианте 3 мы рассмотрели наиболее распространенные пути решения (даже когда Windows 10 не запускается), а также привели несколько специализированных программных средств, с помощью которых можно проанализировать дамп памяти.
Вариант 1: Удаление мусорных файлов
Как уже говорилось, при появлении сообщений о дампе памяти, касающихся локального диска, беспокоиться не стоит – это не проблема накопителя, а лишь информация о том, что файлы были созданы именно на этом разделе. Но можно убрать дамп памяти, очистив данный диск.
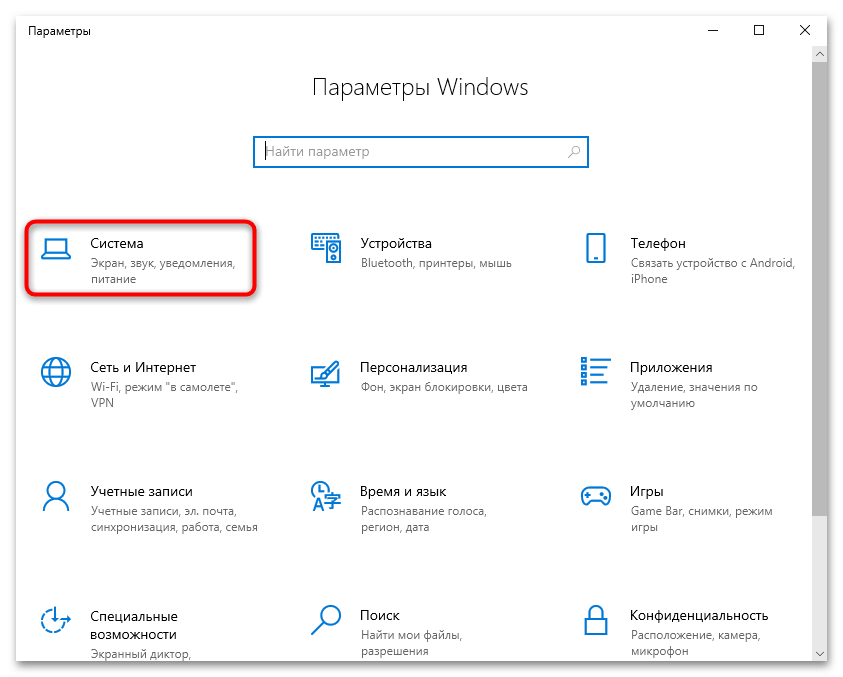
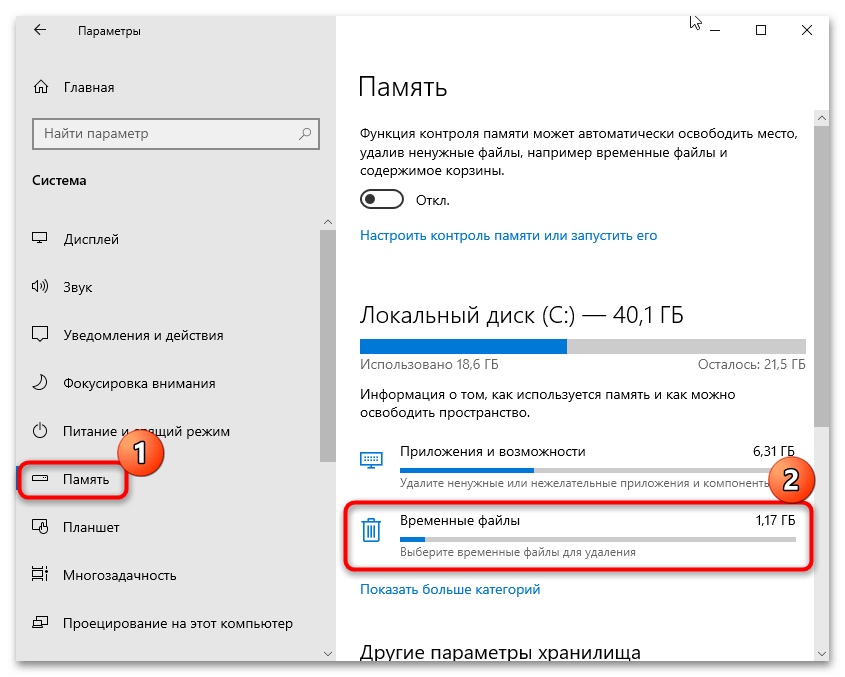
- Нажмите на кнопку «Пуск» и выберите запуск штатных «Параметров».
- Перейдите в раздел «Система».
- Через левую панель переключитесь на вкладку «Память», затем в центральной части окна найдите локальный диск, у которого появилось сообщение об аварийном дампе памяти, и нажмите по «Временные файлы».
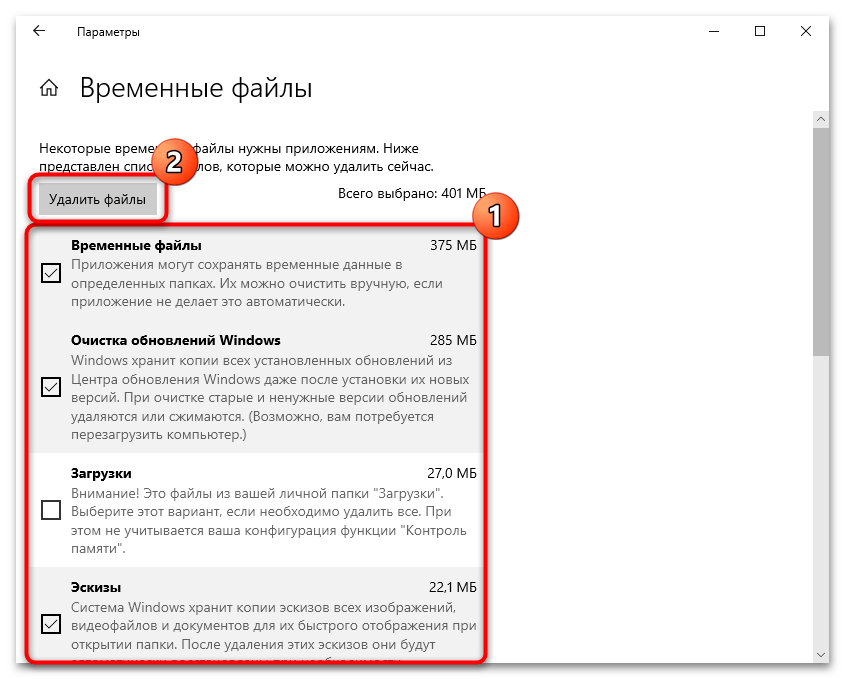
- После сканирования системы отобразятся различные временные файлы. Снимите галочки у всех пунктов, кроме «Файлы дампа памяти для системных ошибок» (впрочем, по желанию можно очистить и другие категории), затем нажмите на кнопку «Удалить файлы», расположенную вверху.
Удалить дампы памяти с локального диска можно и другим способом – вручную через файловую систему. Достаточно запустить «Проводник» и перейти к корневой директории диска. Если это системный раздел, то откройте папку «Windows», где должен располагаться файл под названием «MEMORY.DMP» (это основной дамп памяти), а в каталоге «Minidump» можно найти малые дампы (их размер, как правило, составляет около 1 МБ). Удалите эти данные, но для процедуры потребуются права администратора.
Читайте также: Получение прав Администратора на компьютере с Windows 10
Вариант 2: Отключение дампа памяти
В Windows 10 можно отключить автоматическое создание файла с данными об ошибке – то есть дампа памяти. Конечно, это позволит избежать появления различных предупреждающих надписей и иногда BSOD, но при этом системная ошибка, вызывающая это, исправлена не будет, и, возможно, узнать потом причину ее появления без дампа памяти окажется довольно проблематично.
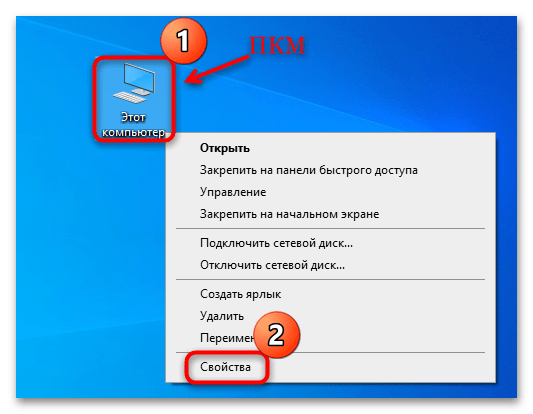
- Кликните правой кнопкой мыши по иконке «Этот компьютер» на рабочем столе и из контекстного меню выберите пункт «Свойства».
- В открывшемся окне штатных «Параметров» кликните по строке «Дополнительные параметры системы» в блоке «Сопутствующие параметры».
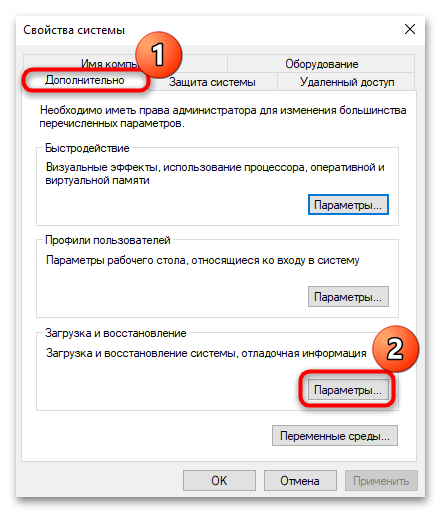
- На вкладке «Дополнительно» в разделе «Загрузка и восстановление» щелкните по кнопке «Параметры».
- Из выпадающего меню «Запись отладочной информации» выберите пункт «Нет», чтобы отключить аварийный дамп памяти. Нажмите на «ОК» для сохранения настроек.

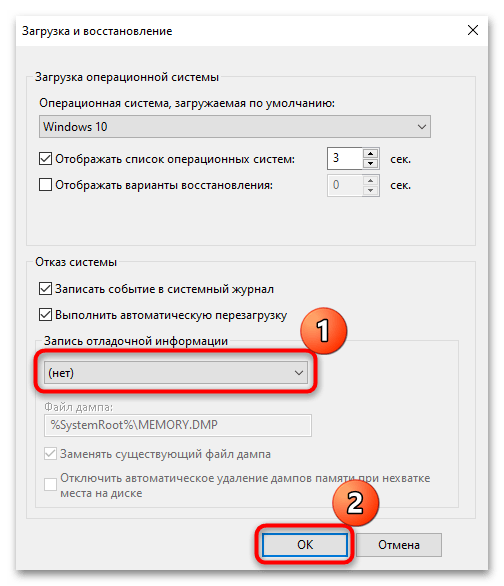
Кстати, изменить путь сохранения для дампа памяти можно здесь же: в текстовом поле «Файл дампа» пропишите нужный адрес.
Вариант 3: Исправление ошибки дампа памяти
Аварийный дамп памяти может быть создан по различным причинам, в частности из-за системных ошибок любого характера. Мы рассмотрим несколько универсальных способов, позволяющих решить многие распространенные неполадки в работе ОС.
Способ 1: Восстановление системных файлов
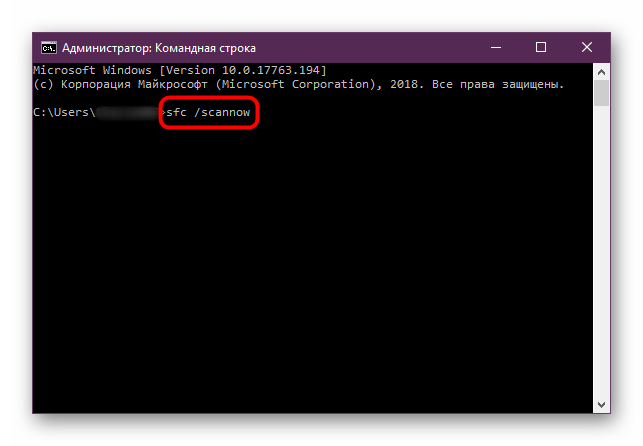
В первую очередь стоит проверить целостность системных файлов, поскольку синий экран и, соответственно, запись дампа памяти часто возникают именно по этой причине. Системные компоненты повреждаются вследствие разных неполадок в работе ОС, а также в результате вирусных атак, но в «десятке» предусматривается специальное средство для сканирования и восстановления поврежденных файлов Windows. О применении такой утилиты мы писали в отдельном материале.
Подробнее: Как проверить целостность системных файлов в Windows 10
Способ 2: Проверка диска
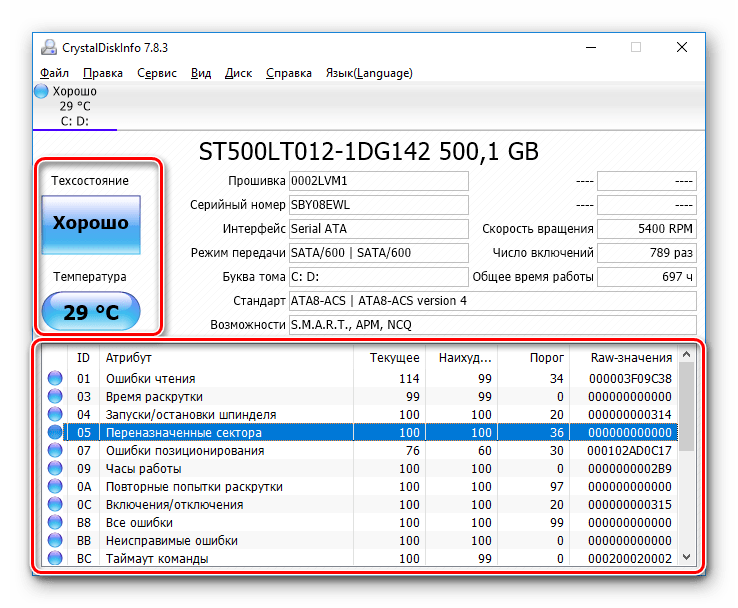
Также не лишним будет проверить накопитель на наличие ошибок, которые могут стать причиной создания дампа памяти. Для этого предназначен специальный инструмент, который встроен в операционную систему. Можно еще воспользоваться средствами от сторонних разработчиков. Переходите по ссылке ниже, чтобы узнать, как правильно выполнить диагностику диска на компьютере с Windows 10.
Подробнее:
Выполнение диагностики жесткого диска в Windows 10
Проверка работоспособности SSD
Способ 3: Автоматическое восстановление
Если после появления BSOD система не стартует, скорее всего, придется запустить автоматическое восстановление. В Windows 10 реализована специальная среда (WinRE), с помощью которой выполняются различные манипуляции по восстановлению работы ОС, диагностики и использование системных средств, например «Командной строки». Вероятно, важные файлы оказались повреждены, отчего и не получается полноценно пользоваться ОС.
Подробнее: Запускаем автоматическое восстановление в Windows 10
Анализ дампа памяти
Различные ошибки в работе операционной системы требуют правильного подбора методов решения. При создании аварийного дампа памяти важно корректно его проанализировать и найти нужный способ исправления неполадки. Для анализа файла дампа существуют специализированные программы, как правило, устанавливаемые отдельно. Одним из таких инструментов является фирменная утилита от компании Microsoft – WinDbg. С ее помощью можно посмотреть информацию, которая содержится в файле с расширением DMP, созданного после появления BSOD.
Скачать WinDbg с официального сайта
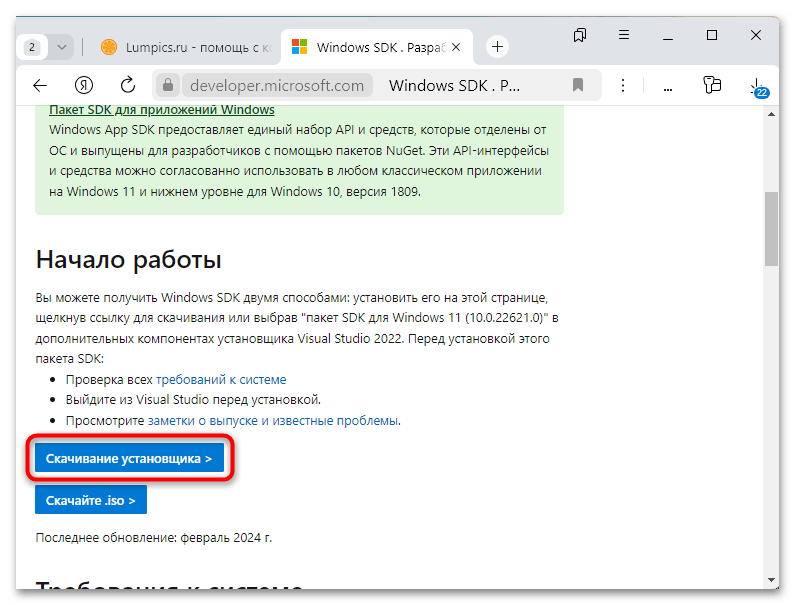
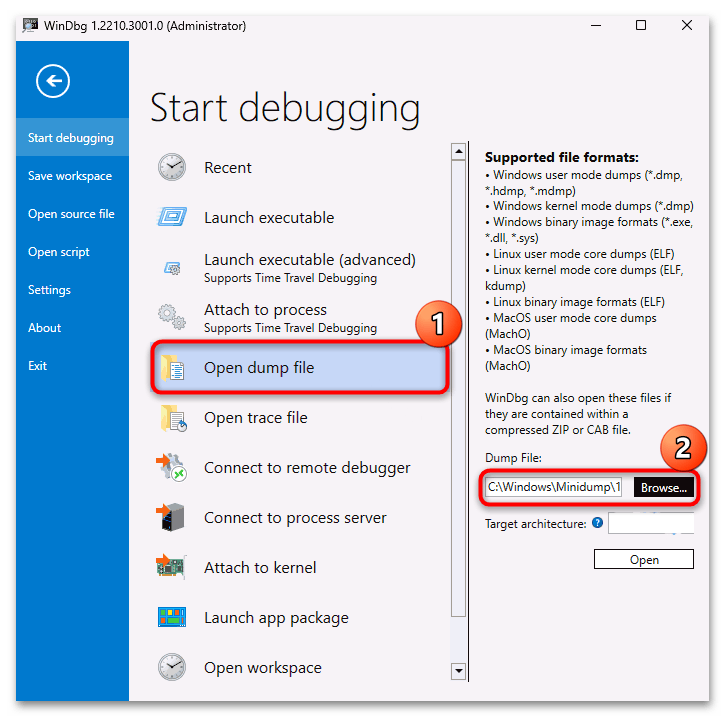
- Перейдите по ссылке выше и скачайте инсталляционный файл программы, нажав на кнопку «Скачивание установщика».
- Далее запустите сохраненный файл и выполните установку на локальный диск. Откройте установленную программу от имени администратора, кликнув правой кнопкой мыши по ярлыку и выбрав нужный тип запуска. В главном окне кликните по строке «Open dump file» и укажите к нему путь (как мы уже упоминали в Варианте 1, он хранится на системном диске в папке «Windows»).
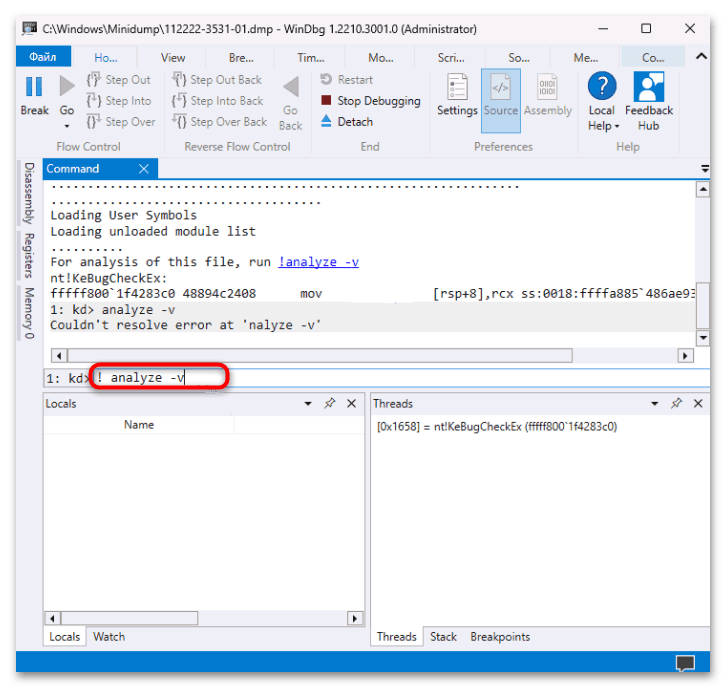
- В текстовом поле панели «Command» введите команду
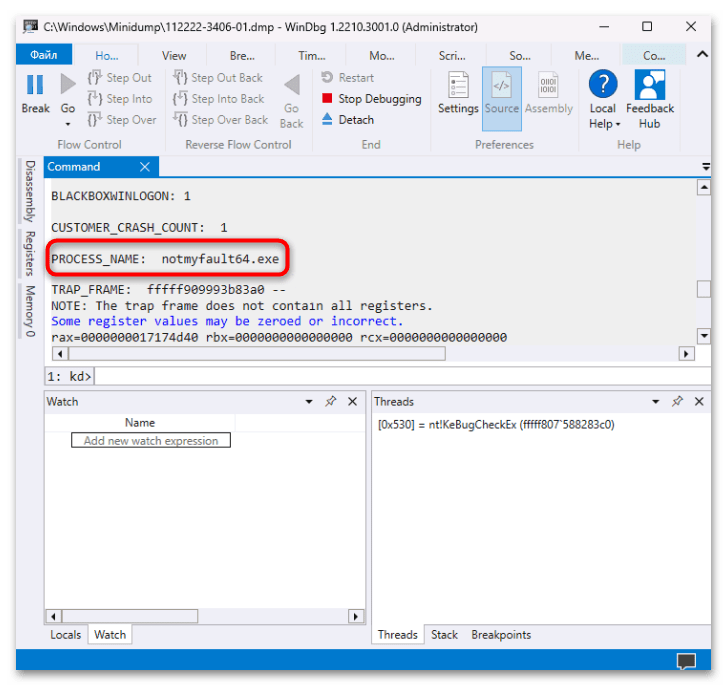
!analyze -vи нажмите на «Enter» для ее выполнения. - После в основной части окна появится информация об ошибке, вызывавшей сбой. Обратите внимание на строку «PROCESS_NAME», где указано название программы, являющейся причиной появления BSOD и записи дампа памяти.
- Также нужные сведения могут быть связаны с файлом драйвера с расширением SYS (строка «IMAGE_NAME»).

После того как причина создания дампа памяти станет известна, более детальные сведения можно найти в интернете. Например, вы сможете узнать, каким устройствам соответствуют проблемные драйверы, или выяснить назначение процессов, вызвавших сбой в работе ОС.
К примеру, если стало понятно, что проблема кроется в конкретном программном обеспечении, то его может потребоваться переустановить или вовсе удалить и заменить на аналогичный софт. Если же дамп был создан вследствие неполадок с драйвером, его, может быть, понадобится обновить или выполнить переустановку ПО на текущую либо предыдущую версию.
Также для анализа ошибок BSOD есть и другие программы от сторонних разработчиков, например BlueScreenView. Как пользоваться этим софтом, мы писали ранее в отдельном руководстве.
Подробнее: Как пользоваться BlueScreenView в Windows 10
Наша группа в TelegramПолезные советы и помощь
Attention Before you read this post, I highly recommend you check out my resources page for access to the tools and services I use to not only maintain my system but also fix all my computer errors, by clicking here!
Driver WudfRd failed to load is not uncommon as errors go, as it occurs most often after a Windows 10 upgrade. The result of driver incompatibility after an operating system update.
The WudfRd error may be the outcome of your current installed drivers being overwritten by Microsoft’s generic driver set, causing a conflict. This leads to error 219 in Event Viewer.
The Event ID (within Event Viewer) is 219, so the error can also be identified as error 219:
Log Name: System
Source: Microsoft-Windows-Kernel-PnP
Event ID: 219
Task Category: (212)
Level: Warning
User: SYSTEM
Description: The driver \Driver\WudfRd failed to load for the device WpdBusEnumRoot\UMB\1&26c175b&0&STORAGE#VOLUME#_??_USBSTOR#DISK&VEN_HUAWEI&PROD_SD_STORAGE&REV_2.31
WudfRd errors are also known to occur in other situations, other than, after a Windows update – as many end users have reported as much. A disabled Windows Driver Foundation Service could also be the culprit.
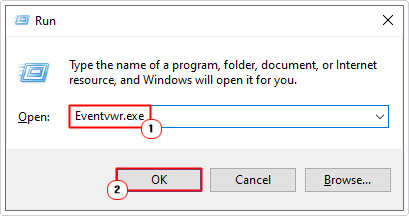
As previously noted, the WudfRd error will appear in the Event Viewer app, which can be accessed by pressing + R, typing eventvwr then clicking on OK.
With that said, there are a number of fixes that you can deploy to fix the Driver WudfRd failed to load error. So do continue reading for those solutions.
But before we get to that, let’s take a deeper look at this error.
WUDFRd Overview
WudfRd is a system process, which makes it an integral component of your operating system. The WudfRd.sys file can be found in the following (default) location:
C:\Windows\System32\drivers
This process is a vital part of the Windows Driver Foundation – User mode Driver Framework Reflector, developed by Microsoft, making it signed and verified.
The Windows drivers operate as an intermediary between the system and the hardware component (or app), making them an integral aspect of your system. WudfRd errors can have a wide range of symptoms. Such as, a failure for the USB controller to work, your operating system may fail to recognise the GPU or it could stop working altogether. This is not restricted solely to any one component. WudfRd errors occur during Windows start-up and are represented as your typical error type.
What Causes Driver WudfRd failed to load Errors?
Looking at possible causes of WudfRd errors, the most common are the following:
- A disabled Windows Driver Foundations service (as previously mentioned).
- A faulty power supply unit.
- An outdated Windows operating system.
- Outdated or corrupted device driver(s).
- USB controller conflict
With all of that said, continue reading for a rundown of possible solutions.
How to Fix It
Fortunately, there are several things you can do to fix Driver WudfRd failed to load errors. Below you will find them arranged in order of effectiveness and ease of execution; so it’s recommended that you attempt them in the order that they appear.
Before attempting any of the more complex solutions outlined below, I’d proffer a guess that you’d be interested in a much easier solution to fixing the Driver WudfRd failed to load error – which brings us to the Windows Repair Tool Advanced System Repair Pro.
This tool is multifaceted, capable of fixing a wide range of issues and errors within a single Windows system scan. It also comes with its own built-in System Guard, allowing it to monitor and notify you of possible hardware or software related issues.
With this tool, you can fix common and uncommon DLL & BSOD errors. In addition, it will clean your Windows registry, protect your system from virus threats, repair system corruption, and more.
It also comes with tune-up capabilities, allowing it to improve or enhance the overall performance of your system.
You can learn more about this powerful tool, from the link below:
CLICK HERE TO CHECK OUT ADVANCED SYSTEM REPAIR PRO
Update Device Drivers
As previously noted, outdated or corrupted drivers are capable of causing the Driver WudfRd failed to load error. To get around this, you can check whether there are any incompatible (or conflicting) drivers installed on your system.
Problematic drivers are usually accompanied by an exclamation mark besides them.
So, that should be the first thing you do, before going any further.
To access Device Manager, simply do the following:
1. First, you will need to boot into your system as a full administrator.
2. Then press + R, type devmgmt.msc and click on OK.
3. When Device Manager loads up, check for any Yellow Exclamation marks. If you find one. Double-click on it, then take note of the device.
4. Then, visit the website of the device manufacturer and download the most up-to-date drivers off there, and install them.
Alternatively, if you do not find any Yellow Exclamation mark(s), then it’s recommended that you update as many drivers as possible.
There are two ways to do this, the first, is the manual method, which entails going through all the various devices on your system, and looking for more recent drivers for each device.
The second option is to use a driver automation tool, to automatically, scan, detect and download the latest drivers for all the devices within or connected to your system. The tool I’d recommend for this option is DriverFinder, which is capable of doing all of that, and then some.
You can learn more about this automation tool, from the link below:
CLICK HERE TO CHECK OUT DRIVERFINDER
Update Windows
An outdated or corrupted driver is possibly to blame for the Driver WudfRd failed to load error. Thus, a Windows Update is potentially capable of fixing the error, by installing the latest working iterations of your operating systems drivers.
To run the Windows Update feature, simply do the following:
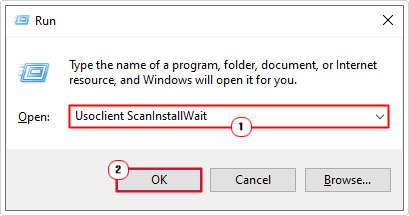
1. Make sure you’re booted into your system as a full administrator.
2. Then press + R, type Usoclient ScanInstallWait and click on OK.
Disable Hibernation
This method is not entirely a fix, although it has been known to fix the Driver WudfRd failed to load error. Essentially, it involves disabling the hibernation feature, to prevent the WudfRd error from occurring. So if you use this feature, this is the trade-off.
To disable Windows Hibernation, simply do the following:
1. Boot into your system as a full administrator.
2. Then type Power Settings into the Type here to search box, then click on Power & Sleep Settings.
3. This will load up the Power & Sleep applet, from here, scroll down and click on Additional power settings.
4. This will bring up Power Options, now click on Change plan settings, under the selected Power Plan.
5. Edit Plan Settings will load up, from here click on Change advanced power settings.
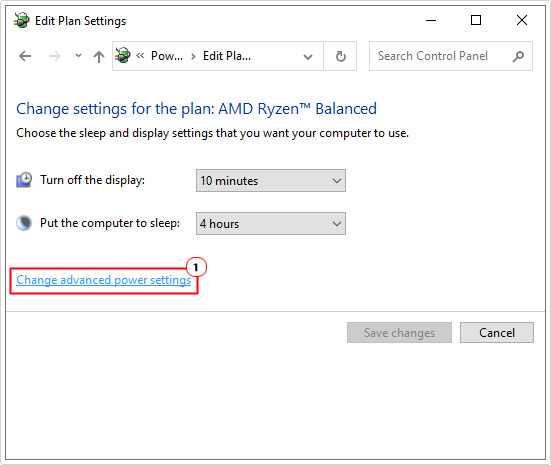
6. The Power Options Advanced settings applet should appear. Now click on the + icon next to Hard disk, then Turn off hard disk after. Now set the Setting (Minutes): to Never, then click on OK.
Enable Windows Driver Foundation Service
Windows Driver Foundation is both an integral component for your drivers and also the service of which WudfRd belongs to. If you’re receiving a Driver WudfRd failed to load error message (in Event Viewer), it’s possible it’s due to this service being disabled. To re-enable it, please do the following:
1. First, boot into your system as a full administrator.
2. Then + R, type Services.msc and click on OK.
3. When Services loads up, locate and double-click on Windows Driver Foundation – User-mode Driver Framework.
4. This will bring up the Windows Driver Foundation – User-mode Driver Framework Properties applet. From here, make sure Startup type is set to Automatic, then click on Start (if the Service has been stopped), then click on OK.
Reinstall USB Controller
Another possible cause of the WudfRd error is a corrupted USB controller driver(s). One effective way of getting around this is to reinstall the drivers that belong to the USB controller. This is a fairly simple process that involves doing the following:
1. First, follow steps 1 – 2 of Update Device Drivers to open Device Manager.
2. Next, click on the > Icon next to Universal Serial Bus controllers, then right-click on the USB Host Controller and select Uninstall device. Repeat this process for all devices labelled with USB.
3. Now, close Device Manager and restart your system.
The operating system will automatically reinstall the USB controller drivers at boot up.
Are you looking for a way to repair all the errors on your computer?
If the answer is Yes, then I highly recommend you check out Advanced System Repair Pro.
Which is the leading registry cleaner program online that is able to cure your system from a number of different ailments such as Windows Installer Errors, Runtime Errors, Malicious Software, Spyware, System Freezing, Active Malware, Blue Screen of Death Errors, Rundll Errors, Slow Erratic Computer Performance, ActiveX Errors and much more. Click here to check it out NOW!