
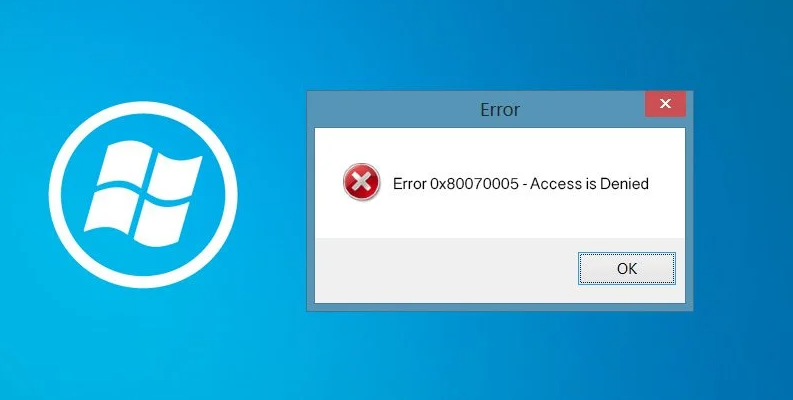
Ошибка 0x80070005 «Отказано в доступе» наиболее часто встречается в трех случаях — при установке обновлений Windows, активации системы и при восстановлении системы. Если же аналогичная проблема возникает в других ситуациях, как правило, решения будут теми же, так как причина ошибки одна.
В этой инструкции подробно опишу работающие в большинстве случаев способы исправить ошибку доступа восстановления системы и установки обновлений с кодом 0x80070005. К сожалению, рекомендуемые шаги не гарантированно приводят к ее исправлению: в некоторых случаях требуется вручную определять, к какому файлу или папке и какому процессу требуется доступ и предоставлять его вручную. Описанное ниже подойдет для Windows 11, Windows 10, 8.1 и 7.
Исправляем ошибку 0x80070005 с помощью subinacl.exe
Первый способ в большей степени относится к ошибке 0x80070005 при обновлении и активации Windows, так что если проблема у вас возникает при попытке восстановления системы, рекомендую начать со следующего способа, а уже потом, если не поможет, вернуться к данному.
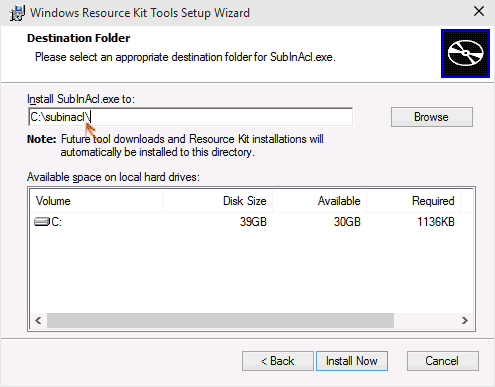
Для начала, загрузите утилиту subinacl.exe с официального сайта Microsoft (обновление: Microsoft удалила утилиту с официального сайта, но её можно скачать так, как описано в этой статье): http://www.microsoft.com/en-us/download/details.aspx?id=23510 и установите ее на компьютер. При этом, рекомендую устанавливать в какую-то папку, близкую к корню диска, например C:\subinacl\ (именно с таким расположением я буду приводить пример кода далее).
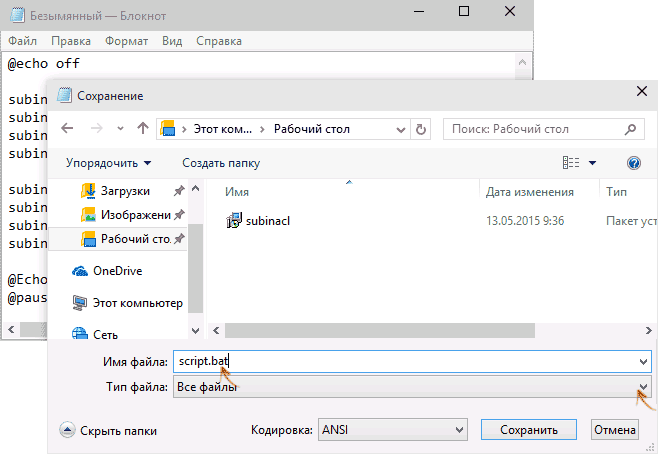
После этого, запустите Блокнот и введите в него следующий код:
@echo off

Set OSBIT=32
IF exist "%ProgramFiles(x86)%" set OSBIT=64
set RUNNINGDIR=%ProgramFiles%
IF %OSBIT% == 64 set RUNNINGDIR=%ProgramFiles(x86)%
C:\subinacl\subinacl.exe /subkeyreg "HKEY_LOCAL_MACHINE\SOFTWARE\Microsoft\Windows\CurrentVersion\Component Based Servicing" /grant="nt service\trustedinstaller"=f

@Echo Gotovo.
@pause
В блокноте выберите «Файл» — «Сохранить как», затем в диалоговом окне сохранения выберите в поле «Тип файла» — «Все файлы» и укажите имя файла с расширением .bat, сохраните его (я сохраняю на рабочий стол).
Кликните правой кнопкой мыши по созданному файлу и выберите пункт «Запуск от имени Администратора». По завершении вы увидите надпись: «Gotovo» и предложение нажать любую клавишу. После этого закройте командную строку, перезагрузите компьютер и попробуйте выполнить ту операцию, которая выдавала ошибку 0x80070005 снова.
Если указанный сценарий не сработал, попробуйте аналогичным образом еще один вариант кода (Внимание: код ниже может привести к неработоспособности Windows, выполняйте его только если готовы к такому исходу и знаете, что делаете):
@echo off

C:\subinacl\subinacl.exe /subkeyreg HKEY_LOCAL_MACHINE /grant=administrators=f
C:\subinacl\subinacl.exe /subkeyreg HKEY_CURRENT_USER /grant=administrators=f
C:\subinacl\subinacl.exe /subkeyreg HKEY_CLASSES_ROOT /grant=administrators=f
C:\subinacl\subinacl.exe /subdirectories %SystemDrive% /grant=administrators=f

C:\subinacl\subinacl.exe /subkeyreg HKEY_LOCAL_MACHINE /grant=system=f
C:\subinacl\subinacl.exe /subkeyreg HKEY_CURRENT_USER /grant=system=f
C:\subinacl\subinacl.exe /subkeyreg HKEY_CLASSES_ROOT /grant=system=f
C:\subinacl\subinacl.exe /subdirectories %SystemDrive% /grant=system=f

@Echo Gotovo.
@pause
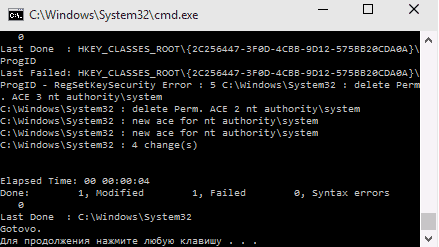
После запуска скрипта от имени администратора, откроется окно, в котором в течение нескольких минут поочередно будут меняться права доступа на разделы реестра, файлы и папки Windows, по завершении нажмите любую клавишу.
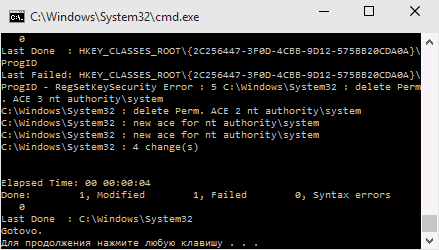
Опять же, лучше перезагрузить компьютер после его выполнения и только после этого проверять, удалось ли исправить ошибку.
Ошибка восстановления системы или при создании точки восстановления
Теперь об ошибке доступа 0x80070005 при использовании функций восстановления системы. Первое, на что следует обратить внимание — ваш антивирус: очень часто такая ошибка в Windows 11, 10, и 8.1 бывает следствием функций защиты антивируса. Попробуйте, используя настройки самого антивируса, временно отключить его самозащиту и другие функции. В крайнем случае, можно попробовать удалить антивирус.
Если это не помогло, то следует попробовать выполнить следующие шаги по исправлению ошибки:
- Проверить, не переполнены ли локальные диски компьютера. Очистить, если да. Также, возможен вариант, когда ошибка появляется, если Восстановление системы использует один из зарезервированных системой дисков и нужно отключить защиту для этого диска. Как это сделать: зайдите в панель управления — Восстановление — Настройка восстановления системы. Выберите диск и нажмите кнопку «Настроить», после чего выберите пункт «Отключить защиту». Внимание: при этом действии имеющиеся точки восстановления будут удалены.
- Посмотреть, не установлено ли «Только чтение» для папки System Volume Information. Для этого в панели управления откройте «Параметры папок» и на вкладке «Вид» уберите отметку с «Скрывать защищенные системные файлы», а также включите «Показывать скрытые файлы и папки». После этого, на диске C кликните правой кнопкой мыши по System Volume Information, выберите пункт «Свойства», проверьте, чтобы не было отметки «Только чтение».
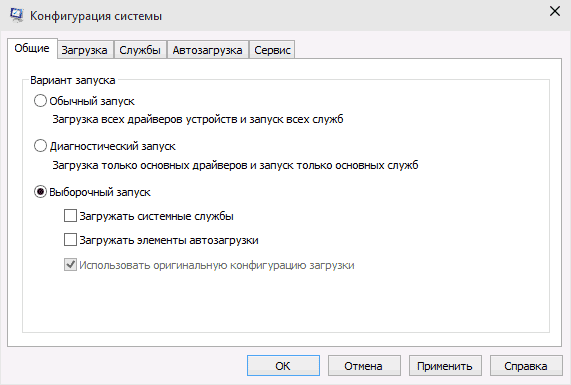
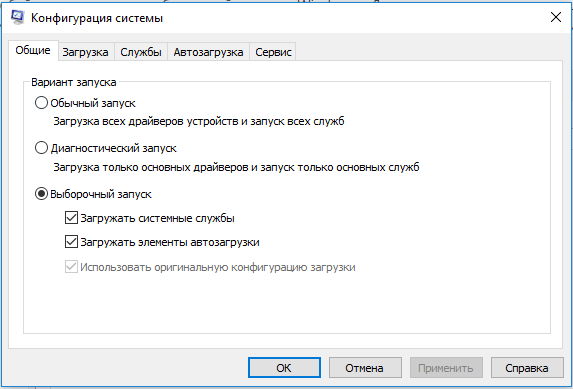
- Попробуйте выполнить выборочный запуск Windows. Для этого нажмите клавиши Win+R на клавиатуре, введите msconfig и нажмите Enter. В появившемся окне на вкладке «Общие» включите либо диагностический запуск, либо выборочный, отключив все элементы автозагрузки.

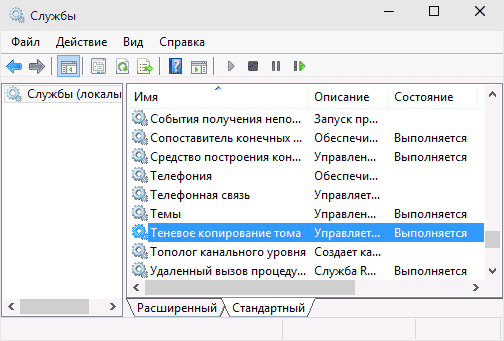
- Проверьте, включена ли служба Теневое копирование тома. Для этого нажмите Win+R на клавиатуре, введите services.msc и нажмите Enter. В списке найдите данную службу, при необходимости запустите ее и установите для нее автоматический запуск.

- Попробуйте сбросить репозиторий. Для этого перезагрузите компьютер в безопасном режиме (можно использовать вкладку «Загрузка» в msconfig) с минимальным набором сервисов. Запустите командную строку от имени администратора и введите команду net stop winmgmt и нажмите Enter. После этого переименуйте папку Windows\System32\wbem\repository во что-то другое, например, repository-old. Снова перезагрузите компьютер в безопасном режиме и введите ту же команду net stop winmgmt в командной строке от имени администратора. После этого используйте команду winmgmt /resetRepository и нажмите Enter. Перезагрузите компьютер в обычном режиме.
Дополнительная информация: если ошибку вызывают какие-либо программы, связанные с работой веб-камеры, попробуйте отключить в параметрах вашего антивируса защиту веб-камеры (например, в ESET — Контроль устройств — Защита веб камеры).
Пожалуй, на данный момент — это все способы, которые я могу советовать для исправления ошибки 0x80070005 «Отказано в доступе». Если эта проблема возникает у вас в каких-то других ситуациях, описывайте их в комментариях, возможно, я смогу помочь.
При попытке загрузить или установить обновление для любой актуальной ОС Windows Windows 7, 8, 8.1, 10 могут появляться ошибки. Сообщение с кодом 0x80070005 также порой отображается во время ввода лицензионного ключа или при восстановлении системы. Дальше мы расскажем, что вызывает проблему, а также приведем методы, которые обычно помогают ее исправить. Даже в случае, если ошибка отобразилась при других условиях, инструкция все равно должна оказаться действенной.
Причины ошибки 0x80070005
С помощью кода 0x80070005 система сообщает пользователю о том, что у нее нет доступа к некоторым файлам. Возможно, ей не хватает привилегий, данные совсем отсутствуют или нет файл оказался поврежденным. Нередко причиной становится слишком агрессивная политика работы антивируса. Защитное ПО порой накладывает блокировку на управление, редактирование и перезапись некоторых данных. Когда «Центр обновления Windows» пытается осуществить корректировку данных, она сталкивается с блокировкой и выдает системные сбои.
Как исправить ошибку 0x80070005 при обновлении или установке Windows?
В большинстве случаев рабочим методом исправления кода 0x80070005 является следующая инструкция:
- Открываем портал Microsoft и скачиваем файл SubInACL.exe.
- Активируем файл и разрешаем установку сюда — C:\subinacl\.
- Скачиваем файл по ссылке.
- Находим загруженный элемент, нажимаем на него ПКМ и выбираем «Запуск от имени администратора».
- После окончания работы скрипта, закрываем окно и перезагружаем компьютер.

Что делать при ошибке 0x80070005 во время восстановления ОС или создания бекапа?
Рекомендуем прибегнуть к следующим способам:
- Перезагружаем компьютер.
- Удаляем файлы SoftwareDistribution. Для этого в консоль последовательно вводим net stop wuauserv и net stop bits, затем переходим в каталог C:\Windows\SoftwareDistribution и чистим его. После выполнения процедуры снова вводим команды, но уже с параметром start вместо stop.
- Отключаем антивирусную защиту. Это можем сделать в трее, достаточно выбрать – «До перезагрузки».
- Проверяем наличие свободного места на диске, на котором будет происходить восстановление.
- Ищем папку System Volume Information в корне диска (следует активировать отображение скрытых и системных элементов. Переходим в «Свойства» и устанавливаем флажок «Только чтение», если он там не установлен.
- Чистый запуск ОС. Для этого вводим msconfig в поиск и выбираем одноименный файл, а затем выбираем «Выборочный» или «Диагностический запуск».

- Активируем средством исправления. Для этого переходим в «Параметры» (Win + I) в раздел «Обновление и безопасность». Затем идем на страницу «Устранение неполадок» и в блоке «Центр обновления Windows» жмем на «Запустить средство».
Вот и все, что может помочь в исправлении ошибки 0x80070005 при разных ситуациях. Обычно этого вполне достаточно и удается отделаться минимальными тратами времени или усилий.
When installing or checking updates through Windows Update, some Windows users have reported encountering the error code 0x80070005 with the message ‘Access Denied’.
If you are among those who’ve encountered the Windows update error 0x80070005, follow the solutions in this post to fix it.
What Is Windows Update Error 0x80070005?
Windows Update error 0x80070005 is also known as ‘Access Denied’ error. It is related to Windows Updates or upgrades.
This error can occur if the external hard drive is not showing up in File Explorer. Even though the files are there and the drive is connected, you cannot access them because the drive does not show up, leading to an Access Denied error.
Many users report encountering it when updating their Windows Operating System or upgrading to a new Windows version.
What Causes Windows Update Error 0x80070005?
The error 0x80070005 often occurs when the user or system lacks the required permissions or files to change settings during a Windows Update. Other reasons why this error may occur include:The system is unable to locate dependent dll files
- Corrupted/damaged registry files
- Presence of malware/virus in your PC
- The need to update all files downloaded and saved on your storage media
- The lack of important system files such as sys file, ocx file, inf file, and other files
This error code results in the Windows Update installation being aborted. After this, the user starts to experience an abrupt system restart, a system slow down, or a Crash —Blue Screen of Death (BSOD).
Ways to Fix Error 0x80070005 in Windows 10
To fix error 0x80070005 in Windows 10, you can try the fixes we have listed below.
But before you proceed to the solutions, you may carry out the following workarounds to ensure that you’re not experiencing a system error.
- Restart PC and rerun Windows Update: Perhaps the issue was a simple PC error or a network issue, which automatically resolves after a reboot.
- Scan your PC with anti-malware: Do this to remove malware or virus blocking the Windows Update process.
- Scan your installation media for malware: Do this if you’re uploading software from an external drive such as a USB disk, hard drive, etc.
- Check the disk space: Windows Update requires adequate storage space to install the updates successfully. If you have a small storage space, you may encounter error 0x80070005. To proceed with the installation, you may need to create enough space to download and store the update installers.
If these preliminary workarounds don’t help you fix error 0x80070005 in Windows 10, you can proceed to the following technical (troubleshooting) solutions.
Note: Before you begin using these troubleshooting solutions, have (or create) a Windows restore point to offer you insurance just in case something goes wrong and you lose your data.
Fix #1: Disable or Uninstall Third-Party Antivirus Programs
Some sensitive third-party antivirus programs can give false positives, which may stop Windows Updates. If scanning for malware did not generate any result, you can consider disabling or uninstalling the antivirus program to allow you to proceed with your Windows update.
You can uninstall the antivirus program before updating or upgrading your Windows. After the update process, you can install it back or switch to another antivirus software.
You may also consider disabling your Windows Firewall to continue downloading the Windows Updates. It is a great solution to fix many other update issues like error code 0x80246007 or Windows error 0x80004005.
Fix #2: Use the Windows Updates Troubleshooter
The Windows OS has a built-in, dedicated troubleshooter designed to fix all Windows Update-related issues easily. You can use this troubleshooter to fix the error 0x80070005 in Windows 10.
- Press Win + X, then click go to Settings.
- Next, go to Update & Security and click Troubleshoot.
- Click on Windows Update.
- Click ‘Run the troubleshooter.’
- Grant admin permission and follow the troubleshooting wizard to apply the recommended fixes.
This process will clear the Windows Update temporary files from your PC, the Software Distribution folder’s contents, and repair and reset Windows Update components.
Fix #3: Allow Full User Control
If there is a specific application causing the 0x80070005 error, perhaps the issue is from its folder permissions or the permission to access the files is misconfigured. When this happens, it blocks the download of the Windows Update.
You may have to give full user control (or take full control of user App data) to enable the updates to proceed. User App data is located at C:\Users\USERNAME\AppData.
Here’s how to grant a user full control of the Files and Folders:
- Open File Explorer in Windows 10.
- Navigate to the File or Folder section, then to the folder you want to take ownership of.
- Right-click on it, then select Properties.
- Select the Security tab.
- Click Advanced.
- Select the Owner tab (or click on “Change” and enter the object name).
- Click OK, then click on “Replace owner on sub containers and object” and click Apply.
Manipulations with Users permissions can also help you solve such issues like installation error 1603 and error 0xc0000022.
Fix #4: Run SFC
Running SFC will help you repair corrupted System Files in your PC that are causing the 0x80070005 error.
- Press the Win + R keys to open the Run dialog box.
- Type
cmdand press Ctrl + Shift + Enter to run Command Prompt as administrator.
- Type the command
DISM.exe /Online /Cleanup-Image /RestoreHealthinto the command line and press Enter.
- Wait for the process to complete.
- Go to the Run dialogue box, type
sfc /scannow, and press Enter key.
- Wait for this SFC process to complete, restart your device, and see if it has been solved.
Fix #5: Use SubInACL
If incorrect file permissions or registry permissions are responsible for the 0x80070005 error, you can use the SubInACL command-line tool to reset the permissions.
Note: This method is still experimental, according to Microsoft.
- Download and install SubInACL from the Microsoft Download Center.
- Open NotePad, then copy and paste the following text:
Set OSBIT=32
IF exist "%ProgramFiles(x86)%" set OSBIT=64
set RUNNINGDIR=%ProgramFiles%
IF %OSBIT% == 64 set RUNNINGDIR=%ProgramFiles(x86)%
subinacl /subkeyreg "HKEY_LOCAL_MACHINE\SOFTWARE\Microsoft\Windows\CurrentVersion\Component Based Servicing" /grant="nt service\trustedinstaller"=f - Save it and append a .CMD file extension. Store it in a location that’s easy to find.
- Right-click on the saved file and Run as Administrator
- Once you run it, restart your computer and see if this process has fixed the problem.
Wrapping Up
Before you update your Windows, always back up! Anything can go wrong. While Windows Update installations are often error-free, sometimes you may encounter issues such as Windows Update error 0x80070005 – Access Denied. If you find yourself in this situation, use one of the solutions we’ve provided here for a quick fix.
Stuck with the windows error code 0x80070005 pop-up message during windows update?
At Bobcares, we often get requests to fix such windows errors as a part of our Server Management Services.
Let’s see how our Support Engineers fix windows error code 0x80070005.
When is windows error code 0x80070005 triggered?

The error code 0x80070005 is usually triggered during Windows Update due to any of the following reasons:
- DLL files permission being denied.
- Access rights not configured correctly.
- Malware or virus infections.
- Settings to Windows Update not configured correctly.
- Issues with Administrative rights
- Firewall software
Commonly used solutions to fix error code 0x80070005:
1. Disable Windows Security
The steps to do this is given below
1. Take Settings.
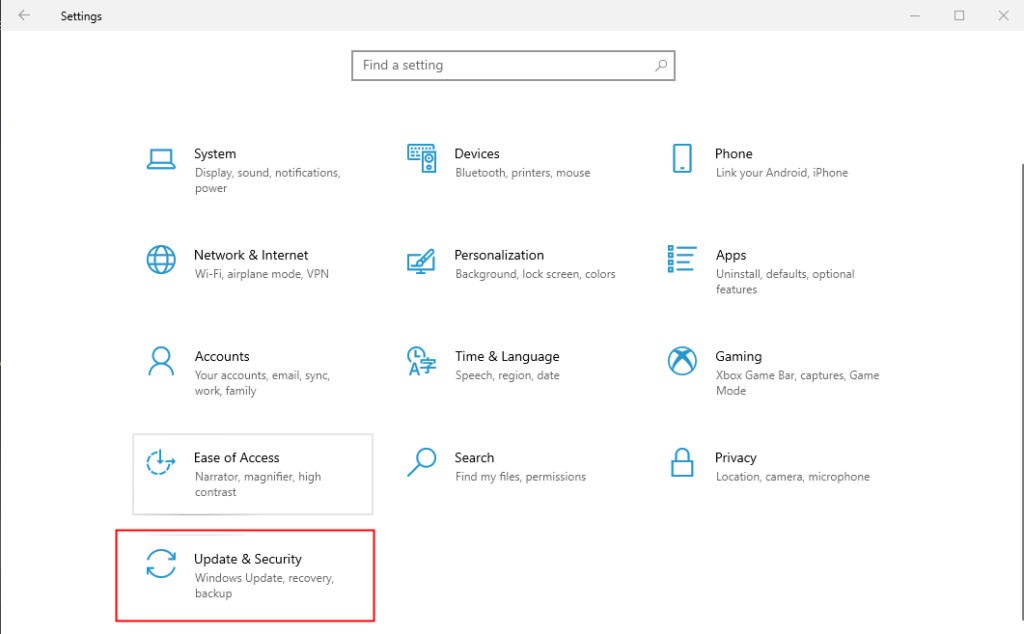
2. Settings window >> Update & Security.
3. Then click on “Windows Security“.
4. On the right-hand side, click on “Firewall & network protection“.
Windows Security window will be opened.
5. In the Firewall & network protection window, click on the network type which is “(active)”
(Like this computer is connected to a Private network. So ‘Private network’ is shown as ‘active‘.)
6. Scroll down to Microsoft Defender Firewall.
7. Switch Microsoft Defender Firewall to ‘Off‘.
8. Now, click ‘Home‘ to go back to the Windows Security window.
9. In the Windows Security window, click on “Virus & threat protection“.
10. Scroll down to Virus & threat protection settings section, click on “Manage settings”
11. In Virus & Threat protection settings, in the “Real-time protection” option, toggle it to “Off“.
Once we have done all the above steps reboot the computer. After rebooting, try copy-pasting the file/folder again.
Windows Defender Firewall and Real-time protection constantly shield the computer from potential threats and dangers so we strictly recommend turning both the settings “On” immediately after attempting this solution.
2. Restart VSC service
Volume Shadow Copy (VSC) service organizes several processes to create a shadow copy of important data.
The steps to be followed are given below
1. Press Windows key+R to open Run Window.
2. In the Run window, type “services.msc” and then hit Enter.
3. In the Services window, scroll down to the “Volume Shadow Copy” service.
4. Now, right-click on “Volume Shadow Copy” click on “Start“.
5. Now, right-click on the same service and then click on “Restart” to restart the service.
Close the Services window.
Check if the error message still persists.
3. Manage Access permission
We will need to create a restore point on the computer before proceeding to the main solution. So that if anything goes wrong we can easily restore the system back to normal again.
Step 1: Create SubInACL folder in the C: drive
1. Press Windows key+E to open the File Explorer window.
2. In the File Explorer window, double click on “Local Disk C:“.
3. Right-click on the space and then click on “New>” and then choose “Folder“.
4. Name the new folder as “SubInACL“.
Close File Explorer window.
Step 2: Download and Install SubInACL package
1. Visit the URL https://www.microsoft.com/en-us/download/confirmation.aspx?id=23510
2. Click on “Download” to download the SubInACL installer.
3. Choose a suitable download location and save.
4. Go to the location where you have downloaded the installer.
5. Double click on the “subinacl.msi” to start the installation process.
6. Click on “Next“.
7. Then, click on “Browse“.
8. Now, navigate to the location of the “SubInACL” folder you have created earlier.
9. Next, click on “OK“.
10. Now, click on “Install Now“.
11. Once the installation is done, click on “Finish” to finish the installation process.
Step 3: Create and Run a script
Now, to create and run a simple batch file on a computer.
1. Click on the Search box beside the Windows Icon, type “Notepad“.
2. Now, click on “Notepad” in the elevated search result.
3. Copy these lines from here and paste those in the blank Notepad page.
@echo off
Set OSBIT=32
IF exist "%ProgramFiles(x86)%"
set OSBIT=64
set RUNNINGDIR=%ProgramFiles%
IF %OSBIT% == 64 set RUNNINGDIR=%ProgramFiles(x86)%
C:\subinacl\subinacl.exe /subkeyreg "HKEY_LOCAL_MACHINE\SOFTWARE\Microsoft\Windows\CurrentVersion\Component Based Servicing" /grant="nt service\trustedinstaller"=f
@Echo Gotovo.
@pause
4. After that, click on “File” from the menu-bar and then click on “Save as“.
5. Now, set the “File name:” as “Script1.bat” and click on “Save as type:” and set it as “All files“.
6. Then save the batch file and close Notepad.
7. Locate the saved batch file.
8. Now, right-click on “Script1.bat“, and then, click on “Run as administrator“.
Wait till the process is completed and then reboot the computer.
Check if this helps.
Step 4: Create and Run another script
1. First open Notepad on the computer.
2. Copy and paste these lines in the blank Notepad page.
@echo off
C:\subinacl\subinacl.exe /subkeyreg HKEY_LOCAL_MACHINE /grant=administrators=f
C:\subinacl\subinacl.exe /subkeyreg HKEY_CURRENT_USER /grant=administrators=f
C:\subinacl\subinacl.exe /subkeyreg HKEY_CLASSES_ROOT /grant=administrators=f
C:\subinacl\subinacl.exe /subdirectories %SystemDrive% /grant=administrators=f
C:\subinacl\subinacl.exe /subkeyreg HKEY_LOCAL_MACHINE /grant=system=f
C:\subinacl\subinacl.exe /subkeyreg HKEY_CURRENT_USER /grant=system=f
C:\subinacl\subinacl.exe /subkeyreg HKEY_CLASSES_ROOT /grant=system=f
C:\subinacl\subinacl.exe /subdirectories %SystemDrive% /grant=system=f
@Echo Gotovo.
@pause
3. Click on “File” and then, click on “Save as“.
4. Then, set the “File name:” as “Script2.bat” and for “Save as type:“, set it as “All files“.
5. Save the batch file and Notepad window.
6. Locate the saved batch file.
7. Now, right-click on “Script2.bat“, and then, click on “Run as administrator“.
Once the batch file has finished executing the commands, reboot the computer.
After rebooting the computer, the error message will not be seen again.
[Still stuck with windows error code 0x80070005? We are here for you!]
4. Change the read-only attribute of System Volume Information
The following are the steps required to change the read-only attribute.
1. Press Windows key+E to open the File Explorer window.
2. In the File Explorer window, double click on “Local Disk C:“.
3. Now you need to click on “View” on the menu bar.
4. Click on “Options“.
5. Click on the “View” tab.
6. Then, check the option “Show hidden files, folders, and drives“.
7. Scroll down and uncheck the option “Hide protected operating system files (Recommended)“.
8. If there is a confirmation message, click on “Yes“.
9. Next, click on “Apply” and then click on “OK“.
10. Now, the ‘System Volume Information‘ folder can be seen in C: drive.
11. Right-click on the “System Volume Information” folder and then click on “Properties“.
12. In the Properties window, make sure to leave a ‘Box‘ checkmark in the “Read-only” option.
13. Finally, click on “Apply” and then click on “OK“.
Close the File Explorer window.
5. Allow user full control
If the 0x80070005 error is caused by a specific application, then the issue may be from its folder permissions.
1. Open Run
2. Type: C:\Users\USERNAME\AppData
Replace C: with the letter of the drive where Windows is installed. Also, replace USERNAME with the username of the account you are logged in.
3. Click OK
4. Right-click on the Local folder
5. Click Properties
6. Go to the Security tab
7. Click “Edit -> Add”
8. Type “Everyone”
9. Click “Check names -> Ok -> Full control”
10. Click OK to save the changes
11. Restart the computer
After verifying that this fix works, we should attempt to narrow down which folders this should be applied to, as it is never a good idea to leave the ACL settings wide-open in this manner.
[ Looking for help to find the exact folder?- We are here for you!]
6. Configure Windows Update Settings
One of the easiest ways to fix windows error code 0x80070005 is to configure Windows Update settings to allow automatic updates.
Ensure that you are logged in as an Administrator and then follow these steps:
1. Click Start
2. Type update in search box
3. Select Windows Update from the search results list
4. Click Change Settings
5. Select Install updates automatically (recommended) at the Important Updates section
6. Set a schedule when the updates are going to be installed
7. Click OK
If Windows Firewall settings are too strict, then error 0x80070005 might appear even if the Windows Update settings are set to automatically install updates.
To fix this, follow these steps:
1. Click Start
2. Type firewall in the search box
3. Select Windows Firewall from the search results list
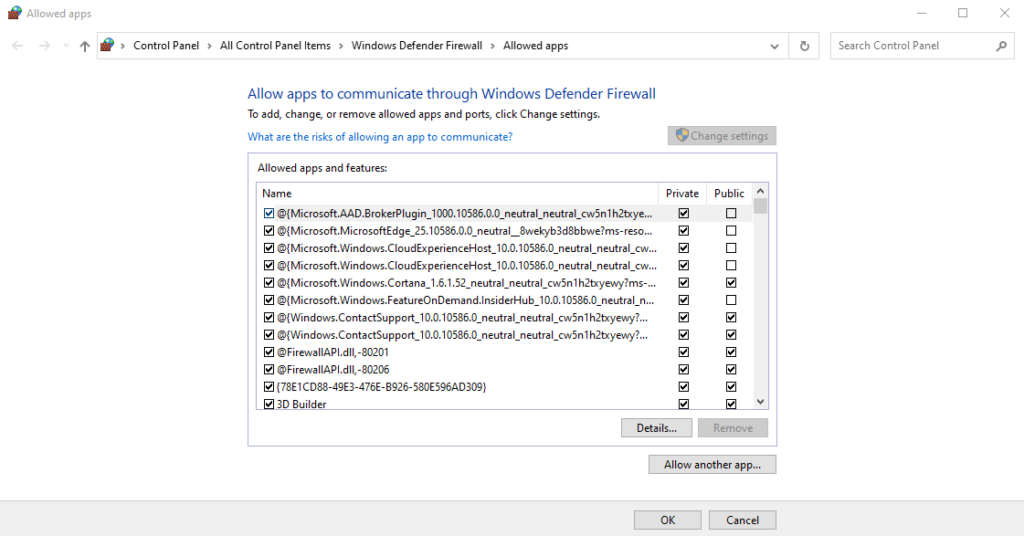
4. Choose Allow a program or feature through Windows Firewall from the left side
5. Click Allow another program
6. Click Browse
7. Look for the svchost.exe file
8. Click Open
9. Click Add
10. A new program called Host Process for Windows Services should be on the list.
11. Click OK
Some other ways to fix error code 0x80070005 are:
1. Scan for viruses
Run an antivirus scan of the computer to ensure that the PC is not infected.
Windows update requires adequate storage space to complete the update successfully. So before starting the updates, make sure the system has enough storage space to accumulate the updates.
2. Use Windows Updates Troubleshooter
Windows provides a dedicated troubleshooter wizard to fix all Windows update-related issues quickly.
3. Run SFC
SFC or System File Checker is a Windows inbuilt utility that lets you scan and repair damaged and corrupt system files that might possibly be hindering the update installation.
4. Manually Update the Windows
When everything fails to fix the Windows update error code 0x80070005, update Windows manually.
[Need further assistance? We are here for you!]
Conclusion
In short, we’ve discussed the causes of the error. Also, we saw different methods that our Support Engineers follow to fix this error.
PREVENT YOUR SERVER FROM CRASHING!
Never again lose customers to poor server speed! Let us help you.
Our server experts will monitor & maintain your server 24/7 so that it remains lightning fast and secure.
GET STARTED
var google_conversion_label = «owonCMyG5nEQ0aD71QM»;
-
Written By
-
Updated on
December 21st, 2022
Error code 0x80070005 – It’s Windows update error is also known as Access Denied error. It arises when the computer needs the permissions to change settings while Windows update. Hence, Windows update installation canceled, and the users go through multiple issues such as system abrupt system restart, slow down, and crash—Blue Screen of Death (BSOD). To repair your lost data due to any of the above reasons, follow this article.
Windows Update is a free Microsoft service. It allows updates like service packs and patches for the Windows OS and other Microsoft software. Windows update, help in protecting our Computer From Malicious Activities, Resolve casual Windows Problems and Bugs, and allow access to New Windows & Software Features.
Read Also: How to Fix Windows Update Error Code 0x80070002
Methods to Fix Error Code 0X80070005
Here are some methods which will help you in fixing this 0x80070005 error:-
Method 1: Shift User Account to Administrator Account
An administrator account holder is the master user of the computer and allowed to make changes in the computer system. The Administrator account can configure security settings, manage software, hardware, and all files. Some of the user’s profile is password-protected so that you have to remember the password to log in to the user account.
Now you can shift the user account to admin with the following steps.
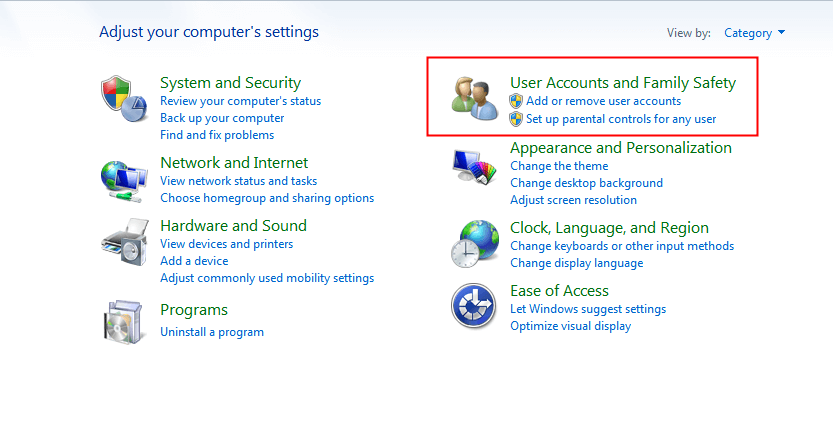
- Tap the START button and select CONTROL PANEL. Here, open the USER ACCOUNT option.
- Here, on the User Accounts window, you see all the user’s accounts, then select your user account. Click Change the account type and type the password.
- Log out Windows and log back in again, then you have the same access rights as the Administrator Account. Then, try installing Windows updates now.
Method 2: Manual Update the Window
Follow another method to update the error code 0x80070005 manually. Follow the below-described steps:-
First, move to Settings/Update & Security/Windows Update.
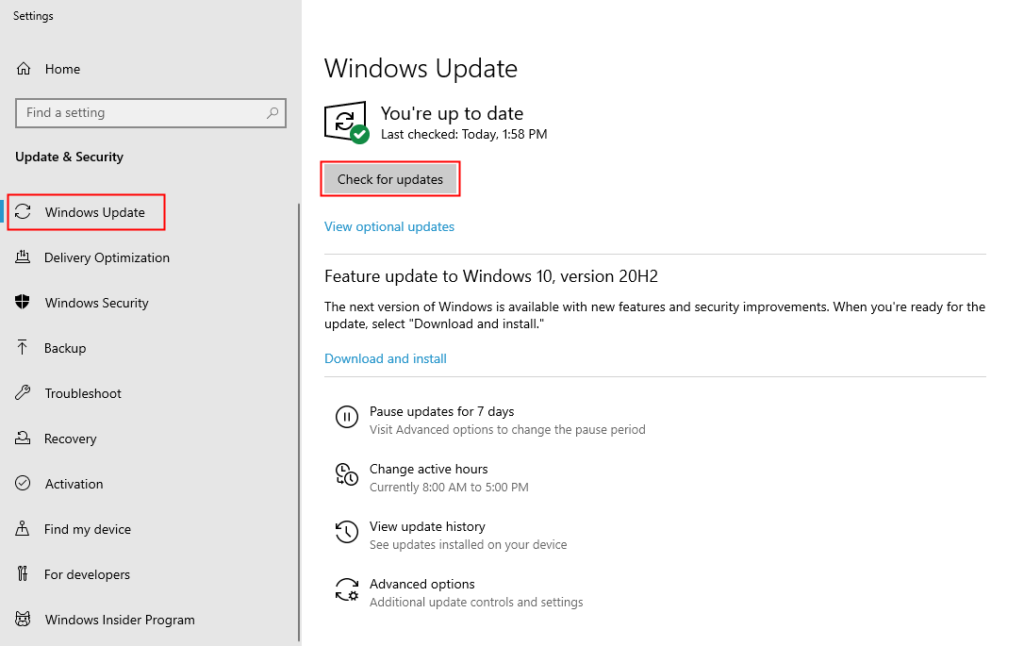
- Now, click on View Update History and copy the Windows Update version code.
- Next, visit Windows Updates Catalogue.
- Finally, type your update version code in the search box and click ENTER or tap the SEARCH button. If you find an error or get a notice, then the update is not installed successfully, reset your system.
Method 3: Configure Windows Update Settings
The solution is to configure Windows Update settings to permit automatic updates.
Firstly, make sure you logged in as an Admin.
Follow these below steps:
- Firstly, type update in the search box and select Windows Update from the search results.
- Then, click on Change Settings.
- Next, you can choose to Install updates automatically (recommended).
- Now, fix a schedule for when the updates are going to be installed and click on the OK button.
If Windows Firewall settings are strict, the error code 0x80070005 could display. To fix this, follow these below steps:
- First, type firewall in the search box and choose Windows Firewall from the search results list.
- Select Allow a program through Windows Firewall from the left side and click allow another program.
- Then, click Browse and Look for the svchost.exe file
- Now, click Open
- Click Add
- A new program known as Host Process for Windows Services will be in your index.
- Finally, click Done.
Method 4: Run Windows Update Troubleshooter.
Make sure you logged in to the Administrator account. If not, the Windows update troubleshooter does not work. Execute a clean boot, reboot the computer, and try again.
- First, search for Troubleshooting and Click on Troubleshoot.
- Then, search Windows update. Tap on Run the Troubleshooter. Follow the given on-screen instructions.
Method 5: Perform Clean Boot
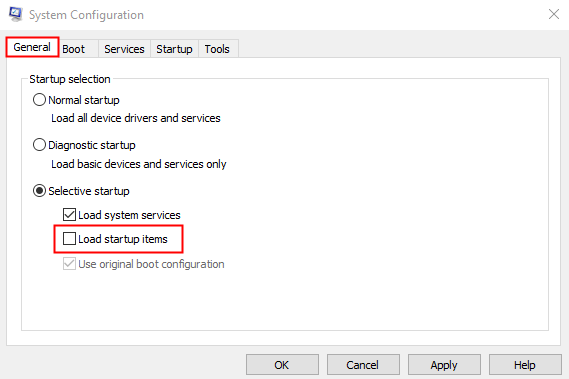
- In the beginning, type Windows + R. Type MSConfig and click Done.
- Then, On the General tab, untick Load startup items.
- Next, Click on Hide all Microsoft services on the Services tab. Tap on Disable all. Press OK.
- Finally, restart the computer and run the Windows update troubleshooter. Step 2 again.
Summing it up
Before starting, an update of your Windows makes sure to back up your files. In this blog, we will describe all the possibilities to fix the error code 0x80070005 securely and effectively. I hope these methods help you in fixing this suspicious error.
Related Post