
While surfing internet in your browser, you may face Server IP address could not be found error. This is a common issue for the Google Chrome users. We bring to you a helpful guide that will fix server IP address could not be found error on Windows 10. So, continue reading!

Table of Contents
One of the most popular web browser is Google Chrome. However if you are facing the error while browsing in the Chrome browser, then do not worry! This issue may be caused due to various reasons like;
- Unstable Internet Connection
- Corrupt Browser Cache and Cookies
- Incorrect IP Address
- Corrupt DNS Cache
- Outdated Network Drivers
Here, we have listed all possible methods to fix the said issue on Windows 10.
Method 1: Troubleshoot Network Adapter
The said issue may occur due to your network error. You can run the network adapter troubleshooter to fix any errors with your network adapter. Read our guide to troubleshoot network connectivity on Windows 10.

Method 2: Clear Browser Cache
The cache files in your web browser may get corrupt. You can try to clear the cache and cookies of your browser and try to check if the error still persists or not. Follow these steps to clear browser cache.
1. Launch the Chrome browser from Windows search bar as shown.

2. Now, click on the three-dotted icon at the top right corner.
3. Here, click on the More tools option.
4. Next, click on the Clear browsing data… option.
Note: You can type chrome://settings/clearBrowserData in the search bar to launch the browser history page directly.

5. Here, select the Time range in the next window. Check the boxes marked:
- Cookies and other site data and
- Cached images and files.

6. Finally, click on Clear data.
Also Read: Fix This Plugin is Not Supported error in Chrome
Method 3: Clear DNS Cache
You can try to clear the DNS cache to fix server IP address could not be found error. Follow our guide to flush and reset the DNS cache in Windows 10.

Method 4: Release and Renew IP Address
Here are the steps to release and renew the IP address.
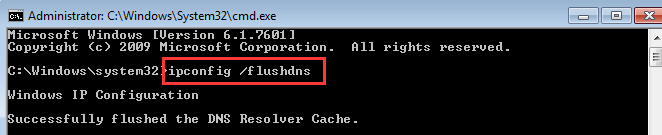
1. Hit the Windows key, type Command Prompt, and click on Run as administrator.

2. Firstly you should flush the DNS cache as shown in Method 2.
3. Once the above process is complete, type ipconfig /release and press the Enter key.

4. Then, type ipconfig/renew and hit Enter to renew your IP.

Also Read: Fix No WiFi Networks Found in Windows 10
Method 5: Change DNS Address
Incorrect DNS address also cause this said Chrome error. You can change your DNS address to fix the error. Follow the given steps to change DNS address.
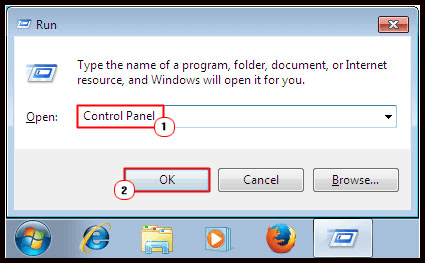
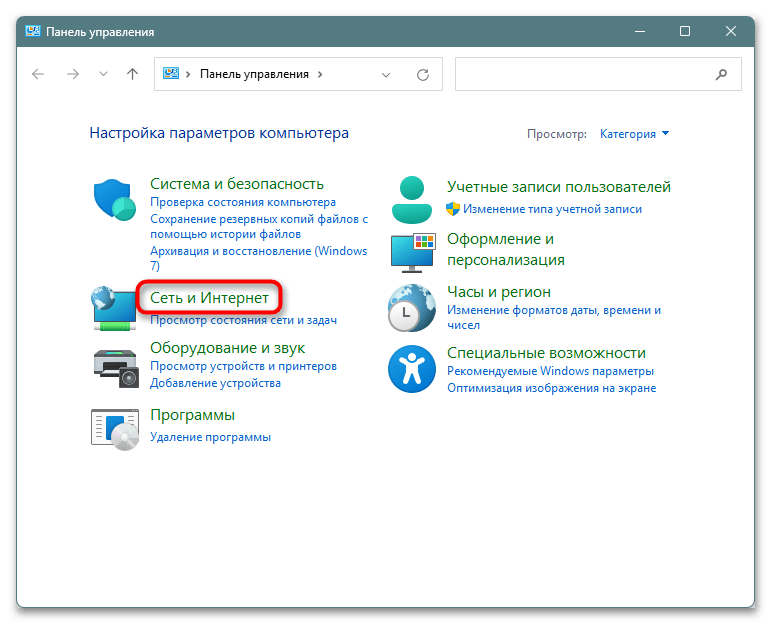
1. Press the Windows key, type Control Panel and click on Open.

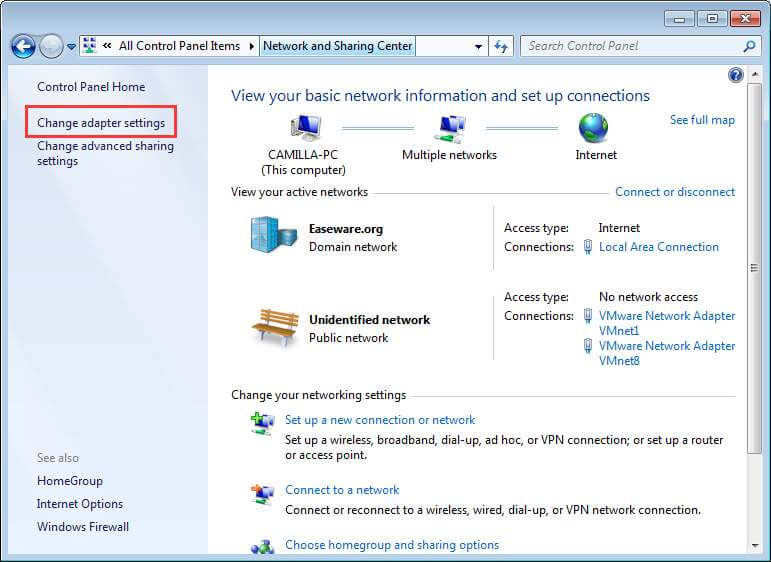
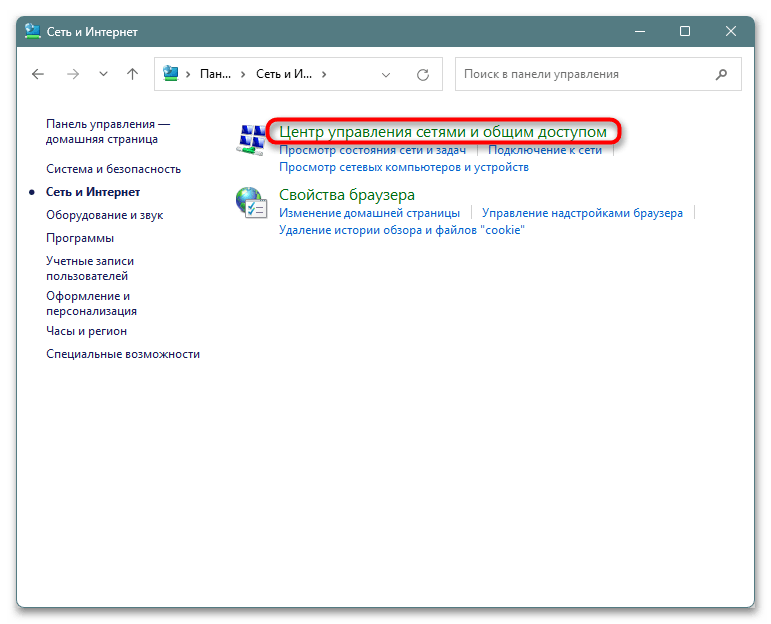
2. Set View by > Category and click on View network status and tasks.

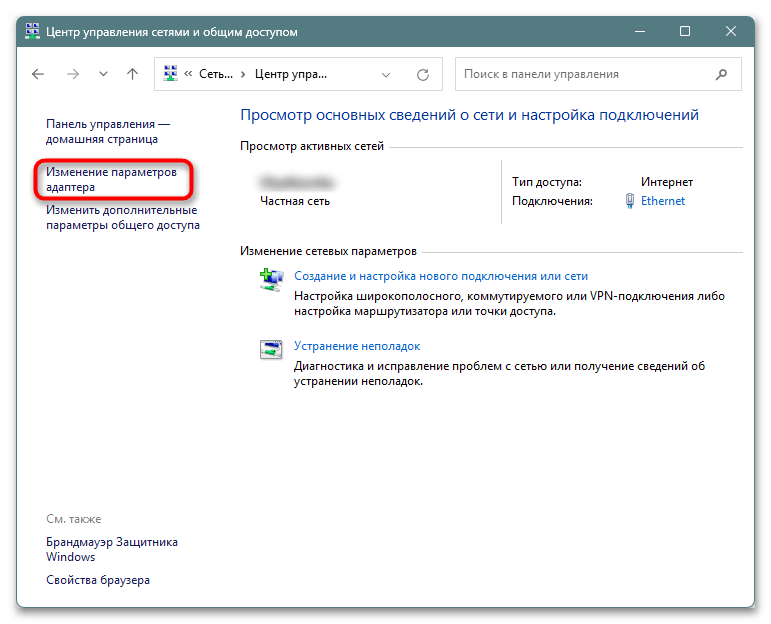
3. Now, click on the Change adapter settings option at the left sidebar.

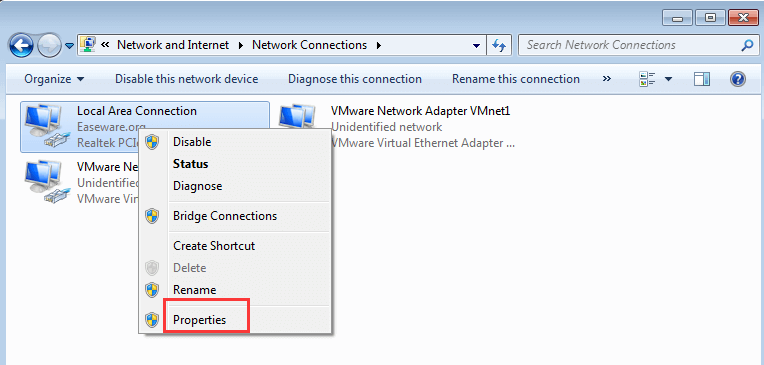
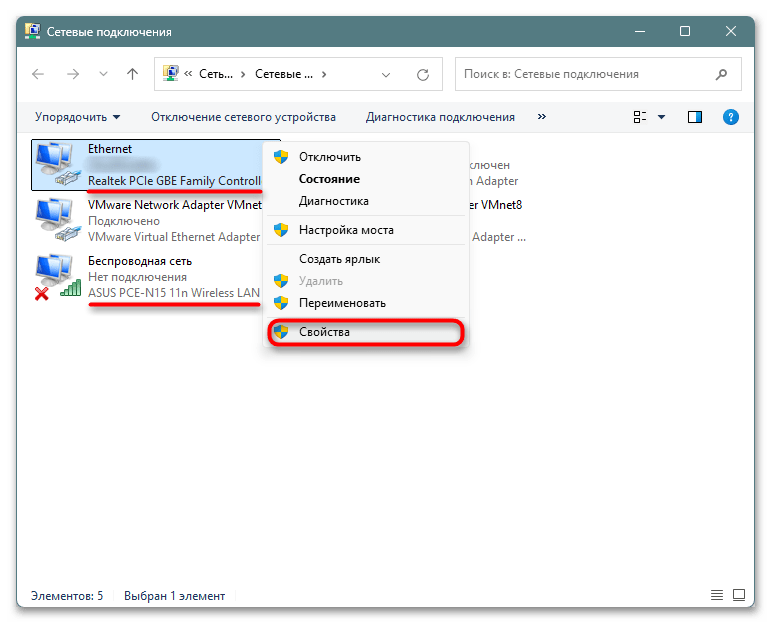
4. Next, right-click on your currently active internet connection and select Properties, as highlighted.

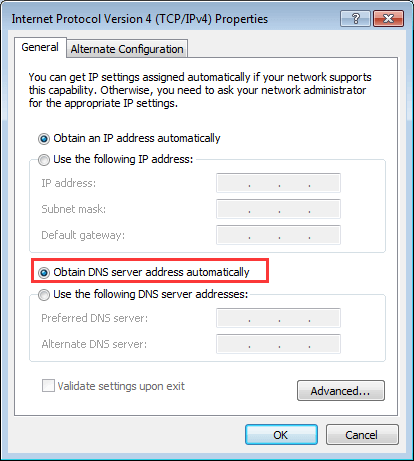
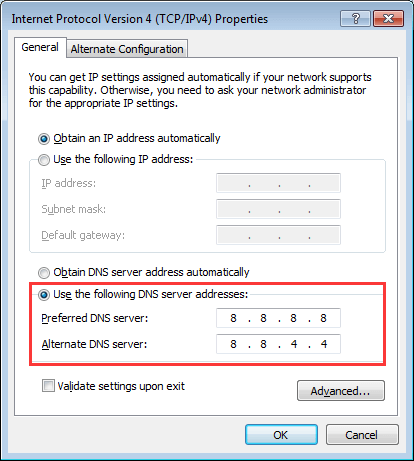
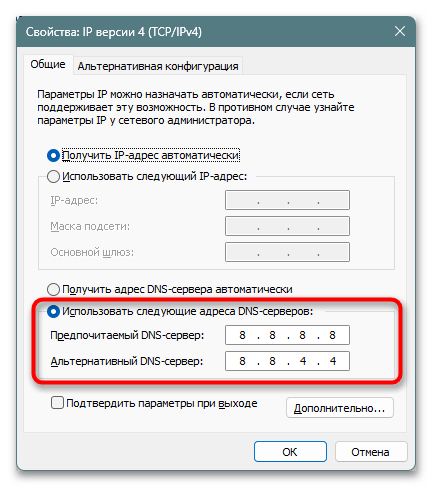
5. In the Properties window, double-click on Internet Protocol Version 4 (TCP/IPv4).

6. Next, check the options titled Obtain an IP address automatically and Use the following DNS server addresses, as highlighted.
6a. For the Preferred DNS server, enter the Google Public DNS address as: 8.8.8.8
6b. And, In the Alternate DNS server, enter the other Google Public DNS as: 8.8.4.4

7. Lastly, click on OK to save the changes and reboot the PC.
Method 6: Restart DNS Cache
You can follow these steps to restart DNS cache.
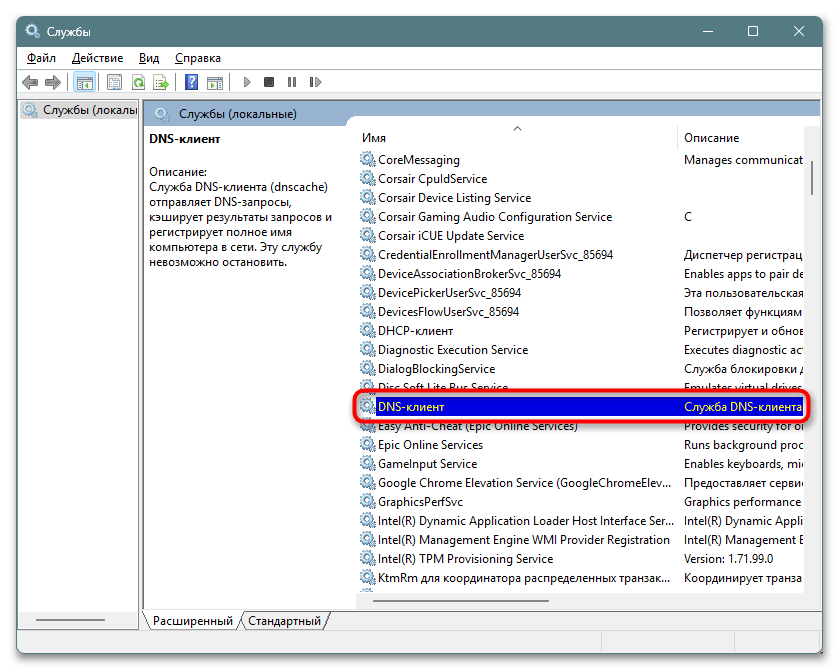
1. Press the Windows + R keys together to open Run dialog box.
2. Then type services.msc and press the Enter key to open Services window.

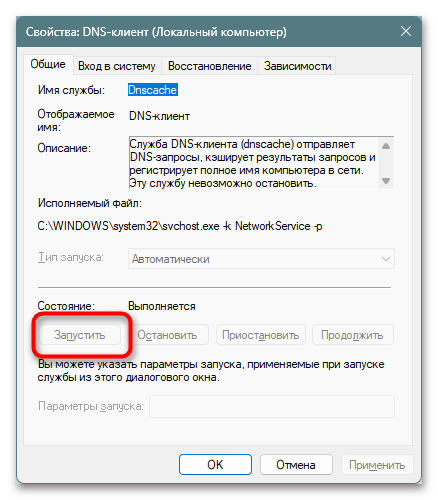
3. Right-click on DNS Client and select Restart.

Note: If you find no restart option and unable to restart it from this method, you do not need to worry. You just need to open an elevated Command Prompt on your system.
4. Type the following command and press the Enter key.
net stop dnscache

5. To start it again, type the given command and hit the Enter key.
net start dnscache

Also Read: How to Reset Network Settings on Windows 10
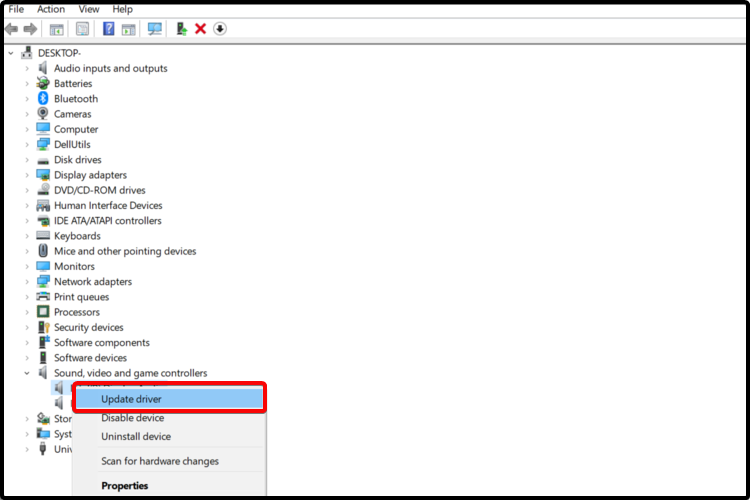
Method 7: Update Network Driver
Outdated network drive also can cause server IP address could not be found error. If you do not have the latest driver versions installed, then this may create bugs and can result in the unstable network connection. So, updating your network driver is necessary for a good network connection. Read our guide to update network drivers on Windows 10.

Method 8: Verify Proxy Settings
If you are using a proxy server, then using a particular proxy can create issues with your internet. You can change your proxy server to solve this problem. Follow the steps listed below to verify proxy settings.
1. Hit the Windows key and type Proxy and click on Change proxy settings from the search results.

2. Here, switch on the toggle for Automatically detect settings.

Recommended:
- How to Perform Reverse Scrolling on Windows 10
- Fix Incognito Mode Error on Netflix
- Fix Outlook Trying to Connect to Server on Windows 10
- Fix Minecraft Server Can’t Keep Up
We hope that you learned how to fix server IP address could not be found on Windows 10. Feel free to reach out to us with your queries and suggestions via the comments section below. Let us know what you want to learn about next.
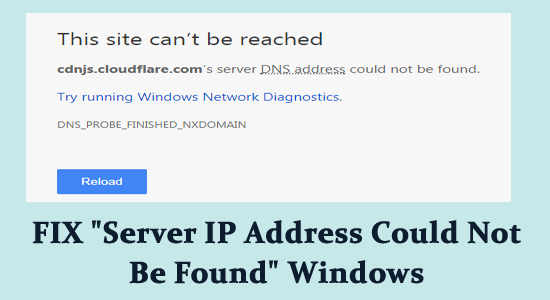
Seeing the ‘Server IP Address Could Not Be Found’ error message while surfing the internet or opening a web page? Well, this is a common error reported by many Windows users on their Google Chrome browser and stops the users from accessing certain websites and showing the error 404.
If you are also facing this issue and looking for how to fix server IP address could not be found an error in Google Chrome, then follow the step-by-step instructions and start accessing the website.
What Does It Mean When Server Not Found?
The “Server Not Found” is an error message (“404” error) that shows when the web browser or the client can connect with the web server, but cannot find the requested information.
An error that is similar to “404” is the “Server Not Found” error. This error fallouts from the chosen destination server not able to find a connection with the requesting client, because of a domain title server problem.
What Causes Server IP Address Could Not Be Found Error to Appear?
This is a common error that arises when the Domain Name does not match its IP address. There are a variety of system errors that occur due to some reasons such as:
- Inaccessible DNS server,
- Incorrect network configuration
- IP address change at a server-level
- Temporary glitches and more.
Whatever be the reason behind this issue, check out the solutions to fix DNS Address Could Not Be Found on Windows 10.
Here is the list of solutions that will help you to error. Now, check out the full steps to perform these solutions and fix the error.
Solution 1: Reboot Chrome Browser
The first solution we recommend is to restart the Google Chrome browser as many times the problem occurs due to some sort of internal glitches.
And restarting the chrome browser will re-establish the entire browser connections and may allow you to establish connections with the sites after fixing the error.
- Simply close the Chrome browser by clicking the X icon in the top right corner of the browser.
- And reopen the Chrome browser by double-clicking on the shortcut.
- Try accessing the website which is showing the error to see if you are able to visit the website without seeing the error.
Solution 2: Check Your Internet is Working Fine
Another possible reason why you are seeing the error is your internet connection is not working fine or is unstable. A slow or unstable internet connection can cause glitches when opening the website and stop you from accessing it.
And might show the error Server IP Address Could Not Be Found, therefore here it is suggested to make sure your internet connection is working fine.
Moreover, you can also examine the internet connection by opening another browser or another app and opening a website. If the other site load properly then the problem might be with the particular website or the browser.
But if in case another website fails to load then fix the problem with your internet connection. Here it is suggested to restart the router and the modem as this will solve the glitches that interrupt the internet connection from running properly.
Moreover, if restarting the router or modem won’t work for you then reset your router and check if the problem is resolved. You can also connect with your internet service provider to fix the problem related to the internet and optimize its speed.
Solution 3: Update the Network Drivers
If in case the network drivers are outdated they won’t support the network hardware in the computer and cause problems when connecting to the internet and may stop the network hardware from running properly.
Below follow the steps to update the network drivers:
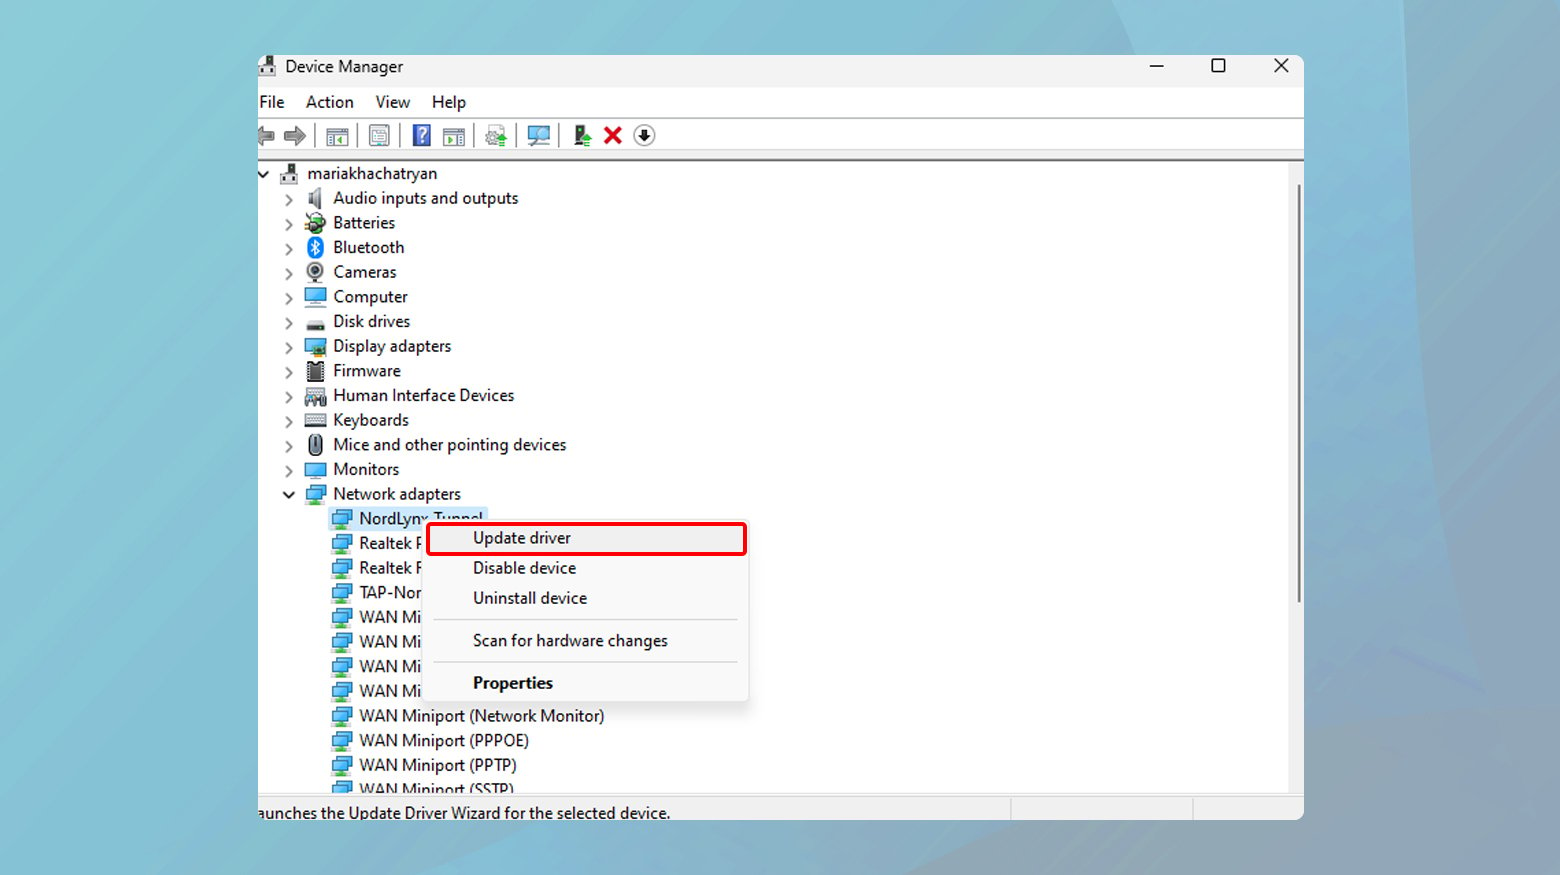
- Press Windows + X key and choose Device manager to open it
- Now right-click on the Network Adapter and choose the option Update driver
- Then click on the option Search automatically for the updated drivers
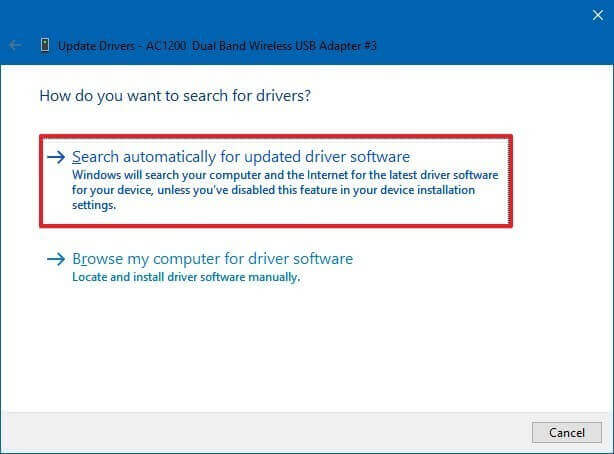
- Windows will now search for the updated drivers and update the network drivers.
However, many times Windows fails to detect and update the drivers, so here it is suggested to go for the Driver Updater tool. This updates the entire system drivers, just by scanning once.
Get Driver Updater to update network driver automatically
Solution 4: Reinstall WIFI Driver Files
If updating the network driver won’t work for you then reinstall the WIFI driver as this help you to fix server IP address could not be found the problem. Before starting to upgrade or reinstall Wi-Fi driver files, disable the compatible hardware checkbox.
So, you can search for the previous versions of the drivers to solve the glitches and driver-related issues. Follow the steps to do so:
- Open Device Manager in your Windows and select ‘Network adapters’
- When you get the My computer icon on the desktop you can use Computer management or open it from the Control panel
- Double Click on your Wi-Fi Network Adapter name
- Go to the “Driver” tab and hit the “Uninstall Driver” option
- Once the driver is uninstalled, install the latest driver by heading to the official website.
- And as the driver is downloaded install it on your Windows system.
After completing reinstalling the driver, restart your machine and now all things should work smoothly.
Solution 5: Delete Unnecessary Files in the Folder
Deleting unnecessary files in the driver folder is a simple solution to fix server not found errors.
Navigate C:\Windows\System32\drivers\etc and delete all the unnecessary files in there.
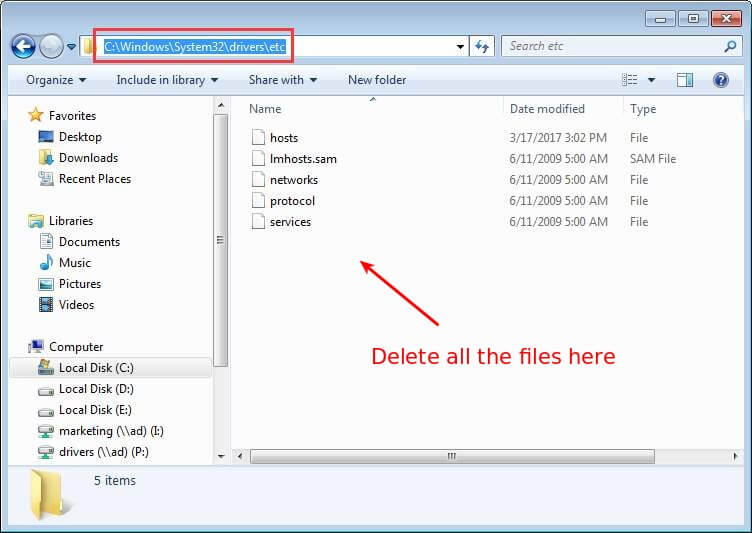
Now, try to access the internet again in Chrome and check whether the problem is solved or not.
Solution 6: Clear the Chrome Host Cache
If the Chrome host cache is corrupted or full, then you will unable to access any of the websites.
As this is a common issue causing server IP address could not be found the error, you may also face DNS probe finished nxdomain in Google chrome and it can be fixed by following the below-given steps.
- Open Chrome
- In address bar, type chrome://net-internals/#dns and press Enter
- Click on Clear host cache
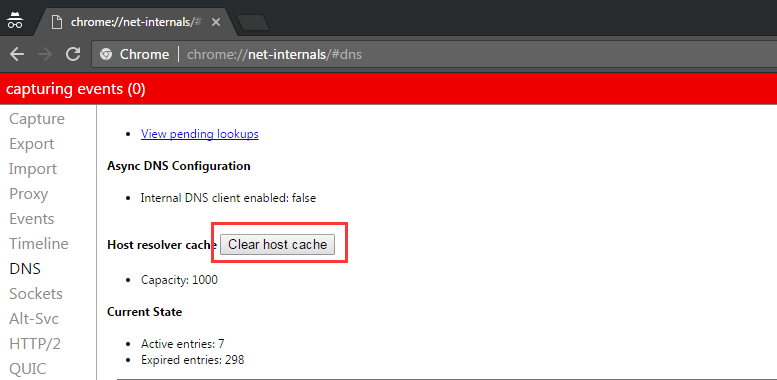
After clearing the chrome host cache, check whether the problem is fixed or not.
Solution 7: Change your DNS Server Settings
If the DNS server locations are configured improperly, then you won’t be able to access the internet. To make your DNS work correctly follow the steps given below:
- Press the Windows +R key
- Type control panel and click OK
- Click on Network and Sharing Center

- Click on Change adapter settings
- Right-click on the connection icon (either on Local Area Connection or on the Wireless Network Connection), and then click on Properties
- Click on Internet Protocol Version 4 (TCP/IPv4)and then click on Properties
- In the General tab, perform either of the following steps depending on ‘Obtain DNS server address automatically selected.
a) If the Obtain DNS server address automatically is NOT selected, then select it, and click on OK
b) If the ‘Obtain DNS servers address automatically’ is selected, then select Use the following DNS server address and enter the following server address and click on OK
Preferred DNS server: 8.8.8.8
Alternate DNS server: 8.8.4.4
After performing the above steps, it is expected that the server IP address could not be found windows 10 error is resolved.
Solution 8: Renew & Flush DNS
Windows repeatedly stores the IP addresses of any websites you visit, so the website will open faster the next time you visit it.
But if the cache becomes corrupted or outdated it will prevent you from accessing the internet. Check what causing the problem and then simply renew & flush the DNS.
Follow the steps to do so:
- Press Windows + R key
- Type cmd and then press Ctrl + Shift + Enter to open the Command Prompt as an administrator
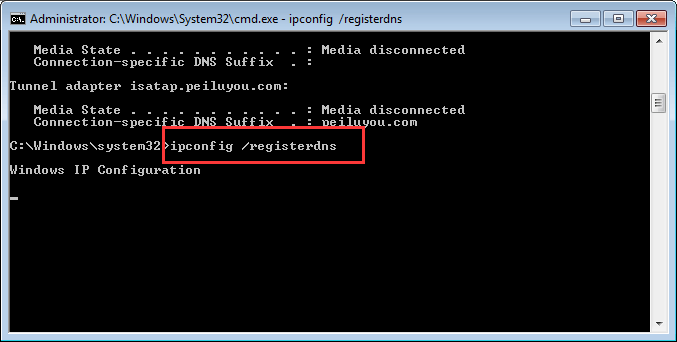
- Type ipconfig /flushdns and hit Enter
- Type ipconfig /renew and hit Enter

- Type ipconfig /registerdns and hit Enter
Reboot your computer and see whether the IP address not found Windows 10 problem is fixed or not.
Solution 9: Check the Proxy Settings
In many cases the error Server IP Address Could Not Be Found is fixed by configuring the proxy server. So, here you need to check which proxy setting your PC is using, as this helps you to assure that they aren’t interfering with the chrome browser.
Here follow the steps to do so:
- Click on the Start menu, and in the search box type Proxy settings, and open the settings
- Now on the page that opens click on the option automatically detect settings
- And disable Use a proxy server option to disable the proxy settings temporarily
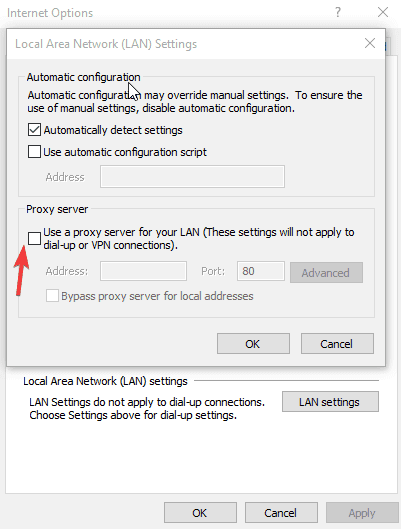
- Then launch Chrome and see if you are able to access the website.
Solution 10: Restart the DNS Client Service
Restarting the DNS client service might help you in solving the server IP address could not be found the problem.
Follow the steps to restart the DNS client service:
- Press Windows + R key
- Type services.msc in the Run box and click OK
- Find the DNS client in the service Window, right-click on it and click on Restart

- Now, close the service Window
Check whether the DNS Server not responding Windows 10 problem is solved or not.
Best & Easy Solution to Fix Various Windows PC Issues & Errors
Many times you start seeing the error due to the PC’s internal issues, so here it is suggested to run the PC Repair Tool. This advanced repair is will scan your PC once, detect the issue and solves the errors such as DLL error, registry error, BSOD error, game error, and others automatically without the need of any professional.
It is an expert tool developed by professionals in order to deal with several problems of Windows PC. Use this tool to scan your PC and fix the PC errors.
Get PC Repair Tool to Fix Windows Issues & Errors
Conclusion
So, these were the solutions that will help you fix DNS server not found error on the Windows system. It is estimated the solutions given work for you to solve the error
Make sure to perform them carefully one after another and get rid of Server Ip Address Could Not Be Found error
It is expected that this article turns out to be useful in solving your problem and allowing you to access the internet.
Apart from this, if you have any sort of questions or suggestions regarding the DNS server or this article then write to us on our Facebook Page.
Good Luck..!
Hardeep has always been a Windows lover ever since she got her hands on her first Windows XP PC. She has always been enthusiastic about technological stuff, especially Artificial Intelligence (AI) computing. Before joining PC Error Fix, she worked as a freelancer and worked on numerous technical projects.
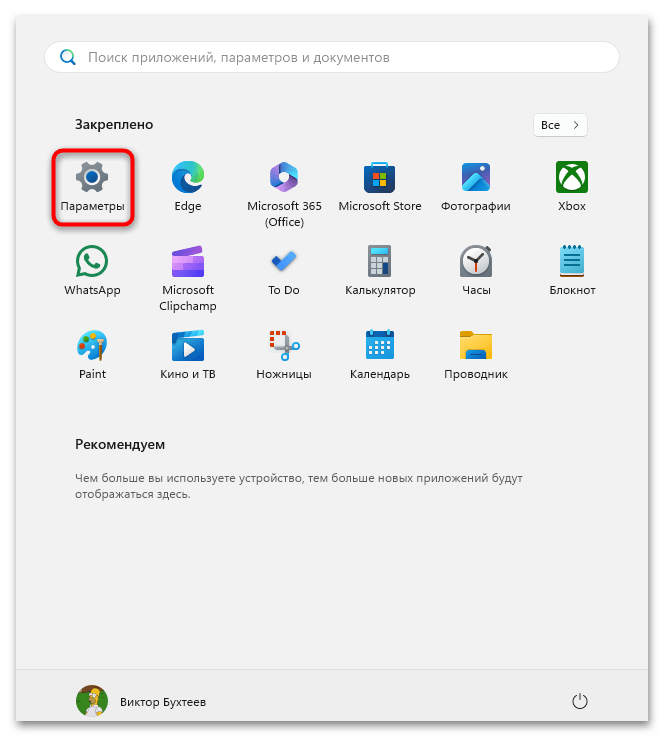
Все способы:
- Способ 1: Проверка доступности сайта
- Способ 2: Перезагрузка роутера
- Способ 3: Проверка браузера
- Отключение расширений
- Удаление cookie и кеша
- Сброс кеша DNS
- Способ 4: Изменение DNS-адресов
- Способ 5: Проверка состояния службы DNS
- Способ 6: Сброс настроек сети
- Автоматический сброс
- Ручной сброс
- Способ 7: Отключение/изменение параметров антивируса
- Способ 8: Очистка файла hosts
- Вопросы и ответы: 0
Способ 1: Проверка доступности сайта
Программы, которые как-либо изменяют ваше текущее интернет-подключение, напрямую или косвенно, следует приостановить. Вероятно, сайт отказывается загружаться как раз по причине несовместимости с какими-то из значений, которые изменил запущенный в системе софт.
Определите, связана проблема с самим сайтом или с вашим устройством. Для этого попробуйте открыть его в другом браузере или на другом устройстве, например на смартфоне. Если сайт недоступен везде, используйте мобильную сеть, чтобы проверить, не связан ли сбой с провайдером или ограничениями вроде блокировки по IP или региональных запретов.
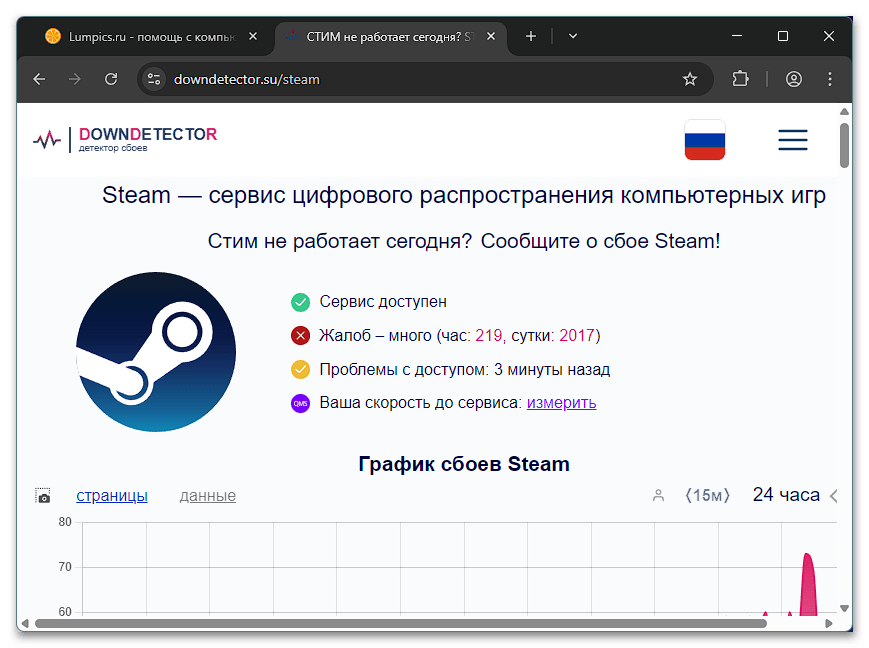
Если проблема касается конкретного сервиса, к примеру игровой платформы или встроенного браузера в ней, проверьте статус его серверов. Это можно сделать на сайтах вроде Downdetector, которые отслеживают сбои популярных ресурсов. Такие сервисы помогут определить, является ли проблема массовой или связана с локальными настройками.
Бывает, что сайт или сервис технически доступен, но из-за сбоев в его работе пользователи все равно не могут получить к нему доступ. В таком случае остается только ждать, пока администраторы или хостинг-провайдер устранят проблему.
При условии, что вы видите отсутствие проблем у других людей, причина находится на вашей стороне. Ошибка «Не удалось найти IP-адрес сервера» может возникать по разным причинам, поэтому придется последовательно проверить все возможные решения, пока не найдете то, которое поможет в вашей ситуации.
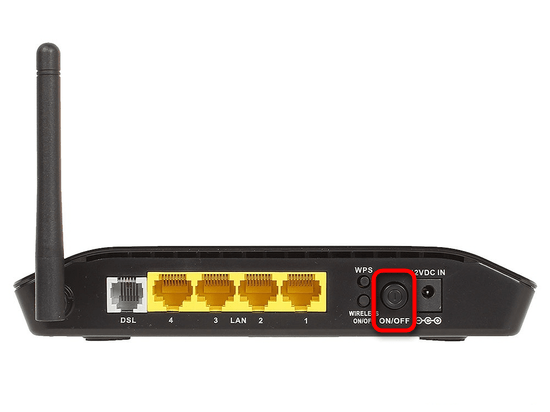
Способ 2: Перезагрузка роутера
Со временем в памяти роутера могут накапливаться сбои и устаревшие сетевые данные, что иногда приводит к ошибке «Не удалось найти IP-адрес сервера». Перезагрузка устройства очищает его кеш, обновляет соединение с интернет-провайдером и может устранить проблему, особенно если она связана с временными сбоями в работе сети. Также она очищает кеш DNS-запросов, который со временем может начать содержать устаревшие или ошибочные записи, мешающие правильному разрешению доменных имен.
Проще всего перезапустить устройство, нажав соответствующую кнопку на его устройстве или отключив его от сети на несколько секунд. Детальнее обо всех методах перезагрузки маршрутизатора мы уже рассказывали ранее.
Подробнее: Методы перезагрузки роутеров
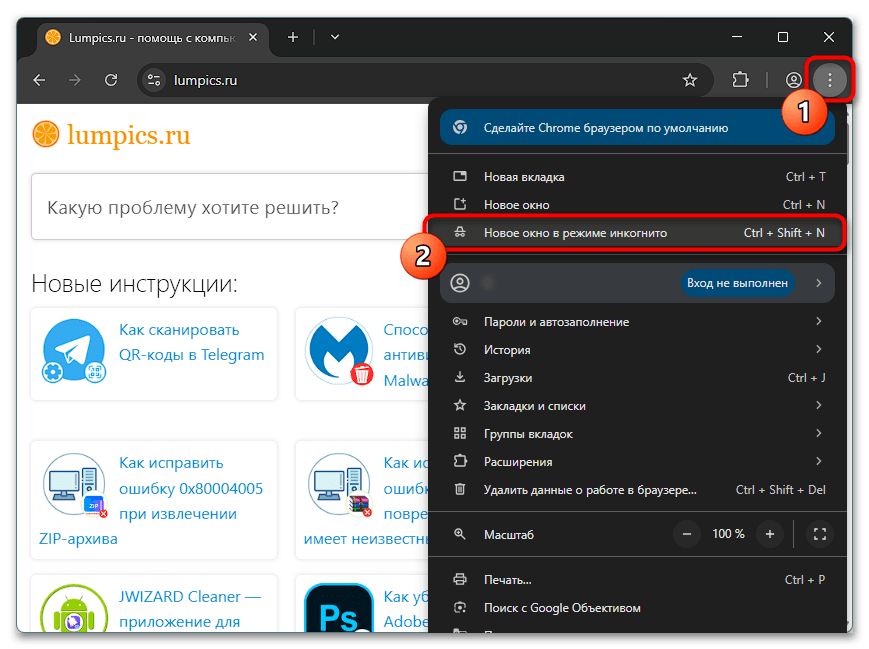
Способ 3: Проверка браузера
Определить, что сбой при установлении соединения вызван самим браузером, можно с помощью простейшей диагностики. Попробуйте загрузить нужный сайт через любой другой веб-обозреватель на этом же ПК или воспользуйтесь режимом инкогнито в текущем.
Если страница открывается без проблем, значит, причина кроется в профиле используемого браузера. В этом случае стоит выполнить его очистку, следуя приведенным ниже инструкциям. Разберем процесс на примере Google Chrome, но для других браузеров на основе Chromium порядок действий останется тем же — различаться будут только элементы интерфейса и способы доступа к настройкам.
Отключение расширений
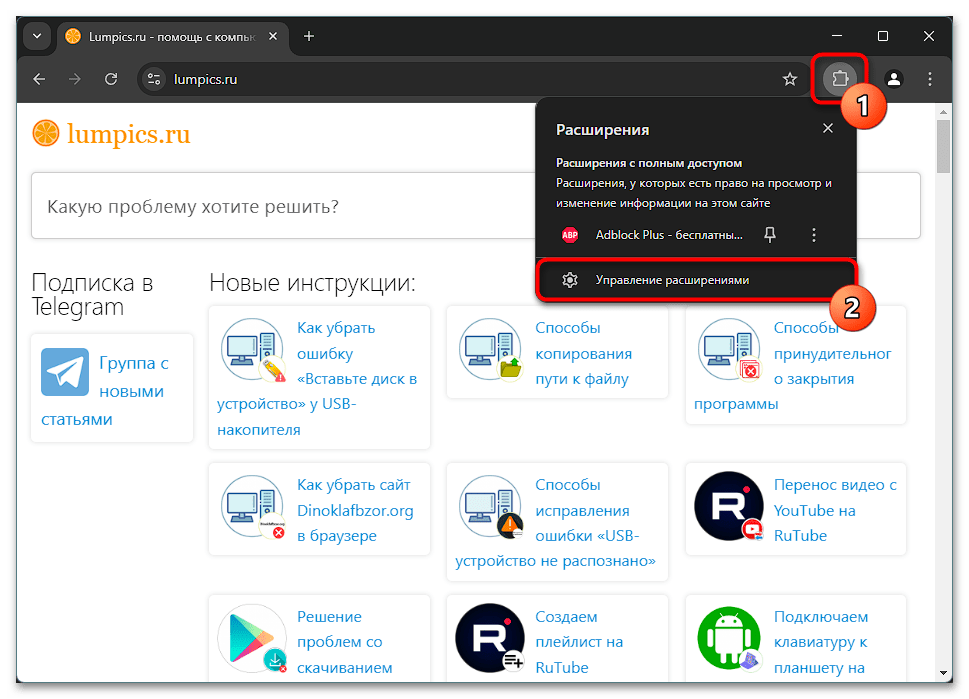
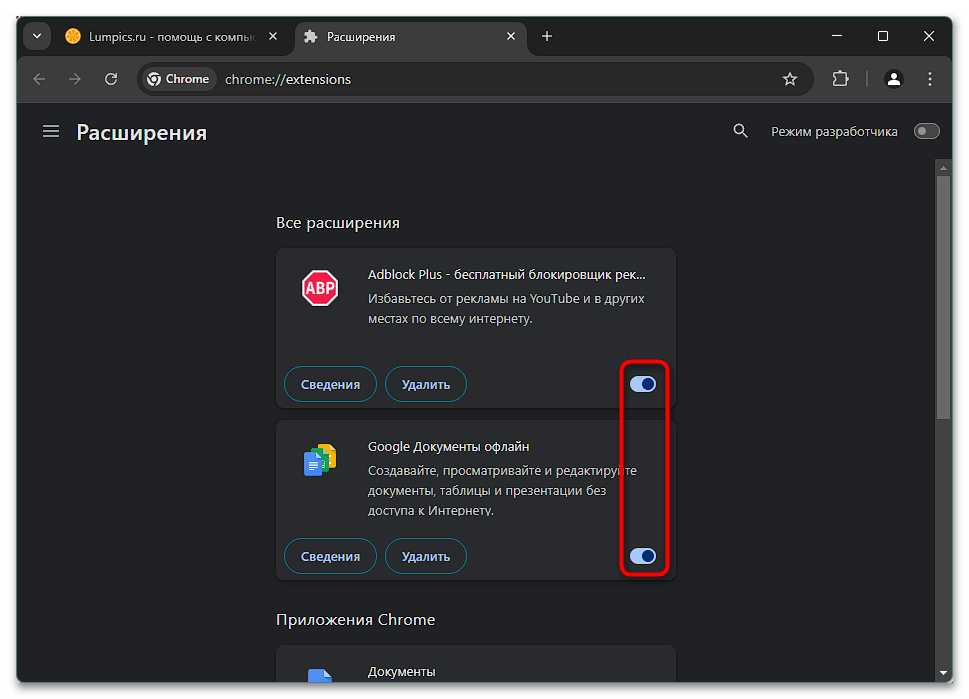
- Откройте настройки браузера и перейдите в раздел «Расширения». Другой способ — нажать на значок пазла на панели инструментов и выбрать «Управление расширениями» из выпадающего списка.
- Отключите все установленные ранее дополнения и попробуйте загрузить проблемный сайт в новой вкладке.
- Если страница открывается, включайте расширения одно за другим, каждый раз обновляя сайт. Когда найдете дополнение, из-за которого ресурс перестает работать, удалите его. Учитывайте, что некоторые расширения требуют не только включения, но и ручного запуска через их меню.
Удаление cookie и кеша
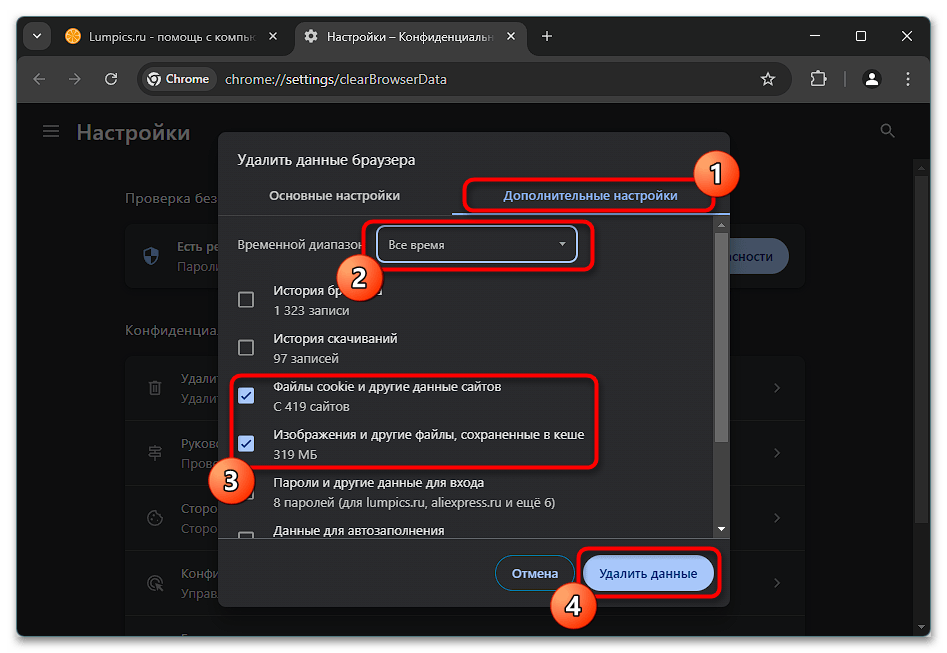
Тем, кому удаление расширений не помогло, стоит почистить кеш и cookie. Эти файлы являются временными и часто перезаписываются для ускорения доступа к веб-ресурсам, что в отдельных ситуациях приводит к сбоям или конфликтам. Следовательно, удаление таких файлов может помочь устранить проблему.
Самый быстрый способ перейти к очистке — нажать сочетание клавиш Ctrl + Shift + Del. В открывшемся окне выберите вкладку «Дополнительные настройки», чтобы увидеть все параметры. Отметьте «Файлы cookie и другие данные сайтов» и «Изображения и файлы, сохраненные в кеше», оставив остальные пункты без изменений или сняв с них выделение. В поле временного диапазона укажите «Все время» и подтвердите очистку, нажав кнопку «Удалить данные». Учтите, что после удаления cookie потребуется повторный вход в аккаунты на всех сайтах, поэтому для начала можно попробовать очистить только кеш, а если это не избавит от проблемы, удалить и cookie.
Сброс кеша DNS
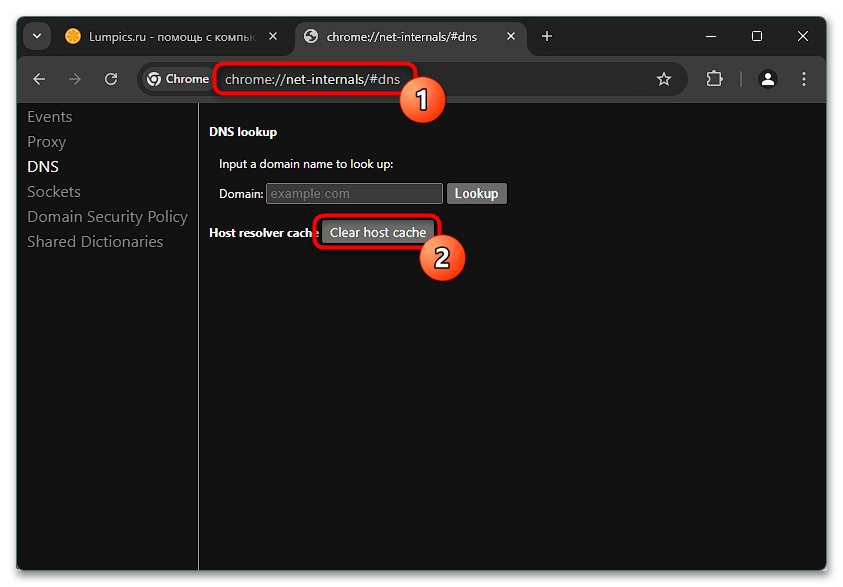
В каждом браузере есть собственный кеш DNS, который со временем может переполниться или содержать ошибки, мешающие загрузке отдельных сайтов. Решить проблему можно, очистив его вручную через специальный раздел меню. Для этого скопируйте один из приведенных ниже адресов, вставьте его в адресную строку браузера и нажмите Enter.
- Для Google Chrome:
chrome://net-internals/#dns - Для Яндекс Браузера:
browser://net-internals/#dns - Для Microsoft Edge:
edge://net-internals/#dns - Остальные браузеры: вместо первого слова в адресе следует вставить название вашего обозревателя (например,
vivaldi://net-internals/#dns) или использовать адрес, предназначенный для Google Chrome
После перехода на страницу нажмите кнопку «Clear host cache», затем закройте вкладку — процесс очистки выполняется мгновенно и не требует подтверждения. Чтобы убедиться, что изменения вступили в силу, перезапустите браузер и попробуйте снова открыть проблемный сайт.
Способ 4: Изменение DNS-адресов
Если страницы не загружаются ни в одном браузере, а проблемы с подключением возникают и в других программах со встроенным браузером, стоит обратить внимание на сетевые настройки. Помимо перечисленного выше, стоит рассмотреть вариант с изменением DNS. Так, если вы ранее изменяли DNS-адреса в системе или настройках роутера, попробуйте вернуть их к исходным. Те, кто, наоборот, не менял ДНС, могут заменить адреса, предоставляемые провайдером, на другие.
Windows 11
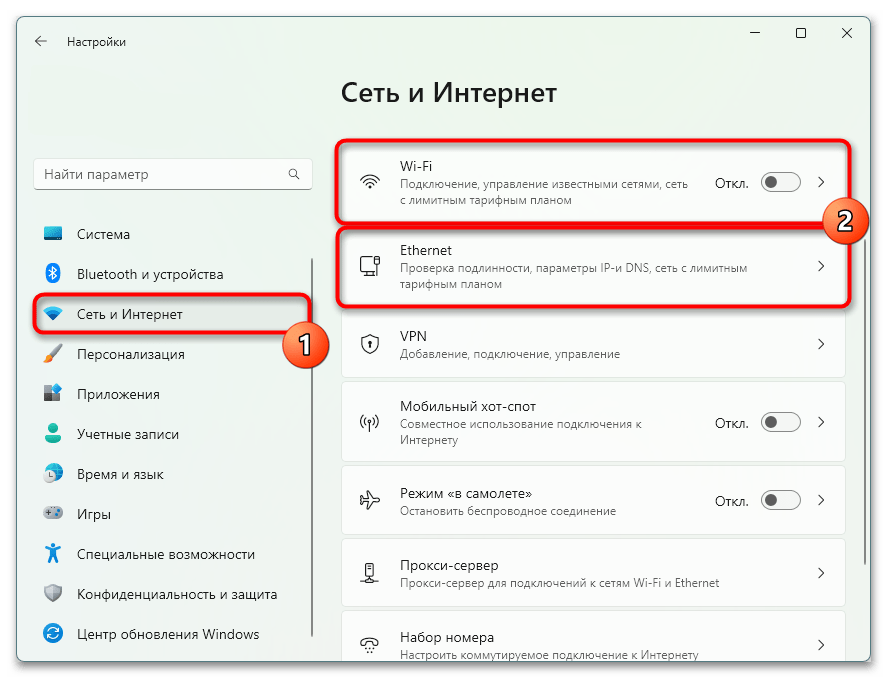
- Перейдите в «Пуск» и откройте «Параметры».
- В левом меню выберите «Сеть и Интернет», затем нажмите на подключение, которое в данный момент активно.
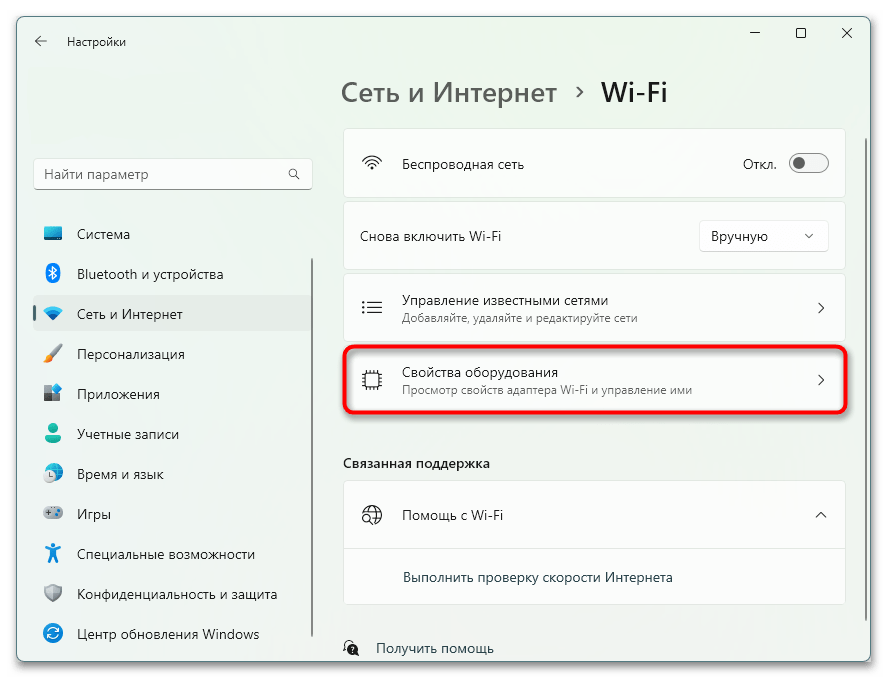
- Если используете «Wi-Fi», дополнительно зайдите в «Свойства оборудования».
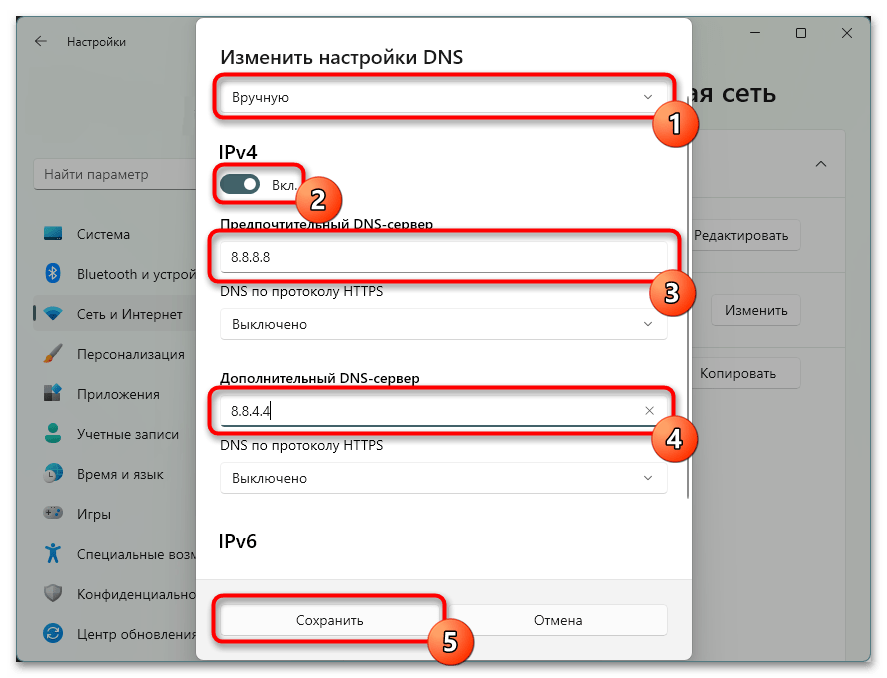
- Отыщите параметр «Назначение DNS-сервера» и нажмите «Изменить».
- Если в настройках уже заданы конкретные DNS-адреса, попробуйте включить автоматическое определение. Если параметры не менялись, переключитесь в режим «Вручную» и введите в поля «Предпочтительный DNS-сервер» и «Дополнительный DNS-сервер» такие значения:
8.8.8.8и8.8.4.4. После этого сохраните внесенные изменения.DNS-сервис Google является одним из самых популярных, но можно выбрать и другие проверенные варианты: Яндекс (
77.88.8.8и77.88.8.1), Cloudflare (1.1.1.1и1.0.0.1) или OpenDNS (208.67.222.222и208.67.220.220).

Windows 10 и ниже
- Откройте классическое приложение «Панель управления», используя «Пуск», и перейдите в раздел «Сеть и Интернет».
- Зайдите в «Центр управления сетями и общим доступом».
- На левой панели нажмите на «Изменение параметров адаптера».
- Найдите свое текущее подключение: для кабельного соединения это будет «Ethernet», а для беспроводного — «Беспроводная сеть». У вас названия могут быть немного другими. Кликните правой кнопкой мыши по выбранному подключению и откройте его «Свойства».
- В списке компонентов найдите «IP версии 4 (TCP/IPv4)», выделите его и нажмите кнопку «Свойства» ниже.
- Выберите режим «Использовать следующие адреса DNS-серверов» и укажите значения, приведенные выше в инструкции для Windows 11. Если ранее вы вручную изменяли DNS-адреса и предполагаете, что это могло вызвать проблемы с загрузкой сайтов, попробуйте вернуть автоматическое определение и сохраните изменения.
Способ 5: Проверка состояния службы DNS
Убедитесь, что в системе не отключена или не остановлена служба DNS. Как правило, она запущена всегда, но в редких случаях может оказаться в нерабочем состоянии. Тогда ее потребуется запустить самостоятельно. Для этого:
- Вызовите «Пуск» и начните набирать слово «Службы». Кликните по обнаруженному совпадению.
- Среди служб отыщите «DNS-клиент» и посмотрите ее статус. Он должен быть как «Выполняется».
- Тем, у кого служба остановлена, следует вручную «Запустить» ее, при необходимости изменив тип запуска на «Автоматически».
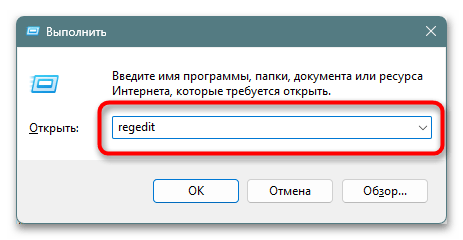
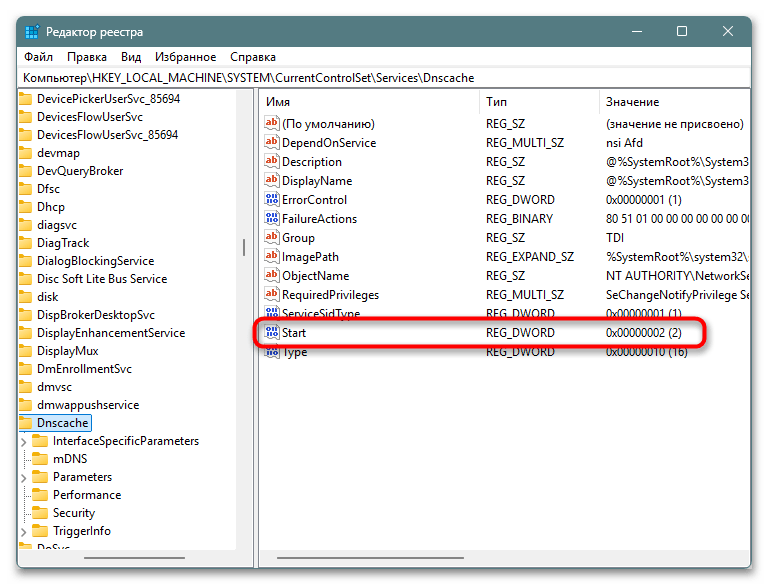
- Возможно, у вас, как и на примере выше, служба окажется недоступной для редактирования. В такой ситуации изменить ее статус следует через реестр. Запустите его любым удобным методом, например найдя по названию в «Пуске» или командой
regeditв окне «Выполнить» (Win + R). - Скопируйте и вставьте в адресную строку редактора следующий путь:
HKEY_LOCAL_MACHINE\SYSTEM\CurrentControlSet\Services\Dnscache. Нажмите Enter для перехода и в основной части окна отыщите параметр «Start». - Дважды кликните по нему для изменения значения и выставьте «2».
- Это изменит ее тип запуска на «Автоматически», а сама служба будет запущена при перезапуске ПК.

Изредка раже редактирование реестра не помогает включить службу. Тогда понадобится проверить состояние зависящих служб, а именно «Диспетчер подключений удаленного доступа» и «Помощник по подключению к сети». Через приложение «Службы» их статус должен быть «Автоматически» и «Вручную» соответственно. Если для редактирования они недоступны, поменяйте их тип запуска через реестр по аналогичной инструкции. Путь для первой службы HKEY_LOCAL_MACHINE\SYSTEM\CurrentControlSet\Services\RasMan (значение для «Start» будет «2»), путь для второй службы HKEY_LOCAL_MACHINE\SYSTEM\CurrentControlSet\Services\NcaSvc (значение для «Start» будет «3»). Не забудьте перезагрузить компьютер.
Способ 6: Сброс настроек сети
Мелкие сбои, заполненный кеш сети или некорректные настройки интернета могут привести к проблемам с соединением. Так как выявить источник ошибки вручную бывает сложно, чаще всего проще выполнить общий сброс сети. В Windows предусмотрено два варианта: автоматический и ручной. Первый вариант обнуляет все сетевые параметры, а второй позволяет выборочно ввести команды, снижая риск новых сбоев.
Ниже описаны оба метода. Автоматический подходит для актуальных версий Windows, а ручной можно использовать на любой версии системы. Какой бы способ вы ни выбрали, сброс не затронет критически важные параметры — интернет останется доступным без необходимости повторной настройки.
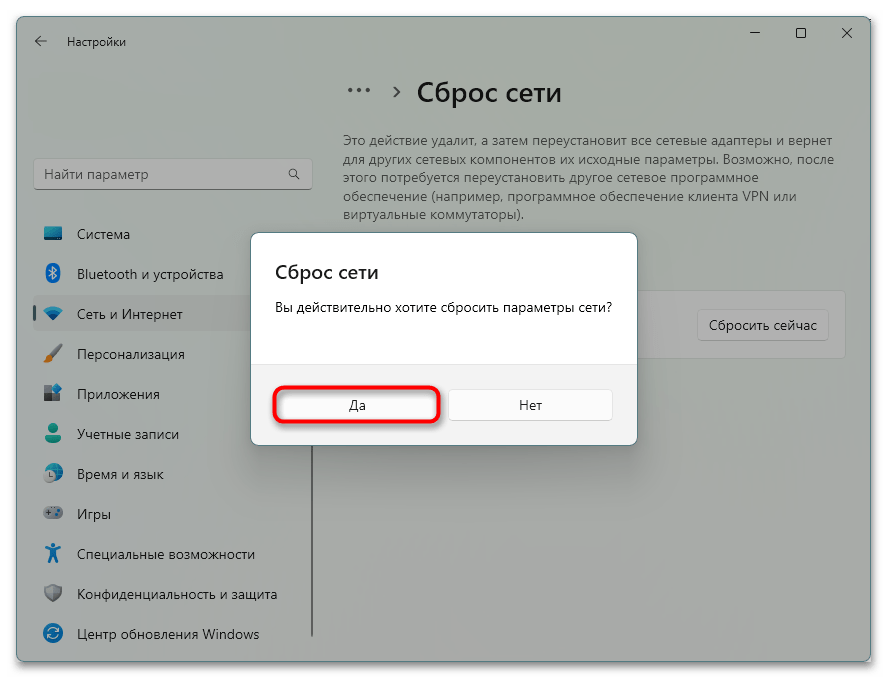
Автоматический сброс
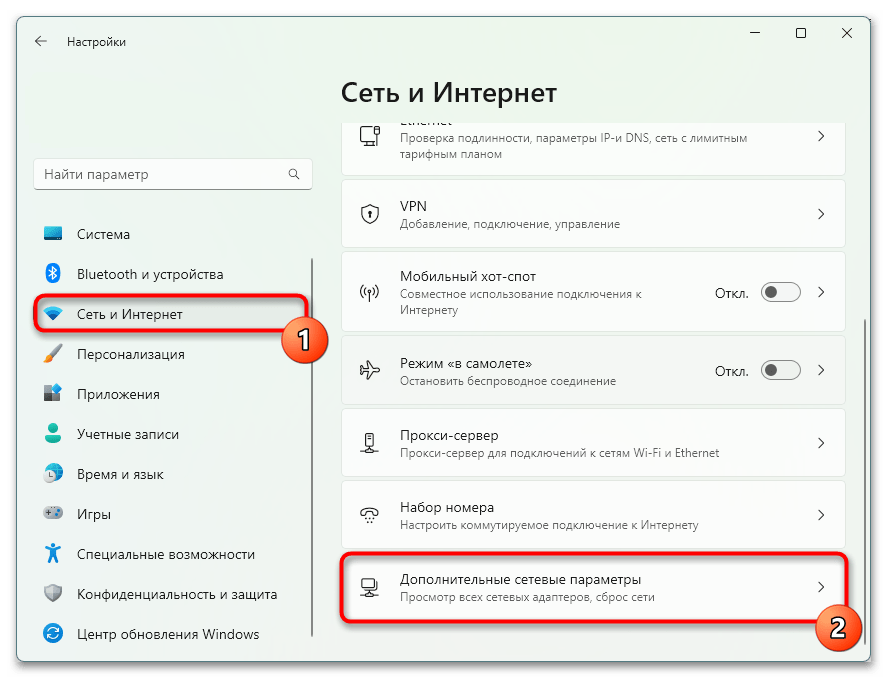
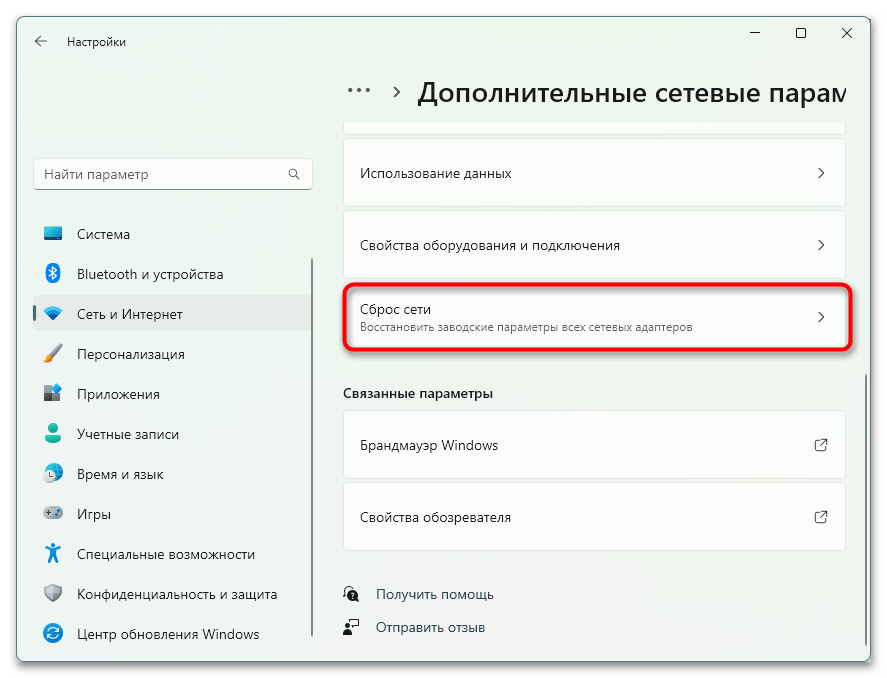
- Перейдите в «Параметры» и откройте раздел «Сеть и Интернет». Если у вас Windows 11, дополнительно откройте «Дополнительные сетевые параметры» (в Windows 10 этого подраздела попросту нет).
- Найдите и нажмите по кнопке «Сброс сети».
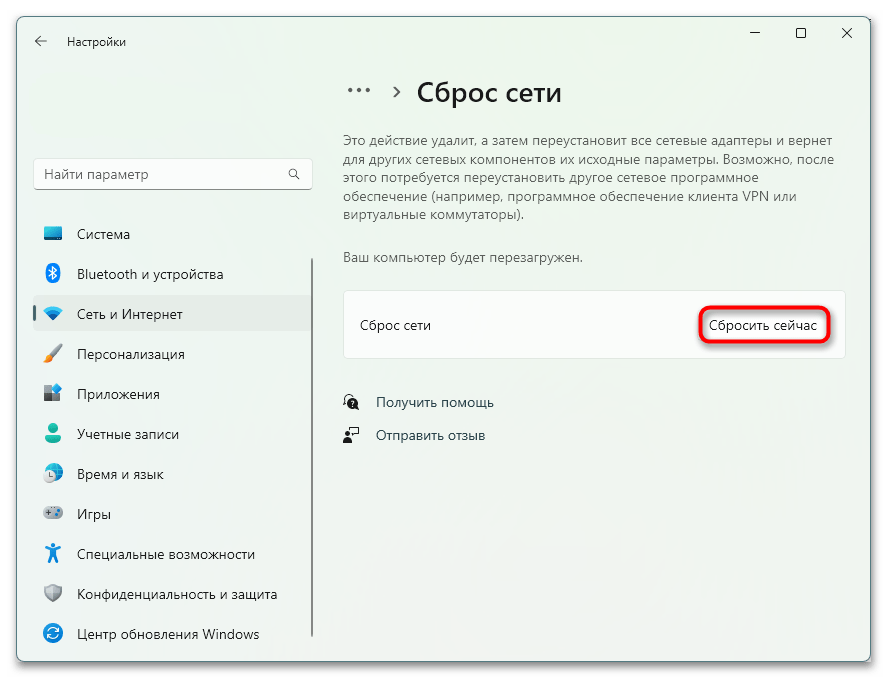
- Прочитайте уведомление о последствиях сброса и кликните «Сбросить сейчас».
- Подтвердите действие в появившемся окне. После этого система автоматически перезагрузится через 5 минут, так что сохраните все важные данные заранее.
Ручной сброс
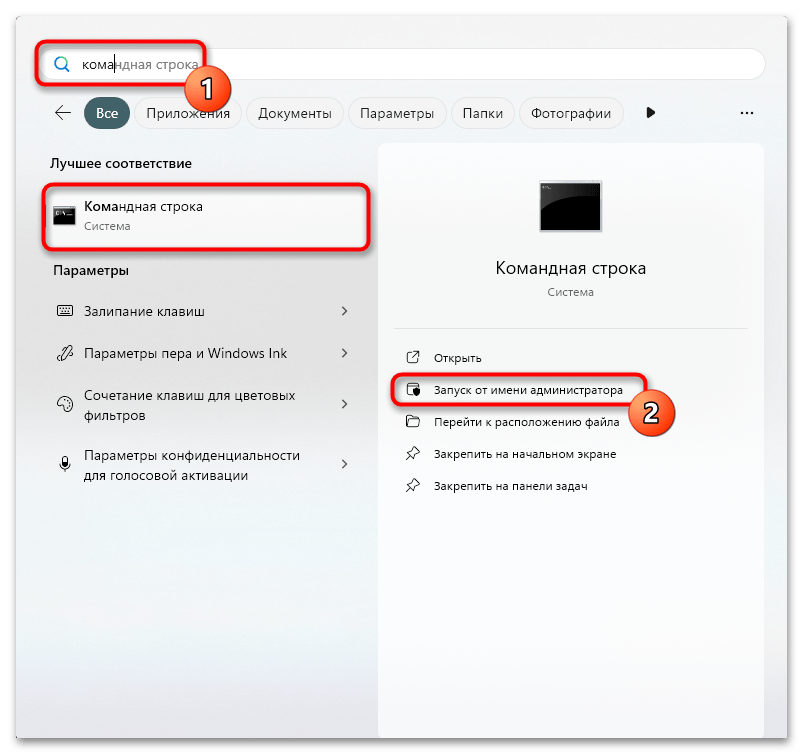
- Запустите «Командную строку» с правами администратора. Для этого откройте «Пуск», введите в поиск «Командная строка» и запустите найденное приложение соответствующим образом.

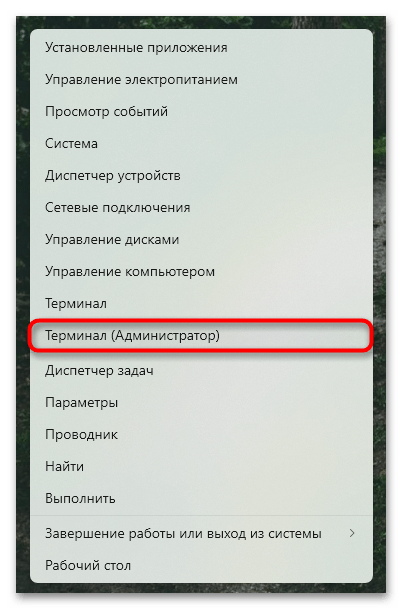
В новых Windows удобнее воспользоваться другим способом: кликните правой кнопкой мыши по «Пуску» и выберите «Терминал (Администратор)» из контекстного меню.

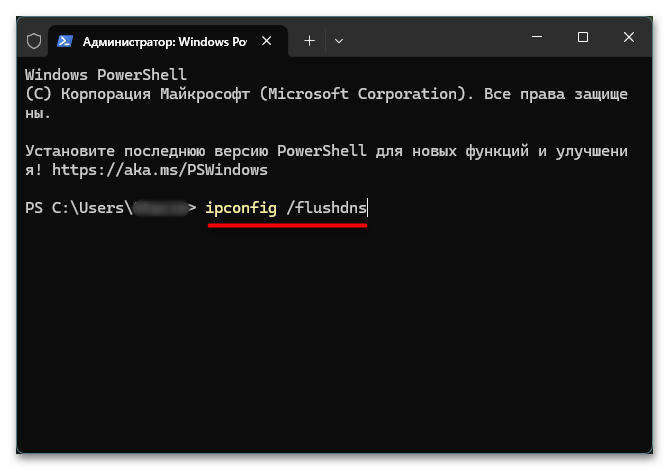
- Очистите кеш DNS, введя команду
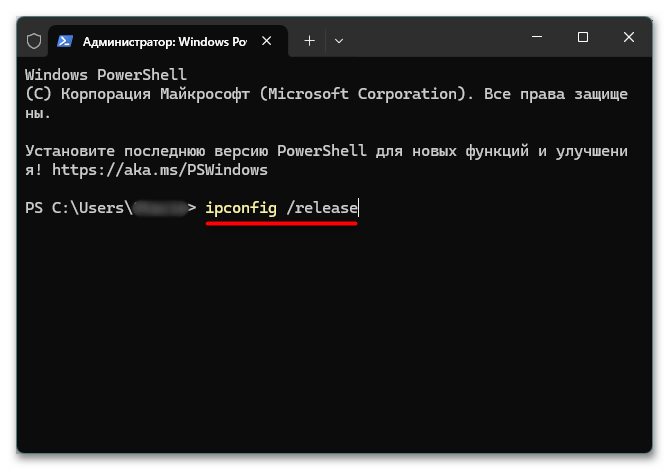
ipconfig /flushdns. После ввода нажмите Enter — так же поступайте со всеми следующими командами для их ввода. - Обновите IPv4-адрес с помощью последовательного выполнения
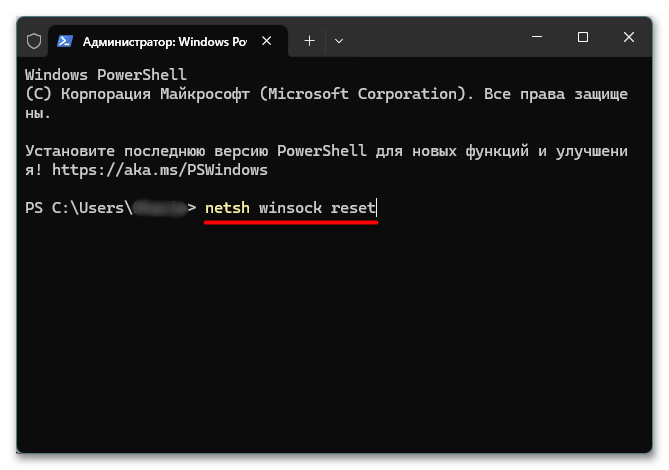
ipconfig /releaseиipconfig /renew. - Сбросьте сетевой интерфейс Winsock, используя команду
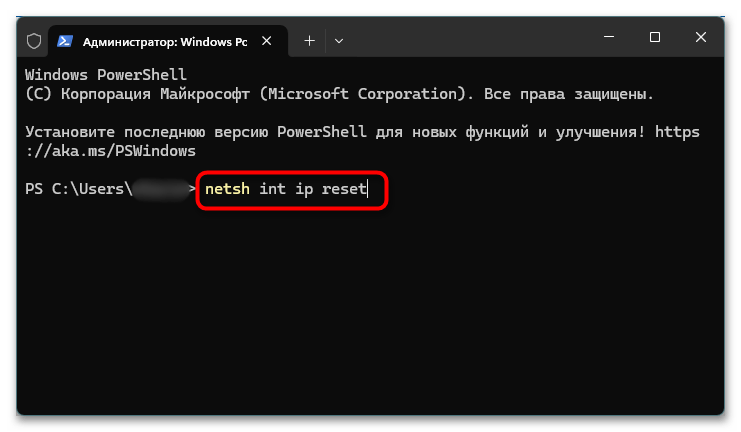
netsh winsock reset. - Если после всех действий проблема не исчезла, выполните дополнительный сброс сетевых параметров с помощью команды
netsh int ip reset. - Перезагрузите компьютер и попробуйте снова открыть нужный сайт.
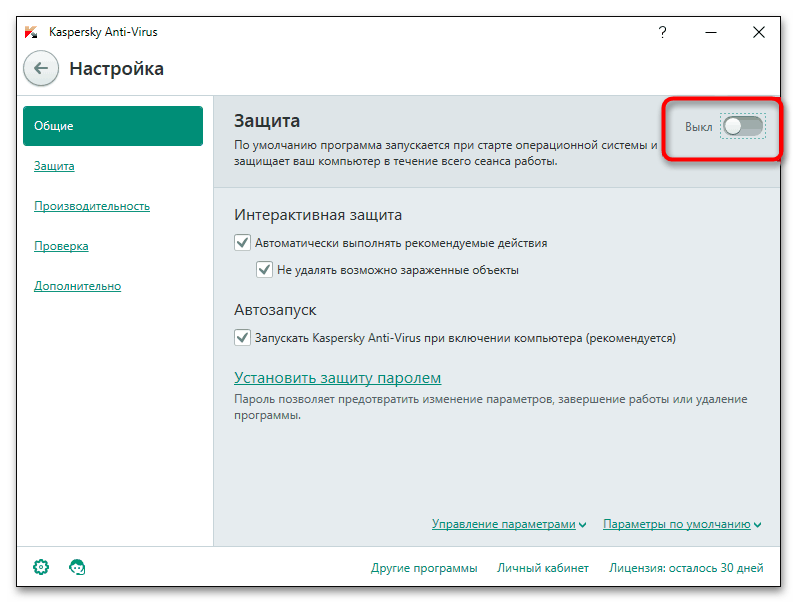
Способ 7: Отключение/изменение параметров антивируса
Антивирусные программы и фаерволы иногда мешают нормальной работе браузера, полностью блокируя доступ к отдельным сайтам. При этом в других браузерах, которые защитник не затрагивает, доступ ко всем веб-адресам сохранится. Даже если вы не изменяли настройки, обновление системы безопасности или самого браузера могло привести к тому, что программа защиты начала воспринимать сетевые запросы как потенциальную угрозу и ограничила их передачу.
Чтобы убедиться, что проблема вызвана именно этим, временно отключите антивирус или межсетевой экран, затем перезапустите браузер и попробуйте снова загрузить страницы. Чаще всего такие сбои возникают при использовании стороннего защитного ПО, тогда как встроенные инструменты Windows обычно не создают подобных конфликтов. Если вдруг окажется, что виноват действительно антивирус, следует ослабить меры его защиты или добавить браузер в белый список — смотря как была настроена защита.
Подробнее: Отключение антивируса
Обычно причиной блокировки сайтов антивирусом становится слишком жесткая фильтрация интернет-трафика. Поскольку у разных антивирусных программ интерфейс и параметры отличаются, инструкции для всех них мы предоставить не можем. Однако нужные настройки можно найти самостоятельно, обратив внимание на разделы, связанные с сетевой безопасностью или защитой при посещении сайтов.
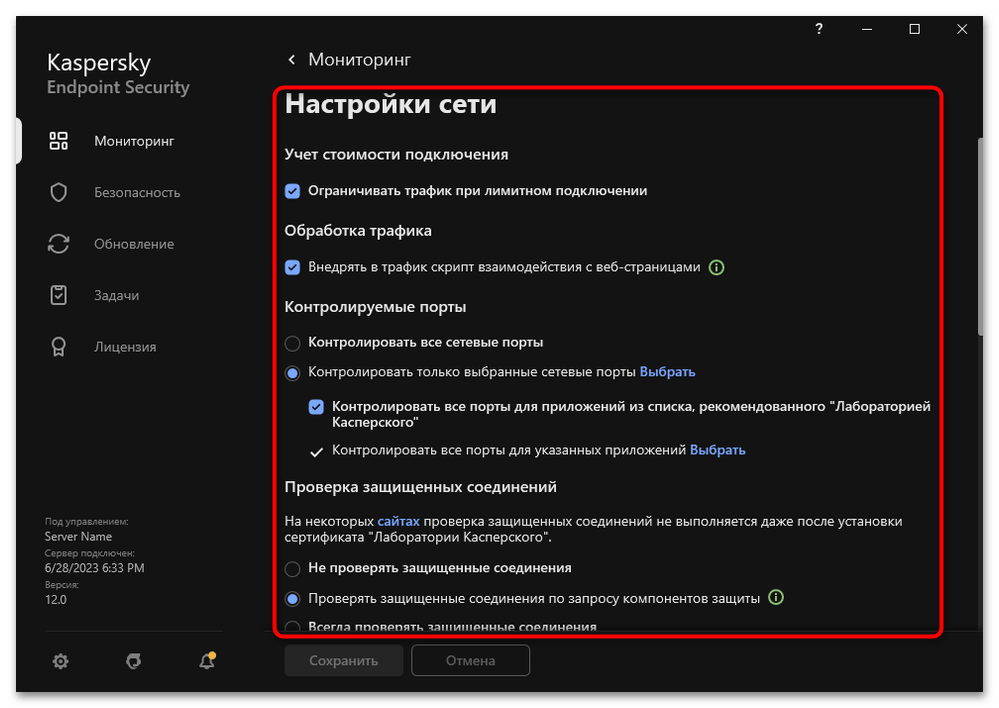
Например, в Касперском параметры блокировки находятся в разделе «Настройки сети» или «Защита» — «Сетевой экран» (конкретное расположение зависит от версии программы). Здесь можно снизить уровень фильтрации трафика или добавить проблемный сайт в список исключений, чтобы антивирус перестал его блокировать. В других защитных решениях названия и расположение настроек могут отличаться, но общий принцип остается таким же.
Способ 8: Очистка файла hosts
Файл hosts служит для ручной настройки соответствия доменных имен и IP-адресов в системе. В него могут быть внесены изменения как пользователем, так и сторонними программами, которые могут воздействовать на интернет-соединение. Иногда такие изменения, особенно если они ошибочные или нежелательные, приводят к тому, что приложение или браузер пытается подключиться не к нужному серверу, а к неправильному или заблокированному адресу, что вызывает рассматриваемую ошибку.
При условии, что неполадка связана с файлом hosts, можно легко решить ее, отредактировав его или полностью удалив, чтобы система вернулась к стандартным настройкам. Это важно, если ошибка затрагивает не только сайты в браузере, но и работу сетевых приложений, таких как игровые клиенты или платформы для покупки цифрового контента.
Если вы не хотите полностью удалять файл, откройте его и отредактируйте. Следуя инструкциям из вышеупомянутой статьи, найдите файл, откройте его, а затем удалите все строки, идущих после этих:
# localhost name resolution is handled within DNS itself.

# 127.0.0.1 localhost

# ::1 localhost
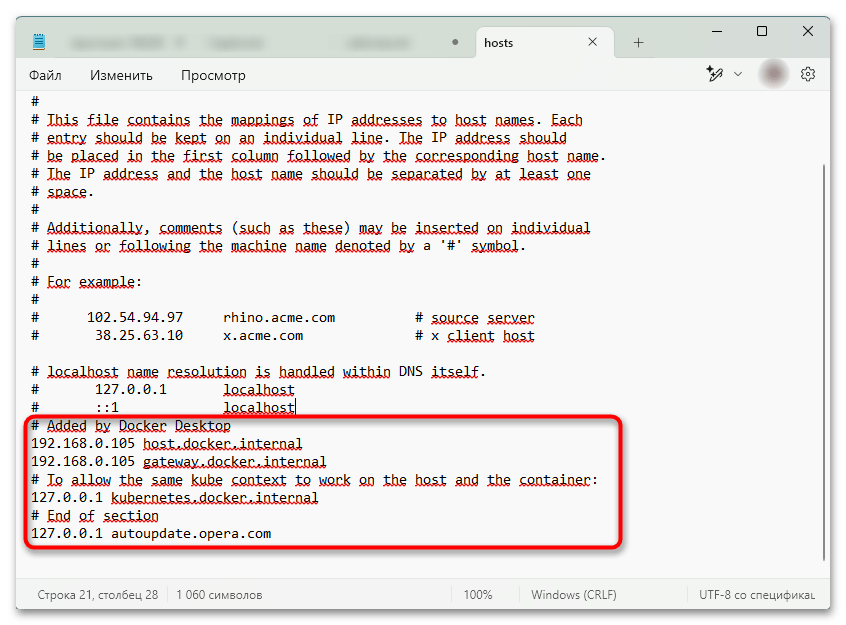
Более опытные юзеры могут поискать среди этих записей те, что связаны с конкретным сайтом или браузером.
Наша группа в TelegramПолезные советы и помощь
When you’re trying to access a website and bump into the “Server IP Address Could Not Be Found” error, it feels like you’re knocking on a door that just won’t open. This issue is a bit like trying to call a friend but dialing the wrong number – you know they’re there, but you just can’t connect.
This error message is your browser’s way of telling you that it’s having trouble finding the website’s address on the internet. Let’s dive deep into what this means, why it happens, and how you can fix it.
Say goodbye to website errors
Achieve peace of mind with 99.99% uptime on 10Web Managed
WordPress Hosting, powered by Google Cloud.
Variations of the issue
This error might appear under different guises depending on the browser or device you’re using, such as:
- DNS Address Could Not Be Found
- DNS_PROBE_FINISHED_NXDOMAIN
- The site can’t be reached
- Server IP address could not be found.
- www.example.com’s server IP address could not be found.
- DNS lookup failed
Each of these messages points to a similar underlying issue: the browser is unable to resolve the website’s domain name into an IP address, which is crucial for establishing a connection to the site’s server.
Understanding the “Server IP Address Could Not Be Found” error requires a bit of background on how the internet operates, particularly in terms of navigating from one site to another. Here’s a simplified breakdown:
When you enter a domain name (like www.example.com) into your web browser the internet performs a DNS lookup to translate that domain name into the IP address where the server hosting the site is located. This process involves querying the Domain Name System (DNS), a vast network of servers acting as the internet’s phone book.
If the DNS lookup fails at any point in this chain, for any reason, your browser will display an error because it can’t find the server’s IP address.
The “Server IP address could not be found” or “DNS_PROBE_FINISHED_NXDOMAIN” error specifically indicates that this DNS lookup process was unsuccessful in finding an IP address for the domain you entered. This can happen for several reasons:
The site is down: If the server hosting the website is not operational, the DNS lookup will realize the domain exists but can’t connect to the server.
Caching issues: Occasionally, old or corrupted cache entries in your browser or operating system can cause this error, even though the site is perfectly reachable.
DNS server problems: The error might also occur if the DNS server your device is using (often provided by your ISP) is down or experiencing issues.
Reasons why this error occurs
Several factors can lead to this error, each with its technical nuances:
DNS server issues: Your computer uses DNS (Domain Name System) servers to look up website addresses. If the DNS server is down or experiencing issues, it can’t translate domain names into IP addresses.
Misconfigured DNS settings: Incorrect DNS settings on your device or router can also lead to this error. This might happen if you’ve manually set DNS servers that are no longer working properly.
Cache problems: Sometimes, your browser or operating system might cache (store) an outdated or incorrect IP address for a website, leading to connection issues.
Firewall or security software: Overzealous firewall or security software settings might block your computer’s attempts to query DNS servers or access certain websites.
ISP issues: Occasionally, the problem could be on your Internet Service Provider’s end, especially if they’re experiencing outages or DNS problems.
Resolving the server IP address could not be found error
While it might seem like these issues are beyond your control, there are several steps you can take to troubleshoot and potentially resolve the problem from your end.
Basic troubleshooting
Check the website’s status: Use online tools to see if the website is down for everyone or just for you. This can help determine if the issue is with the site itself or something on your end.
Clear your browser’s cache: Outdated or corrupt cache data can interfere with DNS lookups. Clearing your browser’s cache might resolve the issue.
Flush your DNS cache: Your operating system also caches DNS lookup results. Flushing this cache (through command line instructions, depending on your OS) can help refresh potentially stale or incorrect DNS information.
Change your DNS server: Switching from your ISP’s default DNS server to a public DNS service like Google DNS or Cloudflare DNS can improve lookup reliability and speed, possibly bypassing the issue altogether.
Restart your router and computer: Sometimes, the problem can be resolved with a simple restart, which clears temporary glitches in your network or device.
Check for typos: Ensure the domain name was entered correctly. Even small typos can lead to DNS lookup failures.
Say goodbye to website errors
Achieve peace of mind with 99.99% uptime on 10Web Managed
WordPress Hosting, powered by Google Cloud.
How to fix the Server IP Address Could Not Be Found error
The “Server IP Address Could Not Be Found” error can be particularly frustrating as it prevents access to websites. Lets dive deeper into the reasons behind each solution and provide detailed, step-by-step instructions to resolve the issue.
Clear browser cache
Clearing your browser’s cache eliminates stored data that may include outdated DNS information or corrupted files, which could interfere with your browser’s ability to connect to a website. Over time, cached data can become corrupted due to technical glitches or when websites get updated. By clearing the cache, you ensure that your browser requests the most current version of the website from the server, bypassing any stored data that might lead to connectivity errors.
Chrome
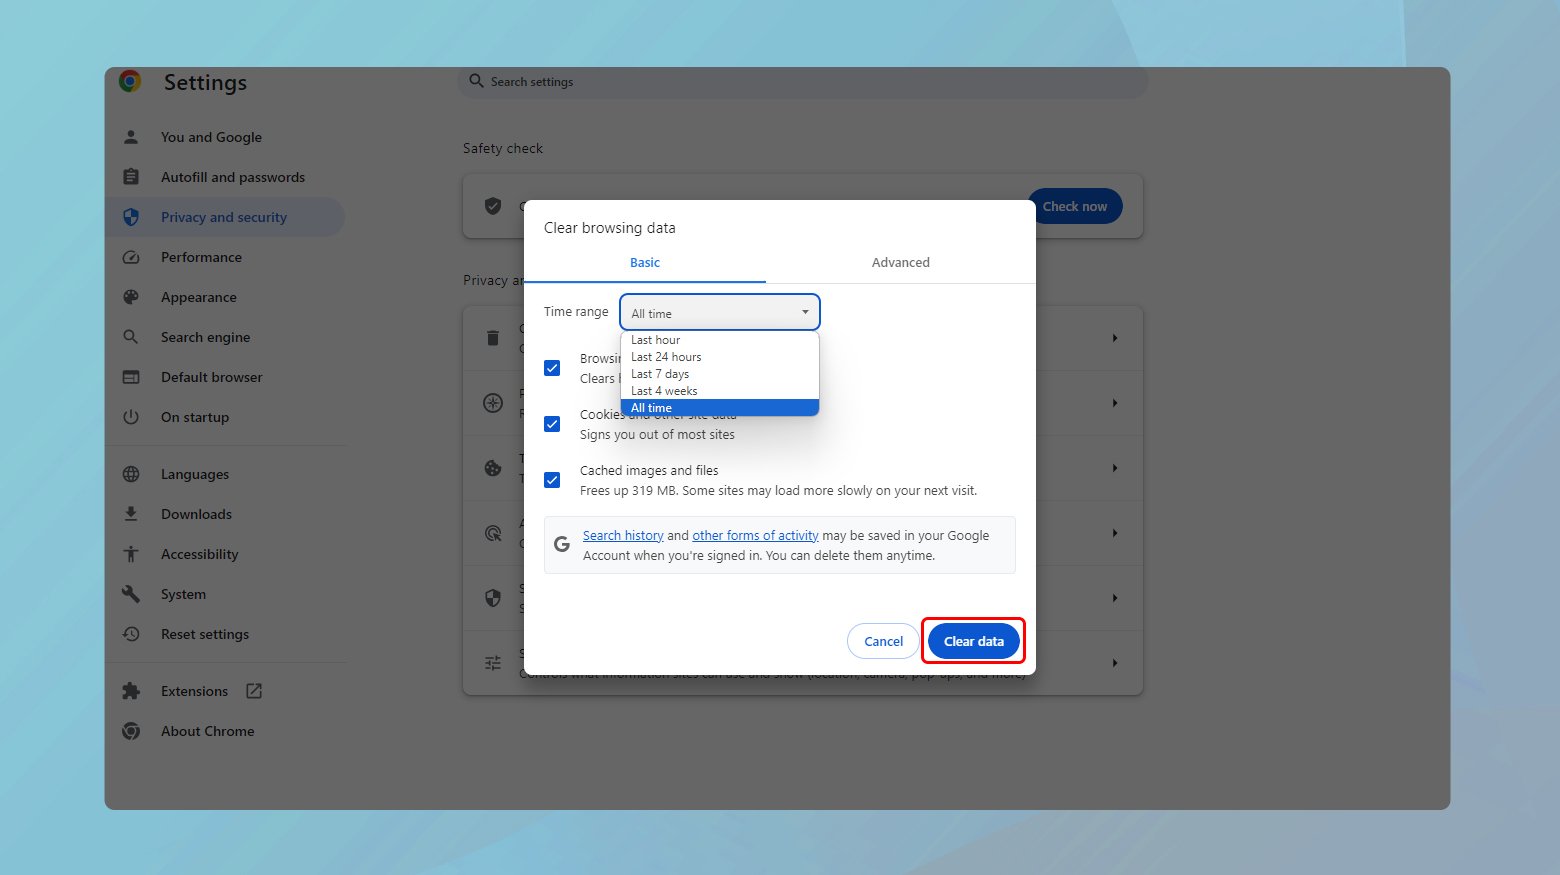
- Click the three dots in the upper-right corner.
- Go to More tools > Clear browsing data.
- Choose a time range or select “All time” to delete everything.
- Check “Cached images and files” and click “Clear data”.
Firefox
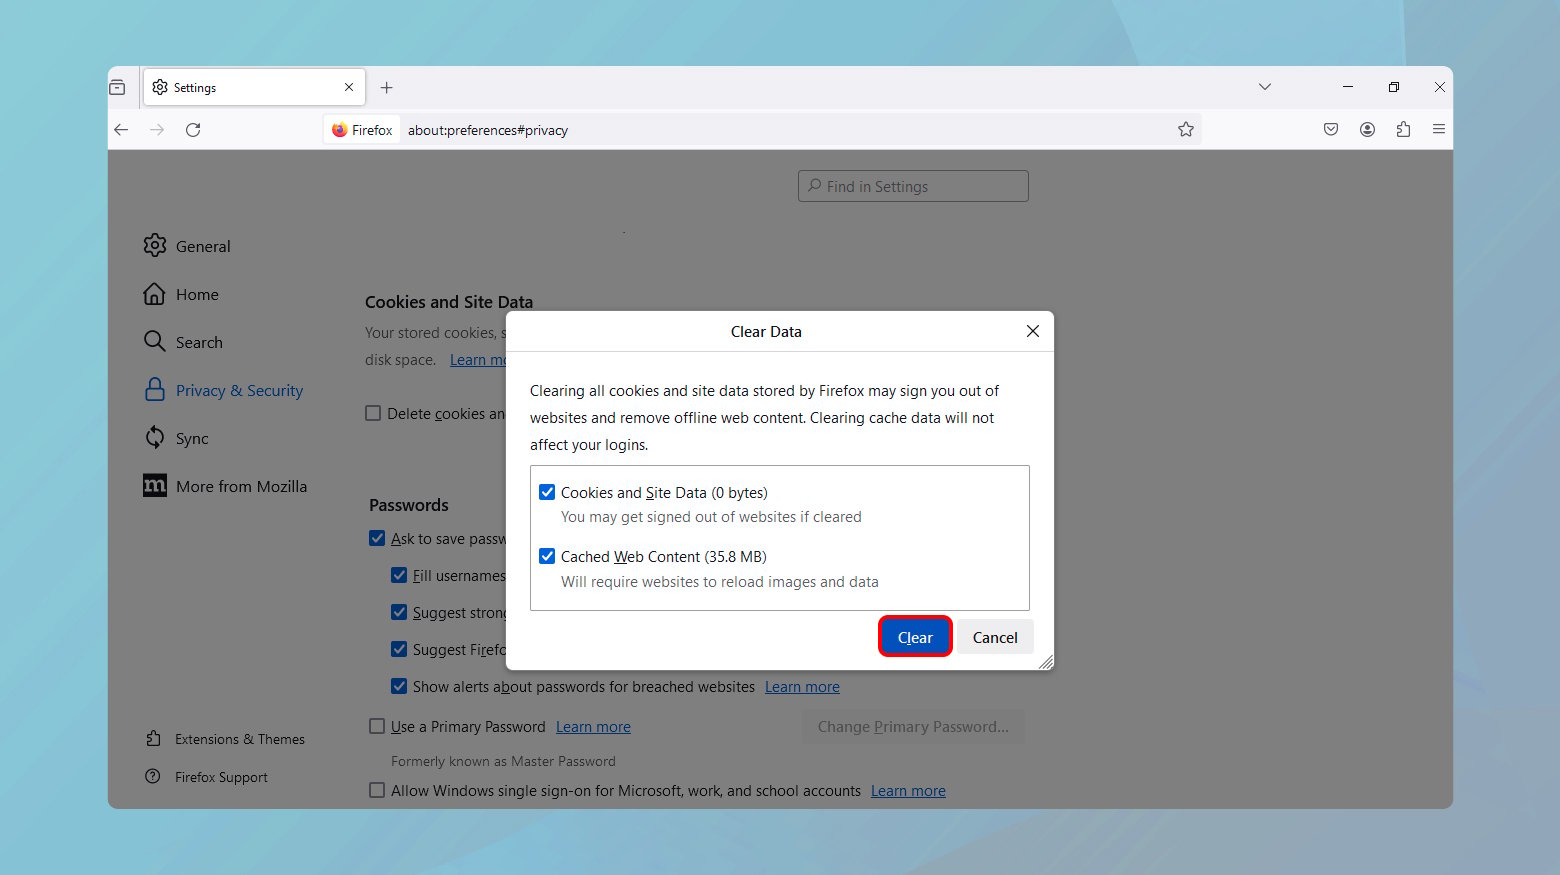
- Click the menu button (three horizontal lines) and select “Options.”
- Go to Privacy & Security and scroll down to “Cookies and Site Data.”
- Click “Clear Data…” and select “Cached Web Content.”
- Click “Clear.”
Safari
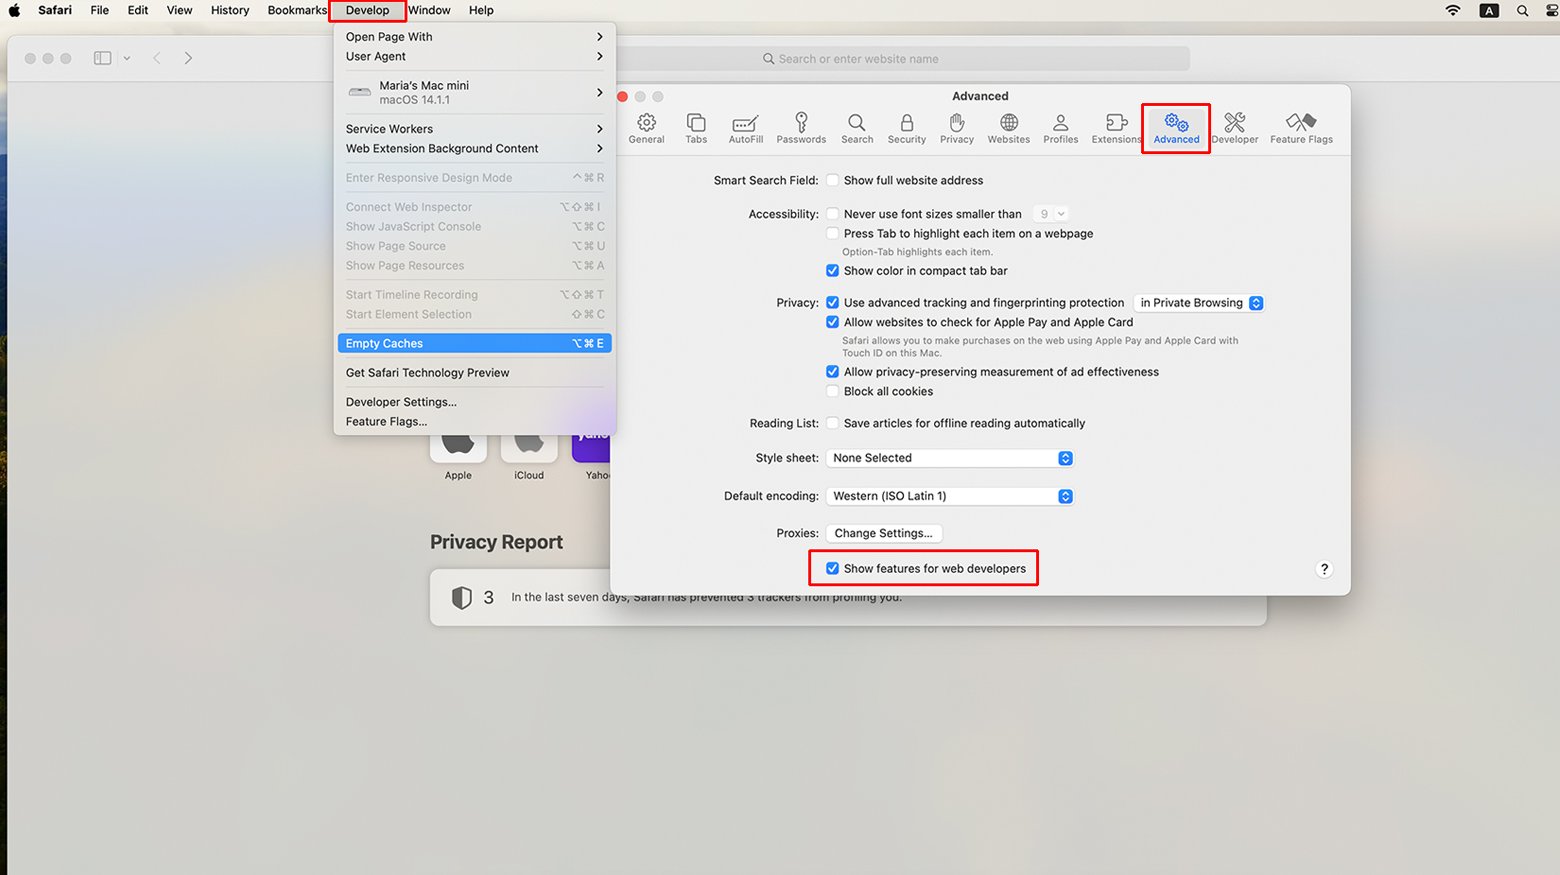
- Go to Safari in the upper-left corner and select “Preferences.”
- Click the “Advanced” tab and check the box at the bottom that says, “Show Develop menu in menu bar.”
- In the menu bar at the top, find “Develop” and select “Empty Caches.”
Change DNS servers
DNS servers translate domain names into IP addresses. If your ISP’s DNS servers are slow or experiencing issues, they might not resolve domain names correctly, leading to errors. Public DNS servers like Google DNS or Cloudflare DNS are often more reliable and faster, providing a more stable internet experience and resolving DNS errors by ensuring efficient and accurate translation of domain names to IP addresses.
Windows
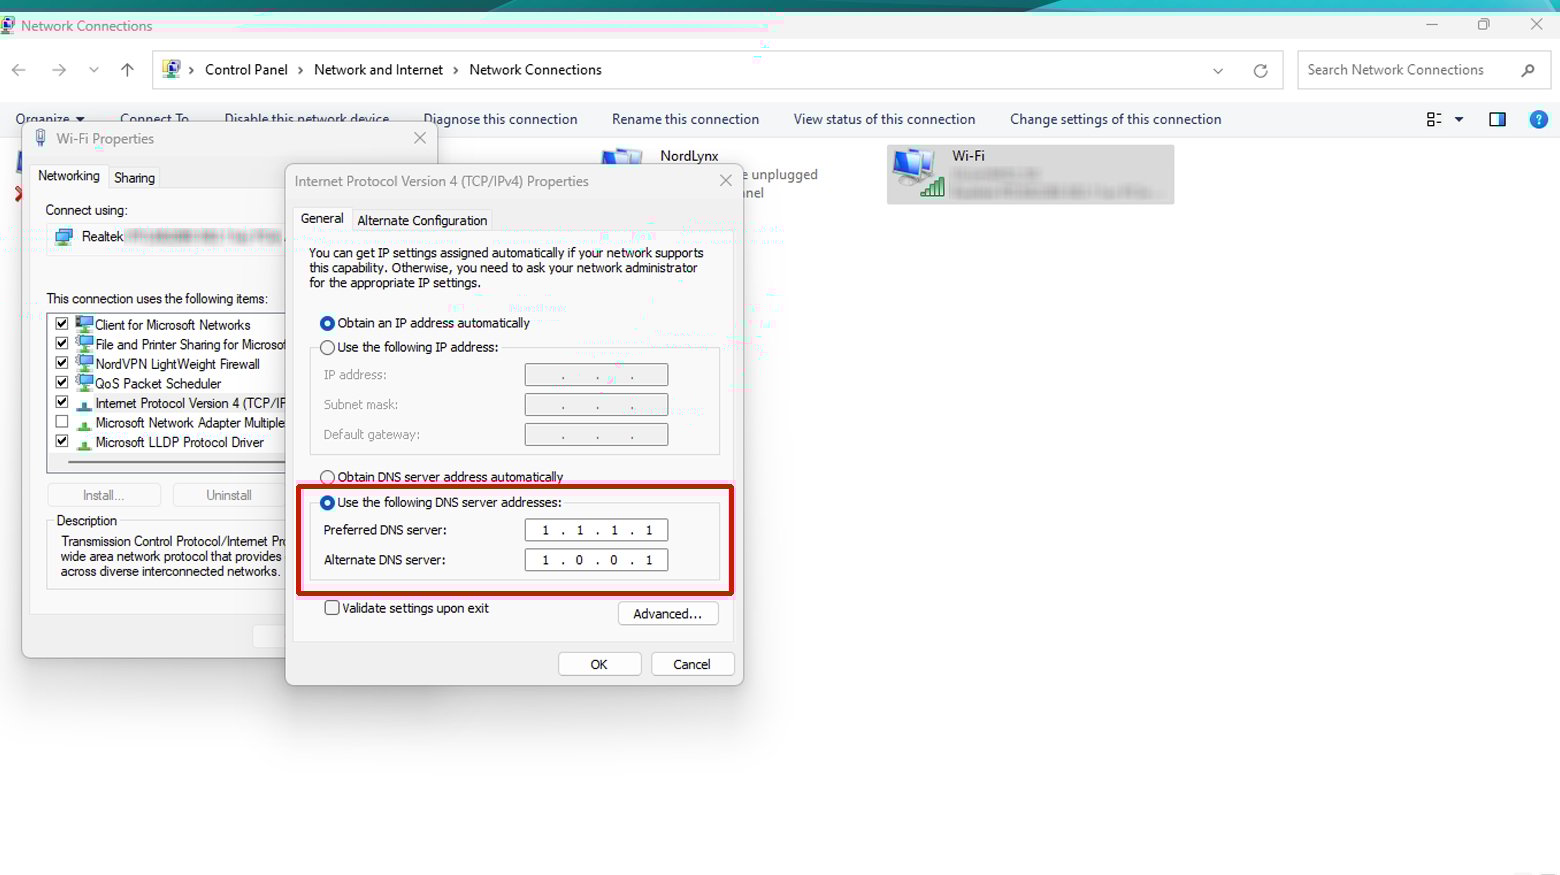
- Open Control Panel and navigate to Network and Internet > Network and Sharing Center > Change adapter settings.
- Right-click your active network connection (e.g., Wi-Fi or Ethernet) and select Properties.
- Scroll down to Internet Protocol Version 4 (TCP/IPv4), click it, then click Properties.
- Select “Use the following DNS server addresses”, and enter the DNS addresses (e.g., Google DNS: 8.8.8.8 and 8.8.4.4).
- Click OK to save your changes.
Mac
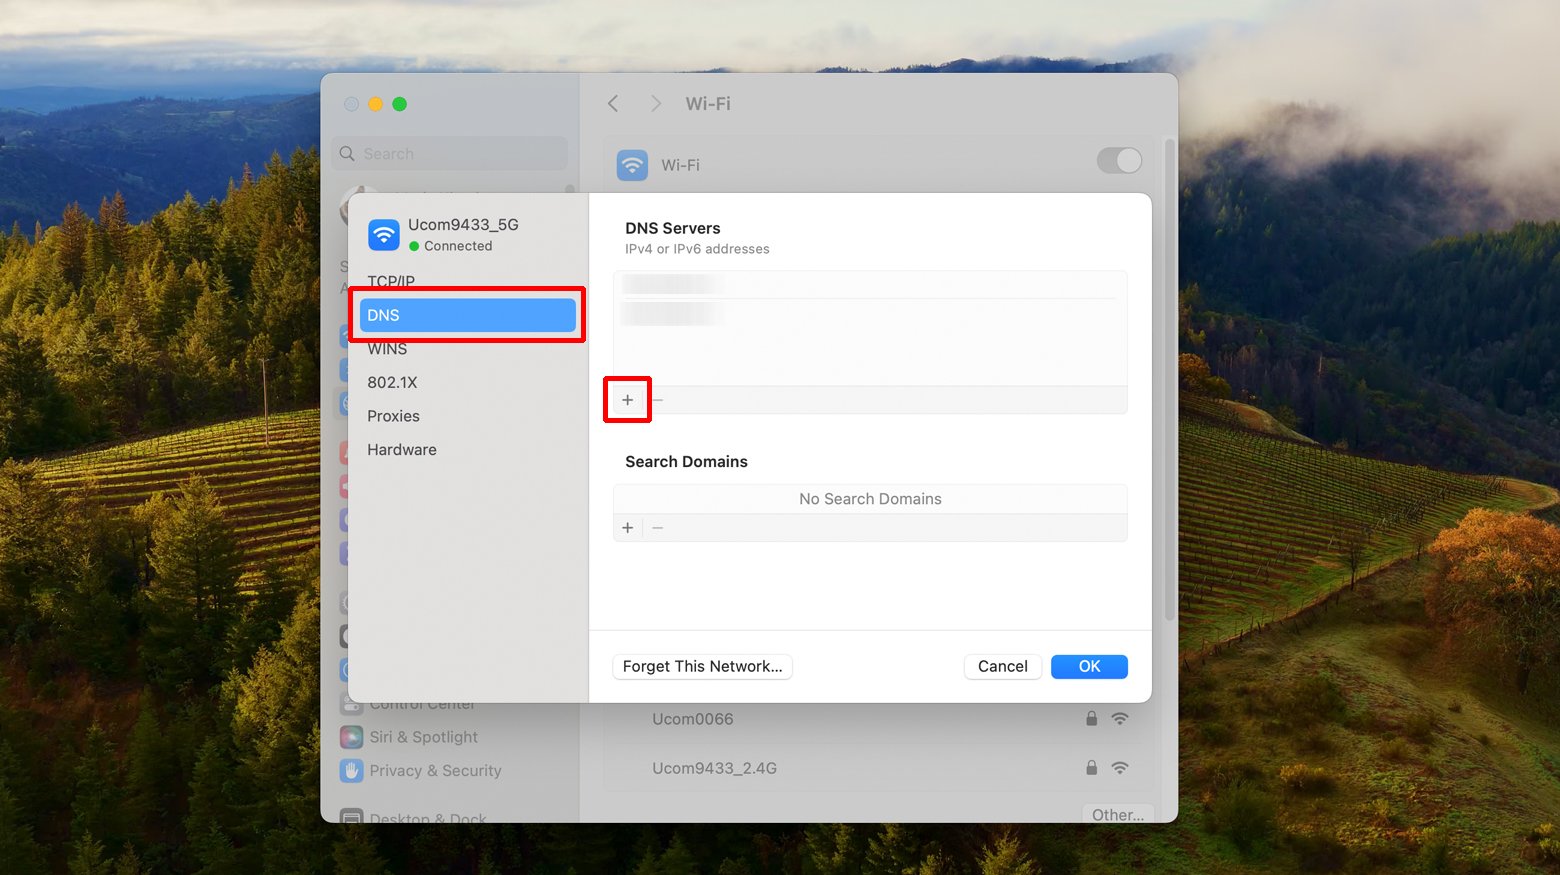
- Open System Preferences and click Network.
- Select your active connection from the list on the left and click Advanced.
- Go to the DNS tab and click the “+” button to add new DNS servers.
- Enter the addresses of the DNS servers you wish to use (e.g., Cloudflare DNS: 1.1.1.1).
- Click OK, then Apply to save the changes.
Check firewall and security software
Firewalls and security software are designed to protect your computer from unauthorized access and various threats. However, they can mistakenly block legitimate network traffic, including DNS queries, if they’re configured too strictly or incorrectly. By ensuring your firewall or security software is correctly set up to allow DNS queries and website access, you can eliminate these as potential causes of the error.
- Open your firewall or security software settings. This process varies depending on the software you’re using.
- Look for a section related to allowed applications, network settings, or exceptions.
- Ensure your web browser and DNS services are allowed to communicate through the firewall. You might need to add them to an exceptions list if they’re not already present.
- Save any changes you make and restart your computer to ensure the new settings take effect.
Flush DNS cache
The DNS cache stores the addresses of websites you’ve visited to speed up future access. However, if this cache becomes outdated or corrupt, it can lead to DNS resolution errors. Flushing the DNS cache removes all the information stored in it, forcing your computer to fetch fresh DNS information the next time you try to access a website. This can resolve issues related to stale or incorrect DNS data.
Windows
- Press Windows key + R to open the Run dialog.
- Type `cmd` and press Enter to open Command Prompt.
- Type the following command and press Enter.
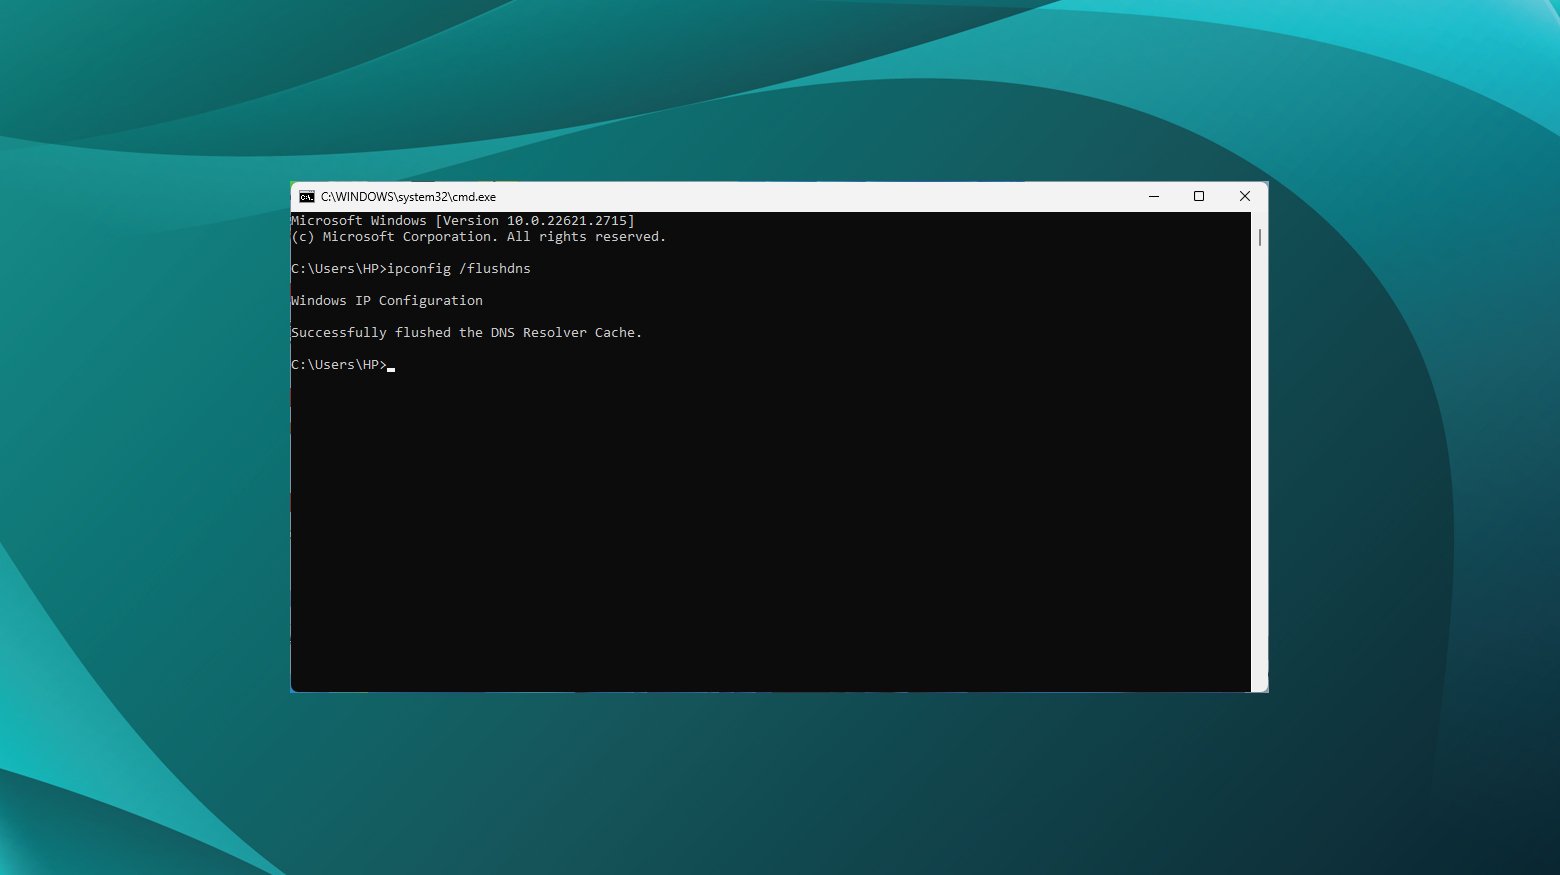
ipconfig /flushdns
You should see a confirmation message stating the DNS Resolver Cache was successfully flushed.
Mac
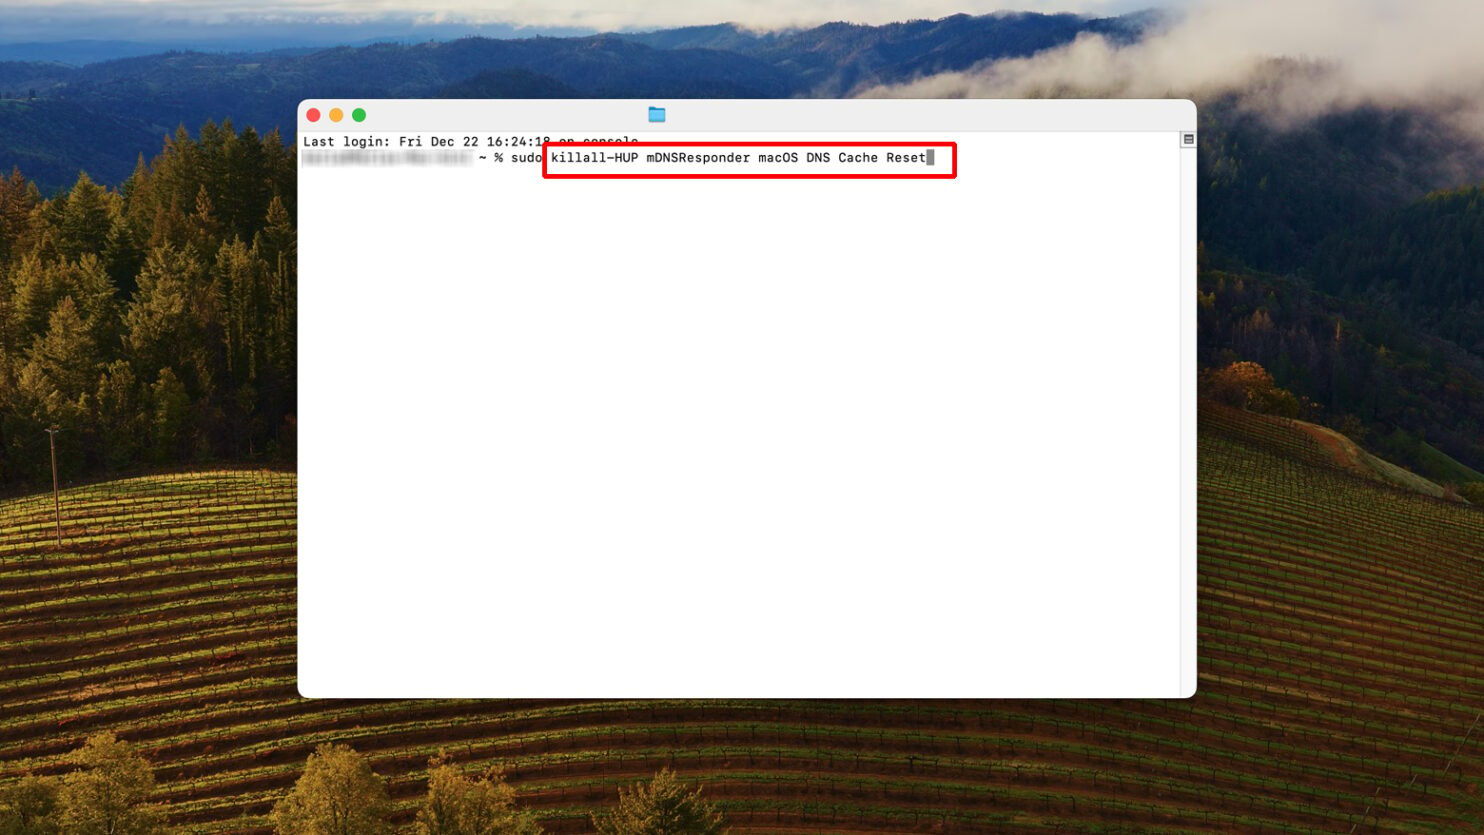
-
- Open Terminal (found in Applications > Utilities).
- Type the following command and press Enter.
sudo killall -HUP mDNSResponder
- Enter your administrator password and press Enter.
This command doesn’t produce a confirmation message, but it effectively flushes the DNS cache.
Check proxy settings
Proxy settings in your computer’s network configuration can redirect internet traffic through a proxy server, which can interfere with DNS resolution and website access. Incorrect or unnecessary proxy settings might route requests in a way that prevents your browser from reaching the intended server. By disabling these proxy settings, you ensure direct communication with DNS servers and websites, potentially resolving the “Server IP Address Could Not Be Found” error.
Windows
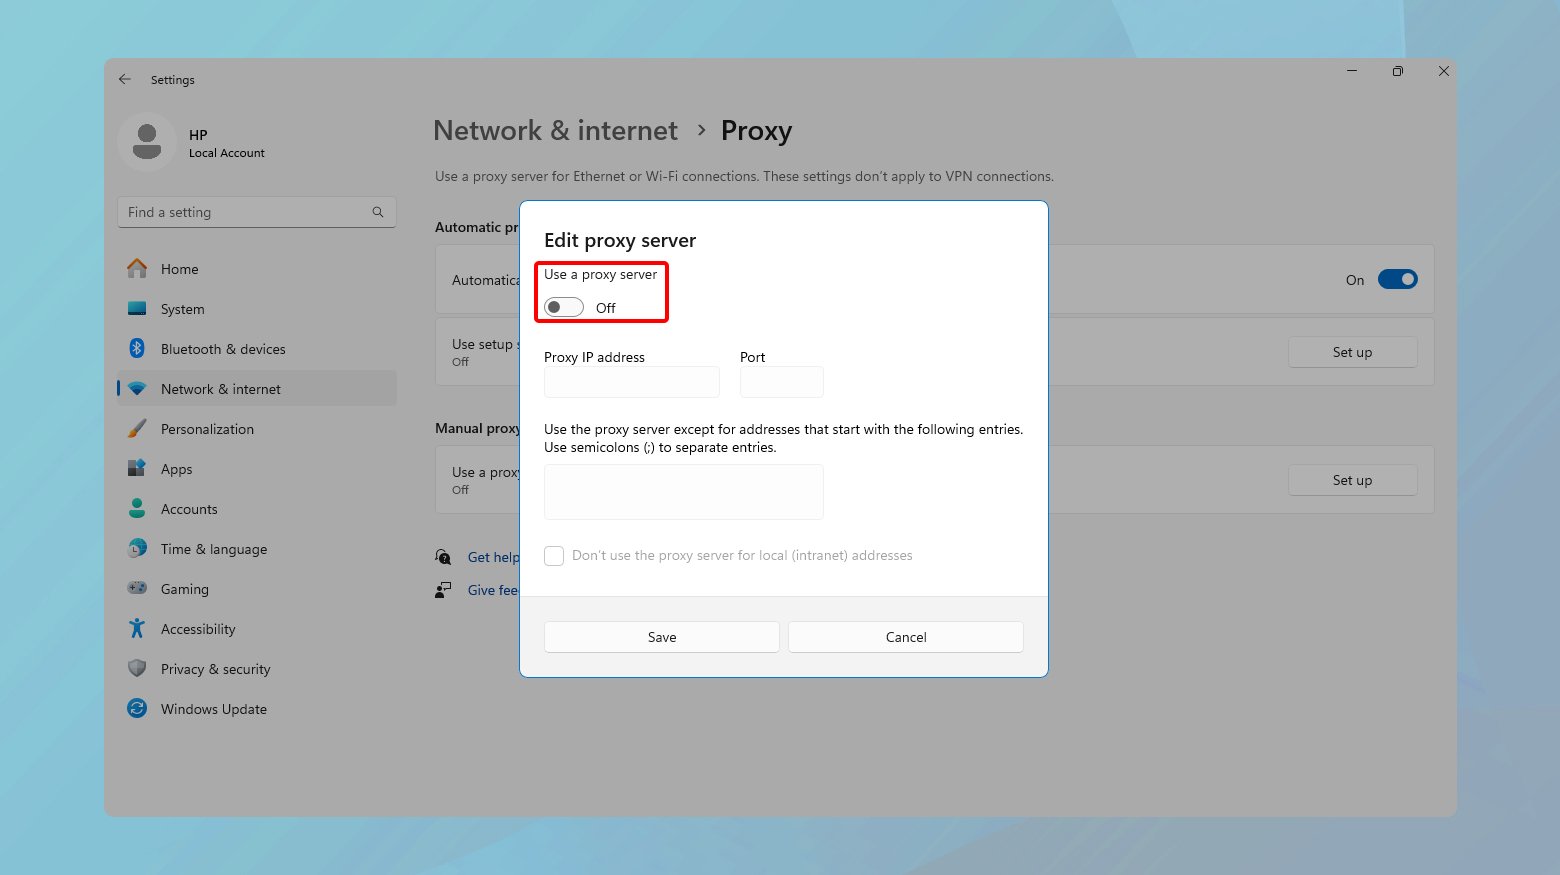
- Open Settings by pressing Windows key + I.
- Go to Network & Internet > Proxy.
- Under Manual proxy setup, set the Use a proxy server switch to Off.
- Close the settings window to apply the changes.
Mac
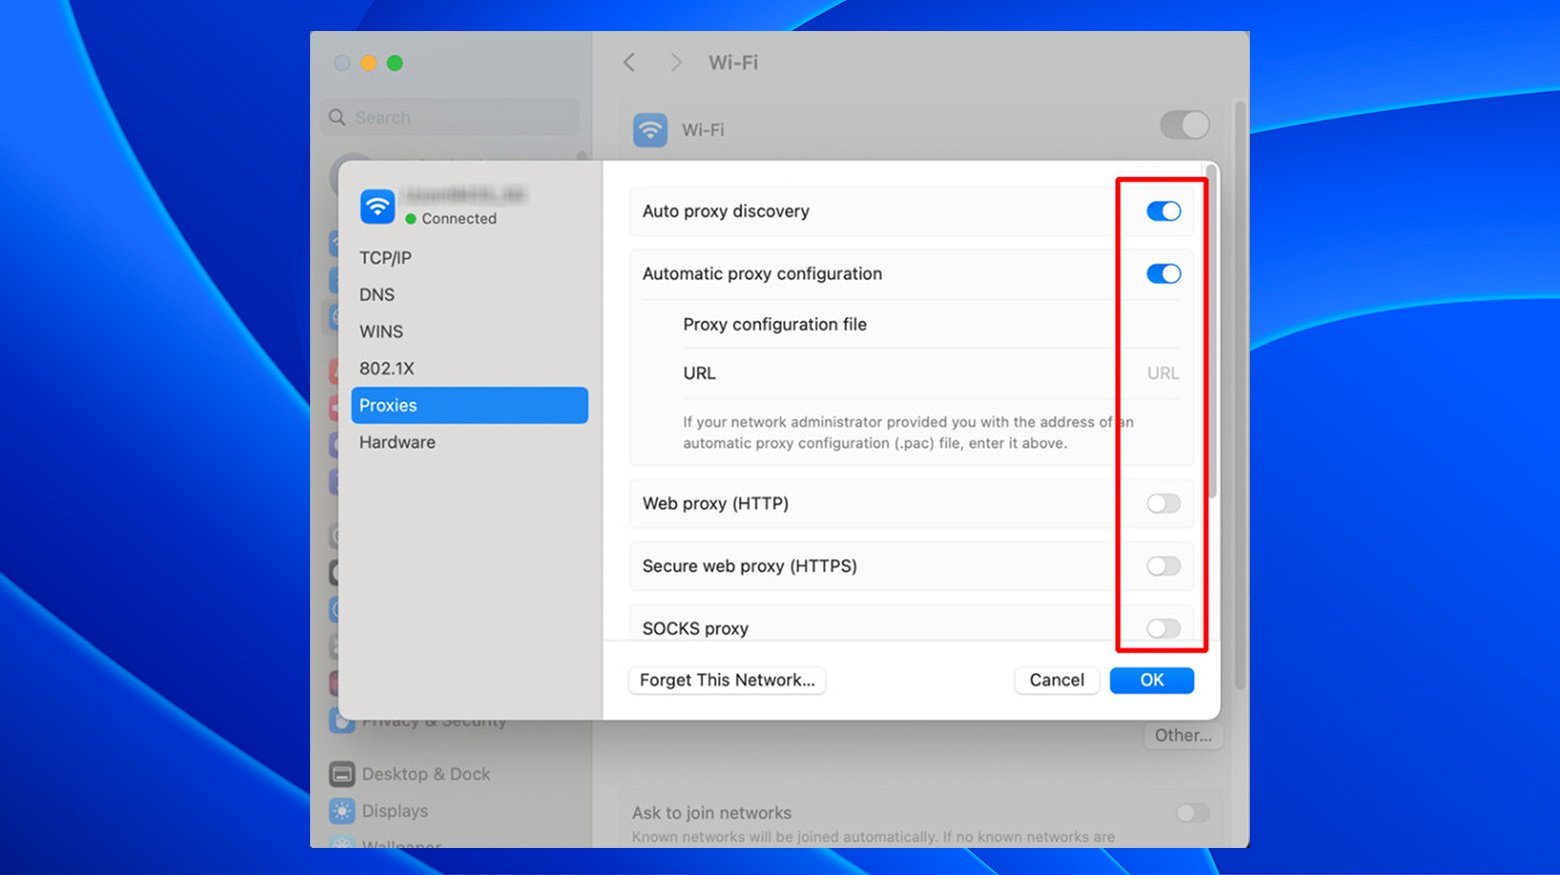
- Open System Preferences and click on Network.
- Select your active network connection and click Advanced.
- Go to the Proxies tab.
- Uncheck all proxies that are checked (unless you specifically require a proxy for your network). This includes options like “Web Proxy (HTTP)” and “Secure Web Proxy (HTTPS).”
- Click OK, then Apply to save the changes.
Release and renew your IP address
Your IP address is essential for network communication, acting as your computer’s identifier on the internet. Sometimes, network issues can be resolved by obtaining a new IP address, as this process refreshes your connection to your local network and the wider internet. This can resolve issues caused by IP address conflicts or other network connectivity problems, improving DNS resolution.
Windows
-
- Press Windows key + R to open the Run dialog.
- type `cmd` and press Enter to open Command Prompt.
- Type the following commands and press Enter after each command.
ipconfig /release
ipconfig /flushdns
ipconfig /renew
- Close the Command Prompt window after the commands complete.
Mac
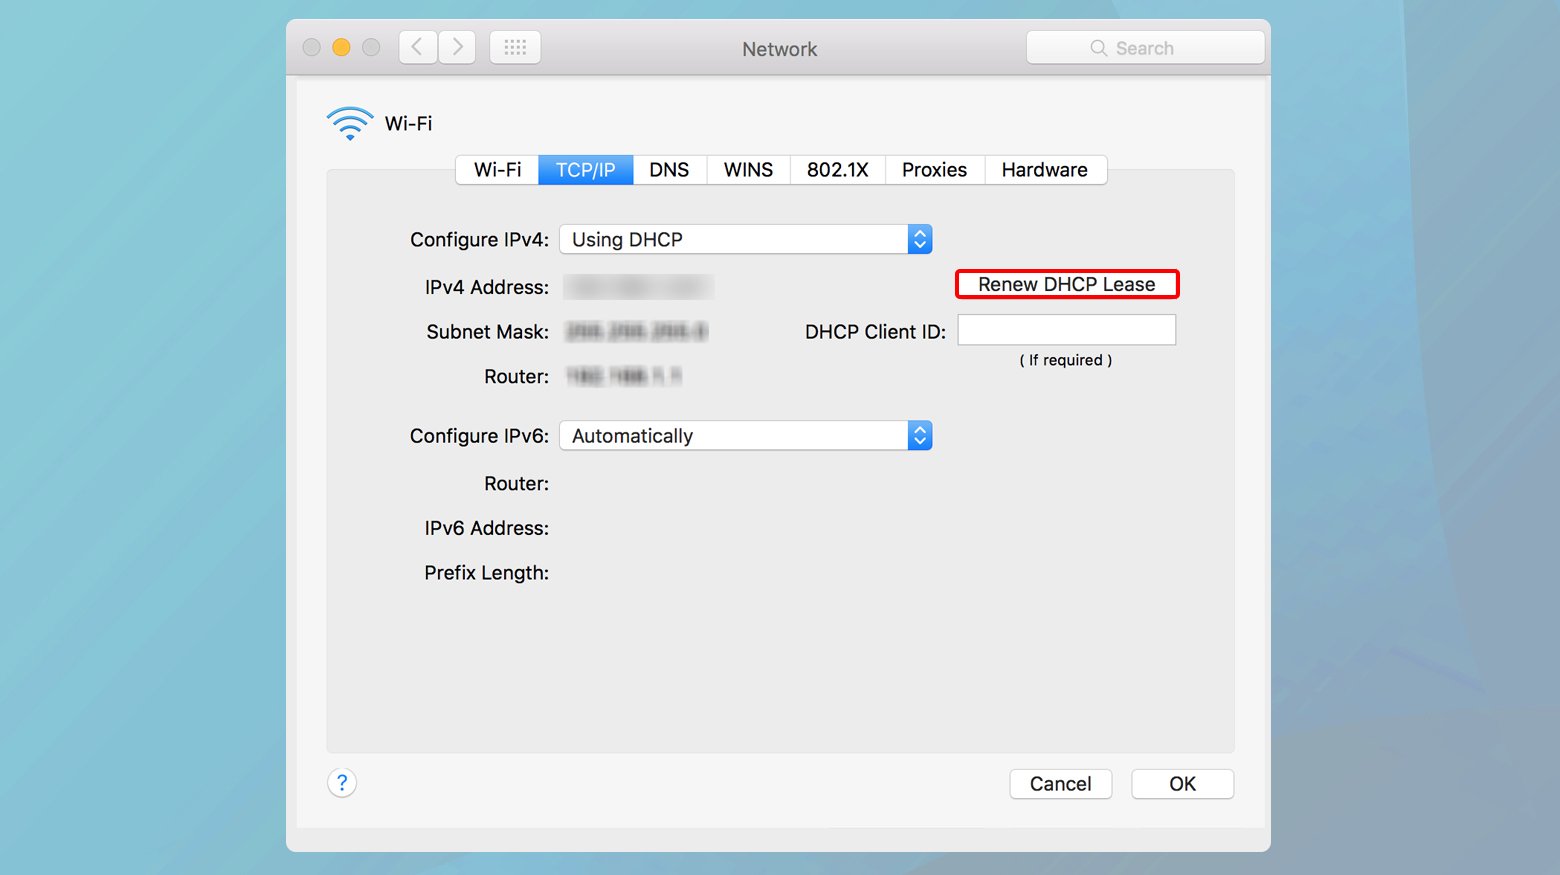
- Go to System Preferences > Network.
- Select your active network connection and click Advanced.
- Go to the TCP/IP tab.
- Click the “Renew DHCP Lease” button. This action requests a new IP address from your network’s DHCP server.
- Click OK, then Apply to save the changes.
Include the site’s IP address in your hosts file
The hosts file on your computer allows you to map domain names to specific IP addresses manually. This can be useful for bypassing DNS servers altogether for a particular domain, which can resolve the “Server IP Address Could Not Be Found” error if the issue is related to DNS resolution. By directing requests for a domain directly to its IP address, you can eliminate DNS as a potential source of the problem.
Windows

- Press Windows key + R to open the Run dialog.
- Type `notepad.exe` and then press CTRL + Shift + Enter to open Notepad with administrator privileges.
- In Notepad, go to File > Open and navigate to `C:\Windows\System32\drivers\etc\hosts`.
- Add a new line at the bottom of the file with the format `IP_ADDRESS DOMAIN_NAME`, e.g., `93.184.216.34 example.com`.
- Save the file and close Notepad.
Mac
- Open Terminal.
- Type `sudo nano /etc/hosts` and press Enter to edit the hosts file in Nano editor, using your administrator password when prompted.
- Move the cursor to the bottom of the file and add the domain and its IP address in the same format as Windows.
- Press Control + O to save changes, then Control + X to exit Nano.
Remove files from the “etc” folder
The `etc` folder on Windows contains network configuration files, including the hosts file. Sometimes, files in this folder can become corrupted or outdated, leading to network and DNS resolution issues. By removing unnecessary files, you can eliminate potential sources of the error.
- Navigate to `C:\Windows\System32\drivers\etc` using File Explorer.
- Back up the contents of the folder by copying them to another location.
- Delete the contents of the `etc` folder. If unsure, start by removing only temporary files or files that were recently added or modified.
- If the issue resolves, try restoring files one at a time to identify the problematic file.
Reboot your DNS service
The DNS Client Service in Windows caches DNS lookups to speed up internet browsing. If this service malfunctions, it can lead to DNS resolution issues. Restarting the service clears the cache and restarts the process, which can resolve these issues.
- Press Windows key + R to open the Run dialog.
- Type `services.msc` and press Enter to open the Services application.
- Scroll down and find the DNS Client service. Right-click it and choose Restart. If Restart is greyed out:
- Open Command Prompt as an administrator.
- Type `net stop dnscache` and press Enter.
- Then type `net start dnscache` and press Enter.
- Close the Services window or Command Prompt.
Bring your network adapter driver up to date
Outdated or corrupt network adapter drivers can cause connectivity issues, including DNS resolution problems. Updating these drivers ensures your network adapter communicates efficiently with your operating system, improving overall network performance and potentially resolving the “Server IP Address Could Not Be Found” error.
- Press Windows key + X and select Device Manager.
- Expand the Network adapters section.
- Right-click your network adapter and select Update driver.
- Choose “Search automatically for updated driver software” and follow the prompts.
- Restart your computer after the update completes.
Ensuring effectiveness and additional troubleshooting tips
After implementing the solutions provided, it’s crucial to verify their effectiveness. Each step addresses a specific potential cause of DNS resolution issues, and their success can depend on various factors, including your network environment, the specific website you’re trying to access, and the current state of your computer’s network configuration.
Verifying changes
After clearing browser cache or changing DNS servers: Restart your browser and attempt to access the website again. Sometimes, changes require a fresh start to take effect.
After adjusting firewall settings or disabling proxy settings: Check if other websites are accessible to ensure that the internet connection is generally working. If only a specific site is problematic, the issue might lie with the site itself or its server.
After flushing DNS cache, releasing/renewing IP, or editing hosts file: Use the command `ping [website address]` in Command Prompt (Windows) or Terminal (Mac) to test connectivity with the website. A successful ping indicates that the IP address can be reached, suggesting that DNS resolution issues are resolved.
After deleting files from the “etc” folder or rebooting DNS service: Monitor your computer’s network performance for a while to ensure that the problem doesn’t recur. Sometimes, issues may be intermittent and require observation over time.
After updating network adapter driver: Check the manufacturer’s website for your network adapter to compare the driver version installed on your computer with the latest one available. Ensuring you have the most recent driver can prevent a wide range of connectivity issues.
Closing thoughts
By understanding the “why” behind each solution and following the detailed “how to” instructions, you can systematically address and eliminate potential causes of the “Server IP Address Could Not Be Found” error. Remember, the effectiveness of each solution can vary based on individual network environments and configurations. Continuous verification, additional troubleshooting tips, and sometimes professional assistance are key to resolving this issue and ensuring a seamless internet browsing experience.
Say goodbye to website errors
Achieve peace of mind with 99.99% uptime on 10Web Managed
WordPress Hosting, powered by Google Cloud.
Если при попытке открыть какой-либо сайт в браузере Google Chrome на компьютере или телефоне вы видите ошибку ERR_NAME_NOT_RESOLVED и сообщение «Не удается получить доступ к сайту. Не удалось найти IP-адрес сервера» (ранее — «Не удается преобразовать DNS-адрес сервера»), то находитесь на верном пути и, надеюсь, один из изложенных ниже способов исправить эту ошибку вам поможет. Методы исправления должны работать для Windows 10, 8.1 и Windows 7 (также в конце есть способы для Android).
Проблема может появиться после установки какой-либо программы, удаления антивируса, изменения сетевых настроек пользователем или же в результате действий вируса и другого вредоносного программного обеспечения. Кроме этого, сообщение может являться и результатом некоторых внешних факторов, о которых тоже поговорим. Также в инструкции присутствует видео об исправлении ошибки. Похожая ошибка: Превышено время ожидания ответа от сайта ERR_CONNECTION_TIMED_OUT.
Первое, что следует проверить, прежде чем приступать к исправлению
Есть вероятность, что с вашим компьютером все в порядке и ничего особенно исправлять не нужно. А поэтому, прежде всего обратите внимание на следующие пункты и попробуйте их использовать, если вас застала эта ошибка:
- Убедитесь, что вы ввели адрес сайта правильно: если ввести URL несуществующего сайта, Chrome выдаст ошибку ERR_NAME_NOT_RESOLVED.
- Проверьте, ошибка «Не удается преобразовать DNS адрес сервера» появляется при входе на один сайт или на все сайты. Если на один — то, возможно, на нем что-то меняют или временные проблемы у хостинг-провайдера. Можно подождать, а можно попробовать очистить кэш DNS с помощью команды ipconfig /flushdns в командной строке от имени администратора.
- Если имеется возможность, то проверьте, ошибка появляется на всех устройствах (телефонах, ноутбуках) или только на одном компьютере. Если на всех — возможно, проблема у провайдера, стоит либо подождать, либо попробовать Google Public DNS, о чем будет далее.
- Эту же ошибку «Не удается получить доступ к сайту» можно получить, если сайт закрылся и больше не существует.
- Если подключение осуществляется через Wi-Fi роутер, выключите его из розетки и включите снова, попробуйте зайти на сайт: возможно, ошибка исчезнет.
- Если подключение без Wi-Fi роутера, попробуйте зайти в список подключений на компьютере, отключить Ethernet (Локальная сеть) подключение и снова включить его.
Используем Google Public DNS, чтобы исправить ошибку «Не удается получить доступ к сайту. Не удалось найти IP-адрес сервера»
Если вышеописанное не помогло исправить ошибку ERR_NAME_NOT_RESOLVED, пробуем проделать следующие простые шаги
- Зайдите в список подключений компьютера. Быстрый способ сделать это — нажать клавиши Win+R на клавиатуре и ввести команду ncpa.cpl

- В списке подключений выберите то, которое используется для выхода в Интернет. Это может быть L2TP подключение Билайн, Высокоскоростное подключение PPPoE или же просто подключение по локальной сети Ethernet. Кликните по нему правой кнопкой мыши и выберите пункт «Свойства».
- В списке компонентов, используемых подключением, выберите «IP версии 4» или «Протокол Интернета версии 4 TCP/IPv4) и нажмите кнопку «Свойства».
- Посмотрите, что установлено в параметрах DNS-сервера. Если установлено «Получить адрес DNS-сервера автоматически», отметьте «Использовать следующие адреса DNS-серверов» и укажите значения 8.8.8.8 и 8.8.4.4. Если же в этих параметрах установлено что-то иное (не автоматически), то для начала попробуйте задать автоматическое получение адреса DNS-сервера, это может помочь.

- После того, как вы сохранили настройки, запустите командную строку от имени администратора и выполните команду ipconfig /flushdns (эта команда очищает кэш DNS, подробнее: Как очистить кэш DNS в Windows).


Снова попробуйте зайти на проблемный сайт и посмотрите, сохранилась ли ошибка «Не удается получить доступ к сайту»
Проверьте, запущена ли служба DNS-клиент

На всякий случай, стоит посмотреть, включена ли служба, отвечающая за преобразование DNS-адресов в Windows. Для этого зайдите в Панель управления и переключитесь к видам «Значки», если у вас стоят «Категории» (по умолчанию). Выберите пункт «Администрирование», а затем — «Службы» (также можно нажать Win+R и ввести services.msc, чтобы сразу открыть службы).

Найдите в списке службу DNS-клиент и, если она «Остановлена», а запуск происходит не автоматически, кликните дважды по названию службы и установите соответствующие параметры в открывшемся окне, а заодно нажмите кнопку «Запустить».
Сброс параметров TCP/IP и Интернета на компьютере
Еще один возможный вариант решения проблемы — сбросить параметры TCP/IP в Windows. Раньше это часто приходилось делать после удаления Avast (сейчас, кажется, нет) для того, чтобы исправить ошибки в работе Интернета.
Если на вашем компьютере установлена Windows 10, то сбросить параметры Интернета и протокола TCP/IP можно таким образом:
- Зайдите в Параметры — Сеть и Интернет.
- Внизу страницы «Состояние» нажмите по пункту «Сброс сети»

- Подтвердите сброс сети и перезагрузите компьютер.

Если же у вас установлена Windows 7 или Windows 8.1, поможет отдельная утилита от Майкрософт для сброса параметров сети.
Скачать утилиту Microsoft Fix it со страницы официального сайта http://support.microsoft.com/kb/299357/ru (На той же странице описано, как можно сбросить параметры TCP/IP вручную.)
Проверка компьютера на наличие вредоносных программ, сброс hosts
Если ничто из вышеперечисленного не помогло, а вы уверены, что ошибка не вызвана какими-либо внешними по отношению к вашему компьютеру факторами, рекомендую провести проверку компьютера на наличие вредоносных программ и сбросить дополнительные параметры Интернета и сети. При этом, даже если у вас уже установлен хороший антивирус, попробуйте использовать специальные средства удаления вредоносных и нежелательных программ (многие из которых ваш антивирус не видит), например AdwCleaner:
- В AdwCleaner зайдите в настройки и включите все пункты как на скриншоте ниже

- После этого перейдите в пункт «Панель управления» в AdwCleaner, запустите сканирование, а затем выполните очистку компьютера.

Как исправить ошибку ERR_NAME_NOT_RESOLVED — видео
Также рекомендую посмотреть статью Страницы не открываются ни в одном браузере — она также может оказаться полезной.
Исправление ошибки Не удается получить доступ к сайту (ERR_NAME_NOT _RESOLVED) на телефоне
Эта же ошибка возможна и в Chrome на телефоне или планшете. Если вы столкнулись с ERR_NAME_NOT_RESOLVED на Android, попробуйте такие шаги (при этом учитывайте все те же моменты, которые были описаны в начале инструкции в разделе про «Что проверить перед исправлением»):
- Проверьте, проявляется ли ошибка только по Wi-Fi или и по Wi-Fi и по мобильной сети. Если только по Wi-Fi, попробуйте перезагрузить роутер, а также установить DNS для беспроводного подключения. Для этого зайдите в Настройки — Wi-Fi, удерживайте имя текущей сети, затем выберите в меню «Изменить эту сеть» и в дополнительных параметрах установите Статический IP с DNS 8.8.8.8 и 8.8.4.4.
- Проверьте, а появляется ли ошибка в безопасном режиме Android. Если нет, то виновато, по всей видимости, какое-то недавно установленное вами приложение. С большой вероятностью, какой-то антивирус, ускоритель интернета, чистильщик памяти или подобное ПО.
Надеюсь, один из способов позволит вам исправить проблему и вернуть нормальное открытие сайтов в браузере Chrome.