
-
Home
-
News
- How to Solve Event ID 46 Crash Dump Initialization Failed
By Tina |
Last Updated
When you boot your computer, you may come across the error crash dump initialization failed. What does the crash dump initialization failed error mean? How to solve the volmgr crash dump initialization failed? This post from MiniTool shows you the solutions.
When you boot the computer, you may come across the error that the Event ID 46 crash dump initialization failed. This issue may occur if the computer boots without a configured dump file. In general, the default dump file is the pagefile. During a clean Windows OS installation, the very first boot will hit this condition as the pagefile has not been set up yet.
So, do you know how to fix the issue of crash dump initialization failed? If not, do not worry. Keep on your reading and find solutions below.
How to Fix Crash Dump Initialization Failed?
In this section, we will show you how to solve the error of volmgr crash dump initialization failed. In order to fix the issue, you need to complete the paging file configuration.
Enable Memory Dump Settings
In order to fix the Event ID 46 volmgr Windows 7, you can choose to enable memory dump settings.
Now, here is the tutorial.
- Open Control Panel.
- Then click System and Security.
- In the pop-up window, choose System.
- Then click Advanced system settings on the left panel to continue.
- Then navigate to the Advanced tab.
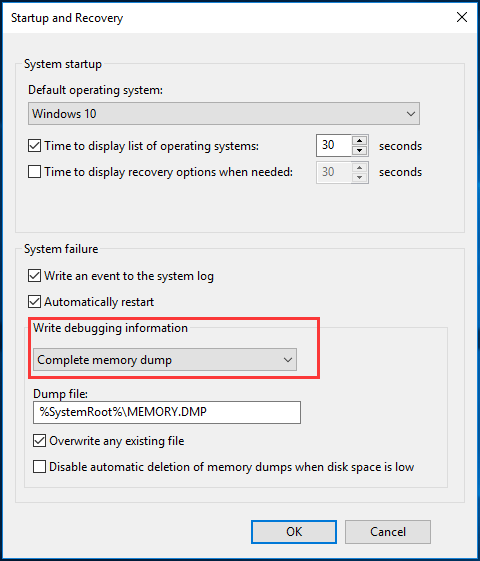
- Click Settings under Startup and Recovery section.
- Check the option Kernel memory dump or Complete memory dump under Write debugging information.
- Then click OK to save the changes.
After that, restart your computer and check whether the issue of crash dump initialization failed is fixed.
Generate Memory Dump File Manually
In general, the contents of physical RAM are written to the paging file that is located on the partition on which the operating system is installed when the computer crashes and restarts. If the dump file is large than 2GB, it will take a long time to respond. So, in order to fix the issue of crash dump initialization failed, you can choose to generate memory dump file manually.
Now, here is the tutorial.
- Press Windows key and R key together to open the Run dialog.
- Type regedit in the box and click OK to continue.
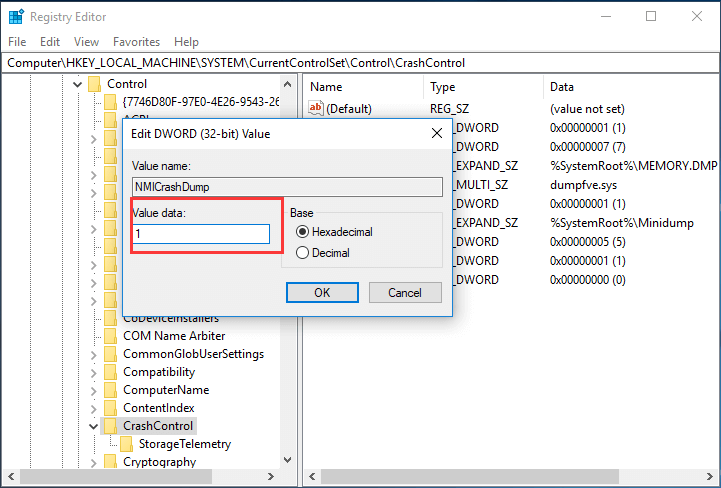
- In the Registry Editor window, navigate to the following path: HKEY_LOCAL_MACHINE\SYSTEM\CurrentControlSet\Control\CrashControl
- Then right-click CrashControl and choose New > DWORD (32-bit) value.
- Rename it new key file as the NMICrashDump.
- Next, right-click and choose Modify.
- In the pop-up window, change its value data to 1.
- At last, click OK to save the changes.
Once all steps are finished, reboot your computer and check whether the error of crash dump initialization failed is fixed. In addition, some brand computers provide the Automatic System Recovery feature. When you troubleshoot to generate a dump memory file, you need to disable this feature first.
To sum up, this post has shown how to solve the error of Event ID 46 crash dump initialization failed. If you come across the same error, try these solutions. If you have any better idea to fix it, you can share it in the comment zone.
About The Author
Position: Columnist
Tina is a technology enthusiast and joined MiniTool in 2018. As an editor of MiniTool, she is keeping on sharing computer tips and providing reliable solutions, especially specializing in Windows and files backup and restore. Besides, she is expanding her knowledge and skills in data recovery, disk space optimizations, etc. On her spare time, Tina likes to watch movies, go shopping or chat with friends and enjoy her life.
Здраствуйте, хочу уточнить, что на данный момент актуальная проблема это обнаруженный троян утилитой «Kaspersky Virus Removal Tool»(прикрепляю все скрины) , а также я проверил с помощью avz 4 мне также выдали 2 файла с трояном, также меня очень волнует в истории браузера при заходе на свою страницу «Вконтакте» возникают в огромном количестве непонятные ссылки каждую минуту около 100 штук, при переходе на которые ведут на начальную страницу со входом в аккаунт «ВК»(прикрепляю ссылки) такое я замечал еще ранее, на протяжении года минимум, также 30.04.24 возник экран смерти с ошибкой DCP_WATCH_violation (я перезагрузил ПК, далее подозрительных действий не наблюдалось)
Скажу что был случай заражения вирусом в 2021 году в то время я снес виндоувс, (отформатировал полностью системный диск С) однако я не стал форматировать второй диск D, и вот сегодня 11.05 решил также проверить диск D и обнаружил как раз остатки трояна, однако до сегодняшнего момента очень явных признаков я не наблюдал (на протяжении 3 лет) , только если сослаться на торможение слегка своего ПК
Скажу что использую базовую версию антивируса платного Касперский.
Насчет файла default.rpd я взял сохраненное сообщение на другом форуме где мне не помогли привожу его ниже:
«»»»»Началось 2 июня 2023 , когда сидел в discord я начал демонстрацию экрана и заметил roaming window (предложено было дискордом демонстрировать данное окно, которое было черное) далее я начал проверку avz и когда она подходила к концу, неожиданно в чате дискорда началось печатания каких то букв , в этот момент я ничего не писал( клавиатура чиста, это не техника) текст был такой примерно «еуеуеуеуеуеуеу» далее я заметил в скрытых значках сенсорную клавиатуру, её значок ( у меня windows 10) которую я не открывал и не мог ее закрыть долгое время(сенсорная клавиатура появилась задолго до этого момента , я просто не обращал внимания) , далее я решил просто удалить старый антивирус бесплатный dr web и установил пробную версию премиум касперского и после этого вроде других действий не замечал до момента когда в папку документов появился скрытый документ default.rpd с размером 0 кб и созданием в тот момент когда я возился с проверками (2 июня ночью)»»»»
Также уточню что 10.05.24 (вчера) установил solidworks крякнутый в сайта diakov (я уже пользовался им, проверенный, устанавливал офисы2016 и adobe), там я вводил какие то изменения в реестр по инструкции, ссылался на локальный хост, отключал сеть, программа работает.
Внизу прикладываю также скрины найденных файлов вирусных разными сканерами — avz(отдельно сканировал им без аутологгера)—2 файла удаленных привожу полное наименование одного из (CWindowsservicingLCUPackage_for_RollupFix~31bf3856ad364e35~amd64~~19041.4291.1.10amd64_microsoft-windows-m..nt-browser.appxmain_31bf3856ad364e35_10.0.19041.3636_none_708b8c01b2212346fsquare44x44logo.targetsize-48_altform-unplated_contrast-white.png)
Если возникнут вопросы отвечу на всё и попытаюсь быстро реагировать
CollectionLog-2024.05.11-12.53.zip
Issue: I have recently replaced my CPU with a Ryzen 5 5600X, and since then my PC has been crashing. I checked the Event Viewer and saw Event ID 46 errors whenever these crashes occur. Please advise on how to resolve this.
Solved Answer
Event Log IDs are integral parts of the Windows operating system, serving as critical indicators of system health and performance. These numerical identifiers correspond to specific events within the system – including errors, warnings, or informational messages. Event Logs, which can be accessed through the Event Viewer tool, are invaluable for diagnosing and troubleshooting system problems. They provide a chronological record of system events and are commonly used by system administrators, technical support teams, and advanced users to uncover the root causes of various issues, aiding in their resolution.
One specific Event Log ID that some users may encounter is Event ID 46, which corresponds to the message, “Crash dump initialization failed.” This message indicates that Windows was unable to create a crash dump file. Crash dumps are files generated by Windows when a system error occurs, containing detailed information about the system state at the time of the error. These files are instrumental in diagnosing and troubleshooting the system error.
The failure of crash dump initialization may occur due to several reasons. The most common of these is insufficient disk space, where Windows cannot create the dump file due to a lack of available storage space. It can also be a symptom of hardware changes, where updated or new hardware components are incompatible with the system’s existing configurations. Sometimes, this error may also be caused by improper system settings or configuration changes, such as those related to the page file settings or registry entries, as well as drivers.
 in Windows?")
In order to fix Event ID 46, users may have to perform several troubleshooting steps, such as changing the Memory Dump settings, checking disk or system files for errors, using Registry Editor, etc. More details on how to perform these fixes are provided in this article below.
Users who want an automated solution to diagnose and repair computer issues may opt to use the FortectMac Washing Machine X9 PC repair tool. This tool can automatically detect system-related issues and provide suitable solutions automatically, streamlining the troubleshooting process.
Fix 1. Enable memory dump in settings
Enabling memory dump involves adjusting your system settings to instruct Windows to create a dump file upon encountering a system error. This is crucial for diagnosing issues like Event ID 46, as the crash dump contains detailed information about the system’s state during the error.
- Open Windows Settings and go to System > About.
- Click on Advanced system settings.
- Under the Startup and Recovery section, click Settings.

- In the new window, under the System failure section, make sure Write an event to the system log and Automatically restart are checked.
- In the Write debugging information dropdown, select Automatic memory dump.
- Click OK to apply changes.

Fix 2. Run check disk
Fix it now!
Fix it now!
To repair damaged system, you will have a 24hr Free Trial and the ability to purchase the licensed version of the Fortect Mac Washing Machine X9.
The Check Disk utility in Windows scans your hard disk for errors and attempts to fix them automatically. If the Event ID 46 issue is due to disk-related issues, running Check Disk may resolve the problem.
- Type cmd in Windows search.
- Right-click on Command Prompt and pick Run as administrator.
- When UAC shows up, click Yes.
- In the new window, type in the following command and press Enter after:
chkdsk c: /f
(Note: use chkdsk c: /f /r /x command if you are using SSD as your primary partition) - If you receive an error, type in Y, close down Command Prompt and restart your system.
- Wait until the scan is finished – you can find the results in the Event Viewer.

Fix 3. Perform SFC and DISM scans
System File Checker (SFC) and Deployment Image Servicing and Management (DISM) are Windows utilities that can repair corrupted system files. If the issue is due to system file corruption, running these scans can help fix the problem.
- Open Command Prompt as administrator.
- Type in the following command and press Enter:
sfc /scannow - When done, run the following commands as well:
dism /online /cleanup-image /scanhealth
dism /online /cleanup-image /checkhealth
dism /online /cleanup-image /restorehealth
(Note: if you get an error executing this last command, add /Source:C:\RepairSource\Windows /LimitAccess to it and try again). - Restart your computer.

Fix 4. Use the registry editor to generate dump file
Fix it now!
Fix it now!
To repair damaged system, you will have a 24hr Free Trial and the ability to purchase the licensed version of the Fortect Mac Washing Machine X9.
Modifying the registry to generate a dump file can sometimes resolve the “Crash dump initialization failed” error. Be cautious when using the Registry Editor, as incorrect changes can cause serious system problems.
- In Windows search, type regedit, and press Enter to open the Registry Editor.
- Navigate to the following location:
HKEY_LOCAL_MACHINE\SYSTEM\CurrentControlSet\Control\CrashControl - In the right pane, right-click on NMICrashDump, select Modify, set the value to 1, and click OK.
- If the NMICrashDump entry does not exist, you should create it by right-clicking on an empty space and selecting New > DWORD (32-bit) value, then naming it NMICrashDump.
- Close the Registry Editor and restart your computer.

Repair your Errors automatically
ugetfix.com team is trying to do its best to help users find the best solutions for eliminating their errors. If you don’t want to struggle with manual repair techniques, please use the automatic software. All recommended products have been tested and approved by our professionals. Tools that you can use to fix your error are listed bellow:
do it now!
Download Fix
Happiness
Guarantee
do it now!
Download Fix
Happiness
Guarantee
Compatible with Microsoft Windows
Compatible with OS X
Still having problems?
If you failed to fix your error using FortectMac Washing Machine X9, reach our support team for help. Please, let us know all details that you think we should know about your problem.
Fortect will diagnose your damaged PC. It will scan all System Files that have been damaged by security threats. Mac Washing Machine X9 will diagnose your damaged computer. It will scan all System Files and Registry Keys that have been damaged by security threats. To repair damaged system, you will have a 24hr Free Trial and the ability to purchase the licensed version of the Fortect malware removal tool. To repair damaged system, you have to purchase the licensed version of Mac Washing Machine X9 malware removal tool.
Protect your online privacy with a VPN client
A VPN is crucial when it comes to user privacy. Online trackers such as cookies can not only be used by social media platforms and other websites but also your Internet Service Provider and the government. Even if you apply the most secure settings via your web browser, you can still be tracked via apps that are connected to the internet. Besides, privacy-focused browsers like Tor is are not an optimal choice due to diminished connection speeds. The best solution for your ultimate privacy is Private Internet Access – be anonymous and secure online.
Data recovery tools can prevent permanent file loss
Data recovery software is one of the options that could help you recover your files. Once you delete a file, it does not vanish into thin air – it remains on your system as long as no new data is written on top of it. Data Recovery Pro is recovery software that searchers for working copies of deleted files within your hard drive. By using the tool, you can prevent loss of valuable documents, school work, personal pictures, and other crucial files.
Решение
– войдите в систему с учетной записью Администратор или члена группы Администраторы;
– нажмите Пуск –> на Компьютер (правой кнопкой мыши) Свойства — Дополнительные параметры системы ;
– в диалоговом окне Свойства системы откройте вкладку Дополнительно;
– в разделе Загрузка и восстановление нажмите кнопку Параметры;
– в разделе Отказ системы диалогового окна Загрузка и восстановление установите флажки:
• Записать событие в системный журнал .
— в разделе Запись отладочной информации выберите малый дамп памяти
Или же можно вообще выключить запись отладочной информации. По ходу они мне в жизни ни разу не понадобилась. Ну пока…
ten_rabbits
New Member
- Регистрация
- 27 Дек 2011
- Сообщения
- 23
- Баллы
- 1
-
-
#1
Всем доброго времени суток!
У меня проблема возникла, приехал с юга — комп 10 дней в простое стоял(выключенный).
При включении выдал что не может к моей точке wi-fi подключиться(с ограниченным доступом). Дрова стояли, но я заново поставил со всей софтятиной от производителя к wi-fi карточке.
Инет заработал, но стали наблюдаться проблемы с виндой — панель задач, пуска, проводники стали подтормаживать и редко отвечать. При иной манипуляции система вовсе виснет (без бсода) и помогает только хард ресет. Даже при написании этого поста 2 раза система свалилась при попытке загрузить вложение.
В журнале событий пишет «Не удалось инициализировать аварийный дамп». Почитал в инете что бы попробовать узнать в чем дело — ничего толкового не нашел, проблема так и осталась нерешенной.
Проверял HDD(единственный) на битые сектора через mhdd с загрузочной флешки — с ним все в порядке. Проверял оперативу стандартным средством windows — с ней вроде как тоже(во всяком случае ошибок не выдавало). Пробовал откатить/восстановить систему — безуспешно.
Не пробовал только LiveCD.
Что посоветуете в моем случае?
система:
Windows 7 ultimate (reactor)
CPU Phenom X6 1055T
RAM 8gb ddr3
Nvidia gt440 1gb gddr5
Dlink wireless G DWA-510
ps: малозначимое примечание — HWMonitor показывает температуру процессора в графе MAX в два раза больше чем в графе VALUE. Т.е. если при запуске value 40, то MAX 80. Переустановка не помогала, проверял еверестом — VALUE не врет. Откуда тогда берутся такие величины в графе MAX?
Axel_F
Забытый всеми юзер
Команда форума
- Регистрация
- 1 Фев 2012
- Сообщения
- 389
- Баллы
- 16
-
-
#2
ten_rabbits написал(а):
малозначимое примечание — HWMonitor показывает температуру процессора в графе MAX в два раза больше чем в графе VALUE. Т.е. если при запуске value 40, то MAX 80. Переустановка не помогала, проверял еверестом — VALUE не врет. Откуда тогда берутся такие величины в графе MAX?
Как запускается HWMonitor? Value- означает текущий. MAX- максимальное значение после запуска совтины HWMonitor.
ten_rabbits
New Member
- Регистрация
- 27 Дек 2011
- Сообщения
- 23
- Баллы
- 1
-
-
#3
DDX777 написал(а):
У вас в свойствах моего компьютера не настроено чтобы создавался дамп поэтому и такая ошибка Синий экран смерти (BSoD) — тут написано как сделать чтобы создавался дамп. Жесткий диск стоить проверить средствами windows и почистить компьютер от пыли. Если вылетит синий экран выкладывайте дампы
Убрал галку автоматической перезагрузки, но экрана по прежнему нет — просто зависает комп. Жесткий диск проверял chkdsk — он вроде особо не ругался, ошибок небыло, но и логи свои не сохранил(там отдельная история, только потом разобрался как логи сохранять, но вроде как без надобности).
Открыл блок — пыли то и нет совсем, сдувать нечего, она на пылесборниках только тусуется у вентилей на корпусе.
Axel_F написал(а):
Как запускается HWMonitor? Value- означает текущий. MAX- максимальное значение после запуска совтины HWMonitor.
Ну вроде как это баг программы. Value ни в один момент не совпадало с Max, и не совпадет, так как стоит текущей температуре увеличиться — max увеличивается в двойной пропорции.
Меня просто насторожили те 80 градусов что показывал Max, но еверест и биос показывают нормальные температуры.
ten_rabbits
New Member
- Регистрация
- 27 Дек 2011
- Сообщения
- 23
- Баллы
- 1
-
-
#4
в общем помог формат и чистая винда..