
Have you ever encountered the error message “Virtual Disk Service Error delete is not allowed” when you try to delete a volume (partition) from your hard drive? This post on MiniTool shows you how to deal with this problem and delete the system volume successfully.
Sometimes you may want to delete an existing volume to free up space or for other reasons. However, according to the Internet, many users are troubled by the “delete is not allowed” error when they try to delete their volumes.
The full name of this Virtual Disk Service Error is “Virtual Disk Service error: Delete is not allowed on the current boot, system, pagefile, crashdump or hibernation volume”.

Various reasons can lead to this error message. And for detailed information about the causes of this message, you can refer to this post: How to Delete Drive C, EFI System Volume, Recovery/OEM Volume. Now let us see how to get rid of this issue and delete your volume effectively.
How to Fix Virtual Disk Service Error Delete Is Not Allowed
Fix 1. Boot From Another Operating System
As the error message says, you cannot delete the partition containing your operating system that is running. In this situation, if you have more than one operating system, you can change the boot order and boot from another one that does not need to be deleted, then delete the unwanted volume.
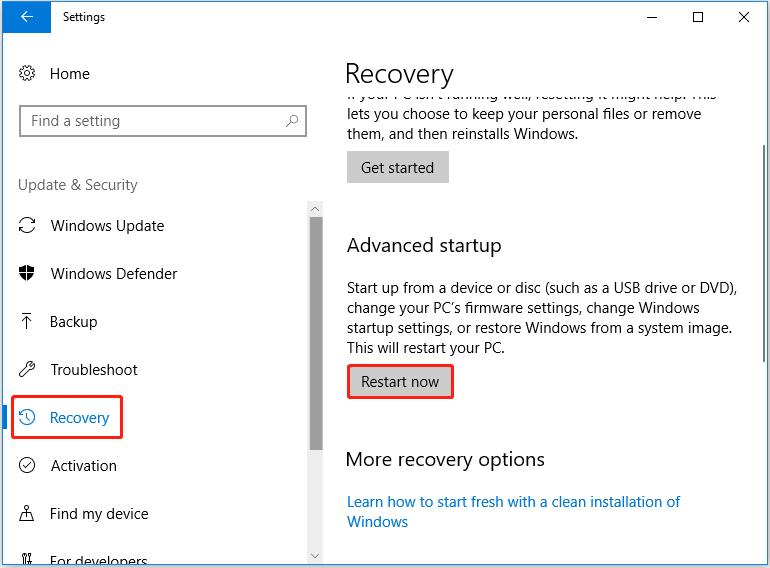
Step 1. Press Windows + I key combinations to go to Windows Settings and select Update & Security.
Step 2. Move on to the Recovery section in the left panel and click Restart now under the Advanced startup section.
Step 3. Click Troubleshoot > Advanced Options> UEFI Firmware Settings > Restart.
Step 4. Move on to the Boot tab and use the arrow keys on your keyboard to change the boot order to meet your needs.
Step 5. Save your changes and reboot your computer from the selected boot partition.
Now you can try to delete the target volume again and check whether the error “Virtual Disk Service Error delete is not allowed” still exists.
Fix 2. Delete the Volume With MiniTool Partition Wizard
When you cannot delete a volume for any reason, you can try to make use of a professional partition management tool to delete it. MiniTool Partition Wizard is such a partition manager that is used to create, resize, move, merge, split, format, delete, wipe, hide partitions, and so on.
To delete the partition that reports the delete is not allowed error in Windows 10, you need to use a bootable edition like MiniTool Partition Wizard Pro because it offers you the Bootable Media Builder feature that can help you delete the system partition without booting Windows.
Now you can download and install MiniTool Partition Wizard Pro to have a try.
MiniTool Partition Wizard DemoClick to Download100%Clean & Safe
Step 1. Launch MiniTool Partition Wizard and click the Bootable Media icon in the upper right corner to create a bootable media by following: Create Bootable CD/DVD/USB Drive with Bootable Media Builder.
Step 2. Boot from the created bootable media.
Step 3. On the main interface of MiniTool Partition Wizard, select the target partition that needs to be deleted and click Delete partition from the left panel. Click Yes in the pop-up window (This action will cause your system to be unbootable, please operate with caution).
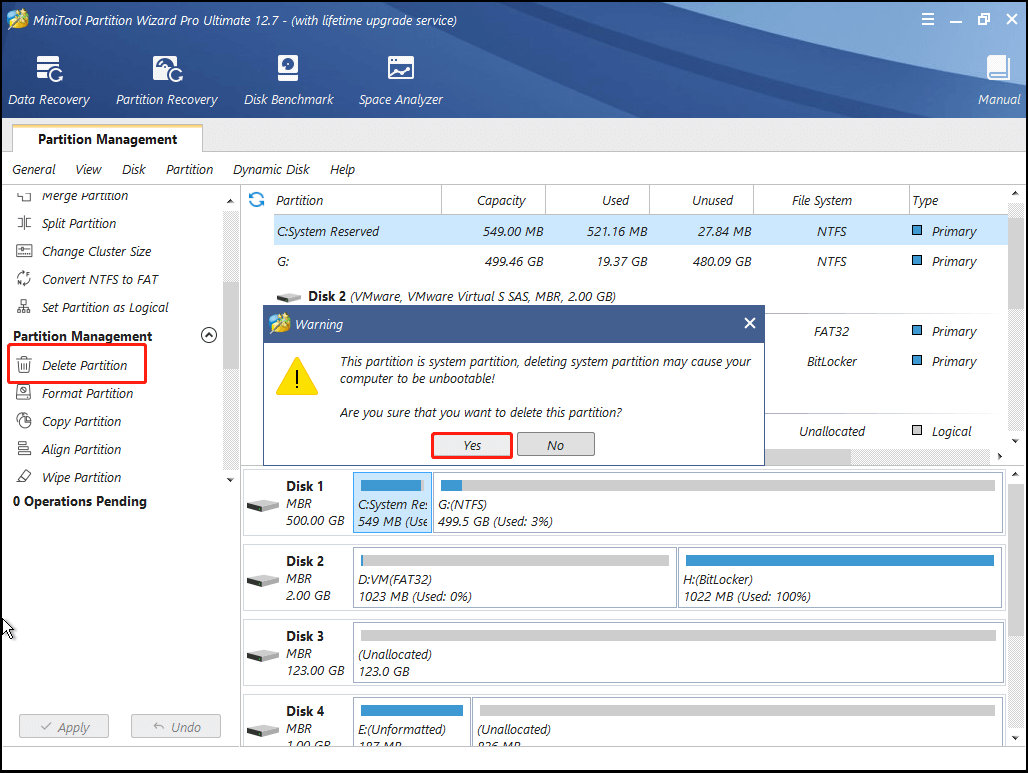
Step 4. Click Apply to perform all the operations.
Now the system volume should be deleted by following the steps above.
However, what if you delete the wrong partition? For example, you should have selected the partition containing the system, such as the C partition, but you accidentally selected another partition and deleted it. How to recover lost data on the deleted partition?
In this case, you can try a reliable data restore tool to recover lost data on the deleted volume. MiniTool Power Data Recovery, a free data recovery software, is the most recommended one. It is designed to recover deleted or lost data from internal hard drives, external hard drives, USB flash drives, CDs/DVDs, and so on.
To get your lost data back from the deleted partition, you can download the free edition of MiniTool Power Data Recovery and have a try.
MiniTool Power Data Recovery FreeClick to Download100%Clean & Safe
For specific steps to recover your files from the unallocated space, you can refer to this post: How to Recover Unallocated Partition With Data on It.
Tips:
Tip: MiniTool Power Data Recovery Free Edition supports 1 GB of data recovery for free. To recover unlimited files, you can choose MiniTool Power Data Recovery Personal Edition. What’s more, this registered edition can help you recover files when your PC won’t boot.
Fix 3. Disable the Paging File
According to the Internet, disabling the paging file is also an effective way to solve the problem of “Virtual Disk Service Error delete is not allowed in Windows 10”. Here you can follow the steps below to have a try.
Step 1. Press Windows + R key combinations and type sysdm.cpl in the input box. Then press Enter.
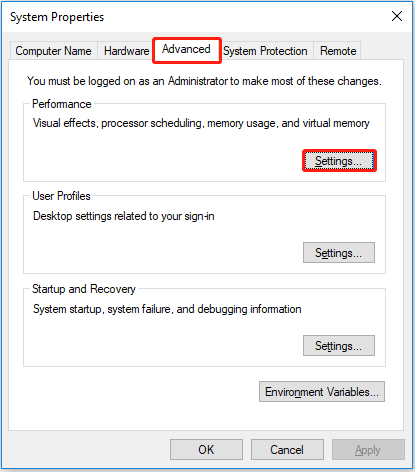
Step 2. In the new window, move on to the Advanced tab and click Settings under the Performance section.
Step 3. In the pop-up window, go to the Advanced tab and click the Change button.
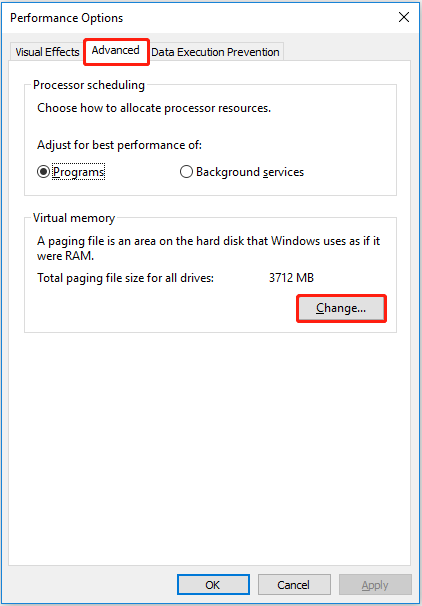
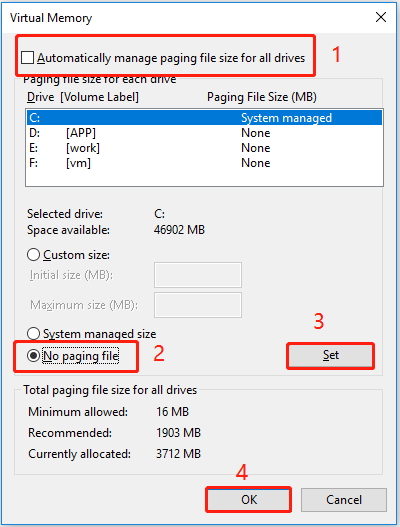
Step 4. Uncheck Automatically manage paging file size for all drives and check No paging file. Then click Set. Finally, click OK.
Step 5. Go back to the Performance Options window, and press Apply and OK.
Wrapping Things Up
Now you should know how to fix the Virtual Disk Service Error delete is not allowed. Just try MiniTool Partition Wizard to manage your volumes and use MiniTool Power Data Recovery to get lost data back.
MiniTool Power Data Recovery FreeClick to Download100%Clean & Safe
If you have any questions when you use the MiniTool software, please feel free to contact us via [email protected].
When you use Storage Spaces to create a virtual hard drive to protect your data from hardware failure using one of the available levels of protection, sometimes, you may have to remove a physical drive for many reasons.
For instance, you may have to replace it with a newer drive, need the drive for another project, or have to extend another pool.
Whatever the case might be, Windows 10 has multiple ways to remove a disk using the Control Panel and Settings app (build 21286 and higher).
In this guide, you will learn the steps to properly prepare and remove a physical drive from a storage pool in Storage Spaces on Windows 10.
- How to remove drive from storage pool using Settings
- How to remove drive from storage pool using Control Panel
How to remove drive from storage pool using Settings
To remove a physical disk of a pool with Settings, use these steps:
-
Open Settings on Windows 10.
-
Click on System.
-
Click on Storage.
-
Under the “More storage settings” section, click the Manage Storage Spaces option.

Settings manage storage spaces -
Select the storage pool and click the expand button in the top-right corner.
-
Under the “Physical disks” section, click the expand button in the top-right to view all the drives participating in the storage pool.
-
Select the drive you want to remove.
-
Click the Properties button.

Storage pool physical disks -
Click the Prepare for removal button.

Storage pool prepare to remove the drive -
Click the Remove button.
Storage Spaces remove the drive


Once you complete the steps, the drive will be removed from the storage pool, and it will appear as empty in Disk Management. You can now remove the drive from the system or assign it to another pool.
How to remove drive from storage pool using Control Panel
To remove a drive from a storage pool with Control Panel, use the steps:
-
Open Control Panel.
-
Click on System and Security.
-
Click the Storage Spaces option.

Control Panel storage spaces option -
Click the Change settings button.
-
Under the “Storage spaces” section, click the Change option for the volume to extend.
-
Under the “Physical drives” section, expand the view to see all the drives.
-
Click the Prepare for removal option.

Storage pool select drive to remove Control Panel -
Click the Prepare for removal button.

Control Panel prepare to remove the drive Quick note: The drive will be labeled “Preparing for removal” until the data has been erased. You can also click the Refresh button in File Explorer to see if the process has been completed, but depending on the data, this can take a long time.
-
Click the Remove option.
Ready to remove the drive from the pool -
Click the Remove button.
Complete storage pool drive remove


After you complete the steps, the physical disk will no longer be part of the storage pool. You can then remove the drive from the device, use to store files, or assign it to another pool.
If you run into issues disconnecting the drive, the Storage Space will likely not have sufficient space to accommodate the data. If this is the case, add a new drive, and then continue with the steps to remove the other drive.
Although Storage Spaces includes an option to remove physical disks from the pool, you can only remove a specific number of the drive since disconnecting more drives will break the space. This means that you won’t see the option to prepare and remove a drive in some instances.
If you must disconnect one or more drives, backup the data from the space, delete the space, and proceed to remove the drives from the pool.
Why You Can Trust Pureinfotech
The author combines expert insights with user-centric guidance, rigorously researching and testing to ensure you receive trustworthy, easy-to-follow tech guides. Review the publishing process.
Xx_L33t_xX
⭐⭐⭐
Здравствуйте, друзья! У меня возникла проблема с удалением диска из пула носителей в Windows 10. Кто-нибудь знает, как это сделать?
WindowsPro
⭐⭐⭐⭐
Для удаления диска из пула носителей в Windows 10 необходимо выполнить следующие шаги: откройте Диспетчер дисков, найдите диск, который вы хотите удалить, и щелкните правой кнопкой мыши по нему. В контекстном меню выберите «Удалить диск». Подтвердите удаление и дождитесь завершения процесса.
IT_Specialist
⭐⭐⭐⭐⭐
Ещё один способ удалить диск из пула носителей — использовать командную строку. Откройте командную строку от имени администратора и выполните команду «diskpart». Затем введите команду «list disk» и найдите номер диска, который вы хотите удалить. После этого введите команду «select disk <номер_диска>» и затем «remove disk». Подтвердите удаление и дождитесь завершения процесса.
NewbieUser
⭐
Спасибо за советы! Я удалось удалить диск из пула носителей с помощью Диспетчера дисков. Теперь у меня всё работает нормально.
Вопрос решён. Тема закрыта.
- Как правильно оформляется больничный лист в бухгалтерии?
- Что случилось со здоровьем Бориса Корчевникова?
- Как избежать штрафа за тонировку передних стекол автомобиля?

Последнее обновление 01.03.2023 —
Если вы используете дисковые пространства, вы можете удалить пул носителей в любое время с помощью панели управления или PowerShell, и в этом руководстве вы узнаете, как это сделать.
В Windows 10 дисковые пространства — это функция, которая существует уже давно, и вы можете использовать ее для защиты своих данных от аппаратного сбоя путем объединения двух или более дисков в пул, который затем можно использовать для создания пространств (томов). ) для хранения данных.
Если вы ранее создали пул и пространство и больше не нуждаетесь в них, Windows 10 предлагает как минимум два способа удаления пула, которые удаляют пространства и все данные о них.
В этом руководстве вы узнаете, как удалить пул носителей в дисковых пространствах в Windows 10.
Чтобы удалить пул носителей из панели управления в Windows 10, выполните следующие действия:
-
Откройте панель управления.
-
Щелкните Система и безопасность.
-
Нажмите «Места для хранения».
-
Нажмите кнопку Изменить настройки.
-
Выберите и разверните пул носителей для удаления.
-
В разделе «Места для хранения» нажмите кнопку «Удалить», чтобы удалить пространство.
-
Нажмите кнопку Удалить место для хранения.
-
Повторите шаги 6 и 7, чтобы удалить оставшееся пространство.
-
Нажмите «Удалить пул».
-
Нажмите кнопку Удалить пул для подтверждения.
После выполнения этих шагов пространство для хранения будет удалено вместе с данными, диски будут удалены из пула, и пул больше не будет доступен на устройстве.
Удалить пул дисковых пространств из PowerShell
Чтобы удалить пул носителей из PowerShell, выполните следующие действия:
-
Откройте Пуск.
-
Найдите PowerShell, щелкните правой кнопкой мыши верхний результат и выберите параметр «Запуск от имени администратора».
-
Введите следующую команду, чтобы просмотреть пулы хранения, доступные в Windows 10, и нажмите Enter:
Get-StoragePool
-
Введите следующую команду для просмотра виртуального диска в пуле носителей и нажмите Enter:
$stpool = (Get-StoragePool -FriendlyName "Storage pool")
Get-VirtualDisk -StoragePool $stpool
В команде измените «Storage pool» на название вашего пула.
-
Введите следующую команду, чтобы удалить виртуальный диск из пула, и нажмите Enter:
Remove-VirtualDisk -FriendlyName "Storage space"
В команде измените «Место для хранения» на имя вашего пространства.
-
Нажмите Y и введите, чтобы продолжить.
-
Введите следующую команду, чтобы удалить пул хранения с помощью PowerShell, и нажмите Enter:
Remove-StoragePool -FriendlyName "Storage pool"
-
Нажмите Y и введите, чтобы продолжить.
После выполнения этих шагов пул носителей больше не будет доступен в Windows 10.
Когда вы используете дисковые пространства для создания виртуального жесткого диска для защиты ваших данных от аппаратного сбоя с помощью одного из доступных уровней защиты, иногда вам может потребоваться удалить физический диск по многим причинам.
Например, вам может потребоваться заменить его на более новый диск, он может понадобиться для другого проекта или расширить еще один пул .
Как бы то ни было, в Windows 10 есть несколько способов удалить диск с помощью приложения «Панель управления и настройки» ( сборка 21286 и выше).
В этом руководстве вы узнаете, как правильно подготовить и удалить физический диск из пула носителей в дисковых пространствах в Windows 10.
- Как удалить диск из пула хранения с помощью настроек
- Как удалить диск из пула хранения с помощью панели управления
Как удалить диск из пула хранения с помощью настроек
Чтобы удалить физический диск пула с настройками, выполните следующие действия:
-
Откройте «Настройки » в Windows 10.
-
Щелкните Система .
-
Нажмите «Хранилище » .
-
В разделе «Дополнительные параметры хранилища» выберите параметр « Управление дисковыми пространствами ».

Настройки управляют местами для хранения
-
Выберите пул хранения и нажмите кнопку «Развернуть» в правом верхнем углу.
-
В разделе «Физические диски» нажмите кнопку «Развернуть» в правом верхнем углу, чтобы просмотреть все диски, участвующие в пуле носителей.
-
Выберите диск, который хотите удалить.
-
Нажмите кнопку Свойства .
Физические диски пула носителей
-
Нажмите кнопку Подготовить к удалению .
Пул носителей готовится к удалению диска
-
Нажмите кнопку Удалить .
Дисковые пространства удалить диск


После того, как вы выполните эти шаги, диск будет удален из пула носителей, и он будет отображаться как пустой в разделе «Управление дисками». Теперь вы можете удалить диск из системы или назначить его другому пулу.
Как удалить диск из пула хранения с помощью панели управления
Чтобы удалить диск из пула носителей с помощью панели управления, выполните следующие действия:
-
Откройте Панель управления .
-
Щелкните Система и безопасность .
-
Нажмите « Места для хранения ».
Вариант места для хранения панели управления
-
Нажмите кнопку Изменить настройки .
-
В разделе «Места для хранения» выберите параметр « Изменить » , чтобы расширить том.
-
В разделе «Физические диски» разверните представление, чтобы увидеть все диски.
-
Нажмите « Подготовиться к удалению ».
Пул хранения данных выберите диск для удаления панели управления
-
Нажмите кнопку Подготовить к удалению .
Панель управления готовится к удалению диска
Краткое примечание: диск будет помечен как «Подготовка к удалению», пока данные не будут стерты. Вы также можете нажать кнопку « Обновить » в проводнике, чтобы увидеть, завершен ли процесс, но в зависимости от данных это может занять много времени.
-
Нажмите « Удалить ».
Готов удалить диск из пула
-
Нажмите кнопку Удалить .
Полное удаление диска пула носителей


После выполнения этих шагов физический диск больше не будет частью пула носителей. Затем вы можете удалить диск с устройства, использовать для хранения файлов или назначить его другому пулу.
Если у вас возникнут проблемы с отключением диска, в области хранения, скорее всего, не будет достаточно места для размещения данных. В этом случае добавьте новый диск , а затем выполните действия по удалению другого диска.
Хотя Storage Spaces включает возможность удаления физических дисков из пула, вы можете удалить только определенное количество дисков, поскольку отключение большего количества дисков приведет к нарушению пространства. Это означает, что в некоторых случаях вы не увидите возможность подготовить и удалить диск.
Если необходимо отключить один или несколько дисков, сделайте резервную копию данных из пространства, удалите пространство и продолжите удаление дисков из пула.