
The Dynamic Host Configuration Protocol, aka DHCP, is an essential network protocol that enables a client machine to automatically obtain a unique IP address, one or more DNS server addresses, and a default route, from a central DHCP server. This is important when configuring an internet connection on your Windows 11 PC or laptop.
As, without DHCP, you will need to configure your IP address manually, which could be tedious and complicated. So, in this article, we have listed some of the best fixes for when your router or your Windows 11 client system fails to obtain the IP address from the DHCP server.
Fix DHCP Not Working in Windows 11
However, before we proceed to the technical solutions, make sure to restart your router and check if DHCP is working properly on your Windows 11 device or not. If it does not or some error occurs, try out the solutions listed right below.
1. Turn Off Antivirus and/or Firewall in Windows 11 Temporarily
Starting with one of the most common reasons why the DHCP might not be working in Windows 11, the Windows Firewall and/or any third-party antivirus software. If you are using any, it may be preventing the network protocol to work properly. You can try disabling the antivirus software or Windows Firewall on your Windows 11 PC or laptop and check if the DHCP is working or not.
If it works, you can contact the customer support of your antivirus program or research the program to see what is preventing DHCP to function in Windows 11 and how to fix it. However, if the DHCP is still not working on your device, proceed to the next fix.
2. Troubleshoot Network Adapter in Windows 11
Minor issues or misconfigured settings in the Network Adapter on your Windows 11 PC or laptop might also prevent DHCP to function properly. However, the good news is that Windows 11 comes with built-in, dedicated troubleshooters to fix generic issues on your PC or laptop.
Hence, you can use the Network Adapter troubleshooter in Windows 11 to fix the DHCP not working issue. To run the Network Adapter troubleshooter in Windows 11, follow the steps right below:
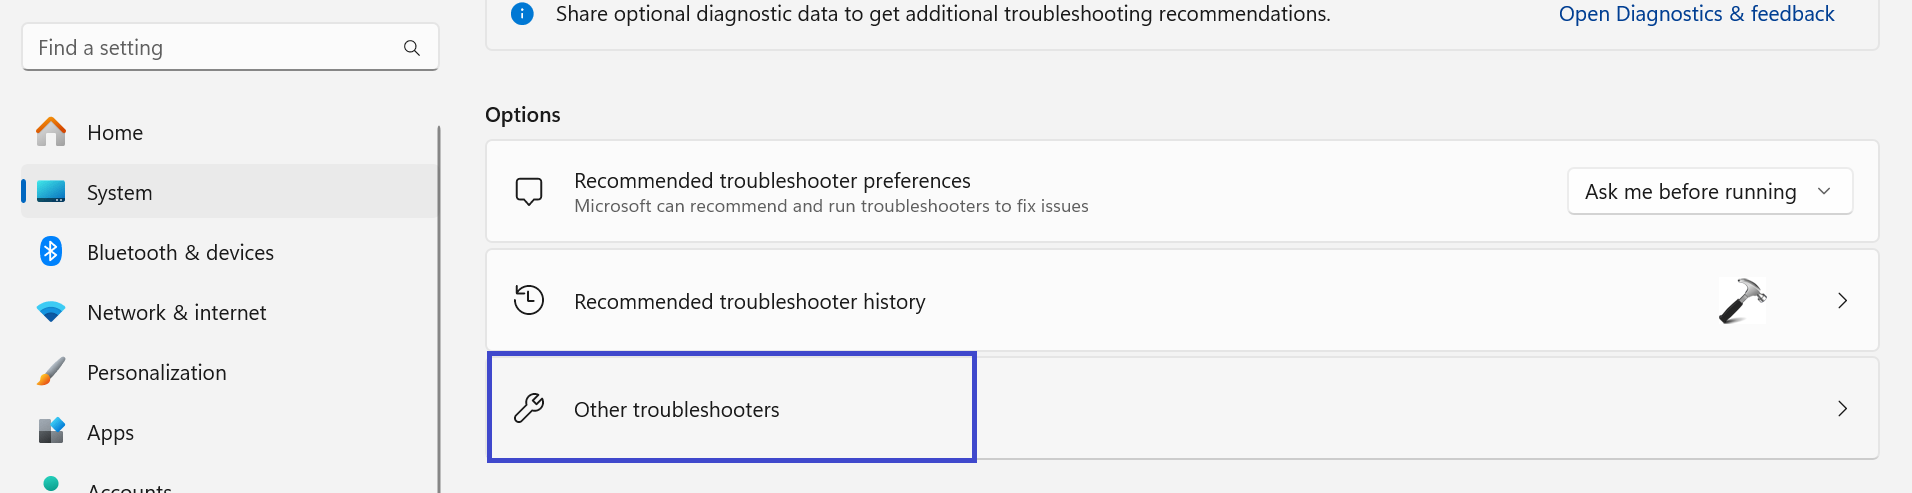
1. Press the Windows + I keyboard shortcut to open the Settings app in Windows 11.
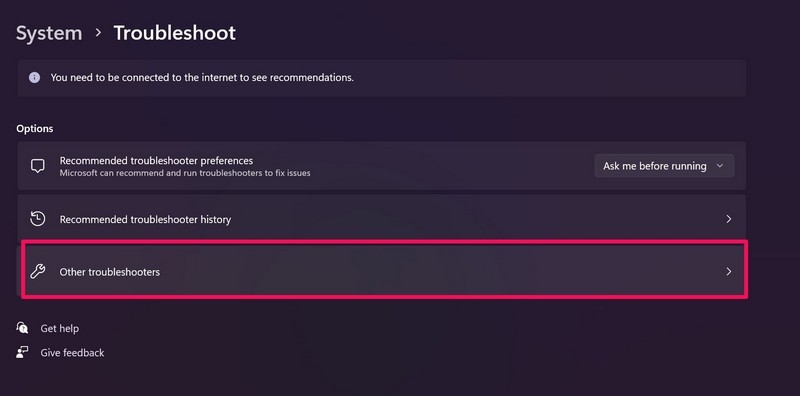
2. While in the System tab, go to the Troubleshoot option.
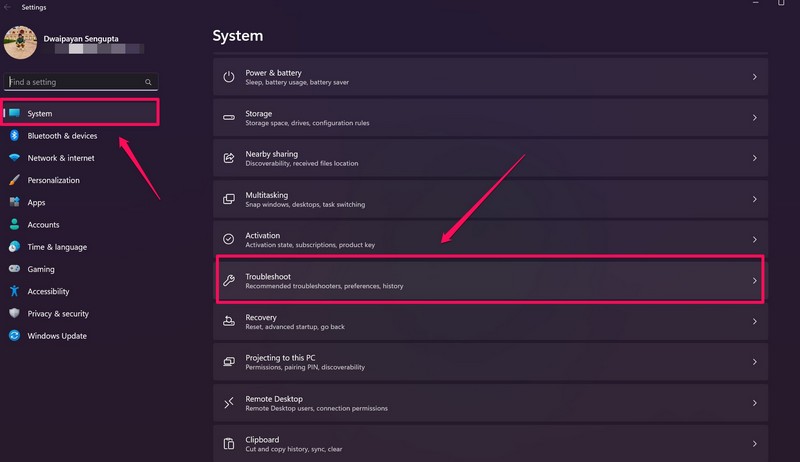
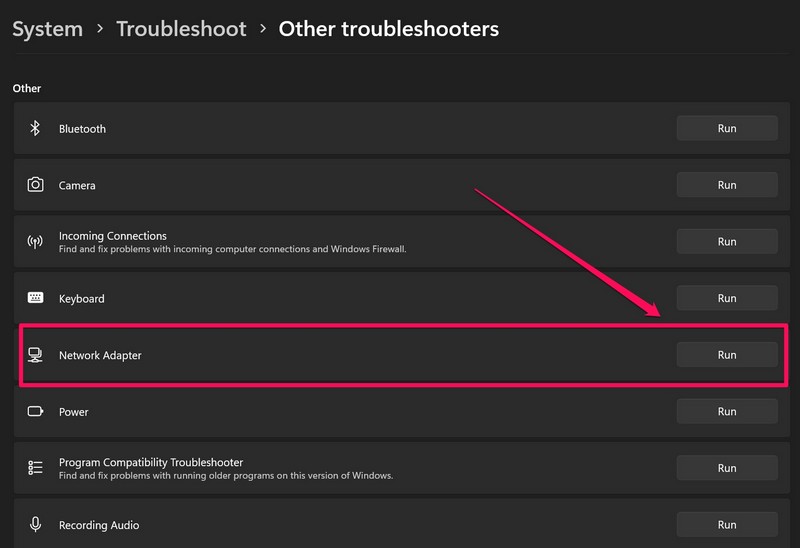
3. Click on the Other troubleshooters option on the next page.
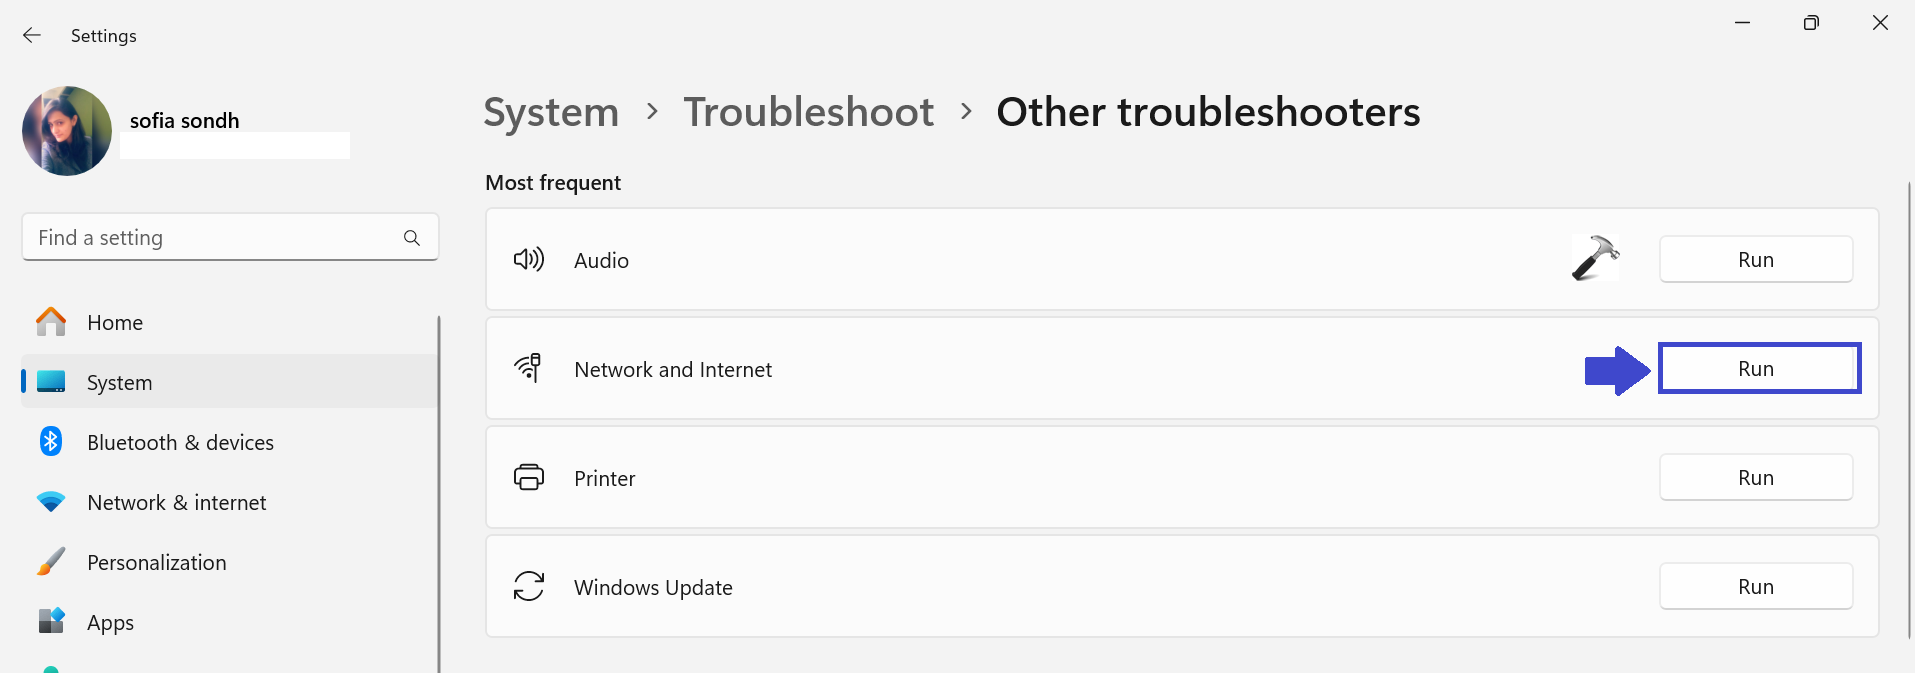
4. Find the Network Adapter option on the following list and click the Run button beside it.
After the troubleshooter completes troubleshooting the network adapters on your Windows 11 PC or laptop, restart your device. Then, check whether the DHCP not working issue has been fixed or not. If it did not, check out the next solution.
3. Check if DHCP is Enabled for Your Network in Windows 11
Now, the next thing you might want to check when the DHCP is not working in Windows 11 is if it is indeed enabled for your network. To check this, follow the steps right below.
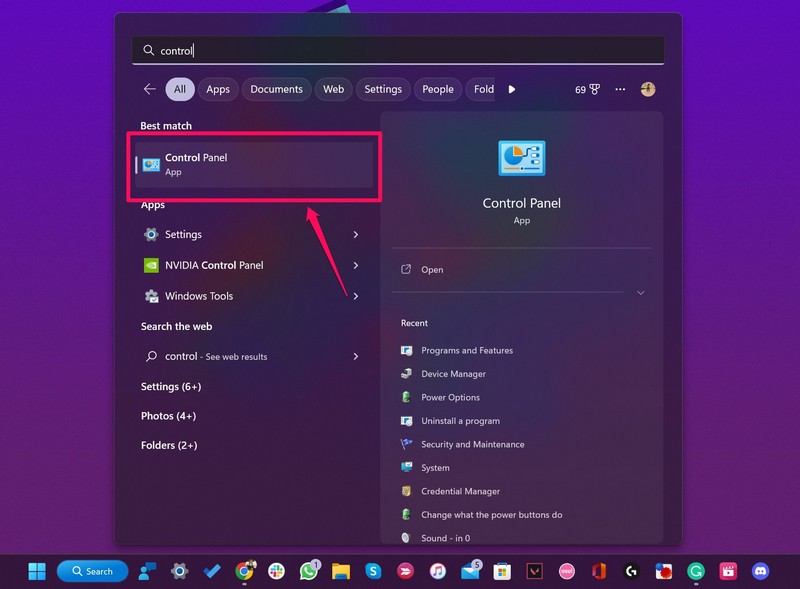
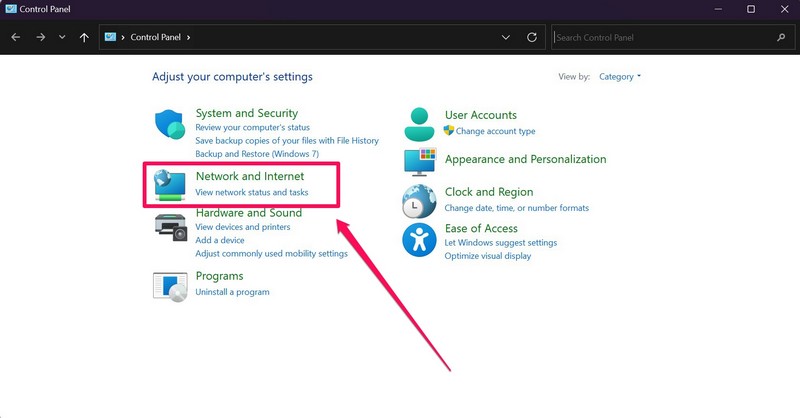
1. Use Windows search to find Control Panel and open it in Windows 11.
2. Click the Network and Internet option.
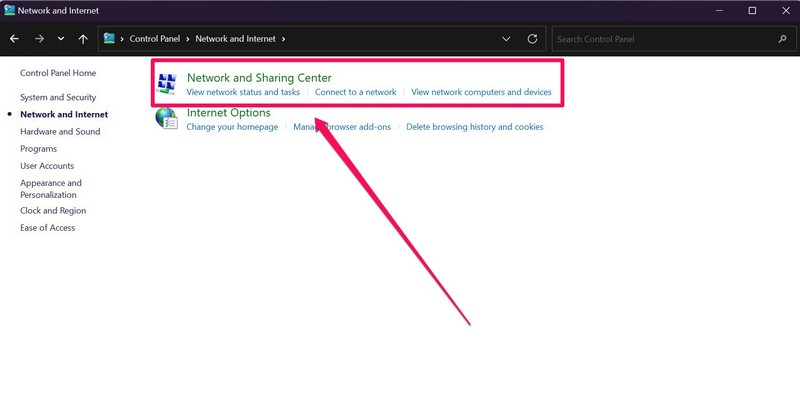
3. Then, open the Network and Sharing Center menu.
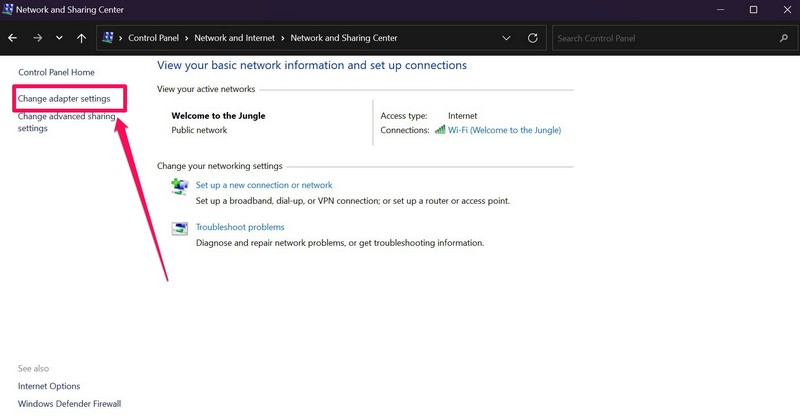
4. On the left pane, click on the Change adapter settings option.
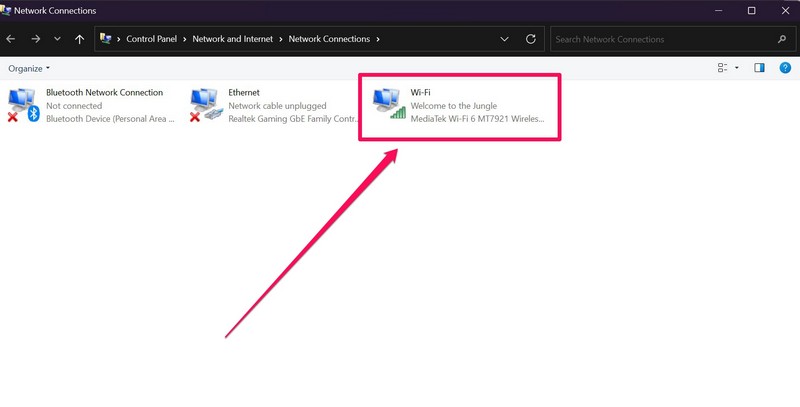
5. Double-click on your active network connection.
6. On the following prompt, click the Details… button.
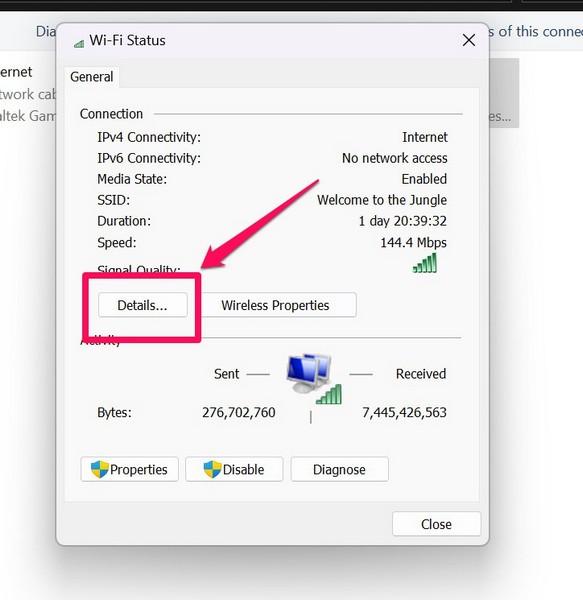
7. Check if it is marked Yes beside the DHCP Enabled option.
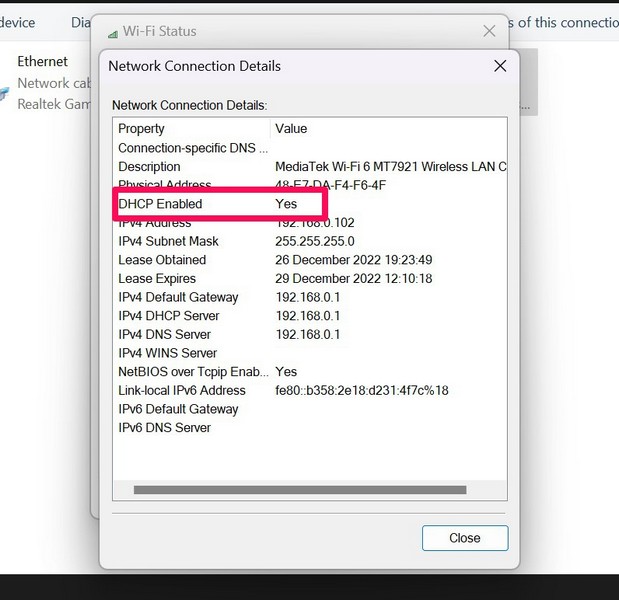
If the DHCP Enabled option is marked with a No, it means that DHCP is disabled on your Windows 11 system. In this case, you must enable the network protocol on your PC or laptop. To do this, follow the steps right below:
1. Follow steps 1-4 from the previous section to open your network connections page.
2. Now, right-click on your active network connection and open Properties.
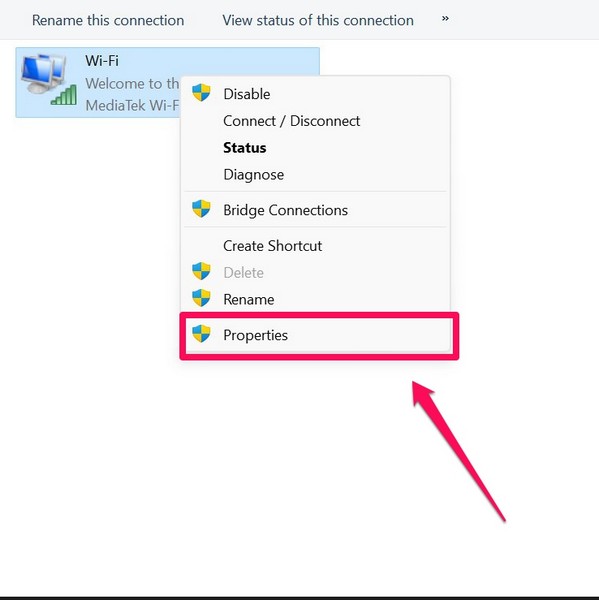
3. Double-click on the Internet Protocol Version 4 (TCP/IPv4) option.

4. Mark the checkboxes beside the following options:
- Obtain an IP address automatically
- Obtain DNS server address automatically.
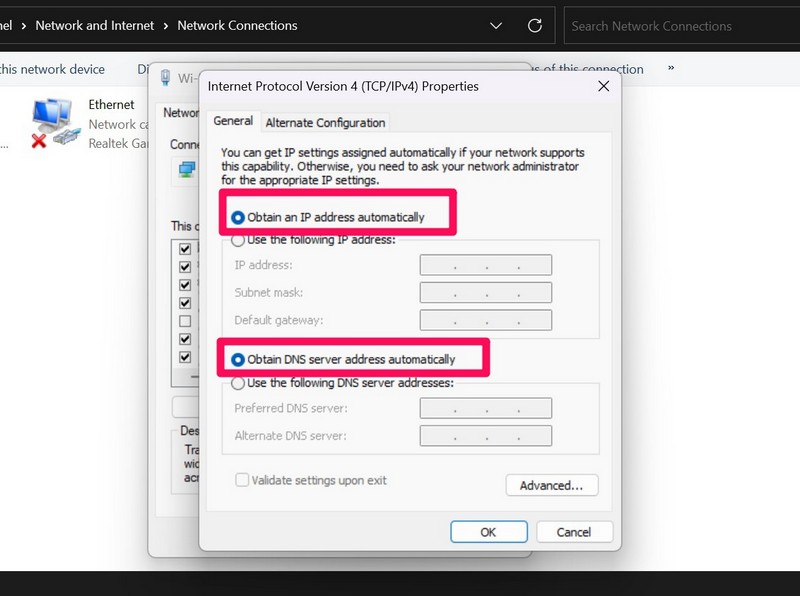
5. Now, close all the windows and restart your Windows 11 PC or laptop.
Following the restart, the DHCP should function properly on your Windows 11 device and the issue should be fixed.
4. Re-install Network Adapter in Windows 11
If the above solutions failed to fix the DHCP on your Windows 11 device, you can try re-installing the network adapters on your PC or laptop. Uninstalling and reinstalling the network adapter in Windows 11 fixes many network issues and updates the adapter.
Hence, there is a high chance that this might fix the DHCP not working issue in Windows 11. So, to re-install the network adapter in Windows 11, follow the steps right below.
1. Use the Windows + X shortcut to open the Quick Links menu and click on the Device Manager option.

2. Find the Network adapter option and click the tiny arrow beside it to expand.
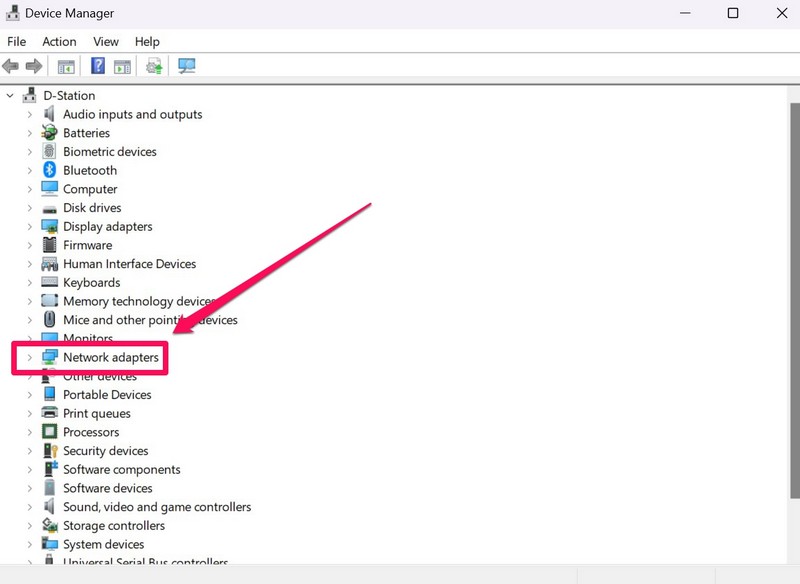
3. Now, right-click on your active network adapter and choose the Uninstall device option from the context menu.

4. Following the uninstallation, restart your Windows 11 PC or laptop.
Restarting your Windows 11 PC or laptop allows Windows to detect the hardware change on your device and automatically install the network adapter. So, following the restart, try running the DHCP in Windows 11. It should be fixed at this point.
5. Restart DHCP Client using Command Prompt/ Services App in Windows 11
The next thing you can try when the DHCP stops working in Windows 11 is to restart the DHCP client in Windows 11. You can do this in two different ways. One of the methods involves the Command Prompt tool and the other one can be executed with the Services app in Windows 11. You can use either of the two ways, mentioned below, to restart the DHCP client in Windows 11.
Restart DHCP client using Command Prompt in Windows 11
Below are the steps to restart DHCP client using Command Prompt in Windows 11.
1. Use Windows Search to find the Command Prompt tool and click the Run as administrator option.

2. Once Command Prompt opens up in Windows 11, type in the following commands and press Enter one by one:
net stop dhcpnet start dhcpNote: Do not execute the above commands simultaneously in Command Prompt. Execute the first one and then move on to the next.
3. Restart your Windows 11 PC or laptop after execution and the DHCP client would be restarted in Windows 11.
Restart DHCP Client Using the Services app in Windows 11
You can also use the Services app to restart DHCP client in Windows 11.
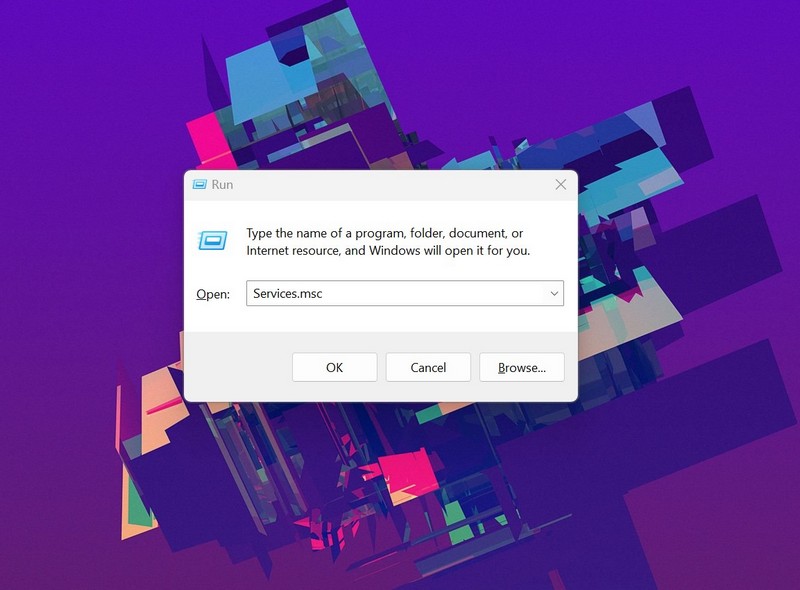
1. Press the Windows + R shortcut to open the Run tool in Windows 11.
2. Type in “services.msc” (without quotes) in the text field and press Enter.
3. In the Services app, scroll down to find the DHCP Client on the list.
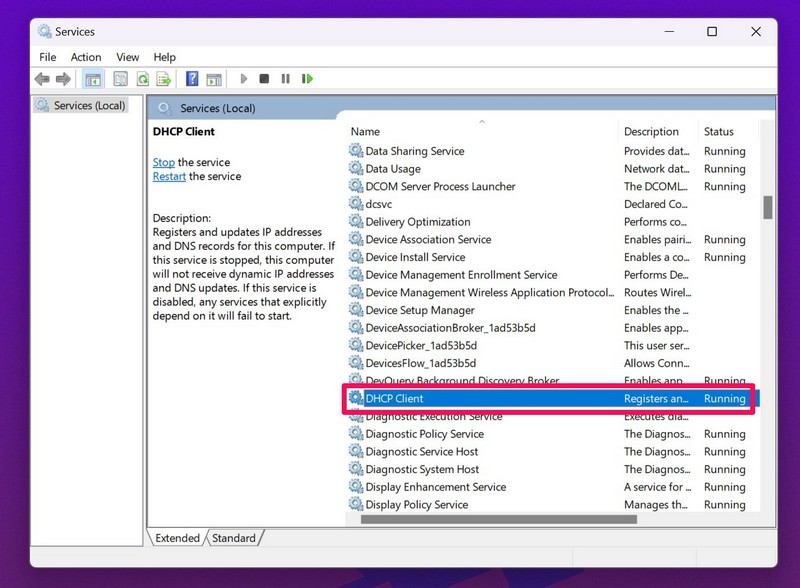
4. Right-click on DHCP Client and click on the Restart option on the context menu.
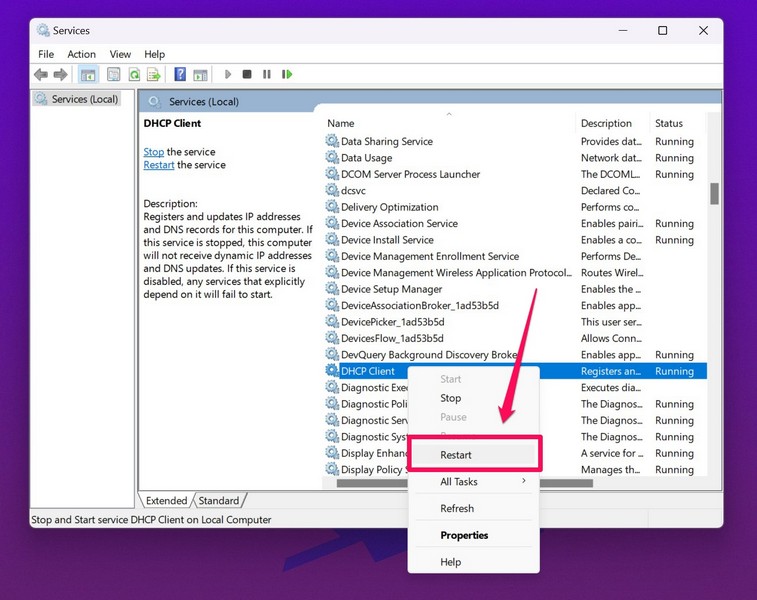
5. Following the restart, double-click the DHCP Client to open its settings.
6. In its Properties dialog box, make sure the Startup type option is set to Automatic.
7. If it is not, click on it to set it as Automatic and click the Apply button.
8. Restart your Windows 11 PC or laptop.
This way, you can use the Services app to restart the DHCP client in Windows 11.
Restarting the DHCP Client in Windows 11 can fix various issues, including the DHCP not working on your PC or laptop. If, however, it still does not work, move on to the next fix.
6. Disable IPv6 in Windows 11
Now, another thing that could cause issues in the DHCP in Windows 11 is the Internet Protocol version 6 (IPv6). You see, we mainly use the IPv4 Internet Protocol to access the DHCP server to obtain IP addresses, default routes, and DNS server addresses.
However, if the IPv6 protocol is somehow enabled on your Windows 11 PC or laptop, it might interfere with the DHCP client, preventing it to work properly. In this case, you must disable the IPv6 protocol on your device. To disable the IPv6 protocol for your network in Windows 11, follow the steps right below:
1. Follow steps 1-4 from the 3rd solution to open your active network connections page via Control Panel in Windows 11.
2. Right-click on your active network connection and click on Properties on the context menu.
3. On the following window, find the Internet Protocol Version 6 (TCP/IPv6) option and uncheck the box beside it.
4. Click the OK button to close the Network Properties window and save your change.
5. Restart your Windows 11 PC or laptop.
Following the restart, check whether the issue with the DHCP has been fixed in Windows 11 or not. At this point, the issue with the DHCP should be fixed on your Windows 11 PC or laptop, and your internet should be up and running.
Frequently Asked Questions
What happens when DHCP stops working in Windows 11?
If DHCP stops working, you will need to manually configure their IP addresses, default route, and DNS server addresses, which could be tedious, and if not done right, you will not be able to connect to the internet in Windows 11.
Why is DHCP not enabled on my Windows 11 laptop/ PC?
Issues in router configuration, DHCP server, and/ or network adapters in Windows 11 might cause issues in the DHCP client, preventing it to work or automatically disabling it on a PC or laptop.
How to enable DHCP in Windows 11?
To enable DHCP in Windows 11, you must open the IPv4 Properties of your active network connection, and switch to the Automatic template for obtaining IP address and DNS server addresses.
Final Words
So, above are some of the best fixes that you can try to fix the DHCP not working issue in Windows 11. We hope one of the listed solutions works for you and you are able to get the internet up and running on your Windows 11 PC or laptop.
If this article helped you fix the issue, do let us know about it in the comments below. You can also check out our other in-depth guides on how to fix Windows 11-related issues from right here.
Is your Windows 11 computer unable to connect to the DHCP server? This frustrating issue can disrupt your internet connection and make it difficult to browse the web, access online services, or connect with other devices on your network. But fear not, there are solutions to help resolve this problem.
When encountering the «Can’t Reach DHCP Server» error in Windows 11, it’s important to understand the underlying causes and potential solutions. This issue can stem from various factors, such as incorrect network configurations, faulty network adapters, or conflicts with antivirus or firewall software. To troubleshoot this problem, you can try resetting the network settings, updating network drivers, disabling security software temporarily, or even restarting your router. By addressing these potential culprits, you can increase your chances of resolving the DHCP server connectivity issue and getting back online smoothly.
If you’re experiencing issues with not being able to reach the DHCP server on Windows 11, there are a few troubleshooting steps you can try. First, check your network cables and connections to ensure everything is properly connected. Next, restart your router and modem. If the problem persists, try releasing and renewing your IP address using the «ipconfig» command in the Command Prompt. If all else fails, consider contacting your internet service provider for further assistance.

What Causes the «Can’t Reach DHCP Server» Error in Windows 11?
In Windows 11, the «Can’t Reach DHCP Server» error occurs when your computer is unable to obtain an IP address from the DHCP (Dynamic Host Configuration Protocol) server. A DHCP server is responsible for assigning IP addresses and other network configuration settings to devices on a network. When your computer cannot connect to the DHCP server, it won’t receive the necessary network settings, making it unable to access the internet or communicate with other devices on the network.
There can be several reasons why you may encounter this error on Windows 11. It could be due to an issue with your network configuration, DHCP server settings, or problems with your computer’s network adapter. In some cases, it may also be caused by incorrect or outdated network drivers, issues with Windows updates, or conflicts with third-party software.
In order to troubleshoot and fix the «Can’t Reach DHCP Server» error in Windows 11, it’s important to identify the specific cause of the issue. By understanding the underlying reasons behind this error, you can take appropriate steps to resolve it and restore network connectivity on your computer.
In this article, we will explore some common causes and potential solutions for the «Can’t Reach DHCP Server» error in Windows 11.
1. Network Configuration Issues
One possible cause of the «Can’t Reach DHCP Server» error on Windows 11 is an issue with your network configuration settings. If your network settings are not correctly configured, your computer may not be able to communicate with the DHCP server. Here are some steps you can take to resolve network configuration issues:
- Check your network settings: Ensure that your computer’s network settings are set to obtain an IP address automatically. To do this, go to «Settings» > «Network & Internet» > «Ethernet» (or «Wi-Fi») > «Change adapter options.» Right-click on your network adapter and select «Properties.» In the «Networking» tab, make sure «Internet Protocol Version 4 (TCP/IPv4)» is checked and set to obtain an IP address automatically.
- Restart your router/modem: Sometimes, a simple restart of your router or modem can resolve network connectivity issues. Unplug the power from your router or modem, wait for a minute, and then plug it back in. Allow a few minutes for the device to restart and establish network connections.
- Reset network settings: If the above steps do not resolve the issue, you can try resetting your network settings to default. Go to «Settings» > «Network & Internet» > «Status» > «Network reset.» Click on «Reset now» to reset your network settings. Note that this will remove all network adapters and settings, so you may need to set up your network connections again.
- Disable VPN or proxy settings: If you are using a VPN (Virtual Private Network) or have proxy settings enabled, try disabling them to see if it resolves the issue. Some VPNs or proxy configurations may interfere with DHCP communication, causing the «Can’t Reach DHCP Server» error.
1.1 Checking Network Settings
When troubleshooting the «Can’t Reach DHCP Server» error, it’s essential to verify that your network settings are properly configured. Follow these steps to check your network settings:
- Click on the Start button and open «Settings» by clicking on the gear icon.
- In the Settings window, select «Network & Internet.»
- In the left sidebar, click on «Ethernet» or «Wi-Fi,» depending on your connection type.
- Click on «Change adapter options.»
- Right-click on your active network adapter and select «Properties.»
- In the Networking tab, make sure «Internet Protocol Version 4 (TCP/IPv4)» is checked.
- Select «Internet Protocol Version 4 (TCP/IPv4)» and click on the «Properties» button.
- Ensure that the «Obtain an IP address automatically» and «Obtain DNS server address automatically» options are selected.
- Click «OK» to save the changes.
By verifying and adjusting your network settings, you can ensure that your computer is set to obtain IP addresses automatically and resolve any potential misconfigurations that may be causing the «Can’t Reach DHCP Server» error.
1.2 Restarting Your Router/Modem
Restarting your router or modem can often resolve network connectivity issues, including the «Can’t Reach DHCP Server» error. Follow these steps to restart your router or modem:
- Locate your router or modem.
- Unplug the power cable from the device.
- Wait for at least one minute.
- Plug the power cable back into the device.
- Wait for the router or modem to start up and establish internet connections.
Once your router or modem has restarted, check if the «Can’t Reach DHCP Server» error is resolved and you can connect to the internet successfully.
2. DHCP Server Configuration Issues
If your network configuration is correct and you are still unable to reach the DHCP server, the issue may lie with the DHCP server configuration itself. Here are some steps you can take to address potential DHCP server configuration issues:
- Contact your network administrator: If you are connected to a business or organization network, reach out to your network administrator and inform them about the issue. They can check the DHCP server configuration and ensure it is functioning correctly.
- Restart or check the DHCP server: If you have access to the DHCP server, try restarting it. Sometimes, restarting the server can resolve temporary issues or glitches. Additionally, ensure that the DHCP server has available IP addresses to assign to devices on the network.
- Check firewall settings: Ensure that your computer’s firewall settings are not blocking communication with the DHCP server. If necessary, configure the firewall to allow DHCP communication on the relevant ports.
- Use a different DHCP server: As a temporary solution, you can try using a different DHCP server or configuring a DHCP relay agent if available. This bypasses any potential issues with the current DHCP server and allows your computer to obtain an IP address from an alternative source.
2.1 Contacting Your Network Administrator
If you are part of a larger network, such as a business or organization network, it is essential to involve your network administrator in troubleshooting the «Can’t Reach DHCP Server» error. They have the expertise and access to the DHCP server configuration, making it easier to identify any issues and implement the necessary changes.
Contact your network administrator and provide them with detailed information about the error, including any error messages or symptoms you are experiencing. They can then investigate the DHCP server configuration and make any necessary adjustments or fixes to resolve the issue.
2.2 Checking Firewall Settings
A misconfigured firewall can sometimes block DHCP communication, resulting in the «Can’t Reach DHCP Server» error. Follow these steps to check your firewall settings and ensure they are not interfering with DHCP communication:
- Click on the Start button and open «Settings» by clicking on the gear icon.
- In the Settings window, select «Privacy & Security.»
- In the left sidebar, click on «Windows Security.»
- Click on «Firewall & network protection.»
- Under «Firewall & network protection settings,» click on «Allow an app through firewall.»
- Scroll down to «Allowed apps and features» and click the «Change settings» button (administrator permission required).
- Look for any instances of «DHCP» or «Dynamic Host Configuration Protocol.»
- Ensure that the checkboxes under the «Private» and «Public» columns are checked for DHCP-related entries.
- If you do not see any DHCP-related entries, click on the «Allow another app» button and browse for the DHCP-related executable file (consult your network administrator if you are uncertain).
- Check the checkboxes under the «Private» and «Public» columns for the DHCP entry you added.
- Click «OK» to save the changes.
By allowing DHCP communication through your firewall, you can ensure that your computer can connect to the DHCP server and obtain the necessary network settings.
3. Network Adapter Issues
If you have ruled out network configuration and DHCP server issues, the problem may lie with your computer’s network adapter. Your network adapter is responsible for connecting to the network and communicating with the DHCP server. Here are some troubleshooting steps to address network adapter issues:
- Update network drivers: Outdated or incorrect network drivers can cause communication issues with the DHCP server. Visit your computer manufacturer’s website or the network adapter manufacturer’s website to download and install the latest drivers for your network adapter.
- Disable and re-enable the network adapter: Sometimes, simply disabling and re-enabling the network adapter can resolve temporary issues. Right-click on the Start button, select «Device Manager,» expand the «Network adapters» category, right-click on your network adapter, and select «Disable.» Wait a few seconds, right-click on the network adapter again, and select «Enable.»
- Reset the network adapter: If disabling and re-enabling the network adapter doesn’t resolve the issue, you can try resetting the network adapter settings. Open the Command Prompt as an administrator by right-clicking on the Start button and selecting «Command Prompt (Admin).» In the Command Prompt window, type the following command and press Enter:
netsh winsock resetOnce the command is executed, restart your computer and check if the issue is resolved. - Replace the network adapter: If all else fails, it’s possible that your network adapter may be faulty. In such cases, you may need to replace the network adapter with a new one or consult a professional technician for further assistance.
3.1 Updating Network Drivers
Outdated or incorrect network drivers can lead to communication issues with the DHCP server. It’s crucial to keep your network drivers up to date to ensure smooth network connectivity. Follow these steps to update your network drivers:
- Identify your network adapter manufacturer and model. You can find this information in the Device Manager (right-click on the Start button, select «Device Manager,» and expand the «Network adapters» category).
- Visit the manufacturer’s website and navigate to the Support or Downloads section.
- Search for the latest driver for your network adapter model and select the appropriate driver for your operating system (Windows 11).
- Download the driver and follow the manufacturer’s instructions to install it on your computer.
- After installing the new driver, restart your computer to apply the changes.
Updating your network drivers can often resolve compatibility issues and ensure optimal network performance on Windows 11.
3.2 Resetting the Network Adapter
If disabling and re-enabling the network adapter does not resolve the «Can’t Reach DHCP Server» error, you can try resetting the network adapter settings. Follow these steps to reset the network adapter:
- Right-click on the Start button and select «Command Prompt (Admin)» to open the Command Prompt with administrative privileges.
- In the Command Prompt window, type the following command and press Enter:
netsh winsock reset - Wait for the command to execute and display a success message.
- Restart your computer to apply the changes.
After resetting the network adapter, Windows will rebuild the network settings and configurations, which may resolve any underlying issues causing the «Can’t Reach DHCP Server» error.
4. Windows Updates and Third-Party Software
In some cases, the «Can’t Reach DHCP Server» error in Windows 11 may be caused by issues related to Windows updates or conflicts with third-party software. Here are some steps you can take to address these potential causes:
- Install Windows updates: Ensure that your Windows 11 operating system is up to date by installing the latest updates. Windows updates often include bug fixes and security patches that can resolve network issues.
- Check for incompatible software: If you recently installed any new software or made changes to your system, it’s possible that it’s causing conflicts with the DHCP server communication. Try uninstalling any recently installed software or disabling any third-party applications, such as antivirus or firewall software, to see if it resolves the issue.
- Perform a clean boot: A clean boot allows you to start Windows with only essential services and drivers, eliminating potential conflicts with third-party software. Follow the instructions on the Microsoft support website to perform a clean boot and check if the «Can’t Reach DHCP Server» error persists.
4.1 Installing Windows Updates
To ensure that your Windows 11 operating system is up to date, follow these steps to install the latest updates:
Troubleshooting Steps for Not Being Able to Reach DHCP Server on Windows 11
When you encounter issues with not being able to reach the DHCP server on Windows 11, it can disrupt your network connectivity and prevent you from accessing the internet. Here are some troubleshooting steps to resolve this problem:
- Check network cables and connections to ensure they are properly plugged in.
- Power cycle your network equipment, including your modem, router, and switches. This can help refresh the network settings.
- Verify that the DHCP server is running and accessible on your network. You can try connecting to it from another device to ensure it is functioning correctly.
- Restart your Windows 11 device to clear any temporary network configuration issues. This can also help reestablish communication with the DHCP server.
- Update your network adapter driver on Windows 11. Outdated or incompatible drivers can cause connectivity problems.
- Check your firewall settings to ensure that they are not blocking the communication between your device and the DHCP server.
- If the issue persists, try resetting your network settings on Windows 11. This will remove any custom configurations and reset them to their default values.
Key Takeaways: Can’t Reach Dhcp Server Windows 11
- Restart your computer and router to resolve DHCP server connection issues.
- Make sure your network adapter settings are configured correctly.
- Disable any VPN or firewall software that might be blocking the DHCP server connection.
- Check the physical connections of your network cables and ensure they are securely connected.
- Contact your Internet Service Provider (ISP) or network administrator if the issue persists.
Frequently Asked Questions
Below are some common questions related to issues with reaching the DHCP server on Windows 11:
1. Why am I unable to reach the DHCP server on Windows 11?
There could be several reasons why you are unable to reach the DHCP server on Windows 11:
First, ensure that your network connection is working properly. Check if your Ethernet or Wi-Fi adapter is enabled and connected to the network. You can also try restarting your router or modem to see if that resolves the issue.
If your network connection is fine, there may be a problem with the DHCP server itself. It could be temporarily down or experiencing technical difficulties. In this case, you can try contacting your network administrator or internet service provider for assistance.
2. Is my DHCP client service enabled on Windows 11?
To check if the DHCP client service is enabled on Windows 11, follow these steps:
1. Press the Windows key + R to open the Run dialog box.
2. Type «services.msc» and press Enter to open the Services window.
3. Scroll down and look for «DHCP Client» in the list of services. Check if the status is «Running» and the startup type is set to «Automatic.» If not, right-click on «DHCP Client» and select «Properties.» Change the startup type to «Automatic» and click «Start» to enable the service.
3. How can I reset the TCP/IP stack on Windows 11?
To reset the TCP/IP stack on Windows 11, follow these steps:
1. Press the Windows key + X and select «Windows PowerShell (Admin)» from the menu.
2. In the PowerShell window, type the following command and press Enter:
netsh int ip reset
3. Wait for the command to complete and then restart your computer. This will reset the TCP/IP stack to its default settings.
4. Can a firewall or antivirus software block communication with the DHCP server?
Yes, a firewall or antivirus software can potentially block communication with the DHCP server. These security programs may have settings that restrict network access or block certain protocols used by DHCP.
To troubleshoot this issue, you can try temporarily disabling your firewall or antivirus software and check if you can reach the DHCP server. If disabling the software resolves the problem, you may need to adjust the settings to allow DHCP communication.
5. How can I manually assign an IP address if I can’t reach the DHCP server?
If you are unable to reach the DHCP server, you can manually assign an IP address on Windows 11 by following these steps:
1. Press the Windows key + X and select «Network Connections» from the menu.
2. Right-click on your network adapter and select «Properties.»
3. In the Properties window, select «Internet Protocol Version 4 (TCP/IPv4)» and click on the «Properties» button.
4. In the IPv4 Properties window, select the «Use the following IP address» option and enter the IP address, subnet mask, default gateway, and preferred DNS server. Make sure the IP address you choose is within the same subnet as your network.
5. Click «OK» to save the changes. Your computer will now use the manually assigned IP address instead of obtaining an address from the DHCP server.
In conclusion, if you are unable to reach the DHCP server on Windows 11, there are various troubleshooting steps you can try to resolve the issue. Firstly, ensure that your network cable or Wi-Fi connection is properly connected and functioning. Restarting your router and modem can also help refresh the connection.
If the problem persists, check if your network adapter drivers are up to date and consider disabling and re-enabling the adapter. You can also try releasing and renewing your IP address using the command prompt. Additionally, disabling any firewall or antivirus software temporarily can rule out any potential conflicts.
Can’t Reach DHCP Server in Windows 11: Understanding and Resolving Connection Issues
As we increasingly rely on technology for daily tasks, network connectivity has become an essential component of our digital lives. Windows 11, the latest operating system from Microsoft, brings several changes and improvements to user experience and functionality. However, like any operating system, it is still susceptible to network-related issues. One common problem users may encounter is the inability to reach the DHCP (Dynamic Host Configuration Protocol) server, which can lead to connectivity problems. In this article, we will explore what the DHCP server is, why you may be unable to reach it, and various ways you can resolve these issues.
Understanding DHCP and Its Importance
At its core, DHCP is a network management protocol that automates the process of assigning IP addresses to devices on a network. This means that when a device connects to a network, it receives an IP address from the DHCP server, which ensures that each device has a unique address necessary for communication.
The importance of DHCP cannot be overstated:
-
Simplifies IP Address Management: It eliminates the need for network administrators to manually assign IP addresses to every device, reducing errors and making management easier.
-
Ensures Unique IP Addresses: To maintain a well-functioning network, each device must have a unique IP address. The DHCP server automatically handles this assignment to avoid conflicts.
-
Facilitates Dynamic Changes: When devices connect and disconnect frequently, DHCP allows for seamless IP address changes, maintaining efficient network functionality.
-
Offers Centralized Administration: Network administrators can centrally manage and configure IP address allocations, hence maintaining consistency and reliability.
The Symptoms of not Being Able to Reach DHCP Server
Upon encountering the issue of not being able to reach the DHCP server on Windows 11, you may experience several symptoms:
-
Limited Connectivity: Windows may show a «Limited» or «No Internet Access» warning in the Wi-Fi icon, indicating that your device cannot access the internet through your network.
-
Errors in Network Settings: You might receive notifications or errors stating that the DHCP server is not reachable or DHCP is not enabled on the connection.
-
Reddish ‘X’ on Network Icon: The network icon in your system tray might show a warning symbol or cross, indicating an issue with network connectivity.
-
IP Configuration Issues: Running the «ipconfig/all» command in the Command Prompt shows an auto-configuration IP address (usually in the range 169.254.x.x), signifying that DHCP has failed.
Causes of the «Can’t Reach DHCP Server» Issue
Understanding the root cause of the inability to reach the DHCP server is crucial for troubleshooting. Several potential factors could contribute to this connectivity issue:
-
Network Configuration Errors: Improper network settings on your device can prevent it from correctly connecting to the DHCP server.
-
Router Issues: Problems with the home or local network router, such as firmware bugs or hardware failures, may hinder its ability to communicate with the DHCP server.
-
Windows Firewall or Security Software: Sometimes, firewall settings or other security software can mistakenly block DHCP requests.
-
Driver Issues: Outdated or corrupted network adapter drivers can lead to failure in communicating with the DHCP server.
-
Physical Connection Problems: Damaged cables or faulty ports on your networking equipment can disrupt the network connection.
-
Network Overload: If many devices are connected to a single network and the DHCP server has a limited IP address pool, requests may be denied.
Troubleshooting Steps to Reach the DHCP Server
Now that we have identified potential causes of the issue, let us explore various methods to troubleshoot and resolve the «Can’t Reach DHCP Server» problem.
Step 1: Restart Your Computer and Network Equipment
Sometimes, the simplest methods can fix many issues. Restart your computer and your networking equipment, including your modem and router. After the restart, check to see if the DHCP server is reachable.
Step 2: Check Network Cables and Connections
Ensure that all network cables are connected securely and that there are no visible signs of damage. If you are using Ethernet cables, try switching to a different cable or port on your router to rule out physical connection issues.
Step 3: Disable and Re-enable Network Adapter
- Go to Settings > Network & Internet > Status.
- Click on Change adapter options.
- Right-click on your active network connection and select Disable.
- After a few seconds, right-click the same connection and select Enable.
This action forces your computer to reinitiate a connection with the DHCP server.
Step 4: Release and Renew IP Address
Open Command Prompt as an administrator and execute the following commands to release and renew your IP address:
ipconfig /release
ipconfig /renew
These commands instruct your operating system to relinquish its current IP configuration and request a new one from the DHCP server.
Step 5: Check DHCP Client Service
Ensure that the DHCP Client service is running:
- Press Win + R, type
services.mscand hit Enter. - Scroll down to find DHCP Client.
- Right-click on it and select Restart. If it is not running, select Start.
Step 6: Set Network to Automatically Obtain IP Address and DNS
- Go to Settings > Network & Internet > Status.
- Click on Change adapter options.
- Right-click your connection (Ethernet/Wi-Fi) and select Properties.
- Select Internet Protocol Version 4 (TCP/IPv4) and click Properties.
- Ensure that both Obtain an IP address automatically and Obtain DNS server address automatically are selected.
Step 7: Update Network Drivers
Outdated or corrupted network drivers may hinder network functionality. To update drivers:
- Press Win + X and choose Device Manager.
- Expand Network adapters.
- Right-click on your network adapter and select Update driver.
- Choose Search automatically for updated driver software and follow the prompts.
Step 8: Disable Firewall Temporarily for Testing
To rule out interference from security software, temporarily disable any firewalls or antivirus software. If this resolves the issue, consider adjusting your firewall settings to allow DHCP traffic rather than disabling it entirely.
Step 9: Reset TCP/IP Stack
Restoring the TCP/IP stack to its default configuration can resolve various network-related issues. Open Command Prompt as an administrator and execute:
netsh int ip resetAfter running this command, restart your computer.
Step 10: Check for Windows Updates
Ensure that your Windows 11 system is up-to-date, as updates may address connectivity issues:
- Go to Settings > Windows Update.
- Click Check for updates and install any available updates.
Step 11: Manual Configuration
As a last resort, you may manually configure a static IP address. Make sure to choose an IP address within your network’s range, but not currently in use by another device. You can find your router’s IP address by inspecting settings or using the command ipconfig.
Conclusion
Encountering difficulties in reaching the DHCP server on Windows 11 can be frustrating, especially when it disrupts your internet connectivity. However, by systematically following the troubleshooting steps mentioned above, users can resolve these issues effectively. From inspecting physical connections to checking service status and resetting configurations, you have several strategies at your disposal.
Ultimately, a well-configured network is fundamental for productivity in today’s digital landscape. If at any point you find these methods aren’t working, consider seeking assistance from your ISP or a professional technician, as they may provide insights tailored specifically to your network configuration.
By gaining a deeper understanding of DHCP and the underlying factors that can impact connectivity, you can empower yourself to handle situations like these with confidence, ensuring a smoother experience in your Windows 11 environment.
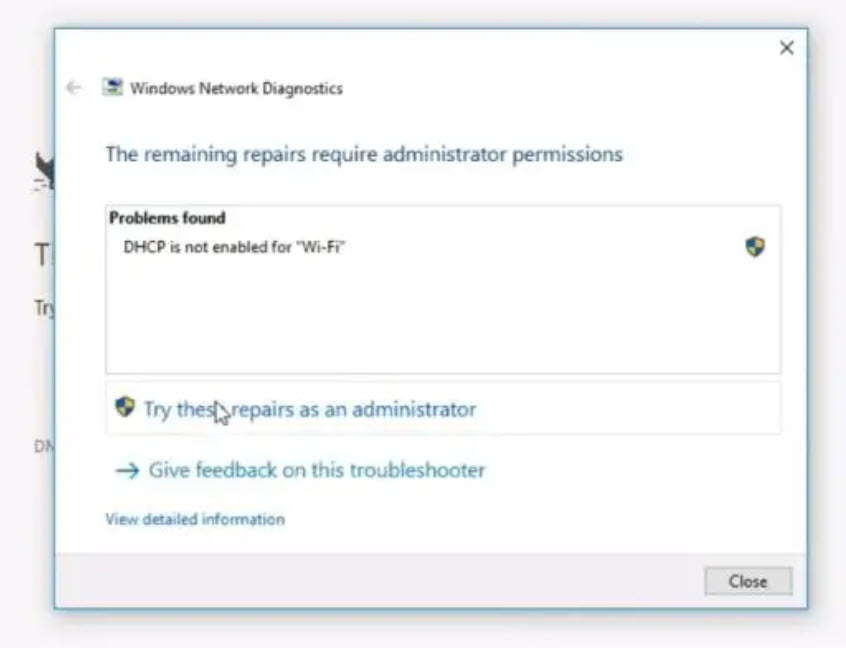
Are you encountering connectivity problems on your Windows 11 device? Don’t worry; we’ve got a solution for you. In this guide, we’ll walk you through the steps to fix DHCP is not enabled for Wi-Fi in Windows 11 issue, so you can get your Wi-Fi up and running smoothly.
Page Contents
What is DHCP?
DHCP stands for Dynamic Host Configuration Protocol. It is a network protocol that automatically assigns IP addresses, subnet masks, default gateways, and other network configuration information to devices on a network.
In Windows 11, DHCP is enabled by default for wired networks. However, it may not be enabled for Wi-Fi networks. If DHCP is not enabled for Wi-Fi in Windows 11, you will not be able to connect to the internet.
Why DHCP is important?
DHCP is important because it makes it easy to manage IP addresses on a network. It also helps to prevent IP address conflicts.
Here are some of the benefits of using DHCP:
- It saves time and effort by automatically assigning IP addresses to devices.
- It helps to prevent IP address conflicts.
- It makes it easier to manage network devices.
- It can improve network security.
The issue behind “DHCP is not enabled for Wi-Fi in Windows 11” can be caused by several factors, such as:
- The Wi-Fi adapter is not properly configured.
- The DHCP server is not reachable.
- There is a problem with the DHCP configuration.
Here, we present 8 essential techniques to resolve this problem.
Fix 1: Update the Network Driver
The network driver allows your computer to communicate with the network adapter. If the network driver is outdated or corrupted, it can cause problems with your computer’s network connection.
To update the network driver in Windows 11, follow these steps:
1. Open the Power User Menu by pressing the Windows key + X and then select “Device Manager“.
2. Now, click on “Network Adapter“.
3. Right-click on the Wi-Fi adapter and click “Update driver“.
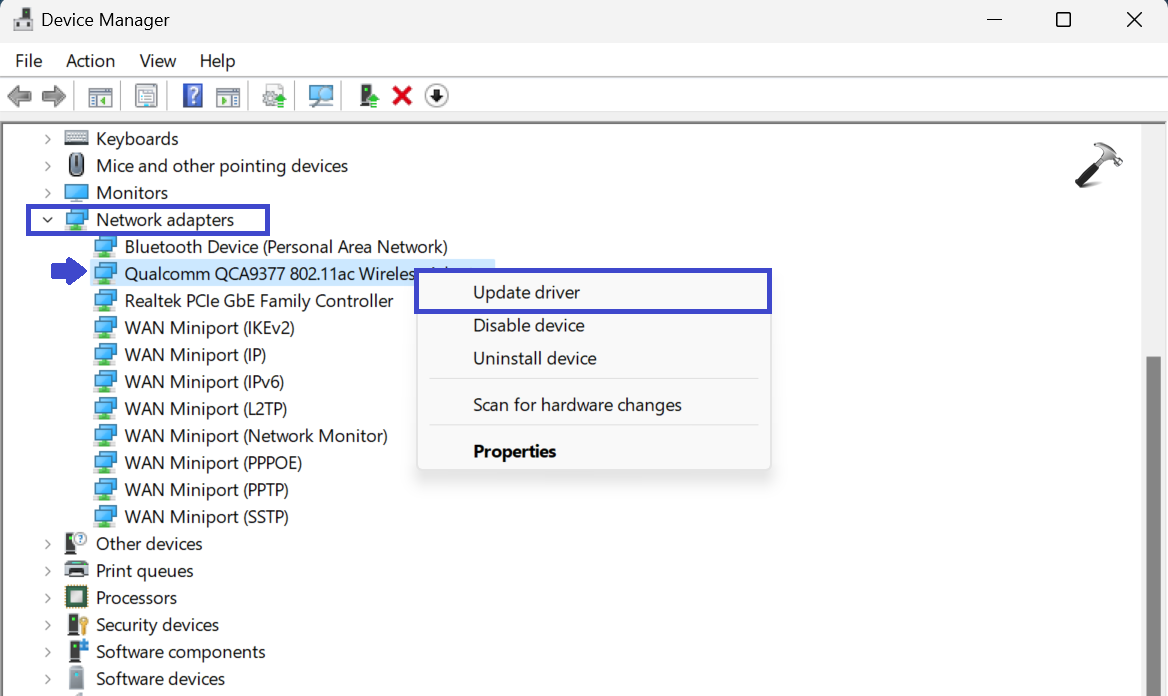
4. Now, select the “Search automatically for drivers” option.
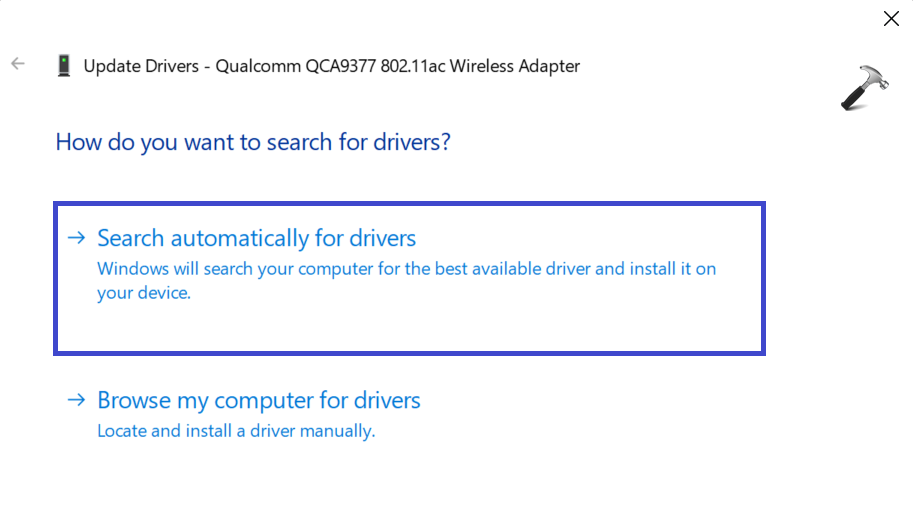
This will update the network driver automatically and will fix the issue. Make sure to restart the PC after updating the network driver.
Fix 2: Reset the Network Settings
Resetting network settings will delete all your saved network profiles, including your Wi-Fi passwords. So, you will need to re-enter your Wi-Fi passwords after resetting the network settings.
Follow the below steps to reset the network setting:
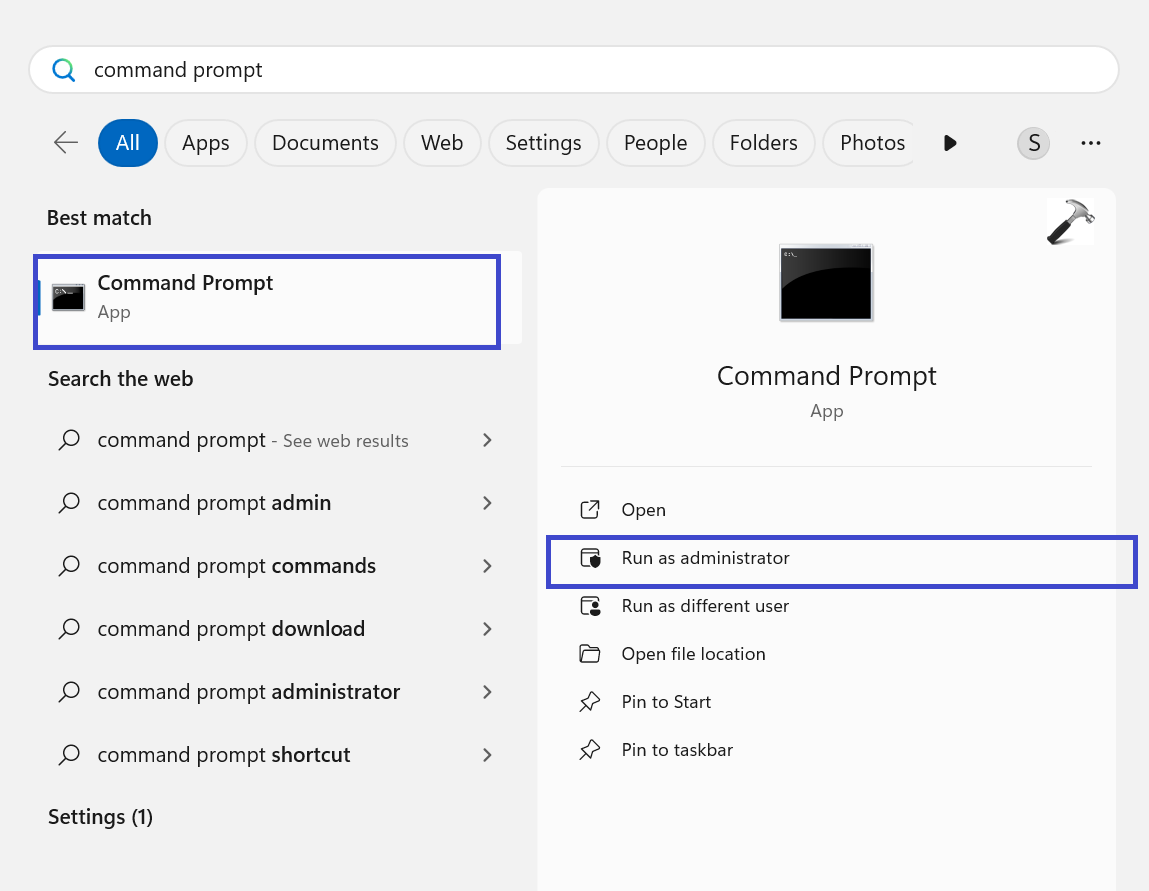
1. Open the Command prompt and run as administrator.
2. Paste the below commands. Press Enter and execute the commands one by one:
netsh winsock reset catalog

netsh int ip reset resetlog.txt
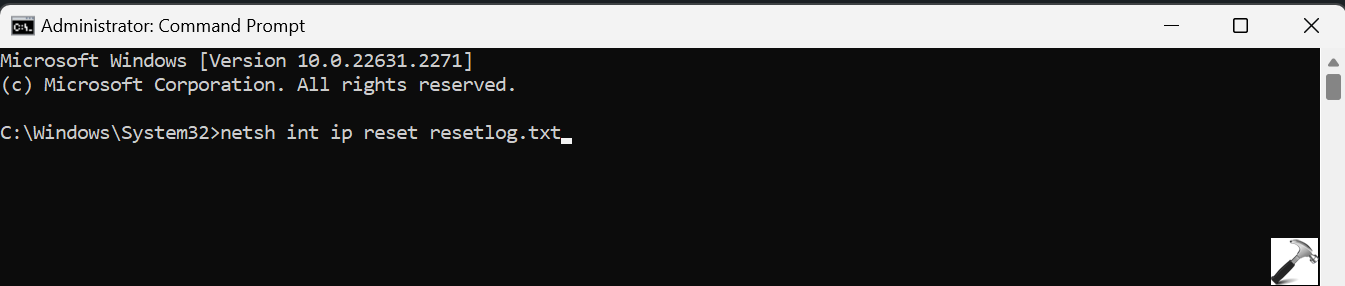
ipconfig /release

ipconfig /renew

3. After executing the above commands, restart the PC.
Now, check whether the issue is fixed for DHCP is not enabled for Wi-Fi in Windows 11.
Fix 3: Run the Network Troubleshooter
The Network Troubleshooter will scan your computer for any problems with your network adapters. If it finds any problems, it will try to fix them automatically.
Follow the below steps to run the network troubleshooter:
1. Open the Settings App by pressing Windows key + I.
2. Now, go to “System” and click on “Troubleshoot“.
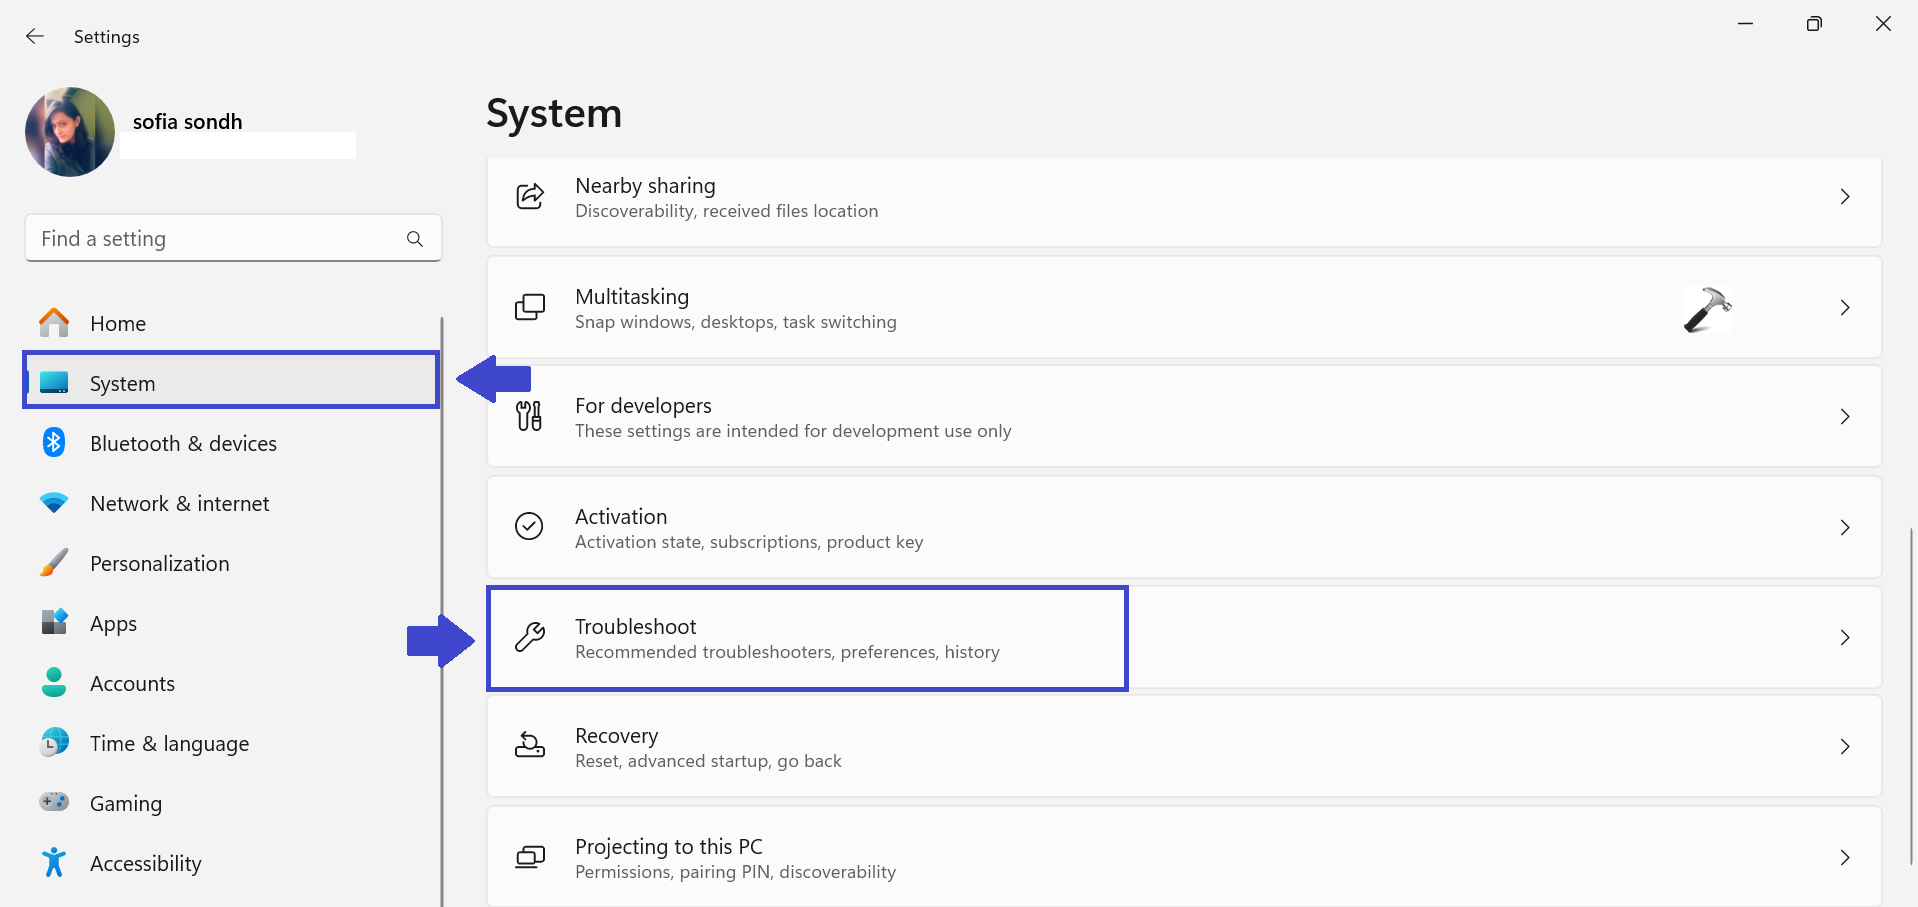
3. Here, click on “Other troubleshooters“.
4. Now, click on “Run” next to the “Network and Internet” option.
If the Network Troubleshooter is unable to fix: DHCP is not enabled for Wi-Fi in Windows 11 problem, you can try the next solution.
Fix 4: Disable Windows Firewall
Disabling Windows Firewall can make your computer more vulnerable to attacks. This is because it will allow all incoming and outgoing connections, even those from untrusted sources.
However, there are some cases where you may need to disable Windows Firewall. For example, if you are having problems connecting to a Wi-Fi network, disabling Windows Firewall may fix the problem.
To disable Windows Firewall in Windows 11, follow these steps:
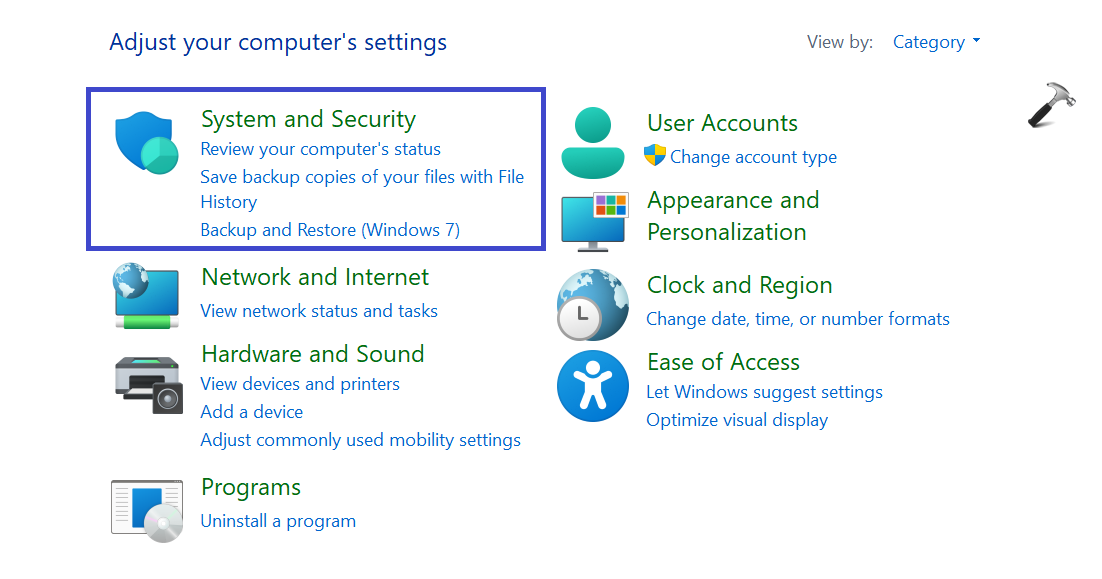
1. Open Control Panel. Select the “System and Security” option.
2. Now, click on “Windows Defender Firewall“.
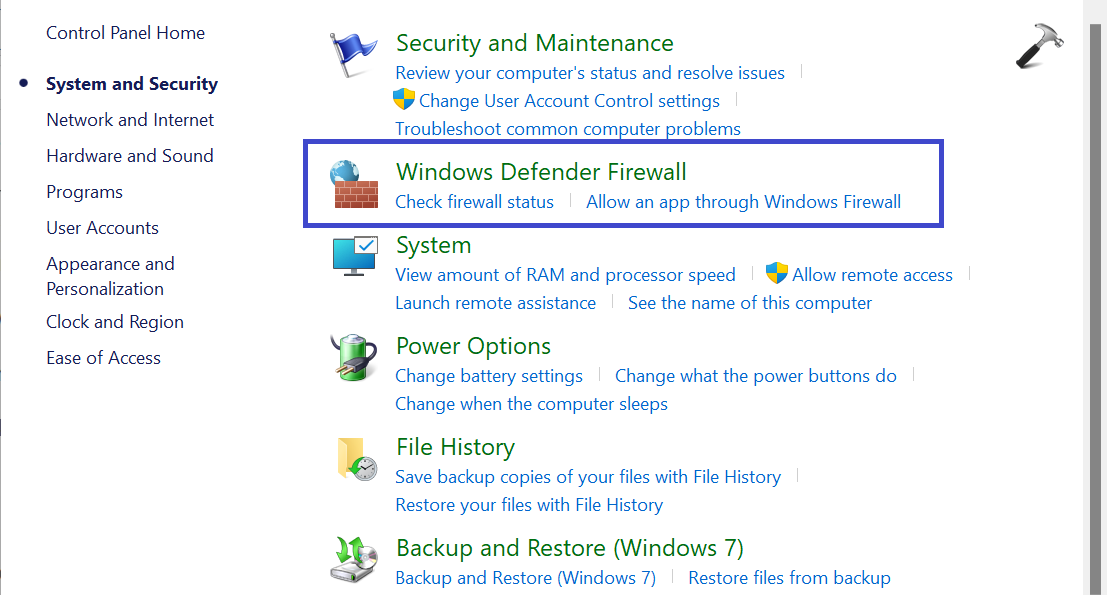
3. From the left panel, select “Turn Windows Defender Firewall on or off“.

4. Under Private Network Settings, select “Turn off Windows Defender Firewall (Not recommended)“.
Under Public network settings, select “Turn off Windows Defender Firewall (Not recommended)“.
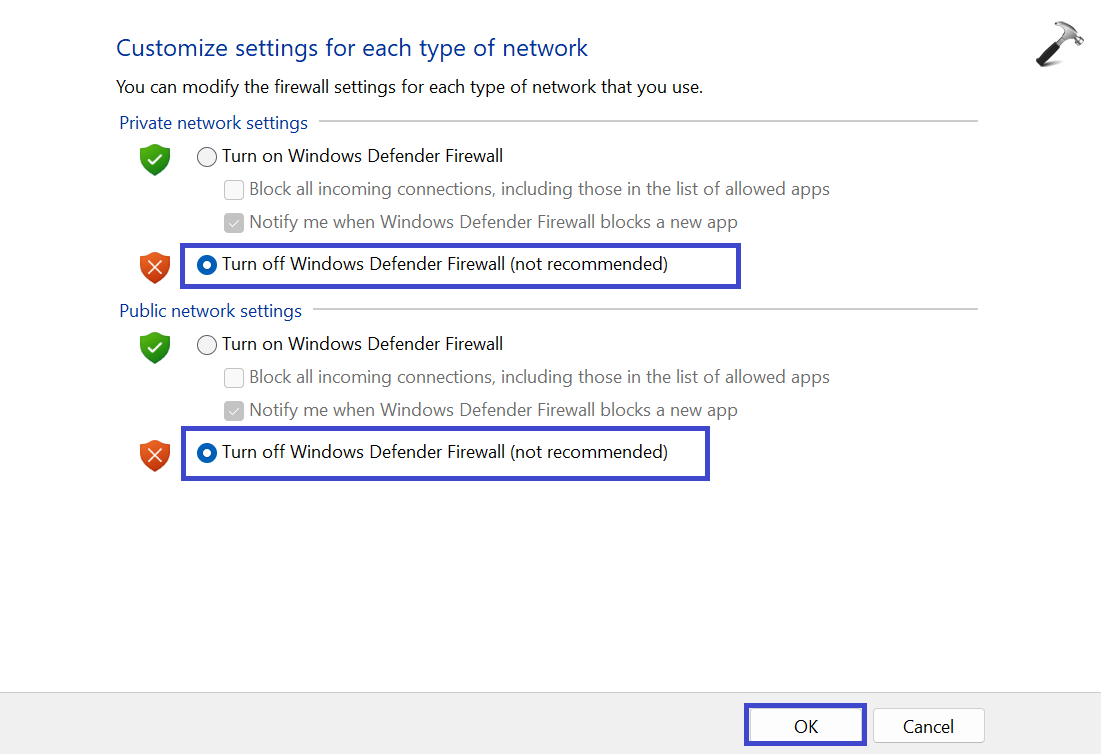
5. Click OK.
Restart your PC to apply the changes and verify whether the DHCP is enabled or not.
Once you have disabled Windows Firewall, you should try to connect to the Wi-Fi network again. If the problem is fixed, you can then enable Windows Firewall again.
Fix 5: Disable Proxy
If you are using a proxy server, your computer will not be able to obtain an IP address from a DHCP server. To fix this, you can try disabling the proxy server.
To disable the proxy server in Windows 11, follow these steps:
1. Open Settings App by pressing the Windows Key + I.
2. Go to “Network & Internet” and select “Proxy“.
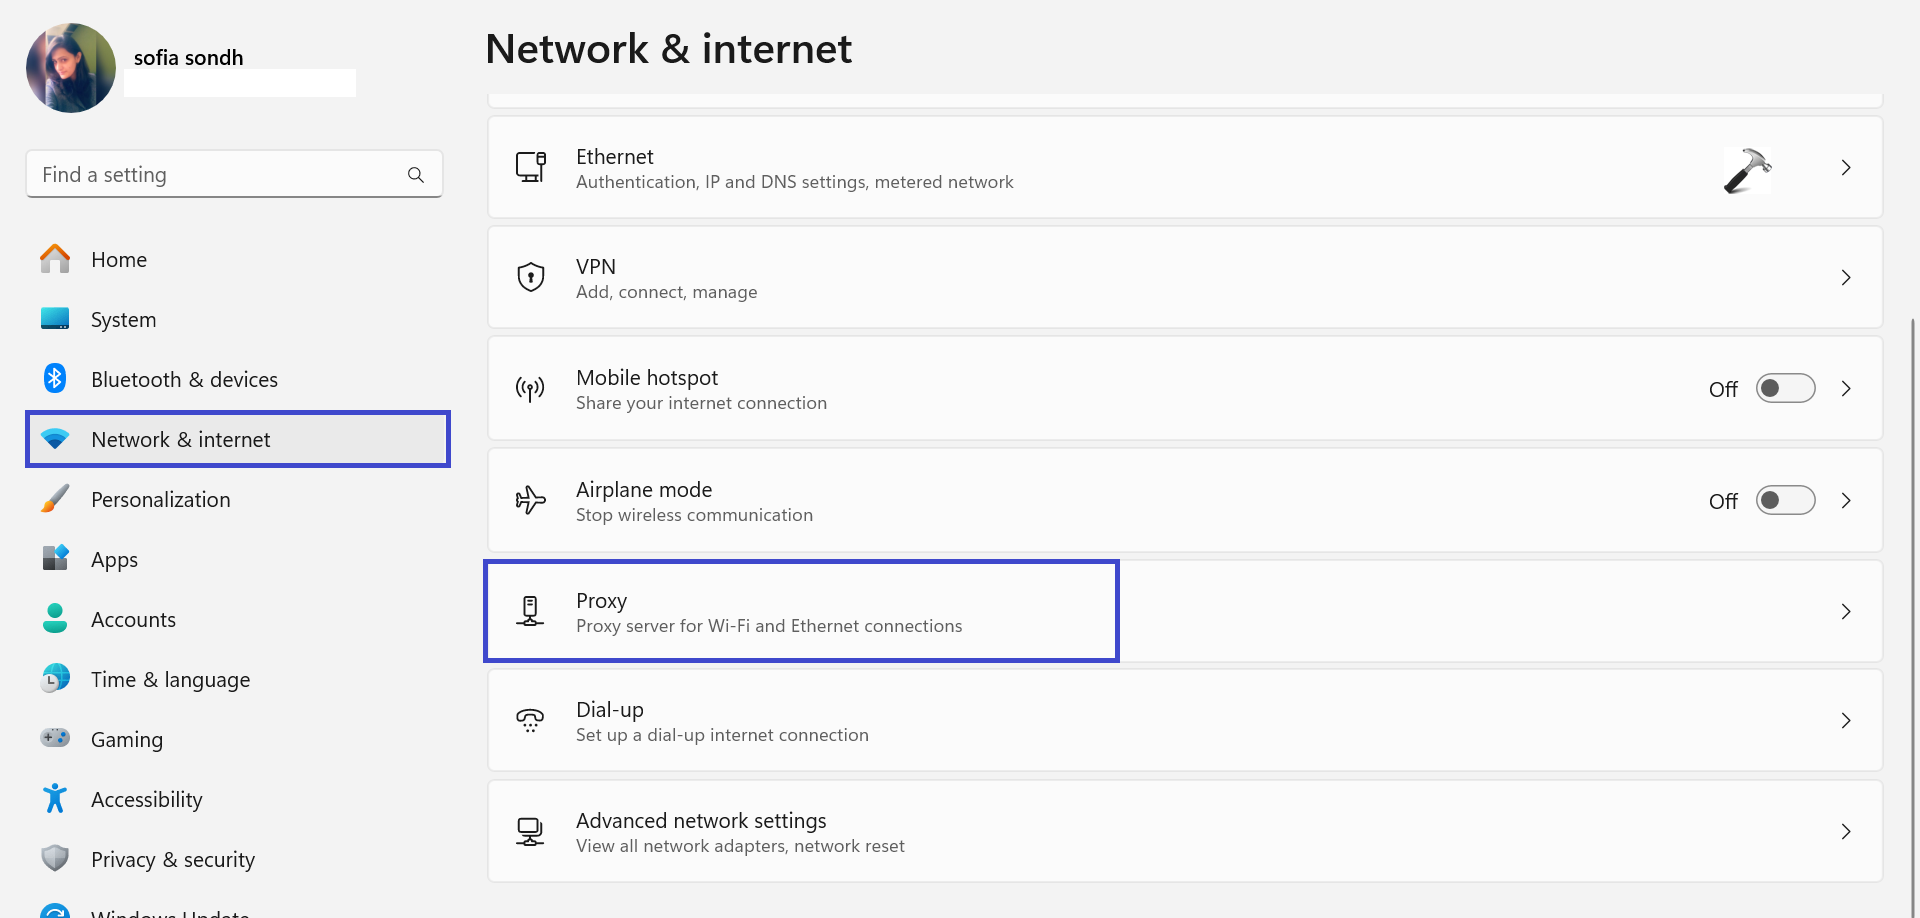
3. Under the “Automatic proxy startup” section, disable the toggle for “Automatically detect settings“.
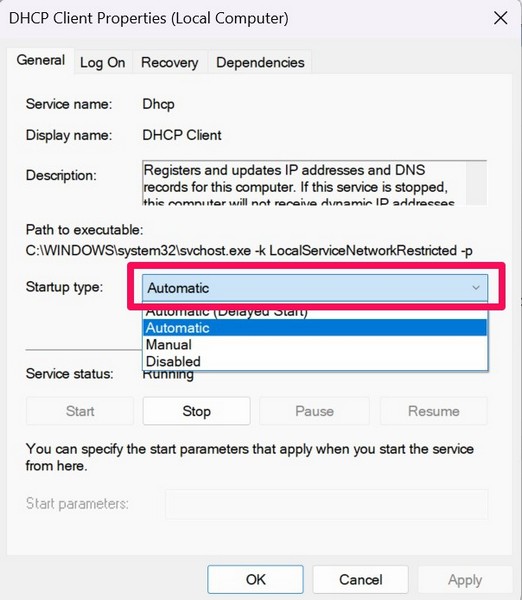
Fix 6: Run the DHCP Client Service
The DHCP client service is a Windows service that allows your computer to obtain an IP address from a DHCP server. If the DHCP client service is not running, your computer will not be able to obtain an IP address and will not be able to connect to the internet.
To start the DHCP client service, follow these steps:
1. Open the search bar, type “Services” and then click “Services“.
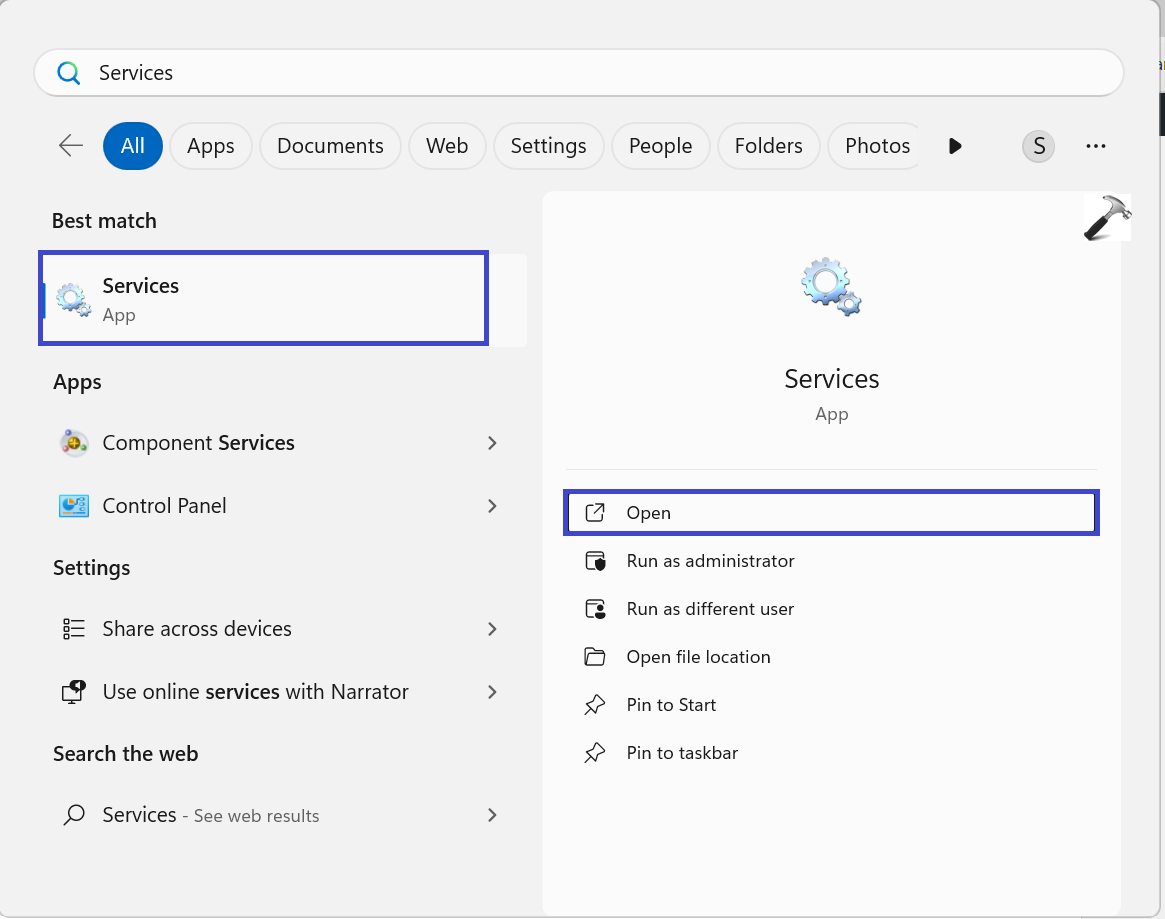
2. Search for the “DHCP Client” option.
3. Now, right-click the option and select “Properties“.
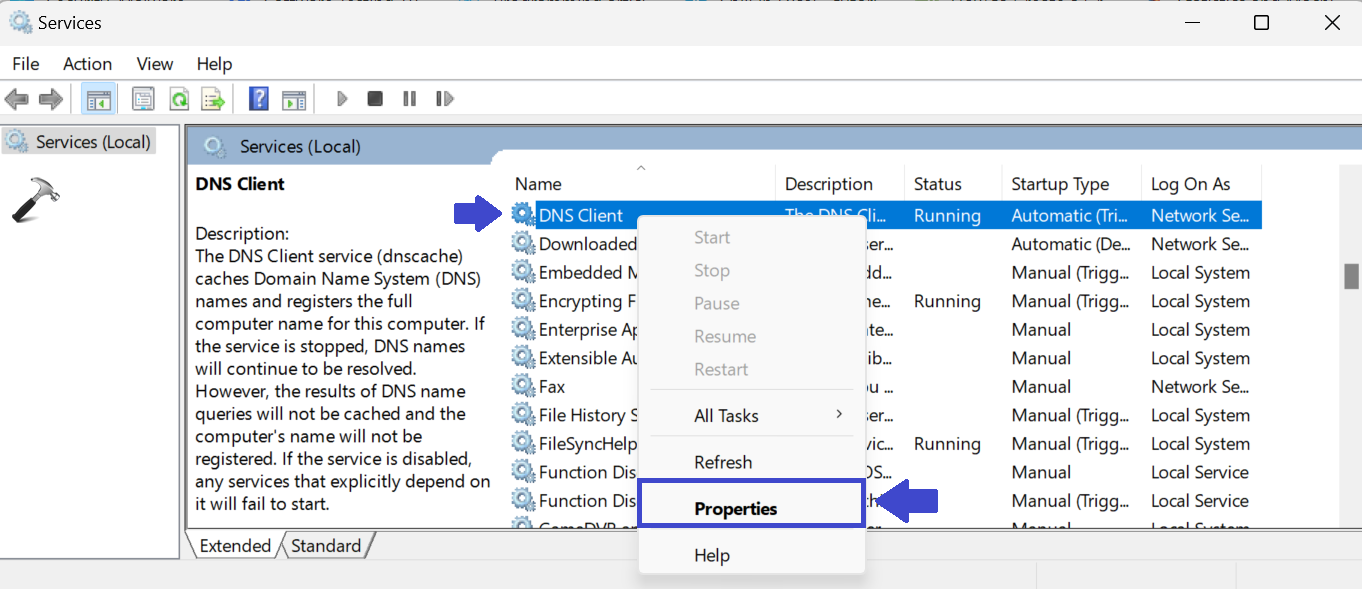
4. Here, under the “Startup type“, select the “Automatic” option.
5. After that, click on the “Start” button.
6. Click OK followed by Apply.
If the DHCP client service is still not working, you can try restarting your computer.
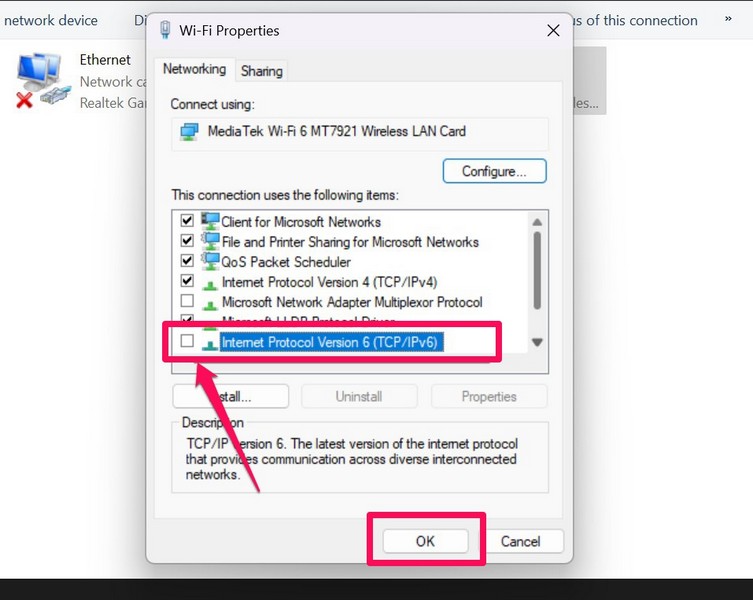
Fix 7: Configure the Network Adapter Settings
The network adapter settings are the configuration settings for your computer’s network adapters. These settings control how your computer connects to the network and how it uses the network.
If the DHCP client service is not enabled, you can try configuring the network adapter settings to fix the problem.
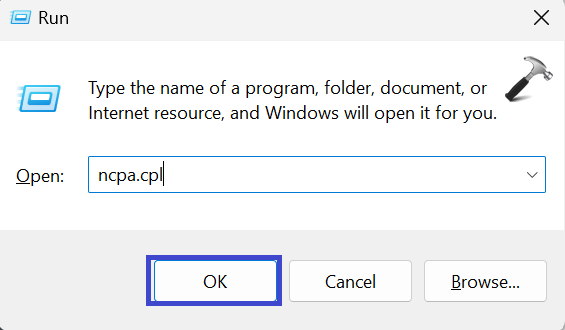
1. Press the Windows key + R to open the registry.
2. A prompt box will appear. Type “ncpa.cpl” and press Enter.
3. Now, right-click on “Wi-Fi Adapter” and select “Properties“.
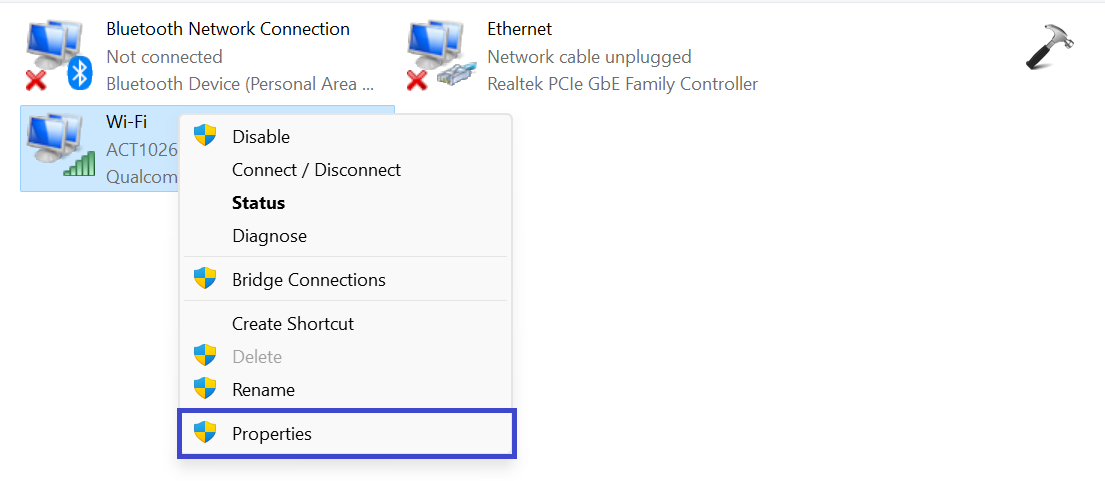
4. Select the “Internet Protocol Version 4 (TCP/IPv4)” and select “Properties“.
5. Now, select the “Obtain an IP address automatically” and “Obtain DNS server address automatically” option.
6. Click OK.
7. If your network connection replies to the protocol, then make sure you make similar changes on “Internet Protocol Version 6 (TCP/IPv6)“.
Once you have configured the network adapter settings, try connecting to the Wi-Fi network again.
Fix 8: Re-enable the Network Adapter and DHCP Service
If the network adapter or the DHCP client service is not running, your computer will not be able to connect to the internet. To fix this, you can try restarting the network adapter and the DHCP client service.
To restart the network adapter and the DHCP client service in Windows 11, follow these steps:
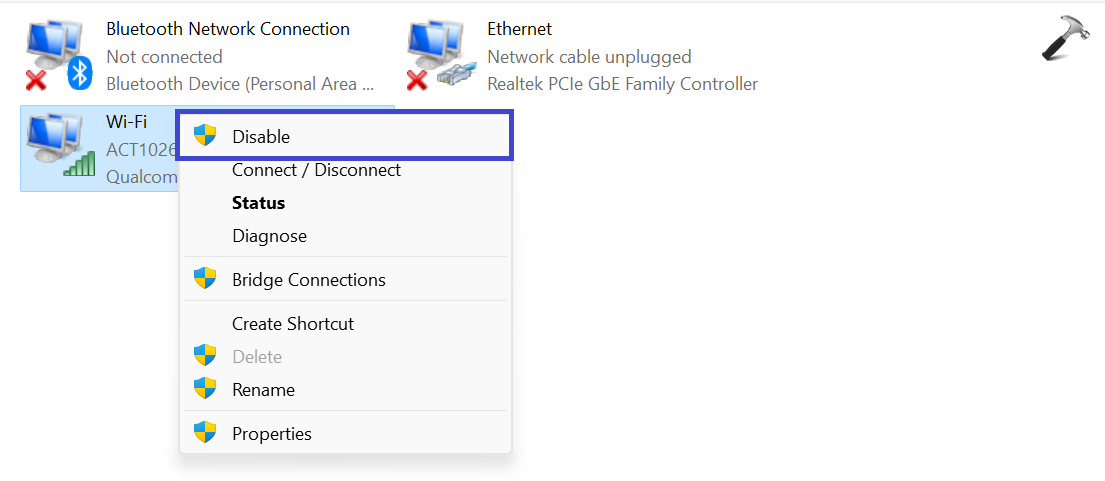
1. Here, again open the registry by pressing Windows key + R and type “ncpa.cpl”.
2. Right-click on the Wi-Fi Adapter and click “Disable“.
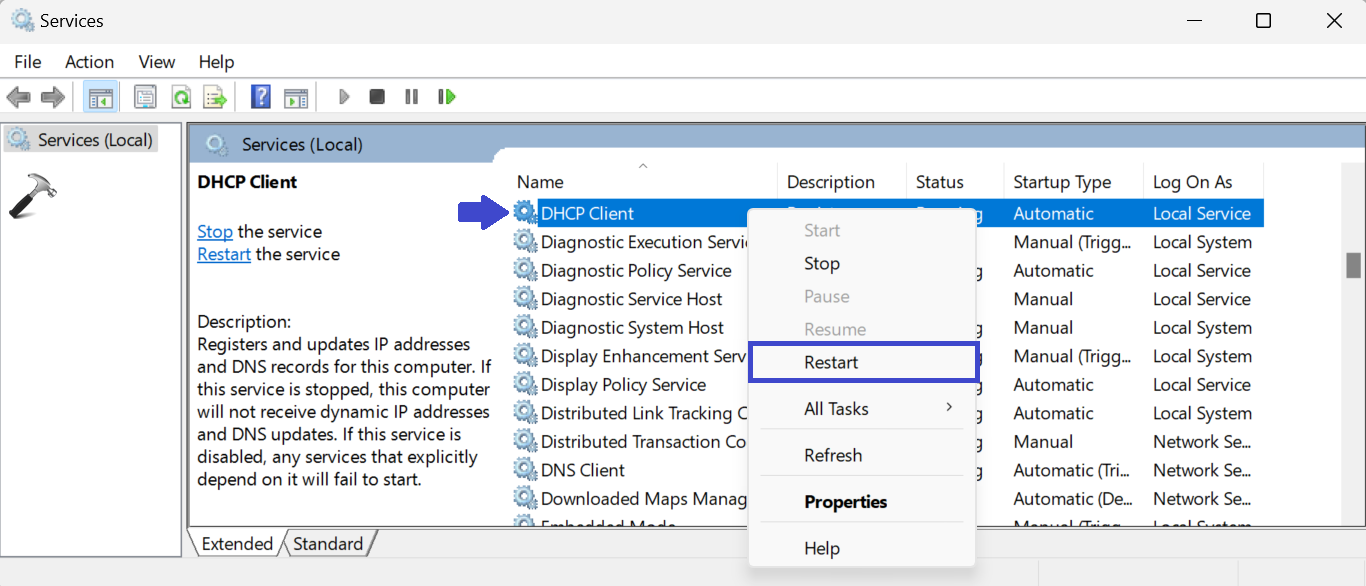
3. Now, open the “Services” Window. Just search “Services” in the search bar.
4. From the list, look for the “DHCP Client” option.
5. Right-click the option and click “Restart“.
6. Now, again go back to the Network connection. Right-click on the Wi-Fi Adapter and click “Enable“.
That’s It!