
-
rsk
- OpenVpn Newbie
- Posts: 4
- Joined: Thu Dec 09, 2021 8:31 pm
TAP-Windows Adapter «cannot verify signature» (Code 52)
I downloaded and installed
Code: Select all
openvpn-connect-3.3.3.2562_signed.msion a Windoze 7 (64-bit) desktop.
The TAP-Windows Adapter V9 for OpenVPN Connect shows up in the Device manager with a warning symbol and the status notation
Windows cannot verify the digital signature for the drivers required for this device. A recent hardware or software change might have installed a file that is signed incorrectly or damaged, or that might be malicious software from an unknown source. (Code 52)
The signature verification log also shows this:
Code: Select all
tap_ovpnconnect.sys 11/12/2021 9.24.2.601 Not Signed N/A
However, in the Powershell, I see this when I run Get-AuthenticodeSignature .\tap_ovpnconnect.cat in the drivers\tap\amd64\win7 directory:
Code: Select all
SignerCertificate                         Status                                                                                       Path
-----------------                         ------                                                                                       ----
478646B53E3F991A02E8A04D36B178DB1AFFF851  Valid                                                                                        tap_ovpnconnect.cat
And if I «run»
from a command line, up pops a window which suggests that everything is in order.
After searching this forum for answers, I see this is a perennial problem that goes back a long ways, but I cannot find any very recent instructions on how to correct the difficulty.
I’ve installed openvpn connect on other machines, even under Windows XP, and just the other day, had no difficulty installing and running the Android version on a new phone.
I’d be grateful for some guidance.
-
rsk
- OpenVpn Newbie
- Posts: 4
- Joined: Thu Dec 09, 2021 8:31 pm
Re: TAP-Windows Adapter «cannot verify signature» (Code 52)
Post
by rsk » Fri Dec 10, 2021 1:34 am
TinCanTech wrote: ↑
Thu Dec 09, 2021 9:09 pm
rsk wrote: ↑
Thu Dec 09, 2021 8:47 pm
on a Windoze 7 (64-bit) desktop
Make sure it is up to date with Micro-shaft, otherwise, it will not recognise the driver signing certificate.
At some point, I found a thread on this subject that pointed to a particular KB patch from them, but when I attempted to apply it, it said it wasn’t applicable to my version.
I still don’t quite understand how I can get past this and run OpenVPN on this machine, or just what I need to do to make the driver-signing certificate recognizable.
-
openvpn_inc
- OpenVPN Inc.
- Posts: 1332
- Joined: Tue Feb 16, 2021 10:41 am
Re: TAP-Windows Adapter «cannot verify signature» (Code 52)
Post
by openvpn_inc » Sat Dec 11, 2021 9:52 pm
Hello rsk,
Just to state this outright — Windows 7 is no longer supported by Microsoft. You should switch to an updated version.
With that out of the way, OpenVPN Connect v3.3.3 does work and install just fine on Windows 7. However there is an important thing to note about Windows 7. It did not originally start out supporting drivers with SHA2 signed certificates. Microsoft eventually switched from SHA1 to SHA2 and brought out updates for Windows 7 to add that support. If your system doesn’t have that, then it can’t verify the driver.
This page on the Microsoft website explains more about this https://support.microsoft.com/en-us/top … a4cde8e64f
I can report that when I tried it just now on Windows 7 Home Premium Server Pack 1 64 bit OS, it installed correctly. There was a popup asking me if I wanted to install the driver, and I clicked install, and now it is installed and working. When I look up the driver in device management it shows up as working correctly. I attached a screenshot as proof.
I advise that you upgrade to an operating system that is actually supported today for security updates. Windows 7 no longer is getting updates. If you insist on sticking with Windows 7 then I can at least advise you that, yes, it still works. However, you may need to figure out which updates you’re missing to get the necessary support for SHA2 signed drivers in your Windows 7 installation. Or figure out what’s wrong in your OS that’s preventing things from being verified correctly.
Kind regards,
Johan
OpenVPN Inc.
Answers provided by OpenVPN Inc. staff members here are provided on a voluntary best-effort basis, and no rights can be claimed on the basis of answers posted in this public forum. If you wish to get official support from OpenVPN Inc. please use the official support ticket system: https://openvpn.net/support
-
rsk
- OpenVpn Newbie
- Posts: 4
- Joined: Thu Dec 09, 2021 8:31 pm
Re: TAP-Windows Adapter «cannot verify signature» (Code 52)
Post
by rsk » Sun Dec 12, 2021 8:20 pm
Yes, now that I understand the difficulty is that my present system cannot verify using the SHA-2 algorithm, I located the update, and will let you know after install and restart.
Thank you for taking the time and trouble to explain what is the matter so clearly.
-
rsk
- OpenVpn Newbie
- Posts: 4
- Joined: Thu Dec 09, 2021 8:31 pm
Re: TAP-Windows Adapter «cannot verify signature» (Code 52)
Post
by rsk » Mon Dec 13, 2021 12:34 am
openvpn_inc wrote: ↑
Sat Dec 11, 2021 9:52 pm
. . . OpenVPN Connect v3.3.3 does work and install just fine on Windows 7. However there is an important thing to note about Windows 7. It did not originally start out supporting drivers with SHA2 signed certificates. Microsoft eventually switched from SHA1 to SHA2 and brought out updates for Windows 7 to add that support. If your system doesn’t have that, then it can’t verify the driver.
This page on the Microsoft website explains more about this https://support.microsoft.com/en-us/top … a4cde8e64f
. . .
Kind regards,
Johan
Thank you, Johan, that guidance got to me to the update patch which I needed to apply, specifically, for my system:
Security Update for Windows 7 for x64-based Systems (KB4474419)
windows6.1-kb4474419-v3-x64_b5614c6cea5cb4e198717789633dca16308ef79c.msu
I uninstalled the TAP-Windows Adapter, applied the patch, rebooted, and re-ran the OpenVPN Connect installation, chose the «repair» option, and as you said, it installed just fine, and OpenVPN Connect is now operating as expected (although I still need to configure it to use an appropriate DNS server, as it seems unable to locate certain sites—but that’s a different problem altogether.
Once again thank you very much for responding thoroughly to my naive inquiry, and pointing me toward what I needed to do. You got me past the problem and I’m up and running.
-
ivan.p
- OpenVpn Newbie
- Posts: 5
- Joined: Fri Apr 01, 2022 10:54 am
Re: TAP-Windows Adapter «cannot verify signature» (Code 52)
Post
by ivan.p » Fri Apr 01, 2022 11:18 am
Hello,
I have the same problem on Windows 7 x64. The question is why SHA1 hash for tap_ovpnconnect.sys file in the catalog is wrong?
Here’s the list of files extracted from MSI (latest openvpn-connect-3.3.6.2752_signed.msi ):

Tha CAT file signature is fine. You can see that CAT file contains 2 hashes:
INF — 4EA7EFACF8D968C662F43AE4723A816B53293EBC
SYS — 58CCFDF3B3A9D56CFEB36658AAEEB83220FD8A03
As you can see in the picture above, the actual SHA1 hash for INF-file is the same, but for SYS file it is different.
It’s 3CE2079895230254E1627D435365ACD3CC3E440E (and that is the hash of tap_ovpnconnect.sys located in c:\windows\system\drivers after installation)
So I believe the problem is not in that Win7 doesn’t have an update for SHA256 hashes, but in that SYS-file in the distribution doesn’t correspond the CAT-file.
Could someone look into this issue?
-
ivan.p
- OpenVpn Newbie
- Posts: 5
- Joined: Fri Apr 01, 2022 10:54 am
Re: TAP-Windows Adapter «cannot verify signature» (Code 52)
Post
by ivan.p » Fri Apr 01, 2022 6:15 pm
Ahhh, my bad. Before calculating hash for driver I need to exlude PE checksum and PE certificate table reference. After doing that hashes matched.
But in this case I don’t understand why it doesn’t work: I have a plenty of unsigned sys-files in my win 7, and they do work. Maybe the timestamp of signing matters
Windows provides different error codes for different types of errors. These codes can be useful in identifying the root cause of the problem and then resolving it. You may get the following error while running a device/component in Windows 11/10:
Windows cannot verify the digital signature for the drivers required for this device. A recent hardware or software change might have installed a file that is signed incorrectly or damaged, or that might be malicious software from an unknown source. (Code 52)

This error was prevalent in Windows 7 but has been reported on Windows 10 and even Windows 11 systems. Most modern components of the PC are automatically installed by Windows 10/11. However, some specific hardware devices may have corrupted drivers or nonstandard drivers might have been installed. As a result, Windows may display Error code 52.
Table of Contents
What is Error Code 52?
In general, error code 52 indicates that Windows is unable to verify the authenticity of the driver installed. As a result, the device cannot be started under Windows. Driver verification is done through the Driver Digital Signature system.
What is Driver Digital Signature?
Windows uses Driver Digital Signatures to verify the legitimacy of device drivers. Microsoft requires hardware vendors to verify their drivers before they can be installed on Windows. In the event that any driver is not verified, Windows will display the above-mentioned error code 52.
Since Driver Digital Signature is a paid service from Microsoft, small vendors do not get their device drivers verified. This is especially the case for USB drivers.
Error Code 52 Solutions
Once the problem has been identified, a solution is straightforward. Given that we know the root cause of the error message is a lack of a proper driver, let’s explore the solution steps here.
You may want to back up the installed drivers before proceeding with the uninstall and reinstall steps below.
Disable Driver Signature Enforcement using Command Prompt
Microsoft gives users the option to disable driver signature enforcement. If you disable this option, Windows will accept all drivers installed in the system, whether they are signed by Microsoft or not verified.
To disable driver signature enforcement, follow the steps below:
-
Launch an elevated Command Prompt.
-
Run the following commands one after the other:
bcdedit.exe -set loadoptions DISABLE_INTEGRITY_CHECKS
bcdedit.exe -set TESTSIGNING ON
Disable signature enforcement

You will need to restart your system after successfully running the commands.
If you see the following error when running the cmdlets above, then you must try disabling the driver signature enforcement using the Windows Recovery Environment (WinRE) for which the method is shared in the next section.
An error has occured setting the element data. The value is protected by Secure Boot policy and cannot be modified or deleted.
Disable Driver Signature Enforcement using WinRE
Follow these steps to disable the driver signature enforcement using WinRE:
-
Hold down the power button for 10 seconds to switch the machine off forcefully.
-
Turn it back on again, and then repeat the process 3 times.
This will reboot Windows into the Windows Recovery Environment (WinRE).
-
Navigate to the following:
Troubleshoot >> Advanced Options >> Startup Settings >> Restart
The device will now restart again. This time, you will be presented with a list of options you can choose from by using the function keys on the keyboard (F1-F9).
-
Press the key that says “Disable drive signature enforcement” (F7).

Disable driver signature enforcement

This procedure to disable driver signature enforcement is the same for all versions of Windows, including Windows 7, Windows 8/8.1, Windows 10, and Windows 11.
Disable Code Signing for Device Drivers using Group Policy
If you find the aforementioned method difficult, you can also disable driver signature enforcement using Group Policy. Follow the steps below to get rid of error code 52:
-
Open the Group Policy editor by typing in “gpedit.msc” in the Run Command box.

Open the Group Policy editor Note: If you are using the Home edition of Windows, learn how to install the Group Policy editor.
-
Go to the following from the left pane:
Local Computer Policy >> User Configuration >> Administrative Templates >> System >> Driver Installation
-
Double-click the policy “Code signing for driver packages.”
Open code signing policy -
Disable the policy.
Disable the policy Select the “Disabled” radio button, then click Apply and Ok.


Please note that this method may or may not work with Windows 10 or Windows 11. If this doesn’t work, you should follow the method given above earlier which surely works.
Delete USB’s Upper and Lower Filter Entries
If you are experiencing the error code 52 every time you connect a USB device, then you can mitigate the issue by deleting the upper filter and lower filter Registry entries. These filters are responsible for managing the device’s access request from third-party applications and can cause the error code 52.
Follow these steps to delete these entries inside the Registry:
Note: Misconfiguration of critical values in the system’s registry could be fatal for your operating system. Therefore, we insist that you create a system restore point before proceeding forward with the process.
You can also use our top selection of disk imaging and backup software so you never lose your data or operating system again.
-
Open the Registry editor by typing in “regedit” in the Run Command box.
Open the Registry editor -
Paste the following in the address bar for quick navigation:
Computer\HKEY_LOCAL_MACHINE\SYSTEM\CurrentControlSet\Control\Class\{4d36e967-e325-11ce-bfc1-08002be10318}
Open the USB filters key inside Registry editor -
Right-click “UpperFilters” and then click Delete.
Delete UpperFilters -
Confirm the action by clicking Yes.
Confirm action -
Repeat Steps 3 & 4 for “LowerFilters.”
Delete LowerFilters -
Restart the computer.


When the computer reboots, check to see if you still encounter the same error code 52 when connecting the USB.
Install a Verified Driver
The best way to tackle error code 52 is to install a verified driver from the vendor (given that the vendor offers one).
To install a new device driver, you will need to uninstall the existing installed driver first. To uninstall the existing driver, follow these steps:
-
Open the Device Manager by typing in “devmgmt.msc” in the Run Command box.
Open the Device Manager -
Expand the respective category, right-click on the device and open its Properties.

Open device properties -
Switch to the “Driver” tab.
Go to Driver tab -
Click “Uninstall Device.”
Uninstall device This will uninstall the driver.


Once you have uninstalled the device driver, Windows will try to find the appropriate driver and automatically install it for you. You can also download and install the latest device drivers automatically using third-party software. Otherwise, you can download the drivers directly from the vendor’s website.
Here’s how you can identify unknown devices in Windows.
Once you have installed a custom driver, you should disable automatic driver updates in Windows to make sure Windows does not replace the installed drivers.
Takeaway
Disabling driver signing is an advanced option and should be used with care. Make sure you trust the vendor before installing unverified drivers. For advanced users, the Dism++ utility can be used to disable automatic drivers signing in Windows using a Live bootable CD like LiveCD.
Have you encountered an error code 52 error on your system? Which drivers were the most problematic?
Fix USB Error Code 52 Windows cannot verify the digital signature: If you have recently installed Windows Updates or upgraded Windows then it’s possible that your USB ports will not recognize any hardware that is connected to them. In fact, if you will dig further you will find out the following error message in Device Manager:
Windows cannot verify the digital signature for the drivers required for this device. A recent hardware or software change might have installed a file that is signed incorrectly or damaged, or that might be malicious software from an unknown source. (Code 52)

Error Code 52 indicates a driver failure and in device manager, you will see a yellow exclamation mark next to each USB icon. Well, there is no particular cause for this error but a number of reasons are responsible such as Corrupted Drivers, Secure boot, Integrity check, problematic filters for USB etc. So without wasting any time let’s see how to actually Fix USB Error Code 52 Windows cannot verify the digital signature with the help of below-listed troubleshooting guide.
Table of Contents
Make sure to create a restore point just in case something goes wrong.
Method 1: Delete USB UpperFilter and LowerFilter Registry Entries
Note: Backup the registry just in case something goes wrong.
1.Press Windows Key + R then type regedit and hit Enter to open Registry Editor.
2.Navigate to the following the Registry Key:
HKEY_LOCAL_MACHINE\SYSTEM\CurrentControlSet\Control\Class\{36FC9E60-C465-11CF-8056-444553540000}
3.Make sure to select {36FC9E60-C465-11CF-8056-444553540000} and then in the right window pane find UpperFilters and LowerFilters.

4.Right-click on each of them and select Delete.
5.Reboot your PC to save changes.
Method 2: Run System Restore
1.Press Windows Key + R and type”sysdm.cpl” then hit enter.
2.Select System Protection tab and choose System Restore.

3.Click Next and choose the desired System Restore point.

4.Follow the on-screen instruction to complete system restore. And see if you are able to Fix USB Error Code 52 Windows cannot verify the digital signature, if not then continue with the below-listed methods.
Method 3: Disable Secure Boot
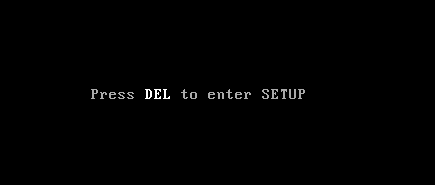
1.Restart your PC and tap F2 or DEL depending upon your PC to open Boot Setup.
2.Find the Secure Boot setting, and if possible, set it to Enabled. This option is usually in either the Security tab, the Boot tab, or the Authentication tab.

#WARNING: After disabling Secure Boot it may be difficult to re-activate Secure Boot without restoring your PC to the factory state.
3.Restart your PC and see if you’re able to Fix USB Error Code 52 Windows cannot verify the digital signature.
Method 4: Disable Driver Signature Enforcement
For Windows 10 user’s, interpret the Windows booting process 3 times to boot into recovery mode or else you could try the following:
1.Go to the Login screen where you see the above error message then click on Power button then hold Shift and click on Restart (while holding the shift button).
2.Make sure you don’t let go of the Shift button until you see the Advanced Recovery Options menu.

3.Now Navigate to the following in Advanced Recovery Options menu:
Troubleshoot > Advanced options > Startup settings > Restart

4.Once you click Restart your PC will restart and you will see a blue screen with a list of options make sure to press the number key next to the option which says “Disable driver signature enforcement.“

5.Now Windows will boot again and once logged into Windows press Windows Key + R then type devmgmt.msc and hit Enter to open Device Manager.

6.Right-click on the problematic device (which has a yellow exclamation mark next to it) and select Update Driver.

7.Select “Search automatically for updated driver software.“

8.Repeat the above process for every problematic device listed in Device Manager.
9.Reboot your PC to save changes and see if you’re able to Fix USB Error Code 52 Windows cannot verify the digital signature.
Method 5: Uninstall Problematic devices
1.Press Windows Key + R then type devmgmt.msc and hit Enter.
2.Right-click on each of problematic device (yellow exclamation mark next to it) and select Uninstall.

3.Click Yes/OK to continue with uninstallation.
4.Reboot your PC to save changes.
Method 6: Delete usb*.sys Files
1.Take Ownership of the files C:\Windows\system32\drivers\usbehci.sys and C:\Windows\system32\drivers\usbhub.sys through any one of the listed methods here.
2.Rename the usbehci.sys and usbhub.sys files to usbehciold.sys & usbhubold.sys.

3.Press Windows Key + R then type devmgmt.msc and hit Enter.
4.Expand Universal Serial Bus Controllers and then right-click on Standard Enhanced PCI to USB Host Controller and select Uninstall.

5.Reboot your PC and new drivers will be automatically installed.
Method 7: Run CHKDSK and SFC
1.Press Windows Key + X then click on Command Prompt(Admin).
2.Now type the following in the cmd and hit enter:
Sfc /scannow
sfc /scannow /offbootdir=c:\ /offwindir=c:\windows

3.Wait for the above process to finish and once done restart your PC.
4.Next, run CHKDSK from here Fix File System Errors with Check Disk Utility(CHKDSK).
5.Let the above process complete and again reboot your PC to save changes.
See if you’re able to Fix USB Error Code 52 Windows cannot verify the digital signature, if not then follow the next method.
Method 8: Disable Integrity Checks
1.Press Windows Key + X then select Command Prompt (Admin).
2.Type the following command into cmd and hit Enter after each one:
bcdedit -set loadoptions DDISABLE_INTEGRITY_CHECKS
bcdedit -set TESTSIGNING ON

3.If the above command doesn’t work then try the following:
bcdedit /deletevalue loadoptions
bcdedit -set TESTSIGNING OFF
4.Reboot your PC to save changes.
Recommended for you:
- Fix USB Drive not showing files and folders
- Fix DPC Watchdog Violation BSOD Error
- How To Fix Screen Resolution changes by itself issue
- Fix Windows Cannot Be Installed to Drive 0
That’s it you have successfully Fix USB Error Code 52 Windows cannot verify the digital signature but if you still have any question regarding this guide then feel free to ask them in the comment’s section.
Урок №21 [Код 52] Ошибка установки (не удается проверить цифровую подпись драйвера)
(урок подготовлен на основании релиза *.0259)
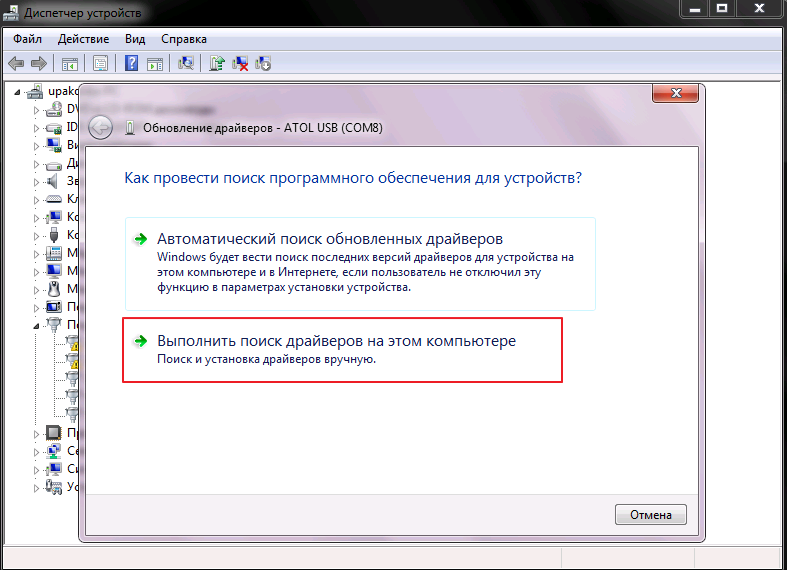
При установки драйверов для онлайн-кассы на примере (АТОЛ)
Установщик создает в системе два виртуальных COM порта
один для взаимодействия с кассой, другой для работы с ОФД
Как правило все происходит в штатном режиме и не требует дополнительных настроек
но инога может произойти следующее — порты определились . но драйвера для них в системе не установились
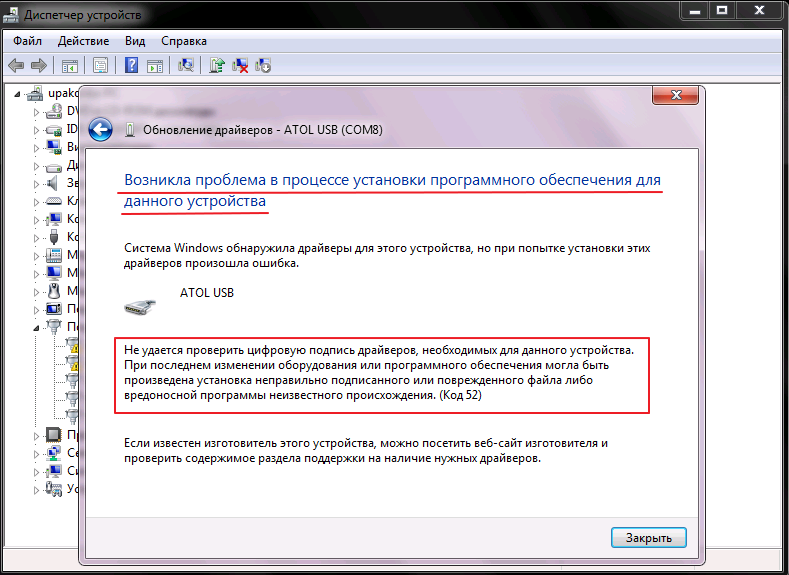
об этом нам указывает желтый треугольник с восклицательным знаком (Мой компьютер — Диспетчер устройств)

правой кнопкой — обновить драйвер
MAGAZKA — Топ-5 в лучших программах для розничной торговли, автоматизация торговли в розничном магазине
указываем папку с АТОЛ
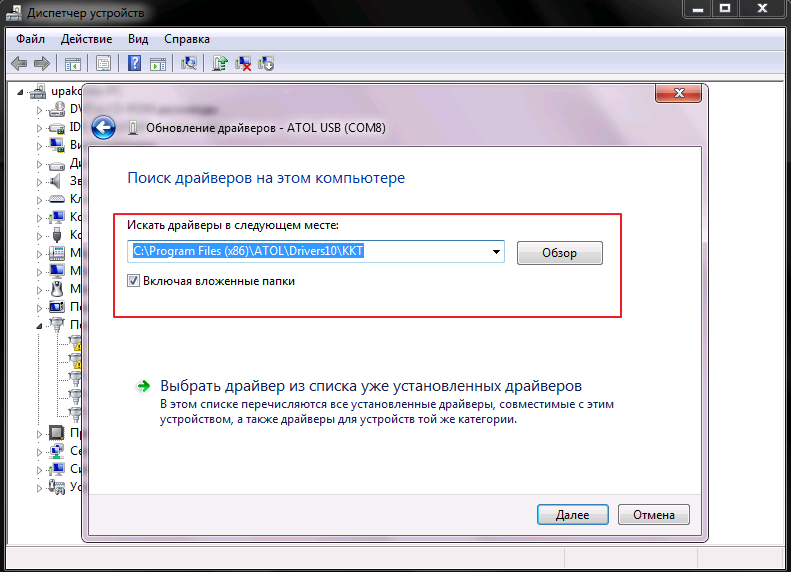
Драйвер найден , но У НЕГО НЕТ ЦИФРОВОЙ ПОДПИСИ
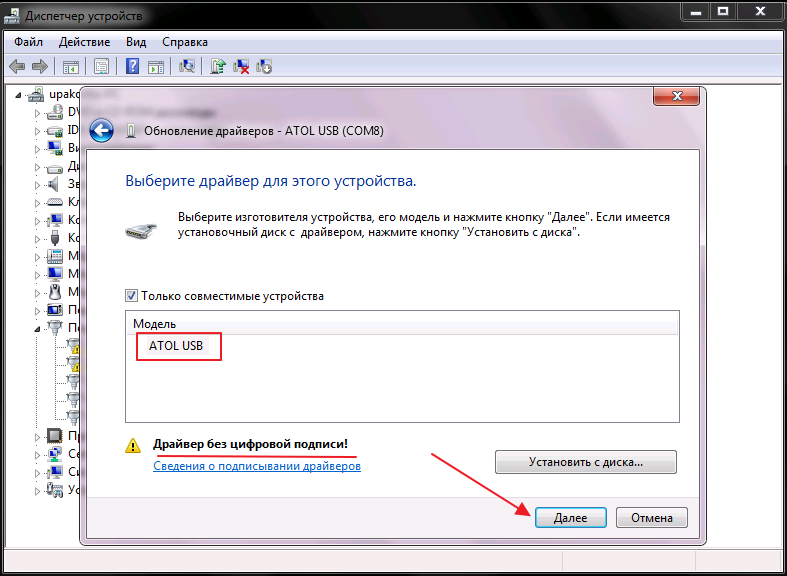
и система не дает его установить. ошибка [КОД 52]
Будем разбираться почему. Мой компьютер — Система — Windows 7 Service Pack 1
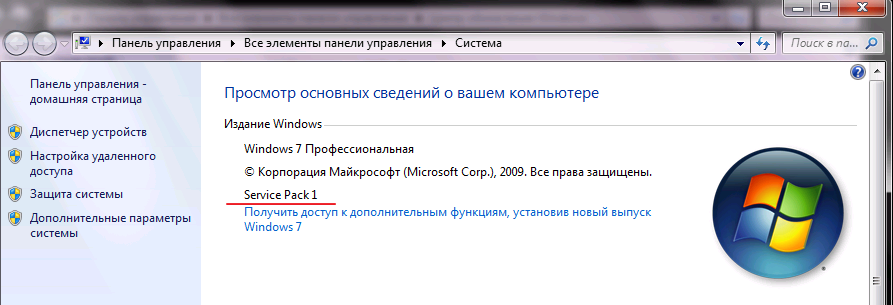
(система очень давно не обновлялась, нужно обновить до Windows 7 Service Pack 3)
Переходим — ПУСК -Панель управления — Система и безопасность — Центр обновления Windows
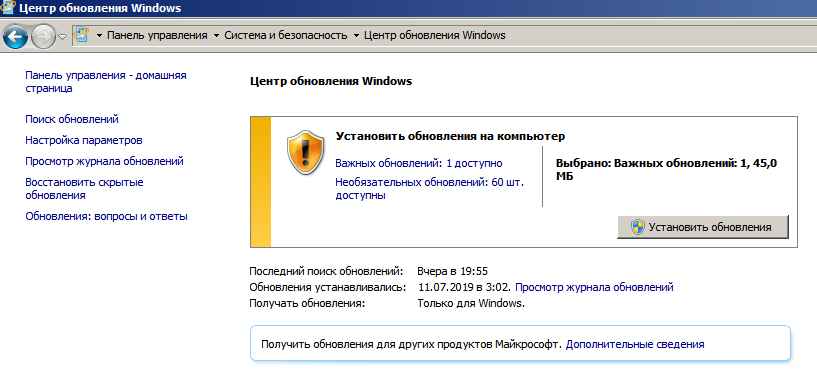
нажимаем «Установить обновления» и ждем….
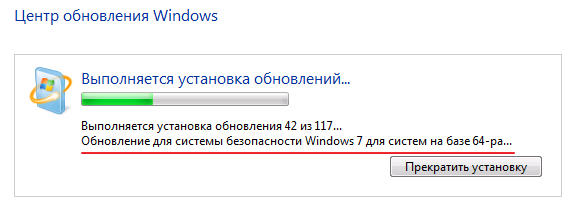
После установки компьютер перезгрузиться и драйвера для COM портов установяться.
Приятной работы !
Пробуйте ! Уверен , что вам понравиться!
Вернуться к содержанию уроков
Распределенное обучение с TensorFlow и Python
AI_Generated 05.05.2025
В машинном обучении размер имеет значение. С ростом сложности моделей и объема данных одиночный процессор или даже мощная видеокарта уже не справляются с задачей обучения за разумное время. Когда. . .
CRUD API на C# и GraphQL
stackOverflow 05.05.2025
В бэкенд-разработке постоянно возникают новые технологии, призванные решить актуальные проблемы и упростить жизнь программистам. Одной из таких технологий стал GraphQL — язык запросов для API,. . .
Распознавание голоса и речи на C#
UnmanagedCoder 05.05.2025
Интеграция голосового управления в приложения на C# стала намного доступнее благодаря развитию специализированных библиотек и API. При этом многие разработчики до сих пор считают голосовое управление. . .
Реализация своих итераторов в C++
NullReferenced 05.05.2025
Итераторы в C++ — это абстракция, которая связывает весь экосистему Стандартной Библиотеки Шаблонов (STL) в единое целое, позволяя алгоритмам работать с разнородными структурами данных без знания их. . .
Разработка собственного фреймворка для тестирования в C#
UnmanagedCoder 04.05.2025
C# довольно богат готовыми решениями – NUnit, xUnit, MSTest уже давно стали своеобразными динозаврами индустрии. Однако, как и любой динозавр, они не всегда могут протиснуться в узкие коридоры. . .
Распределенная трассировка в Java с помощью OpenTelemetry
Javaican 04.05.2025
Микросервисная архитектура стала краеугольным камнем современной разработки, но вместе с ней пришла и головная боль, знакомая многим — отслеживание прохождения запросов через лабиринт взаимосвязанных. . .
Шаблоны обнаружения сервисов в Kubernetes
Mr. Docker 04.05.2025
Современные Kubernetes-инфраструктуры сталкиваются с серьёзными вызовами. Развертывание в нескольких регионах и облаках одновременно, необходимость обеспечения низкой задержки для глобально. . .
Создаем SPA на C# и Blazor
stackOverflow 04.05.2025
Мир веб-разработки за последние десять лет претерпел коллосальные изменения. Переход от традиционных многостраничных сайтов к одностраничным приложениям (Single Page Applications, SPA) — это. . .
Реализация шаблонов проектирования GoF на C++
NullReferenced 04.05.2025
«Банда четырёх» (Gang of Four или GoF) — Эрих Гамма, Ричард Хелм, Ральф Джонсон и Джон Влиссидес — в 1994 году сформировали канон шаблонов, который выдержал проверку временем. И хотя C++ претерпел. . .
C# и сети: Сокеты, gRPC и SignalR
UnmanagedCoder 04.05.2025
Сетевые технологии не стоят на месте, а вместе с ними эволюционируют и инструменты разработки. В . NET появилось множество решений — от низкоуровневых сокетов, позволяющих управлять каждым байтом. . .