
Many Windows 10 users encounter the “The boot configuration data store could not be opened” error when running the bcdedit repair command. In this post, MiniTool will analyze all possible causes of the error and provide corresponding solutions.
About The Boot Configuration Data Store Could Not Be Opened Error
After analyzing extensive user reports and posts, we find the boot configuration data store could not be opened error often occurs after they cloned a disk improperly using a third-party tool and then run the bcdedit repair command. Here’s a true example from the tenforums.com forum.
I used Macrium Reflect to clone a disk onto another disk and now all BCD data has disappeared. When I run bcdedit, I get this: The boot configuration data store could not be opened.
The system cannot find the file specified. EasyBCD doesn’t find a file either. Should I run bootrec /rebuildbcd? Also, x:bootbcd is missing on all 3 disks that are bootable with Windows 10 (they are all clones).https://www.tenforums.com/general-support/142303-bcdedit-boot-configuration-data-store-could-not-opened.html
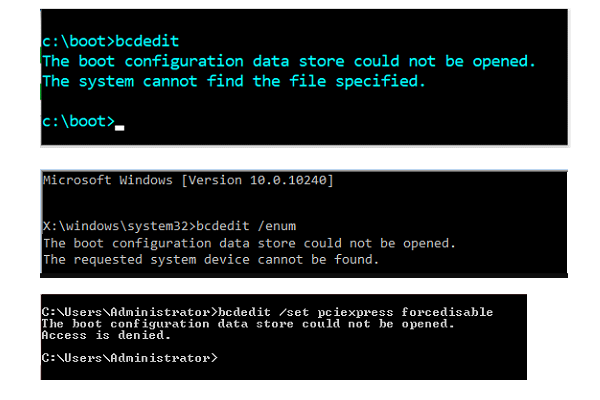
In addition, the bcdedit: The boot configuration data store could not be opened error is not exclusive to Windows 10 and it’s confirmed to occur on Windows 7/8/8.1. The error may slightly vary in different situations. Here are 3 main cases when the error occurs:
- The boot configuration data store could not be opened the system cannot find the file specified.
- The boot configuration data store could not be opened the requested system device cannot be found.
- The boot configuration data store could not be opened. access is denied.
What Is Boot Configuration Data (BCD)
Boot Configuration Data (BCD) store is a vital important Windows component where the Windows boot options are stored based on BIOS or UEFI boot mode computers. It provides a command, firmware-independent boot option interface. You can manage the BCD and boot options with administrator assign rights.
Once the BCD gets missing or broken, you may encounter various errors and issues such as Boot Configuration Data unreadable error 0xc000014c, Windows boot error 0xc0000098, Windows Boot Configuration error 0xc0000185, Windows boot error 0xc000000d, and so forth.
When it comes to the BCD errors, many people want to use the BCDEdit command to repair them. However, some of them encounter new errors like “the boot configuration data store could not be opened. access is denied.” So, we write the post to analyze all possible causes of the error and provide corresponding fixes.
What Causes The Boot Configuration Data Store Could Not Be Opened Error
What causes the Boot configuration data store not to open error? After investigating extensive user reports and posts, we find the error is mainly related to the following several reasons.
- The Command Prompt window doesn’t have administrator rights: As mentioned above, managing the BCD requires admin rights to access. If you are not running the bcdedit repair command as an administrator, you may encounter the “The boot configuration data store could not be opened. access is denied.” error.
- Boot Configuration Data files are missing or broken: It is the boot reason for the boot configuration data store could not be opened error. You can try rebuilding BCD to fix it.
- The boot mode is not the same as the partition table of your disk: If the boot partition type was set to different from the current boot mode, the bcdedit repair utility can’t work properly and throws the boot configuration data store could not be opened Windows 10 error.
How to Fix The Boot Configuration Data Store Could Not Be Opened Error
Here we summarize the following 6 methods to fix the “The boot configuration data store could not be opened the system cannot find the file specified” error. You can try them in order until the error gets solved.
# 1. Run Command Prompt as an Administrator
The bcdedit is a command-line utility that requires admin rights to manage the BCD. The “The boot configuration data store could not be opened. access is denied” error can occur if you run the command without admin access. Here’s how to fix it:
Note:
If your computer can’t boot normally due to the error, you can access Advanced Start Options (WinRE) first and run Command Prompt from WinRE.
Step 1. Type cmd in the Windows Search box, and then right-click the Command Prompt app from the top result and select Run as administrator.
Step 2. Click on Yes when you are prompted with the UAC window to open the elevated Command Prompt. Then you can run the bcdedit repair command again and see if the error disappears.
# 2. Change the Boot Mode
As discussed above, you need to make sure that the partition you boot from is the same type of boot mode (BIOS or UEFI). If not, the “The boot configuration data store could not be opened the requested system device cannot be found” error can occur. In this case, you can try changing the boot mode to fit your partition type. For that:
Step 1. Start your computer, and then hold the F2 and Delete hotkey before the computer is booted. By doing so, you will enter BIOS.
Note:
The BIOS hotkeys may vary from different PC manufacturers. Most modern motherboards use the Delete or F2 key. Usually, you can see a message on the Windows startup screen telling you to press which key to enter BIOS.
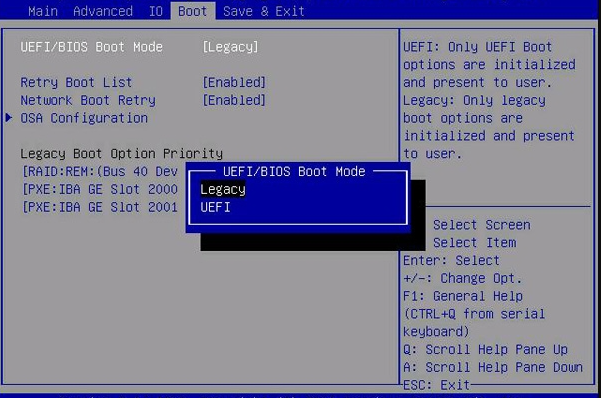
Step 2. Navigate to the Boot tab using the left or right arrow key and change the Boot Mode to the type that your boot partition was set for. If the partition table is set to MBR, you should select Legacy BIOS. If the partition is set to GPT, select the UEFI boot mode.
Step 3. Save and exit the BIOS setup window and restart your computer. Then you can try running the bcdedit command and check if the “The boot configuration data store could not be opened. the requested system device cannot be found” error gets fixed.
# 3. Change the Partition Type
In addition to changing the boot mode, you can also change the boot partition type so that it is compatible with the current boot mode. Here comes a new question – how to change partition type without data loss? MiniTool Partition Wizard can help you convert MBR to GPT easily and vice versa.
More importantly, the MiniTool program can help you fix the “bcdedit: The boot configuration data store could not be opened” error even your computer can’t boot normally. Here we will show you how to change the partition type using the MiniTool Partition Wizard Bootable Edition.
MiniTool Partition Wizard DemoClick to Download100%Clean & Safe
Step 1. Create a bootable CD/DVD/USB drive with MiniTool Partition Wizard media builder.
Step 2. Insert the MiniTool bootable media into your computer, and then enter BIOS just as we explain above, set the media as the first boot order, and press F10 and Enter to save the change. Then your computer will reboot with the media.
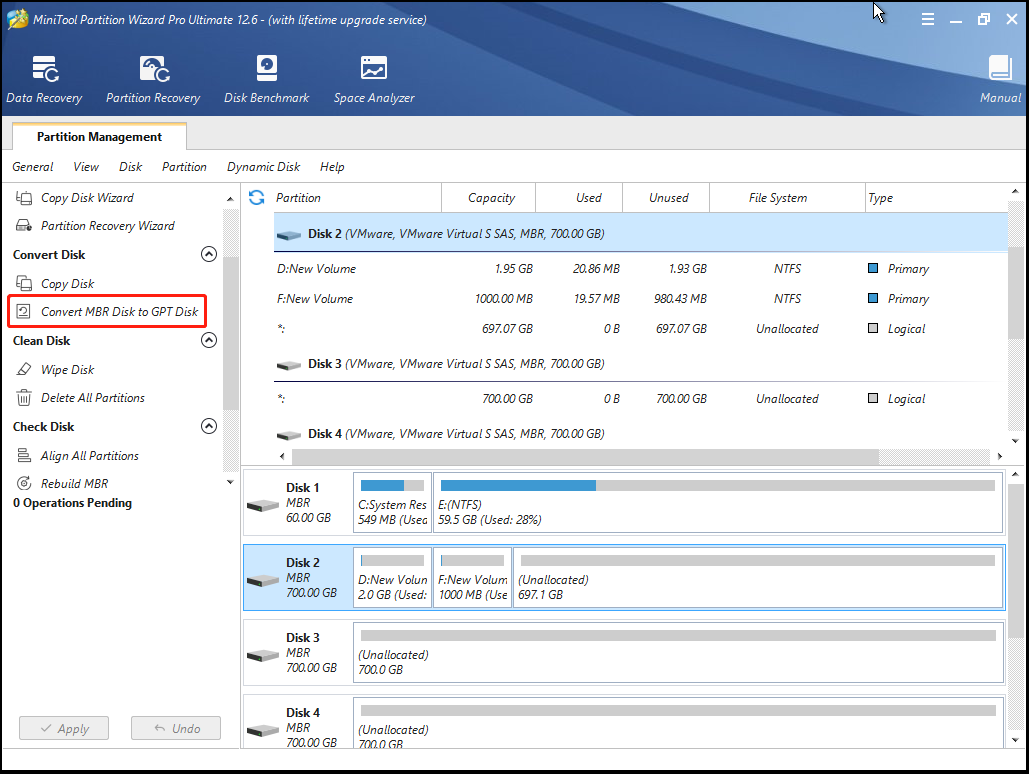
Step 3. In the main interface of the MiniTool software, select the disk that contains the boot partition and click on Convert MBR Disk to GPT Disk or Convert GPT Disk to MBR Disk from the left action panel.
Note:
Here you need to select according to your Boot mode. If your Boot mode is set as Legacy BIOS, you need to convert partition type to MBR. If the Boot mode is set as UEFI, convert the partition type to GPT. To know more differences between MBR and GPT, you can read this post.
Step 4. Click on Apply to execute the pending operation.
Step 5. Exit the MiniTool software, and then restart your system and press the F2 or Delete key at the startup screen to enter BIOS again, set your hard drive to the first boot order, and press F10 and Enter to save the change. Then your computer will restart from the selected disk.
# 4. Set an Entry Point in BCD
Some users reported that the error can be solved by setting an entry point in BCD. It may seem strange but worth trying. Here’s how:
Step 1. Open the elevated Command Prompt window as we explained in the first solution.
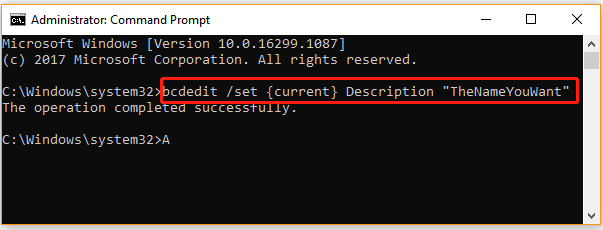
Step 2. Type the following command and hit Enter. The /set command will set an entry point and enable the system to trust the Windows version that is not trusted by default.
bcdedit /set {current} Description “TheNameYouWant”
# 5. Specify the BCD File
If the above methods can’t help you fix the boot configuration data store could not be opened Windows 10 error, you can try specifying the BCD file. This method is suitable for those who have dual-boot OS or multiple disks.
Step 1. Open the elevated Command Prompt window again and run the following command. This will show you a list of BCD options.
bcdedit /store c:BootBCD
Step 2. Chose to run the following command and restart your computer, and then immediately press F8 and choose into which OS to boot from the disk.
bcdedit /store c:BootBCD /set bootmenupolicy legacy
# 6. Rebuild BCD
If none of the above methods fix the “bcdedit: The boot configuration data store could not be opened” error, you can consider manually rebuilding BCD in WinRE. To do so, you need to use the Windows 10 media creation tool. Here’s how to do that:
Step 1. Plug the installation media into your computer and boot it from the media.
Step 2. Once started, click on Next > Repair your computer > Troubleshoot > Command Prompt in order.

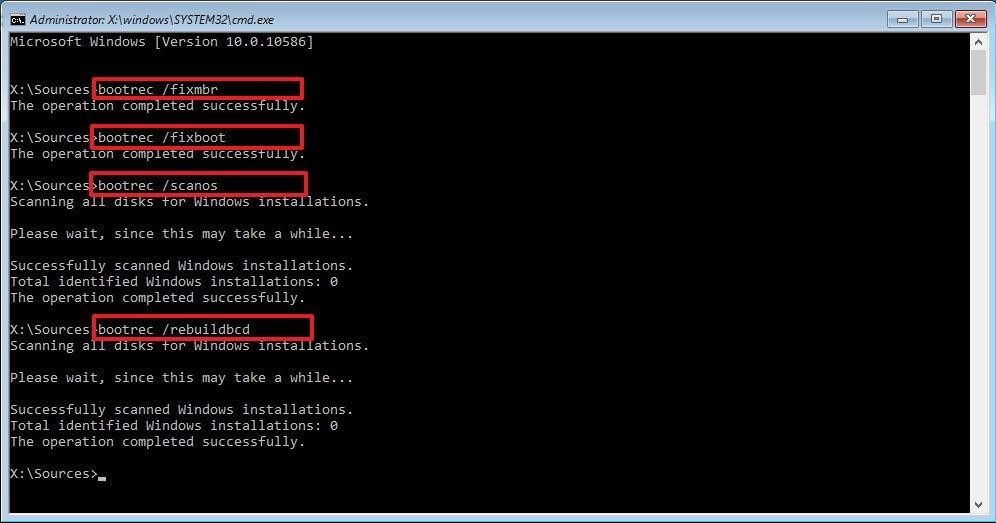
Step 3. In the elevated Command Prompt window, type the following commands in order and hit Enter after each one.
- bootrec /fixmbr
- bootrec /fixboot
- bootrec /scanos
- bootrec /rebuildbcd
When running the bcdedit command, I receive the “The boot configuration data store could not be opened the requested system device cannot be found” error. This post helped me fix it.Click to Tweet
Bonus Tip: Best Alternative to Clone Your Hard Disk Without Reinstalling OS
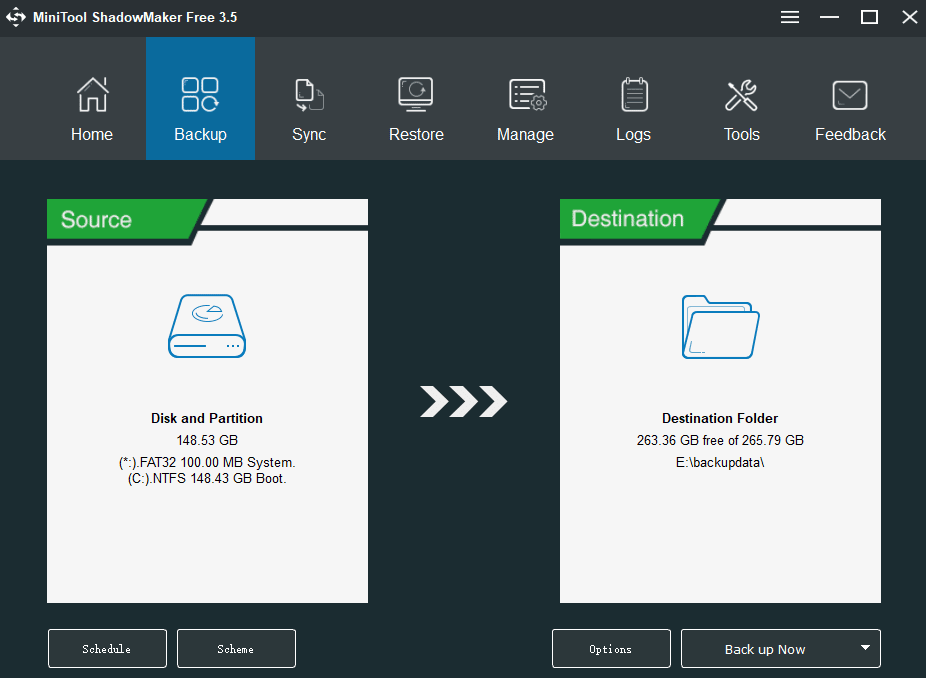
As mentioned above, the “The boot configuration data store could not be opened the system cannot find the file specified” error mainly occurs after cloning a disk to another disk using the Macrium Reflect. In addition to that tool, there are many other trusted disk clone tools like MiniTool ShadowMaker. It can not only be used to clone the whole disk without reinstalling OS but make system/partition/file backups.
MiniTool ShadowMaker TrialClick to Download100%Clean & Safe
What’s Your Opinion
Here comes the end of this post. If you have any other opinions about the boot configuration data store could not be opened Windows 10 error, write them down in the comment zone. Of course, you can send us an email to [email protected] for any difficulty using the MiniTool software.
Updated on Apr 28, 2025
The error «The Boot Configuration Data Store Could Not Be Opened» is quite common when dealing with BCD files executing «bcdedit.exe.» This error might prevent the system from booting if the BCD files are corrupted or misconfigured. As a result, you might also face problems such as:
- Being unable to access or change the BCD data.
- Challenging dual-booting or altering system settings.
- System instability.
BCD files are crucial for the proper booting of an operating system, and failure in execution can lead to issues with commonly encountered messages such as:
- «The boot configuration data store could not be opened; the system cannot find the file specified.»
- «The boot configuration data store could not be opened; the requested system device cannot be found.»
- «The boot configuration data store could not be opened. Access is denied.»
So, if you also have encountered one such error, you are in the right direction. Continue reading this article to fix the Boot Configuration Data store that could not be opened.
Refer to the table given below to get a brief idea about the methods that you are going to implement, their efficiency as well as the difficulty level of each one of them.
| Solutions | Efficiency | Difficulty |
| Run the Command Prompt | 👍High — Efficient for resolving BCD issues once administrative privileges are granted. | ⭐Low — Basic administrative tasks. |
| Use the Boot Repair Tool | 👍High — Effectively handles various BCD issues, including missing or inaccessible files. | ⭐Low — User-friendly, no advanced technical skills required. |
| Change the Boot Mode | Moderate — Resolves issues related to boot settings alignment and conflicts between UEFI and Legacy/CSM modes. | Moderate — Involves accessing BIOS/UEFI settings, which may vary by manufacturer. |
| Change the Partition Style | 👍High — Solves compatibility problems and ensures proper recognition of the BCD store. | Moderate — Utilizes a tool like EaseUS Partition Master and is beginner-friendly. |
| Specify BCD File | Moderate — Allows precise BCD file location definition, ensuring the system can access it correctly. | ⭐Easy — User-friendly tool used to access BCD files correctly. |
| Rebuild BCD | 👍High — Manually rebuild the BCD in cases where other methods fail. | Moderate — Involves using Windows Recovery Environment (WinRE) and executing advanced commands in Command Prompt. |
The next are the specific instructions for each approach shown in the above table. You can also share this guide with other friends who are also searching for the solutions to fix the boot configuration.
Method 1. Run the Command Prompt as Administrator
The command-line tool «bcdedit» needs admin privileges to manage the BCD. Using this method, you may raise your privilege in Command Prompt and run «bcdedit.exe» with administrator permissions to fix the «Boot Configuration Data Store Could Not Be Opened» problem. Here is how you can do it:
Step 1. Right-click the Start button.
Step 2. Select «Command Prompt (Admin).»
Step 3. Retry the ‘bcdedit.exe’ command to check if the problem persists.
Method 2. Use the Boot Repair Tool
A boot repair tool may resolve several BCD-related problems, including missing or unreachable boot BCD files. EaseUS Partition Master, a flexible software program, can help you manage BCD-related problems. It has a great «Boot Repair» function that can deal with several BCD exception issues, such as situations in which the boot BCD file is missing or unable to be located.
You can download EaseUS Partition Master and quickly fix the «The boot configuration data store could not be opened» problem, both easily and quickly.
Step 1. Start EaseUS Partition Master after connecting the external drive/USB to your computer, go to «Bootable Media,» and click «Create bootable media.»

Step 2. Select an available USB Drive or CD/DVD and click «Create.» You can also burn the Windows ISO file to the storage media.

Step 3. Connect the created bootable drive to the new computer and reboot the computer by pressing and holding F2/Del to enter the BIOS. Then, set the WinPE bootable drive as the boot disk and press F10 to exit.
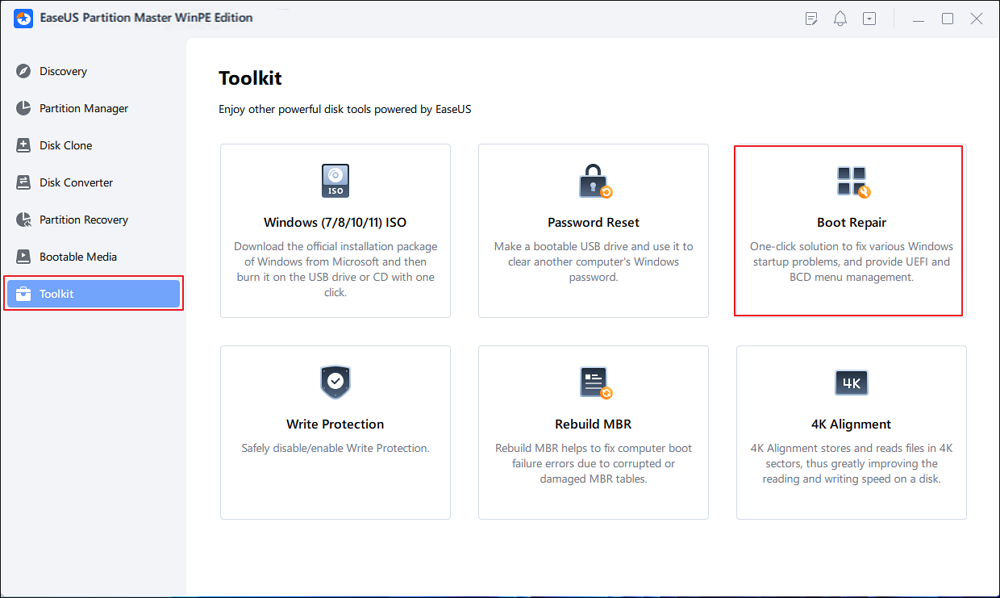
Step 4. Boot the computer again and enter the WinPE interface. Then, open EaseUS Partition Master and click «Boot Repair» under the «Toolkit» option.
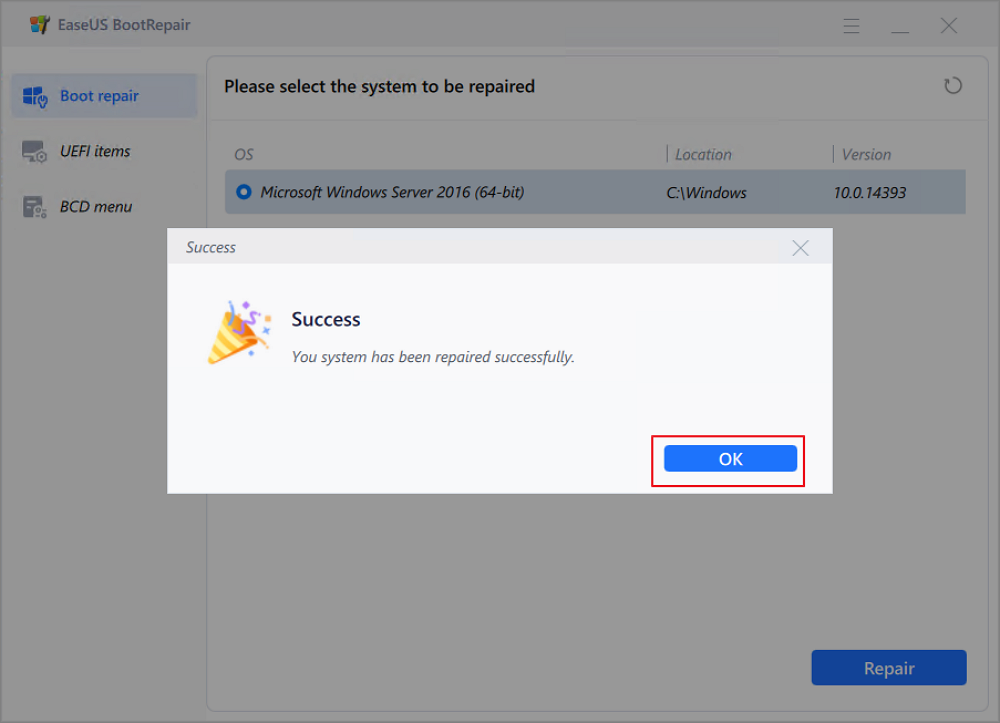
Step 5: Select the system you want to repair and click «Repair.»
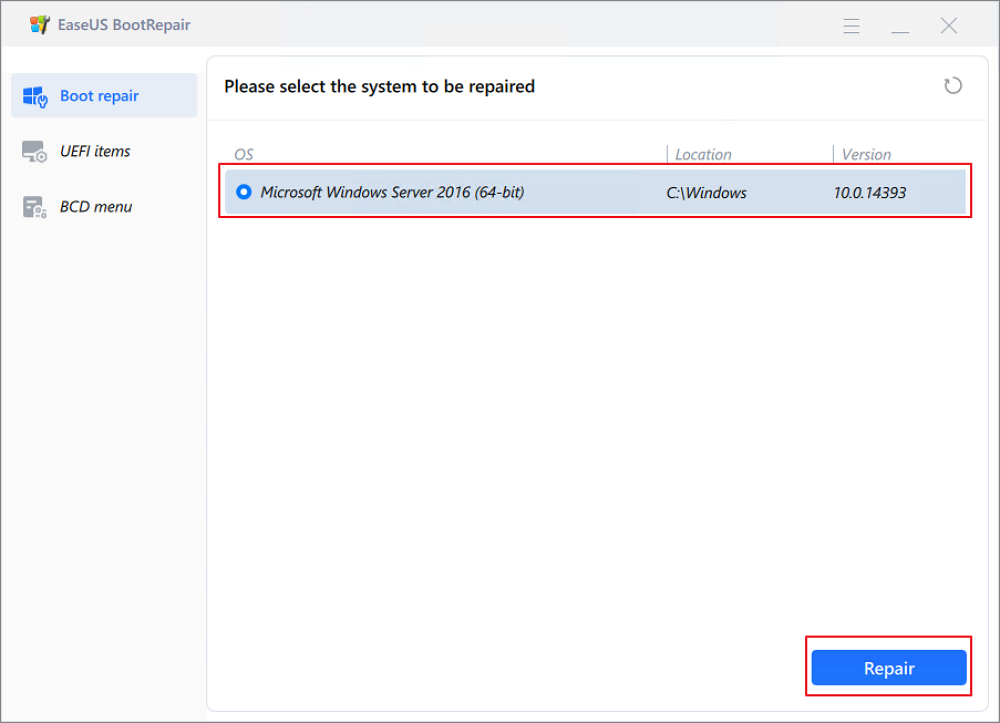
Step 6. Wait a moment, and you will receive an alert that the system has been successfully repaired. Click «OK» to complete the boot repair process.
⭐Contact US
For comprehensive support or further details on any part of the process, our dedicated team is here to provide individualized assistance:
EaseUS experts are available to provide you with 1-on-1 manual services (24*7) and help fix Windows boot error, BSOD or computer boot loop issues. Our experts will offer you FREE evaluation services and efficiently diagnose and resolve system boot failure, Windows stop codes and OS lagging issues using their decades of experiences.
- 1. Fix BSOD — blue/black screen of death error due to Windows update or other reasons.
- 2. Get rid of Windows boot error such as no bootable device found, or BCD file corruption.
- 3. Serve to fix 0X000_error codes on Windows system or OS boot loop issues.
Other errors that EaseUS Partition Master can fix:
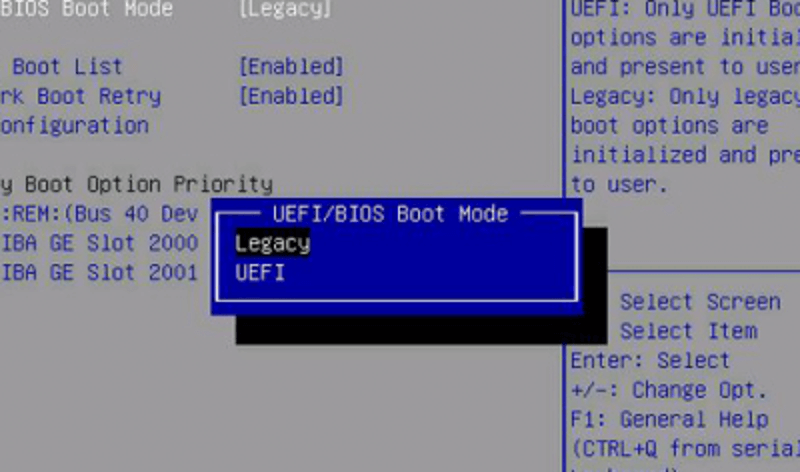
Method 3. Change the Boot Mode
Switching the boot mode might be helpful when receiving the «Boot Configuration Data Store Could Not Be Opened» issue since it can realign the system’s boot settings and eliminate potential conflicts.
Step 1. Restart your computer.
Step 2. Access BIOS/UEFI settings (typically by pressing a key like F2, F12, Del, or Esc during boot).
Step 3. Find the «Boot» or «Boot Options» section.
Step 4. Switch between UEFI and Legacy/CSM boot mode.
Step 5. Save changes and exit BIOS/UEFI.
Step 6. Let your computer boot into Windows.
Step 7. Reattempt the ‘bcdedit.exe’ command.
Method 4. Change the Partition Style
Converting from MBR to GPT or vice versa can assist in resolving compatibility difficulties and guarantee that the boot configuration data store is suitably recognized. On top of that, the EaseUS Partition Master, a flexible disk management tool, makes it simple for you to complete this process.
The MBR (Master Boot Record) and GPT (GUID Partition Table) partition styles can be switched using EaseUS Partition Master. The effortless transition ability between these two partition methods makes this tool significant in fixing the problem.
Here’s how to go about it:
Step 1. Download and launch EaseUS Partition Master on your computer.
Step 2. Go to Disk Converter, select «MBR => GPT» and click «Next» to continue.

Step 3. Select the target MBR disk that you tend to convert to GPT, and click «Convert» to start the conversion.

Once you have changed the partition style with the help of this tool, check if the issue has been solved. In most cases, this method proves to be very useful. So, if you haven’t tried this method yet, go to your browser and download EaseUS Partition Master and see how effortlessly it can solve your problem.
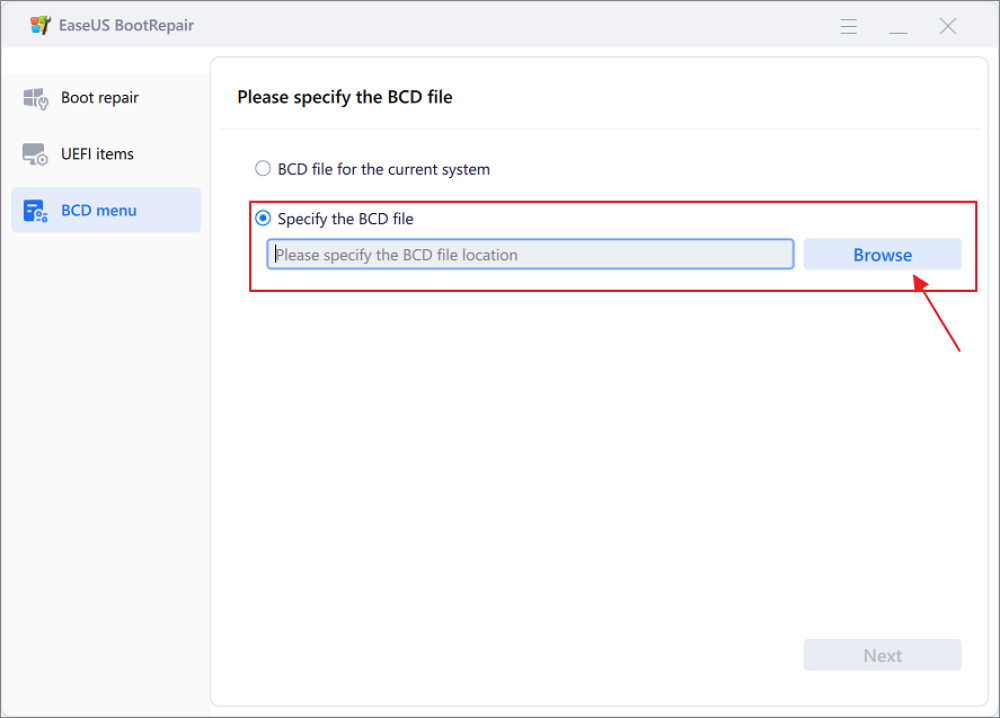
Method 5. Specify BCD File
This allows you to explicitly define the location of the BCD (Boot Configuration Data) file, guaranteeing that the system can locate it correctly when you face the «The boot configuration data store could not be opened; the system cannot find the file specified» error.
Using the EaseUS Partition Master, a comprehensive Windows boot repair tool, you can complete this process effectively. The BCD menu in EaseUS Partition Master allows you to designate where the BCD file is located.
Method 6. Rebuild BCD
Using Windows Recovery Environment (WinRE) and the Windows 10 installation disc, you may manually rebuild BCD if the previous ways don’t work to fix the «bcdedit: The boot configuration data store could not be opened» problem.
Here are the steps you can follow to handle BCD-related problems successfully:
Step 1. Start your PC from the Windows 10 installation disc by inserting it.
Step 2. Once the Windows setup begins, select «Next,» then choose «Repair your computer,» followed by «Troubleshoot,» and finally, «Command Prompt.»
Step 3. In the elevated Command Prompt window, enter the following commands one by one and press Enter after each:
- bootrec /fixmbr
- bootrec /fixboot
- bootrec /scanos
- bootrec /rebuildbcd
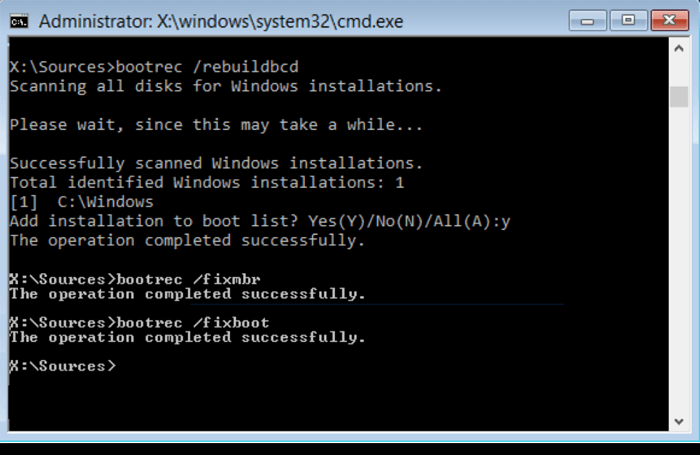
Step 4. After the process finishes, restart your computer and check if the error has been resolved.
If you found this article useful in resolving your issue, consider sharing it with friends who might benefit from these solutions.
Sharing knowledge can make troubleshooting easier for everyone! Also, don’t worry if you encounter the bootrec /fixboot error, here is a tutorial article to help:
What Is Boot Configuration Data
In Windows operating systems, Boot Configuration Data (BCD) is a crucial system component. As it maintains crucial configuration parameters for the bootloader, it is crucial to the boot process. BCD instructs the machine on how to boot and load the operating system.
Several boot-related issues, including the following, might arise when the BCD is damaged or has problems:
- It failed to open the boot configuration data storage.
- lt states, «Boot BCD is missing or corrupt.»
- Error: «The requested system device cannot be found.
- «When attempting to access BCD, access is denied.»
Now that you know what BCD is and the issues it might create continue reading to see why you could get the particular error message: «The BootConfiguration Data Store Could Not Be Opened.» If you like this tutorial, you can share it with others by clicking the social buttons below:
Why The Boot Configuration Data Store Could Not Be Opened
Look at a real example from the Microsoft community forum to see the context of the error.
For some reason, BCDedit won’t open for me now. I’ve used it before in Windows Vista to edit OS description names on my dual-boot (XP-Vista) system, but now when I go into the command prompt and type in BCDedit, it returns «The boot configuration data store cannot be opened. Access is denied.» I’m logged in as administrator (as I was the previous times that I had used it), but suddenly, it won’t open now.
This case is a perfect example of the problem many Windows users encounter.
So, continue reading to discover the underlying variables in the «Access is denied» problem.
- Lack of Command Prompt Window Privileges. Administrative rights are necessary to access BCDedit. The «Access is denied» issue may appear if the command prompt is not launched as an administrator.
- Missing Startup Configuration Data File. If the startup configuration data file is missing or damaged, Windows will encounter this issue because it cannot retrieve the essential boot data.
- Boot Partition Type and Disk Partition Table Inconsistency. When the boot partition type (MBR or GPT) and the disk’s partition table are incompatible, BCD access may be hampered, and errors may occur.
Conclusion
The «Boot Configuration Data Store Could Not Be Opened» error is frequent and distressing for Windows users. It may cause the boot process to fail and cause other issues.
However. the EaseUS Partition Master Tool is a highly effective and simple solution after examining other approaches to this issue, each with a different level of efficiency and complexity. It is the best option for quickly fixing this problem because of its Boot Repair tool, which speeds the processing of an array of BCD-related problems.
FAQs About The Boot Configuration Data Store Could Not Be Opened
Suppose you have any additional queries. The following sections contain responses to commonly asked questions regarding «The Boot Configuration Data Store Could Not Be Opened.»
1. How to fix BCD errors in Windows 10?
Fixing the BCD error in Windows 10 isn’t that challenging. Just follow the steps below, and you’ll be able to fix the issue in no time.
Step 1. Launch the Command Prompt as administrator.
Step 2. Run ‘bcdedit.exe’ to check for BCD errors and apply appropriate fixes.
2. How can the requested system device not be found?
You can fix the requested system device cannot be found error using the process below:
Step 1. Access BIOS/UEFI settings.
Step 2. Verify and adjust the boot device or partition settings to ensure the system device is recognized.
3. How do you repair BCD from the command prompt?
Repairing BCD from the command prompt is quick and effective. Follow the instructions , and you can repair BCD easily.
Step 1. Boot into Windows Recovery Environment (WinRE) using a Windows installation media.
Step 2. In the Command Prompt, execute ‘bootrec /fixmbr,’ ‘bootrec /fixboot,’ ‘bootrec /scanos,’ and ‘bootrec /rebuildbcd’ commands to repair the BCD.
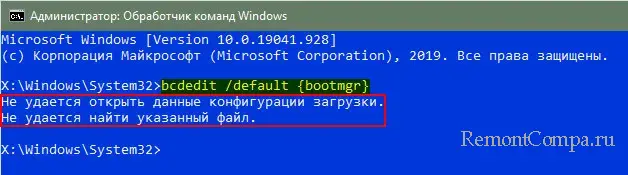
При редактировании параметров загрузки Windows 11, Windows 10 или других версии системы в командной строке с помощью bcdedit.exe вы можете столкнуться с ошибкой: «Не удается открыть данные конфигурации загрузки. Не удается найти указанный файл», в результате задать необходимые настройки не получается.
В этой инструкции подробно о том, как решить проблему для систем Windows с UEFI или Legacy загрузкой и отредактировать конфигурацию загрузки BCD с помощью bcdedit.exe в случае, если вы столкнулись с рассматриваемой ошибкой.
Указание данных конфигурации загрузки BCD при использовании bcdedit.exe
Ошибка «Не удается открыть данные конфигурации загрузки. Не удается найти указанный файл» возникает, когда bcdedit.exe не может автоматически определить, где хранятся данные конфигурации загрузки BCD, как правило, в Windows 11 или Windows 10 проблема возникает после использования некоторых сторонних программ, изменяющих параметры загрузки, например, добавляющих себя в меню.

Исправить ситуацию можно, вручную указывая путь к файлу BCD при выполнении команд bcdedit.exe. Сам файл находится в разных расположениях, в зависимости от того, какой тип загрузки используется: UEFI или Legacy.
Для Legacy-систем установленных на диск MBR:
- Файл конфигурации загрузки находится в C:\Boot\BCD
- Для изменения параметров конфигурации загрузки потребуется использовать следующий вариант написания команды:
bcdedit /store C:\Boot\BCD команда_изменения_параметров
- Также может иметь смысл указать, к какой загрузочной записи она применяется, обычно — к системе, загружаемой по умолчанию. Пример команды для данного случая выглядит следующим образом:
bcdedit /store C:\Boot\BCD /set {default} safeboot minimal
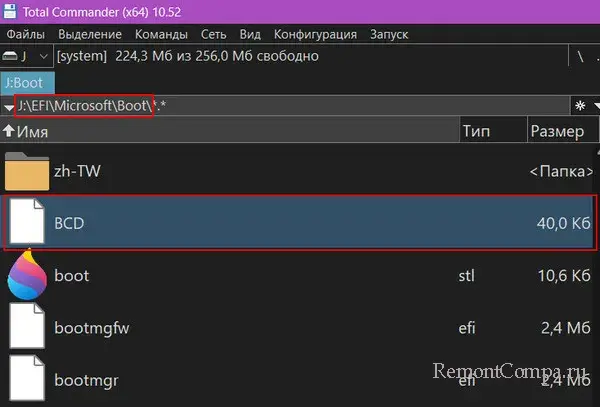
В случае с UEFI-системами конфигурация загрузки находится на скрытом разделе FAT32 по пути EFI\Microsoft\Boot\BCD и чтобы указать этот путь при выполнении команд предварительно потребуется назначить букву диска для этого раздела. Полностью путь будет состоять из следующих шагов:
- Запустите командную строку от имени администратора и введите команды
diskpart
list volume
- В списке томов посмотрите номер тома FAT32 с EFI-загрузчиком системы. Далее — N.
- Используйте команды (букву X можно заменить на другую букву диска):
select volume N
assign letter=X
exit

- Теперь для раздела с загрузчиком указана буква диска (в моем случае — X). И мы можем выполнять команды bcdedit следующим образом:
bcdedit /store X:\EFI\Microsoft\Boot\BCD команда_изменения_параметров
- Как и в предыдущем случае может иметь смысл указать конкретный пункт загрузки, к которому требуется применить параметры, обычно — {default}. Итоговый пример команды:
bcdedit /store X:\EFI\Microsoft\Boot\BCD /set {default} loadoptions DISABLE_INTEGRITY_CHECKS


После выполнения необходимых изменения, вы можете снова скрыть раздел с загрузчиком. Используйте шаги 1-3, заменив предпоследнюю команду на remove letter=X
В этой публикации, друзья, рассмотрим ошибку, возникающую при работе с консольной утилитой bcdedit.exe для редактирования загрузчика Windows — «Не удаётся открыть данные конфигурации загрузки. Не удаётся найти указанный файл». Ошибка означает, что утилита не может автоматически определить, где хранятся данные конфигурации загрузки BCD. Как быть при появлении такой ошибки?
Итак, рассматриваемая ошибка возникает, когда bcdedit.exe не может обнаружить данные конфигурации загрузки BCD. Хранятся эти данные в конфигурационном файле BCD. Соответственно, bcdedit.exe не может обнаружить этот файл BCD. А не может обнаружить его по причине того, что он удалён, повреждён или перемещён.
Файл BCD может быть удалён или повреждён в результате системного сбоя Windows, некорректных пользовательских действий или операций сторонних программ. В таком случае Windows у вас не будет загружаться, и с ошибкой вы будете сталкиваться при попытке восстановления загрузчика средствами bcdedit.exe с установочного носителя Windows или реанимационного WinPE. Восстановить загрузчик Windows можно разными способами, максимальный арсенал для решения этой задачи предусматривается LiveDisk’ом WinPE 11-10-8 Sergei Strelec. Смотрите эти способы в статьях сайта в зависимости от типа вашего загрузчика – EFI (в UEFI-системах) или MBR (в Legacy-системах):
- Восстановление MBR-загрузчика Windows с помощью Live-диска by Sergei Strelec;
- Восстановление загрузчика EFI-систем Windows с помощью Live-диска by Sergei Strelec.
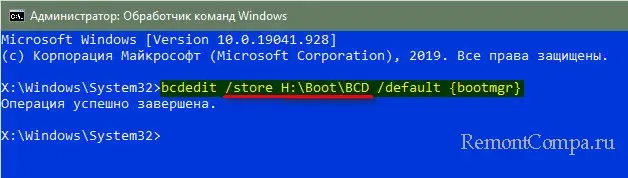
Если ранее на компьютере проводились операции с загрузчиком Windows с использованием сторонних программ, файл BCD мог быть перемещён в другое место. В этом случае можно тоже восстановить загрузчик (создать его заново). Как это сделать, приводится в указанных выше статьях. Но если Windows исправно работает, можно просто при работе с утилитой bcdedit.exe указывать путь к файлу BCD. Для этого в командах bcdedit.exe необходимо сначала указывать параметр /store, а далее через пробел вписывать уже непосредственно саму команду. Шаблон команд будет такой:
bcdedit /store путь к файлу BCD /команда
Пример:
bcdedit /store H:\Boot\BCD /default {bootmgr}Где /store H:\Boot\BCD – это указание пути к файлу BCD.
А /default {bootmgr} – это команда (в данном случае для установки загрузчика).
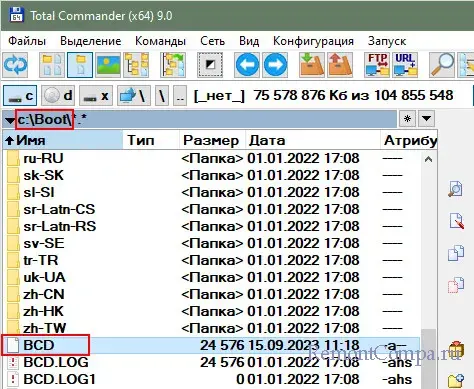
Но, друзья, как узнать путь к файлу BCD? В Legacy-системах, установленных на диск MBR, этот файл изначально расположен по пути:
- Раздел «Зарезервировано системой»\Boot\BCD;
- C:\Boot\BCD, если раздела «Зарезервировано системой» нет, и файлы загрузчика размещаются на диске С.
В UEFI-системах, установленных на диск GPT, файл BCD изначально расположен по пути:
- Шифрованный EFI-раздел\EFI\Microsoft\Boot\BCD.
Если файл BCD перемещался, его, соответственно, не будет по исходному пути размещения. И этот файл нам нужно искать через поиск в проводнике Windows или стороннем файловом менеджере. А как искать, если файл BCD скрыт?
В случае с размещением файла BCD на диске C, когда на MBR-диске нет раздела «Зарезервировано системой», необходимо в проводнике Windows установить отображение скрытых объектов. Если вы используете сторонний файловый менеджер, вы, соответственно, в нём включаете отображение скрытых файлов.
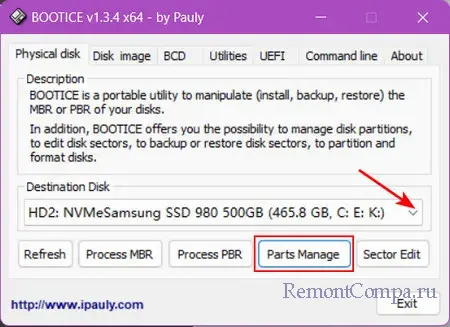
Если есть разделы «Зарезервировано системой» или шифрованный EFI, они обычно скрыты. Им для отображения в Windows необходимо присвоить букву. Это можно сделать, например, средствами бесплатной утилиты Bootice. В окошке утилиты выбираем диск, на котором размещается раздел «Зарезервировано системой» или шифрованный EFI. Жмём «Parts Manage».
Кликаем этот раздел. В обоих случаях это будет раздел небольшого размера. Шифрованный EFI-раздел будет с файловой системой FAT.
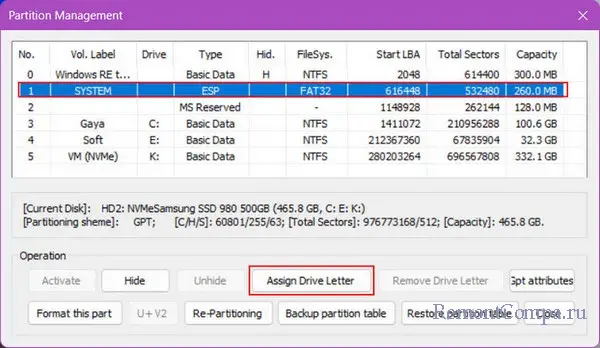
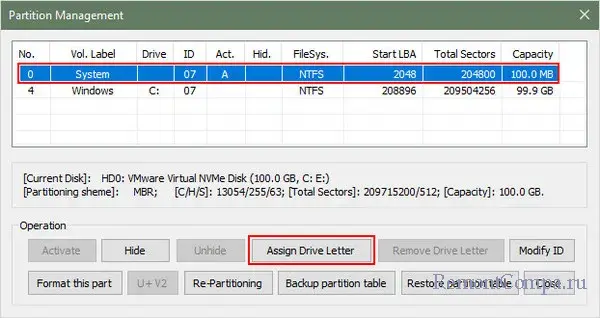
Раздел «Зарезервировано системой» будет с файловой системой NTFS, обычно размещается перед диском С. Жмём кнопку «Assign Drive Letter» для присвоения разделу буквы.
Можем взять букву по умолчанию.
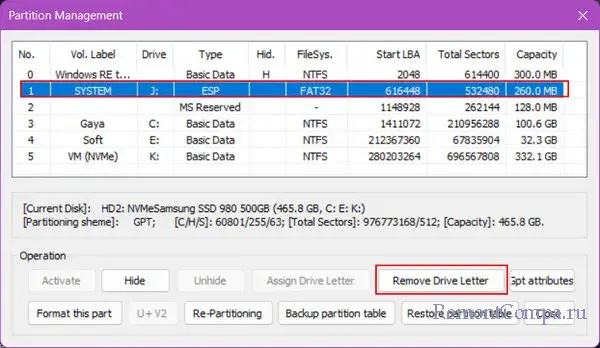
Впоследствии, по завершении работы с bcdedit.exe можем убрать букву раздела. Кликаем его и жмём кнопку рядом «Remove Drive Letter» для удаления буквы.
Друзья, после присвоения буквы разделам «Зарезервировано системой» или шифрованному EFI проводник Windows может не предоставлять доступ, требуя внесения настроек безопасности. В таком случае используйте сторонний файловый менеджер. Например, Total Commander беспрепятственно предоставляет доступ к содержимому этих скрытых разделов.
И ещё. Будьте внимательны при указании пути к файлу BCD. При указании неверного пути мы также получим ошибку «Не удаётся открыть данные конфигурации загрузки. Не удаётся найти указанный файл».
The Boot Configuration Data or BCD files have the instructions required by the Windows operating system in order to properly boot the computer. So if you experience any trouble when you boot your computer, then it is possible that it is due to some misconfiguration or even corrupted Boot Configuration Data files. And if you also encounter an error saying,
“The boot configuration data store could not be opened”
while you try to carry out any command on the bcedit.exe, then you’ve come to the right place as this post will guide you on how you can fix this error in Windows 10.
This kind of error could pop up if the system is not able to locate the specified file. It is also possible that the requested system device can’t be found or that the boot configuration data store could not be opened. In addition, when you open the System Configuration or MSConfig, you might notice that there is no Boot data, and according to the reports, is that when you try to dual boot the computer, the installer will replace the default bootloader.
Explanation
In case you don’t know, Windows’ earlier versions were stored in the “Boot.ini” file. You can find the entry in the EFI firmware boot manager of the EFI-based operating system which is located at EFIMicrosoftBootBootmgfw.efi.
Whatever the cause of the error is, there are several suggestions you can check out to resolve the problem. You can try to set an entry option value in BCD or enable the Advanced options menu, as well as rebuild the BCD. Before you proceed with the troubleshooting options provided below, make sure that you boot your computer into the Advanced Recovery Mode first since that’s where you can find Command Prompt under the Advanced Options. In addition, you also have to suspend or disable BitLocker and Secure Boot on your PC.
Option 1 – Try to set an entry option value in BCD
- Once you’re in the Advanced Options, select Command Prompt.
- Next, execute this command to set an entry point: bcdedit /set {current} Description «TheNameYouWant»
- After the command has been executed, it will enable the system to trust a version of Windows that is not trusted by default. This should fix the problem, if not, follow the next given options below.
Option 2 – Try to specify the BCD file
- In the elevated Command Prompt, execute this command: bcdedit /store c:BootBCD
- Once done, the command will give you a list of options and then execute this next command: bcdedit /store c:BootBCD /set bootmenupolicy legacy
- After that, restart your computer and select your Windows and then tap the F8 key right away.
Note: When you select the legacy option, the Advanced Options menu will be available during the computer boot up and then you can select into which operating system you can boot your computer into.
Option 3 – Try to rebuild the BCD files
The first thing you can do to resolve the issue is to Rebuild Boot Configuration Data or BCD files.
- You can start by booting into the installation environment for Windows 10 from an installation media.
- After that, click on Repair your computer and on the blue screen, select Troubleshoot and then select the Advanced options menu.
- From there, select Command Prompt and once you open it, enter each one of the commands given below by sequence.
- bootrec /FixMbr
- bootrec /FixBoot
- bootrec /ScanOS
- bootrec /RebuildBcd
- Once you’re done executing the commands given above, type “exit” to close the Command Prompt window and then restart your computer and see if it fixed error code 0xc000014c.
Do You Need Help with Your Device?
Our Team of Experts May Help
Troubleshoot.Tech Experts are There for You!
GET HELP
Troubleshoot.Tech experts work with all versions of Microsoft Windows including Windows 11, with Android, Mac, and more.
Share this article:
You might also like
DOTA2 involves teams of five players each, where each player chooses a “hero” character. Each game has two teams pitted against each other, on opposite sides of a map. Once you start, you and your teammates try to level up by fighting and defeating heroes from other teams as well as non-player characters who exist within the game universe. Once you have a strong enough team, you would then try to attack an opposing team’s base. If you destroy their “ancient,” your team wins.
The teamwork and interactivity required to play the game are some of its biggest attractions. You can text and voice chat as part of the Dota 2 gameplay, enabling you and your team to come up with strategies to take over your opponents’ base and fortifications. For this reason, a properly working microphone and headset are important if you are to get the most out of this exciting online game. However, there are many times when you find that there are audio dropouts when you try to speak into your microphone. The question “How do I get my mic to work on Dota 2?” is one of the most commonly asked on gaming forums related to this game.
Here are solutions for why this can happen:
-
You are logged in to another computer that is running the STEAM client
While entirely rare, there are cases where the microphone in Steam is disabled because the same account is active and in use on a different computer. It may not notify you that your account is in use elsewhere. If this is the error, try to log out on other devices and then test it on only one system. If you cannot access the other computer that has access to your account, then change your password. This will automatically disconnect your Steam account from the other computer and let you enjoy voice chat in Dota 2 and other Steam games.
-
Your microphone is not properly set up in Dota 2
From the main Dota 2 menu, before you start a match, you can set up your microphone for voice chat.
At the top, left-hand corner, click the gear icon to open Settings
Select the AUDIO tab and ensure that the Sound Device and Speaker Configuration are set to default.
On the same tab, activate Voice (Party) and set your Push to Talk shortcut key for your team.
Select the appropriate Open Mic Threshold using the slider at the bottom of this tab to get your microphone recorded at a comfortable level. -
The Windows Audio Enhancements setting is turned on
If you still cannot get your microphone to work properly, then your problem could be Windows Audio Enhancement. It is possible to get your microphone to work with Dota 2 by disabling these features.
Right-click your volume icon on the system tray and select Recording Devices.
Choose your active microphone then click its Properties button.
On the Microphone Enhancements tab, make sure the checkboxes marked Voice enhancements and Acoustic Echo cancellation is unchecked
Reboot your PC and retry using your microphone to chat. -
Your audio drivers need to be updated
If you try all of the steps above and still have Dota 2 not recognizing your mic input update mic drivers by going in device manager and choosing update driver.
Read More
The MP4 MIME-type is a video type that is mainly configured in IIS or Internet Information console. It is the one that instructs a web browser to use the default video application when running MP4 files from websites. MIME which stands for Multipurpose Internet Mail Extensions which offers a way to identify files on the Internet-based on their format and nature. For example, when a content-type header value like MP4 is defined in an HTTP response, the browser can be configured to open the file with the proper plugin. However, there are some servers that don’t have an associated MIME type to support MP4 files and so they fail to play these files. In such cases, you will encounter the “Unsupported video type or invalid file path” error, especially when you use the Internet Explorer browser in Windows 10. To fix this problem, you may have to configure the MP4 MIME type in IIS but you might find that IIS is not enabled in Windows 10 which is why you need to turn it on or enable it first. For more details, refer to the following instructions below.
Step 1 – Enable IIS:
- Open Control Panel and go to Programs > Programs and Features.
- From there, select “Turn Windows features on or off” to mark its checkbox.
- After that, select “Web Management Tools” and expand its menu and look for “IIS Management Console”.
- Click the OK button and then wait for a couple of seconds to allow Windows to successfully apply the changes made.
Step 2 – Configure the MP4 MIME type in IIS:
- Go to Control Panel and from there, access Administrative Tools.
- Next, click “Internet Information Services Manager” from the list of given options.
- Once confirmed, it will open the IIS console where you have to click the name of your IIS Server located on the left panel. This will enable several options in the central details section.
- Now double click on the icon with the label “MIME Types”.
- After that, you should see an “Add” link option on the right panel. Click on the link to open a configuration dialog box.
- Then type “.mp4” in the File Name Extension field and enter “video/mp4” in the textbox of the MIME Type.
- Click the OK button to save the changes made. This should fix the “Unsupported video type or invalid file path” error on your Windows 10 computer.
Step 3 – Reset your browsers:
Mozilla Firefox
- Open Firefox and click the icon that looks like three stacked lines located at the top-right section of the browser.
- Next, select the question mark icon from the drop-down menu.
- Then select “Troubleshooting information” from the slide-out menu.
- After that, click on the “Reset Firefox” button located at the top-right section of the newly opened web page.
- Now select “Reset Firefox” in the confirmation pop-up window that appears.
Google Chrome
- Open Google Chrome, then tap the Alt + F keys.
- After that, click on Settings.
- Next, scroll down until you see the Advanced option, once you see it, click on it.
- After clicking the Advanced option, go to the “Restore and clean up option and click on the “Restore settings to their original defaults” option to reset Google Chrome.
- Now restart Google Chrome.
Internet Explorer
- Launch Internet Explorer.
- Next, click the wrench icon for Settings.
- Then click Internet Options.
- After that, go to the Advanced tab.
- From there, click the Reset button. This will reset Internet Explorer’s settings to their default condition.
- Now click OK to save the changes made.
Read More
Error Code 10 — What is it?
Error code 10 is a type of Window Device Manager error code. This error code is generated when the Device Manager can’t start the hardware device or is experiencing device driver issues. It is displayed in the following format:
«This device cannot start. (Code 10)»
You can access complete details about error codes related to Device Manager such as code 10 through the Device Status area in the Device Properties.
By accessing Device Status, you can easily view the status of each device and learn about the specific device that could be causing the problem.
Solution
Error Causes
Error code 10 can be triggered due to several reasons. These include:
- Outdated drivers
- Corrupted drivers
- Incompatible drivers
- Device configuration issues
- Hardware compatibility problems
Device driver corruption can cause you great inconvenience and PC performance issues. The computer’s operating system relies heavily on device drivers to communicate with the hardware.
For example, the printer driver facilitates functioning of the printer. Similarly, the graphic card driver ensures proper video output on the monitor screen.
However, your PC hardware, such as printer or keyboard, may stop functioning properly if their device drivers become outdated or corrupt. Therefore to avoid inconvenience and to ensure your PC works properly, it is important to resolve the problem immediately without any delay.
Further Information and Manual Repair
To repair error code 10, you don’t have to be a technical whiz or hire a professional computer programmer. Here are some of the best and easy to perform DIY methods that can help you fix this device error in no time.
Method 1 — Reboot Your PC
Sometimes temporary problems in Device Manager can also generate code 10 error. Therefore it is advisable to restart your PC. Rebooting your system might fix the error. Try it! If it does, great, however, if the error still persists, then try other methods listed below.
Method 2 — Reinstall Drivers
Go through the Device Status in the Device Properties to view the driver causing the problem. If any driver is tagged with a yellow exclamation point, it means that driver is the one causing problems. Once identified, uninstall that driver and then reinstall it. This will hopefully resolve the problem.
Method 3 — Update the Device Driver
Whether the error code 10 is generated due to incompatible, corrupted, or outdated device drivers, simply update the device driver to resolve. To update the driver, go to the Device Manager, then click the driver tab in the device properties dialog box.
After that, click update driver. This will start the hardware update wizard. Then follow the instructions to update the driver on your PC. During this process, you may be prompted to provide the driver path.
If you don’t have it, then you will have to download the latest driver from the hardware vendor’s official website. This can be time-consuming and stressful.
Method 4 — Install DriverFIX
Another alternative is to install DriverFIX. It is a user-friendly device driver management software with an intuitive interface.
Its intelligent algorithm is designed to detect all the problematic drivers in seconds. It automatically updates and accurately installs appropriate drivers and ensures your PC runs at its optimum level in no time.
Click here to download DriverFIX on your system to resolve error code 10.
Read More
Many times we were talking and writing here on Errortools.com about security, privacy, hacking, identity theft, etc. We tried to raise important security questions and I hope I have managed to at least shed some light and change maybe some bad behaviors for some, helping them embrace better routines about their security on their PC.
In this light, I will today present you with one neat and awesome piece of software, a password manager worth your time and money (if you want premium features): BitWarden.
What BitWarden offers?
The first thing that it offers is the completely free basic plan, granted BitWarden is not an open-source project nor completely free but it has an unlimited free basic plan that will cover 90% of user needs. There is also a free basic unlimited plan for Organizations letting you and one more user share files and other stuff via BitWarden making it a cool option if you need it.
Premium features offer you encrypted sharing of files, two-step login, 1GB file attachments (encrypted), Bitwarden Authenticator (TOTP), Vault Health Reports, Emergency Access, and Priority Support. The cost for all of these additional features is 10 USD per year for an individual plan or 40 USD per year for organizations where you will get an increase of maximum users from 2 to 6. Yes, you read that correctly, only 10 USD per YEAR for the whole set of features. Granted if you do not need any of them, enjoy the free version forever.
Besides very low premium cost BitWarden will offer you compatibility with all major browsers and devices including both Android and iOS platforms making it a great cross-platform solution to login and maintain your passwords anywhere with just one click.
Once installed all you need to do is set one master password and be very careful not to lose or forget this one, if you do all of your other generated passwords will be lost forever.
Features
Secure Password Sharing
Share your encrypted data quickly and easily, and only with the users or teams who need access
Cross-Platform Accessibility
Access critical data in your Bitwarden vault from any location, browser, and device
Cloud-Based or Self-Host
Get up and running in minutes in the cloud or you can self-host Bitwarden for complete data control
Security Audit & Compliance
Open source and third-party audited, Bitwarden complies with Privacy Shield, GDPR, CCPA regulations
Vault Health Reports
Access insightful reports to reveal weak, reused passwords, and other helpful data security metrics
Directory Sync
Our powerful Directory Connector streamlines user and group onboarding and keeps them in sync
Always-On Support
Our Customer Success agents are available to support you around the clock
Detailed Event Logs
Bitwarden creates audit trails to help you keep track of user and group access to sensitive data
Flexible Integrations
Unite your existing systems with Bitwarden using SSO authentication, Directory services, or powerful APIs
Conclusion
There are many password managers out there but via recommendation I have tried BitWarden and truth to be told, I really never felt the need to try anything else, it is great at what it does and it is moving forward with features and it is constantly updated and maintained.
Read More
Support for Bluetooth hardware has always been included in the Windows 10 operating system for a long time now. And it just keeps getting better especially now with the support for the latest version of Bluetooth 5.0 LE. However, there are still times when Bluetooth experiences a couple of issues one of which is users were not able to turn on or off Bluetooth on their Windows 10 Pc since the option to turn Bluetooth off or on is missing in the Windows 10 settings app and even in the Action Center. So if you are one of the users who experience the same problem, read on as this post will guide you in resolving the issue.
To resolve this Bluetooth issue, here are some suggestions that could help:
Option 1 – Try running the Bluetooth Troubleshooter
As you know, Windows 10 has various troubleshooters with user-friendly interfaces where you can utilize them to fix issues in your PC. And since you’re dealing with some Bluetooth problem, you have to run the Bluetooth Troubleshooter.
- Open the Windows 10 Settings.
- Then go to Update & Security > Troubleshoot.
- You should find the option for Bluetooth on your right-hand side – click on it then click on the “Run the troubleshooter” option.
- Now follow the next screen options.
Option 2 – Try to reinstall or update the Bluetooth driver
The issue might have something to do with the Bluetooth drivers. It could be that it is outdated and needs to be updated or that you recently updated it and since then you have trouble removing the Bluetooth devices and so to fix the issue, you can update, roll back or uninstall the Bluetooth drivers. How? Follow the steps below.
- Tap the Win + X keys to open the Device Manager.
- Next, look for the Bluetooth device and right-click on it.
- Select the option “Update driver”.
- After that, a new popup window will appear. In there, select the option, “Search automatically for updated driver software”.
Note: Checking the update may take a few minutes so you’ll have to wait until it finishes. If it is able to find an update, you must install it. And if you want to reinstall the Bluetooth driver, just select the “Uninstall driver” option and follow the next on-screen instructions that follow.
Option 3 – Configure the Bluetooth Services
If the first two options didn’t work, the next thing you can do is configure Bluetooth Services. How? Simply follow these steps:
- Tap the Win + R key combination to open the Run dialog box.
- After that, type “services.msc” in the field and hit Enter to open the Windows Services Manager.
- You will then see a list of services and from there, look for the following services and make sure that their default values are set as follows:
- Bluetooth Handsfree Service – Manual (Triggered)
- Bluetooth Audio Gateway Service – Manual (Triggered)
- Bluetooth Support Service – Manual (Triggered)
- Bluetooth User Support Service – Manual (Triggered)
- Now click on the Start button to start all the aforementioned services and then check if you can now see the option to turn Bluetooth on or on.
Read More
In this post, you will be guided on how you can set up the USB tethering feature on your Windows 10 computer and share your mobile device’s mobile data so other devices can also access the internet. Tethering is usually known as Wi-Fi tethering which allows users to share mobile data to any device with Wi-Fi, laptops included. This is really useful especially when you have no other way to access the internet. For instance, if you are using a desktop computer and there is no way for you to connect to the Ethernet, and you have no Wi-Fi adapter that you can use to connect to a router as well, you can use USB tethering instead to access the internet. It is almost similar to Wi-Fi tethering except that it works over a USB connection instead of a Wi-Fi adapter.
USB tethering is almost quite the same as an Ethernet connection except that it’s faster compared to Wi-Fi tethering as well as Bluetooth tethering. Just like Wi-Fi tethering, USB tethering is free unless your network carrier has blocked it. Thus, it’s better if you make that clear with your operator. Once you have that covered,
Follow the instructions provided below to set up USB tethering on your Windows 10 computer.
Step 1: First, connect your mobile device to your Windows 10 computer using a USB cable.
Step 2: If it asks you to enable the file transfer feature, just cancel it. A prompt that says, “Tethering or Hotspot active—Tap to setup” should be available as soon as you get connected – tap on it.
Note: If there is no prompt, just go to Settings > Network and Internet > Hotspot and Tethering and from there, toggle on the USB tethering option.
Step 3: Afterwards, the setup will create a new network adapter in Windows 10 automatically and your computer should now be connected to the internet using USB tethering.
Note: You have to make sure that the Wi-Fi connection in your mobile device is turned off and if it is connected to an existing network, the USB tethering will be disabled but if you see its status as enabled, then the USB tethering setup is successfully done. In addition, keep in mind that the location of tethering can be different for every phone, especially on a customized operating system such as RealMe, Redmi, Samsung, and any other mobile device although they are clubbed in the section of Mobile and Data Network.
In case you encounter some problems when using USB tethering in your Windows 10 computer, there are troubleshooting tips you should follow. The NDIS-based Internet Sharing Device network adapter is what Windows 10 uses to make USB tethering possible so if it stops working, follow the options provided below.
Option 1 – Perform basic check
The first thing you can do if you encounter problems in USB tethering is to do a basic check like checking if Wi-Fi is enabled automatically as well as check if the USB cable is disconnected or if you’ve turned off USB tethering accidentally.
Option 2 – Try installing or updating the USB RNDIS adapter
RNDIS or Remote Network Driver Interface Specification can also help you resolve any USB tethering problem. If the pre-installed driver does not help you in connecting to the internet, then you can try installing the USB RNDIS driver that is, if it’s not installed yet. If it is already installed, you can try to update it instead.
- Tap the Win + R keys to open Run and type “devmgmt.msc” in the field and hit Enter to open the Device Manager.
- Next, expand the Network adapters section and look for the Remote NDIS based Internet Sharing Device. But if you are using a Samsung smartphone, you might see “Samsung” instead of under Network adapters.
- Right-click on it and then select the “Update driver” option.
- Then select the “Browse my computer for driver software” option.
- After that, select the “Let me pick from a list of available drivers on my computer” option.
- Now uncheck the checkbox for “Show compatible hardware”.
- From the given list on your left-hand side, look for Microsoft and then select the Remote NDIS based Internet Sharing Device on your right-hand side.
- Click on Next. A new popup will appear where you have to click on Yes. This will install the driver.
- Now click on the Close button and restart your computer.
Read More
After you fresh install Windows 10 on your computer, it allows you to set up a PIN just before you can start using it. However, a number of users reported that the Windows 10 installation gets stuck on the “Set up a Pin” phase. If you are one of the users who experience the same thing, then read on as this post will walk you through fixing the problem.
As users start to use their newly installed Windows 10 computer, they reported that the screen is still stuck even after they enter the correct PIN twice and there is no way for them to go forward or backward. Note that this is a part of the account setup and that your computer must stay connected to your internet connection before you finalize everything. And even though the PIN works when the computer is offline, the account setup still needs an internet connection, at least for a fresh installation.
The solution for this kind of issue is quite easy and there won’t be any problem even if your computer shuts down or restarts since the installation is already complete and all that’s left is the account setup. To fix this problem, follow the steps given below.
Step 1: The first thing you have to do is to turn off your internet connection or disable all connectivity from your computer.
Note: If you are using either an Ethernet cable or a Wi-Fi switch to connect to the internet, you have to disable or remove them. But if you don’t have any options, just completely turn off your internet connection.
Step 2: The next thing you have to do is to force your computer to shut down and then restart your computer. The setup process will eventually pick up exactly where it left off. The only difference is that there is no connection to the internet and your screen will no longer be stuck on the PIN setup screen so you now have the option to skip it and wait until you’re logged in for the first time.
Step 3: Once you’re done, you can then you can choose to Setup Pin later on and turn your internet connection back on or connect your computer with an internet connection.
Read More
myBrowser is a Potentially Unwanted Program that allows users to access the internet. This browser suggests users install other PUP like myfiles, myemail, and others.
This application claims to be a good reliable portable internet browser, however during our test use of the program several website scripts crashed and were not able to open up all the website assets required, leaving the users with a mediocre browsing experience.
While browsing the internet through this program, you might see additional ads and sponsored links injected into your search results and/or websites.
About Potentially Unwanted Applications
What is a Potentially Unwanted Program (PUP)?
Everyone has experienced it – you download and install a free application, you then notice some unwanted programs on your computer system, come across a strange toolbar on your web browser, or find your default search engine has been changed to something else. You didn’t set them up, so how did they turn up? Potentially Unwanted Programs (PUP), also referred to as Potentially Unwanted Applications (PUA), are programs that you never wanted in the first place and often come bundled with freeware software. Once installed, most of these applications can be difficult to eliminate and become much more of an annoyance rather than a necessity.
PUP doesn’t involve malware in the traditional sense. A basic difference between PUP and malware is distribution. Malware is commonly dropped by silent installation vectors such as drive-by downloads while PUP gets installed with the consent of the user, who knowingly or unintentionally authorizes the PUP installation on their PC. PUP developers may argue that their programs aren’t malicious software but they can still be dangerous software and put the computer at risk much the same way a computer virus does.
What do PUPs do on your PC, precisely?
Unwanted programs can be found in various forms. Usually, they will be found in adware bundlers that are known to utilize aggressive and misleading advertising. The majority of bundlers install many adware applications from several vendors, each of which features its own EULA policy. Safebytes Anti-malware entirely removes this threat and protects your PC against unwanted programs or malware infection. PUPS also appear in the form of undesirable toolbars or web browser add-ons. They may change your internet browser settings, monitor your surfing activities and online searches, take up a large amount of space on your monitor, and degrade your web browsing experience.
Potentially Unwanted Programs at times act quite similarly to computer viruses or spyware. They will often carry keyloggers, dialers, and other programs built inside them that may track you or send your sensitive details to third parties. Even if the PUPs aren’t basically malicious, these programs still do absolutely nothing good on your computer – they will take precious resources, slow down your PC, weaken your device’s security, making your PC more vulnerable to trojans.
Protect yourself from PUPs
• Read very carefully before you install anything. Do not click accept till you have read the fine print. There will probably be a clause about PUPs.
• Always select “Custom” or “Advanced” installation and never blindly click the Next button, which will let you uncheck any foistware software programs you do not want.
• Use an anti-PUP program. Security software like Safebytes Anti-malware provides the very best real-time protection against PUPs and also other malware.
• Be alert if you install freeware, open-source software, or shareware. Don’t install programs that appear suspicious or malicious.
• Always download software from reliable sources like official websites instead of untrustworthy sharing space. Stay away from file-hosting sites where/when possible.
Comply with these guidelines and you should more or less never get potentially unwanted programs on your PC
What To Do When You Cannot Install Safebytes Anti-Malware?
Malware could cause all kinds of damage once they invade your PC, from stealing your private details to deleting files on your computer. Some malware is designed to restrict or prevent things that you wish to do on your computer. It may well not let you download anything from the internet or stop you from accessing a few or all of the internet sites, particularly the anti-malware sites. So what you should do if malware prevents you from downloading or installing Safebytes Anti-Malware? Follow the instructions below to eliminate malware by alternate methods.
Make use of Safe Mode to fix the problem
If any virus is set to run automatically when Microsoft Windows starts, stepping into safe mode could very well block this attempt. Since only the minimal programs and services launch in Safe Mode, there are hardly any reasons for issues to occur. Below are the steps you need to follow to start into the Safe Mode of your Windows XP, Vista, or 7 computers (check out the Microsoft website for instructions on Windows 8 and 10 computers).
1) Hit the F8 key repeatedly as soon as your PC boots, but before the big Windows logo comes up. This will bring up the Advanced Boot Options menu.
2) Make use of the arrow keys to select Safe Mode with Networking and press ENTER.
3) When this mode loads, you should have the internet. Now, make use of your internet browser to download and install an anti-malware application.
4) Right after the software is installed, let the scan run to remove viruses and other threats automatically.
Obtain the antivirus software using a different browser
Some malware mainly targets specific web browsers. If this sounds like your case, make use of another internet browser as it might circumvent the virus. If you’re not able to download the security application using Internet Explorer, this means the virus is targeting IE’s vulnerabilities. Here, you should switch to another internet browser such as Chrome or Firefox to download the Safebytes program.
Create a bootable USB antivirus drive
Here’s another solution which is creating a portable USB anti-virus software package that can scan your system for malware without needing installation. Adopt these measures to run the anti-virus on the affected PC.
1) Download Safebytes Anti-Malware or Microsoft Windows Defender Offline onto a clean PC.
2) Plug in the pen drive into the uninfected computer.
3) Double click on the exe file to open the installation wizard.
4) When asked, choose the location of the USB drive as the place in which you want to store the software files. Follow the directions to finish the installation process.
5) Now, transfer the flash drive to the infected computer.
6) Double-click the EXE file to open the Safebytes tool right from the flash drive.
7) Click the “Scan” button to run a full computer scan and remove malware automatically.
SafeBytes Anti-Malware: Lightweight Malware Protection for Windows Computer
If you’re looking to download the anti-malware program for your computer, there are numerous tools on the market to consider however, you should not trust blindly anyone, irrespective of whether it is a paid or free program. Some of them do a good job in removing threats while some will ruin your computer themselves. You have to select one that is reliable, practical and has a good reputation for its malware source protection. On the list of strongly recommended tool by industry experts is SafeBytes Anti-Malware, a well known security software for Microsoft Windows.
SafeBytes is a powerful, real-time anti-malware application that is designed to assist the common computer user in safeguarding their computer from malicious threats. With its outstanding protection system, this tool will quickly detect and eliminate the majority of the security threats, which includes adware, viruses, browser hijackers, ransomware, trojans, worms, and PUPs.
SafeBytes anti-malware takes computer protection to a whole new level with its enhanced features. The following are some of the great features included in the software.
Live Protection: SafeBytes offers real-time active checking and protection against all known viruses and malware. It will continuously monitor your pc for hacker activity and also gives end-users superior firewall protection.
Best AntiMalware Protection: This deep-cleaning anti-malware application goes much deeper than most antivirus tools to clean your computer. Its critically acclaimed virus engine locates and disables hard to remove malware that hides deep within your computer.
Website Filtering: SafeBytes provides instant safety rating to the webpages you’re going to visit, automatically blocking unsafe sites and to make sure that you are certain of your safety while browsing the internet.
Lightweight Utility: SafeBytes is a light-weight application. It consumes a very small amount of processing power as it works in the background so you are free to use your Windows-based computer the way you really want.
Premium Support: You will get 24/7 technical assistance to quickly resolve any concern with your security application.
SafeBytes can keep your PC protected from the latest malware threats automatically, thus keeping your online experience secure and safe. Now you may realize that this tool does more than just scan and delete threats in your computer. If you’re looking for the very best malware removal tool out there, and if you don’t mind spending some dollars for it, opt for SafeBytes Anti-Malware.
Technical Details and Manual Removal (Advanced Users)
If you want to carry out the removal of myBrowser manually instead of using an automated software tool, you can follow these simple steps: Proceed to the Windows Control Panel, click on the “Add/Remove Programs” and there, choose the offending application to remove. In cases of suspicious versions of browser extensions, you can easily remove them through your web browser’s extension manager. You will most probably also want to totally reset your internet browser to its default settings.
Lastly, check your hard disk for all of the following and clean your Windows registry manually to remove leftover application entries after uninstalls. Please remember that only advanced computer users should try to manually edit the registry because incorrect file deletion leads to a major problem or even a PC crash. Moreover, some malicious programs have the capability to defend against its deletion. Carrying out this in Safe Mode is advised.
Read More
A lot of users connect to the internet are using VPN on their Windows 10 computers which means that their regions could be different from the actual region of their Windows 10 computers. Thus, if you are facing some issues in updating your computer in this kind of environment, specifically the Windows Update error 0x800F0922, you need to follow the tips given in this guide to help you resolve the issue.
When you encounter this kind of Windows Update error, you might see either of the following error messages on your screen:
“Windows could not search for updates, Code 0x800F0922 Windows Update encountered an unknown error”
Or:
“Windows failed to install the update with error 0x800F0922”
This issue might be caused by two possible reasons such as:
- VPN issues
- Not enough space on the System Reserved partition
To resolve the problem, here are some tips that might help:
Option 1 – Try disabling the VPN
As mentioned, if you are using VPN, this could be the reason why you’re getting the Windows Update error 0x800F0922 so the most obvious thing to do is for you to turn off the VPN and try to run the Windows Update once more. And if you use a VPN software that works using their software, you can just completely exit or log-off from its account. On the other hand, if you are using a built-in Windows 10 VPN, you can simply turn it off or delete all the settings you have created there. Although it’s understandable that you might have to use a VPN connection to connect to the work network, you really have to disable it at least until the Windows Update is no longer stuck in the error 0x800F0922. It would be best if you do this when you are not working.
Option 2 – Try to free up space in the System Reserved partition
The System Reserved partition is a part of the hard disk created when Windows is first installed on it. It is where the Boot Configuration Database, Boot Manager Code, Windows Recovery Environment, and the reserves space for the startup files are stored. And as mentioned early on, the error might be due to some insufficient space in the System Reserved partition so the next thing you can do is to increase the space in this partition. Note that it is a complex process so you need to make sure that you have made backups to all your data on the computer. So if ever something goes out of hand, at least you have copies of your important files in case you aren’t able to boot into the system at all.
Read More

Microsoft’s initial Windows 11 hardware requirements were not really well received by users and they were not really clearly represented from the start making a lot of potential customers slowly drift away from the hype.
It seems that Microsoft has acknowledged this since they have changed their tune about system hardware requirements for the upcoming Windows 11.
It seems that Windows 11 will be able to be officially installed on unsupported computers but with a little inconvenience.
What is a catch?
Windows 11 will still have the same hardware requirements and if the PC meets them, that computer will be officially supported, other ones (any that can run Windows 10) that do not meet system requirements can still run Windows 11 but the system will have to be clean installed. So no upgrade option for old computer users, just a clean install.
This means of course that you will need to download the ISO image and make a bootable USB in order to install it. Also since you will be doing a clean install do a backup of the hard drive since it will need to be formatted.
Also, Microsoft has stated that with unofficially supported PC some driver updates might not be delivered leaving you with either older driver versions or relying on your hardware manufacturer on them. This is still not confirmed by Microsoft, just stated as an option. We will see how it goes.
Conclusion
It is very good that Microsoft has reconsidered its system requirements and will not stubbornly push its initiatives over the top requirements allowing even older computers to install new OS.
I am sure over time lot of users will upgrade their hardware and drive into officially supported waters, but it is good that they will be able to use new OS on their current hardware.
Read More
Copyright © 2023, ErrorTools. All Rights Reserved
Trademark: Microsoft Windows logos are registered trademarks of Microsoft. Disclaimer: ErrorTools.com is not affiliated with Microsoft, nor claims direct affiliation.
The information on this page is provided for information purposes only.