
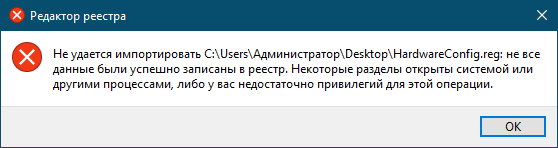
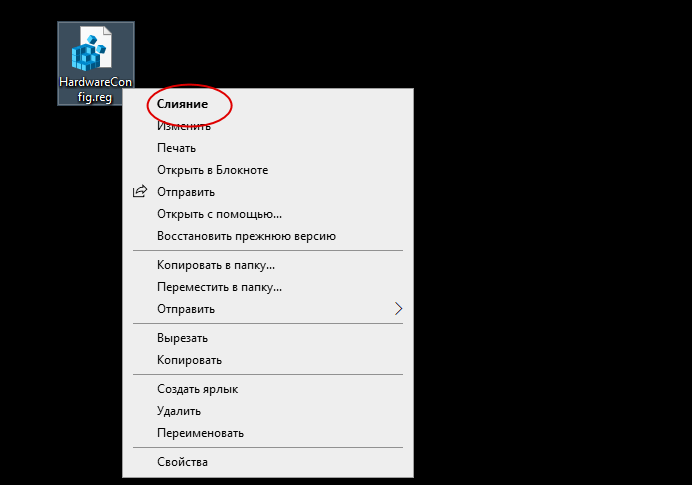
В интернете можно встретить немало инструкций, в которых в качестве решения предлагается использовать готовые твики реестра — текстовые файлы в формате REG. Когда вы запускаете такой файл, указанные в нём ключи и параметры заносятся в системный реестр, добавляя или перезаписывая уже имеющиеся данные. В большинстве случаев слияние выполняется без каких-либо проблем, однако, если вдруг перезаписываемый ключ окажется в данный момент используемым системным процессом или у вас как у пользователя будут отсутствовать на него права, что случается намного чаще, вы получите ошибку «Не удалось импортировать файл.reg: не все данные были успешно записаны в реестр».

В большинстве случаев сталкиваться с этой ошибкой приходится при попытке перезаписать либо же создать каталоги или параметры в ключах, владельцем которых является Система или TrustedInstaller. Если под рукой у вас имеется диск WinPE 10-8 Sergei Strelec, вы можете загрузить компьютер с него и внести изменения в реестр вручную с помощью встроенного в загрузочную среду спасательного диска редактора реестра, но это не самое удобное решение, поскольку REG-файл может содержать несколько записей. Обойти ограничения прав доступа при слиянии файлов реестра можно в работающей системе.

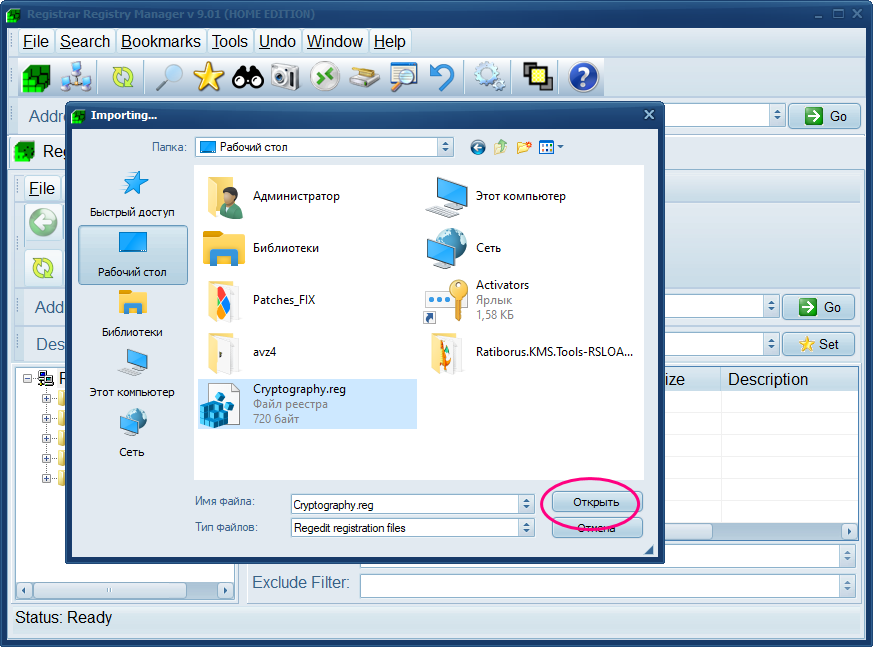
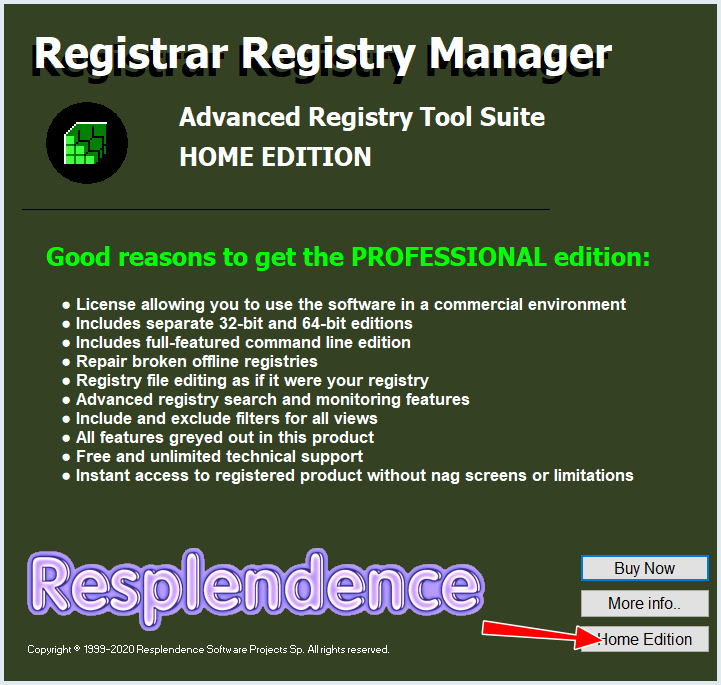
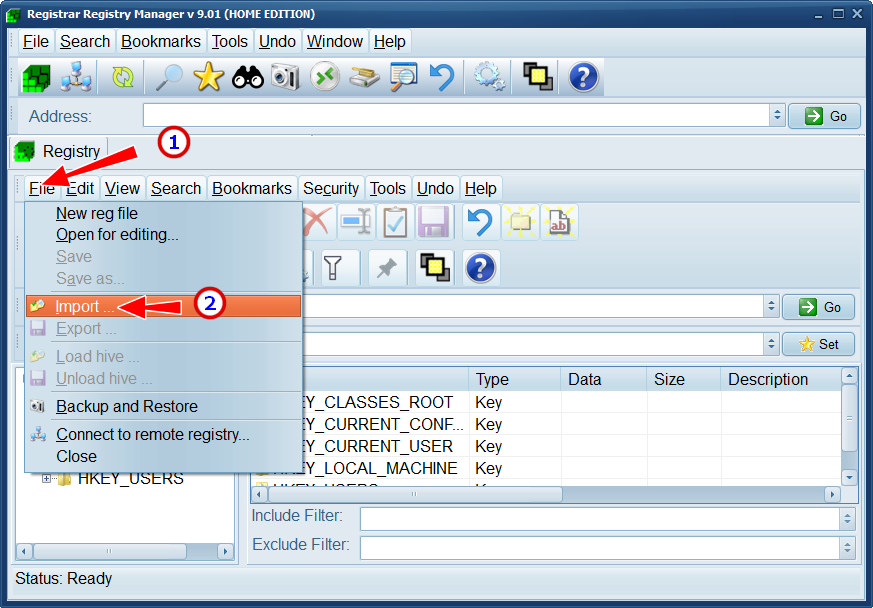
Скачайте и установите программу Registrar Registry Manager — комплексный инструмент для обслуживания, мониторинга и редактирования реестра. Запустив приложение, нажмите в приветственном окне «Home Edition», а когда откроется окно редактора, выберите в меню опцию File → Import. Обратите только внимание, что в Registrar Registry Manager два меню: вам нужно то, что ниже, второе. В открывшемся окне обзора укажите путь к импортируемому файлу реестра, записи которого будут добавлены в реестр без ошибки.


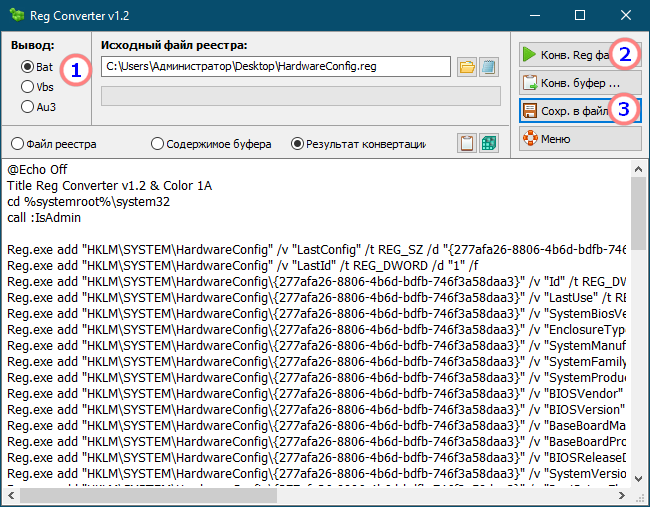
Второй способ столь же прост, но он требует больше шагов. Утилита ExecTI — полезный инструмент в арсенале администратора, она позволяет запускать программы с правами Системы и TrustedInstaller, но она не работает с REG-файлами. Проблемный файл реестра сначала придётся сконвертировать в командный файл CMD или BAT, воспользовавшись Reg Converter или аналогичной тулзой.
Получив на выходе «батник», запустите от имени администратора утилиту ExecTI, укажите путь к командному файлу и нажмите «OK». Тут же запустится командная строка с наивысшими правами, которая обратится к реестру уже не с правами администратора, а с правами системы или службы TrustedInstaller. В результате указанные в скрипте данные будут занесены в реестр без ошибки прав доступа.


Windows Registry is a critical database that stores information about the apps, services, and hardware used to run Windows. Power users often edit it to change OS or apps settings to make Windows function a certain way that isn’t possible otherwise. Well, even you can perform registry hacks on Windows 10 to customize how it works. But what if the registry editor cannot import a registry file on your Windows PC? That error can be puzzling.

The thing that is supposed to help us solve an error itself needs troubleshooting. Ironic. Well, I hope you’re ready with your sleeves rolled up because these solutions warrant your focus.
Disclaimer: We assume that you are well-versed with tinkering around the registry entries. If you don’t know your way around inspecting the .reg files, we do not encourage you to download and use registry files from random locations without understanding what they are for — such files can crash your PC or render it unusable.
Here are all possible solutions to solve when your registry editor cannot import a file and throws an error.
1. Precautions
We recommend you learn how to backup, restore, and edit registry files before moving ahead. It will help you troubleshoot errors in the future too, and tweak settings to get the most out of Windows OS. Note that these files are critical for the functioning of not just third-party and system apps, but the Windows operating system itself. Failure to take proper backups can result in a lot of trouble. You may have to reinstall the entire OS, and you don’t want that. Also, take a backup of your data in the cloud or on an external hard drive. And always use Safe Mode for such tasks.
2. File Format
Don’t download and import registry files from unknown or unsafe sources. That means stay away from shareware sites, torrents, and new or unknown sites. We are talking about system-level changes, and you certainly should not take it lightly. Also, make sure that the file is in the correct format and ends in .reg extension. Select the file, right-click on it, and choose Properties from the contextual menu to confirm its extension.
3. Blank Line
Are you viewing the ‘The specified file is not a registry script’ error while importing a registry file? Open the .reg file in Notepad or your favorite text editor and check whether the first line in the file is blank.
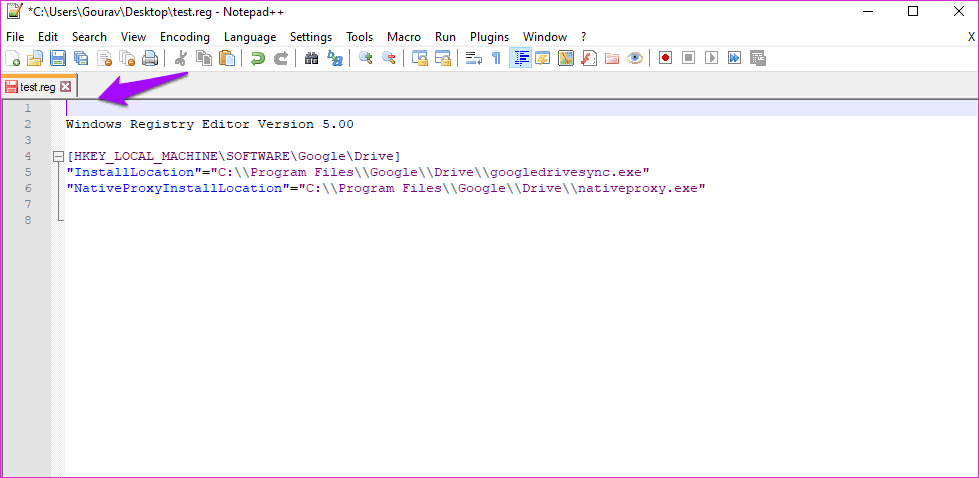
Remove the blank line if there is one, save the file, and try importing the file into registry editor again. Try not to tinker around with any values of the code in that registry unless you are sure about it.
4. Admin Rights
If you are using an office computer, you need to ask the IT administrator or your superior for granting admin rights to your user account. Only then can you edit or make changes in the registry editor that also involves importing registry files.
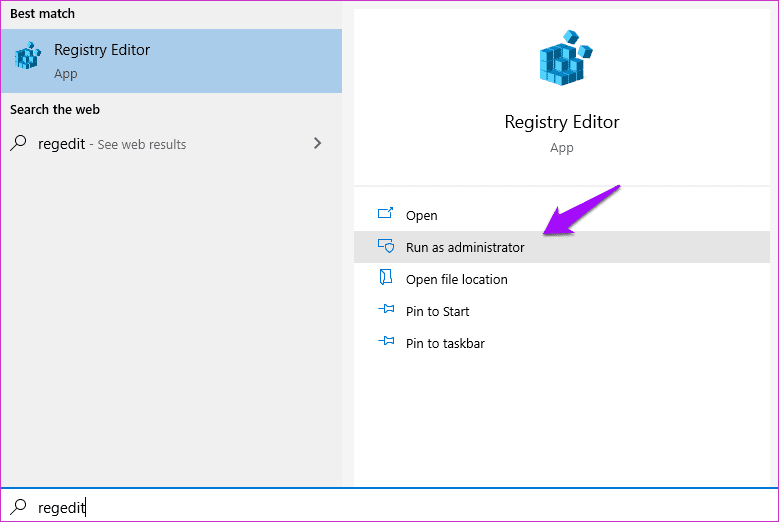
Are you using a personal computer? Open the registry editor from the Search menu with admin rights. Try importing that reg file again.
Note: The following fix is suitable for those using a multi-computer setup. The .reg file should be on the same computer as the one where you are trying to import it via the registry editor.
5. Registry File Location
Where does your computer save the registry files? That is an important question. Because importing registry files requires admin rights and access, the file should be saved in a drive where the user account has full access. Signing in with an admin user account on Windows is enough for a personal computer. You may need to contact the admin in case of an office/enterprise computer.
6. Grant Permission to Registry
Standard user accounts don’t have the permission to edit registry entries. Only Admin accounts have those privileges. To grant permission, launch the Registry Editor and drill down to the folder structure where you were trying to import the registry file.
As an example, I am using Computer\HKEY_LOCAL_MACHINE\SECURITY folder as I need to import a registry file in the Security folder, as shown in the screenshots below.
After you’ve navigated to the respective folder on your computer, click on Edit from the menu, and select Permissions.

Click on Advanced button on the pop-up that follows.

You will see a list of entries for different types of users with different levels of access. Find your username and make sure it has Full Control under the Access tab.
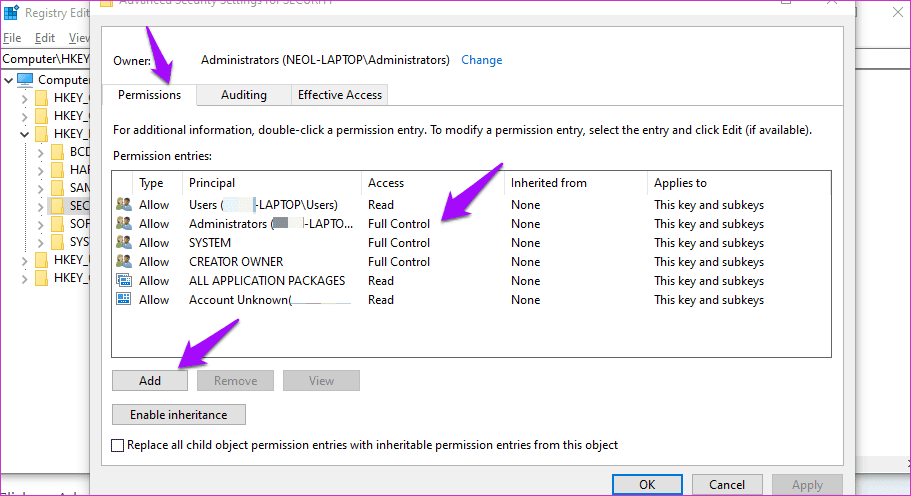
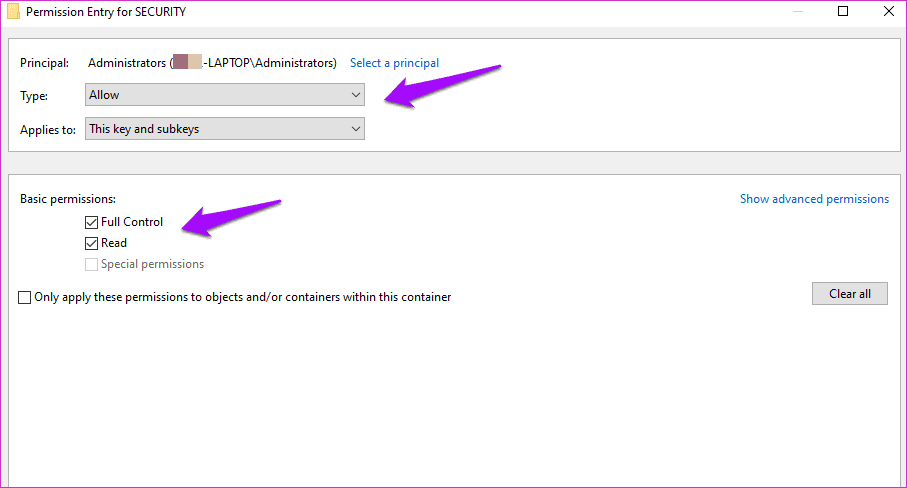
You can double-click on the entry to change access control or under the Permissions tab, click on Add at the bottom to create a new entry.
Select the top-level folder to give full access to all the folders and files (called keys and values technically) under it.
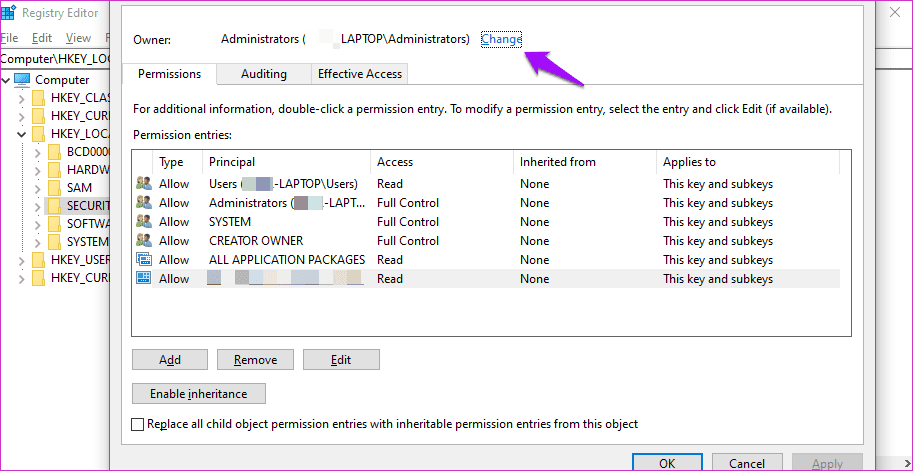
7. Take Ownership of Registry
Open Registry Editor again and click on Permissions under Edit.
You can choose a folder or sub-folder, right-click, and select Permissions option there too. The difference is that the changes will be applied to that folder and everything in it only. Otherwise, you are making changes to the parent folder from top to bottom. The rest of the steps remain the same.
Click on Advanced button.
Click on Change next to the Owner heading where you should see your admin account name.
Type administrators (plural and not singular which will cause even more errors) in the ‘Object name to select’ box and select Check Names to verify integrity.

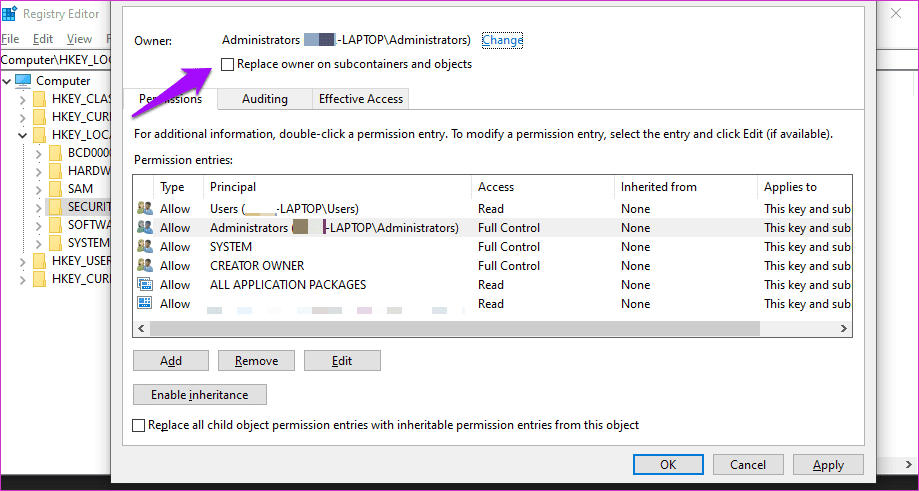
You should now see the Administrator account user name there.

You will be taken back to the previous screen when you click on OK. You should now see a new checkbox below the Owner. Select ‘Replace owner on subcontainers and objects’ box, and click on Apply and OK to save changes.
Your user account now should be able to make changes to the folder. Check if you can import files in Registry Editor or not.
Note: Depending on your computer, system configuration, and level of user account access, you may see a separate tab for Owner. The steps to take ownership will slightly differ in that case.
Register All Changes
I hope you were able to import that registry file after trying one of the solutions mentioned above. The registry editor is a complex tool and you mustn’t experiment or mess around with it — unless you know what you’re doing. Well, we still recommend you to take all the necessary precautions. I know I keep repeating that but still can’t stress this enough. Also, I urge you to use Safe Mode when making such changes.
Next up: Can’t fix or troubleshoot an error on your computer? Messed up the registry key? Click on the link below to learn how to reset or restore your computer to a time when everything was in working order.
Was this helpful?
Thanks for your feedback!
The article above may contain affiliate links which help support Guiding Tech. The content remains unbiased and authentic and will never affect our editorial integrity.
Применение готовых твиков реестра — наиболее простой способ включить или отключить ту или иную функцию в Windows. Запустили REG-файл, подтвердили слияние, перезагрузили, если необходимо, компьютер — и дело сделано. Однако слияние не всегда проходит гладко, если указанные в REG-файле ключи реестра используются в данный момент системой или у вас недостаточно прав для выполнения этой операции.
В момент подтверждения слияния вы получите ошибку «Не удалось импортировать файл.reg: не все данные были успешно записаны в реестр».
Решить эту проблему можно тремя разными способами, хотя не все эти способы одинаково удобны и эффективны.
Рассмотрим их чуть более подробно.
Использование утилиты ExecTI
Этот портативный инструмент поможет записать данные в ключи реестра, владельцем которых является Система или TrustedInstaller. К сожалению, утилита не позволяет запускать с наивысшими правами сами REG-файлы, поэтому вам придется либо править реестр вручную, либо сконвертировать REG-файл в скрипт CMD или BAT, а затем запустить его с помощью ExecTI.
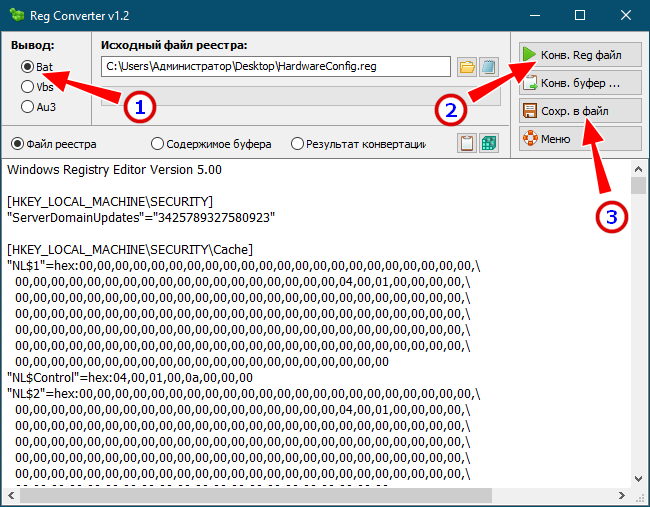
Второй способ более удобен при условии, что вы воспользуетесь конвертером Reg Converter, предназначенным для преобразования файлов реестра в командные файлы BAT и VBS. Получив на выходе BAT-файл, запустите ExecTI от имени администратора, укажите путь к батнику и нажмите «OK».
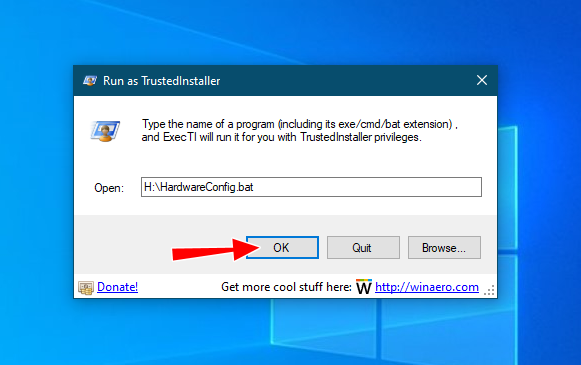
В результате в окне консоли вы должны получить сообщение «Операция успешно завершена».

Импорт REG-файла в безопасном режиме
Этот способ не так эффективен, поскольку не наделяет пользователя более высокими правами доступа, он лишь исключает использование ключа реестра процессом, не позволяющим внести в ключ изменения, причем далеко не факт, что этот процесс не окажется системным.
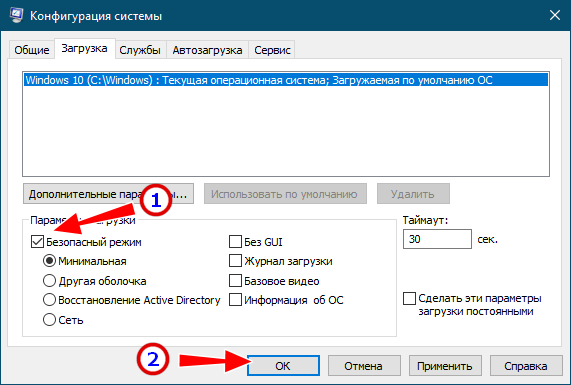
Напоминаем, что загрузиться в безопасном режиме проще всего с помощью встроенной оснастки msconfig, отметив на вкладке «Загрузка» чекбокс «Безопасный режим».
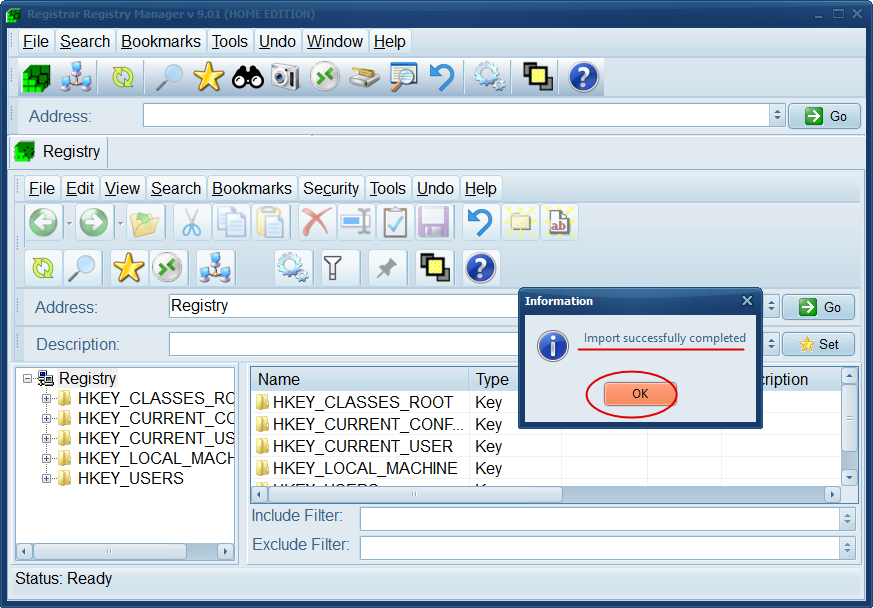
Импорт REG-файла с помощью Registrar Registry Manager
А еще для импорта файлов реестра вы можете воспользоваться диспетчером регистратора реестра — программой Registrar Registry Manager, созданной для обслуживания системного реестра Windows. Установите и запустите программу и нажмите в приветственном окне «Home Edition».
В открывшемся окне приложения выберите во втором меню File -> Import.
И укажите путь к импортируемому REG-файлу.
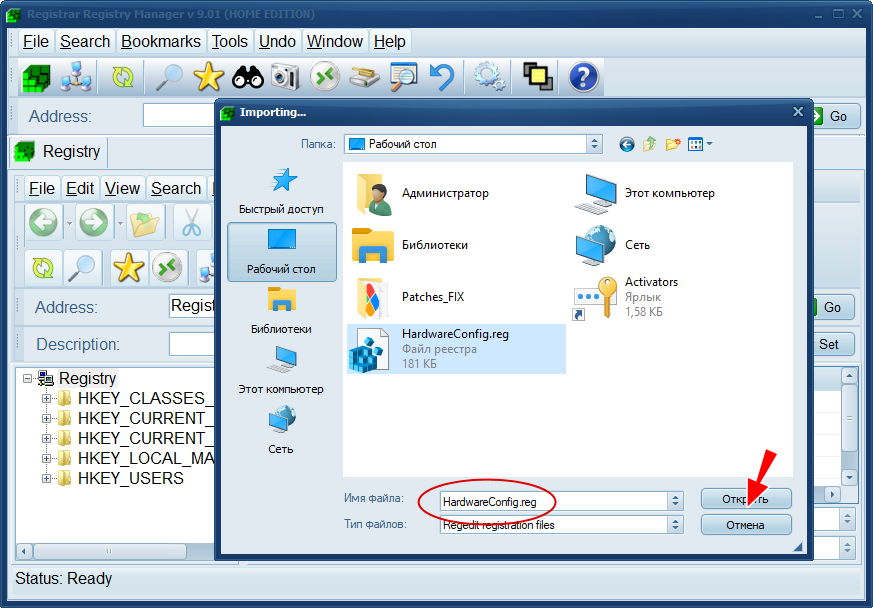
Слияние должно быть выполнено без ошибок.
Поскольку этот способ требует минимум шагов (если не считать установки самой программы), он представляется нам наиболее удобным из перечисленных.
Ссылки на используемый софт: disk.yandex.ru/d/pEP2u_1_R4wWPQ
Readers help support Windows Report. We may get a commission if you buy through our links.
Read our disclosure page to find out how can you help Windows Report sustain the editorial team. Read more
The Registry Editor is a powerful tool that allows you to make changes to your Windows registry. You can use it to add, remove, or change registry keys and values.
However, if you try to import a .reg file that contains invalid data, you may receive an error message. Luckily, there are a few ways you can fix this problem, and this is what I’ll be tackling today.
What causes registry errors?
There are three leading causes of Registry Editor’s cannot import error.
- Over time, as you install and uninstall programs, your registry can become cluttered with old entries and broken settings. This can lead to stability and performance problems on your PC.
- Bad drivers or other software can corrupt the registry and cause these errors.
- Viruses or other malware can also cause this error.
How to fix cannot import error in Registry Editor
1. Use the Windows Registry Editor
- Press Windows + R and type Regedit in the Search box.

- Press Enter. The Registry Editor will now open.
- In the Registry Editor, go to File, then select Import.

- Browse to the location of the.REG file that you want to import. Select the file and click Open, then choose Yes when prompted.
- Close the Registry Editor and restart your computer.


- Fix: An Error Occurred While Loading a Higher Quality Version of This Video
- iTunesMobileDevice.dll is Missing From Your Computer [Solved]
- SYNSOACC.DLL Could Not Be Located: How to Fix in Cubase
2. Use a different.REG file
If you are still getting the Cannot Import Error in Registry Editor, try using a different one.REG file. Ensure that the file is from a trusted source and compatible with your current version of Windows.
3. Use the Command Prompt
- Click Start, type cmd in the Search box, and press Enter.

- In the Command Prompt, type the following command and press Enter:
reg import filename.reg
- Replace filename.reg with the name of the .REG file that you want to import.
- Close the Command Prompt and restart your computer.


Remember, you need to have new .REG file ready for these methods to work. You can download them from the Windows Registry files pages.
These are three ways to fix the Cannot Import Error in Registry Editor. If you are still having issues, then get in touch with Microsoft. For more Registry Editor error messages, check out our website.
Vladimir Popescu
Being an artist his entire life while also playing handball at a professional level, Vladimir has also developed a passion for all things computer-related.
With an innate fascination for research and analysis, and realizing many other people share his passion for this subject, he delved into writing Windows-related articles, so other people can also benefit from the acquired information.
When not writing kick-ass articles, Vladimir likes to spend his time doing Crossfit and creating art.
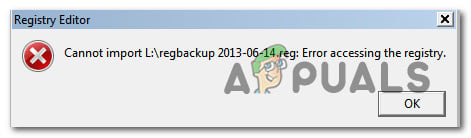
Some users are getting the “error accessing the registry” error when trying to merge a registry key on a Windows computer. Most affected users report that the issue occurred after they did a re-install of their Windows version and tried to open a .reg file. The issue is mostly encountered on Windows 7, Windows 8 and Windows 10.
What is causing the “error accessing the registry” issue?
We researched this error message by looking at various user reports and the repair strategies that they used to either circumvent or resolve the issue entirely. Based on our investigations, there are a couple of common scenarios that will trigger this particular error message:
- Registry File doesn’t have administrative privileges – This scenario is quite common with fresh Windows installs/reinstall. If Registry Editor hasn’t been opened before, it’s likely that the program doesn’t have the necessary permissions to merge the .reg file with your current registry.
- System file corruption is causing the error – There are confirmed cases where this error appeared due to a suite of corrupted system files that were interfering with the importing abilities of the Registry Editor utility. If that’s the case, there are two confirmed solutions (system restore and repair install) that are known to resolve the issue.
If you’re struggling to resolve this particular error message, this article will provide you with a selection of verified troubleshooting steps. In the area that follows, you’ll discover several potential fixing methods that other users in a similar situation have used to get the issue resolved.
For the best results, follow the methods below in order until you discover a fix that is applicable to your current situation and manages to resolve the issue.
Method 1: Importing the registry file with administrator privileges
As several affected users have suggested, chances are that you’re dealing with a privilege issue. Most likely the Registry Editor utility doesn’t have enough permissions to merge the file yet. This is a fairly common thing with new Windows installations where the Registry Editor hasn’t been opened before.
Several users that were struggling to resolve the same error message have reported that the issue was finally resolved after they opened Registry Editor with Administrative privileges and use the Import menu to merge the files. Here’s a quick guide on how to do this:
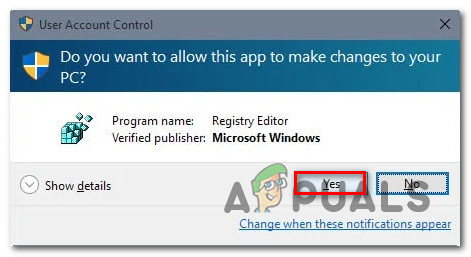
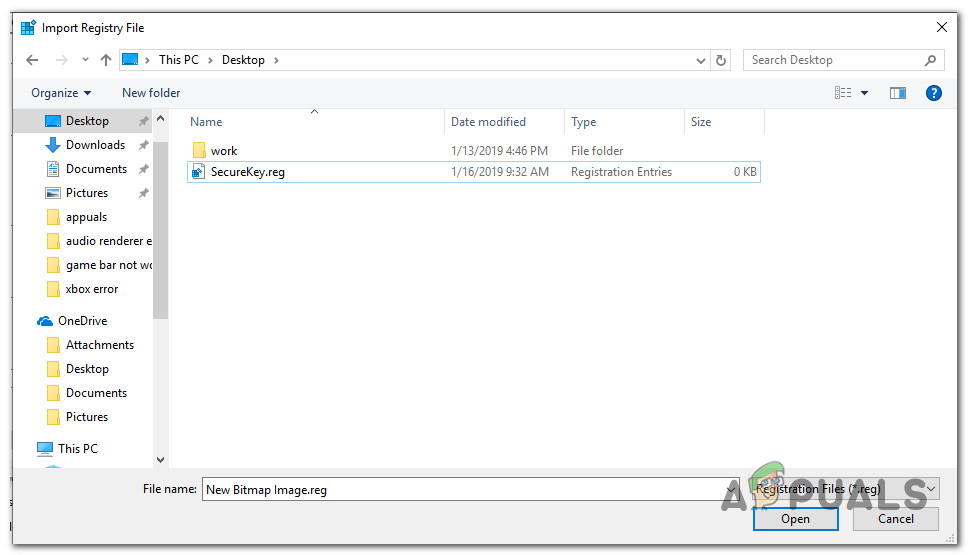
- Press Windows key + R to open up a Run dialog box. Then, type “regedit” and press Ctrl + Shift + Enter to open up Registry Editor with administrative privileges.
Typing Regedit in Run to Open Registry Editor - At the UAC (User Account Control) prompt, choose Yes to grant administrative privileges.

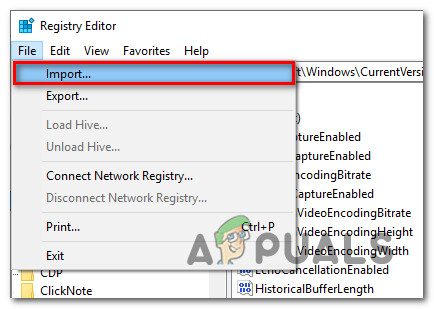
Granting administrative permissions to Registry Editor - Inside Registry Editor, go to File > Import using the ribbon bar at the top.

Using the built-in Import menu of Registry Editor - Use the Import menu to navigate to the location of the file that you’re trying to merge. Once you get there, select it and click Open to merge it with your current registry.

Merging the key with the current registry Note: The same principle applies to those situations where you encounter the error when trying to import a .reg key automatically via a .bat file. In order for it to work, you’ll need to run it from an elevated CMD window – press Windows key + R, type “cmd” and press Ctrl + Shift + Enter to open a Command Prompt window with administrative privileges.
This procedure should have successfully circumvented the “error accessing the registry” error. If you’re still getting the error or this method is not applicable to your current situation, move down to the next method below.
Method 2: Performing a System Restore
If you’ve just started getting this error message out of the blue (you didn’t perform a Windows reinstall recently), it’s possible that a system file has become corrupted and is preventing the merging operation from completing.
In this particular case, users finding themselves in a similar situation have managed to get the issue resolved by using the System Restore wizard to revert the machine to a previous point in time (when registry operations were functioning properly).
Using an older system restore point will return your machine state to how it was when the backup was created. This will fix any errors that might have appeared during that time, but will also get rid of any applications and user settings that you installed or created during that time.
Here’s a quick guide on using the System Restore wizard:
- Press Windows key + R to open up a Run dialog box. Then, type “rstrui” and press Enter to open the System Restore wizard.
- Once you get to the first System Restore screen, you will be asked whether you want to use the recommended restore point. Change the toggle to Choose a different restore point and hit Next to continue.
- Choose a system restore point from the list and hit Next to proceed.
- Hit Finish to finalize the restoring process. After a short while, your computer will restart and the old state will be restored.
- Once the next startup is complete, try to merge/import the file again and see if the error message has been resolved.

If you’re still encountering the “error accessing the registry” error, move down to the next method below.
Method 3: Performing a repair install
If you’ve come this far without a result, it’s very likely that you’re encountering this issue because of system file corruption. Most likely, a system file or service that is used during the registry importing process is corrupted and can no longer be accessed.
Several users that have been struggling with precisely the same error have reported that the issue was finally resolved after they performed a repair install.
A repair install is a non-destructive procedure that will refresh all Windows components without touching any of your personal files or applications. It does roughly the same thing as a clean install, but leaves your applications, user preferences and personal files out of the equation.
If you decide to do a repair install, you can follow the instructions present in this article (here).
Kevin Arrows
Kevin Arrows is a highly experienced and knowledgeable technology specialist with over a decade of industry experience. He holds a Microsoft Certified Technology Specialist (MCTS) certification and has a deep passion for staying up-to-date on the latest tech developments. Kevin has written extensively on a wide range of tech-related topics, showcasing his expertise and knowledge in areas such as software development, cybersecurity, and cloud computing. His contributions to the tech field have been widely recognized and respected by his peers, and he is highly regarded for his ability to explain complex technical concepts in a clear and concise manner.