
Все способы:
- Способ 1: Включение видеоадаптера (для ПК с двумя видеокартами)
- Способ 2: Освобождение места в хранилище
- Способ 3: Завершение всех процессов NVIDIA
- Способ 4: Временное отключение антивируса
- Способ 5: Ручная установка ПО
- Способ 6: Переустановка драйвера
- Дополнительные рекомендации
- Вопросы и ответы: 0
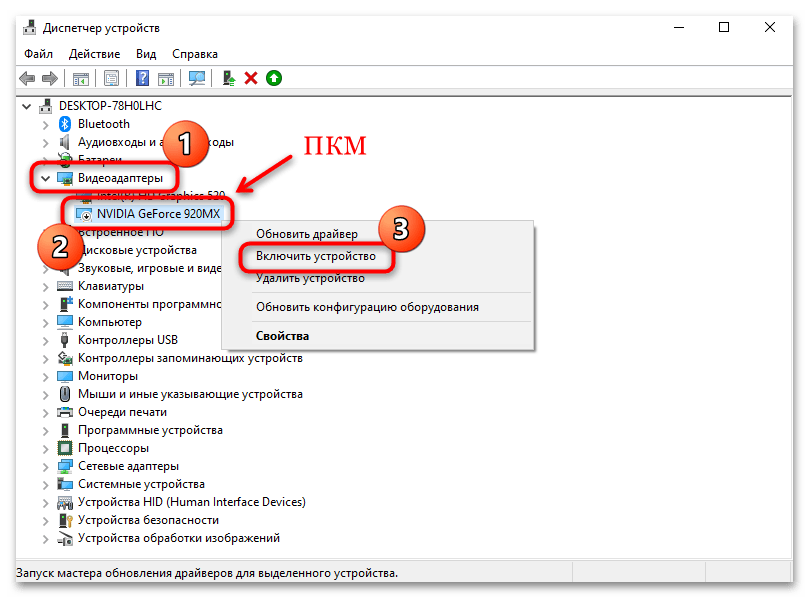
Способ 1: Включение видеоадаптера (для ПК с двумя видеокартами)
На ноутбуках довольно часто бывают установлены две видеокарты; реже такое встречается у настольных ПК. Если ваш компьютер оснащен двумя графическими адаптерами, в первую очередь убедитесь, что нужная работает. Вероятно, она по каким-то причинам была отключена, из-за чего теперь и возникает рассматриваемая ошибка.
- Кликните правой кнопкой мыши по «Пуску» и выберите запуск встроенного «Диспетчера устройств».
- Разверните меню «Видеоадаптеры» и в списке найдите видеокарту NVIDIA. Если рядом с ее названием отображается значок в виде стрелки, значит, адаптер действительно отключен. Кликните по нему правой кнопкой мыши и из контекстного меню выберите пункт «Включить устройство». Список оборудования будет обновлен, после чего можно попытаться выполнить повторную установку ПО.
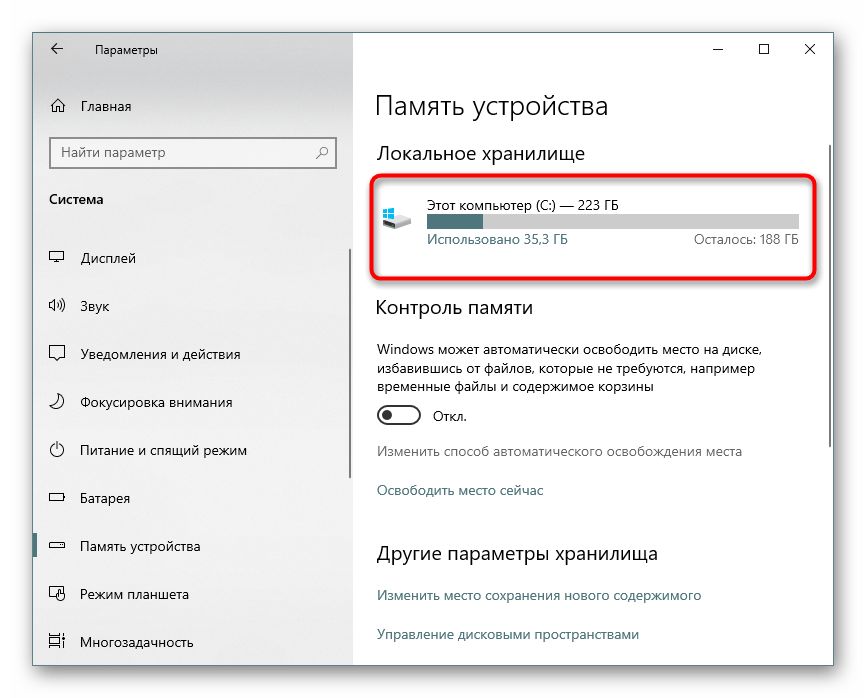
Способ 2: Освобождение места в хранилище
Вероятно, ошибка при установке программного обеспечения появилась в связи с нехваткой места на системном диске. Проверьте наличие свободного пространства с учетом того, что для корректной работы самой операционной системы также должен быть незанятый объем. Можно избавиться от ненужных программ, кеша приложений и файлов обновлений, в значительной степени освободив место на накопителе. Развернутую информацию об этом читайте в нашем отдельном руководстве.
Подробнее: Освобождаем место на диске C в Windows 10
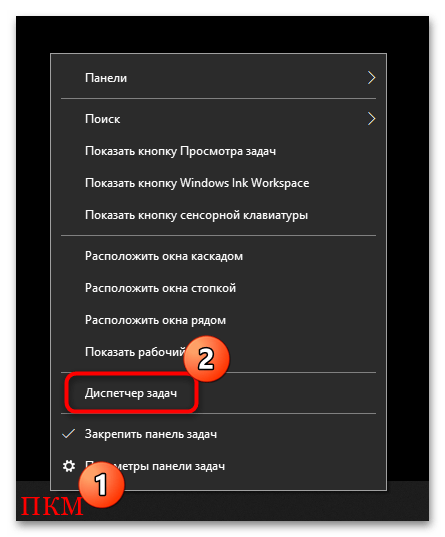
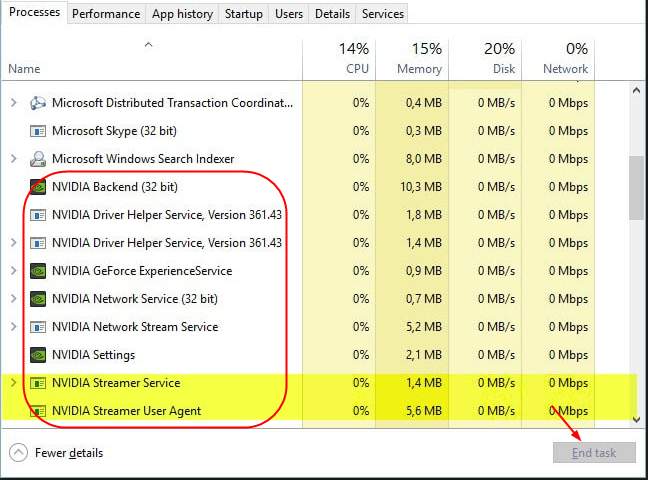
Способ 3: Завершение всех процессов NVIDIA
Попробуйте перед установкой программного обеспечения вручную отключить все процессы, которые связаны с софтом от NVIDIA. Делается это через встроенный «Диспетчер задач»:
- Щелкните по панели задач правой кнопкой мыши и выберите запуск средства из появившегося меню.
- На вкладке «Процессы» в списке работающих утилит и служб найдите все процессы от NVIDIA – как правило, это «NVIDIA Container» в меню «Фоновые процессы».

Если вкладки «Процессы» нет, значит, скорее всего, окно «Диспетчера задач» запущено в свернутом режиме — нажмите на «Подробнее».
- Поочередно выделяйте каждый процесс и нажимайте на кнопку «Снять задачу» внизу.
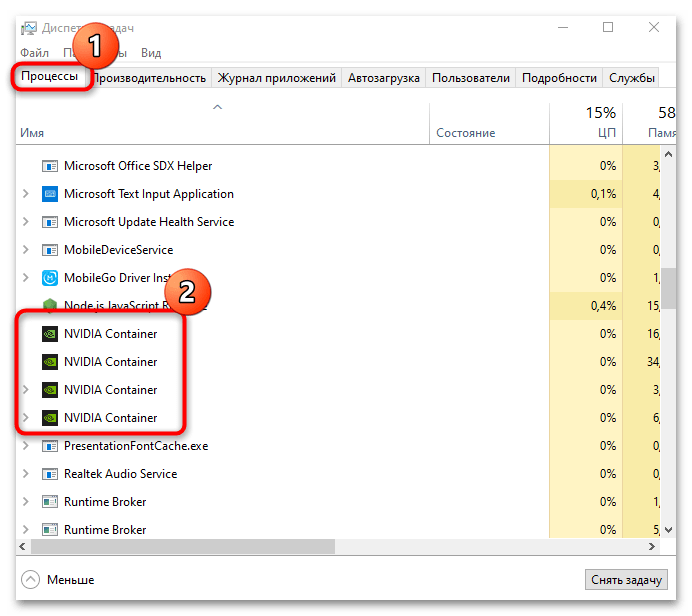
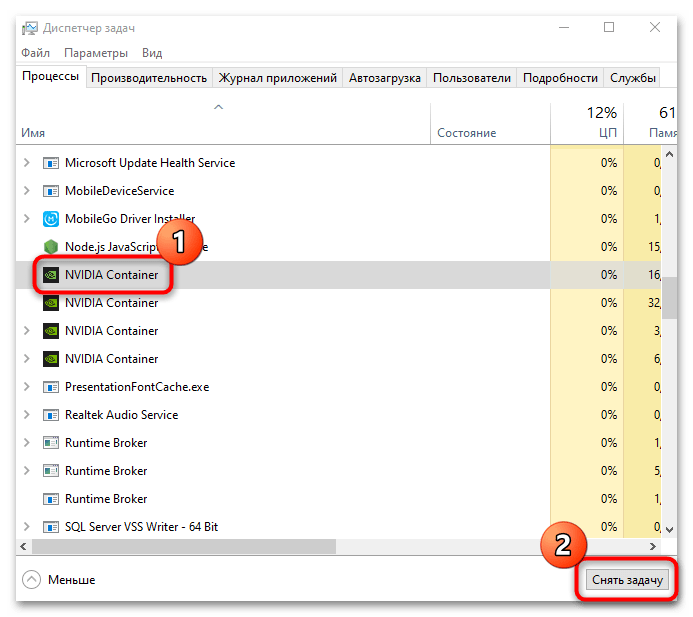
Чтобы проще было найти процесс, отсортируйте все пункты в алфавитном порядке, нажав на строчку «Имя».
После того как все процессы, связанные с программным обеспечением производителя видеокарты, завершены, попытайтесь вновь инсталлировать GeForce Experience на компьютер.
Способ 4: Временное отключение антивируса
Случается, что встроенное средство защиты Windows 10 или сторонний антивирус препятствует установке программного обеспечения, поскольку ошибочно считает его подозрительным. Приостановите работу такого софта, чтобы проверить, влияет ли он на установку. О том, как это сделать для «Защитника Windows» и антивирусов от различных разработчиков, мы писали ранее в отдельных материалах на сайте.
Подробнее:
Отключение «Защитника» в Windows 10
Отключение антивируса
Чтобы в дальнейшем работа GeForce Experience не блокировалась антивирусом, исполняемый файл программы можно добавить в список исключений, после чего он перестанет контролировать работу и действия ПО от производителя графического адаптера.
Подробнее:
Добавление исключений в «Защитнике» Windows 10
Добавление программы в исключения антивируса
Способ 5: Ручная установка ПО
Если ничего не помогло, может потребоваться ручная установка программного обеспечения с предварительным скачиванием нужной версии драйвера с официального сайта компании. Все дело в том, что ПО для современных видеокарт поставляются в двух вариантах: драйверы DCH (они не устанавливаются на более старые Windows и первые версии «десятки»), а также стандартные драйверы, которые сложно установить в систему с уже инсталлированными драйверами DCH. Такое случается с ноутбуками (когда производитель сам устанавливает ПО) либо же в случаях, когда ОС самостоятельно их инсталлировала.
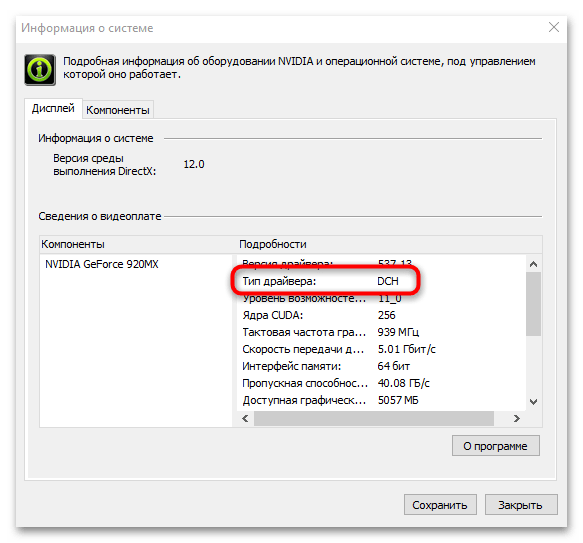
Если драйвер уже установлен, определить его тип не составит труда:
- Кликните правой кнопкой мыши по значку NVIDIA на нижней панели и откройте «Панель управления NVIDIA».
- В открывшемся окне щелкните по вкладке «Справка» и выберите пункт «Информация о системе».
- Появится окно с подробной информацией о программном обеспечении – в колонке «Подробности» отыщите строку «Тип драйвера» и посмотрите, какой тип используется.
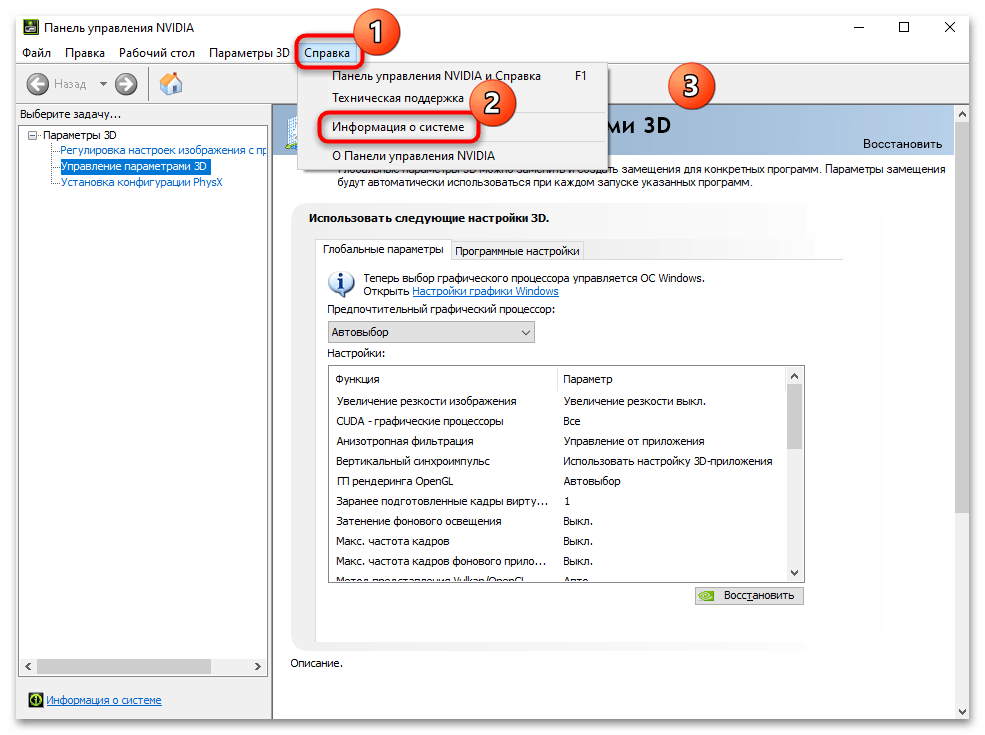
Чтобы исправить ошибку при установке софта от NVIDIA, следует скачать вручную драйвер такого же типа с официального сайта производителя. Сразу следует отметить, что данный способ срабатывает не всегда, но в некоторых ситуациях может помочь.
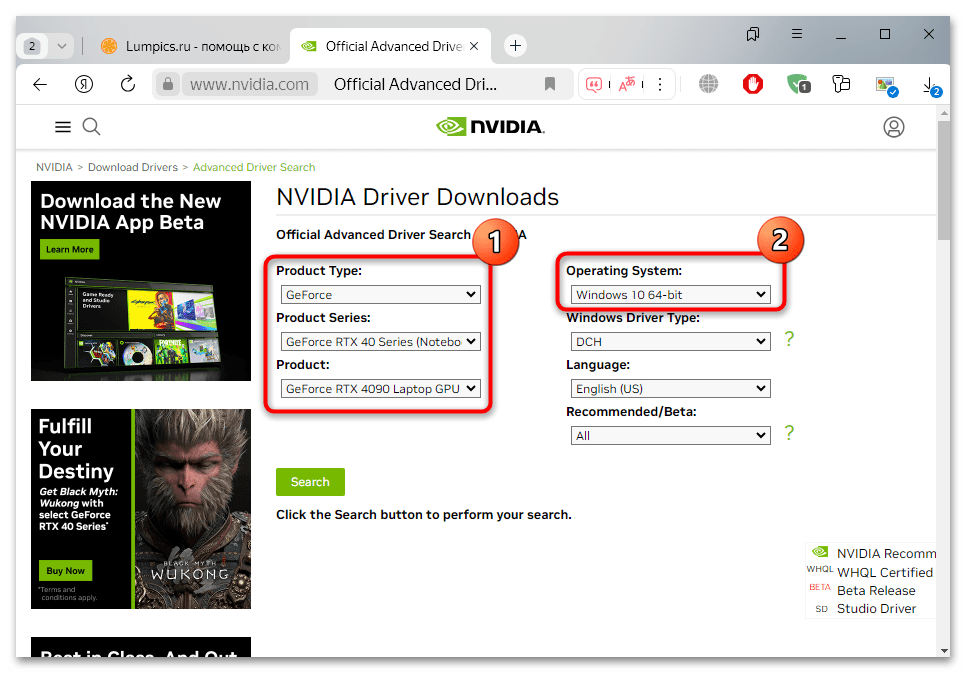
Перейти на страницу расширенного поиска драйверов NVIDIA
- Откройте ссылку выше, затем на странице сайта укажите модель видеокарты и операционную систему, для которых софт будет устанавливаться.
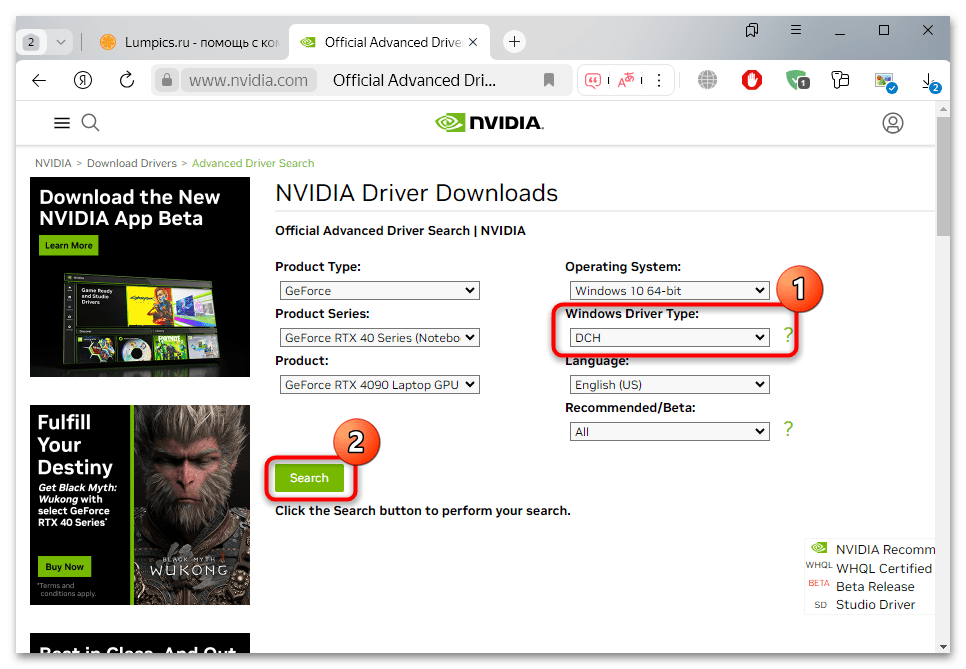
- Из меню «Windows Driver Type» выберите тип драйвера (в нашем случае это DCH). Нажмите на «Search».
- Внизу отобразятся варианты загрузок – найдите нужное программное обеспечение и щелкните по нему. Далее останется скачать софт, нажав на «Download».
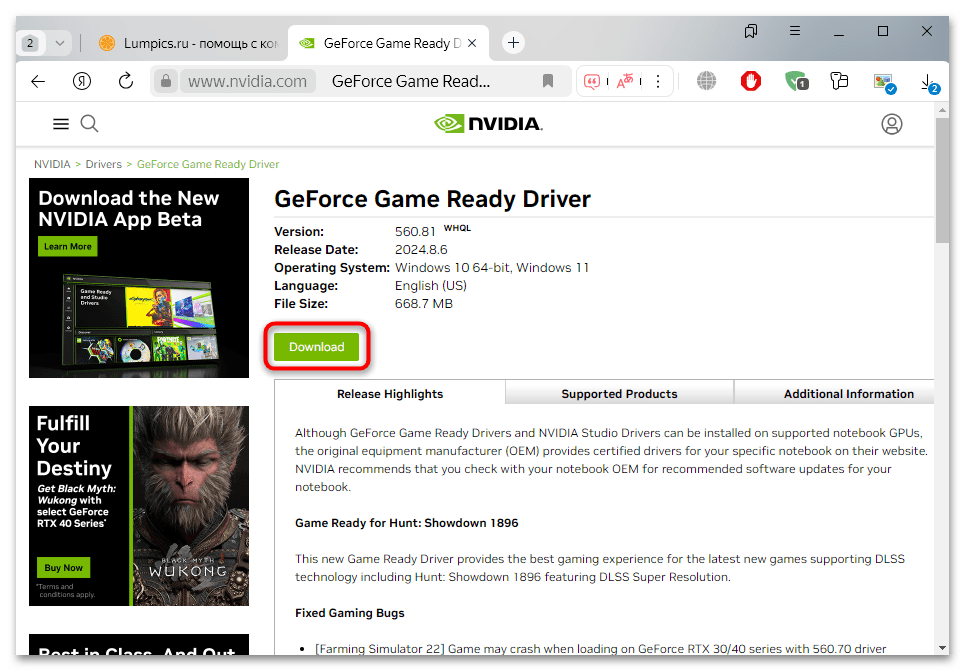
Скачав, инсталлируйте программу на свой компьютер самостоятельно.
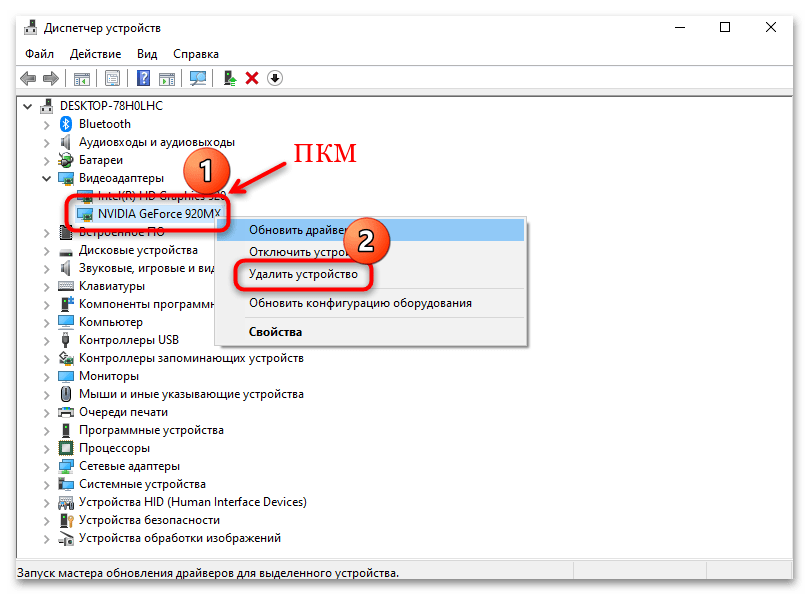
Способ 6: Переустановка драйвера
Иногда предыдущей рекомендации оказывается достаточно, однако в некоторых случаях дополнительно все же требуется полностью удалить уже установленное программное обеспечение, а уже после этого вновь пытаться инсталлировать драйвер. Предварительно проделайте все то же самое, что в Способе 4 (скачайте нужную версию ПО, но установку не выполняйте – это нужно сделать уже после того, как файлы NVIDIA будут удалены).
Перед процедурой деинсталляции лучше на время отключить интернет, чтобы операционная система автоматически не инсталлировала базовый драйвер GPU.
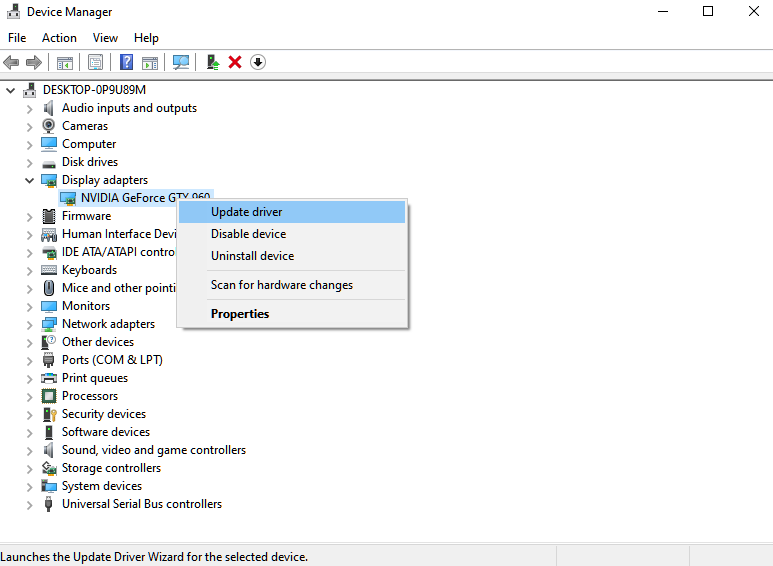
- Удаление устройства происходит в несколько кликов: нажмите правой кнопкой мыши по «Пуску» и выберите запуск «Диспетчера устройств». Разверните меню «Видеоадаптеры» и найдите видеокарту NVIDIA. Кликните по ней правой кнопкой мыши и из меню выберите пункт «Удалить устройство».
- В новом окне поставьте галочку у опции «Удалить программы драйверов для этого устройства» и подтвердите действие.
Когда деинсталляция завершится, обязательно перезагрузите компьютер и попробуйте установить софт вручную с помощью ранее скачанного файла. После этого неполадка с NVIDIA GeForce Experience должна быть исправлена.
Дополнительные рекомендации
Приведем также еще несколько рекомендаций, которые могут помочь при установке программного обеспечения от NVIDIA в зависимости от характера проблемы. Если у вас ноутбук или фирменный компьютер, проверьте версию драйвера для видеокарты на официальном сайте производителя не компонента, а устройства (обычно он называется «VGA Driver») – вероятно, проблема с ПО связана с банальной несовместимостью версии драйвера и компонента, который используется.
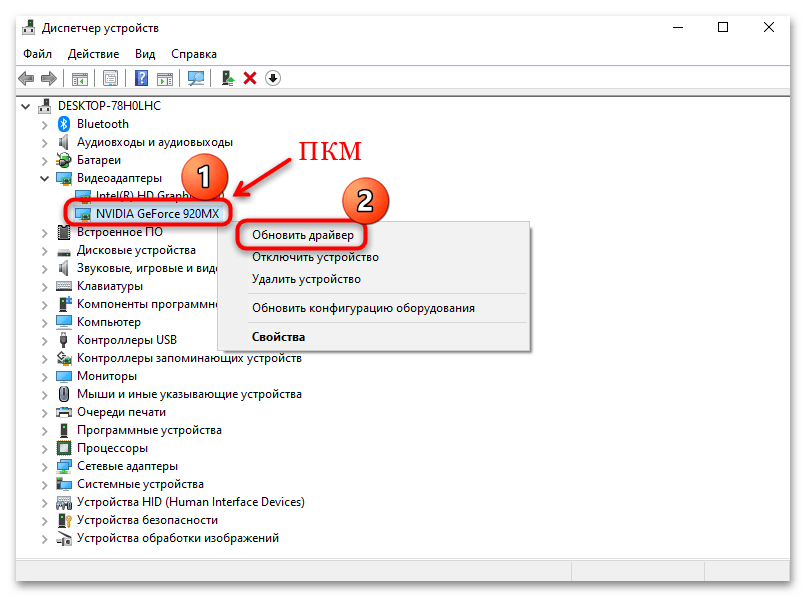
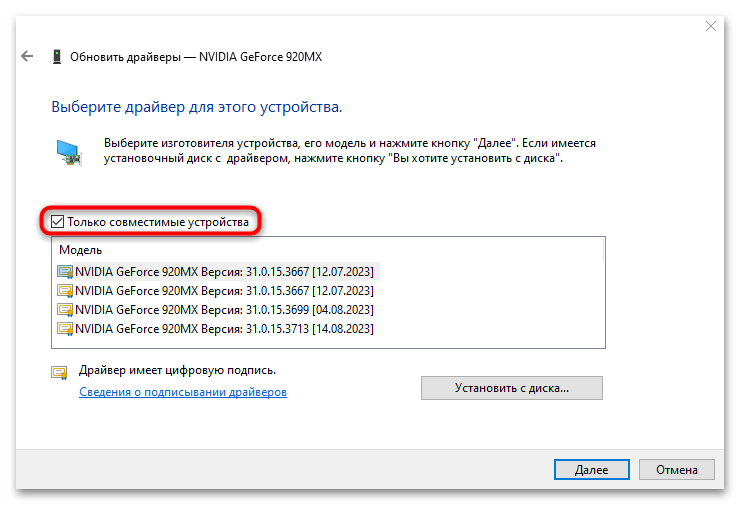
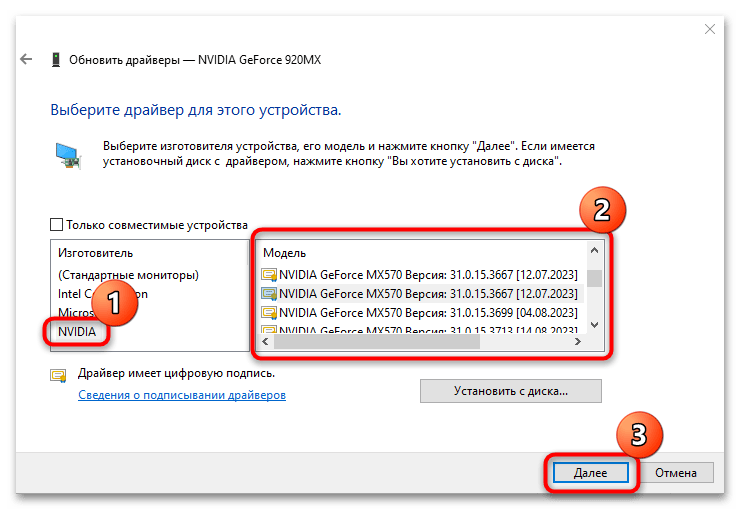
Также стоит проверить, как отображается драйвер видеокарты в «Диспетчере устройств». Если это «Базовый видеоадаптер Майкрософт», есть вероятность, что ПО попросту слетело, например после обновления операционной системы или БИОС. В этом случае выполните установку нужного драйвера с помощью встроенных средств «Диспетчера устройств»:
- Кликните правой кнопкой мыши по названию компонента в меню «Видеоадаптеры» и выберите пункт «Обновить драйвер».
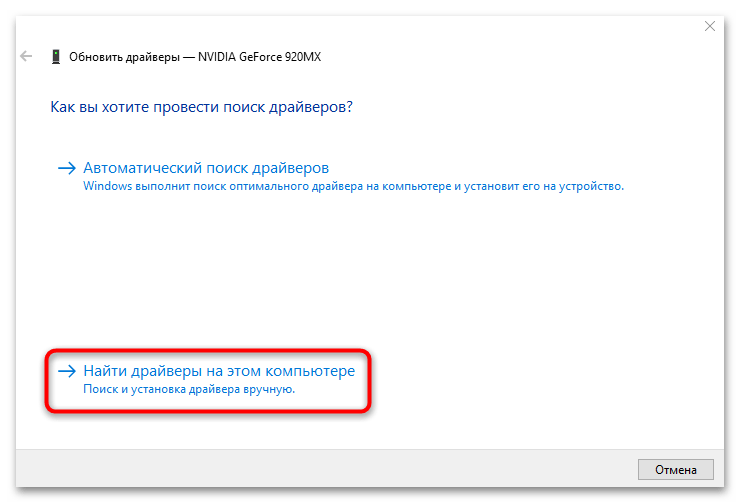
- В новом окне щелкните по строке «Найти драйверы на этом компьютере».
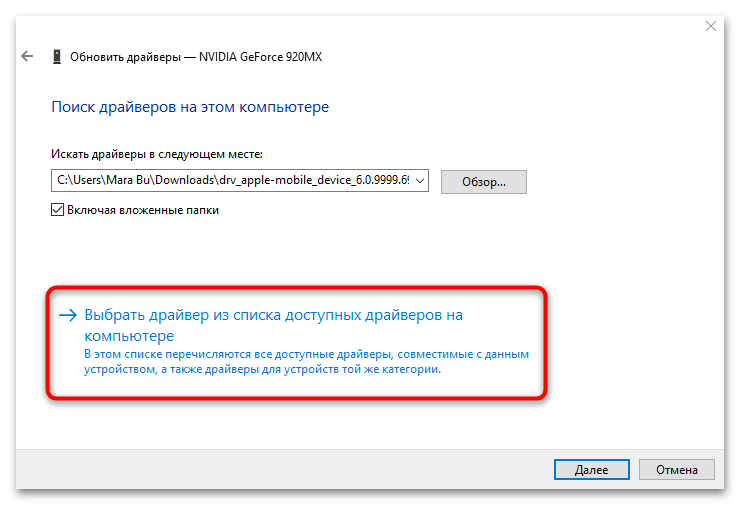
- Нажмите на «Выбрать драйвер из списка доступных драйверов на компьютере».
- Снимите галочку у параметра «Только совместимые устройства».
- Внизу появится перечень всех доступных драйверов – выберите нужный (в зависимости от модели графического адаптера), отметив изготовителя и тип ПО, затем воспользуйтесь кнопкой «Далее».
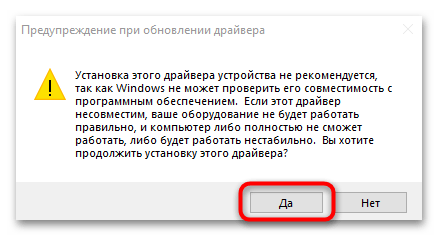
- В окне с предупреждением подтвердите действие и дождитесь окончания установки, после чего перезагрузите компьютер.
Есть еще одна рекомендация, которая позволяет решить проблемы с программным обеспечением NVIDIA. Она связана с другими компонентами системы, в частности с интегрированной видеокартой, драйвером чипсета или центральным процессором. Некоторые пользователи Windows 10 сталкивались с ошибкой во время попыток установить драйверы NVIDIA и GeForce Experience до тех пор, пока не было установлено актуальное ПО (в том числе «Панель управления») для Intel. Отсюда следует возможное решение – следует обновить остальные драйверы на компьютере, после чего уже пытаться инсталлировать софт для дискретной видеокарты.
Подробнее: Обновляем драйверы в Windows 10

Наша группа в TelegramПолезные советы и помощь
Solving NVIDIA Installer Issues
Updated 12/18/2024 06:17 PM
Solving NVIDIA Installer Issues
What can I do when the NVIDIA software installation fails?
The installer package of the NVIDIA GeForce Experience/Quadro Experience application or the NVIDIA Graphics Driver can sometimes hit generic failures that do not pinpoint an exact error condition. These errors can be caused by an incorrect system state.
If the software installation fails, the best first step is to reboot and try the installation again. If that doesn’t help, try explicitly uninstalling the previous version (if any), rebooting, and then reinstalling. If it continues to fail, try performing the following steps to reset the system state:
1. Make sure that NVIDIA Windows services are not running. To stop the NVIDIA Windows services, run «services.msc» from the Run window, then find and stop all services where the service name starts with NVIDIA.
2. After all services are stopped, make sure that no instance of any NVIDIA application is running. To look for instances of NVIDIA applications, open the Task Manager and look for processes starting with nv or NVIDIA. Kill those processes, if any.
3. Please review Group Policy settings, security restrictions, or the system configuration that might prevent the installer from completing its actions.
4. Make sure to remove the following registry keys if they exist. Run Regedit and search for each key, then delete if found.
HKEY_LOCAL_MACHINE\SOFTWARE\NVIDIA Corporation\Logging
HKEY_LOCAL_MACHINE\SOFTWARE\Wow6432Node\NVIDIA Corporation\Logging
5. Now try to install again. If the above steps do not resolve the issue, uninstall all NVIDIA programs using the Windows Control Panel, reboot, and then try steps 1 to 4 again.
If you currently have the NVIDIA app installed on your system and you attempt to also install GeForce Experience, the NVIDIA installer will fail.
NVIDIA app and GeForce Experience can not coexist on a PC at the same time. If you have the NVIDIA app installed and you wish to go back to using GeForce Experience, you will first need to uninstall the NVIDIA app.
1. Navigate to the Windows Installed Apps list by opening the Windows Settings -> Apps -> Installed apps
2. Scroll down until you see the NVIDIA app. Left-click over the three dots and select Uninstall as pictured below.

4. Click on the DOWNLOAD NOW button to start the download process.

5. Once the GeForce Experience installer file has finished downloading, double-click on the file to start the installation process.
6. Follow the instructions to complete the installation process.
Live Chat
Chat online with one of our support agents
CHAT NOW
ASK US A QUESTION
Contact Support for assistance
800.797.6530
Ask a Question
Do you encounter installation problems on GeForce Experience?
Being able to finally upgrade your video card is one of the most exciting things for any PC gamer. This means more frames per second, more games you can run, and more hours of nonstop fun.
While upgrading your GPU is as simple as installing the card and updating your drivers, there are some problems that could occur along the way. Unfortunately, this is the case for some users who experience installation problems with GeForce Experience.
GeForce Experience is a companion software developed by NVIDIA for their GeForce series graphics cards. This tool allows users to manage performance optimizations for gamers, record gameplay, and several other features.
If you want to get the full experience of NVIDIA’s platform, installing GeForce Experience is a must.
To help out, we’ve decided to make a guide for fixing installation problems on GeForce Experience.
1. Restart Your PC.
If you have encountered an error while installing GeForce Experience on your computer, try restarting it before attempting to install the software again. This should flush your system cache and eliminate errors that occurred during runtime.
Here’s what you need to do:
- On your keyboard, press the Windows key to open the Start Menu.
- After that, access the Power Options tab.
- Finally, choose Restart to reboot your system.
Run the installer again to check if you can install GeForce Experience without issues.
2. Ensure Your Graphics Card Is Enabled.
One of the most common reasons you cannot install GeForce Experience is if your NVIDIA graphics card is not getting detected by the software. To rule this out, head to the Device Manager and ensure your GPU is enabled.
Follow the steps below to guide you through the process:
- On your keyboard, press the Windows + X keys to open the Quick Menu.
- After that, click on Device Manager to launch it.
- Lastly, expand the Display Adapters tab.
Check if your video card shows up on the list. If not, it’s possible that your GPU is not properly connected. Reseat the video card from the slot and restart your PC.
3. Check Your Connections.
If your GPU is not getting detected by your computer, there’s a good chance that your HDMI or Display Port cable is connected to the motherboard. This will force your system to use the integrated graphics of your CPU, which is not what you want.
To fix this, make sure that your HDMI, DVI, or VGA cable is connected to the ports available at the back of your video card.
Restart your computer afterward and see if you can now install GeForce Experience.
4. Update Your Display Drivers.
Outdated or incompatible display drivers could also be the reason you cannot install GeForce Experience on your computer. In this case, we suggest updating your drivers to the latest version to rule out any compatibility issues.
Here’s what you need to do:
- On your keyboard, press the Windows + X keys to open the Quick Menu.
- Now, click on Device Manager.
- Expand the Display Adapters tab and right-click on your video card.
- Finally, choose the Update Driver option and follow the prompts.
Reboot your system to apply the changes and try installing GeForce Experience again.
5. Redownload the Installer.
There’s a possibility that you’ve lost your internet connection while downloading the GeForce Experience installer, which corrupted the installer. To ensure everything’s in order, re-download the installer on your computer.
Head to NVIDIA’s website and download a fresh copy of GeForce Experience’s installer.
6. Uninstall Samsung Magic Rotate.
For unknown reasons, Samsung’s Magic Rotate software causes issues with GeForce Experience. If you have this software installed on your computer to rotate your display, we strongly suggest uninstalling it.
See the guide below to delete Magic Rotate:
- Launch the Control Panel on your computer.
- Click on Uninstall a Program.
- Next, locate the Magic Rotate Software. Most of the time, it’s named 5_RAFF.
- Right-click on the software and choose Uninstall.
Once done, restart your system and try installing GeForce Experience.
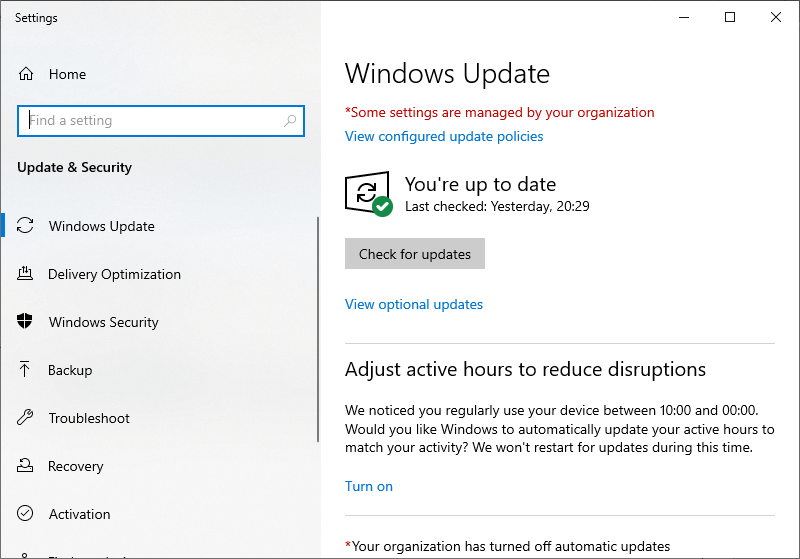
7. Update Windows.
The version of Windows you are using might have an underlying issue or is not compatible with GeForce Experience. Whichever the case is, you can try updating your operating system to patch issues.
Here’s what you need to do:
- On your computer, access the Start Menu and go to Windows Settings.
- After that, click on Update & Security and click on Windows Update.
- Finally, click on Check for Updates and follow the prompts.
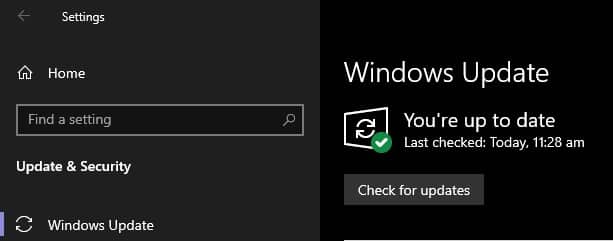
Restart your system and try installing GeForce Experience again.
That sums up our guide on how to fix installation problems on GeForce Experience. If you have questions, please drop a comment below, and we’ll do our best to help.
If this guide helped you, please share it. 🙂
-
John is a staff writer at Saint and comes from a SAP ABAP development background. He has a Bachelors in IT and has been writing since 2018, with over 500 posts published. He loves to build PCs and has a deep curiosity in understanding how different components and configurations work. John spends hundreds of hours at a time, researching and testing the software and apps, before he proceeds to write about it. LinkedIn
X (Twitter)
Website
View all posts
NVIDIA GeForce Experience is the first choice of many gamers across the world as it optimizes the game settings automatically and keeps your drivers updated.
But, apart from its popularity this is not free from bugs, and plenty of users reported that the GeForce Experience is stuck on the “preparing to install” screen.
As a result, they are unable to update the Nvidia driver and experience various troubles.
So, here in this article, find out what to do when GeForce Experience preparing to install error occur as well as learn the common reasons responsible for the error.
To repair corrupted Windows system files, we recommend Advanced System Repair:
This software is your one stop solution to fix Windows errors, protect you from malware, clean junks and optimize your PC for maximum performance in 3 easy steps:
- Download Advanaced System Repair rated Excellent on Trustpilot.
- Click Install & Scan Now to install & scan issues causing the PC problems.
- Next, click on Click Here to Fix All Issues Now to fix, clean, protect and optimize your PC effectively.
Below has a look at the common culprits causing the GeForce experience not to install:
- Missing Admin rights: The lack of permissions or administrative rights can cause conflict with the proper functioning of the Nvidia GeForce experience driver and cause preparing to install errors.
- Poor Internet connection: The unstable or slow Internet connection may cause the installation process to stuck in the preparation screen.
- Third-party app confliction: Many times, the 3rd party installed apps interfere with the GPU driver update process and as a result, it gets stuck in the installation process.
- GPU driver Confliction: The corrupted or damaged driver can stop the graphics driver from updating and leads to preparing to install error.
Now follow the fixes listed to resolve the error and install the NVidia driver.
How to Fix GeForce Experience Stuck on Preparing to Install?
Solution 1: Run GeForce Experience as an Administrator
This solution is very simple and helped a lot of users bypass the GeForce Experience preparing to install errors.
After a certain point while the installation process, you will prompt to confirm if you want to install the driver. And, without the proper administrator privileges, a confirmation prompt will not pop up and the installation process will get freeze.
So, it is advised to open the GeForce Experience in the Administrator Mode. You can do this by following the given steps:
- Go to the GeForce Experience desktop shortcut and right-click on it.
- Select Run as administrator
- With this, GeForce Experience will open in administrator mode.
- Now, attempt to install the GPU driver and check if the GeForce Experience gets stuck at the preparing to install screen issue is resolved or not.
Also Read: How To Fix NVIDIA GeForce Experience Error Code 0x0003 On Windows 10?
Solution 2: Restore 3D Settings To Default
If you have modified any Nvidia 3D settings, then restoring them to the default setting might help you to resolve the preparing to install error. So, to do this, follow the steps given below:
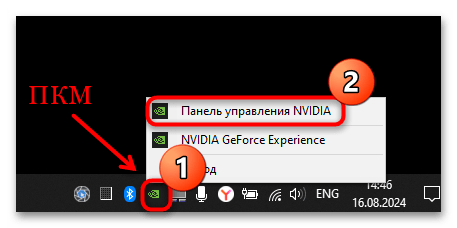
- Right-click on the Windows desktop
- Select the NVIDIA Control Panel
- On the left side of the window, click on the 3D Settings to expand the section
- Click on the Manage 3D settings
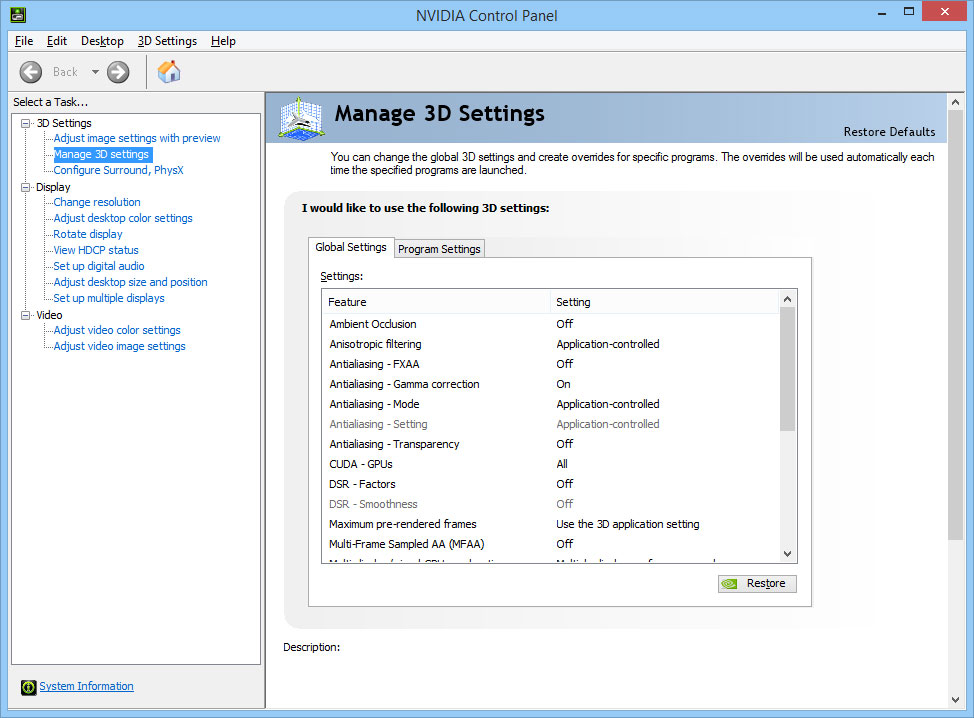
- Now, click on the Restore button to get back to the default settings
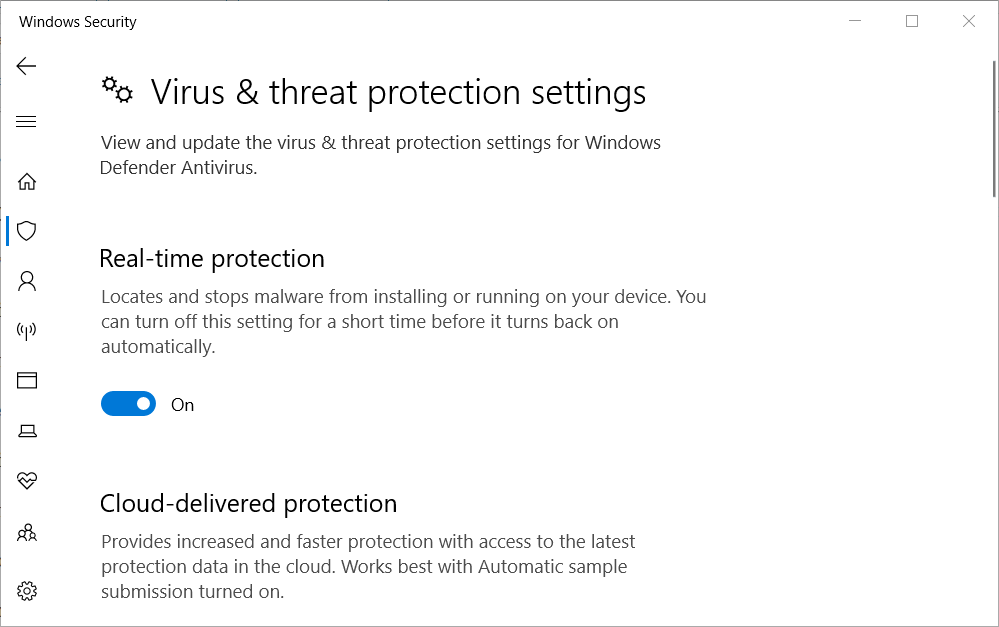
Solution 3: Disable Antivirus Real-Time Scanning
One of the most common reasons responsible for the GeForce Experience preparing to install an error is an antivirus. Almost all third-party antivirus tools have real-time scanning features and this will prevent the updating of registry files.
The antivirus run-time scanning feature might also prevent GeForce from installing driver packages. Hence, to fix the GeForce Experience stuck on preparing to install error, turn off this feature.
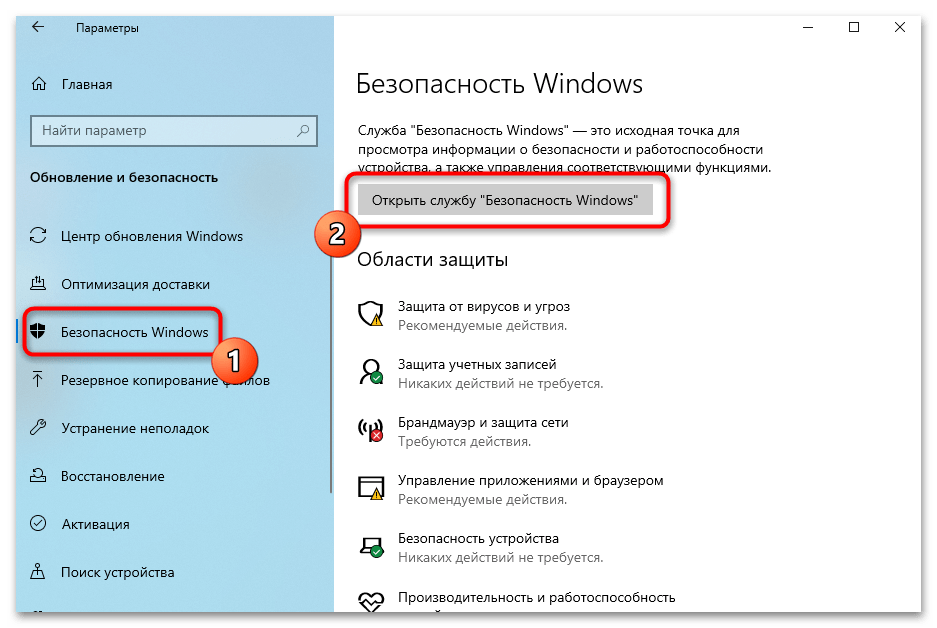
If you don’t have any third-party antivirus installed on your computer, then disable Windows Security. To do so, follow the given steps:
- Go to the Windows Search bar and type Windows Security
- Click on the Windows Security
- Go to the Virus and threat protection option on the left side of the window
- Click on the Manage settings
- Turn off the Real-time protection option
Now, try to update the graphics driver with the GeForce and check whether Geforce Experience stuck at preparing to install screen issue has been resolved or not. If not, then move to the next solution.
Solution 4: Update the Nvidia Graphics Driver
Many times updating the driver solves various problems so here it is suggested to update the NVIDIA drivers in Windows. Updating the driver with the latest update solves various glitches and bugs causing the error.
Here we have listed different methods to update drivers.
- Allow Windows Update to install the appropriate drivers.
- Update driver via device manager
- Automatically update the Nvidia driver
Here follow the steps to force Windows to update the driver.
- Press the Windows + I keys to open Settings
- Now click on the Windows Update option.
- And then click on the Check for Updates. If there is a new update then download the update.
Note: Most of the time, Windows Update automatically install the missing GPU drivers. You can also check it in the Device Manager window and see whether the GPU driver is installed or not.
- Press the Windows + X key and click on Device Manager to open it.
- Right-click on the Nvidia GPU-related entry under the Display Adapter category and select the Update Driver. In this way, Windows will be forced to install the fresh driver automatically.

Moreover, you can also update the driver easily in a few clicks by running the Driver Updater tool. This is an advanced tool, that just by scanning once detects and updates the entire system drivers automatically.
Get Driver Updater to update the NVIDIA driver automatically
Solution 5: Download the Graphics Driver Manually
Updating the graphics driver manually may fix GeForce Experience preparing for installation errors. You can easily update drivers without the GeForce Experience by downloading the graphics driver from the Nvidia official website.
- First, completely stop the GeForce Experience. For this, follow these steps:
- Press Ctrl + Shift + Esc key to open the Task Manager
- Locate and highlight the GeForce Experience process on the Task Manager window
- Click on the End Task button
- Open the Download Drivers page on Nvidia’s website
- Now, select the appropriate Product Type, Product Series, Operating System, etc.
- Click on the Search button, it will show you the suitable driver according to your requirements
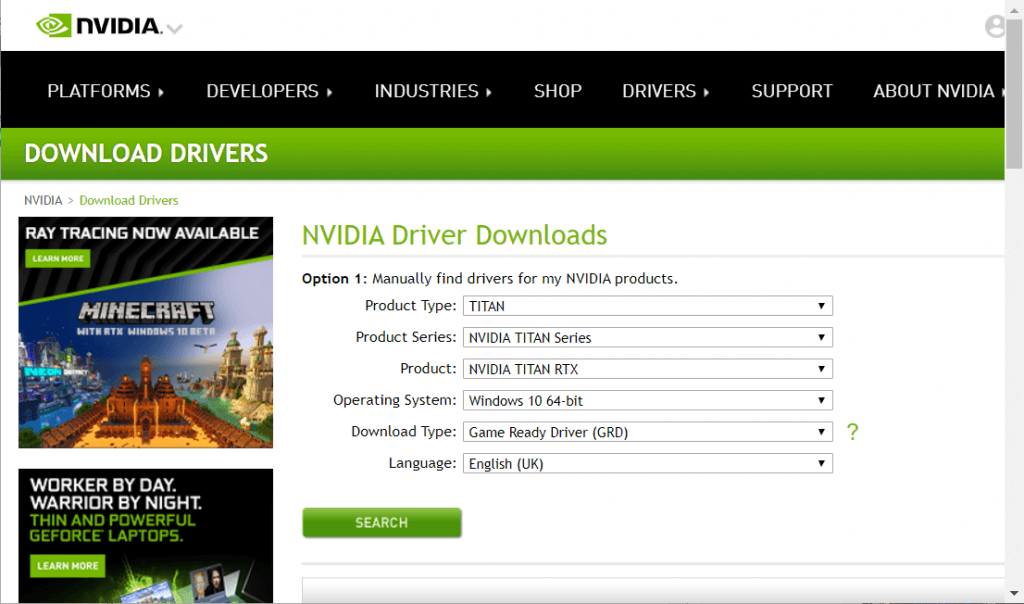
- Click on the Download button to download the driver installer file
- Now run the NVIDIA graphics driver installer as an administrator.
Follow the onscreen instructions to install the latest update.
Solution 6: Perform Clean Installation of the Driver
If all the above-mentioned solutions failed to resolve the GeForce Experience driver preparing to install error, then uninstalling and reinstalling the NVIDIA driver works for you.
Follow the given steps to do so:
- Press Windows + R to open the Run box
- Type appwiz.cpl in the Run box, then hit enter.
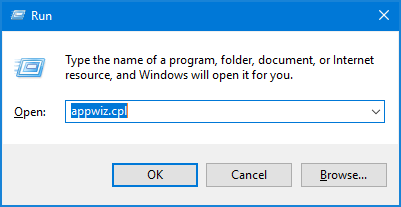
- Right-click on the NVIDIA graphics driver and select Uninstall
- Also uninstall the Audio Driver, GeForce Experience, and PhysX system.
- Now restart your computer.
- The NVIDIA drivers get installed automatically.
So, these are the solutions that work for you to fix Nvidia GeForce Experience stuck on preparing to install error.
Frequently Asked Questions:
What does the GeForce Experience do?
GeForce Experience is a counterpart application to the GeForce GTX graphics card. And, it also helps to keep the drivers updated, automatically optimizes the game settings and also provides the easiest and best way to share the gaming moments with your friends.
Why does GeForce Experience take so long to install drivers?
If you are using the NVIDIA GeForce Experience to install drivers, it first checks the compatibility of drivers, unzips the installed packages of drivers, removes the old driver, and then implement the new driver. So, due to this, it takes time to install the drivers. Also, there are some other factors that affect the installation time, such as your CPU speed, RAM, OS, and data transfer rate of the HD.
Is GeForce Experience good for streaming?
Yes, GeForce Experience is good for game streaming as it has an inbuilt game streaming feature. So, if you have the NVIDIA graphics hardware, then you don’t require any other software for game streaming on YouTube, Facebook Live, or Twitch.
Does GeForce Experience makes a difference in the gaming experience?
Yes, it does. GeForce Experience always prompts users whenever there is a GeForce Game Ready Driver available for the GPU. Also, keeping the drivers updated, and making the optimized settings for the game often brings a noticeable improvement in the gaming experience.
Best Solution to Maintain Your PC Health
As we know Windows OS is full of features and also comes with various errors and stubborn issues. And some of them cannot be fixed with manual solutions.
Therefore, here is an easy solution for you that will help you in resolving all Windows PC errors or issues without any hassle. Try the PC Repair Tool.
This is an advanced repair tool designed by professionals to scan your entire system to detect and fix errors. All you need to do is, just download this tool and the rest of the work will be done automatically.
This tool fixes DLL errors, game errors, update errors, BSOD errors, and registry issues, and it also repairs corrupt/damaged or inaccessible system files, keeps PC secure from viruses/malware, optimizes performance and much more.
Get a PC Repair Tool to Keep Your PC Error-Free
Conclusion
So, as we know GeForce Experience Preparing to install errors will prevent the GPU drivers from being updated, it is needed to fix this issue as soon as possible.
To fix the GeForce Experience stuck at preparing to install screen issue, follow the above-given solutions. These solutions are easy to execute and can be implemented by the non-techy person also.
Well, I hope that you liked this article and it helped you to fix this GeForce Experience error on your computer.
Also, if you have any queries or suggestions, then write them to us on our Facebook page. We would be more than happy to help you with your queries.
Hardeep has always been a Windows lover ever since she got her hands on her first Windows XP PC. She has always been enthusiastic about technological stuff, especially Artificial Intelligence (AI) computing. Before joining PC Error Fix, she worked as a freelancer and worked on numerous technical projects.