
Table of contents
- Why Are My Headphones Not Working on Windows 11/10?
- How to Fix the USB Headset Not Working on Windows 10/11
- Solution 1: Boot your PC with your headphones disconnected
- Solution 2: Check if the system volume is on mute
- Solution 3: Check if your headset has physical damages
- Solution 4: Run the Hardware and Devices troubleshooter
- Solution 5: Change your default audio device to the USB headphones
- Solution 6: Update your audio driver
- Solution 7: Adjust your privacy settings
- Solution 8: Update Windows
- Solution 9: Reset your headphones
- Additional Troubleshooting Tips for Your USB Headset
- USB Headset Not Working on Windows 10/11: Fixed
- FAQ
Is your U SB headset not workin g? This article is for you! These devices are a necessity in our everyday lives, so we can’t afford them to malfunction, especially since it can affect the flow of work.
We’ll walk you through effective means to permanently fix the problem. Go through the guide and choose the method that best works for your situation.
By the end of this article, the “USB headset not detected” issue should be fixed!
Let’s begin.
Why Are My Headphones Not Working on Windows 11/10?
A lot of things can cause your headphones to malfunction. Let’s go briefly through them:
- Connection issues. For instance, c onnectivity problems with your Bluetooth may come from pairing errors, interferences from other devices, or low battery. If you’re connected via USB and your USB-C headphones are not workin g, t he cable may be damaged or simply not fully or properly plugged in.
- System errors. Your system files could be corrupted , or recent software updates may be conflicting with your audio settings. There can also be a conflict between different hardware components.
- Incorrect configuration settings. Sometimes, if your audio settings are not set correctly, your c omputer USB headse t might not work the way you want. For example, if you use the wrong output device or if the volume is too low , the device may appear like it’s not functioning properly, but deep down, there’s nothing wrong with it.
- Your headset is damaged. Over time, wear and tear can break the connectors, fray the wires, or damage the speakers. And this can lead to the U SB headphones not working .
- Your drivers are old. If the drivers are out-of-date, they may not be compatible with the system. And this can cause the sound to distort or Bluetooth options to disappear .
Further reading: How to Download, Install, and Update Bluetooth Drivers
How to Fix the USB Headset Not Working on Windows 10/11
In this section, we’ll walk you through different effective ways to fix the problem:
Solution 1: Boot your PC with your headphones disconnected
One of the reasons why your USB headset is not detected is because it may be interfering with other peripheral devices connected to your system. To fix this, remove the devices and restart your computer.
When that is done, check to see if your headphones are working.
Solution 2: Check if the system volume is on mute
For some weird reason, it could be that your sound is muted, especially if your keyboard has volume keys on it. Quickly check your taskbar right now if it’s muted. If that’s not the case for you, proceed to the next method.
Solution 3: Check if your headset has physical damages
When headphones with a USB connection get worn out, you could have a hard time hearing your music or video game sounds properly. So, analyze if your device has sustained any damage somewhere.
You can also connect it to another device to see if the problem is coming from your computer or headset.
Solution 4: Run the Hardware and Devices troubleshooter
Windows 10 and 11 have a built-in feature to check for any issues with your hardware and various devices.
Important bit
Windows is retiring the Hardware and Devices troubleshooter . They’ve redirected some of the troubleshooters to the new Get Help troubleshooting platform (if you’re using Windows 11). So, if the steps below don’t work for you, check the other solution.
Run the troubleshooter on Windows 10
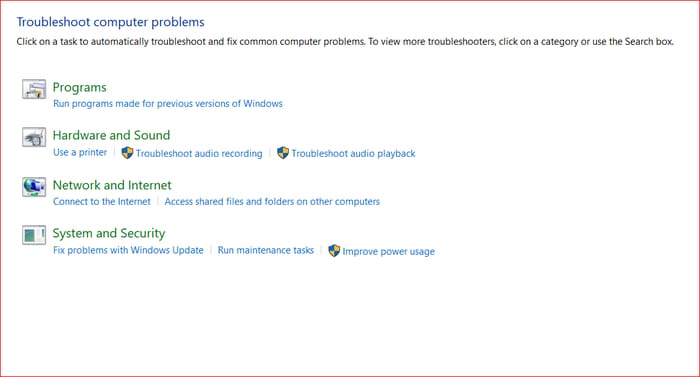
- Go to your Control Panel (Win + S, type “Control Panel,” and hit Enter) and click the drop-down arrow beside View by and select and choose Large icons .
- From there, search for Troubleshooting .

- Select Hardware and Sound.
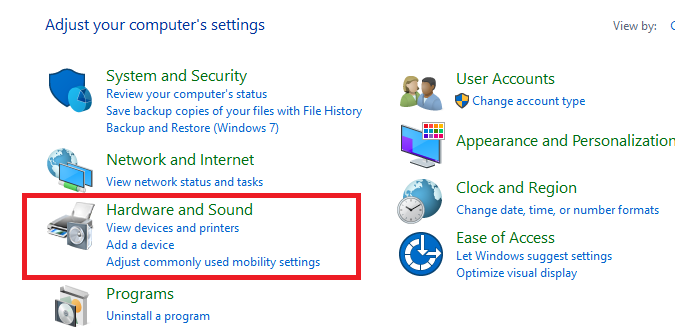
- Finally, select Hardware and Devices and click Next to begin the scanning.
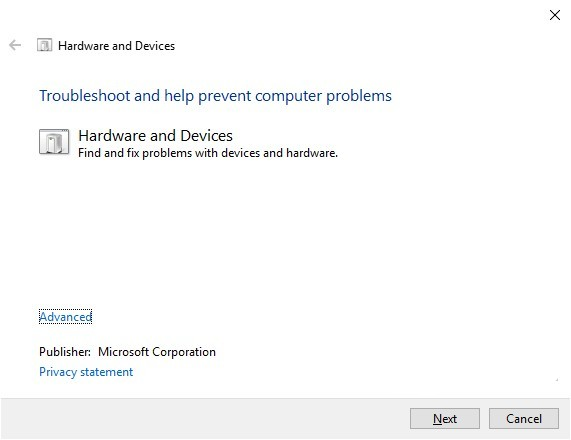
The troubleshooter will search your system for any issues and try to fix them. If the problem is indeed from your headset, it’ll try to correct the issue. You’ll know the result when the scan is complete.
If you’re running Windows 10 build 1809, you won’t find the Hardware and Devices troubleshooter in the Control Panel. However, you can still open the problem using the Windows Powershell .
Don’t forget to run it as an administrator. When it opens, just enter the command “msdt.exe -id DeviceDiagnostic” and the troubleshooter will open. This also works for Windows 11.
Run the troubleshooter on Windows 11
- Open your Settings window by pressing
Windows + I. - After that, click on System and select Other troubleshooters.
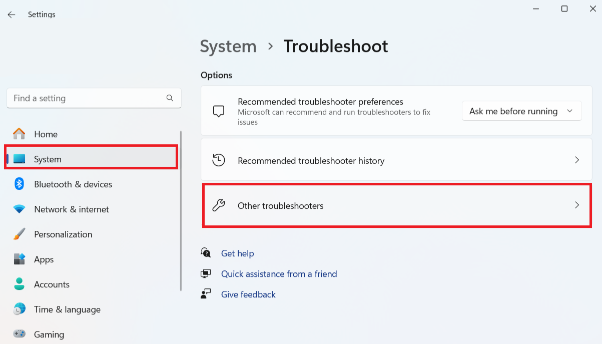
- Click the Run button next to Audio to initiate the issue detection process.
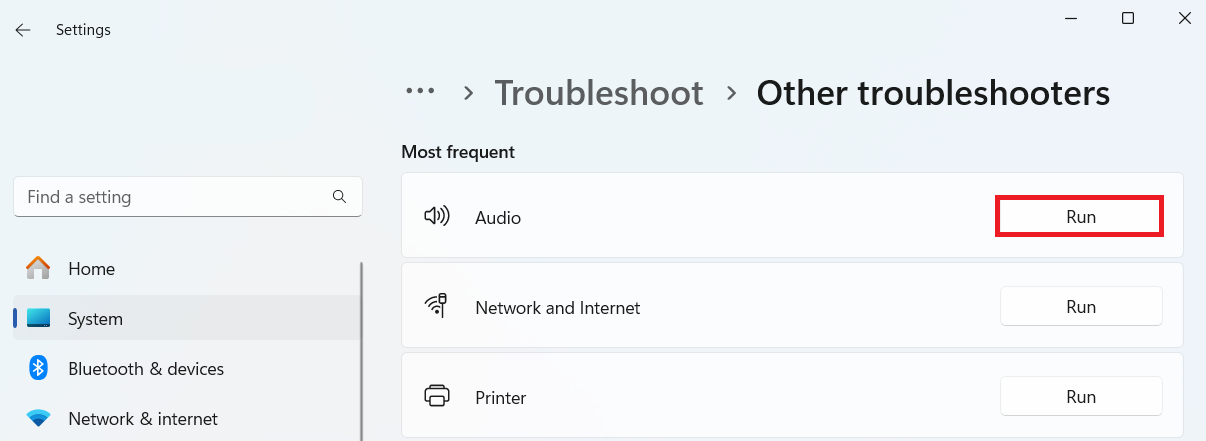
The system will search for any issues with your audio and suggest ways to fix them. If the U SB headphones are not detected , proceed to the next solution.
Solution 5: Change your default audio device to the USB headphones
Setting the device as a default can sometimes do the trick. Let’s try that if that works for you:
Windows 10
- Go to the bottom-right of your taskbar and right-click the speakers or headphones icon.
- Select Open Sound settings from the options.
- Click the Sound Control Panel under Related Settings.
- When the Sound settings window pops up, choose your USB headset.
- Click Set Default, then select OK to save the changes.
Windows 11
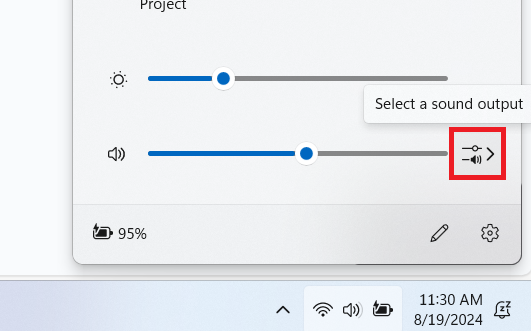
-
Click the speaker icon on the far right-hand corner of your screen and click on the Select a sound output button.
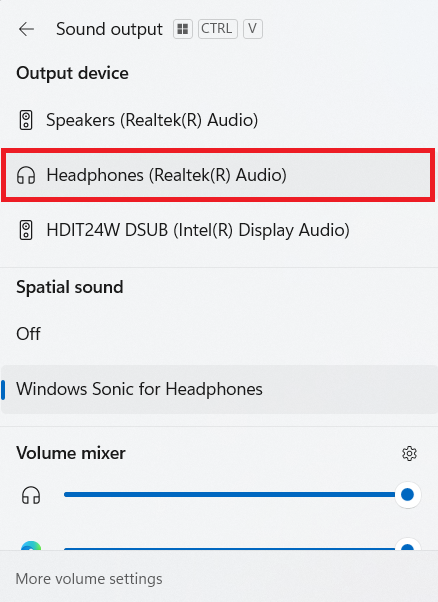
-
Select your headphones under the Output device section.
Is your USB headset still not working? Go to the next solution.
Also read: How to Fix Bluetooth Audio Delay on a Windows PC?
Solution 6: Update your audio driver
Another reason why your USB headset not working because the audio driver may be obsolete, corrupted, or just not found.
You can easily resolve this by updating them. One option is to download the new driver updates from the manufacturer’s website, but that is a hassle, especially if you’re not tech-savvy.
Well, let me save you the trouble and show you two easy ways to update your drivers . The last one is particularly simple!
Update drivers with Device Manager
- Tap Windows + R to open the Run dialog box.
- Type “devmgmt.msc” when the window opens and press Enter.
- Expand Sound, video and game controllers , right-click your USB headset, and select Update driver from the list.
- Click the Search automatically for drivers and wait for the process to complete.
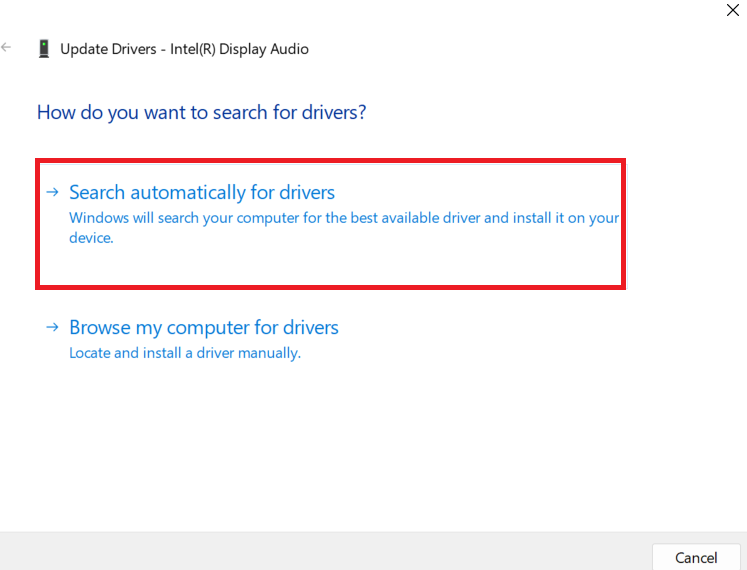
Restart the computer. If your h eadphones with USB connecti on are still not functioning, check out the next solution.
Use Auslogics Driver Updater
Device Manager can be a bit of a pain. It’s unreliable and may not even fix the problem. But there’s a better way to fix problems with drivers.
You can use a tool such as Auslogics Driver Updater to take care of everything for you. Just download, install, and run the program.
It’ll automatically analyze your OS version and processor type. From there, you can update all your drivers with just a few clicks.
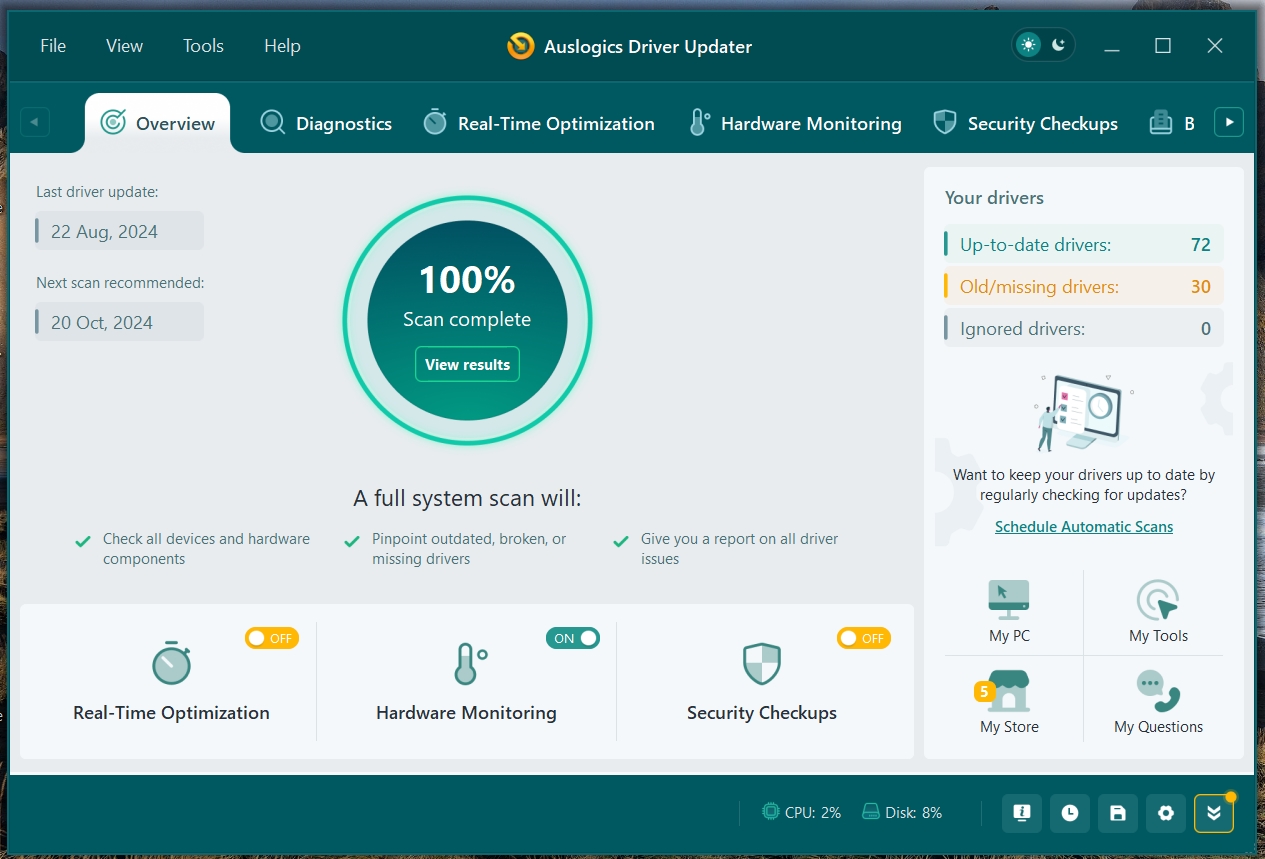
What’s great about Auslogics Driver Updater is that it addresses all driver-related problems on a computer. So, once the process is complete, you can expect a noticeable improvement in your PC’s performance. You can check the review of Driver Updater before making a decision!
PRO TIP
Auslogics have just released Driver Updater 2.0 , which offers more comprehensive driver updates.
Now, you can check your CPU, GPU, and disk temperature in real time! On top of that, you can analyze drivers for viruses, use smart algorithms to precisely install only the official manufacturer-recommended updates, and much more!
Solution 7: Adjust your privacy settings
Have you tried configuring your privacy settings? Sometimes, when your USB headset not working it is the fault of this setting.
So, if you want your computer to recognize a USB headset, you need to adjust your privacy settings for peripheral devices.
Here are the steps:
- Press
Win + Ito launch the Settings app. - Next, click Privacy and choose Microphone from the options.
- Check and make sure to allow apps to access your microphone. You can also verify the programs individually to determine the ones you want to grant access to.
Windows 11
- In the Settings window, select Privacy & security on the left pane and select Microphone .
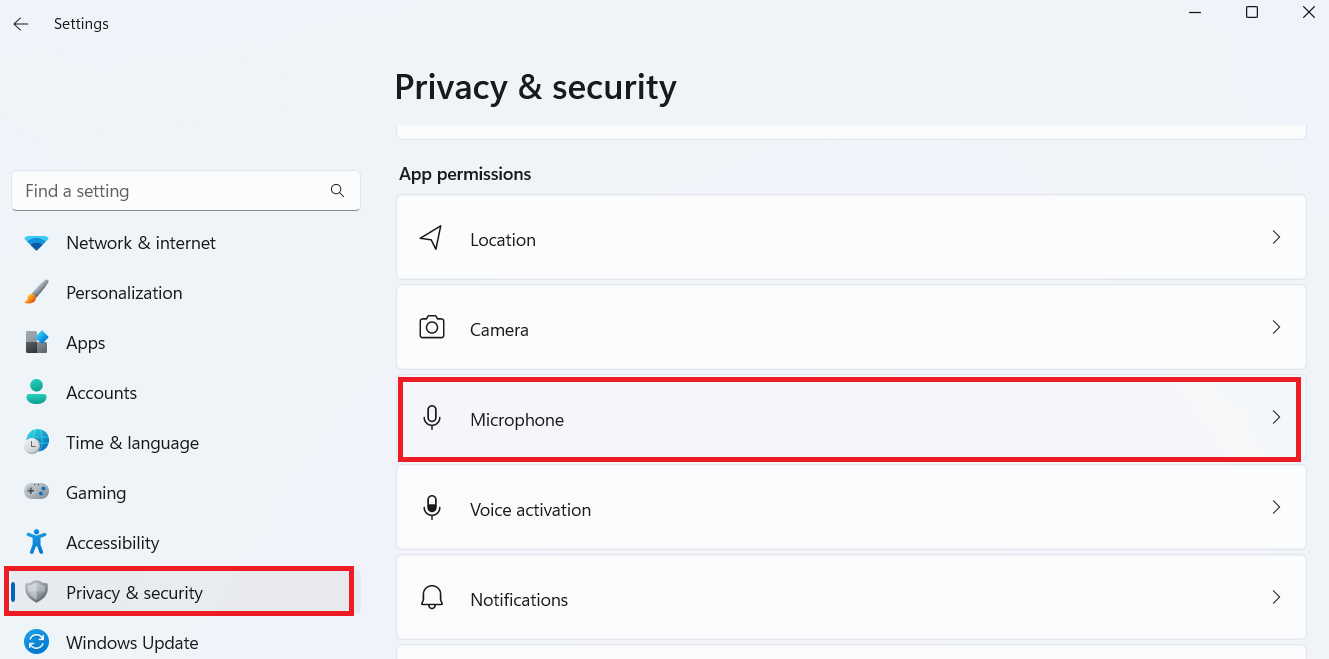
- You can scroll through the various apps and grant or deny access to the programs you want.
Solution 8: Update Windows
Updating Windows can sometimes fix the issue. Here’s how to get Windows 10 and 11 updated:
- Open the search bar and type “Windows update.”
- Select the appropriate result that appears.
- When the Settings window opens, click Check for updates .
- The system will start searching for updates automatically and install any pending updates.

If the issue doesn’t resolve, try the next method.
Solution 9: Reset your headphones
Some settings may be causing the USB headset to malfunction. The best option is to reset the sound settings to their default state:
Windows 10
- Right-click the speaker icon on your taskbar and select Sounds .
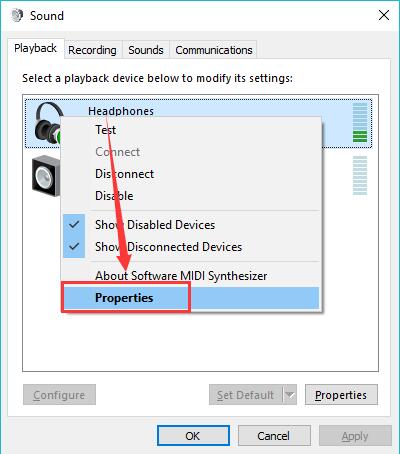
- Go to the Playback tab.
- Right-click your headset and select Properties .
- You’ll see Restore Defaults in the Advanced tab. Click on it.
- Go to the Spatial sound tab and click Restore defaults to reset the headset.
Windows 11
- Click on the search icon on your taskbar, type “Sound settings,” and press Enter.
- Then choose More sound settings .
- Look for your headset among the listed audio devices, right-click it, and select Properties .
- Open the Enhancements tab and click the Restore Defaults
- Repeat the same process in the Advanced and Spatial sound tabs .
- After that, click Apply and select OK to save the changes.
Resetting your headphones should fix the headphones not working on Windows 11 or 10.
Also read: [FIXED] Windows 10 Computer Is Not Recognizing Headphones
Additional Troubleshooting Tips for Your USB Headset
Although it’s essential to know how to enable USB headphones on Windows 10 or 11, making sure the device works at 100% is a different ball game.
We’ve included some steps you can take:
- Click on the sound icon on your taskbar.
- Select your USB headphones from the drop-down menu.
- If you set the sound output device to your headset, test it. To do that, right-click the sound icon on your taskbar.
- Click Open Sound settings .
- Select the Sound Control Panel link, and select your USB headset.
- At the bottom-right portion of the window, click Properties .
- Go to the Advanced tab, then click the Test button.
If you hear the sound coming from your headphones, you’ve successfully fixed the problem.
And what should you do if your Windows computer isn’t recognizing your headphones? Check out this video for a quick fix:
USB Headset Not Working on Windows 10/11: Fixed
If your USB headset is not working, the solutions we’ve gone through should rectify the problem once and for all. We hope that one of these solutions can help you resolve the problem.
Are there other troubleshooting tips you can recommend? Let us know in the comments below!
Also, share this article with your friends who might find it useful!
FAQ
Your drivers may be missing or just plain outdated. Another reason is that the settings are not compatible or there are issues with your system hardware.
Whatever the case, you can use Device Manager to update them. The quickest and most effective way, however, is to use Auslogics Driver Updater.
There are a few reasons why your USB headset mic is not working. What I’d recommend, regardless of the cause, is to troubleshoot the problem and use Device Manager to reinstall or update your drivers.
Your headset jack may be faulty, or it could be a hardware issue. So, check if that’s the case. If not, the problem may be simply an outdated driver, incorrect audio settings, or software conflicts.
Updated by Sherly on Apr 15, 2025
If your USB headset has suddenly stopped working, luckily, there are some solutions you can use to fix your problem. We bring you the best and easiest way to fix the USB headset not detected issue. Please read on to learn the ways:
| Workable Solutions | Step-by-step Troubleshooting |
|---|---|
| Fix 1. Update USB Headset Drivers | Step 1. Click the scan button to locate the USB headset drivers…Full steps |
| Fix 2. Check USB Headset Hardware | Step 1. Close other programs to avoid conflict, and restart your PC…Full steps |
| Fix 3. Configure Privacy Settings | Step 1. Press Windows and I on the keyboard…Full steps |
| Fix 4. Run the Audio Troubleshooter | Step 1. Navigate to the settings menu and choose…Full steps |
Many reasons lead to USB headsets not being detected, such as an outdated, corrupted, or missing audio driver. Now, let’s fix this error and help the USB headset work properly.
Fix 1. Update USB Headset Drivers
One of the main reasons you’re experiencing the «USB headset not detected» on Windows 10/11 issue on your PC is an outdated, missing, or corrupted audio driver. So you need to make sure it’s updated. Then, if you do not have enough experience in computer technology, we recommend you use EaseUS DriverHandy. It can automatically update outdated drivers to avoid this error. It works well on Windows 11/10/8/7, so don’t worry about its compatibility. Here are the steps:
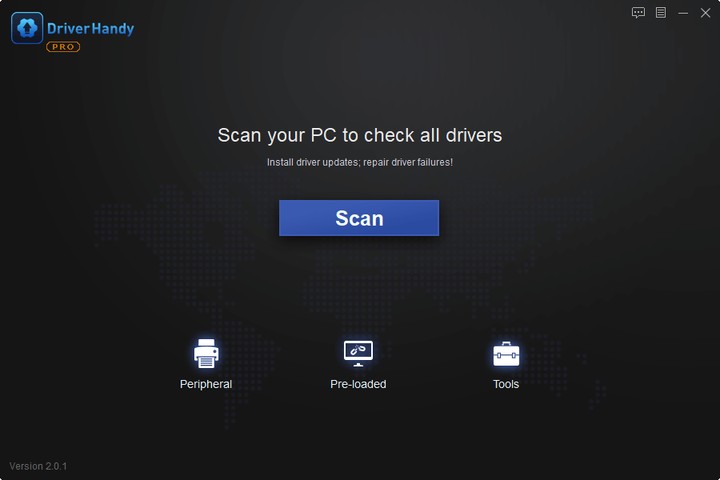
Step 1. Launch EaseUS DriverHandy and click the «Scan» button.
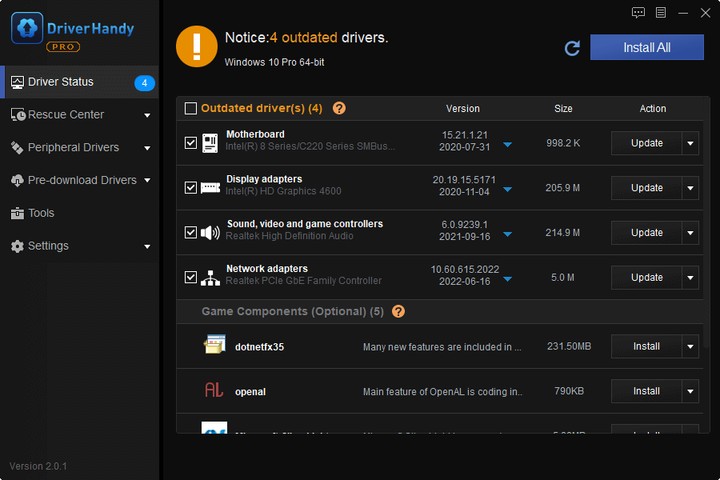
Step 2. Choose the drivers and click «Install All» in the upper right corner to update all drivers. Or you can select the single Motherboard, Sound, or Graphisc drivers and click «Update» on the right side.
Let’s learn more features of EaseUS DriverHandy:
- Update drivers on Windows 10
- Fix the «Power surge on USB port» error
- Fix the «USB not connected to laptop» error
- Fix the «USB not recognized keeps popping up» error
- Check the condition of all kinds of external devices like USB
This software can detect outdated drivers and update them automatically, so if you are tired of managing all kinds of drivers, download this tool to help.
Fix 2. Check USB Headset Hardware
When you fail to detect the USB headset, you need to make sure your USB headset is not broken or damaged. Follow these steps to check:
- Close other programs to avoid conflict, restart your PC and replug into another USB headset.
- If you are using a desktop, try plugging a USB headset adapter into the rear USB port.
- Plug the USB headset into a USB port on another PC to see if your computer is the problem.
If your USB headset can work properly on another PC or another USB port, it turns out that your USB headset is in good condition. Then, try the following fixes to fix this error.
Fix 3. Configure Privacy Settings
If your USB headset is not detected by the PC, you can check the privacy settings on your system, as some settings can prevent applications on your system from using your microphone.
Step 1. Press Windows and I on the keyboard to open Windows Settings.
Step 2. After arriving at the Settings section, select the Privacy tab.
Step 3. Go over to the left pane and click on the microphone option.
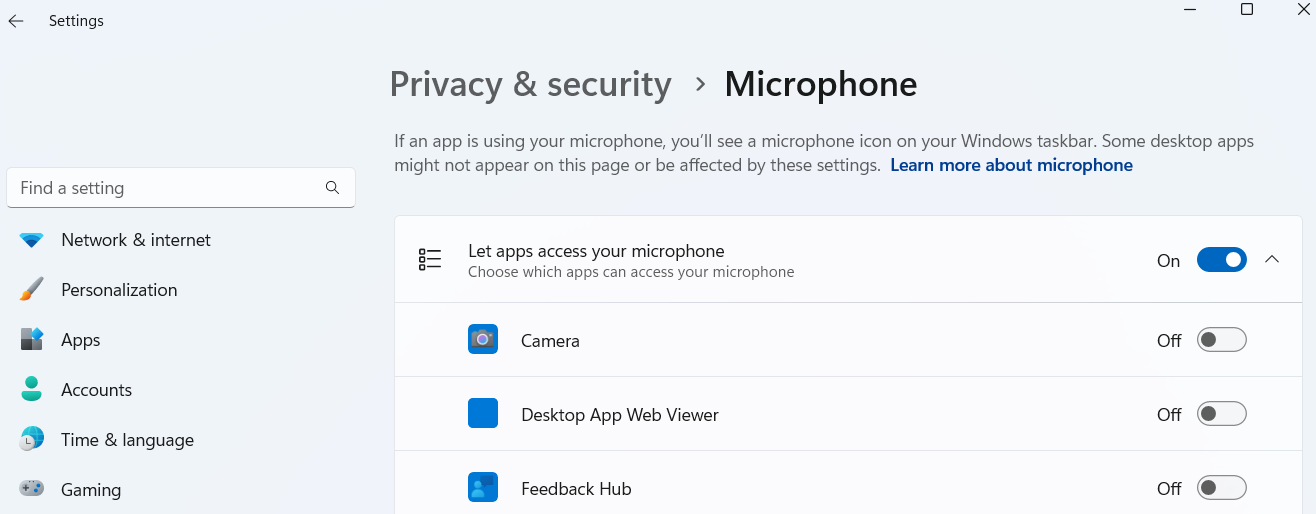
Step 4. Next, select the Allow apps to access your microphone option in the right pane.
Determining which applications should have access to the USB headset’s microphone can be done by going through each app one at a time. You can try again to see if the issue disappears after altering the privacy settings.
Do these fixes help with the «USB headset not detected» error? If they do help you, share this article to help more people.
Fix 4. Run the Audio Troubleshooter
Windows 1o Troubleshooter is designed to solve common problems that you usually encounter with the operating system. In order to solve the problem of headphones not being detected, you can visit the troubleshooter and see if it helps.
Step 1. Navigate to the settings menu and choose «Update & Security.»
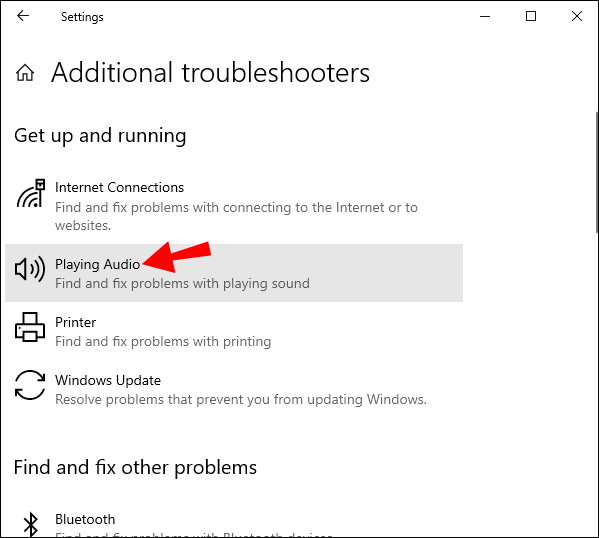
Step 2. Click Troubleshoot. Then choose «Additional Troubleshooters» or «Other Troubleshooters» based on your Windows version.
Step 3. Click on the Troubleshooting option, and then click on Hardware and Sound.
Step 4. Then, choose «Playing audio» and select the targeted device. Finally, follow the wizard to finish the process. If you are prompted to change settings, do it to fix this error.
Here are some other links you may like. Click them if you need help:
Conclusion
Are your USB headsets recognized and detected? If yes, then these solutions have worked. In addition to occasional hardware reasons, the USB headset is not detected mainly because the driver is outdated, so keeping the driver on the computer up to date can help you effectively avoid similar problems and ensure your audio-visual experience. EaseUS DriverHandy can help you manage your drivers; for example, it can install/uninstall/update drivers. In addition, it is easy to use and friendly to newbies.
Download it to try. You will like what it brings you.
USB Headset Not Detected FAQs
It can be annoying if the USB headset is not detected in time, so I list some other common questions in this part. Check them if you are facing similar problems.
1. Why is my USB headset not being detected?
Your computer doesn’t recognize or detect your headset is a fairly common issue in Windows 10/11/8/7 PCs. This can be caused by corrupt or outdated drivers, a faulty USB port (if your headset uses USB), a bad connection (such as Bluetooth), or a problem with the headset itself.
2. How do I get Windows 10 to recognize my USB headset?
If your audio drivers are new and the USB headset is in good condition, Windows can recognize it once you plug it in. However, if it can’t be detected or recognized, you may need to do as follows:
- Check if your USB headset is broken or physically damaged
- Update audio and USB drivers
- Configure the privacy settings
3. Why won’t my USB headset mic work?
There are many possible reasons why your USB headset mic can’t work properly, such as:
- Old, corrupted or missing audio drivers
- USB headset mic is not the default device
- Computer hardware issues
- A problem with your USB headset
Readers help support Windows Report. We may get a commission if you buy through our links.
Read our disclosure page to find out how can you help Windows Report sustain the editorial team. Read more
Many people use USB headsets, but it seems that some users are having issues with their USB headsets. If your USB headset is giving you trouble today we’ll show you how to fix those issues on Windows 10.
Users are reporting distorted sound on their USB headsets and replacing the USB headset with the exact same model doesn’t fix the issue. So if the problem isn’t the USB headset what can you do to fix this problem?
USB headsets are great, but sometimes you might encounter certain issues with them. Speaking of USB headset issues, here are some problems that users reported:
- USB headset mic not working – Sometimes the microphone on your USB headset isn’t working properly. This can be a big problem, but you might be able to fix it by changing your microphone settings.
- USB headset not working Windows 10, 8, 7, on Skype – This problem can appear on any version of Windows, and if you encounter it, you should be able to fix it using the solutions from this article.
- USB headset not detected, not showing up in playback devices, not working with YouTube – Sometimes your headset might not be detected at all. To fix this issue, be sure to reinstall your USB headset and check if that works.
- USB headset audio, sound not working – If your USB headset isn’t working, the issue might be a third-party application. To fix the problem, you need to find and remove this application from your PC.
- USB headset noise problem, static, crackling, buzzing – These are some common problems that can appear with USB headsets. To fix the problem, temporarily disable your headset and enable it again.
- USB headset is not working – If your USB headset isn’t working, you might have to reinstall your USB drivers. Once your drivers are installed, check if the problem is still there.
How to fix USB headset not detected or working on Windows 10?
1. Unplug the headset while Windows 10 boots
Users report that there might be some conflicts with your USB headset and other USB devices, and in order to fix this issue, it’s required that you unplug your USB headset while your system boots. When your Windows 10 starts you can plug in your USB headset and it should work without any problems.
2. Update your BIOS and reset CMOS
Some users report that updating BIOS and resetting CMOS fixes the distorted sound issue. Updating your BIOS is an advanced process and it’s different for each motherboard. If you don’t know how to do it properly maybe hire a professional to do it for you if you want to avoid any potential damage to your system.
3. Don’t use your headset as default playback device
This solution applies to headsets that come with built-in sound card and connect to both USB and audio port on your computer. The issue with these headsets is that you’re hearing sound only from one speaker when gaming, and in order to fix it you need to do the following.
- Right-click the Sound icon in the Taskbar and choose Open Sound settings from the menu.
- Select Sound control panel.

- The sound window will now appear. Right-click your headphones and choose Properties from the menu.

- Set Device usage to Don’t use this device (disable) and click Apply and OK to save changes.


By doing this you will make the sound card process your audio instead of the card that is built in your USB headset.
4. Uninstall your USB drivers
According to users, sometimes USB headset issues can occur due to your USB drivers. Several users reported issues with USB 3 drivers, but after reinstalling them, the problem was permanently resolved. To do that, you just need to follow these steps:
- Press Windows Key + X to open Win + X menu. Now choose Device Manager from the list.
- When Device Manager opens, locate your USB 3 driver, right-click it and choose Uninstall device.
- Confirmation dialog will now appear. Choose Uninstall from the menu.
- After the driver is uninstalled, click Scan for hardware changes icon.


Windows will now search for the default driver and install it. Once the default USB driver is installed, be sure to check if the problem is resolved. Keep in mind that this solution works for both USB 2 and USB 3 drivers, so you can use it regardless of the USB type you’re using.
The default drivers should work without issues, but sometimes it’s better to use a dedicated driver. You can download the appropriate drivers from your motherboard’s manufacturer’s website. Simply visit the website, enter the model of your motherboard and download the latest drivers for it.
If searching for drivers manually seems a bit complicated to you, there are automated tools that can download the necessary drivers with just a single click.
5. Remove the problematic applications
Sometimes third-party applications can install their own drivers, and that can lead to USB headset issues. To fix the problem, it’s advised to remove the problematic application from your PC.
Some users reported that Etron software caused this problem to appear, and in order to fix the issue, you need to remove the software. You can remove the application using the Settings app, but this method isn’t always effective since it can leave certain leftover files that can still interfere with your USB headset.
To fix the problem, it’s advised to use an uninstaller software. This is a special application that can remove any application from your PC along with all of its files and registry entries.
By using an uninstaller application, you’ll remove all files and registry entries associated with the problematic application and prevent any future issues from occurring.
Once you remove the problematic application, the issue should be permanently resolved.
6. Temporarily disable your USB headset
Sometimes there might be a glitch in your system, and that glitch can cause various USB headset issues to appear. One of the fastest ways to fix this problem is to temporarily disable your USB headset. To do that, you just need to do the following:
- Open Device Manager.
- Locate your USB headset, right-click it and choose Disable device from the menu.
- Now right-click your USB headset and choose Enable device.
After doing that, your USB headset will start working again. Keep in mind that this is just a workaround, so you’ll have to repeat it if the issue reappears.
7. Disconnect the headset and turn off Razer Synapse software
Sometimes USB headset issues can be caused by a software such as Razer Synapse. According to users, they managed to fix the problem simply by unplugging the headset and closing the Razer Synapse. After doing that, you just need to connect the headset again and restart Razer Synapse software.
Keep in mind that this is just a workaround, so you’ll need to repeat it whenever the issue occurs.
- How to fix static noise in Windows 10/11 in 6 easy steps
- No sound from headphones in Windows 10/11? Try these fixes
- Headphones not detected in Windows 10 or 11 [Easy Fix]
8. Check your privacy settings
According to users, USB headset issues can occur due to your privacy settings. Users reported that apps weren’t allowed to use the microphone on their USB headset due to certain settings. However, you can fix that issue by doing the following:
- Open the Settings app. You can do that quickly by pressing Windows Key + I.
- Navigate to the Privacy section.

- In the left pane choose Microphone. In the right pane, make sure that Allow apps to access your microphone is enabled. In addition, be sure to check the list below and allow individual applications to access your microphone.


After enabling your microphone the issue with your USB headset should be completely resolved.
9.Uninstall any old USB headset drivers
Several users reported USB headset issues after purchasing a new headset. According to them, the problem was caused by drivers from an older USB headset. To fix the problem, it’s advised to remove the older driver since it might interfere with your new headset. To do that, just follow these steps:
- Open Device Manager.
- Now go to View > Show hidden devices.
- Locate your old USB headset driver, right-click it and choose Uninstall device.
- If available, check Remove driver software for this device and click Uninstall.
After removing the older driver, the issue should be completely resolved, and you should be able to use your USB headset without any problems.
In case none of these solutions worked for you, go and check out our article about sound problems in Windows 10, maybe it will be helpful.
However, we hope this article helped you to solve the problem with your USB headset in Windows 10. If you have any comments or questions, just reach for the comments, below.
Milan Stanojevic
Windows Toubleshooting Expert
Milan has been enthusiastic about technology ever since his childhood days, and this led him to take interest in all PC-related technologies. He’s a PC enthusiast and he spends most of his time learning about computers and technology.
Before joining WindowsReport, he worked as a front-end web developer. Now, he’s one of the Troubleshooting experts in our worldwide team, specializing in Windows errors & software issues.
Suddenly, your Logitech or Onikuma or Mpow headset stops working on Windows 10, 8, 7. You may find your USB headphones do not work after you plugged them into a PC USB port or after you boot up Windows 10. You can’t get sound through the USB headset or static in headphones and speakers, so Logitech USB headset is not working on Windows 7, 8, 10.
Or sometimes, even though there is sound in the USB headphones, the headset sound likes noise and is cracking, buzzing or keeps in low voice. When you check the USB headset driver in device manager, it displays it in other devices and informs you that the USB headset is not detected and no longer works on your PC.
How to Fix USB Headset Not Working on Windows 10?
So long as you are encountering issues with the Logitech or Plantronics or Blackweb USB headset or any other USB headphones, you are supposed to troubleshoot this USB headset error with USB headset adapter step by step.
Solutions:
1: Check USB Headphone Hardware
2: Avoid Device and Application Conflict
3: Update USB Headset Drivers
4: Set USB Headset as Default Device
5: Grant Exclusive Control
6: Run Playing Audio Troubleshooter
Solution 1: Check USB Headphone Hardware
Once there is no audio from the USB headset, it may imply that Logitech USB headset is not detected when plugged in or no sound after setup. The first thing you are supposed to do is making sure the USB headset is not broken or incorrectly configured on Windows 10. You need to check the things below.
1. Restart your PC and then re-plug the Logitech, Blackweb, Plantronics, Beexcellent gaming USB headphones into the computer USB port.
2. Plug your USB headset with microphone into another USB port on your computer.
3. Try to plug the USB headset adapter into the rear USB port if you are using a Desktop.
4. Plug the USB headphones into the USB port on another PC to see if it is your computer running into issues.
5. Reconnect the wireless USB headset to Windows 10 if you are utilizing a wireless one.
6. Attempt to use another headset on your PC to check if your USB headset is physically impaired.
If you noticed that it is of no use re-plugging the USB headphones into another port of your PC or another PC, maybe it is time to consider replacing a new headset or headphones.
But if another audio device can work fine on your PC or Logitech USB headset runs well on another computer, you need to fix this headphone issues right away.
Solution 2: Avoid Device and Application Conflict
In a large sense, if too many devices or programs need the audio device, like the game, or the media player, etc. USB headset mic not will happen to you as there exists device conflict on Windows 10. Hence, you need to get rid of the program interruptions.
1. Try to turn off some of the applications if possible. For instance, when play games, choose to close Groove music.
2. Uninstall the most recently downloaded third-party antivirus applications, such as Avast, in Control Panel.
3. Plug out any other USB devices, including the USB mouse, USB keyboard, speaker, etc.
Just make sure Logitech USB headphone, Onikuma headset, and any other USB headsets with microphones won’t in a conflicting condition on Windows 10.
Solution 3: Update USB Headset Drivers
Aside from USB headset hardware and working circumstance, USB headset driver can also be categorized into one of the causes of undetected USB headphones. In this way, updating Onikuma, Plantronics headset driver, Mpow drivers, and Logitech headset drivers is necessary anyway.
If you have no time and energy to find the USB headphone driver online, it is strongly recommended that you make full use of Driver Booster to help you install the latest USB headset drivers in the hope that USB headphones not recognized by Windows 7, 8, 10 can be fixed here.
1. Download Driver Booster on your computer.
2. After rapidly installing and running Driver Booster, hit the Scan. You can observe that Driver Booster is scanning from 0% to 100% until it detects all the device drivers on Windows 10.

3. Find out Sound, video and game controllers and then Update the USB headset drivers.
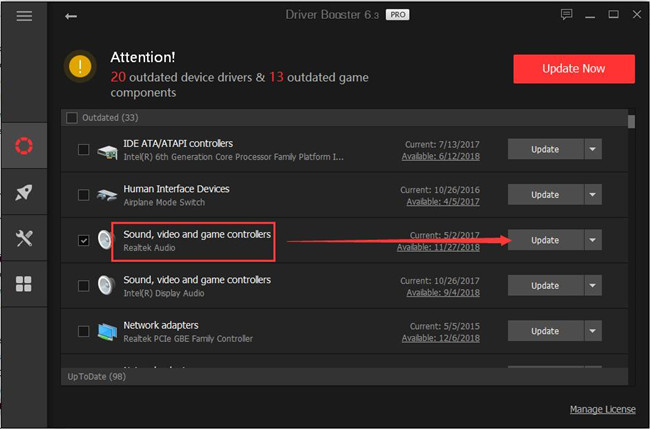
Here Driver Booster will update Mpow USB headset driver, Plantronics drivers, Sades headset driver, etc.
With the up-to-date audio driver, try to re-plug the USB headphones into Windows 10 to see if Logitech USB headset no longer working has disappeared.
Related: 3 Ways to Download Beats Audio Drivers on Windows 10, 8, 7
Solution 4: Set USB Headset as Default Device
If you do wish to enjoy a high-quality sound from the headset, it is also worth trying to make the USB headphones as default audio device on Windows 10.
1. Right click the sound icon on the right bottom of the Desktop and then choose Sounds from the list. Here if you noticed that sound icon is missing from Windows 10, try to fix it as well.
2. Under the Playback tab, right click the USB headset or headphones to Set as Default Device.
3. Then under the Recording tab, try to set the USB headset as the default device as well.
Next time you play audio and videos, USB headphones will be working for you as the default device. It will work for you smoothly.
Solution 5: Grant Exclusive Control
Provided that Logitech, Plantronics, Mpow, Beexcellent gaming USB headset is not working in some specific applications, like game, media player, it is of great use that you try to gain exclusive control for the programs to let it use the USB headphones.
1. Right click the sound icon and then pick out Sounds from the list.
2. Under the Playback tab, right click your USB headphones or headset to open its Properties.
3. Under the Advanced option, check the box of Allow applications to take exclusive control of this device.
4. After that, hit Apply and OK to save changes.
At this moment, you can try to use the USB headset with microphone in games or videos. Maybe the Logitech, Plantronics, Hunterspider headset not recognized is removed here.
Solution 6: Run Play Audio Troubleshooter
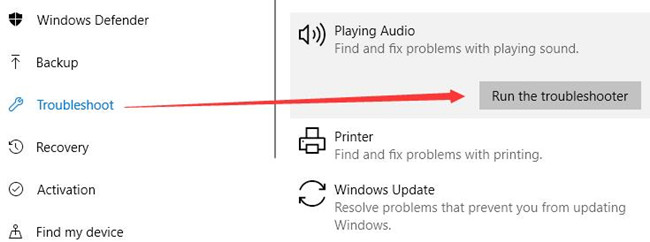
As a device on Windows 10, the instant you hit upon headset microphone not working, you may as well utilize Windows embedded troubleshooter to fix this headset device issue.
1. Bound for Start > Settings > Update & Security.
2. Under Troubleshoot, scroll down to locate the Playing Audio and then decide to Run the troubleshooter.
3. Then in Which of these devices do you want to troubleshoot, tick the circle of Headphones to troubleshoot the USB headset errors.
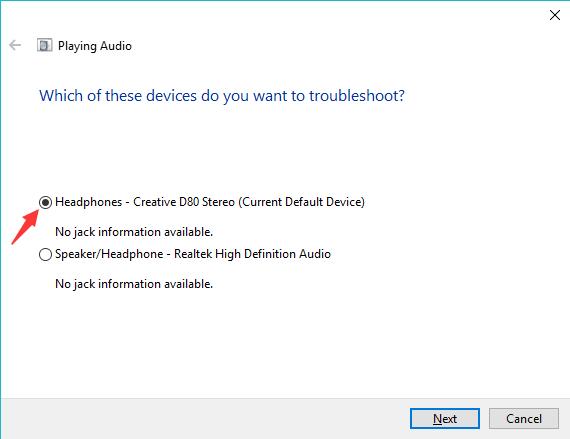
4. Click Next to finish this troubleshooting process.
If possible, Windows 10 troubleshooter will scan and fix no audio from the USB headset error.
In brief, in order to fix Logitech, Mpow, Onikuma, Plantronics, Beexcellent USB headset not working on Windows 10, you can get down to factors like the USB headphone drivers, settings, and physical condition.
Все способы:
- Не работают наушники в Windows 10
- Причина 1: Физические неисправности
- Причина 2: Ошибки при подключении
- Причина 3: Системные сбои
- Причина 4: Отключено устройство
- Причина 5: Драйвера и другое ПО
- Причина 6: Вирусы
- Заключение
- Вопросы и ответы: 0
Неполадки в работе звуковых устройств в ОС Windows – явление далеко не редкое. Причины, их вызывающие, в большинстве случаев довольно легко поддаются диагностике, но бывают и исключения. В этой статье мы разберемся, почему отсутствует звук в наушниках на ПК с Виндовс 10.
Не работают наушники в Windows 10
Факторов, влияющих на подобное поведение устройств, несколько. В первую очередь это невнимательность пользователя при подключении или физические неисправности штекеров или самих наушников. Остальные неполадки имеют программную природу, и степень сложности их устранения зависит от того, что привело к сбою. Это может быть отказ службы, сбой системных настроек или драйверов, а также внешние воздействия в виде вирусных атак. Далее мы подробно разберем наиболее распространенные варианты.
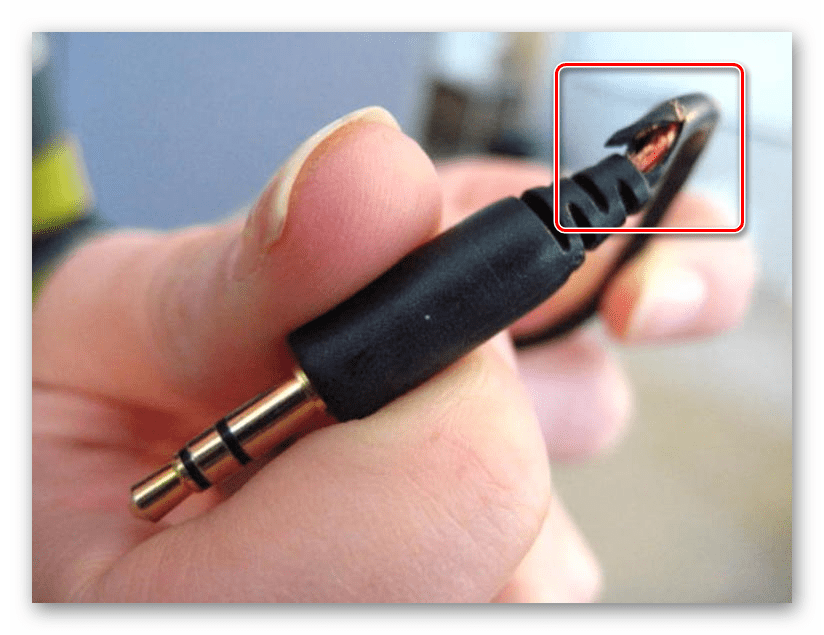
Причина 1: Физические неисправности
Первое, на что стоит обратить внимание, это возможный выход из строя самого устройства или штекера и кабеля. Закрыть вопрос с проводами поможет визуальный осмотр. Довольно часто некачественные материалы и небрежное отношение приводят к перелому возле штекера или на входе в наушники.
Диагностировать выход из строя устройства можно, подключив его к другому разъему, например, на передней панели корпуса, или к другому компьютеру или телефону. Отсутствие звука говорит о том, что «ушам» требуется ремонт или замена.
Существует вероятность того, что «приказали долго жить» разъемы, к которым подключаются наушники, или компоненты, отвечающие за звук на материнской плате или звуковой карте. Явный признак — устройство работает на другом ПК. В такой ситуации вам предстоит визит в сервисный центр. Если используется гарнитура, которая подключается по USB, необходимо также проверить и этот порт на работоспособность, подключив к нему флешку или другой девайс. Не стоит исключать и возможность сбоя драйверов USB. Попробуйте несколько раз переподключить устройство, подсоединить его к другому порту, а также повторить те же действия после перезагрузки. Отказ портов также служит поводом для обращения в сервис.
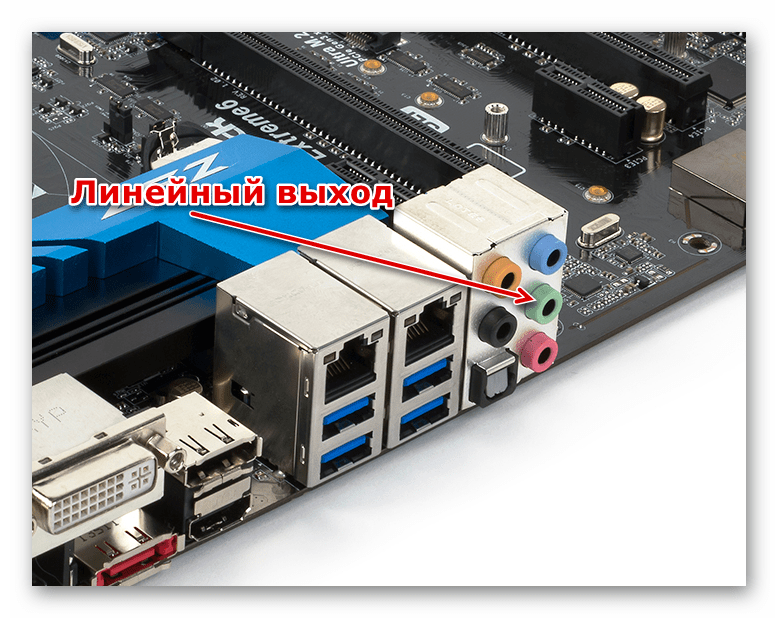
Причина 2: Ошибки при подключении
Неопытные пользователи нередко путают входы и выходы на звуковой карте, особенно, если их много или нет разделения по цвету. Обычно наушники подключаются к линейному выходу зеленого цвета. Если на вашей материнской плате разъемы одинаковые, внимательно посмотрите на значки на задней планке: там может стоять соответствующее обозначение. Другой, более надежный способ определить назначение гнезд – почитать мануал к материнской плате или «звуковухе».
Подробнее: Включение звука на компьютере
Причина 3: Системные сбои
Говоря о системных сбоях, мы имеем в виду отказ службы аудио, сброс настроек или случайные ошибки в драйверах. В большинстве таких ситуаций проблема решается перезагрузкой ПК. Если она не помогла, попробуйте выключить машину, а затем включить снова. Делается это для того, чтобы все системные процессы были остановлены, а драйвера выгружены из памяти. Далее поговорим о других вариантах.
Служба аудио
Служба аудио («Windows Audio») – это системный сервис, отвечающий за вывод звука и функционирование устройств. Случается, что при очередном включении компьютера она попросту не запускается. Об этом говорит красный значок ошибки на иконке звука в области уведомлений.
Решить проблему можно разными способами, в зависимости о того, какие причины привели к такому поведению системы. Можно воспользоваться автоматическим средством, запустить службу вручную, а если не получится, проверить ПК на вирусы или прибегнуть к восстановлению Windows.
Подробнее: Решаем проблемы со службой аудио в Windows 10
Сброс настроек
Сброс системных настроек аудио может произойти по разным причинам. Это может быть установка нового драйвера, обновления или программы управления звуком, вирусная атака или обычный системный сбой, каких бывает немало. При этом обычно сбиваются отметки на устройствах по умолчанию и уровни воспроизведения.
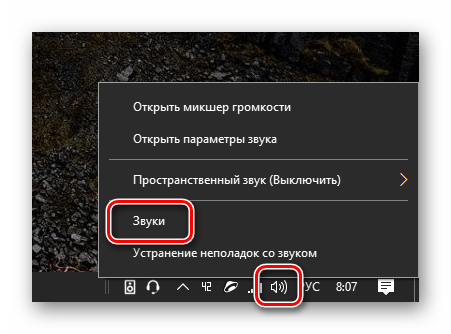
- Идем в системные настройки звука, кликнув по значку динамика правой кнопкой мыши и выбрав пункт, указанный на скриншоте.

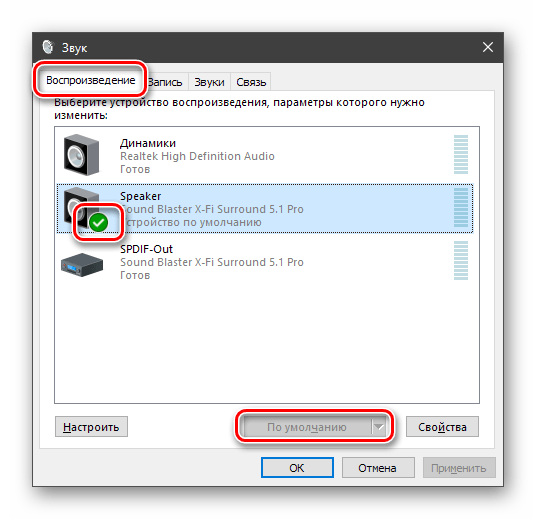
- Идем на вкладку «Воспроизведение» и проверяем, чтобы зеленая отметка стояла на наушниках. Если «уши» подключены не к передней панели на корпусе, устройство может называться так же, как и колонки («Динамики» или «Speaker»). Выбираем девайс и нажимаем «По умолчанию».

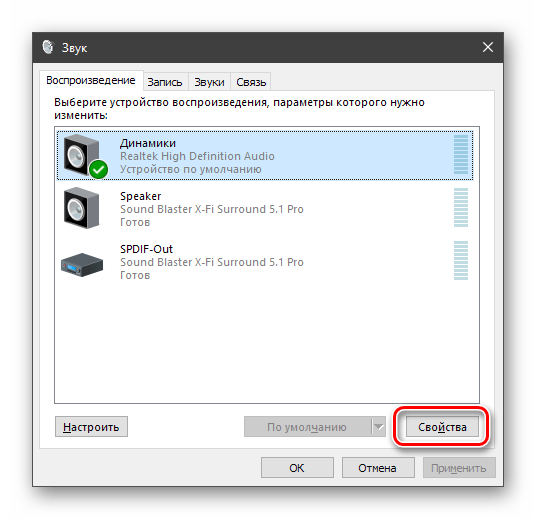
- Нажимаем на кнопку «Свойства».
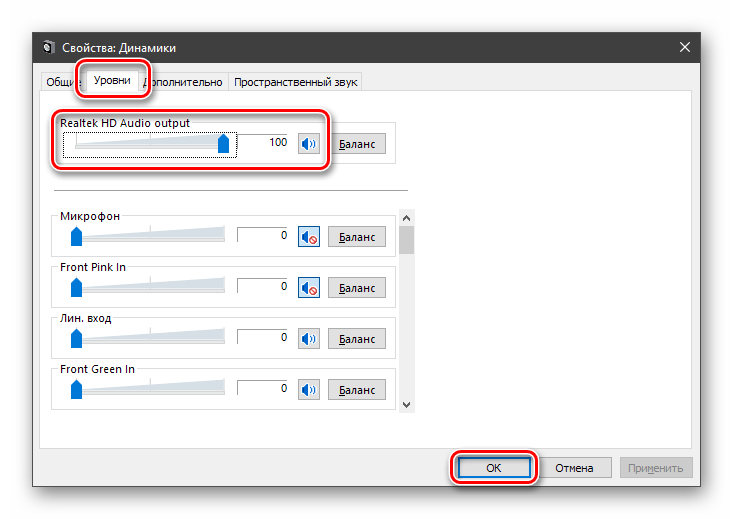
На вкладке «Уровни» смотрим, чтобы ползунок был в положении «100» или, по крайней мере, не «0».

Подробнее: Настраиваем звук на компьютере
Причина 4: Отключено устройство
Бывают ситуации, когда при переходе в настройки мы видим картину, как на скриншоте, с надписью «Звуковые устройства не установлены».
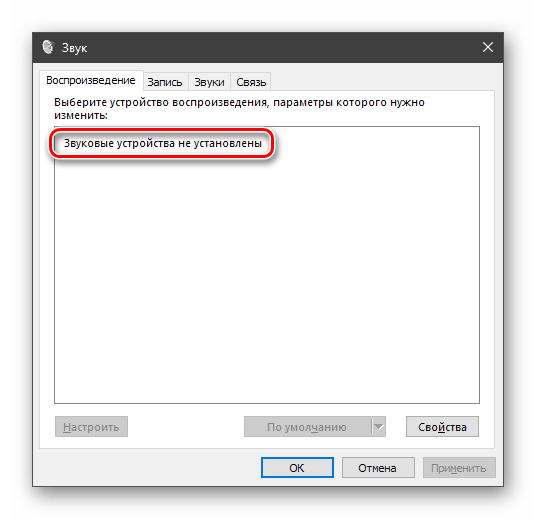
Здесь необходимо выполнить следующие действия:
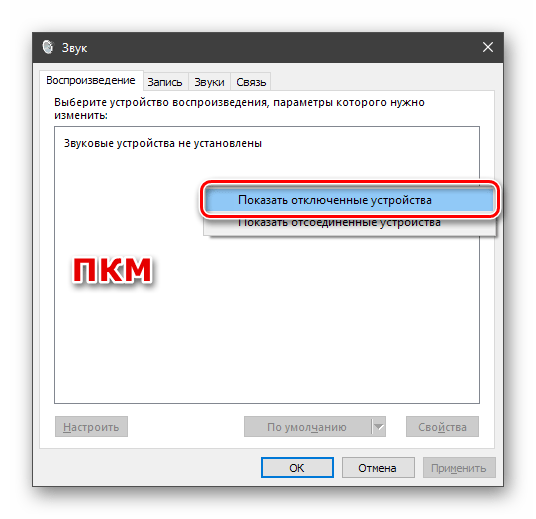
- Жмем правой кнопкой мыши по любому месту окна настроек и выбираем пункт «Показать отключенные устройства».
- Выбираем устройство, кликаем по нему ПКМ и нажимаем «Включить».
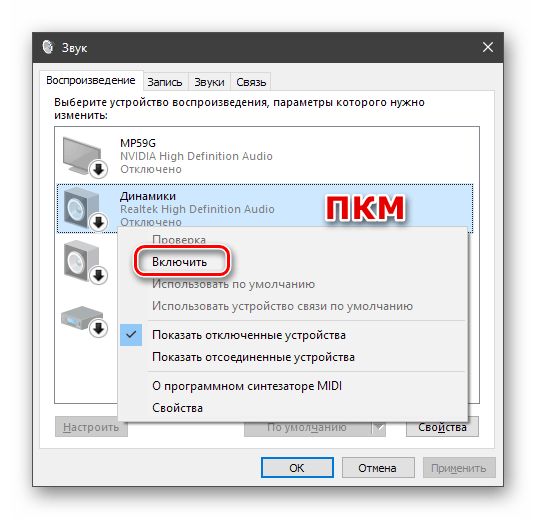
Если приведенная инструкция не сработала, следует попробовать решить проблему способами, представленными в статье по ссылке ниже.
Подробнее: Решаем проблему с не установленными аудиоустройствами в Windows 10
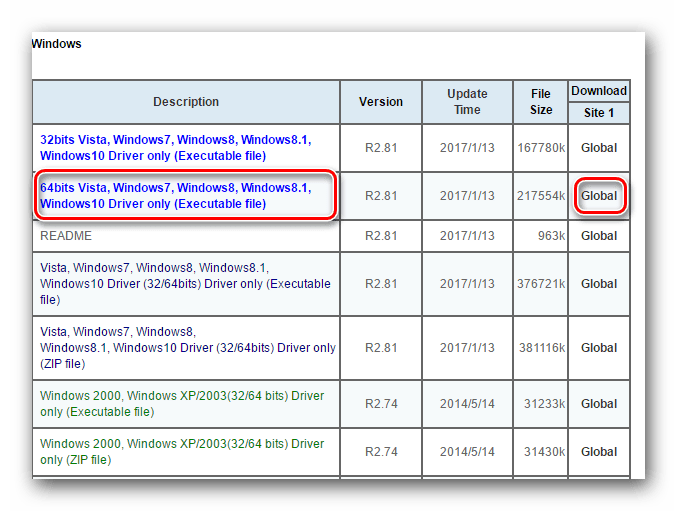
Причина 5: Драйвера и другое ПО
Причиной отсутствия звука в наушниках может стать некорректная работа драйверов или их отсутствие. Также, возможно, был установлен софт для управления аудио, который мог изменить параметры или «перебросить» управление ими на себя. В первом случае нужно проверить совместимость «дров» с вашими аудиоустройствами, переустановить ПО или, если все действия не привели к желаемому результату, восстановить систему.
Подробнее: Решаем проблему со звуком после обновления драйверов
Если вы решили воспользоваться какой-либо программой по усилению или настройке звука, здесь два варианта. Первый – ознакомиться с мануалом к софту и изменить необходимые параметры, а второй – отказаться от его использования, удалив с компьютера. Обратите внимание, что после удаления, возможно, придется заново произвести настройку аудио (см. параграф «Системные сбои»).
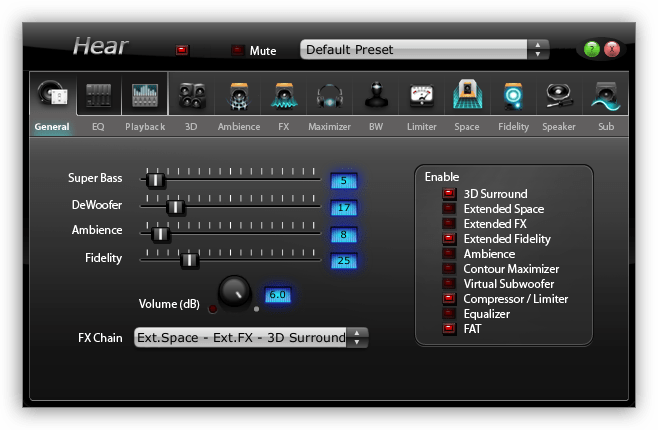
Читайте также: Программы для настройки, усиления звука
Причина 6: Вирусы
Вредоносные программы, разумеется, не способны вывести из строя сами наушники, но они могут стать причиной всех озвученных выше программных проблем. Проникая в компьютер, вредители изменяют системные параметры, повреждают файлы и препятствуют нормальной работе служб и драйверов. Любые неполадки, которые не поддаются диагностике, также должны вызвать подозрение на заражение. В таких случаях требуется без отлагательств произвести сканирование системы специальными утилитами и избавится от вирусов. Кроме того, можно обратиться за бесплатной помощью к волонтерам, которых можно найти на специализированных форумах. Несмотря на то, что там не берут платы за свои услуги, эффективность приближается к 100 процентам.
Подробнее: Как почистить компьютер от вирусов
Заключение
Мы разобрали шесть причин отсутствия звука в наушниках на компьютере с Windows 10. Большинство из них устраняется довольно легко путем манипуляций с настройками или исправления функционирования драйверов. О физических неисправностях сказать больше нечего, кроме того, что придется или ждать ремонта, или посетить компьютерный магазин.
Наиболее серьезной проблемой является вирусная атака. Поскольку никогда нельзя исключать такую возможность, проверку на вирусы необходимо произвести в обязательном порядке, даже если удалось вернуть звук приведенными способами.
Наша группа в TelegramПолезные советы и помощь