
Methods and Steps to Fix BlueStacks not Working on Windows 10 – Are you encountering troubles along launching BlueStacks on the newest Windows OS? Many users face lots of similar problems after they upgraded their computers to the latest edition. They complain about BlueStacks Windows 10 crash, gray screen, not loading like problems.
If you are confronting the same issues then you are on the right page since here is the guide to settle all issues belonging to this application on Windows 10.
BlueStacks not Working on Windows 10
When you find this error the first thing you should ensure that you have downloaded the application from its authoritative website. And the second is once Uninstall and reinstall so that you can avoid extra hassle. Despite this, you experience the issues then follow the fix Step by step carefully.
Step 1 –
Ensure Accurate System Requirement
Before starting any fix confirm that you fulfill Requirements of System. Your computer must be equipped with
1. At least 2 GB of RAM,
2. Not lower than 4 Gigabyte volume in Hard Disk,
3. Fully updated Graphics Card,
4. Running with Administrator Privilege.
Step 2 –
Update Graphics Card
Graphics card plays a great role in running run this emulator so here we are writing the way to update it.
Right click on the NVIDIA icon residing in the system tray and choose the option Check for updates on the menu.
Wait until the card is perfectly updated and restart the system after it is finished.
Step 3 –
Start in Compatibility mode
If BlueStacks Windows 10 not loading issue occurs then the finest solution is running it in Compatibility mode.
Right click on the Shortcut of the app and select Properties from the list of options.
Now switch to Compatibility tab afterward click Run compatibility troubleshooter.
Pick Try recommended settings within two choices.
Click Test the program… and check whether you have solved BlueStacks not Working on Windows 10.
If not then click Next and select Try Using different settings to launch the emulator.
Step 4 – Make sure if you have proper Permission to run BlueStacks
Several times lack of correct security settings prevents this application from running on Windows 10. So check it.
Again right-click on this emulator shortcut and choose Properties option.
Switch to the Security tab and click Edit.
Select your username in Group or user names block and tick Full control box in Allow column in the lower section. At last, click Apply and then OK.
Close and Start the application freshly and see whether it is loading.
Step 5 – Uninstall and Reinstall BlueStacks
If these steps stay imperfect to Fix BlueStacks not Working on Windows 10 then uninstall and reinstall it.
To uninstall BlueStacks, click Win+X altogether and select Programs and Features on the list of options.
Right click on BlueStacks App Player and choose Uninstall on an extra small pop up.
An Uninstaller Dialog box appears questioning Are you sure you want to uninstall BlueStacks App Player, select Yes.
One more dialog box opens after a short time and asks Do you want to keep all your apps and data? select No.
Instantly the Applications are removed from your computer.
To completely remove Bluestacks from Windows 10 you need to put some more effort.
1. Navigate to C => Program Data and delete BlueStacks Setup.
2. In a similar way, go to C:\Program Files (x86)\BlueStacks, C:\Program Files\BlueStacks, C:\ProgramData\BlueStacks and Delete items if present.
3. Type BST in File Explorer search box (Local Disk C in the Quick access navigation pane) and press Enter.
4. Open run dialog box, type %temp%, and click Enter. Select all the items in the Window and Delete.
5. Run Ccleaner to wipe out registry clutter caused by the Application.
6. Click this link to download the cleaner and run both Batch files under it one by one.
Finally, Install the latest version of BlueStacks from the official website.
Conclusion
So these are the procedures and steps for How to fix BlueStacks not Working on Windows 10. One thing worth remembrance is that always grabs the application from the official website to avoid unnecessary issues. Still, you face any problem do inform through commenting.
Windows 10 21296
AMD 4800H
I don’t know whether this is related to WSL, Windows or Android emulator itself, but here’s what’s happening.
I used to run WSL2, Docker (WSL2) and Android Studio emulator side-by-side. Everything worked.
Docker was up and running in WSL2.
I could launch emulators from within Android Studio.
Now, the emulators stopped working.
AVD Manager throws a The emulator process for AVD Pixel_4_API_30 was killed. error, without further information.
When I try to run it manually via the console, I get these errors:
.\emulator -avd Pixel_4_API_30
WHPX: Failed to get virtual processor registers, hr=c0350005
WHPX: Failed to emulate PortIO access with EmulatorReturnStatus: 64
WHPX: Failed to exec a virtual processor
- Author
- Recent Posts
I started writing code around 20 years ago, and throughout the years, I have gained a lot of expertise from hands-on experience as well as learning from others. This website has also grown with me and is now something that I am proud of.
When the Android Studio emulator not working Windows 10, it can feel like hitting a brick wall on your development journey, and we understand your frustration. That’s why we’ve compiled several tried-and-true fixes to get your Android emulator and virtual device up and running again.

Whether you aim to publish on Google Play or just test your Android app, ensuring your emulator doesn’t keep you from creating the next big thing in the Android ecosystem is crucial. So let’s dive in together and solve the emulator process for avd has terminated mistake once and for all.
JUMP TO TOPIC
- Why the Emulator in Android Studio Doesn’t Start? 3 Common Issues
- – Interfering Antivirus Programs
- – Improper Android Virtual Device Settings
- – Corrupted or Missing Files
- How to Repair the Emulator in Android Studio That Doesn’t Start?
- – Temporarily Disabling the Antivirus
- – Tweak Your AVD Settings
- – Reinstall Your Android Studio
- Conclusion
Why the Emulator in Android Studio Doesn’t Start? 3 Common Issues
The Android Studio emulator not showing or starting could be due to insufficient system resources, improper emulator configuration, or issues with the Android Studio installation. These common issues can be resolved through appropriate troubleshooting steps, but for that, reproducing the Android emulator not starting a bug is critical.
We’ve all been there, you know? You’ve poured hours, days, and weeks into creating your Android application. Then, the moment of truth arrives. You hit ‘Run’, waiting to see your work in action on the Android Studio emulator. But then…nothing. Instead of your app running smoothly, you’re left with a nagging issue: your Android Studio emulator black screen.
Well, let’s not panic. Instead, look at the three most common issues causing your emulator grief.
The first issue might surprise you. It’s your antivirus software. Yes, that’s right, the very thing that’s supposed to protect your system might be holding you back. Antivirus software can occasionally interfere with Android Studio and its emulator, making it seem like the Android Studio connecting to the emulator forever.

Disabling the software temporarily or creating an exception for Android Studio in the software can fix this problem.
Let’s say you’ve waited for an eternity, but your Android emulator is not showing output. It makes you wish to pull your hair out, right? This can often be due to improper AVD (Android Virtual Device) settings or issues with the system image.
Lastly, your Android Studio installation might have some corrupted or missing files causing the emulator not to start. You might need to reinstall Android Studio or update to the latest version to process this.
So, if you’re seeing the dreaded black screen or your emulator seems to be taking a sweet eternity to connect, remember you’re not alone. These obstacles are more common than you think, and there’s almost always a solution. Keep these three potential problems in mind, and you’ll be back on your development journey soon.
– Interfering Antivirus Programs
Antivirus programs safeguarding your system from malicious threats can sometimes go overboard, inadvertently obstructing other applications. Android Studio and its emulator are no exceptions.
It might seem odd, but this protective software can interfere with Android Studio’s network and file operations, leading to issues like the emulator not starting or the application not deploying correctly.

For instance, you’ve written your app code and are set to run it on the emulator. You hit ‘Run’, and then…nothing happens. You find an error message in your console, something like:
emulator: ERROR: x86 emulation currently needs hardware acceleration!
“`
This could result from your antivirus program hindering Android Studio’s hardware acceleration functionality.
– Improper Android Virtual Device Settings
Android Virtual Devices (AVDs) in Android Studio are meant to represent an actual Android device accurately. However, if not set up correctly, your AVD can act up, leading to a situation where your emulator won’t start or displays a black screen.
Imagine you’re trying to emulate a high-end device, say a Pixel 4 XL, on a system with limited resources. The AVD configuration might look like this:
Name: Pixel_4_XL_API_30
Device: pixel_4_xl (Google)
Path: C:\Users\username\.android\avd\Pixel_4_XL_API_30.avd
Target: Google Play (Google Inc.)
“`
But your emulator might refuse to start, or you might end up with an emulator slower than a snail. This is an example of improper AVD settings where the chosen device configuration surpasses the host system’s capabilities.
– Corrupted or Missing Files
Like any other software, Android Studio depends on a series of files and libraries to function correctly. Android Studio might behave unpredictably if these files are missing or corrupted, including the emulator not starting.
For example, let’s say that Android Studio can’t find the required `emulator.exe` file, and you get an error like this:
Cannot launch AVD in the emulator.
Output:
emulator: ERROR: This AVD’s configuration is missing a kernel file
“`
This error typically points towards a problem with the Android SDK installation where some crucial files are either missing or corrupted. The absence of these files can bring your development process to an abrupt halt.
How to Repair the Emulator in Android Studio That Doesn’t Start?
To repair the emulator that doesn’t start in Android Studio, check for interfering antivirus software and inspect your Android Virtual Device settings. If these steps don’t resolve the issue, it might be due to corrupted or missing files, necessitating a reinstallation of Android Studio.
So, you’re dealing with the infamous issue of the Android Studio emulator not starting? It’s daunting when the emulator refuses to cooperate, but there’s no need to worry. Instead, we’ll walk you through a few scenarios to remedy this.
First off, let’s tackle the issue of interfering with antivirus software. You might be thinking, “My antivirus? Really?” Yes, really. Your antivirus software might be the very obstacle that’s stalling your emulator.

Here’s what you can do:
- Temporarily disable the antivirus software or create an exception for Android Studio. This should help your emulator get its groove back.
- Secondly, improper Android Virtual Device settings can be a sneaky culprit. If you’re emulating a device with more firepower than your system can handle, the emulator might refuse to start. The solution here is to tweak your AVD settings.
- Try to opt for a device configuration that matches your system’s capabilities. You’d be surprised how often this simple adjustment can fix the problem.
- Lastly, if corrupted or missing files are to blame, a simple reinstall of Android Studio might be your best bet. A fresh installation can often iron out any hitches and get your emulator back on track.
And there you have it. Dealing with a stubborn emulator can be tricky, but remember, there’s usually a solution. Sometimes, it takes a bit of endurance, a dash of troubleshooting, and a lot of perseverance. That’s the life of a developer, isn’t it?
– Temporarily Disabling the Antivirus
Disabling your antivirus is typically a straightforward task. It involves accessing the antivirus software’s control panel or settings and finding the option to deactivate it.

Here’s a unique example of how you can do it:
- Open your antivirus application from the system tray or start menu.
- Navigate to the ‘Settings’ or ‘Control Panel’ section.
- Look for the ‘Disable’, ‘Stop’, or ‘Deactivate’ buttons.
- Click on it to temporarily disable the antivirus.
Remember, your antivirus is there for protection, so re-enable it once you’re done with your Android Studio session.
– Tweak Your AVD Settings
Improper Android Virtual Device (AVD) settings can hinder the emulator from starting. So, ensuring that the AVD settings align with your system’s capabilities is crucial.
Follow these steps to modify your AVD settings:
- Open Android Studio and navigate to the AVD Manager.
- Select the AVD you want to change and click ‘Edit this AVD’.
- Adjust the settings according to your system’s specifications, like choosing a lower API level or less RAM.
- Click on ‘Finish’ to save the changes.
By tweaking these settings, you’ll tailor the AVD to your system, thus mitigating any emulator start issues.
– Reinstall Your Android Studio
Corrupted or missing files in your Android Studio installation can prevent the emulator from starting. If other troubleshooting methods fail, it might be time to reinstall Android Studio.
Here’s a simple process to do so:
- Uninstall Android Studio via the ‘Add or Remove Programs’ feature in your system settings.
- Download the latest Android Studio version from the official Android Developer website.
- Install Android Studio by following the instructions provided in the installer.
By reinstalling Android Studio, you can ensure all required files are in place and in the correct format, thus potentially resolving the emulator start issue.
Conclusion
Navigating through the roadblocks of Android Studio’s emulator not starting is part of the developer’s journey. It’s a challenging hiccup but not an impossible one, as emphasized in the following bullet points that will not only highlight the main takeaways but also serve as a quick guide to help you swiftly overcome this challenge:
- Temporarily disabling your interfering antivirus software can clear the way for Android Studio’s operations.
- Tweaking your AVD settings to align with your system’s capabilities can prevent overloading and improve emulator performance.
- Reinstalling Android Studio can resolve issues stemming from corrupted or missing files in the installation.
Encountering problems and learning to overcome them mold us into better developers. So keep pushing through, keep exploring, and remember that every problem you solve is another step forward on your development journey, so stay positive and keep coding!
11.10.2017, 10:46. Показов 10652. Ответов 2
Добрый день столкнулся с такой проблемой
Кликните здесь для просмотра всего текста
До этого 4 месяца играл на NOX все нормально было на днях начал ловить бесконечную загрузку на 99% переставил помогло но не на долго и теперь же опять зависает на 99% но при попытке принудительного закрытия перезапуск компа с синим экраном на котором написано что произошла ошибка и мы собираем данные о ней код ошибки 0x00000667 (может 0-й в коде больше не успевал посчитать).
Решил поставить BlueStacks App Player 3.7.34.1574 вроде работал до его закрытия. Сегодня решил поиграть и ловлю тоже бесконечную загрузку потом ошибку не удалось загрузить движок виртуализации и два варианта перезагрузка компа или движка.
При любом из выбранных вариантов происходит тоже самое что и с ноксом синий экран тот же код ошибки.
Стоит винда 10-я в компе нечего не менял дрова обновил не помогло. Ставил другие версии и менее популярные эмуляторы но результат тот же.
Много чего перечитал что надо пере установить эмуляторы (удалял через Reg Organizer с чисткой следов или CCleaner правда некоторые папки приходилось вручную с диска C удалять), ставил от самых древних версий до самых новых толку 0. Успели побывать на пк (нокс, блюстакс, дроид4х, мему) результат один и тот же.
Так же в меми нашел такие сведения
Много так же отправляют в BIOS что бы включить виртуализацию но возникает встречный вопрос как это все работало до этого момента, а прошло то не мало более 4 месяцев.
You are here: Home / Software / What To Do When Android Emulator Is Not Starting? -Ultimate Guide
Android Studio is the official IDE (Integrated Development Environment) for the Android OS. The Android Studio emulator is creating issues for many users. They are unable to start the Android studio emulator on Windows 10. If you are facing a similar issue, don’t worry as in this article I have discussed what to do when Android Emulator not starting.
Why Android Studio Emulator Won’t Start?
Lets first have a look at the multitude of things that can go wrong and prevent the Android emulator from working:
- If you are getting an error on ‘failed to install APK’ or ‘failure to run Android Debug Bridge’, then it means that the required Android SDK is not available for connecting to the emulator.
- Hardware acceleration can be disabled in the Android studio, which can lead to this issue.
- If you have not created an x86 based image in your virtual device, then the Android Studio will run extremely slow, and maybe the issue behind the emulator not starting.
- Having Hyper V enabled in Windows 10 can also prevent the Android Emulator from starting.
- Incorrectly configured BIOS settings can disable the hardware acceleration and not even provide the option for it.
- Inadequate free space in the drive is another cause of this issue.
- Memory leak or background applications hogging memory can prevent the Android Studio emulator from accessing enough memory to start.
- Outdated Graphics Drivers: Outdated Graphics drivers can also be the cause of this issue.
- Antivirus can prevent Android Studio from working correctly and run the emulator.
Now that you know the different causes of this issue, it is time to troubleshoot it. Follow the solutions given below carefully and you should be able to run the Android Studio emulator again.
Solution 1: Download Intel’s HAXM Through Android SDK Manager
If your application’s minimum SDK is higher than the emulator’s SDK, then such an issue can arise. However, if this is not the case, then install the HAXM on your SDK manager. HAXM issues are also known to trigger this error. It generally happens when there are conflicts with other virtualization technologies or outdated HAXM driver.
To install the latest HAXM, follow the steps given below:
- Launch Android SDK Manager.
- In the Packages section, locate the Extras folder and expand it by clicking on the downward arrow beside it.
- Check the Intel x86 Emulator Accelerator (HAXM) box.
- Click on the Install Package option.
- Accept the terms of the Intel Corporation License Agreement after reviewing them.
- Click on the Install option to begin the download process. Now, the SDM manager will download the installer to the Extras folder.
- After the download is finished, open the executable and run it to install it.
- Follow the on-screen instructions to complete the process.
Solution 2: Check If Your PC Has The Required Free Disk Space
The Android Studio Emulator requires at least 2 GB of free RAM to start. If this much free space is unavailable, then the Android Studio Emulator won’t start. If you find that your PC doesn’t have adequate free disk space, then try running the Disk Cleanup tool to delete all the unnecessary files remaining on your PC.
To run Disk Cleanup, follow the steps given below:
- Type Disk Cleanup in the Windows search bar and select the appropriate option.
- The Disk cleanup app will now be up on your screen. Select the drive from which you want to delete the junk files and then click on OK.
- Now, click on the Clean up system files option. The disk cleanup tool will now scan your selected drive for all the junk files.
- Once the scan finishes, select the files that you want to delete from the list and then click on OK.
Solution 3: Check For Memory Leak And Close Unnecessary Processes In The Background
If the system memory is hogged by other applications, or if there is a memory leak, then the Android Studio Emulator won’t start. This happens because the emulator asks for the total amount of guest memory at the start from Windows. When the full guest memory size exceeds the Commit limit of the system, the emulator fails to start.
To check this, you can open the Task Manager and see the memory consumption in the Performance tab. If the Committed memory is already too high, then it explains why the Android Studio Emulator not starting. Close the unnecessary background processes to free up space. To do it, follow the steps given below:
- Press the Ctrl + Shift + Esc keys to open the Task Manager.
- Select the Processes tab and locate the processes that are consuming the system resources.
- Right-click on them and select the End Task option.
- Once you have freed enough space, try starting the Android Studio Emulator.
Solution 4: Update Graphics Drivers
If your graphics drivers are outdated, then it explains why Android Emulator is not working. Update your graphics drivers, and this issue should get fixed. Keeping the graphics drivers up to date is always a wise choice of action. To update your graphics drivers, follow the steps given below:
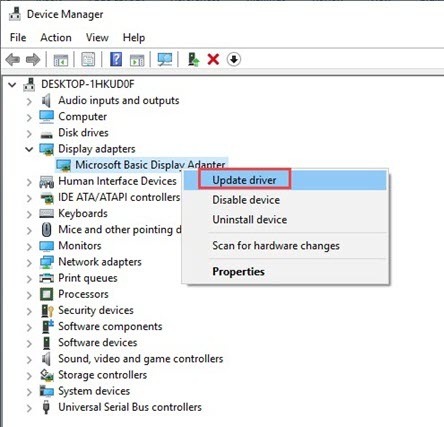
- Press the Windows + R keys to open the Run utility.
- Type devmgmt.msc and press Enter to open the Device Manager.
- Expand the Display Adapters option.
- Right-click on the graphics driver and select the Update Driver option.
- Select the Search for updated drivers option.
- Follow the on-screen instructions to complete the process.
Solution 5: Disable The Antivirus
The antivirus software installed on your PC can also prevent the Android Studio emulator from starting. Antiviruses are well known for acting overprotective and interfere with programs that are not a threat to the system. Try disabling the antivirus and see whether still the Android Studio Emulator won’t start.
If you are not using a 3rd party antivirus, then disable the Windows Defender, which is the native antivirus of Windows 10. To do it, follow the steps given below:
- Type Windows Security in the Start menu and select the top result.
- Click on the Virus & Threat protection option.
- In the Virus & threat protection settings section, click on the Manage settings
- Disable the Real-time protection option. This will disable the Windows Defender.
After disabling antivirus, the Android Studio Emulator should start normally.
Wrapping Up
So, there you have it. Now you know what to do when the Android Studio emulator not starting. Follow the steps given above and this issue should get fixed. If you have any questions related to this article, ask them in the comment section below.