
No sound after updating Windows! Don’t be upset; follow the best fixes listed below & troubleshoot Realtek HD audio manager problems.
For Windows users, encountering audio issues is not new. After each Windows update, some or the other user faces audio-related issues. This leaves users with no sound; if you can relate to it and are looking for ways to fix the Realtek audio driver problem, you are right.
Quick Tip- When manually downloading the latest Realtek audio driver from the official website, ensure your operating system’s correct name and version is selected. Realtek high-definition audio comes preinstalled on Windows 11 and 10, but this doesn’t mean Realtek audio is not working issue cannot be encountered. If you are facing the issue, here are the best ways to fix sound and not working issues.
Common Realtek Audio Issues
- Missing Audio Manager Icon
- Conflicts with preinstalled Microsoft Drivers
- Windows 11, 10, no audio devices are installed
- The audio service is not responding
- No sound
Besides, there are other sound problems that Windows users face. This troubleshooting guide will cover all this and the best ways to fix these issues.
Download and Install Advanced Driver Updater.
Why is there a Realtek High Definition Audio on My PC?
The Realtek HD Definition Audio is the popular sound driver for Windows. It helps choose the audio configuration for the speaker system, and the software also allows adjusting the volume for individual speakers.
However, due to certain reasons, you may face issues with Realtek High Definition Audio.
6 Common Reasons That Cause Realtek Audio Problems
1. Outdated Realtek audio driver.
2. There is a conflict between installed Microsoft and Realtek audio drivers.
3. Audio service is either not running or responding.
4. Misconfigured audio settings.
5. Incorrect output device for audio is selected.
6. Disable audio service.
How to Fix Realtek Audio Issues in Windows 11, 10
Whether you face audio problem issues after installing the latest Windows update or uninstalling a driver, try these 8 ways to troubleshoot the issue.
Basic Troubleshooting
You should always check the device and cable connections before updating the drivers and trying other technical fixes.
- Check the output audio device whether working or not.
- Ensure the output device is receiving power.
- Correct output should be selected on Windows 11 and 10.
- Use the volume controls to ensure the sound is not muted.
- Disconnect and reconnect the output device, and also use the alternate port to ensure the connection is proper.
After following these steps, try the following methods if the audio is still not there.
1. Update Realtek High-Definition Audio on Windows 11 and 10
Common sound problems on Windows are outdated, corrupt, or missing drivers. To fix this issue, downloading and installing the latest driver is recommended. This can be done either manually or automatically.
To download and update the latest driver manually, visit the sound card manufacturer and look for the right driver download. Before this, you must collect information about the operating system’s version, your motherboard’s model, or the sound card. Once you have, only then can you download the correct driver.
Update Audio Drivers using Manufacturer website –
- Search for the audio driver’s manufacturer website on a browser. Click on it.
- Enter your device’s serial number.
- Click the ‘Detect’ button for automatic identification.
- Select your product manually from the list.
- Browse products for general information or resources.
- Download the audio driver on your computer.
Update Audio Drivers using Device Manager –
Another way to update drivers on your computer is to use the Device Manger.
- Open Device Manager.
- Right click on the device, in this case, audio device.
- Select ‘Update Driver’.
- Choose “ Search automatically for updated driver software”.
- Now follow the on-screen instructions to complete the update.
Suppose this sounds like too much work, or you don’t have the technical expertise to collect all this information. In that case, you can try Advanced Driver Updater, a third-party driver updating utility.
This tool lets you download and install compatible drivers without collecting system or device information. Not only this, but Advanced Driver Updaters also keep a backup of old drivers for security reasons. It is easier to use as you have to click Start Scan Now, wait for the scanning to finish, and update the driver.
Also Read: Advanced Driver Updater Review
Here are the detailed steps on how to use Advanced Driver Updater
1. Download and install Advanced Driver Updater

2. Run the professional tool and click Start Scan Now to perform the scanning for outdated Realtek sound drivers.

3. Wait for the scanning to finish.

4. After that, click the Update driver option and update the driver.
Note : If you are using a trial version of the product, you will have to update each driver by clicking the Update driver option. However, if you want to update all drivers in a go, you need to upgrade to the Pro version as it offers an Update All feature. Not only this, but the excellent driver updating utility also comes with a money-back guarantee.
Read more at the official website
5. After updating the driver, restart the system to apply changes.
Now try to play a video or song; the Realtek sound not working issues should not be fixed.
See This- How To Update And Download Realtek 802.11 N WLAN Adapter Driver- Windows 11, 10
Method 2. Disable Audio Enhancement
Changes made to Audio Enhancements might conflict with sound on Windows 11 and 10. Therefore, it is recommended to disable audio enhancement. To do so, follow the steps below:
1. Right-click the Volume icon present in System Tray.
2. Select Open Sound settings > Device properties > Additional device properties.
3. This will open a new window; click the Enhancements tab and uncheck the box next to Disable all enhancements > Apply > Ok

This should troubleshoot Realtek audio problems on your PC.
3. Enable/ Restart Windows Audio Service
Ensure Windows Audio service is enabled to fix high-definition audio devices not working. To do so, follow the steps below:
1. Press Windows + R to open the Run window
2. Type services.msc > Ok
3. Look for Windows Audio service > right-click > Properties

4. Click the down arrow next to Startup type and select Automatic > Start > Apply > Ok
Note: If the service is already running and set to Automatic, you need to restart it. To do so, look for Windows Audio service > right-click > Restart.

Now try to play the sound; this should fix Realtek audio speakers’ not working issues.
Also, Read- How To Update Realtek Bluetooth Driver – Windows 11,10
Method 4. Disable Microsoft UAA Bus Driver
Usually, when two high-definition audio drivers run on the system, a conflict occurs. Therefore, to fix the issues with Realtek audio speakers not working, we must disable Microsoft UAA Bus Driver. To do so, follow the steps below:
1. In the Windows search bar, type Device Manager
2. Look for System Devices > double click to expand it
3. Select Microsoft UAA Bus Driver for High Definition Audio.
Note: If it is not on the list, it is already disabled. This means you can skip this step and move to the next one.
4. If you see it > right-click > Disable device.
5. Restart the system to apply changes; now, try to play the sound. Realtek audio driver issues should be fixed.
Method 5. Use a Generic high-definition Audio Device Driver
You can fix Realtek audio driver issues by switching to a generic driver. To learn how to do that, follow the steps below:
1. In the Windows search bar, type Device Manager
2. Search for Audio inputs and outputs
3. Double-click to expand all the audio drivers
4. Right-click the Realtek audio device > select Update driver from the list
5. Next, select Browse my computer for driver software

6. After that, choose Let me pick from a list of available drivers on my computer

7. Select High Definition Audio driver from the list > Next > follow on-screen instructions.
This will load the default sound driver, and the problem with the Realtek audio driver will be solved.
Check This- How to Download Realtek Ethernet Controller Driver
Method 6. Change Default Sound Format
By altering the default sound format, you can fix high-definition audio devices not working. To do so, follow the steps below:
1. Right-click the sound icon present in the system tray.
2. Select Open Sound settings
3. In the new window that opens, click Device Properties.

4. Click the Additional device properties option

5. This will open a new pop-up window here; click the Advanced tab
6. Next, click the down arrow and select the following depending on the speaker configuration:
24bit/44100 Hz
24bit/192000Hz
7. Click Apply > Ok to save changes.
This should fix Realtek audio speakers not working problems. If this doesn’t work, let’s move to the next step.
Method 7. Reinstall Sound Driver
1. Type Device Manager in the Windows search bar
2. Look for audio inputs and outputs. Double-click to expand it.
3. Right-click the sound driver > select Uninstall device from the context menu

4. Once done, click the computer icon with lens (Scan for hardware changes)

5. Now, restart the system. Windows will automatically install the default driver.
This should fix the issue, and the speaker Realtek audio not working problem should be resolved.
Method 8. Select the Correct Output Device
When an incorrect output device is selected, you might face Realtek audio driver problems. We need to switch to the correct output device to fix it. To do so, follow the steps below:
1. Right-click the volume icon present in System Tray.

2. Select Open Sound settings from the context menu.
3. Set Speakers or Headphones as the output device

Now, check your system, the Realtek audio speakers are not working, and the problem should be resolved. If you still face the issue, try updating Windows. If you are using an older version, there are chances that you are facing the issue due to some bug. Updating Windows will help resolve it. Press Windows + I to open Windows Settings > Click Windows Update > Check for updates > Download & Install and restart the PC.
See Also-How to Fix Microsoft Teredo Tunneling Adapter Missing
Frequently Asked Questions
Q1. How do I fix Realtek’s no sound?
To fix Realtek’s no sound issue, set the speakers as default. To do so, follow these steps:
1. Press Windows + R and open the Run window.
2. Type mmsys.cpl > press enter.
3. Click the Playback tab > right-click Speakers > Set as Default Device > Apply > Ok.
4. Exit the Sound Settings window and reboot the PC.
Now check you should not face an audio issue.
If this doesn’t help, automatically update the Realtek Audio driver using Advanced Driver Updater.
Q2. How do I repair and fix Realtek audio driver Windows 10?
To repair and fix Realtek Audio Driver try the following fixes:
1. Check cables, volume, speaker, and headphone connections
2. Update Realtek High-Definition Audio.
3. Disable Audio Enhancement.
4. Enable/Restart Windows Audio Service.
5. Disable Microsoft UAA Bus Driver.
6. Use a Generic High-Definition Audio Device Driver.
7. Change Default Sound Format.
8. Reinstall Sound Driver.
9. Select Correct Output Device.
10. Run the Audio Troubleshooter.
Q3. How do I get my sound back on Windows 10?
Use a generic driver to get the sound back and fix Realtek audio driver issues.
1. Right-click the Windows Start icon,> select Device Manager
2. Go to Audio inputs and outputs> double-click on it.
3. Right-click the Realtek audio device > select Update driver from the list
5. Choose the second option, “Browse my computer for driver software.”
6. Select, “Let me pick from a list of available drivers on my computer.”
7. Select High Definition Audio driver from the list > and follow on-screen instructions.
Q4. Why is there no sound on my Windows 10?
There are chances that the audio device is muted, has been disabled, or the driver is outdated. To fix the problem, unmute the audio device, enable it and update the driver through Device Manager or Advanced Driver Updater.
Q5. How do I fix a corrupted Realtek driver?
The easiest way to fix a corrupted Realtek driver is to reinstall and update the driver. You can do it manually through Device Manager or use Advanced Driver Updater, a driver updating tool, to update corrupt and problematic drivers.
Q6. How do I fix my Realtek audio?
To fix issues with Realtek audio, you can try the following techniques:
1. Update Realtek driver
2. Disable Audio-Enhancement
3. Restart Windows Audio Service
4. Disable Microsoft UAA Bus Driver
5. Modify Default Sound Format
Fix – Realtek Audio Driver Problems
You can quickly troubleshoot Realtek audio problems on your system using these fixes. Alongside these fixes, we suggest checking whether the speakers are correctly connected. Also, ensure that the speaker is not muted. This will help resolve Realtek speakers not working.
We hope using these steps, you can fix the problem with sound. To keep drivers updated and avoid facing such issues in the future, use Advanced Driver Updater, the best driver updater to update outdated drivers in a go. We’d love to hear from you; please share your feedback in the comments section. If you have any product-related queries, contact the support team.
Recommended :
12 Best (Free & Paid) Driver Updater Software To Fix Driver Issues on Windows
How to Download & Update Realtek PCIe GbE Family Controller Driver
How To Download & Update Realtek Audio Driver on Windows 11/10
No sound after upgrading to Windows 10? It’s probably a driver problem. Your audio driver is probably missing or out of date (and therefore incompatible with Windows 10).
So it’s usually a pretty quick fix. Most of the time, you just need to update your audio driver. Here’s how…
STEP 1 – Confirm it’s a driver problem
STEP 2 – Update your audio drivers
TIP: Tired of driver problems? Scroll down to learn how you can eliminate them altogether.
STEP 1 – Confirm it’s a driver problem
To confirm if your PC sound problem is caused by driver issue, you need to check for the driver status in Device Manager:
- Open Rub box
On your keyboard, press the Windows logo key and R at the same time to invoke a Run box.
- Open Device Manager
Type devmgmt.msc and click OK. This will start the Windows 10 Device Manager.
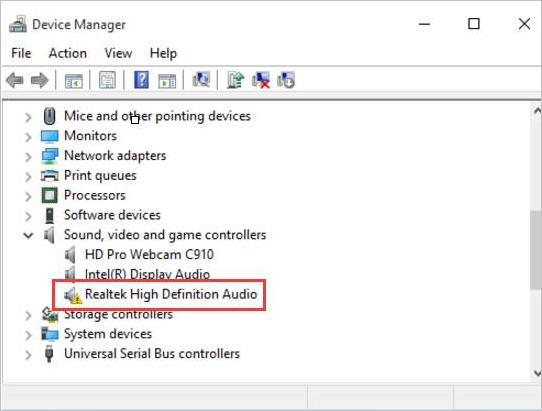
- Check if Realtek High Definition Audio device is having problems
In Device Manager, expand Sound, video and game controllers. Under this category, you’ll see Realtek High Definition Audio. If there’s a yellow mark next to the device name (usually an exclamation or a question mark), there’s problem with the driver, and you need to update it. E.g.:

STEP 2 – Update your audio drivers
There are three ways you can update your audio drivers:
Method 1 – via Device Manager – You can uninstall the driver from Device Manager, then allow Windows to reinstall the driver automatically. This could be easy to follow with the step-by-step guide below.
OR
Method 2 – Manually – You’ll need some computer skills and patience to update your drivers this way, because you need to find exactly the right the driver online, download it and install it step by step.
OR
Method 3 – Automatically (Recommended) – This is the quickest and easiest option. It’s all done with just a couple of mouse clicks – easy even if you’re a computer newbie.
Method 1 – Uninstall then reinstall the driver via Device Manager
To fix the Realtek high definition audio driver issue, you can uninstall the driver first then allow Windows to reinstall it.
To do so, follow these steps:
1) On your keyboard, press the Windows logo key and R at the same time to invoke a Run command.
2) Type devmgmt.msc and click OK. This will start the Windows 10 Device Manager.
3) In Device Manager, expand Sound, video and game controllers. Right-click on Realtek High Definition Audio (in some Windows versions, this could be Realtek Audio) and select Uninstall.
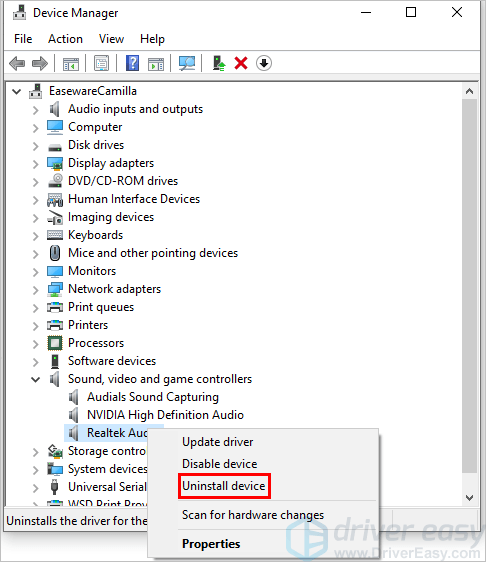
4) Once you get the prompt to ask you to confirm the uninstall, click Uninstall. If you see a checkbox “Delete the driver software for this device”, select it then click Uninstall.
5) Restart your computer and check too see if the Realtek audio driver problem is resolved.
Method 2 – Download and install the driver manually
You can download Realtek audio drivers from Realtek. To get them, you need to go to the Realtek website, find the drivers corresponding with the sound card model and your specific flavor of Windows 10 (32 or 64 bit) and download the driver manually.
Once you’ve downloaded the correct drivers for your system, double-click on the downloaded file and follow the on-screen instructions to install the driver.
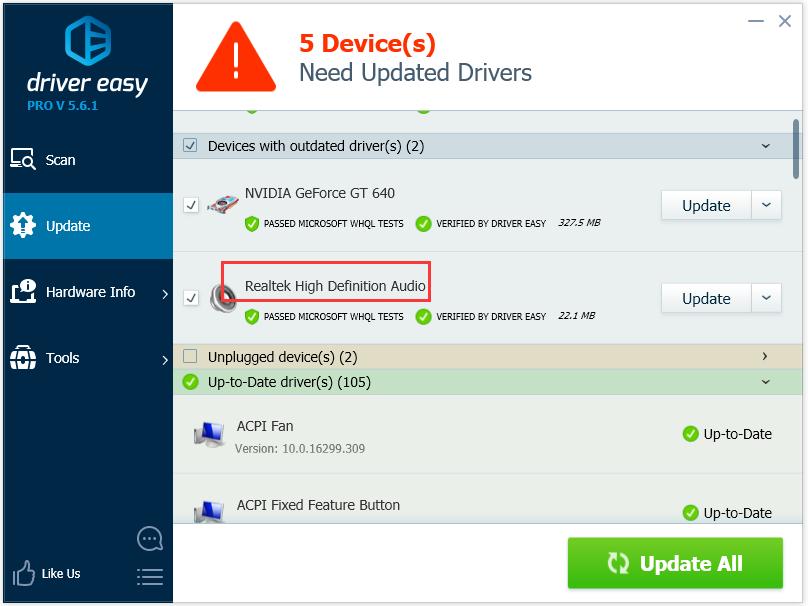
Method 3 – Automatically update Realtek audio drivers
If you don’t have the time, patience or computer skills to update the Realtek driver manually, you can do it automatically with Driver Easy.
Driver Easy will automatically recognize your system and find the correct drivers for it. You don’t need to know exactly what system your computer is running, you don’t need to risk downloading and installing the wrong driver, and you don’t need to worry about making a mistake when installing.
You can update your drivers automatically with either the FREE or the Pro version of Driver Easy. But with the Pro version it takes just 2 clicks (and you get full support and a 30-day money back guarantee):
1) Download and install Driver Easy.
2) Run Driver Easy and click Scan Now button. Driver Easy will then scan your computer and detect any problem drivers.

3) Click the Update button next to the Realtek driver to automatically download and install the correct version of this driver (you can do this with the FREE version).
Or click Update All to automatically download and install the correct version of all the drivers that are missing or out of date on your system (this requires the Pro version – you’ll be prompted to upgrade when you click Update All).
Realtek Audio Driver
Tired of driver problems?
Windows is a very old technology. Sure, Windows 10 is relatively new, but it’s still just the latest iteration of a decades-old operating system, designed for a bygone era (pre-internet).
Now that we have the internet, fast connection speeds, free cloud storage, and endless web apps (like Gmail, Google Docs, Slack, Facebook, Dropbox and Spotify), the entire Windows way of doing things – with locally installed programs and local file storage – is totally outdated.
Why is that a problem? Because when you’re constantly installing uncontrolled third-party programs, you’re constantly opening the door to viruses and other malware. (And Windows’ insecure permission system compounds this problem.)
Plus the way Windows manages installed software and hardware has always been a problem. If your computer shuts down unexpectedly, or a program installs, uninstalls or updates incorrectly, you can get ‘registry’ corruptions. That’s why Windows PCs always slow down and become unstable over time.
Also because everything’s installed and saved locally, it doesn’t take long before you run out of disk space, and your disk gets fragmented, which makes everything even slower and more unstable.
For most people, the simplest way to solve Windows problems is to ditch Windows altogether, and switch to a faster, more reliable, more secure, easier to use and cheaper operating system…
Google ChromeOS.
ChromeOS feels much like Windows, but instead of installing heaps of programs to email, chat, browse the internet, write documents, do school presentations, create spreadsheets, and whatever else you normally do on a computer, you use web apps. You don’t need to install anything at all.
That means you don’t have virus and malware problems, and your computer doesn’t slow down over time, or become unstable.
And that’s just the start of the benefits…
To learn more about the benefits of ChromeOS, and to see comparison videos and demos, visit GoChromeOS.com.
Hopefully you find this article helpful. If you have any questions, ideas or suggestion, feel free to leave a comment below.
Проблемы со звуком на компьютере могут быть невероятно неприятными, особенно если вы пытаетесь watch видео, присутствовать на собрании или слушать музыку. К счастью, большинство проблем со звуком можно устранить, выполнив ряд действий по устранению неполадок. В этой статье представлено комплексное руководство по устранению проблем со звуком в Windows. Советы перечислены в определенном порядке — начните с первого, проверьте, помог ли он, и переходите к следующему.
Запуск средства устранения неполадок со звуком Windows
Если вы используете устройство Windows 11, начните с запуска автоматического средства устранения неполадок со звуком в приложении «Получить справку». Он автоматически запустит диагностика и попытается устранить большинство проблем со звуком. Если вы используете более раннюю версию Windows или мобильное устройство, перейдите к разделу Общие действия по устранению неполадок.
Запустите средство устранения неполадок в разделе «Справка»
Если приложению «Получить справку» не удается устранить проблему со звуком или звуком, попробуйте перечисленные возможные решения.
Общие действия по устранению неполадок
Выполните следующие общие действия по устранению неполадок, чтобы устранить проблему со звуком.
Если доступно несколько устройств вывода звука, убедитесь в том, что выбрано нужное. Для этого выполните следующие действия.
-
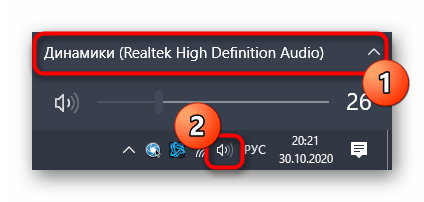
Щелкните значок Динамики на панели задач.
-
Затем щелкните стрелку справа от ползунка громкости динамиков, чтобы открыть список аудиоустройств, подключенных к компьютеру. При наведении указателя мыши на стрелку подсказка должна отображаться как Выберите звуковой выход.
-
Убедитесь в том, что звук воспроизводится на предпочитаемом вами звуковом устройстве, таком как динамик или наушники.
Если это не помогло, переходите к следующему совету..
Выполните следующие действия.
-
Проверьте надежность подключения динамиков и наушников к разъемам. Убедитесь, что все кабели подключены.
-
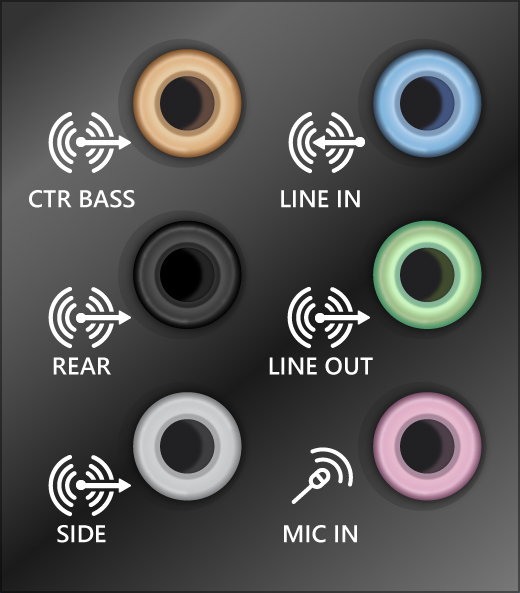
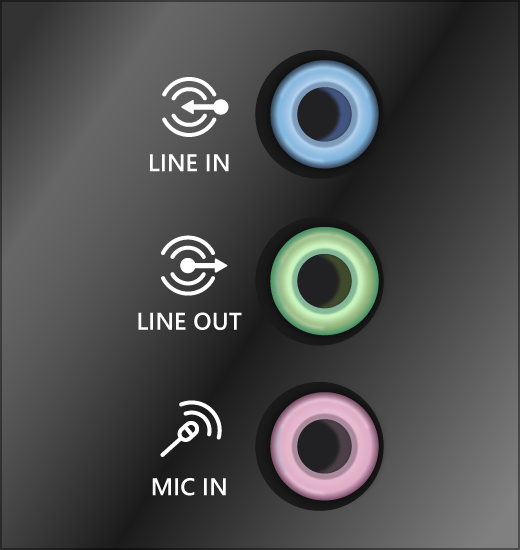
При наличии нескольких разъемов 5 мм для подключения, особенно в системе объемного звука, убедитесь, что все кабели подключены к правильному разъему.
-
Если не ясно, к какому разъему необходимо подключить тот или иной кабель, обратитесь к изготовителю оборудования или попытайтесь по очереди найти наиболее очевидные выходные разъемы и проверьте, работают ли они.

Примечание: В некоторых системах для аудиовыхода используется разъем зеленого цвета, а для микрофонного входа — разъем розового цвета. Также могут использоваться маркировки «наушники» или «микрофон».
-
-
Убедитесь, что питание включено.
-
Убедитесь, что параметр «Отключить звук» не включен. Попробуйте установить более высокий уровень громкости с помощью всех регуляторов.
Примечание: У некоторых динамиков и в некоторых приложениях используются собственные регуляторы громкости. Обязательно проверьте их все.
-
Попробуйте подключить динамик и наушники к другому USB-порту.
-
Возможно, что динамики не будут работать, когда подключены наушники. Отключите наушники и посмотрите, помогло ли это.
Если проблемы со звуком сохранились, ознакомьтесь со следующими разделами, чтобы получить дополнительные сведения об устранении неполадок.
Иногда наличие дополнительных средств звука может привести к проблемам со звуком. Их отключение может помочь устранить проблему.
-
Выберите Пуск > Параметры > Звук.
-
В разделе Выходные данные выберите используемое звуковое устройство (например, динамики или наушники).
-
На открывающейся странице прокрутите до пункта Дополнительные параметры, а затем в раскрывающемся меню установите для параметра Улучшения звуказначение Выкл .
Если выключение дополнительных средств звука не дало результатов, дополнительные инструкции по устранению неполадок см. в следующих разделах.
-
Выберите Пуск > Параметры > система.
-
Прокрутите вниз и выберите Устранение неполадок > Другие средства устранения неполадок.
-
Перейдите в раздел Аудио и нажмите кнопку Выполнить , чтобы запустить средство устранения неполадок со звуком.
Проверьте, не отключен ли звук для звуковых устройств и не отключены ли эти устройства.
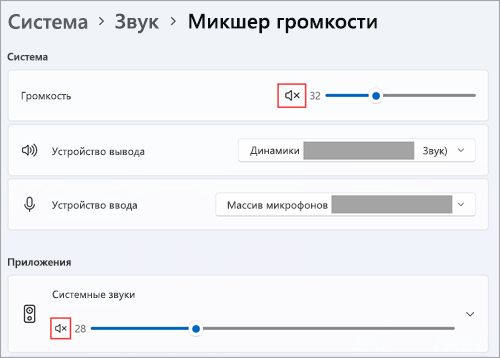
-
Выберите и удерживайте (или щелкните правой кнопкой мыши) значок Динамики на панели задач.
-
Затем щелкните стрелку справа от ползунка громкости динамиков, чтобы открыть список аудиоустройств, подключенных к компьютеру. При наведении указателя мыши на стрелку подсказка должна отображаться как Выберите звуковой выход.
Примечание: Если значок Динамики не виден, он может находиться в области переполнения. Выберите Показать скрытые значки , чтобы проверить эту область.
-
Щелкните значок параметров справа от ползунка Микшер громкости, чтобы открыть параметры микшера томов. При наведении указателя мыши на значок параметров на значок параметров подсказка должна отображаться как Дополнительные параметры микшера.
-
Вы увидите набор элементов управления громкостью для ваших устройств. Убедитесь, что ни на одном из них не отключен звук. Если звук отключен, рядом с элементов управления будет отображаться красный крестик. Чтобы включить звук, одно из следующих действий:
-
Выберите регулятор громкости и установите нужный уровень громкости.
-
Щелкните значок Включить динамики.

-
-
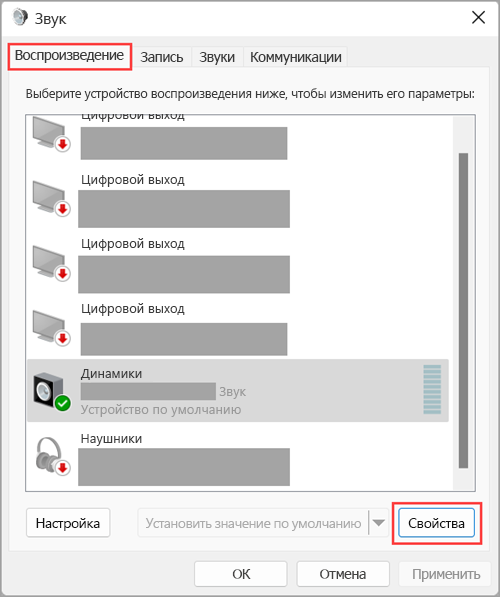
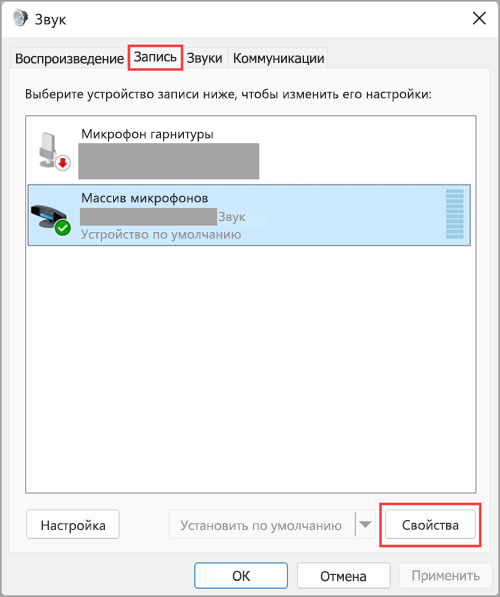
Проверьте свойства устройства и убедитесь, что устройства не были отключены по ошибке. Нажмите кнопку Пуск > Параметры > Система > Звук .
-
В разделе Дополнительно выберите Дополнительные параметры звука, затем перейдите на вкладку Воспроизведение (вывод) или Запись (ввод).
-
Выберите устройство и нажмите кнопку Свойства.
-
Убедитесь, что рядом с параметром Использование устройства в списке устройств ввода и вывода установлен флажок Использовать это устройство (включить).


Если это не решило проблему, переходите к следующему совету.
Если вы подключаетесь к звуковому устройству, такому как наушники или динамики, с помощью USB или HDMI, возможно, вам потребуется задать это звуковое устройство как используемое по умолчанию. Если вы используете внешний монитор без встроенных динамиков, убедитесь, что этот монитор не выбран в качестве устройства вывода звука по умолчанию. В этом случае не будет звука. Это можно проверить при задании устройства вывода звука по умолчанию. Ниже рассказывается, как это сделать.
-
Нажмите кнопку Пуск > Параметры > Система > Звук .
-
В разделе Выходные данные выберите устройство, которое вы хотите использовать для воспроизведения в качестве устройства вывода. При выборе этого устройства вы также задаете его в качестве значения по умолчанию.
Если настройка звукового устройства по умолчанию не дала результатов, дополнительные советы по устранению неполадок см. в следующих разделах.
Проверка наличия обновлений:
-
Выполните одно из следующих действий:
-
Если отображается состояние «Установлены все доступные обновления», перейдите к следующему совету.
-
Если отображается состояние «Доступны обновления», щелкните Установить сейчас.
-
-
Выберите обновления, которые необходимо установить, а затем нажмите кнопку Установить.
-
Перезагрузите компьютер и проверьте, правильно ли работает звук.
Если это не решило проблему, переходите к следующему совету.
После установки ряда обновлений необходимо перезапустить устройство.
Чтобы проверить наличие установленных обновлений, ожидающих перезагрузки, выполните следующие действия.
-
Сохраните документы и закройте все приложения.
-
Нажмите кнопку Пуск > Завершение работы . Если есть обновления, ожидающие установки, вы увидите параметры Обновить и перезапустить и Обновить и завершить работу.
-
Выберите один из этих параметров перезапуска, чтобы применить обновления.
Требуется справка по Центру обновления Windows? См. статью Устранение неполадок при обновлении Windows.
Если перезапуск не дал результатов, дополнительные инструкции по устранению неполадок см. в следующем разделе.
Аппаратные проблемы могут быть вызваны устаревшими или неработоспособными драйверами. Убедитесь, что аудиодрайвер обновлен, и при необходимости обновите его. Если это не сработает, попробуйте удалить аудиодрайвер (он будет переустановлен автоматически). Если это не поможет устранить проблему, попробуйте воспользоваться универсальным аудиодрайвером, который поставляется вместе c Windows. Если у вас возникли проблемы со звуком после установки обновлений, попробуйте выполнить откат драйвера звукового устройства.
Автоматическое обновление аудиодрайвера:
-
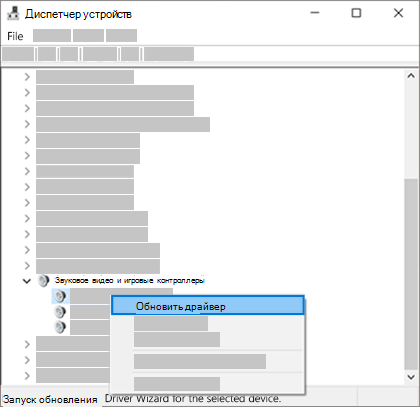
В поле поиска на панели задач введите диспетчер устройств, а затем выберите его в списке результатов.
-
Нажмите стрелку рядом с разделом Звуковые, игровые и видеоустройства, чтобы развернуть его.
-
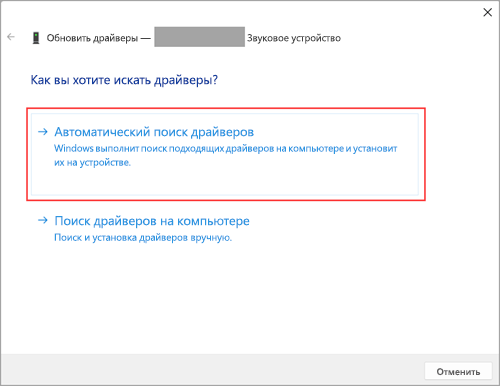
Нажмите и удерживайте (или щелкните правой кнопкой мыши) название звуковой платы или звукового устройства, например наушников или динамиков, выберите Обновить драйвер, затем выберите Автоматический поиск драйверов. Следуйте инструкциям на экране, чтобы завершить обновление.

Если Windows не находит новый драйвер, найдите его на веб-сайте изготовителя устройства и выполните сопутствующие указания. Если это не поможет устранить проблему, попробуйте удалить аудиодрайвер.
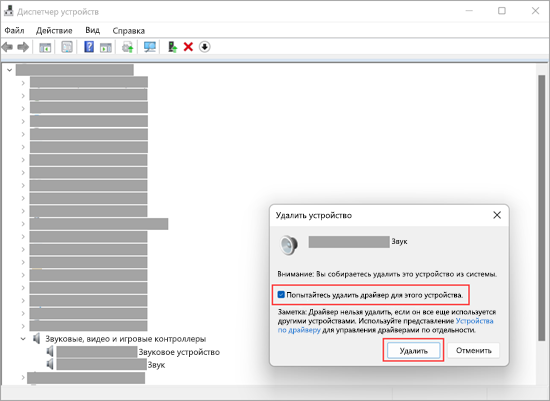
Удаление аудиодрайвера:
-
В поле поиска на панели задач введите диспетчер устройств, а затем выберите его в списке результатов.
-
Нажмите стрелку рядом с разделом Звуковые, игровые и видеоустройства, чтобы развернуть его.
-
Нажмите и удерживайте (или щелкните правой кнопкой мыши) название звуковой платы или звукового устройства, выберите Удалить устройство, установите флажок Попытаться удалить драйвер для этого устройства и нажмите кнопку Удалить.

-
Перезагрузите компьютер.
Примечание: Перед перезапуском обязательно сохраните документы и все остальные текущие данные.
-
При перезапуске автоматически появится запрос на переустановку звукового драйвера на компьютере.
-
Чтобы перезапустить компьютер, нажмите кнопку Пуск > Завершение работы > Перезагрузка .
-
Если это не поможет устранить проблему, попробуйте воспользоваться универсальным аудиодрайвером, который поставляется вместе c Windows.
Использование универсального аудиодрайвера, который поставляется вместе c Windows:
-
В поле поиска на панели задач введите диспетчер устройств, а затем выберите его в списке результатов.
-
Щелкните стрелку Звуковые, игровые и видеоустройства, чтобы развернуть этот раздел.
-
Нажмите и удерживайте (или щелкните правой кнопкой мыши) название звуковой платы или звукового устройства, выберите Обновить драйвер > Найти драйверы на этом компьютере > Выбрать драйвер из списка уже установленных драйверов.
-
Выберите звуковое устройство, драйвер которого требуется обновить, нажмите кнопку Далее, а затем следуйте инструкциям по его установке.

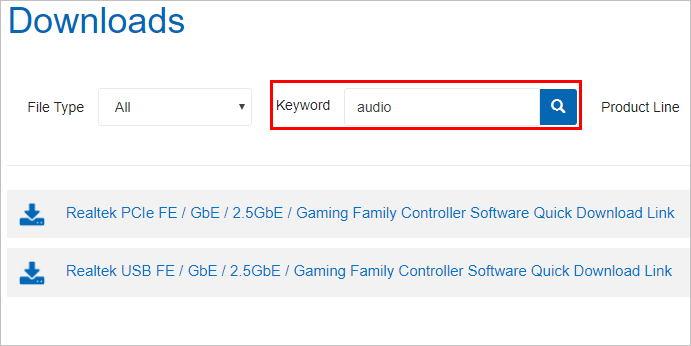
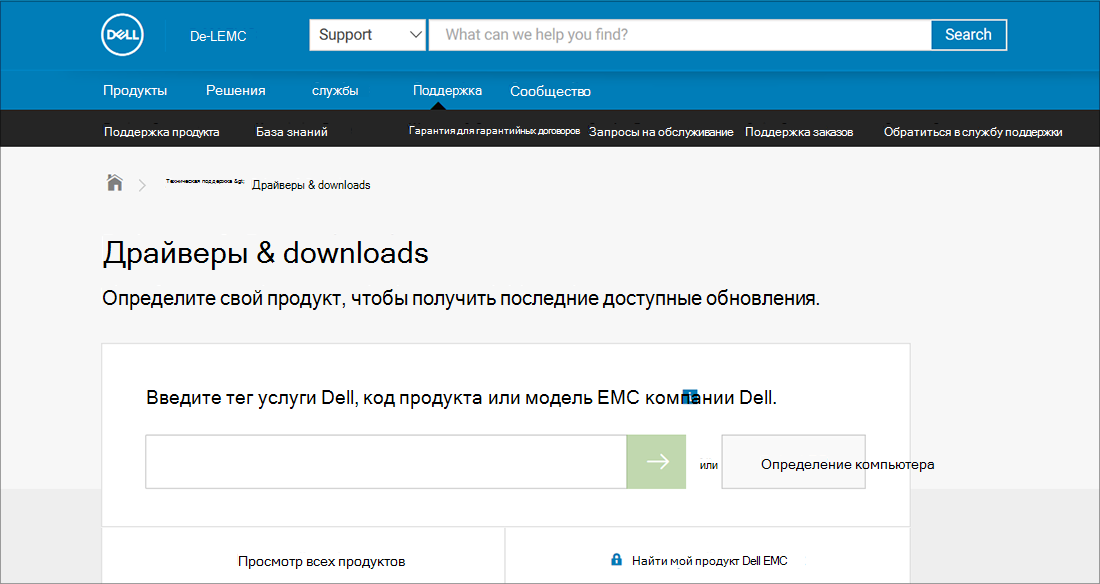
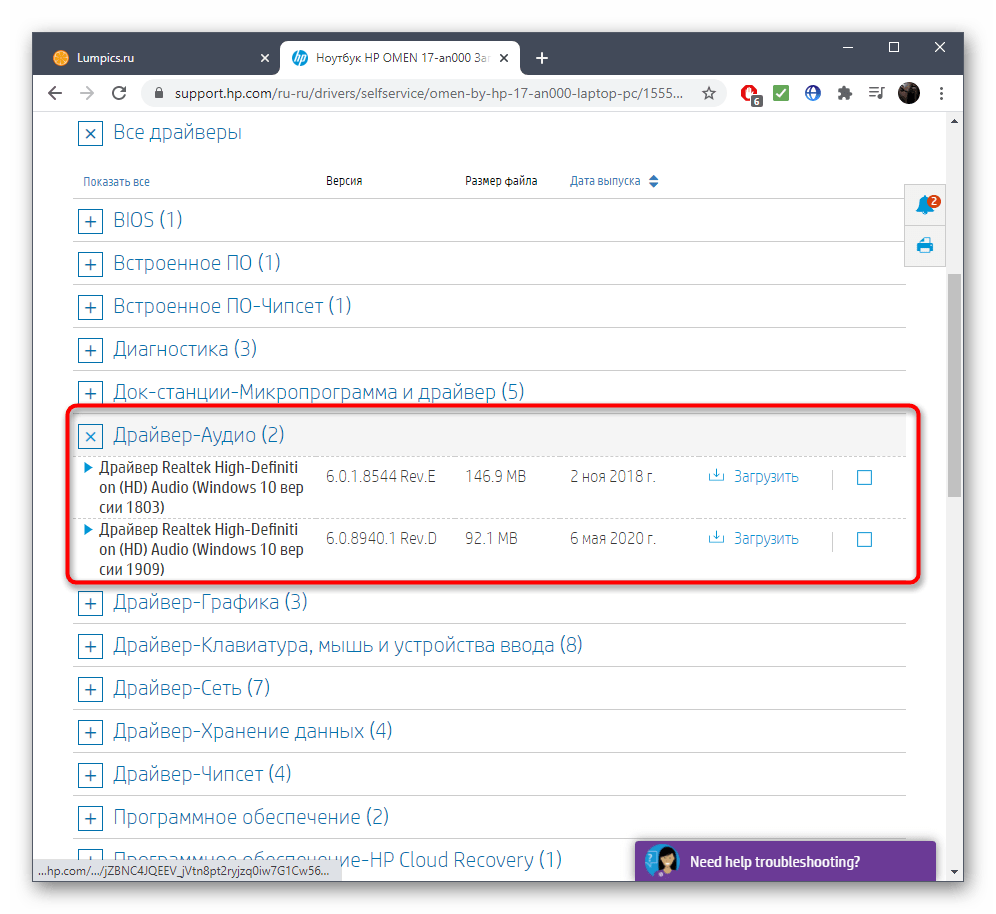
Если эти действия не устранили проблему со звуком, перейдите на веб-сайт изготовителя устройства и установите самые последние аудиодрайверы для вашего устройства. Ниже приведен пример страницы скачивания драйвера на веб-сайте производителя звукового устройства.
Если после установки обновлений возникли проблемы со звуком
Если звук работал до запуска Центра обновления Windows, а теперь не работает, попробуйте выполнить откат аудиодрайвера.
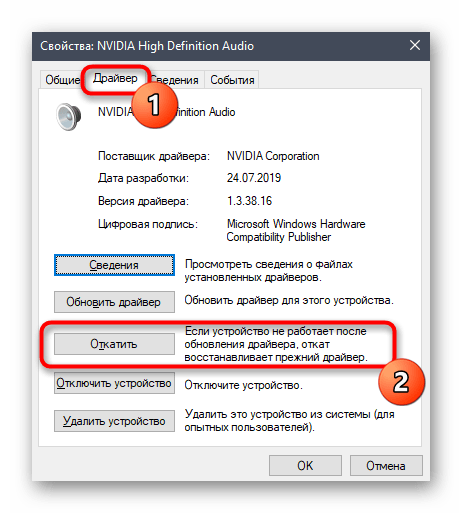
Откат аудиодрайвера:
-
В поле поиска на панели задач введите диспетчер устройств, а затем выберите его в списке результатов.
-
Нажмите стрелку рядом с разделом Звуковые, игровые и видеоустройства, чтобы развернуть его.
-
Нажмите и удерживайте (или щелкните правой кнопкой мыши) название звуковой платы или звукового устройства, затем выберите Свойства.
-
Перейдите на вкладку Драйвер и выберите Откатить.
-
Прочтите и выполните инструкции, затем нажмите кнопку Да, если требуется откатить аудиодрайвер.
Если откат звукового драйвера не помог или оказался невозможен, вы можете попытаться восстановить компьютер из точки восстановления системы.
Восстановление компьютера из точки восстановления системы:
При установке обновлений Майкрософт в системе мы создаем точку восстановления системы на случай возникновения проблем. Попробуйте восстановить систему до этой точки и проверьте, помогло ли это устранить проблемы со звуком. Дополнительные сведения см. в разделе «Восстановление из точки восстановления системы» статьи Параметры восстановления в Windows.
Некоторые проблемы со звуком могут быть вызваны проблемой с аудиокодеком IDT High Definition Audio. Это можно исправить при помощи ручного обновления драйверов, позволяющего выбрать нужный звуковой драйвер.
Примечание: Не все системы имеют аудиокодек IDT High Definition Audio.
Чтобы убедиться в наличии этого аудиокодека и обновить драйвер вручную, выполните следующие действия.
-
В поле поиска на панели задач введите диспетчер устройств, а затем выберите его в списке результатов.
-
Щелкните стрелку Звуковые, игровые и видеоустройства, чтобы развернуть этот раздел.
-
Найдите аудиокодек IDT High Definition Audio. Если он есть в списке, нажмите и удерживайте его (или щелкните правой кнопкой мыши), выберите Обновить драйвер, Найти драйверы на этом компьютере > Выбрать драйвер из списка уже установленных драйверов.
-
Вы увидите список предустановленных драйверов. Выберите Устройство с поддержкой High Definition Audio и нажмите кнопку Далее.
-
Введите панель управления в поле поиска на панели задач, а затем в списке результатов выберите «Панель управления».
-
В разделе «Панель управления» выберите Оборудование и звук > Звук.
-
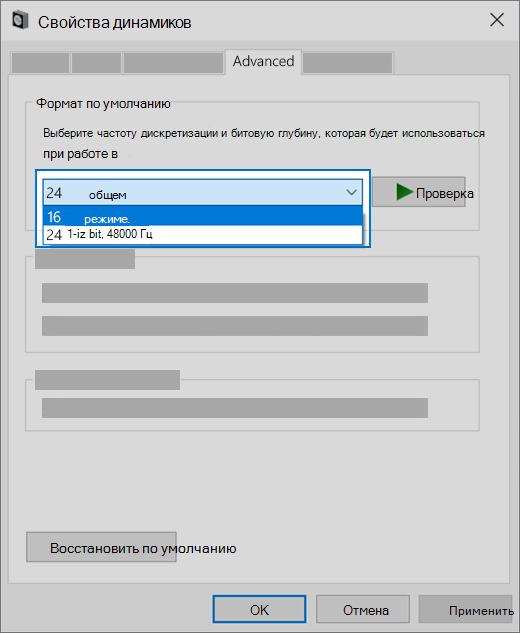
На вкладке Воспроизведение нажмите и удерживайте (или щелкните правой кнопкой мыши) Устройство по умолчанию, затем выберите Свойства.
-
На вкладке Дополнительно в разделе Формат по умолчанию измените этот параметр, нажмите кнопку ОК, затем снова проверьте звуковое устройство. Если это не помогло, попробуйте еще раз изменить данный параметр.
Если использование других форматов аудио не дало результатов, дополнительные инструкции по устранению неполадок см. в следующих разделах.
-
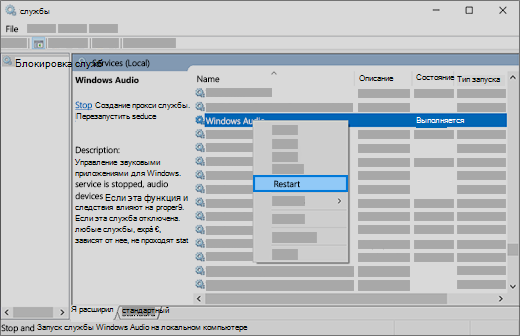
Введите службы в поле поиска на панели задач, а затем в списке результатов выберите «Службы».
-
Выберите каждую из следующих служб, нажмите и удерживайте ее (или щелкните правой кнопкой мыши), выберите Перезапустить, затем нажмите кнопку Да.
-
Windows Audio
-
Средство построения конечных точек Windows Audio
-
Удаленный вызов процедуры (RPC)
-
Если перезапуск этих служб не решит проблему, дополнительные инструкции по устранению неполадок см. в следующих разделах.
-
Нажмите кнопку Пуск > Параметры > Конфиденциальность и безопасность.
-
В разделе Разрешения приложений выберите Микрофон.
-
Убедитесь, что переключатели Доступ к микрофону и Разрешить приложениям доступ к микрофонувключены.
-
Если возникла проблема с определенным приложением, прокрутите вниз список в разделе Разрешить приложениям доступ к микрофону и убедитесь, что переключатель для этого приложения также включен.
-
Home
-
Partition Manager
- [Solved] Realtek HD Audio Manager Not Opening
By Sherry |
Last Updated
Are you facing Realtek HD Audio Manager not opening in Windows 10? Usually, the problem is caused by faulty or outdated drivers and you can easily fix it by yourself. MiniTool offers you some step-by-step fixes which you can take a reference from.
About Realtek HD Audio Manager
Realtek HD Audio Manager is one of the most widely available sound card driver applications. It comes with the support for all the major sound codes, which Enables your pc to support process audio, playback multimedia, record audio and manage speakers.
If you have RealteK HD Audio drivers installed on your system, you will also get Realtek HD Audio Manager on your device.
Usually, you can open Realtek HD Audio Manager with the following steps:
Step 1: Press Win + E to open File Explorer.
Step 2: Navigate to C: > Program Files > Realtek > Audio > HDA.
Step 3: Locate and double-click the .exe file of Realtek HD Audio Manager.
To make it easier to run Realtek HD Audio Manager next time, you can right-click the .exe file and choose Create shortcut.
Tip: You can also go to Control Panel and view items by “Small icons” to find Realtek HD Audio Manager.
However, in some cases, you may encounter the error Realtek HD Audio Manager not opening in Windows 10 or even cannot find Realtek HD Audio Manager.
Since Realtek HD Audio Manager is a tool installed along with the Realtek audio driver, it’s probably due to the faulty or outdated audio driver when the Audio Manager is missing or not opening.
You can try the following solutions to fix it.
Fix 1: Update the Realtek HD Audio driver
There are two ways you can update your Realtek HD Audio driver.
Option 1: Download and Install the Driver Manually
To get the latest Realtek HD Audio driver, you can go to the Realtek website. Then download the driver corresponding with your Windows version (for example, Windows 64 bit) manually.
Once it’s downloaded, double-click the installation file and follow the on-screen instructions to install the driver.
Option 2: Automatically Update Realtek HD Audio Drivers
If you want an easier way to update the driver, you can follow the steps bellow.
Step 1: Open Run window by pressing Win + R. Then type devmgmt.msc and hit Enter to access Device Manager.
Step 2: Double-click Sound, video and game controllers to expand it.
Step 3: Right-click Realtek High Definition Audio and choose Update driver.
Step 4: In the pop-up window, select Search automatically for updated driver software.
After searching your computer and the Internet for the latest driver software for your device, Windows will download and install it. Just wait patiently.
Once it’s done, you have to restart your computer for the changes to take effect.
Fix 2: Check for Windows Updates
If many users have reported the same issue, Microsoft may launch a system update to help solve the problem. So, you can try checking for Windows updates to fix Realtek HD Audio Manager not opening in Windows 10.
Step 1: Press Win + S to open Search. Type updates in the search box, and then click Check for updates from the results.
Step 2: In Windows Update pane, select Check for updates.
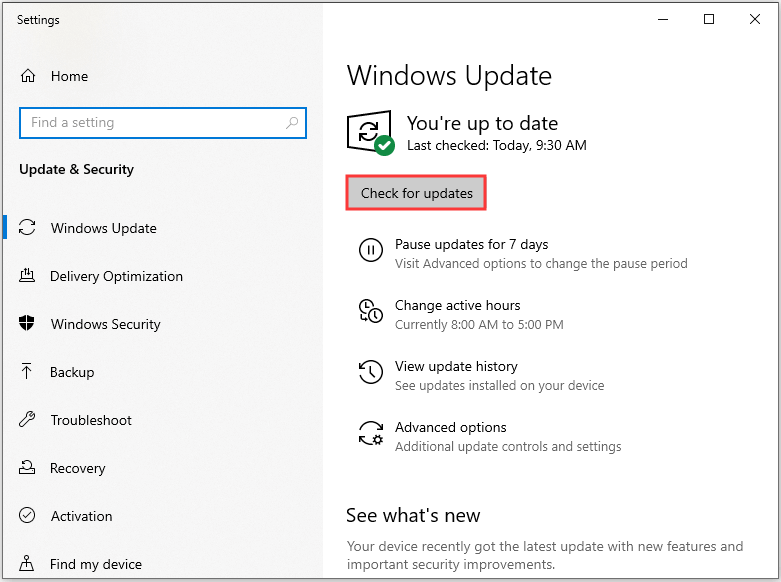
Step 3: Install all identified updates to troubleshoot the issue.
Then restart your computer to see if the problem has been solved.
Fix 3: Run Microsoft Troubleshooter
Microsoft provides troubleshooter to fix some issues. You can try it when you have problems related to Realtek HD Audio Manager not opening.
Step 1: Open Control Panel and select Large icons from View by.
Step 2: Go to Troubleshooting > Hardware and Sound > Hardware and Devices.
Step 3: Click Advanced in Hardware and Devices. Then check Apply repairs automatically and click Next.
Step 4: Follow the on-screen instructions to finish the rest steps.
Then check if the problem Realtek HD Audio Manager not opening has been fixed.
About The Author
Position: Columnist
Sherry has been a staff editor of MiniTool for a year. She has received rigorous training about computer and digital data in company. Her articles focus on solutions to various problems that many Windows users might encounter and she is excellent at disk partitioning. She has a wide range of hobbies, including listening to music, playing video games, roller skating, reading, and so on. By the way, she is patient and serious.
Все способы:
- Способ 1: Проверка устройства воспроизведения
- Способ 2: Установка устройства по умолчанию
- Способ 3: Использование автоматического средства исправления неполадок
- Способ 4: Откат звукового драйвера
- Способ 5: Установка новых звуковых драйверов
- Вопросы и ответы: 2
Способ 1: Проверка устройства воспроизведения
Realtek Digital Output — устройство воспроизведения, которое при использовании определенного комплектующего устанавливается в качестве основного. К перечню проблем, возникающих во время работы такого оборудования, относится и пропажа звука. В таких случаях в первую очередь необходимо проверить, действительно ли было выбрано правильное устройство воспроизведения. Для этого нажмите по значку звука в трее, разверните список оборудования и определите подходящее.
Дополнительно можно кликнуть по значку правой кнопкой мыши и выбрать пункт «Открыть параметры звука».
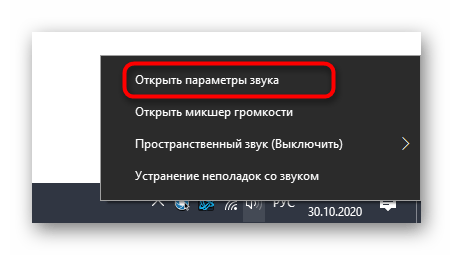
Так вы отследите не только громкость, но и чувствительность динамика, поняв, воспроизводится ли звук на этом оборудовании в принципе. Если изменение средства вывода не принесло никакого результата, приступайте к выполнению следующих методов.

Способ 2: Установка устройства по умолчанию
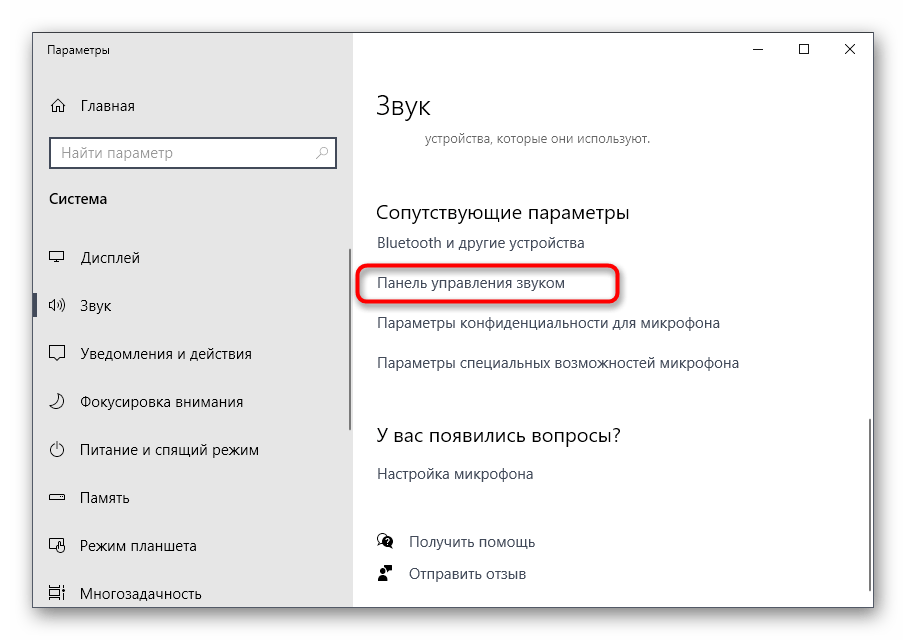
Сразу же советуем приступить к проверке выбранного устройства для вывода звука по умолчанию, чтобы оно соответствовало используемому. Этот вариант окажется эффективным, если изначально параметры настраивались для уже отключенного девайса или по каким-то другим причинам они были сброшены.
- В этом же меню настройки звука нажмите по кликабельной надписи «Панель управления звуком», которая расположена в блоке «Сопутствующие параметры».
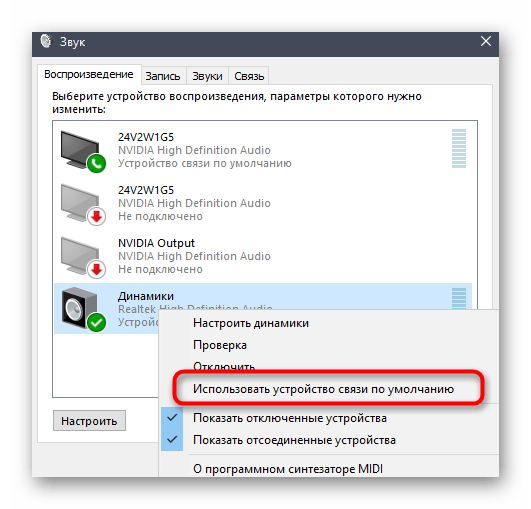
- Найдите значок с именем «Realtek Digital Output» и щелкните по нему правой кнопкой мыши.
- Примените настройку «Использовать устройство связи по умолчанию».

После этого ничего не помешает перейти к проверке звука, воспроизведя музыку или включив какое-нибудь видео на компьютере.
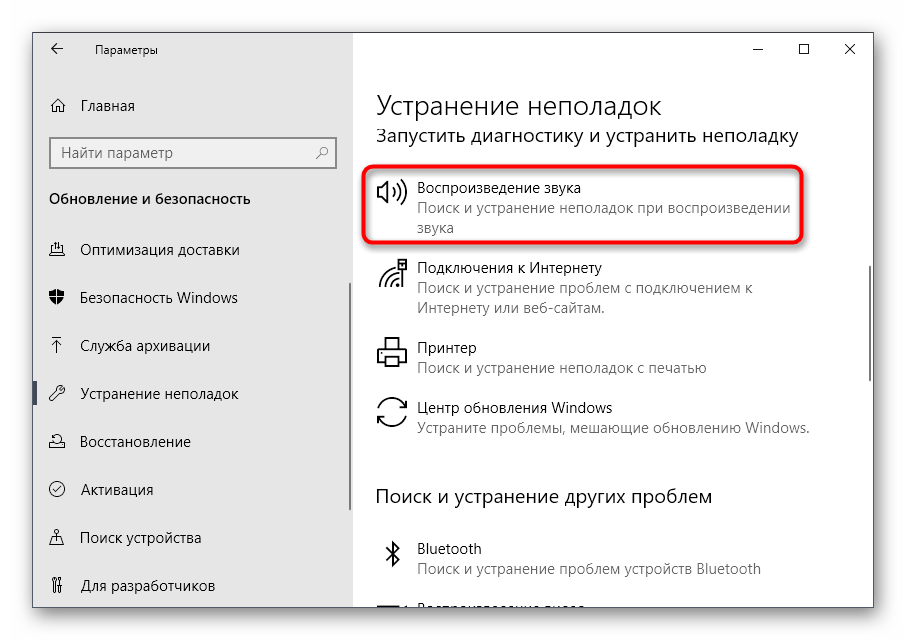
Способ 3: Использование автоматического средства исправления неполадок
В Windows есть автоматическое средство исправления неполадок, позволяющее решать проблемы, связанные с различным оборудованием и другими системными компонентами. Сюда относится и аудио, поэтому этот инструмент может оказаться полезным при отсутствии звука в Realtek Digital Output.
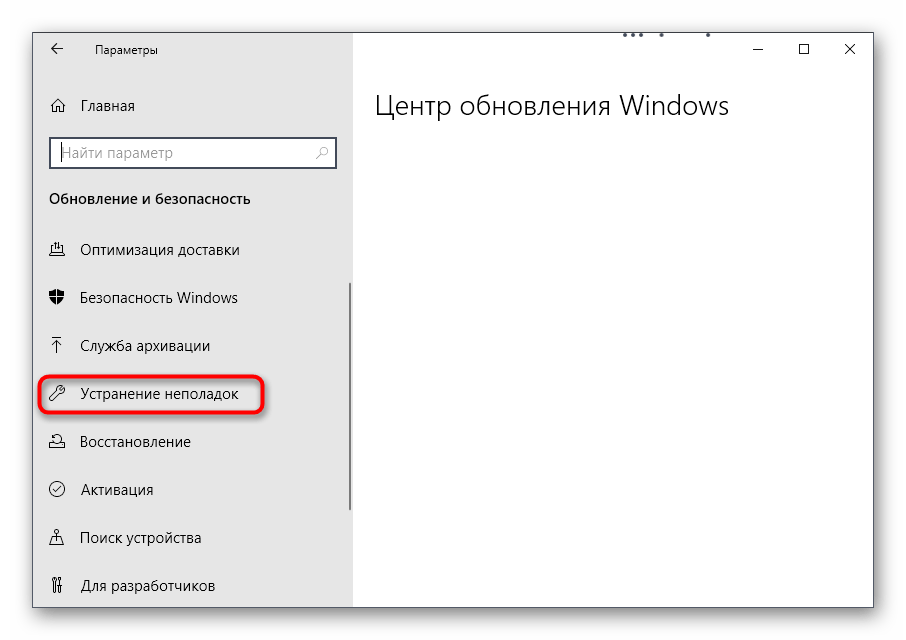
- Откройте «Пуск» и перейдите в приложение «Параметры».
- Нажмите по плитке «Обновление и безопасность».
- Выберите раздел «Устранение неполадок».
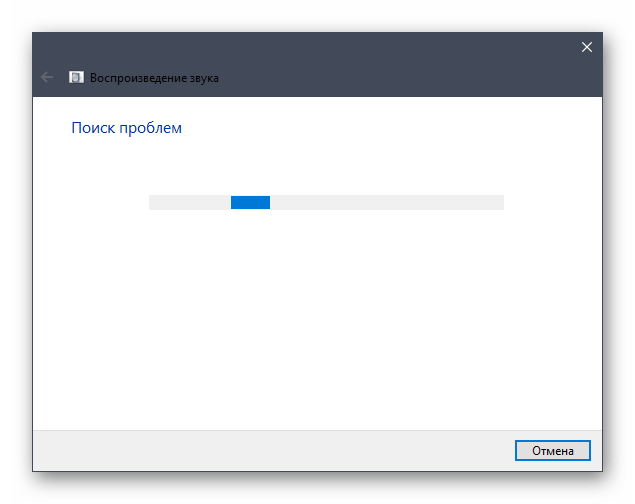
- Найдите средство диагностики «Воспроизведение звука» и запустите его.
- Ожидайте окончания проверки, занимающего несколько минут, а затем ознакомьтесь с полученной информацией и примите новые настройки, если средство предложит изменения.


Способ 4: Откат звукового драйвера
Следующая рекомендация особо полезна пользователям Windows 10, где звуковой драйвер был установлен автоматически операционной системой. Он не всегда соответствует требуемому или же процесс проходит не совсем корректно, что провоцирует появление проблемы с пропажей звука. Драйвер следует откатить, а затем проверить, как это повлияет на воспроизведение.
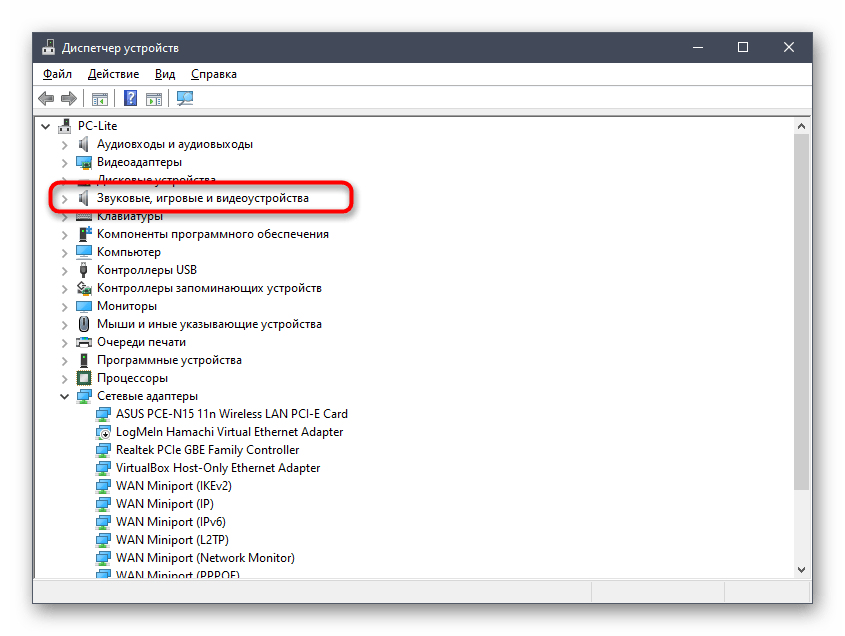
- Для этого сделайте правый клик мышкой по кнопке «Пуск» и в контекстном меню выберите пункт «Диспетчер устройств».
- Разверните категорию «Звуковые, игровые и видеоустройства».
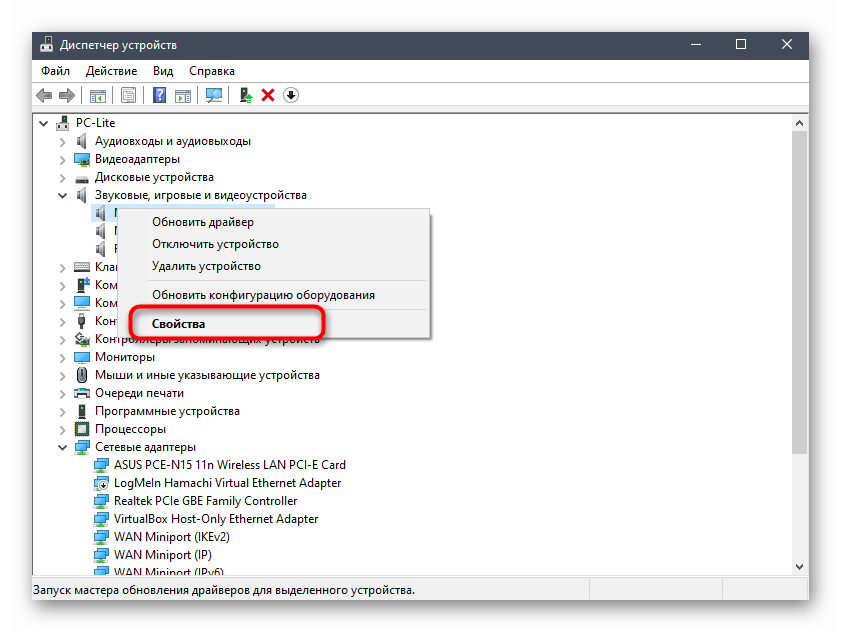
- Щелкните ПКМ по «Realtek Digital Output» и выберите «Свойства».
- Перейдите на вкладку «Драйвер» и используйте функцию «Откатить», подтверждая удаление текущего драйвера.

Изменения должны вступить в силу сразу же, и вполне вероятно, что устройство Realtek Digital Output отобразится в том меню с новым названием. Не пугайтесь этого, просто проверьте звук. Если он все еще отсутствует, обратите внимание на следующий метод, тоже связанный с драйверами.
Способ 5: Установка новых звуковых драйверов
Автоматическая инсталляция драйверов звука в ОС не всегда работает правильно, поэтому ее нельзя считать лучшим средством получения файлов. Сейчас все еще оптимальным вариантом является скачивание ПО с официального сайта производителя материнской платы или ноутбука, но можно воспользоваться сторонним ПО или выполнить поиск по ID оборудования. Обо всех этих вариантах читайте в другой статье по ссылке ниже, где подберите подходящий метод и реализуйте его.
Подробнее: Скачиваем и устанавливаем звуковые драйвера для Realtek
Если ни один из приведенных методов не принес должного результата, рекомендуем проверить физическую исправность устройства воспроизведения — колонок или наушников. Иногда может помочь переустановка или восстановление Windows, но практика показывает, что чаще всего неполадки вызваны неправильной работой драйверов или ошибками при настройке звуковых устройств в Виндовс.
Наша группа в TelegramПолезные советы и помощь