
HDMI audio not working on Windows 11? Unable to hear any sound through HDMI? Don’t worry. You’ve come to the right place. In this post, we have listed a variety of workarounds that you can use for resolving this issue within no time.

Image source: Tech Cult
Well, agree or not but there’s no better than enjoying watching our favorite movie or TV show on the big screen, right? We often use an HDMI cable to connect our device to an external monitor or TV. HDMI cables elevate our home entertainment experience and display video in high quality. An HDMI cable automatically configures the best audio format and delivers a seamless viewing experience.
So, if the HDMI audio stops working on Windows, it can be utterly frustrating. Here are a few workarounds that you can try to fix this issue via simple troubleshooting.
Let’s get started.
Also read: How To Fix USB To HDMI Adapter Issues
Solution 1: Check the HDMI Ports

Before you make any changes to your device’s settings, here’s something you can try. First, check the HDMI cable thoroughly, unplug it and then plug it in again. Try switching to an alternative HDMI port to dock the cable. If nothing helps, use an alternative HDMI cable and check if it helps in fixing the issue.
Solution 2: Manually Configure the HDMI Sound Settings
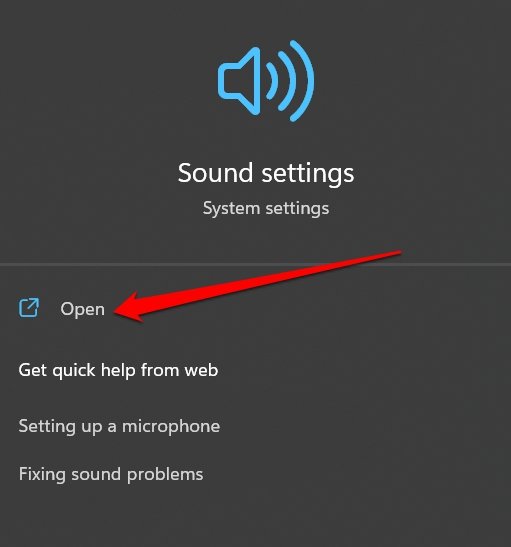
Step 1: Tap on the search icon placed on the Taskbar, type “Sound Settings” and hit Enter.

Step 2: Under the “Choose where to play the sound” section, manually select the audio output device.

Alternatively, you can also try this. Tap on the sound icon placed on the System Tray. Hit the speaker icon placed on the extreme right side of the volume bar. Manually select the audio output device from the list.
Also read: How To Fix HDMI Monitor Not Detected In Windows 10
Solution 3: Set HDMI as Default Playback Device
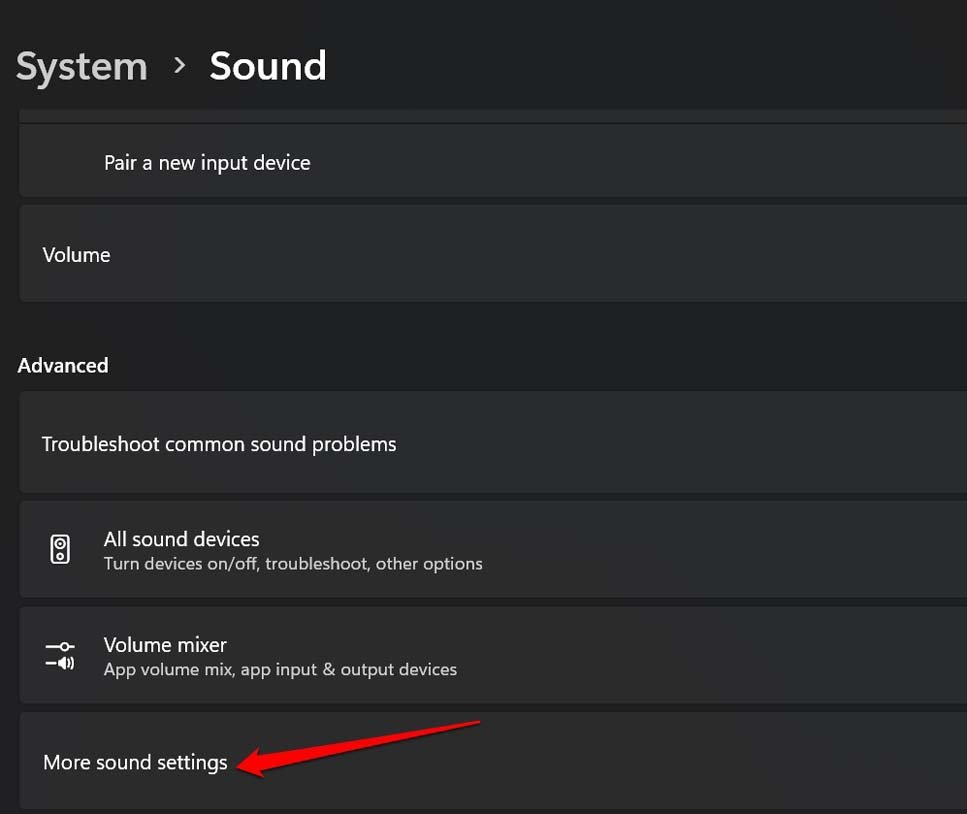
Step 1: Tap on the search icon placed on the Taskbar, type “Sound Settings” and hit Enter. Select “More Sound Settings”.

Step 2: The sound properties window will now appear on the screen. Select the HDMI output device from the list and then tap on the “Set Default” button.

So, now whenever you will plug the HDMI cable into your device, Windows will automatically use it as your default playback device.
Also read: How To Fix Second Monitor Not Detected on Windows 10 (2022)
Solution 4: Run the Windows Sound Troubleshooter
Step 1: Tap on the Windows icon placed on the Taskbar, and select “Settings”.
Step 2: Switch to the “System” tab from the left menu pane. Scroll down and select “Troubleshoot”.

Step 3: Tap on “Other Troubleshooters”.
Step 4: Hit the “Run” button placed next to the “Playing audio” troubleshooter.

Step 5: Follow the on-screen instructions so that Windows can automatically scan and diagnose the underlying issues.
Solution 5: Update Sound Drivers
Step 1: Press the Windows + R key combination to open the Run dialog box.
Step 2: Type “Devmgmt.msc” in the textbox and hit Enter.

Step 3: In the Device Manager window, select “Sound, video, and game controllers”.

Step 4: Right-click on the audio driver, and select “Update Driver”.
Step 5: Follow the on-screen instructions to update the sound drivers installed on your device.
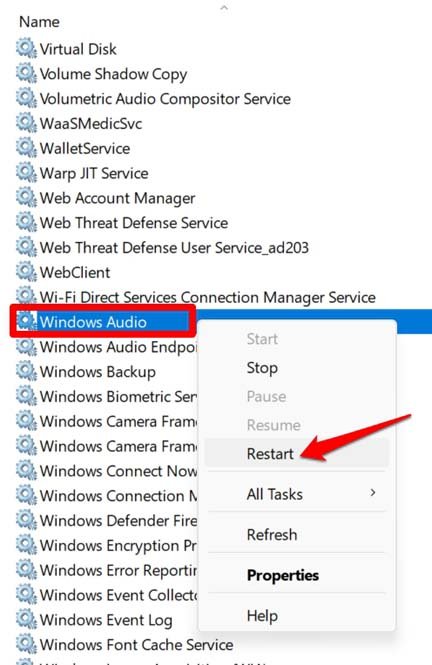
Solution 6: Restart the Audio Service
Step 1: Press the Windows + R key combination to open the Run dialog box.
Step 2: Type “Services.msc” in the textbox and hit Enter.

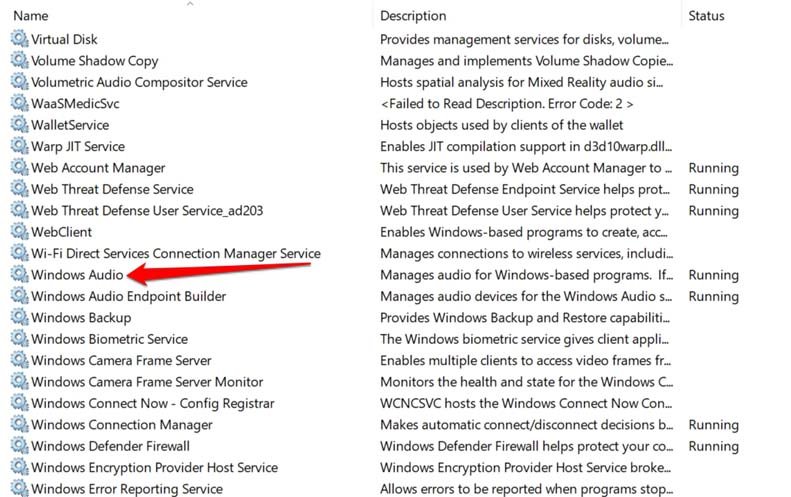
Step 3: In the Services window, look for the “Windows Audio” service. Right-click on it and select “Restart”.

Step 4: Windows will now display a confirmation prompt. Hit on the “Yes” button to confirm.
Step 5: After restarting the Windows Audio service, plug in the HDMI cable and check if the audio issues are resolved.
Solution 7: Update Windows
Using an outdated version of Windows can also trigger the “HDMI audio not working” issue on your device. The new version of Windows always comes loaded with performance improvements and bug fixes. Hence, check for the available updates and install the latest version of Windows 11 on your device.

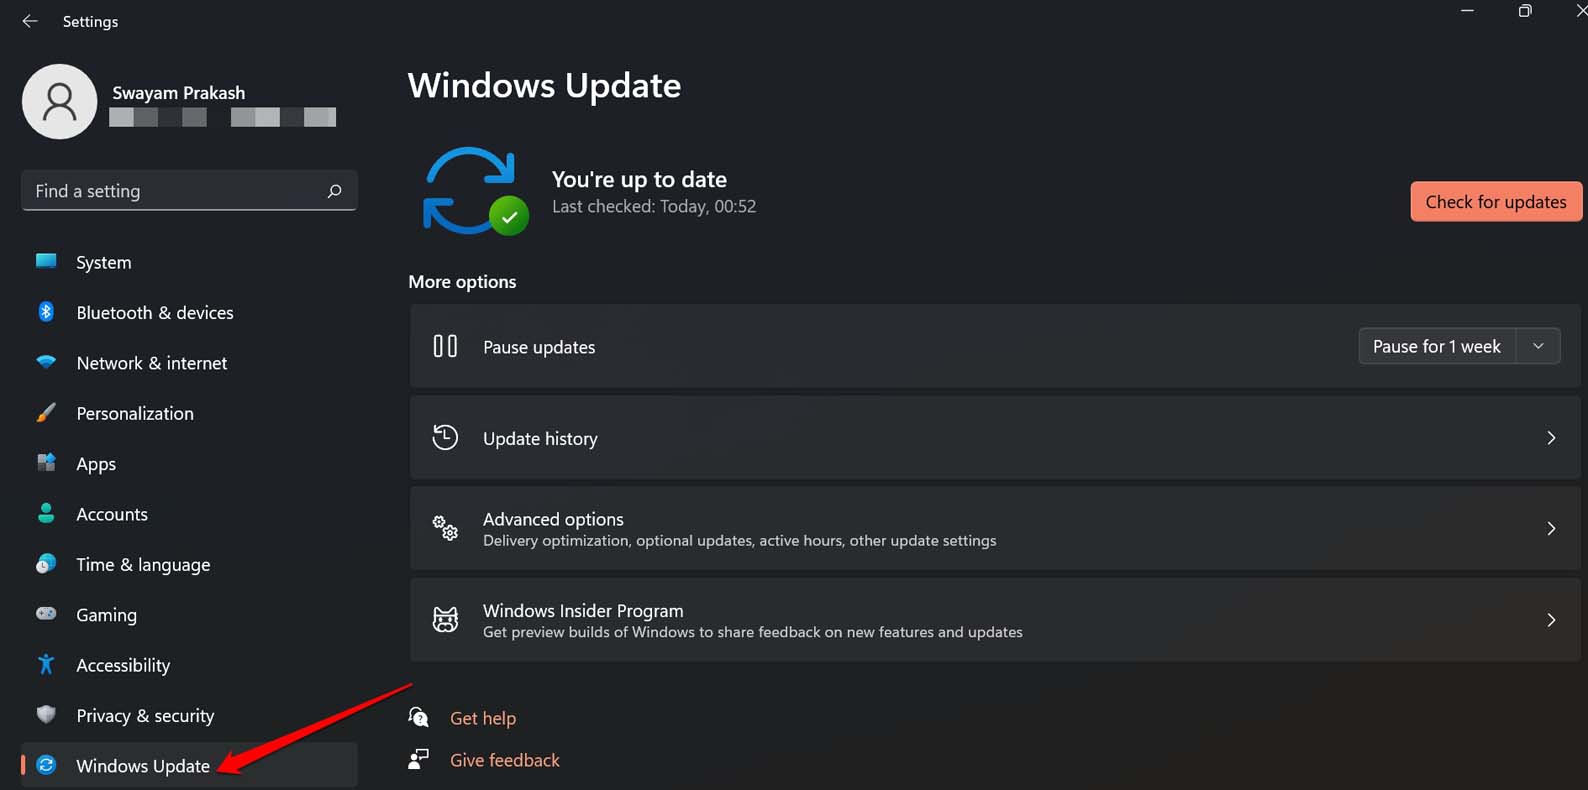
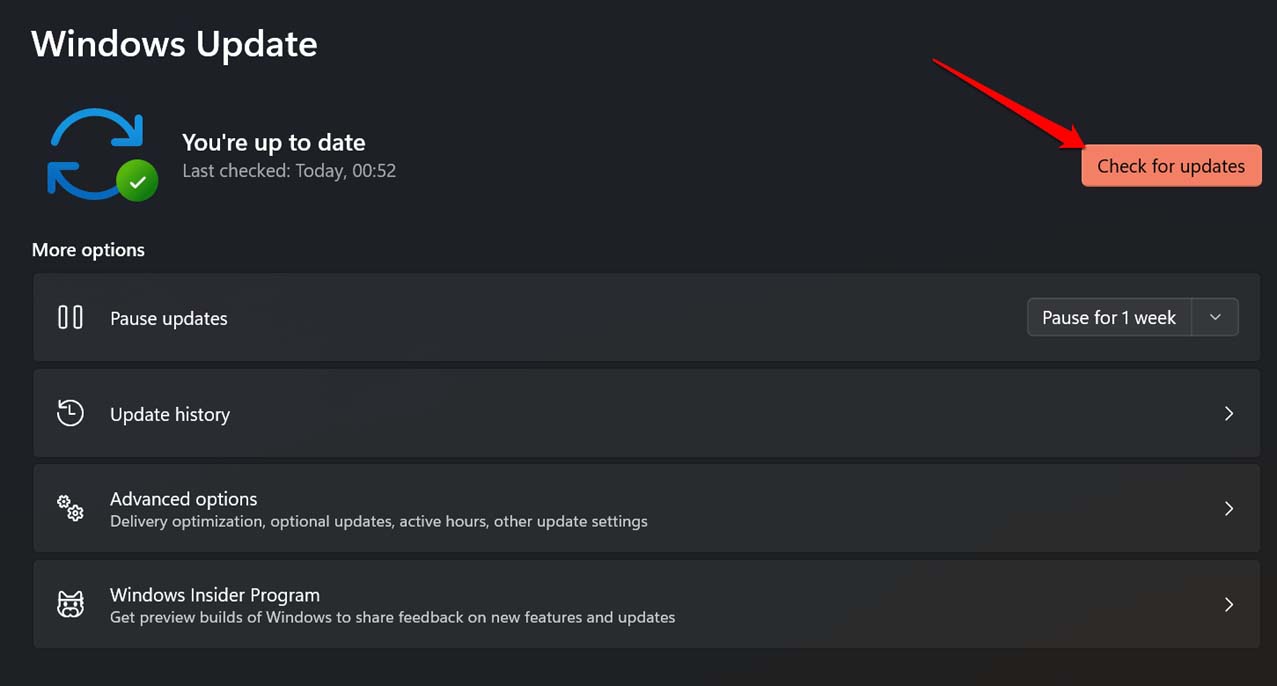
Step 1: Launch the Settings app, and switch to the “Windows Update” section from the left menu pane.
Step 2: Hit on the “Check for updates” button.
Step 3: If any update is available for your device, upgrade your PC right away.
The Final Word On How To Fix HDMI Audio not Working on Windows 11
Here are a few simple solutions to fix the “HDMI audio not working” issue on Windows 11. Using an HDMI cable on Windows can amp your audio listening experience. So, if you are facing any kind of issues related to the HDMI audio output, you can use any of the above-listed solutions to resolve the issue.
Was this post helpful? Do let us know which method did the trick for you. Feel free to share your thoughts in the comments box.
21698
В этой статье мы рассмотрим решения проблемы, когда нет звука на телевизоре или мониторе после подключения ноутбука или компьютера на Windows 11. Проще говоря, когда Windows 11 не выводит звук на устройства, которые подключены по HDMI кабелю. В данном случае совсем не важно, какое устройство не хочет выводить звук. Но чаще всего это именно телевизоры, так как мониторов со встроенными динамиками не очень много.
На сайте уже есть похожая статья: почему нет звука через HDMI на телевизоре, при подключении ноутбука (ПК) на Windows 7 и Windows 10. Она собрала очень много просмотров. В комментариях оставили больше количество благодарностей и поделились рабочими решениями. Думал обновить ее и добавить информацию по Windows 11, но решил написать отдельную статью. Так будет проще и не так запутано.
Проблема простая и понятная. После подключения телевизора к ноутбуку с Windows 11 изображение есть, а звука нет. Вместо телевизора может быть монитор, а вместо ноутбука — стационарный компьютер. Это ничего не меняет, решения будут практически одинаковые. Нам нужно, чтобы звук воспроизводился из динамиков телевизора, или через подключенную к нему акустическую систему. А он продолжает играть через динамики ноутбука или компьютера, несмотря на то, что изображение выводится на телевизор.
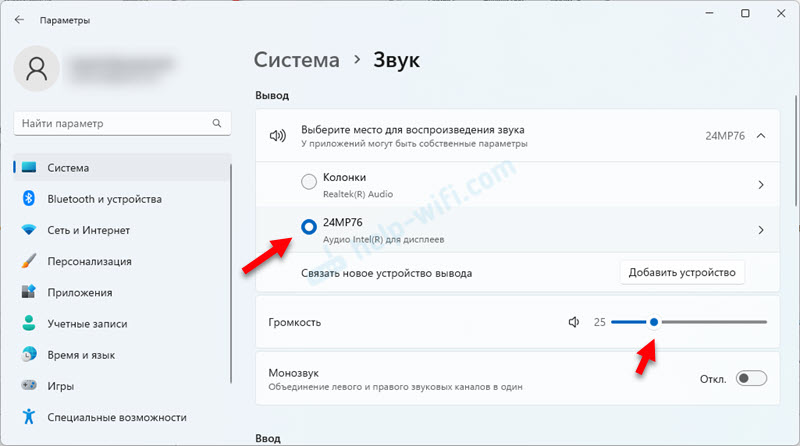
Настройки вывода звука через HDMI в Windows 11
Сейчас я покажу, как проверить настройки звука и в качестве устройства для вывода звука выбрать телевизор, который подключен по HDMI кабелю. Важно: убедитесь, что телевизор или монитор действительно подключен и выводит изображение с компьютера. В отдельной статье я уже показывал как подключить телевизор к Windows 11 ноутбуку или компьютеру, в том числе по HDMI.
Простой способ переключить вывод звука на телевизор
Нажмите на иконку звука в системном трее. Дальше нажмите на иконку выбора аудиовыхода. Там должен быть ваш телевизор. Обычно возле модели написано что-то типа «Аудио Intel для дисплеев», «Цифровое аудио», «AMD HDMI Output». Выберите его и звук сразу должен воспроизводиться через телевизор. Если вы выбрали свой телевизор, но звука нет, то проверьте уровень громкости на самом телевизоре и уровень громкости в Windows 11.

В Параметрах Windows 11
Можно открыть Параметры (нажав правой кнопкой на меню Пуск или сочетание клавиш Win+X) и перейти в раздел Система – Звук. В меню Выберите место для воспроизведения звука выберите свой телевизор, который подключен по HDMI кабелю (если его там нет – смотрите другие решения ниже). В этом же окне проверьте уровень громкости.
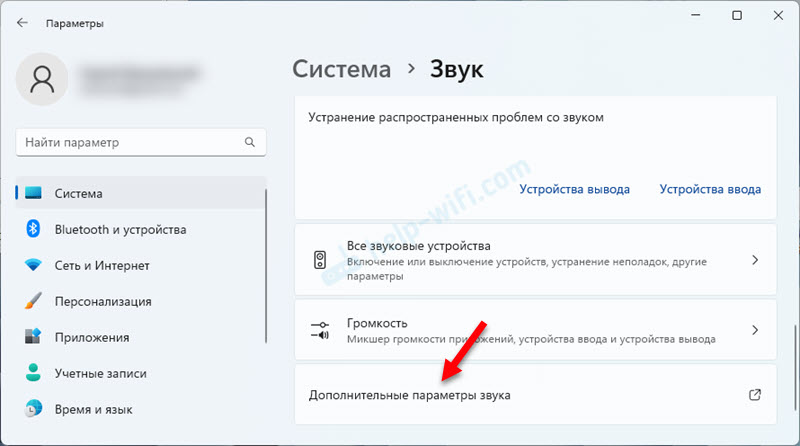
В старом окне с настройками звука
Пока в Windows 11 еще не убрали старое окно с настройками звука, но очень хорошо его спрятали.
- В параметрах, в разделе Система – Звук выберите пункт Дополнительные настройки звука.

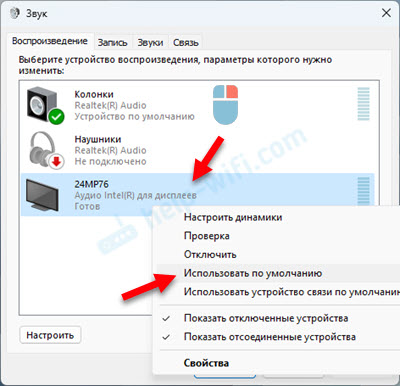
- На вкладке Воспроизведение должен отображаться наш телевизор или монитор. Обратите внимание на статус (надпись под названием). Если там написано «Готов» и нет зеленой галочки, то нажмите на него правой кнопкой мыши и выберите Использовать по умолчанию.

Если возле телевизора написано «Отключено», «Не подключено», или «Соединение прервано», то так же нажмите на него правой кнопкой мыши и выберите пункт Включить или Подключить.
- Если Windows 11 не видит телевизор как устройство для вывода звука и в окне Звук он не отображается, то нажмите правой кнопкой мыши на пустую область и установите галочки возле двух пунктов, как на скриншоте ниже.
Возможно, телевизор появится и его можно будет выбрать как устройство для вывода звука, или включить/подключить.

Нет звука на телевизоре по HDMI от Windows 11: решения для ноутбуков и ПК
Если вам по какой-то причине не удалось установить телевизор в качестве устройства для воспроизведения звука, то сначала примените эти простые решения:
- Подключите кабель в другой HDMI-порт на телевизоре. Обычно на телевизорах несколько портов HDMI. Так же, возможно, понадобится выбрать новый порт, как источник сигнала. Посмотрите, как подписан порт на телевизоре. Не подключайте кабель в порт HDMI (DVI), через него звук не выводится, только изображение. Если у вас ПК и на видеокарте тоже несколько HDMI выходов, то подключите кабель в другой порт на компьютере.
- Выключите телевизор и вытащите вилку из розетки. Оставьте его на 15 минут. Выключите ноутбук или компьютер. Соедините их HDMI кабелем, после чего включите телевизор и компьютер.
- Если у вас ноутбук, то попробуйте просто зажать кнопку питания и держать ее пока он не выключится. После чего включите ноутбук. Возможно, после этого звук будет выводиться на телевизор.
- Установите все обновления Windows 11.
- Были случаи, когда помогало отключение Bluetooth на ноутбуке (что странно, конечно).
- Еще одно странное, но рабочее решение – смена режима загрузки в BIOS на UEFI (работает в предыдущих версиях Windows, по Windows 11 пока что нет информации).
Следующие решения, которые мы рассмотрим более подробно, были проверены на практике лично мной, или посетителями этого сайта.
Переустановка звуковой карты
- Телевизор должен быть подключен к Windows 11 (ноутбуку или компьютеру).
- Откройте диспетчер устройств. Можете нажать сочетание клавиш Win+X и выбрать его в появившемся меню. Или сделайте так:
- Нужно удалить звуковую карту. Откройте вкладку Звуковые, игровые и видеоустройства, нажмите правой кнопкой мыши на звуковую карту и выберите Удалить устройство. У меня это «Аудио Intel(R) для дисплеев». Так же можно попробовать удалить «Realtek Audio». Еще там могут быть устройства «AMD High Definition Audio Device» или «NVIDIA High Definition Audio». Зависит это от установленной звуковой или видеокарты.

- Подтвердите удаление устройства.
- Перезагрузите компьютер. Можно вместо перезагрузки нажать на кнопку Обновить конфигурацию оборудования в том же диспетчере устройств, но лучше выполнить перезагрузку.

Можно еще открыть вкладку Аудиовходы и аудиовыходы и удалить там свой телевизор (если он там отображается). Так же рекомендую обратить внимание на иконку возле телевизора. Если там есть стрелочка, то скорее всего это устройство просто отключено. Нажмите на него правой кнопкой мыши и выберите Включить устройство.

А на вкладке Системные устройства найдите и проверьте устройство Технология Intel(R) Smart Sound — аудиоконтроллер (OED), или Контроллер High Definition Audio (Microsoft).

Посмотрите, нет ли возле контроллера желтого восклицательного знака, или иконки в виде стрелочки. Если есть, то попробуйте его включить, или посмотрите какая там отображается ошибка открыв его свойства. Его так же можно попробовать удалить, или переустановить драйвер. Или просто выключите и включите этот контроллер.
Обновление или переустановка драйверов
Я перечитал все комментарии к статье с решениями такой же проблемы в предыдущих версиях Windows (ссылка в начале статьи) и там очень много сообщений, что помогло именно обновление или переустановка драйвера видеокарты, и/или звуковой карты.
Обновление драйверов через диспетчер устройств результата не даст. Необходимо именно скачать установочный файл с сайта производителя и запустить его установку.
Что нужно сделать:
- Если у вас ноутбук – зайти на сайт производителя ноутбука. Если ПК – зайти на сайт материнской платы (там обычно можно скачать драйвер на звук) и/или на сайт производителя видеокарты. Найти страницу с загрузками для своего ноутбука, материнской платы или видеокарты. Искать можно по модели через поиск по сайту (на сайте производителя), через меню (обычно это раздел Поддержка) или через Google.
- Скачать драйвер на видео и/или звук. Необходимо, чтобы он был именно для Windows 11. Поддерживаемые операционные системы всегда указаны в описании драйвера.
- Подключить телевизор к ноутбуку через HDMI кабель. На момент установки драйвера телевизор должен быть подключен!
- Запустить установку драйвера. Обычно это файл с расширением .exe. Он один, или находится в архиве.
- Следовать инструкции по установке. Там ничего сложно, нажать несколько раз кнопку Далее.
Обычно уже в процессе установки драйвера компьютер начинает воспроизводить звук через телевизор. Если у вас не так – перезагрузите компьютер. Этот способ помог многим. Мне сложно дать вам конкретную инструкцию, так как у всех разные производители оборудования. Соответственно сайты, драйверы, программы будут разные.
Какие еще есть варианты:
- Если у вашего производителя ноутбука или материнской платы есть программа, задача которой искать устаревшие драйверы и обновлять их, то можете использовать ее. Я на своем ноутбуке Dell пользуюсь такой программой, называется она Dell Update. У ASUS это приложение MyASUS, у HP – HP Support Assistant, у Lenovo – Lenovo System Update.
Скачать ее можно с сайта производителя устройства. Эти программы так же умеют обновлять BIOS. - Видел много сообщений, что помогло обновление драйверов через программы типа DriverPack Solution. Тоже как вариант, но мне не очень нравятся подобные программы. Не редко после их использования появляются другие проблемы.
- Если переустановка драйвера не помогла, вы можете сделать откат или замену драйвера прямо в диспетчере устройств.
- Обновите BIOS своего ноутбука или материнской платы. Это так же может быть причиной того, что по HDMI нет звука на телевизоре при подключении компьютера на Windows 11. Обновление BIOS можно скачать так же, как и драйверы, на той же странице.
Средство устранения неполадок со звуком
Нажмите правой кнопкой мыши на иконку звука и выберите Устранение неполадок со звуком.
Откроется окно, в котором нужно дать согласие на запуск автоматической диагностики.

Остается только дождаться результатов диагностики. Если проблема будет найдена, то система должна исправить ее автоматически, или предложить вам варианты решения или дополнительной диагностики.
Sound Not Working with HDMI. Here is the Comprehensive Guide to Fix HDMI Audio Not Working on Windows 11 PC.
In this guide, we have highlighted some tips to fix HDMI audio not working in Windows 11. You must connect your PC to the TV via HDMI cable to watch content such as movies or web series on a bigger TV screen. At times, while the video from the PC gets cast on the TV screen, the sound is not audible. Often the HDMI port may be faulty, or the cable may have issues.
Sometimes certain bugs on Windows 11 can cause these issues where HDMI audio is not working when the PC and TV screen are connected. Outdated sound drivers on the Windows 11 computer may cause interference with the HDMI sound output. Also, you need to ensure that HDMI audio output is set as the default source of output on your PC. The Windows audio services may have some problems, due to which they may have stopped.
Here are all the troubleshooting techniques you can implement to check for the reason why the HDMI audio output is not audible and fix the same.
1. Update Windows 11
Start the troubleshooting by fixing the possible bugs on the version of Windows 11 installed currently on your PC.
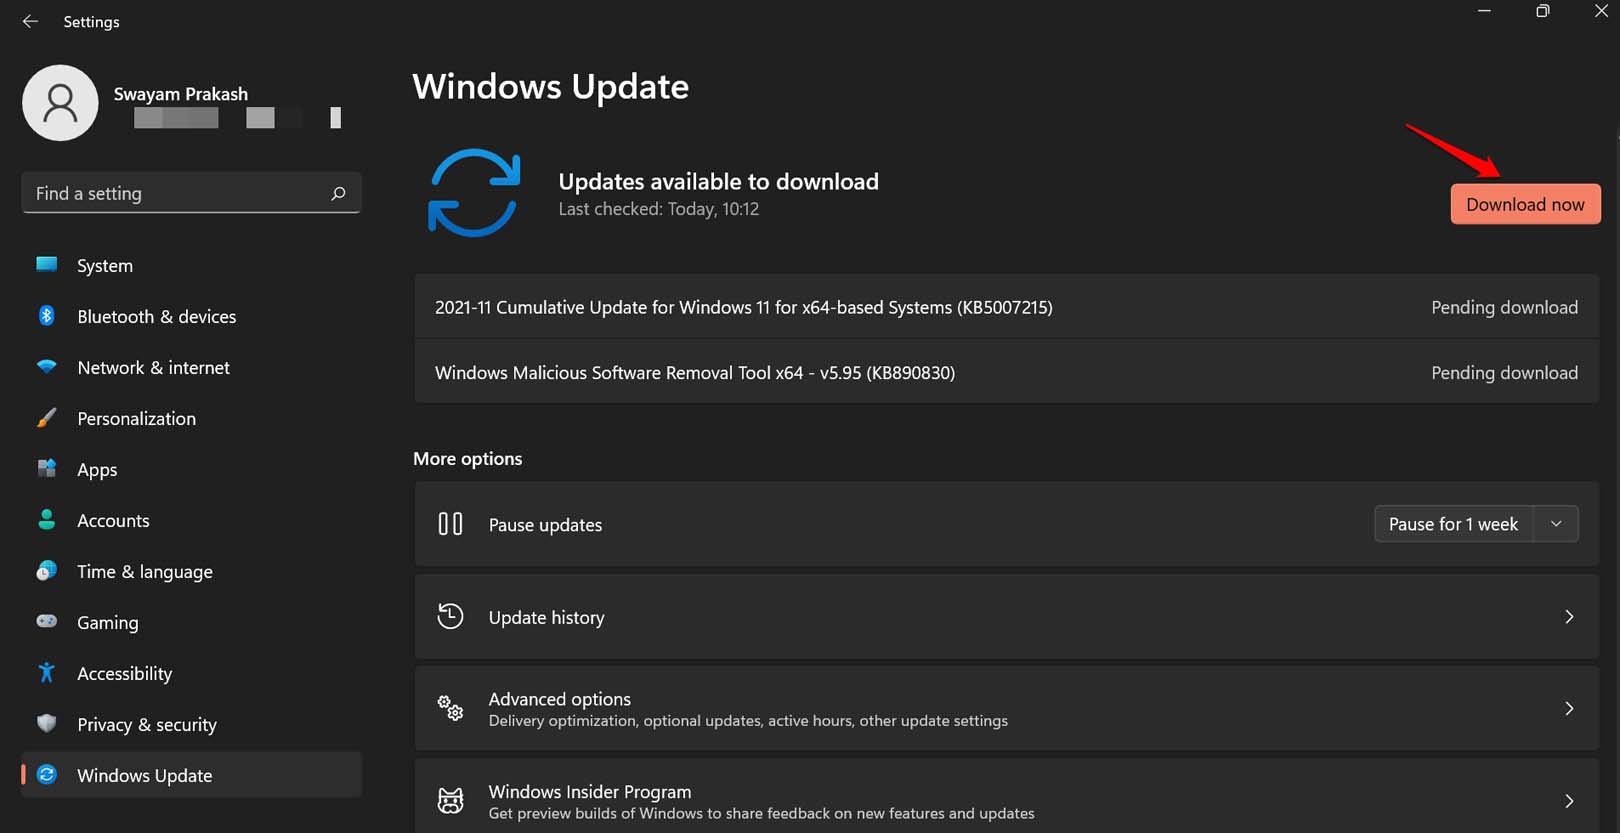
- Go to the settings by pressing the Windows + I shortcut.
- Then click on the Windows Update at the left-hand panel.

- Next, click on Check for Updates.

- If an update is available it will show up. Click on Download Now to proceed with the new update installation.

Usually, if your PC is connected to a WiFi network, all the software updates for the PC should be installed automatically. In case, your computer missed out on a new update, you can follow the above steps to carry out the update manually.
2. Manually Update the Sound Drivers on Windows 11
Check the steps mentioned below to manually update the audio drivers on your Windows 11 PC.
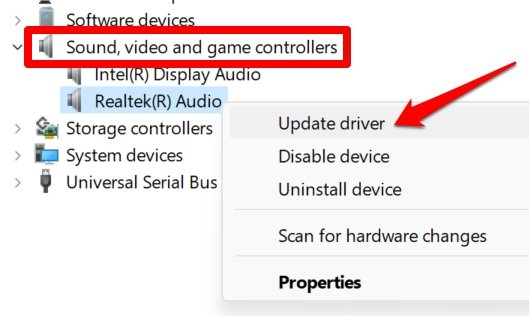
- Open the device manager by pressing Windows + X.
- Navigate to Sound, video, and Game Controllers and click to expand it.
- Right-click on Realtek Audio and select Update Driver.

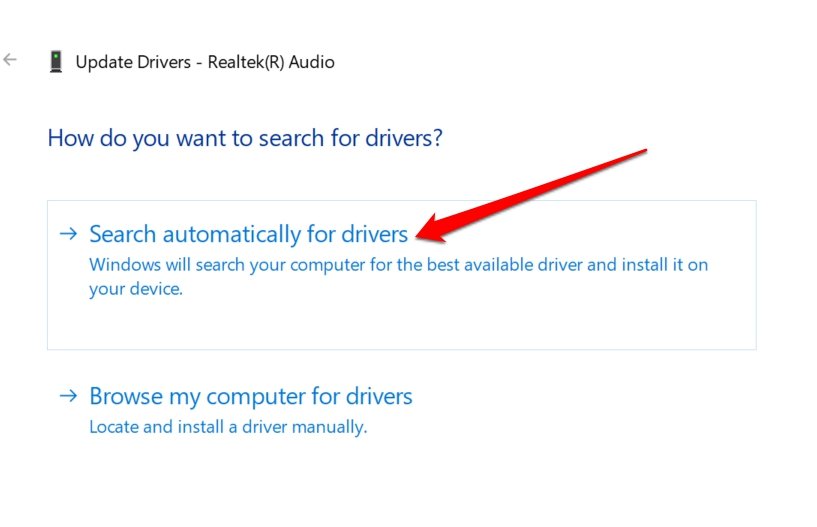
- Click on Search Automatically for Drivers. It will allow the system to download available latest drivers for the system audio for Windows 11.

3. Enable HDMI Output as Default Playback
Here is how you can set the HDMI output as default playback.
- Open the Sound Settings of Windows.

- Navigate to the Advanced tab and click on More Sound Settings.

- Click on the Playback tab > select the HDMI output(the TV model name).
- Now, click on Set Default from the drop-down menu.
- Click on Apply to save the changes.
4. Restart the Windows Audio Services
Here are the steps to restart the Windows audio services.
- Open the Windows Services app using Windows search.

- Once you see the Services, navigate to Windows Audio.

- Right-click on Windows Audio > select Restart.

- Click on Yes to confirm the move.
5. Restart your computer
It may be some random technical glitch on the PC. As the computer and the Tv are connected the sound output from the HDMI connection may not be working due to that. Try to restart the PC.
- Press the Windows key to bring up the search console.
- Click on the Power icon at the bottom right corner of the search console.
- From the little menu that pops up, click on Restart.

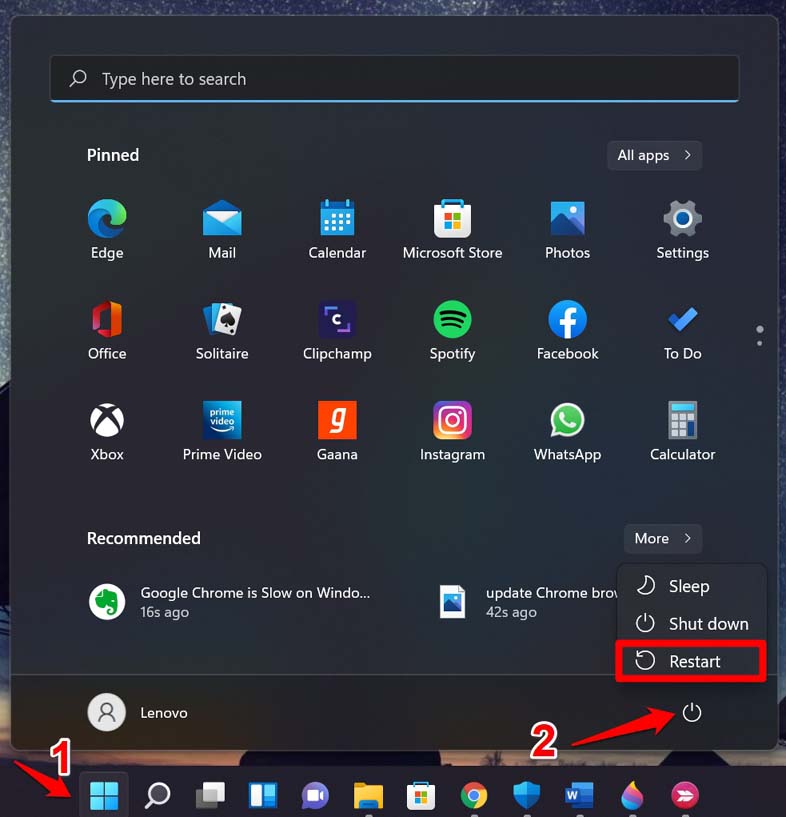
Once the computer restarts, try to reconnect it to the TV via HDMI. Then check if the sound output on the TV is audible or not.
6. Enable HDMI Auto Detection
As the TV is the output device and it is now connected to the PC, you have to do the following steps. Enable the auto-detection of HDMI sound output on your computer sound settings.
- Open the Realtek Audio Console using Windows search.

- Navigate to Device advanced settings.

- Click the toggle beside the option Enable Jack detection when a device is plugged in.
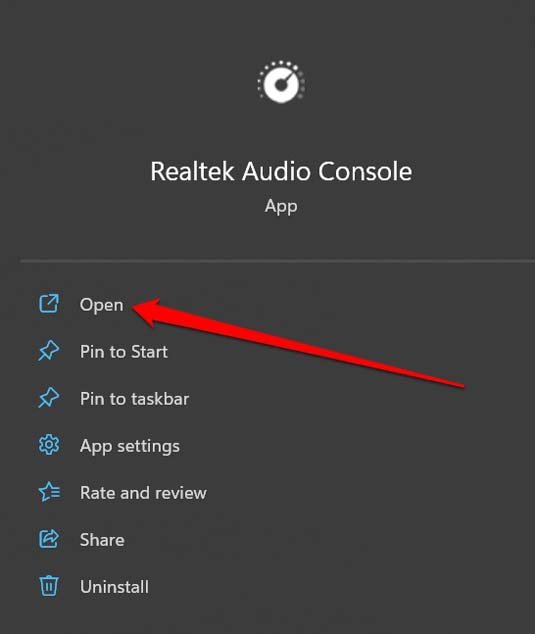
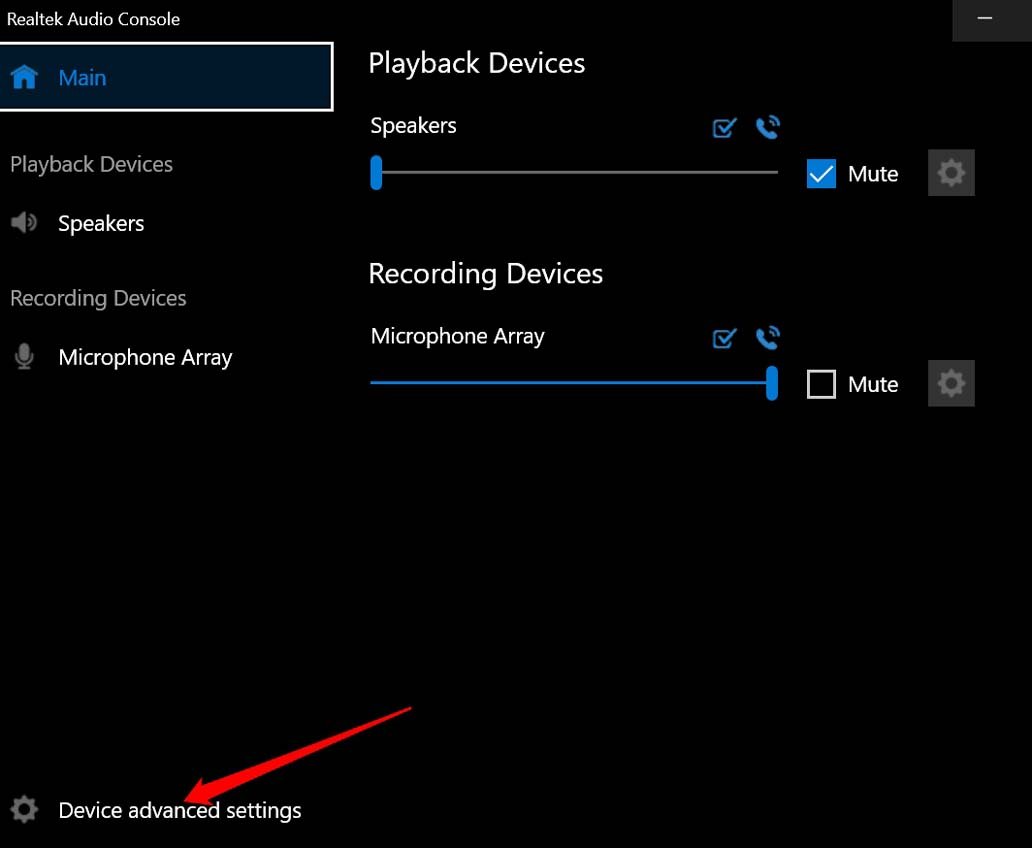
When you connect the PC and a TV via HDMI cable, automatically, the output source for sound will be detected as the TV.
7. Check if the HDMI Cable is Faulty
Check the HDMI cable connection at both ends of the connection. The cable may have issues at either end connected to the PC or the TV. Also, sometimes not inserting the cable properly at the input and output ends can cause sound output issues.
Unplug the cable and re-insert it properly on the computer as well as on the TV. If the HDMI audio is not working after reinserting the cable, you may replace the cable. If you have a spare HDMI cable lying around, use that.
8. Tweak the Volume Level of the TV
It may seem like a silly fix, but often within this lies the root of the inaudible HDMI output issue. Check the sound output on the TV as it is the output device. Your TV remote may be faulty, and its volume rockers may not be working.
Try to increase the volume using the buttons present on the TV. Also, check if you have accidentally enabled the Mute option on the TV. If that is the case, unmute the TV, and you should be good to go.
9. Use the Windows Sound Troubleshooter Tool
You may use the inbuilt troubleshooter provided by Microsft for Windows 11 to fix the issues with sound output. Here is how to utilize this tool.
- Press the Windows key to bring up the search console.
- Type Sound Settings and click open when the correct search result appears.
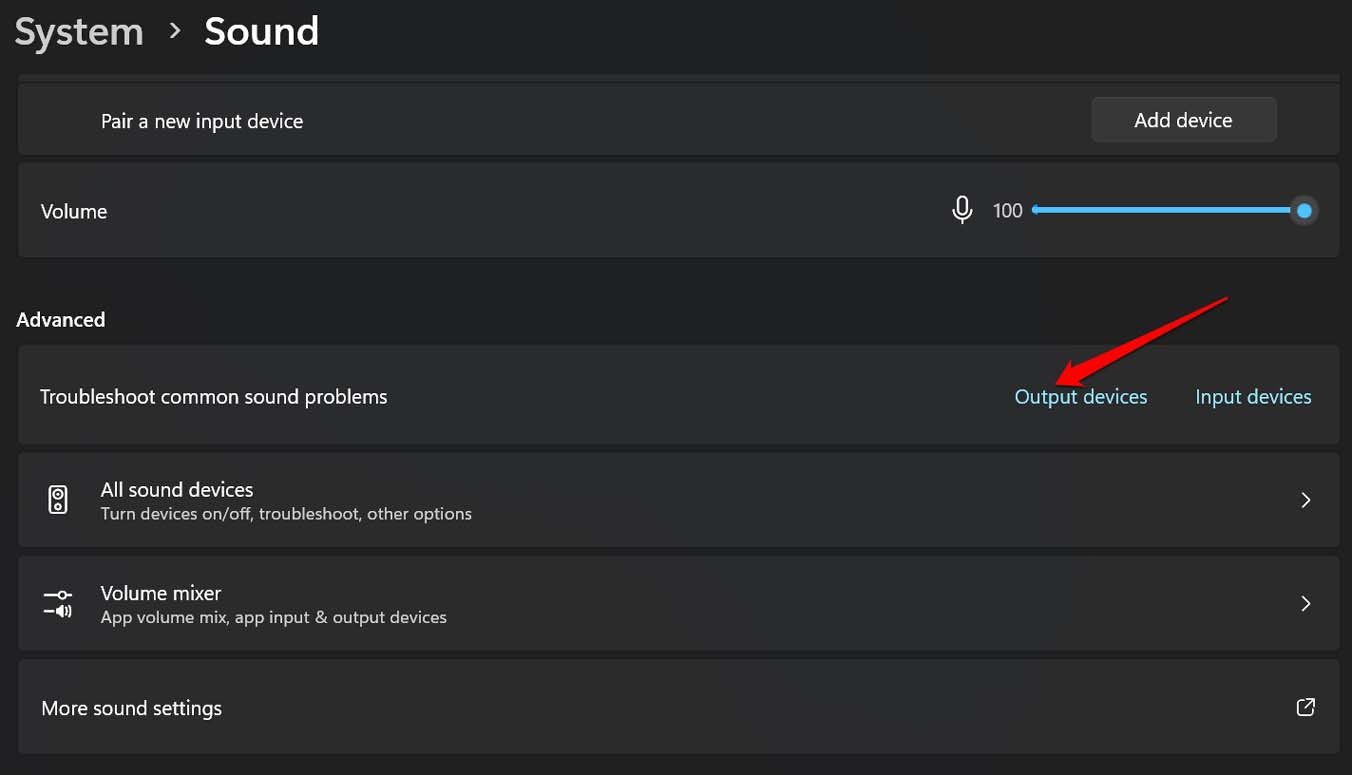
- Click on the option OutPut devices besides the tab Troubleshoot Common sound Problems.

- Next, select the output device (the TV in this case) upon which the troubleshooter will work.
If you see further instructions, follow them to continue with the troubleshooting.
10. Reset the Windows 11
If none of the other troubleshooting tips are working, then you have to reset the Windows 11 PC. Usually, a reset will set all the configurations on your device to their default settings. This has often helped in fixing technical issues that are too stubborn to be fixed by other general fixes.
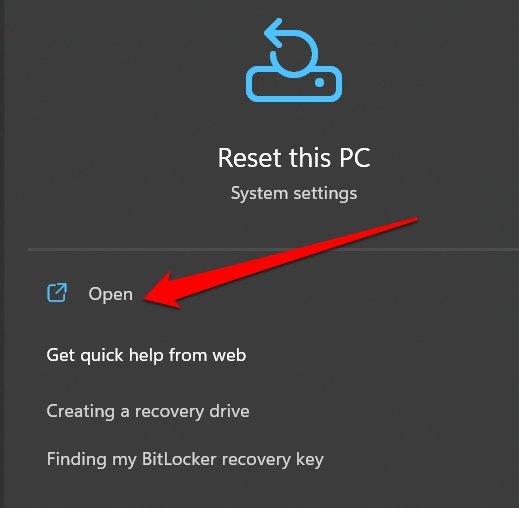
- Press the Windows key to bring up the search console.
- Type Reset This PC and click Open when the correct search result shows up.

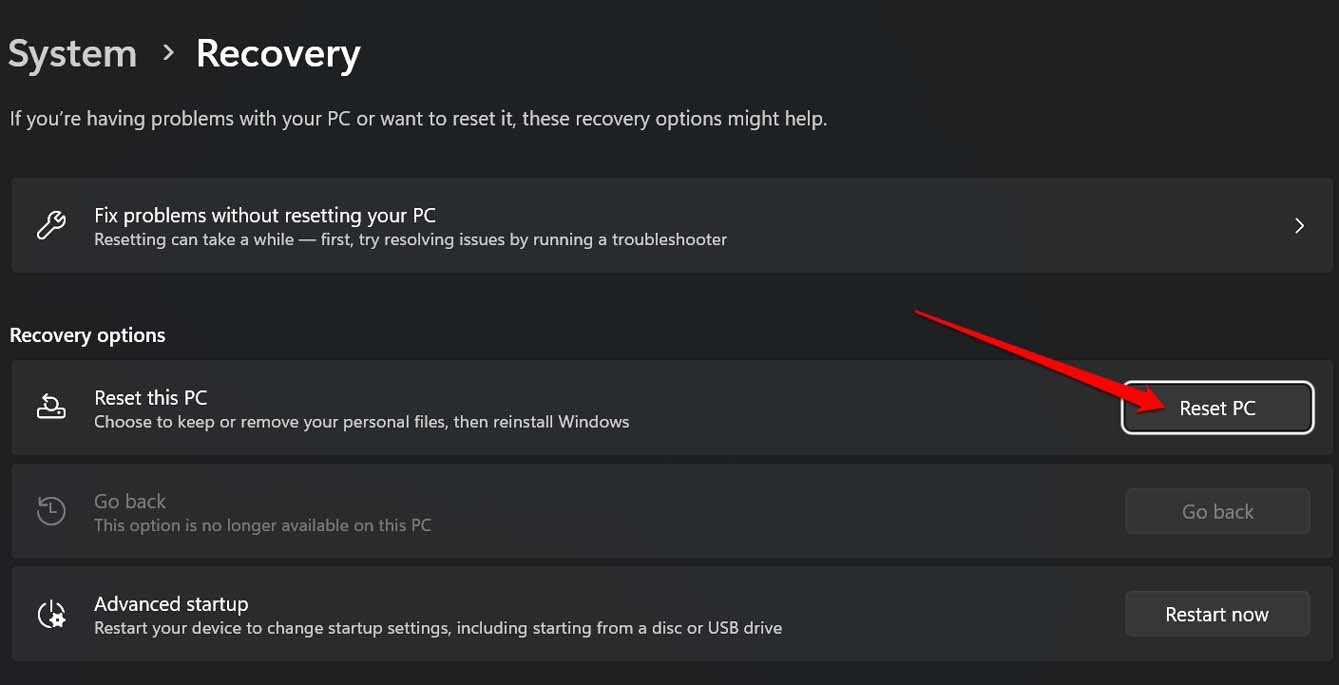
- Click on the button Reset PC.

- Select whether you want to keep your files or want a full factory reset that will wipe away all the data on your PC.
Once the reset process is over, reboot the computer, connect it to the TV via HDMI cable and try to watch your content. The audio should now become audible.
Conclusion
That’s a wrap for this guide on how to fix HDMI audio not working in Windows 11. Follow the troubleshooting tips and fix the sound output on the TV. Enjoy your favorite content from the PC on the big screen without any hassles.
If you’ve any thoughts on How to Fix HDMI Audio Not Working in Windows 11?, then feel free to drop in below comment box. Also, please subscribe to our DigitBin YouTube channel for videos tutorials. Cheers!
Readers help support Windows Report. We may get a commission if you buy through our links.
Read our disclosure page to find out how can you help Windows Report sustain the editorial team. Read more
Surround sound means a stereophony system that surrounds the listener with three or more speakers to create a more realistic effect.
However, a Windows 11 HDMI surround sound issue is common among Windows 11 users. In this article, we are going to discuss what to do if surround sound isn’t working through HDMI on Windows 11.
Any audio player might have this problem on both 7.1 and 5.1 surround sound systems. Your system won’t produce sound through your rear speakers if this problem arises.
The affected consumers claim that the Realtek sound card is typically to blame for this problem. Other sound card users could, however, also experience this issue.
Does Windows 11 support surround sound?
Yes, it does! Windows 11 gives you the option to choose between three alternative spatial sound providers: Windows Sonic for Headphones, Dolby Atmos for Headphones, and Dolby Atmos for Home Theater.
However, this is only the software part. For the full experience, you will also need a surround sound board installed on your PC.
What can I do if surround sound isn’t working through HDMI on Windows 11?
1. Run the Audio troubleshooter
- Type audio troubleshooter into Windows Search and press Enter.

- Click on Advanced and then turn on the Apply repairs automatically checkbox.

- Click Next and follow the on-screen instructions to execute the audio troubleshooter.


2. Turn on mono audio
- Click on the Start button and select Settings.

- Select System and then click Sound.

- Turn the Mono audio switch to On.


3. Download the HD Audio Codecs
- Visit the sound card manufacturer’s website, such as the Realtek Audio Codecs.

- Look for your device’s HD Audio Codecs and download them.
- Run the installation file and follow the on-screen instructions to install the audio codecs.

4. Unmute any device
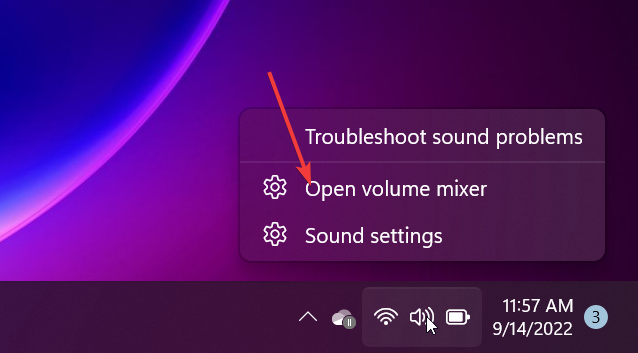
- Right-click the taskbar Speaker icon and then choose Open Volume mixer.

- Unmute any devices whose volume is currently muted.
5. Restart the audio services
- Press the Windows + R hotkey to start the Run command box.
- Enter services.msc and click OK.
- Right-click on the Windows Audio service and choose Restart.

- Do the same with the Remote Procedure Call (RPC) and Windows Audio Endpoint Builder services.

6. Check your surround sound speaker’s configuration settings.
- Press Windows + R key combination to launch the Run window.
- Type mmsys.cpl and then select OK.

- Select the Playback tab and choose your speaker.
- Choose Set as Default Device. If the option is grayed out, that means that it’s already set as the default device.

- Choose Configure from the menu.
- Depending on the sort of speakers you are using, choose 5.1 or 7.1 Surround in the speaker settings and then click Next. If you don’t have these options, your soundboard is either not installed or doesn’t have surround capabilities.
- Select the check boxes next to Center, Subwoofer, and Side pair, and then click Next.
- Hold off until the configuration is finished and click Finish to finish the configuration after that.


7. Switch on Speaker Fill.
- Press Windows + R key combination to launch the run window.
- Type mmsys.cpl and then select OK.
- Right-click on your speaker under the Playback tab and choose Properties.
- Select the Enhancements tab and then activate the Speaker Fill or Surround sound settings.


8. Attempt various audio formats.
- Press Windows + R key combination to launch the Run console.
- Type or paste mmsys.cpl just like in the previous solutions and hit Enter or click OK.
- Choose your speaker from the list and then click Properties.
- Select a different audio format from the drop-down box on the Advanced tab.
- Click Apply and then OK to save your settings.


How do I enable Dolby on Windows 11?
Dolby Atmos is available in Windows 11, so you can use it but you won’t benefit from the best results unless you also install the required hardware.
First, get the Dolby Access app from the Microsoft Store to enable Dolby. The setup process is quite simple, and the software will walk users through it.
Choose With my home theater if you have both a receiver and a home entertainment system.
If you own headphones, pick With my headphones instead. The app will request that Dolby Atmos is enabled for headphones when the trial has been activated.
Surround sound not working with HDMI on Windows 11 is a common issue among many Windows 11 users.
When you are faced with this issue, you do not have to seek help from a technician. As you can see above, you can fix the problem on your own without any problems.
You should also check our list including the best virtual surround sound software that might help you enjoy this audio effect.
If you have any questions regarding this problem or other suggestions on how to fix it, use the comments section below.
Radu Tyrsina
Radu Tyrsina has been a Windows fan ever since he got his first PC, a Pentium III (a monster at that time).
For most of the kids of his age, the Internet was an amazing way to play and communicate with others, but he was deeply impressed by the flow of information and how easily you can find anything on the web.
Prior to founding Windows Report, this particular curiosity about digital content enabled him to grow a number of sites that helped hundreds of millions reach faster the answer they’re looking for.
Download Windows Speedup Tool to fix errors and make PC run faster
Many monitors support audio over HDMI, and they also come with a speaker or an audio port to connect to an external speaker. These speakers show up as HDMI Playback devices. However, if they don’t, this post will help you resolve the problem when the HDMI playback device does not show up on Windows 11/10.
How do I get HDMI to show in playback devices?
Sometimes HDMI Playback devices get disabled. So if you want to show it in the list of playback devices, go to Control Panel > Hardware and Sound > Manage audio devices. Right-click on an empty area and select show disabled devices and disconnected devices. Once you find it, please enable it.
Why is the HDMI device not detected?
It can be because it is not connected properly or your monitor doesn’t support HDMI audio. Unless the monitor has a built-in speaker or an audio port, it will not appear in the list.
How do I add a playback device to Windows?
If you cannot find the device listed, Open Device Manager. Then right-click on the computer name and select scan for hardware changes. This will ensure that the HDMI audio device appears if it is not listed.

Follow these tips to get the HDMI Playback devices.
- Enable Playback Devices
- Update HD Audio Device Drivers
- Update Display Adapters.
Since these involve updating drivers, you will need admin privileges to install it.
1] Enable Playback Devices

- Open Run prompt (Win +R), types control, and then press the Enter key
- Go to Hardware and Sound, and then click on Manage audio devices
- Right-click on any of the listed device, and select show disabled devices, and show disconnected devices
- If the HDMI Playback device is listed, and enable it
2] Update HD Audio Device Drivers

- Open Device Manager by using Win + X followed by pressing the M key
- Locate Sound, video, and game controllers
- Locate the AMD High Definition Audio Device or NVIDIA High Definition Audio Device or Intel Display Audio
- Right-click the device, and choose Update driver.
Follow the wizard and update the driver through Windows update or using the available driver.
3] Update Display Adapters

While it may sound out of place, users at forums have reported that updating the display adapters sometimes helps fix the problem. Similar to how we updated the HD audio device drivers, we can update the display adapters.
Open Device Manager and expand the Display Adapters section. Right-click on your computer’s display adaptor and choose to update the driver. Then, select the right display adaptor from the list.
Related reads:
- HDMI Port not working properly
- HDMI Audio device not detected.
Ashish holds a Bachelor’s in Computer Engineering and is a veteran Windows. He has been a Microsoft MVP (2008-2010) and excels in writing tutorials to improve the day-to-day experience with your devices.