
Is your Windows 11 not detecting second monitor and you are looking for a solution to the issue?
Due to its enormous benefits in terms of multitasking for people who work with many programs at once, using multiple displays has become increasingly popular.
In general, it boosts productivity while also improving a workspace’s appearance. This is the reason why many Youtubers, Programmers, and Video editors prefer a dual monitor setup nowadays
Setting up a second monitor is quite easy and can be done in a short period of time. On the other hand, there have been several online complaints about Windows 11 not detecting second monitor.
This is a very frustrating issue for many users as they struggle with finding ways to resolve the issue but result in none.
Fortunately, there are some tried-and-true methods you may use to resolve this problem, and we will go over them in detail in this article.
Let’s first discuss some factors that cause Windows 11 not to detect second monitor.
Table Of Contents
- Fix Windows 11 not detecting second monitor
- Fix 1: Make sure the monitor and HDMI cable is in proper condition
- Fix 2: Update Display Driver
- Use INF file from manufacturer’s site and install it to update display driver
- Use Windows Update to update the display driver
- Use Driver Installer
- Fix 3: Uninstall and reinstall the display driver
- Fix 4: Roll back Display Driver
- Fix 5: Set the same refresh rate on both screens
- Fix 6: Check Display Preferences
- Fix 7: Force your computer to detect the monitor
- Frequently Asked Questions
- Why is my second monitor not detected on Windows 11?
- Can my HDMI cable be the reason for Windows 11 not detecting second monitor issue?
- How can I connect with a second monitor wirelessly?
Fix Windows 11 not detecting second monitor
Here are some fixes you should attempt if you get Windows 11 not detecting second monitor issue.
Before your issue is solved, you might need to attempt more than one of these solutions. Also, we recommend restarting your computer and doing Fix 1 before attempting the other alternatives.
Fix 1: Make sure the monitor and HDMI cable is in proper condition
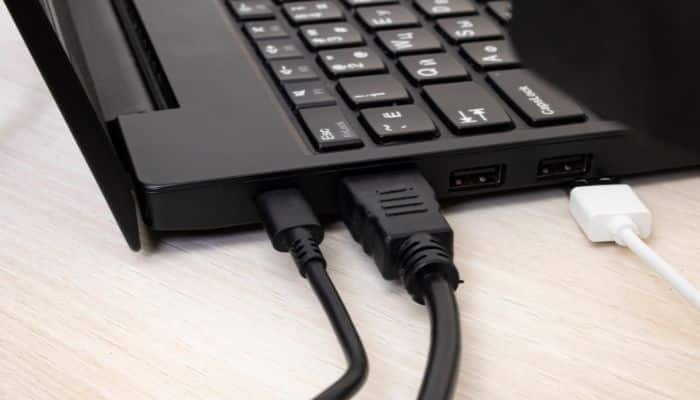
Your monitor must be turned on and properly connected to the Windows 11 computer before it can be detected. In some instances, the HDMI cable you are using or the ports on either of the screens are to blame for Windows 11’s failure to detect the second monitor.
Hence, you should check that everything is in order. The following are the key actions you should take and verify before exploring other solutions:
- Make sure the second monitor is turned on
- Try to use another HDMI cable
- Try another HDMI port
- Choose the correct input on your monitor
- Check for dirt or debris in the HDMI port and cable and remove it
Fix 2: Update Display Driver
The display drivers, also known as graphics drivers, are in charge of communicating commands to the Windows OS and display hardware on a computer. You will undoubtedly start experiencing problems with some of your display functionalities if this is a display driver issue.
Using an outdated display driver is one of the major causes of driver issues, and it may be the reason for Windows 11’s failure to discover the second monitor. If that is the case, updating the driver would be the only solution.
You must manually download the driver or use one of the alternative options described below as the Device Manager option to “Search automatically for device driver software” doesn’t actually function to update your driver.
- Download the driver’s INF file from the manufacturer’s site and install it.
- Use Windows Update
- Use Driver Installer
Use INF file from manufacturer’s site and install it to update display driver
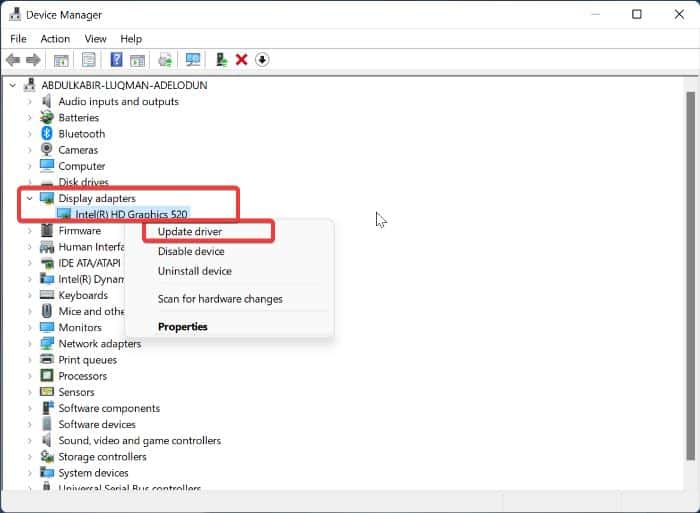
1. Right-click on the Start menu and tap on Device Manager.
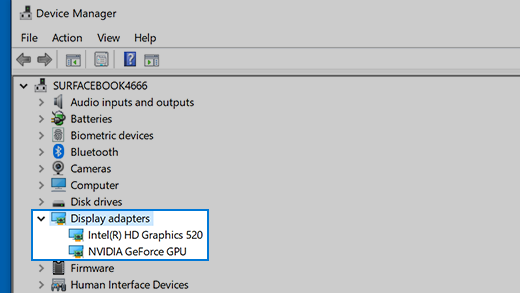
2. Double-click the Display adapters option on the Device Manager window and note the display driver you have on your computer.
3. Go to the display driver’s website and download an updated driver version.
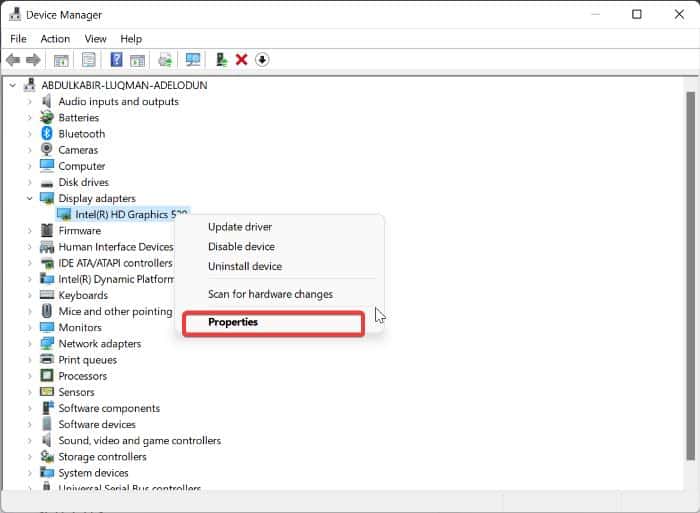
4. Now, go back to Device Manager and right-click your display driver under Display adapters.
5. On the resulting drop-down menu, tap on the Update driver option.
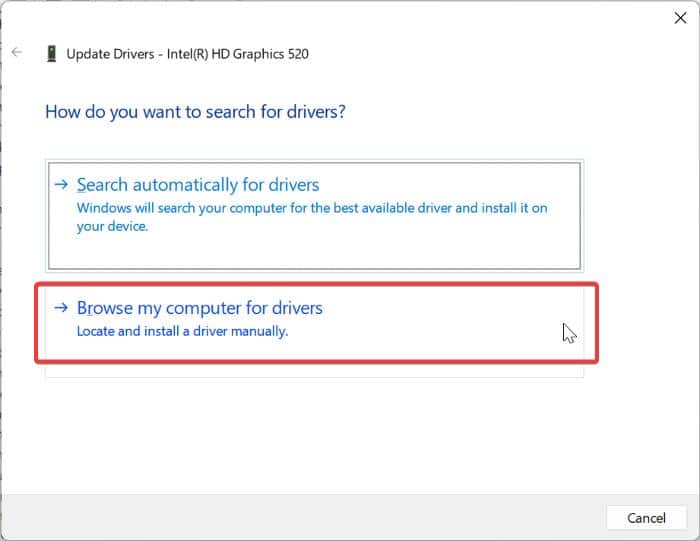
6. Select Browse my computer for drivers and follow other on-screen prompts to select the driver package you downloaded earlier.
Use Windows Update to update the display driver
1. Press Windows + I to open Settings on your computer.
2. Click on Windows Updates on the left-hand pane.
3. Navigate to Advanced options and click on it.
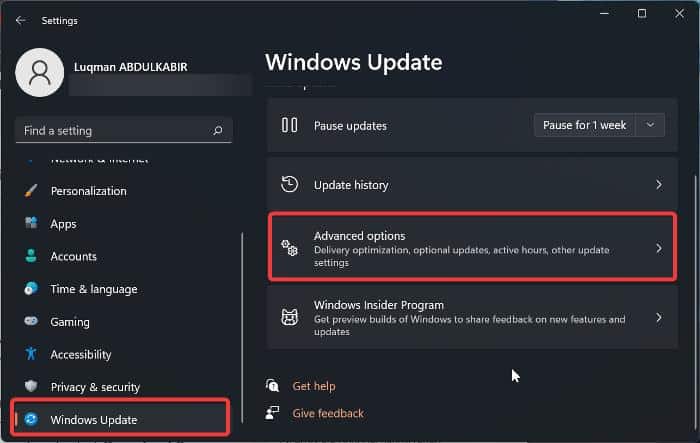
4. Select Optional updates under Additional options.
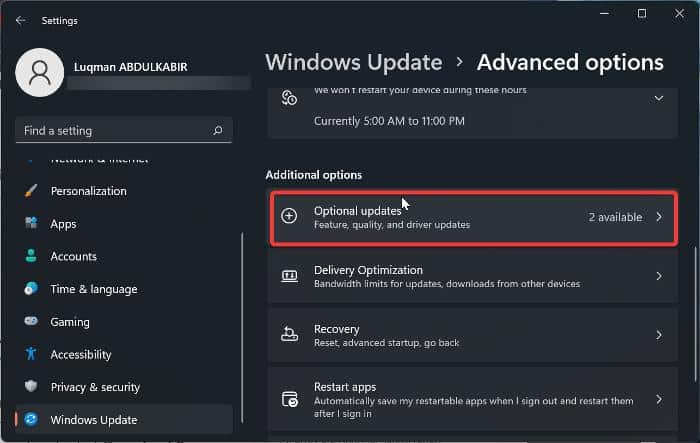
5. Click on Driver updates.
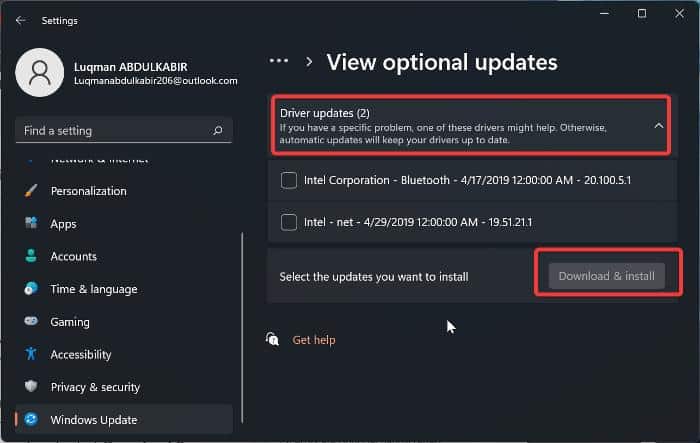
6. Look for your Graphics driver. If any update is available, tap on it and select Download & Install at the bottom of the section.
Use Driver Installer
You may also use the appropriate driver installer provided by the manufacturer of your GPU to upgrade your display driver. Here are the download links for the graphics card drivers for NVIDIA, Intel, and AMD.
- NVIDIA GeForce Experience
- Intel Driver & Support Assistant
- AMD Radeon Software Adrenalin Edition
After updating your display driver, it is recommended that you restart your computer and then connect your second monitor.
Fix 3: Uninstall and reinstall the display driver
Reinstalling the display driver has also effectively resolved the Windows 11 not detecting second monitor issue. You can try it, and perhaps it will help you resolve the problem. Here is how to do it:
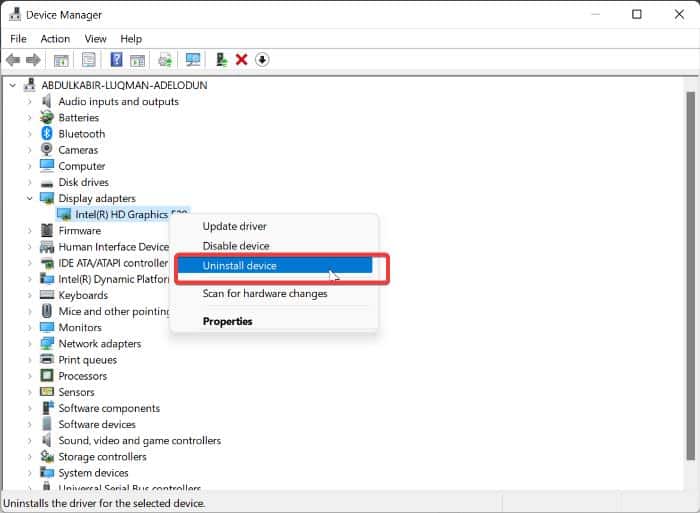
1. Open Device Manager and double-click Display adapters.
2. Right-click your display driver and select Uninstall device.
3. Then, restart your computer and open Device Manager again.
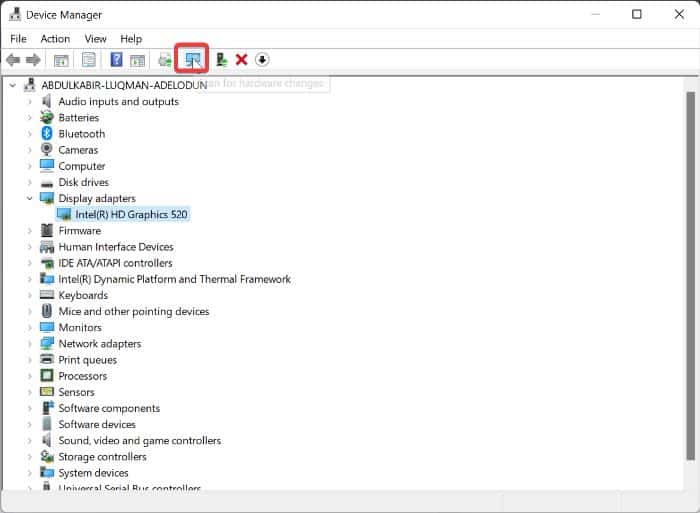
4. On the Device Manager page, click on Scan for hardware changes.
Fix 4: Roll back Display Driver
If the problem arose right after you updated your display driver or performed Windows Update, then there is a problem with the updated driver version. Therefore, you should roll back to the previous version of your display driver. Here is how to roll back the display driver.
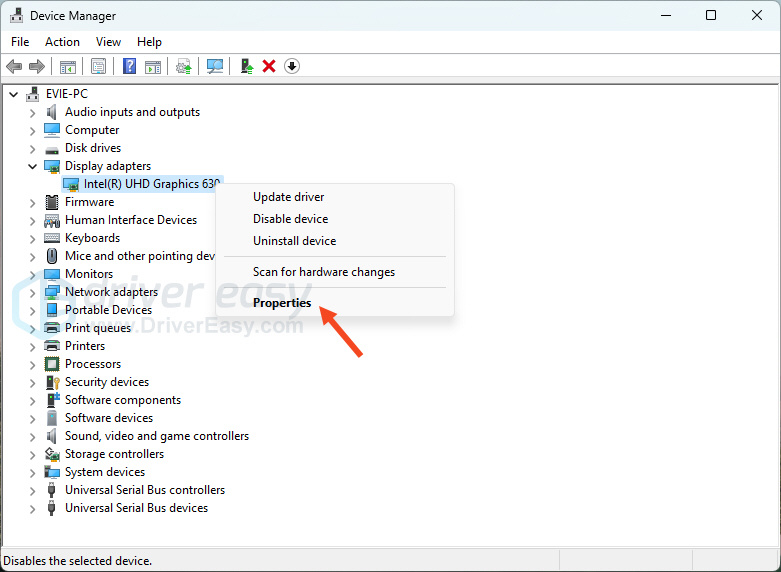
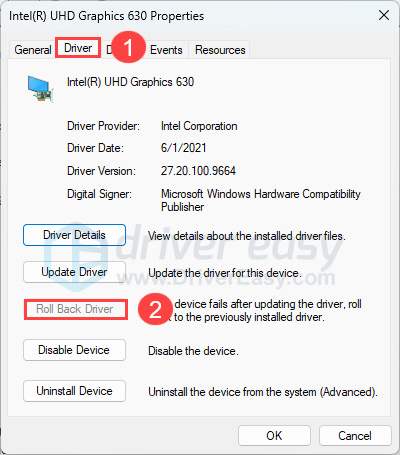
1. Open Device Manager and double-click on Display adapters.
2. Right-click your display driver and select Properties.
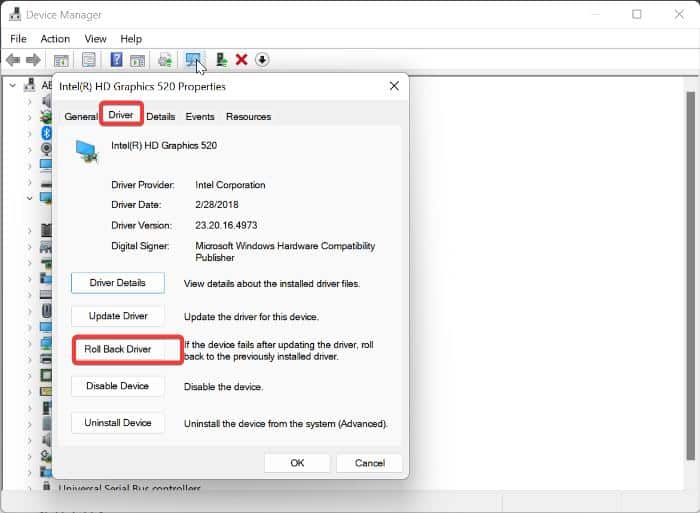
3. Switch to the Driver section, click on Roll Back Driver and select Yes to confirm the action.
Also Read: No Sound on Windows 11? Here’s How To Fix No Audio [SOLVED]
Fix 5: Set the same refresh rate on both screens
Another approach you can use to fix Windows 11 not detecting dual monitor issue is to set the same refresh rate for both screens. This is because setting different refresh rates for the screen may cause software conflict on your PC and lead to this issue.
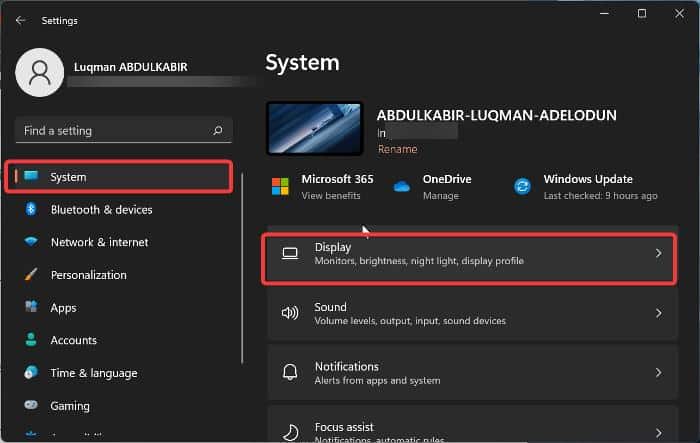
1. Press Windows + I to open Settings on your computer.
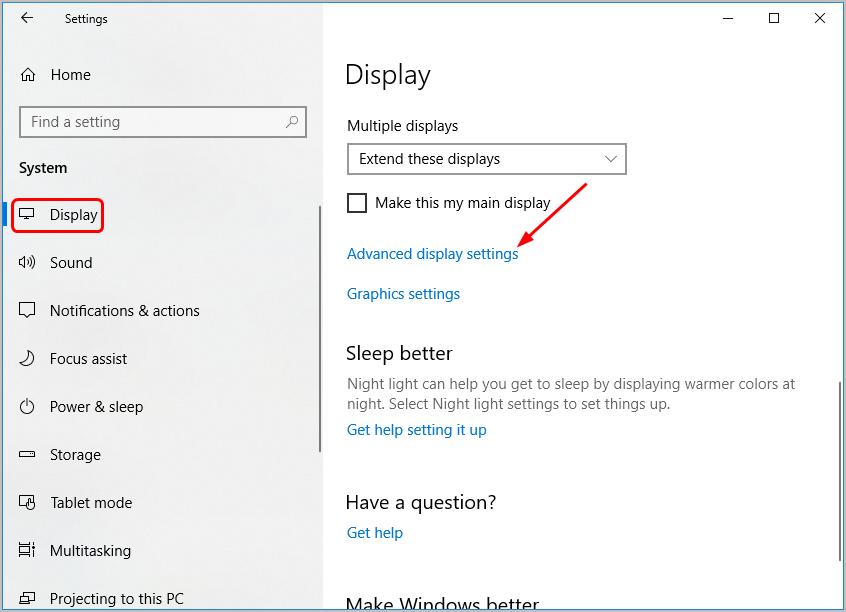
2. Select System and click on Display.
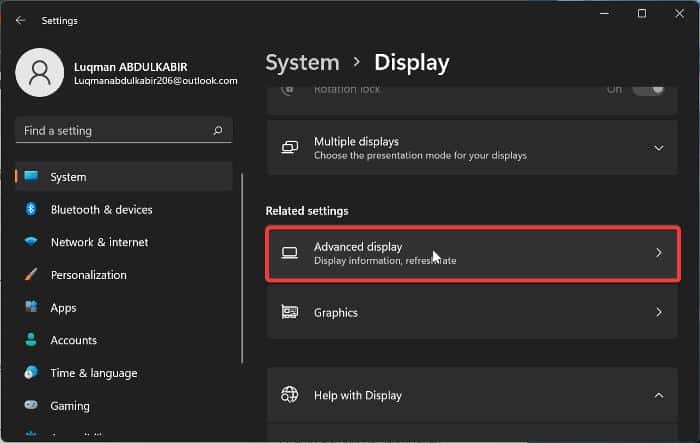
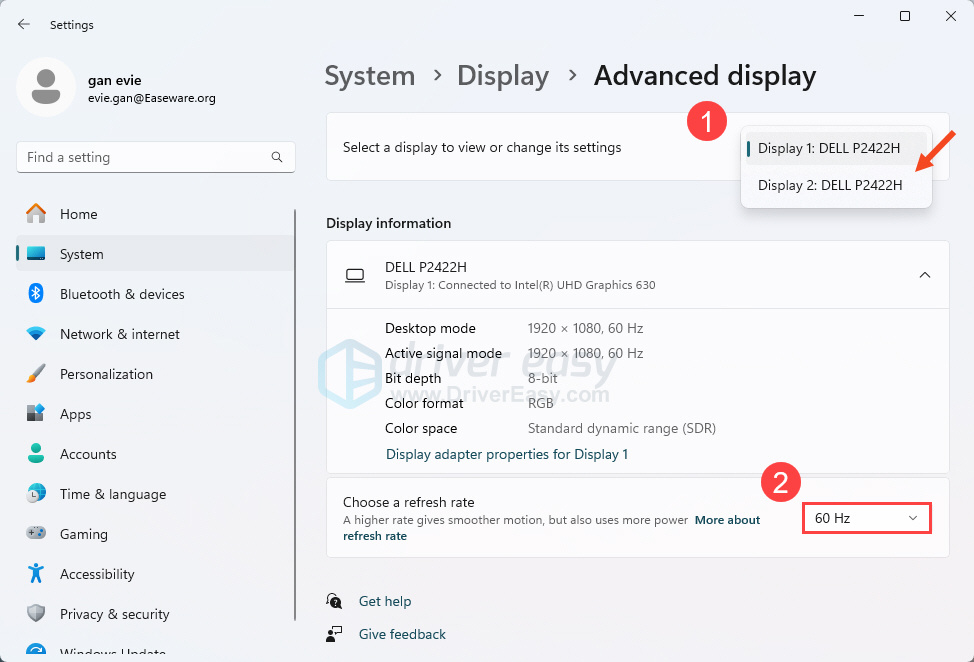
3. Scroll down and select Advanced display.
4. On the Select a display to view or change its settings option, choose the display you want to change its refresh rate.
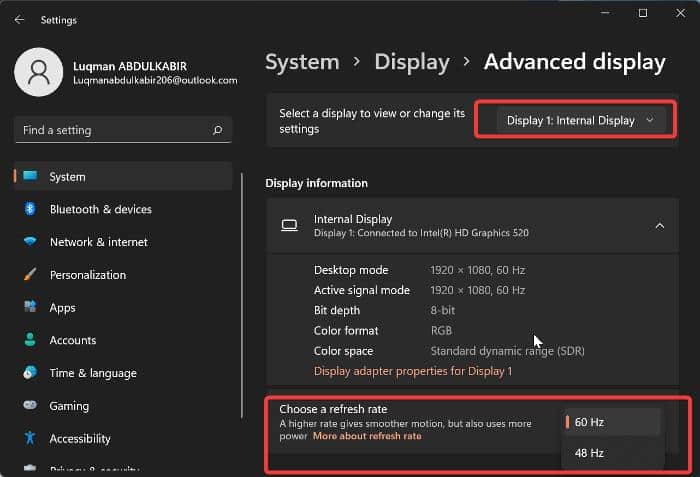
5. Go to Choose a refresh rate and select a refresh rate that works with both screens. Then follow other on-screen prompts to save the change.
After this, unplug the monitor from your PC and reconnect it. Hopefully, the issue will have been fixed.
Fix 6: Check Display Preferences
There are times when the second monitor would have connected with your monitor, but due to the display preference on your PC, you won’t be seeing anything on the second monitor. This is what you can do in that case:
1. Press Windows + P on your keyboard.
2. On the resulting menu, select Extend.
Fix 7: Force your computer to detect the monitor
You can also force your computer to detect the second monitor by following the steps below:
1. Press Windows + I to open Settings on your computer
2. Select System and tap on Display.
3. Navigate to the Multiple displays option under the Scale & layouts category and click on it.
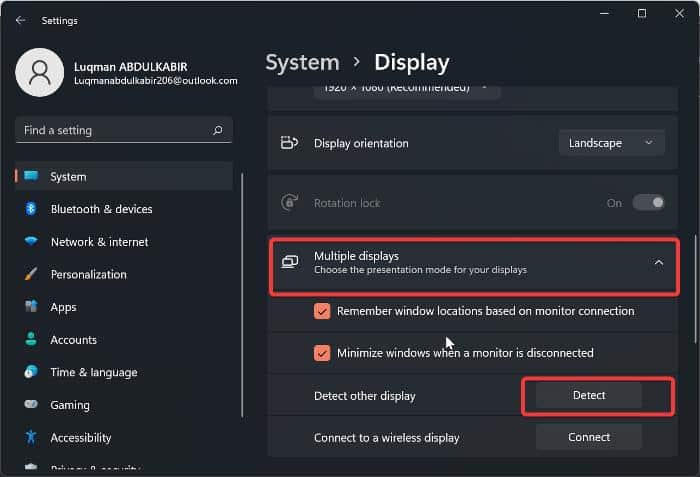
4. Check the boxes under the Multiple displays option and tap on Detect.
Frequently Asked Questions
Why is my second monitor not detected on Windows 11?
If you’ve ruled out hardware problems like HDMI port cable or ports issue, what majorly causes Windows 11 not to detect a second monitor is a buggy, corrupted, or outdated display driver. In order to resolve this issue, you can go over the solutions we’ve discussed in the article.
Can my HDMI cable be the reason for Windows 11 not detecting second monitor issue?
A faulty or improperly plugged HDMI cable will make it impossible for your PC to detect a second monitor. Hence, if you are having issues with Windows 11 detecting a second monitor, try checking if your HDMI cable is properly plugged in and make sure it is in good condition also.
How can I connect with a second monitor wirelessly?
If you need to connect your Windows 11 PC with a second monitor using Bluetooth, here are the steps to do it:
1. Put the second monitor in pairing mode (you can refer to the monitor’s manual for directions on how to do that).
2. On your Windows PC, press Windows + I to show the Cast option, then click on the monitor you want to connect to.
Final Thoughts
It is important to know that using multiple displays on a Windows computer is quite simple, but it could be challenging if you have problems with your graphics driver or don’t know how to connect to the monitor.
However, using the suggestions in this article, you ought to be able to quickly fix the problem with Windows 11 not detecting second monitor and get your PC to a working condition.
Let us know the solution that worked for you in the comment section below

Luqman
A tech junkie, and music fan.
I love writing Reviews, How-to, and explainer articles related to Android, iOS, and Windows. If I’m not on my laptop brainstorming ideas for content, you’ll most probably see me watching Tv shows or streaming videos on Youtube. Don’t forget to follow me on Twitter as @Luqqman14
Before you reinstall drivers, check your power, cables, and settings
Published on August 15, 2024
Sometimes, your second monitor may seem to be powered on, but it won’t show any image; other times, the screen won’t even turn on properly. This article covers all of the best strategies for how to fix a second monitor not detected on Windows 11 issues with over 20 tested tips and tricks for you to apply.
How to Fix It When a Second Monitor Isn’t Showing Up in Windows 11
Here are all of the best solutions to try when you have issues getting Windows 11 to show your second monitor. We recommend you work through these fixes in the order presented, as we’ve listed them from the easiest and fastest to the most time-consuming and advanced.
-
Detect your Windows 11 second monitor. Open Settings and select System > Display > Multiple displays. Select either Detect to scan for a second monitor connected by cable or Connect if your second monitor is using a wireless connection.
-
Turn your second monitor on. Some monitors need to be manually switched on and won’t automatically activate when you power on your Windows 11 computer.
-
Power cycle your second monitor. Switch it off, wait at least 30 seconds, and then turn it on again. This method can help your Windows 11 device detect it by resetting the connection.
-
Change the Windows 11 project settings. Press Windows key + P and select a different project setting for your second monitor.
-
Wirelessly cast with the Google Chrome browser instead. If you’re having trouble wirelessly connecting your Windows 11 computer to a secondary monitor or TV screen, try using the Google Chrome browser’s built-in cast option instead. It tends to be much more reliable and stable than the Windows operating system’s primary casting option.
-
Manually change the monitor’s input settings. Most monitors have physical buttons to select different input signals and display options. It’s possible that the monitor isn’t automatically detecting your Windows 11 computer.
-
Change the monitor’s brightness and contrast settings. Using your monitor’s physical buttons, increase its contrast and brightness. It’s possible that your monitor is actually working, but its display is set to the darkest settings.
-
Try alternative power sources. Plug the second monitor into a separate outlet from the computer, as it may not be getting enough power.
-
Check the monitor’s cable connections. Ensure that all of the connecting cables are fully seated on both the monitor and computer ends.
-
Try a different cable connection. If your computer or connected dock has multiple ports, try connecting your second monitor to one of these instead. The original port may be the incorrect one, or it could even be damaged.
Your Windows 11 computer may support image output via a USB-C port. This port can be a convenient alternative if the primary HDMI port isn’t working properly.
-
Restart Windows 11. A quick, basic restart with the second monitor connected can help your computer detect it.
-
Update Windows 11. Windows updates often include fixes for display and hardware bugs that can affect connected devices such as second monitors.
-
Remove other devices from the dock. If you’re using a dock to connect multiple devices to your Windows 11 computer, it’s possible that one or more of these devices could be causing some kind of conflict. Unplug all of the devices you don’t need, restart your computer, and see if this fixes your secondary monitor problems.
-
Check the cable compatibility. For a second monitor to work properly with Windows 11, you need to use a cable that’s compatible with both the second monitor and your computer. Your monitor’s manual should have details on which cable type to use. If you can’t find it in the manual, check the manufacturer’s website.
-
Test the connecting cable. Swap out the cable connecting your Windows 11 computer to the second monitor for another one. If the new cable works, then the previous cable is likely damaged. If the new cable doesn’t work, the fault likely lies elsewhere.
-
Swap out the second monitor for another one. If this new monitor works then the problem lies with your original monitor. However, if the new monitor also fails to work properly, the issue likely involves either the connecting cable or your computer.
-
Test your second monitor with another computer. If it works there, the fault is likely with your original hardware.
-
Change the monitor’s refresh rate. Incompatible refresh rates can sometimes cause a lack of image on a second monitor.
-
Restart the video driver. Press Windows key + Ctrl + Shift + B to restart the Windows 11 video drivers. Your screens should turn black for a few seconds as they refresh, but then they should turn back on as normal.
-
Update the display drivers. This option can fix a variety of Windows hardware issues, including those that affect second monitors.
-
Reinstall the display drivers. Open Device Manager, expand the Display adaptors menu, right-click your adapter, and select Uninstall device. Check the box next to Attempt to remove the driver for this device, select Uninstall, and then restart your Windows 11 computer. The restart process should automatically trigger the reinstallation of the correct drivers.
If you’re unsure if the restart process reinstalled the drivers, you can still manually trigger this action. Open Device Driver once again, select the Action menu from the top toolbar and then choose Scan for hardware changes.
Causes of Computer Not Detecting Second Monitor on Windows 11
Several possible things can cause your Windows 11 computer not to detect the second monitor. Some of the most common include:
- Loose monitor connector cables.
- Insufficient power supply to the second monitor.
- Out-of-date or incorrect Windows 11 drivers.
- Using incorrect ports.
- Damaged or broken ports.
- The second monitor is turned off.
- You’ve selected the incorrect monitor input source.
Thanks for letting us know!
Get the Latest Tech News Delivered Every Day
Subscribe
Applies ToWindows 11 Windows 10
Before considering troubleshooting options, make sure your device is up to date.
Check for updates
Notes:
-
If you need help setting up your external monitors, see How to use multiple monitors in Windows.
-
If you’re having trouble setting up multiple monitors on Surface, see Troubleshoot connecting Surface to a second screen.
Troubleshoot issues that occur when setting up external monitors
If you are trying to set up an external monitor and it’s not working, press the Windows logo key + P to make sure that the Extend option is selected. If the Extend option is selected, try the following troubleshooting tips.
If you’re not seeing what you expect on the external monitor, start with basic hardware troubleshooting:
-
Disconnect all accessories from your PC. Connected docks, dongles, adapters and other hardware can cause conflicts.
-
Make sure the cable connecting your PC to your external monitor is secure.
-
Try changing the cable connecting the external monitor. If the new one works, you know the previous cable was faulty.
-
Try using the external monitor with a different system. This can help to isolate whether the issue is with the monitor or the primary system
If those didn’t work, here are more possibilities:
-
If your system has more than one video output port, try plugging your external monitor into one of the other video output ports. Typical ports are HDMI, VGA, DVI, and DisplayPort.
-
If your system has more than one display adapter, also called a graphics card, you can try switching your system’s default display adapter. For example, on some systems, you can right click your desktop and select the software associated with your additional display adapter. Steps to change the default display adapter vary by device, so contact the manufacturer for more information.
First, to confirm that one external monitor does work with your system, see the above info about using only one.
If you’re able to use one external monitor, but have issues using more than one, it’s possible that your display adapter (also called a graphics card) can’t support more than one monitor. For information on how many monitors your display adapter can support, contact its manufacturer.
Note: If you are trying to use a display splitter to extend your display to more than one external monitor, you won’t be able to. The splitter is duplicating the same signal instead of creating two independent signals.
If your device only has one video output port, then by default, you can only support a single external monitor. You’ll need one of the following to support more than one external monitor:
-
Docking station – To find out if there are docking stations available for your PC, contact the manufacturer of your PC.
-
USB adapter – If you have a USB-C port, you may be able to use a USB adapter to give your device an additional video output port.
Troubleshoot issues that are occurring with an existing setup
If your setup has been working well, then suddenly stopped, here are a few things you can try.
In some cases, pressing Windows logo Key + Ctrl + Shift + B to reset your graphics driver may fix your issue. If this does not work, see if restarting helps.
To restart your device, select Start, then select Power > Restart.
If that doesn’t work, select Start, then select Power > Shut Down. Then, turn your device back on.
If you are experiencing issues after an update, returning, or rolling back, to a previous version of your display driver may solve the issue. To roll back the driver:
-
In the search box on the taskbar, enter device manager.
-
Select Device Manager from the list to open it. Then, select the arrow to expand the Display adapters section.
-
Right-click your display adapter and select Properties and the Driver tab, and then select Roll Back Driver. If you don’t see a roll back option, reinstall your display driver.
If none of the previous steps work, reinstall your display driver. Here’s how:
-
In the search box on the taskbar, enter device manager.
-
Select Device Manager from the list to open it. Then, select the arrow to expand the Display adapters section.
-
Right click your display adapter, and then select Uninstall device and Attempt to remove the driver for this device, then select Uninstall.
-
You may be asked to restart your computer. Make sure to write down the remaining instructions before you restart.
-
Open Device Manager again and expand the Display adapters section.
-
Right click your display adapter and select Update driver.
-
Select Search automatically for updated driver software and follow the remaining installation instructions.
-
In the search box on the taskbar, enter device manager.
-
Select Device Manager from the list to open it. Then, select the arrow to expand the Display adapters section.
You’ll see the manufacturer’s name and the name of your adapter or adapters.
Still having issues?
If you’ve tried the steps in this article or don’t see a solution to the problem, use Windows Feedback Hub to file a bug.
Include details about what you were doing or specific steps you were taking when the issue occurred. Log in to the Feedback Hub and follow the instructions to summarize and describe your problem. Next, select your category and then add enough additional info to recreate the problem. Your information helps Microsoft determine the root cause of this issue.
Open the Feedback Hub
Need more help?
Want more options?
Explore subscription benefits, browse training courses, learn how to secure your device, and more.
HDMI or High-Definition Multimedia Interface standard for simultaneously transmitting digital video and audio from a source such as computer to monitor. PC and laptops come with HDMI port that allows connect second monitor or to enjoy TV and movies on a bigger screen. But after upgrading to Windows 11 few users report, HDMI port is not working on their laptop or PC, preventing connect PC or laptop to an external monitor via HDMI port. Sometimes you may experience, the computer monitor is connected through HDMI port but the sound is not playing. or HDMI Display Not working after the current Windows 11 Update.
Contents
- 1 Why HDMI port not working on Windows 11?
- 1.1 Basic things to check
- 1.2 Restart windows 11
- 1.3 Update windows 11
- 1.4 Check Resolution and Refresh Rate
- 1.5 Check Multi-Monitor Mode
- 1.6 Update Display Drivers
- 1.7 Run SFC or DISM Scan
Several things might cause HDMI not working on Windows 11, faulty HDMI cables, dust and debris inside the HDMI port, outdated display (Graphics) driver, Outdated windows 11 version or Windows update bug are common. Here is what to do if Windows 11 not detecting HDMI TV/Monitor or a sound problem on your PC.
- Ensure the HDMI cable is connected properly between your PC/Laptop and Monitor or TV.
- Installing the latest Windows 11 update sometimes brings fix for the problem.
- If HDMI sound is not working run the sound troubleshooter and make sure the latest audio drivers are installed on your PC.
- An outdated display driver is another common reason why Windows 11 Not Detecting HDMI TV/Monitor, update or reinstall the display driver most probably work for you.
Basic things to check
- The first thing you need to ensure the HDMI cable is connected properly, blow out any dust from the HDMI port manually.
- Try to unplug the HDMI cable from the Windows 11 device as well as the output device and then plug it back in properly.
- Next, visually inspect the cable to check for damage, or try changing the HDMI cable and use a different HDMI port to dock the cable as well.
- If you have a graphics card, ensure you’ve plugged the cable into the HDMI port on the graphics card and not the HDMI port on the motherboard.
Restart windows 11
Sometimes due to temporary glitches Windows might fail to recognize the port is active and result HDMI Connection Not Working on Windows 11. Let’s reboot your computer, not only refresh the operating system and restart running process, but also clear temporary glitches and Windows should recognize the port and (if necessary) install the correct driver.
Update windows 11
Microsoft regularly updates Windows with the latest bug fixes and security improvements. And it’s essential to keep your system up to date as the latest Windows updates may contain a fix for HDMI not working on your Windows 11 PC.
- Press Windows key + X and select settings,
- Click on windows update then hit the Check for Updates button,
- If Windows updates are pending there, allow them to download and install,
- In addition, click on advanced options then optional updates,
- If optional updates or driver updates are available, check and allow them to download and install as well.
Once done reboot your PC to apply the change and check if the second display is detected or if HDMI sound working.
Check Resolution and Refresh Rate
Ensure the correct resolution and refresh rate are selected when you plug in the HDMI cable to your PC and external display.
- Right-click an empty area on the desktop and click Display settings from the context menu.
- Next, select the display you want to modify. If you don’t see it, click the Identify button.
- Scroll down to the Scale and Layout section and use the dropdown menu to adjust the Display resolution for the external monitor.
- Now click Advanced Display under the Related settings section.
- Adjust the refresh rate for the display in the Choose a refresh rate section.
Note – You can refer to your monitor or TV’s user guide for the maximum rate to use here.
Check Multi-Monitor Mode
If you’re using HDMI for a second display, it’s worth checking the multi-monitor setup, because due to incorrect configuration, your PC might ignore your HDMI TV or monitor entirely.
- Right-click an empty area on the desktop and click Display settings.
- You can choose between Duplicate these displays, extend these displays, show only on 1, or show only on 2.
Note – If you have more than two monitors, you’ll see additional options.
Update Display Drivers
Outdated Graphics driver is another common reason why HDMI Displays Not working on Windows 11. Ensure your graphics card drivers are updated.
To update your display drivers:
- Right-click on the start menu and select Device Manager
- This will display all devices and peripherals connected to your computer,
- locate and expand display adapters, right-click your graphics card and select Update driver.
- Select Search automatically for drivers and Windows will search for an updated driver.
- Or you can download the updated driver from the manufacturer’s website, and manually install it.
- Also, you can download the OEM update tool from the manufacturer and run the OEM’s update utility. Usually, it consists of OEM software updates and, more important, driver updates.
Run SFC or DISM Scan
Sometimes system file corruption could be the reason why Windows 11 HDMI not detecting the second monitor. If the above solutions haven’t yet fixed the problem, you can use the SFC and DISM tools to check your local drive for corrupted system files and replace them.
- Open command prompt as administrator,
- First, run DISM command DISM /Online /Cleanup-Image /RestoreHealth
- Next, run the system file checker command sfc /scannow
- Let the scanning complete, once done Restart your PC and see if HDMI is working once the SFC tool finishes its scan.
Well, if you are only experiencing HDMI Audio Not Working in Windows 11.
- Ensure the correct HDMI output is selected from the list. You can check the same on the System Tray volume controls section.
- Run the built-in Windows sound troubleshooter to automatically scan and fix HDMI audio not working problem.
- Again, old versions of audio/sound drivers might cause the HDMI audio not to connect properly, update sound drivers in Windows 11 that probably restore the audio on your PC.
- Sometimes restarting the Audio service restart Windows audio from the Services menu fix the problem as well.
Also read
- Windows 10 Not Detecting HDMI TV (5 working solutions)
- How to Fix Windows 10 Doesn’t Recognize Android Phone?
- 7 ways to fix Microsoft Edge Black Screen Issue on Windows 11
- Microsoft Edge Crashes or Not Working after Windows 10 update !!!
- Windows 11 Won’t Shut Down? Here are 6 ways to fix it

If your second monitor is not detected on Windows 11/10, even though you know the monitor itself works fine and the video output it’s connected to is fine, don’t give up hope. Usually, it’s a driver problem, so it should be very easy to fix. Read on to find out how…
5 Fixes for ‘second monitor not detected’:
If your video driver is out of date, incorrect or faulty, your OS won’t be able to extend or mirror your desktop to your second display. Rolling back the driver to an older version may fix the problem.
- Roll back to a previously installed video driver
- Update your video driver
- Make sure your monitor refresh rates are set to the same
- Change your project mode
- Repair corrupted system files
Fix 1: Roll back to a previously installed video driver
Sometimes the latest drivers don’t work properly on Windows. To check if this is what’s causing your problem, simply roll back to a previous version of your video driver (aka ‘display driver’).
1) On your keyboard, press the Windows logo key and R (at the same time) to invoke the Run box.
2) Type devmgmt.msc and press Enter or click OK.
3) In the Display adapters section, right-click on your display device software, and select Properties.
4) Select the Driver tab and click Roll Back Driver, then follow the on-screen instructions.
Note: If the Roll Back Driver option is grayed out, you can download a previous video driver from the manufacturer’s website for your video card and install it on your computer, or try the following Method 2.
5) When complete, restart your computer, and see if Windows can now detect your second monitor.
Fix 2: Update your video driver
If rolling back your video driver doesn’t help your computer recognize your second monitor, it’s likely that you’re using the wrong driver. There are two ways you can get the right driver for your video card: manually or automatically.
Manual driver update – You can update your video driver manually by going to the manufacturer’s website for your video card, and searching for the most recent correct driver for it. Be sure to choose the only driver that is compatible with your variant of Windows.
Automatic driver update – If you don’t have the time, patience or computer skills to update your video driver manually, you can, instead, do it automatically with Driver Easy. Driver Easy will automatically recognize your system and find the correct driver for your exact video card, and your variant of Windows, and it will download and install it correctly:
1) Download and install Driver Easy.
2) Run Driver Easy and click the Scan Now button. Driver Easy will then scan your computer and detect any problem drivers.
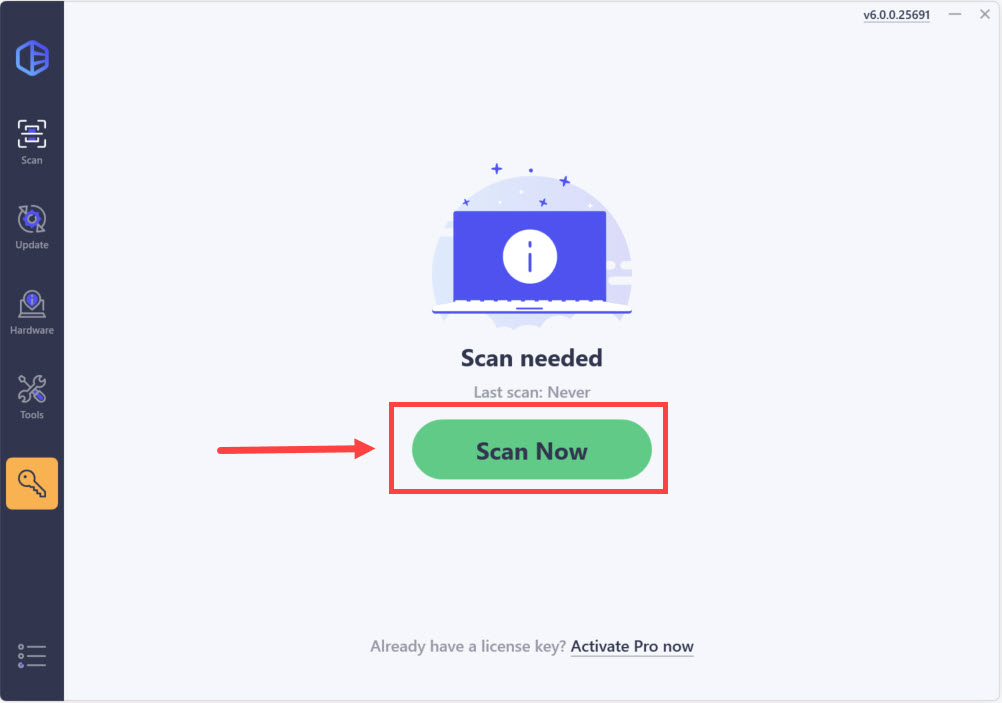
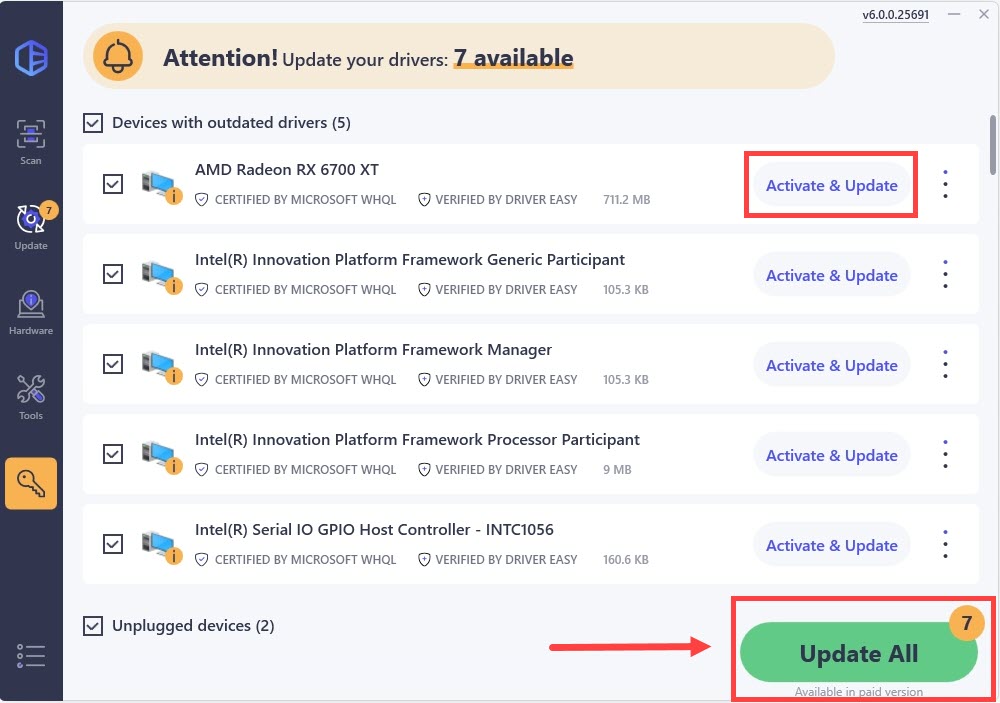
3) Click Update All to automatically download and install the correct version of all the drivers that are missing or out of date on your system. (This will prompt an upgrade to the Pro version. Driver Easy offers a 7-day free trial, providing access to premium features such as high-speed downloads and one-click installs without any charges until the trial period ends.)
4) Restart your computer and check to see if Windows can now detect your second monitor.
Fix 3: Make sure your monitor refresh rates are set to the same
The monitor/screen refresh rate is the number of times per second that your screen refreshes the images on it. When two monitors are connected to your Windows PC together, the refresh rate plays a vital role. Some graphics cards don’t support different refresh rates at the same time.
So if the screen fresh rate of your two monitors is different, your second monitor probably can’t be detected. To address this, follow the steps below to make sure your monitor refresh rates are set to the same.
On Windows 10:
On Windows 11:
Windows 10:
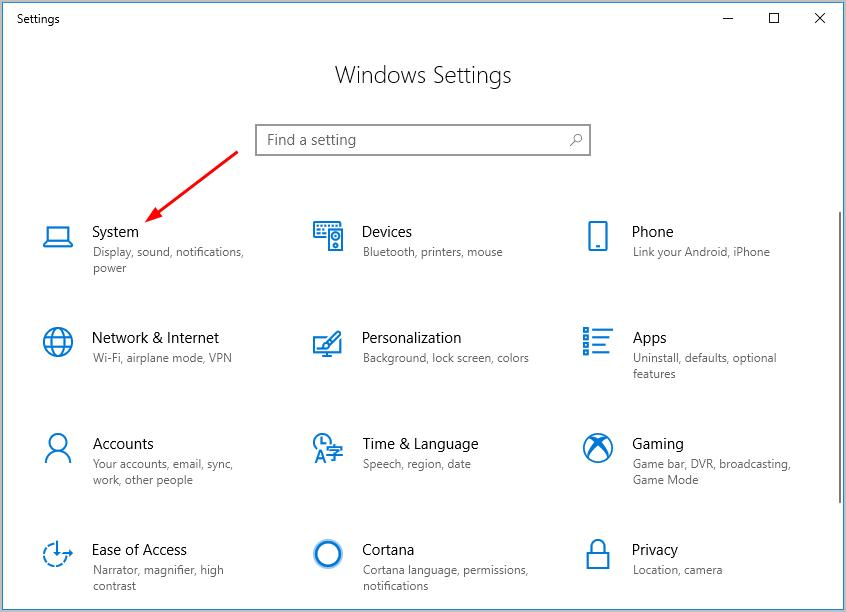
1) On your keyboard, hold down the Windows logo key, then press the I key.
2) Click System on the pop-up Settings window.
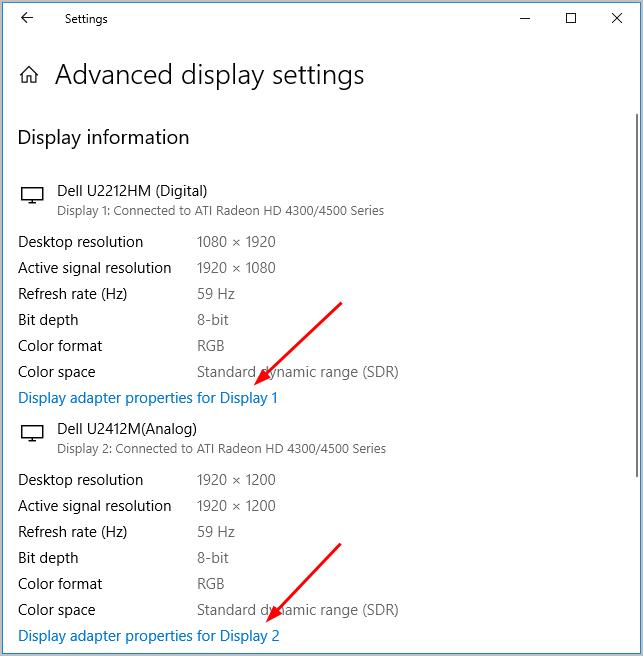
3) Click Advanced display settings under the Display section.
4) Click Display adapter properties for Display 1, then click Display adapter properties for Display 2.
5) Check and see the Screen refresh rates of both monitors under the Monitor sections.
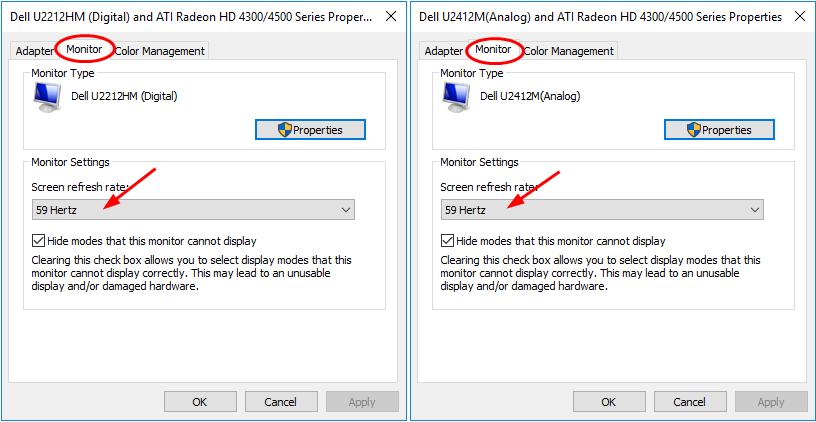
If the rates are different, then change either one to set them to the same. Then save your change by Apply > OK and proceed to check to see if your second monitor is detected successfully.
Windows 11:
1) Right-click on any empty space on the desktop and select Display settings.
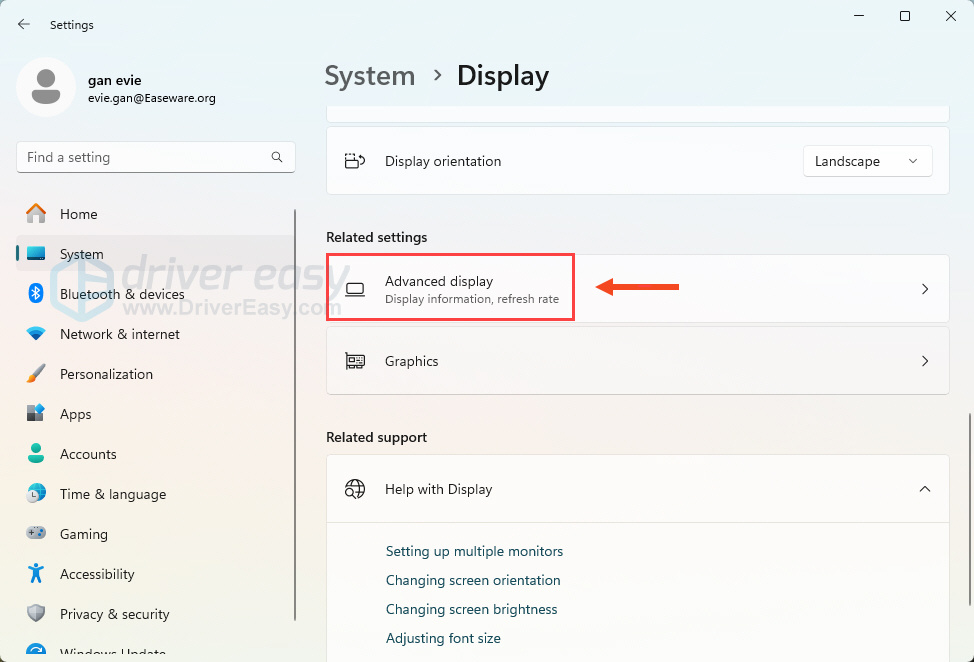
2) Click Advanced display under the Related settings section.
4) Select the different displays from the top, then adjust the refresh rates of your to the same in the Choose a refresh rate section.
If the rates have been set to the same already, then move on to the next fix.
Fix 4: Change your project mode
Sometimes your second monitor can’t be detected might be due to the wrong-set project mode. Quickly and easily change your project mode by these two steps:
1) On your keyboard, hold down the Windows logo key, then press the P key.
2) Select Duplicate if you want to display the same screen on your two monitors. Select Extend if you want to earn more workplace.
Fix 5: Repair corrupted system files
Missing, corrupted, or damaged system files may be the culprit for this error. To eliminate this issue as a possible cause, you can try below to repair possible system file issues.
System File Checker (SFC) is a handy feature in Windows that helps scan your system files and repair missing or corrupted system files(including those related to BSOD). To run the SFC scan:
1) On your keyboard, press the Windows logo key and type cmd into the search bar. Then right-click on Command Prompt and click Run as administrator.
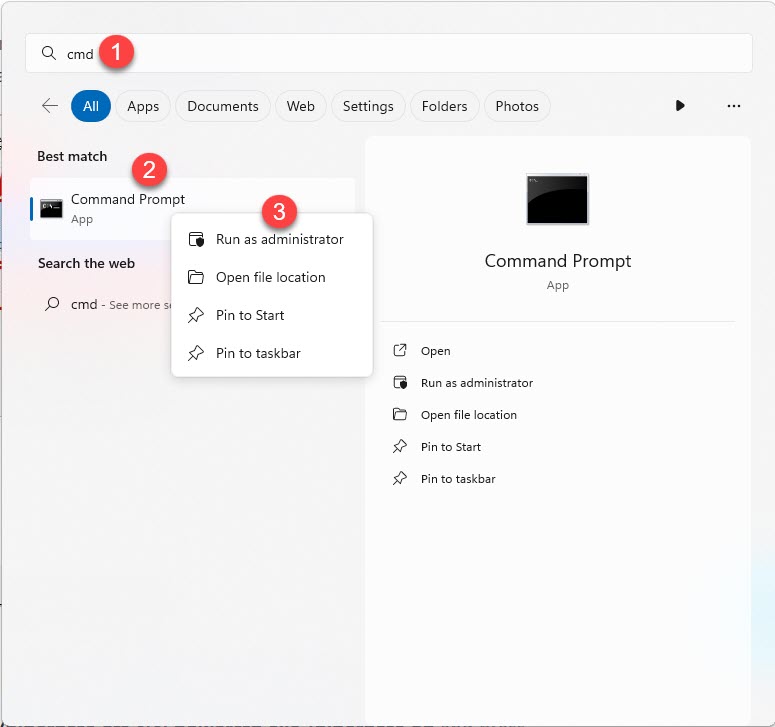
2) Click Yes when prompted to confirm.
3) In the command prompt window, type sfc /scannow and press Enter.
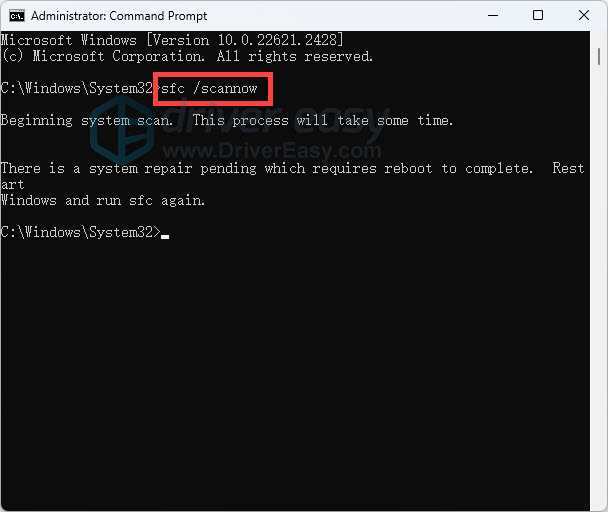
It’ll take some time for the SFC to replace the corrupted system files with new ones if it detects any, so please be patient.
4) Restart your computer for the changes to take effect.
5) Check your computer to see if the problem has been fixed.
That’s all there is to it. Hopefully one of these methods resolves your problem, and you can now extend your desktop to your second monitor, or mirror/project your laptop onto your second monitor.
If you have any questions, ideas or suggestions, please let me know in the comments. Thanks for reading!