
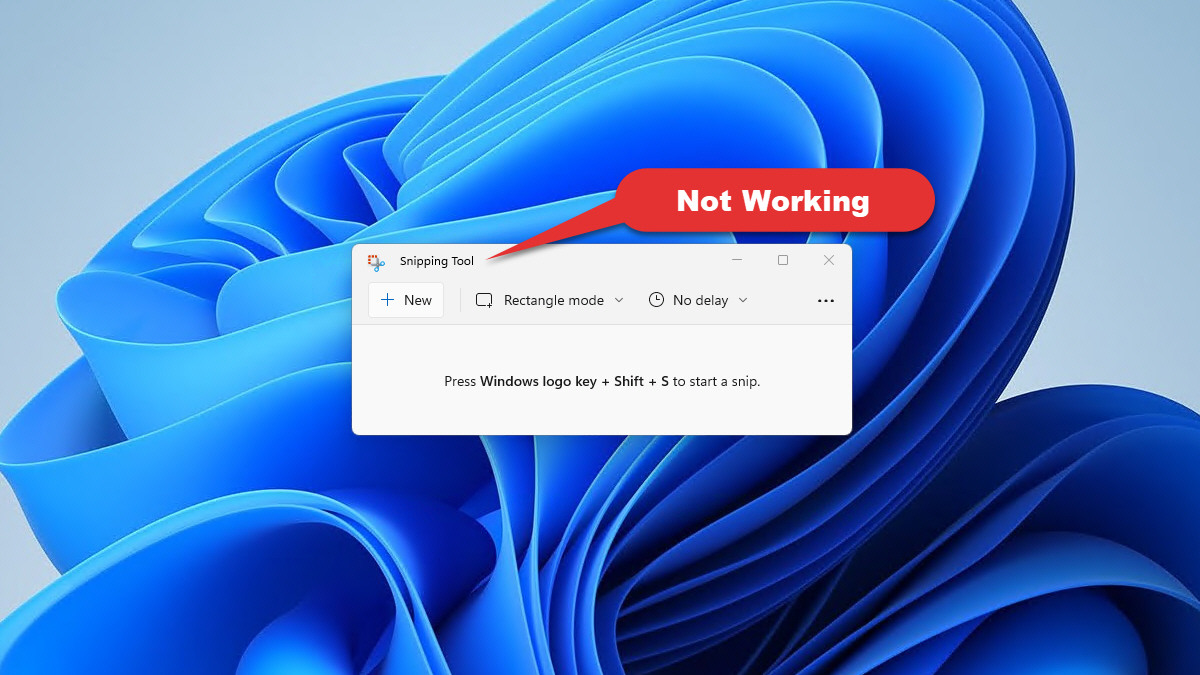
Многие функции из предыдущей версии Windows перекочевали и в одиннадцатую версию, куда входит и приложение «Ножницы» для создания скриншотов. Некоторые пользователи сталкиваются с проблемами в его работе и не могут сделать снимок экрана.
Я постараюсь разобраться в этой проблеме, представив вашему вниманию все известные методы ее решения.
Перед просмотром следующих рекомендаций убедитесь в том, что скриншоты действительно не создаются. Обычно они сохраняются в папке C:\Users\\Pictures\Screenshots (Снимки экрана). Перейдите в папку и убедитесь в отсутствии изображений в ней.
Способ 1: Использование другой комбинации клавиш
В первую очередь хочется обратить внимание на ситуацию, когда скриншоты не сохраняются исключительно при использовании горячих клавиш для их создания, куда входит PrtSc (Print Screen). Скорее всего, под упомянутую клавишу записано какое-то функциональное действие. Если после нажатия на нее ничего не происходит, рекомендую попробовать комбинацию Fn + PrtSc или Win + PrtSc.
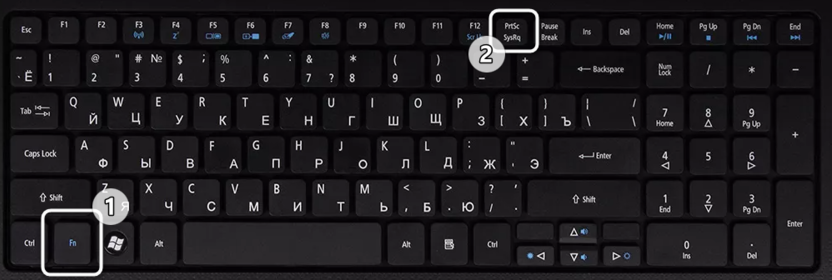
Еще есть сочетание Alt + PrtSc, которое должно создать снимок исключительно активного окна, игнорируя все остальное содержимое. Попробуйте разные варианты и убедитесь в том, что один из них сработал. Если это не так, переходите к следующим методам.
Комьюнити теперь в Телеграм
Подпишитесь и будьте в курсе последних IT-новостей
Подписаться
Способ 2: Проверка установленного времени
Неправильное время, установленное в операционной системе, может сказываться на работе различных системных приложений, в том числе и «Ножниц». Конечно, случается такое редко, но все же стоит проверить текущее время и сравнить его с тем, которое выдаст Гугл или Яндекс при соответствующем запросе.
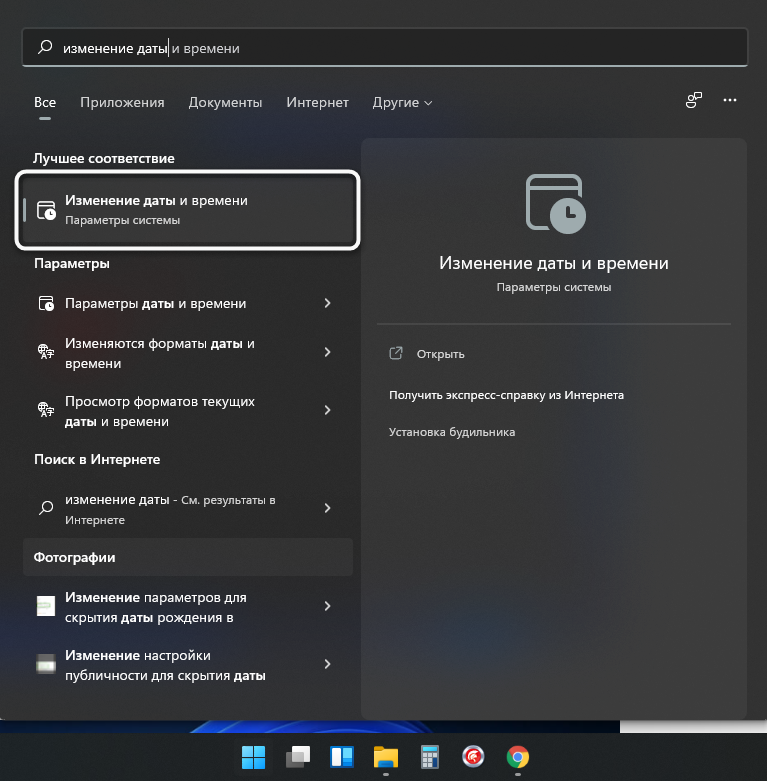
Если что, вы всегда можете открыть параметр «Изменение даты и времени» через «Пуск», чтобы включить автоматическую синхронизацию или установить правильное значение самостоятельно. Внесенные изменения провоцируют сброс в настройках «Ножниц», что и позволит нормализовать работу приложения, если ошибки действительно возникали из-за времени.
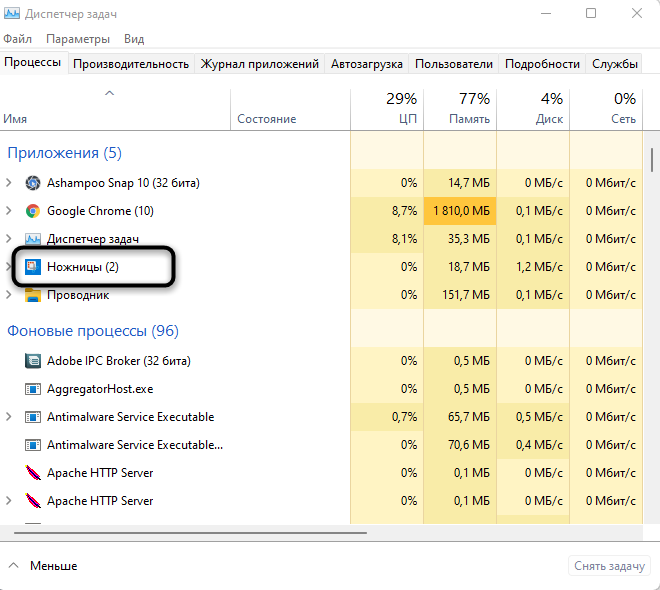
Способ 3: Перезапуск приложения
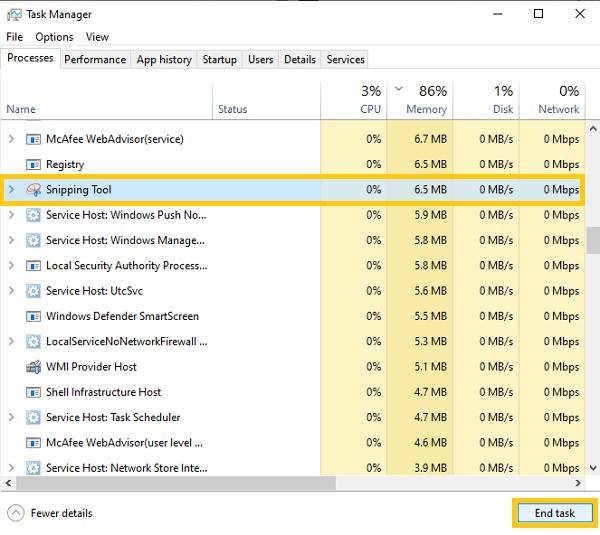
Может показаться, что это предложение звучит банально, но я веду речь именно о перезапуске. Для этого понадобится завершить процесс, что проще всего сделать через «Диспетчер задач».
-
В Windows 11 для открытия «Диспетчера задач» все еще можно использовать горячие клавиши, а также есть другой вариант: нажмите ПКМ по «Пуск» и выберите «Диспетчер задач» из появившегося списка.
-
Найдите задачу «Ножницы» и снимите ее, выбрав соответствующий пункт в контекстном меню.

-
Отыщите «Ножницы» через «Проводник» и запустите его. Проверьте, создаются ли скриншоты теперь.

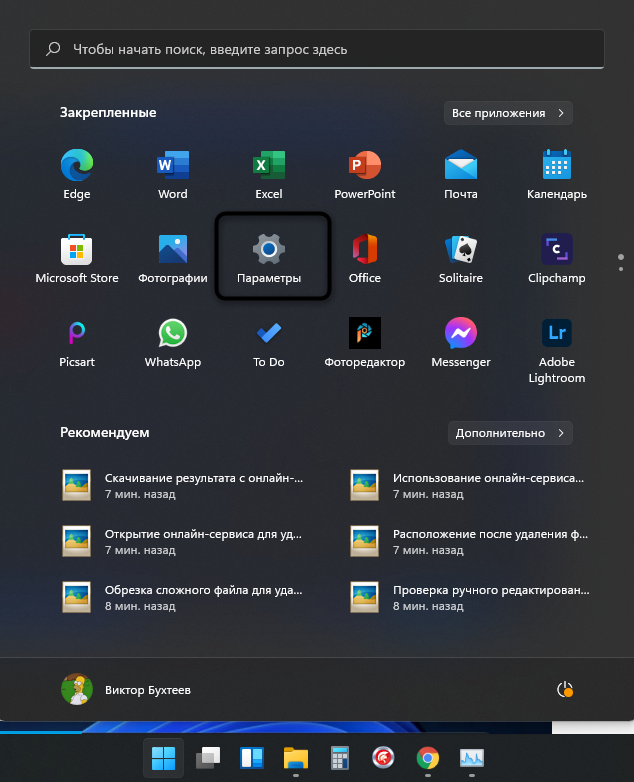
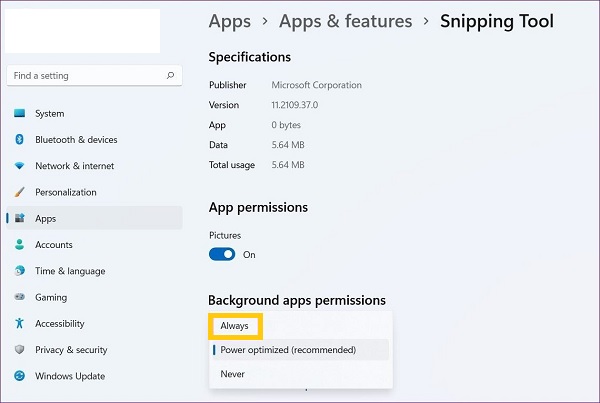
Способ 4: Настройка фоновой работы приложения
Иногда «Ножницы» не отвечают на запросы пользователя по причине некорректного функционирования в фоновом режиме. Вам необходимо сделать так, чтобы приложение всегда было активным, выполнив следующую настройку:
-
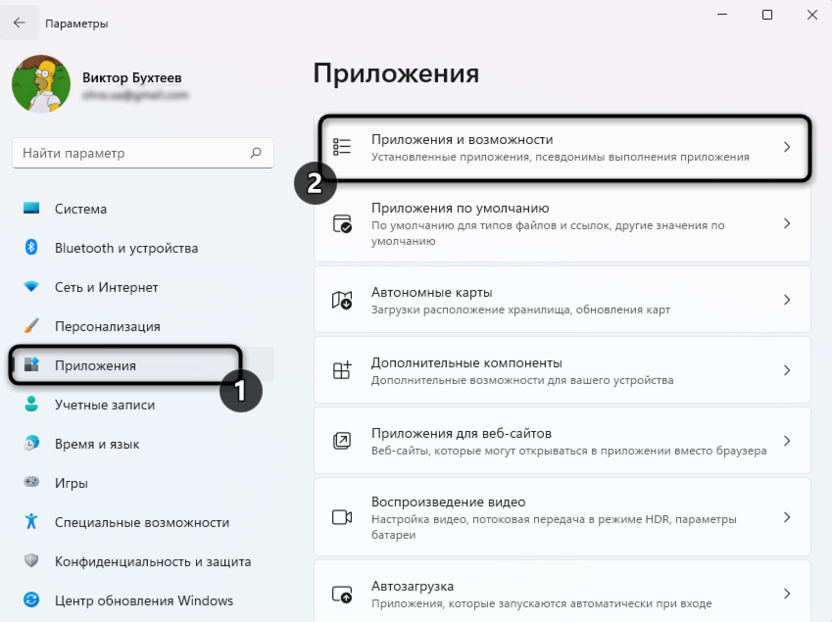
Откройте «Пуск» и нажмите по значку «Параметры».
-
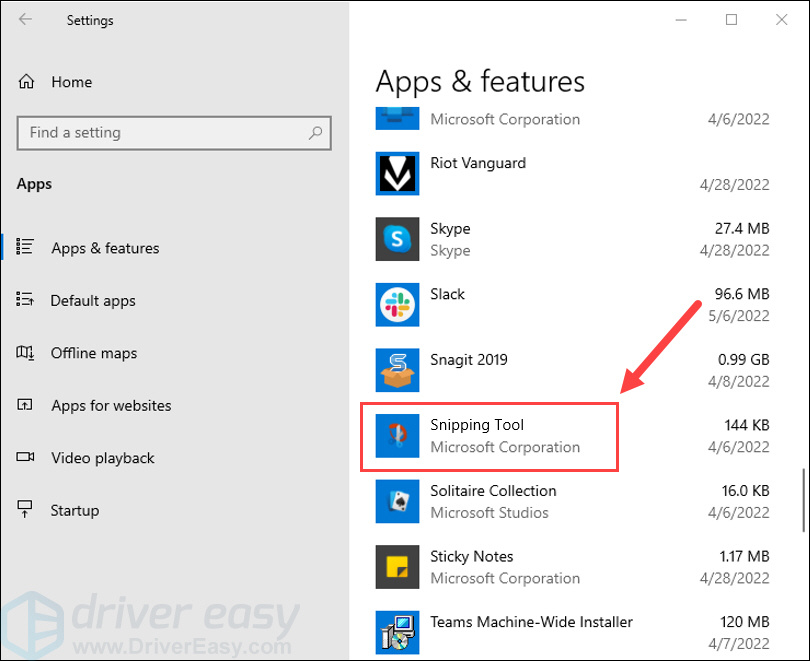
На панели слева выберите пункт «Приложения» и щелкните по первой строке «Приложения и возможности».
-
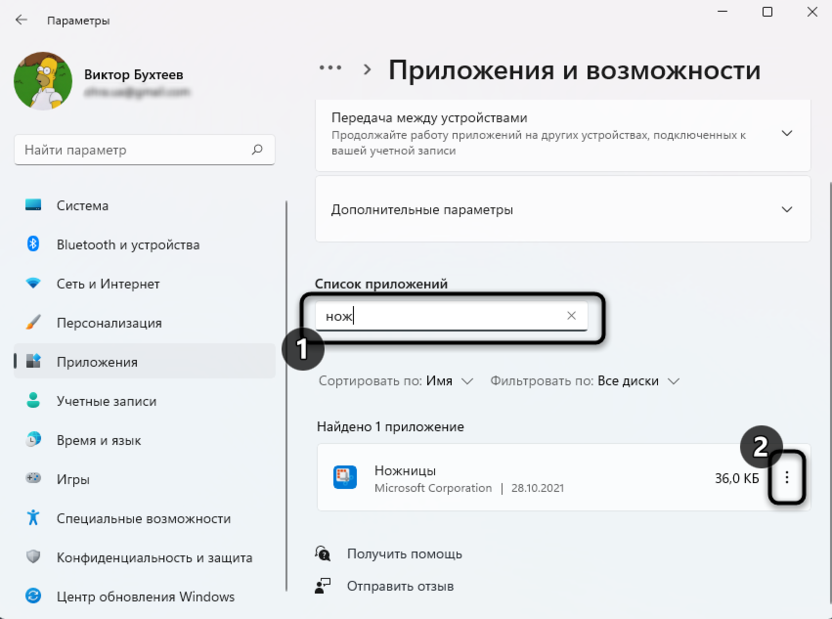
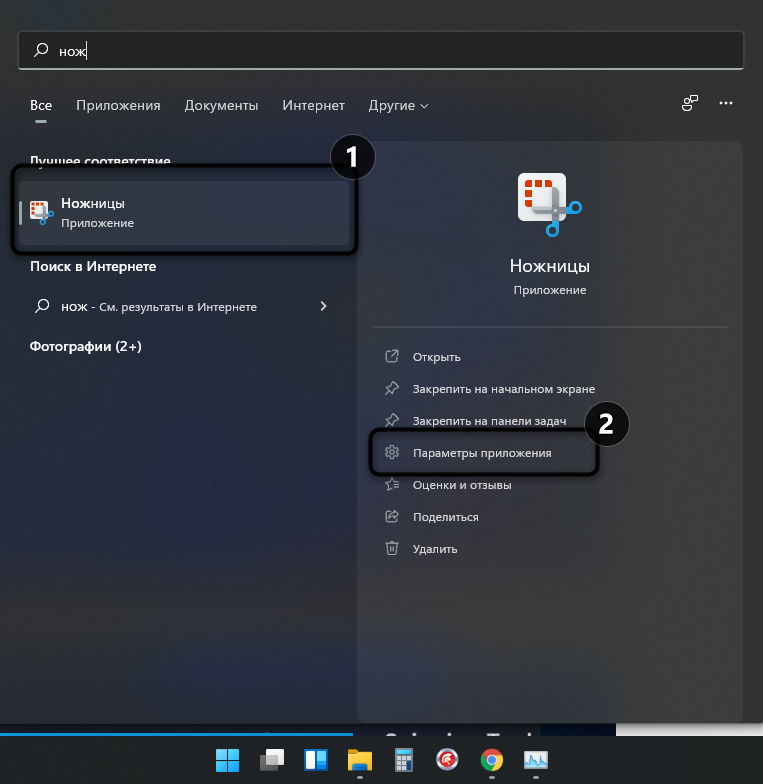
Обязательно используйте поиск для нахождения «Ножниц» и нажмите по трем точкам в поле справа.
-
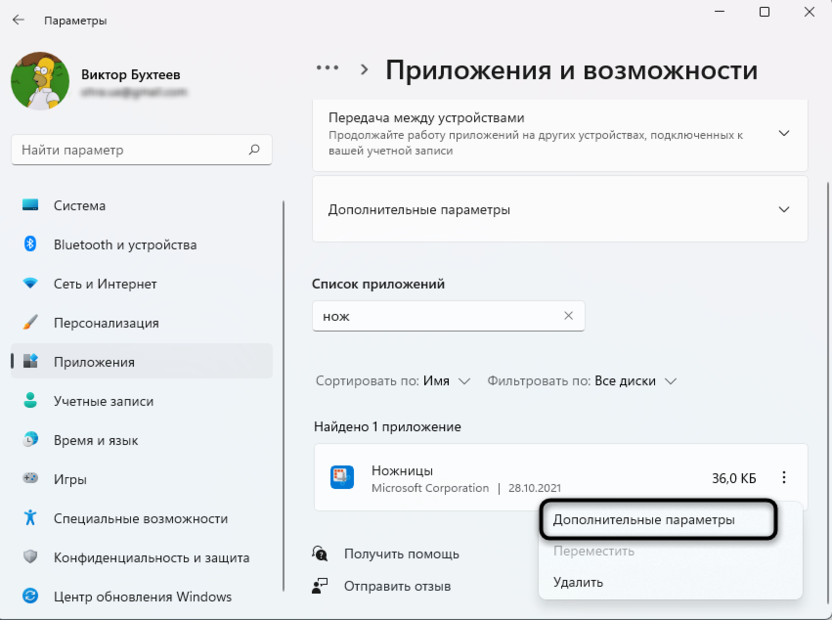
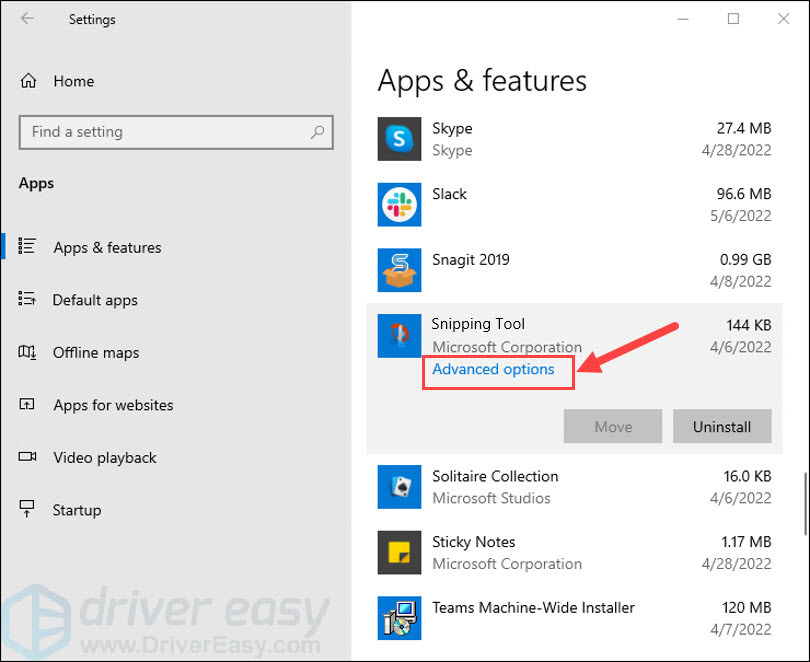
Из появившегося списка выберите «Дополнительные параметры».
-
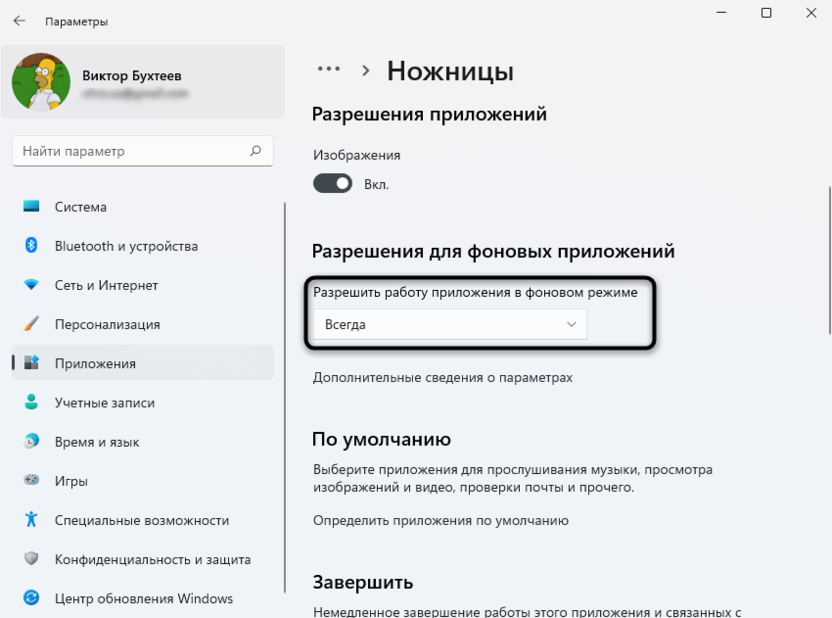
Разрешите работу приложения в фоновом режиме, указав вариант «Всегда». После этого можете перезапустить ПК и попробовать сделать снимок экрана.
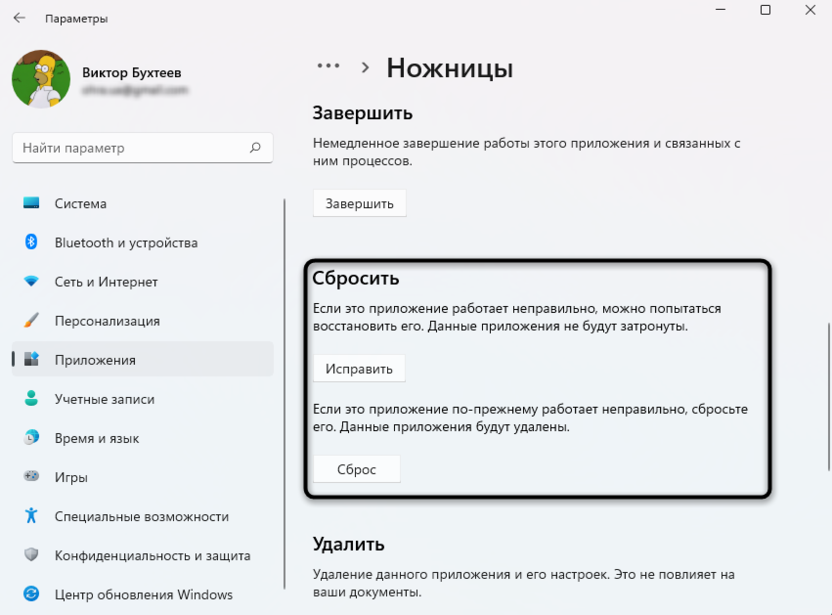
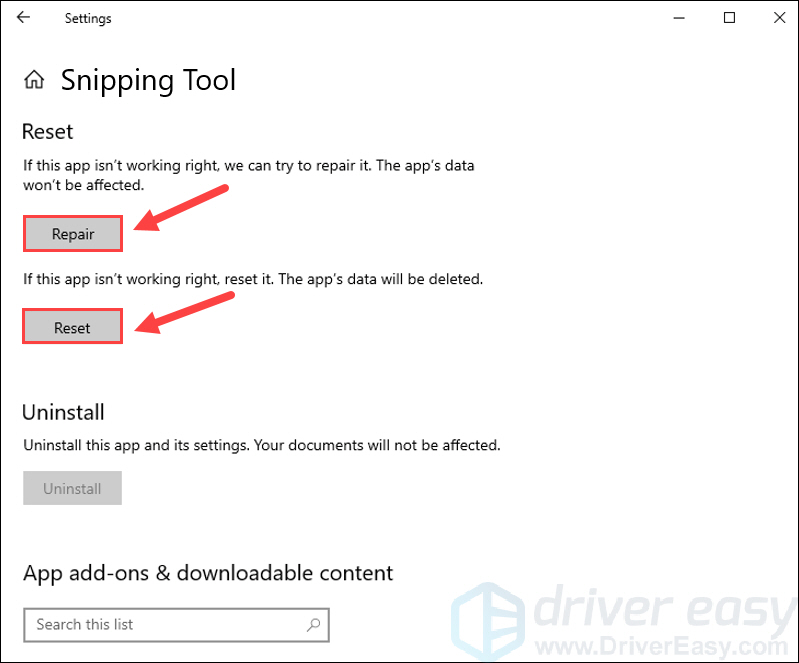
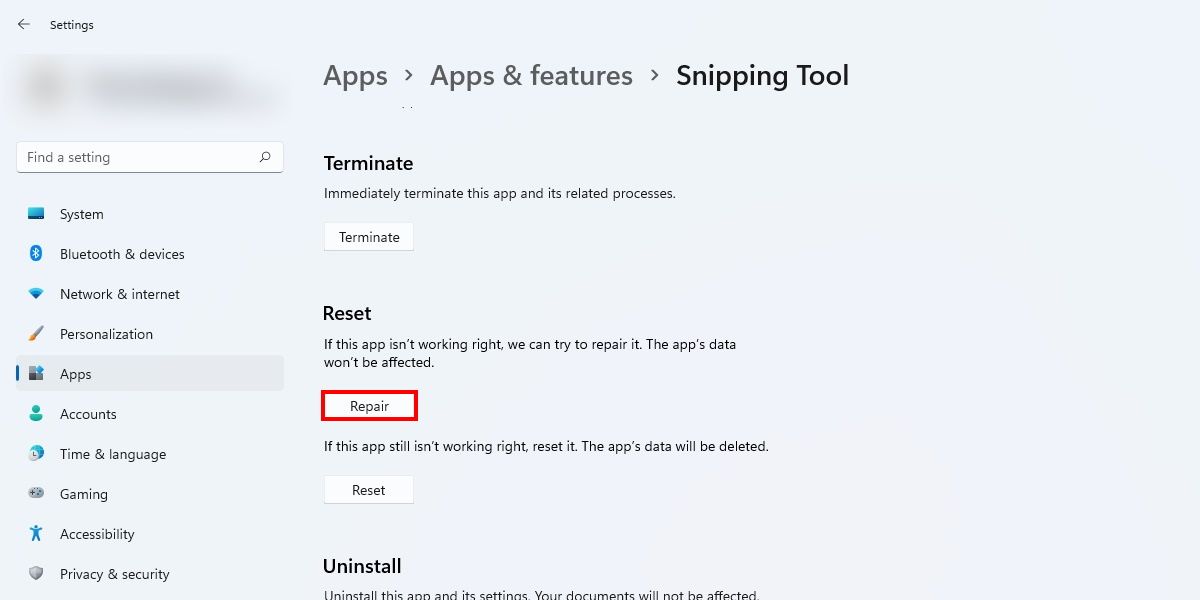
Способ 5: Исправление и сброс приложения
В Windows 11 есть интересные опции для приложений, позволяющие сбрасывать их или исправлять в автоматическом режиме. Возможно, это поможет решить вашу проблему, если она кроется в некорректном функционировании «Ножницы». Для этого откройте тот же раздел с параметрами так, как это было показано выше, или отыщите «Ножницы» через «Пуск» и в меню справа выберите «Параметры приложения».
Сначала нажмите кнопку «Исправить», а если это не поможет, используйте «Сброс». После выполнения таких манипуляций программа возвращается к стандартным настройкам, а все данные удаляются – это позволяет восстановить ее работоспособность.
Скорее всего, хотя бы один из перечисленных выше вариантов окажется полезным. Если нет, откройте «Командую строку» и запустите сканирование целостности системных файлов с помощью sfc /scannow. Это займет некоторое время; в случае нахождения ошибок вы будете уведомлены об их исправлении.
Получите 10 эффективных и работоспособных решений 100%, чтобы исправить неработающий инструмент для ножниц в Windows 11:
- Перезапустите ножницы – простой способ решить застрявшую проблему
- Сброс ножниц – устраните проблему приложения в один клик
- Измените время и дату – обновите настройки до нужных.
- Обновите Windows 11: избегайте просроченного цифрового сертификата Microsoft
- Включить фоновые разрешения – снять ограничения
- Изменить настройки. Убедитесь, что копирование и вставка скриншота работает правильно.
- AnyRec Screen Recorder — лучшая альтернатива для создания снимков экрана в Windows 11/10
Когда Ножницы Windows 11 не работают после нажатия кнопок Windows+Shift+S вы не сможете использовать встроенный инструмент для захвата экрана для работы или учебы в обычном режиме. К счастью, в этом посте подготовлены 10 простых и быстрых решений, как исправить «Ножницы», которые не работают в Windows 11. Так что вам больше не о чем беспокоиться! Все, что вам нужно сделать, это положиться на приведенные ниже решения и посмотреть, какое решение подойдет вам.
9 решений, как исправить неработающий инструмент «Ножницы» в Windows 11
Если вы ищете решение, которое не доставит вам проблем с ремонтом вашего Snipping Tool, вы находитесь в идеальном месте! В этом разделе вы познакомитесь с шестью простыми и эффективными решениями, которые помогут исправить Snipping Tool, не работающий в Windows 11.
Решение #1. Перезапустите приложение Snipping Tool.
Если ножницы Windows 11 не работают, вы можете перезапустить приложение, чтобы исправить это. Все, что вам нужно сделать, это зайти в диспетчер задач. Вы можете выполнить поиск или просто нажать комбинацию клавиш «Crtl + Shift + Esc», чтобы открыть диспетчер задач. Оттуда нажмите кнопку «Ножницы», затем нажмите кнопку «Завершить задачу». После этого вы можете еще раз запустить «Ножницы» и посмотреть, будет ли он работать.
Решение #2. Сброс приложения для обрезки
Проблемы или ошибки в некоторых приложениях являются нормальным явлением. Их просто нужно сбросить, чтобы большую часть времени снова работать без сбоев. А чтобы исправить «Ножницы», которые не работают в Windows 11, вы можете перезагрузить приложение. Нажмите комбинацию клавиш «Windows + I» на клавиатуре, затем откройте кнопку «Настройки». После этого нажмите кнопку «Приложения» и нажмите кнопку «Приложения и функции». Затем найдите приложение «Ножницы», щелкните три точки и нажмите кнопку «Дополнительно», чтобы открыть приложение. Наконец, отметьте кнопку «Сброс», чтобы сбросить приложение.
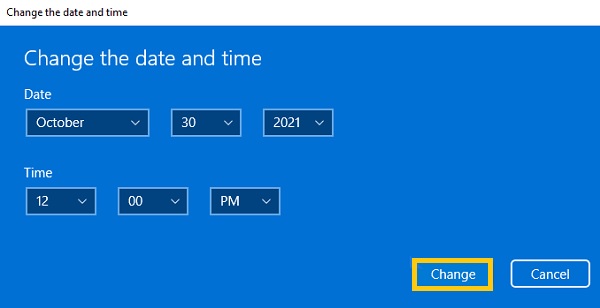
Решение #3. Измените время и дату
Неправильные настройки даты и времени иногда могут привести к проблемам с ножницами. Временное изменение этих настроек вручную, а затем возврат к автоматическому режиму может решить проблему. Вам нужно зайти в «Настройки» и изменить дату вашего компьютера на «30 октября 2021 года». Затем попробуйте использовать комбинацию клавиш «Windows + Shift + S» и посмотрите, сможете ли вы теперь сделать снимок экрана. Затем вы можете изменить время и дату на самую позднюю дату.
Решение #4. Загрузите обновление KB5008295 для Windows 11.
Microsoft исправила неработающий инструмент «Ножницы» в Windows 11, обновив его до KB5008295. Есть некоторые проблемы, связанные с тем, что срок действия цифрового сертификата Microsoft истек после 31 октября 2021 г.; вот почему ножницы перестали работать. Но чтобы устранить проблему, установите новое обновление «KB5008295». Зайдите в «Настройки» или нажмите комбинацию клавиш «Windows + I» на клавиатуре. Затем перейдите в раздел «Центр обновления Windows» и нажмите кнопку «Проверить наличие обновлений». Затем вы увидите обновление «KB5008295». Вам просто нужно скачать и запустить его на своем компьютере с Windows 11.

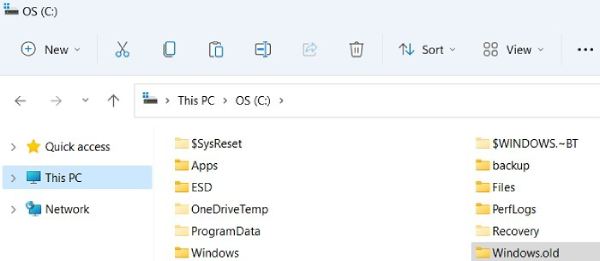
Решение #5. Запустите Snipping Tool из папки «Windows.old».
Для тех, кто обновился до Windows 11 с Windows 10, папка «Windows.old» может содержать классический инструмент «Ножницы». Запуск этой более старой версии может обойти проблемы с последней версией Snipping Tool. Найдите папку «Windows.old» на диске C. Найдите файл приложения с именем «Ножницы» в меню поиска файлов и папок Windows 11. Откройте его, чтобы использовать классический инструмент «Ножницы». При желании закрепите «Ножницы» в меню «Пуск» или на панели задач для быстрого доступа.
Решение #6. Разрешите запуск Snipping Tool в фоновом режиме.
Наконец, если инструмент «Ножницы» по-прежнему не работает в Windows 11, возможно, у вашего приложения нет необходимых разрешений, необходимых для работы в фоновом режиме. При этом вам необходимо перейти в «Настройки» или нажать «Windows + I», чтобы открыть настройки. Оттуда нажмите кнопку «Приложения», а затем кнопку «Приложения и функции». Затем вы можете использовать панель поиска для поиска «Ножницы» и нажать кнопку «Настройки» со значком «три точки», чтобы нажать кнопку «Дополнительно». Наконец, щелкните раскрывающийся список «Разрешение фоновых приложений» и нажмите кнопку «Всегда».
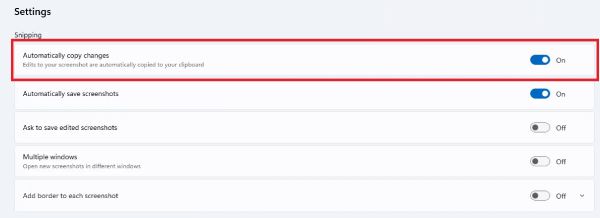
Решение #7. Включите «Автоматическое копирование изменений» в настройках ножниц.
Если ваши ножницы открываются, но не копируют и вставляют изображения, настройка параметра «Автоматически копировать изменения» может решить проблему. Этот параметр гарантирует сохранение изменений в буфере обмена. Откройте «Ножницы» и нажмите меню «Дополнительно». Выберите «Настройки» и убедитесь, что параметр «Автоматически копировать изменения» включен. При желании включите кнопку «Несколько окон», чтобы сохранить несколько снимков экрана. Убедитесь, что ножницы теперь работают должным образом.
Решение #8. Установите клавишу Print Screen для ножниц.
Для пользователей, сталкивающихся с проблемами с ошибочными обновлениями, обходным путем является установка клавиши PrtScr на клавиатуре в качестве кнопки запуска по умолчанию для ножниц. Откройте «Ножницы» и выберите меню «Дополнительно». Выберите «Сочетание клавиш Print Screen» и «Изменить настройки Windows». Включите параметр «Использовать кнопку Print Screen, чтобы открыть фрагмент экрана». Выберите параметры захвата снимков экрана непосредственно с помощью кнопки «PrtScn» на клавиатуре. Проверьте, правильно ли запускается и работает инструмент «Ножницы» в Windows 11 с новым ярлыком.

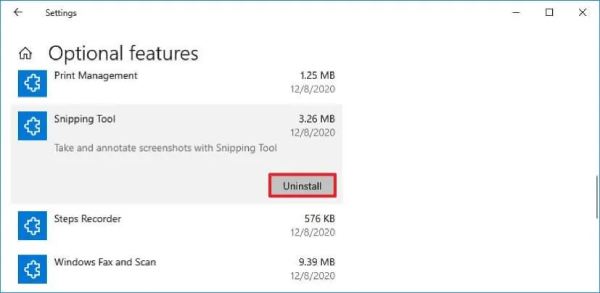
Решение #9. Удалите и переустановите ножницы.
Если работа Snipping Tool прерывается при запуске, возможно, виновата неправильная установка. Удаление и повторная установка инструмента может решить эту проблему. В меню поиска «Пуск» или «Панель управления» выберите «Установка и удаление программ». Прокрутите вниз, чтобы найти приложение «Ножницы», и выберите «Удалить» в меню «Дополнительно». После удаления переустановите Snipping Tool из Microsoft Store. Затем вы можете проверить, решена ли проблема с неработающим в Windows 11 инструментом «Ножницы».
Лучший альтернативный способ делать снимки экрана в Windows 11/10/8/7
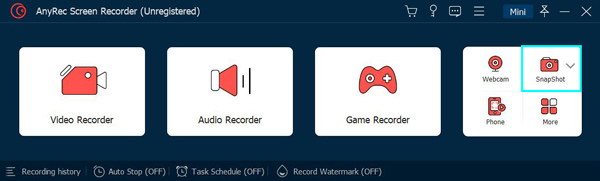
Предположим, ваш Windows 11 Snipping Tool все еще не работает; вы можете загрузить сторонний инструмент в качестве решения. И нет другого лучшего и совершенного решения, чем иметь AnyRec Screen Recorder на вашем компьютере с Windows 11. Этот инструмент для обрезки позволит вам сделать снимок экрана в полноэкранном режиме или в пользовательском размере изображения. Кроме того, вы можете добавить текст, рисунки, стрелки, линии и фигуры на захваченный экран, если хотите что-то подчеркнуть. Вы также можете использовать его для запись экрана на Windows 10/11.

Действия, которые необходимо выполнить:
Шаг 1.Прежде всего, скачайте AnyRec Screen Recorder на вашем устройстве Windows. Затем запустите программу и нажмите кнопку «Снимок». Без инструмента для обрезки изображений в Windows 11 вы также можете легко сделать снимок экрана.
Шаг 2.После этого вы можете использовать мышь в качестве курсора, чтобы захватить экран, который вы хотите сделать скриншотом. Затем вы можете свободно регулировать стороны захваченного экрана, пока не достигнете желаемой области.
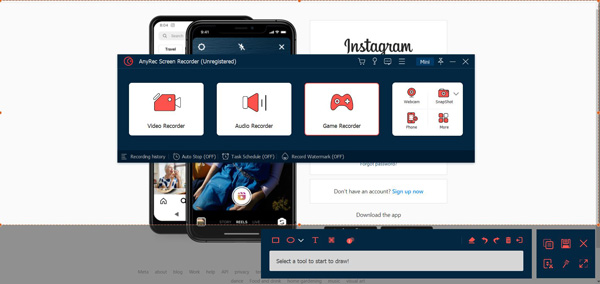
Шаг 3.К снимкам можно добавлять рисунки, текст, линии, фигуры и стрелки. После всех изменений вы можете сохранить снимок. Нажмите кнопку «Сохранить», и все готово!

Часто задаваемые вопросы о том, что ножницы в Windows 11 не работают
-
1. Какая лучшая альтернатива, если Windows 11 Snipping Tool не работает?
Лучший инструмент, который мы можем предложить, если вы ищете альтернативу своему Snipping Tool, это AnyRec Screen Recorder. Это приложение не только позволит вам делать скриншоты, но и поможет вам записывать важные события на ваш экран. Кроме того, вы можете сохранять снимки в различных форматах изображений, таких как PNG, JPG, TIFF, BMP или GIF.
-
2. Как использовать Snipping Tool в Windows 11?
Перейдите в раздел «Пуск» и найдите Snipping Tool. Затем откройте его и выберите нужный режим снимка экрана. Затем вы можете захватить экран с помощью мыши. Наконец, вы можете добавлять рисунки и тексты, а затем сохранять их в свои файлы.
-
3. Где сохраняются мои скриншоты в Windows 11?
После того, как вы устраните проблему с неработающим инструментом Windows 11, вы должны знать куда деваются скриншоты в виндовс 11. На самом деле скриншоты еще не сохранены, и их нужно вставить из буфера обмена и сохранить в локальную папку.
Заключение
Отличная работа! Теперь вы можете исправить неработающий инструмент Windows 11 Snipping Tool. Помимо решений по умолчанию, вы также можете положиться на AnyRec Screen Recorder легко делать снимки. Пожалуйста, поделитесь этим сообщением, чтобы помочь своим друзьям и близким исправить их неработающий инструмент Windows 11 Snipping Tool.
Другие связанные статьи
Multiple Windows 11 users are unable to open Snipping Tool in order to take screenshots. There are 2 ways to launch the utility using Keyboard Shortcut and through Search; sadly both of these do not work to launch this built-in screen capturing app. If you are facing Snipping Tool not working in Windows 11 issue then here you will find the solutions. The methods in this post will be effective in all cases whether the app is not working after installing the Windows version or in normal situations.
Snipping tool not working in Windows 11 usually occurs after installing this version. After upgrading to Windows 11, when you press the shortcut keys Ctrl + Shift + S the tool doesn’t open. Furthermore, using search also fails to launch the program. Sometimes, you might find that the program opens but doesn’t work properly. The issue might happen because of buggy Windows update, incorrect settings configuration for the Screenshot capturing tool, corrupted system files, and other.
Snipping Tool not working in Windows 11
Here is how to fix Snipping Tool not working in Windows 11 –
Way-1: When the utility doesn’t work after upgrading
If Windows 11 Snipping Tool missing problem occurs just after installing or upgrading to Windows 11 then this might be due to a bug. Here, you can find a discussion about this issue – Techcommunity. You may assume in this case that Microsoft will soon take notice of the issue and come with a resolution. Until then you can run the app with a tweak that includes restoring Snipping Tool from the Windows.old folder. Installation of the Windows operating system commonly stores the antecedent data and files are in a folder called Windows.old. Many users delete the folder because this folder occupies a large amount of space just after upgradation. So make sure that you haven’t done this then follow the steps –
- Press – Windows and E.
- Click on This PC from the right navigation pane.
- Double click on – Local Disk (C:).
- This will have a Windows.old directory. Double click on it.
- Go to Windows folder in this directory.
- Once reached, double click on System32.
- Here you will find Snippingtool.exe.
- Double click on this.
- The shortcut path to the location of this tool is C: /Windows.old/Windows/System32/SnippingTool.exe.
- After the tool is launched we recommend to pin it to the Taskbar so that you can further open the app easily.
- For this, right-click on the shortcut of the Snipping tool on the taskbar.
- Select – Pin to taskbar.
See – How to Pin Snipping Tool to Start and Taskbar in Windows 11 or 10
Way-2: Reset Snipping Tool
Windows 11 offers to reset any app if it is causing any problem and provides an option in Settings for this purpose. Once you use this option the Snipping tool will restore the default configurations. Therefore, in case, the problem started after changes in settings or installing a third party program then follow the steps –
- Click the – Start.
- Select- Settings.
- When Settings appears, click on- Apps.
- Go to the right and select – Apps & features.
- Let the page load to see the list of all programs installed on your PC.
- Locate Snipping Tool.
- From this section, click on 3 dots menu.
- Select – Advanced options.
- From the next page, click on – Reset.
- You will come across a tiny pop up.
- Again click on ‘Reset’.
- Restart the computer and check if the utility is working now.
Way-3: Download Snipping tool
Snipping tool is a built-in screenshot-taking utility and has been available since Windows XP. However, commonly it comes through installation files and is not downloadable. We have managed somehow the MSU file of the utility using which you will be able to install the utility on Windows 11.
- Click this link.
- Download the Snipping tool.
- Double click Setup file Snipping_Tool_5.2.0.0 (1).msi and follow the instructions on the screen to complete the installation.
Way-4: Uninstall recent updates
Many times, Snipping Tool problem occurs after updating Windows 11. This case indicates that the patch or build you have received is having some bugs. The simplest method to fix the screenshot utility error would be to uninstall the update. Further, install the update after the bug is fixed because it is essential for the protection of your operating system. However, follow the guidelines to uninstall now –
- Click the – Search.
- Type – update history.
- Hit – Enter.
- When the Settings app appears, scroll down to the bottom and click on – Uninstall updates.
- A window from Control panel will open soon; find the patch installed recently. This will be in KB…… form.
- Right-click on this one and select – Uninstall.
- You may notice a confirmation dialog, click – Yes.
- The update will be uninstalled in a while. See if the utility works now.
Way-5: Repair the app
You are getting troubles like Snipping Tool not popping up in Windows 11 then using Repair from the Settings app can work. This will work as a troubleshooter to fix the screenshot utility. Here are the steps –
- Press – Win+I.
- Select – Apps from Settings.
- Click on Apps & features.
- In the list of installed apps click on 3 dots from the Snipping Tool section.
- Select – Advanced options.
- From the coming page, click on – Repair.
Way-6: Use the Shortcut key to launch the Tool
Using Shortcut keys is the handiest way to launch apps on Windows operating system. You can see a complete list of Windows 11 Keyboard shortcuts with downloadable PDF in this concern. Give a try to use these keys as they may easily invoke the Snipping Tool.
- Press Windows + Shift + S on the keyboard.
Way-7: Install the pending Windows updates
When any mishap occurs because of Windows updates sent from Microsoft then you may get a resolution. The only matter is time for this situation so try checking updates at a regular interval. However, the updates are installed automatically but sometimes you may need to follow some manual action as below –
- Press – Winkey+I.
- Select – Windows update.
- Click on – Check for updates.
- Windows will start scanning for updates and in case anyone is pending it will download automatically.
- When the downloading is completed you will get a notification pop up. Click on Restart now on that pop up.
- Now open the app and work with it.
Way-8: Let the app run in background
Some apps require permission in Windows 11 or in the earlier versions for running in the background. The activities in the background commonly help the apps to send and receive notifications, sync information and keep them updated. Lacking permission might prevent the Snipping tool from opening on the desktop. So change the Setting by following steps –
- Press – Winkey + I.
- Select – Apps.
- Click on Apps & features.
- Move down in the next Settings page and reach Snipping Tool.
- Click on the three dots icon in that section and select – Advanced options.
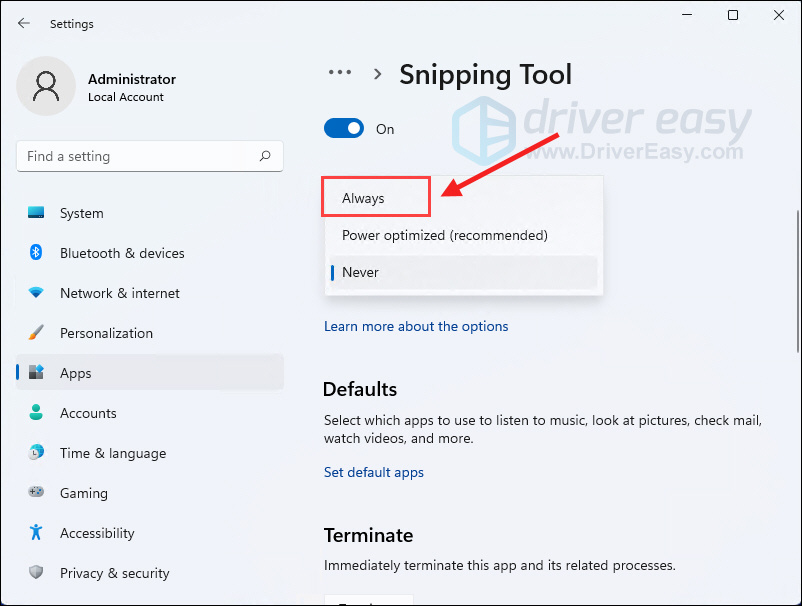
- Now, click the drop-down under Background apps permissions.
- Select – Always.
Way-9: Run SFC aka System file checker
There might be third-party utilities or antivirus programs interfering with the functionality of Windows 11 if you find Snipping Tool not working problem. These programs corrupt the system files and create different types of messes on the PC. But fortunately, System file checker diagnoses all the issues and repair them by running on cmd command prompt. Here is the method –
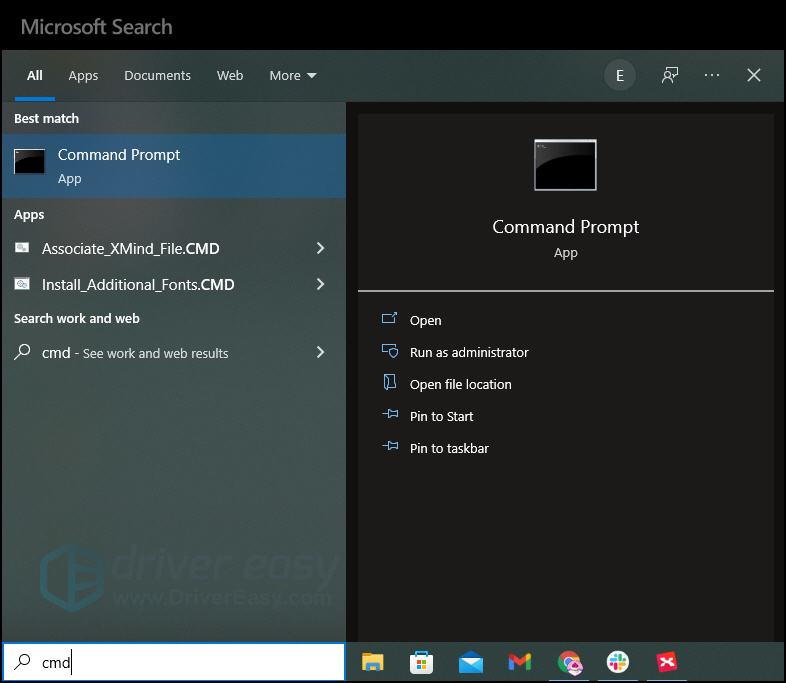
- Click the Search located on the taskbar.
- Type – cmd.
- Select – Run as administrator.
- A user account control dialog will appear; click on – Yes.
- Once Command prompt opens up, type SFC /Scannow.
- Press – Enter.
- You will see Beginning system scan on the prompt. Once it reaches 100 percent reboot the PC.
Way-10: Run Store app troubleshooter
Store app troubleshooter, being a built-in utility, diagnoses problems with the applications installed through Microsoft Store and repairs them. When Snipping Tool not opening error occurs this utility may be a great help. Follow the instructions –
- Press – Windows logo key+I.
- On the Settings app, click on – Troubleshoot.
- Click on – Other troubleshooters.
- Move down to Store apps and click on Run.
- The tool will scan for issues and then suggest you follow some steps. Go along with them to fix the issue.
Way-11: Run DISM tool
Deployment image servicing and management aka DISM is a command-line utility to detect any messes in WIndows image and rectify them. Once running on Command prompt, the tool repairs the issues which may cause the tool not working in Windows 11. Follow –
- Right-click on Start from the taskbar.
- Select – Windows Terminal (Admin).
- Once User account control pop up prompts, click on Yes.
- Click on ‘Open a new tab’ drop down and select – Command prompt.
- type –
DISM.exe /Online /Cleanup-image /Restorehealth. - Press – Enter.
- Reboot your device and hopefully, the app should work now.
Still, the Snipping Tool couldn’t be opened and you are desperately needing to run it then you can Join Windows Insider Program and switch to receiving builds.
Methods list:
Way-1: When the tool doesn’t work after upgrading to Windows 11
Way-2: Reset Snipping Tool
Way-3: Download Snipping tool
Way-4: Uninstall recent updates
Way-6: Repair the app
Way-7: Use the Shortcut key to launch the Tool
Way-8: Install the pending Windows updates
Way-9: Let the app run in background
Way-10: Run SFC aka System file checker
Way-11: Run Store app troubleshooter
Way-12: Run DISM
That’s all!!
Snipping Tool is a handy screenshot-taking & editing tool for many Windows users. As one of the native Windows apps, it’s lightweight and useful in producing screenshots, but sometimes it also fails to work properly.
Users may encounter issues such as a pop-out error message, blank or black screen, images failing to be saved or the app not working after the system is upgraded. If you’re stuck in one of these Snipping Tool problems, you’ve found the right place! In this article, we will guide you through several methods that may help you out. Now, let’s move on to show you how:
Try these methods:
You might not need to try them all, just walk your way down the list until you find the one that fixes the snipping tool not working issue.
- Relaunch Snipping Tool in Task Manager
- Allow the Snipping Tool to run in the background
- Update your graphics driver
- Update your Operating System
- Repair or reset apps in Apps & features
- Run DISM tool
- Run System File Checker
Method 1: Relaunch Snipping Tool
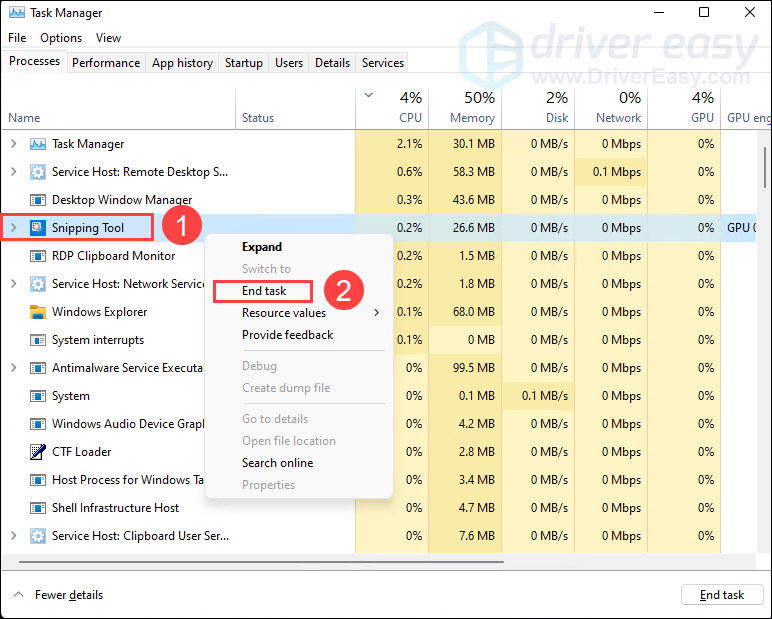
Simply quitting the Snipping Tool and restarting it may help with the problem. You can use the built-in program Task Manager that allows you to close any non-responding or freezing application to end the Snipping Tool completely, and then have a relaunch to see if your problem can be solved.
- Press Ctrl + Shift + Esc keys to open the Task Manager.
- Under the Processes tab, right-click the Snipping Tool listed on the left and select End task from the pop-up menu.

- Restart your Snipping Tool and check if it can function properly.
If this fix doesn’t work, try the next below.
Method 2: Allow the Snipping Tool to run in the background
For most of the time, Snipping Tool is an app that “stays behind the screen” and waits for being woken. If Snipping Tool lacks permission from your PC to run in the background, it won’t be able to work at any time when you are not active in the app’s window.
On Windows 10
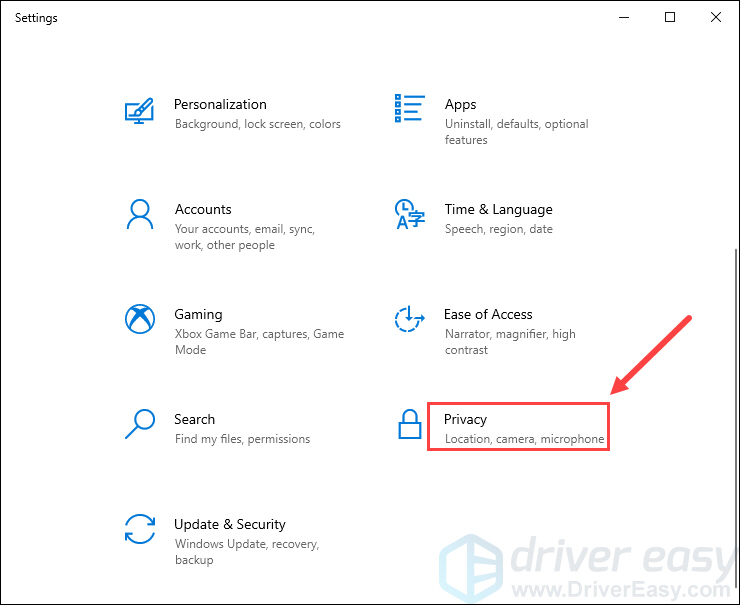
- Right-click the Windows icon on the taskbar to open the quick access menu and then select Settings.
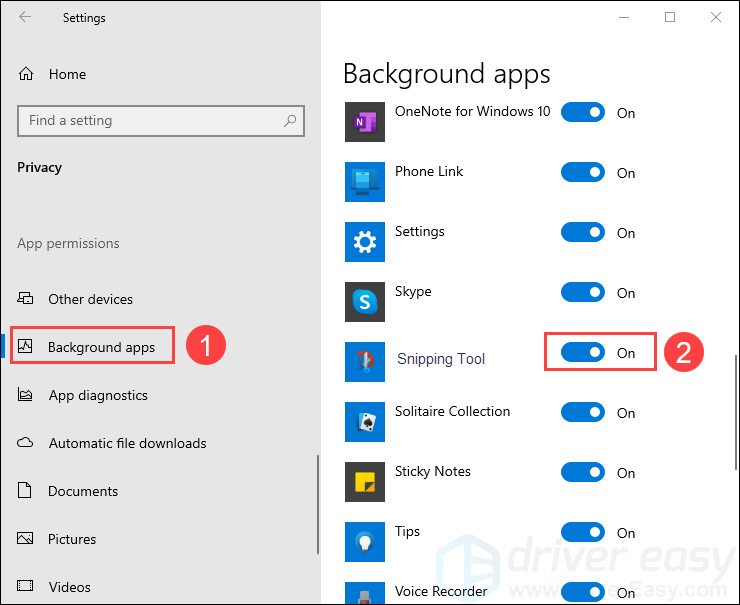
- In Settings, click Privacy.

- On the left panel, scroll down to the Background apps, check if the Snipping Tool is turned on. If not, toggle the switch to On
On Windows 11
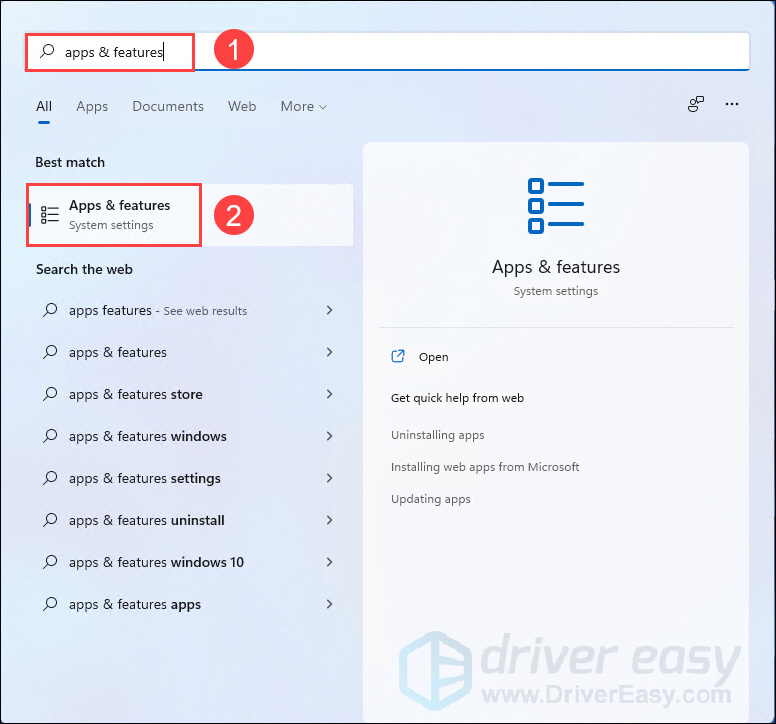
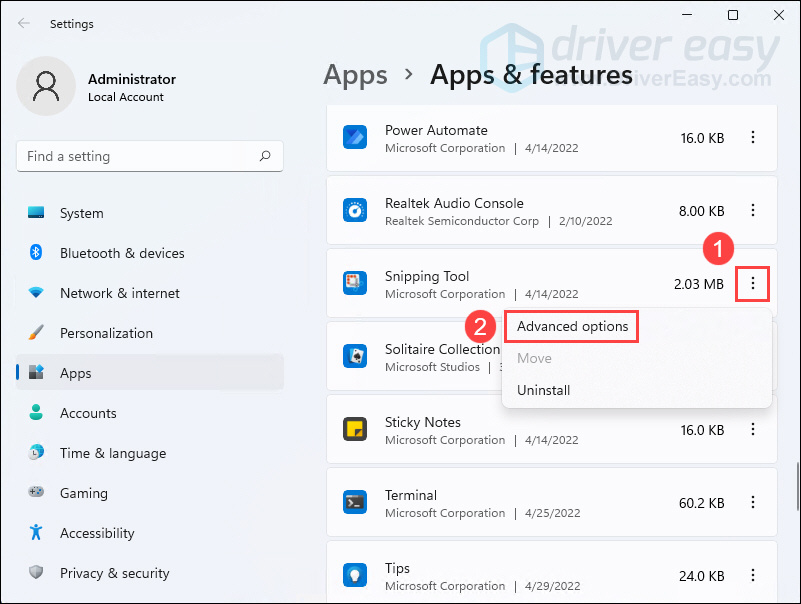
- Press the Windows key to open the Start menu, type apps & features in the search box and select it from the result.

- Scroll down to the Snipping Tool in the right list and click the 3-dots icon next to it, then select Advanced options.

- In the Background apps permissions section, click on the box under Let this app run in the background.

- Select Always from the drop-down list.


If this fix doesn’t work, try the next below.
Method 3: Update your graphics driver
If you have an outdated graphics driver, your graphics would not be able to process images appropriately in your computer and as a result, the Snipping Tool cannot be used properly. So you should update your graphics driver to see if it fixes your problem.
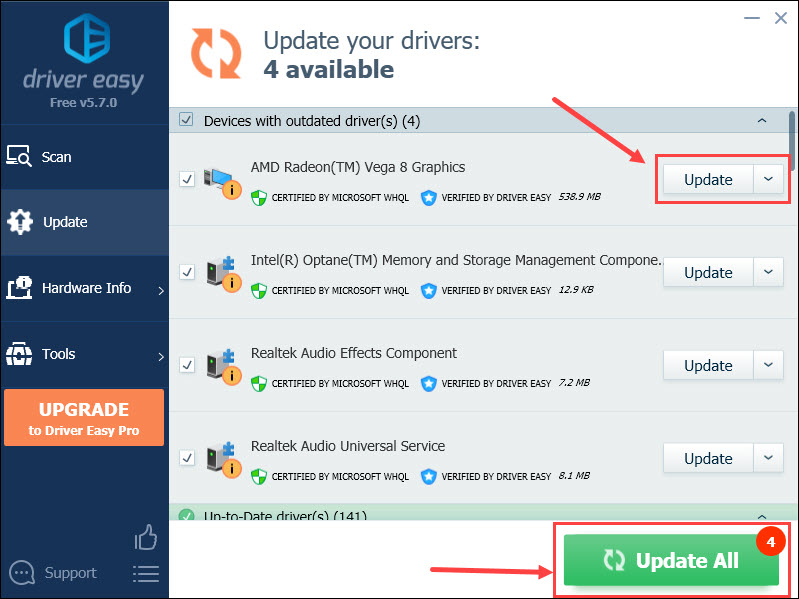
You can update your graphics driver manually by visiting the manufacturer’s website (NVIDIA/AMD), finding the latest correct installer and installing step by step. But if you don’t have the time, patience or skills to update the driver manually, you can do it automatically with Driver Easy.
Driver Easy will automatically recognize your system and find the correct drivers for it. You don’t need to know exactly what system your computer is running, you don’t need to be troubled by the wrong driver you would be downloading, and you don’t need to worry about making a mistake when installing.
- Download and install Driver Easy.
- Run Driver Easy and click the Scan Now button. Driver Easy will then scan your computer and detect any problem drivers.

- Click Update All to automatically download and install the correct version of all the drivers that are missing or out of date on your system (this requires the Pro version with full support and a 30-day money-back guarantee – you’ll be prompted to upgrade when you click Update All).
You can do it for free if you like, but it’s partly manual.

Method 4: Update your Operating System
Apart from updating the graphics driver, updating your Windows should also be a trick that is worth trying since Microsoft keeps releasing OS updates with bug fixes for its apps including Snipping Tool. Here’s how you can check for updates:
On Windows 10
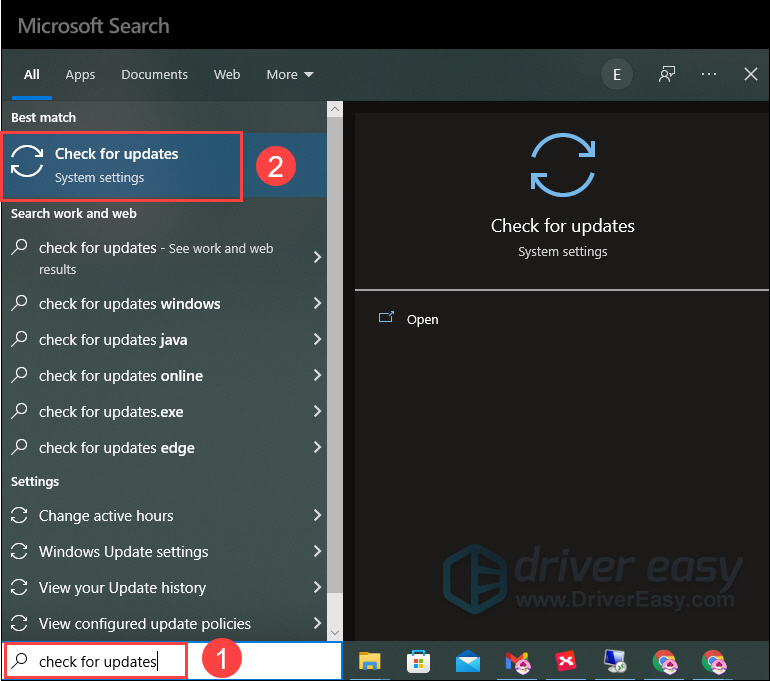
- In the search box, type check for updates and select it from the result that appears.

- Click Check for updates on the right section and wait for the checking.

- The checking result could be You’re up to date, which means you don’t need to do anything about it next.
If not, there will be a Download and install button. Click on it to have a Windows update.
On Windows 11
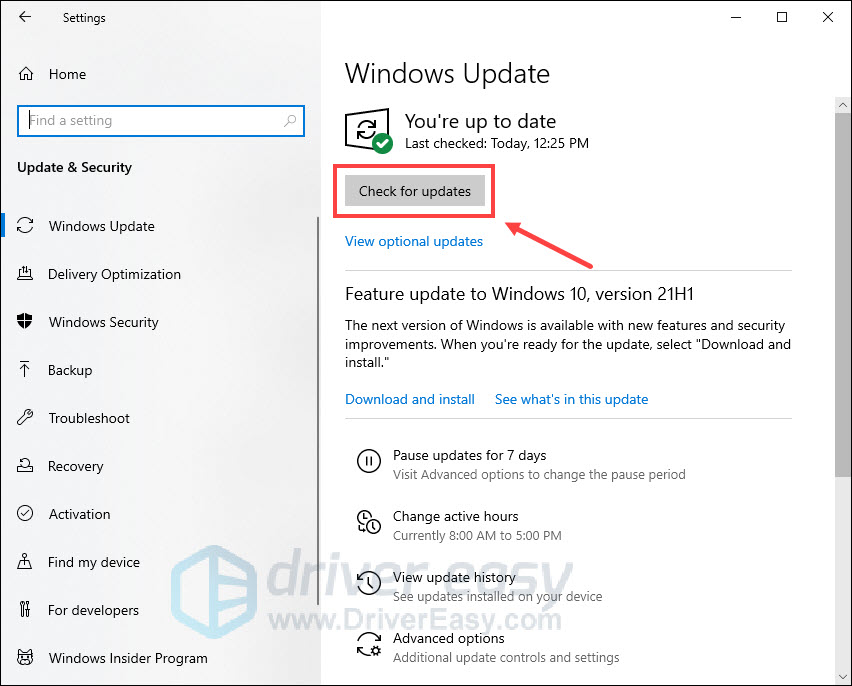
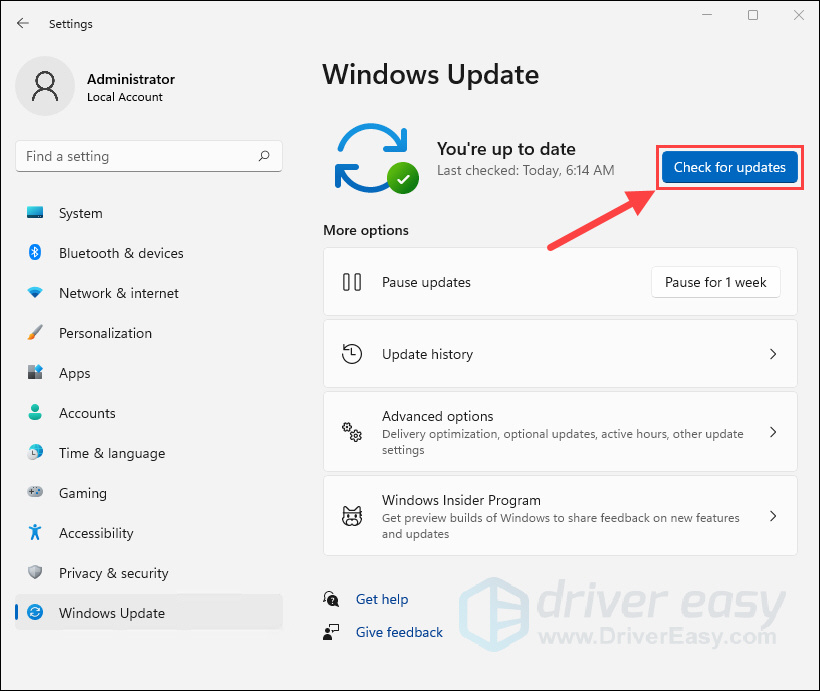
- Press the Windows + I keys to open Settings.
- Click Windows Update on the left section.

- Click Check for updates. Then Windows will start downloading the updates if they are available.

- Click Restart now when the process is finished.
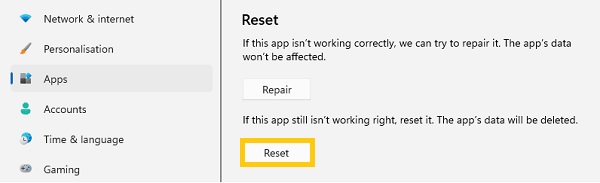
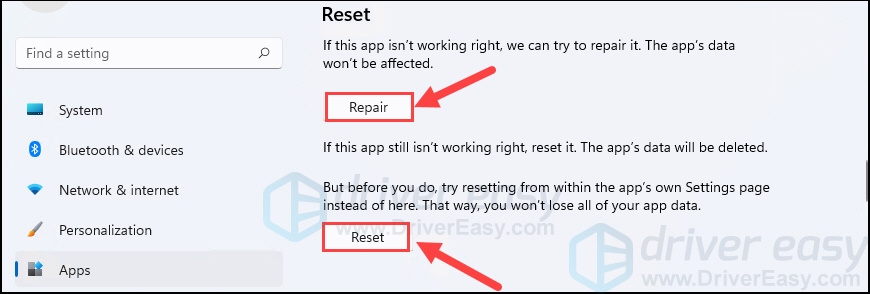
Method 5: Repair or reset the Snipping Tool
When an app is not running correctly or the app’s certain features fail to work properly, you can give it a try to repair and reset it with the built-in process Apps & features. Below is how to do it when your Snipping Tool is somehow not working.
On Windows 10
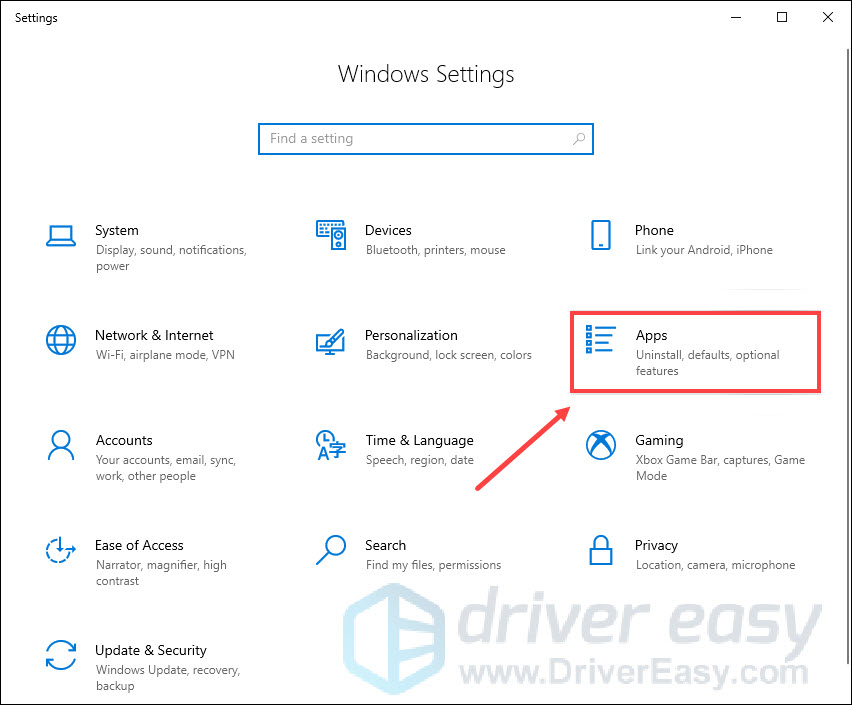
- Press Windows + I keys to open Windows Settings and then click Apps.

- Scroll down to the Snipping Tool in the right list and click to expand it.

- Click Advanced options.

- If Repair is available, click on it.
If it isn’t available or doesn’t fix the problem, select Reset.
On Windows 11
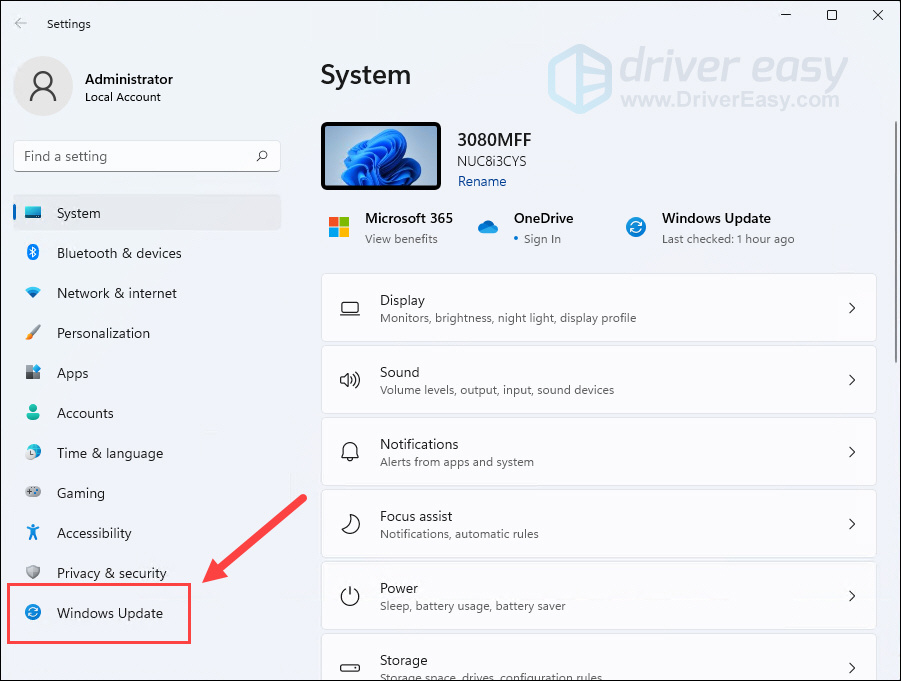
- Press the Windows key to open the Start menu, type apps & features in the search box and select it from the result.
- Scroll down to the Snipping Tool in the right list and click the 3-dots icon next to it, then select Advanced options.
- Click Repair if it’s available.
If it isn’t available or doesn’t fix the problem, then select Reset.
Move on to the next fix below if this method doesn’t work for you.
Method 6: Run the DISM tool
The Deployment Image Servicing and Management (DISM) is a command-line tool for Windows image service. One of its many uses is to repair system images when image-related problems occur. So if your Snipping Tool is not working correctly, you can run the DISM command with the RestoreHealth option to see whether problems come from the system image.
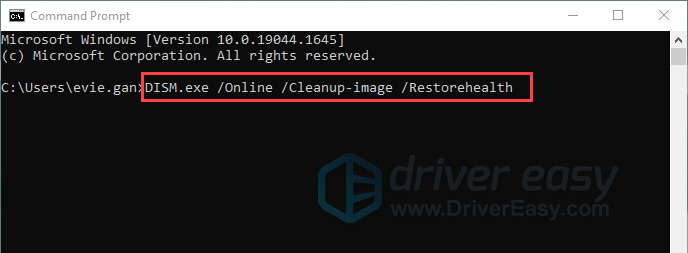
- Type cmd in the search box and select Run as administrator to open the Command Prompt.

- Copy the following command to the Command Prompt and press Enter.
DISM /Online /Cleanup-Image /RestoreHealth
- Wait for the restore operation to complete.
- Restart your PC to see if the Snipping Tool is working now.
If this fix doesn’t work, try the last method below.
Method 7: Run System File Checker
When corrupted or damaged system files exist in your system, they could also cause the Snipping Tool to go wrong. In this case, maybe you should run a system scan to detect broken system files in your PC.
To do this, follow these steps:
- Press the Windows logo key and R on your keyboard to invoke the Run box.
- On your keyboard, type cmd and press Ctrl, Shift and Enter at the same time to run Command Prompt as administrator.
- You’ll be prompted for permission. Click Yes to open Command Prompt.
- Type sfc/scannow, then press Enter.

- The System Files Checker tool will automatically scan for corrupt or missing files and fix them, if there’s any.
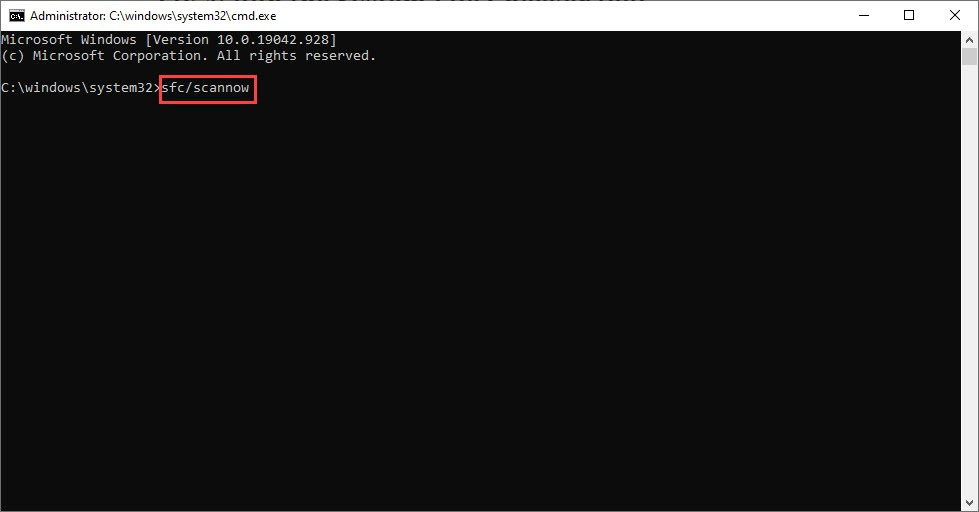

Restart your PC to see if the issue persists.
That’s it – hopefully, this guide could help you solve the Snipping Tool not working problem. If you have any ideas or other fixes for this issue, please feel free to leave comments below. We would appreciate your thoughts!
10
10 people found this helpful
The Snipping Tool holds the crown for the best screenshot tool for Windows OS, and for good reason. It’s efficient, the lightest of all existing alternatives, takes up very little disc space, and doesn’t clog your RAM.
However, the Snipping Tool isn’t perfect as it comes with its fair share of flaws and issues that cause major inconvenience. It may begin to malfunction or occasionally crash or freeze, leaving users in a state of frustration.
Here, we have compiled some ways to fix the «Snipping tool not working» error on Windows 11 and resolve it for good.
It is inevitable that once in a while, a bug might cause your programs or system files to malfunction. However, with Windows 11, it is now easier than ever to fix programs.
You can simply troubleshoot and repair an application without any additional third-party software with these few steps:
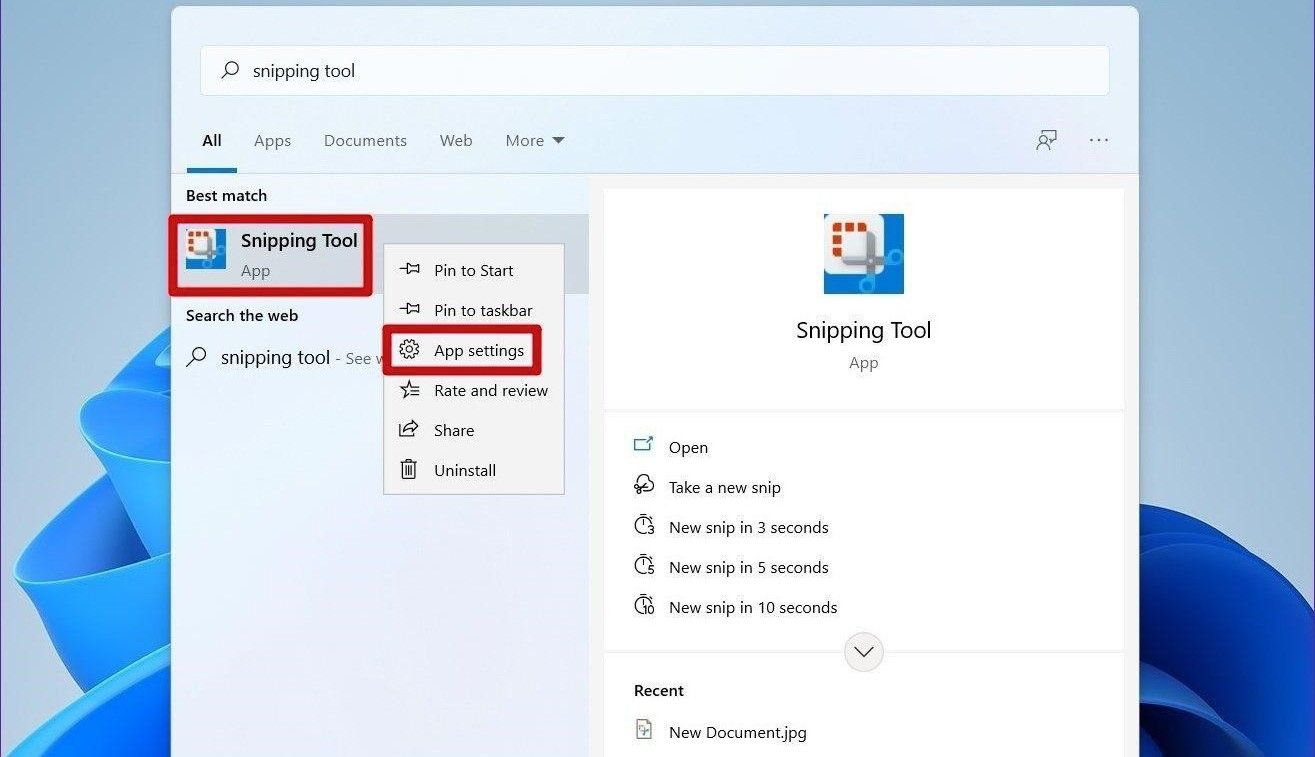
- Open Windows Search by clicking on the search icon on the taskbar.
- Type Snipping Tool.
- Right-click on the Snipping Tool app and select App settings.
- Scroll down to Reset and click on the Repair option. The system will attempt to repair the software.
- If repairing the app does not solve the issue, try resetting the app by clicking on Reset. However, keep in mind that by doing so, you’re going to lose all your app data.
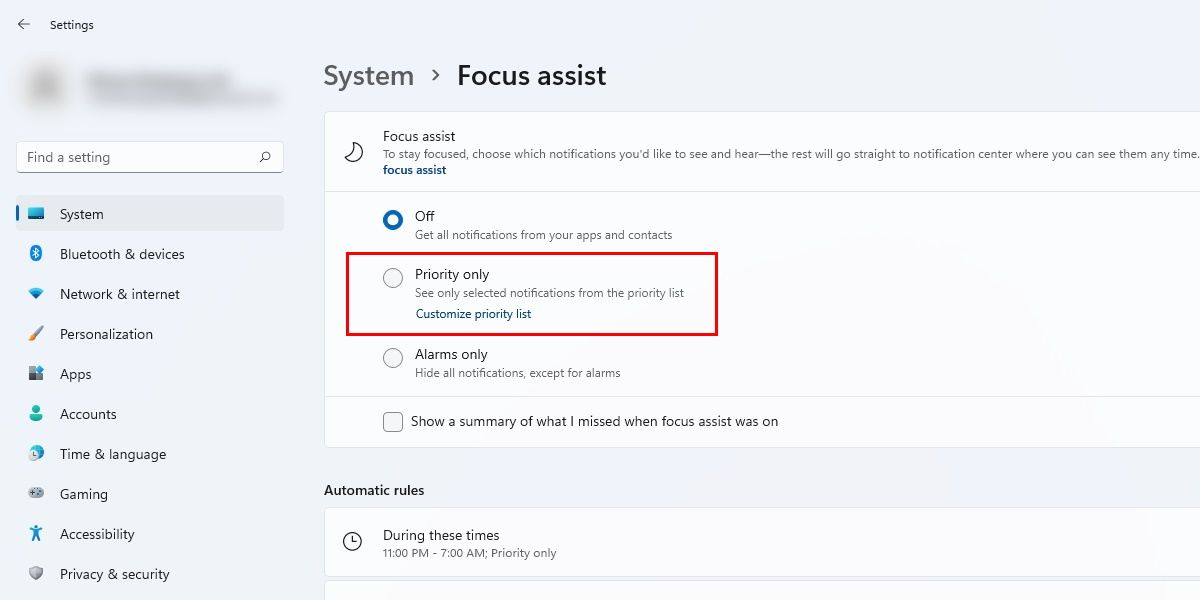
2. Turn Off Focus Assist
Focus Assist is a fantastic Windows feature that filters all unwanted notifications to help you get more done. However, this can cause problems with some helpful apps, such as the Snipping Tool, by preventing them from launching.
You can disable Focus Assist from blocking Snipping Tool by:
-
Head to Settings > Systems > Focus assist.

-
In Focus Assist, select the Priority only option and click on the Customize priority list.
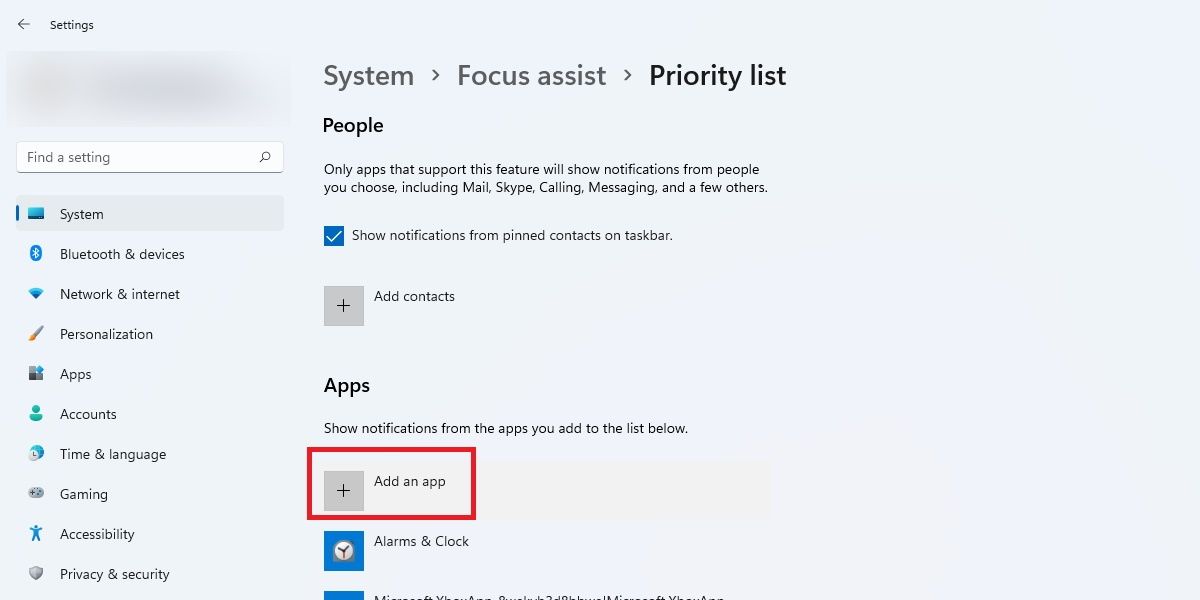
- Here, under the Apps section, click on Add an app. Find the Snipping Tool from the list of apps and close the window.
- Try opening Snipping Tool and check if it works now.
The Snipping Tool has been replaced by the new Snip & Sketch tool by Microsoft, and as a result, the former’s stopped working on many PCs. The most straightforward solution is to use some other method for taking screenshots or upgrade to the more advanced Snip & Sketch tool manually. To do this:
- Find the Microsoft Store pinned on your Windows 11 taskbar and open it.
- Search Snip & Sketch.
- Click on the Get button which will prompt app installation.
- Once the app is installed, you can start using Snip & Sketch by selecting Open.
You can also check out our in-depth guide on how to fully acquaint yourself with Snip & Sketch.
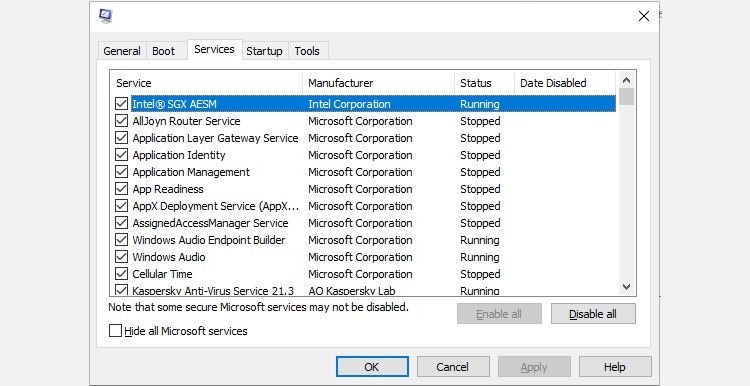
4. Perform a Clean Boot
Another reason for the Snipping Tool to not work is interference from other apps or third-party programs, especially your antivirus software. Performing a clean boot can help you with this issue and get the screenshot tool working in no time.
To perform a clean boot, you have to disable all the third-party services and programs. For this:
- Press Win + R to launch the Run dialog box.
- Type msconfig in search.
- In the System Configuration dialog box, go to the Services panel.
-
Check the Hide all Microsoft services box and then click on Disable all button.

After you have disabled all these third-party services:
- Head over to the Startup tab and click on Open Task Manager
- Right-click on all third-party programs, one by one, and Disable them.
- Click Ok on the System Configuration box.
- Restart your computer.
5. Disable Automatic Time
Some users identified the jump to Windows 11 as the leading cause of Snipping Tool troubles. They pinned down this error on the latest Windows version, however, later, more testing revealed that the app would work perfectly fine on devices if Microsoft Store was not set to auto-update programs, hinting that the issue is due to expired certificates.
To fix the issue and continue grabbing screenshots, you can try these steps:
- Open Settings app.
-
Navigate to Time & Language > Date & time.

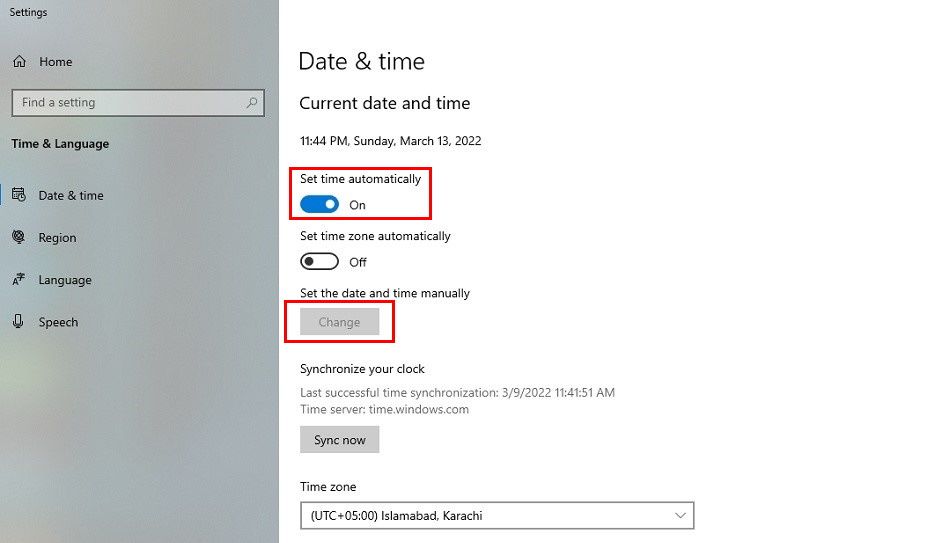
- Toggle the Set time automatically option to off.
- Now, press Change which will allow you to reset the value manually. You can select any random date before October 30, 2021, however, you don’t need to change the time.
- Hopefully, this would have straightened any issues you were facing with Snipping Tool. Turn the Set time automatically to On if your app is working smoothly once again.
If none of the above methods work, and you wish to use solely the Snipping Tool in Windows 11 without reverting to Windows 10, follow the steps below to utilize the Classic Windows 10 Snipping Tool.
- Open Settings > File Explorer.
- Head to the System drive partition (C:\).
- Next, open the Windows.old folder followed by the system32 folder.
- Here, you’ll find SnippingTool.exe. Double-click on this file to launch and use the classic Snipping Tool even in Windows 11.
7. Use Regedit
The Snipping Tool is installed and enabled by default on the Windows 11 operating system, but the Software Restriction Policy prevents some users from using it, or in some cases, restricts them from being able to view the app in the File Explorer.
If you are also facing similar issues and completely confused about what to do next, here’s how what you can do as a last resort:
- Launch the Run dialog box by pressing Win + R on your keyboard.
- Type Regedit in the search box and press enter.
- This will prompt open a User Account Control window asking you permission to continue and make changes to your device. Select Yes and the Registry Editor will be displayed.
-
Scroll down the Registry Editor until you spot HKEY_LOCAL_MACHINE & follow the path SOFTWARE > Policies > Microsoft.

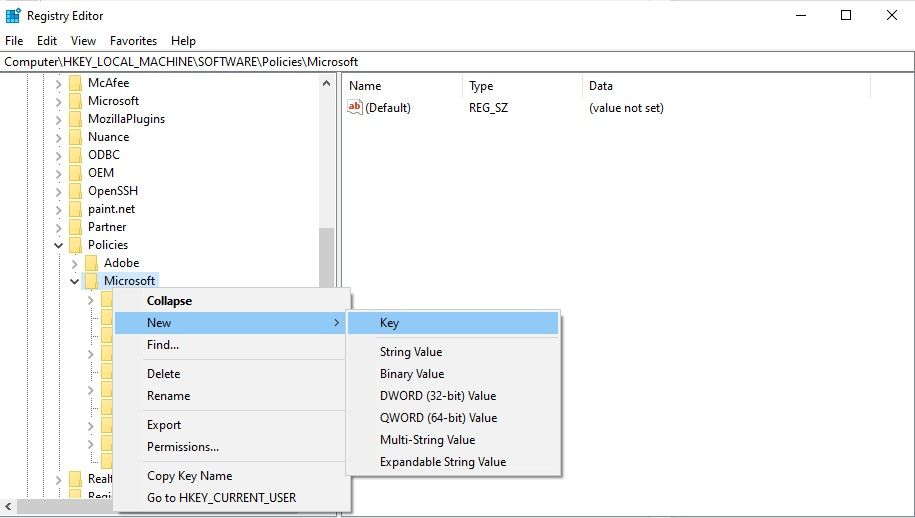
- Locate the TabletPC key. If it doesn’t exist, right-click on Microsoft, select New > Key, and name it TabletPC.
-
Right-click on this newly created key TabletPC > New > DWORD (32-bit) Value and rename it to DisableSnippingTool.
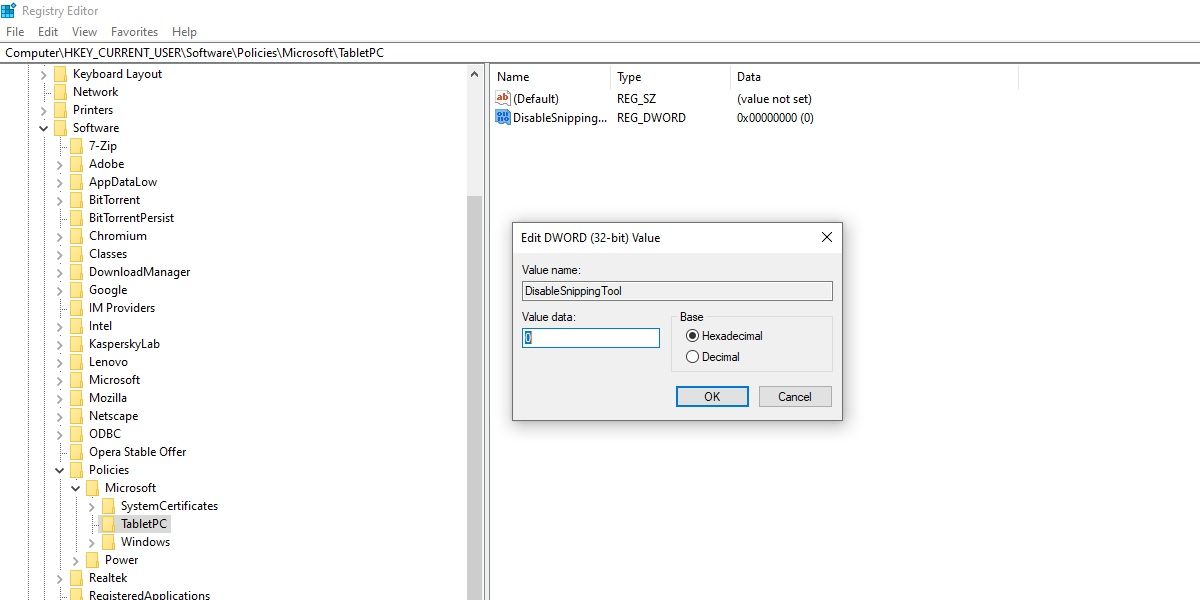
- Double-click on DisableSnippingTool and make sure the Value data is set to 0 with Hexadecimal option also selected.
- Close the Registry Editor, and try searching and opening the Snipping Tool. These steps will have reset and kick-started the app, allowing you to successfully take screenshots on your Windows 11.
Capturing Screenshots on Windows, Quicker
There’s no doubt that Windows’ Snipping tool is quite a handy app to take screenshots on your laptops & PC; however, it is not the only way. Now, you can capture your screen more flexibly (and quickly) with different Windows hotkeys that you probably didn’t even know were at your disposal. Check out these screen-capturing shortcuts and make the most of your Windows experience.