
In Windows 11/10, users sometimes come across an issue, where the Location services is reported to be greyed out. It could happen due to the Operating System or some third-party software. When this issue arises, users cannot enable or disable the Location services. Also, they cannot make any changes to the Location settings. So, how to fix Location settings greyed out in Windows 11/10?
Before you move on, it is better to perform a clean boot. After performing it, check if the issue related to the Location settings has been resolved. If not, then keep on reading.
In this post, learn how you can fix the location settings greyed out issue using different methods easily.
Page Contents
Fix 1: Using Registry Editor
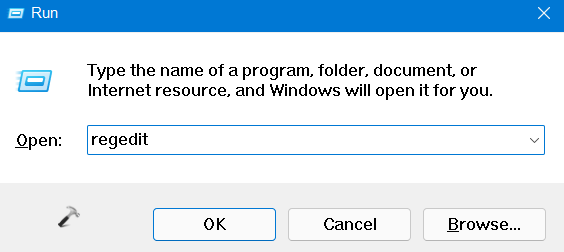
1. In the first place, you need to open the Run dialog box. For this, press the Windows + R keys simultaneously on your keyboard. Once opened, type regedit in the Run dialog box to open Registry Editor.
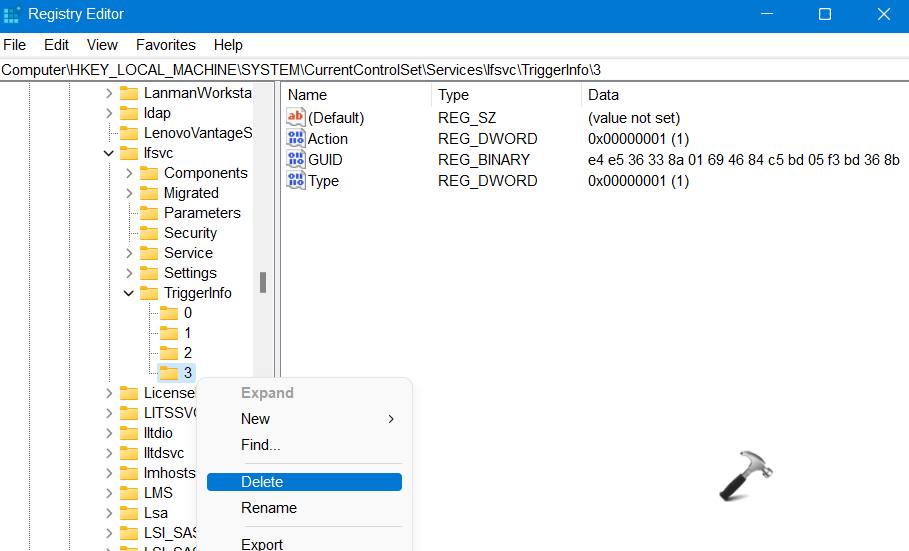
2. After that, navigate to the following location:
HKEY_LOCAL_MACHINE\SYSTEM\CurrentControlSet\Services\lfsvc\TriggerInfo
3. Once there, right-click on the folder named 3. Now, select the Delete option from the context menu.
4. Lastly, close Registry Editor. Once done, check if the issue has been fixed.
Fix 2: Using the Windows Services Manager
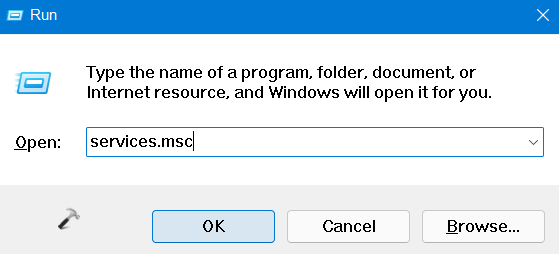
1. Firstly, open the Windows Services Manager. To do this, open the Run dialog box and type services.msc in the Run dialog box. Then, press Enter.
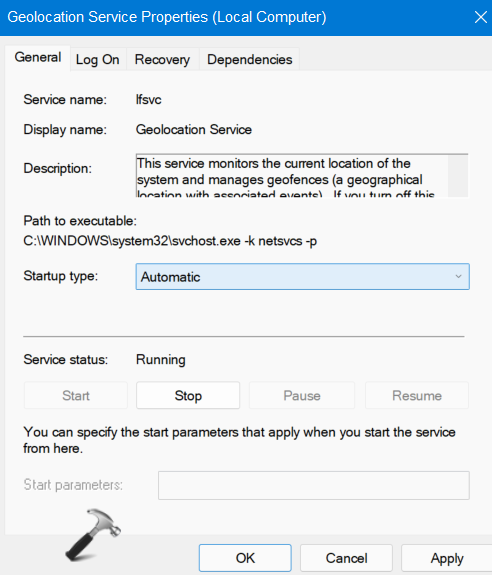
2. Now, look for Geolocation service and double-click on it. This will open its Properties window.
3. In the Properties tab, ensure that the Startup type is set to Automatic and Service status is Running. Make the changes if necessary and click on Apply and then, press OK.
So, this is how to fix location settings greyed out in Windows 11/10 issue. Both of these methods are quite effective. It is recommended to follow them carefully.
RELATED ARTICLES
Служба определения местоположения Майкрософт помогает определить точное географическое расположение устройства с Windows, позволяя приложениям предоставлять вам маршруты, показывать близлежащие магазины и рестораны и многое другое. Службы определения местоположения также поддерживают функции Windows, такие как автоматический часовой пояс и поиск устройства.
Службы определения местоположения позволяют контролировать, каким приложениям разрешен доступ к вашему точному расположению. Если службы определения местоположения включены, она будет использовать сочетание службы глобального позиционирования (GPS), близлежащих беспроводных точек доступа и маршрутизаторов, вышек сотовой связи, IP-адреса или расположения по умолчанию для определения местоположения устройства.
Принцип работы параметров определения местоположения
Если службы определения местоположения отключены, Windows и приложения не будут иметь доступа к расположению устройства, а некоторые приложения могут не получить доступ к сведениям о Wi-Fi сетях. После включения служб определения местоположения каждый пользователь на устройстве может разрешить приложениям и службам использовать расположение своего устройства. Если пользователи отключают разрешить приложениям доступ к вашему расположению, никакие приложения не получают сведения о расположении. Если параметр включен, приложения будут иметь доступ к грубым данным о расположении, и вы можете решить, какие приложения имеют доступ к точному расположению. Грубое расположение предоставляет приблизительную информацию о расположении устройства, которое было замаскировано, в то время как точное расположение обеспечивает наиболее точное расположение, которое может быть определено системой.
Если служба определения местоположения включена, ваше устройство отправляет сведения о местоположении вместе с ближайшими беспроводными точками доступа, маршрутизаторами, башнями сотовой связи и IP-адресом в корпорацию Майкрософт после удаления любых данных, определяющих человека или устройство, с которого они были собраны. Эти сведения о неидентифицированном расположении используются для улучшения служб определения местоположения Майкрософт и могут быть переданы нашим партнерам по службе определения местоположения, в настоящее время HERE и Skyhook, для улучшения служб определения местоположения поставщика.
Существуют некоторые исключения механизма определения местоположения вашего устройства, которые не управляются напрямую параметрами определения местоположения.
Классические приложения — это приложения определенного типа, которые не поддерживают управление доступом к точному расположению для каждого приложения. Классические приложения обычно скачиваются из Интернета или устанавливаются с носителя (например, компакт-диска, DVD-диска или USB-накопителя), в отличие от приложений из Microsoft Store.
Даже если вы отключили службы определения местоположения в Windows, некоторые сторонние приложения и службы могут использовать другие технологии (например, Bluetooth, IP-адрес, сотовый модем и т. д.) для определения местоположения устройства с различной степенью точности. Корпорации Майкрософт требуются сторонние разработчики программного обеспечения, которые разрабатывают приложения для microsoft Store или разрабатывают приложения с помощью средств Майкрософт для соблюдения параметров расположения Windows, если вы не предоставили юридически необходимое согласие на использование вашего расположения. Тем не менее, чтобы еще больше снизить риск того, что приложение или служба может определить ваше расположение, следует устанавливать только из доверенных источников. Ознакомьтесь с политиками конфиденциальности установленных вами приложений и служб, чтобы получить дополнительные сведения о том, как они используют местоположение вашего устройства.
Если приложение или компонент обращается к расположению устройства и вы вошли с помощью учетной записи Майкрософт, сведения о вашем последнем известном расположении также сохраняются в облаке. Эта информация доступна на ваших устройствах другим приложениям или службам, которые используют вашу учетную запись Майкрософт и которым вы предоставили разрешение. Эти данные о местоположении можно просмотреть или удалить на панели мониторинга конфиденциальности учетной записи Майкрософт.
Чтобы упростить получение помощи в чрезвычайных ситуациях, каждый раз, когда вы делаете экстренный вызов, Windows будет пытаться определить и предоставить общий доступ к вашему точному расположению независимо от параметров вашего расположения. Кроме того, ваш оператор мобильной связи будет иметь доступ к расположению вашего устройства, если устройство использует сотовую связь. Ограниченный набор функций в Windows будет использовать ваш IP-адрес для предоставления контекстной информации о вашем регионе, если службы определения местоположения не включены, например погода на панели задач. Вы можете отключить эти функции.
Вы можете в любое время отключить службы определения местоположения, а также контролировать и просматривать, какие приложения имеют доступ к вашему расположению, на странице Расположение в приложении «Параметры». Приложения, запрашивающие доступ к определенным API-интерфейсам Wi-Fi, которые можно использовать для определения вашего расположения, также будут отображаться на этой странице. Дополнительные сведения о расположении
Управление параметрами расположения
«Служба определения местоположения»
Чтобы включить службы определения местоположения, выполните приведенные далее действия.
-
Перейдите в раздел Пуск >Параметры >Конфиденциальность & безопасность>расположение.
-
Выполните одно из следующих действий:
-
Если вы являетесь администратором устройства, вы можете использовать параметр Службы определения местоположения, чтобы определить, можно ли использовать службу определения местоположения на этом устройстве. Если вы не являетесь администратором на этом устройстве, вы не увидите этот параметр.
-
Чтобы управлять расположением только для учетной записи пользователя, установите переключатель Разрешить приложениям доступ к вашему расположениювключено или выкл. Если на странице параметров отображается сообщение «Службы определения местоположения отключены», вы не сможете включить параметр Разрешить приложениям доступ к вашему расположению для отдельной учетной записи пользователя.
-
-
Вы можете выбрать, какие приложения имеют доступ к точному расположению, и просмотреть, когда приложения последний раз обращались к вашему расположению.
«Журнал сведений о местоположении»
В марте 2025 г. было удалено локальное хранилище журнала расположения и связанных параметров. Если вы вошли в систему с помощью учетной записи Майкрософт и включили службы определения местоположения, ваше расположение может периодически сохраняться в облаке.
Чтобы очистить журнал расположения, хранящийся в облаке и связанный с вашей учетной записью Майкрософт, перейдите по адресу account.microsoft.com и убедитесь, что вы вошли в свою учетную запись. Выберите Очистить действия расположения, а затем —Очистить.
Стандартное расположение
Вы можете задать расположение по умолчанию для устройства, которое Windows, приложения и службы могут использовать, если более точное расположение не удается обнаружить с помощью GPS или других методов. Это настоятельно рекомендуется для устройств без Wi-Fi и для настольных компьютеров.
Чтобы изменить расположение устройства по умолчанию, выполните следующие действия:
-
Перейдите в раздел Пуск > Параметры > Конфиденциальность & безопасность > расположение.
-
В разделе Расположение по умолчанию выберите Задать по умолчанию.
-
Выберите точку на карте, где находится устройство, или введите адрес вручную. Нажмите кнопку Сохранить.
-
Чтобы удалить расположение по умолчанию, очистите поле адреса от любого текста и нажмите кнопку Сохранить. Приложения и службы больше не смогут использовать расположение по умолчанию.
Разрешить переопределение расположения
На облачном компьютере или виртуальном рабочем столе можно разрешить приложениям использовать расположение удаленного устройства. Например, при использовании удаленного рабочего стола можно найти погоду вокруг клиентского устройства, а не рядом с сервером, на котором размещена виртуальная машина, к которому вы подключились.
Чтобы параметр Разрешить переопределение расположения работал, необходимо включить параметр Службы определения местоположения как для локальных, так и для удаленных устройств. Кроме того, приложению, используемому для управления удаленным подключением, должен быть разрешен доступ к расположению.
Чтобы разрешить приложениям на этом устройстве использовать расположение другого устройства, выполните следующие действия:
На устройстве, выполняющего подключение:
-
Перейдите в раздел Пуск > Параметры > Конфиденциальность & безопасность > расположение.
-
Убедитесь, что параметр Службы расположения включен.
-
Убедитесь, что приложению, используемому для удаленных подключений, предоставлен доступ к вашему расположению.
На устройстве, к которому подключено:
-
Перейдите в раздел Пуск > Параметры > Конфиденциальность & безопасность > расположение.
-
Убедитесь, что параметр Службы расположения включен.
-
Включите параметр Разрешить переопределение расположения.
Уведомление о том, что приложения запрашивают расположение
Приложения могут запрашивать доступ к вашему расположению, даже если службы определения местоположения отключены. В этом случае запрос отображается при первом запросе приложения расположения на устройстве. Вы можете отключить эти запросы, чтобы не получать уведомления. Однако некоторые приложения, например те, которые обращаются к Wi-Fi API, могут работать неправильно, и вы больше не будете получать уведомления, объясняющие, почему они заблокированы. Этот параметр не влияет на запросы разрешений приложений при включении служб определения местоположения.
Чтобы остановить получение запроса о расположении, выдается запрос при отключении расположения:
-
Перейдите в раздел Пуск > Параметры > Конфиденциальность & безопасность > расположение.
-
В разделе Уведомлять о том, что приложения запрашивают расположение, включите параметр ВЫКЛ.
Расположение веб-сайтов в Microsoft Edge
Если для Microsoft Edge включено определение местоположения, вы все равно можете выбирать, какие веб-сайты могут получить доступ к сведениям о местоположении устройства. Microsoft Edge запросит разрешение при первом посещении веб-сайта, который запрашивает сведения о местоположении. Вы можете отменить разрешение для веб-сайта в параметрах Microsoft Edge. Дополнительные сведения о расположении и конфиденциальности в Microsoft Edge
Как мы выполняем построение базы данных служб определения расположения
Если служба определения местоположения включена, корпорация Майкрософт запишет расположение мобильных вышек сотовой связи и Wi-Fi точек доступа, чтобы помочь нам предоставить службы определения местоположения. Наша база данных может содержать MAC-адреса беспроводного маршрутизатора или других соседних сетевых устройств. Мы не связываем MAC-адреса с вами лично или с устройствами, подключенными к вашей сети.
Чтобы запретить майкрософт использовать MAC-адреса ваших Wi-Fi точек доступа в базе данных служб определения местоположения, перейдите в раздел Отказ от служб определения местоположения.
Как мы вас информируем — значок местоположения
Если одно или несколько приложений в настоящее время используют расположение устройства через службу определения местоположения Windows, вы увидите значок расположения в области уведомлений на панели задач. Наведите указатель мыши на значок, чтобы увидеть имя приложения или приложений, использующих расположение.
Вы также можете узнать, какие приложения в настоящее время используют точное расположение или недавно получили доступ к вашему точному расположению на устройстве с Windows, выбрав Пуск > параметры > конфиденциальность & безопасность > расположение , а в разделе Разрешить приложениям доступ к вашему расположению вы увидите дату и время последнего использования расположения.
Location services is a built-in tool in Windows 10 is a useful tool that offers users location information even when your laptop or desktop computer does not have a GPS since it uses Wi-Fi positioning as well as your device’s IP address. However, there are instances when you might encounter some problems when using this service. One instance is when you suddenly find the toggle button for Location service greyed out.
This kind of program could be due to some glitch in the system or some third-party application on your computer. Because of this problem, you won’t be able to toggle the Location service on or off and you won’t be able to make any changes in its settings. Worry not, for this post will guide you on what you can do to fix the greyed-out toggle button of Location services in Windows 10.
Before you perform some troubleshooting steps, you might want to restart your computer and see if it fixes the problem. If it didn’t, then this problem is not just some minor glitch. Thus, you have to follow the potential fixes provided below to fix the problem but before you do that, make sure that you create a System Restore point first. After that, follow each one of the following options.
Option 1 – Put your PC in a Clean Boot State
The first thing you can do to resolve the problem is to put your computer in a Clean Boot State. It could be that there is a third-party program that’s preventing the toggle button from functioning. To isolate this possibility, you need to put your computer in a Clean Boot State.
- Log onto your PC as an administrator.
- Type in MSConfig in the Start Search to open the System Configuration utility.
- From there, go to the General tab and click “Selective startup”.
- Clear the “Load Startup items” check box and make sure that the “Load System Services” and “Use Original boot configuration” options are checked.
- Next, click the Services tab and select the “Hide All Microsoft Services” check box.
- Click Disable all.
- Click on Apply/OK and restart your PC. (This will put your PC into a Clean Boot State. And configure Windows to use the usual startup, just simply undo the changes.)
- Now check if you can now use the toggle button of the Location service or not.
Option 2 – Try to use the Registry Editor
If putting your computer in a Clean Boot state didn’t fix the problem, you might want to make some adjustments in the Windows Registry via Registry Editor.
- Tap the Win + R keys to open the Run utility and type “regedit” in the field and then tap Enter to open the Registry Editor.
- After that, navigate to this registry path: HKEY_LOCAL_MACHINESYSTEMCurrentControlSetServiceslfsvcTriggerInfo
- From there, select the Key (folder) named as “3” and right-click on it, and then delete it.
- Once done, exit the Registry Editor and restart your computer.
Option 3 – Try to use the Windows Services Manager
- Tap the Win + R keys to open the Run dialog box and type “services.msc” in the field and hit Enter to open the Services Manager.
- Next, look for the “Geolocation Service” entry from the list of services.
- Once you find it, right-click on it and select Properties. This will open a new mini window.
- From there, make sure that it is “Running” and its Startup Type is set to “Automatic”.
- After that, close the Services Manager and check if the problem is now resolved.
Option 4 – Try to use the Group Policy Editor
- Tap the Win + R keys to launch Run and type “gpedit.msc” in the field and click OK to open the Group Policy Editor.
- After that, navigate to this path: Administrative TemplatesWindows ComponentsLocation and Sensors
- Next, double click on each one of the following settings and select the “Not configured” or “Disabled” option.
- Turn off location scripting
- Turn off location
- Turn off sensors
- Once done, navigate to this path: Administrative TemplatesWindows ComponentsLocation and SensorsWindows Location Provider
- From there, double click on the “Turn off Windows Location Provider” policy setting and set its configuration to either “Disabled” or “Not configured”. You should see the following description of the policy setting in the window:
“This policy setting turns off the Windows Location Provider feature for this computer. If you enable this policy setting, the Windows Location Provider feature will be turned off, and all programs on this computer will not be able to use the Windows Location Provider feature. If you disable or do not configure this policy setting, all programs on this computer can use the Windows Location Provider feature.”
- Now restart your computer.
Do You Need Help with Your Device?
Our Team of Experts May Help
Troubleshoot.Tech Experts are There for You!
GET HELP
Troubleshoot.Tech experts work with all versions of Microsoft Windows including Windows 11, with Android, Mac, and more.
Share this article:
You might also like
What Is STOP 0x00000014 Error?
0x00000014 error is actually an error that is always displayed on a STOP message.
It is also known as Blue Screen of Death, abbreviated as BSOD. When this error occurs, the message that is displayed to the user either says ‘STOP: 0x00000014’ or states ‘CREATE_DELETE_LOCK_NOT_LOCKED’. It is crucial to fix this error to ensure your program is functioning appropriately. If this error message is not rectified, you might be opened to other error messages, such as error code 0x000000d1.
Solution
Error Causes
As far as the causes of STOP 0x00000014 error are concerned, this error usually occurs when a device driver or hardware problem occurs. This error may also occur if users attempt to run some specific application or update or modify an existing application. When a 0x00000014 error occurs, the operating system restarts to disable the PC from performing any further.
Without taking into consideration the causes of its occurrence, it is crucial to make sure that the 0x00000014 error is fixed as soon as possible to eliminate any undesired inconvenience in the future.
Further Information and Manual Repair
A lot of times when an operating system tries to recover from the STOP 0x00000014 error, the user is prompted that Windows has recovered from an unexpected shutdown.
However, if Windows fails to recover on its own, manual repair has to be performed.
While there are several ways this error can be fixed, some of the most effective and efficient ways of troubleshooting the 0x00000014 error are listed below as follows.
- Restart your computer. Often simply restarting the computer can help eliminate the problem.
- If restarting the system doesn’t help, find if you have recently modified or altered any hardware or driver. It is possible that the 0x00000014 error has been caused by the recent modification. Undo the changes and find out if the error occurs again. If it doesn’t, it is highly likely the issue has been resolved.
However, if the error persists, some solutions that may work are outlined below.
- Start your system using the Last Known Good Configuration. This will undo any changes in the driver and recent registry.
- Another solution is to manually perform System Restore. This will also return the system back to its former state.
- Another idea that my work is to use roll back the device driver. When the driver will return to its previous version, the problem will easily be resolved.
To keep the 0x00000014 error from occurring in the future, it is advised to unplug any newly installed hardware or reinstall any deleted software.
If you’re not tech-savvy and wish to get this error code rectified in a jiffy, download a powerful automated tool and perform a computer scan.
Read More

Valve has announced the first gaming PC handheld console: Steam Deck. At its core, Stead Deck is just a portable, small PC in little casing. It uses AMD Zen 2 CPU and RDNA 2 GPU architecture, has 16GB of RAM, Wi-Fi, and Bluetooth.
It is a portable device with both a touchpad and joystick packing a seven-inch screen with a resolution of 1280×800 (16:10 aspect ratio). The screen has an ambient light sensor for automatic light adjustments same as your modern mobile device.
Stating to Valve battery will hold up from two to eight hours depending on the activity of the user and what exactly he is doing. The handheld comes also with a carrying case.
Steam Deck operating system and software
Out of the box, Steam Dock comes with the latest Valve’s version of SteamOS 3. Just for comparing, the steam box was coming SteamOS 2, so this new Linux-based OS is aimed to provide better performance and better compatibility.
Naturally, all Linux games in your Steam library will work right out of the box but Valve has something called PROTON inside OS, it is emulation software based on Wine that will supposedly let you play all of your Library games on a given OS.
One big thing to mention here is that this is PC after all meaning that if you do not like having SteamOS on it you can install Windows instead and so far as we know it will support Windows 11. Now with Windows 11, you will be able to play all of your Steam games and run any kind of Windows software on it including EPIC store, battle.net, and others.
Cost and release date
The initial release date is set for December 2021 and today on July 16th Valve is opening you can reserve your copy if you want to pre-purchase. Follow this link if you want to reserve your copy. Reserve your Steam Deck device
The price of the device will depend on the memory capacity which you would like to have. Please note that each of the 3 offered devices will have the same hardware, the only difference will be in memory available, and the most expensive version will also have anti-glare screen, everything else is identical.
64GB model will be $399, 256GB model will have the price of $529 and largest one with whooping 512GB will be $649
Conclusion
Valve ventures into the digital hardware domain again but it is unsure will they make it this time. Both Steam machine and their controller were in long run failed and later unsupported products so perhaps some customer caution is advised.
Although having a handheld PC is tempting I would advise seeing how the overall market will accept this contraption before throwing money into it.
Read More
Having the latest applications is often preferred for most users but sometimes we have some old applications which have not been updated or simply we just want to run oldie on our computer because it does everything we need and we do not want to upgrade in order to save some money.
The issue is presented sometimes when we try to run an old application in Windows 10 and some components are missing in Windows itself or the application is simply coded in a way to work on older Windows versions. If by any chance you have this issue then this guide is for you since we are going to show you how to run old applications in Windows 10.
This guide is made in a way to takes into account that the application itself is completely installed on your Windows 10 machine if you can not even install the application you will need to search solution for that particular application since that can not really be generalized and pinpointed issue, every application is different.
Running old applications using the compatibility option
All of that being said, let’s start that old app you have. First thing is to locate an executable file or shortcut of the desired application. Once it is located, right-click on it to bring up the menu, and all the way to the bottom you will find properties. Left-click on properties.
The application settings screen will open, in upper tabs locate Compatibility and left-click on it.
After the click, you will find yourself in application compatibility settings.
In this window, you will face different options to run the chosen application in various modes in order to make it run. How settings are self-explanatory and different applications will need different settings sadly we can not cover them all but your safest bet is to run them in an environment where they have worked.
For example, if the application was working fine in Windows XP and required administrator privileges, check Run this program as an administrator and Run this program in compatibility mode for Windows XP.
Read More
Error 2 — What is it?
Error 2 is a typical Battle.net error code. Battle.net is a desktop app that allows you to access all Blizzard games.
It enables Blizzard gamers around the world to play multiplayer matches together, online. Error 2 occurs when you are unable to connect to the login server. This error code is displayed in the following format:
Battle.net Error #2: Unable to connect. Please try again later. If the problem persists, please contact technical support.
Solution
Error Causes
Error 2 may be triggered due to several reasons. These include:
- Program conflict
- Security software conflict
- Bad DNS cache entry
- Issues with network devices
- Viruses and malware
- Registry corruption
Error 2 is not a fatal error like the blue screen of death error codes. However, this error may hamper your ability to play Blizzard multi-player games. To overcome this problem it is advisable to fix error 2 immediately.
Further Information and Manual Repair
To resolve this error you don’t need to spend hundreds of dollars to hire a professional and get it fixed. Here are some of the easy do-it-yourself methods to resolve this error on your PC. These methods require no technical expertise or knowledge. Let’s get started:
Method 1
Error 2 may sometimes pop up on the screen due to program conflict. This happens when you have Blizzard games and other programs running on your PC at the same time.
In such a situation, it is advisable to close background applications to resolve conflicts between Blizzard games and other programs running in the background.
Method 2
Sometimes antivirus programs and firewalls can also hinder and interfere with the game’s connection to our servers. In this event, the best way to fix the error is to temporarily uninstall your security software.
Method 3
If error 2 is triggered by the issues with network devices then simply power cycle network devices to re-stabilize the connection.
Power cycling router and modem allow you to reset and reestablish a connection to your ISP. To do this, shut down the computer then power down/unplug the router and the modem.
Allow the modem to sit for 60 seconds, unplugged. Then turn it on and allow it to boot up till the front panel connection lights show a steady connection.
Now turn on the router and do the same as you did with the modem. After that start the computer and allow it to completely boot up. Now try logging on to the Blizzard gaming server.
This will hopefully resolve the issue.
Method 4
Viruses and malware infections can also trigger error 2. In such a situation install an antivirus and remove all malicious programs infecting your PC.
Method 5
If the cause of the error is related to registry corruption, then it is advisable to download Restoro. This is a user-friendly PC Fixer with a registry cleaner. The registry cleaner removes all unnecessary and obsolete files corrupting the registry, cleans and repairs the corrupted registry in a few minutes.
Click here to download Restoro on your PC to resolve error 2. For further information you may be interested in these similar issues:
Read More
NoteHomepage (by MyWay) is a browser extension that may be bundled with other free software that you download off of the Internet, or delivered via other advertising means. When installed NoteHomepage will set the homepage and search engine for your web browser to http://search.myway.com.
While installing this extension will gather information from your browsing sessions, including website visits, clicked links, and sometimes even private information, that it later sends back to display unwanted ads into your browser.
Several anti-virus scanners have marked this extension as a Browser Hijacker and are therefore not recommended to keep on your computer. It is considered potentially unwanted, and many users wish to remove it, so it is flagged for optional deletion.
About Browser Hijackers
Browser hijacking is a form of unwanted software program, usually a web browser add-on or extension, which then causes modifications in the web browser’s settings. Browser hijacker malware is developed for many different reasons. Generally, browser hijacking is utilized for earning advertising revenue from forced advert mouse clicks and site visits. Even though it might seem harmless, these tools are designed by malicious individuals who always look to take full advantage of you, so that they can earn money from your naivety and distraction. Some browser hijackers are programmed to make certain modifications beyond the browsers, like altering entries on the system registry and letting other malware further damage your machine.
Find out how to identify a browser hijack
Below are some signs and symptoms that suggest your browser has been hijacked: the home page of your browser is changed unexpectedly; your browser is constantly being redirected to adult websites; the default search engine is changed; you are getting browser toolbars you have never noticed before; never-ending pop-up advertisements show up and/or your web browser popup blocker is disabled; your web browser gets sluggish, buggy, crashes regularly; Inability to navigate to certain websites, particularly anti-malware and also other security software websites.
So how exactly does a browser hijacker infect a computer?
Browser hijackers might use drive-by downloads or file-sharing networks or an e-mail attachment in order to reach a targeted PC. They could also come from add-on programs, also called browser helper objects (BHO), web browser plug-ins, or toolbars. Browser hijackers sneak into your computer in addition to free software application downloads also that you unknowingly install alongside the original. A good example of some infamous browser hijackers includes Babylon, Anyprotect, Conduit, SweetPage, DefaultTab, Delta Search, and RocketTab, however, the names are regularly changing.
Browser hijackers will affect the user’s web surfing experience severely, track the websites frequented by users and steal personal information, cause difficulty in connecting to the web, and eventually create stability problems, causing software programs and systems to crash.
Learn how to remove browser hijackers
Some hijackers can be removed by just uninstalling the corresponding freeware or add-ons through the Add or Remove Programs in the Windows control panel. But, many browser hijackers are difficult to get rid of manually. No matter how much you try to get rid of it, it might keep returning again and again. Additionally, manual removals demand in-depth system knowledge and thus can be a very difficult job for novices.
Industry experts always suggest users remove any malicious software including browser hijacker with an automatic malware removal tool, which is easier, safer, and quicker than the manual removal method. Employ a PC optimizer along with your anti-malware software to solve various registry issues, remove computer vulnerabilities, and boost your computer performance.
Download the software in Safe Mode with Networking
If the malware is set to run immediately when Windows starts, stepping into safe mode may block the attempt. Just minimal required applications and services are loaded whenever you start your laptop or computer in Safe Mode. To launch your Windows XP, Vista, or 7 PCs in Safe Mode with Networking, follow the instructions below.
1) At power on, hit the F8 key before the Windows splash screen begins to load. This would invoke the “Advanced Boot Options” menu.
2) Select Safe Mode with Networking with arrow keys and press ENTER.
3) As soon as this mode loads, you should have an internet connection. Now, get the malware removal software you want by utilizing the web browser. To install the program, follow the directions in the installation wizard.
4) Immediately after installation, run a full scan and let the software remove the threats it discovers.
Switch over to an alternate browser
Some viruses may target vulnerabilities of a particular web browser that obstruct the downloading process. If you’re not able to download the anti-virus software program using Internet Explorer, this means malware is targeting IE’s vulnerabilities. Here, you need to switch to a different internet browser such as Firefox or Chrome to download the antivirus program.
Run anti-virus from a pen drive
To successfully get rid of the malware, you have to approach the problem of installing anti-malware software on the affected computer system from a different perspective. Adopt these measures to run the anti-virus on the affected computer system.
1) Download the anti-malware software on a virus-free computer.
2) Plug the USB drive into the clean computer.
3) Double click on the downloaded file to open the installation wizard.
4) Select flash drive as the location when the wizard asks you exactly where you wish to install the application. Follow the on-screen instructions to finish the installation process.
5) Remove the flash drive. Now you can utilize this portable anti-malware on the affected computer.
6) Double-click the anti-malware software EXE file on the USB drive.
7) Press the “Scan” button to run a full computer scan and remove viruses automatically.
Technical Details and Manual Removal (Advanced Users)
To eliminate NoteHomepage manually, navigate to the Add or Remove programs list in the Windows Control Panel and select the program you want to get rid of. For web browser plug-ins, go to your web browser’s Addon/Extension manager and choose the add-on you want to disable or remove. You might also want to reset your home page and search providers, as well as clear your web browser cache and cookies.
Finally, check your hard disk for all of the following and clean your Windows registry manually to remove leftover application entries after uninstalls. Please be aware that this is for professional users only and could be challenging, with incorrect file removal resulting in additional PC errors. In addition to that, certain malware is capable of replicating or preventing deletion. You’re advised to do this procedure in Windows Safe Mode.
Files:
C:\Users\%USERNAME%\AppData\Local\Google\Chrome\User Data\Default\Extensions\lamecoaceiheggdhlnjnmciaonfdamlg.600.11.14900_0
C:\Users\%USERNAME%\AppData\Local\Google\Chrome\User Data\Default\Local Extension Settings\lamecoaceiheggdhlnjnmciaonfdamlg
C:\Users\%USERNAME%\AppData\Local\Google\Chrome\User Data\Default\Sync Extension Settings\lamecoaceiheggdhlnjnmciaonfdamlg
C:\Users\%USERNAME%\AppData\Local\NoteHomepageTooltab
C:\Users\%USERNAME%\AppData\Roaming\Mozilla\Firefox\Profiles\profile\extensions\[email protected]
C:\Users\%USERNAME%\AppData\Roaming\Mozilla\Firefox\Profiles\profile\extensions\[email protected]\chrome
C:\Users\%USERNAME%\AppData\Roaming\Mozilla\Firefox\Profiles\profile\extensions\[email protected]\META-INF
C:\Users\%USERNAME%\AppData\Roaming\Mozilla\Firefox\Profiles\profile\notehomepage_j
Registry:
HKLM\SOFTWARE\Classes\AppID\NoteHomepage Toolbar.exe
HKEY_LOCAL_MACHINE\SOFTWARE\Microsoft\Internet Explorer\Extensions
HKEY_LOCAL_MACHINE\Software\Microsoft\Windows\CurrentVersion\Explorer\Browser Helper Objects
HKEY_LOCAL_MACHINE\Software\Microsoft\Internet Explorer\Toolbar
HKEY_LOCAL_MACHINE\SOFTWARE\Google\Chrome\Extensions
HKEY_LOCAL_MACHINE\SOFTWARE\Mozilla\Firefox\Extensions
HKEY_CURRENT_USER\Software\Opera Software\Explorer\Main\Start Page Redirect=http://random.com
HKEY_LOCAL_MACHINE\SOFTWARE\Microsoft\Windows NT\CurrentVersion\NoteHomepage
HKEY_CURRENT_USER\Software\Microsoft\Windows NT\CurrentVersion\Winlogon Shell = %AppData%\IDP.ARES.Generic.exe
HKEY_CURRENT_USER\Software\Microsoft\Windows\CurrentVersion\Run Random
HKEY_LOCAL_MACHINE\Software\Microsoft\Windows NT\CurrentVersion\Random.
HKEY_CURRENT_USER\Software\Microsoft\Internet Explorer\Main
HKEY_CURRENT_USER\Software\Microsoft\Windows\CurrentVersion\Uninstall\NoteHomepageTooltab Uninstall Internet Explorer
HKEY_CURRENT_USER\Software\NoteHomepage
Read More
If you have a BlueTooth device on your computer, you know that each time you need to receive or transfer the file you need to find the icon in the system tray, right-click on it and choose the desired option. But there is a simpler solution, create a Bluetooth icon on the desktop so it is always easy to access.
Open File Explorer by pressing ⊞ WINDOWS + E
Go to C:\Windows\System32
Find fsquirt.exe
Right-click on it and choose copy
Go to the desktop and right-click, choose paste
Rename the file to Bluetooth
And, you are done!
Read More
Sadooma is a Browser Extension for Google Chrome. This extension offers users the ability to search for any trending news on the web.
This extension changes your default search engine to Yahoo, and while active it changes the displayed ads on your browser, allowing it to make revenue on every ad you click. While this is not inherently malicious, the extension redirects your search to its servers first before forwarding it to yahoo and displaying search results. The information that is sent back to the servers contains your browsing data & visited web pages. As this represents a security and privacy risk, Sadooma is classified as a browser hijacker for its potentially unwanted functions and poor user experience.
From the Author:
We’ve got what you need!
If you are like us, addicted to interesting viral content, you’ve reached the best place for this.
Sadooma will help you to find what is trending right now on the internet in an easy and immediate way.
Privacy – We don’t share your information with others.
Trending Content – New viral content every day
Up to Date – We update sources to keep things fresh.
Made with Love – Our content is safe and suitable for all ages.
About Browser Hijackers
Browser hijacking is a type of unwanted software, commonly a browser add-on or extension, which then causes modifications in the web browser’s settings. Browser hijackers can do more than simply modifying home pages. It redirects you to the sponsored sites and inserts advertisements on the internet browser that helps its creator generate earnings. A lot of people think that these types of sites are legitimate and harmless but that is not true. Nearly all browser hijackers pose an existent threat to your online safety and it is vital to classify them under privacy dangers. In a much worst case, your web browser could be hijacked to download malicious software that will do a lot of damage to your computer.
Indications of browser hijack
There are many symptoms that point to a browser hijacking: you see unauthorized modifications to your web browser’s homepage; you get re-directed to sites you never intended to visit; default web engine is modified; you’re getting browser toolbars you haven’t noticed before; your internet browser will display constant pop-up windows; your web browser starts running slowly or presents frequent errors; You can’t access certain websites, particularly anti-virus websites.
How they get into your computer or laptop
Browser hijackers infect computers via malicious email attachments, downloaded infected computer files, or by visiting infected sites. Many web browser hijackings originate from add-on software, i.e., browser helper objects (BHO), toolbars, or extensions added to web browsers to give them extra features. Browser hijackers sneak to your computer along with free software application downloads that you unknowingly install alongside the original. An example of some well-known browser hijacker includes Conduit, Anyprotect, Babylon, SweetPage, DefaultTab, RocketTab, and Delta Search, but the names are regularly changing.
Removal
Certain browser hijacking could be quite easily stopped by finding and removing the corresponding malware application from your control panel. But, the majority of hijackers are really tenacious and require specialized applications to remove them. You should think about undertaking manual repairs only if you’re a tech-savvy individual, as potential risks are associated with fiddling with the system registry and HOSTS file.
You might opt for automatic browser hijacker removal methods by simply installing and running a reliable anti-malware application. One of the top tools for correcting browser hijacker malware is SafeBytes Anti-Malware. It can help you remove any pre-existing malware in your computer and gives you real-time monitoring and protection from the latest internet threats. Together with the anti-malware tool, a system optimizer will help you in removing all linked files and modifications in the computer registry automatically.
What To Do When You Cannot Install Any Antivirus?
All malware is inherently dangerous, but certain kinds of malware do a lot more damage to your computer than others. Some malware variants modify internet browser settings by including a proxy server or change the computer’s DNS configurations. In such cases, you’ll be unable to visit some or all websites, and thus unable to download or install the required security software to clear out the computer virus. If you are reading this, you may have infected by a virus that prevents you from downloading computer security software like Safebytes Anti-Malware. Although this sort of issue will be difficult to circumvent, there are some steps you can take.
Make use of Safe Mode to resolve the problem
In Safe Mode, you could adjust Windows settings, un-install or install some programs, and eliminate hard-to-delete malware. If the malicious software is set to load immediately when the computer starts, switching into this mode may well prevent it from doing so. In order to enter into Safe Mode or Safe Mode with Networking, press the F8 key while the computer is starting up or run MSCONFIG and locate the “Safe Boot” options under the “Boot” tab. Once you are in safe mode, you can try to download and install your anti-malware software program without the hindrance of malicious software. After installation, run the malware scanner to eliminate most standard infections.
Switch to some other browser
Malicious code may exploit vulnerabilities on a specific internet browser and block access to all anti-virus software websites. When you suspect that your Internet Explorer happens to be hijacked by a computer virus or otherwise compromised by hackers, the best plan of action is to switch to a different internet browser such as Google Chrome, Mozilla Firefox, or Apple Safari to download your chosen security application – Safebytes Anti-Malware.
Install and run anti-virus from your Thumb drive
Another solution is to save and run an antivirus program entirely from a USB drive. Try these simple actions to clear up your infected PC using a portable antivirus.
1) Make use of another virus-free PC to download Safebytes Anti-Malware.
2) Plug the Flash drive into the clean computer.
3) Double-click the Setup icon of the antivirus software to run the Installation Wizard.
4) Select the drive letter of the flash drive as the location when the wizard asks you where you would like to install the anti-virus. Follow the on-screen instructions to finish the installation process.
5) Remove the pen drive. You may now use this portable anti-malware on the infected computer.
6) Double click the Safebytes Anti-malware icon on the flash drive to run the program.
7) Run Full System Scan to identify and get rid of all kinds of malware.
Let’s Talk About SafeBytes Anti-Malware!
If you are looking to download the anti-malware program for your computer, there are several tools in the market to consider however, you cannot trust blindly anyone, no matter whether it is paid or free program. Some of them do a great job in getting rid of malware threats while some will affect your PC themselves. You have to purchase a tool that has got a good reputation and detects not just viruses but other sorts of malware as well. One of the recommended tools by industry analysts is SafeBytes Anti-Malware, the safest program for Microsoft Windows.
SafeBytes anti-malware is a powerful, very effective protection software made to assist users of all levels of IT literacy in finding and removing malicious threats out of their personal computers. Using its cutting-edge technology, this application will help you get rid of several types of malware including computer viruses, PUPs, trojans, worms, ransomware, adware, and browser hijackers.
There are many great features you’ll get with this security product. Below are some of the highlighted features included in the tool.
Real-time Threat Response: SafeBytes provides round-the-clock protection for your PC restricting malware intrusions instantly. It will regularly monitor your laptop or computer for hacker activity and also provides users with advanced firewall protection.
World-class AntiMalware Protection: Safebytes is made on the best virus engine in the industry. These engines will find and get rid of threats even during the early phases of a malware outbreak.
Faster Scanning: This software has got one of the quickest and most effective virus scanning engines in the industry. The scans are very accurate and take a short amount of time to complete.
Safe Web Browsing: SafeBytes provides an instant safety rating on the web pages you are about to check out, automatically blocking unsafe sites and make sure that you’re certain of your online safety while browsing the net.
Lightweight Tool: SafeBytes is a lightweight and user-friendly anti-virus and antimalware solution. Since it uses minimal computer resources, this application leaves the computer’s power exactly where it belongs to: with you actually.
24/7 Online Technical Support: You could get high levels of support round the clock if you’re using their paid software.
To sum it up, SafeBytes Anti-Malware is pretty great for securing your laptop or computer against all sorts of malware threats. There is no doubt that your computer will be protected in real-time as soon as you put this software to use. So if you’re trying to find a comprehensive antivirus program that’s still simple enough to use, SafeBytes Anti-Malware is exactly what you will need!
Technical Details and Manual Removal (Advanced Users)
If you don’t want to use malware removal software and prefer to eliminate Sadooma manually, you could do so by going to the Add/Remove Programs menu in the Control Panel and removing the offending software; in cases of browser add-ons, you may uninstall it by visiting the browser’s Add-on/Extension manager. You might even want to reset your browser settings, as well as clear your web browser cache and cookies.
In order to ensure the complete removal, manually examine your hard disk and registry for all the following and eliminate or reset the values as needed. However, editing the Windows registry is actually a complicated job that only advanced users and professionals should try to fix it. In addition, certain malicious programs have the capability to defend against its deletion. You are encouraged to do this procedure in Safe Mode.
Files:
%USERPROFILE%\AppData\Local\Google\
Registry:
HKEY_CURRENT_USER\Software\Microsoft\Windows\CurrentVersion\Run
HKEY_LOCAL_MACHINE\SOFTWARE\Microsoft\Windows\CurrentVersion\Run
HKEY_LOCAL_MACHINE\SOFTWARE\Wow6432Node\Microsoft\Windows\CurrentVersion\Run
Read More
Being in the Microsoft Windows insider program will let you get a hands-on new Windows 11, but some people just want Windows 11 without being in the insider program.
Well, people beware! It was detected that some groups have been releasing fake Windows 11 installers with malware into them.
There’s one malicious file called 86307_windows 11 builds 21996.1 x64 + activator.exe. Based on the filename, one might guess that it includes Windows 11 build 21996.1, and on top of that, there’s something in it that will automatically activate Windows for you. It comes in at 1.75GB, so for some people, that might seem reasonable. It starts out looking like a normal installer, and then there’s a second installer that calls itself a download manager. If you accept the nonsense agreement that’s included, you get a bunch of malware.
This is just one example of malicious installers running amok internet, but there are more of them with different software placed inside. Malware can be anything from adware to a Trojan virus. The adware usually isn’t super dangerous. It’s just malware that’s meant to inject your PC with advertisements. Viruses can be more of an issue, and they can be harder to get rid of if your machine is infected.
Windows Defender does a good job of getting rid of this stuff. The only problem is that if you’re downloading Windows 11 from shady sources, you’re probably already set to click through the dozen or so warnings that pop up telling you not to install it.
The solution will be to get Windows from a trusted source of roll inside the insider program and get it from Microsoft directly.
Read More
EliteUnzip is a program developed by Mindspark Interactive. This program lets you compress and extract all the popular archive types.
From the Author:
Elite Unzip is a program for creating and extracting archive files;
it has support for over 20 file formats.
This application downloads onto your computer in two parts: one for your desktop, and one for your browser.
They both work together to make packing and unpacking archive files easy.
While EliteUnzip itself is not a threat, it comes bundled with other software that might cause a problem to your computer.
Due to its bundled nature, several anti-virus scanners have marked EliteUznip as a Potentially Unwanted Program and is therefore not recommended to keep on y our computer, especially because there are other free programs that do the same functions without the additional bundled software.
About Potentially Unwanted Applications
Precisely what is a Potentially Unwanted Program (PUP)?
Have you ever found out an unwanted program running on your computer and wondered how the heck it got there? These unwanted programs, which are known as Potentially Unwanted Programs, or PUPs in short, often tag along as a software bundle when downloading the program and can result in major problems for computer users.
It’s clear by the name – unwanted programs – but did not really constitute “malware” in the traditional sense. The reason for this is that the majority of PUPs enter into users’ computers not because they exploit security weaknesses, for instance, but mainly because the users give consent to download it – unknowingly in many instances. No matter whether it is regarded as malware or otherwise, PUPs are almost always bad for a computer owner as they might bring on adware, spyware, keystroke logging, and other nasty “crapware” features on your PC.
What do PUPs do on your computer, precisely?
Most Potentially Unwanted Programs comes in the form of adware, which generally aims to exhibit lots of annoying pop-up ads, banners, coupons, and deals on websites you explore. PUPs that come in the form of browser add-ons and toolbars are widely identifiable. They may track your online activities, redirect your search results to risky sites where adware and spyware can be downloaded, hijack your home page, and slow your browser down to a crawl.
PUPs carry a dangerous bite if left behind unchecked. The worst part of setting up a PUP is the spyware, adware, and keystroke loggers that could hide inside. These are programs that don’t do anything good for you; in addition to taking over space on the hard disk, they will also slow down your PC, often change settings without your permission, and the list of bothersome features goes on and on.
Protect yourself from unwanted programs
• When installing anything on your desktop, always read the fine print, like the license agreement. Don’t accept terms of use that are for bundled applications.
• Normally, when installing a software program you get two options, ‘Standard Installation’ and ‘Custom Installation’. Don’t opt for ‘Standard’ as unwanted programs might automatically be installed that way!
• Use good anti-malware software. Try Safebytes Anti-malware which can spot PUPs and treat them as malware by flagging them for deletion.
• Be alert when you download and install freeware, open-source programs, or shareware. Nowadays ‘freeware’ isn’t actually freeware – but crapware bundling nonsense.
• Only use official product sites for downloading applications. Steer clear of download websites altogether since most websites compel users to download the program with their own download manager, which is often bundled up with some kind of PUPs.
Virus Blocking Access To Safebytes Site And Preventing Anti-Malware Downloads – What You Should Do?
All malware is inherently unsafe, but certain kinds of malicious software do a lot more damage to your computer or laptop than others. Some malware variants alter browser settings by adding a proxy server or change the computer’s DNS configuration settings. When this happens, you will be unable to visit some or all of the sites, and therefore unable to download or install the necessary security software to eliminate the malware. If you are reading this, chances are you’re stuck with a virus infection that is preventing you to download and install Safebytes Anti-Malware software on your computer. There are some actions you can take to circumvent this issue.
Install in Safe Mode
In the event the malware is set to run at Windows start-up, then booting in safe mode should avoid it. Since only the minimal applications and services start-up in safe mode, there are hardly any reasons for conflicts to happen. The following are the steps you should follow to start your computer into the Safe Mode of your Windows XP, Vista, or 7 computers (go to Microsoft site for directions on Windows 8 and 10 computers).
1) Tap the F8 key continuously as soon as your computer boots, however, before the large windows logo comes up. This should bring up the Advanced Boot Options menu.
2) Make use of the arrow keys to select Safe Mode with Networking and press ENTER.
3) Once you get into this mode, you should have internet access once again. Now, obtain the malware removal software you need by using the web browser. To install the program, follow the guidelines in the setup wizard.
4) Following installation, run a full scan and let the program eliminate the threats it finds.
Download the antivirus software in a different internet browser
Some malware mainly targets particular browsers. If this sounds like your case, make use of another internet browser as it may circumvent the virus. If you appear to have malware attached to Internet Explorer, then switch over to a different browser with built-in safety features, such as Firefox or Chrome, to download your favorite anti-malware program – Safebytes.
Install antivirus on a thumb drive
Here’s yet another solution which is utilizing a portable USB anti-malware software package that can check your system for malware without needing installation. Adopt these measures to use a flash drive to clean your infected system.
1) Download the anti-malware on a virus-free computer.
2) Plug the pen drive into the uninfected computer.
3) Double click on the exe file to open the installation wizard.
4) When asked, select the location of the pen drive as the place where you want to store the software files. Follow the directions to complete the installation process.
5) Transfer the thumb drive from the uninfected computer to the infected PC.
6) Double-click the anti-malware software EXE file on the thumb drive.
7) Click on “Scan Now” to run a scan on the affected computer for viruses.
Benefits and Features of SafeBytes Anti-Malware
If you are looking to purchase anti-malware for your PC, there are various brands and applications for you to consider. A few of them are great and some are scamware applications that pretend as authentic anti-malware software waiting to wreak havoc on your computer. You need to pick a tool that has gained a good reputation and detects not only computer viruses but other types of malware as well. When considering commercial application options, many people opt for popular brands, such as SafeBytes, and are very happy with them.
SafeBytes anti-malware is really a powerful, highly effective protection application intended to help users of all levels of IT literacy in finding and removing harmful threats out of their computer. This application could easily identify, remove, and protect your computer from the most advanced malware intrusions such as adware, spyware, trojan horses, ransomware, worms, PUPs, as well as other possibly damaging software applications.
There are lots of great features you’ll get with this security product. Below are a few of the best ones:
Real-Time Protection: SafeBytes provides real-time active monitoring service and protection against all known computer viruses and malware. It will monitor your personal computer for suspicious activity regularly and shields your personal computer from unauthorized access.
Best AntiMalware Protection: Safebytes is built on the very best virus engine in the industry. These engines will find and remove threats even during the early phases of a malware outbreak.
Fast Multi-threaded Scanning: SafeBytes’s virus scan engine is one of the quickest and most efficient in the industry. It’s targeted scanning substantially increases the catch rate for viruses that are embedded in various PC files.
Web Protection: SafeBytes inspects the links present on a webpage for possible threats and tells you whether the website is safe to view or not, through its unique safety rating system.
Light-weight: SafeBytes is well known for its minimal impact on computer resources and great detection rate of numerous threats. It operates quietly and efficiently in the background so you’re free to make use of your PC at full power all of the time.
Premium Support: SafeBytes gives you 24/7 technical support, automatic maintenance, and upgrades for the best user experience.
SafeBytes has created a wonderful anti-malware solution to help you conquer the latest malware threats and virus attacks. Once you have downloaded and installed SafeBytes Anti-Malware, you will no longer have to bother about malware or other security concerns. So if you want sophisticated forms of protection features & threat detections, purchasing SafeBytes Anti-Malware will be worth the money!
Technical Details and Manual Removal (Advanced Users)
To remove EliteUnzip manually, go to the Add/Remove programs list in the Control Panel and choose the program you want to get rid of. For internet browser plug-ins, go to your browser’s Addon/Extension manager and select the plug-in you want to remove or disable. You will additionally also want to totally reset your internet browser to its default settings.
To make sure of complete removal, find the following Windows registry entries on your system and remove it or reset the values appropriately. However, this is often a tricky task and only computer professionals could perform it safely. Also, certain malware is capable of replicating itself or preventing its deletion. Carrying out this malware-removal process in Safe Mode is suggested.
Files:
%PROGRAMFILES%\EliteUnzip_aa\bar.bin\aaSrcAs.dll
%PROGRAMFILES(x86)%\EliteUnzip_aa\bar.bin\aabar.dll
%PROGRAMFILES%\EliteUnzip_aa\bar.bin\aaHighIn.exe
%PROGRAMFILES(x86)%\EliteUnzip_aa\bar.bin\CrExtPaa.exe
%USERPROFILE%\Application Data\EliteUnzip_aa
%USERPROFILE%\AppData\LocalLow\EliteUnzip_aa
%UserProfile%\Local Settings\Application Data\Google\Chrome\User Data\Default\Extensions\gaklecphgkijookgheachpgdkeminped
%LOCALAPPDATA%\EliteUnzip_aa
%USERPROFILE%\Meus documentos\Downloads\EliteUnzipSetup.EliteUnzip_aa.ffjcmnpnoopgilmnfhloocdcbnimmmea.ch.exe
%PROGRAMFILES(x86)%\aaUninstall Elite Unzip.dll
%USERPROFILE%\Downloads\EliteUnzipSetup.exe
C:\Program Files\EliteUnzip\EliteUnzip.exe
Search And Delete:
RebootRequired.exe
IAC.UnifiedLogging.dll
DesktopSdk.dll
IAC.Helpers.dll
UnifiedLogging.dll
SevenZipSharp.dll
7z.dll
7z64.dll
LogicNP.FileView.WPF.dll
LogicNP.FolderView.WPF.dll
LogicNP.ShComboBox.WPF.dll
lua5.1.dll
Registry:
HKEY_CURRENT_USER\Software\AppDataLow\Software\EliteUnzip_aa
HKEY_LOCAL_MACHINE\SOFTWARE\Microsoft\Windows\CurrentVersion\Run, value: EliteUnzip EPM Support
HKEY_LOCAL_MACHINE\SOFTWARE\Microsoft\Windows\CurrentVersion\Run, value: EliteUnzip Search Scope Monitor
HKEY_CURRENT_USER\Software\EliteUnzip_aa
HKEY_LOCAL_MACHINE\SOFTWARE\Wow6432Node\Microsoft\Internet Explorer\Toolbar, value: ef55cb9f-2729-4bff-afe5-ee59593b16e8
HKEY_LOCAL_MACHINE\SOFTWARE\Wow6432Node\Microsoft\Windows\CurrentVersion\Run, value: EliteUnzip AppIntegrator 64-bit
HKEY_LOCAL_MACHINE\SOFTWARE\Wow6432Node\Microsoft\Windows\CurrentVersion\Run, value: EliteUnzip EPM Support
HKEY_LOCAL_MACHINE\SOFTWARE\Wow6432Node\Microsoft\Windows\CurrentVersion\Run, value: EliteUnzip Search Scope Monitor
HKEY_LOCAL_MACHINE\SOFTWARE\Microsoft\Windows\CurrentVersion\Run, value: EliteUnzip AppIntegrator 32-bit
HKEY_LOCAL_MACHINE\SOFTWARE\Microsoft\Windows\CurrentVersion\Run, value: EliteUnzip AppIntegrator 64-bit
HKEY_LOCAL_MACHINE\SYSTEM\CurrentControlSet\services\EliteUnzip_aaService
HKEY_LOCAL_MACHINE\SYSTEM\ControlSet001\services\EliteUnzip_aaService
HKEY_LOCAL_MACHINE\SYSTEM\ControlSet002\services\EliteUnzip_aaService
HKEY_LOCAL_MACHINE\SOFTWARE\Microsoft\Windows\CurrentVersion\RunOnce, value: EliteUnzip_aabar Uninstall
HKEY_LOCAL_MACHINE\SOFTWARE\Wow6432Node\EliteUnzip_aa
HKEY_LOCAL_MACHINE\SOFTWARE\Wow6432Node\Mindspark\EliteUnzip
HKEY_LOCAL_MACHINE\SOFTWARE\Mindspark\EliteUnzip
Read More
You might be familiar with the Encryption File System or EFS algorithm if you rather keep your files and folders encrypted. Encryption File System is a built-in feature in Windows 10 which allows users to secure their important files. Although there is an alternative way for you to secure your data on your Windows 10 computer, you can’t ignore the fact that the main advantage of an Encryption File System over BitLocker is that the former can help you encrypt a particular folder rather than encrypting the whole hard drive partition.
If you move a file inside a folder encrypted with the Encrypting File System it will automatically get encrypted. There are some users who like this feature but unsurprisingly, there are some that don’t. So if whether you want your files encrypted when you place them in an encrypted folder or if you want to keep it as it is, read on as to how you can do it either way. You can enable or disable automatic encryption of files moved to encrypted folders in Windows 10 using the Registry Editor or the Group Policy Editor.
Before you proceed, make sure to create a System Restore Point first because the modifications you’re about to make in your computer might affect its overall functioning so if anything goes wrong, you can always undo the changes. Once you have that covered, refer to the options given below to enable or disable automatic encryption in Windows 10.
Option 1 – Enable or disable automatic encryption using Registry Editor
- Press the Win key + R key at the same time to open the Run dialog box.
- Then type “Regedit” in the field and press Enter to open the Registry Editor and if a User Account Control or UAC prompt appears, just click Yes to proceed.
- After opening the Registry Editor, navigate to this key location: HKEY_LOCAL_MACHINESOFTWAREMicrosoftWindowsCurrentVersionPoliciesExplorer
- Next, right-click on Explorer and select New > DWORD (32-bit) Value and then name the newly create DWORD to “NoEncryptOnMove” and press Enter to save it.
- After that, double click on the NoEncryptOnMove DWORD and set its value to the following preferences:
- 1 – Disable Auto Encryption of files moved to encrypted folders.
- 0 – Enable Auto Encryption of files moved to encrypted folders.
- Now close the Registry Editor and restart your computer to successfully apply the changes made.
Option 2 – Enable or disable automatic encryption using the Group Policy Editor
- Press the Win + R keys to open the Run box and type “gpedit.msc” in the field and press Enter to open the Group Policy Editor.
- After that, navigate to this path: Computer ConfigurationAdministrative TemplatesSystem
- Next, look for the “Do not automatically encrypt files moved to encrypted folders” option and double click on it to set the policy. From there, you will see the following description:
“This policy setting prevents File Explorer from encrypting files that are moved to an encrypted folder. If you enable this policy setting, File Explorer will not automatically encrypt files that are moved to an encrypted folder. If you disable or do not configure this policy setting, File Explorer automatically encrypts files that are moved to an encrypted folder. This setting applies only to files moved within a volume. When files are moved to other volumes, or if you create a new file in an encrypted folder, File Explorer encrypts those files automatically.”
- Now select one of the radio buttons below depending on your preference:
- Not Configured or Disabled: Enable Auto Encrypt of files moved to EFS Encrypted folders.
- Enabled: Disable Auto Encrypt of files moved to EFS Encrypted folders.
- Then click on the Apply and OK buttons to save the changes made.
- Exit the Group Policy Editor and restart your computer.
Read More
Copyright © 2023, ErrorTools. All Rights Reserved
Trademark: Microsoft Windows logos are registered trademarks of Microsoft. Disclaimer: ErrorTools.com is not affiliated with Microsoft, nor claims direct affiliation.
The information on this page is provided for information purposes only.
Methods to Enable and Disable Location Services in Windows 10 with steps. – Multiple apps and third-party tools need and use the location of your PC to provide their services. Map traces the location of PC and helps you in exploring nearby restaurants. But there are many users who don’t want certain applications to use the location service. Well, for those users, Windows includes few location settings so that they can have control over it. So, in this guide, we present you the guidelines to Enable and Disable Location Services on Windows 10.
There are certain applications that need to know the location information of your device before it can render its service. So, when these applications are run for the first time, they seek your approval to track the location details of the device. After granting permission, in future if you don’t want to share the location of the device with any app, you can anytime disable location services on Windows 10. Pursue a similar guide on [How To] Change App Permissions On Windows 10. So, Windows 10 includes specific location settings to manage location services for account, apps, and device respectively.
Ways to Enable and Disable Location Services on Windows 10
Method 1 – Through Action Center
Step 1 – Launch Action Center and to do so click the tiny icon that exists on the extreme right of the taskbar. Alternatively, you can also make it appear by pressing Win+A keys altogether.
You can Determine App Notification Count to Show in Action Center Windows 10.
Step 2 – If you cannot see the buttons on the Action Center, click Expand to view all of them. Now, locate Location button and click on it to enable or disable it. If Location button is highlighted, then the service is enabled and if it is not highlighted, the feature is disabled.
Method 2 – Using Settings Application
Step 1 – Open Settings program by jointly pressing Win&I keys. When various categories appear on its homepage, locate and select Privacy.
Read our similar guide on How to Avoid Privacy Issues on Windows 10.
Step 2 – Privacy settings page provides few segments on its left sidebar, so click Location.
a. Enable and Disable Location Services for this Device
Note – Settings program gives you the provision to control location services for your device (PC). In addition, keep in mind that you must possess administrative authorities before performing the below steps.
Step 3 – Shift to its right pane and click the Change button that appears underneath Location heading.
Step 4 – On another pop-up, use the slider and turn ON the slider for the option Location for this device. This will enable the location service for this (your) device.
Noteworthy point is that Location service for this device is enabled by default.
Step 5 – To disable the service, click on Change button and moreover, toggle OFF the slider of Location for this device by pulling it towards left.
b. Enable and Disable Location Services for Apps and Account
Note – Before you follow the below directions, make sure that the Location service for this device is enabled by the administrator either using Method 2a or 3a.
Step 6 – On the right panel of Location, find the option Location service. Switch ON the setting and this will enable location service for apps and account (This is the default setting).
Step 7 – Switch OFF the option Location service and specifically disable the feature for both your account and applications.
Method 3 – Via Registry Editor
Step 1 – On Cortana search field, type the command regedit and when she displays the same command, click on it.
For reference, you can read How to Access Registry Editor in Windows 10 – 5 Simple Tips.
Step 2 – UAC prompt will come up displaying the details of the tool. Give permission by clicking Yes and let Registry Editor open.
a. Enable and Disable Location Services for this Device
Note – Registry Editor also gives provision to enable and disable location service for this device but to carry out this procedure you must hold admin authorities.
Step 3 – On the Registry Editor, browse to the below path.
HKEY_LOCAL_MACHINE => SYSTEM => CurrentControlSet => Services => lfsvc => Service => Configuration
Step 4 – Shift to the right pane of Configuration key where a DWORD with a name Status will be visible, double-click on it.
Step 5 – To Enable Location for this device, input the value 1 on its edit box. Click OK to implement the change in the service.
Step 6 – To Disable Location service for this device, set 0 as its value and finally, click OK to make the changes effective.
b. Enable and Disable Location Services for Apps and Account
In order to follow this way, ensure that Location for this device is enabled using Method 2a or 3a.
Step 7 – After opening Registry Editor, navigate to the below path on the left sidebar.
HKEY_CURRENT_USER => SOFTWARE => Microsoft => Windows => CurrentVersion => DeviceAccess => Global => {BFA794E4-F964-4FDB-90F6-51056BFE4B44}
Step 8 – Once you reach the above key, find the string value with a name Value on the right pane and double-click on it.
Step 9 – To enable location services for apps and account, set its value as Allow on the edit box. Click OK.
Step 10 – To disable location services for apps and account, assign the value as Deny and click OK.
Step 11 – Once you change the string value, you have to modify DWORD also. To do so, travel to the below path.
HKEY_CURRENT_USER => SOFTWARE => Microsoft => Windows NT => CurrentVersion => Sensor => Permissions => {BFA794E4-F964-4FDB-90F6-51056BFE4B44}
Step 12 – On its right pane, find and double-click the DWORD SensorPermissionState.
Step 13 – A small edit box will pop-up, so, type 1 to enable or insert 0 to Disable Location Services for Apps and Account.
Conclusion
Hence, to Enable and Disable Location Services on Windows 10, the OS provides you a few distinct ways. Well, Registry Editor is generally for the advanced users. Normal users can manage location services using other ways pretty much easily. If you have more tips to manage location services on Windows 10, please write down to us.