
Fix GeForce Experience Won’t Open in Windows 10: If you’re facing the issue where your NVIDIA GeForce Experience won’t open or not working then don’t worry as today we are going to see how to fix the issue. Users are reporting that they are facing this issue after an update or upgrade to Windows 10. To see if you’re facing the error, just click on GeForce Experience icon and you receive the following error message “Something went wrong. Try restarting GeForce Experience.”

The cause of this error might be outdated, corrupted, or incompatible graphics driver, damaged video card, recently installed software or hardware might be incompatible etc. Anyway, without wasting any time let’s see How to Fix GeForce Experience Won’t Open in Windows 10 with the help of the below-listed tutorial.
Table of Contents
Make sure to create a restore point just in case something goes wrong.
Method 1: Enable GeForce Experience service
1.Press Windows Key + R then type services.msc and hit Enter.
2.Next, find the NVIDIA GeForce Experience Service in the list.
3.Then right-click on NVIDIA GeForce Experience Service and select Start. If there is no option for start then click on Restart.

4.Click Apply followed by OK.
5.Similarly, repeat the above process for Nvidia Geforce Experience Backend Service.
6.Now find the Nvidia Telemetry Container service then right-click on it and select Properties.

7.Make sure to click on Stop (if the service is already running) then from the Startup type drop-down select Automatic then click on Start and click Apply followed by OK.

8.Now try to open NVIDIA GeForce Experience and this time it will open without any issues.
Method 2: Reinstall GeForce Experience
1.Press Windows Key + R then type control and hit Enter to open Control Panel.
2.Click on Uninstall a program under Programs.

3.Find NVIDIA GeForce Experience in the list, then right-click on it and select Uninstall.
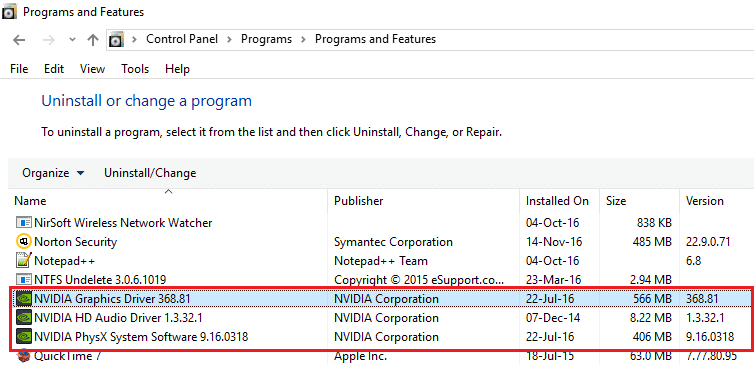
4.Once finished, reboot your PC to save changes.
5.Now head over to NVIDIA website to download the latest version of GeForce Experience.
6.Click on Download then double-click on the downloaded .exe file to install NVIDIA GeForce Experience on your PC.
7.Run the recently installed GeForce Experience and this may Fix GeForce Experience Won’t Open in Windows 10 issue.
Method 3: Update your NVIDIA graphics card driver
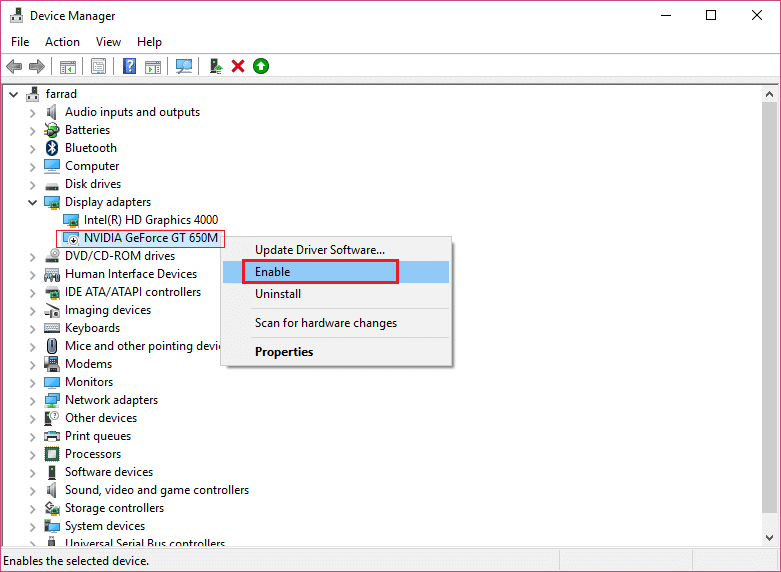
1.Press Windows Key + R then type “devmgmt.msc” (without quotes) and hit enter to open Device Manager.

2.Next, expand Display adapters and right-click on your Nvidia Graphic Card and select Enable.
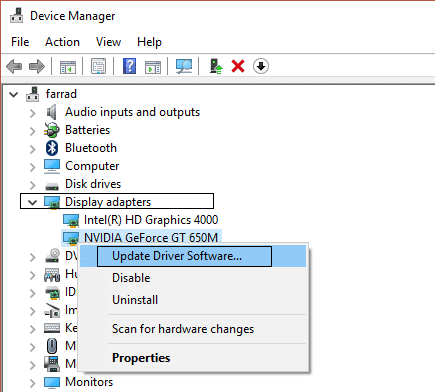
3.Once you have done this again right-click on your graphic card and select “Update Driver Software.“
4.Select “Search automatically for updated driver software” and let it finish the process.

5.If the above step was able to fix your problem then very good, if not then continue.
6.Again select “Update Driver Software” but this time on the next screen select “Browse my computer for driver software.“

7.Now select “Let me pick from a list of device drivers on my computer.”

8.Finally, select the compatible driver from the list for your Nvidia Graphic Card and click Next.
9.Let the above process finish and restart your PC to save changes.
After updating Graphics drivers you may be able to Fix GeForce Experience Won’t Open in Windows 10.
Method 4: Reinstall NVIDIA Drivers
1.Download Display Driver Uninstaller from this link.
2.Boot your PC into Safe Mode using any of the listed methods.
3.Double-click on the .exe file to run the application and select NVIDIA.
4.Click on Clean and Restart button.

5.Once the computer restarts, open chrome and visit NVIDIA website.
6.Select your product type, series, product and operating system to download the latest available drivers for your Graphic Card.

7.Once you download the setup, launch the installer then select Custom install and then select Clean install.

8.Reboot your PC to save changes and see if you’re able to Fix GeForce Experience Won’t Open in Windows 10.
9.If the issue still occurs, again remove the drivers following the above method and download older drivers from the NVIDIA website and see if this works.
Method 5: Update your Drivers from NIVIDA website
1.First of all, you should know what graphics hardware you have i.e. which Nvidia graphic card you have, don’t worry if you don’t know about it as it can be easily find.
2.Press Windows Key + R and in the dialog box type “dxdiag” and hit enter.
3.After that search for the display tab (there will be two display tabs one for the integrated graphic card and another one will be of Nvidia’s) click on the display tab and find out your graphic card.

4.Now go to the Nvidia driver download website and enter the product details which we just find out.
5.Search your drivers after inputting the information, click Agree and download the drivers.
6.After successful download, install the driver and you have successfully updated your Nvidia drivers manually. This installation will take some time but you will have successfully updated your driver after that.
Recommended:
- Fix Your DNS Server might be unavailable error
- How to Fix Windows 10 Mic Not Working Issue
- Fix ERR_CONNECTION_TIMED_OUT Chrome error
- 3 Ways to Check Your Graphics Card in Windows 10
That’s it you have successfully Fix GeForce Experience Won’t Open in Windows 10 but if you still have any questions regarding this post then feel free to ask them in the comment’s section.
Sign in to your MUO account
GeForce Experience is a handy app for gaming optimization. However, some GeForce Experience users have posted on NVIDIA’s forum about the “unable to connect to NVIDIA” error message. Those users see that message when they start GeForce Experience.
GeForce Experience still opens when the “unable to connect to NVIDIA” error occurs. However, users can’t download NVIDIA drivers or utilize other features like ShadowPlay in that software because of this error. As such, here is how you can fix the “unable to connect to NVIDIA” error in Windows 11 and 10.
1. Erase the NSManagedTasks.xml and Restart the NVIDIA Network Service
Users with older GeForce Experience versions have been able to fix the “Unable to connect to NVIDIA” error by deleting an NSManagedTasks.xml file. However, that file doesn’t exist for more recent GeForce Experience versions. So, not all users will be able to apply this potential fix.
If you’re utilizing older GeForce Experience software, you might be able to resolve this issue by erasing the NSManagedTasks.xml file like this:
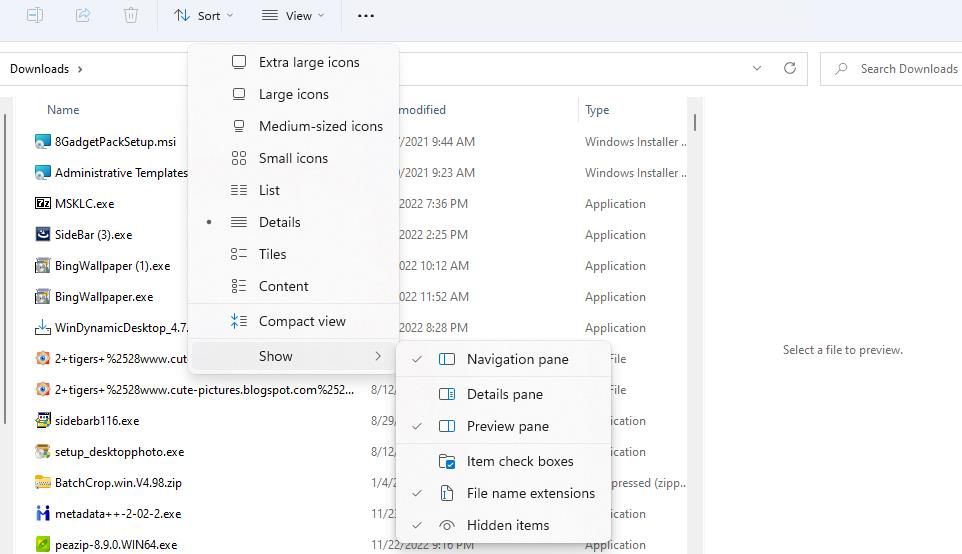
- To view File Explorer, press Win + E.
-
Click View > Show > Hidden Items in Windows 11 File Explorer. In Windows 10 File Explorer, you’ll need to select the Hidden Items checkbox on the View tab.

-
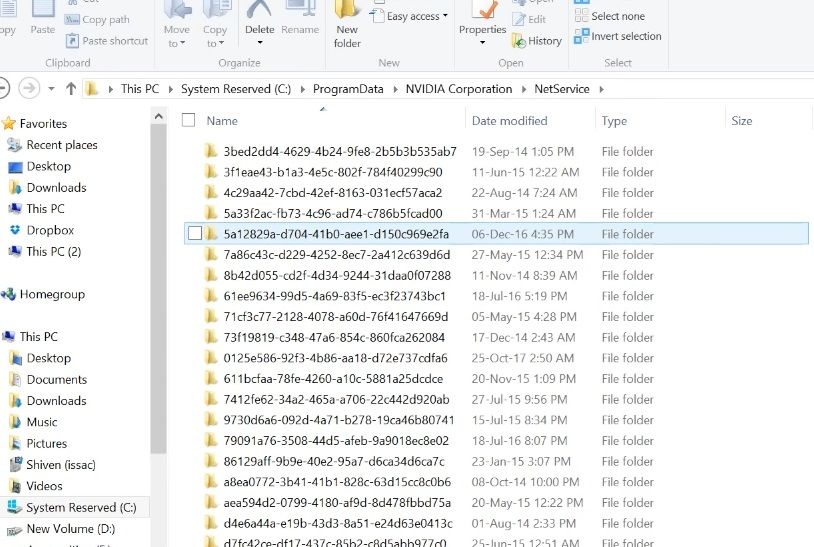
Clear the current folder path in File Explorer’s address bar. Then input this NetService folder path and hit Enter:
C:\ProgramData\Nvidia Corporation\NetService\
-
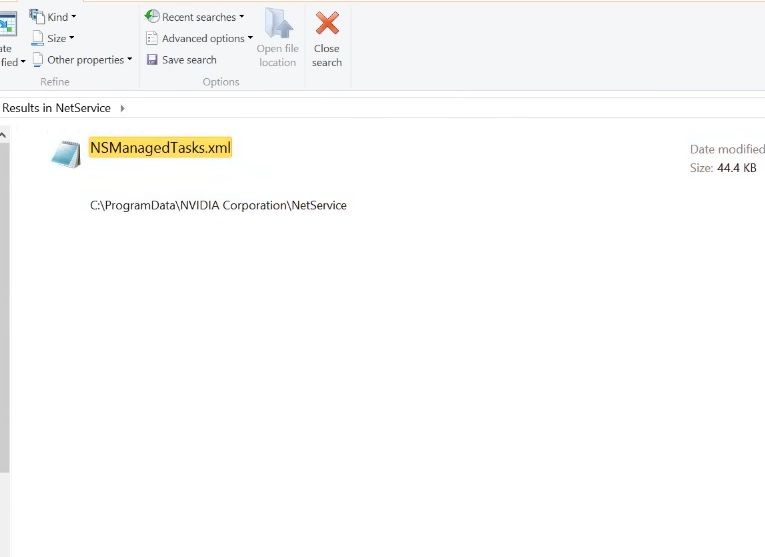
Input NSManagedTasks.xml in Explorer’s search box to find that file within the folder.

- Right-click the NSManagedTasks.xml file and select its Delete option (the trash can in Windows 11).
Once that’s done, it’s time to restart the NVIDIA network service.
- Bring up the Task Manager tool, which has a useful Ctrl + Shift + Esc hotkey for quick access.
- Select Task Manager’s Details tab.
-
Then find and select the NvStreamNetworkService.exe (NVIDIA Network Service) there.

- Click End Task to stop the service.
- Exit the Task Manager window.
- Next, click a Search box or Type here to search button on the Windows taskbar.
- Enter a services search phrase.
- Click Services inside the search tool’s results.
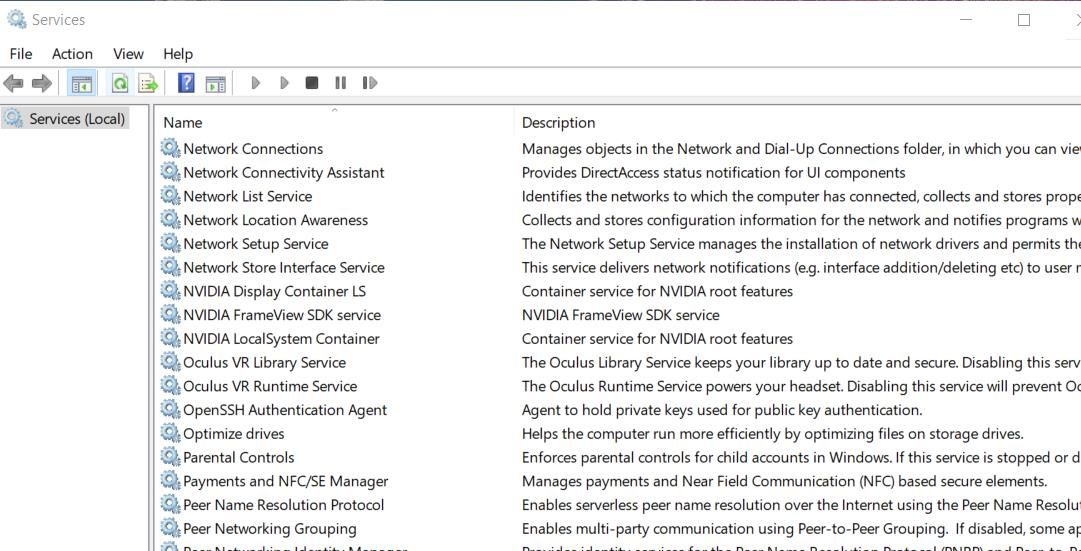
- Then double-click the NVIDIA Network Service to access its options.
- Select Start for the NVIDIA Network Service to restart it.
- Press the NVIDIA Network Service Properties window’s Apply > OK buttons.

Now launch GeForce Experience to see if the “unable to connect” error persists.
If you can’t find a NetService folder or NSManagedTasks.xml file, then this isn’t the “Unable to connect” resolution for you. Proceed with the other potential fixes below.
2. Run the Relevant NVIDIA Services
Some GeForce Experience users have confirmed they’ve been able to fix the Unable to connect to NVIDIA” error by starting NVIDIA services. Thus, this error can seemingly occur because of disabled NVIDIA services.
Here is how you can enable and run NVIDIA services in Windows 10 and 11:
- Open Services as instructed in steps 11-13 of the first resolution above.
-
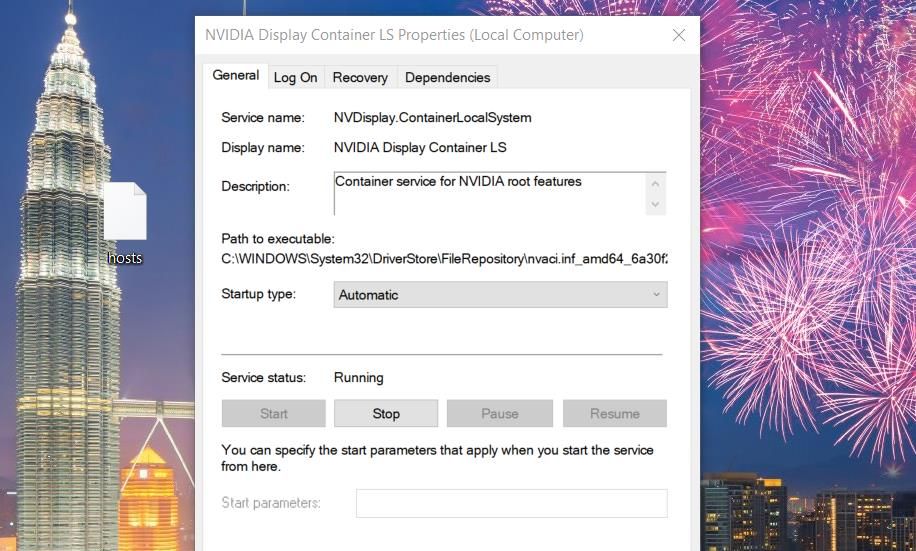
Then double-click an NVIDIA service in the window to open its properties window.

- Select the Start option in the properties window if the service isn’t running (stopped).
-
Click Apply and OK to save settings and exit the service’s window.

- Repeat those steps for all NVIDIA services you can find.
3. Manually Update the NVIDIA Graphics Driver With Device Manager
Updating the NVIDIA graphics driver is a potential resolution some users confirm to fix the “Unable to connect” error. However, users can’t update their graphics drivers with GeForce Experience because of the issue. Instead, manually update your NVIDIA GPU’s driver with Device Manager like this:
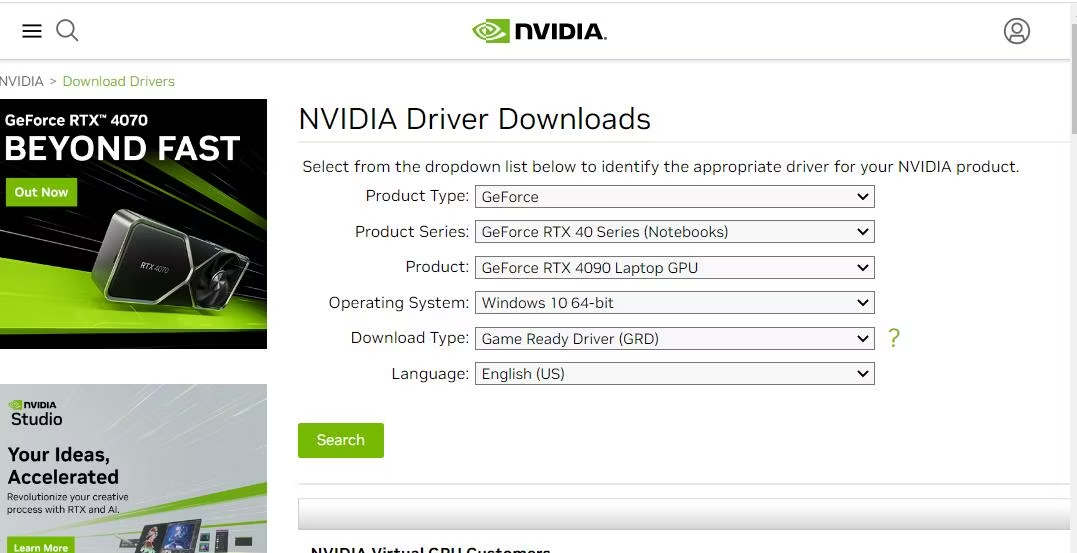
- Open the NVIDIA driver download website.
-
Select your graphics card model and PC OS in the drop-down menus and click Search.

- Select Download to obtain the NVIDIA driver pack.
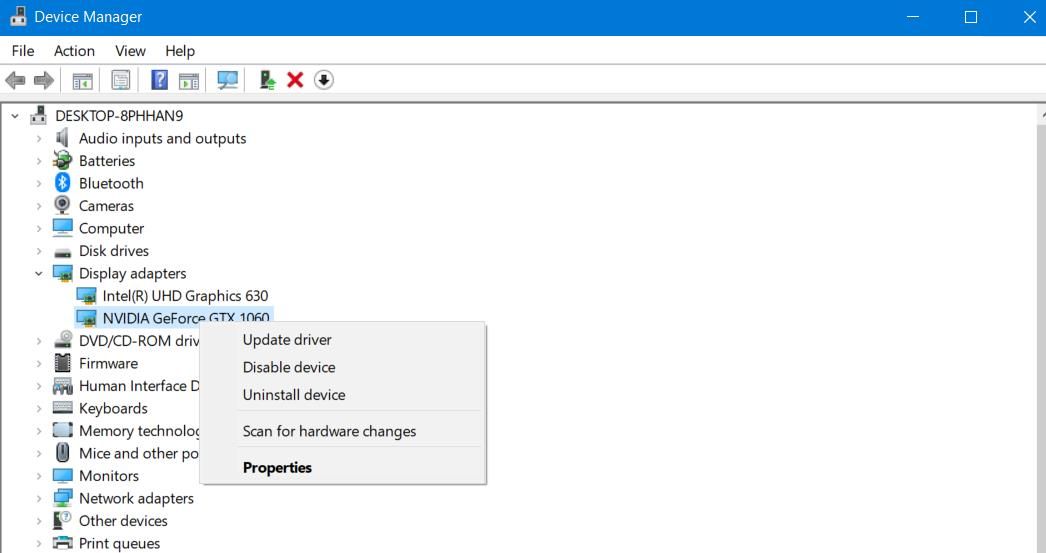
- Then open Device Manager, which you can access by right-clicking your Start button in Windows and selecting the shortcut for that tool. You can also use one of the other ways to open the Device Manager.
- Next, click the arrow beside the Display adapters to view that category.
-
Right-click the NVIDIA GPU to select Update driver on the context menu.

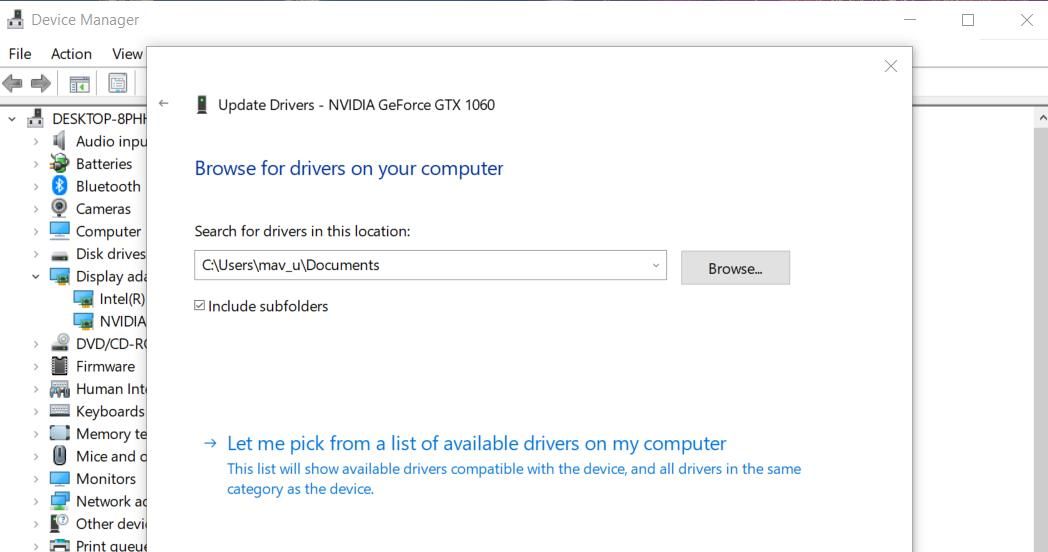
- Select Browse my computer to locate a driver package.
-
Click Browse to select the downloaded driver package.

- Select Next to install the selected NVIDIA driver.
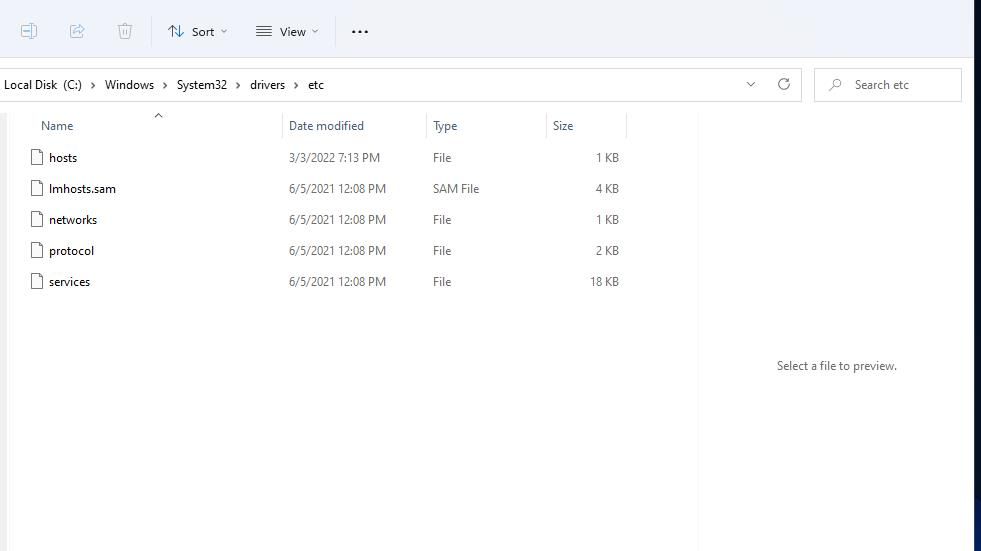
4. Edit the Hosts File
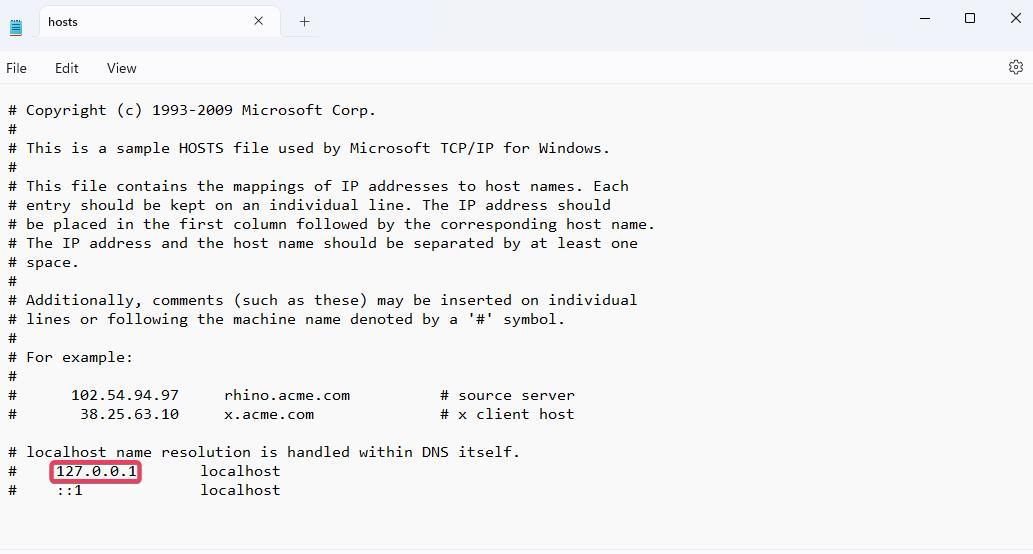
Hosts is a file for mapping domain names. The “Unable to connect to NVIDIA” error occurs when the localhost value in it equals 0.0.0.0. Some GeForce Experience users have fixed the “Unable to connect to NVIDIA” error by changing the localhost value to 127.0.0.1 in the hosts file like this:
-
Open File Explorer and input this folder location in the folder address bar:
C:\Windows\System32\drivers\etc -
Click the hosts file with the mouse’s right button and select Open with.

- Then click Notepad to view the hosts file in that text editor.
-
If the localhost is set to 0.0.0.0, or another value, change it to 127.0.0.1 as shown in the image below.

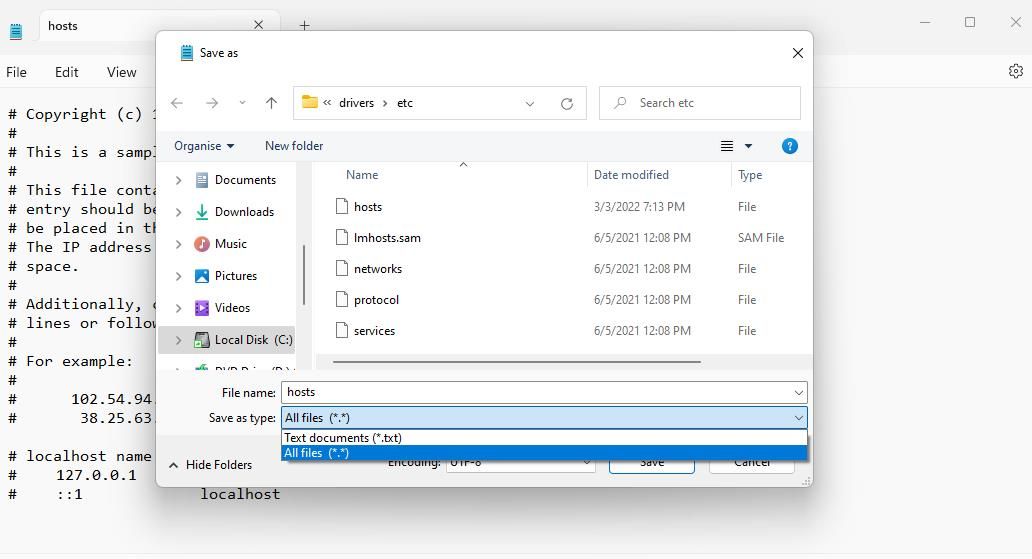
- Then click File at the top of Notepad to select a Save option.
-
Select All Files on the drop-down menu and click Save.

If you can’t edit hosts because of permission restrictions, copy and paste the file onto the desktop. To do so, right-click hosts and select Copy. Then right-click the desktop and select Paste.
Next, edit and save hosts as outlined above. Copy the edited hosts file on the desktop. Open the etc folder that includes the original hosts file again and press the Ctrl + V hotkey. Click the Replace option to overwrite the original file.
5. Reinstall GeForce Experience
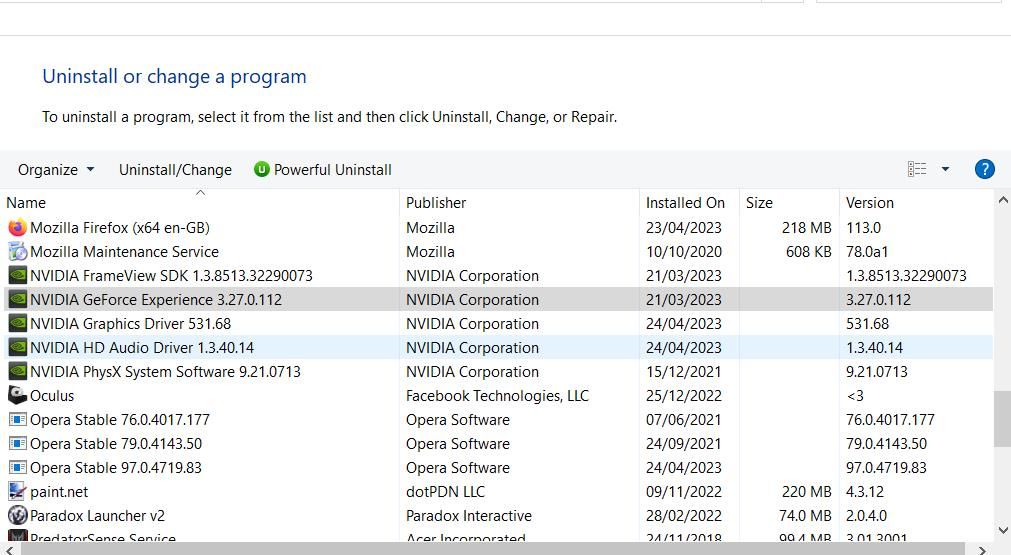
Outdated GeForce Experience software is one of the most common causes of the “Unable to connect to NVIDIA” error. Many users have resolved the issue by uninstalling GeForce Experience and installing the latest version. You can uninstall GeForce Experience within the Control Panel as instructed in this guide to removing Windows software.
When you’ve uninstalled the old software version, open the GeForce website. Click Download Now to obtain the setup wizard for the latest GeForce Experience version. Go into File Explorer, open the folder containing the downloaded setup file, and double-click GeForce_Experience_v3.27.0.112.exe. Then select Agree and Install within the setup wizard.
Get the “Unable to connect to NVIDIA” Error Sorted
The “unable to connect to NVIDIA” error is an old issue GeForce Experience users have talked about on the NVIDIA forum for many years. A lot of users have been able to fix that issue by applying the potential resolutions outlined above. So, it’s likely one of them will get the same “unable to connect to NVIDIA” error sorted on your Windows PC.
If you made up to this blog post, then chances are that NVIDIA GeForce Experience is not working, opening, or starting up on your Windows 10 PC. Lets, learn how to fix the issue.
Before we start, let us learn a little about the NVIDIA GeForce Experience It is a software suite for Nvidia GPUs. The app provides a friendly environment to gamers by updating consistently and frequently optimizing the game settings.

Sometimes when users try to open the NVIDIA GeForce Experience app, it fails to open and usually throws an error message that reads “Something went wrong. Try restarting GeForce Experience“. Unfortunately, restarting the device does nothing.
Usually, this error can be caused due to either your system’s antivirus or OS loading issues. You can fix this error with some workarounds. The most common solution is to disable the default antivirus on your device. (Not recommended). Unfortunately, this doesn’t fix the issue.
To help you out we did research and found a possible solution that works for the majority of the users. Let’s start with first one:
Method One
You need to make sure, that all the services required for the proper functioning of the NVIDIA Geforce Experience are running. Here’s how you can check that:
Use WIN + R to open Run dialog and type ‘services.msc‘.
Now, scroll down and search for NVIDIA services.

If any of the NVIDIA service status is not Running, then right click on it and select ‘start‘.
Now, double click on the services and change the start type to ‘Automatic‘.

Apply the changes and click on OK. Now restart your system.
Method Two
It is possible that the NVIDIA Geforce Experience is corrupted. So in this situation, you can reinstall the app to ensure that the issue doesn’t persist again.
Launch Settings app on your device, and then select Apps > Apps & Features.

Here, on the right side look for NVIDIA GeForce Experience. Select the app and click on Uninstall twice.
After that, reboot your computer and then download NVIDIA GeForce Experience again.
Hope that these workarounds would have worked for you to solve the error. In case, you know any other solution that worked for you, then share with us in the comments.
Viney Dhiman, the mind behind GeekerMag, is a seasoned content writer with over 12 years of experience. Specializing in simplifying complex tech concepts, he covers Windows OS, Android, iOS, web apps, and product reviews. His work can be found on popular tech websites like Gizmodo and The Verge, and he has been interviewed by the Microsoft Edge team.
Facing NVIDIA GeForce Experience not working or not opening Windows 10 issue? Learn how to fix NVIDIA GeForce Experience not opening on Windows 10 computer.
NVIDIA GeForce Experience
Something went wrong. Try restarting GeForce Experience.
This kind of NVIDIA GeForce Experience not opening or GeForce Experience not working error usually occurs when your Windows 10 computer is incapable to launch the GeForce Experience application properly.
NVIDIA GeForce Experience is the companion application to your GeForce GTX graphics card which takes the gaming experience to a whole new level. This application is responsible for keeping your drivers up to date, automatically optimizing your game settings, and giving you the easiest way to share your greatest gaming moments with your friends by capturing and sharing videos, screenshots, and live streams.

(Disclosure: This post contains affiliate links and images. I earn advertising/referral fees if you make a purchase by clicking them. There is no extra cost to you. See our full disclosure here. )
This application works on almost all Windows operating systems which come with NVIDIA Graphics cards installed on them. In short, GeForce Experience is your perfect gateway to a great PC gaming.
But over the past few days, we have received many frequent reports from our readers saying: How to fix NVIDIA GeForce Experience not opening at all on Windows 10 PC? Why NVIDIA GeForce Experience not working on Windows 10 and crashing repeatedly? What to do if GeForce Experience won’t open in Windows 10, but the process will keep running? And many more similar queries too.
If you have recently upgraded to Windows 10 then you might come across GeForce experience not working issue too. Usually, you will see Geforce icon in the system tray but when you will try to open it, it will throw up “Something went wrong. Try restarting GeForce Experience.” error.
In this GeForce Experience not opening Windows 10 fix tutorial, we are going to cover few easy methods which will help you in getting rid of GeForce Experience won’t open on Windows 10 problem.
According to some Gaming PC experts, if the user configuration of the NVIDIA application isn’t configured properly or if it is corrupted then you might face such errors. Sometimes, if your computer failed to start some NVIDIA services then the NVIDIA GeForce Experience not working or not opening error might occur.
But the great news is you can easily fix it just by making few changes. Here we are going to explain a couple of methods which will help you with GeForce experience not opening Windows 10 issue. Here we go:
Method 1: End NVIDIA Related Processes
Before following the below-explained solutions or doing any major changes on your computer, end all NVIDIA related processes from the Task Manager and try launching the NVIDIA GeForce Experience application again. It might help you. To do so:
Step (1): First of all, open Task Manager by right-clicking on the Windows 10 Taskbar and selecting the Task Manager option.

Step (2): In the Task Manager window, find NVIDIA related processes and right click on them and then select End task option.

Step (3): Once you have closed each and every process related to NVIDIA, now close the Task Manager window and open NVIDIA GeForce Experience application.
This simple solution works in most of the cases. If it doesn’t help and NVIDIA GeForce Experience not opening on your Windows 10 PC, you can start troubleshooting with the help of different method listed below.
Method 2: Restart NVIDIA GeForce Experience Service
If you are repeatedly facing the error “Something went wrong. Try restarting GeForce Experience.” then restarting NVIDIA GeForce Experience Service using the Windows Services is one of the most appropriate things to do.
Here’s how to restart NVIDIA GeForce Experience Service in Windows 10 operating system:
Step (1): At first, open Run dialog box by pressing Windows + R keys together and type services.msc in it and then hit Enter key.

Step (2): Once you are in the Services window, find NVIDIA GeForce Experience service and double-click on it.

Step (3): On its Properties dialog box, set the Startup type to Automatic and then Start the service in case it’s been stopped.
Step (4): Follow the same procedure to restart other NVIDIA related services such as NVIDIA Network Service and NVIDIA Streamer Service etc.
Once you have restarted these services, now try launching NVIDIA GeForce Experience application and see if you are getting any errors this time.
Method 3: Change Geforce Experience Compatibility Mode
Changing NVIDIA Geforce Experience compatibility mode is another helpful way to fix Nvidia GeForce Experience not working or not opening issue.
If GeForce Experience application is not compatible (consistent with another) with your Windows 10 computer then you might get error messages like “Something went wrong. Try restarting GeForce Experience.” or “Unable to connect to NVIDIA. Try again later.” etc. So just try to change the compatibility settings of GeForce Experience and see if it helps.
Here’s how to change Geforce Experience Compatibility Mode in Windows 10 PC:
Step (1): First of all, right-click on the GeForce Experience application icon and then select Properties option.
Step (2): On the GeForce Experience Properties dialog box, go to the Compatibility tab and check “Run this program in compatibility mode for:” option and then select a different operating system (Windows 7, Windows 8, or Vista) using the drop-down menu.
Step (3): Next, check “Run this program as an administrator” option and then click on the Apply and OK button.
This GeForce Experience not opening Windows 10 fix is quite effective and it should help you in order to get rid of the problem.
If changing compatibility mode for Geforce Experience doesn’t work for you, make sure to revert the compatibility settings back and then proceed with the other below explained solutions.
Method 4: Reinstall NVIDIA GeForce Experience
If the above-explained methods didn’t help you in solving NVIDIA GeForce Experience won’t open on Windows 10 computer problem then the next thing which you can do is try reinstalling GeForce Experience software on your system.
Here’s how to uninstall NVIDIA GeForce Experience on Windows 10 PC and reinstall it:
Step (1): At first, open Run dialog box by pressing the combination of Windows + R keys together and type appwiz.cpl in it then hit Enter key.
Step (2): Next on the Programs and Features window, right-click on the Nvidia GeForce Experience and then select Uninstall option to begin the uninstallation.

Step (3): Once the GeForce Experience is uninstalled from your computer, go to the official website and download the latest version of NVIDIA GeForce Experience application.

Step (4): Now install NVIDIA GeForce Experience application on your Windows 10 computer.
After the installation completes, open it up and see if GeForce Experience opening perfectly and working just fine.
In case, the If the “GeForce Experience won’t open” or “NVIDIA GeForce Experience not working” problem still persists then follow the next important solution of this tutorial.
Method 5: Reinstall NVIDIA GeForce Drivers
In most of the cases, a quick reinstallation of NVIDIA GeForce Driver usually fixes GeForce experience not working issue. Follow the steps mentioned below to find out how to reinstall NVIDIA GeForce Drivers in Windows 10 operating system:
Step (1): First of all, press the combination of Windows + X keys together and select Device Manager from the power user menu.

Step (2): On the Device Manager window, expand Display Adapters and right-click on the NVIDIA GeForce graphics card software then select Uninstall device option.

Step (3): Once the driver is uninstalled, go to the GeForce drivers download center and select your NVIDIA graphics card type and then operating system type. Finally, click on the Start Search button.

Step (4): Now, download the NVIDIA GeForce driver from the latest search results and install it on your computer.
After the driver installation, restart your PC and then open GeForce Experience to confirm if it’s working properly without any interruptions like “Something went wrong. Try restarting GeForce Experience.” or “Unable to connect to NVIDIA, Try again later.“
Method 6: Disable Antivirus Software
You can also try disabling the antivirus program which is installed on your Windows machine. It is known that at times antivirus software also hampers the performance of few specific applications which includes NVIDIA GeForce Experience too.
So, just temporarily disable the antivirus program on your PC and then try opening the GeForce Experience application. Sometimes, this solution works like a magic.
Conclusion
So, these are some of the most active and helpful ways to fix GeForce experience not working or GeForce experience not opening on Windows PC problem.
Try out all these methods one by one and get rid of Something went wrong. Try restarting GeForce Experience and NVIDIA GeForce experience won’t open issue.
Do let us know using the comments section below – Which NVIDIA GeForce Experience not opening Windows 10 fix helped you in resolving the issue completely?
You may also be interested in checking out:
- How to Fix Google Maps Not Working Properly?
- How to Fix Android Touch Screen Not Working Properly
- How to Fix Spell Check Not Working in Word 2016 / 2013 / 2010
- How to Fix Outlook 2010 Search Not Working
- How to Fix Windows Update not Working in Windows 7
- How to Fix “A device attached to the system is not functioning” in Windows 10
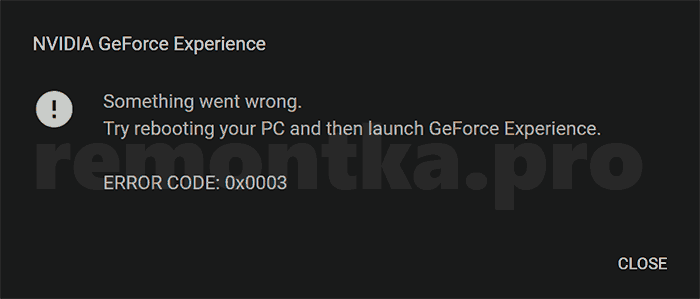
Одна из самых распространенных ошибок при запуске GeForce Experience от NVIDIA — ошибка с кодом 0x0003 (Error code 0x0003 «Something went wrong»). Если вы столкнулись с такой проблемой, обычно ее сравнительно просто исправить.
В этой инструкции подробно о том, чем может быть вызвана рассматриваемая ситуация и как исправить Error Code 0x0003 в GeForce Experience в Windows 10, 8.1 и Windows 7. Прежде чем приступать к любым действиям попробуйте простую перезагрузку компьютера или ноутбука, если вы этого еще не делали — может сработать.
- Проверка служб NVIDIA
- Переустановка GeForce Experience, драйверов видеокарты
- Решение проблем с сетью и интернетом
- Видео инструкция
Проверка работы служб NVIDIA
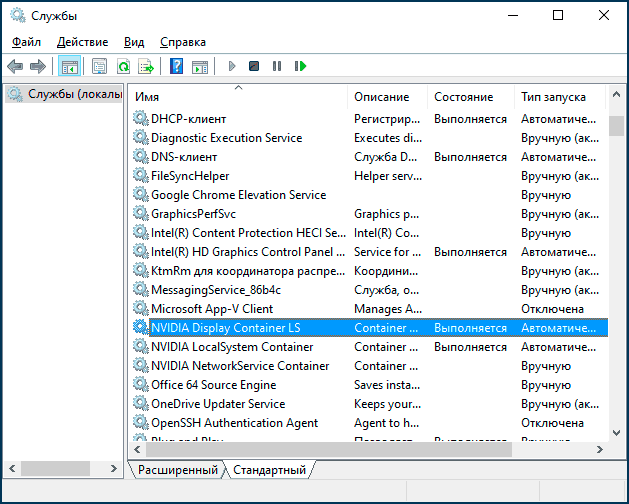
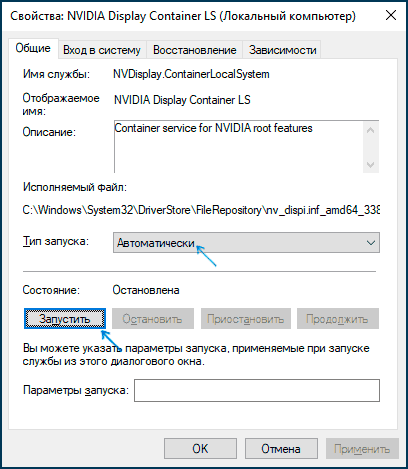
Прежде всего при появлении ошибки 0x0003 в GeForce Experience рекомендуется проверить правильные параметры работы служб NVIDIA:
- Нажмите клавиши Win+R на клавиатуре, введите services.msc и нажмите Enter.
- Откроется список служб Windows, найдите среди них службы NVIDIA и обратите внимание, что для служб NVIDIA Display Controller LS и NVIDIA LocalSystem Container тип запуска был «Автоматически», а состояние — «Выполняется», а для службы NVIDIA NetworkService Container — тип запуска «Вручную». Если в списке присутствует служба телеметрии NVIDIA, рекомендую перейти ко второму методу в следующем разделе инструкции.

- Если это не так, нажмите дважды по нужной службе, измените тип запуска и примените настройки. Для тех служб, где тип запуска «Автоматически» после применения нажмите кнопку «Запустить».

После изменения параметров запуска служб, проверьте, запускается ли GeForce Experience.
Обычно, при условии, что причина ошибки была именно в службах, NVIDIA GeForce Experience исправно запускается.
Переустановка GeForce Experience и драйверов
Еще один часто срабатывающий метод для исправления Error Code 0x0003 в NVIDIA GeForce Experience — простая переустановка программы:
- Зайдите в Панель управления — Программы и компоненты, выберите «NVIDIA GeForce Experience» в списке и нажмите «Удалить/Изменить».

- Удалите программу.
- Скачайте последнюю версию GeForce Experience с официального сайта NVIDIA https://www.nvidia.com/ru-ru/geforce/geforce-experience/ — установите и проверьте работу программы.

Если этот метод не помог, попробуйте также полностью удалить все программы и драйверы NVIDIA, сделать это можно следуя инструкции: Как полностью удалить драйверы видеокарты NVIDIA, AMD или Intel. Затем вручную загрузите последние доступные драйверы для вашей видеокарты с официального сайта NVIDIA и установите их (рекомендую при установке поставить отметку «Чистая установка».
Решение проблем с сетью и Интернетом
Проблемы с доступом к сети также могут оказаться причиной ошибки с кодом 0x0003 при запуске GeForce Experience:
- Если в последнее время вы устанавливали антивирусы или файрволлы, попробуйте отключить их и проверить, решило ли это проблему.
- В командной строке от имени администратора попробуйте выполнить команду netsh winsock reset и перезагрузить компьютер после её выполнения.
- Если у вас Windows 10, попробуйте выполнить сброс сетевых настроек встроенными средствами системы.
Видео инструкция по исправлению ошибки 0x0003 в NVIDIA GeForce Experience
Как правило, один из указанных методов позволяет исправить проблему, а GeForce Experience исправно запускается и работает, не сообщая о каких-либо ошибках.