
If you are an accountant or a corporate executive who works on a Windows 11 PC or laptop, we are sure you know the significance of the Numpad on your keyboard. However, we have seen many users report that after upgrading their PCs and laptop to the latest Windows 11 OS, they are facing the Numpad not working issue.
So, in this in-depth fix guide, we bring you some of the top solutions that you can try to fix the Number pad not working in Windows 11 issue on your laptop or PC. Check them out!
Fix Number Pad Not Working in Windows 11
Below we have listed some of the best and working fixes for the Numpad not working in Windows 11 issue. Be sure to try them all out on your laptop or PC one by one to see which one works. Now, with that out of the way, let’s get into the fixes, shall we?
1. Restart Your Windows 11 PC or Laptop
Restarting your Windows 11 PC or laptop might sound like the most generic fix but believe me you, it often proves to be highly effective for system issues such as the Numpad not working in Windows 11 issue. A quick restart of your Windows system force-closes all the running applications and background processes, and even clears the RAM.
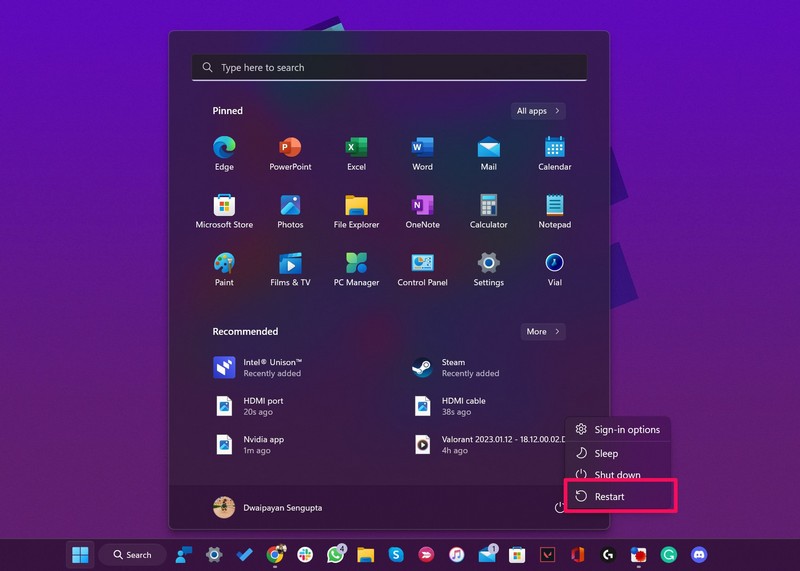
Hence, there is a high chance that restarting your Windows 11 device would fix the Numpad not working and get it up and running once again. So, head over to the Power options in the Start menu on your Windows 11 device and give your system a restart.
2. Check Your Keyboard and Connections
If you are reading this, we assume that the restart did not fix the Numpad not working in Windows 11 issue on your device. If that is the case, the next things you might want to check are your keyboard and the physical connections. So, check if the USB connector is properly inserted into your PC or laptop port or not and whether or not your keyboard is operational.
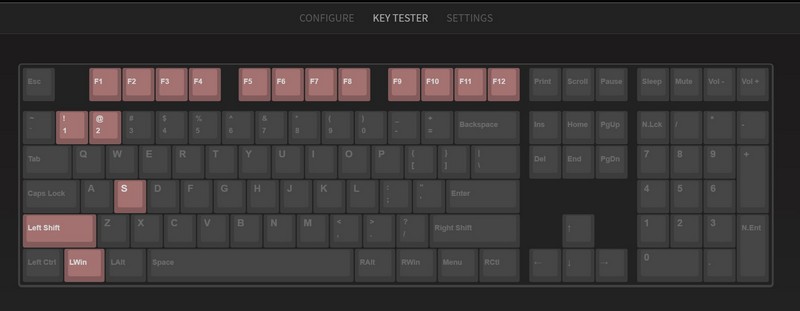
To check if your keyboard is alright and whether or not all the keys are working on your device, you can use the key tester to test all the keys. If you find that the Numpad keys are not working, you can contact the customer care of the keyboard brand that you are using to get it replaced, if it is still under warranty.
You also might want to check if the Numpad is locked on your keyboard or not. In this case, you can simply press the dedicated Num Lock button on your keyboard to enable the Numpad on your Windows 11 device.
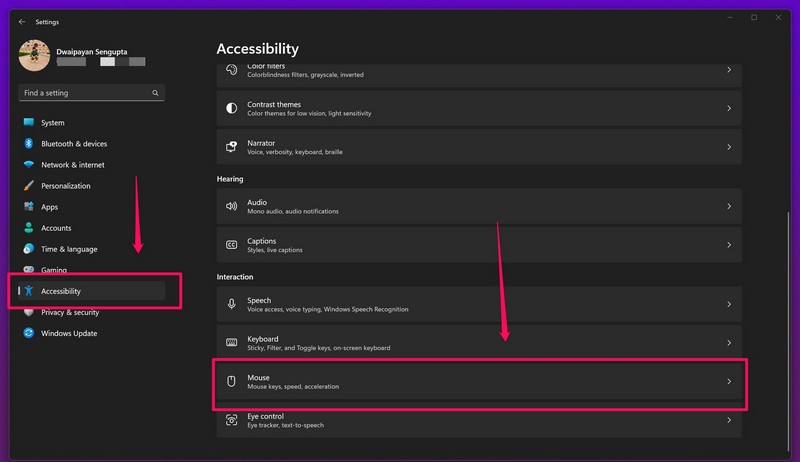
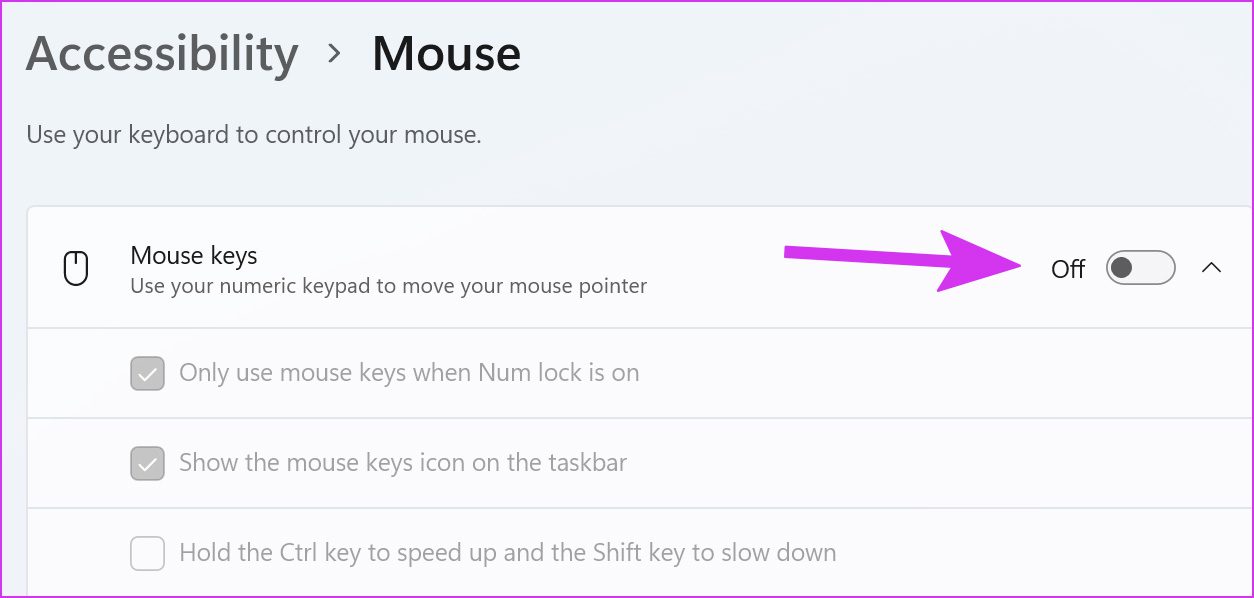
3. Disable Mouse Keys in Windows 11 Settings
Now, if you did not know it already, Windows allows users to use the number pad on the keyboard to control the mouse pointer. So, if you somehow enabled the Mouse keys feature on your PC or laptop, you might face the Numpad not working issue on your Windows 11 device as the number keys will control the cursor.
Follow the steps right below to disable the Mouse keys feature in Windows 11 and fix the Numpad not working issue:
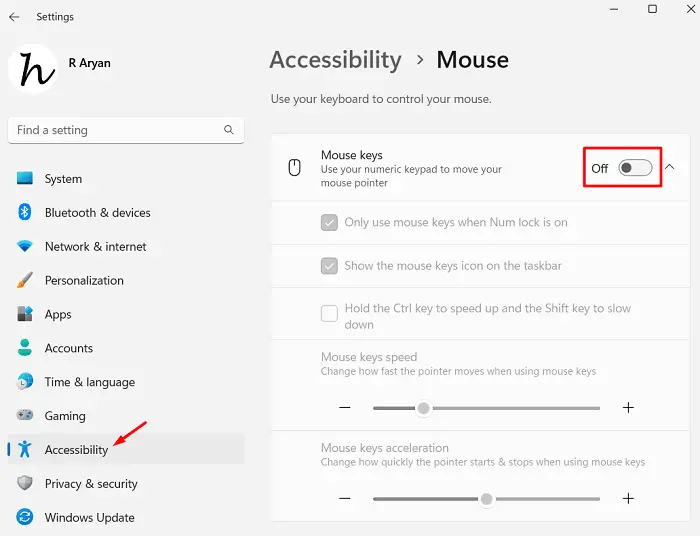
1. Press the Windows + I shortcut to launch the Settings app.
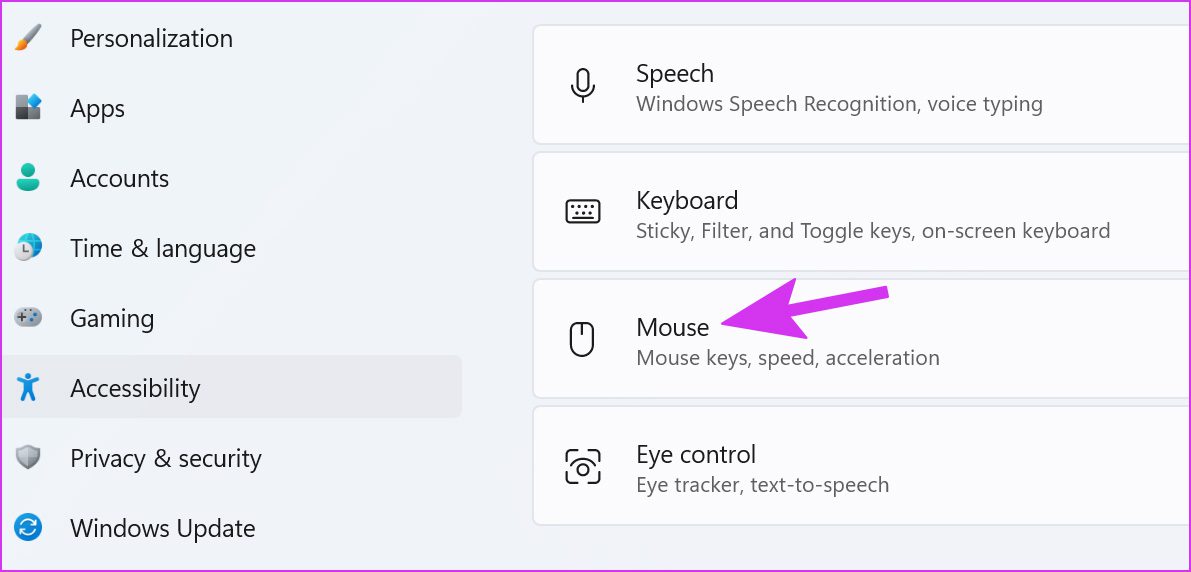
2. Go to the Accessibility tab on the left nav bar and click the Mouse option.
3. Now, click on the toggle for the Mouse keys option to disable it in Windows 11.
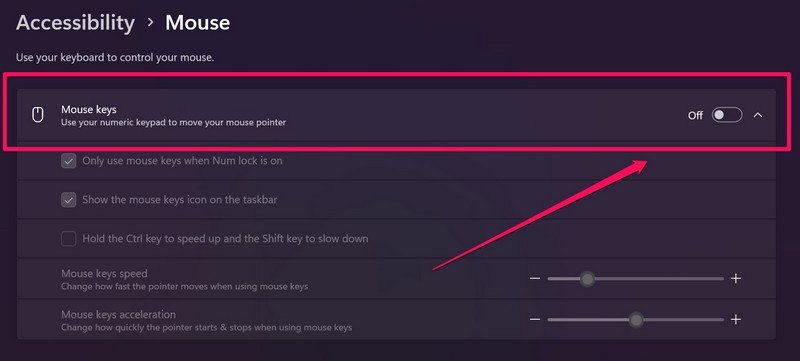
After making this change, check if the Numpad not working issue is fixed on your Windows 11 device or not.
4. Update the Keyboard Driver in Windows 11
Amongst other factors like misconfigured settings, running an outdated keyboard driver can cause the Numpad not working issue in Windows 11. So, if you have not updated your keyboard driver in a while, it is about time you do that. Follow the steps right below to update the keyboard driver on your Windows 11 PC or laptop:
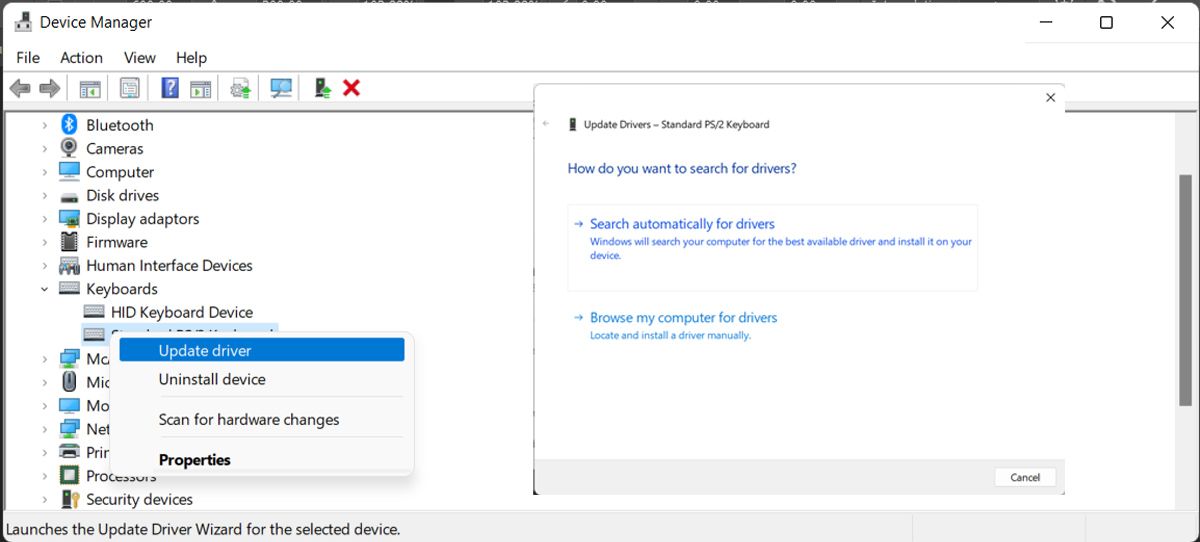
1. Right-click on the Start button on the Taskbar to open the Quick Links menu.
2. Click the Device Manager option.

3. In the following window, click the tiny arrow beside the Keyboards option to expand it.
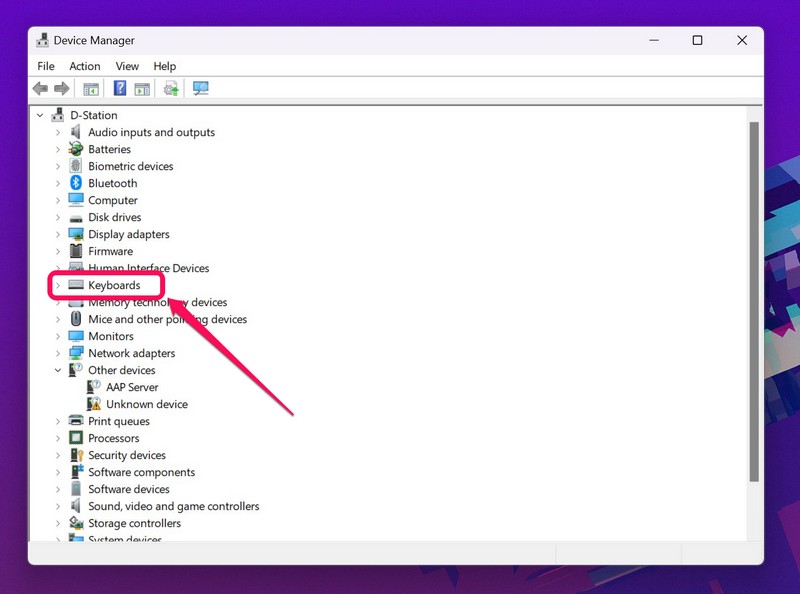
4. Find the primary keyboard driver for your Windows 11 PC or laptop.
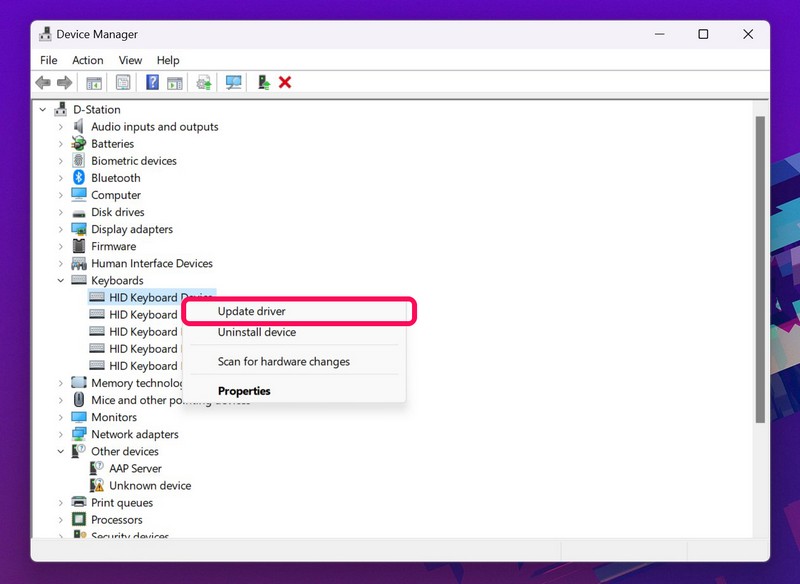
5. Right-click on the keyboard driver and choose the Update driver option on the context menu.
6. Choose the Search automatically for drivers on the following prompt.
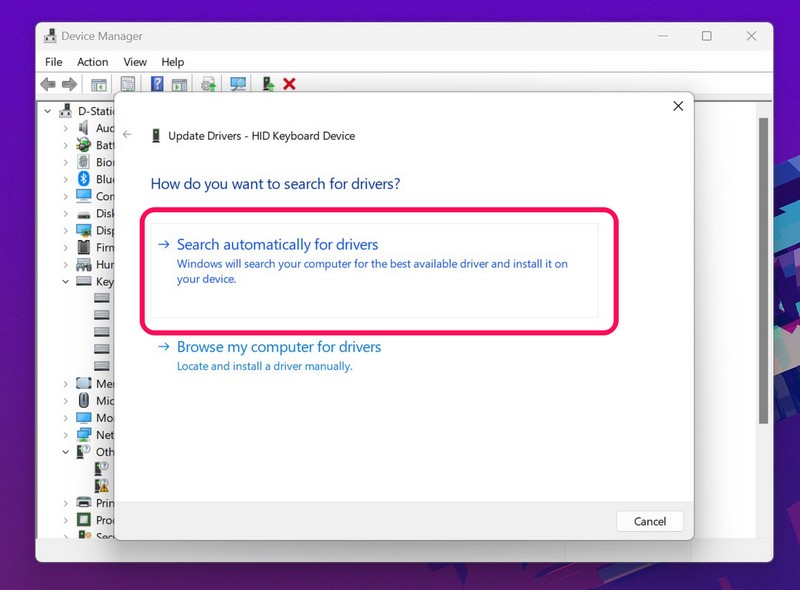
7. Wait for the update process to complete.
8. Restart your Windows 11 PC or laptop.
5. Re-Install the Keyboard Driver in Windows 11
Other than outdated drivers, minor issues in the keyboard driver of your PC or laptop could also cause the Numpad not working issue. In this case, you can completely uninstall the keyboard driver and let Windows re-install it on your device. Follow the steps below to do just that:
1. Right-click on the Start icon and open the Device Manager from the Quick Links menu.
2. Expand the Keyboards option by clicking the tiny arrow beside it.
3. Right-click on your primary keyboard driver and select the Uninstall device option on the context menu.
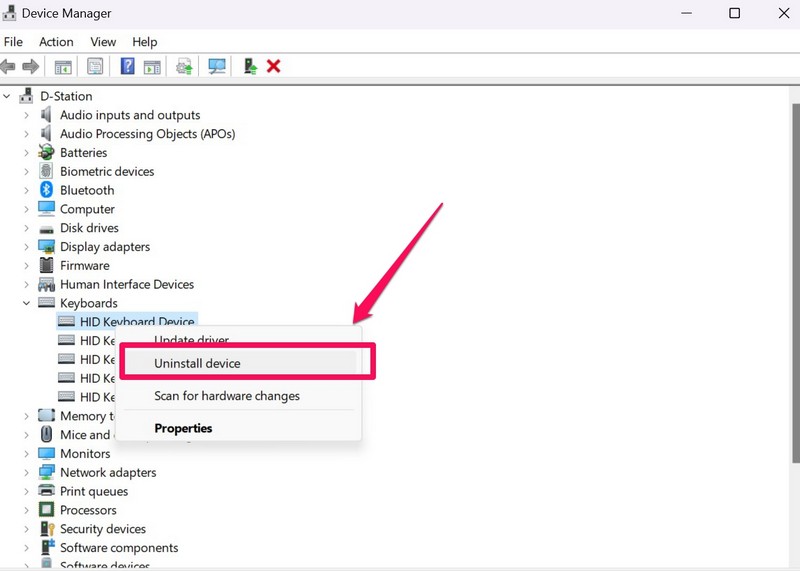
4. Confirm your action.
5. Wait for the process to complete.
6. Restart your Windows 11 PC or laptop.
After the restart, Windows will automatically detect the hardware change and re-install the keyboard driver. And if the driver was responsible for the Numpad issue on your Windows 11 device, it should be fixed at this point.
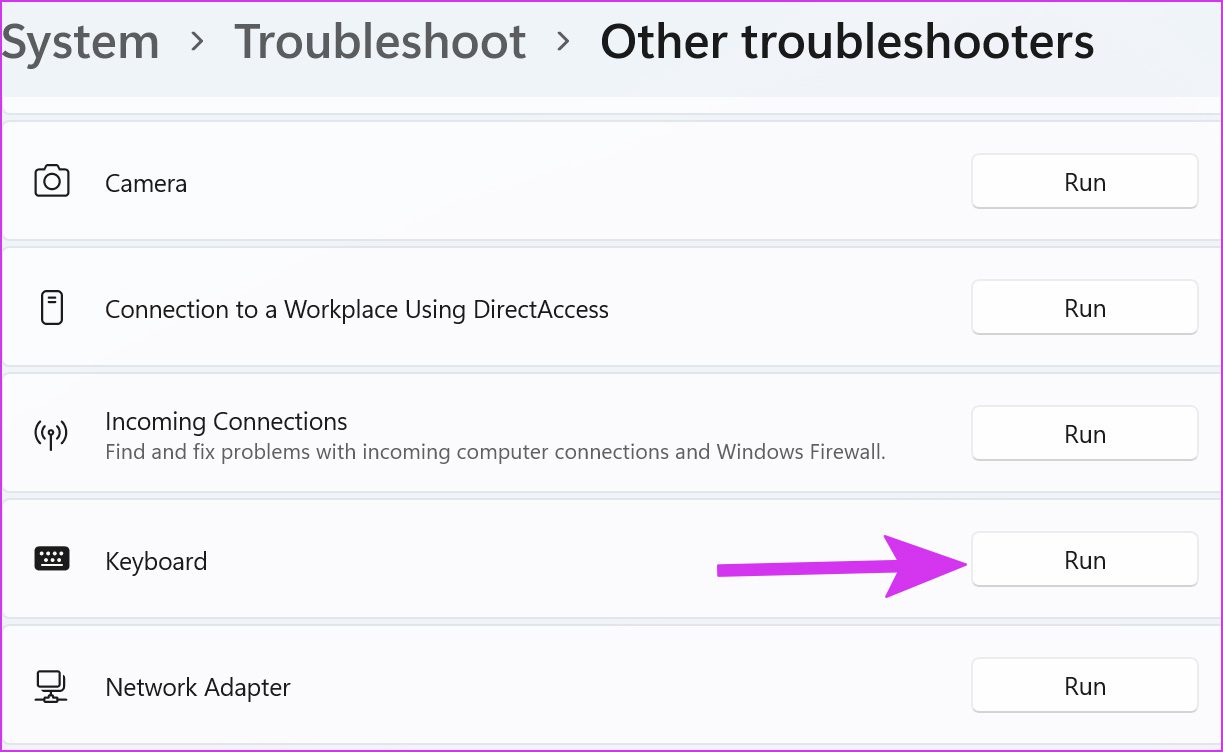
6. Troubleshoot Your Keyboard in Windows 11
Now, if the above fixes did not work and you are still stuck with an inoperable Numpad, chances are that a misconfigured setting is causing the Numpad not working issue in Windows 11.
If that is the case, you can use the integrated, dedicated troubleshooter in Windows 11 to troubleshoot the hardware and fix internal issues. Check out the steps below to troubleshoot your keyboard in Windows 11 and fix the Numpad not working issue right away:
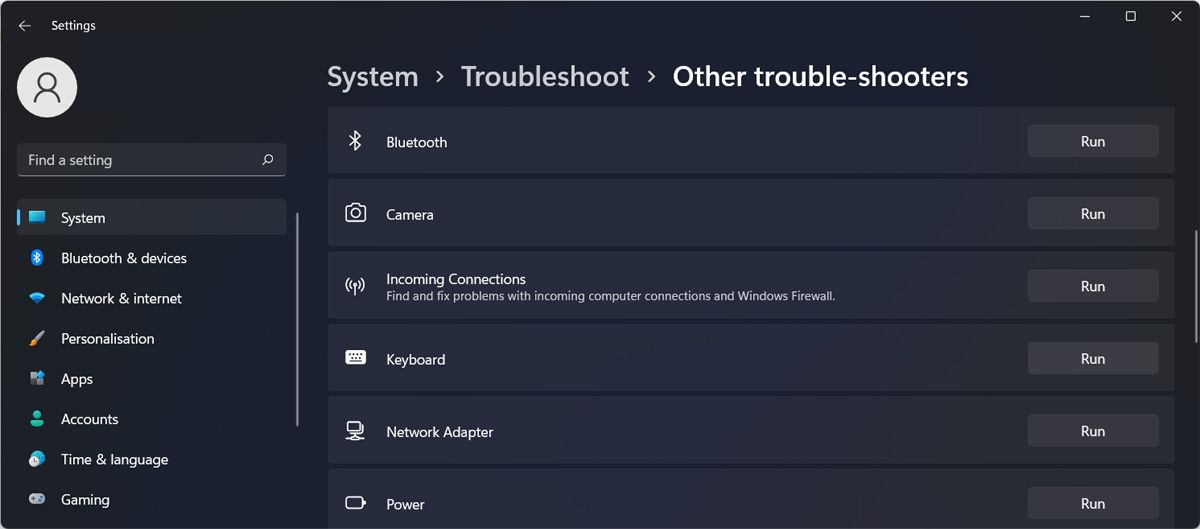
1. Use Windows + I to launch the Settings app in Windows 11.
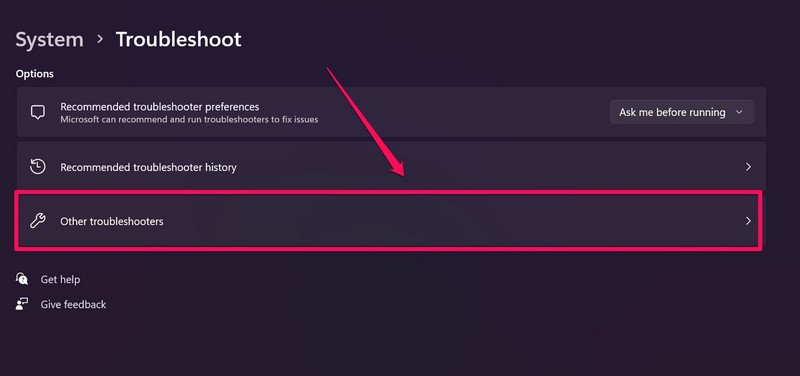
2. Under the System tab on the left nav bar, go to the Troubleshoot menu.
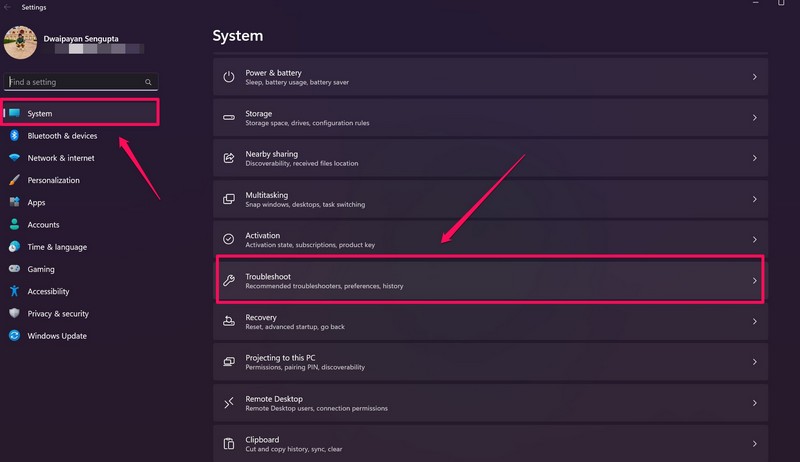
3. Click the Other troubleshooters button.
4. Find the Keyboard option on the following list of troubleshooters and click the Run button beside it.
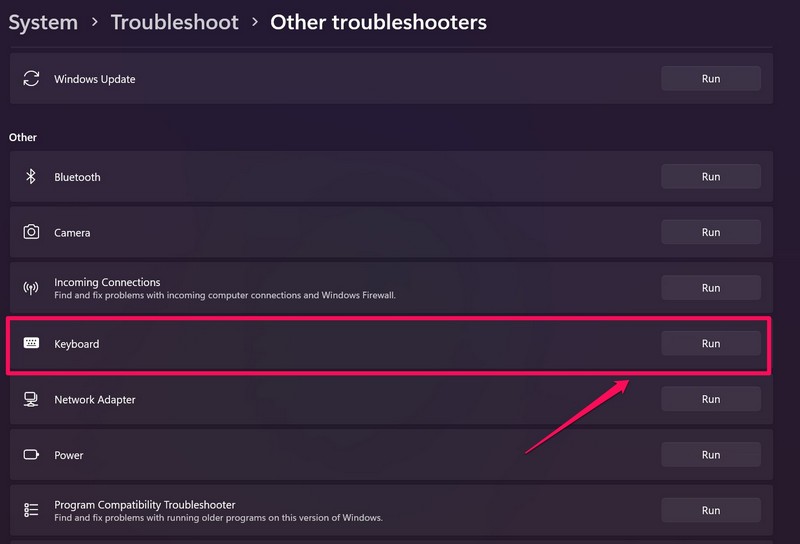
5. Wait for the troubleshooting process to complete.
Restart your Windows 11 PC or laptop and check whether the Numpad is working on your device or not.
7. Check for Windows Updates in Windows 11
Much like how outdated keyboard drivers can cause the Numpad not working issue in Windows 11, running an outdated Windows version can also cause such issues on your PC or laptop. However, the good news is that you can easily check for Windows updates in Windows 11 and update your Windows version. Here’s how you can do that:
1. Press the Windows + I shortcut to launch the Settings app in Windows 11.
2. Under the Windows Update tab on the left navigation bar, click the Check for updates button.

Note: Make sure you are connected to an active internet connection during this process.
3. Once the latest available updates show up, click the Download and install button.
4. Wait for the update to complete.
5. Restart your Windows 11 device after the process.
8. Use Windows Registry Editor to Fix Numpad in Windows 11
If all the above solutions fail to revive the Numpad on your Windows 11 PC or laptop, you can use the Registry Editor to fix it. However, before proceeding with this step, it is recommended that you back up your current registry files in Windows. You see if you make an incorrect change in the Registry Editor in Windows, it can cause severe system issues.
In that case, you can use the backup to restore your device. Also, be sure to follow the below steps just as they are to avoid this kind of situation. Now, with that out of the way, let’s take a look at how you can use the Registry Editor in Windows 11 to fix the Numpad not working issue. Check it out right below:
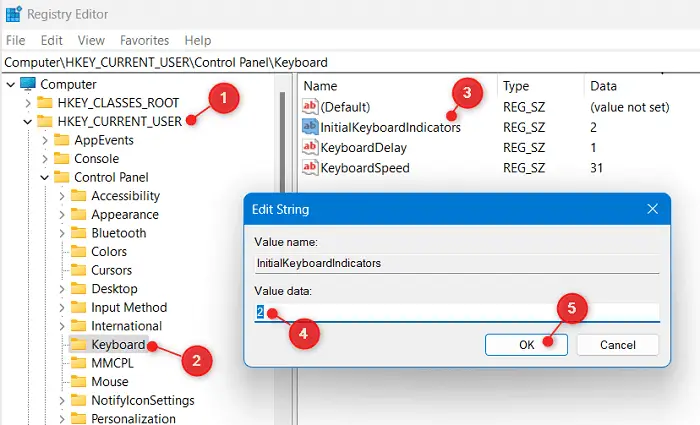
1. Press the Windows + R shortcut to open the Run tool.
2. Type in regedit in the text field and press Enter.
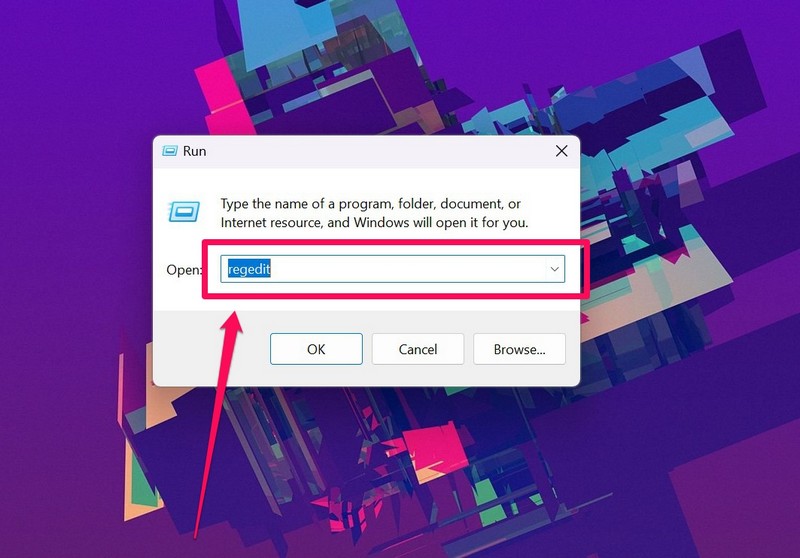
3. Click Yes on the following User Account Control prompt.
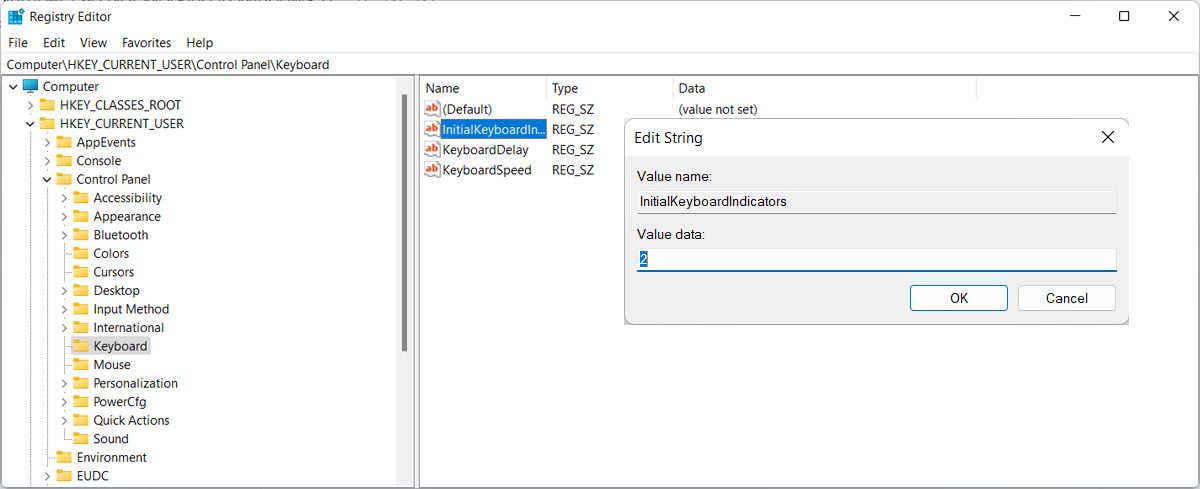
4. Once the Registry Editor opens, copy and paste the following path on the above URL bar:
HKEY_CURRENT_USER\Control Panel\Keyboard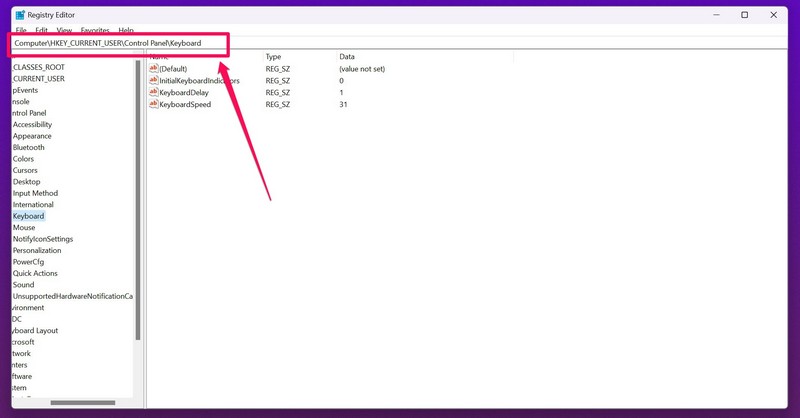
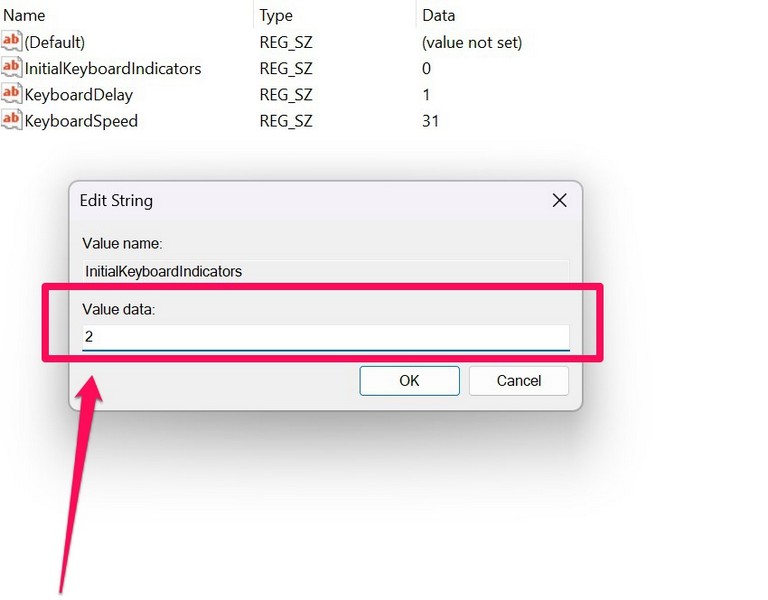
5. On the right panel of the window, find the InitialKeyboardIndicators registry key and double-click on it.
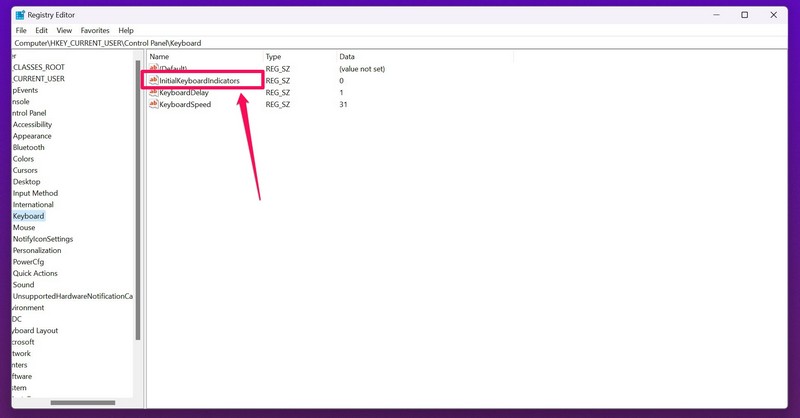
6. In the Edit String window, change the Value data to 2 and click the OK button to save the changes.
7. Restart your Windows 11 PC or laptop.
FAQs
Why is the Numpad not working in Windows 11?
There can be various reasons why the Numpad is not working in Windows 11, including misconfigured keyboard settings, outdated keyboard drivers, outdated Windows versions, issues with the keyboard unit, and a few others.
Can I use an on-screen keyboard in Windows 11?
Yes, you can easily use an on-screen keyboard in Windows 11. Simply press the Ctrl + Windows + O keyboard shortcut to launch the on-screen keyboard in Windows 11.
How to disable Num Lock without the Num Lock in Windows 11?
To do this, you can press Ctrl + Windows + O to bring up the on-screen keyboard, check the box for Turn on numeric key pad in the Options window, and use the Num Lock button on the on-screen keyboard to disable Num Lock without using the physical Num Lock button on your keyboard.
Wrapping Up
So, these were some of the best solutions that you can try on your PC or laptop to fix the Numpad not working issue in Windows 11. We hope one of the above methods works for you and that you are able to get the Numpad on your keyboard up and running once again.
If you are facing other keyboard issues in Windows 11 such as the Function-keys not working or the Windows key not working, check out our in-depth fix guide on those via the provided links.
The Number Pad keys not working is one of its kind issues and it may happen either because of internal glitches or when you have configured the local settings incorrectly. For example, enabling Mouse Keys in Windows doesn’t let the users use the number keys effectively. If you have turned on this accessibility feature, you better turn it off, and the Number Pad keys start working just fine.
In addition to this, keeping the Num Lock disabled might also result in a malfunctioning Keyboard in Windows 11/10. Worry not, as you can always resolve this issue by applying a few tricks here and there. Let’s explore the five key fixes that ought to solve this issue on your computer. If nothing works, use a virtual keyboard or replace your keyboard with a new one.
How to Fix Ctrl + Alt + Delete Not Working on Windows 11
If the Number keys are not appearing when pressed in Windows 11/10, consider applying the below fixes one after another. Though you may attempt these fixes in any order, we suggest following the same order as they were put in.
- Turn On Num Lock
- Disable Mouse Keys
- Update the Keyboard Drivers
- Troubleshoot Keyboard
- Tweak the Registry Editor
1] Turn On Num Lock
At times, users unnecessarily worry about their Number Pad not working while the Num Lock is disabled on their PCs. So, before you apply any real fix, we suggest having a look at the Num Lock key and pressing it once. After you press this key, ensure typing some number keys and check if you do see any number corresponding to the pressed keys.
Note: Several third-party keyboard manufacturers provide a light next to the Num Lock that tells us whether this key has been in use or not. If you don’t see any lighting signal available nearby Num Lock, you better check this manually by pressing the Num Lock one or two times.
[Solved] Keyboard Not Working in Windows 11/10
2] Disable Mouse Keys
There’s an added accessibility on Windows PC that lets you use your numeric keypad to move your Mouse pointer. If you have enabled this feature, there will not appear any numbers when you press the number keys available on the right side of your keyboard. What it actually does is shift your mouse pointer left, right, top, or to the bottom of the screen.
Turn off this accessibility feature and you will find the number pad working again on your computer. Here’s what you need to do to disable Mouse keys in Windows 11 –
- Press Windows + I to launch Settings.
- Select Accessibility from the left pane and head over to the right pane.
- Scroll down to the Interaction section and select Mouse.
- On the upcoming screen, you will see an option to Mouse Keys at the top.
- Turn off the toggle switch available next to the Mouse keys.
Close the Settings window and press again the Num Lock key. Hopefully, the Number Pad starts working thereafter.
Windows 11 Keyboard Shortcuts – Five New Hotkeys (Win+?)
3] Update the Keyboard Drivers
The number keys on your keyboard might also stop working if the related drivers have somehow corrupted or when you haven’t updated them for a long time. As you must know, a driver is responsible for the smooth interaction between the hardware and software, you must check for any pending driver updates for your Keyboard.
Note: Device Manager has become obsolete these days. Therefore, you need not require opening the same and search for pending updates there. In case you search over there, you will find all your drivers are up to date and don’t require an update.
Upgrade or manually download and install the pending updates to your Keyboard and check if the Number Pad starts working thereafter. Here’s how to check for pending driver updates in Windows 11 –
- Press Windows + I to launch Settings.
- Select Windows Update from the left navigation and head over to the right pane.
- Scroll down and locate Advanced options under More options. Once found, click on it once.
- Scroll down again to “Additional options” and click to expand Optional updates.
- This is the section where you will find all the pending updates related to any driver, firmware, or other software.
- If you indeed find some pending updates to your device or its components, tick all the checkboxes, and hit Download & Install.

- Wait for all the driver updates to download and install on their own. And, as soon as this is over, restart your computer.
From the next login, you must be able to use the number keys on your computer as usual. Let’s know in the comment section if this solution works.
4] Troubleshoot Keyboard
Although the above three methods alone will help you to get back the Number Pad working again, there are cases when the keys still won’t work. This mostly happens because of some internal glitches or bugs. If that’s the case, you must run the Keyboard troubleshooter by following these easy steps –
- Press Windows + X, and select Settings from the Power menu.
- Select System from the left navigation and move to the right pane.
- Click Troubleshoot > Other troubleshooters next and when it expands, locate Keyboard under the Other section.
- You will see a Run button available beside the Keyboard. Well, click on this button and follow the on-screen instructions that appear moving forward.

- Wait for this tool to automatically detect and resolve the internal glitches and bugs on your computer.
After the troubleshooting completes, restart your PC, and check if the Number Pad starts working again. If not, follow the next workaround.
Get Frequently Used Windows 10 Keyboard Shortcuts
5] Tweak the Registry Editor
Third-party apps are known to interact with the system files and make them corrupt in Windows 11 or 10. The Number Pad not working issue could also be a direct result of these interactions. If that’s the case, you must check and configure the keyboard’s registry settings to their default values. Here’s how to check and tweak the keyboard inside the registry.
- Press Windows + R to launch the Run dialog.
- Type “Regedit” without quotes on it and hit OK.
- The UAC window will prompt next. Click Yes to authorize opening the registry as an administrator.
- When the registry editor launches, navigate to the below path on it –
HKEY_CURRENT_USER > Control Panel > Keyboard
- Locate InitialKeyboardIndicators on the right pane and double-click on this REG_SZ entry.
- On the Edit String window, put “2” under the Value data field, and hit OK.
- Close the registry and other opened windows in the background, and restart your PC.
Sign back into your device again and check if the Number Pad keys start working now.
Enable or Start using the Virtual keyboard
If none of the above solutions seem to address the Number Pad not working issue, the problem might lie within the Keyboard itself. One may confirm the same by enabling and using the Virtual keyboard on your computer. Here’s how to enable the Virtual Keyboard in Windows 11 –
- Close or Minimize all running windows on your computer and press “Ctrl + Windows + O“. Using this shortcut will automatically enable the On-screen keyboard on the display screen.
If this shortcut doesn’t work on your computer, you may navigate to Accessibility > keyboard, and turn on the toggle switch available next to the On-screen keyboard.
Note: By default, a virtual keyboard doesn’t display the Numeric keypad. Since you require confirming the same, click the Options button. Make sure to tick the checkbox available left of “Turn on numeric key pad“, and hit OK.
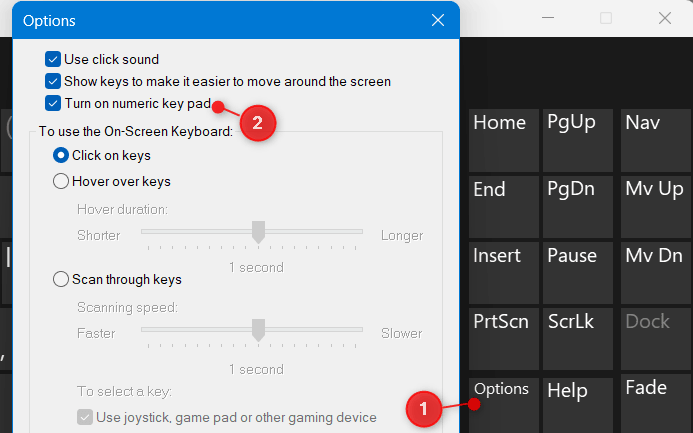
You may now see the virtual keyboard stretching a bit further on the right side and displaying the Number keys there. Click on any number key and check if the same appears where you are trying to put the numbers.
- In case the keys are working all right here, you must replace your real keyboard with a new one.
I hope the above tips and tricks help to get your number pad keys working again on your Windows PC. In case you face any difficulty following this article, let’s know in the comment section.
Helping millions of people navigate the world of technology.
Quick Tips
- Open Settings and go to Accessibility > Mouse > disable the Mouse keys toggle.
- Go to Settings > System > Troubleshoot > Other troubleshooters > go to Keyboard and click on Run.
- Open Device Manager > Keyboards > right-click your keyboard > Uninstall device > confirm > restart Windows 11.
Basic Fixes:
- Enable Num Lock on the keyboard: Most keyboards come with a dedicated Num Lock key. When you disable it, the number pad stops working. So, check whether you need to re-enable the Num Lock key to start typing numbers.
- Clean the physical keys: If the number pad keys are filled with dust particles, you might face issues. So, clean around the keys and dislodge any such debris. Then, try using the number pad again.
- Check for keyboard damage: If you accidentally damage your keyboard, you might end up with a broken number pad. In this case, you might need to replace the keyboard with a wired or wireless keyboard.
- Use the on-screen keyboard: If you’re waiting on a new keyboard or are intermittently facing issues when using the number pad on your device, you can use the on-screen keyboard as a replacement.
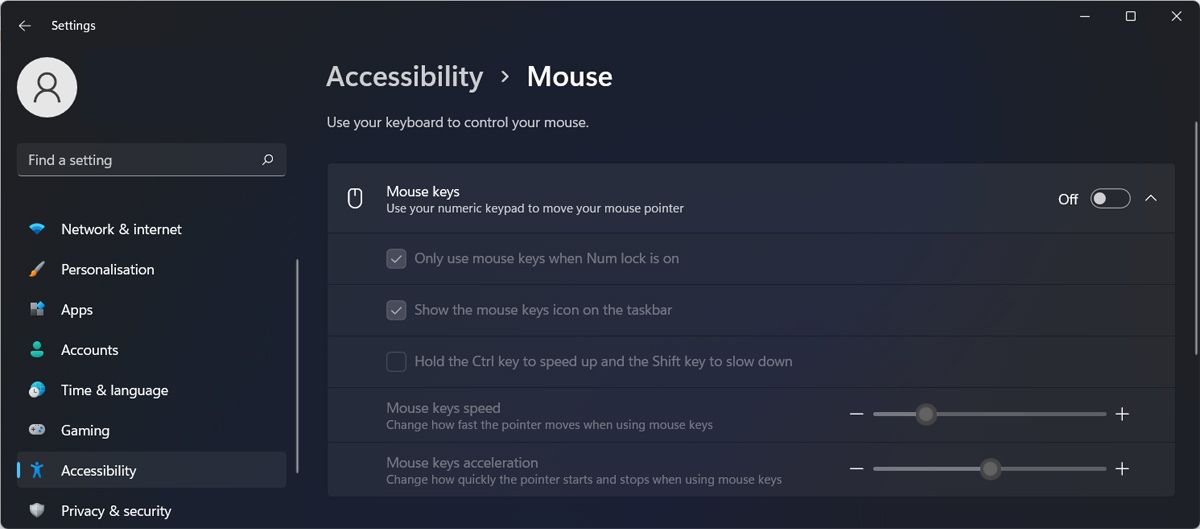
Fix 1: Turn off Mouse Keys
When you enable mouse keys on Windows 11, you can use the numeric keypad to move your mouse pointer. However, this can cause the number pad to not work properly on your Windows 11 device. So, here’s how you can disable mouse keys.
Step 1: Use the Windows + I key to open Settings and go to Accessibility. Click on Mouse.
Step 2: Disable the Mouse keys toggle.
Fix 2: Update Keyboard Drivers
The latest Windows 11 update might have developed incompatibility with your device’s keyboard drivers. You need to download the latest keyboard drivers to ensure it stays compatible. Follow the steps below to do it.
Step 1: Open Device Manager and click on Keyboards. Right-click your keyboard and select Update driver.

Step 2: Select Search automatically for drivers. Wait for the driver updates to install and check.

Fix 3: Run Keyboard Troubleshooter
If the number pad has stopped working suddenly, you can run the keyboard troubleshooter and fix the issue. Here’s how to do it.
Step 1: Open Settings and go to System. Select Troubleshoot and click on Other troubleshooters.

Step 2: Go to Keyboard and click on Run. Wait for the troubleshooter to run and check the results.
Fix 4: Reinstall Keyboard Drivers
If you didn’t find any update for the keyboard’s drivers, then you can reinstall the ones on your computer. First, you’ll need to uninstall the old keyboard drivers and reinstall the latest ones again. Here’s how to do it.
Step 1: Open Device Manager and click on Keyboards. Right-click your keyboard and select Uninstall device.

Confirm when prompted. Then, restart your computer and the system will reinstall the required drivers. Once done, try using the number pad again to check.
Was this helpful?
Thanks for your feedback!
Last updated on 19 August, 2024
The article above may contain affiliate links which help support Guiding Tech. The content remains unbiased and authentic and will never affect our editorial integrity.
Sign in to your MUO account
If you use your number pad to quickly enter numbers you’ll miss it when it stops working. However, there are ways to get it working again on Windows 11.
As such, let’s explore how you can fix a malfunctioning number pad on Windows 11, alongside a quick replacement trick if you don’t have the time or patience to fix the number pad now.
1. Turn On Num Lock
If you notice your keyboard does some weird things such as scrolling up and down instead of writing numbers, the num pad is disabled. The quickest way to enable it is to press the Num Lock key. Usually, keyboards come with a small light for special keys such as Num Lock or Caps Lock. If the light is on, your number pad is enabled.
If you notice the keys don’t work as usual, and you feel some resistance when pressing it, it may be time to clean your keyboard.
If there’s nothing wrong with the key itself, move on to the next solutions.
2. Turn Off the Mouse Keys
If you’ve enabled the mouse keys feature on your Windows 11 computer, you can use the numeric keys to control your cursor. And while this is a good option to enable when your mouse is malfunctioning, it will stop you from using the number pad as usual.
Here is how you can disable mouse keys:
- Open the Start menu and select Settings.
- Head to Accessibility > Mouse.
- There, head to the Use your keyboard to control your mouse and turn off the toggle next to Mouse keys.
- Enable the number pad and check if it’s now working.
3. Run the Keyboard Troubleshooter
If a malfunctioning number pad isn’t the only problem regarding your keyboard, you should run the Windows keyboard troubleshooter to get your keyboard working as usual. Here is how you can do it:
- Press Win + I to bring up Settings.
- Go to System > Troubleshoot > Other trouble-shooters.
- Scroll down to Keyboard and click the Run button.
Once it finishes the troubleshooting process, Windows will notify you about the detected problems and suggest solutions to fix it.
4. Update the Keyboard Drivers
There’s a chance your keyboard’s number pad isn’t working because of an outdated, corrupt, or incompatible keyboard drive. If you’re using an external keyboard, you can download the latest driver version from the producer’s website, or you can use Device Manager.
- Press Win + X and select Device Manager.
- Expand the Keyboards menu.
- Right-click the keyboard’s driver and select Update driver.
- In the pop-up window, click Search automatically for drivers.
Windows 11 will now look for a verified driver version and install it.
5. Edit the Windows Registry
Maybe a third-party app changed your system settings, and now you can’t use the number pad. In this case, editing the registry should fix the problem.
- Open Registry Editor with administrative rights.
- Head to HKEY_CURRENT_USER > Control Panel > Keyboard.
- Open InitialKeyboardIndicators.
- Set Value data to 2 and click OK.
- Restart your computer and check if the number pad is now working.
6. Use the Virtual Keyboard
If you couldn’t get the number pad working, you can use Windows 11 virtual keyboard as a replacement. To launch it, press the Ctrl + Windows key + O keyboard shortcut.
If this doesn’t work, you can open it from the Settings menu. Go to Accessibility > Keyboard and turn on the toggle next to On-screen keyboard.
By default, the virtual keyboard doesn’t include the number pad. To enable it, click Options and check the Turn on numeric key pad option.
If you’re looking for a virtual keyboard with more customizing options, you can install a free virtual keyboard compatible with Windows 11.
Get the Num Pad Working Again
With these quick tips, you should get the number pad working again. To avoid any future problems, don’t go too crazy when it comes to remapping your keyboard.
If nothing worked, and you still can’t use the number pad, you might have to take your laptop to a professional service or shop for a new external keyboard.
Capacitive Sensor Reset
-
Unplug your keyboard (if external) fa-plug
-
Press and hold all number keys simultaneously for 30 seconds
-
Reconnect the keyboard and test

Try this reset if some keys are unresponsive.
Function Key Lock Override
-
Locate the Fn key on your keyboard
-
Look for a key labeled Num Lk or similar
-
Press Fn + Num Lk to toggle numpad functionality

Toggle if number keys aren’t responding.
Use the Registry Editor
-
Press Win + R
-
Navigate to the following key: HKEY_USERS.DEFAULT\Keyboard Layout\Preload
-
Locate the value named «1» (corresponds to the default keyboard layout)
-
Double-click the value and modify it:
- Enter the code for your desired keyboard layout
- Examples:
- 00000409: US English
- 00000407: German
- 00000809: UK English
-
Close the Registry Editor
-
Restart your computer to apply the changes
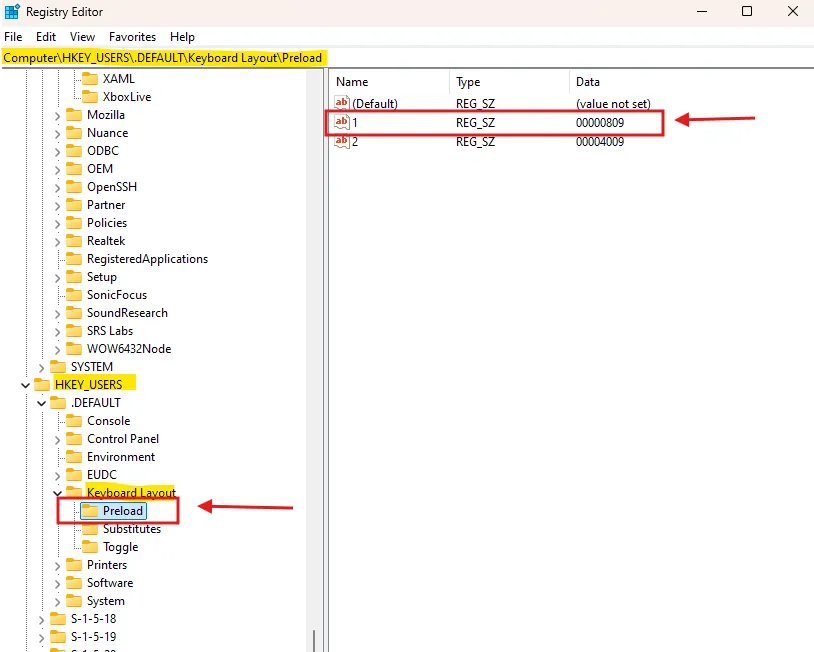


Exercise caution when editing the registry. Incorrect modifications can cause system issues.
IME (Input Method Editor) Reset
-
Open Settings
-
Click Time & Language
-
Select Language & region
-
Find your main language
-
Click the three dots (…) next to it
-
Choose Language options
-
Under «Keyboards», delete extra ones
-
Keep only your main keyboard
-
Restart your computer
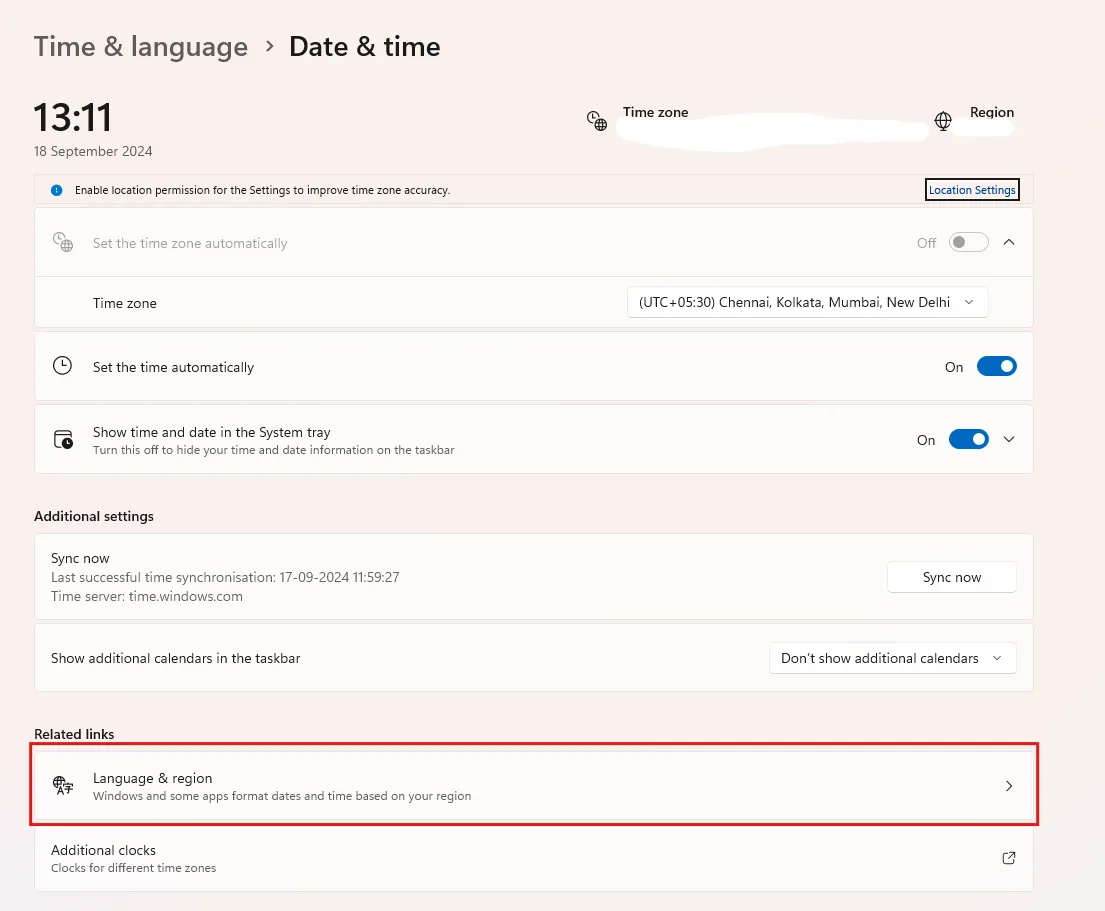

Reset the IME to troubleshoot language-specific keyboard issues.
USB Selective Suspend Setting
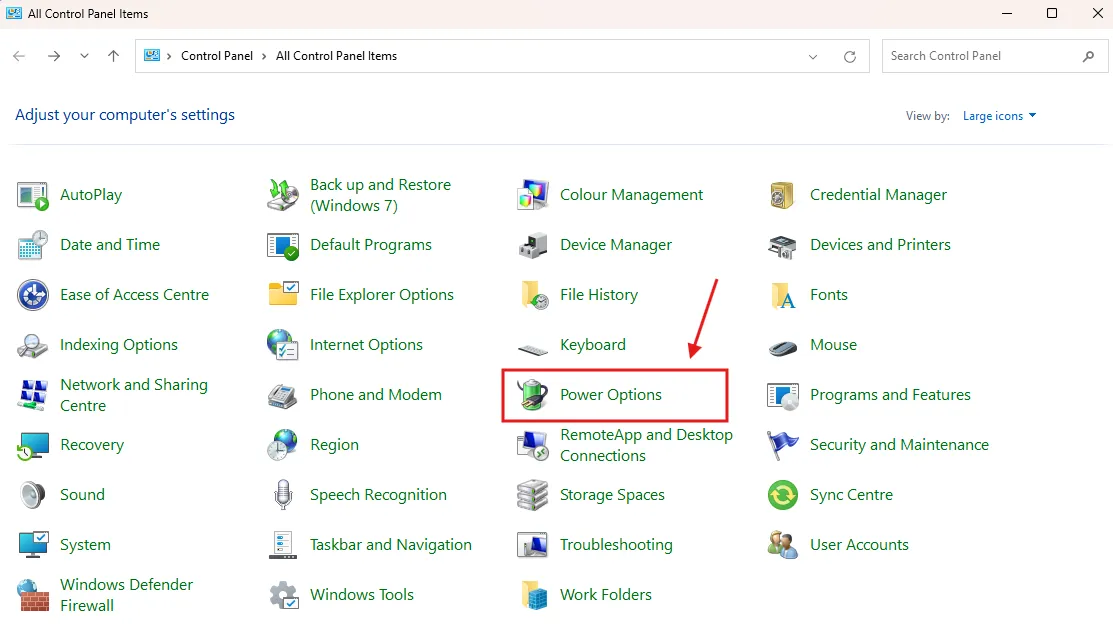
-
Open Control Panel > Power Options
-
Click «Change plan settings»
-
Click on «Change advanced power settings» on bottom side.
-
Expand «USB settings» > «USB selective suspend setting»
-
Disable this setting for both battery and plugged in

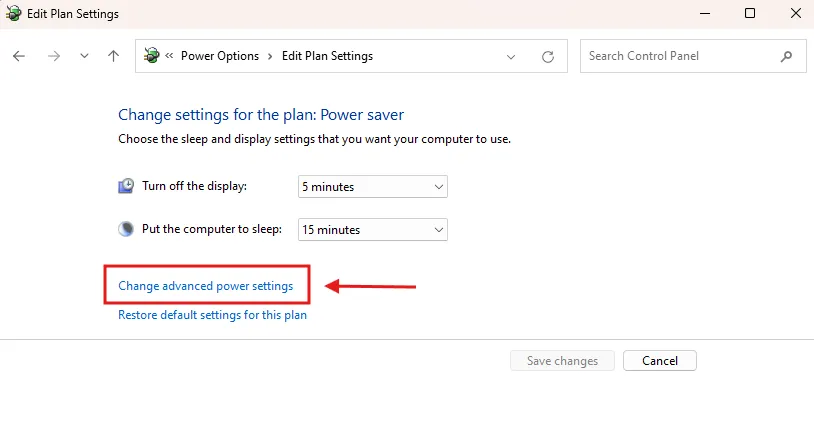
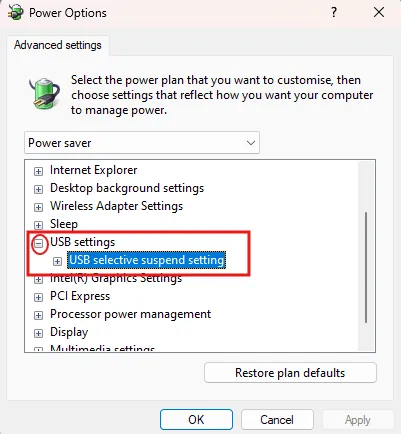
Disabling USB suspend can prevent peripherals from disconnecting randomly.