Если в установленной Windows 11 не работает регулировка яркости экрана ноутбука или ПК: отсутствует слайдер регулировки в центре действий (открывается по нажатию на значки в области уведомлений) или этот слайдер не активен, не работает регулировка яркости с помощью клавиш на клавиатуре или проблема имеет иной характер, обычно это сравнительно просто решить.
В этой инструкции подробно о методах исправить работу регулировки яркости в Windows 11 в зависимости от ситуации. Обратите внимание: если речь идёт о настольном компьютере или внешнем мониторе, подключенном к ноутбуку, лучше сразу перейти к последнему разделу статьи со сторонними приложениями регулировки яркости.
Что делать, если не работает регулировка яркости экрана ноутбука с Windows 11

В случае, если яркость экрана ноутбука необходимо настраивать встроенными средствами Windows 11 — в параметрах экрана или с помощью слайдера в центре действий, а он отсутствует или не активен, следует учитывать, что его работа зависит от следующих составляющих:
- Главное — драйвер монитора.
- Второстепенно, но может также влиять — драйверы видеокарты (интегрированной и дискретной), драйверы чипсета и управления электропитанием.
Обычно всё упирается в драйвер монитора и здесь могут помочь следующие шаги, выполненные по порядку:
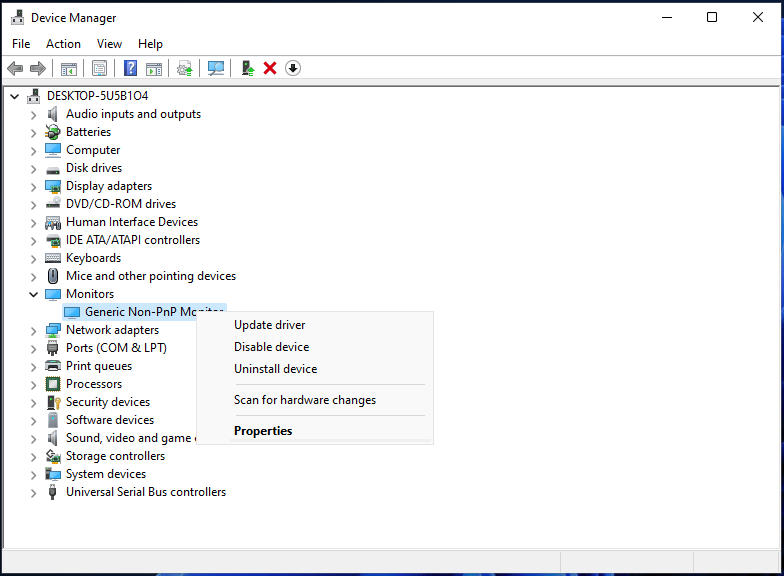
- Откройте диспетчер устройств, для этого можно нажать правой кнопкой мыши по кнопке «Пуск» и выбрать соответствующий пункт контекстного меню.
- Раскройте раздел «Мониторы». Если в списке вы видите монитор, на значке которого отображается стрелка, нажмите по нему правой кнопкой мыши и выберите пункт «Включить устройство».
- Если стрелки нет, нажмите правой кнопкой мыши по монитору, выберите «Обновить драйвер».
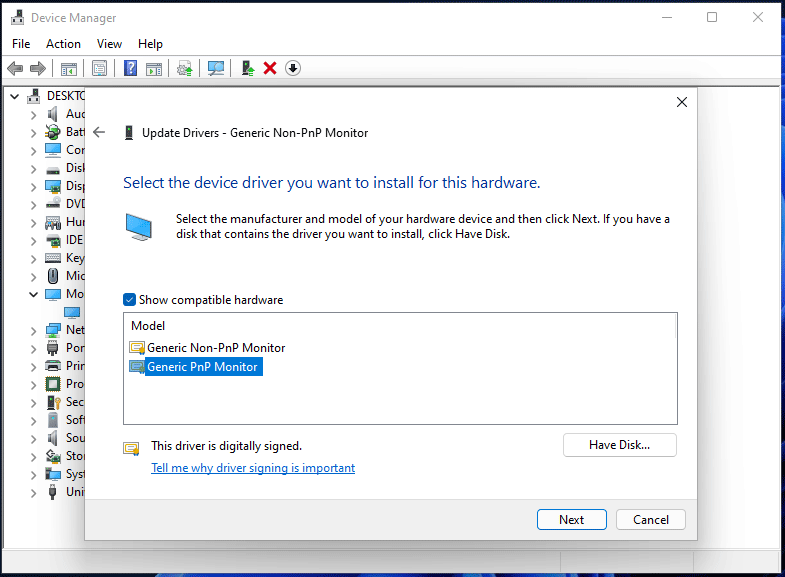
- Нажмите «Найти драйверы на этом компьютере».

- Нажмите «Выбрать драйвер из списка доступных драйверов на компьютере».
- Обратите внимание, есть ли в списке совместимых драйверов другие (отличающиеся от установленного) драйверы монитора, например, стандартный «Универсальный монитор PnP». Если есть — выберите его, нажмите «Далее» и выполните установку. Причина, по которой это может помочь: некоторые сторонние программы (например, для удаленного доступа к компьютеру, такие как TeamViewer) устанавливают собственные драйверы монитора, после установки которых яркость не работает, в то время как со стандартным — порядок. После установки драйвера перезагрузите компьютер.

- Если отличающихся драйверов нет, попробуйте такой вариант (в процессе может пропадать изображение на экране) — в диспетчере устройств нажмите правой кнопкой мыши по монитору и выберите пункт «Удалить устройство», а затем в диспетчере устройств выберите «Действие» — «Обновить конфигурацию оборудования» или просто выполните перезагрузку.


Если указанные шаги не помогли вернуть работу регулировки яркости, убедитесь в том, что вы установили оригинальные драйверы чипсета, а при наличии — и драйверы управления электропитанием и другими функциями (ACPI, Power Management, Intel Management Engine) с сайта производителя ноутбука.
Также следует проверить, установлены ли все драйверы видеокарт — и интегрированной и дискретной (при наличии), если в диспетчере устройств в разделе «Видеоадаптеры» присутствует какой-либо «Базовый видеоадаптер Майкрософт», драйвер не установлен.
Здесь нужно учитывать, что даже если диспетчер устройств сообщает, что «Наиболее подходящий драйвер уже установлен», это не означает, что это на самом деле так — необходимо вручную скачать и установить драйверы: с официального сайта производителя ноутбука для вашей модели, с сайтов AMD, NVIDIA или Intel (однако с последним сейчас есть проблемы).
Исправление работы яркости с помощью клавиш на клавиатуре ноутбука
На большинстве ноутбуков присутствуют клавиши в верхнем ряду, позволяющие регулировать яркость экрана — они должны работать либо при простом нажатии, либо при нажатии в сочетании с клавишей Fn.

На современных ноутбуках для работы клавиш яркости и громкости обычно какие-либо дополнительные драйверы не требуются, но если реакции на нажатия нет, с большой вероятностью вам необходимо установить специальные драйверы и утилиты с сайта производителя для вашей модели ноутбука.
Названия необходимых утилит и драйверов в качестве примера для популярных марок ноутбуков (но в зависимости от конкретной модели ноутбука названия нужных утилит могут отличаться, это только пример):
- ASUS — ATK Package, ATKACPI, ATK Hotkey Utility
- Gigabyte — Gigabyte Control Center
- Dell — иногда нужна утилита QuickSet
- Lenovo — Hotkey Features Integration (ноутбуки), AIO Hotkey Utility Driver (для моноблоков),
- HP — HP Software Framework, Средства поддержки HP UEFI, HP Power Manager
Подробнее на тему — Что делать, если не работают функциональные клавиши на ноутбуке.
Сторонние программы для управления яркостью на ноутбуке и компьютере
Если восстановить работу стандартных средств регулировки яркости не удается, либо вам требуется удобная регулировка яркости на ПК, а не ноутбуке, можно использовать сторонние приложения. Я рекомендую следующие два варианта из Microsoft Store (можно скачать и не из магазина, а с официальных сайтов разработчиков), предпочтительно — первый из указанных:
Оба приложения бесплатны, на русском языке (во втором перевод лишь частичный), в большинстве случаев позволяют очень легко регулировать яркость всех подключенных мониторов, в первом приложении можно создавать расписания для разной яркости в зависимости от времени суток, имена мониторов и дополнительные параметры.
Для некоторых мониторов доступны собственные фирменные программы позволяющие, в том числе, регулировать яркость без использования аппаратных кнопок на самом мониторе — найти их обычно можно на странице поддержки вашей модели монитора на официальном сайте.
Надеюсь, один из предложенных подходов поможет решить проблему в вашей ситуации и возможность регулировки яркости заработает исправно.
Quick Tips
- Make sure the automatic brightness feature is turned off on your laptop and update the display drivers.
- Switching to the Microsoft Basic Display Adapter can also resolve brightness-related issues in Windows 11.
- If the problem persists, consider running an SFC scan to repair system files.
Try Basic Fixes
- Adjust brightness from the Quick Settings panel or Settings app: If you can’t seem to adjust the screen brightness using the function keys on your keyboard, press the Windows key + A to access the Quick Settings panel and use the slider next to the brightness icon to modify it. Alternatively, go to Settings > Display to change the screen brightness.
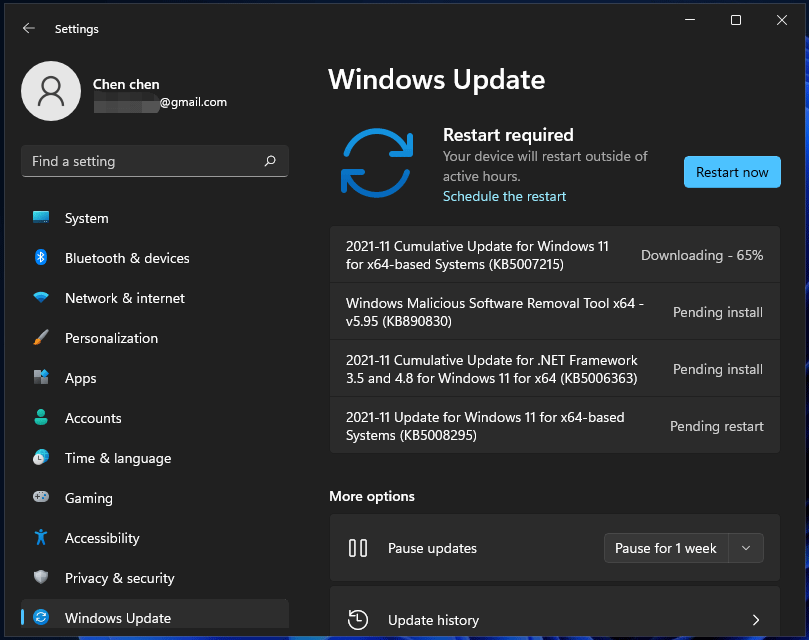
- Install Windows updates: It’s possible that the brightness controls not working issue is due to a bug within the Windows 11 build your laptop is running. If that’s the case, installing pending updates should help.
Fix 1: Disable Auto-Brightness
Next, you should check if the auto-brightness feature is enabled on your PC. If it is, you may have trouble changing the screen brightness manually.
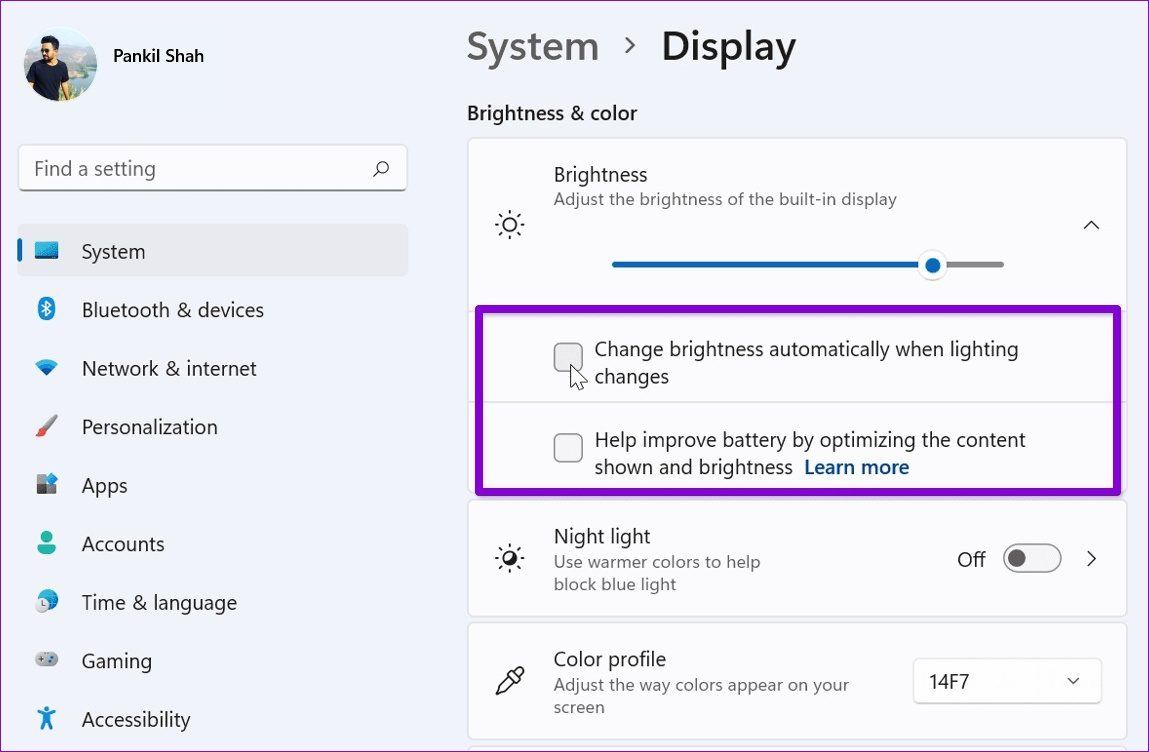
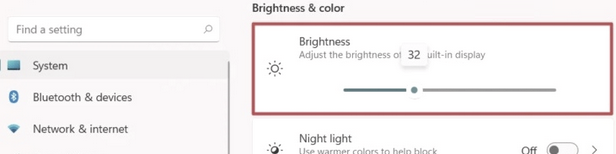
Step 1: Press the Windows key + I to open the Settings app and head to System > Display.
Step 2: Click on the arrow next to Brightness to expand it. Then, uncheck the boxes that read Change brightness automatically when lighting changes and Help improve battery by optimizing the content shown and brightness.
Fix 2: Update Display Driver
The display drivers on your PC can become outdated over time. When this happens, brightness controls may not work as expected in Windows 11. To fix this, you can update the display drivers by following the steps below.
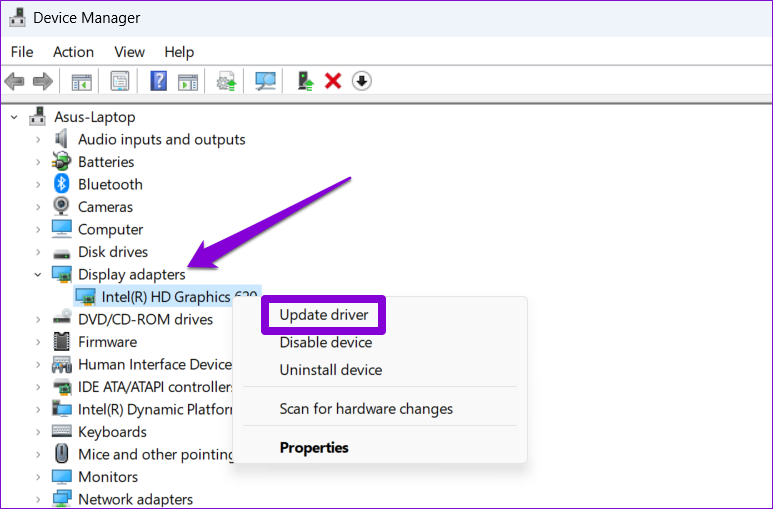
Step 1: Press the Windows key + S to access the search menu. Type in device manager and press Enter.

Step 2: Expand Display adapters, right-click on your display drivers, and select Update driver.

Follow the on-screen instructions to finish updating the display drivers.
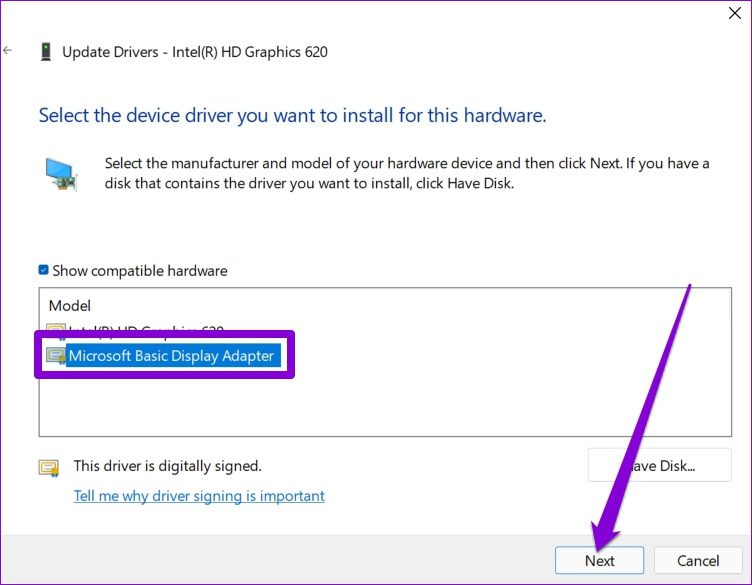
Fix 3: Use Microsoft Basic Display Adapter
If the brightness keys or slider do not work even after you update the display driver, you can try switching to Microsoft’s basic display adapter driver.
Step 1: Open Device Manager using the search menu.
Step 2: Expand Display adapters, right-click on your driver, and select Update driver from the list.
Step 3: Select Browse my computer for drivers.

Step 4: Click the Let me pick from a list of available drivers on my computer option.
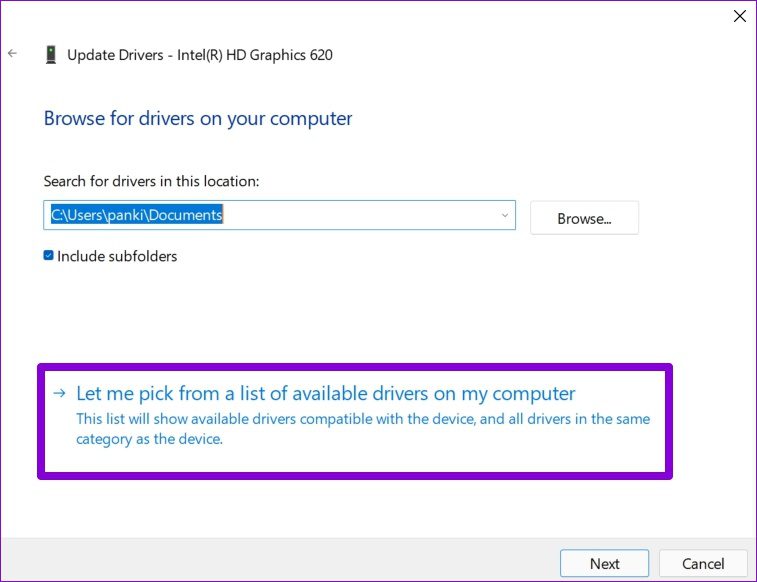
Step 5: Select Microsoft Basic Display Adapter and click Next to install them.
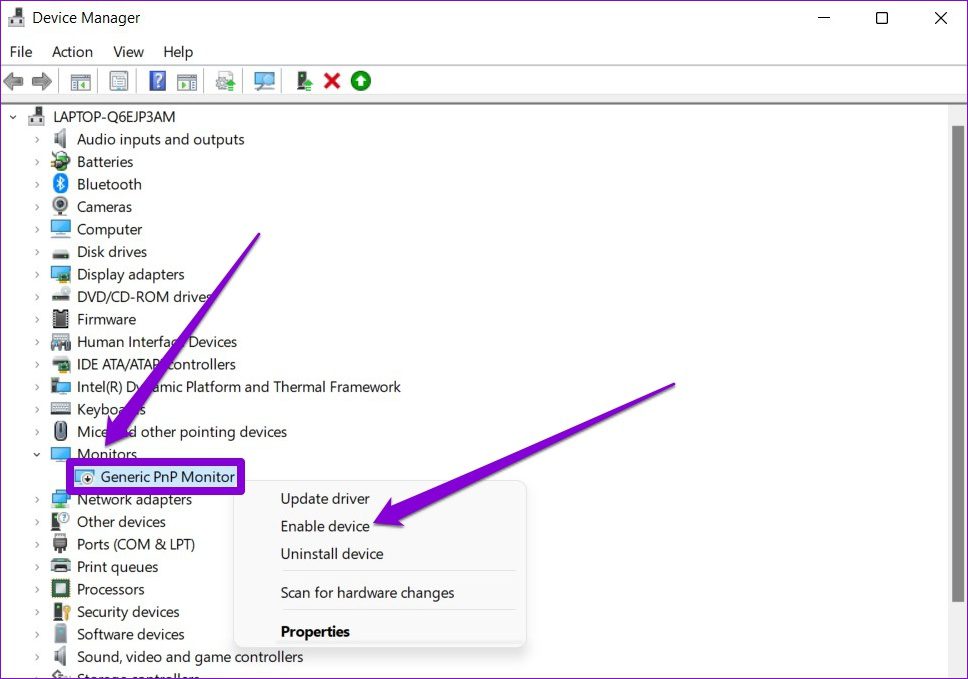
Fix 4: Re-Enable Generic Monitor Drivers
Generic PnP (Plug and Play) monitor drivers on Windows help you connect external displays without requiring any additional setup. However, if you’re having trouble changing the brightness on your external monitor, you can try disabling the Generic PnP monitor driver and enabling it again.
Step 1: Open Device Manager using the search menu.
Step 2: Expand Monitors, right-click on Generic PnP Monitor, and select Disable device from the list.
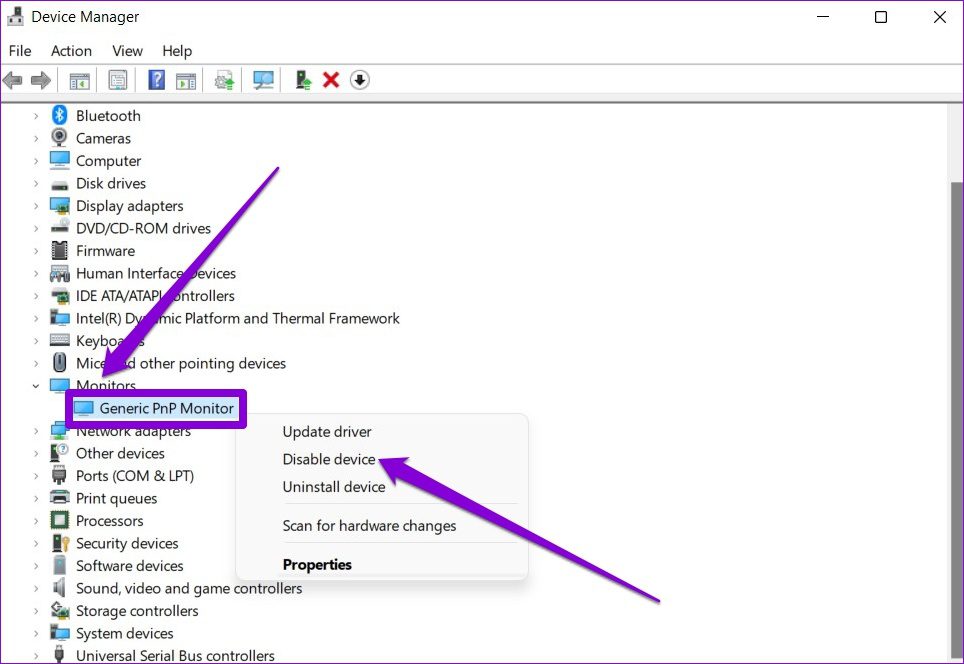
Step 3: Restart your PC and follow the steps above to enable the Generic PnP Monitor.
Fix 5: Repair System Files
Such issues can also arise if some of the system files on your PC are damaged or missing. If that’s the case, running the SFC (System File Checker) scan will help fix the brightness problem on your Windows 11 laptop.
Step 1: Right-click on the Start icon and select Terminal (Admin) from the resulting menu.

Step 2: Type the command mentioned below and press Enter.
SFC /scannow

Wait for the scan to complete and then restart your Windows laptop.
Was this helpful?
Thanks for your feedback!
The article above may contain affiliate links which help support Guiding Tech. The content remains unbiased and authentic and will never affect our editorial integrity.

The missing brightness slider is one of the annoying issues faced by Windows 11 and 10 users. Luckily, the problem can be solved using the ways mentioned in the following post.
The correct brightness is crucial for proper viewing when working on a PC. Without it, you face problems while watching a movie, playing a game, working on a PC, etc. Below we will explain how to fix the brightness slider missing on Windows 10 and 11.
Reasons for Missing Brightness Slider on Windows 10
- Outdated graphics driver
- Brightness setting removed from Notification Center
- Disabled monitor driver in Device Manager
Common Error Reports By Users When Facing Brightness Issue
- The brightness option is either greyed out or unavailable
- Brightness is not working on the laptop.
- Missing screen brightness option.
- The disappearance of the brightness slider.
How To Fix the Windows Brightness Slider Not Showing?
The mysterious disappearance of the brightness slider surprises many users. For some, it is greyed out, or perhaps the icon is missing. So, why does this happen? A possible explanation is that the option is disabled. To fix it, follow these steps:
Method 1 – Add Brightness Slider to Quick Action Center
If you cannot see the brightness slider in the Quick Action Center, it seems it is not added. To do so, add it follow these steps:
- Press Windows + I to open Windows Settings.
- Double click System option > click Notifications & actions > Edit your quick actions.

- You will now see the notification area > click Add Brightness. When added, click Done.
- You will now see the Brightness slider in the Windows 11 and 10 action center.
If the brightness slider is still not visible, you can follow the other fixes below.
Method 2 – Enable Adaptive Brightness
- Press Windows + I to open Settings.
- Click System.

- Power & sleep > Additional power settings.

- Click Change plan settings.

- Click Change advanced power settings.

- Click the + button to unhide the Display option and Enable the adaptive brightness option.

This will help activate the brightness slider in the Action Center.
Method 3 – Uninstall and Reinstall Default Monitor Driver
If the brightness option is unavailable, the issue can be driver related. To fix this problem, uninstall and reinstall the driver. To do so, follow these steps:
- Right-click the Windows start icon > select Device Manager.
- Double click the Monitors section > right-click the monitor driver > Uninstall device.

- Check the box next to Delete the driver software for this device and click Uninstall.
- Let the operating finish.
- Click the Action tab > select Scan for hardware changes.
- This will reinstall the default driver. Now check if you can use the brightness settings.
If this doesn’t help, check if the monitor driver is enabled or disabled. If disabled, enable it using the instructions given below:
- Press Windows + X > select Device Manager.
- Expand Monitors category > right-click your Monitor driver and see choose Enable option. Instead of Enable, if you see Disable, the driver is enabled.
Check if the problem is solved or not. If not, we suggest updating the graphics driver. The easiest way is to use a third-party driver updating tool.
To use Advanced Driver Updater, the best tool for Windows to update drivers, follow these steps:
- Download and install Advanced Driver Updater.
- Open the tool and click Start Scan Now to start the scanning process and identify the outdated drivers.

- You’ll get a list of outdated drivers. To update the driver click the Update driver link. If you click Update All & are re-directed to the purchase page, you are a trial user. Free users can update only one driver at a time. While only paid users can use the Update All button. To update all drivers, you must purchase the product with a 60-day money-back guarantee.

- Wait for the driver update to install. Restart the PC the apply changes.
Now try to adjust the brightness. You should not face any problems.
Method 4 – Install Generic PnP Monitor Driver
If the Generic PnP monitor driver is not installed on your PC, then also you can face the brightness slider missing issues. To fix it, install the driver and get the brightness problem resolved.
- Press Windows + R to open the Run window.
- Type devmgmt.msc and press Enter key.
- Expand Monitors category. Select the monitor driver > right-click > Update driver.
- Select the second option, Browse my computer for driver software.
- Click Let me pick from the list of available drivers on my computer.

- Select Generic PnP Monitor from the list > click Next.

- Restart PC to apply changes. The brightness problem should now be fixed.
Method 5 – Update Windows
You might face a brightness issue when you don’t have the latest Windows update installed. To update Windows, follow these steps:
- Press Windows + I to open Settings.
- Click Update & Security > Windows Update > Check for updates.

- Wait for the updates to install. Alternatively, you can click Download and install and wait for the updates to install.

- Restart the PC to apply updates and then check if the problem is fixed or not.
Final Words
This concludes our troubleshooting guide on how to fix brightness unavailable on Windows 11 and 10. Suppose the above fixes did not help; you try uninstalling problematic software. Some users have reported that after uninstalling TeamViewer, the issue is fixed. If you don’t know how to uninstall it, you can use the Uninstall module of Advanced System Optimizer.
After using the above methods, we hope you can resolve the missing brightness slider problem.
Most Related :
How To Fix Windows 10/11 LAN Drivers Problem?
How To Fix Windows 11 Bluetooth Not Working Problem
Fix – No Sound Steam Games Windows 11/10
How To Fix Video_Dxgkrnl_Fatal_Error on Windows (2022)
Windows 11 brightness issue is a common problem. If you find brightness is not working, this is frustrating. Well then, how can you fix this issue on your Windows 11 PC? Take it easy and some useful solutions can be found in this post from MiniTool Solution.
Windows 11 Brightness Not Working
When using a computer, sometimes you need to change the screen brightness to avoid eye strain, improve visibility, and save energy. If you use the PC outdoor or near a window, you also need to adjust the brightness according to the brightness of your surroundings.
However, you may fail to change brightness in Windows 11 since there is no brightness slider in Settings. When going to adjust screen brightness from Quick Access, the option is greyed out.
Besides, there are some other situations on Windows 11 brightness not working. According to users, the brightness option is existing, but the brightness control is not working. In addition, sometimes Windows 11 brightness keeps going down.
If you run into one of the above situations, how can you fix the Windows 11 brightness issue? Move to the next part to look for some solutions.
Solutions to Windows 11 Brightness Not Working
Disable/Enable Generic PnP Monitor or Update Driver
PnP stands for the plug-and-play hardware device. According to users, this way is useful to fix the issue of brightness not working like Windows 11 brightness control not working, Windows 11 brightness slider missing, etc. So, you can also have a try by following the steps below.
Related article: Fix Generic PnP Monitor Issue in Windows 10
Step 1: Right-click the Start button and choose Device Manager.
Step 2: Expand Monitors, right-click on the Generic PnP Monitor and check if it is enabled. If it is, choose Disable device. If it is not enabled, disable it.
Step 3: Click Action at the top menu and choose Scan for hardware changes.
In addition to disabling and enabling the Generic PnP monitor driver, you can choose to update the driver to fix your Windows 11 brightness issue.
Right-click this monitor and choose Update driver. Click Browse my computer for drivers > Let me pick from a list of available drivers on my computer, choose Generic PnP Monitor, and click Next. Then, Windows will install the driver successfully.
Update Graphics Card Drivers
Outdated graphics card drivers can lead to Windows 11 brightness not working or Windows 11 brightness slider missing. To help you out, go to update the GPU drivers.
Step 1: Go to Device Manager via the Win + X menu.
Step 2: Expand Display adapters, right-click on the graphics card driver and choose Update driver.
Step 3: Choose the first option to let Windows automatically search for drivers to update.
In addition, you can update graphics card drivers by downloading the driver from the official website and installing it on your PC. To know more information, refer to this post – How to Update Graphics Card Drivers (NVIDIA/AMD/Intel).
Use Microsoft Basic Display Adapter
If your brightness is not working in Windows 11, you can use Microsoft Basic Display Adapter.
Step 1: In Device Manager, right-click the display adapter and choose Update driver.
Step 2: Go to Browse my computer for drivers > Let me pick from a list of available drivers on my computer, select Microsoft Basic Display Adapter and click Next. Windows will install the driver for your Windows 11 PC.

Enable Adaptive Brightness
If you run into Windows 11 brightness control not working, you can enable Adaptive Brightness to fix this issue. This feature can use light sensors to change the brightness of your screen depending on your environment. On most modern laptops, you can do this task.
Step 1: Go to Control Panel > Power Options.
Step 2: Click Change plan settings > Change advanced power settings.
Step 3: Expand Display and turn on settings for Enable adaptive brightness.
Step 4: Save the change by clicking Apply and OK.
Update Windows 11
Windows update is a useful common to fix some issues including Windows 11 brightness bug. If you cannot adjust brightness, keep your Windows updated. Go to Settings > Windows Update and check for updates. Once some available updates are detected, download and install them on your PC.
Related articles:
- Top 5 Solutions to Windows 10 Brightness Not Working
- Top 6 Solutions to Windows 10 Brightness Slider Missing
These are methods to fix Windows 11 brightness not working. If you have any other useful methods, you can leave a comment below to let us know. Thanks.
Проблема с регулировкой яркости экрана – частая проблема, которая встречается как в Windows 10, так и в Windows 11. Как правило пользователи жалуются, что не удается увеличить или уменьшить яркость экрана на ноутбуке из панели управления Windows, с помощью выделенных клавиш или сочетаниями Fn+F5/F6/F11/F12.
В большинстве случае проблема с регулировкой яркости в Windows связана с драйверами монитора и видеокарты (часто проблема встречается на устройствах с видеокартами Intel Graphics и AMD Radeon). Однако есть и другие причины. Рассмотрим несколько простых способ исправить проблему с невозможностью изменить яркость на ноутбуке с Windows 10 и 11.
Содержание:
- Как изменить яркость экрана в Windows 10 и 11?
- Включите Generic Pnp Monitor
- Не работает регулировка яркости после установки TeamViewer
- Обновите драйвер видеоадаптера
- Не работают Fn клавиши регулировки яркости на ноутбуке
- Включить регулировку яркости экрана в реестре
- Не регулируется яркость дисплея на ноутбуке с интегрированной графикой Intel HD Graphics
- Проверьте настройки адаптивной регулировки яркости
Как изменить яркость экрана в Windows 10 и 11?
В первую очередь проверьте, удастся ли вам изменить яркость экрана с помощью стандартных способ регулировки яркости в Windows.
Вариант 1. Изменить яркость из панели Параметры Windows
В Windows 10 и 11 можно изменить настройку яркости дисплея из панели Параметры. Перейдите в Settings -> System -> Display (можно открыть эту панель настроек, выполнив команду быстрого доступа ms-settings:display или desk.cpl). Воспользуйтесь ползунком Brightness, чтобы изменить яркость дисплея.
Вариант 2. Изменить яркость дисплея из панели быстрого доступа Windows
В Windows 10 и 11 вы можете использовать панель быстрого доступа (quick settings) для изменения настроек яркости. Нажмите на любую системную иконку в таскбаре (Wi-Fi, звук, батарея или нажмите
Win+A
). Отрегулируйте яркость дисплея с помощью ползунка.
Если ползунок яркости отсутствовует или неактивнем:
- Возможно вы используете компьютер с внешним монитором (используйте кнопки на мониторе, чтобы изменить яркость);
- Попробуйте обновить драйвер видеоадаптера (описано ниже).
Вариант 3. Настройка яркости с помощью функциональные клавиш клавиатуры
На большинстве ноутбуков есть специальные функциональные клавиши со значками 🔆 и 🔅. Нажмите на кнопку Fn+функциональную клавишу увеличения/уменьшения яркости и убедитесь, что яркость дисплея изменилась.
На моем ноутбуке для регулировки яркости используются сочетания Fn+F11 и Fn+F12. У разных производителей устройств эти сочетания могут отличаться.
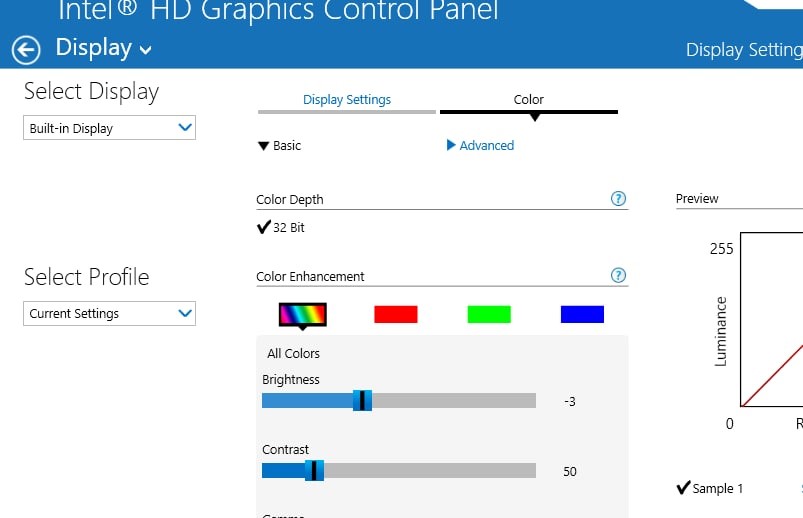
Вариант 4. Настройки яркости экрана в параметрах видеодрайвера
Вы можете изменить яркость экрана в параметрах видеокарты. В моем примере это Intel HD Graphisc Control Panel, доступная из контекстного меню рабочего стола.
Вариант 5. Задать яркость экрана с помощью PowerShell
Следующая команда PowerShell позволяет принудительно задать определенную яркость дисплея:
(Get-WmiObject -Namespace root/WMI -Class WmiMonitorBrightnessMethods).WmiSetBrightness(1,70)
Яркость задается в процентах от максимальной в диапазоне от 0 до 100. В этом примере я задал 70% яркости.
Включите Generic Pnp Monitor
Если вы не можете изменить настройки яркости Windows, проверьте не отключен ли у вас в оборудовании Универсальный монитор PnP (Generic Pnp Monitor). Это распространенная проблема на ноутбуках Lenovo и HP Pavilion.
Откройте диспетчер устройств (
devmgmt.msc
) и в разделе Monitors (Мониторы) проверьте, что устройство Generic Pnp Monitor (Универсальный монитор PnP) включено. Если это не так, щелкните по нему ПКМ и включите его (Enable / Задействовать).

Перезагрузите компьютер и проверьте возможность регулировки яркости.
В некоторых случаях нужно попробовать обновить/переустановить драйвер Generic Pnp Monitor в диспетчере оборудования через Update Driver.
Не работает регулировка яркости после установки TeamViewer
Есть известная проблема, что в Windows перестает работать регулировка яркости экрана после установки TeamViewer. Дело в том, что TeamViewer при устанавливает собственный драйвер дисплея Pnp-Montor Standard, который используется для компрессии графики и оптимизации трафика
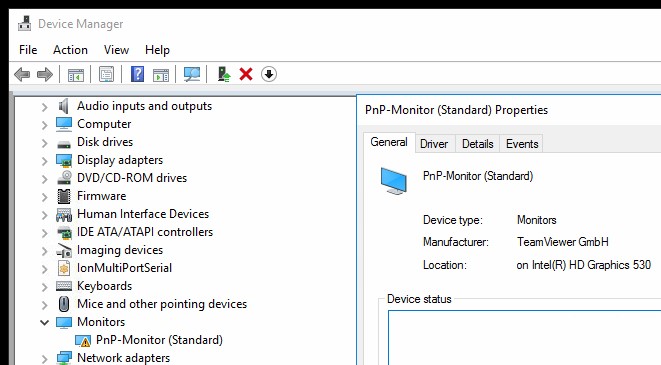
Попробуйте заменить драйвер для этого устройства на «Универсальный монитор PnP» (ПКМ -> Обновить драйверы -> Выбрать из списка уже установленных драйверов).
Обновите драйвер видеоадаптера
Возможно проблема с яркостью связана с текущим драйвером видеоадаптера. В первую очередь проверьте, что ваша видеокарта включена в диспетчере устройств (по аналогии со способом выше). Если предыдущий метод не помог, попробуйте выполнить автоматическое обновление драйвера видеоадаптера (если оно не отключено).
В диспетчере устройств (консоль
devmgmt.msc
) разверните секцию Display adapters найдите свою видеокарту, щелкните по ней ПКМ и выберите пункт Update Driver Software. Затем выберите опцию Search automatically for updated driver software и подождите пока Windows 10 найдет и установит последнюю версию драйвера (требуется подключение к интернету).
Если автоматическое обновление драйвера не исправило проблему с неработающей регулировкой яркости в Windows 10, попробуйте удалить текущий драйвер и установить с сайта производителя самую последнюю версию драйвера.
В некоторых случаях нужно наоборот, откатить версию видеоадаптера на предыдущую: Update driver -> Browse my computers for drivers -> Let me pick from a list of available drivers on my computer -> включите Show compatible hardware. Выберите предыдущую версию драйвера.
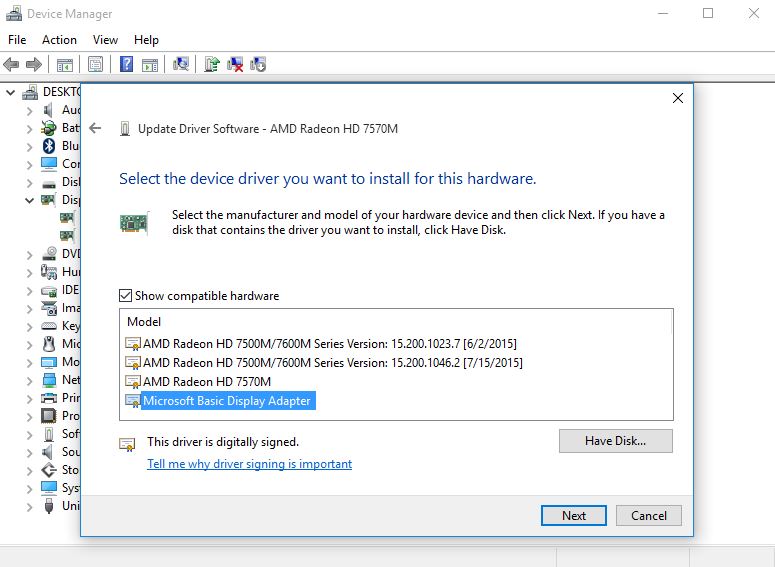
Если обновление или откат драйвера не помогли решить проблему с регулировкой яркости, попробуйте использовать для видеокарты стандартный драйвер Microsoft Basic Display Adapter.
Не работают Fn клавиши регулировки яркости на ноутбуке
Если вы обнаружили, что регулировка яркости в настройках Windows работает нормально, но не работают функциональные клавиши (
Fn
) управления яркости на клавиатуре ноутбука, скорее всего вам нужно установить дополнительно ПО от производителя ноутбука.
У каждого вендора есть своя утилита. Ниже представлены названия утилит для популярных моделей ноутбуков:
- ASUS — ATK Hotkey Utility
- Sony Vaio — Sony Notebook Utilities
- Dell – QuickSet
- HP — HP Software Framework и/или HP Hotkey Support
- Lenovo — Hotkey Features Integration for Windows 10 или AIO Hotkey Utility Driver
Скачайте программу с официального сайта производителя и установите ее. Попробуйте изменить яркость с помощью функциональный клавиш нуотбука.
Включить регулировку яркости экрана в реестре
В Windows можно разрешить регулировку яркости экрана с помощью параметра реестра KMD_EnableBrightnessInterface2 в ветке HKEY_LOCAL_MACHINE\SYSTEM\ControlSet001\Control\Class\{4d36e968-e325-11ce-bfc1-08002be10318}\0000.
Откройте редактор реестра (regedit.exe), перейдите в указанную ветку и измените значение DWORD-параметра KMD_EnableBrightnessInterface2 с 1 на 0
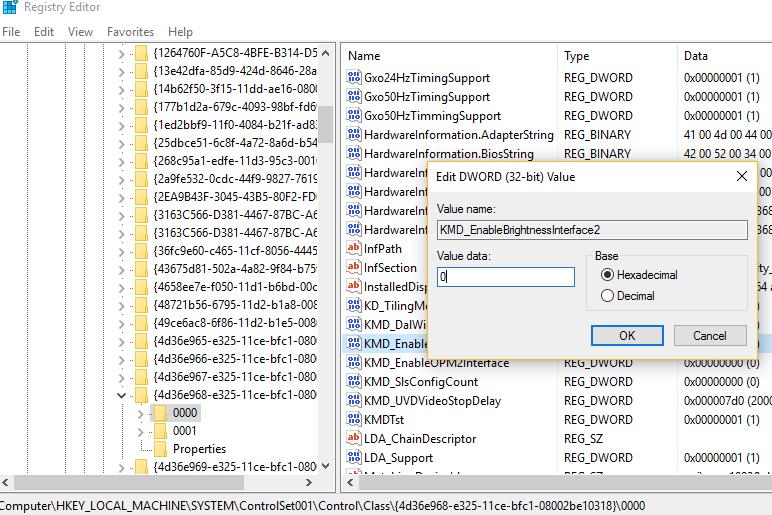
В реестре может быть несколько параметров KMD_EnableBrightnessInterface2. Поэтому, воспользуйтесь поиском (F3) и найдите все остальные параметры с именем
KMD_EnableBrightnessInterface
. Для всех найденных ключей нужно изменить значение с 1 на 0.
Перезагрузите компьютер.
Не регулируется яркость дисплея на ноутбуке с интегрированной графикой Intel HD Graphics
На ноутбуках со встроенной видеокартой Intel HD Graphics нужно отключить коррекцию яркости через реестр. Для этого перейдите в раздел реестра HKEY_LOCAL_MACHINE\SYSTEM\ControlSet001\Control\Class\{4d36e968-e325-11ce-bfc1-08002be10318}\0000 (в некоторых случаях 0001) и найдите DWORD параметр FeatureTestControl. Измените его значение c f000 на f008 и перезагрузите компьютер.
В комментариях пишут, что иногда помогает значение FeatureTestControl = fb20.
нужно внести изменения в реестр с помощью такого reg файла:
Windows Registry Editor Version 5.00
[HKEY_LOCAL_MACHINE\SYSTEM\ControlSet001\Control\Class\{4d36e968-e325-11ce-bfc1-08002be10318}\0000]
"FeatureTestControl"=dword:0000f008
"KMD_EnableBrightnessInterface2"=dword:00000000
"KMD_EnableBrightnesslf2"=dword:00000000
[HKEY_LOCAL_MACHINE\SYSTEM\ControlSet001\Control\Class\{4d36e968-e325-11ce-bfc1-08002be10318}\0001]
"FeatureTestControl"=dword:0000f008
[HKEY_LOCAL_MACHINE\SYSTEM\ControlSet001\Control\Class\{4d36e968-e325-11ce-bfc1-08002be10318}\0002]
"FeatureTestControl"=dword:0000f008
[HKEY_LOCAL_MACHINE\SYSTEM\ControlSet001\Services\intelkmd]
"FeatureTestControl"=dword:0000f008
Проверьте настройки адаптивной регулировки яркости
Windows может использовать датчики освещенности ноутбука для регулировки ярости экрана. Яркость экрана задается в зависимости от освещения помещения (Ambient Light). Это называется адаптивная яркость.
Вы можете включить/отключить адаптивную яркость дисплея из панели Settings: System -> Brightness -> Change brightness automatically when lighting changes

Здесь же есть еще одна опция – уменьшения яркости дисплея, если устройство работает от батареи (Help improve battery by optimizing the content shown and brightness). Эта функция называется CABC (Content Adaptive Brightness Control).
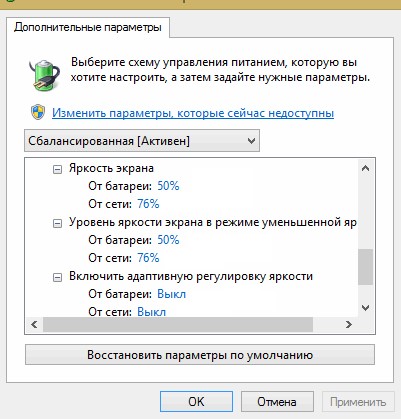
Также отключить адаптивную регулировку яркости в настройках схемы электропитания Windows: Control Panel -> Power Options (Электропитание) -> в свойствах выбранного плана электропитания, нажмите на кнопку Change advanced power settings (Настройка схемы электропитания) -> Change advanced power settings (Изменить дополнительные параметры питания) -> разверните раздел Display (Экран).
В пункте Enable adaptive brightness (Включить адаптивную регулировку яркости) нужно отключить адаптивную яркость для режима от сети и от батареи. Если адаптивная яркость включена, вы не можете значительно увеличить яркость экрана
Также попробуйте изменить настройки в пунктах:
- Dimmed display brightness (Уровень яркости экрана в режиме уменьшенной яркости)
- Display brightness (Яркость экрана)