
Quick Tips
- Use the Join Audio option once you are in the meeting.
- Switch the microphone to the webcam microphone if the PC microphone is not working.
- The Switch to Phone audio option lets you use the phone as a microphone quickly.
Basic Fixes You Should Try
- Restart the Zoom app and Windows PC.
- Make sure the microphone is connected to the correct port or Bluetooth.
- Make sure to update the sound driver from the OEM website.
Fix 1. Use the Join Audio Button
Even though Zoom asks you to let it use your computer’s audio before joining a meeting, one sometimes misses it. That could be the reason why others are unable to hear you. To fix it, follow these steps:
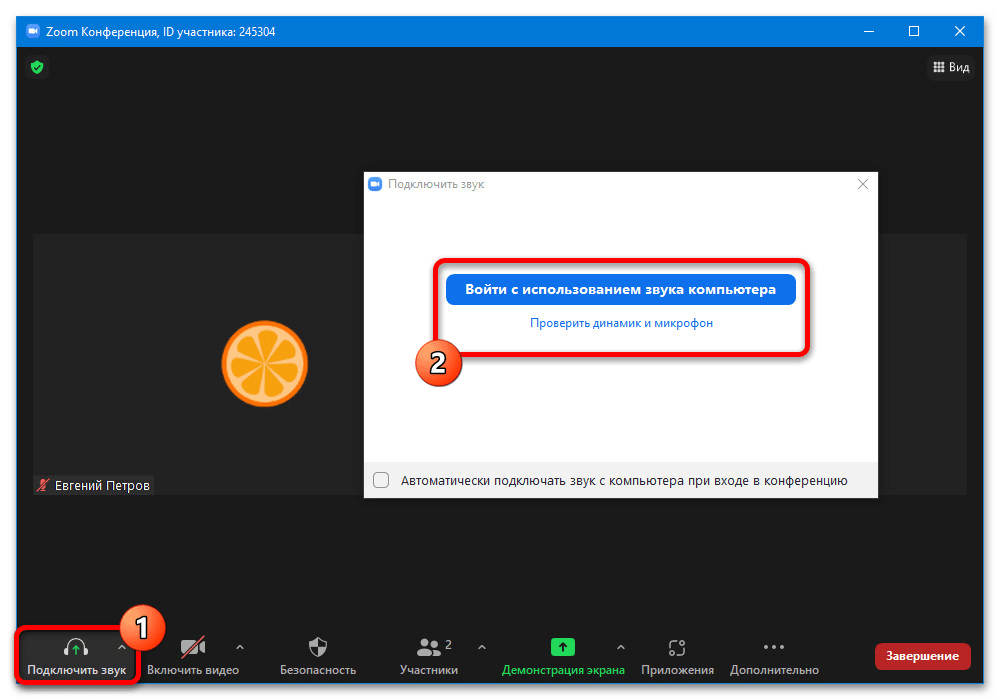
Step 1: Click on the Join Audio option present at the bottom-left corner of the meeting window.

Step 2: Click on Join with Computer Audio in the pop-up window.

Fix 2. Unmute Microphone in Zoome App
If you’re wondering why your mic is not working on Zoom, you might be surprised to know there might not be any issue. It could be that your microphone is muted on Zoom, and that’s why it doesn’t work.

When that happens, you will see a red line on the microphone icon or Audio icon at the bottom of the Zoom app. Click on it to unmute it. Alternatively, press the spacebar key to unmute the audio.
Tip: Find out how to mute and unmute on the Zoom mobile app.
Fix 3. Change the Input Microphone
Your selected Zoom microphone may not be working correctly with the app, or you may have selected the wrong device as the mic. In this case, you can change the microphone used in the Zoom app.
Step 1: Click on the settings icon at the top-right corner of the Zoom app.
Step 2: From the left panel, go to the Audio section. Click on the drop-down box next to the Microphone label.

Step 3: Change the microphone. You can also test it using the Test Mic button. If the audio works fine, the progress bar next to the Input level will change. Relaunch the Zoom app.
Tip: Increase the volume level from the slider under the Microphone tab.
Step 4: If you are in a meeting, click on the small arrow next to the Mute/Unmute option on the bottom bar of the meeting screen. Select a different microphone from the list.

Fix 4. Grant Zoom Access to Your Microphone
If the Zoom app doesn’t have permission to use your microphone in Windows, Zoom will fail to detect your mic. So, you need to check and grant access to Windows privacy settings.
Step 1: Open Windows Settings (Win + I) and navigate to Privacy & security.
Step 2: Scroll to find the Apps permissions section, and then click on Microphone.

Step 3: Enable the toggle next to Let desktop apps access your microphone.

Fix 5. Troubleshoot Microphone Issues
Microsoft offers a native way to troubleshoot microphone-related issues on your computer. You’ll need to use it to fix the issues with your Zoom microphone not working on Windows.
Step 1: After that, right-click on the sound icon in the taskbar and choose Troubleshoot sound problems.

Step 2: Follow the on-screen instructions to complete the process. If it doesn’t show anything, type Sound troubleshooter, and you should see the troubleshooter.

Fix 6. Last Resort: Use Audio From the Phone
Zoom offers an exciting way to use audio from your phone instead of the computer. So, if nothing fixes the microphone issue on your computer, you should use your phone’s audio. When doing so, you must speak into your phone, i.e., consider it your mic.
Download the Zoom app on your Android or iPhone to use this feature—login with your account. Now, on the desktop version of Zoom, click on the arrow present next to Mute. Select Switch to Phone audio. You will be given a meeting ID and password. Use it to join the meeting on your phone.

Here’s a video on our YouTube channel about fixing Zoom mic call issues.
This video will give you a detailed idea about the fixes.
Was this helpful?
Thanks for your feedback!
The article above may contain affiliate links which help support Guiding Tech. The content remains unbiased and authentic and will never affect our editorial integrity.
A large number of people from the corporate world depend on video conferencing apps to connect with their teammates or clients virtually. Zoom has come out as one of the most robust solutions for this purpose. Cross-platform support, ability to arrange a large meeting for a maximum of 500 people, made this app more popular actually. But very often you may find out zoom audio not working, as a result, people connected with you can’t hear your voice properly.
As the audio plays an important role in remote calls and video conferences, anything wrong with the same can be really frustrating. However, this audio problem is temporary in most cases and a normal restart fixes the problem. But in case of conflicting the same issue time and again, you will have to try out advance workarounds.
Zoom Audio not working
Here is how to fix Zoom Audio not working in Windows 10 –
1] Join with computer audio
When you use Zoom to enter into a meeting, the app usually asks for permission to use the computer’s audio. If it fails somehow, your voice will not transmit completely and this is the reason other people can’t hear you. To overcome the issue, follow the below steps –
- After joining a meeting, click Join Audio.
- From the appearing pop-up, hit the checkbox set for Automatically join audio by computer when joining a meeting.
- Later on, opt for Join with Computer Audio.
2] Make sure the microphone is not muted
Sometimes, people from the other side can’t hear your voice just because the microphone is muted in Zoom. If so, you will see a red line on the microphone icon located at the bottom of the app console. Click on that unmute icon or press the spacebar key to unmute audio.
3] Check if Zoom has access to your Microphone
When your system settings don’t let Zoom to use your microphone, the audio will not work properly. To grant access, follow the below steps –
- Press Win+I hotkey together.
- Choose Privacy.
- Click Microphone from the left column,
- Turn on the toggle button set for Allow desktop apps to access your Microphone.
- Scroll down a bit and also enable the toggle button of Allow Microsoft Store apps to access your Microphone.
- Make sure Zoom Meetings is available in the following list.
4] Test your Microphone
A defective microphone can be a big reason to give rise audio related issues while using Zoom. To eradicate the problem, you will have to test the microphone at first instance. If there is something wrong, change the accessory.
Change microphone before joining a meeting
- Launch Zoom app and click on the settings icon from the top-right corner.
- Opt for Audio from the left column.
- From the right pane, click Test Mic button.
- See if the progress bar next to Input level changes.
- If Yes, your microphone is absolutely fine.
- On the contrary, click the drop-down list located next to Microphone and choose another available one.
- Relaunch Zoom app.
Change microphone during a meeting
- Click the up arrow icon present next to Mute/Unmute option.
- Choose a different microphone from the list.
5] Check out advanced audio settings if Zoom audio not working
Advanced audio settings that Zoom offers works to reduce background noise at the same time enhance the sound quality. But if it incorrectly set, you may experience low voice transmission or Zoom audio not working. Hence, take a look at the settings and change if needed. Here’s how –
- Open Zoom app.
- Click the gear icon from top right corner.
- Select Audio from the left sidebar.
- Hit Advanced button.
- Click the down arrow icon available next to each option located under Audio Processing.
- Either change them to Moderate or Disable one by one.
- Now, check if the microphone works.
- If the modification doesn’t work, check the box set beside Show in-meeting option to “Enable Original Sound” from microphone option.
- From now on, whenever you will join a meeting; you will see Turn original sound on/off option at the app console.
- Simply, click on it to make the option effective.
6] Change the port if there is an external mic
If the port where you have inputted the external microphone is faulty itself, the audio will not definitely work. A simple tweak to overcome the issue is removing the input wire from the existing socket and insert the same to another one.
7] Use Windows built-in troubleshooter
Windows 10 comes with a troubleshooter that finds out issues related to audio and fix them as well. When Zoom audio not working, you must give it a try. To use the utility –
- Right-click on the sound icon from the taskbar and choose Troubleshoot sound problems.
- A wizard will show up detecting problems.
- Keep following the onscreen guideline to end the process.
- After completion, all sound problems should be resolved.
8] Update Sound driver if Zoom audio not working
Outdated and broken sound driver can give rise to so many bugs and problems related to audio. Therefore, update them to get rid of any issue. To do so –
- Press Windows key and X at one go.
- Choose Device Manager.
- Expand Sound, video, and game controllers by double-clicking.
- Right-click on the sound driver and select Update driver.
- Complete the process complying with onscreen instructions.
9] Covert your Phone to Microphone
There is another top-notch feature of Zoom which may be one of the greatest helps in case the built-in Microphone of the computer doesn’t work. You can use the microphone of your smartphone as an audio device instead. The phone will be used as a mic and you will have to speak into it. To use this feature, perform the following tasks –
- Download the Zoom app on your smartphone.
- Log in to the app using your zoom account credentials.
- Open the desktop version of Zoom.
- Do a click on the arrow icon next to Mute.
- Select Switch to Phone audio option.
- In a few seconds, the application will provide your meeting ID and Password.
- Use these credentials to join the meeting using the phone as an audio device.
Methods:
1] Join with computer audio
2] Make sure the microphone is not muted
3] Check if Zoom has access to your Microphone
4] Test your Microphone
5] Check out advanced audio settings
6] Change the port if there is an external mic
7] Use Windows built-in troubleshooter
8] Update Sound driver
9] Covert your Phone to Microphone
That’s all!!
Loading…
Video conferencing applications like Zoom have made the meeting world simpler and easier to easily communicate friends, or colleagues for meetings and presentations. Many key features of Zoom are liked by millions of users, yet often issues like Zoom audio not working on Windows 10 PCs come up. This is very frustrating as you cannot hear anything from co-participants or maybe others can’t hear you either. We bring to you a perfect guide to alter Zoom audio settings to fix said problem.

Table of Contents
Before you head towards advanced troubleshooting methods to ensure proper Zoom audio settings in Windows 10, a few simple hacks will help you fix the Zoom audio not working issue within clicks.
Preliminary Checks
- Reboot your PC and any temporary glitches associated with the computer will be resolved.
- Ensure proper internet connectivity, since video conferencing requires an adequate limit of bandwidth. You may face lagging video issues and audio cut-ins during the meeting if some of the data packets are lost due to insufficient bandwidth.
- Use high-quality microphone which is set firmly with your PC.
- Avoid echoing. When you are attending a meeting, please avoid sitting near other co-participants. This may sometimes cause echo and audio issues.
- Always choose to either Join with Computer Audio or by dialing a phone number.
- Place the external mic 6 inches away from the mouth to avoid audio muffling.
- On the other hand, if you are using an inbuilt audio device from your device, make sure you are within two feet of the distance from the mic.
- Join a test call on Zoom to ensure you face no trouble with audio issues during the meeting.
- Last but not least, make sure you are not in a noisy environment with traffic sounds or crowd noises in the background. This will prevent your voice from fading away from other participants in the meeting. You can also try better noise cancellation extensions for Zoom.
Method 1: Ensure Mic is Not Muted
Even though this may seem not a great deal, many users face Zoom audio, not working issues because they do not turn on their mic unintentionally. There is an easy way to check whether your mic is on or not and modify Zoom audio settings in Windows 10.
1. If the mic status displays Unmute, option it means the audio is mute. Hence, click on the Unmute icon.

2. Now, the mic will disaply the option to Mute as shown.

Also Read: How to Access Sound Control Panel on Windows 10
Method 2: Allow Zoom to Access Microphone
Your PC will have a list of applications and programs that are allowed for audio and microphone access. If in case Zoom is not on this list, you cannot hear any audio while using the app. Therefore, ensure the audio settings are enabled for Zoom on your PC by following the below-mentioned steps to fix Zoom audio not working Windows 10 error.
1. Launch Windows Settings by pressing Windows + I keys together.
2. Now, click on Privacy as depicted below.

3. Here, scroll down the left pane and click the Microphone menu option.
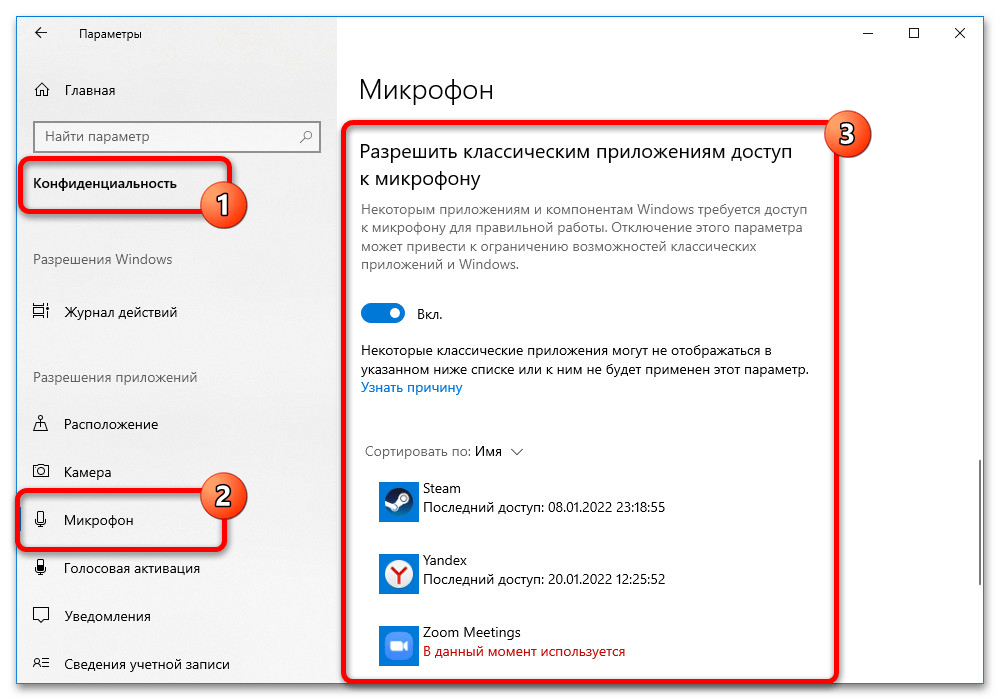
4A. Enable Allow apps to access your microphone option as highlighted in the pic below.

4B. On the same screen, toggle on the option marked Allow desktop apps to access your microphone as depicted below. Make sure Zoom appears in the list of allowed desktop apps.

Method 3: Restart Zoom & Close Background Applications
In some cases, Zoom may load into the meetings without audio devices leading to Zoom audio not working problem. If Zoom interferes with other applications and programs on your PC, you may face Zoom audio not working issues. Some other programs may use your microphone and thus, you may not be able to use Zoom audio. Exit all applications and restart Zoom as instructed below:
1. Launch Task manager by hitting Ctrl + Shift +Esc keys simultaneously.
2. Select the Zoom process and click on End task as depicted below.

3. Locate and select the unwanted background processes using high Memory and disable them similarly.
4. Now reboot your PC and open the Zoom app again.
Also Read: How to Play Outburst on Zoom
Method 4: Run In-built Troubleshooter
You may face sound connectivity issues if there are any glitches or bugs on the hardware part, troubleshooting this will help you resolve the same.
Option I: Run Playing Audio Troubleshooter
1. Press the Windows key, type Control Panel, and click on Open.

2. Set View by > Large icons then, click on the Troubleshooting option.
3. Click on View All option in the left pane.

4. Click on the Playing Audio troubleshooter option to Find and fix problems with playing sound.

5. Click on the Advanced option in Playing Audio troubleshooter.

6. Then, check the Apply repairs automatically option and click on Next.

7. The Troubleshooter will start detecting problems.

8. Follow the on-screen instructions to fix the issue.
Option II: Run Hardware & Devices Troubleshooter
1. Press Windows + R keys simultaneously to launch Run Dialog Box.
2. Type msdt.exe -id DeviceDiagnostic and click OK, as shown.

3. Click Next on the Hardware and Devices troubleshooter window.

4A. Wait for it to detect problems and then, Click Apply this fix if any.

Then, Restart your PC.
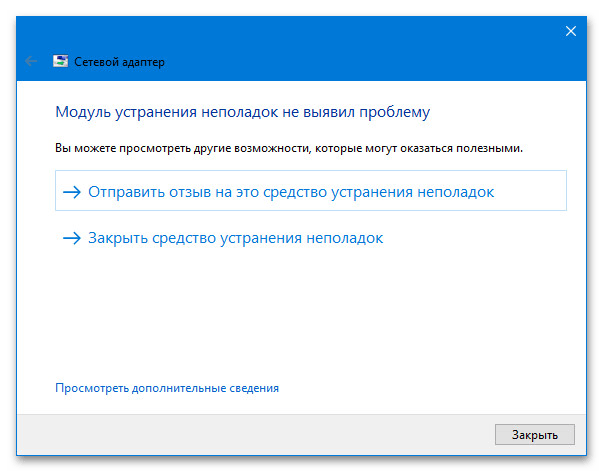
4B. However, the following screen will appear if Troubleshooting couldn’t identify the problem. In this case, you can try the remaining fixes listed in this article.

Also Read: Fix Windows 10 No Audio Devices are Installed
Method 5: Modify Audio Settings for Zoom & PC
To ensure proper audio levels in Zoom, your PC has to meet some audio requirements. Else, you will face several audio-related issues in all video conferencing applications. Follow all of these checklists to ensure proper Zoom audio settings in Windows 10.
Step I: Adjust Windows Audio
To experience a high-quality audio experience in Zoom, make sure that the computer volume is also set to the optimum level. To check and fix the low volume on your PC, follow the instructions below:
1. Right-click on the Speakers icon in the bottom right corner of the screen.
2. Then, select the Open Volume mixer option as highlighted.
3. Now, make sure the audio levels are set to max for Zoom Meetings as shown.

You can also adjust the audio levels according to your needs.
Step II: Change Zoom Audio Settings
When you are in the middle of a meeting or before, test your audio and modify Zoom audio settings in Windows 10.
1. Launch Zoom and click on your profile picture.
2. Then, select the Settings option as highlighted.

3. Now, switch to the Audio tab on the left pane. If you want to test the speaker, click on the Test Speaker option. The test tone will be played now. If you cannot hear anything, adjust the Volume slider or change the speaker if available.

4. To test your microphone, click on the Test Mic option. Your audio will now be recorded. Once you have finished recording, select the Recording button to playback your audio.
5. If you feel your audio is being distorted, then you can choose another microphone or adjust the volume sliders.
Note: We recommend that you keep Automatically adjusting your microphone box to be checked. Still, if you want to adjust the audio levels manually, you can uncheck it.

Also Read: How to Take Zoom Meeting Screenshot
Method 6: Tweak Microphone Settings
If you have any incorrect settings like muted microphone, mic not set as the default input audio device has very low volume which may prevent Zoom from accessing the audio set up in your PC. Follow the below-mentioned steps to tweak microphone settings to fix Zoom audio not working Windows 10 issue.
1. Hit the Windows key, type Control Panel, and click on Open.

2. Then, set the View by: option to Large icons and click on the Sound link as shown.
3. Next, switch to the Recording tab, right-click on the empty space and check Show Disabled Devices option as illustrated below.

4. The Default Device, if disabled, right-click on it and select Enable as shown.

5. Then, right-click on your default audio device and select the Properties option as depicted.

6. Then, in the Speakers Properties option, switch to the Levels tab and ensure the Speakers value is set to max.
Note: You can adjust the slider to increase/decrease the volume.

7. Finally, click on Apply > OK to save the changes and check if the issue is resolved now.
Method 7: Change Default Speaker & Microphone
Your PC may choose any different microphone or speaker as its default device and when you may use another speaker and microphone in the meeting. This may lead to audio issues. Hence, either change the default microphone & speaker on your PC or use the default microphone & speaker in Zoom meetings to avoid problems. Here are a few steps to set up the default speaker & microphone to fix Zoom audio not working Windows 10 issue.
1. Right-click on the Sound icon in the bottom right corner of the screen as shown.
2. Then, in the Sound window, switch to the Recording tab and right-click on the microphone you would like to set as the default one.
3. Now, select the Set as Default Device option as highlighted and click on Apply > OK to save the changes.

4. Then, switch to the Playback tab and right-click on the Speakers you would like to set as the default one.
5. Now, select the Set as Default Device option as highlighted and click on Apply > OK to save the changes.

6. Finally, reboot your PC.
7. Right-click on the Sound icon in the Taskbar and select the Open Sound settings option.
8. Here, select the correct Input device e.g. Microphone (2-High Definition Audio Device) as default under Choose your input device section.

Also Read: Show Profile Picture in Zoom Meeting Instead of Video
Method 8: Clear Browser Cache (For Zoom Web Version)
If you are using Zoom in your browsers and facing Zoom no sound on PC, then too much temporary data might block the audio scripts on Zoom. This happens in rare cases, yet don’t give a chance for this to be the reason for this issue. Clear your browser cache as instructed below to fix Zoom audio not working Windows 10 issue.
Note: Here, Microsoft Edge is shown as an example. Make sure you follow the steps according to your browser.
1. Launch the Edge browser and open a new tab. Click on the three-dotted icon near your profile image as you did earlier.
Note: You can directly navigate the page to delete browsing history in Edge by typing edge://settings/clearBrowserData in the search bar.

2. As shown, navigate to the Privacy, search, and services option in the left pane as shown.
3. Then, scroll down the right screen and click on Choose what to clear option under Clear browsing data as shown.

4. In the next window, select the boxes according to your preferences like Browsing history, Cookies and other site data, Cached images and files, etc, and click on Clear now as highlighted below.

Also Read: How to Stop Microsoft Teams from Opening on Startup
Method 9: Update or Rollback Audio Drivers
If you are using an outdated version of audio or headset drivers, you may face several audio-related issues since the version of Zoom is incompatible with the drivers. In this case, try updating all the audio drivers available on your PC to see if you have fixed the issue.
Option I: Update Audio Driver
If the current drivers in your system are incompatible or outdated with the Zoom files, then you will face this problem. Therefore, you are advised to update your device and drivers to fix Zoom audio not working Windows 10 issue.
1. Click on Start, type device manager, and hit the Enter key.

2. Double-click on Sound, video, and game controllers to expand.

3. Right-click on your audio driver (e.g. Realtek High Definition Audio) and choose Properties.

4. Go to the Driver tab and click on Update Driver

5A. Choose Search automatically for drivers. Windows will automatically search the drivers needed for your PC and install them. Click on Close after finishing the process and Restart PC once done.

5B. Else, The best drivers for your device are already installed message will be displayed. In this case, click on Search for updated drivers on Windows Update which will take you to Settings and will search for drivers on the next Windows update.

Option II: Rollback Driver Updates
If your system had been working correctly and began to malfunction after an update, rolling back the drivers might help. The rollback of the driver will delete the current driver installed in the system and replace it with its previous version. This process should eliminate any bugs in the drivers and potentially fix Zoom audio not working Windows 10.
1. Navigate to Device Manager > Sound, video and game controllers > Audio Driver Properties as shown in the previous option.
2. Go to the Driver tab, and click on the Roll Back Driver button.
Note: If the button is greyed out or not available, this means that you do not have any updates installed for the respective driver.

3. In the Driver Package rollback, give a reason for Why are you rolling back? and click on Yes to roll back driver updates.

4. Restart your Windows 10 PC to have the appropriate drivers automatically installed after system boot.
Also Read: Show Profile Picture in Zoom Meeting Instead of Video
Method 10: Reinstall Zoom
If none of the methods have helped you, then try to reinstall the software if possible. All the settings and configurational setup will be refreshed when you reinstall Zoom, and hence there are more chances that you will attain a fix for your problem.
1. Press the Windows key, type Control Panel and click on Open.

2. Now, select the Programs and Features option as highlighted.

3. Now, on the list, click on Zoom and select the Uninstall option.

4. Then, confirm Uninstall in the pop-up prompt. Then, reboot your PC after uninstallation is completed.
5. Download Zoom from the official website.

6. Now, navigate to My downloads and launch the ZoomInstaller file.
7. Follow the on-screen instructions to complete the installation on your PC.
Pro Tip: How to Run Test Speaker & Microphone Tool
If Zoom fails to detect your audio automatically, you can test the Test Speaker & Microphone tool to resolve it. Thus, you may manually select the microphone and speaker to be used in the meeting. Here are a few simple steps to run the Test Speaker & Microphone tool.
1. Unmute your audio in Zoom meeting and select the carat icon next to the mic as shown.
2. Now, select the Test Speaker & Microphone… option.

3. Check and set the volume of your speaker and microphone and click on Finish.
Recommended: Fix Zoom is Unable to Detect a Camera
We hope this guide was useful and you could fix Zoom audio not working Windows 10 issue. Let us know which method worked for you the best. Also, if you have any queries or suggestions regarding this article, drop them in the comments section.
Все способы:
- Проверка и настройка интернета
- Вариант 1: Компьютер
- Способ 1: Изменение настроек микрофона
- Способ 2: Изменение системных настроек
- Способ 3: Переустановка программы
- Способ 4: Диагностика устройства
- Вариант 2: Телефон
- Способ 1: Изменение настроек микрофона
- Способ 2: Изменение системных настроек
- Способ 3: Переустановка программы
- Способ 4: Диагностика устройства
- Вопросы и ответы: 0
Проверка и настройка интернета
Большинство проблем с работой различных функций Zoom на компьютере или телефоне, как правило, связано с нестабильным или медленным интернетом, что в конечном счете приводит к задержкам при отправке данных и значительному снижению качества. Если вы столкнулись именно с такой ситуацией, в первую очередь проверьте скорость интернета с помощью любого удобного сервиса вне зависимости от платформы.
Подробнее: Проверка скорости и стабильности интернета
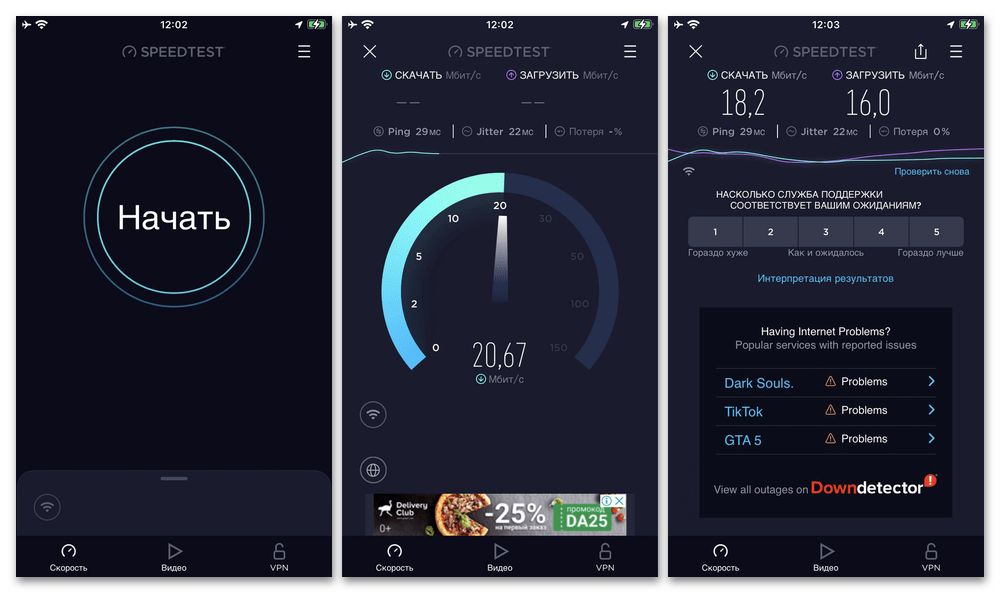
При значениях скачивания и загрузки ниже 2 Мбит/сек. можете ознакомиться с другими нашими инструкциями на тему увеличения скорости интернета в различных операционных системах. Кроме этого, конкретно в Zoom оптимизировать работу можно путем отключения камеры во время конференции, так как именно передача высококачественного видеосигнала потребляет больше всего ресурсов.
Подробнее: Увеличение скорости интернета на телефоне и компьютере
Если проблема с низкой скоростью сохраняется, скорее всего, дело в провайдере и, к сожалению, мы уже ничем помочь не сможем – для этого нужно связываться с поставщиком услуг и уточнять детали. При этом конкретно на смартфоне есть и другой вариант, сводящийся к использованию Wi-Fi вместо сотовой передачи данных, что может значительно улучшить качество связи.
Вариант 1: Компьютер
На компьютере препятствовать правильной работе микрофона могут внутренние настройки Zoom, если ранее по тем или иным причинам были установлены в отличающееся от стандартного положение. Более того, в данной версии проблема может быть связана с выбором неправильного устройства ввода, включая виртуальные аналоги.
Читайте также: Включение микрофона и входящего звука в Zoom на ПК
Способ 1: Изменение настроек микрофона
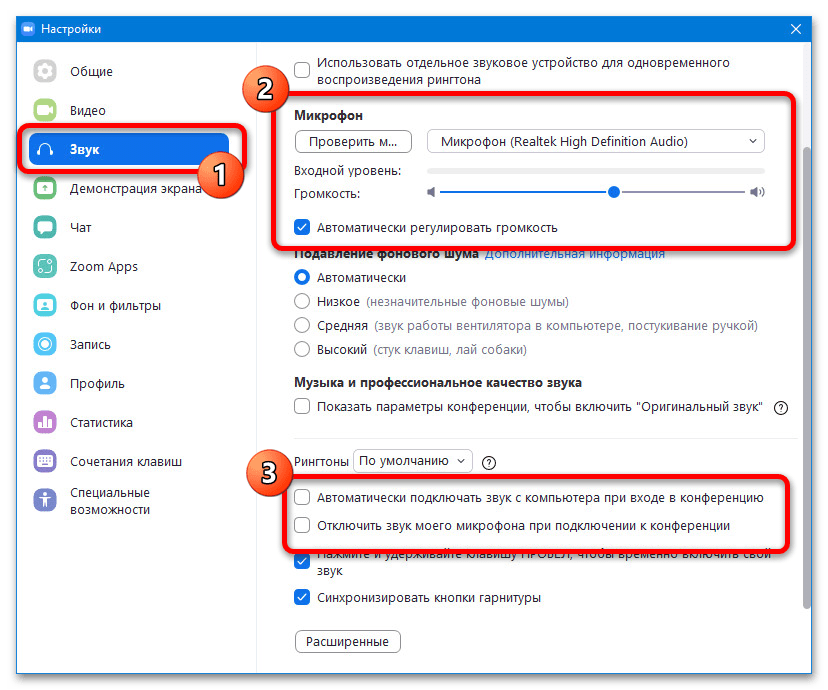
- Для начала следует проверить параметры активной конференции, сместив курсор в рамках рабочей области для появления нижней панели инструментов и воспользовавшись кнопкой «Подключить звук». Если все было сделано правильно, в той же области экрана будет отображаться иконка микрофона без дополнительных символов, и вас смогут услышать собеседники.
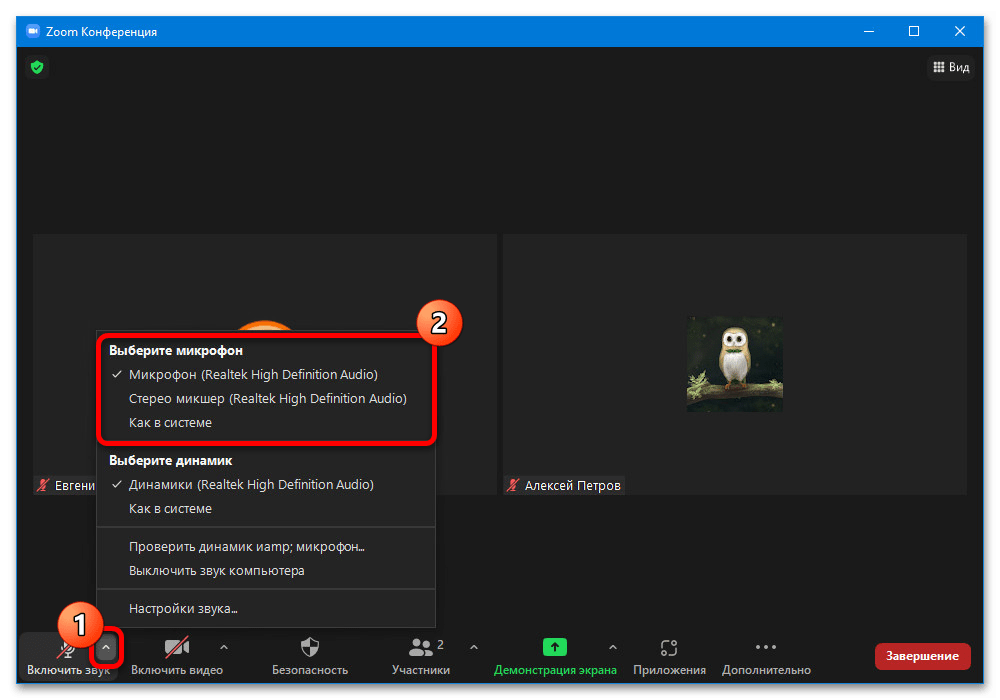
- При наличии нескольких звукозаписывающих устройств или включенном стереомикшере, важно проверить внутренние настройки. Чтобы это сделать, наведите курсор мыши на кнопку с отмеченной иконкой и в самом начале списка выберите подходящий микрофон, ориентируясь по названию или по необходимости пробуя разные варианты.
- В основных параметрах программы на вкладке «Звук» также доступен ряд настроек, связанных с микрофоном, включая выпадающий список с устройствами. Здесь следует установить достаточно высокий показатель громкости при помощи соответствующего ползунка и деактивировать функции в нижней части окна, отвечающие за автоматическое отключение звука.
Рассмотренных шагов должно быть более чем достаточно для возращения собственного звука в Zoom. В то же время, если вы испытываете проблемы с отсутствием входящих звуков, ограничения могут быть выставлены на стороне собеседников или одного из организаторов конференции.
Способ 2: Изменение системных настроек
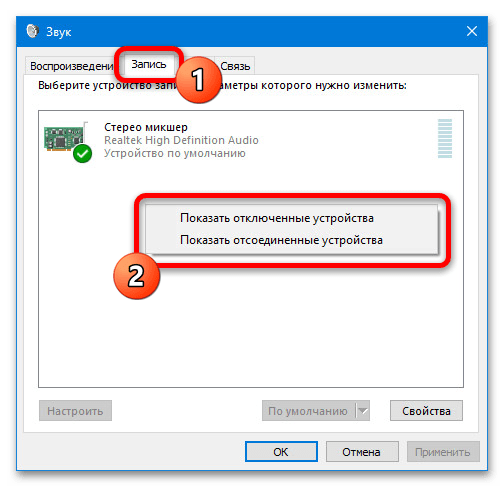
- Помимо внутренних параметров программы, не меньшее внимание нужно уделить настройкам операционной системы, потому как отключенный в панели управления звуками микрофон нельзя будет ни использовать, ни выбрать из списка устройств. В первую очередь для этого на панели задач нажмите правой кнопкой мыши по значку динамика и выберите «Звуки».
- Оказавшись в окне «Звук», перейдите на страницу «Запись» и кликните ПКМ по любой свободной области. Здесь необходимо активировать обе доступные опции «Показать отсоединенные устройства» и «Показать отключенные устройства».
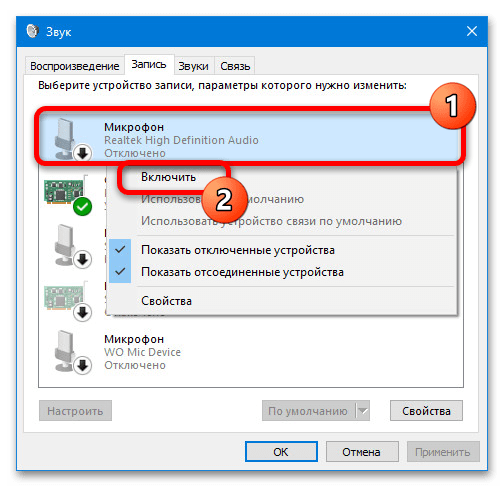
- Идентичным образом нажмите правой кнопкой мыши по нужному микрофону со статусом «Отключено» и во всплывающем меню воспользуйтесь опцией «Включить». После этого не забудьте обязательно выбрать задействованное устройство во внутренних настройках Зума.
Подробнее: Включение микрофона в Windows 7, Windows 8 и Windows 10
- Дополнительно можете развернуть параметры устройства и на вкладке «Уровни» установить достаточно высокий уровень усиления, который нельзя изменить через Zoom. Также не будет лишним проверить настройки конфиденциальности Windows, которые позволяют ограничивать доступ разным программам.
Подробнее: Устранение проблем с работой микрофона в Windows 10
В завершение напомним, что физическое подключение проверить необходимо вообще в первую очередь, так как использование неправильного порта не позволит системе увидеть устройство. Это будет актуально и в тех случаях, если в панели управления звуками микрофон просто не отображается.
Способ 3: Переустановка программы
- Хоть такое случается и не часто, но в работе настольной версии мессенджера могут возникать неисправности, из-за которых программа не получит разрешения на использование микрофона или устройство не будет отображаться во внутренних настройках. Чтобы избавиться от проблемы, следует выполнить удаление и повторную установку, для начала щелкнув правой кнопкой мыши по значку пуск и выбрав «Приложение и возможности» или «Программы и компоненты» в зависимости от версии системы.
- При появлении одноименного окна найдите в общем списке «Zoom», нажмите по блоку левой кнопкой мыши и воспользуйтесь опцией «Удалить». В более ранних версиях ОС удаление осуществляется через дополнительное меню при нажатии ПКМ.
Подробнее: Удаление программ в Windows 7, Windows 8 и Windows 10
- Теперь необходимо посетить официальную страницу мессенджера в Microsoft Store, воспользоваться кнопкой «Установить» и дождаться завершения процедуры. Если вы предпочитаете классическую версию или используете раннюю версию ОС, откройте официальный сайт, загрузите EXE-файл и просто подождите некоторое время до автоматического открытия программы.
Скачать Zoom с официального сайта

В дальнейшем потребуется обязательно пройти повторную авторизацию, так как любые связанные с мессенджером данные будут удалены. Это также относится и к настройкам, информация о которых хранится на компьютере до переустановки.
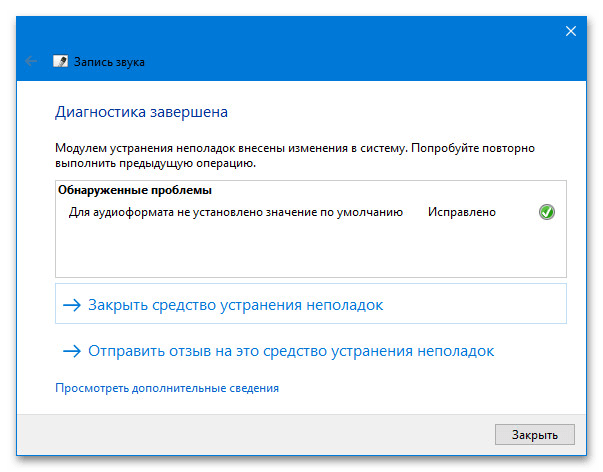
Способ 4: Диагностика устройства
Последнее, что может препятствовать правильной работе звукозаписывающего устройства в Zoom, это неисправности самого микрофона и прочих связанных компонентов компьютера. Данную тему лучше изучать отдельно по соответствующей инструкции, где была рассмотрена диагностика и некоторые системные решения вроде переустановки драйверов.
Подробнее: Устранение проблем с работой микрофона на компьютере
Во время выполнения рекомендаций не забывайте про указанные ранее параметры конфиденциальности. К сожалению, если ничего из названого не поможет, скорее всего придется менять устройство, что особенно сложно на ноутбуках.
Вариант 2: Телефон
Официальное приложение Zoom для Android и iOS значительно отличается от настольной версии мессенджера, но несмотря на это, причины и способы устранения неисправностей примерно одинаковые. Большее внимание при этом стоит уделить третьему разделу, так как блокировка доступа к микрофону может быть связана не только с намеренным изменением настроек, но и возникнуть вследствие ошибок, например, после обновления системы.
Читайте также: Включение микрофона в Zoom на телефоне
Способ 1: Изменение настроек микрофона
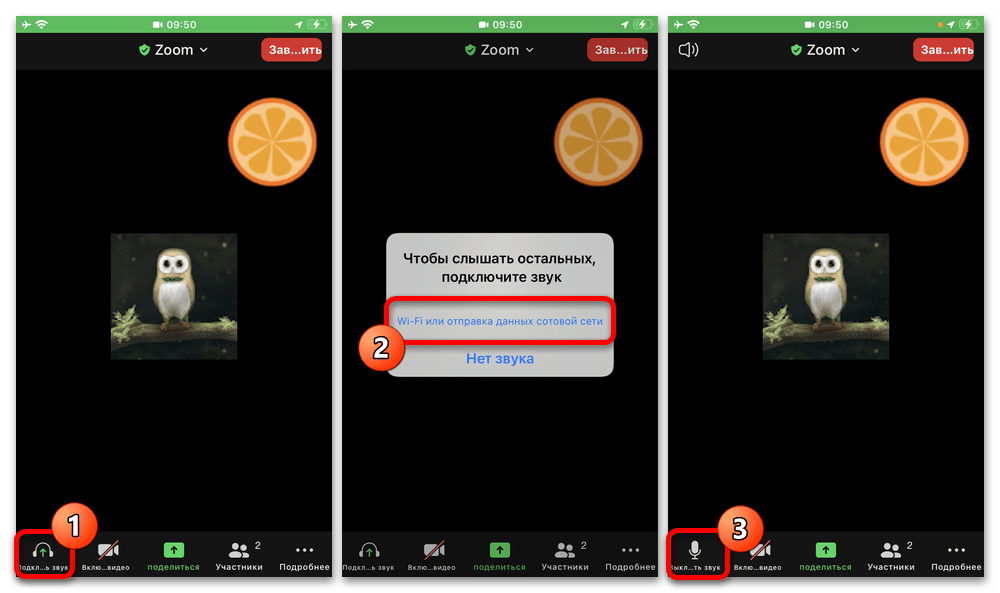
- Внутренние параметры Zoom на телефоне сильно ограничены в плане управления микрофоном, и потому буквально единственное, что можно сделать, это проверить статус и по необходимости задействовать передачу аудио. Для этого на нижней панели воспользуйтесь кнопкой с изображением наушников и во всплывающем окне подтвердите включение.
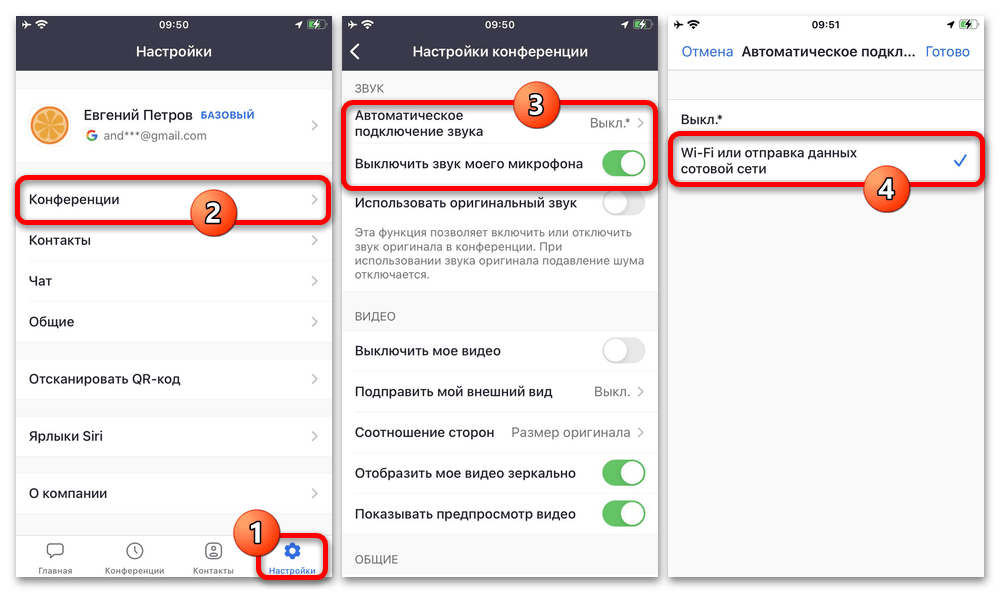
- Дополнительное можете посетить основные настройки, чтобы включить автоматическую передачу звука при подключении к конференции. Это будет полезно, если исходящий звук блокируется в начале каждого отдельного сеанса связи.
Если вы являетесь одним из организаторов видеочата, проблемой может стать принудительное отключение микрофона у всех участников. Чтобы снять такого рода ограничения, следует открыть список участников и воспользоваться опцией «Выкл. звук у всех» или «Попросить вкл».
Способ 2: Изменение системных настроек
Доступ к микрофону во всех разновидностях операционных систем могут блокировать настройки конфиденциальности, которые фиксируются при первом запуске приложения. Если вами было ограничено использование данного компонента в Зуме, необходимо соответствующим образом изменить глобальные параметры в зависимости от платформы.
Android
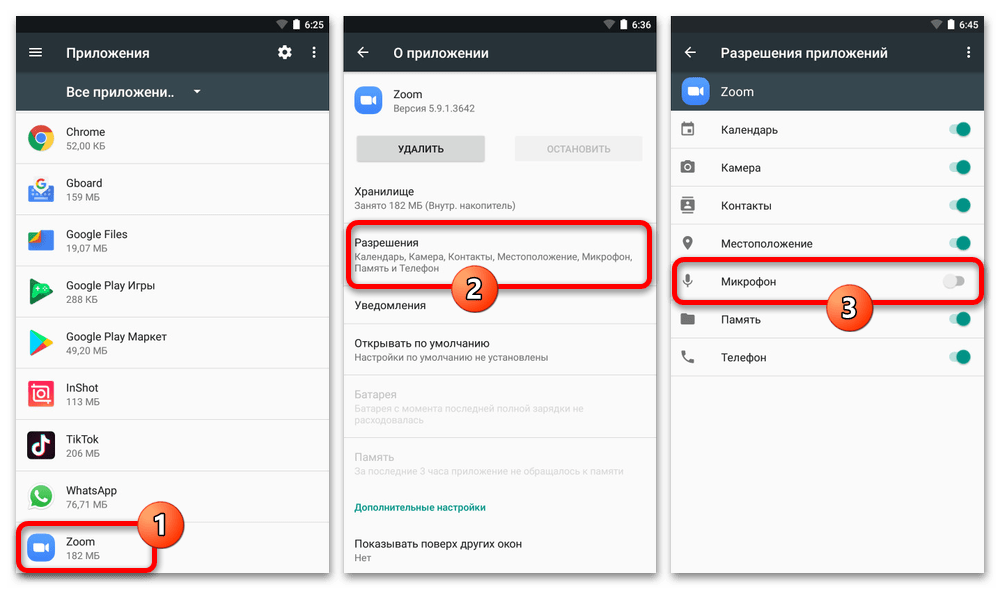
- Чтобы выполнить поставленную задачу на Android-устройстве, перейдите в полный список установленных приложений, выберите «Zoom» и разверните категорию «Разрешения». Здесь необходимо изменить положение ползунка напротив пункта «Микрофон», как показано на скриншоте.
- В более поздних версиях системы настройки меняются немного по-другому, и потому в разделе с полным списком приложений придется перейти в категорию «Управление разрешениями», выбрать «Микрофон» и только потом найти рассматриваемую программу. Более того, выдача разрешений осуществляется путем выбора пункта «Разрешить», а не с помощью ползунка.
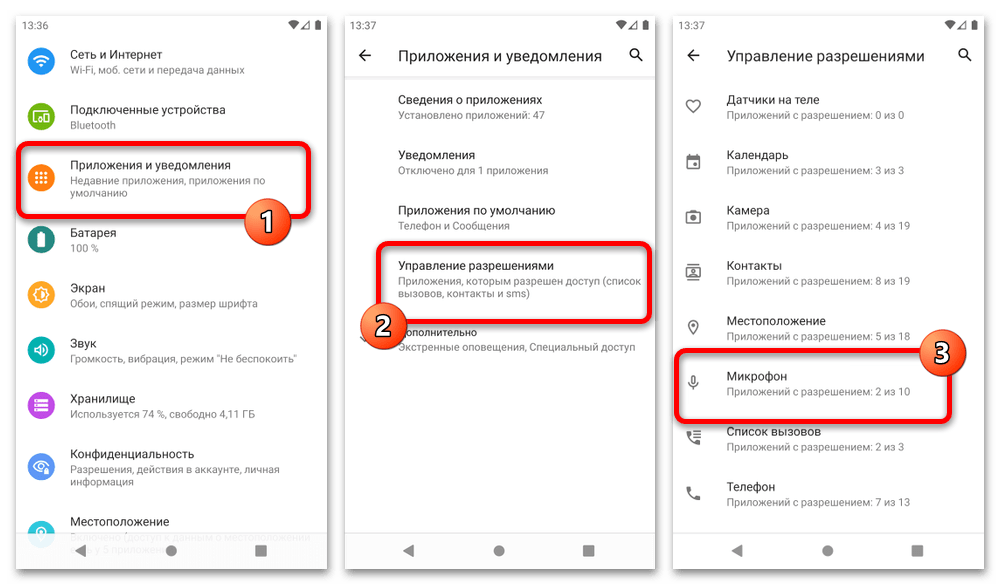
Целенаправленное сохранение ни в одном из вариантов не требуется, изменения применяются автоматически. В дальнейшем достаточно будет выйти из раздела и проверить микрофон в приложении.
iOS
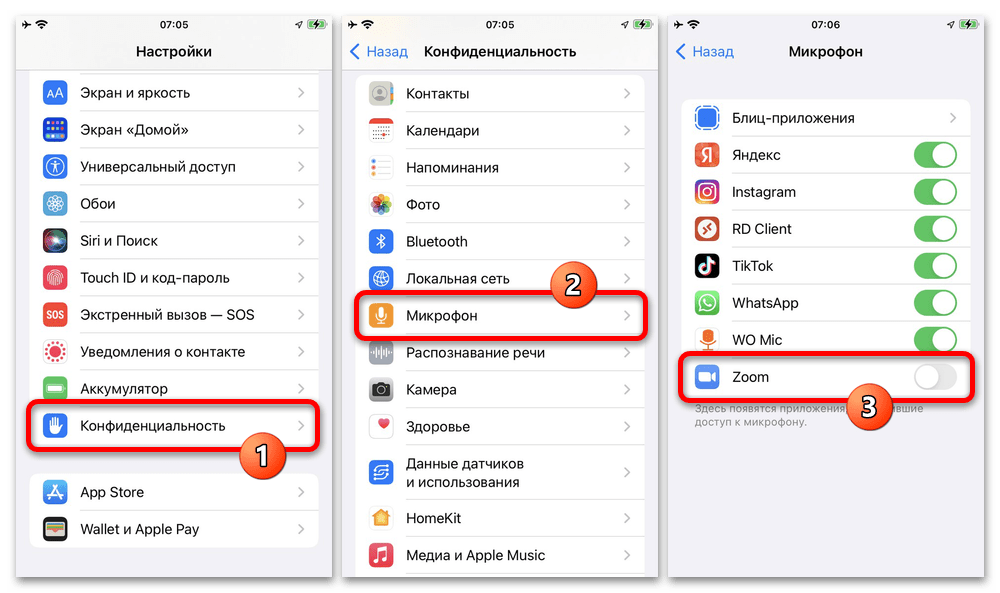
- Предоставить доступ к микрофону приложению Zoom на iOS можно в разделе «Конфиденциальность», выбрав категорию «Микрофон» и воспользовавшись ползунком напротив соответствующего названия. Как и ранее, сохранение новых параметров не требуется.
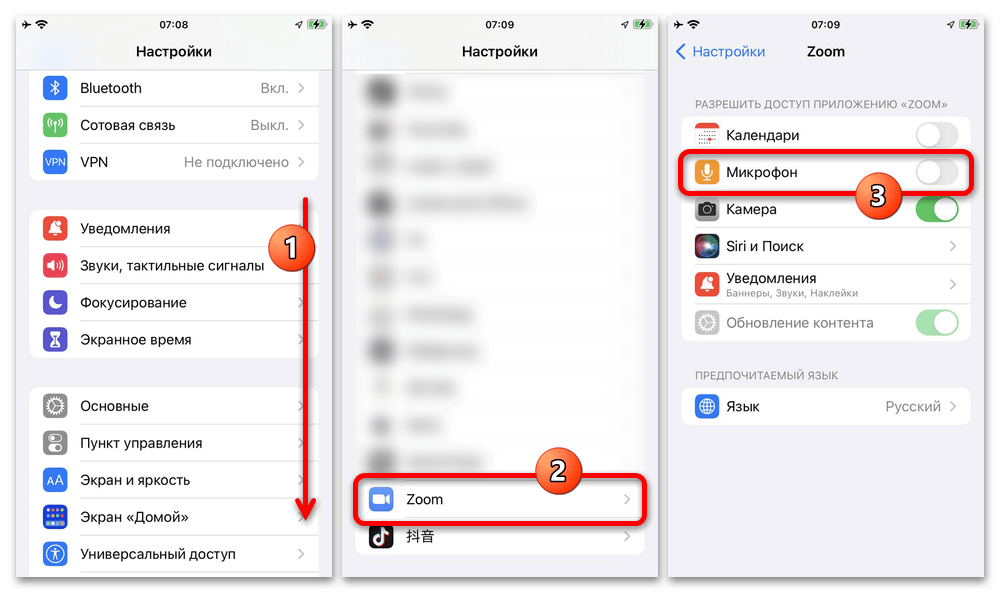
- Альтернативой данного варианта, например, если ПО отсутствует в предыдущем разделе, могут стать индивидуальные параметры приложения, расположенного в нижней части главной страницы системных «Настроек». Здесь нужно воспользоваться ползунком, подписанным как «Микрофон».
Если вы меняли параметры во время действующей конференции, возможен автоматический выход, потому как Zoom перезапустится с новыми разрешениями. Поэтому старайтесь вносить изменения при закрытом приложении, чтобы избежать дополнительных неудобств.
Способ 3: Переустановка программы
В отличие от ПК, на смартфонах сбои в приложениях происходят достаточно часто, что может приводить как к нестабильной работе определенных функций, так и к отсутствию программы в настройках конфиденциальности. Исправить ситуацию поможет полная переустановка Зума, которую мы продемонстрируем на примере одного способа для каждой платформы.
Android
- Универсальным решением для Android является Google Play Маркет, с помощью которого можно не только устанавливать, но и удалять любые официальные приложения. Для этого перейдите по указанной ниже ссылке, воспользуйтесь кнопкой «Удалить», подтвердите выполнение задачи во всплывающем окне и дождитесь завершения.
Страница Zoom в Google Play Маркете
- Затем нажмите кнопку «Установить» и подождите некоторое время. Когда приложение загрузится на устройство, на той же странице появится кнопка «Открыть».
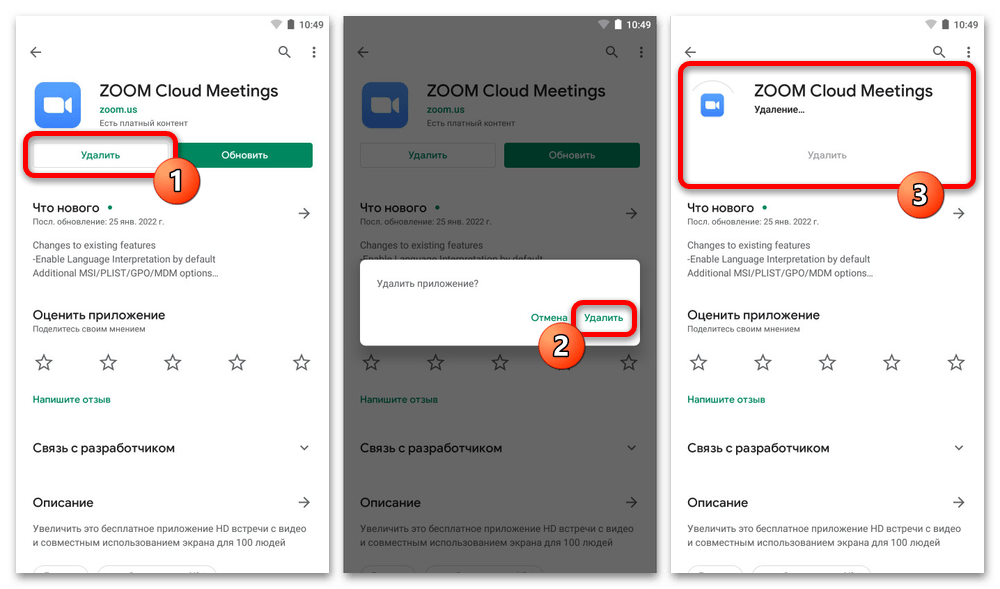

Если вами используется устройство без сервисов Google, можете попробовать сделать аналогичное через другой магазин приложений вроде AppGallery от Huawei. Кроме этого, удаление вполне можно осуществить через системные настройки и впоследствии повторить установку с помощью загруженного из интернета APK-файла.
iOS
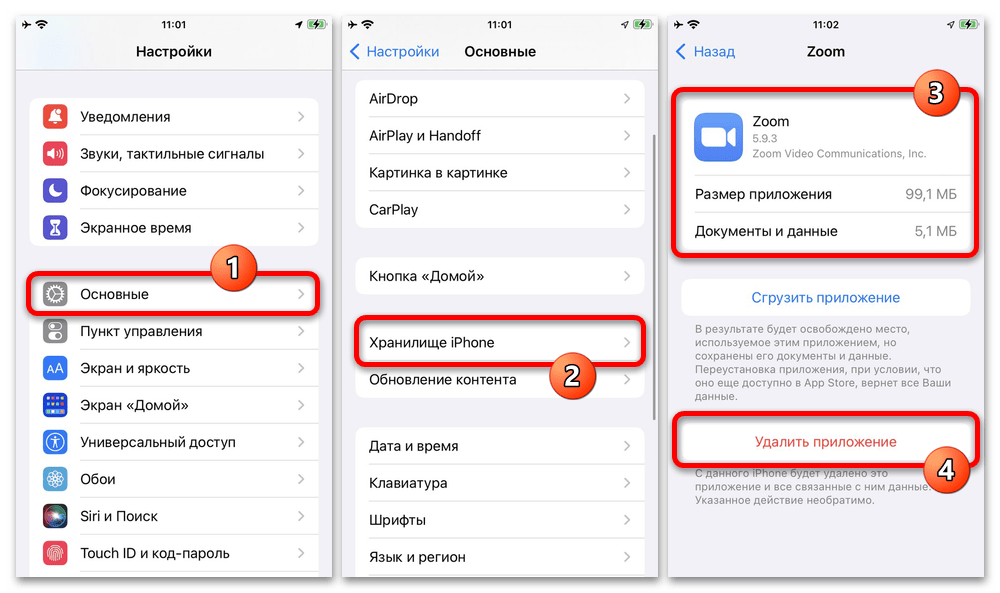
- На iPhone произвести удаление можно через настройки системы, для открытия которых используйте соответствующий значок на домашнем экране устройства. Здесь необходимо перейти в раздел «Основные», выбрать «Хранилище iPhone», найти «Zoom» в общем списке и в нижней части экрана воспользоваться кнопкой «Удалить приложение».
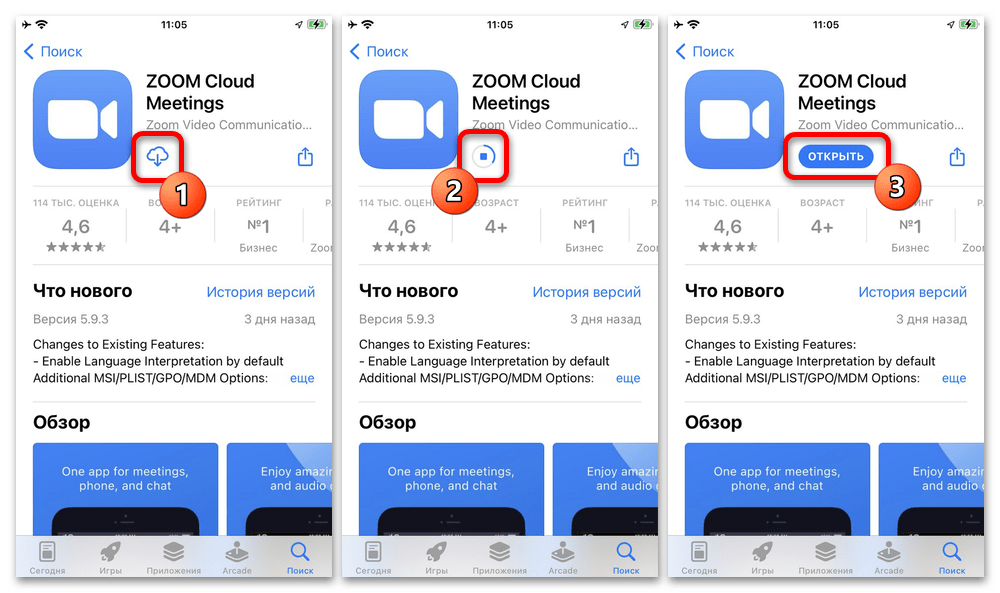
- Теперь перейдите по указанной ниже ссылке на официальную страницу программы в App Store и нажмите кнопку «Загрузить» или по значку облака с указывающем вниз стрелочкой. Это приведет к повторному скачиванию приложения, открыть которое можно будет с этой же страницы или при помощи ярлыка на домашнем экране.
Скачать Zoom из App Store
- Отдельно для Айфона существует еще один вариант переустановки, сводящийся к сгрузке программы и последующему использованию опции «Переустановить приложение». Если не хотите вручную восстанавливать настройки, можете попробовать данный вариант.

Какой бы платформой вы не пользовались, после переустановки обязательно предоставьте приложению доступ к микрофону и камере при появлении соответствующего запроса. Если окно не появляется, самостоятельно посетите страницу мессенджера в системных «Настройках».
Способ 4: Диагностика устройства
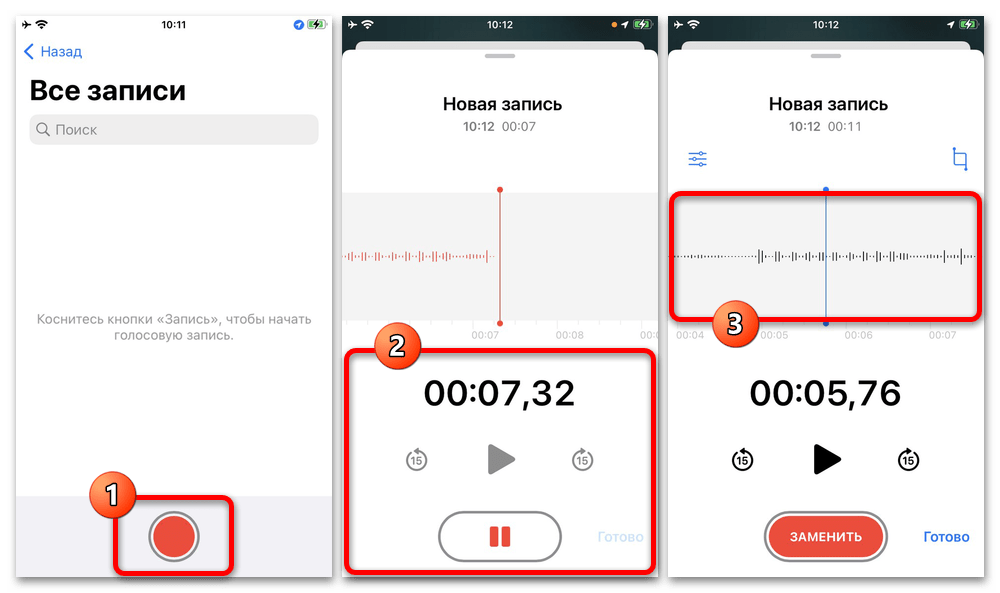
Еще одной причиной неработоспособности звукозаписывающих компонентов в Zoom могут быть неполадки смартфона, что случается не так уж часто, но актуально, если звук не записывается другими способами. Проверить это достаточно легко, просто воспользовавшись стандартным «Диктофоном» или специальными сторонними приложениями.
Читайте также:
Использование диктофона на iPhone
Рассматривать какие-то определенные приложения в данном случае нет никакого смысла, так как существует огромное количество вариантов, найти которые можно по соответствующему запросу в Google Play Маркете и App Store. Сама по себе диагностика осуществляется при помощи функции «Полная проверка» или выбора пункта «Микрофон» и последующего выполнения требуемых действий.
Подробнее:
Не работает микрофон на телефоне
Не работает микрофон на Samsung

Исправить механические неисправности, к сожалению, самостоятельно не получится, и потому придется обратиться в сервисный центр. В то же время, иногда помогает сброс системы к заводскому состоянию или восстановление с помощью компьютера.
Наша группа в TelegramПолезные советы и помощь