
Mic not working on Steam when you’re mid-match trying to call the shots, or just hanging out in voice with friends? You’re not alone. It’s a common issue — and a frustrating one. The good news? It’s usually easy to fix.
Below are 5 tried-and-true fixes that have helped many players get their mic working again in Steam voice chat. You don’t need to try them all; just start from the top and work your way down until one does the trick.
- Fix 1: Troubleshoot hardware issues
- Fix 2: Make sure your microphone is enabled and set as default
- Fix 3: Allow microphone access for Steam
- Fix 4: Configure the right mic in Steam voice settings
- Fix 5: Update your audio driver
Fix 1: Troubleshoot hardware issues
You can start troubleshooting the Steam voice chat not working issue by ruling out the hardware issues.
Here is how to do it:
1) Make sure you have plugged your mic into the right connector on your computer. Typically, analog mic connections are pink and should be plugged into the pink connector on your headset. But if there is no pink connector on your headset, you might have to consult the manual for your headset to make sure your mic is properly plugged.
2) Connect your sound device to a different port. Sometimes the mic mot working problem may occur if the port you’re using is faulty. If you get the microphone working on Steam again after switching to another port, then congrats! (and avoid using the faulty port). If the mic not working on Steam issue remains, please move on to Fix 2, below.
Fix 2: Make sure your microphone is enabled and set as default
Sometimes, the issue isn’t with Steam at all — Windows might not be detecting your mic correctly. If the microphone isn’t enabled or set as the default input device, Steam won’t pick it up no matter what.
Here’s how to make sure your mic is properly recognized and ready to use:
- On your keyboard, press the Windows logo key and R simultaneously, type
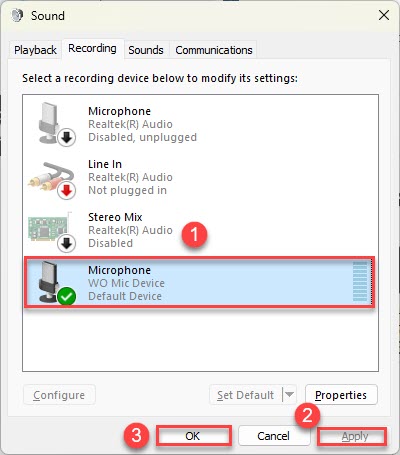
mmsys.cpl, and hit Enter. - Click the Recording tab, then check your mic and make sure it’s enabled (a tick symbol).

- Right-click it again > Set as Default Device and Default Communication Device.
- Speak into the mic and see if the green bars move.
- Restart Steam and test voice chat. If it’s working properly, then great! If it’s still not working, please proceed to Fix 3, below.
Fix 3: Allow microphone access for Steam
If your microphone is working fine, but Steam still can’t detect it, the issue might be with Windows privacy settings. By default, Windows may block apps like Steam from using your mic. Here’s how to ensure Steam has the necessary permissions to access your microphone:
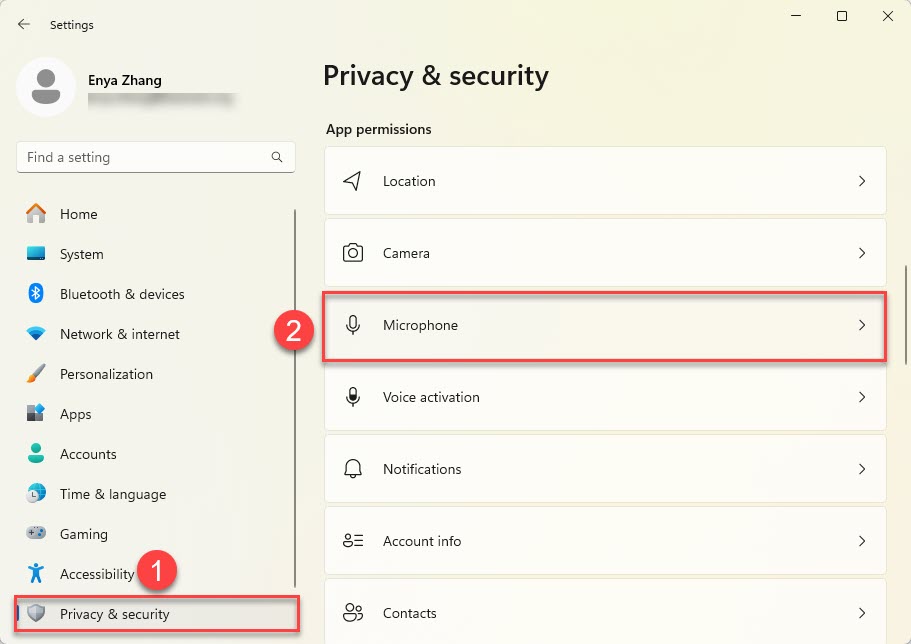
- On your keyboard, press the Windows logo key and I to open Settings.
- Go to Privacy & security > Microphone.

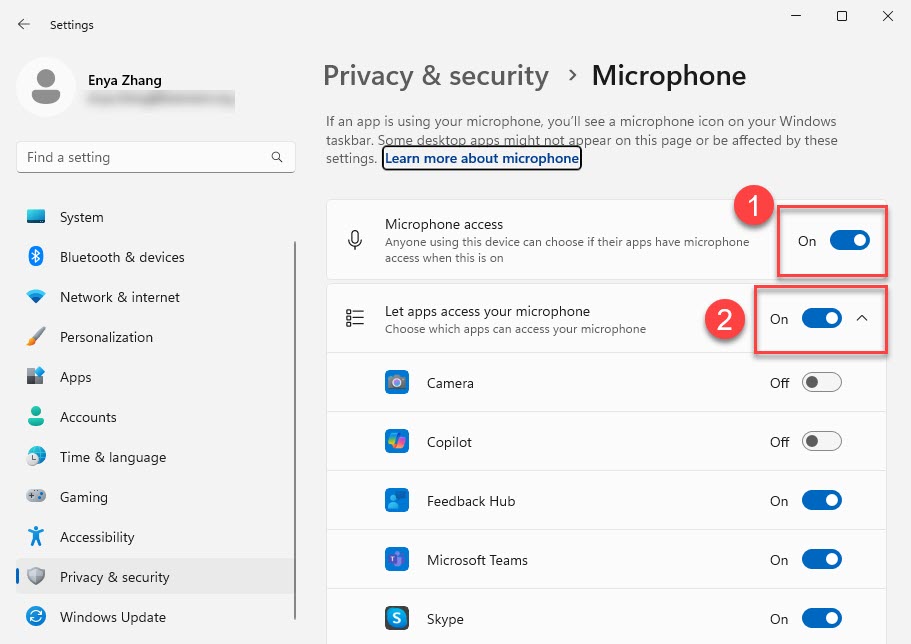
- Under Microphone access, make sure it’s turned on. Then scroll down and enable Let apps access your microphone > Steam.
- Restart Steam and test the voice chat. If your mic works now, excellent! If the issue is still there, move on to Fix 4, below.
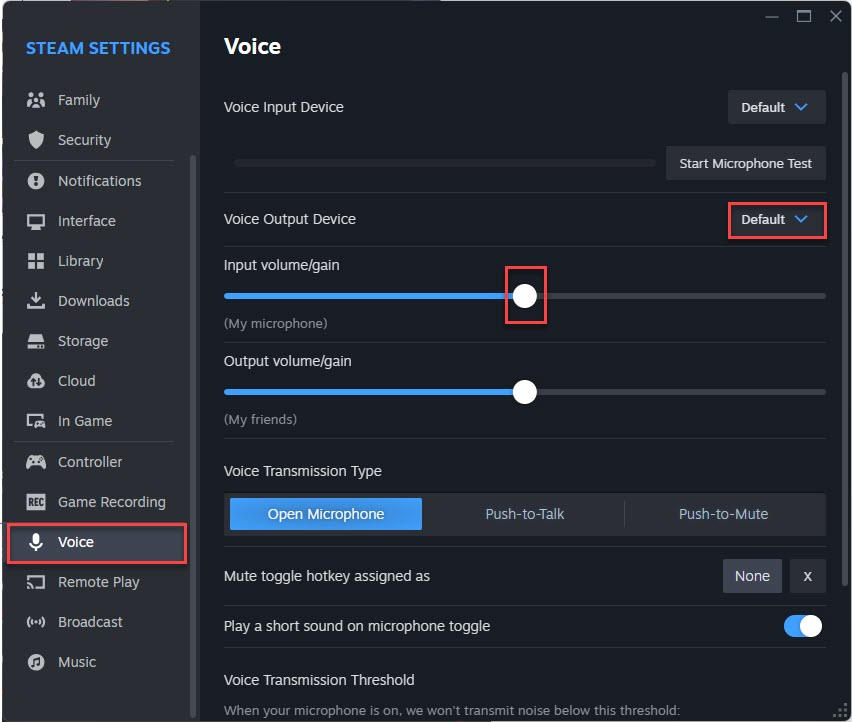
Fix 4: Configure the right mic in Steam voice settings
Sometimes, Steam doesn’t automatically select the right microphone, even if it’s the default on your system. For the microphone to work properly on Steam, you should make sure the microphone used by steam the same as the one you’ve set as the default input device.
Here is how to do it:
- Launch Steam.
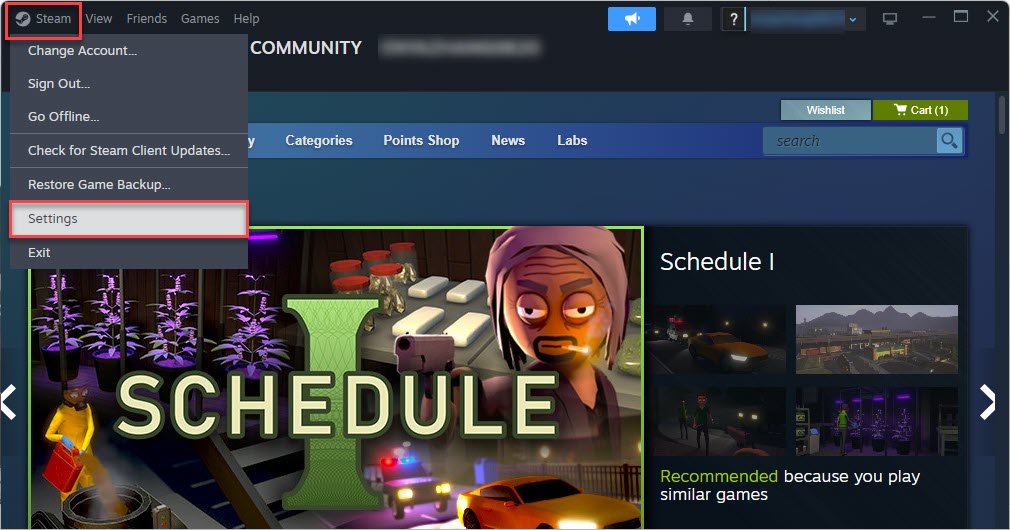
- Navigate to Steam > Settings.

- In VOICE INPUT DEVICE, make sure the microphone you set as the input device in Fix 2) is selected. Then in VOLUME, make sure the Input volume/gain and Output volume/gain slide bars are dragged to medium or high to make sure both you and your teammates can be heard.

- Save the changes and close the window.
- Test to see if the voice chat is working properly. If it’s still not working, it may point to an outdated or faulty audio driver. Please proceed to Fix 5.
Fix 5: Update your audio driver
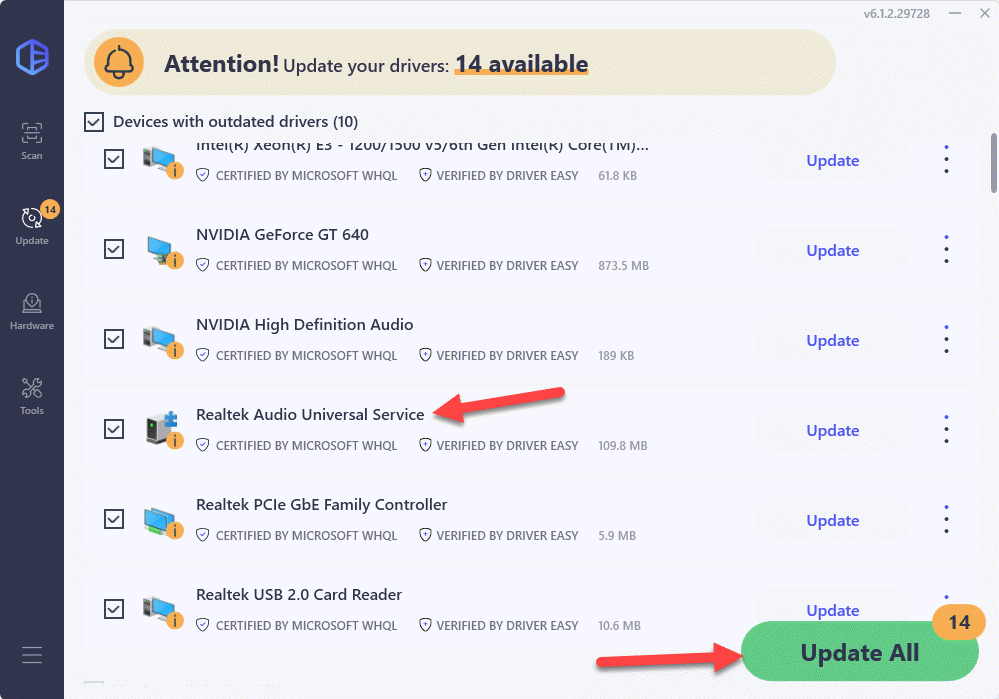
This problem may occur if you are using the wrong audio driver or it’s out of date. So you should update your audio driver to see if it fixes your problem. If you don’t have the time, patience or skills to update the driver manually, you can do it automatically with Driver Easy.
Driver Easy will automatically recognize your system and find the correct drivers for it. You don’t need to know exactly what system your computer is running, you don’t need to be troubled by the wrong driver you would be downloading, and you don’t need to worry about making a mistake when installing. Driver Easy handles it all.
All it takes is just 2 steps:
1) Download and install Driver Easy.
2) Run Driver Easy and click the Scan Now button. Driver Easy will then scan your computer and detect any problem drivers.

3) Check if your audio driver is flagged in the scan results. If it is, click Activate & Update to start a 7-day free trial or upgrade to Driver Easy Pro. Either option will automatically download and install the latest audio driver for you.
4) Restart your computer for the changes to take effect.
5) Check the microphone in Steam to see if the voice check not working problem is resolved.
Hopefully you have successfully resolved the Mic Not Working On Steam issue by now. If you have any questions, ideas or suggestions, please let me know in the comments. Thanks for reading!
4
4 people found this helpful
Не работающий микрофон в отдельных программах или в системе в целом — одна из наиболее частых проблем пользователей, решение которой в большинстве случаев сравнительно простое.
В этой пошаговой инструкции подробно о том, что делать, если не работает микрофон в Windows 11 и о возможных способах решить проблему. Сначала более простые, но часто срабатывающие методы исправления (в случаях, когда микрофон виден в системе), затем — дополнительные варианты, в том числе для случаев, если с точки зрения ОС микрофон отсутствует.
Исправление работы микрофона в Параметрах Windows 11
Перове, что следует проверить при проблемах с работой микрофона — некоторые параметры в Windows 11, особенно часто это помогает, если микрофон перестал работать после обновления или чистой установки системы. Чтобы исправить проблему, выполните следующие шаги:
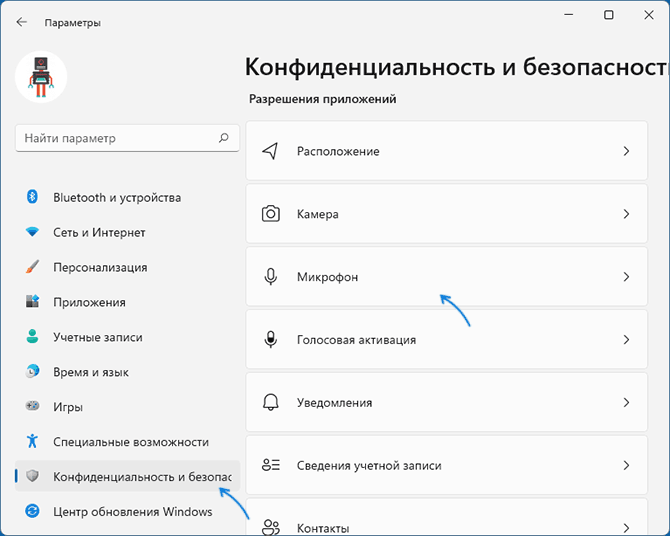
- Откройте Параметры (можно нажать клавиши Win+I), перейдите в раздел «Конфиденциальность и безопасность», а затем, внизу нажмите «Микрофон».

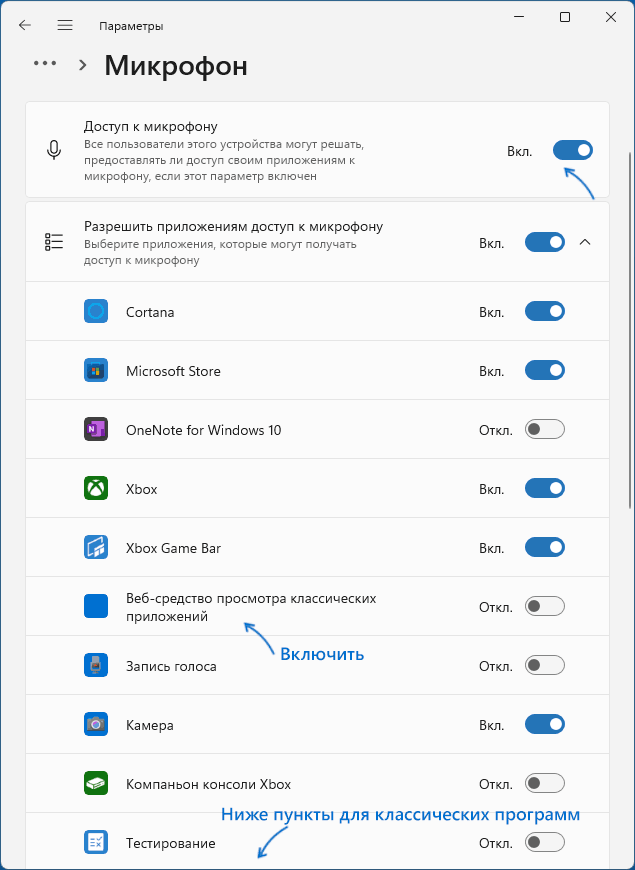
- Включите два переключателя: «Разрешить приложениям доступ к микрофону» и, внизу, в следующем разделе — «Разрешить классическим приложениям доступ к микрофону».

- Если программа, в которой не работает Микрофон есть в списке, включите для него доступ к микрофону (в верхней части отображаются «современные» UWP приложения, в нижней — классические программы.
- Также рекомендую включить пункт «Веб-средство просмотра классических приложений» (при условии, что соответствующий пункт присутствует в списке) — это позволит задействовать микрофон для некоторых классических программ, использующих в работе веб-технологии.
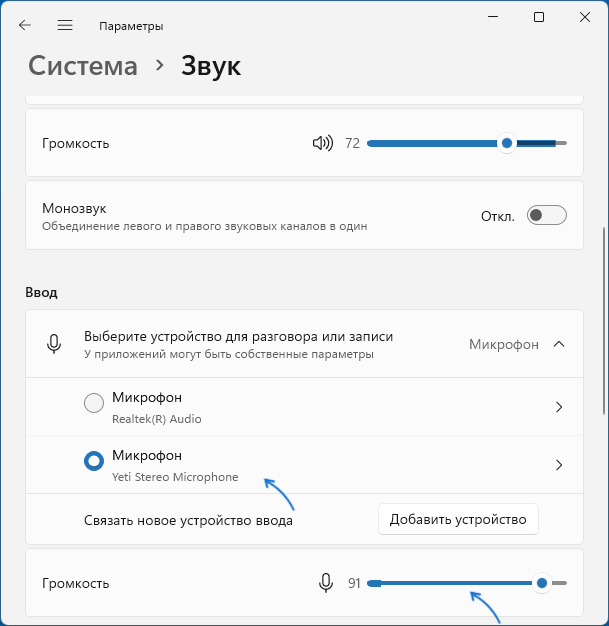
- Если указанные шаги не помогли, перейдите в раздел параметров «Система» — «Звук». Убедитесь, что в разделе «Ввод» выбран нужный микрофон. Также проверьте, чтобы для него не была выставлена нулевая громкость.

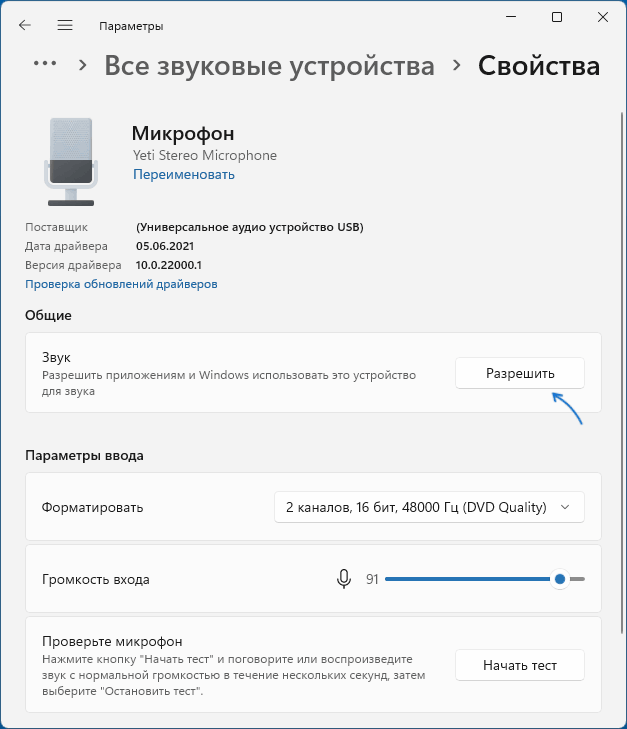
- Если в разделе «Ввод» правильный микрофон не отображается, при этом он есть в диспетчере устройств, на той же странице параметров внизу перейдите в раздел «Все звуковые устройства» и, если там есть нужный микрофон, нажмите по нему, а затем в пункте «Разрешить приложениям и Windows использовать это устройство для звука» нажмите «Разрешить».

Как правило, если с драйверами звуковой карты нет проблем, а устройства работают исправно, один из предложенных выше шагов решает проблему.
Однако, возможен вариант, что на уровне системы в качестве устройства записи установлен один микрофон, а в качестве устройства связи — другой (даже если физически микрофон лишь один), в результате в некоторых программах он может исправно работать, а в других — нет. Решение — далее.
Устройства записи по умолчанию и устройства связи по умолчанию
Возможна ситуация, когда правильный микрофон в параметрах Windows 11 уже выбран, в параметрах конфиденциальности всё задано верно, и он даже работает в некоторых программах, в других он всё так же не работает. В этом случае попробуйте такой подход:
- На вкладке параметров «Система» — «Звук» внизу нажмите «Дополнительные параметры звука». Или нажмите клавиши Win+R, введите mmsys.cpl и нажмите Enter.
- В открывшемся окне перейдите на вкладку «Запись».
- Если вы увидите, что в списке есть два и более микрофонов и зелёные отметки есть на нескольких, нажмите по нужному для всех задач микрофону и выберите пункт «Использовать по умолчанию» или «Использовать устройство связи по умолчанию» — в результате зелёная отметка будет только на нужном микрофоне, и он будет использован в системе для всех задач: для записи и связи.


Проверка настроек микрофона в программе
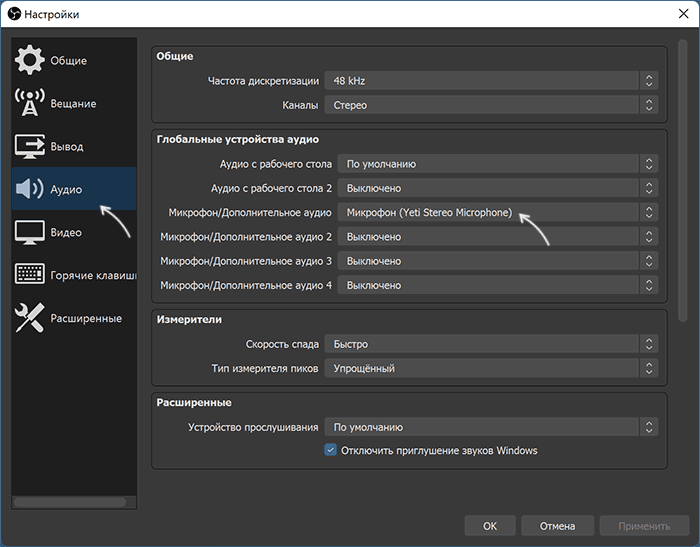
Некоторые программы имеют собственные настройки микрофона, как правило, они расположены в параметрах звука, связи, записи. Эти настройки могут отличаться от системных и иногда самопроизвольно сбрасываться. В случае если микрофон не работает в отдельной программе или игре, постарайтесь найти соответствующую настройку и выбрать нужный микрофон.
Внимание: не забывайте про включение доступа программы к микрофону из первого раздела инструкции, обязательно выполните 1-4 шаги.
Проверка микрофона в диспетчере устройств Windows 11
Не исключено, что проблема с драйверами звуковой карты: работа микрофона зависит от этих драйверов. Используйте следующие шаги:
- Откройте диспетчер устройств Windows 11, для этого можно нажать правой кнопкой мыши по кнопке «Пуск» и выбрать соответствующий пункт контекстного меню.
- Откройте раздел «Аудиовходы и аудиовыходы» и проверьте, отображается ли нужный микрофон там.
- Если микрофон присутствует в списке, но рядом с ним отображается желтый восклицательный знак — попробуйте нажать по нему правой кнопкой мыши, выбрать пункт «Удалить», подтвердить удаление, а затем в главном меню диспетчера устройств нажать «Действие» — «Обновить конфигурацию оборудования».
- Если микрофон отображается без каких-либо знаков, но всё равно не работает, нажмите клавиши Win+R на клавиатуре введите mmsys.cpl и нажмите Enter. Если в окне «Звук» на вкладке «Запись» нужный микрофон отображается со значком с серой стрелкой, нажмите по нему правой кнопкой мыши и выберите пункт «Включить» в контекстном меню. Если стрелка красная — с точки зрения системы микрофон физически не подключен к компьютеру (на всякий случай, проверьте кабель).
- Отсутствие микрофона в списке может говорить о том, что есть проблемы с драйверами звуковой карты, подключением или исправностью микрофона. Прежде всего попробуйте такой подход (внимание: может пропасть звук на компьютере): в диспетчере устройств, в разделе «Звуковые, игровые и видеоустройства» удалите вашу звуковую карту, а затем используйте пункт главного меню «Действие» — «Обновить конфигурацию оборудования» для их повторной установки.
- Если предыдущий шаг не помог, попробуйте вручную скачать драйверы звуковой карты с сайта производителя материнской платы ПК или производителя ноутбука для вашей модели и установить их — обычно это решает проблему. Для того, чтобы найти нужный сайт обычно достаточно использовать поиск в Интернете по запросу «модель_устройства поддержка», заменив модель устройства на модель материнской платы или ноутбука.
В завершение — ещё несколько моментов, которые могут быть полезны в контексте решения проблем с работой микрофона в Windows 11:
- Попробуйте использовать встроенные средства устранения неполадок работы микрофона в Windows 11. В Параметры — Звук в разделе «Дополнительно» в пункте «Устранение распространенных проблем со звуком» нажмите «Устройства ввода». Это может помочь в некоторых ситуациях: например, если проблема вызвана отключенными службами.

- При появлении проблемы только с микрофоном наушников, попробуйте методы из статьи: Что делать, если компьютер не видит микрофон от наушников.
- Если проблема появляется после завершения работы и включения, но исчезает после перезагрузки, попробуйте отключить быстрый запуск Windows.
- Если до недавнего времени всё работало исправно, а затем перестало, могут сработать точки восстановления системы.
- Если все настройки говорят о том, что микрофон должен работать и он присутствует в диспетчере устройств, попробуйте зайти на вкладку «Запись» в Win+R — mmsys.cpl, выбрать нужный микрофон и нажать «Свойства». На вкладках открывшегося окна попробуйте отключить (при наличии) любые эффекты микрофона, включить или отключить (в зависимости от текущего состояния) монопольный доступ приложений к микрофону на вкладке «Дополнительно».
- При неработоспособности микрофона только на передней панели ПК, имеет смысл проверить её подключение (или подключать к задней панели). Подробнее: Как подключить переднюю панель системного блока компьютера к материнской плате.
- Редко, но случается, что микрофон не работает из-за аппаратных проблем или неисправного кабеля — рекомендую проверить его работу на другом компьютере, чтобы прояснить: проблема в системе или самом микрофоне.
- Возможна ситуация, когда новая гарнитура с одним комбинированным коннектором для микрофона и наушников подключается к старому компьютеру или ноутбуку. Здесь следует учитывать, что на старых звуковых картах может не поддерживаться одновременная работа микрофона и наушников на одном выходе.

Будет отлично, если в комментариях вы сможете поделиться, чем именно была вызвана проблема с работой микрофона в вашем случае и как в итоге решилась проблема — это может быть полезным другим читателям.
-
Home
-
News
- 5 Solutions to Steam Voice Chat Not Working
By Tina |
Last Updated
Do you know how to solve the error of Steam voice chat not working? This post from MiniTool shows you how to fix it. In addition, you can visit MiniTool to find more Windows solutions and tips.
Some Steam users report that they fail to use the voice chat function when using the Steam and come across the error of Steam voice chat not working. There are two scenarios that will cause the error of Steam voice chat not working.
- The current Steam account is actively being used on a different computer.
- The built-in Windows Audio Enhancements feature is glitching the microphone.
So, in the following section, we will show you how to fix the error of Steam voice chat not working.
5 Solutions to Steam Voice Chat Not Working
In this part, we will focus on how to fix the error of Steam voice chat not working.
Way 1. Make Sure You Are Using the Right Microphone
In order to fix the error of Steam Mic not working Windows 10, the first thing you need do is to check whether you are using the right microphone.
Now, here is the tutorial.
- Right-click the Sound icon on the lower right side of the screen and select Sounds.
- In the pop-up window, navigate to the Recording
- Then select the Microphone you want to use and click Set Default
- After that, check whether the error of Steam voice chat not working is solved.
- If the issue still exists, you need to set the default device in Steam as well.
- Then open up Steam and click on Friends
- Then click on View Friends List and then click Cog Wheel.
- Next, click on Voice and then select Voice Input Device.
- Click on your Selected Microphone from the list and close the window.
Once all steps are finished, reboot your Steam and check whether the error of Steam voice chat not working is fixed.
Way 2. Sign Out of Steam from Another Computer
As we have mentioned in the above part, sometimes Steam voice chat cannot work because your Steam account is using on another computer.
So, in order to fix this error, you need to sign out your Steam account from another computer. After that, restart your Steam and check whether the error of Steam voice chat not working is solved.
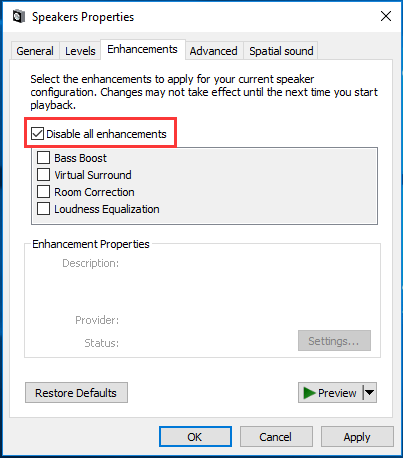
Way 3. Turn Off Audio Enhancements
In order to fix the issue of Steam voice chat not working, you can check whether there are audio enhancements and turn off them.
Now, here is the tutorial.
- Click the Sound button on the system tray and click Sound from the context menu to continue.
- In the pop-up window, navigate to the Playback tab.
- Select your output device and choose Properties.
- In the pop-up window, navigate to the Enhancements tab.
- Check the option Disable all enhancements.
- Then click Apply and OK to save your changes.
After all steps are finished, restart the Steam and check whether the error of Steam voice chat not working is fixed.
Way 4. Change the Privacy Settings
In order to solve the error of Steam Mic not working Windows 10, you can try to change the privacy settings.
Now, here is the tutorial.
- Press Windows key and I key together to open Settings.
- In the pop-up window, select the Privacy.
- Then choose Microphone from the left pane to continue.
- Then turn on the option Let apps use my microphone.
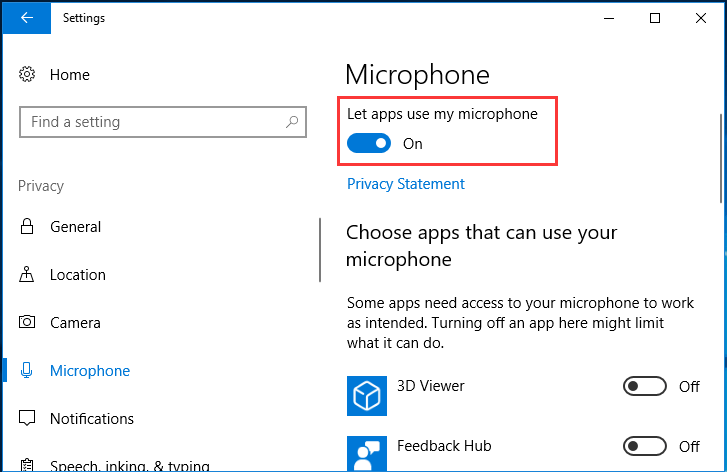
Once all steps are finished, restart your Steam and check whether the issue of Steam voice chat not working is solved.
Way 6. Allow Steam to Record Microphone
In order to fix the issue of Steam voice chat not working, you can try allowing Steam to record microphone.
Now, here is the tutorial.
- Launch Steam and sign in your account.
- Then click on Steam option on the top right and select Settings.
- Click on Broadcasting tab from the right and then check the Record my Microphone.
- After that, click OK to save the changes.
Once all steps are finished, restart your Steam and check whether the issue of Steam voice chat not working is solved.
Related article: How to Fix Steam Disk Write Error on Multiple Games Quickly
Final Words
To sum up, in order to fix the error of Steam voice chat not working, this post has shown 5 solutions. If you come across the same issue, try these solutions. If you have any better solution to fix it, you can share it in the comment zone.
About The Author
Position: Columnist
Tina is a technology enthusiast and joined MiniTool in 2018. As an editor of MiniTool, she is keeping on sharing computer tips and providing reliable solutions, especially specializing in Windows and files backup and restore. Besides, she is expanding her knowledge and skills in data recovery, disk space optimizations, etc. On her spare time, Tina likes to watch movies, go shopping or chat with friends and enjoy her life.
When trying to play games via Steam, are you unable to hear any sound? You are not alone; many users have reported problems. Some started facing the issue after updating Windows, while others said the problem occurred after installing Steam. However, there’s a catch the sound works well with non-gaming apps like VLC, Spotify, etc. but not with Steam games.
Fortunately, there’s a fix for the problem, and this post explains different ways to resolve Steam games; there is no sound problem.
Reasons For No Sound Issues with Steam
- Suppose you are using Windows 10 version latest than build 1803. In that case, there’s a possibility that 3rd-party sound managers like Sonic Studio II, MSI Audio, and others are interfering with the in-built sound manager.
- Two different Windows user accounts are logged in simultaneously.
- Some files are missing from the game folder, or the game cache folder is corrupt.
- Outdated or corrupt Realtek HD Audio driver. The best way to update the audio driver and fix the issue is to use Advanced Driver Updater. This driver updating tool quickly identifies outdated drivers and shows compatible updates. To learn more about it, Click Here.
How to Download and Update Realtek HD Audio Manager
So, these are the common reasons for sound not working with Steam games. Remember, since there are multiple reasons for the issue, not every fix will work for you. Therefore, go through each method to troubleshoot the problem & find a workable fix.
Note: While finding the solution for the problem, we found that the issue is not hardware-related. Usually, it is related to a problem with the general Audio drivers.
How To Fix No Sound In Games- Windows 10
Method 1 – Select the Suitable Sound Devices
Step 1: Press the Windows key + R to open the Run window.
Step 2: Type mmsys.cpl and press Enter key.
Step 3: Click the Playback tab > ensure the correct audio device is selected.
Step 4: Click the Recording tab to check if the correct device is selected.
After confirming that the correct device is selected, check if the problem is fixed. If not, move to the next fix.
Method 2: Log Out Other Users
You face the sound issue when two different users are simultaneously logged in. To fix the problem and avoid confusion that might make the Steam client redirect the sound to the wrong user, follow these steps:
- Click the Start menu > user icon > sign out.
- Log in with the username you want to use to play the Steam game.
- Now try and check if the audio issue is fixed.
Note: Merely switching the user will not fix the problem. To resolve it, you must log out from the current user and log in with the other user.
Method 3: Check Privacy Settings of the Microphone
After updating Windows, try changing the Microphone settings if you encounter the sound not working issue.
For Windows 10
Step 1: Type microphone privacy settings in the Windows Start search menu and click Open.

Step 2: Click the Change button under the Allow access to the microphone on this device section.

Step 3: Toggle the slider to the right to enable it.
Exit the Settings app and play Steam games. The problem should be fixed.
For Windows 11
- Like Windows 10, in Windows 11, look for Microphone Privacy settings.
- Ensure Microphone access and Let apps access your microphone are enabled.

Now, check the list of apps; the mic should be enabled for Steam.
Method 4: Use a Generic Windows Audio Driver
For some users switching back to the Generic Windows Audio Driver and updating drivers has worked.
Step 1: Right-click the Windows Start menu > select Device Manager.
Step 2: Go to the Sound, video, and game controllers section and double click on it to unhide view attached devices.
Step 3: Right-click on the connected audio device > Update driver.
Step 4: Select Browse my computer for drivers.

Step 5: Next, click ” Let me pick from a list of available drivers on my computer.”

Step 6: Check the box next to the Show compatible hardware option in the window.

Step 7: Choose Generic software device or High Definition Audio Device from the list > click Next.
Step 8: Restart the PC and run Steam to check whether the sound issues with Steam games are fixed. If not, try updating the driver.
The best way to update drivers and keep them updated without any problem is to use a third-party driver updater – Advanced Driver Updater. The tool helps detect outdated drivers and update them without any hassle. Also, it allows scheduling driver scanning and helps keep them updated.
To use it, follow the instructions below:
- Download and install Advanced Driver Updater.
- Launch the tool and click Start Scan Now to scan the PC for outdated sound and other drivers.

- Update the sound driver by clicking Update driver next to it.

- If you are a registered user, you can take advantage of the Update All button and update all outdated drivers. This will help update all missing, corrupt, and problematic drivers in a go.

- Restart the PC to apply changes and then run Steam games; you should not face any problems.
Method 5: Uninstall The Conflicting Programs
Suppose third-party sound managers like Asus Sonic Studio 3, Alienware Sound Center, Sonic Radar 3, or MSI Audio programs are running. There is a possibility that you face problems with Steam games. Therefore, to resolve the issue, uninstall conflicting programs.
Step 1: Press Windows + R to open the Run window.
Step 2: Type appwiz.cpl in the Run window and press Enter key.
Step 3: Select the third-party programs with which the suspect might be creating problems and click Uninstall Uninstall > confirm the action when prompted.
Once the uninstallation is done, reboot the computer. Now check if the sound problem is fixed or not.
Method 6: Set Steam to Run as Administrator
You might face an audio problem if the Steam app runs without admin privileges. Therefore, run the game app as the administrator:
Step 1: Right-click the Steam app shortcut.
Step 2: Select Run as administrator.
This will run the Steam app as administrator and check if you can hear the sound. If this does not help, make the Steam app run permanently as an administrator.
Step 1: In the Windows search bar, type Steam > right the best search result > select Open file location.
Step 2: Now > right-click on Steam > select Properties.
Step 3: Click the Shortcut tab. Make sure the Run Normal window is selected and click Open File Location.
Step 4: This will open the location of the Steam.exe.
Step 5: Right-click on it and select Properties.
Step 6: Click the Compatibility tab > select Run this program as an administrator in the Setting section.

Step 7: Click Apply > Ok.
This will run the Steam app as admin. You should now not face sound issues.
Method 7: Using the Steam App Run the Game as an Administrator
If the above steps did not help and you still face Steam games with no sound issue when playing a specific game, set that game to run as administrator.
Step 1: Launch the Steam app > click on the Games options > select View Games Library.
Step 2: Right-click on the game that makes you face the no sound problem > select Properties.
Step 3: Click on Local Files.
Step 4: Click on Browse.

Step 5: Right-click on the game file (.exe) > Properties > Compatibility tab > select Run this program as an administrator > Apply > Ok.
Method 8: Verify the Integrity of Game Cache
Still, if nothing has helped, the game cache or some files are corrupt. To fix this, verify the integrity of the game cache.
Step 1: Run Steam app > click LIBRARY tab > Home.
Step 2: Right-click on the game, giving trouble > Properties.
Step 3: Click on Local Files.
Step 4: Click on Verify integrity of tool files and wait for the app to finish the process.

When you get “All files successfully validated, “ click on Close & go back to the app.
Play the game; everything should be fine.
Method 9: Roll back Windows Update
Sometimes, the latest Windows update can also cause no sound issues. Therefore revert to the Windows update where everything was working fine.
Step 1: Press the Win + I to open Windows Settings app.
Step 2: Click on Update & Security.
Step 3: Next, click on the View update history.

Step 4: Click on Recovery options in the View update history window.

Step 5: You will be re-directed to the Recovery page. Click the Get started button.

To roll back the Windows Update,> follow on-screen instructions. You will now get the previous version restored.

Close Settings app and check whether the issue is fixed or not.
*Note – The Get started button can only be used within 10 days of updating Windows. If it is more than that, you will need to uninstall updates.
Method 10: Uninstall Windows Updates
Step 1: Open Windows Settings. Right-click Start menu > select Settings.
Step 2: Click Update & Security option > View update history option > Uninstall updates.

Step 3: Select the latest update > click Uninstall.

Windows will auto restore to the previous version.
Step 4: Reboot PC to apply changes.
Method 11: Reset this PC
If neither restoring to the previous version nor uninstalling the Windows update worked for you, try resetting your PC.
Note: This method will uninstall the Steam app and other games. However, if you want, you can retain personal files.
Step 1: Press the Win + I to open the Settings window.
Step 2: Click on the Update & Security > Recovery option.
Step 3: Click on Get started under Reset this PC.

Step 4: Next, select from either of the options Keep my files or Remove everything and follow on-screen instructions to reset the PC.
*Note – The first option will keep personal files secure and remove the apps and settings. The second option will delete everything.
Reinstall the PC and run Steam games; the no sound problem should no longer be there.
How to Fix Steam Black Screen not Loading In 2022 (Try these fixes)
Wrap Up
Following the above mentioned methods, you can quickly fix the no sound in games problem on Windows 11 and 10. Until you find the right fix, you cannot skip any method because you don’t know which one will work for you. Please let us know which method works best for you in the comments section. Also, if you tried any other way that worked, please share the same with us.
Recommended-
How to Download Realtek Ethernet Controller Driver
How to Update Realtek Wi-Fi Driver in Windows PC
How to Download and Update Realtek Audio Console