
As a PC gamer or regular user, on your Windows 11 or Windows 10 computer, you may encounter microphone-related issues like Discord Mic not working, Microphone not plugged in, Zoom Microphone not working, Skype Audio or Microphone not working and so on. In this post, we provide the most suitable solutions to the issue of USB microphone not working on Windows 11/10.

If your USB microphone is not working on your Windows 11/10 system, you can try our recommended solutions below in no particular order to resolve the issue.
- Run Recording Audio Troubleshooter
- Restart Windows Audio service
- Update/Reinstall latest driver for the USB Microphone
- Uninstall and Reinstall the USB microphone
- Run Hardware and Devices Troubleshooter
Let’s take a look at the description of the process involved concerning each of the listed solutions.
Before you try the solutions below, you can do the following, and after each task see if your USB microphone is now working normally on your PC without issues:
- Disconnect and reconnect the USB microphone.
- Check if your USB mic has a physical mute button and set the switch accordingly.
- Restart your computer. In most cases, a quick restart of your PC will resolve minor issues.
- Make sure microphone access is turned on and mic is not disabled in Settings app or Device Manager on your PC, the mic is set as default input device and Exclusive Mode is disabled in Microphone properties.
- Use another USB cable. If the USB cable is detachable from the microphone, try another USB cable. If there’s provision on the mic, you can use an audio jack cable to connect to the PC or you may use the USB audio jack adapter.
- Try another USB port. You can plug the USB microphone into another USB port on your computer.
- Check for updates and install any available bits on your Windows 11/10 device. On the other hand, if the error started after a recent Windows update, you can perform System Restore or uninstall the update as a last resort maybe, after you have tried the solutions described below.
- If you recently installed any Voice Over Internet Protocol (VOIP) app on your PC and the issue in focus started, uninstall the app.
1] Run Recording Audio Troubleshooter
If your USB microphone is not working on your Windows 11/10 system, you can begin troubleshooting to fix the sound/audio issue on your device by running the Recording Audio Troubleshooter.
To run Recording Audio Troubleshooter on your Windows 11 device, do the following:

- Press Windows key + I to open the Settings app.
- Navigate to System > Troubleshoot > Other troubleshooters.
- Under the Other section, scroll to find Recording Audio.
- Click Run button.
- Follow on-screen instructions and apply any recommended fixes.
To run the Recording Audio Troubleshooter on your Windows 10 device, do the following:

- Press Windows key + I to open the Settings app.
- Go to Update and Security.
- Click the Troubleshooter tab.
- Scroll down and click on Recording Audio.
- Click the Run the troubleshooter button.
- Follow on-screen instructions and apply any recommended fixes.
Continue with the next solution if the issue in view remains unresolved.
2] Restart Windows Audio service

The Audio service running in Windows 11/10 manages audio for programs, and If this service is stopped or disabled on your system, it will affect the sound devices and your audio peripherals will not work properly. In this case, you need to make sure to start/restart the Windows Audio service.
Do the following:
- Press Windows key + R to invoke the Run dialog.
- In the Run dialog box, type services.msc and hit Enter to open Services.
- In the Services window, scroll and locate the Windows Audio service.
- Double-click on the entry to edit its properties.
- In the properties window, click the drop-down on the Startup type and select Automatic.
- Next, make sure the service is started. If the service is already started, right-click the entry and select Restart from the context menu.
- Click Apply > OK to save changes.
- Restart PC.
On boot, check if the issue you’re currently facing is resolved. Otherwise, try the next solution.
3] Update/Reinstall latest driver for the USB Microphone

Outdated driver for the USB microphone you installed on your system is a likely culprit here. In this case, to rule out the possibility, you can update your audio driver. To perform this task, you can do so in the following ways:
- You can manually update audio driver for the USB mic via Device Manager if you have already downloaded the .inf or .sys file for the driver.
- You can also update the audio driver via Command Prompt.
- In Windows Update, you can as well get the driver updates on the Optional Updates section.
- Another option available for you, is to automatically update your drivers using any of the free Driver Update software for Windows 11/10 PC.
Keep in mind that updating driver is not always the ultimate solution to fix issues with externally connected hardware devices like microphones – the reason being software vendors often release a buggy update or a partially broken one, which if you have installed that update the issue won’t still be resolved. In this case, you may need to reinstall the driver in case updating doesn’t work properly.
You can uninstall the audio driver, and then restart your PC – on boot, Windows will scan for hardware changes and automatically reinstall the generic driver for the USB mic device. Alternatively, after you uninstall the driver, you can download the latest version of the driver from the microphone hardware manufacturer’s website and then install on your PC.
4] Uninstall and Reinstall the USB microphone
USB or Bluetooth mics, as well as headsets connected to your Windows 11/10 PC will be listed in Devices and Printers applet in the Control Panel. So, to resolve the issue in hand, you can remove the device to uninstall it and then reconnect the device once again to reinstall it properly in Windows. To perform this task, do the following:
- Press Windows key + R to invoke the Run dialog.
- In the Run dialog box, type control and hit Enter to open Control Panel.
- From the top right corner of the window, set the View by option to Large icons or Small icons.
- Click Devices and Printers.
- Next, right-click on the USB microphone attached to the PC.
- Select Remove device option from the context menu.
- Click Yes on the prompt that pops up.
This will uninstall the device. You can disconnect and reconnect the mic to the computer, then check if the error is resolved. If not, try the next solution.
5] Run Hardware and Devices Troubleshooter

At this point, you may be dealing with faulty hardware, in this case, the USB microphone which may need to be replaced. To be certain the USB microphone is faulty, you can run the Hardware and Devices Troubleshooter to fix problematic devices. You can also manually check for faulty hardware by trying another USB microphone on the PC or try the problematic mic on another system and see if it works. If the issue isn’t with the hardware, you can check for faulty components, including batteries if the mic requires it to operate.
Any of these solutions should work for you!
Related post: Intel SST microphone not working on Windows
Why does my microphone not work on Windows 11?
If your microphone isn’t detected after updating Windows 11, you may need to give your apps permission to use it. Here’s how:
- Select Start > Settings > Privacy & security > Microphone.
- Now, make sure Microphone access is turned on.
Why is my PC not detecting my USB mic?
If your Windows 11/10 PC is not detecting your USB mic, it could be due to a number of reasons, mainly incompatible drivers. You can uninstall your USB controller driver to quickly fix the issue. You can also update your audio and sound drivers and see if that helps.
Not all microphones connect via the audio jack on a laptop or PC. The audio jack is the commonly used port for a wide range of audio devices but some devices can and do use a USB port. These microphones aren’t any less capable than those that use an audio jack. In fact, many of them offer better sound quality.
Devices that connect over a USB port are easy to use. Drivers for them are normally generic ones and they’re already present making the device plug & play. That said, if USB microphone you’ve connected to your system isn’t working or if you’ve connected a microphone via an audio jack to USB adapter and it isn’t detected, try the fixes below.
1. Restart app/system
If you connected the USB mic to your system after opening the app you intend to use it in, it is possible the app cannot detect the new device.
- Disconnect the microphone from the system.
- Close the app you want to use it with.
- Connect the microphone to the system.
- Open the app and check if the mic is detected.
If this doesn’t work, try the same steps but with the system.
- Disconnect the mic from the system.
- Shut the system down.
- Connect the mic to the system.
- Boot the system up.
- Open an app and check if the mic is detected.
2. Select the microphone from Sounds
The mic may have been set up correctly but it may not be set as the preferred device or the default device on Windows 10. You need to set it as the default device from the Sound settings.
- Open Control Panel.
- Go to Hardware & sound.
- Click Sounds.
- Go to the Recording tab.
- Right-click the mic and select Set as default device.
- Restart the system and check if the mic is detected.
3. Reinstall USB Microphone
Reinstalling the Microphone may help resolve issues with it.
- Open Device Manager.
- Expand Audio Inputs and Outputs
- Right-click the USB mic and select Uninstall device.
- Disconnect the mic.
- Connect the mic again.
- Windows 10 will detect and install drivers for the device.
4. Run hardware troubleshooter
Problems with the USB port may be one reason the mic isn’t working. To troubleshoot the UBS port you have to run the hardware troubleshooter.
- Tap the Win+R keyboard shortcut to open the Run box.
- In the run box, enter
msdt.exe -id DeviceDiagnosticand tap the enter key. - Run the Hardware troubleshooter and apply all fixes that it recommends.
- Restart the system and connect the mic again.
5. Run audio troubleshooter
The audio problems may not have to do with the USB port. Instead, other audio-related settings may need to be checked in order for the mic to work. The easiest way to check and fix problems with audio settings is to run the audio troubleshooter.
- Open the Settings app with the Win+I keyboard shortcut.
- Go to Update & Security.
- Select the Troubleshoot tab.
- Click Additional troubleshooters.
- Select and run the Audio troubleshooter.
- Apply all fixes that it recommends.
- Restart the system and use your mic.
6. Check power source
Some devices, including mics, that can connect via the USB port need an external power source. Check if your mic needs either an external power source or not. It will come with the appropriate cable and directions on how to connect it. Try connecting it to the same USB port that you use to charge device i.e., the charging port on a Windows 10 system.
Conclusion
USB mics often offer better audio quality than those that connect over the audio jack. This holds especially true for cheaper mics. A more expensive mic will work well regardless of the port that it uses. You should also check if the mic model you’re using has any known issues with it. Check forums dedicated to the device and its set up and make sure you’ve done everything to set it up correctly.

Fatima Wahab
Fatima has been writing for AddictiveTips for six years. She began as a junior writer and has been working as the Editor in Chief since 2014.
Fatima gets an adrenaline rush from figuring out how technology works, and how to manipulate it. A well-designed app, something that solves a common everyday problem and looks
Если у вас возникли проблемы с функциями микрофона или с микрофоном на гарнитуре или веб-камере, следующие сведения помогут вам устранить неполадки.
Убедитесь, что у приложений есть доступ к микрофону
Если после обновления Windows 11 микрофон не обнаружен, может потребоваться предоставить приложениям разрешение на его использование. Вот как это сделать.
-
Выберите Пуск > Параметры > Конфиденциальность & безопасность > Микрофон и убедитесь, что доступ к микрофону включен.
-
Убедитесь, что включен параметр Разрешить приложениям доступ к микрофону , а затем выберите, какие приложения имеют доступ. Классические приложения не отображаются в этом списке.
Если вы хотите предоставить доступ к классическим приложениям, убедитесь, что включен параметр Разрешить классическим приложениям доступ к микрофону. Вы не можете отключить доступ к микрофону для отдельных приложений.
Если камера содержит микрофон, также может потребоваться предоставить приложениям разрешение на использование камеры. В этом случае выберите Пуск > Параметры > конфиденциальность & безопасность > камера и убедитесь, что камера включена.
Другие пользователи не слышат меня
Попробуйте следующие решения:
-
Если ваша гарнитура оснащена кнопкой выключения звука, убедитесь, что она не нажата.
-
Убедитесь, что микрофон или гарнитура правильно подключены к компьютеру. Если гарнитура является беспроводным устройством Bluetooth, убедитесь, что устройство Bluetooth связано и подключено, выполнив действия, описанные в разделе Связывание устройства Bluetooth в Windows.
-
Убедитесь, что в качестве системного устройства для записи звука по умолчанию используется микрофон или гарнитура. Вот как это сделать в Windows 11.
-
Выберите Пуск > Параметры > система > звук.
-
В разделе Входные данные выберите Выберите устройство для речи или записи и выберите нужное устройство.
-
Чтобы протестировать микрофон, проговорите в него. В разделе Громкость убедитесь, что синяя полоса перемещается, чтобы убедиться, что Windows вас услышит.
-
-
Запустите средство устранения неполадок со звуком записи. Выберите Параметры > Системный > Устранение неполадок > Другие средства устранения неполадок. Выберите средство устранения неполадок со звуком записи.
Windows не обнаруживает гарнитуру, камеру или микрофон
Если предыдущие действия по устранению неполадок не помогли устранить проблему, а Windows даже не обнаруживает микрофон, попробуйте переустановить аудиодрайверы:
-
Щелкните правой кнопкой мыши кнопку Пуск и выберите диспетчер устройств.
-
Разверните раздел Звуковые, видео- и игровые контроллеры .
-
Найдите любые звуковые устройства или драйверы. Щелкните правой кнопкой мыши звуковое устройство и выберите Удалить устройство. Убедитесь, что проверка поле Удалить программное обеспечение драйвера для этого устройства, а затем выберите Удалить. Повторите этот процесс для любых других звуковых устройств.
-
Перезагрузите компьютер. Windows попытается переустановить аудиоустройства и драйверы автоматически. Если это не так, щелкните правой кнопкой мыши кнопку Пуск и выберите диспетчер устройств. Щелкните правой кнопкой мыши раздел Звуковые, видео- и игровые контроллеры и выберите Пункт Проверить наличие изменений оборудования.
-
Обновите драйверы. После перезагрузки компьютера вернитесь к диспетчер устройств. Разверните раздел Звуковые, видео- и игровые контроллеры . Щелкните правой кнопкой мыши звуковой драйвер и выберите Обновить драйвер.
Громкость микрофона слишком низкая или, как представляется, вообще не работает
Попробуйте следующие решения:
-
Убедитесь, что микрофон или гарнитура правильно подключены к компьютеру.
-
Убедитесь, что микрофон правильно размещен.
-
Увеличьте громкость микрофона Вот как это сделать в Windows 11.
-
Выберите Пуск > Параметры > система > звук.
-
На вкладке Вход выберите микрофон, чтобы просмотреть его свойства.
-
В поле Громкость ввода убедитесь, что синяя полоса настраивается при разговоре с микрофоном.
-
Если это не так, перейдите к разделу Тестирование микрофона и Запуск теста. Это поможет устранить любые проблемы с микрофоном.
-
Readers help support Windows Report. We may get a commission if you buy through our links.
Read our disclosure page to find out how can you help Windows Report sustain the editorial team. Read more
Many people use USB headsets, but it seems that some users are having issues with their USB headsets. If your USB headset is giving you trouble today we’ll show you how to fix those issues on Windows 10.
Users are reporting distorted sound on their USB headsets and replacing the USB headset with the exact same model doesn’t fix the issue. So if the problem isn’t the USB headset what can you do to fix this problem?
USB headsets are great, but sometimes you might encounter certain issues with them. Speaking of USB headset issues, here are some problems that users reported:
- USB headset mic not working – Sometimes the microphone on your USB headset isn’t working properly. This can be a big problem, but you might be able to fix it by changing your microphone settings.
- USB headset not working Windows 10, 8, 7, on Skype – This problem can appear on any version of Windows, and if you encounter it, you should be able to fix it using the solutions from this article.
- USB headset not detected, not showing up in playback devices, not working with YouTube – Sometimes your headset might not be detected at all. To fix this issue, be sure to reinstall your USB headset and check if that works.
- USB headset audio, sound not working – If your USB headset isn’t working, the issue might be a third-party application. To fix the problem, you need to find and remove this application from your PC.
- USB headset noise problem, static, crackling, buzzing – These are some common problems that can appear with USB headsets. To fix the problem, temporarily disable your headset and enable it again.
- USB headset is not working – If your USB headset isn’t working, you might have to reinstall your USB drivers. Once your drivers are installed, check if the problem is still there.
How to fix USB headset not detected or working on Windows 10?
1. Unplug the headset while Windows 10 boots
Users report that there might be some conflicts with your USB headset and other USB devices, and in order to fix this issue, it’s required that you unplug your USB headset while your system boots. When your Windows 10 starts you can plug in your USB headset and it should work without any problems.
2. Update your BIOS and reset CMOS
Some users report that updating BIOS and resetting CMOS fixes the distorted sound issue. Updating your BIOS is an advanced process and it’s different for each motherboard. If you don’t know how to do it properly maybe hire a professional to do it for you if you want to avoid any potential damage to your system.
3. Don’t use your headset as default playback device
This solution applies to headsets that come with built-in sound card and connect to both USB and audio port on your computer. The issue with these headsets is that you’re hearing sound only from one speaker when gaming, and in order to fix it you need to do the following.
- Right-click the Sound icon in the Taskbar and choose Open Sound settings from the menu.
- Select Sound control panel.

- The sound window will now appear. Right-click your headphones and choose Properties from the menu.

- Set Device usage to Don’t use this device (disable) and click Apply and OK to save changes.


By doing this you will make the sound card process your audio instead of the card that is built in your USB headset.
4. Uninstall your USB drivers
According to users, sometimes USB headset issues can occur due to your USB drivers. Several users reported issues with USB 3 drivers, but after reinstalling them, the problem was permanently resolved. To do that, you just need to follow these steps:
- Press Windows Key + X to open Win + X menu. Now choose Device Manager from the list.
- When Device Manager opens, locate your USB 3 driver, right-click it and choose Uninstall device.
- Confirmation dialog will now appear. Choose Uninstall from the menu.
- After the driver is uninstalled, click Scan for hardware changes icon.


Windows will now search for the default driver and install it. Once the default USB driver is installed, be sure to check if the problem is resolved. Keep in mind that this solution works for both USB 2 and USB 3 drivers, so you can use it regardless of the USB type you’re using.
The default drivers should work without issues, but sometimes it’s better to use a dedicated driver. You can download the appropriate drivers from your motherboard’s manufacturer’s website. Simply visit the website, enter the model of your motherboard and download the latest drivers for it.
If searching for drivers manually seems a bit complicated to you, there are automated tools that can download the necessary drivers with just a single click.
5. Remove the problematic applications
Sometimes third-party applications can install their own drivers, and that can lead to USB headset issues. To fix the problem, it’s advised to remove the problematic application from your PC.
Some users reported that Etron software caused this problem to appear, and in order to fix the issue, you need to remove the software. You can remove the application using the Settings app, but this method isn’t always effective since it can leave certain leftover files that can still interfere with your USB headset.
To fix the problem, it’s advised to use an uninstaller software. This is a special application that can remove any application from your PC along with all of its files and registry entries.
By using an uninstaller application, you’ll remove all files and registry entries associated with the problematic application and prevent any future issues from occurring.
Once you remove the problematic application, the issue should be permanently resolved.
6. Temporarily disable your USB headset
Sometimes there might be a glitch in your system, and that glitch can cause various USB headset issues to appear. One of the fastest ways to fix this problem is to temporarily disable your USB headset. To do that, you just need to do the following:
- Open Device Manager.
- Locate your USB headset, right-click it and choose Disable device from the menu.
- Now right-click your USB headset and choose Enable device.
After doing that, your USB headset will start working again. Keep in mind that this is just a workaround, so you’ll have to repeat it if the issue reappears.
7. Disconnect the headset and turn off Razer Synapse software
Sometimes USB headset issues can be caused by a software such as Razer Synapse. According to users, they managed to fix the problem simply by unplugging the headset and closing the Razer Synapse. After doing that, you just need to connect the headset again and restart Razer Synapse software.
Keep in mind that this is just a workaround, so you’ll need to repeat it whenever the issue occurs.
- How to fix static noise in Windows 10/11 in 6 easy steps
- No sound from headphones in Windows 10/11? Try these fixes
- Headphones not detected in Windows 10 or 11 [Easy Fix]
8. Check your privacy settings
According to users, USB headset issues can occur due to your privacy settings. Users reported that apps weren’t allowed to use the microphone on their USB headset due to certain settings. However, you can fix that issue by doing the following:
- Open the Settings app. You can do that quickly by pressing Windows Key + I.
- Navigate to the Privacy section.

- In the left pane choose Microphone. In the right pane, make sure that Allow apps to access your microphone is enabled. In addition, be sure to check the list below and allow individual applications to access your microphone.


After enabling your microphone the issue with your USB headset should be completely resolved.
9.Uninstall any old USB headset drivers
Several users reported USB headset issues after purchasing a new headset. According to them, the problem was caused by drivers from an older USB headset. To fix the problem, it’s advised to remove the older driver since it might interfere with your new headset. To do that, just follow these steps:
- Open Device Manager.
- Now go to View > Show hidden devices.
- Locate your old USB headset driver, right-click it and choose Uninstall device.
- If available, check Remove driver software for this device and click Uninstall.
After removing the older driver, the issue should be completely resolved, and you should be able to use your USB headset without any problems.
In case none of these solutions worked for you, go and check out our article about sound problems in Windows 10, maybe it will be helpful.
However, we hope this article helped you to solve the problem with your USB headset in Windows 10. If you have any comments or questions, just reach for the comments, below.
Milan Stanojevic
Windows Toubleshooting Expert
Milan has been enthusiastic about technology ever since his childhood days, and this led him to take interest in all PC-related technologies. He’s a PC enthusiast and he spends most of his time learning about computers and technology.
Before joining WindowsReport, he worked as a front-end web developer. Now, he’s one of the Troubleshooting experts in our worldwide team, specializing in Windows errors & software issues.
Что делать, если собеседник вас слышит плохо или вообще не слышит? Проверить и настроить микрофон.
Если друг или бабушка еще потерпят проблемы со звуком с вашей стороны, то босс или партнеры вряд ли захотят с ними мириться. Вас не слышат или жалуются на качество связи? Выясняем, как можно решить эту проблему (если не хочется читать, в конце — видео).
Конечно, на качество звука влияют и плохое интернет-соединение, и подвисание программ. Но чаще виноват микрофон — либо само устройство, либо его неправильная настройка.
Проверьте, тот ли микрофон активен
Бывает, что к компьютеру подключено несколько микрофонов. Например, один работает по умолчанию, в веб-камере, а другой — в гарнитуре. Если камера стоит далеко, то ваш голос для собеседника может звучать тихо или с посторонними шумами.
Делаем так. Нажимаем кнопку «Пуск», затем следуем по пути: Параметры → Система → Звук. В пункте «Ввод» кликаем на название микрофона и смотрим, открывается ли список. Если микрофонов подключено несколько, в списке будут отображаться все доступные варианты — попробуйте выбрать альтернативный. Если нужного микрофона в списке нет, идем дальше.
Попробуйте использовать другой разъем
Актуально, если ваш микрофон или гарнитура подключены через USB. Разъемы сгорают, а их контакты окисляются.
Порты на передней панели корпуса ПК подключаются к материнской плате проводами: проблемы начинаются, когда теряется контакт на одном из штырьков. Разъемы USB, которые находятся на задней панели, надежнее: они распаяны на материнской плате. Попробуйте включить наушники или гарнитуру к ним. Возможно, всё заработает.
Еще один способ понять, что проблема с разъемами — подключить другую гарнитуру. Если ваше устройство подключено через гнездо для микрофона, это единственный вариант. Главное, не забывайте о программной настройке — только так удастся убедиться, что проблема в порте подключения.
А что если сбиты настройки?
Бывает, что система видит микрофон, но вас всё равно не слышно. Тогда следует проверить настройки сигнала. Для этого снова заходим в Пуск → Параметры → Система → Звук. Под списком подключенных микрофонов есть шкала (Проверьте микрофон) — она закрашивается синим, если микрофон ловит звук.
Говорите громко, а потом тихо, и наблюдайте за шкалой. Если при громком разговоре закраска не доходит даже до половины, кликните на Свойства устройства и попробуйте увеличить громкость. Да, в Windows 10 чувствительность названа общей громкостью.
Есть ли доступ к конкретному приложению?
Возможна такая ситуация: в настройках микрофона все установлено верно, он работает исправно, но в конкретном приложении, том же Skype, собеседник вас не слышит.
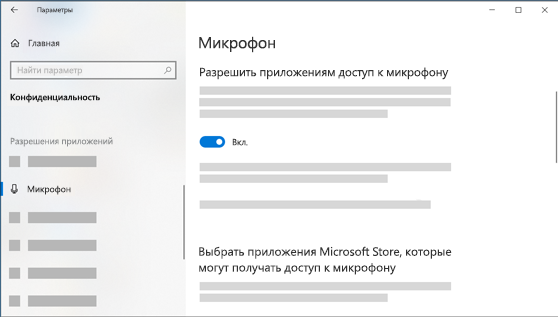
У приложения может просто не быть доступа к микрофону. Чтобы проверить это, нажмите Пуск → Параметры → Конфиденциальность → Микрофон. Найдите тумблер «Разрешить приложениям» доступ к микрофону — он должен быть включен.
Затем прокрутите окно вниз — там вы найдете список приложений и переключатели справа. Если напротив Skype стоит Откл., проблема найдена — откройте ему доступ к микрофону.
Не забудьте проверить настройки микрофона и в самом приложении. В Skype зайдите в Настройки → Звук и Видео. На шкале «Микрофон» должны быть видны синие точки. Если она пустая, кликните на Устройство связи по умолчанию и выберите нужный микрофон.
Вряд ли (но возможно): вышла из строя звуковая карта
Специально поставили этот пункт последним. Если вы используете подключение через 3,5 мм и никакие рекомендации не помогли, попробуйте устройства с USB-подключением.
Дело в том, что через 3,5 мм подается аналоговый сигнал, который звуковая карта преобразует в цифровой. А в наушниках с USB-подключением звук передается сразу в цифровом виде.
Если остались вопросы, посмотрите видео, где мы еще более наглядно разобрали эту проблему: