
Five Solutions to Fix System Restore Not Working in Windows 10/8/7
To fix the matter, there are five fixes you can try.
| Workable Solutions | Step-by-step Troubleshooting |
|---|---|
| Fix 1. Run System Restore in Safe Mode | Restart your computer, press «F8» during…Full steps |
| Fix 2. System Properties Settings | Right-click the «Computer/This PC» icon and…Full steps |
| Fix 3. Volume Shadow Copy Service | Type Services.msc in the Start Menu…Full steps |
| Fix 4. Repair Corrupted System Files | Press «Windows + X» to bring up a menu…Full steps |
| Fix 5. System Restore Alternative | Create a system backup and restore…Full steps |
Do you receive any of the following error messages that indicate your System Restore is not working?
- System Restore failed
- A shadow copy could not be created
- Error 0x80070005/0x800423F3/0x80070570
- System Restore did not complete successfully
- System Restore failed to extract the original copy of the directory from the restore point.
- Restore point could not be created for this reason: Error detected in the Volume Shadow Copy Services (VSS).
When Windows System Restore is not working, it usually happens after users update the system, install an application, or their computer becomes infected with malware or a virus. However, there are many other factors that result in failure to restore a previous version of Windows. We provide several methods to fix System Restore within this page, but it is an all-too-common problem that can be caused at no fault to the user. There are simpler alternatives to restoring your System besides using Windows System Restore and reconfiguring your PC every time something inevitably fails with it.
You can create restore points of the status of your system, applications, and personal files using third-party software. EaseUS Todo Backup is capable of doing just that, and it allows users to perform a complete system restore in Windows 10/8/7. More details are provided in the FINAL PART first we’ll discuss how to directly fix Windows System Restore.
Fix 1: Run System Restore in Safe Mode
There are different ways to enter Windows Safe Mode, depending on the version of your Windows OS. The specifics of the procedure vary slightly between Windows 10/8.1/8 and Windows 7, but the general method is the same.
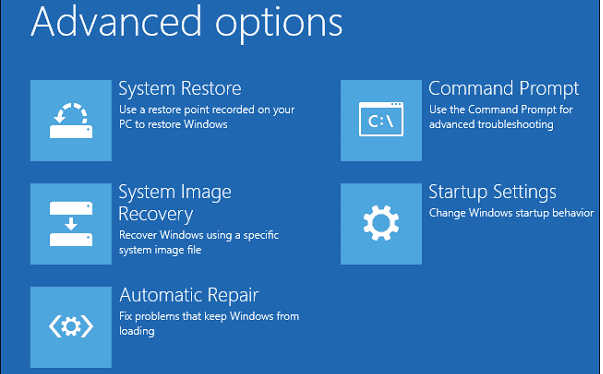
Step 1. Restart your computer, press «F8» during the boot process to open the Windows «Advanced Boot Options» menu and enter «Safe Mode».
Step 2. In the Safe Mode menu, type recovery into the Start Menu search bar and select «Recovery» from the list.
Step 3. Open «System Restore» from the Advanced recovery tools menu.
By booting into Safe Mode, you may be able to create a system restore point or restore to a prior restore point. Alternatively, if the issue is not resolved, you could execute a Clean Boot to see if you are able to get system restore working without potentially-interfering applications.
Fix 2: Check System Protection Settings and Configure Disk Space Usage
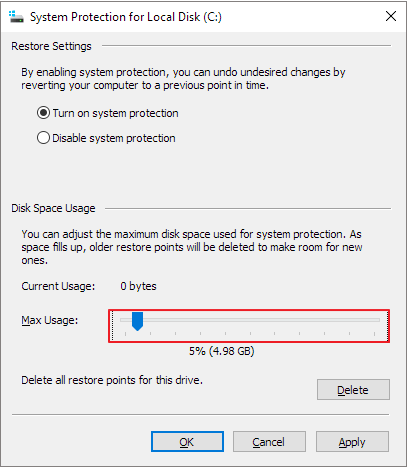
If the size of your created system restore points exceeds the maximum disk space configuration in the System Protection settings, you will lose many new backup images. In this case, you cannot restore your Windows to the desired restore point because it has not truly been saved. To resolve this, allocate more space for system restore points.
Step 1. Right-click «Computer/This PC» icon and select «Properties» -> «System Protection» -> «Configure».
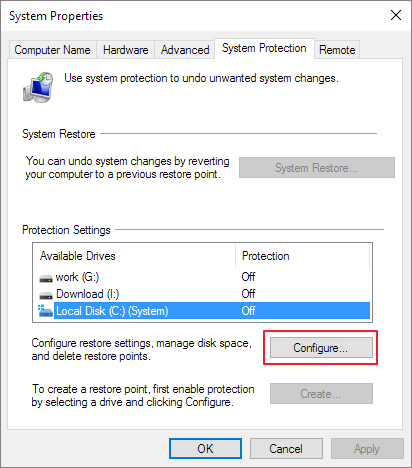
Step 2. When you arrive at the Configure area, drag the «Max Usage« bar and consider increasing from the default 3 percent to over 5 percent.
Fix 3: Check the Status of Volume Shadow Copy Service & System Restore Service
You should be aware of another facet of the system that can cause System Restore to not work properly. Volume Shadow Copy Service (VSS) is an implementation that allows volume backups to be performed while applications are running. If VSS is not enabled or the registry value of the Volume Shadow Copy Service has been changed in the Registry, it will lead to Windows System Restore issues.
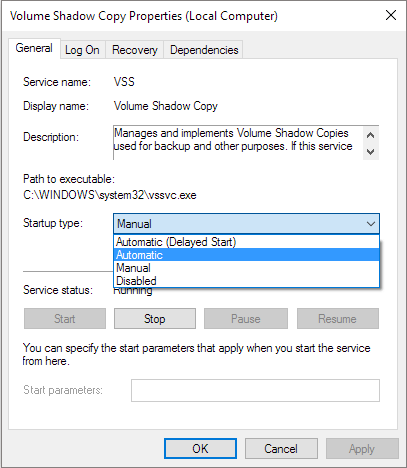
To set the Volume Shadow Copy Service to «Automatic»:
Step 1. Type Services.msc in the Start Menu search box and hit «Enter».
Step 2. Search for «Volume Shadow Copy, Task Scheduler, and Microsoft Software Shadow Copy Provider Service»; check if they are Running and have their «Startup type» set to «Automatic».
Step 3. Reboot your computer and retry System Restore.
Fix 4: Repair Corrupted System Files
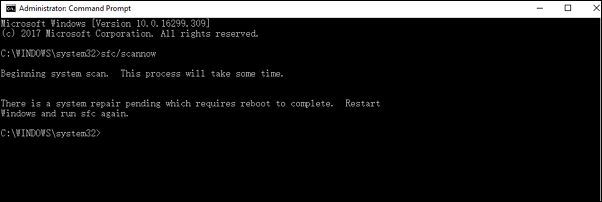
If system restore loses functionality, one possible reason is that system files are corrupt. So, you can run System File Checker (SFC) to check and repair corrupt system files from the Command Prompt to fix the issue.
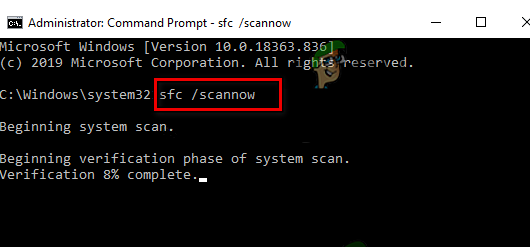
Step 1. Press «Windows + X» to bring up a menu and click «Command Prompt (Admin)».
Step 2. On the Command Prompt window, type: sfc /scannow and press «Enter».
Fix 5: Windows System Restore Alternative — EaseUS Todo Backup
The System Restore feature is undoubtedly a very useful feature that is a life-saver when your computer runs into an accident and requires a restore. But at times, no matter how many restore points Windows automatically created for you, you are unable to restore your computer: System Restore simply won’t work!
What’s worse, you don’t get the luxury of having a specialized consultant help solve your problems. If you find your Windows System Restore not working time and time again, it is wise to prepare a backup plan that can perfectly replace the Windows function.
Alternatively, backup software can provide double protection of your system restore points. EaseUS Todo Backup is the best tool for the job. You can use it to create a backup image of everything — including system data, applications, and files — onto internal/external hard drives, Network, or Cloud storage. Furthermore, you have direct access to a dedicated support team if you ever have an issue using the product. Ensure that you can always bring your computer back to a safer state with this backup and recovery program.
Create a system restore point with EaseUS Todo Backup
The detailed steps are provided here:
Part 1. Create a system backup
Step 1. Launch EaseUS Todo Backup on your computer, and click Create Backup on the home screen and then hit the big question mark to select backup contents.

Step 2. To back up your Windows operating system, click «OS» to begin the backup task.

Step 3. Your Windows operating system information and all system related files and partitions will be automatically selected so you don’t need to do any manual selection at this step. Next, you’ll need to choose a location to save the system image backup by clicking the illustrated area.

Step 4. The backup location can be another local drive on your computer, an external hard drive, network, cloud or NAS. Generally, we recommend you use an external physical drive or cloud to preserve the system backup files.

Step 5. Customiztion settings like enabling an automatic backup schedule in daily, weekly, monthly, or upon an event, and making a differential and incremental backup are available in the Options button if you’re interested. Click «Backup Now«, and the Windows system backup process will begin. The completed backup task will display on the left side in a card style.

Part 2. Restore the system
After you back up the system, you can refer to the detailed guide to restore the system from its restore points or follow the simple guide below to get things done.
* To perform system recovery on a none-bootable machine, try to boot the computer through the EaseUS Todo Backup emergency disk.
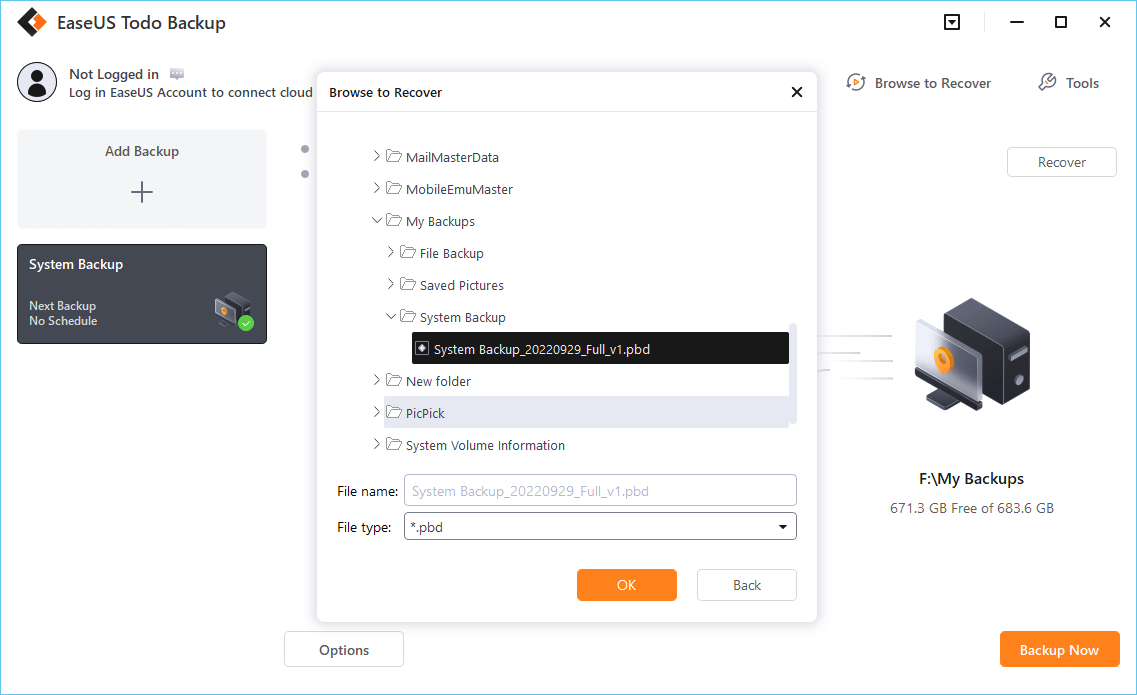
Step 1. Launch EaseUS Todo Backup, click «Browse to Recover«.

Step 2. Guide to your backup destination, choose the system backup file you need. (The backup file created by EaseUS Todo Backup is a pbd file.)
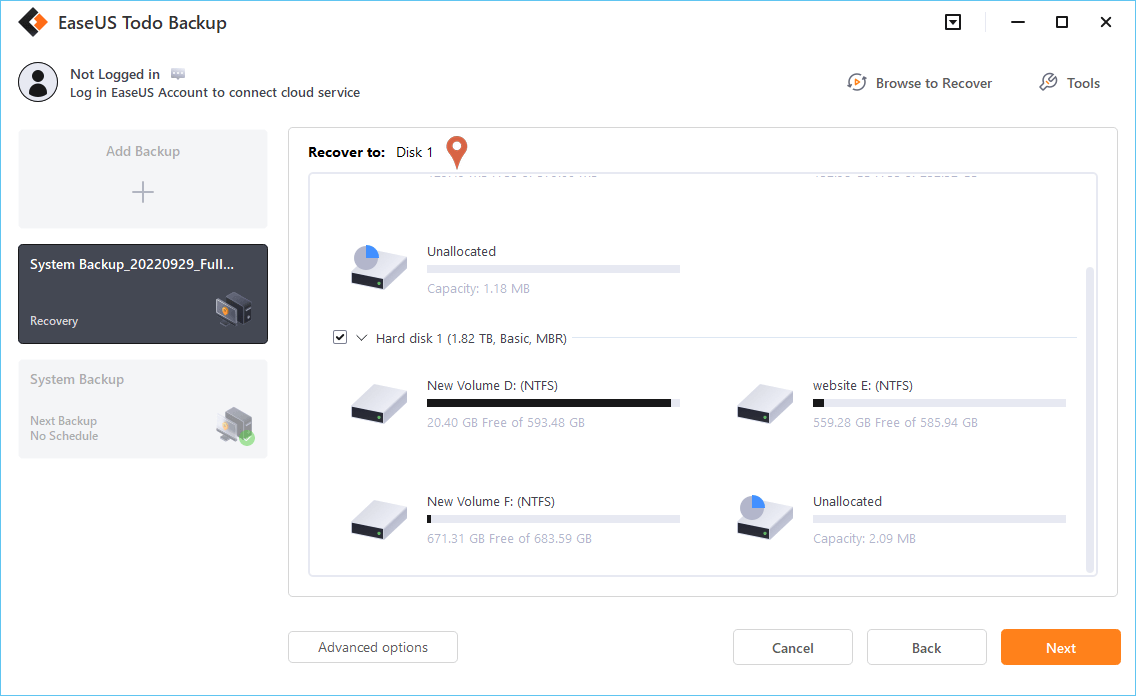
Step 3. Choose the recovery disk. Make sure that the partition style of the source disk and the recovery disk are the same.
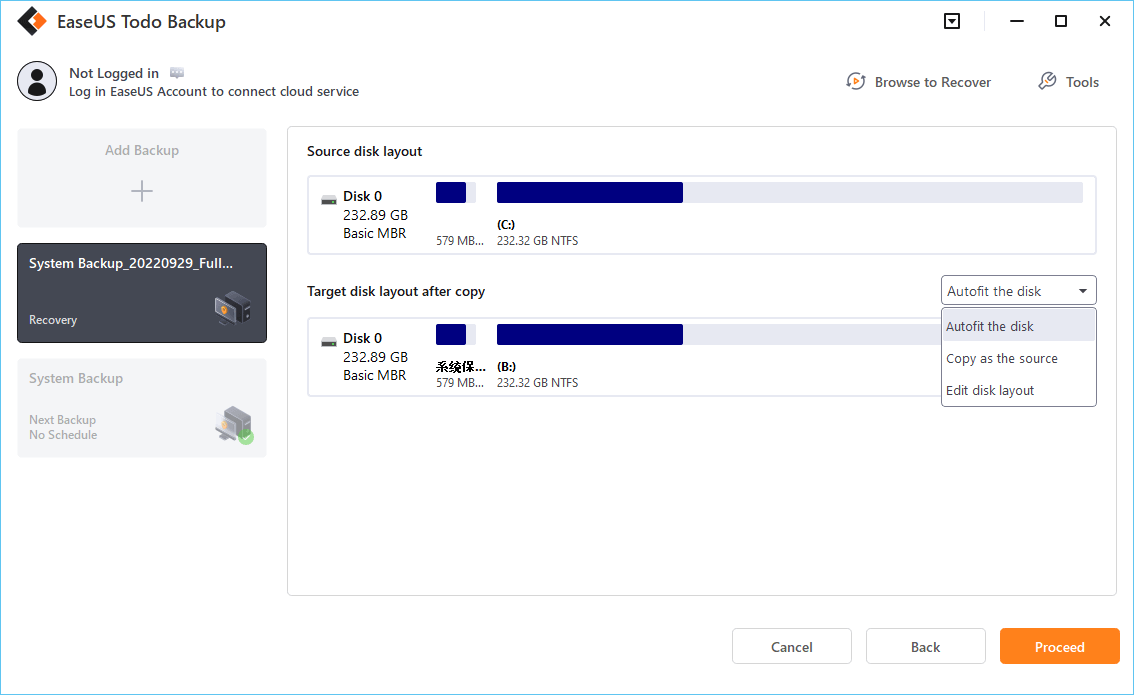
Step 4. You can customize the disk layout according to your needs. Then click «Proceed» to start system backup recovery.
Do you have the following issues while using EaseUS Todo Backup for backup and recovery? Start a live chat with an EaseUS Expert to tailor a professional backup solution specific to your requirements.
- Unable to back up
- Backup process stuck
- Recovery failed
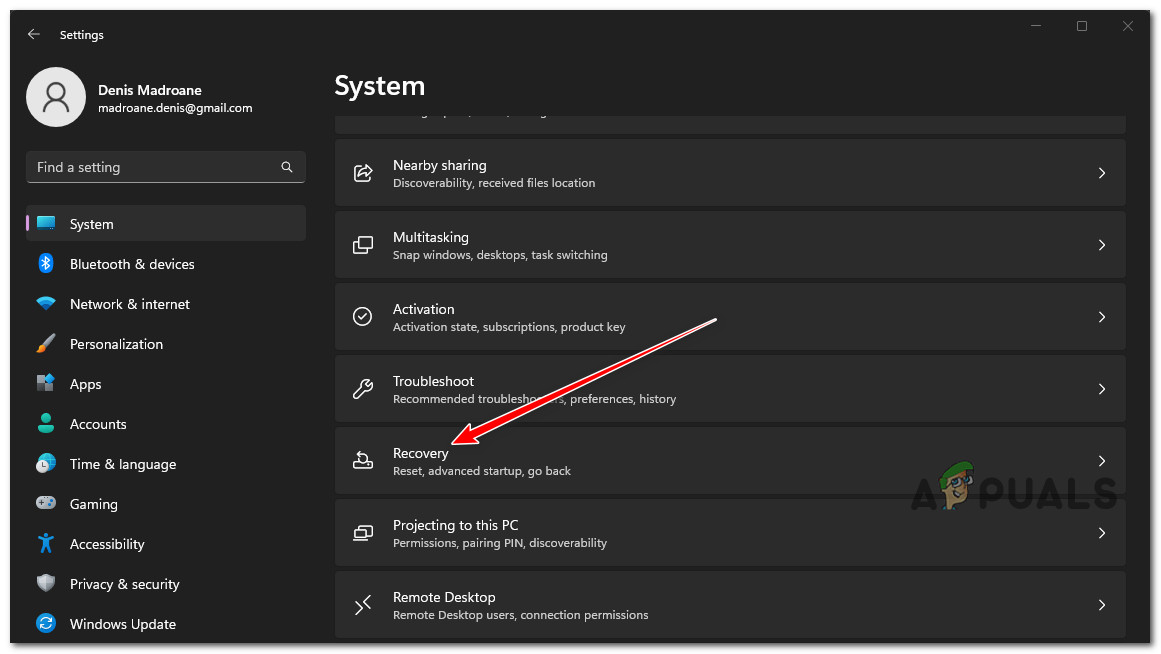
Some Windows users report that the Settings app crashes and closes when they access the Settings menu and click on System> Recovery options. Upon repeating this action, the same kind of behavior reoccurs. This problem seems to only occur on Windows 11 and Windows 10.
After we’ve looked into this issue thoroughly, we realized that there are several different underlying causes of why you might experience this type of issue. Here’s a list of potential culprits that you should be aware of when troubleshooting this issue:
- Broken Recovery GUI – If the Recovery crashes due to a graphical control element that is independent of the functionality of this Windows feature, you might be able to avoid the crash entirely by booting directly into the recovery menu and resetting your PC via a cloud download.
- Missing Windows hotfix – As it turns out, Microsoft has released several different hotfixes aimed at addressing this multi-version bug that occurs on both Windows 10 and Windows 11. Before trying anything else, you should ensure that your Windows version (10 or 11) is updated to the latest version available.
- Recent machine change – A recent machine change such as a driver installation, an update, or an AV scan might end up indirectly causing an issue with the Recovery menu. In this case, you can revert the changes using a system restore and a snapshot to revert your PC to a state where this problem was not occurring.
- System file corruption – Depending on your circumstances, this particular issue can also occur due to corruption affecting your PC’s ability to initiate recovery actions. In this case, you can attempt to fix the problem by running SFC and DISM scans in quick succession or by performing a clean install or repair install.
- Failing storage sectors – Run a CHKDSK scan on your conventional (HDD) drive if you’re still using one to see whether this behavior is linked to a failing disk sector that is starting to die. The corrupted sectors will be replaced with unused equivalents following this type of scan.
- Corrupted Windows account – One of the primary causes of this persistent issue might also be corruption impacting the Windows profile. If this situation applies, establishing a new Windows account should solve the problem.
- Corrupted Settings app – There’s a good likelihood that the issue affects the app’s whole GUI framework if you’re having identical crashing problems with any other Settings tab (apart from the Recovery page).
- 3rd party interference – Several moving pieces might end up causing the Recovery component to malfunction. You should boot in Safe Mode and attempt launching the service once again to eliminate third-party software or service interference from your list of potential offenders. You are dealing with some third-party influence if the mistake doesn’t occur again.
Now that we covered every potential scenario why you might experience this problem let’s go over a series of verified fixes that other affected users have successfully used to get to the bottom of this issue.
1. Reset this PC via cloud download
You may be able to avoid the crash entirely by booting directly into the recovery menu and resetting your computer through a cloud download if the Recovery program crashes due to a graphical control element unrelated to this Windows feature’s functionality. In this scenario, you will be able to avoid the crash.
Note: This method involves forcing your Windows 10 or 11 computer to boot directly into the recovery menu. This way, you can circumvent a scenario where the Recovery menu crashes before you get the chance to do anything.
Remember that this method will only be effective in scenarios where the Recovery component is not affected by corruption.
To force your PC to boot directly into the recovery menu and deploy the recovery procedure from a cloud download, follow the instructions below:
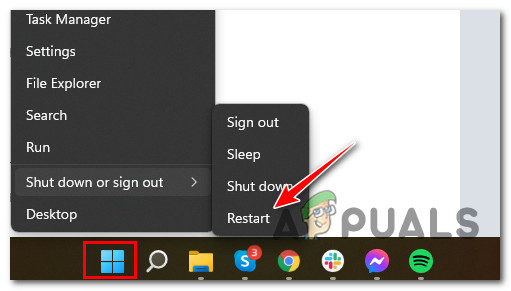
- Press the Windows key to bring up the Start menu.
- Next, press and hold the Shift key and click on the power icon from the Start icon.

Restart directly into the recovery menu - Click on Restart once again at the confirmation prompt and wait until your PC boots directly into the recovery menu.
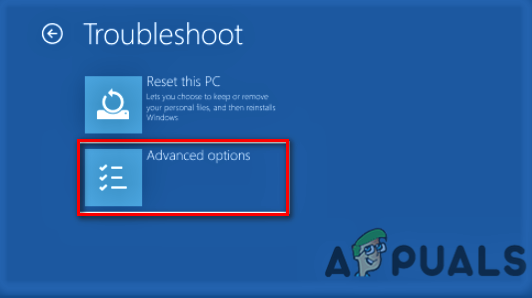
- Once your PC boots inside the recovery menu, click on Advanced Options from the list of options and Troubleshoot from the context menu that just appeared.

Access the Advanced Options menu - Once you’re finally inside the Troubleshoot menu, choose Reset this PC, then select Download Cloud when you are prompted to choose one from the different recovery options.
- Complete the recovery operation and see if you are allowed to use this utility without it crashing.
If the same crashing problem reoccurs when you boot directly into the recovery menu, move down to the following method below.
2. Install every pending update
As it turns out, Microsoft has published a variety of hotfixes to solve this multi-version fault that manifests itself on Windows 10 and 11. Before you attempt anything more, you need to make sure that the Windows version you are using (either 10 or 11) has been updated to the most recent version that is currently available.
Because Microsoft has recently sent a few updates to reduce the likelihood of issues of this nature, this is the potential solution you should investigate next.
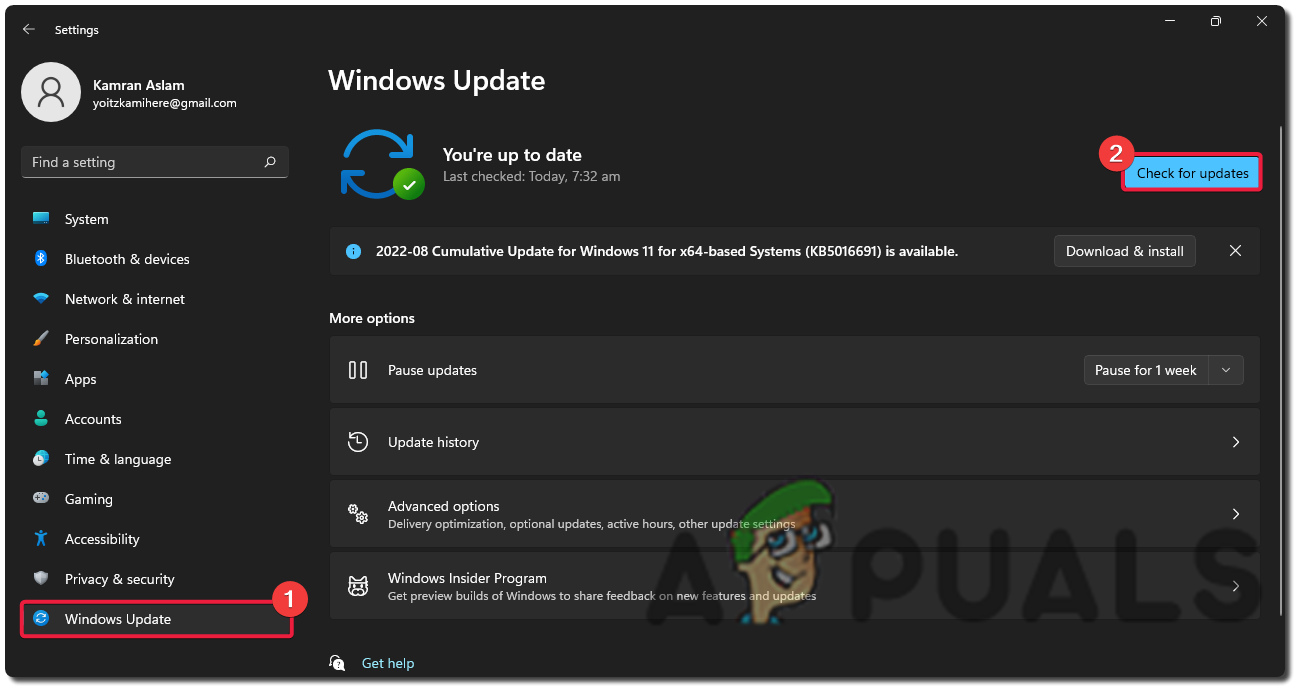
Accessing the Windows Update component and confirming that you are operating on the most recent build available for your version of Windows 11 is the first step in solving this issue, which can be done by clicking here.
To prevent a crash from occurring while entering the Recovery menu, follow these steps to install the most recent available build of Windows 11 using Windows Update:
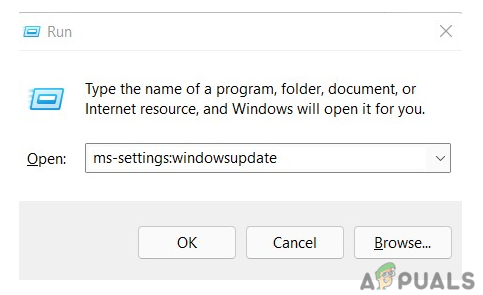
- To launch the Run dialog box, press the Windows key + the R key simultaneously.
- In the following step, within the text box, write “ms-settings:windowsupdate” and then hit the Enter key to access the Windows Update tab within the Settings application.

Access the Windows update menu Note: You may be prompted for an account control prompt at this stage, even if you have not tampered with the default settings for the UAC. In this scenario, you should select Yes to enable admin access.
- After that, proceed to the area on the right and click the button labeled Check for Updates.

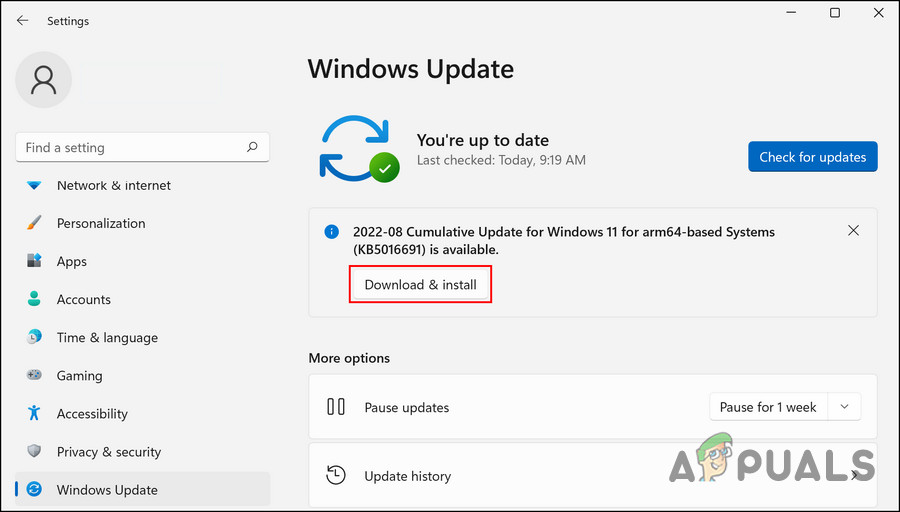
Checking for updates - After downloading the update locally, click the Install Now button to begin installing it locally.

Download and install Windows Updates - After everything else, restart your computer and check to see if the issue persists.
If you are still experiencing the same problem while attempting to access the Recovery menu, go to the probable solution listed further down this page.
3. Deploy SFC and DISM Scans
You may also be experiencing this problem due to corruption that affects the Recovery component (either directly or indirectly).
The next step in resolving this problem is to run quick successions of SFC (System File Checker), and DISM (Deployment Image Servicing and Management) scans.
Note: Even though SFC and DISM are somewhat similar, we advise running both scans quickly, one after the other, to increase your chances of fixing the corrupted system files. Even if the two scans are comparable in some ways, this should still be done.
If this circumstance applies, you must start with a basic SFC scan.
Necessary: This tool functions entirely locally and does not require you to be actively connected to the internet to use it. The CMD window must not be closed after this procedure starts, even if the utility seems to have stopped responding and frozen.
Wait until the process is complete before interfering because doing so might cause logical errors on your HDD or SSD.
Restart your computer when the SFC scan has been completed, and after the machine has started again, check to see if the issue has been fixed.
If you cannot install the pending cumulative update(s), carry out a DISM scan and complete the process by following the on-screen instructions. This will be your final fallback if you cannot install the update.
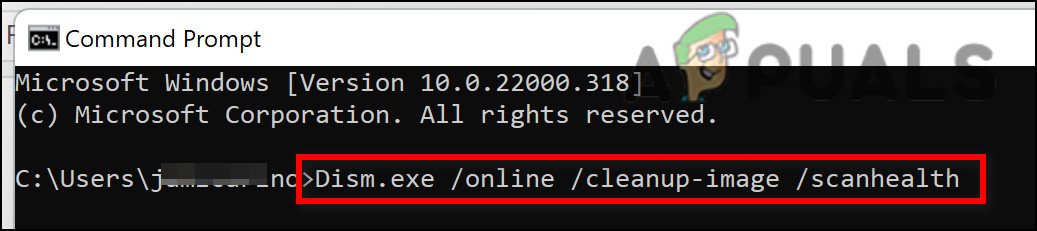
Noting that DISM uses a component of Windows Update to retrieve healthy copies of corrupted system files to replace such files, this is an important distinction between DISM and SFC. As a result, you must make sure that you have access to a solid internet connection before starting this process.
You will need to restart your computer once again to determine if the problem has been fixed once the DISM scan has been successfully completed.
If the problem still persists, follow the next method below to deploy a CHKDSK scan.
4. Perform a CHKDSK scan
Run a CHKDSK scan to see whether this behavior is connected to a failing disk sector that is just starting to fail if you’re still using a conventional (HDD) drive. The corrupted sectors will be replaced with unused equivalents following this type of scan.
According to many users who have encountered this problem, this problem may also arise if the HDD or SSD that is now housing your OS installation starts to malfunction. This scenario can easily be verified, and you can even extend your storage hardware’s life by performing a CHKDSK scan – this will effectively replace damaged storage sectors with healthy ones (for a few more months).
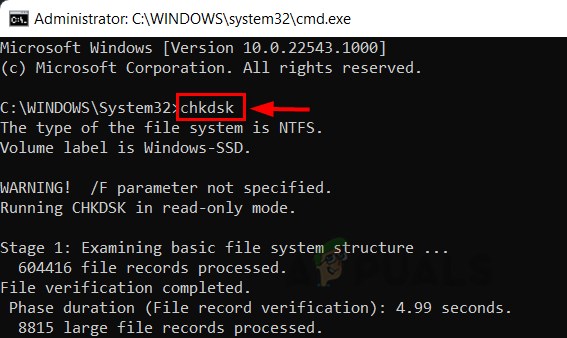
Running a Check Disk Scan will help you extend the life of your HDD in this situation by replacing damaged sectors with healthy ones. Try running a CHKDSK scan from an elevated CMD prompt to rule out this scenario.
Widespread Launch of a CHKDSK scan
Note: Fortunately, the built-in CHKDSK application in Windows can scan for faults and corruptions and repair any logical errors and damaged data that could have been left behind by a forced deletion attempt.
Open it in an elevated CMD window to grant CHKDSK the permissions required to repair damaged files. The procedures should function no matter what version of Windows you’re using.
After the CHKDSK scan is complete, restart your computer to see whether you can now enter the Recovery option straight from the Settings menu.
If the issue continues, try the next method below.
5. Reinstall the Settings app
If you’re experiencing similar crashing problems with other Settings tabs (besides the Recovery tab), there’s a big chance that the problem is occurring due to an issue that affects the entire GUI framework of the Settings app.
Several affected users who are also dealing with this problem have confirmed that they resolved the issue by using an elevated CMD window to reinstall the Settings app effectively.
Note: This method is confirmed to work on both Windows 10 and Windows 11.
Follow the instructions below for specific steps on reinstalling the Settings app from an elevated CMD window:
- Press the Windows key + R to open up a Run dialog box. Next, type ‘cmd’ inside the text box and press Ctrl + Shift + Enter to open an elevated CMD prompt with admin access.

Open a CMD window - Click Yes to grant admin access at the User Account Control (UAC).
- Once you’re inside the elevated CMD prompt, type or paste the following command to reinstall the Settings app effectively:
Get-AppXPackage | Foreach {Add-AppxPackage -DisableDevelopmentMode -Register “$($_.InstallLocation)AppXManifest.xml”} - Once the command has been enforced successfully, reboot your PC and see if the problem is now fixed.

If the same issue is still occurring, move to the next method below.
6. Open the Recovery menu from Safe Mode (workaround)
There are several moving elements that have the potential to cause interference with the recovery component. If you wish to rule out the possibility that interference from third-party software or service is to blame for the issue, you should boot your System in Safe Mode and then attempt to reopen the service.
If the issue does not reappear, it is quite evident that you are dealing with some form of influence from a third party.
In this scenario, you can try to boot into safe Mode with Networking and then start the remote desktop service when you are positive that there is no potential interference causing this behavior.
This is the procedure to follow:
- To pick Restart while holding down the Shift key, hit the Windows key to open the Start menu (while keeping the Shift key pressed).
Boot in Safe Mode - Your computer will immediately access the Recovery menu after resuming.
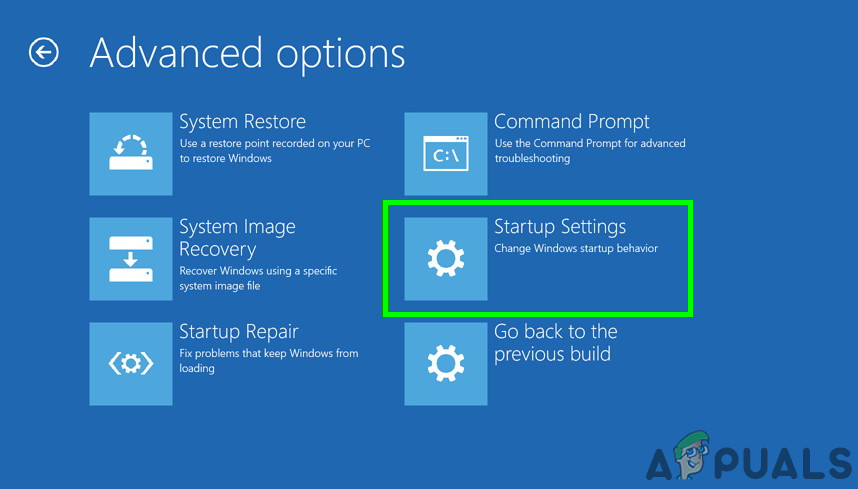
- When you eventually get to the recovery option, select Troubleshoot from the drop-down menu.
- Select Startup Settings from the drop-down menu in the Advanced Options menu.

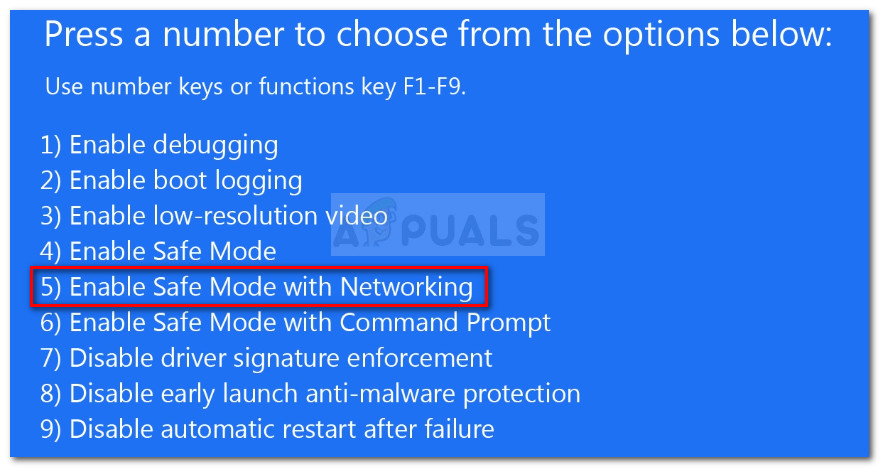
Access the Startup Settings - Press F5 to start your computer in Safe Mode with Networking on the next page.

Safe Mode with networking - Wait until your PC boots in safe Mode, then see if you can open the Recovery page.

Move on to the technique that is listed below if the same sort of problem is still present.
7. Create a new Windows account
It has come to our attention that one of the possible causes of this issue is corruption, which originates from within your Windows profile.
Users who were experiencing this issue while attempting to open a native Windows app have reported that the issue was fixed when they switched to a local Microsoft account. This was validated by these users.
Note that utilizing this approach will ultimately result in deleting any tainted dependencies currently associated with your active user profile.
Create a new local user account for your Windows installation by following the instructions below, and then log in with that account whenever you start a native Windows application:
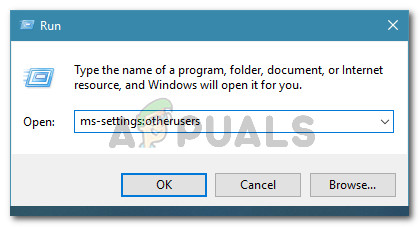
- First, click Windows key + R to enter the run dialog box.
- To enter the Family & other persons page of the Settings app, type “ms-settings:otherusers” into the text box that just opened and hit Enter.

Access the Other Users tab - Click on Add someone else to this PC under the Other user’s tab of the Family & other users page by scrolling down.
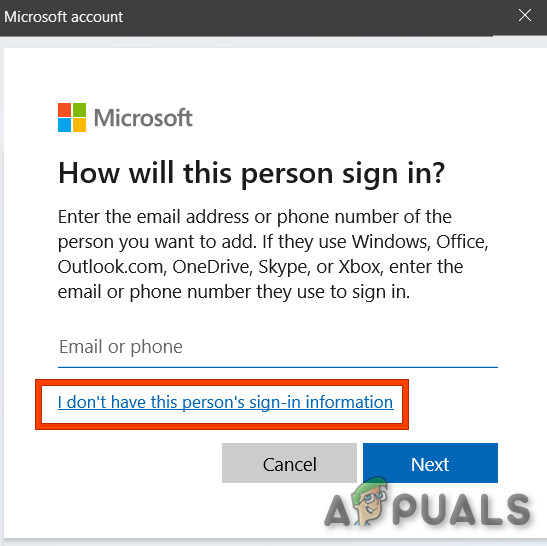
- To establish a local account, choose “I don’t have this person’s sign-in information” from the following selection.

Don’t have this persons sign in - Sign in using your Microsoft account on the next page, then select Add a user without a Microsoft account.
- Create a username, password, and a set of security questions for the new account.
- After that, restart your computer and log in the following time it starts up using the newly established account.
Launch the Recovery component and see what happens to see if the issue has been fixed. Continue to the next potential solution below if the issue is still not resolved.
8. Restore to a healthy snapshot
It is important to remember that a recent change to the computer, such as the installation of drivers, the updating of software, or the running of an antivirus check, may have inadvertently caused an issue with the Recovery menu.
The trouble with these issues is that most of the time, there is no way to identify which one is causing the problem. If this is the case, the simplest solution to fix the issue at hand is to use the System Restore software on your computer to return it to a point in time when the issue was not occurring. This will allow you to fix the issue.
It is crucial to note that all current versions of Windows, including Windows 11, include a setting that automatically creates and stores fresh recovery snapshots regularly (during important system events).
Note: The following explains how to configure the settings for System Restore on Windows 10 or 11.
You should have plenty of System Restore points from which to pick and implement this procedure on your own computer, provided that you have not modified the default behavior in any way (or that a third party has not done so for you).
IMPORTANT: However, before you get started with the steps below, it is important to understand that after this process, every change that you made to your System since that restore snapshot was created will be lost. This is important to know because it will prevent you from making any mistakes while you are making the restoration. This will affect any games, programs, and other system updates that may have been installed during that time. This includes any and all updates.
If you are prepared to use System Restore, then the following is a simple instruction on how to use it to restore your machine back to a healthy condition when this problem was not occurring:
- To launch the Run dialog box, press the Windows key + R simultaneously.
- After that, launch the System Restore menu by typing “rstrui” and pressing the Enter key.
Access the Recovery menu - When you have navigated beyond the first screen that appears when you select System Restore, select the Next option to go to the subsequent menu.

Deploy a System Restore - The following step is to begin by marking the associated box.
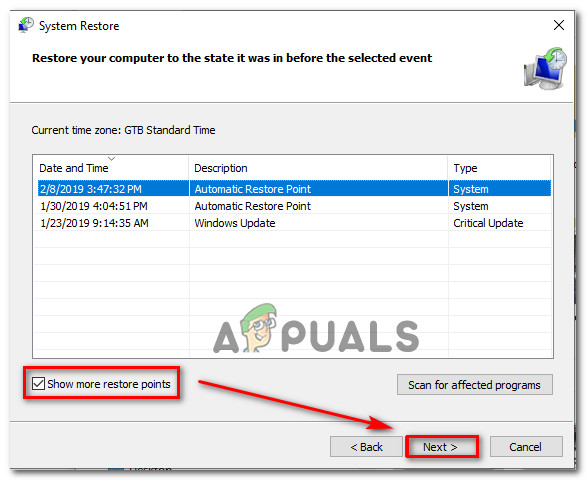
- From the screen that follows, proceed by checking the dates of each stored restore point. Choose a restore point that was created before the appearance of this problem.
Show more restore points Note: To prevent losing a significant amount of data, you should avoid picking restore points older than one month.
- Once you have ensured that the right restoration point is selected, go to the last option by clicking the Next button.
- The functionality of the utility is now completely operational at this stage. After clicking the Finish button, you will need to wait for the procedure to begin.

Deploy a system restore point Note: You will be required to restart the application shortly after this. Follow the instructions, and then wait for the subsequent startup to finish.
- When your personal computer has finished booting up, try entering the recovery menu once more to see whether or not the issue has been resolved.


If the issue is still experienced, proceed to the next possible solution further down the page.
9. Perform a Clean install or Repair Install
If you can still not access the Recovery menu through the GUI menu, the final thing you should check for is an underlying system corruption issue that cannot be resolved through traditional methods (with DISM and SFC scans).
It has been noted that other customers who have had the same issue have successfully resolved it by doing either an in-place repair (repair install) or a clean installation.
A clean installation is a more straightforward alternative; nevertheless, the primary drawback is that it will not let you save your own data, including programs, games, and personal media (unless you back them out first).
You should consider using a repair install technique if you are searching for a solution to prevent you from losing data. The most significant benefit is that you can preserve all of your own data, including programs, games, personal media, and even some user settings.
Все способы:
- Способ 1: Сканирование с SFC
- Способ 2: Точка восстановления
- Способ 3: Исправление работы среды восстановления
- Способ 4: Правка реестра
- Способ 5: Отключение твикеров
- Способ 6: Использование образа ISO
- Вопросы и ответы: 0
Способ 1: Сканирование с SFC
Одной из наиболее вероятных причин ошибок при сбросе системы к исходным настройкам является повреждение тех системных файлов, которые отвечают за эту процедуру. Проверьте Windows 10 на предмет повреждения целостности, используя встроенную утилиту «SFC».
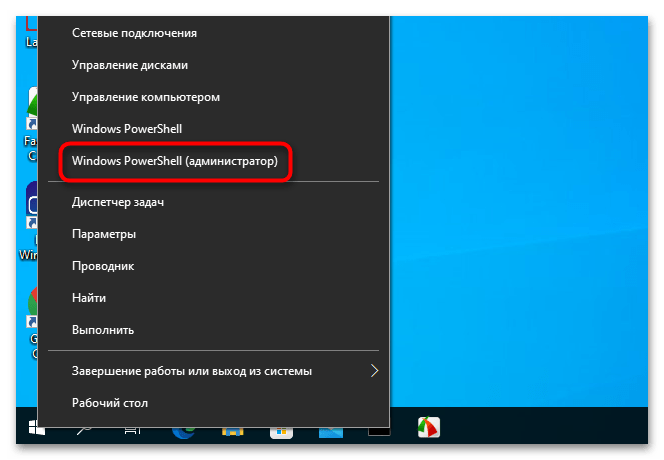
- Запустите от имени администратора консоль «PowerShell» из контекстного меню кнопки «Пуск». «Командная строка» тоже подойдет.
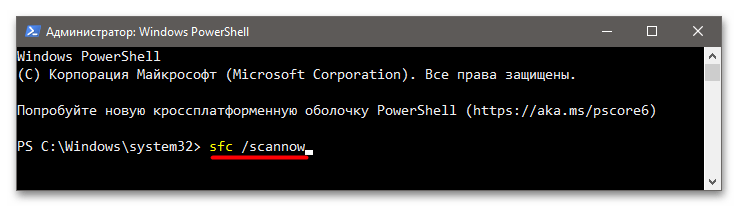
- Выполните в консоли команду
sfc /scannowи дождитесь результатов сканирования. В случае обнаружения нарушений целостности утилита предпримет попытку восстановить поврежденные или отсутствующие файлы.
После завершения процедуры проверки и обнаружения проблем необходимо будет перезагрузить компьютер. Если вы получили какую-то ошибку в ходе восстановления файлов, обратитесь к инструкции по ссылке ниже.
Подробнее: Восстановление системных файлов в Windows 10
Способ 2: Точка восстановления
Если в Windows 10 включена функция защиты системы, выполните откат к любой из точек восстановления, можно к самой ранней.
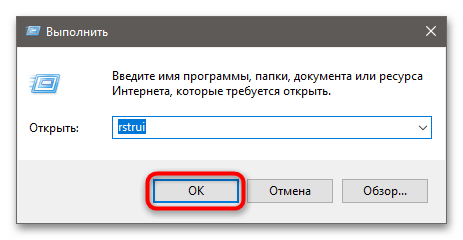
- Нажмите на клавиатуре Win + R, чтобы открыть диалоговое окошко «Выполнить», введите в него команду
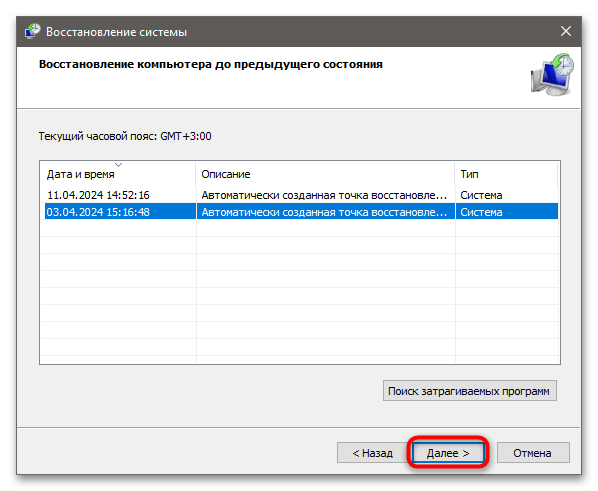
rstruiи нажмите «OK» или клавишу ввода. - В открывшемся окне мастера отката выберите рекомендуемую или другую точку восстановления и нажмите «Далее».
- Если был выбран второй вариант, укажите конкретную точку восстановления, нажмите «Далее» и подтвердите запуск процедуры отката.
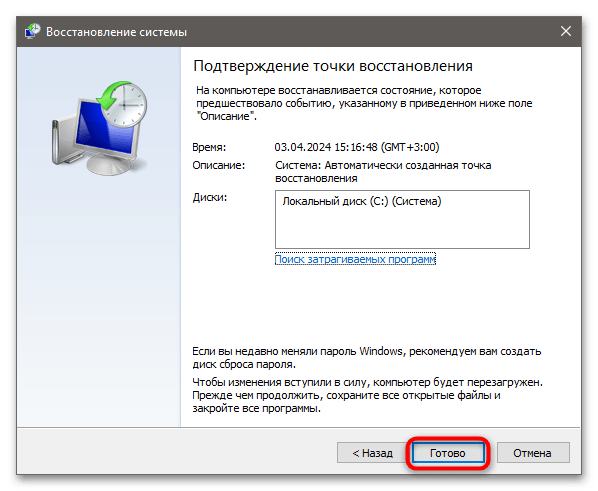
Компьютер будет перезагружен, а по завершении необходимых операций на экране появится сообщение об успешном или неуспешном восстановлении системы.
Заодно убедитесь, что на системном диске имеется достаточно свободного места – примерно 8-10 ГБ. Дополнительно рекомендуется отключить в системе сторонние антивирусы.
Способ 3: Исправление работы среды восстановления
Этот способ позволяет устранить проблемы, вызванные сбоем в работе среды восстановления. Суть его заключается в отключении и повторном включении среды WinRE.
- Запустите от имени администратора консоль «PowerShell» как было показано выше.
- Выполните одну за другой команды
reagentc /disableиreagentc /enable.
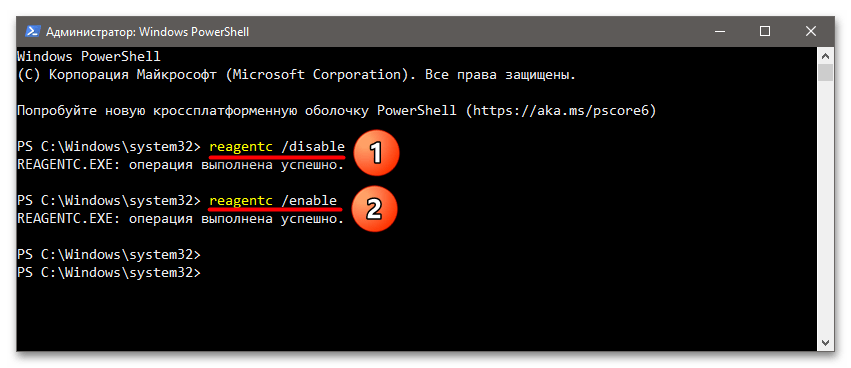
Перезагрузите компьютер и попробуйте сбросить операционную систему.
Способ 4: Правка реестра
В некоторых случаях может помочь такое радиальное действие как пересоздание кустов реестра system и software. Это потенциально небезопасная операция, но так как Windows 10 все равно готовится к сбросу, это не имеет значения.
- Запустите от имени администратора «PowerShell» или классическую «Командную строку».
- Выполните одну за другой следующие три команды:
cd config

ren system system.001

>ren software software.001
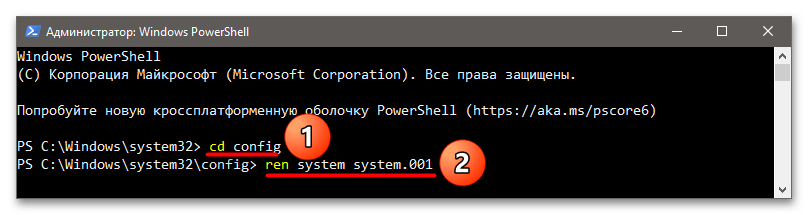
Не обращайте внимания на сообщения о невозможности переименования файлов. Перезагрузите компьютер, а затем попробуйте воспользоваться функцией сброса Windows 10.
Способ 5: Отключение твикеров
Если на компьютере используются какие-либо твикеры или оптимизаторы, восстановите измененные с их помощью настройки. Такая опция сброса имеется в большинстве твикеров. Если вдруг нужная опция недоступна или не работает, используйте откат к точке восстановления, созданной до применения твиков.
Способ 6: Использование образа ISO
Если при попытке сброса Windows 10 появляется сообщение с требованием использовать диск восстановления или установочный накопитель, можете попробовать следующее решение.
- Скачайте с официального сайта Microsoft установочный ISO-образ Windows той же версии и разрядности, что и на компьютере.
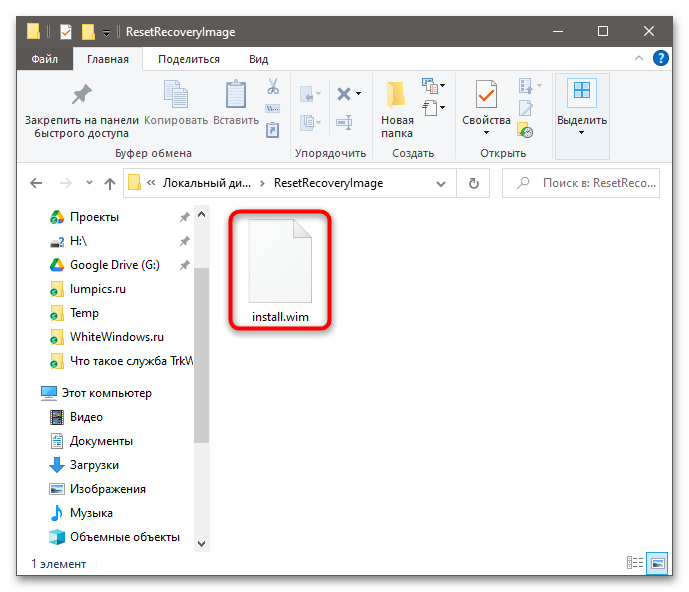
- Смонтируйте его в «Проводнике» или распакуйте любым архиватором. Зайдите в папку «source» и скопируйте из нее файл «install.wim» в предварительно созданную на пользовательском разделе «D» папку «ResetRecoveryImage».
- Запустите от имени администратора «PowerShell» и выполните в ней команду
reagentc /setosimage /path "D:\ResetRecoveryImage" /index 1.
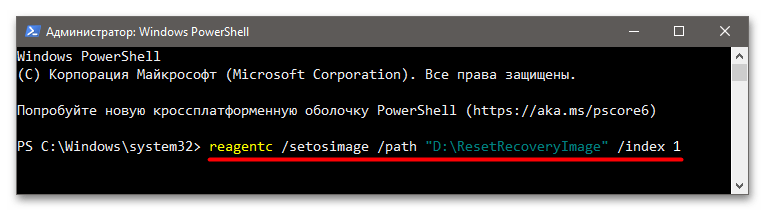
В случае успешного выполнения команды попробуйте выполнить сброс операционной системы.
Если ни один из описанных способов не помог, выполните чистую установку Windows 10 с использованием установочной флешки.
Подробнее: Как переустановить Windows 10
Наша группа в TelegramПолезные советы и помощь
Вопрос
«Я столкнулся с ситуацией, когда восстановление системы Windows 10 зависает, я не знаю почему это происходит. Как это исправить?»
Прежде чем перейти непосредственно к решению проблемы, важно понять, в чем заключается причина зависания при восстановлении системы Windows 10. Что ж, в Windows есть потрясающая функция под названием «Восстановление системы», которая позволяет восстановить все настройки системы, которые были на определенный момент времени на вашем компьютере. Эта функция помогает восстановить заводские настройки и начать работу с чистого листа.
Но в какой-то момент во время процедуры восстановления системы вы понимаете, что это занимает слишком много времени. А причина в том, что на определенном этапе восстановление зависло. Или процедура восстановления системы оказывается неуспешной, и в конечном итоге вы возвращаетесь к текущему состоянию и настройкам Windows. Эта проблема может возникнуть на двух разных этапах восстановления системы Windows 10: при инициализации и при восстановлении файлов. У этой проблемы может быть несколько причин, давайте узнаем о них подробнее.
- Часть 1: Почему Windows 10 зависает при восстановлении системы?
-
Часть 2: Как исправить зависание восстановления системы при инициализации Windows 10?
- Решение 1. Запустите восстановление системы при запуске Windows 10
- Решение 2. Загрузка компьютера в безопасном режиме с подключением к Сети
-
Часть 3: Как исправить зависание восстановления системы Windows 10 при восстановлении файлов?
- Решение 1. Запустите восстановление системы в безопасном режиме с поддержкой командной строки
- Решение 2. Запуск команды SFC
- Бонусный совет: Ваше идеальное решение для загрузки Windows
Как было сказано ранее, причин по которым windows 10 застряла при восстановлении системы может быть несколько. Вот некоторые из них:
- Поврежденные файлы восстановления системы: Иногда файлы восстановления системы повреждаются из-за неправильного создания файла или вируса. Это может привести к зависанию при восстановлении системы.
- Внутренний конфликт программного обеспечения и Windows: Существует огромная вероятность того, что какое-то внутреннее программное обеспечение конфликтует с файлами Windows, приводя к зависанию восстановления системы Windows 10.
- Битые сектора диска: Если жесткий диск вашего компьютера неисправен, существует огромная вероятность того, что с него пропадут или удаляться некоторые из второстепенных файлов восстановления системы. Это приведет к неудачному восстановлению системы, в том числе к зависанию на этапе инициализации.
- Перебои в питании во время процедуры восстановления системы: Внезапное отключение питания во время восстановления системы может привести к зависанию на определенном этапе.
- Любая другая внутренняя проблема Windows: Другие внутренние проблемы в операционной системе Windows могут привести к зависанию восстановления системы. Это может быть из-за проблем с системными файлами, настройками реестра или другими неизвестными конфликтами программного обеспечения.
Итак, это были самые распространенные причины, по которым восстановление системы Windows 10 может зависнуть. Теперь давайте перейдем к тому, как вы можете устранить эти проблемы самостоятельно.
Часть 2: Как исправить зависание восстановления системы при инициализации Windows 10?
Если восстановление системы Windows 10 застряло на этапе инициализации, есть 2 различных способа устранить эту проблему.
Решение 1. Запустите восстановление системы при запуске Windows 10
- Прежде всего, выключите компьютер, с помощью кнопки питания или обычным способом (если возможно).
- Как только компьютер выключится, вам нужно подождать не менее 30 секунд, а затем нажать кнопку питания. Вместе с этим, вам нужно зажать кнопку F8.
-
Зажав клавишу F8, вы увидите на своем экране несколько опций. Все, что вам нужно сделать – нажать «Поиск и устранение неисправностей», затем перейти к «Дополнительным параметрам» и нажать «Восстановление при запуске».
Будут восстановлены изначальные настройки Windows. По окончании процедуры ваш компьютер перезагрузится, и вы сможете выполнить восстановление системы без каких-либо проблем.
Решение 2. Загрузка компьютера в безопасном режиме с подключением к Сети
Если первый метод не сработал или вы не хотите им пользоваться, то это не проблема. Вот еще один способ, который может помочь вам исправить зависание при восстановлении системы при инициализации Windows 10.
Вам нужно будет загрузить свой компьютер в безопасном режиме, а затем выполнить восстановление системы. Для этого следуйте данным шагам.
- Прежде всего, вам нужно загрузить ISO-файл Windows 10 на свой компьютер с официального веб-сайта.
- Как только файл будет загружен, запустите его и начните процесс установки. На экране установки вы увидите разные параметры для выбора. Все, что вам нужно сделать – нажать на кнопку «Восстановление системы».
-
Появится новое окно, где вам нужно нажать на кнопку «Поиск и устранение неисправностей», а затем на «Дополнительные параметры».
- Здесь вам нужно выбрать «Восстановление при запуске», а затем перезагрузить компьютер.
- После этого ваш компьютер выключится, а затем включится. Как только он загрузится, необходимо быстро нажать клавишу 5, чтобы активировать безопасный режим с подключением к Сети. Затем ваш компьютер запустится, и вы снова сможете попробовать запустить восстановление системы.
В этом режиме вы можете выполнить восстановление системы без каких-либо хлопот.
Часть 3: Как исправить зависание восстановления системы Windows 10 при восстановлении файлов?
Если вы столкнулись с проблемой восстановления системы Windows 10 на этапе восстановления реестра, вот 2 способа, которые помогут вам.
Решение 1. Запустите восстановление системы в безопасном режиме с поддержкой командной строки
Используя этот способ, вы можете запустить восстановление системы в безопасном режиме с поддержкой командной строки. Все, что вам нужно сделать, это выполнить действия, приведенные ниже:
- Загрузите ISO-файл для Windows 10 на свой компьютер, перейдя по этой ссылке. После загрузки запустите этот ISO-файл и приступите к процедуре установки.
- Вам нужно нажать кнопку «Восстановление системы», затем кнопку «Поиск и устранение неисправностей» на следующем экране. После этого нажмите кнопку «Дополнительные параметры», а затем «Восстановление при запуске».
-
Далее нужно будет нажать на кнопку перезагрузки. Ваш компьютер перезагрузится, и как только он будет включен, вам нужно будет нажать клавишу 6, чтобы перевести его в безопасный режим с поддержкой командной строки.
- Как только вы войдете в этот режим, вам нужно нажать на значок поиска на панели задач и ввести команду, а затем щелкнуть правой кнопкой мыши по первому попавшемуся варианту и запустить его от имени администратора.
- Теперь вы увидите черное поле, куда вы должны скопировать и вставить «rstrui.exe», далее нажмите «Enter».
- Вы увидите вкладку «Восстановление системы», и отсюда вы сможете легко восстановить Windows, не зависая на пустом экране.
Решение 2. Запуск команды SFC
Второй способ исправить зависание восстановления системы Windows 10 при восстановлении реестра – запустить командную строку и выполнить команду SFC.
Для этого следуйте данным шагам.
- Выполните первые 2 шага из описанного выше метода, а затем нажмите на опцию «Дополнительные параметры».
- Здесь вам нужно будет выбрать командную строку.
-
Теперь вы увидите черное поле, в котором вам нужно будет написать «sfc/scannow» и нажать «Enter».
- Теперь система выполнит сканирование на наличие поврежденного файла; если он будет найден, она покажет его.
- Все, что вам нужно будет сделать – заменить этот поврежденный файл новым и повторить попытку восстановления системы.
Бонусный совет: Ваше идеальное решение для загрузки Windows
Когда ваш компьютер зависает при восстановлении системы, вызывая такие проблемы, как синий / черный экран, сбой системы, мы предлагаем воспользоваться программой 4DDiG Windows Boot Genius для их устранения. Это программное обеспечение может загружать Windows ПК в различных ситуациях. Например:
- При зависании во встроенном интерфейсе восстановления системы и невозможности войти в систему.
- При зависании в интерфейсе обновления / перезагрузки и невозможности войти в систему.
- При ошибке загрузки Windows: не найден загрузчик операционной системы.
Все, что вам нужно сделать – загрузить и установить это программное обеспечение на свой компьютер и следовать инструкциям на экране, чтобы в кратчайший срок запустить компьютер и устранить проблемы, описанные выше.
Часто задаваемые вопросы:
1. Сколько времени требуется для завершения восстановления системы?
Весь процесс восстановления системы может занять от 30 до 40 минут, но в некоторых случаях на старых компьютерах время может увеличиться до 60 минут.
И если ваш компьютер выполняет восстановление слишком долго, например, более 60 минут, вам необходимо проверить, не произошло ли зависания во время какого-нибудь этапа. Если это так, то вам нужно будет решить проблему, следуя методам, приведенным выше.
2. Удаляются ли при восстановлении системы пользовательские файлы?
Нет, при восстановлении системы личные файлы, сохраненные на компьютере, не удаляются. Происходит только восстановление Windows до прежнего состояния, а все личные файлы остаются в безопасности.
Вывод
Итак, с помощью описанных выше методов вы сможете исправить проблему со сбоем восстановления системы Windows 10 на этапе инициализации или восстановления файлов. Вам просто нужно внимательно следовать инструкциям, и ваш компьютер будет в строю в кратчайшие сроки. Если у вас возникают проблемы с загрузкой компьютера на базе Windows, мы рекомендуем вам использовать программное обеспечение 4DDiG Windows Boot Genius для решения данных проблем.