
FAQ
[Windows 11/10] Troubleshooting — Camera problem
Applicable Products: Notebook, Desktop, All-in-One PC
Camera is integrated on laptops and All-in-One PCs, and you can use external USB camera on desktops. If you experience the following camera problems (picture is upside down, no image, camera not recognized, abnormal display, etc.), please refer to the following troubleshooting steps in order:
To provide you more detailed instruction, you can also click ASUS YouTube video link below to know more about How to Fix Camera Problems on ASUS Laptops.
Please go to the corresponding instruction based on the current Windows operating system on your computer:
- Windows 11
- Windows 10
Windows 11 operating system
Table of Contents:
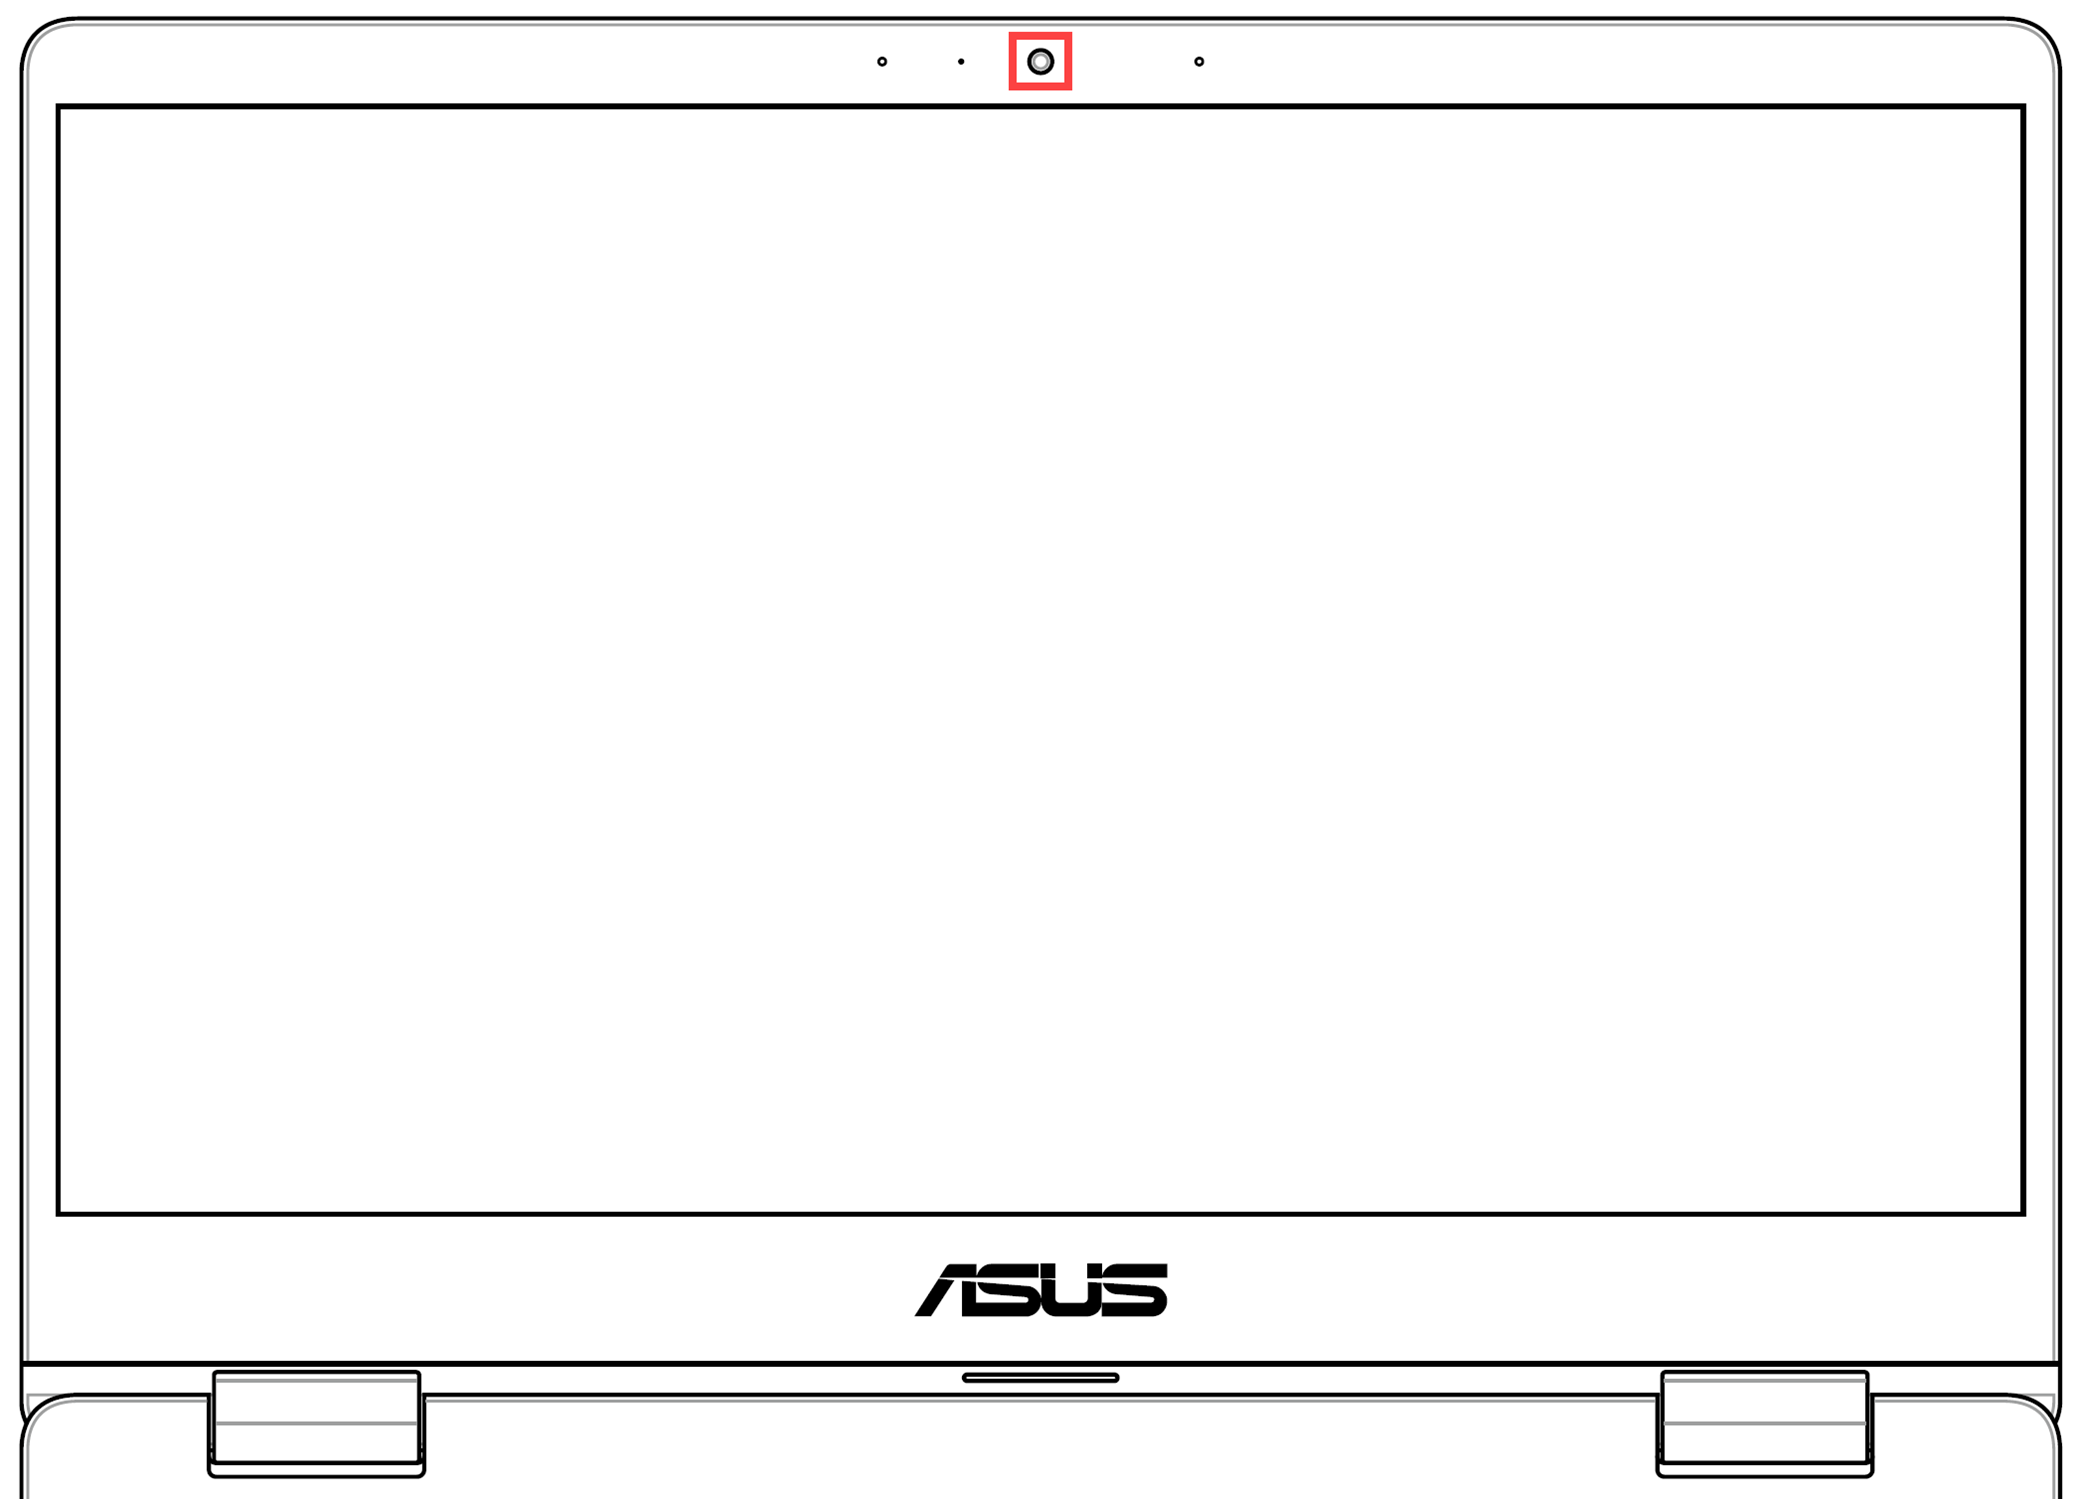
Inspect the Camera’s appearance
- Verify whether the camera is obstructed, for instance, by a screen protector or a privacy film.
Sometimes, if the camera lens is covered in dust or dirt, it may affect the image quality. Please use a clean, soft cloth to gently wipe the camera lens, ensuring it remains pristine.
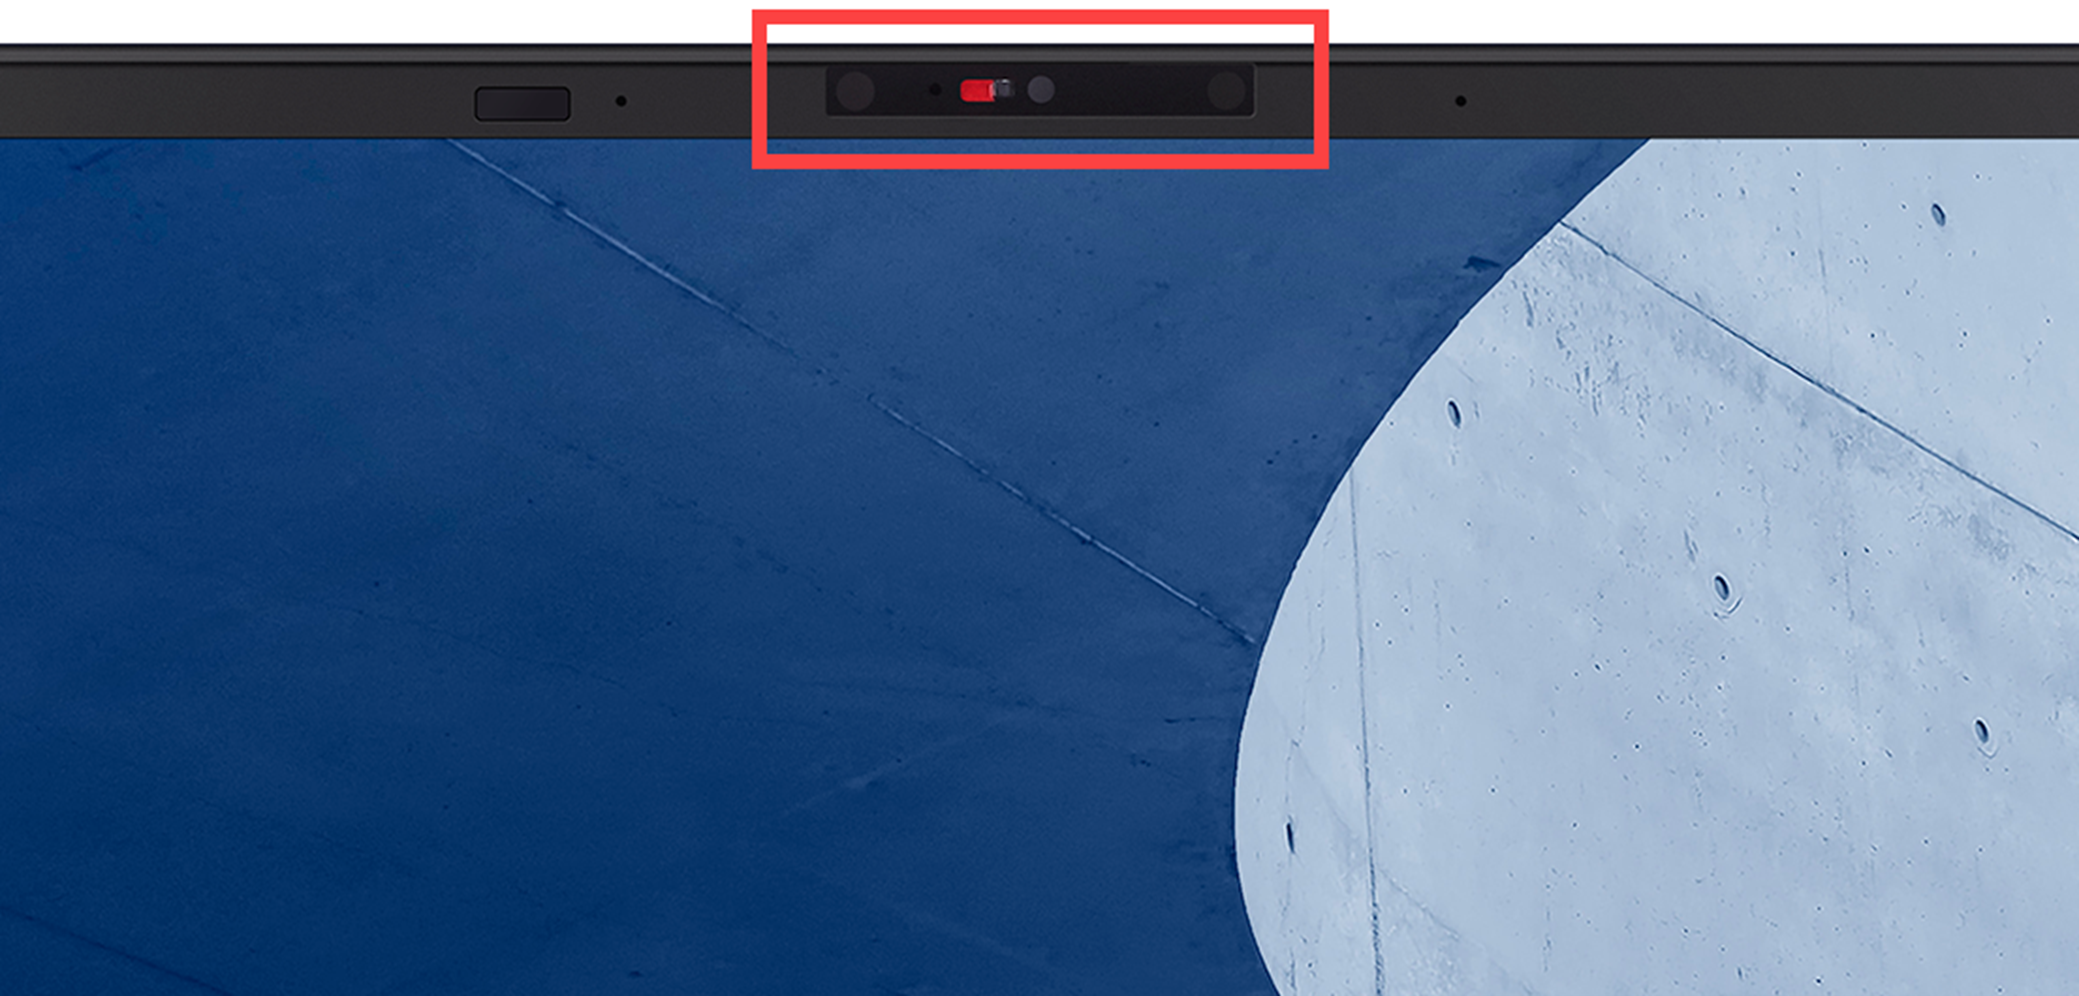
- Certain devices may be equipped with a physical privacy shield for the camera. When you intend to use the camera, ensure that the privacy shield is in the closed position.
Note: The location of the privacy shield may vary depending on the model. If you are uncertain whether your device is equipped with a physical privacy shield, please refer to the instructions in the User Manual.
Back to Table of Content
Use the built-in camera application
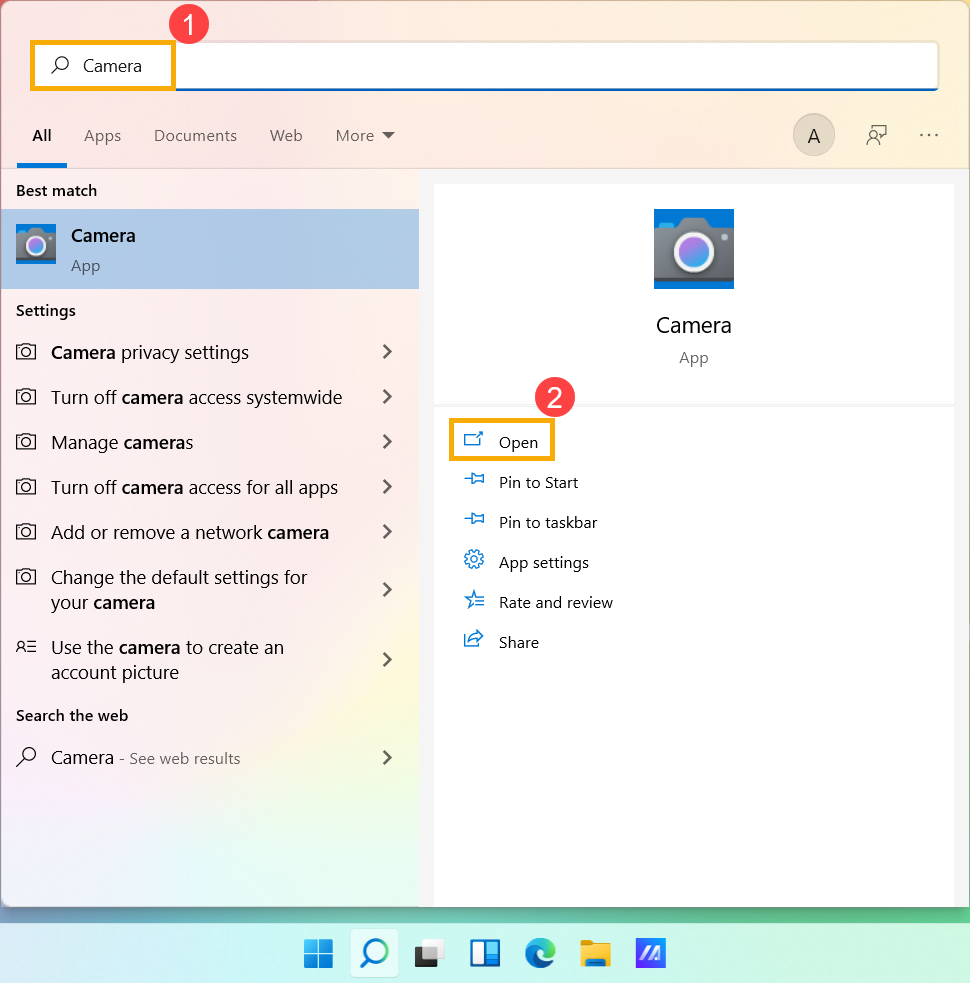
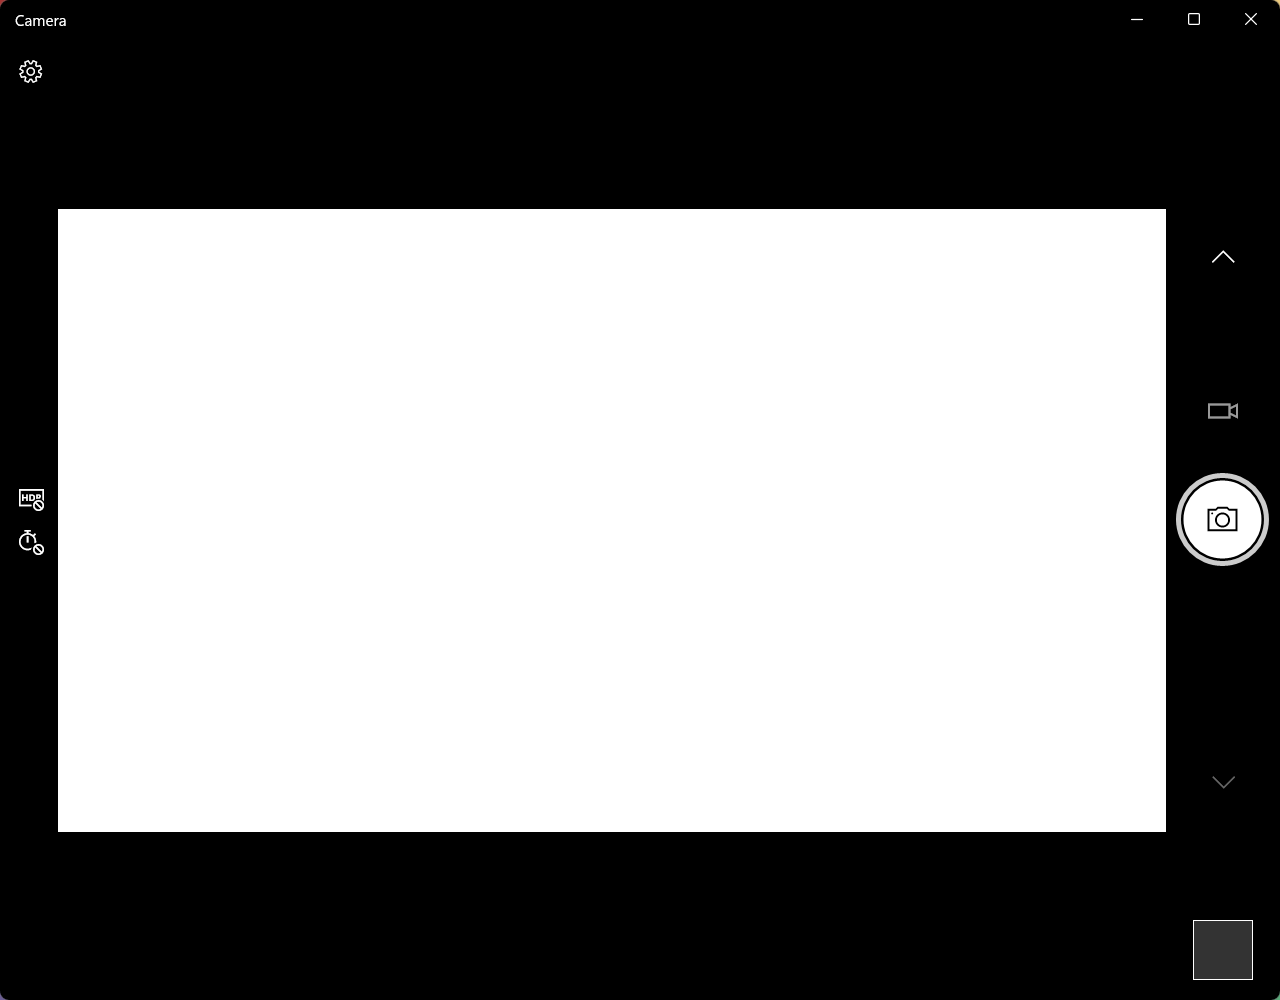
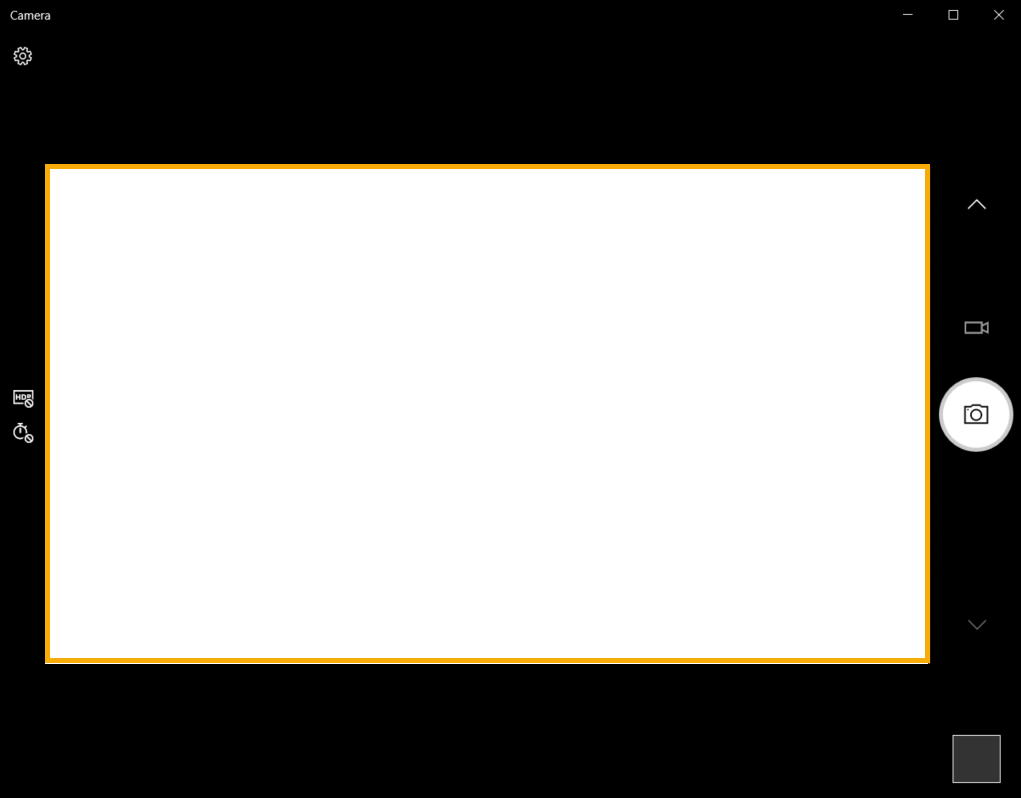
- Type and search [Camera] in the Windows search bar①, then click [Open]②.
- Confirm that the camera is working properly after executing [Camera] application. Please follow the next steps if it is not.
Note: Camera errors include Upside down image, No image, Cannot recognize camera, Display abnormal, etc.
Back to Table of Content
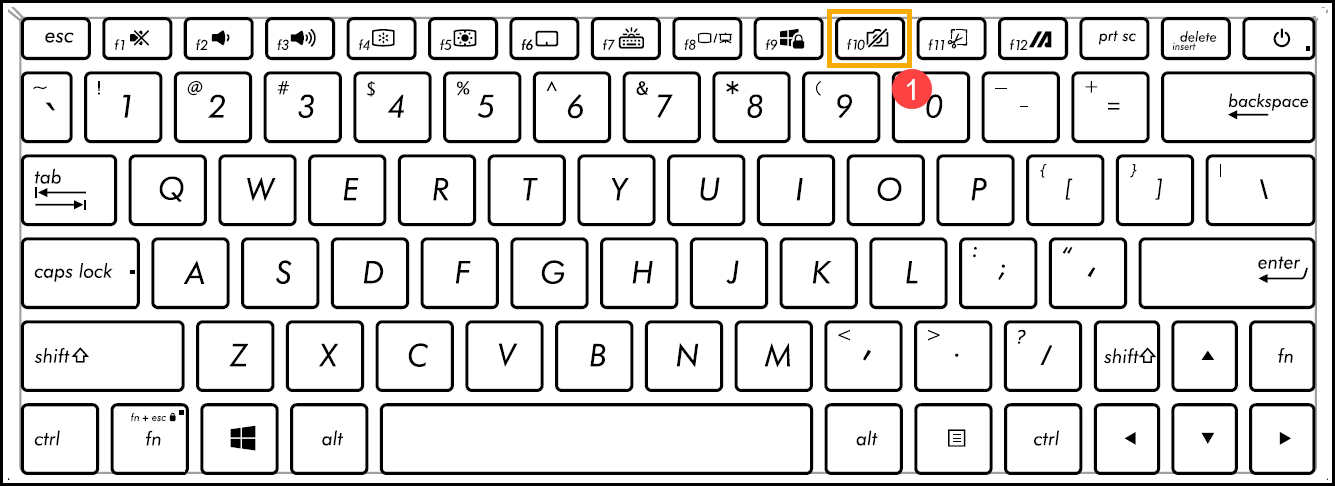
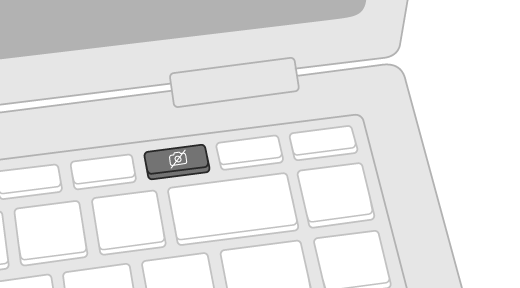
Check the status of F10 Camera Hotkey (for ASUS laptops only)
- Please check whether there is a [F10 Camera Hotkey]① on your keyboard of the laptop. If no, please go to the next chapter.
Note: The hotkeys functions may be different based on different models, please refer to the User Manuals.
- Press F10 key or press the function key + F10 key (It depends on what your hotkey option selected is.), then check whether there is a message of [Camera on]② on the screen. Here you can learn more about ASUS Keyboard hotkeys Introduction.
- If the problem persists, please continue the next troubleshooting step.

Back to Table of Content
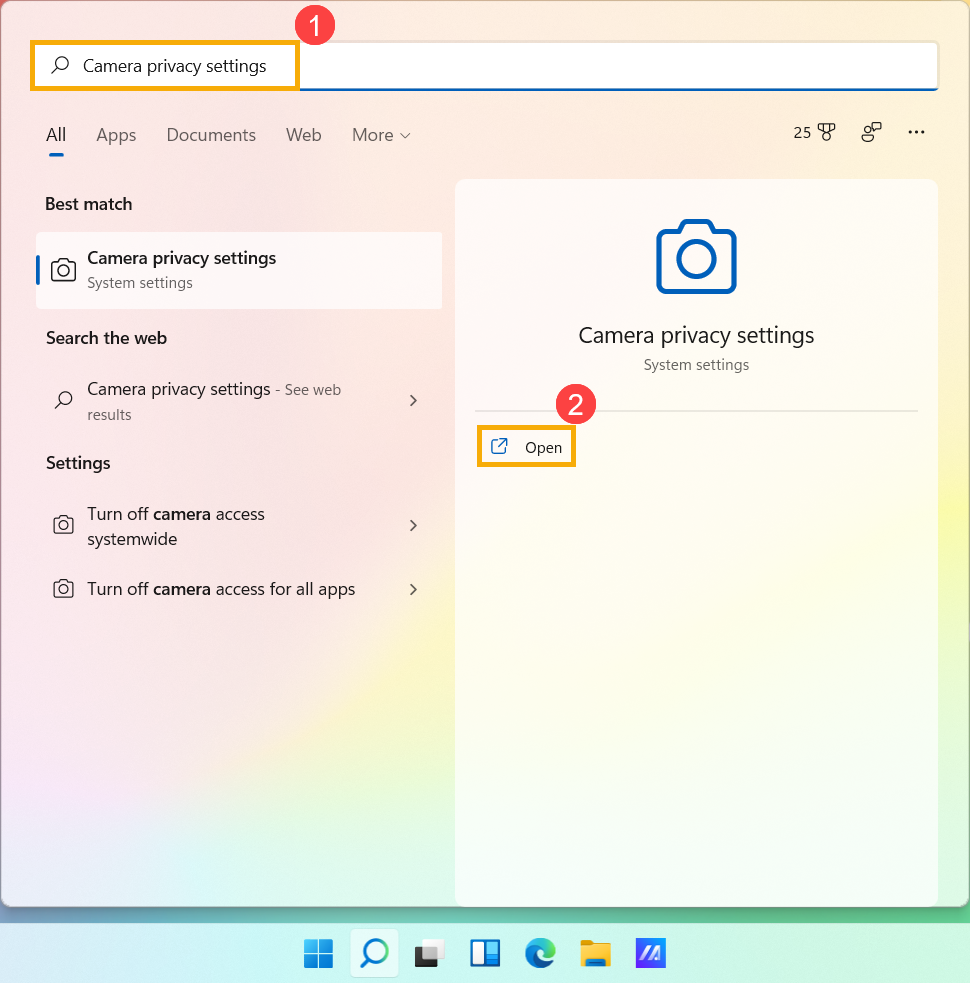
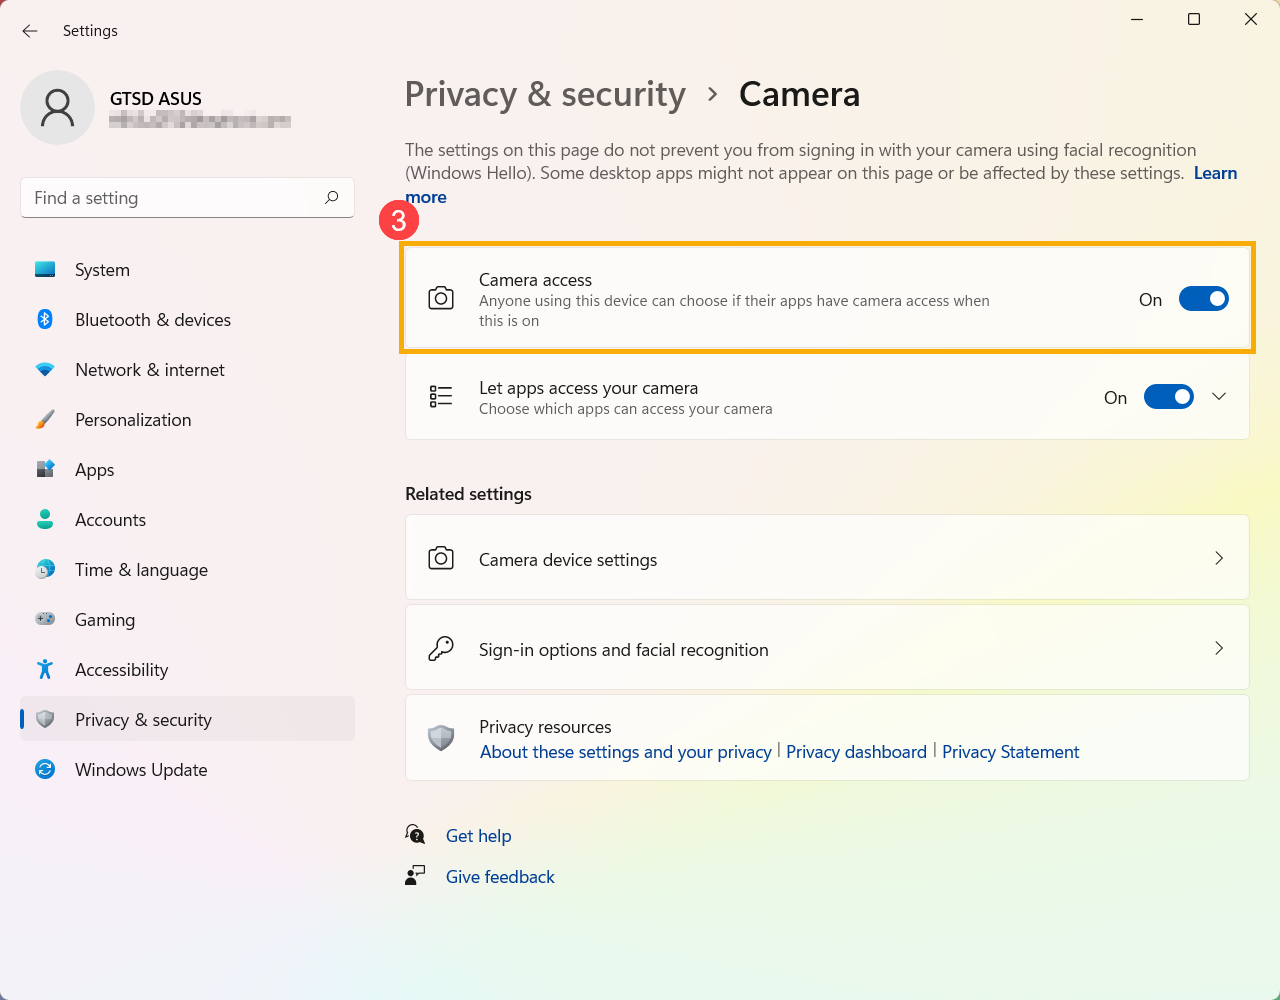
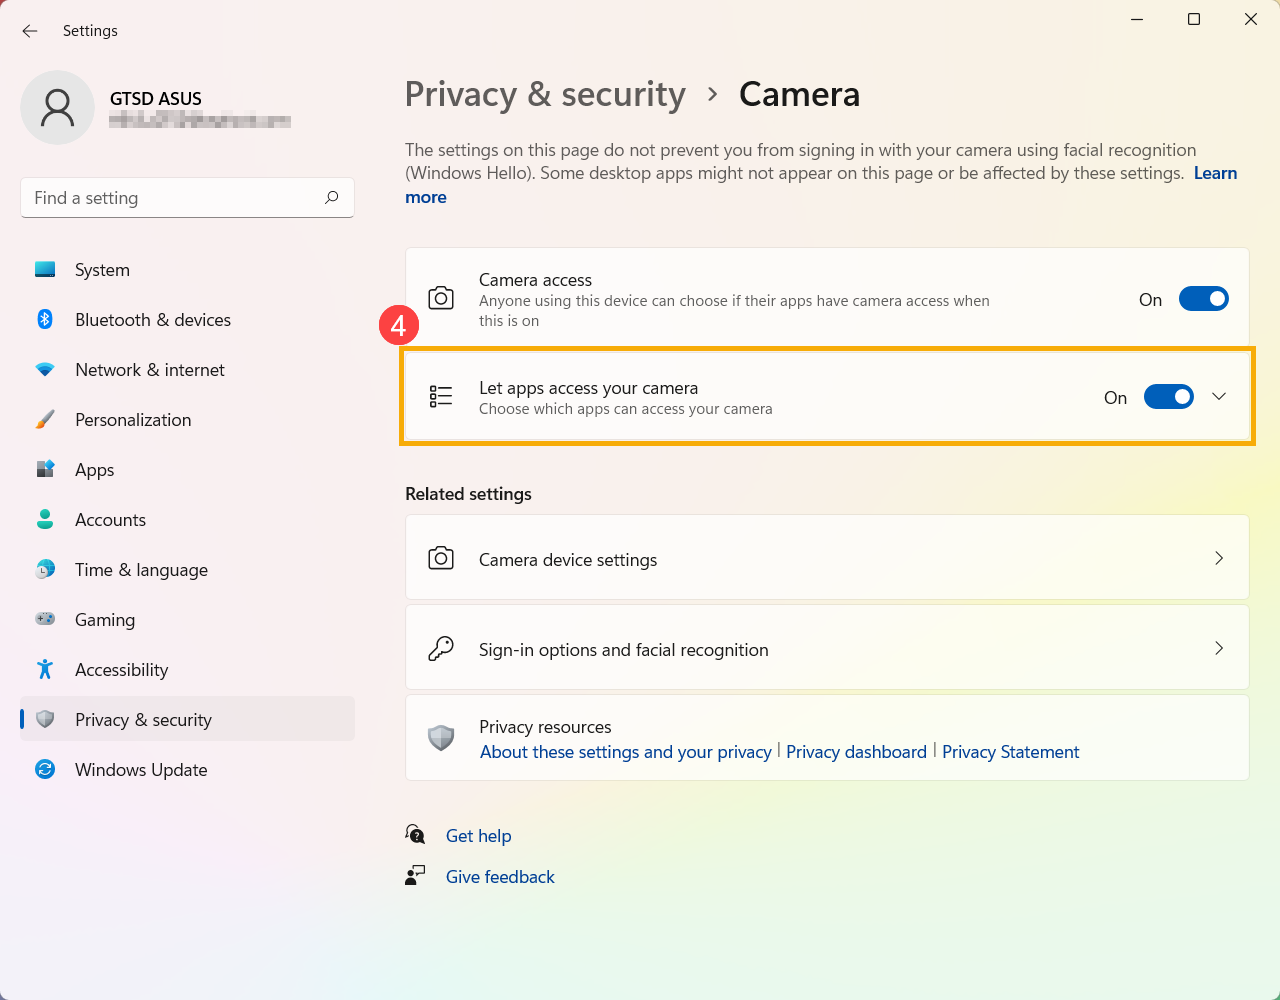
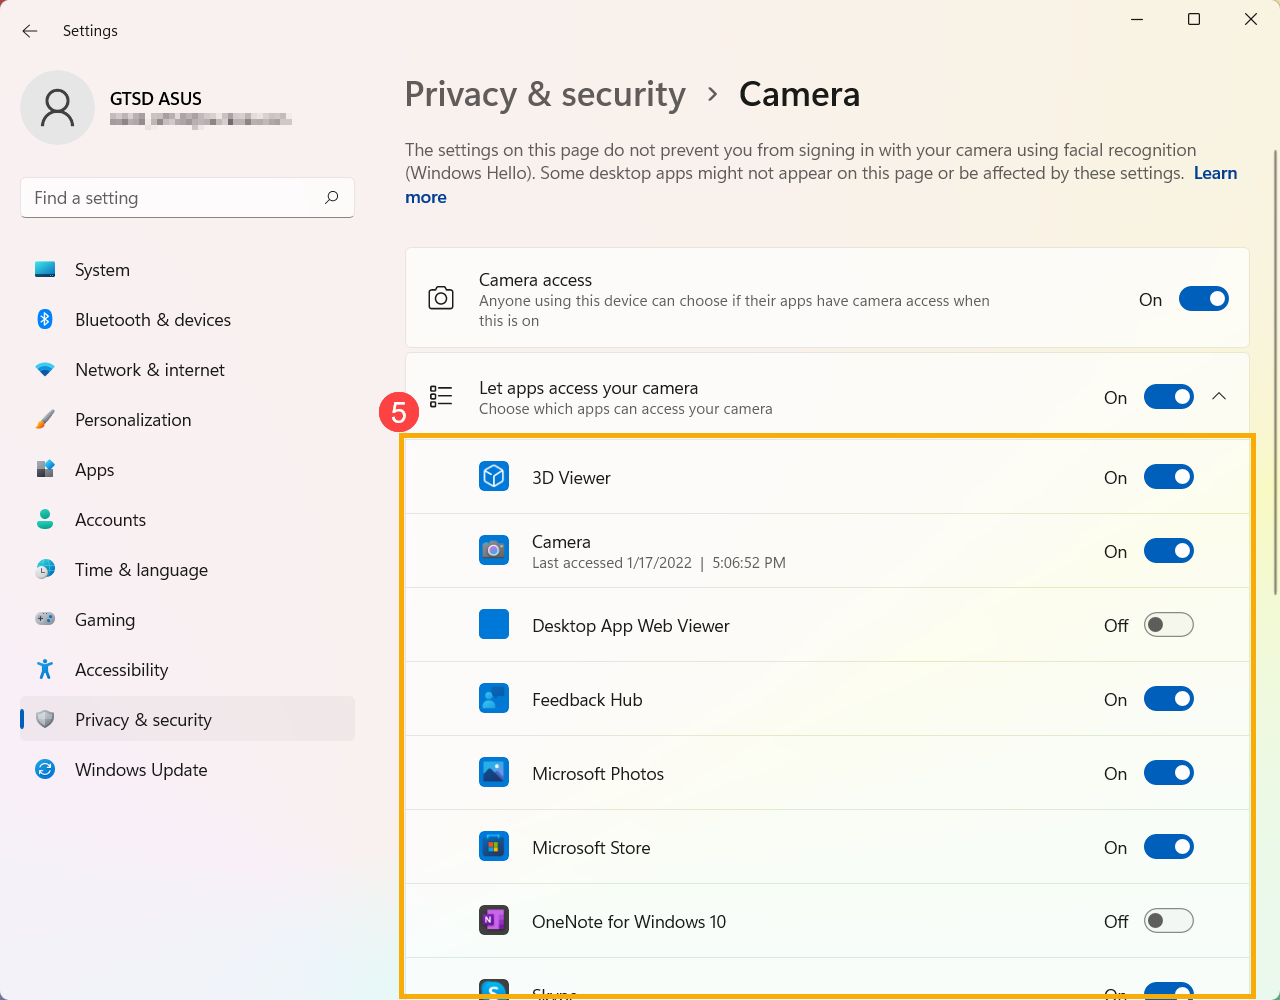
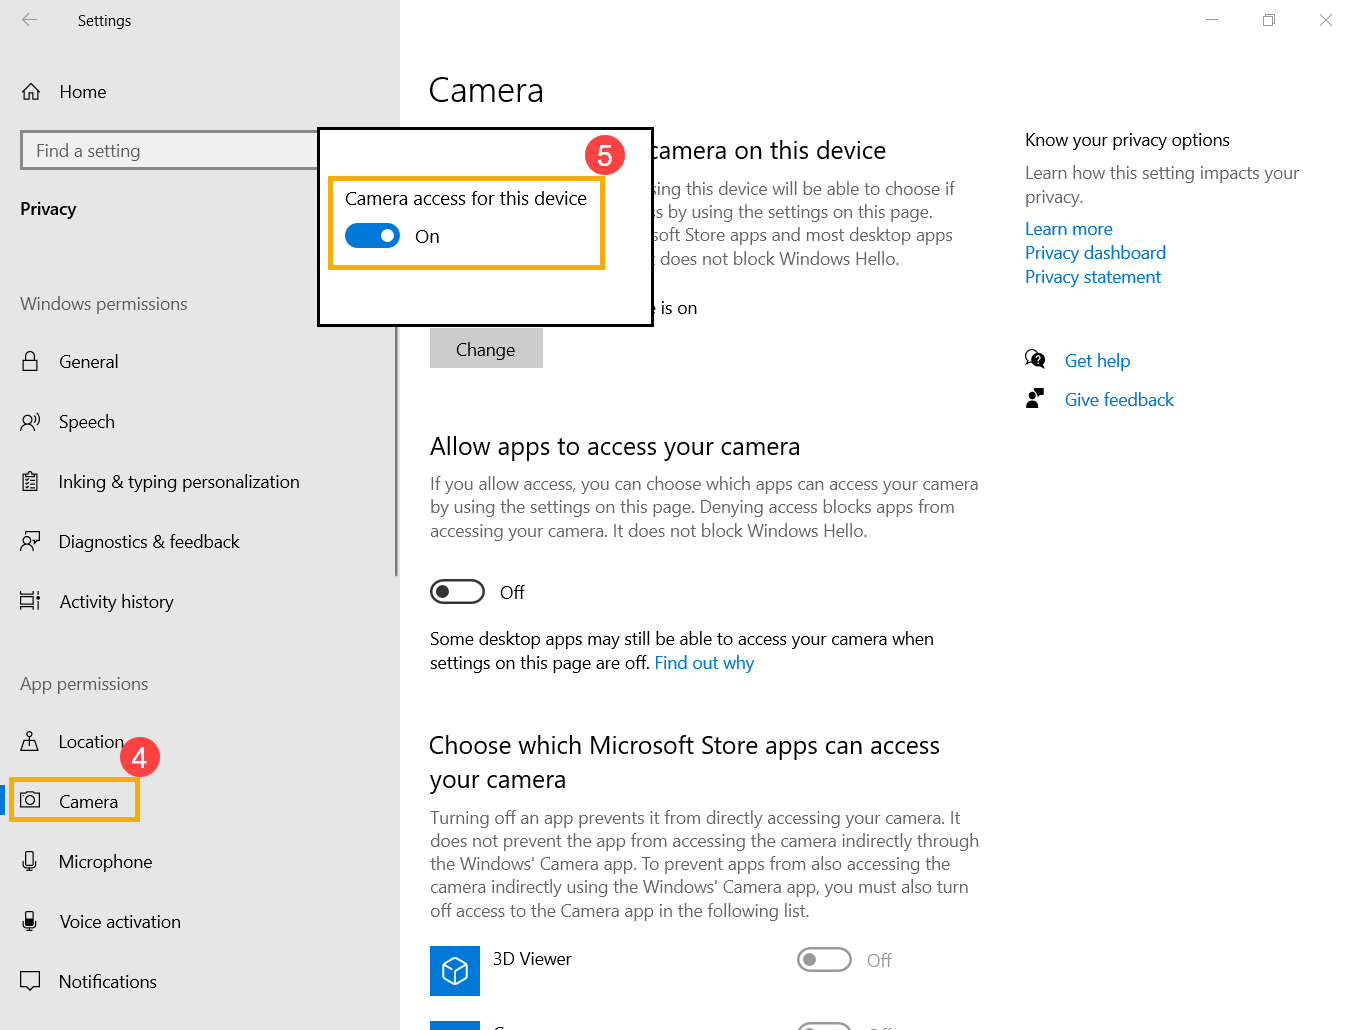
Give your apps permission
- Type and search [Camera privacy settings] in the Windows search bar①, then click [Open]②.
- Turn on [Camera access]③.
- Turn on [Let apps access your camera]④.
- Expand the Let apps access your camera filed, here you can turn on/off which apps can using camera⑤.
- If the problem persists, please continue the next troubleshooting step.
Back to Table of Content
Update and confirm BIOS / Windows packages / drivers with the latest version on your PC
Updating software usually helps the system stability and optimization, so we recommend you check and often update to the latest version in your PC. Here you can learn more about How to update BIOS:
How to update the BIOS version in Windows system
How to use EZ Flash to update the BIOS version
(For desktop products, please refer to ASUS Motherboard EZ Flash 3 Introduction.)
For executing Windows update and drivers update, here you can learn more about:
How to execute Windows Update
How to update drivers via System Update in MyASUS
If the problem persists after you have updated BIOS/Windows packages/drivers to the date, please continue the next troubleshooting step.
Back to Table of Content
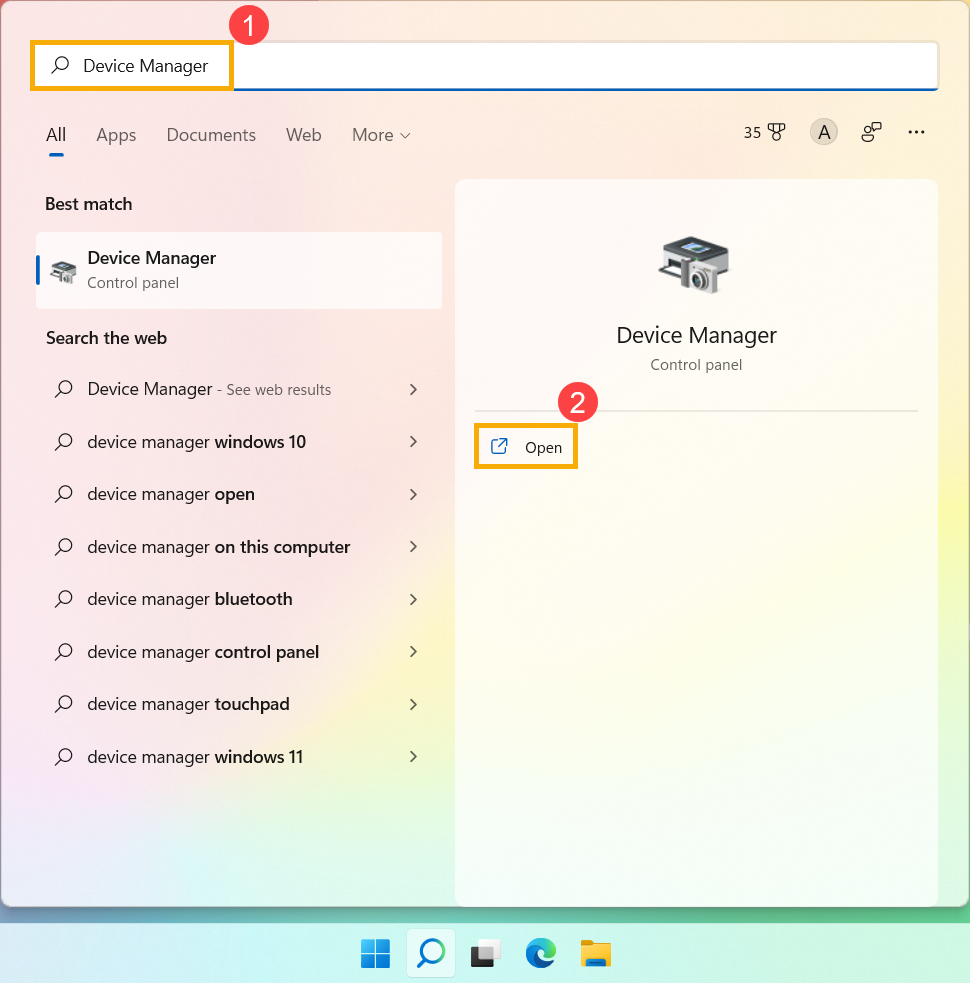
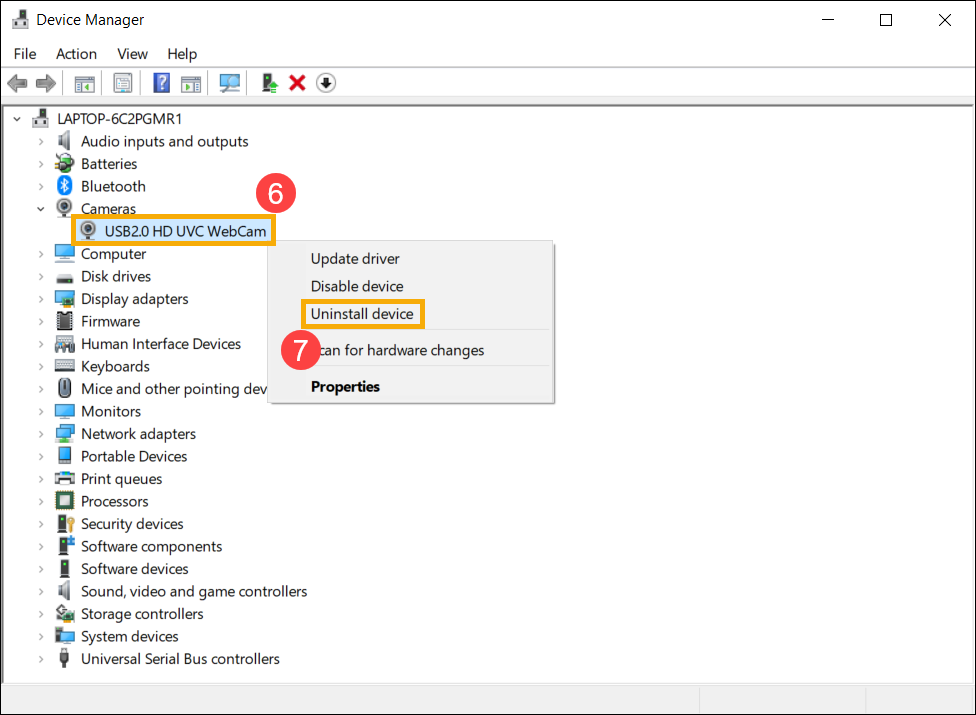
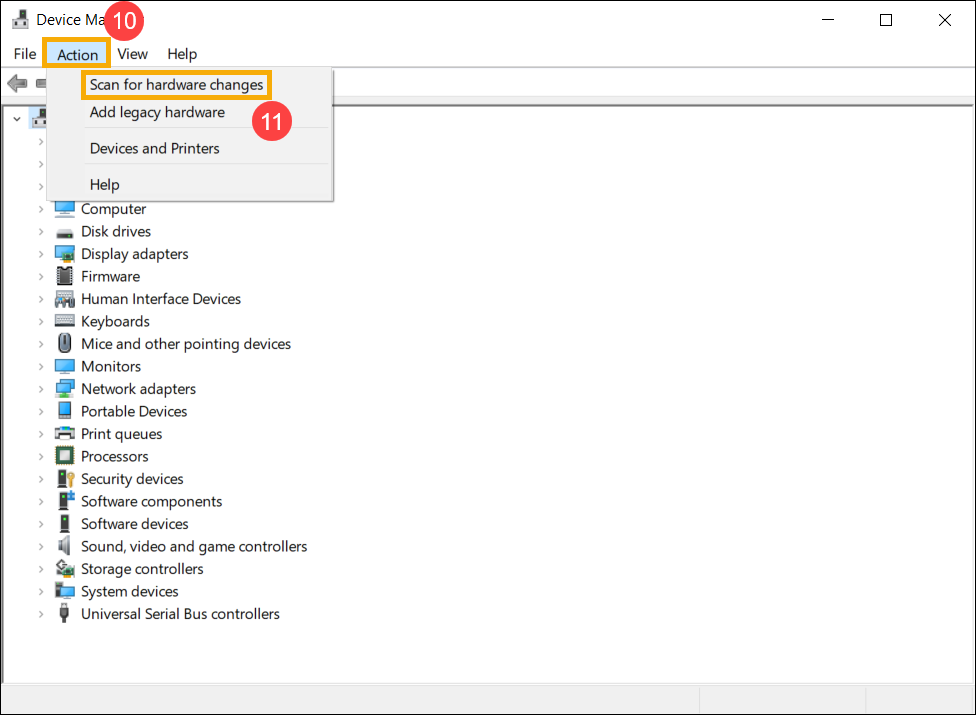
Enable and reinstall Camera driver in Device Manager
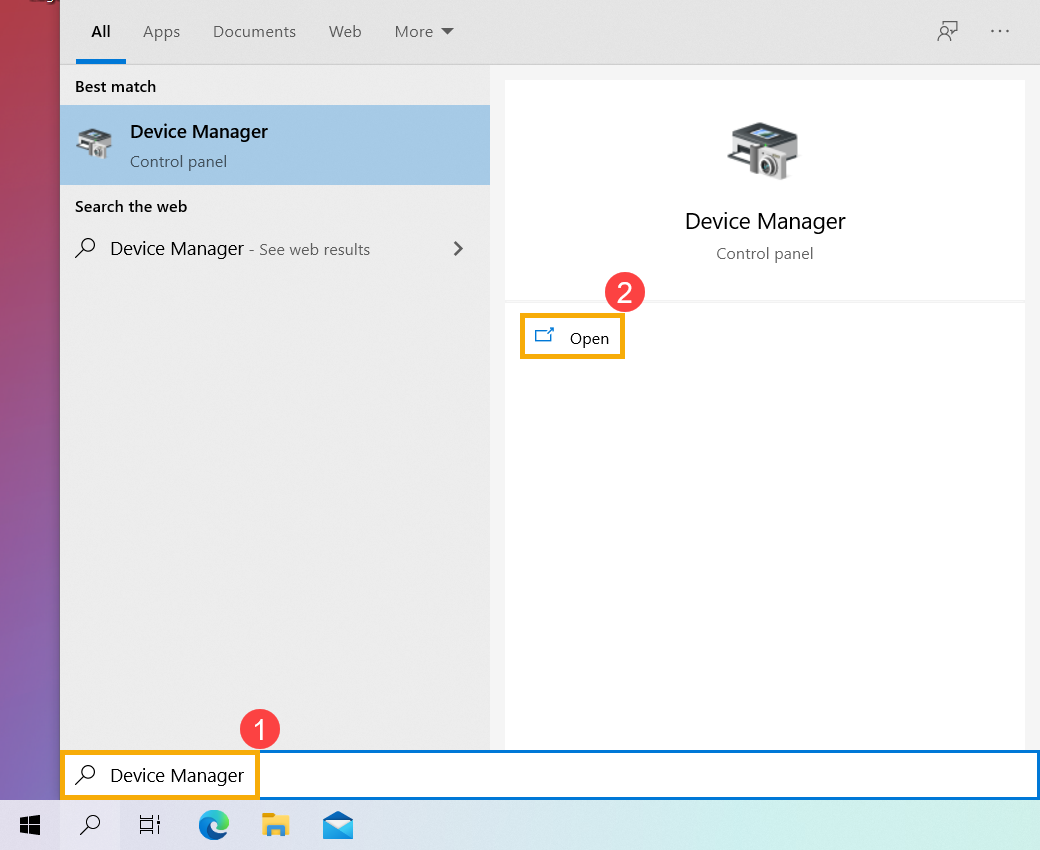
- Type and search [Device Manager] in the Windows search bar①, then click [Open]②.
- Click the arrow next to [Camera]③, then right-click the [your camera device name]④ and select [Enable device]⑤. To test if the camera work normally.
If the [Enable device] option does not display that is meaning the camera is enabled already, please continue to the next step.
- Uninstall the camera driver. Right-click the [your camera device name]⑥ and select [Uninstall device]⑦.
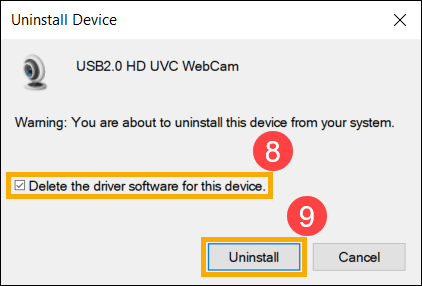
- Check the box to [Delete the driver software for this device]⑧, then click [Uninstall]⑨.
- Select [Action] on the top of Device Manager⑩, and select [Scan for hardware changes]⑪, then system will automatically install the camera driver.
- After the camera driver installation is completed, please restart your computer and then try opening the Camera application again. If the problem persists, please continue to the next troubleshooting.

Back to Table of Content
Use Restore Point to restore the system
If the camera problem happens recently, and if you have ever created a restore point or there is an automatic system restore existed, try to restore the computer to a point before the problem began to resolve the problem. Here you can learn more about How to use restore point to restore the system. If the problem persists, please continue the next troubleshooting step.
Back to Table of Content
Reset the system
If the problem persists after all troubleshooting steps are completed. Please backup your personal files, then reset the PC to back to its original configuration. Here you can learn more about How to reset the system.
Back to Table of Content
Windows 10 operating system
Table of Contents:
Inspect the Camera’s appearance
- Verify whether the camera is obstructed, for instance, by a screen protector or a privacy film.
Sometimes, if the camera lens is covered in dust or dirt, it may affect the image quality. Please use a clean, soft cloth to gently wipe the camera lens, ensuring it remains pristine.
- Certain devices may be equipped with a physical privacy shield for the camera. When you intend to use the camera, ensure that the privacy shield is in the closed position.
Note: The location of the privacy shield may vary depending on the model. If you are uncertain whether your device is equipped with a physical privacy shield, please refer to the instructions in the User Manual.
Back to Table of Content
Use the built-in camera application
- Click [Start menu]①, then execute [Camera] application②.
- Confirm that the camera is working properly after executing [Camera] application. Please follow the next steps if it is not.
Note: Camera error (Upside down image, No image, Cannot recognize camera, Display abnormal, etc.
Back to Table of Content
Check the status of F10 Camera Hotkey
- Please check whether there is a [F10 Camera Hotkey]① on your keyboard of the laptop. If no, please go to the next chapter.
Note: The hotkeys functions may be different based on different models, please refer to the User Manuals.
- Press F10 key or press the function key + F10 key (It depends on what your hotkey option selected is.), then check whether there is a message of [Camera on]② on the screen. Here you can learn more about ASUS Keyboard hotkeys Introduction.
- If the problem persists, please continue the next troubleshooting step.


Back to Table of Content
Give your apps permission
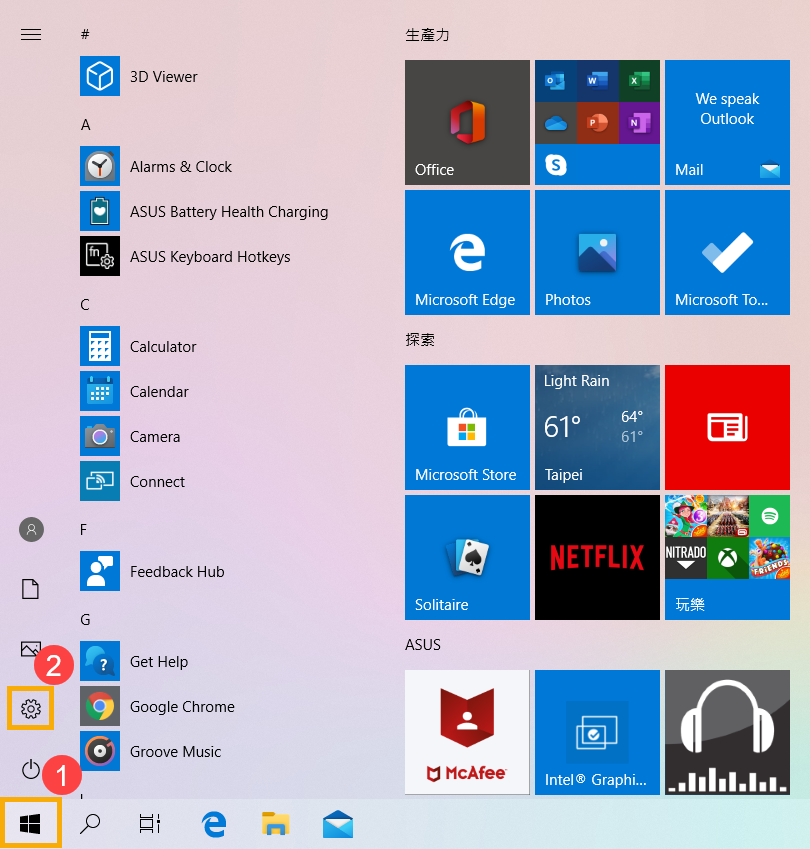
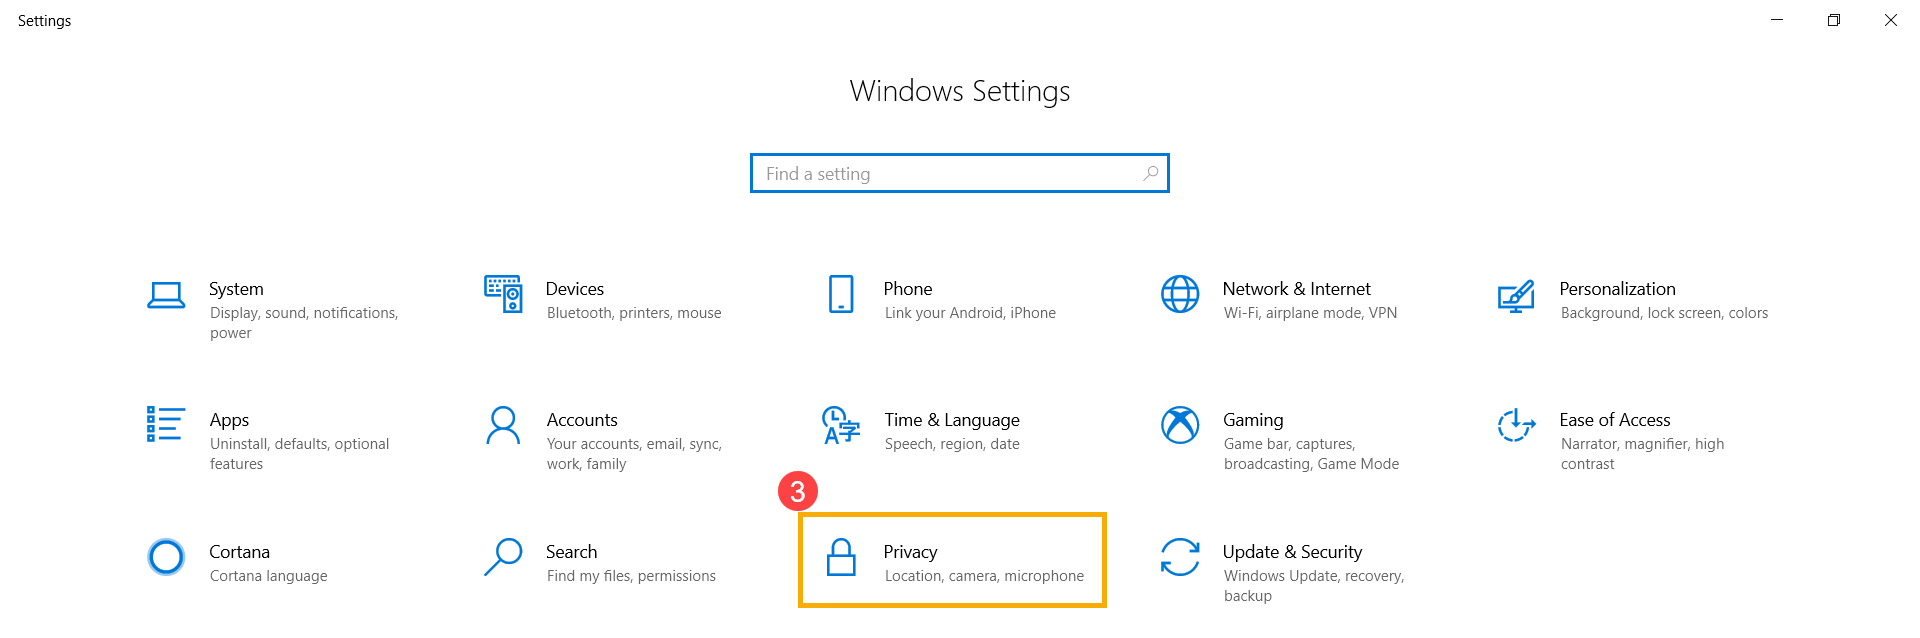
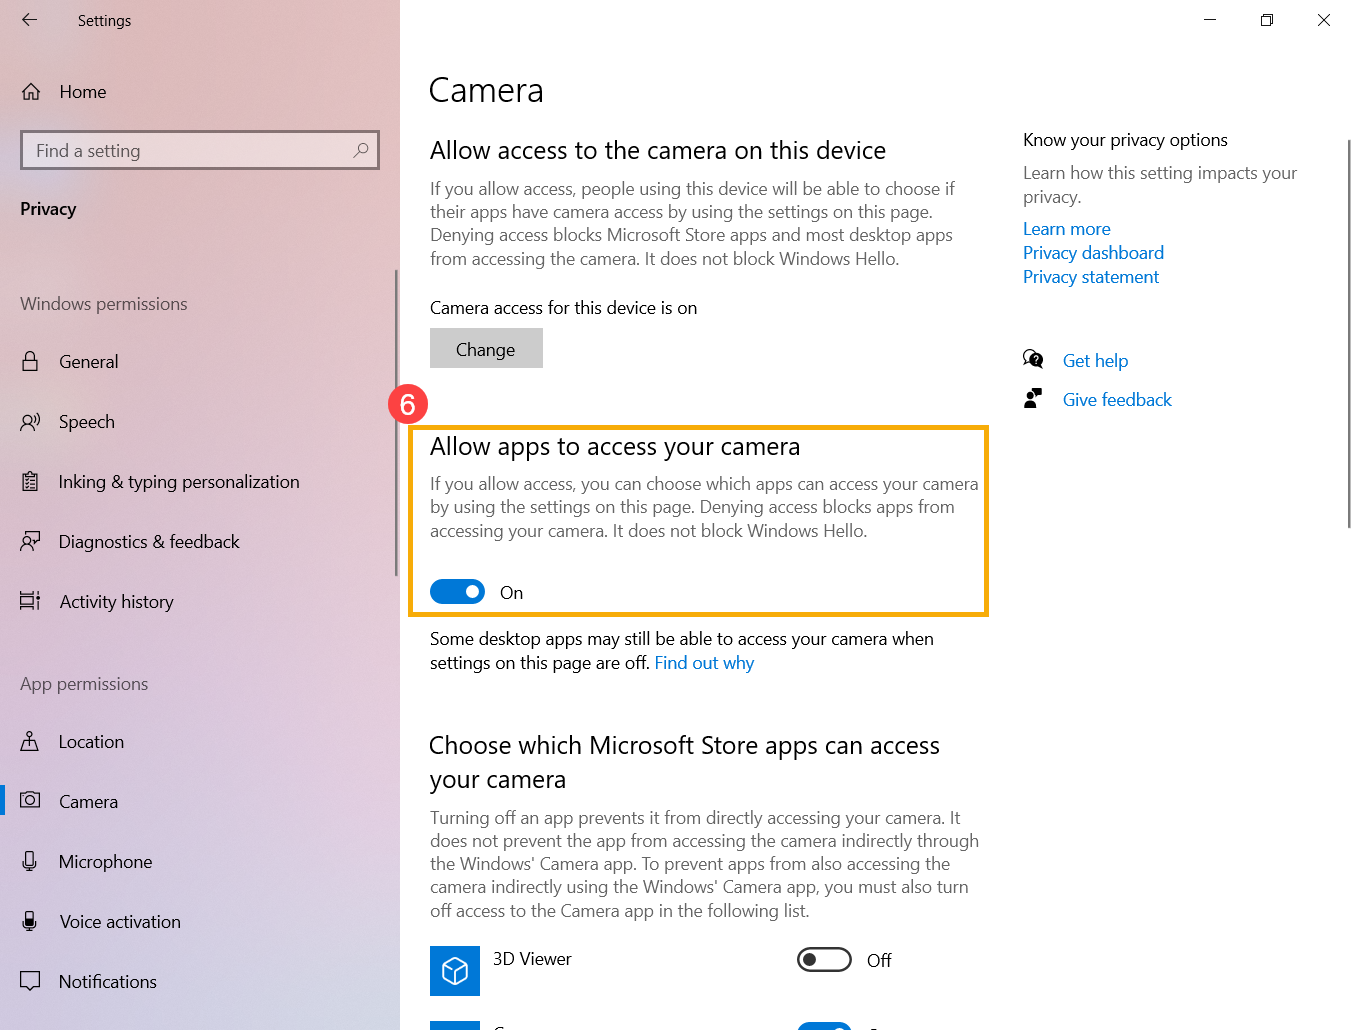
- Click on [Start] button①, then select [Settings]②.
- Select [Privacy]③.
- Select [Camera]④, then click change and turn on [Camera access for this device]⑤.
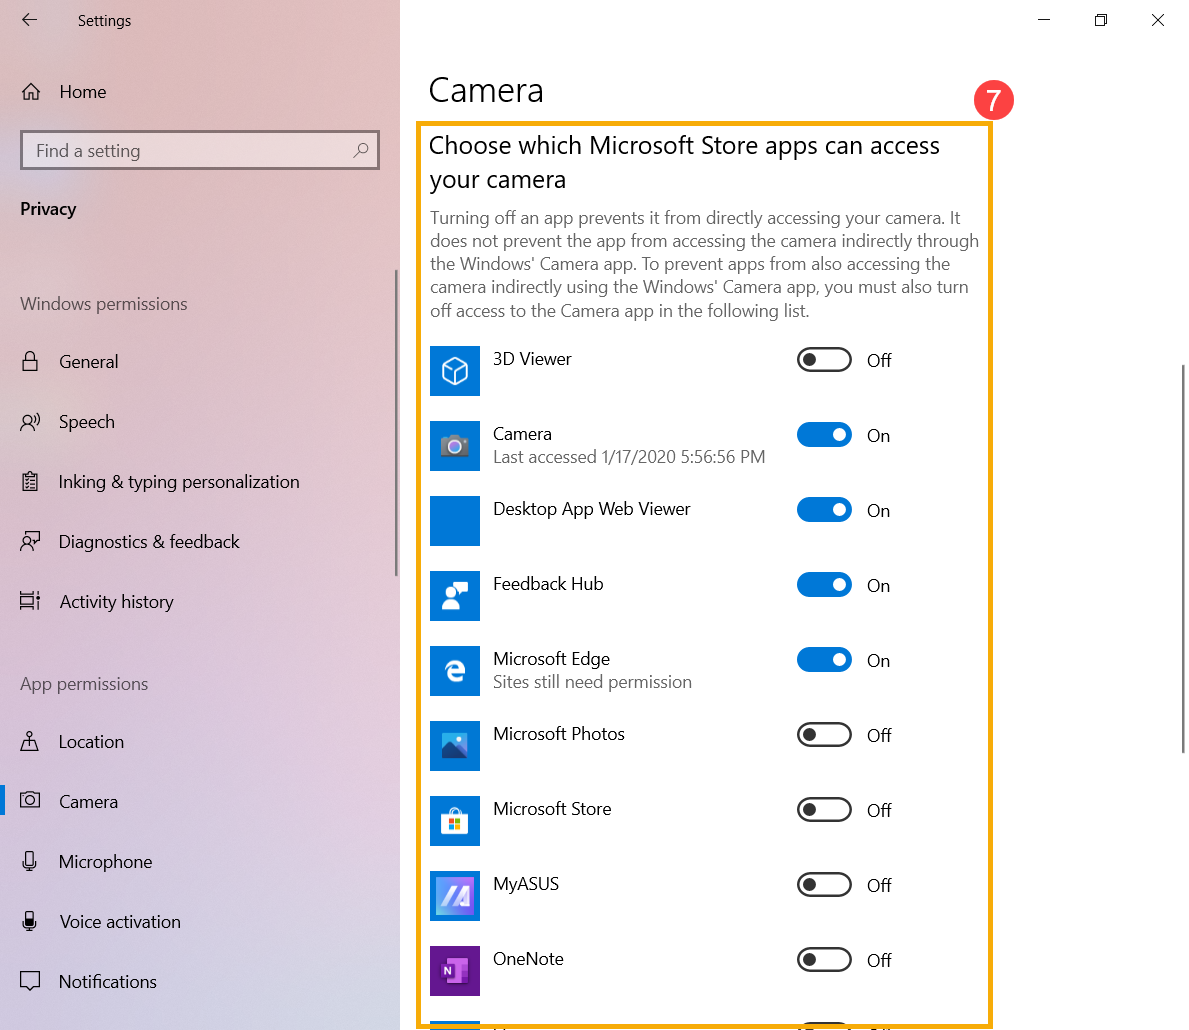
- To allow access for individual apps, turn on [Allow apps to access your camera]⑥.
- After allowing access to the camera, scroll down to [Choose which Microsoft Store apps can access your camera]⑦ and turn on camera access for the apps you want.
- If the problem persists, please continue the next troubleshooting step.
Back to Table of Content
Update and confirm BIOS / Windows packages / drivers with the latest version on your PC
Updating software usually helps the system stability and optimization, so we recommend you check and often update to the latest version in your PC. Here you can learn more about How to update BIOS:
How to update the BIOS version in Windows system
How to use EZ Flash to update the BIOS version
(For desktop products, please refer to ASUS Motherboard EZ Flash 3 Introduction.)
For executing Windows update and drivers update, here you can learn more about:
How to execute Windows Update
How to update drivers via System Update in MyASUS
If the problem persists after you have updated BIOS/Windows packages/drivers to the date, please continue the next troubleshooting step.
Back to Table of Content
Enable and reinstall Camera driver in Device Manager
- Type and search [Device Manager] in the Windows search bar①, then click [Open]②.
- Click the arrow next to [Camera]③, then right-click the [your camera device name]④ and select [Enable device]⑤. To test if the camera work normally.
If the [Enable device] option does not display that is meaning the camera is enabled already, please continue to the next step.
- Uninstall the camera driver. Right-click the [your camera device name]⑥ and select [Uninstall device]⑦.
- Check the box to [Delete the driver software for this device]⑧, then click [Uninstall]⑨.
- Select [Action] on the top of Device Manager⑩, and select [Scan for hardware changes]⑪, then system will automatically install the camera driver.
- After the camera driver installation is completed, please restart your computer and then try opening the Camera application again. If the problem persists, please continue to the next troubleshooting.


Back to Table of Content
Use Restore Point to restore the system
If the camera problem happens recently, and if you have ever created a restore point or there is an automatic system restore existed, try to restore the computer to a point before the problem began to resolve the problem. Here you can learn more about How to use restore point to restore the system. If the problem persists, please continue the next troubleshooting step.
Back to Table of Content
Reset the system
If the problem persists after all troubleshooting steps are completed. Please backup your personal files, then reset the PC to back to its original configuration. Here you can learn more about How to reset the system.
Back to Table of Content
If you still cannot resolve your problem, download MyASUS and try the System Diagnosis for troubleshooting. Click below!

Was this information helpful?
Yes
No
- Above information might be partly or entirely quoted from exterior websites or sources. please refer to the information based on the source that we noted. Please directly contact or inquire the sources if there is any further question and note that ASUS is neither relevant nor responsible for its content/service
- This information may not suitable for all the products from the same category/series. Some of the screen shots and operations could be different from the software versions.
- ASUS provides the above information for reference only. If you have any questions about the content, please contact the above product vendor directly. Please note that ASUS is not responsible for the content or service provided by the above product vendor.
- Brand and product names mentioned are trademarks of their respective companies.
Если ваша камера перестает работать, она может нарушить видеозвонки, онлайн-собрания и другие действия, которые зависят от камеры. К распространенным причинам относятся отсутствие драйверов после недавнего обновления, антивирусная программа, блокирующая камеру, ограничивающие параметры конфиденциальности или проблемы с приложением, которое вы пытаетесь использовать. В этой статье содержится пошаговое руководство по устранению неполадок и эффективному устранению проблем с камерой.
Запуск средства устранения неполадок с камерой Windows
Если вы используете устройство Windows 11, начните с запуска автоматического средства устранения неполадок с камерой в приложении «Получить справку». Он автоматически запустит диагностика и попытается устранить большинство проблем с камерой. Если вы используете более раннюю версию Windows или мобильное устройство, перейдите к разделу Общие действия по устранению неполадок .
Запустите средство устранения неполадок в разделе «Справка»
Если средству устранения неполадок с камерой в приложении «Получить справку» не удается устранить проблему, выберите конкретную проблему с камерой в разделе Наиболее распространенные проблемы с камерой ниже и выполните указанные действия. Если проблема отсутствует в списке, попробуйте возможные решения.
Общие действия по устранению неполадок
Чтобы устранить проблему с камерой, выполните следующие общие действия по устранению неполадок.
-
Если вы используете внешнюю камеру, убедитесь, что она надежно подключена к USB-порту. Проверьте наличие свободных кабелей или кабелей и убедитесь, что все подключения правильно подключены.
-
Чтобы исключить проблемы с оборудованием, протестируйте камеру на другом устройстве.
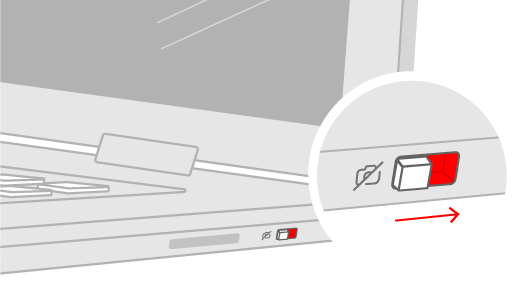
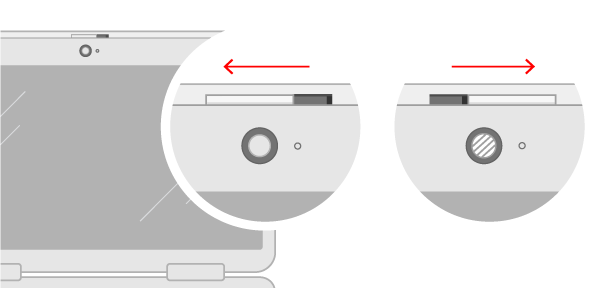
У некоторых ноутбуков и переносных устройств есть физический выключатель или кнопка, отключающая и включающая камеру. Если камера отключена, возможно, устройство не распознает, что на нем установлена камера, или может приводить к тому, что камера будет показывать изображение камеры с косой чертой. Если на ноутбуке есть выключатель или кнопка, перед использованием камеры убедитесь, что он включен.
Найти эти переключатели или кнопки может быть непросто, поэтому убедитесь, что вы проверили все возможные места. Возможные варианты:
-
Кнопка на клавиатуре, активируемая клавишей Fn.
-
Специальная кнопка камеры на клавиатуре

-
Ползунок-переключатель сбоку ноутбука
-
Небольшой ползунок для затвора, встроенный прямо в камеру

Если вы недавно обновили Windows 11, может потребоваться предоставить приложениям разрешение на использование камеры. В более новых версиях Windows 11 некоторые приложения не будут иметь доступа к камере по умолчанию.
Приложениям можно предоставить доступ к камере следующим образом:
-
Убедитесь, что Доступ к камере включен.
Примечание: Если доступ к камере для устройства отключен и затенен, вам потребуется администратор устройства для включения доступа к камере.
-
Убедитесь, что параметр Разрешить приложениям доступ к камере включен.
-
Выберите приложения, которым должен быть предоставлен доступ. В этом списке будут отображаться только приложения, установленные из магазина Microsoft Store.
При возникновении проблем с приложением, которое вы не устанавливали из Microsoft Store, убедитесь, что включен параметр Разрешить классическим приложениям доступ к камере. Вы не можете отключить доступ к камере для отдельных классических приложений. Браузеры, например Microsoft Edge, и многие приложения для видеоконференций, например Microsoft Teams, являются классическими приложениями, для которых требуется включить этот параметр.
Дополнительные сведения см. в статье Управление разрешениями приложения для камеры в Windows.
Используйте приложение Камера в Windows, чтобы проверка, если проблема связана с определенным приложением.
-
Откройте пуск > камера и посмотрите, работает ли предварительная версия.
-
Если камера работает в одном приложении, но не в другом, проблема связана с параметрами приложения.
-
Проверьте наличие обновлений. Нажмите Пуск > Параметры > Центр обновления Windows > Проверить наличие обновлений.
-
При отсутствии обновлений для камеры попробуйте нажать Дополнительные параметры > Необязательные обновления и выполните поиск обновлений для драйвера камеры. Разрешите установку доступных обновлений, а затем после завершения установки перезапустите устройство.
-
-
Перезапустите компьютер. Если вы не перезапускали устройство после прекращения работы камеры, вам следует это сделать. Нажмите Пуск > Выключение > Перезагрузка . Пробуждение устройства из спящего режима отличается от перезапуска.
-
Протестируйте камеру с помощью приложения «Камера». Нажмите Пуск , а затем в приложениях выберите Камера. Если появится запрос на разрешение доступа к камере, выберите Да. Если камера работает в приложении «Камера», проблема может быть связана с приложением, которое вы пытаетесь использовать.
Открыть приложение «Камера
Средство устранения неполадок с камерой может автоматически устранять проблемы с камерой. Запуск средства устранения неполадок:
-
Выберите Пуск > Параметры > система.
-
Прокрутите вниз и щелкните Устранение неполадок, а затем выберите Другие средства устранения неполадок.
-
Найдите раздел Камера и нажмите кнопку Выполнить, чтобы запустить средство устранения неполадок с камерой.
Некоторые антивирусные программы или брандмауэры могут блокировать доступ к камере. Найдите эти параметры и временно отключите их и протестируйте камеру. Чтобы получить помощь, посетите веб-сайт компании-разработчика антивирусной программы.
Попробуйте использовать другой USB-порт и проверьте наличие изменений оборудования:
Если вы используете внешнюю камеру, сначала попробуйте использовать ее с другим USB-портом на устройстве. Если это не помогает или ваша камера встроена в устройство, попробуйте сделать следующее.
-
Нажмите Пуск , введите диспетчер устройств и выберите его в результатах поиска.
-
Найдите свою камеру в разделе Камеры, Устройства обработки изображений или Звуковые, игровые и видеоустройства.
-
Если вы не можете найти свою камеру, выберите меню Действие и нажмите Обновить конфигурацию оборудования.
-
Подождите, пока приложение просканирует и переустановит обновленные драйверы, перезагрузите устройство, а затем повторно откройте приложение «Камера», чтобы проверить его.
-
Если эти действия не устранят проблему, перейдите к следующим действиям.
Откат драйвера камеры:
Если после обновления камера перестала работать, выполните следующее.
-
В диспетчере устройствщелкните правой кнопкой мыши (или нажмите и удерживайте) на камеру, затем выберите пункт Свойства.
-
Перейдите на вкладку Драйвер и выберите Откатить > Да. (Некоторые драйверы не поддерживают этот параметр. Если для драйвера не отображается параметр Откатить, переходите к следующему исправлению.)
-
После отката перезапустите устройство и попробуйте открыть приложение «Камера» еще раз.
-
Если откат не сработал или недоступен, переходите к следующим действиям.
Удалите драйвер камеры и проверьте наличие изменений оборудования:
-
В диспетчере устройствщелкните правой кнопкой мыши (или нажмите и удерживайте) на камеру, а затем выберите Свойства.
-
Перейдите на вкладку Драйвер и выберите Удалить устройство. Установите флажок Попытка удалить драйвер для этого устройства и нажмите OK.
-
В меню Действиедиспетчера устройств выберите Обновить конфигурацию оборудования.
-
Дождитесь, пока будут найдены и установлены обновленные драйверы, перезапустите компьютер и попробуйте открыть приложение «Камера» еще раз.
Примечание: Если камера по-прежнему не работает, обратитесь за помощью на веб-сайт производителя камеры.
Переключите внешнюю USB-камеру для использования драйвера UVC:
Большинство доступных веб-камер USB — это совместимые камеры UVC (стандартный видеокласс USB). Они будут работать с драйвером UVC, включенным в Windows (драйвер UVC, поставляемый с Windows). Если ваша веб-камера работает неправильно, проблему может устранить переключение на драйвер UVC, поставляемый с Windows. Выполните следующие действия, чтобы изменить драйверы (требуются права администратора).
Примечание: Драйвер UVC, поставляемый с Windows, может поддерживать не все функции камеры. Например, распознавание лиц Windows Hello может перестать работать, если эта функция поддерживалась драйвером изготовителя камеры с использованием пользовательских USB-расширений, не поддерживаемых драйвером, поставляемым с Windows.
-
Нажмите Пуск , введите диспетчер устройств и выберите его в результатах поиска.
-
Найдите проблемную веб-камеру в списке устройств, отображенных в диспетчере устройств. Она должна находиться в разделе Камеры или Устройства обработки изображений.
-
Щелкните правой кнопкой мыши устройство веб-камеры и выберите Обновить драйвер.
-
Выберите Найти драйверы на этом компьютере.
-
Выберите Выбрать драйвер из списка доступных драйверов на компьютере.
-
Выберите Видеоустройство USB и нажмите Далее, чтобы завершить обновление драйвера.
-
Чтобы подтвердить выбор параметров и вернуться в диспетчер устройств, нажмите Закрыть. Веб-камера появится в категории Камеры в списке диспетчера устройств.
Наиболее распространенные проблемы с камерой
Ниже вы найдете наиболее распространенные проблемы с камерой, с которыми сталкивались пользователи, а также коды ошибок и инструкции по их устранению.
Коды ошибок и их потенциальные причины
В следующем списке перечислены коды ошибок и возможные причины, связанные с камерой Windows. Щелкните код ошибки, чтобы просмотреть подробные действия по устранению неполадок, которые необходимо устранить.
|
Код ошибки |
Причина |
|---|---|
|
0xA00F4244 |
Система не может обнаружить камеру. |
|
0xA00F4243 (0xA00F4289) |
Камера используется другим приложением или процессом. |
|
0x80070005 |
Доступ к камере запрещен |
|
0xA00F4292 |
Доступ к камере ограничен политикой. |
|
0x800705AA |
Недостаточно системных ресурсов для запуска камеры. |
|
0xA00F4246 |
Камера заблокирована программным обеспечением безопасности |
|
0x80070490 |
Ошибка обнаружения устройства из-за проблемы с реестром или оборудованием. |
|
0xA00F4294 |
Сбой запуска видео |
|
0x80004005 |
Общая ошибка часто возникает из-за сбоя оборудования или драйвера. |
Если камера не обнаружена, это может быть связано с нехваткой или отключением оборудования (для внешних камер) или неправильными параметрами конфиденциальности. Чтобы устранить эту проблему:
Убедитесь, что камера подключена: Если вы используете внешнюю камеру, убедитесь, что она надежно подключена к USB-порту. Проверьте наличие свободных кабелей или кабелей и убедитесь, что все подключения правильно подключены.
Включите камеру в диспетчере устройств: Выберите Пуск > диспетчер устройств. Разверните раздел Камеры и щелкните правой кнопкой мыши камеру в списке. Если отображается параметр Отключить устройство , что означает, что камера уже включена. Если камера отключена, вы увидите параметр Включить устройство , чтобы включить камеру.
Проверьте параметры конфиденциальности для камеры. Вот как вы можете разрешить приложениям доступ к камере:
При возникновении проблем с приложением, которое вы не устанавливали из Microsoft Store, убедитесь, что включен параметр Разрешить классическим приложениям доступ к камере. Вы не можете отключить доступ c1amera для отдельных классических приложений. Браузеры, например Microsoft Edge, и многие приложения для видеоконференций, например Microsoft Teams, являются классическими приложениями, для которых требуется включить этот параметр.
Дополнительные сведения см. в статье Управление разрешениями приложения для камеры в Windows.
-
Убедитесь, что Доступ к камере включен.
Примечание: Если доступ к камере для устройства отключен и затенен, вам потребуется администратор устройства для включения доступа к камере.
-
Убедитесь, что параметр Разрешить приложениям доступ к камере включен.
-
Выберите приложения, которым должен быть предоставлен доступ. В этом списке будут отображаться только приложения, установленные из магазина Microsoft Store.
Если камера не работает в определенных приложениях, это может быть связано с тем, что другое приложение использует камеру или из-за ограниченного доступа к камере. Чтобы устранить эту проблему, выполните приведенные ниже действия.
Закройте все приложения, которые могут использовать камеру:
-
Завершите работу всех фоновых приложений, которые могут получить доступ к камере и вызвать конфликты.
-
Проверьте диспетчер задач для приложений, использующих камеру, и закройте их: Щелкните правой кнопкой мыши панель задач и выберите Диспетчер задач. Вы увидите список запущенных приложений. Щелкните правой кнопкой мыши любое приложение с помощью камеры и выберите команду Завершить задачу , чтобы закрыть ее.
Проверьте параметры конфиденциальности для камеры. Вот как вы можете разрешить приложениям доступ к камере:
-
НажмитеПуск > Параметры > Конфиденциальность и защита > Камера .
Разрешить доступ к камере на этом устройстве
-
Убедитесь, что Доступ к камере включен.
Примечание: Если доступ к камере для устройства отключен и затенен, вам потребуется администратор устройства для включения доступа к камере.
-
Убедитесь, что параметр Разрешить приложениям доступ к камере включен.
-
Выберите приложения, которым должен быть предоставлен доступ. В этом списке будут отображаться только приложения, установленные из магазина Microsoft Store.
При возникновении проблем с приложением, которое вы не устанавливали из Microsoft Store, убедитесь, что включен параметр Разрешить классическим приложениям доступ к камере. Вы не можете отключить доступ c1amera для отдельных классических приложений. Браузеры, например Microsoft Edge, и многие приложения для видеоконференций, например Microsoft Teams, являются классическими приложениями, для которых требуется включить этот параметр.
Дополнительные сведения см. в статье Управление разрешениями приложения для камеры в Windows.
Кроме того, убедитесь, что антивирусное или стороннее программное обеспечение безопасности не блокирует камеру.
-
Проверьте параметры групповой политики (для корпоративных пользователей).
-
Если политики ограничены, обратитесь к ИТ-администратору.
-
Проверьте параметры конфиденциальности для камеры. Вот как вы можете разрешить приложениям доступ к камере:
-
НажмитеПуск > Параметры > Конфиденциальность и защита > Камера .
Разрешить доступ к камере на этом устройстве
-
Убедитесь, что Доступ к камере включен.
Примечание: Если доступ к камере для устройства отключен и затенен, вам потребуется администратор устройства для включения доступа к камере.
-
Убедитесь, что параметр Разрешить приложениям доступ к камере включен.
-
Выберите приложения, которым должен быть предоставлен доступ. В этом списке будут отображаться только приложения, установленные из магазина Microsoft Store.
-
При возникновении проблем с приложением, которое вы не устанавливали из Microsoft Store, убедитесь, что включен параметр Разрешить классическим приложениям доступ к камере. Вы не можете отключить доступ c1amera для отдельных классических приложений. Браузеры, например Microsoft Edge, и многие приложения для видеоконференций, например Microsoft Teams, являются классическими приложениями, для которых требуется включить этот параметр.
Дополнительные сведения см. в статье Управление разрешениями приложения для камеры в Windows.
Если камера зависает или аварийно завершает работу или не открывается, выполните следующие действия, чтобы устранить неполадки.
-
Закройте ненужные приложения, чтобы освободить память.
-
Перезагрузите компьютер.
-
Обновите драйвер камеры:
-
Выберите Пуск > диспетчер устройств.
-
Разверните раздел Камеры и найдите камеру в списке.
-
Щелкните правой кнопкой мыши камеру и выберите Обновить драйвер.
-
Выберите Автоматический поиск драйверов. Windows выполнит поиск в Интернете последней версии драйвера и установит его, если он доступен.
-
После завершения обновления перезагрузите компьютер, чтобы изменения вступили в силу.
-
Временно отключите антивирусную программу или брандмауэр:
-
Откройте антивирусную программу или приложение брандмауэра в меню Пуск.
-
Найдите параметр для отключения или приостановки защиты, который часто можно найти на вкладке Параметры, Инструменты или Защита .
-
Выберите длительность для временного отключения (например, 10 минут, 1 час).
-
Обновите антивирусную программу.
Запустите средство устранения неполадок с камерой: Средство устранения неполадок с камерой может автоматически устранять проблемы с камерой. Запуск средства устранения неполадок:
-
Выберите Пуск > Параметры > система.
-
Прокрутите вниз и щелкните Устранение неполадок, а затем выберите Другие средства устранения неполадок.
-
Найдите раздел Камера и нажмите кнопку Выполнить, чтобы запустить средство устранения неполадок с камерой.
Переустановите драйверы камеры:
-
Выберите Пуск > диспетчер устройств.
-
Разверните раздел Камеры и найдите камеру в списке.
-
Щелкните правой кнопкой мыши камеру и выберите Удалить устройство.
-
В диалоговом окне подтверждения проверка поле Удалить программное обеспечение драйвера для этого устройства (если доступно).
-
Нажмите кнопку Удалить , чтобы удалить драйвер.
-
Перезагрузите компьютер после удаления драйвера. Windows попытается переустановить драйвер по умолчанию автоматически.
-
После перезапуска диспетчер устройств щелкните правой кнопкой мыши камеру и выберите Обновить драйвер.
-
Выберите Автоматический поиск драйверов. Windows выполнит поиск в Интернете последней версии драйвера и установит его, если он доступен.
Это часто происходит из-за устаревших или несовместимых драйверов. Чтобы устранить эту проблему, выполните приведенные далее действия.
Обновите драйвер камеры:
-
Выберите Пуск > диспетчер устройств.
-
Разверните раздел Камеры и найдите камеру в списке.
-
Щелкните правой кнопкой мыши камеру и выберите Обновить драйвер.
-
Выберите Автоматический поиск драйверов. Windows выполнит поиск в Интернете последней версии драйвера и установит его, если он доступен.
-
После завершения обновления перезагрузите компьютер, чтобы изменения вступили в силу.
Проверьте наличие обновлений Windows:
-
Проверьте наличие обновлений. Нажмите Пуск > Параметры > Центр обновления Windows > Проверить наличие обновлений.
-
При отсутствии обновлений для камеры попробуйте нажать Дополнительные параметры > Необязательные обновления и выполните поиск обновлений для драйвера камеры. Разрешите установку доступных обновлений, а затем после завершения установки перезапустите устройство.
-
-
Перезапустите компьютер. Если вы не перезапускали устройство после прекращения работы камеры, вам следует это сделать. Нажмите Пуск > Выключение > Перезагрузка . Пробуждение устройства из спящего режима отличается от перезапуска.
Протестируйте камеру в другом приложении:Используйте приложение Камера в Windows, чтобы проверка, если проблема связана с определенным приложением.
-
Откройте пуск > камера и посмотрите, работает ли предварительная версия.
-
Если камера работает в одном приложении, но не в другом, проблема связана с параметрами приложения.
Если вы видите черный экран или нет видео, это может быть связано с неисправным оборудованием камеры, устаревшими драйверами, плохим освещением или физическим препятствием. Чтобы устранить эту проблему:
Обновите драйвер камеры:
-
Выберите Пуск > диспетчер устройств.
-
Разверните раздел Камеры и найдите камеру в списке.
-
Щелкните правой кнопкой мыши камеру и выберите Обновить драйвер.
-
Выберите Автоматический поиск драйверов. Windows выполнит поиск в Интернете последней версии драйвера и установит его, если он доступен.
-
После завершения обновления перезагрузите компьютер, чтобы изменения вступили в силу.
Протестируйте камеру в другом приложении:Используйте приложение Камера в Windows, чтобы проверка, если проблема связана с определенным приложением.
-
Откройте пуск > камера и посмотрите, работает ли предварительная версия.
-
Если камера работает в одном приложении, но не в другом, проблема связана с параметрами приложения.
Убедитесь, что объектив камеры чистый и не заблокирован.
Если вы видите размытое или некачественное видео, это может быть связано с плохим разрешением камеры, грязное или поврежденным объективом камеры или проблемами с сетью во время видеозвонков. Чтобы устранить эту проблему:
-
Очистите объектив камеры.
-
Настройте параметры разрешения в приложении камеры или приложении видеоконференций.
-
Обеспечьте надежное и стабильное подключение к Интернету.
Если камера перестала работать после обновления до Windows, выполните приведенные ниже действия по устранению неполадок.
Откат драйвера камеры:
Если после обновления камера перестала работать, выполните следующее.
-
В диспетчере устройствщелкните правой кнопкой мыши (или нажмите и удерживайте) на камеру, затем выберите пункт Свойства.
-
Перейдите на вкладку Драйвер и выберите Откатить > Да. (Некоторые драйверы не поддерживают этот параметр. Если для драйвера не отображается параметр Откатить, переходите к следующему исправлению.)
-
После отката перезапустите устройство и попробуйте открыть приложение «Камера» еще раз.
-
Если откат не сработал или недоступен, переходите к следующим действиям.
Удалите драйвер камеры и проверьте наличие изменений оборудования:
-
В диспетчере устройствщелкните правой кнопкой мыши (или нажмите и удерживайте) на камеру, а затем выберите Свойства.
-
Перейдите на вкладку Драйвер и выберите Удалить устройство. Установите флажок Попытка удалить драйвер для этого устройства и нажмите OK.
-
В меню Действиедиспетчера устройств выберите Обновить конфигурацию оборудования.
-
Дождитесь, пока будут найдены и установлены обновленные драйверы, перезапустите компьютер и попробуйте открыть приложение «Камера» еще раз.
Примечание: Если камера по-прежнему не работает, обратитесь за помощью на веб-сайт производителя камеры.
Webcam is one of the most used tools on the computer nowadays and any disturbance in this is intolerable. But this is really frustrating to get an error like Windows 11 Camera not working on a device. This webcam issue occurs in the laptop of every brand whether it is Lenovo, Asus, HP, Dell, HP, or other. After upgrading the Operating System to Windows 11, the issue has become widespread. Although Windows 11 recognizes and configures most cameras in the machine automatically, we cannot hope there will be no trouble at any instance. If you are here looking for a solution to this trouble, there is always a way out.
Windows 11 Camera not working can happen for so many reasons varies from one device to another. For some people, Windows oftentimes fails to detect the built-in camera and throws this error on display. But the most common reason to cause this is, there must be some driver issues, likely it can be outdated. Some other reasons like recent system updates, privacy settings restricting permission to access, hardware issues can also cause this trouble. However, we can fix the error easily using some common workarounds. We are here to discuss them and make the camera app working.
Windows 11 Camera not working
Here is how to How to Fix Windows 11 Camera not working –
1] Ensure Windows detected Camera app properly
Windows 11 usually detects the peripherals like camera app automatically. Nevertheless the detecting accuracy of the Operating System, we may have errors too. The reason, the system may fail to recognize the webcam app due to any sudden change.
To resolve this error, make sure the Operating System has detected the webcam of the device properly. For that, follow the below instructions –
- Press – Winkey and R.
- In the Run dialog box, type in – “devmgmt.msc”
- Press Enter key to open up Device Manager.
- In the app, reach to Camera device and expand this branch.
- If the camera is not showing in Device manager, look for any of the Imaging devices, Sound, video, and game controllers branches.
- If Windows 11 has detected your webcam, it will appear in the list under any of these devices.
- In case the built-in Camera is not listed under any of the devices, click – Action from the top bar.
- Select – Scan for hardware changes.
- The camera should appear this time in the list.
If Windows 11 fails to detect the webcam of your computer even after completing the above procedure, disconnect it right away. Restart the OS and check once more time. If this is connected via USB cable, try interchanging the ports to ensure USB port is okay. Furthermore, you can also try connecting the camera directly if you are using a USB hub.
In case of repeated failure, try checking the webcam with other devices to check it is working fine. If not, you might need to replace the camera and or renew it immediately.
2] Check and adjust the Camera app privacy Settings
With respect to enhancing the productivity of Windows 11, the OS oftentimes limit the use of default camera for applications like Microsoft Teams, Zoom, and Skype. This may also happen when you have selected and enabled the privacy-sensitive option while setting up the machine. In both cases, you will get the Windows 11 Camera not working error message while trying to use those apps.
If the same happens to you, there is a simple solution to settle down the camera error only by reversing the Privacy Settings. In order to allow the applications to access the default camera, follow the below steps –
- Hit – Winkey+I.
- From the Settings app, click – Privacy & Security.
- In the right pane go down to App permissions section and click Camera.
- Turn on Camera access (Anyone using this device can choose if their apps have camera access when this is on).
- And also turn on Let apps access your camera.
- From the “Choose which Microsoft Store apps can access your camera” area, Turn on the switch alongside the apps for which you want to allow the camera. For example – Camera, Skype, Zoom, Microsoft Team, etc.
- Restart the Windows 11 PC and check if the error appears while accessing those programs.
In case the same happens, you have to allow access to the webcam for the desktop apps as previous settings were only for the Store Applications. For that,
- Come down at the bottom of the previous Settings page.
- Turn On the slider from the Allow desktop apps to access your camera.
- Now, Restart the OS and try checking for the error again.
3] Update the Webcam driver to the latest firmware
Most of the hardware accessories give trouble due to driver incompatibilities. Drivers are manufactured to ensure and maintain interaction and communication well between software and external hardware devices. If you are getting Windows 11 Camera not working, the first thing that comes to mind is driver outdated.
Windows 11 has easier ways to update any driver thereby settling down the compatibility issues right away. Here are the guidelines to update your webcam driver –
- Right-click on the – Start.
- Select – Device Manager.
- From the app homepage, look for Camera device.
- Click it to expand the branches.
Note – if you are unable to find the Camera, locate Sound, video, moreover game controllers and double click to expand the ‘Imaging’ section.
- Right-click the – Camera driver.
- Select – Update driver.
- Click on – Search automatically for drivers.
- System will start looking for compatible drivers from here on, ensure the device has stable internet connectivity.
- Follow the on-screen guidelines until the updating ends.
- Restart the Windows 11.
4] Re-install or roll back problematic Webcam driver
Driver compatibility issues don’t disappear sometimes by simply uploading them. In some cases, Windows 11 Camera not working can keep coming on after upgrading to the new rollout of the Operating System. Nevertheless, all the drivers are updated, you can have such issues in the system. The reason is, driver manufacturers or vendors like Microsoft releases buggy updates quite often. Installing them in the system will cause additional problems rather than resolving an existing issue.
However, Device Manager in Windows 11 provides an option to Roll back a driver to its default update. This way, you can negotiate a buggy update and resolve the error. In case that fails, the best idea is to uninstall the problematic driver and reinstall the same from vendor’s official site. To complete these tasks for reinstall camera driver Windows 11, follow the below instructions –
- Press – Win+X.
- Click – Device Manager.
- Access – Camera.
- Expand the branches.
- Right click the default camera listed.
- Select – Properties.
- Enter – Driver tab.
- Click – Roll Back Driver.
- Follow the on-screen guidelines to complete the task.
- For uninstalling a problematic driver, click – Uninstall Device.
- Once the process ends up after following the stepwise guidelines from display, Restart the Windows 11.
- Download and Install the latest & compatible camera driver from trusted site.
- Check if the error is resolved by now.
5] Install the Camera driver in compatibility mode
At times it may happen that, the Windows 11 Camera not working error persists even after reinstalling the camera driver in usual method. In that case, installing this driver in compatibility mode found to deal with the error effectively.
To carry out this workaround, follow the below guidelines –
- Download the latest camera driver from its maker’s website.
- Right-click the Setup file of the downloaded driver.
- Select – Properties.
- Enter into Compatibility tab.
- Check the box that reads – Run this program in Compatibility mode.
- Select the Operating System from the drop-down list.
- Once the driver is installed, check the functionality.
- Restart the computer and check for the error once more time.
6] Remove problematic System updates
Microsoft often releases some rollout containing small bugs in them. These update patches sometimes are incompatible to run peripherals properly. If you are encountering the Windows 11 Camera not working error after installing a new patch in the OS, uninstall the update straightway.
Uninstalling a problematic update does not only resolve the evolved issue like camera not working, it will also save the device from greater damage. Here is how you can remove a troublesome update file from the system –
- Open – Settings (Win+I).
- Select Windows Update from the left pane.
- On the right side, click – Update history.
- Click – Uninstall updates link.
- On the new window, look for the recently installed patch.
- Right click the same and select – Uninstall.
- Click – Yes when prompt.
- Restart the computer once the uninstalling ends successfully.
Check for the error in the system, Hope it will resolve now. Don’t be afraid to uninstall a problematic update from the system anytime. Windows 11 has this amazing utility to turn back the old state of OS without making sleek changes to the device.
7] Reset Camera Application
In some devices, Windows 11 Camera not working error appears even after having everything alright. Since the exact reason is unknown, you can try Resetting the Camera app.
In most cases, this simple workaround has become completely effective to deal with the error. Here are the instructions to follow for Resetting Camera app –
- Press the – Windows key.
- Type – Apps and features.
- Scroll down to reach Camera
- Click on the 3 dots menu and select – Advanced options.
- In the next page, scroll down to reach Reset area.
- Click – “Reset”.
- From the popup dialog box, again click – Reset.
- Restart the Computer after completing this method.
- Check if the error is gone by now.
8] Readjust the Privacy Settings from Third party anti-virus suits
Oftentimes it so happens, third party anti-malware suits override permission of few applications. This is because of some security reasons of course. At times, the third party anti-virus program can also impose the restriction on the usage of webcam for certain applications. While trying to use the camera for that specific application, you will encounter Windows 11 Camera not working error on display.
If this happens to your case, open the anti-virus suit and check in the permission section if there is any. You can also change the setting to default if no such thing is available. Not to mention, Windows 11 doesn’t need a third-party anti-malware program in it. Windows Security is the most popular app to deal with all virus components with its robust contraction and strong security layer. If you feel it unnecessary to have such programs, uninstall it using the below instructions –
- Open Run dialog (Win+R).
- Type – appwiz.cpl.
- Click – Ok.
- From the Program and Features window, look for the culprit application.
- Right click it and select – Uninstall.
- Click Uninstall once more time when a prompt is out.
- Restart the Windows after completing all steps from on-screen guidelines.
Hopefully, the error will not appear in the next session.
9] Run the Hardware and Device Troubleshooter
Webcam in a laptop or a desktop computer is a hardware device and they can anytime end up giving trouble. With respect to this probability, Windows 11 has Hardware and Devices Troubleshooter in the Operating System. This utility is a method of identifying and diagnosing operational or technical issues related to a hardware accessory. By running the tool, any physical or logical error can be settled down easily.
Windows 11 Camera not working error can also be triggered when the webcam runs into trouble. We will try running the Hardware and Devices Troubleshooter to negotiate this issue within the system. Here are the steps to run the tool –
- Press – Win+R.
- Type the below command –
msdt.exe -id DeviceDiagnostic
- Hit the – Enter.
- Click Next when the Hardware and Devices Troubleshooter prompts.
- When you see a list of devices having issues by the utility, select – Camera.
- Click the – Next.
- After the utility traces out some problems, click – Apply this fix.
- Select – Next once more.
- Restart the Windows once troubleshooting ends successfully.
Check for the error now, hopefully, it will not come to display anymore.
Methods list:
1] Ensure Windows detected Camera app properly
2] Check and adjust the Camera app privacy Settings
3] Update the Webcam driver to latest firmware
4] Re-install or roll back problematic Webcam driver
5] Install the Camera driver in compatibility mode
6] Remove problematic System updates
7] Reset Camera Application
8] Readjust the Privacy Settings from third-party anti-virus suits
9] Run the Hardware and Device Troubleshooter
That’s all!!
When you discover that the camera stopped working after Windows 11 24H2 update, what are you gonna do? If you are helpless, this MiniTool post is a lifeline for you. It introduces why it stopped working and how to get it back to work.
Camera Stopped Working After Windows 11 24H2 Update
It’s confirmed that it happened because of the new rollout for 24H2, but since then, in our company, the camera stopped working for random people, and we have tried the steps below to troubleshoot, but it’s not working. Please recommend if there is any solution.answers.microsoft.com
Some users reported that their camera stopped working after Windows 11 24H2 update, which may be due to the following reasons:
- Driver compatibility issues: The camera driver of some devices may be incompatible with Windows 11 24H2, causing the camera not working on Windows 11.
- Privacy settings changes: After the update, Windows may adjust the privacy permissions of the camera, causing applications to be unable to access the camera.
- System security function impact: Some security features (such as memory integrity checks) may prevent the camera driver from running properly, causing the camera to be unusable.
- Application conflicts: Some applications running in the background may occupy camera resources, preventing other applications from using the camera.
- BIOS setting issues: Some devices may need to re-enable the camera function in the BIOS.
Method 1: Run the Camera Troubleshooter
When the camera gets something wrong, you can try running the troubleshooter first. The camera troubleshooter can detect and diagnose some existing and potential issues for your camera. Here are some steps.
Step 1: Right-click the Windows icon on the desktop and choose Settings.
Step 2: In the System tab, scroll down the list to find Troubleshoot.
Step 3: Click it and choose Other troubleshooters.
Step 4: Find and click the Camera option, and then click the Run button.
Wait for the detection process to complete. It will automatically fix the issues.
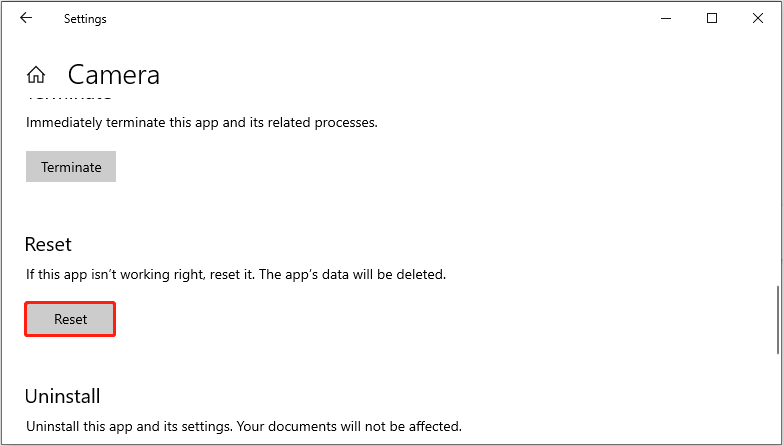
Method 2: Reset Your Camera
If the troubleshooter cannot find any problems, you can also reset your camera. This practice is capable of restoring this utility to the original state, which is beneficial for cleaning the faults. Here is how you can do it.
Step 1: Press the Win + I keys to open the Settings app.
Step 2: Click Apps, and then find Camera from the right pane.
Step 3: Click it and choose Advanced options.
Step 4: Scroll down the list until you find the Reset section.
Step 5: Click the Reset button. In the pop-up prompt, click on Reset to confirm the change.
Method 3: Update the Camera Driver
Driver compatibility issues, such as an outdated driver, can lead to this problem. In this case, you need to update the camera driver. The operations are as follows.
Step 1: Right-click the Start button and choose Device Manager.
Step 2: Click the small arrow in front of Cameras to expand it.
Step 3: Right-click Integrated Webcam and choose Properties.
Step 4: Switch to the Driver tab and click Update Driver.
Step 5: In the new window, click Browse my computer for drivers.
Step 6: Click Let me pick from a list of available drivers on my computer.
Step 7: Click the device driver you want to install for this hardware and click Next.
Wait for the installation process to complete.
Method 4: Turn on the Camera Access
If camera access is not enabled, the app will not be able to obtain images or videos, causing this problem. Enabling camera access allows apps (such as Zoom, Microsoft Teams, Skype, etc.) to use your camera to make video calls, record videos, or take photos.
Step 1: Open the Settings app and choose Privacy & security.
Step 2: In the right pane, scroll down the list to choose the Camera option.
Step 3: Turn on the Camera access button and the Let apps access your camera button.
Step 4: Finally, turn on the Let desktop apps access your camera button.
See Also: How to Use Canon Camera as Webcam? Here’re 2 Simple Ways
Method 5: Uninstall the Device
If none of the above methods are working, you should uninstall the camera device. This operation will install a new device on your computer, which may fix the problem.
Step 1: Type Device Manager in the Windows search box and press Enter.
Step 2: Expand Cameras and right-click Integrated Webcam to choose Properties.
Step 3: Go to the Driver tab and click Uninstall Device.
Step 4: In the pop-up prompt, click Uninstall to start this process.
Tips:
Data loss is common, I recommend a comprehensive tool, MiniTool Power Data Recovery, to you. This free file recovery software supports recovering 1 GB of files for free.
MiniTool Power Data Recovery FreeClick to Download100%Clean & Safe
Final words
With these methods, you don’t have to worry about the camera not working after updating Windows 11 to version 24H2. I hope your camera can serve you efficiently.
Quick Tips
- Ensure your apps are allowed to access the camera in Windows.
- If you use an external webcam, ensure it’s connected properly to your computer or laptop.
- Consider updating or reinstalling the camera drivers on your PC if the issue remains.
Try Basic Fixes
- Test your webcam online: It’s a good idea to test the webcam by visiting a website like Webcam Test. This should help you determine whether the camera problem is specific to the app or program you’re using.
- Disable the antivirus program: Some antivirus software includes a privacy setting that prevents apps from accessing the camera on Windows. To check for this possibility, disable your antivirus temporarily.
- Install Windows updates: Issues with your webcam can also occur if you run an outdated or buggy Windows build. Check and install any pending Windows updates and see if that helps.
Fix 1: Run the Camera Troubleshooter
Windows offers a range of troubleshooters for diagnosing and fixing system-related issues. In this case, running the camera troubleshooter can help.
Step 1: Press Windows Key + S to open the search menu, type troubleshoot settings, and press Enter.

Step 2: Go to Other troubleshooters.
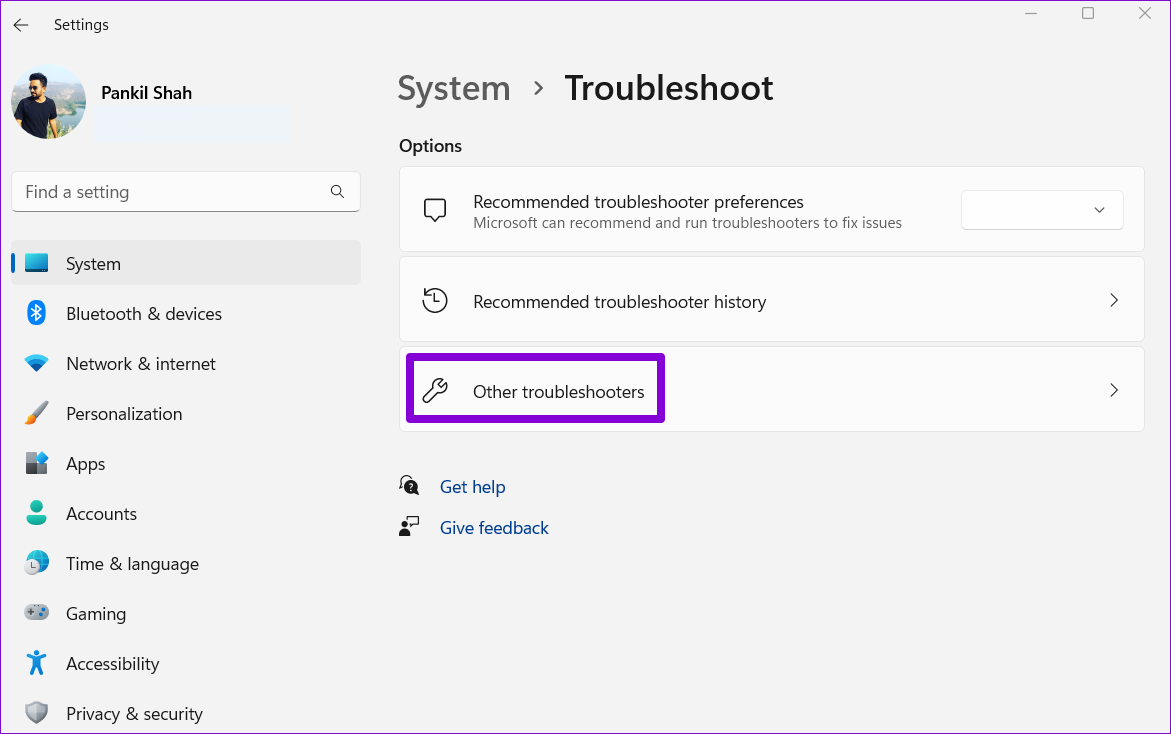
Step 3: Click the Run button next to the Camera and follow the on-screen instructions to run the tool.
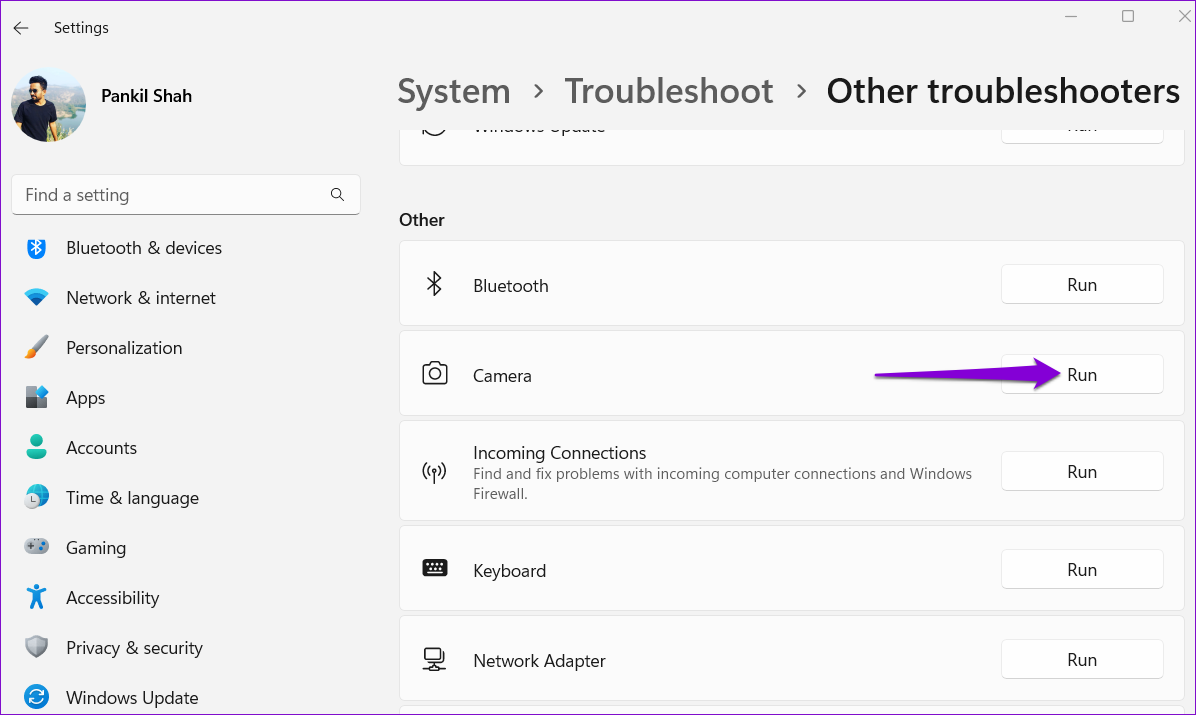
Fix 2: Check the Camera Connection
If you use an external webcam, ensure that it is connected properly. You can also switch to a different USB port to ensure the issue is not related to a malfunctioning port. Additionally, if your PC or external webcam has a physical on/off switch, verify it is in the correct position.
If reconnecting the camera does not help, try scanning your computer for hardware changes. To do so, use these steps:
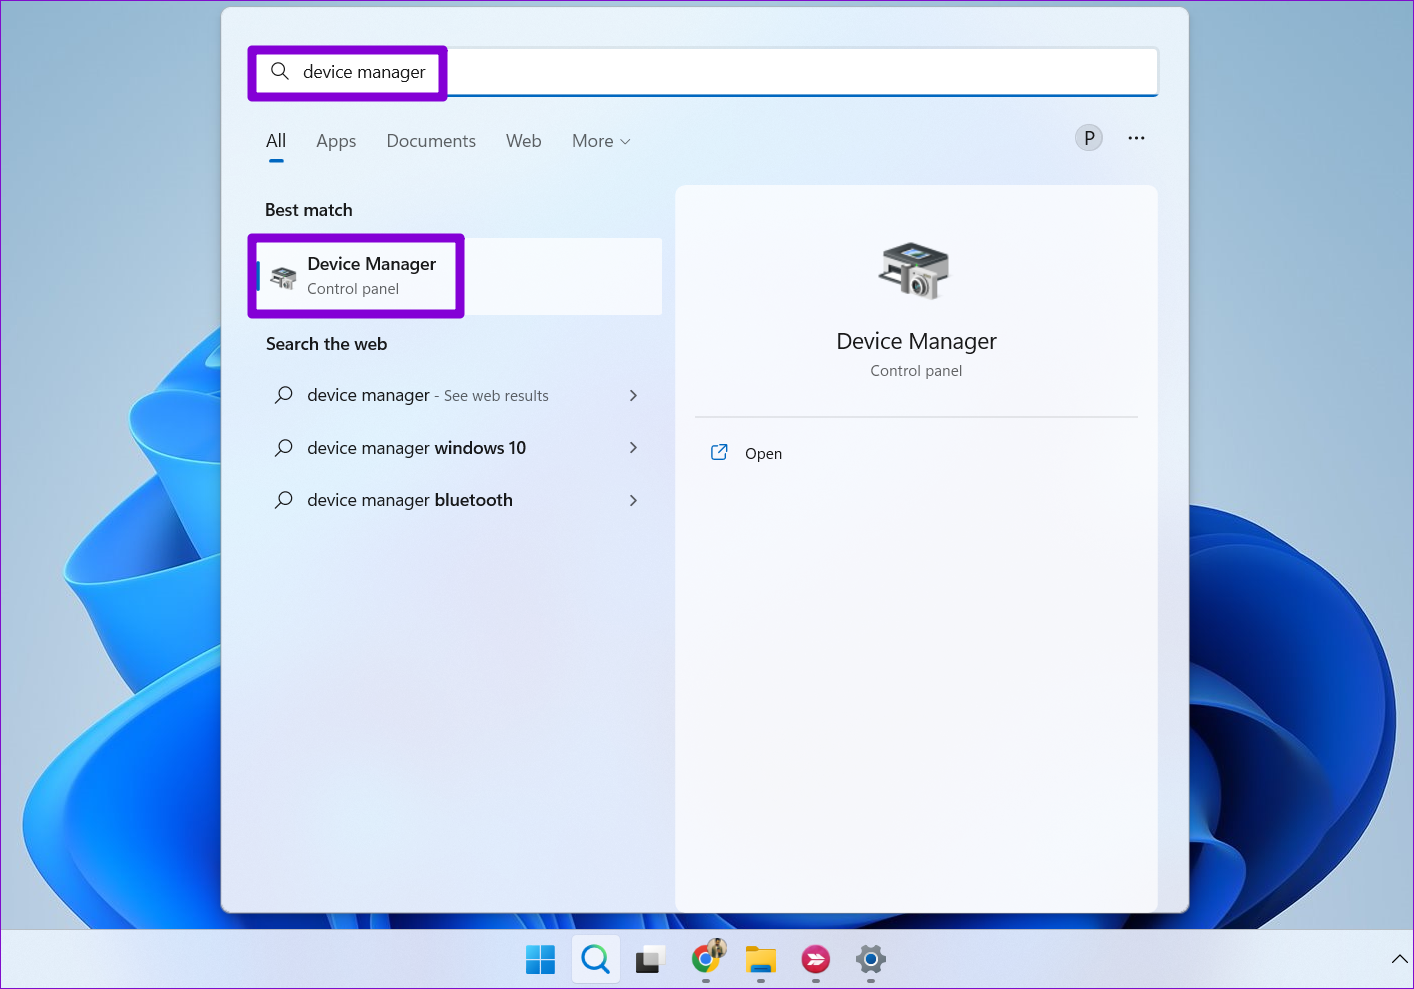
Step 1: Press the Windows key + S to open the search menu. Type device manager in the box and press Enter.
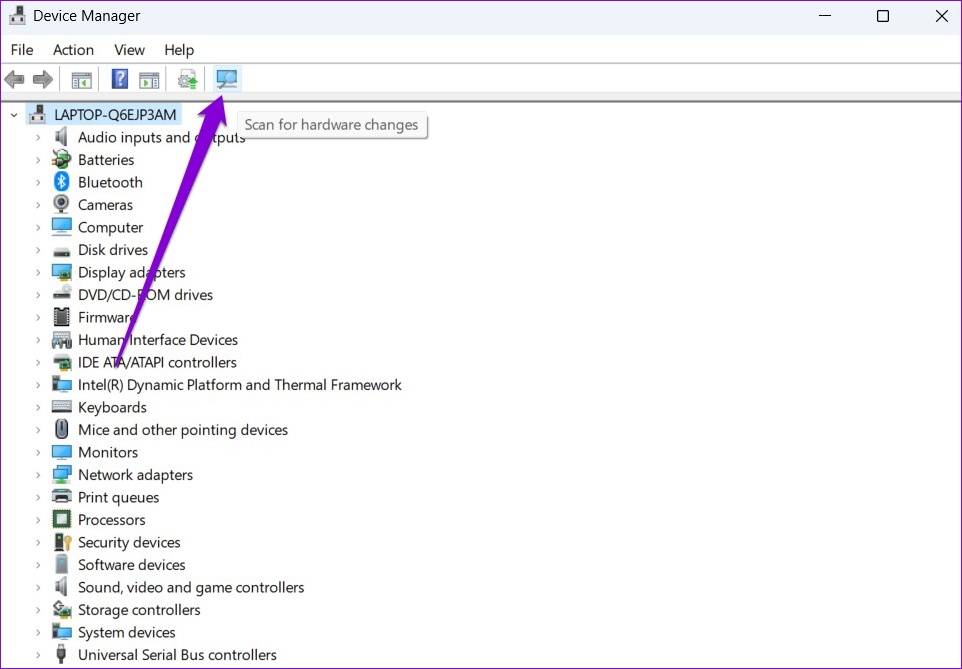
Step 2: Click the Scan for hardware changes icon at the top.
Fix 3: Allow Apps to Access Camera
Another thing you should do is review app permissions on Windows and ensure that the app you use is allowed to access the camera. Here’s how to go about it.
Step 1: Press the Windows key + I to launch the Settings app and head to Privacy & security > Camera.

Step 2: Enable the toggle next to Camera access.

Step 3: Ensure that the app you’re trying to use has camera access.

Fix 4: Re-Enable the Camera From the Device Manager
Disabling and re-enabling the camera driver can also help resolve any temporary issues preventing Windows from accessing the webcam. Here’s how to do it.
Step 1: Open Device Manager using the search menu.
Step 2: Expand Cameras, right-click on your webcam, and select Disable device.

Step 3: Right-click on the webcam again and choose Enable device.
Fix 5: Update or Reinstall Camera Drivers
Since Windows relies on drivers on your PC to detect and work with the camera, this problem can also occur if those drivers are outdated or incompatible. To resolve this, you can try updating the driver to see if that resolves the issue.
Step 1: Open Device Manager using the search menu.
Step 2: Expand Cameras, right-click on your webcam, and select the Update driver option. Then, follow the on-screen prompts to finish updating the driver.

If the problem persists, the drivers may be corrupted. So, uninstall the drivers via Device Manager and restart your PC. Windows should install the missing drivers automatically when booting.
Was this helpful?
Thanks for your feedback!
The article above may contain affiliate links which help support Guiding Tech. The content remains unbiased and authentic and will never affect our editorial integrity.