
Все способы:
- Способ 1: Функциональная клавиша / физический переключатель
- Способ 2: MSI Dragon Center
- Способ 3: Встроенная в Windows функция
- Способ 4: «Диспетчер устройств»
- Вопросы и ответы: 0
Способ 1: Функциональная клавиша / физический переключатель
Сейчас на многих ноутбуках, включая модели от компании MSI, функция управления веб-камерой максимально продуманная в плане конфиденциальности для пользователя. В данной ситуации ее активация осуществляется при помощи функциональной клавиши на клавиатуре. В большинстве случаев это F6, поэтому ее нужно нажать вместе с зажатой Fn, чтобы получилась комбинация Fn + F6, которая и отвечает за включение веб-камеры.
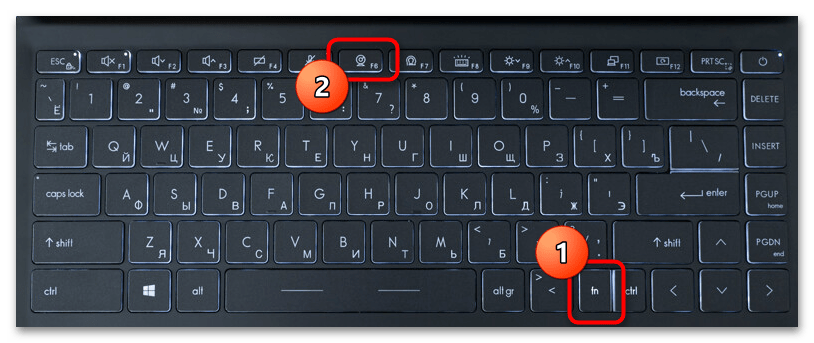
Вы должны увидеть, как справа внизу клавиши F6 появилась небольшая светящаяся точка, которая и означает, что веб-камера сейчас включена и готова к работе. Используйте этот индикатор как показатель активности камеры и при использовании других методов ее активации, если этот вдруг по каким-то причинам вас не устраивает.
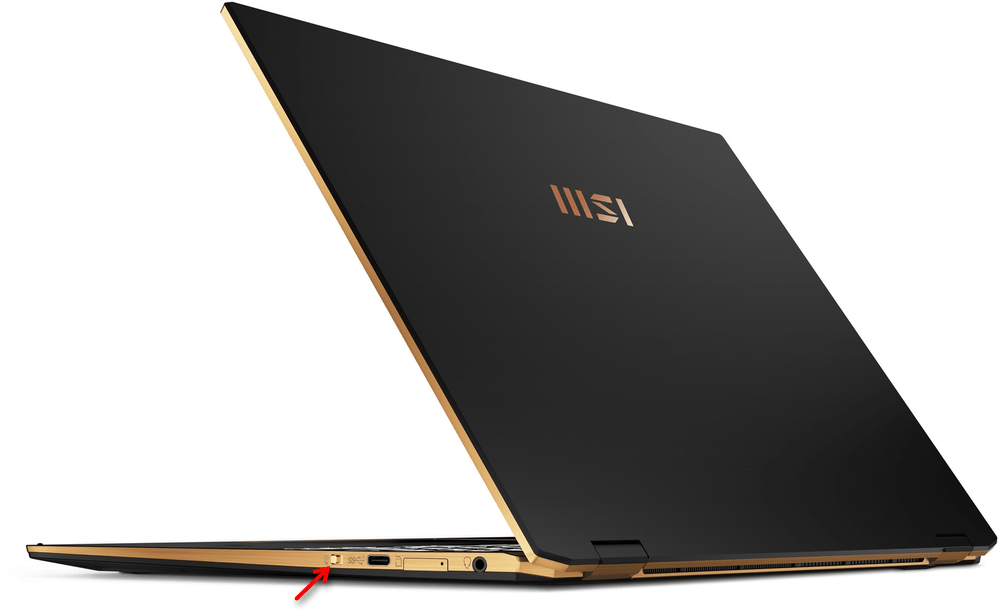
Гораздо реже, когда речь идет о бизнес-линейке новых ноутбуков от MSI, регулятор управления веб-камерой встречается на боковой панели и выполнен в виде кнопки или переключателя. Если вы посмотрели на клавиатуру и не нашли такую клавишу, о которой шла речь выше, скорее всего, на вашем устройстве реализован именно такой переключатель на корпусе. Посмотрите на боковые панели ноутбука (обычно у MSI это правая грань) и найдите этот элемент управления. Нажмите эту самую кнопку или передвиньте переключатель в положение «On».
Способ 2: MSI Dragon Center
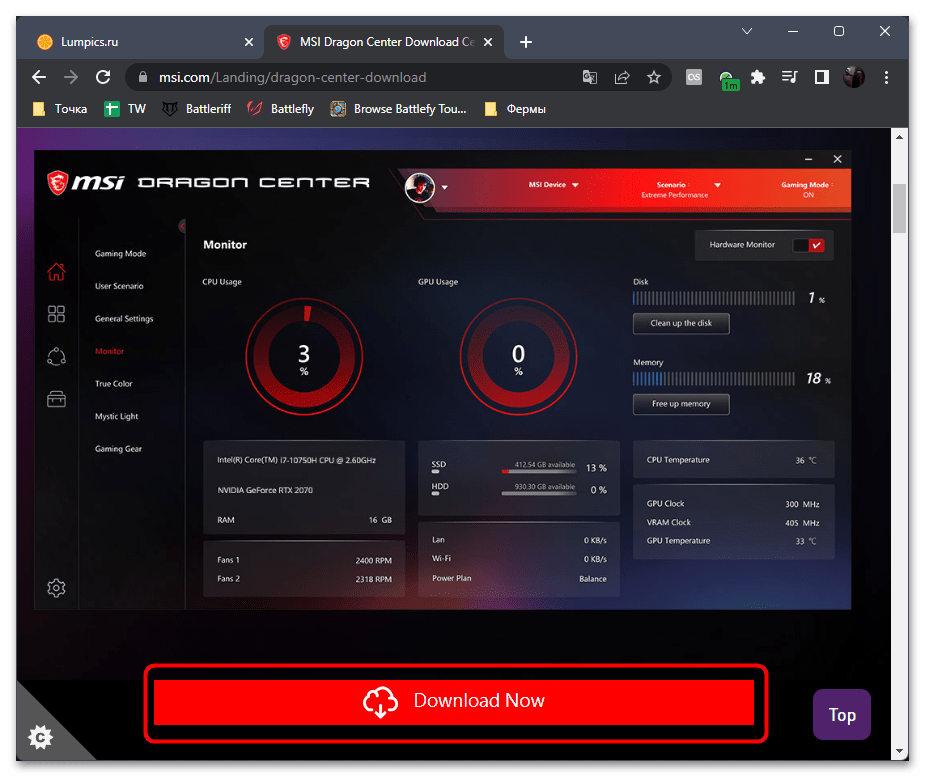
Многие ноутбуки от MSI позиционируются как игровые, поэтому не удивительно, что производитель выпускает и специализированное программное обеспечение, через которое осуществляется управление комплектующими, периферией и различными игровыми настройками. Среди них есть и переключатель, способный активировать веб-камеру. Если MSI Dragon Center еще отсутствует на вашем ноутбуке, скачайте эту программу с официального сайта по ссылке ниже и установите ее, после чего переходите к следующему шагу.
Скачать MSI Dragon Center с официального сайта
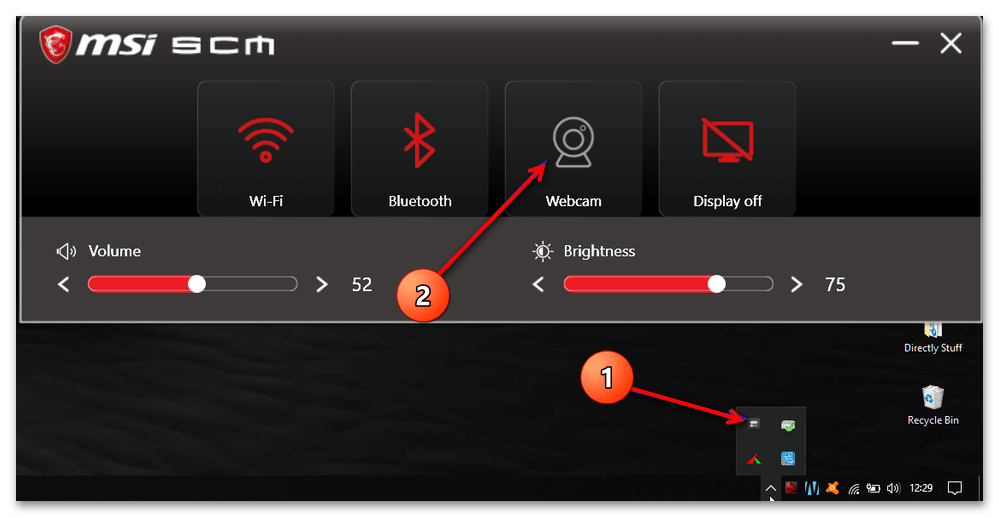
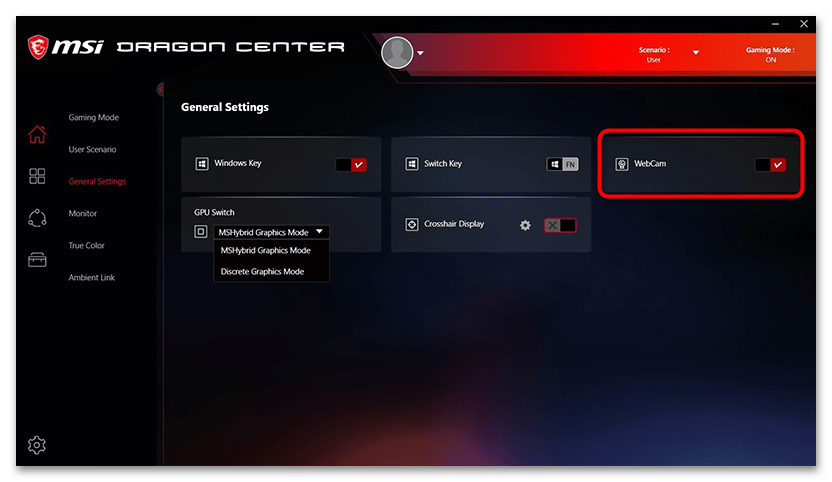
Следующий этап — открыть меню управления MSI Dragon Center и найти там необходимый переключатель для активации веб-камеры. Если ваш ноутбук поддерживает только старую версию программы, она откроется в виде небольшого окна, в котором будет всего несколько кнопок и переключателей. Отыщите в нем кнопку с названием «Webcam» и нажмите по ней, чтобы она была подсвечена красным. Это означает, что сейчас веб-камера находится в активном режиме работы.
В последних версиях данного вспомогательного софта понадобится открыть раздел «General Settings», кнопка перехода в который находится на левой панели. В нем найдите пункт «WebCam» и передвиньте переключатель вправо, чтобы возле него появилась галочка. Проверьте индикатор на клавиатуре и переходите к использованию камеры в своих целях.
Дополнительно отметим, что возможности MSI Dragon Center на этом не заканчиваются. В программе есть большое количество полезных функций, которые позволяют оптимизировать работу ноутбука или активировать некоторые функции. Развернутую инструкцию по данному ПО вы найдете в другой статье на нашем сайте, перейдя по следующей ссылке.
Подробнее: Настройка и использование приложения MSI Dragon Center
Способ 3: Встроенная в Windows функция
В операционной системе тоже есть переключатели и кнопки, которые помогут пользователю управлять работой веб-камеры. При этом ее можно настроить так, чтобы она была заблокирована только в определенных приложениях. Учитывайте эту особенность и внимательно смотрите все настройки, чтобы обеспечить корректное функционирование камеры на ноутбуке MSI во всех нужных программах.
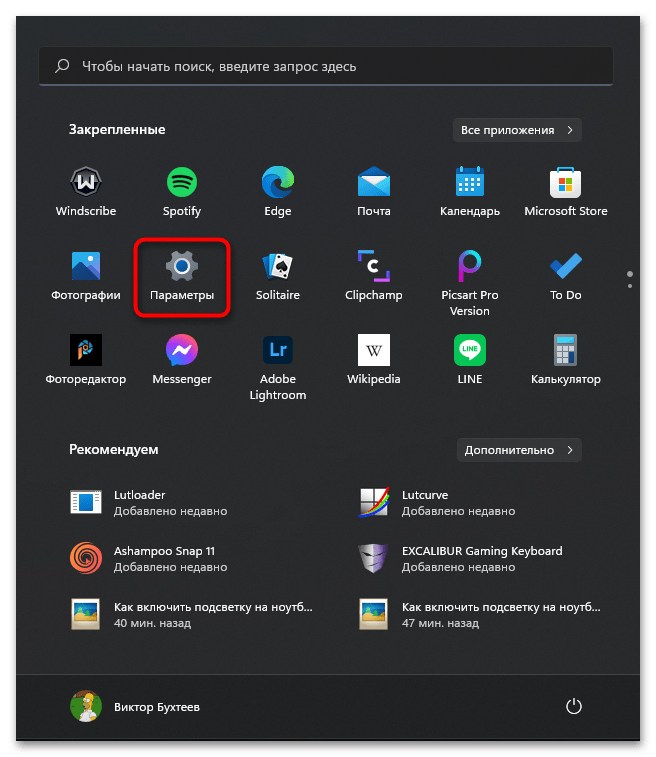
- Откройте меню «Пуск» и перейдите в «Параметры», щелкнув по значку в виде шестеренки. В Windows 10 этот значок находится на панели слева.
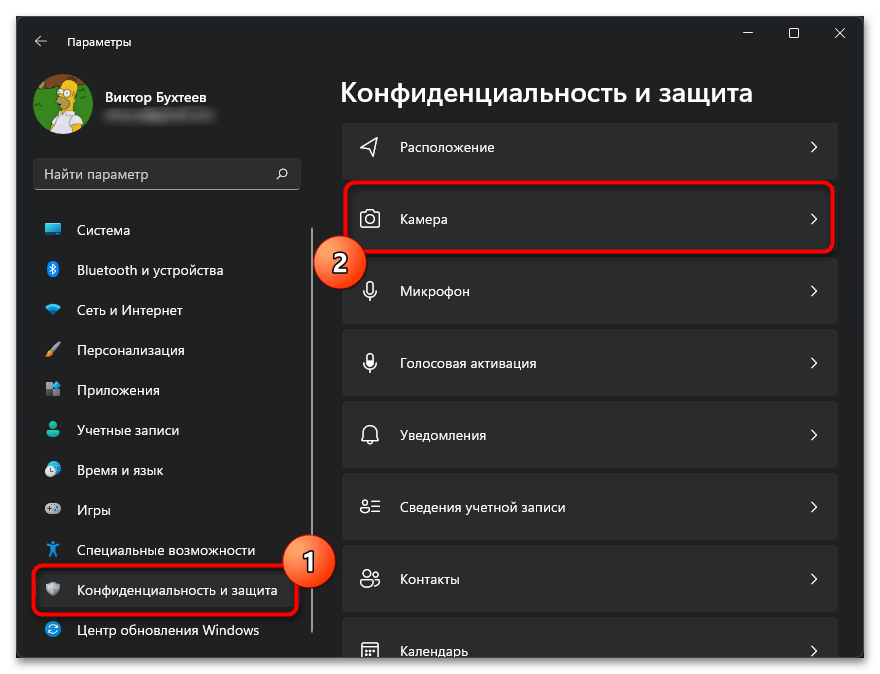
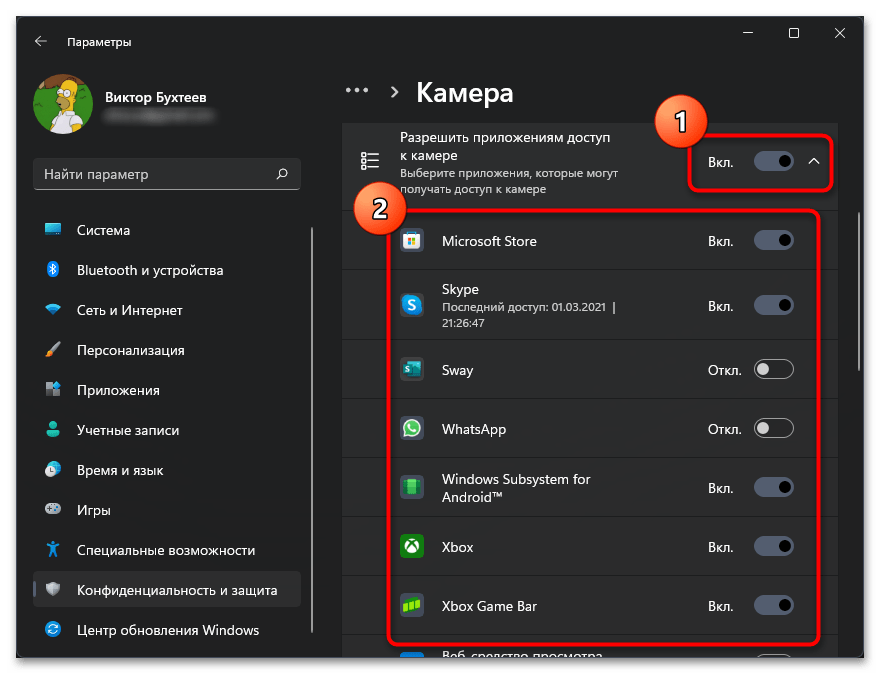
- В «Параметрах» ознакомьтесь с левой панелью и найдите в ней раздел «Конфиденциальность и защита». Выбрав его, отыщите пункт «Камера» и разверните соответствующие настройки.
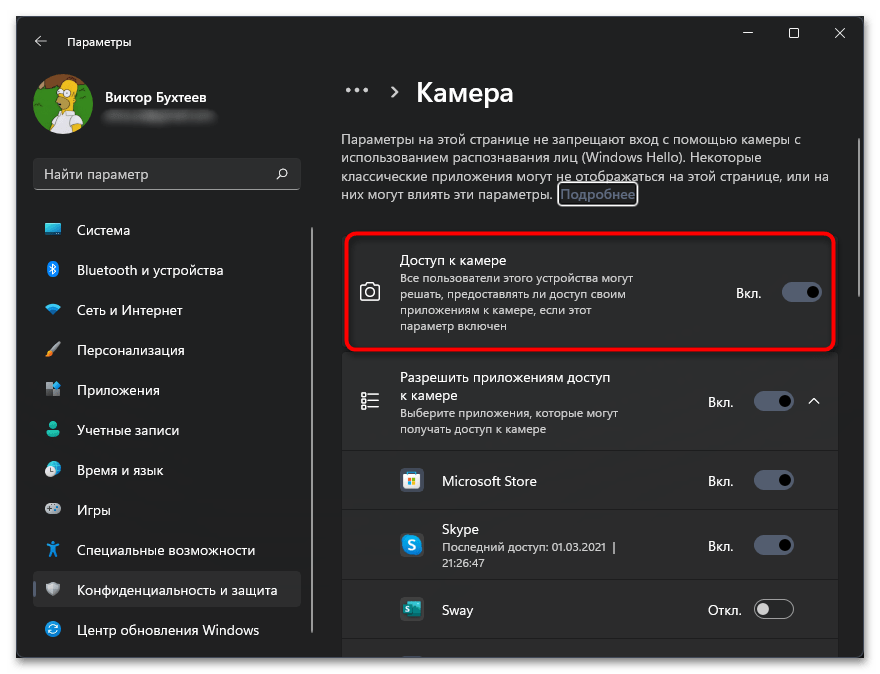
- Найдите параметр «Доступ к камере» и переключите его в значение «Вкл.», чтобы обеспечить включение веб-камеры по умолчанию для всех приложений.
- Дополнительно предлагается настроить доступ для программ. Обязательно включите настройку «Разрешить приложениям доступ к камере», после чего посмотрите на список всех установленных программ и решите, для каких из них нужно отключить разрешение на работу с веб-камерой. В этом месте как раз можно найти приложения, которым вы ранее случайно запретили доступ к вебке.
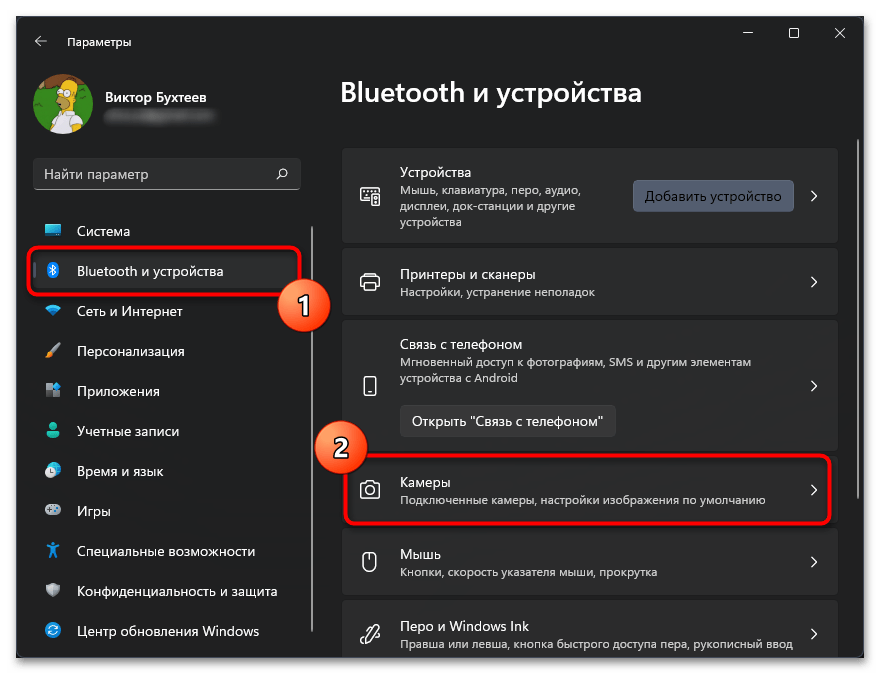
Пользователи Windows 11 могут не просто управлять приложениями и их доступом к камере, а полностью отключать или включать данное периферийное устройство, чтобы обеспечить необходимый уровень конфиденциальности. Если после произведенных выше действий камера все еще не работает, настоятельно рекомендуем проверить именно эту настройку и убедиться в том, что устройство находится во включенном состоянии.
- В том же меню «Параметры» выберите раздел «Bluetooth и устройства», после чего отыщите в списке «Камеры» и перейдите в данную категорию.
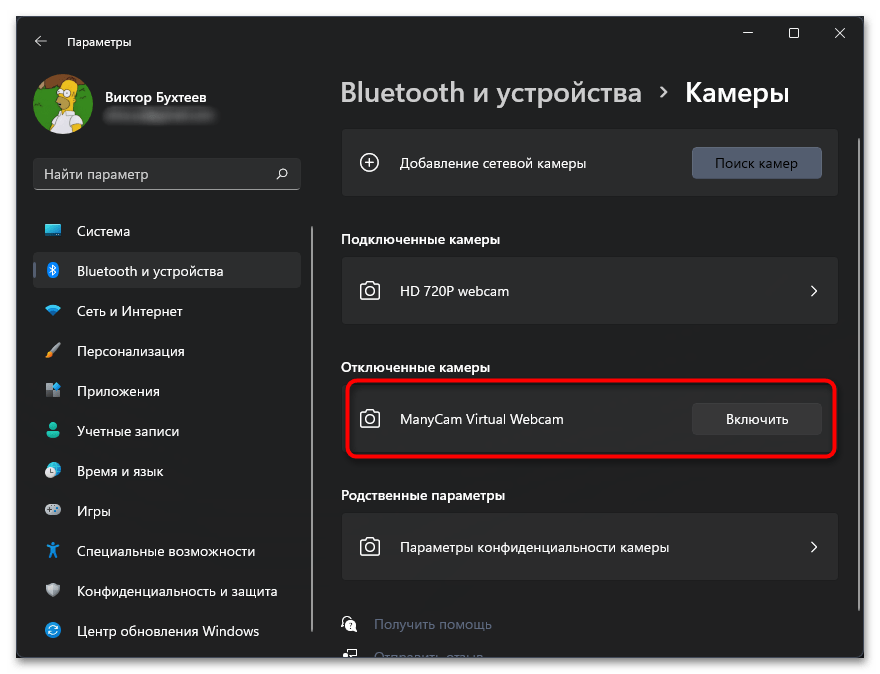
- Если в блоке «Отключенные камеры» есть веб-камера вашего ноутбука MSI, понадобится нажать кнопку «Включить», чтобы перевести ее в активный режим работы.
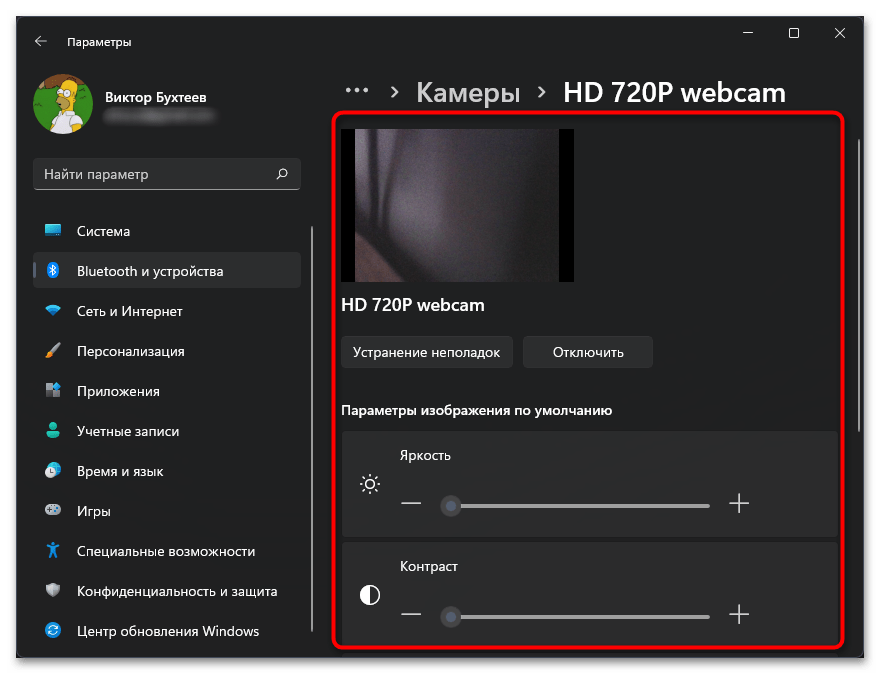
- После этого нажмите по плитке с названием камеры левой кнопкой мыши, чтобы перейти в отдельное меню управления ею. Если вы увидели изображение с нее, значит, теперь устройство работает и готово для дальнейшего взаимодействия. В этом же окне часто можно регулировать цвета, яркость и контраст камеры.
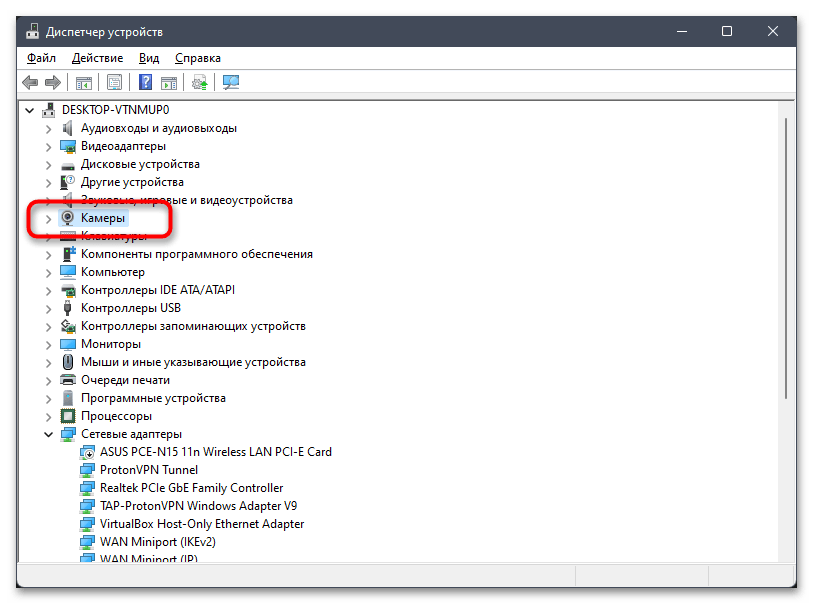
Способ 4: «Диспетчер устройств»
Мы оставили этот метод напоследок, поскольку очень редко происходит так, что веб-камера на ноутбуке MSI оказывается отключенной именно в «Диспетчере устройств». Рекомендуем переходить к выполнению следующей инструкции только в том случае, если вам не удалось добиться работоспособности периферии ни одним из перечисленных выше способов.
- Щелкните по кнопке «Пуск» правой кнопкой мыши и из появившегося контекстного меню выберите пункт «Диспетчер устройств».
- В списке устройств отыщите «Камеры» и разверните эту категорию.
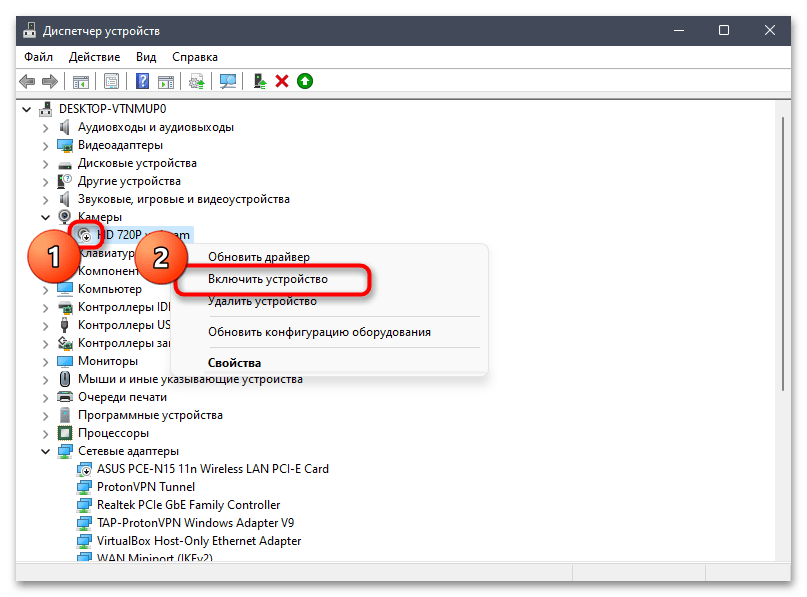
- Если вы видите значок рядом с веб-камерой ноутбука MSI, который имеет вид стрелки вниз, значит, сейчас устройство отключено. Кликните по нему правой кнопкой мыши и из появившегося меню выберите пункт «Включить устройство».
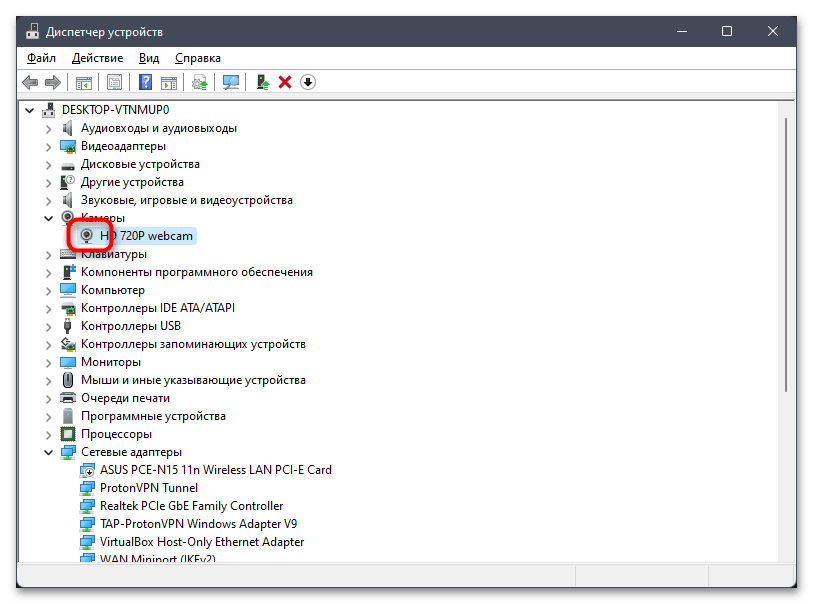
- После этого упомянутый выше значок должен пропасть. Это означает, что устройство активировано и готово к работе. Если после проверки оно все еще недоступно, попробуйте включить его одним из предыдущих методов (сначала попробовав функциональную клавишу).
Иногда ни один метод включения веб-камеры не позволяет добиться нужного эффекта и оказывается, что устройство вовсе не хочет работать. В таком случае понадобится проверить несколько причин этой неисправности: установить драйвер, изменить некоторые системные настройки или обратиться к параметрам программы, в которой собираетесь использовать веб-камеру. Обо всем этом рассказано во вспомогательных статьях на нашем сайте.
Читайте также:
Решаем проблему с неработающей камерой на ноутбуке с Windows 10
Наша группа в TelegramПолезные советы и помощь
Fix MSI laptop camera not working in Windows 10,11 error with these easy but productive solutions. To know which one can work in your case, do read the entire write-up, till the end!
MSI is an abbreviation of Micro-Star International, a Taiwanese-based computer manufacturer. MSI is one of the well-known gaming hardware peripherals manufacturers. MSI’s mid to high-advanced laptops have earned the recognition of the overall gaming community. If you also acquired an all-new MSI laptop but unable to identify a way to make its webcam functioning properly for your gaming streaming platforms.
Then, no worries, you are not all alone, there are many users out there who have reported MSI laptop camera not working issue. So, particularly, we have created this document just to explain to you those easy tactics, which you can adopt in order to fix this annoying issue.
But, before we look forward, here is one of the most obvious reasons why your MSI laptop’s camera is not performing well. Outdated camera drivers are the core culprits behind this annoyance. So, we advised you to keep your camera drivers always updated. To do so, with much ease, you can try Bit Driver Updater, which is one of the best driver updater utilities that can update all the broken drivers in just a single click of the mouse. To get it downloaded and installed on your PC for free, click on the button provided below.
Quick Solutions to Fix MSI Camera Not Working in Windows 10,11 PC
Here at TechPout, we have mentioned the four possible strategies to resolve the MSI laptop camera not working issue in Windows PC. However, you are not required to try all of them, just keep working your way down until you get the one that does a miracle for you. Without any further ado, let’s get directly to it!
Solution 1: Make Sure the Camera is Enabled
First and foremost, you can check whether the MSI camera is turned off/ disabled by default or not. If you find it disabled then you need to enable it manually so that the camera can function normally as it is supposed to do.
For enabling the MSI camera, you simply need to hit the Fn and F6 keys from your keyboard simultaneously in order to trigger the camera on your MSI laptop. There you have enabled it effortlessly, now check to ensure if the MSI camera not working resolved. If the issue still remains the same as earlier, then don’t panic, here are more solutions below to fix the issue, just try them.
Also Read: Best Free Driver Updater for Windows
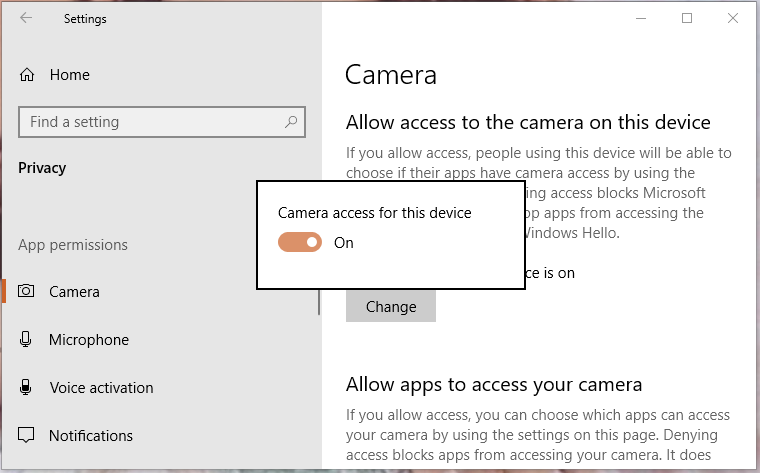
Solution 2: Grant Permission to your Camera
One of the major causes because of which you can encounter the MSI built-in camera not working issue and that’s when your system or Windows 10,11 fails in recognizing the camera. But, no need to worry, in this event you need to grant permission through the Windows privacy settings. Here are steps on how to grant permission to your camera:
Step 1: Make a click on the Start button and then click on the gear icon (Settings) to trigger the Windows Settings on your PC.

Step 2: Once the Windows Settings prompt, then locate and choose Privacy from the available options.

Step 3: After this, head to the Camera tab in the left pane, then make a click on the Change button and enable camera access for this system.

Step 4: Next, turn on the button under the Allow apps to access your camera.

Now, try to access your MSI camera on your device just to ensure whether the issue is resolved or not.
Also Read: Troubleshoot Mouse Problems in Windows 10 – Fix Mouse Problems
Solution 3: Turn On WebCam On MSI Dragon Center
The next solution that worked for many users to fix the MSI camera not working on Windows 10,11 PC was enabling the webcam in the MSI Dragon Center. If you own an MSI gaming laptop, then you need to follow this procedure. The Dragon Center is a tool that allows you to get the best gaming experience on your laptop with ease. If the webcam is disabled in the settings of the tool, then you can not use the camera. Follow the steps below to know how to enable the camera:
- Run the MSI Dragon Center tool on your laptop.
- Open the tool Settings and navigate to General Settings.
- Lastly, toggle on the button across the WebCam to turn on the same.
Follow the next solution if this one fails to fix the MSI webcam not running error.
Solution 4: Update your Camera Driver
Even after giving access permission isn’t able to make the MSI camera working properly then it’s clear that there may be a driver-related issue. As we have explained above, outdated camera drivers could cause MSI camera not working in Windows 10, 11. So, to get it resolved, you must update the camera drivers to their most up-to-date version.
You can do this task via two approaches i.e, either manually or automatically. Talking about the manual approach, then either from the manufacturer’s official website or via seeking the help of the Windows in-built utility tool called Device Manager, you can get the latest camera drivers installed on your PC. But though they are manual methods hence it requires special technical skills as well as sufficient time.
Therefore, we recommend you adopt the automatic approach to install the latest camera drivers. For updating the driver automatically millions of users showed their trust upon Bit Driver Updater. Likewise, you can too trust Bit Driver Updater to ensure automatic driver updates. Be assured, with this utility you don’t need to search for the drivers manually, what you need to do is just install the utility on your system and leave it by clicking on the Scan button, after the click, Bit Driver Updater comes into the action and scans the overall PC for the faulty drivers. For better understanding, go through the steps provided below to know how swiftly Bit Driver Updater runs:
Step 1: Install the Bit Driver Updater from the button provided below.
Step 2: Thereafter, follow the wizard’s instructions to get it successfully installed on your PC.
Step 3: Launch the tool on your PC, then, find the Scan button in the left menu pane and click on it.

Step 4: After the click, Bit Driver Updater gets the command and starts scanning your PC for the drivers which need an update.
Step 5: Later on, when scanning is over, the tool provides you with a list of all the faulty or outdated drivers.
Step 6: Now, you need to see the list and find the camera drivers. Once you find the camera drivers, then click on the Update Now button which shows next to the driver.

Step 7: If you think to update other outdated drivers along with the camera driver then Bit Driver Updater allows you to do so as well. For this, you have to make a click on the Update All option instead of Update Now.

There Bit Driver Updater downloaded and installed the correct or genuine drivers on your PC quite easily & quickly. You can use the tool in two versions i.e, either free or pro. But, it is advisable to use the pro version, as it gives you access to use the high-end features of utility which consist of one-click driver update, built-in system optimizer, complete technical aid 24/7, backup & restore.
Also Read: How To Update Graphics Drivers In Windows 10 {Simple Guide}
Solution 5: Uninstall & Reinstall your Camera Driver
Due to some compatibility issues, if updating the outdated or missing camera drivers doesn’t fix the issue. Then, as a final bet, you have only one option left and that is uninstalling and then reinstalling the camera drivers. To uninstall the camera drivers you may use the Windows in-built utility tool named Device Manager. Below are the steps that your must follow in order to uninstall the camera drivers through Device Manager:
Step 1: To open Device Manager, you need to press the Windows logo key, then type the Device Manager in the search box, and choose the best-searched result of it.
Step 2: Next, when you land on the Device Manager window, locate and double click on the Imaging devices category to expand it.
Step 3: After this, click right on the Integrated Camera option to choose Uninstall device as an option.

Step 4: To affirm the uninstallation click on the Ok option.
Thereafter, start your PC again, and now the MSI laptop camera not working in Windows 10 should be resolved. Plus, the camera drivers should be installed again automatically.
Also Read: How to Fix Windows 11 Camera Not Working – Quickly and Easily
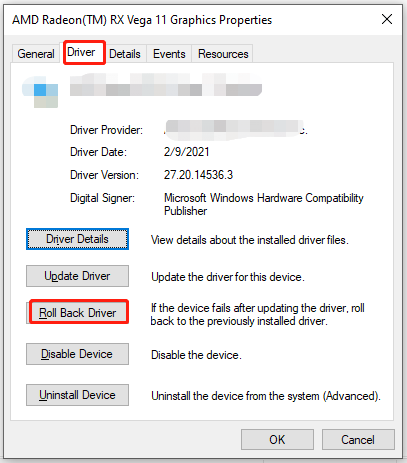
Solution 6: Rollback Driver
If none of the previous method work to fix the error, you can try rolling back the drivers to the previous versions as well. It is possible that the new driver update is not compatible with your system and causing the MSI camera not working issue. Follow the below steps to know how to roll back the driver:
- Use the Device Manager to open the Properties of your MSI webcam as did in the previous method (Up to step 3 in method 5 above)
- Click on the Driver tab and select the option to Rollback the driver if available.
Follow the on-screen instructions to roll back the driver safely.
Solution 7: Run the Camera Troubleshooter
The next thing that you can do to fix the MSI webcam not working properly is to use the device troubleshooter. The option, just like its name, allows your system to troubleshoot all the problems related to hardware. Follow the steps below to know how to use the troubleshooting:
- Press Win+S keys, type Run, and press Enter.

- Type the below command in the box and hit Enter.
msdt.exe -id DeviceDiagnostic - Follow the on-screen instructions to run the troubleshooter and fix all the errors.


Also Read: Lenovo Laptop Camera Not Working on Windows
MSI Camera Not Working in Windows PC – FIXED
So, these were the troubleshooting solutions to fix the MSI camera not working on Windows 10,11 PC. Try any one of them which fits your case, and let us know which solution worked for you in the comment box below.
Plus, if you face any kind of difficulties while implementing the steps of the above solutions, then please share them with us in the comments below. We would try to assist you in the best way possible. Additionally, you may also seek the help of the MSI support center if the problem persists.
Additionally, if you have any suggestions then tell us about them through the box. For reading more troubleshooting and downloading guides, do subscribe to TechPout. We are looking forward to your feedback.
Since most of the work nowadays is done remotely, you will very likely face complications if you do not have a functional webcam. This is exactly the case for most MSI laptop users. That is, the laptop does not detect the webcam/camera.
One major but simple cause is that, sometimes, the MSI camera is disabled by default. Besides this, the other reason could be you have a dysfunctional MSI camera.
Here in this article, we have listed some causes and explained some solutions that might fix the issue you face. Without further delay, let us get right into it.
Why Is My MSI Camera Not Working?
A couple of settings enable or disable a camera. The PC might not access the camera unless you allow all the settings.
Here are some other common reasons MSI camera is not working.
- Camera disabled from MSI Dragon Center
- Outdated camera drivers
- Corrupted driver files
- Physical damages to the camera/internal wiring
7 Easy Fixes to MSI Camera Not Working
Below, we have mentioned seven solutions to fix the MSI camera. Since there are multiple settings you need to enable before the laptop can access the camera, perform all the steps below one after the other.
Enable Camera Access
Due to privacy concerns, the laptop might disable camera access. If so, the camera application, when opened, will give you a notification saying that it needs permission to access the webcam.
Follow the steps mentioned below to turn the camera on manually.
- Press the Windows + I key to open Settings.
- Go to Privacy & security
- Scroll down to App permission and select Camera.
- Here, make sure that Camera access is toggled On.


If you cannot access the camera on a certain application, it can also be that the computer has blocked the camera for said application. In this case, you need to enable the camera for this application as well.
- Under Let apps access your camera, search for the application that has issues detecting the camera.
- Now toggle the radio button from Off to On.
Enable Camera from MSI Dragon Center
MSI’s Dragon Centre is a pre-installed application with every MSI laptop. The application also has a setting that enables or disables the camera with a button. If you have enabled a hotkey on MSI Dragon Centre, there is a chance that a random button has turned off the camera.
To check this, open MSI’s Dragon Centre and go to General Settings. Here, make sure that WebCam is toggled on.

Enable Camera Using Function Keys
All, if not most, MSI laptop has a built-in feature that lets the computer access the webcam with a press of a button. You can see this button, depending on the laptop, can be any of the function keys.
To locate this, search for the function keys for a small icon that looks like a webcam. Generally, you will see this icon on F4 or F6.
Press Fn and this function key simultaneously to enable/disable your camera.
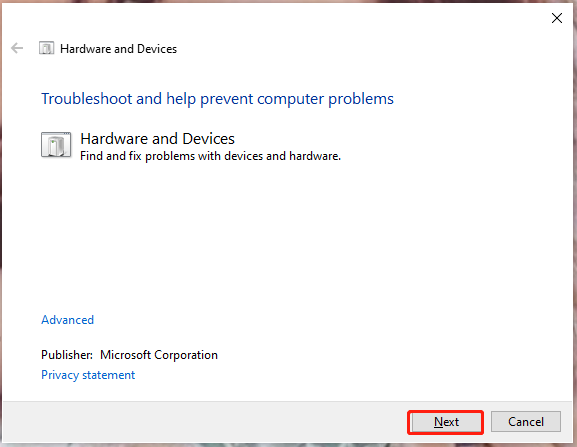
Hardware troubleshoot
If enabling the above three solutions still does not fix the issue with the camera, you might be facing some internal hardware problems. To check if that’s the issue, you can try running the hardware troubleshooter to pinpoint and fix the issue.
- Press the Windows + R key to open Run.
- Type
msdt.exe -id DeviceDiagnosticand press Enter to open Hardware and Device Troubleshooter.
- Once the process is complete, it should show any hardware causing the issue.
- Now, follow the troubleshooting process.

Update/Rollback Driver
Updating any driver helps devices work smoothly with your computer. If your drivers are not up-to-date, it is best that you keep them updated. However, updating the driver does not always fix the issue. Sometimes, an update may also be causing the problem.
If you start having problems with the device after a driver update, you can roll back to the previous version to fix the issue.
- Press the Windows + X key and select Device Manager.
- Expand the Camera and double click on the driver that is listed below.
- Go to the Driver tab.
- Now click on Update or Roll Back Driver according to your need.
If this does not work, you can also try uninstalling the driver. Once uninstalled, restart your computer. This will automatically reinstall the driver.
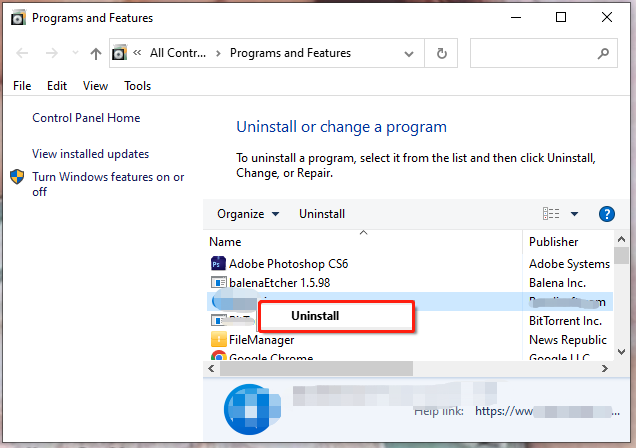
Uninstall Recently Installed Application
If you face the issue after installing an application, said application may be why the camera is not working. Try uninstalling this application to see if it fixes the problem.
- Press Windows + R key simultaneously to open Run.
- Type
appwiz.cpland press Enter to open the Program and Feature Window. - Click on the recently installed application and select Uninstall.

- Once the uninstall process is complete, restart your computer.

Contact MSI Customer Service
The problem you face might also be due to internal damage to the camera. This damage can be a broken camera itself or damage to internal cables. If none of the above-mentioned solutions work, contact Official MSI Service And Service.
-
Home
-
News
- Is Your MSI Camera Not Working? Here Are 7 Fixes with Pictures!
Is Your MSI Camera Not Working? Here Are 7 Fixes with Pictures!
By Aurelie | Follow |
Last Updated
What will you do when your MSI camera is not working? Do you spend hours finding solutions for it? Stop wasting your time now! In this guide on MiniTool, you can solve this issue easily within minutes.
MSI is famous as one of the best gaming hardware peripherals manufacturers in the world. You may need to have a video chat with your friends or colleagues in daily life. If your MSI gaming laptop camera not working suddenly, it will affect your work and game experience. For several reasons, the webcam will stop working. You can adapt the solutions to tackle this issue easily.
How to Fix MSI Camera Not Working on Windows 10/11?
Fix 1: Enable MSI Webcam Manually
By default, MSI camera is disabled, so you need to turn it on manually. Just press Fn + F6 to turn on your camera. If this is not working for you, you can also try to hit the F6 key alone.
Fix 2: Allow Camera Access
MSI camera needs some necessary permissions due to privacy concerns. If you forget to grant the camera corresponding access, MSI camera not working will appear.
Step 1. Press Win + I altogether to open Windows Settings.
Step 2. Go to Privacy > Camera.
Step 3. Hit the Change button under Allow access to the camera on this device.
Step 4. Toggle on Camera access for this device.
Fix 3: Enable Webcam on MSI Dragon Center
Chances are that you have enabled a hotkey on MSI Dragon Center hence triggering MSI laptop camera not working. You can open your MSI Dragon Center to check if the camera is disabled.
Step 1. Launch MSI Dragon Center and go to General Settings.
Step 2. Turn on Webcam.
Tips:
What if MSI Dragon Center is not working? Take it easy! You can find fixes from this post — MSI Dragon Center Not Working in Windows 10/11? [5 Proven Ways].
Fix 4: Update Camera Driver
An outdated camera driver might be the reason for MSI computer camera not working. If you don’t update your camera driver for a long time, follow the guidelines below:
Step 1. Press Win + X at the same time and highlight Device Manager in the context menu.
Step 2. Expand Camera or Imaging devices and then right-click on the first drive to choose Update driver.
Step 3. Press Search automatically for drivers and wait for the system to install your latest camera driver for you.

Tips:
If a camera device has a yellow exclamation mark or an unrecognized USB device appears, you can refer to MSI’s website for solutions.
Fix 5: Roll Back Camera Driver
Meanwhile, a camera driver update might also cause MSI camera not working. Therefore, reinstalling the camera drive is also a solution for you.
Step 1. Type device manager in the search bar and hit Enter.
Step 2. Expand Camera or Imaging devices and right-click on the first driver to choose Properties.
Step 3. Under the Driver tab, hit Roll Back Driver.
Fix 6: Uninstall Recently Installed Application
If you encounter camera not working on MSI laptop after installing a program, try to uninstall it to check out improvements.
Step 1. Press Win + R to open the Run box.
Step 2. Type appwiz.cpl and hit enter to open Programs and Features.
Step 3. Scroll down to look for the app that you installed recently, right-click on it and choose Uninstall.
Step 4. Hit Uninstall again to confirm this action and then follow the uninstallation wizard to finish the uninstallation process.
Step 5. After the uninstallation process is complete, reboot your computer.
Fix 7: Run the Camera Troubleshooter
If none of the fixes above helps you out, you can consider the internal hardware issues. Try running the hardware troubleshooter to resolve this problem.
Step 1. Press Win + R to evoke the Run box.
Step 2. Type msdt.exe -id DeviceDiagnostic and hit Enter.
Step 3. Press Next to start the detecting process.
Step 4. After the process is done, you will see the hardware issues and then follow the instructions on the screen to complete the troubleshooting process.
About The Author
Position: Columnist
Aurelie is a passionate soul who always enjoys researching & writing articles and solutions to help others. Her posts mainly cover topics related to games, data backup & recovery, file sync and so on. Apart from writing, her primary interests include reading novels and poems, travelling and listening to country music.
Реализация DI в PHP
Jason-Webb 13.05.2025
Когда я начинал писать свой первый крупный PHP-проект, моя архитектура напоминала запутаный клубок спагетти. Классы создавали другие классы внутри себя, зависимости жостко прописывались в коде, а о. . .
Обработка изображений в реальном времени на C# с OpenCV
stackOverflow 13.05.2025
Объединение библиотеки компьютерного зрения OpenCV с современным языком программирования C# создаёт симбиоз, который открывает доступ к впечатляющему набору возможностей. Ключевое преимущество этого. . .
POCO, ACE, Loki и другие продвинутые C++ библиотеки
NullReferenced 13.05.2025
В C++ разработки существует такое обилие библиотек, что порой кажется, будто ты заблудился в дремучем лесу. И среди этого многообразия POCO (Portable Components) – как маяк для тех, кто ищет. . .
Паттерны проектирования GoF на C#
UnmanagedCoder 13.05.2025
Вы наверняка сталкивались с ситуациями, когда код разрастается до неприличных размеров, а его поддержка становится настоящим испытанием. Именно в такие моменты на помощь приходят паттерны Gang of. . .
Создаем CLI приложение на Python с Prompt Toolkit
py-thonny 13.05.2025
Современные командные интерфейсы давно перестали быть черно-белыми текстовыми программами, которые многие помнят по старым операционным системам. CLI сегодня – это мощные, интуитивные и даже. . .
Конвейеры ETL с Apache Airflow и Python
AI_Generated 13.05.2025
ETL-конвейеры – это набор процессов, отвечающих за извлечение данных из различных источников (Extract), их преобразование в нужный формат (Transform) и загрузку в целевое хранилище (Load). . . .
Выполнение асинхронных задач в Python с asyncio
py-thonny 12.05.2025
Современный мир программирования похож на оживлённый мегаполис – тысячи процессов одновременно требуют внимания, ресурсов и времени. В этих джунглях операций возникают ситуации, когда программа. . .
Работа с gRPC сервисами на C#
UnmanagedCoder 12.05.2025
gRPC (Google Remote Procedure Call) — открытый высокопроизводительный RPC-фреймворк, изначально разработанный компанией Google. Он отличается от традиционых REST-сервисов как минимум тем, что. . .
CQRS (Command Query Responsibility Segregation) на Java
Javaican 12.05.2025
CQRS — Command Query Responsibility Segregation, или разделение ответственности команд и запросов. Суть этого архитектурного паттерна проста: операции чтения данных (запросы) отделяются от операций. . .
Шаблоны и приёмы реализации DDD на C#
stackOverflow 12.05.2025
Когда я впервые погрузился в мир Domain-Driven Design, мне показалось, что это очередная модная методология, которая скоро канет в лету. Однако годы практики убедили меня в обратном. DDD — не просто. . .