
Все способы:
- Способ 1: Ручной запуск исполняемого файла
- Способ 2: Добавление программы в автозагрузку
- Способ 3: Работа со звуковым драйвером
- Ручная загрузка звукового драйвера
- Автоматический поиск драйвера в Windows
- Поиск драйвера из доступных на компьютере
- Удаление драйвера звука
- Способ 4: Исправление работы приложения
- Способ 5: Откат обновления Windows
- Способ 6: Использование сторонних эквалайзеров
- Вопросы и ответы: 0
Способ 1: Ручной запуск исполняемого файла
Если после установки «Диспетчера Realtek HD» вы заметили, что данная программа не запускается и, соответственно, с ее помощью не получается настроить звук, сначала следует в целом проверить ее работоспособность. Осуществляется это при помощи поиска исполняемого файла софта и его ручного открытия, что и позволит понять, отобразится ли графический интерфейс драйвера в Windows 11. Используйте для этого следующую простую инструкцию.
- Откройте «Проводник» и перейдите по пути
C:\Program Files\Realtek\Audio\HDA. - В данном каталоге найдите файл «RAVCpl64.exe» и дважды кликните по нему, подтверждая тем самым открытие.
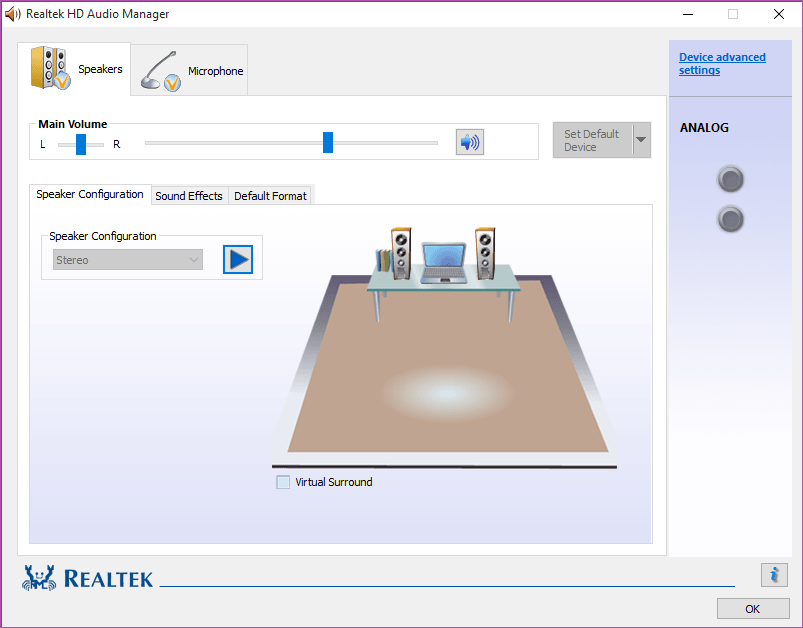
- Если программа работает корректно, на экране должно появиться основное окно «Диспетчера Realtek HD», которое и используется для настройки звука.


Следующие действия зависят уже непосредственно от того, открылась ли программа для дальнейшей работы. Если да, стоит попробовать добавить ее в автозапуск, о чем будет сказано ниже. При отсутствии какой-либо реакции нужно перейти в первую очередь к работе с драйвером звука, а затем к другим решениям проблемы, если исправление так и не будет найдено.
Способ 2: Добавление программы в автозагрузку
Если вам удалось открыть «Диспетчер Realtek HD» так, как это было показано выше, но вы не желаете выполнять это же действие при каждом входе в операционную систему, программу можно добавить в автозагрузку. Так значительно снижается шанс сброса настроек и установленные вами параметры звука всегда будут применены.
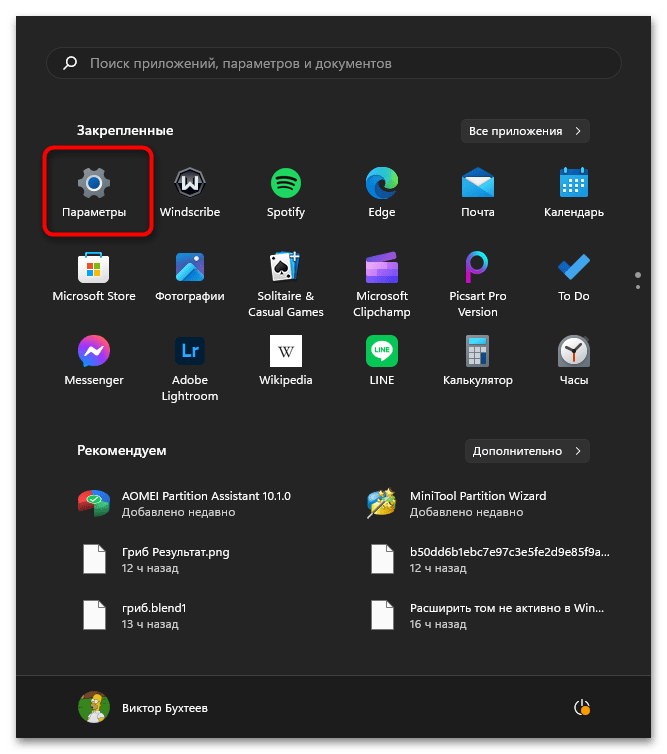
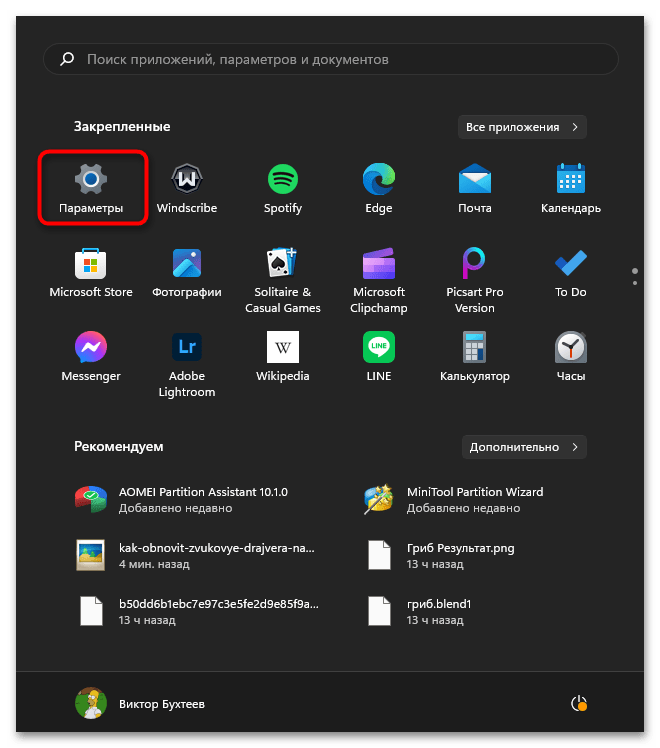
- Откройте «Пуск» и перейдите в «Параметры», кликнув по значку с изображением шестеренки.
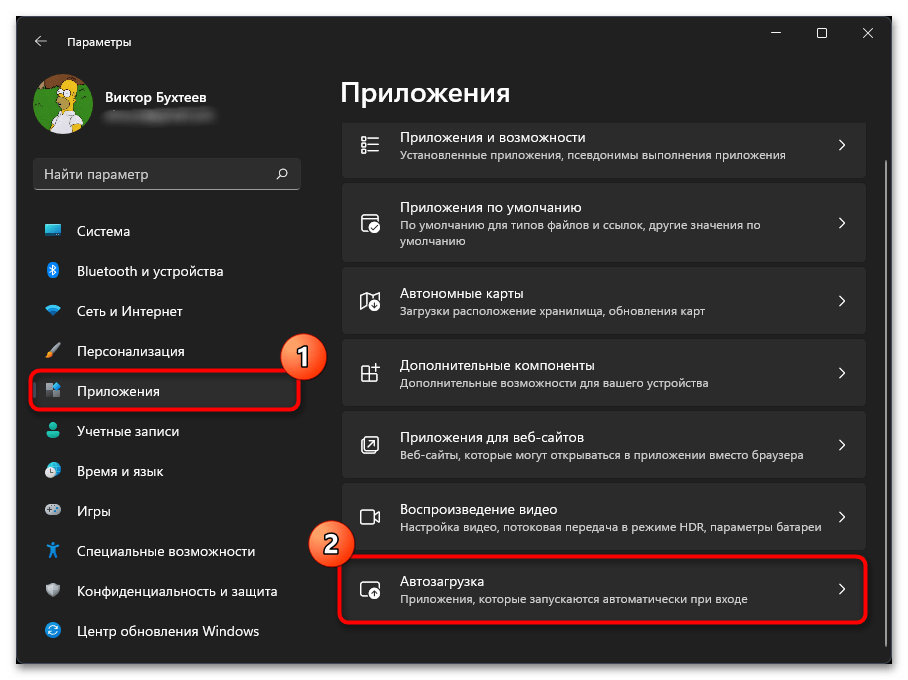
- На панели слева выберите раздел «Приложения», прокрутите колесико вниз списка справа и нажмите по пункту «Автозагрузка».
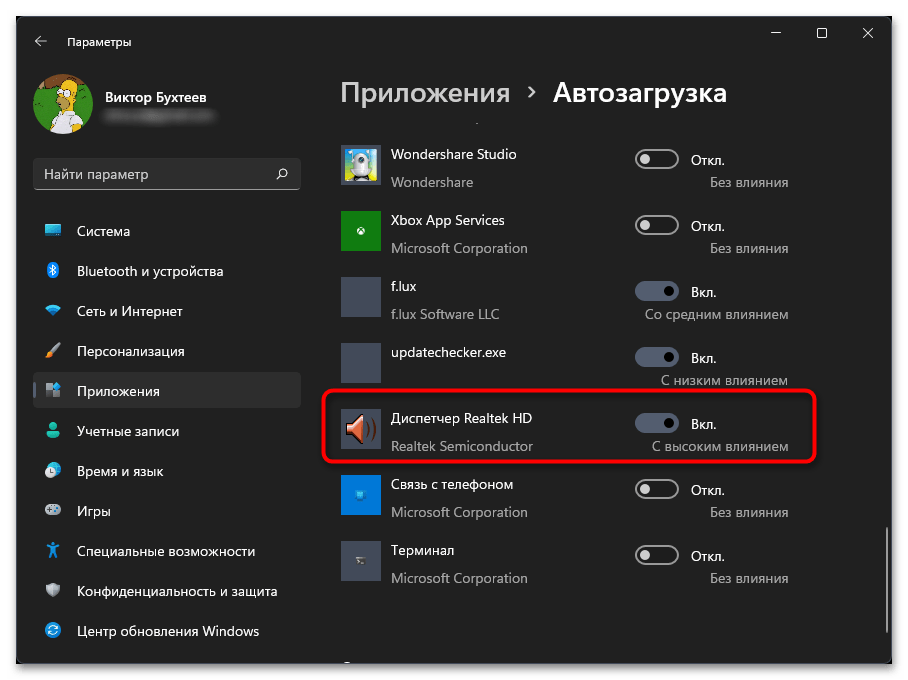
- В списке приложений понадобится найти «Диспетчер Realtek HD» и перетащить переключатель справа в состояние «Вкл.».
При отсутствии данного пункта в списке приложений для автозагрузки принцип действий немного меняется, поскольку придется взаимодействовать непосредственно с самим исполняемым файлом и вносить изменения в настройки операционной системы. Более детальную информацию об этом читайте в статье ниже. Попробуйте разные предложенные способы, пока не добьетесь того, чтобы «Диспетчер Realtek HD» включался вместе с Виндовс 11.
Подробнее: Добавление приложений в автозагрузку в Windows 11
Способ 3: Работа со звуковым драйвером
Неправильный звуковой драйвер или его отсутствие — одна из главных причин проблемы в работе «Диспетчера Realtek HD», поэтому мы и предлагаем основное внимание удалить данному методу. Он будет комплексным, подразумевающим выполнение разных алгоритмов действий для достижения нужного результата. Мы попробуем установить разные версии звукового драйвера, чтобы выяснить, какой из них обеспечит корректную работу программе от Realtek.
Ручная загрузка звукового драйвера
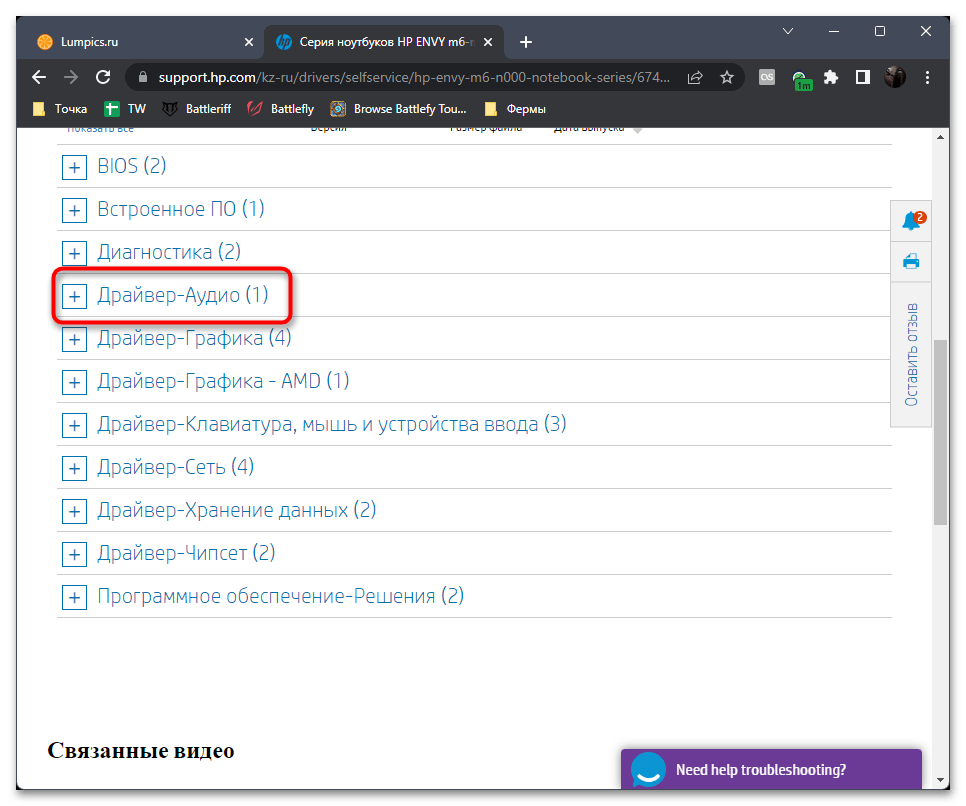
Сначала пойдем по стандартной рекомендации, которая заключается в использовании актуальной версии звукового драйвера, предназначенного конкретно для вашей модели материнской платы или ноутбука. Рекомендуем самостоятельно найти такой файл на официальном сайте или в крайнем случае использовать сторонние программы, если поддержка для вашей модели устройства уже прекращена. В некоторых случаях можно выполнить поиск по ID оборудования или загрузить официальную программу от производителя, которая как раз и предназначена для поиска апдейтов. Об этом более детально читайте в материале по следующей ссылке.
Подробнее: Обновление звукового драйвера в Windows 11
Обратим ваше внимание: если при поиске такого драйвера на официальном сайте или уже после его установки вы обнаружили, что звуковое устройство не имеет в названии «Realtek», вполне возможно, на ПК установлена звуковая карта от другого производителя и «Диспетчер Realtek HD» не поддерживается. Вам предстоит самостоятельно проверить спецификацию вашего ноутбука или материнской платы, чтобы узнать, какой софт для настройки звука совместим, если он предоставляется производителем звуковой карты.
Читайте также: Как узнать название звуковой карты на компьютере
Автоматический поиск драйвера в Windows
В некоторых случаях лучшим решением проблемы со звуковым драйвером станет установка рекомендованного из Windows 11. Стандартное средство прекрасно сканирует звуковые устройства и находит для них подходящие файлы, позволяя в пару кликов инсталлировать их и проверить работу. Давайте проверим это на практике и узнаем, поможет ли данное действие решить проблему с запуском «Диспетчера Realtek HD».
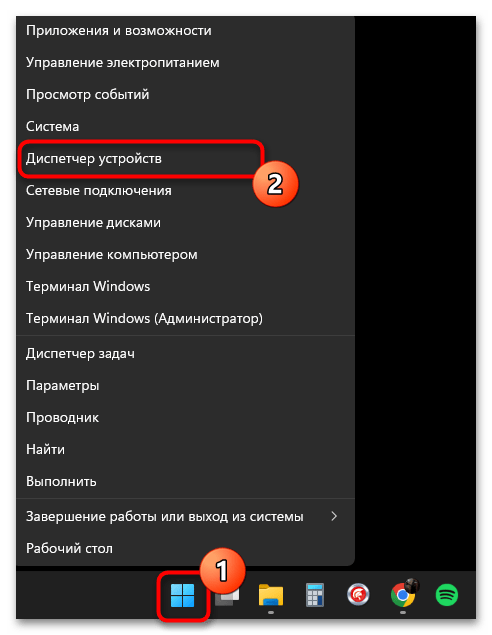
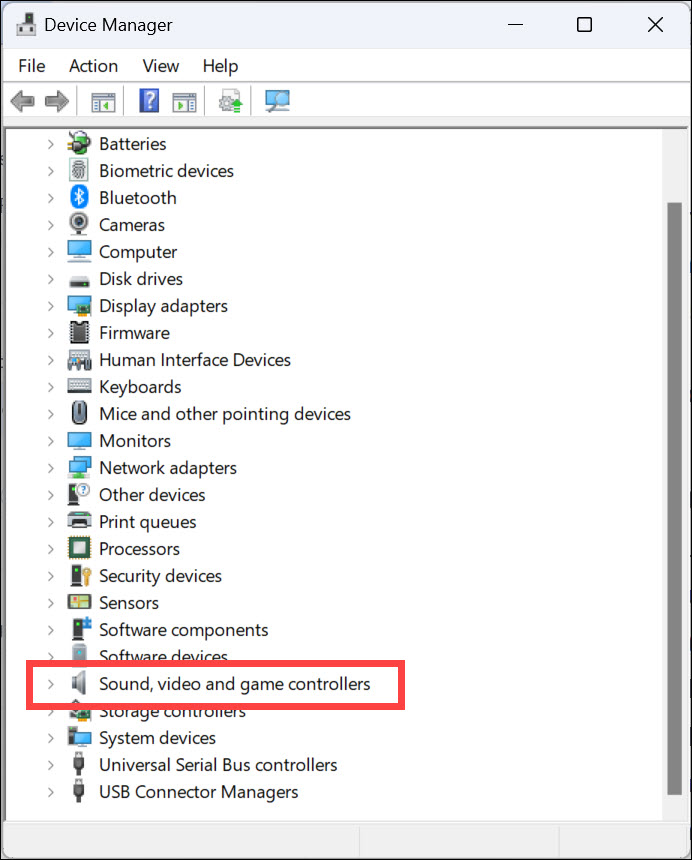
- Нажмите по «Пуску» правой кнопкой мыши и из появившегося контекстного меню выберите пункт «Диспетчер устройств».
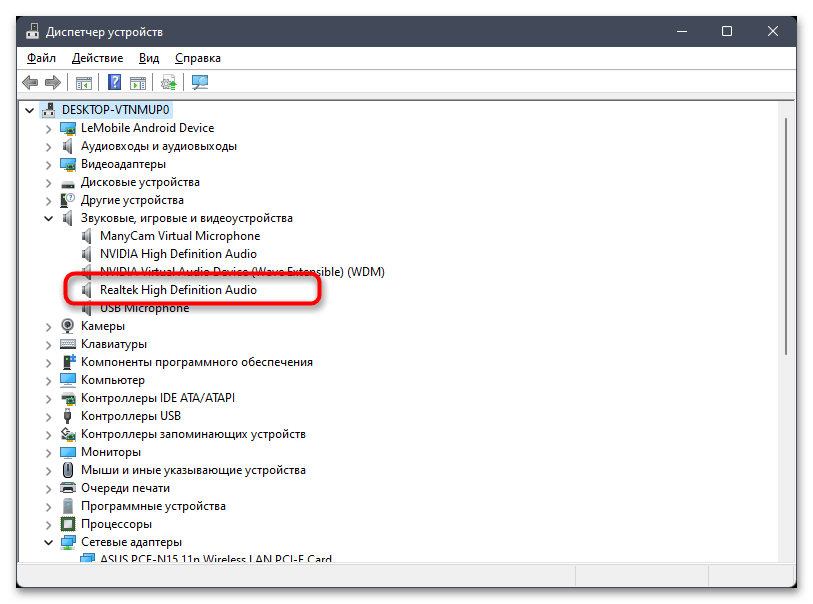
- Разверните категорию «Звуковые, игровые и видеоустройства», чтобы отыскать там «Realtek High Definition Audio». Если такое устройство отсутствует, то вместо него выберите «Устройство с поддержкой High Definition Audio».
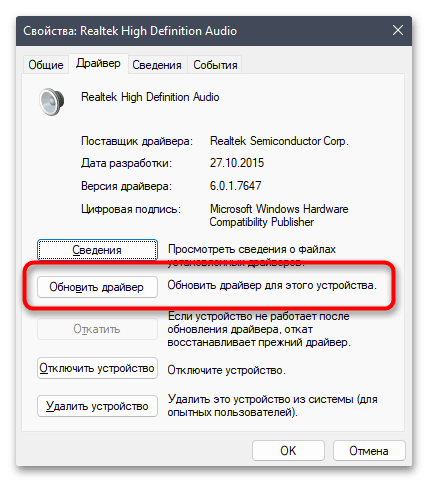
- Щелкните дважды по строке с названием устройства и в новом окне выберите действие «Обновить драйвер».
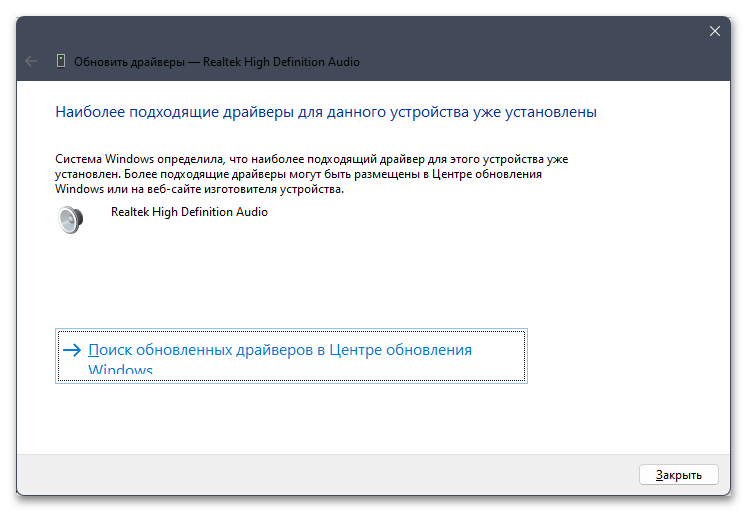
- Далее нажмите по варианту обновления «Автоматический поиск драйверов».
- Ожидайте окончания сканирования и получения результатов. Если обновление удачное, перезагрузите ПК и проверьте работу компонентов. В противном случае переходите к следующим рекомендациям.

Поиск драйвера из доступных на компьютере
Для некоторых моделей звуковых карт оптимальным будет вариант поиска и установки стандартного драйвера, который уже присутствует на компьютере. По большей части это относится к старым устройствам, официальная поддержка которых уже была прекращена. Принцип действий немного отличается от предыдущей инструкции, но имеет сходства в плане использования одного и того же штатного инструмента.
- Дважды кликните по своему звуковому устройству в «Диспетчере устройств» и снова выберите действие «Обновить драйвер».
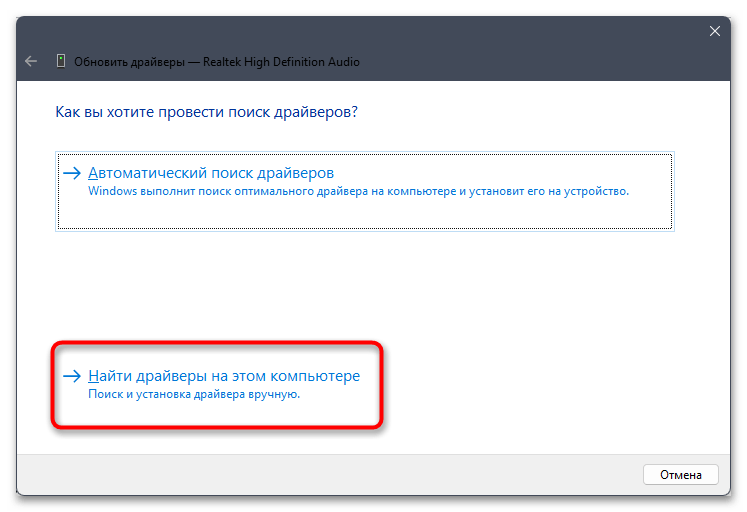
- На этот раз в окне нажмите по «Найти драйверы на этом компьютере».
- В следующем шаге вас интересует «Выбрать драйвер из списка доступных драйверов на компьютере».
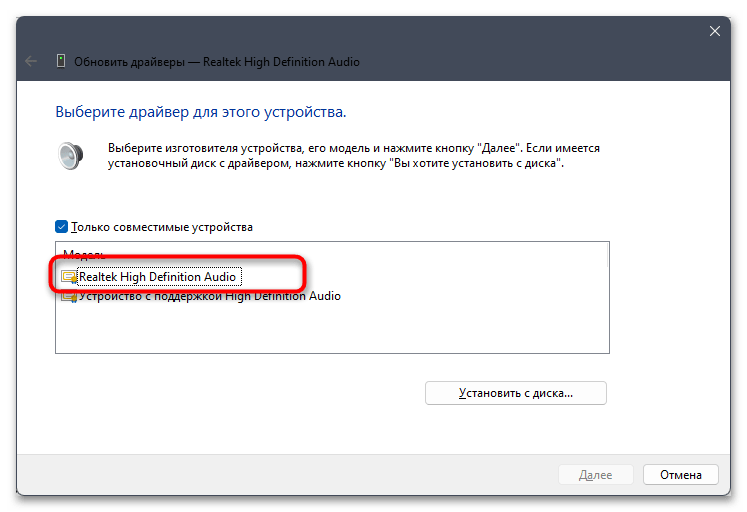
- Дождитесь загрузки списка и выберите из него «Realtek High Definition Audio», после чего подтвердите установку.


Удаление драйвера звука
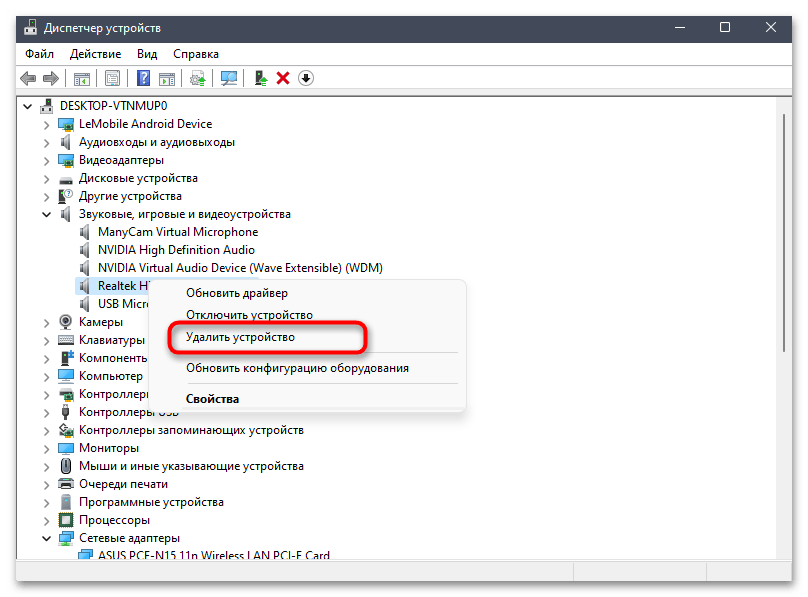
Выше мы уже говорили о том, что неправильный звуковой драйвер тоже может быть причиной проблем с запуском «Диспетчера Realtek HD» в Windows 11. Иногда стандартная версия оказывается оптимальной, поскольку в будущем она сможет обновиться автоматически средствами ОС. Поэтому если предыдущие действия ни к чему не привели, найдите текущее звуковое оборудование, кликните по нему правой кнопкой мыши и выберите пункт «Удалить устройство».
В следующем окне обязательно отметьте маркером пункт «Попытка удалить драйвер для этого устройства». Это позволит избавиться от всех связанных файлов и наладить стандартную работу звукового оборудования в операционной системе.
По завершении просто перезагрузите компьютер и проверьте, будет ли работать программное обеспечение управления звуком. Если оно вовсе пропало, значит, было удалено вместе с драйвером. Понадобится загрузить его вручную, о чем еще будет написано ниже.
Способ 4: Исправление работы приложения
Для некоторых версий программ, обеспечивающих работу «Диспетчера Realtek HD», поддерживается функция исправления, которая запустит соответствующее средство и инициирует проверку на ошибки с их дальнейшим исправлением. Вам стоит проверить доступность этого инструмента и использовать его для решения ошибок с запуском приложения.
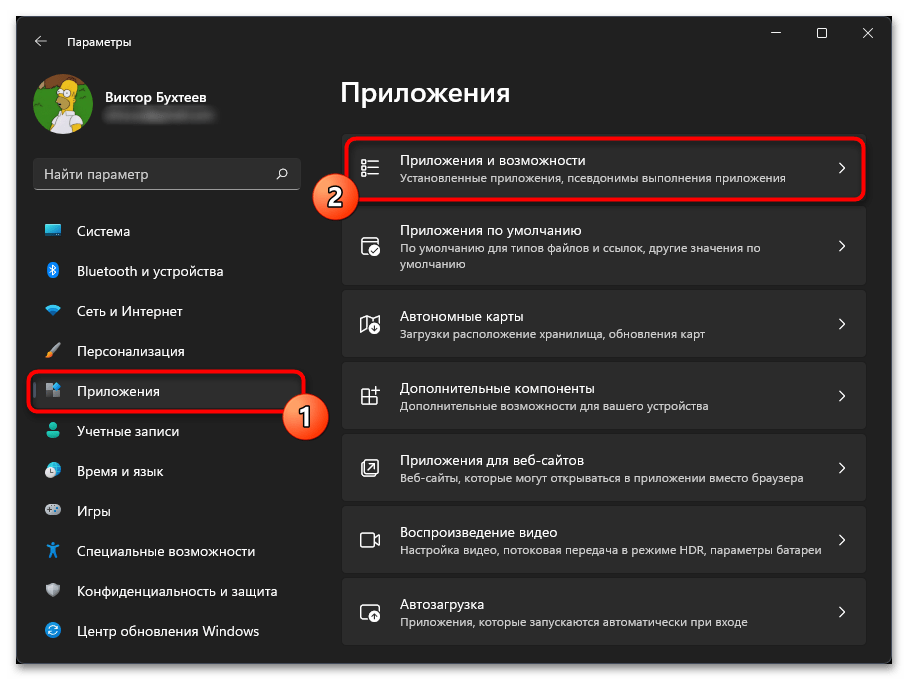
- Откройте «Пуск» и перейдите в «Параметры», нажав по значку с шестеренкой.
- На панели слева выберите «Приложения» и перейдите в «Приложения и возможности».
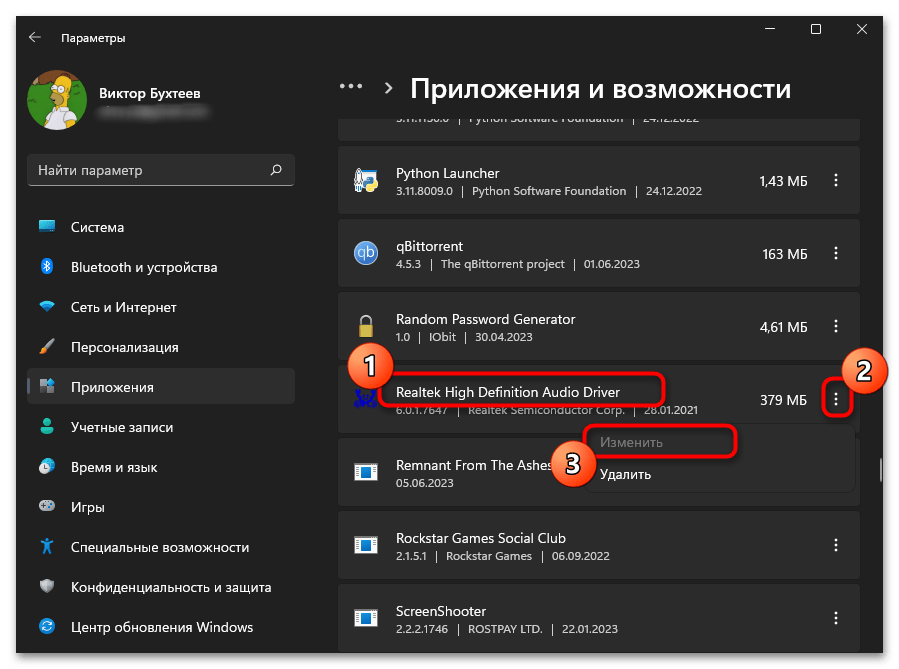
- Найдите приложение «Realtek High Definition Audio Driver» или другое, связанное с Realtek. Справа от приложения нажмите по кнопке с тремя точками и выберите пункт «Изменить». Если он неактивен, значит, исправление недоступно для данной версии и ее можно только попробовать переустановить.
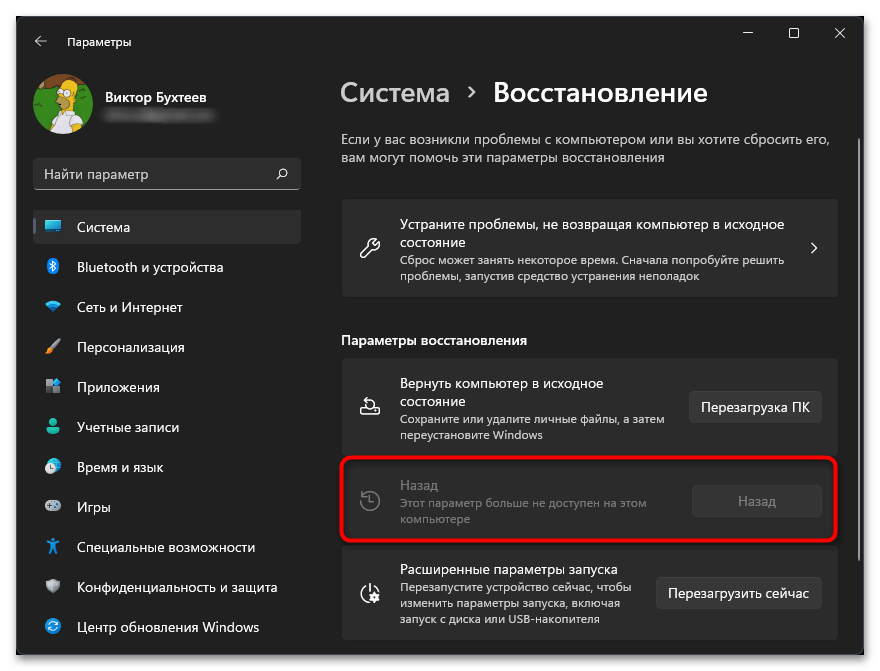
Способ 5: Откат обновления Windows
В редких случаях пользователи замечают, что ошибки с работой «Диспетчера Realtek HD» появились как раз после установки системных обновлений. Это может привести и к тому, что в Виндовс вовсе пропадет звук, но такие проблемы случаются нечасто. Если у вас есть повод полагать, что именно установленное недавно обновление и повлияло на работу компонента, его можно попробовать откатить и проверить, поможет ли это решить проблему. О доступных методах реализации подобной задачи читайте в материале по ссылке ниже.
Подробнее: Как удалить обновление в Windows 11
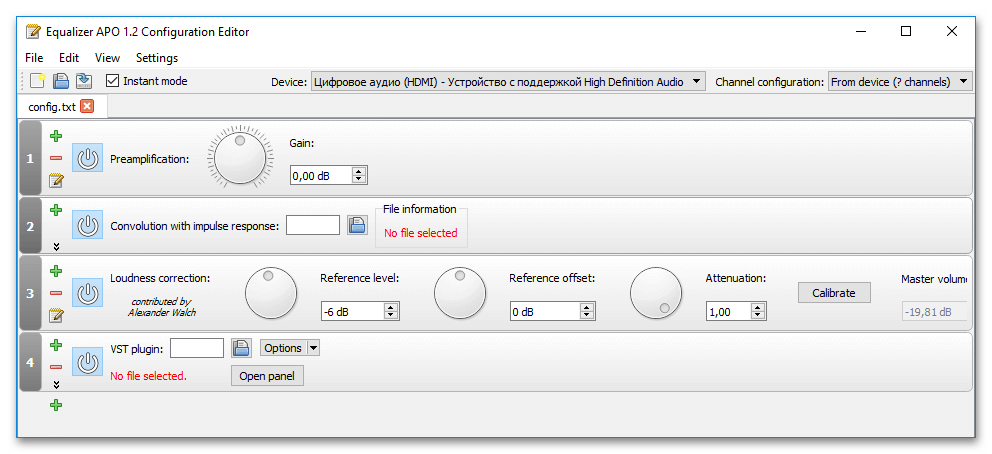
Способ 6: Использование сторонних эквалайзеров
По большей части «Диспетчер Realtek HD» используется в Windows 11 как эквалайзер с различными звуковыми настройками. Если в ходе выполнения предыдущих инструкций оказалось, что ваш компьютер не поддерживает данную программу или ее работу не получилось исправить, возможно, стоит обратить внимание на сторонние эквалайзеры, устанавливаемые отдельно от звукового драйвера. Таких программ существует большое количество с разными возможностями и преимуществами. Список самых популярных вы найдете в статье по ссылке ниже и сможете подобрать что-то подходящее для себя.
Подробнее: Популярные эквалайзеры для компьютера на Windows
Дополнительно отметим, что некоторые проблемы со звуком, если именно ради них вы и решили открыть «Диспетчер Realtek HD», можно решить другими методами. Часть из них представлена в отдельных материалах по следующим ссылкам, поэтому можете воспользоваться рекомендациями и попытаться справиться без применения рассматриваемой программы.
Читайте также:
Как усилить звук на ноутбуке с Windows 11
Устранение проблемы тихого звука на ноутбуке с Windows 11
Включение тонкомпенсации в Windows 11
Наша группа в TelegramПолезные советы и помощь
Quick Tips
- It’s best to install the Realtek driver using the OEM driver setup.
- If you can’t hear anything, chances are that the Realtek Audio Universal Service is not running.
- Ensure to enable the playback device if you don’t have any other speaker on your laptop or PC.
Fix 1: Check for Realtek HD Audio Manager in Apps
Step 1: Open Windows Settings (Win + I) and navigate to Apps > Installed Apps.
Step 2: In the search bar, type Realtek. If the Realtek app is installed, it will show up. If it doesn’t, download and install it again.

It is available on Intel’s website and Dell.
Fix 2: Add Realtek HD Audio to Windows Startup
If you have the Realtek HD audio driver installed on your PC, it also registers the Realtek Audio Universal Service.
Step 1: Type services.msc in the Run prompt (Win + R) and press Enter.
Step 2: In the Services Snap-in, locate and double-click the Realtek Audio Universal Service and open its Properties.

Step 3: Select Automatic from the drop-down next to Startup type. Click on OK to save the changes.
Next time you restart the PC, the Realtek services and app launch will automatically be ensured.
Fix 3: Enable Realtek Audio for Playback Devices
Windows sometimes disable devices for no reason, or if you have been experimenting and have accidentally disabled the speaker, then you need to enable it.
Step 1: Open the Control Panel by typing control in the Run prompt (Win + R) and pressing Enter.
Step 2: Locate and click the sound icon to open the Sound settings.
Step 3: Find the Realtek speaker, right-click, and click on Enable. Now, play an audio file to check if you can hear it.

Fix 4: Troubleshoot Audio Driver Issues
Windows 11 packs a bunch of troubleshooters that diagnose and automatically fix some of the common issues on a computer. Here’s how to run an audio-specific troubleshooter to detect and fix the issue:
Step 1: Open the Get Help app on Windows by searching it on the Windows Start menu.
Step 2: Type Audio troubleshooter in the search box and press enter.

Step 3: You should see a Welcome to Windows audio or sound troubleshooter message and a confirmation prompt. Here, you give your consent to proceed with the diagnostics and try automated steps to fix the problem.
Step 3: Click on Yes, and the audio troubleshooter will run. It will diagnose and apply fixes for your computer’s audio problem.
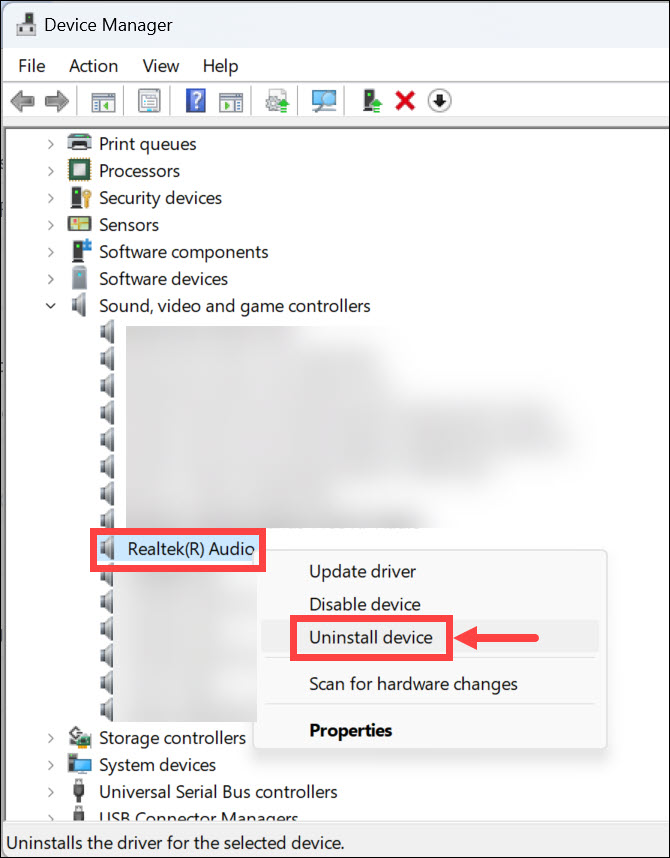
Fix 5: Uninstall Buggy Realtek HD Audio Driver
A corrupt or buggy driver can make the device visible in the system, but it may not work as expected. Device Manager can help you uninstall the device and then add it again. The best part is that you have the option to delete the driver along with the uninstallation.
Step 1: Right-click on the Start button, and from the menu that opens, select Device Manager.
Step 2: When the Device Manager window opens, expand the Sound, video, and game controllers section.
Step 4: Right-click on the Realtek High Definition Audio and select Uninstall.
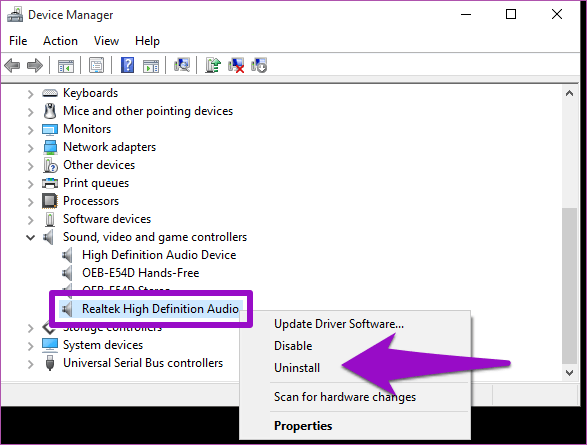
Step 3: Check the Delete the driver for this software option and tap on OK to proceed with the uninstallation.

Ensure to restart the PC for the final cleanup. Once done, you can install the driver again. This will ensure that all corrupted existing drivers are fixed.
Fix 6: Create Realtek HD Audio Driver Shortcut
To ensure the Realtek HD Audio Manager works, you can create a shortcut of the app’s display icon on the desktop of your Windows computer.
Step 1: Press the Windows + E keys to launch File Explorer and navigate to this location:
C:\Program Files\Realtek\Audio\HDAStep 2: Right-click RAVCpl64, click on Send to, and select Desktop (create shortcut).
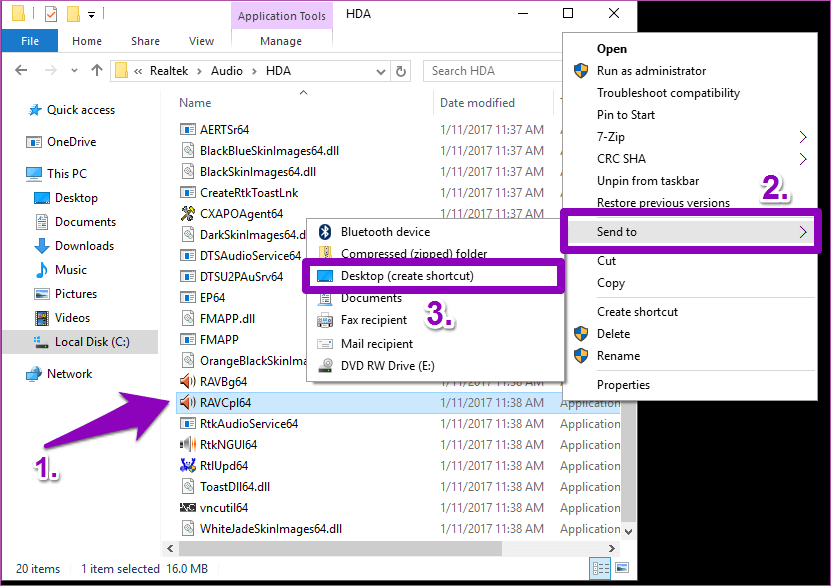
Step 3: Go to the desktop and double-click the shortcut to launch it if it is not running in the background.
FAQs
Why Is Realtek Not Showing Up in Device Manager?
One of the primary reasons for it to be missing is disabled status. You need to go to the Sound section of the Device Manager, and if the Realtek device is disabled, enable it.
What Is an Alternative for Realtek HD Audio Manager?
If your PC only supports Realtek devices, you don’t have an option. However, if your configuration supports Dolby, it is an excellent alternative to Realtek Audio HD Manager. It features automatic audio control and enhances the overall quality.
Was this helpful?
Thanks for your feedback!
The article above may contain affiliate links which help support Guiding Tech. The content remains unbiased and authentic and will never affect our editorial integrity.
WINDOW 11
5 SOLUTIONS
FEBRUARY 25, 2025
If the Realtek HD Audio Manager is missing in Windows 11, here are five effective ways to bring it back. You can reinstall drivers through Device Manager, enable it in Startup, use Realtek Audio Control from the Microsoft Store, manually launch the tool, or roll back to a stable driver to fix any conflicts or corrupt installations.
Deepak Yadav
Audio problems can be one of the most frustrating issues on a computer. Imagine watching a movie or a video, only to be left with no sound and no idea how to fix it!
Many Windows users have reported that after upgrading to Windows 11 from Windows 10, their Realtek audio stopped working. If you’re experiencing this issue with your Realtek audio on Windows 11, don’t worry; fortunately, there are a few fixes.
In this article, we will show you how to fix the Realtek audio not working in Windows 11. We will also provide some tips to avoid audio problems on Windows 11.
Why Is Realtek Audio Not Working in Windows 11?
If the Realtek audio drivers are not functioning on your Windows 11 device, it could be due to any of the following reasons:
- Outdated or corrupted Realtek audio drivers: If the sound driver is outdated or corrupted, it may not work correctly on your device.
- Incorrect audio settings: If you have selected incorrect audio settings on your device, the audio may not work correctly.
- Hardware compatibility: If you are using hardware that is not compatible with the Windows 11 operating system, it may not work correctly.
- Changes in Windows settings: If you have changed certain Windows settings, it may cause the audio to not work properly.
- Wrong connections: If you have connected your device to the wrong audio port, it may cause the audio to not work properly.
- Audio service stopped working: If the audio service on your device has stopped working, it may cause the audio to not work.
Fix Realtek Audio Driver Not Working on Windows 11
Now you know the reasons why your Realtek audio may not be working on Windows 11. Here are various fixes that you can apply.
1. Check Your Connection and Audio Source
The first thing you should do is check the connections between your device and the audio source. Make sure that you have connected your device to the right port and that it is adequately secured. Also, make sure that you are using the correct audio source.
2. Update Realtek Audio Driver
If your Realtek audio driver is outdated or corrupted, it may cause the audio to not work. To fix this issue, you need to update your Realtek audio driver.
You can do this manually by visiting the website of Realtek and downloading the latest drivers for your device. Or, if you can update the Realtek audio drivers through Device Manager:
1. Press the Windows + X keys at the same time and click on Device Manager.
2. Expand the Sound, video, and game controllers option by clicking on it.
3. Right-click on Realtek(R) audio and select Update driver.

4. Choose “Search Automatically for Updated Driver Software” from the options available and wait for Windows to finish the process.
3. Re-Install Realtek Audio Drivers
If updating the audio drivers doesn’t help, you may need to re-install them. You can do this by following these steps:
1. Press Windows + X keys at the same time and click on Device Manager.
2. Expand the Sound, video, and game controllers option by clicking on it.
3. Right-click on Realtek(R) audio and select Uninstall device.
4. Restart your device, and Windows will automatically install the latest Realtek driver. If not, you can manually re-install the latest version of the drivers from the website of Realtek.
4. Verify Audio Settings
If you have selected incorrect audio settings, it may cause the audio to not work correctly. To fix this issue, verify your audio settings and make sure that they are correct:
1. Right-click on the “speaker icon” in the taskbar and select Sound settings from the context menu.
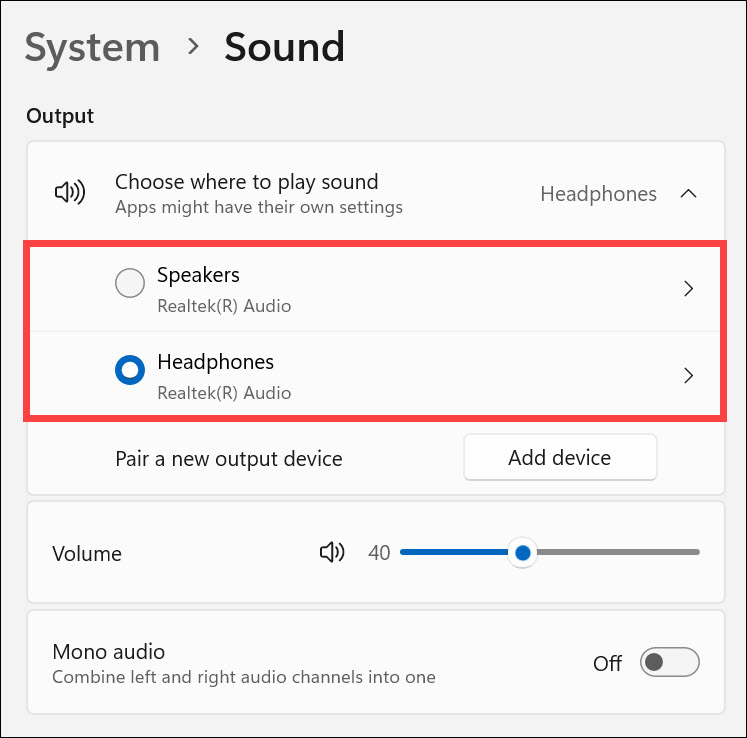
2. Under the Output heading, click Choose where to play sound.
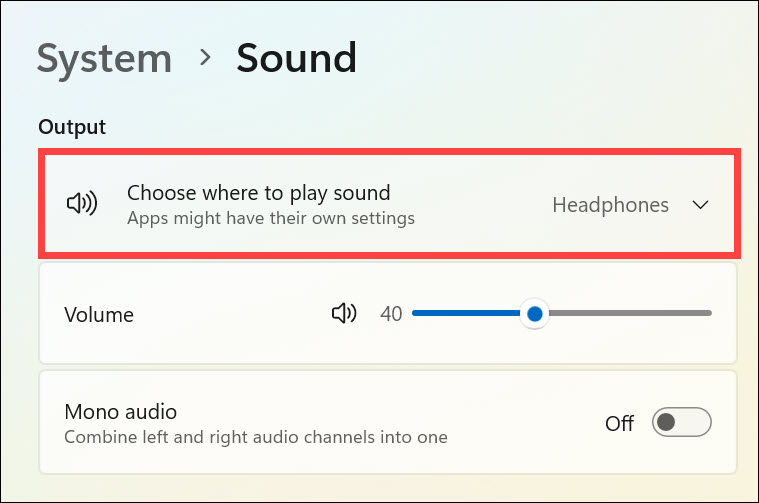
3. Select the correct audio source from the list. Also, adjust the volume as per your preference.
5. Run Windows 11 Audio Troubleshooter
You can also run the Windows 11 audio troubleshooter to detect and fix any audio-related issues on your device. It can help you resolve any conflicts or incorrect settings causing the Realtek audio not working problem.
Here are the steps to run Windows audio troubleshooter:
1. Launch Windows Settings by pressing the Windows + I keys at the same time.
2. On the left pane, remain on the System tab and select Troubleshoot on the right.
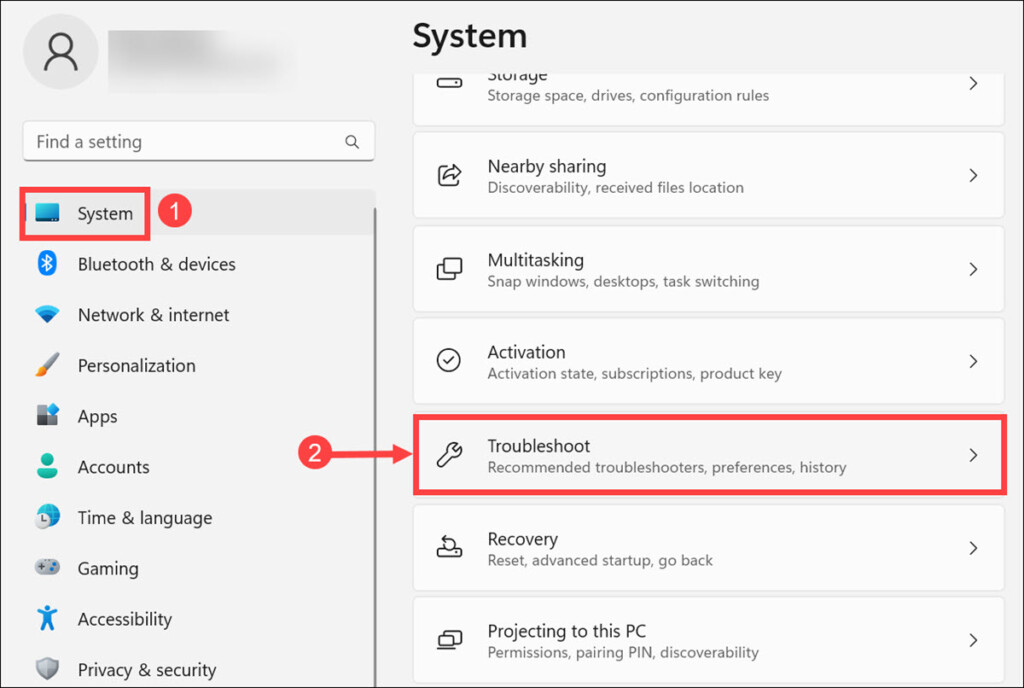
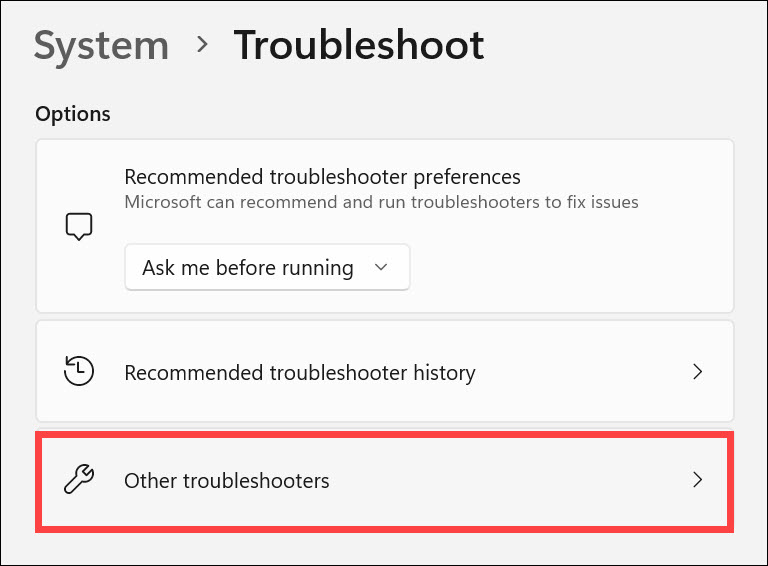
3. Under the Troubleshoot settings, select Other troubleshooters.
4. Click the Run button next to “Playing Audio” to begin troubleshooting.

5. Follow the on-screen instructions to fix any audio-related issues on your device.
6. Restart Realtek Audio Service
Realtek audio service is responsible for running the audio on your device. If it has stopped working, it can cause the audio to not work. To fix this issue, you need to restart Realtek audio service.
Here is how to restart Realtek Audio Service:
1. Press Windows + R keys at the same time and type “services.msc” into the Run box. Press Enter to launch the Services window.
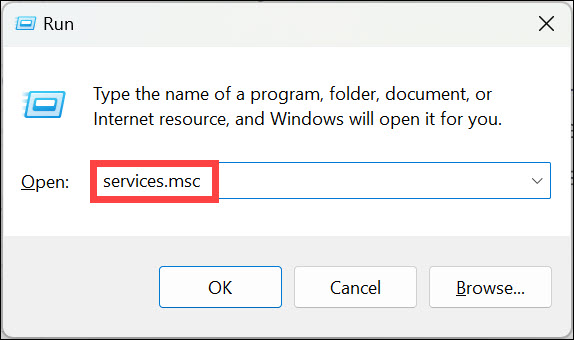
2. Locate Realtek Audio Universal Service or RtkAudioService in the list, right-click on it, and select Start.

3. Wait for Windows to finish the process and verify that your Realtek audio is now working correctly.
7. Disable Audio Enhancements
It is possible that any audio enhancements enabled on your device can interfere with the Realtek audio and cause it to not work correctly. To fix this issue, you need to disable all audio enhancements. Here is how to do that:
1. Click the ‘search icon’ on the taskbar, type Change system sounds on the Windows search box, and click on its icon to launch.

2. Now switch to the Playback tab, select your Speaker, and click Properties at the bottom.

3. Under the Speaker Properties window, switch to the Advanced tab and uncheck Enable audio enhancements.

Now check if the Realtek audio is working correctly on your device. If it still doesn’t work, try the next solution.
8. Restore Windows 11 to a Previous State
Windows 11 automatically creates restore points every time you install an app or make any major changes to the system. If any app or recent changes are causing the problem, restoring your PC to a previous state can help fix it.
However, remember that restoring Windows to a previous state would delete all the recent applications and restore all the changes you have made to the system. Here are the steps to run the system restore:
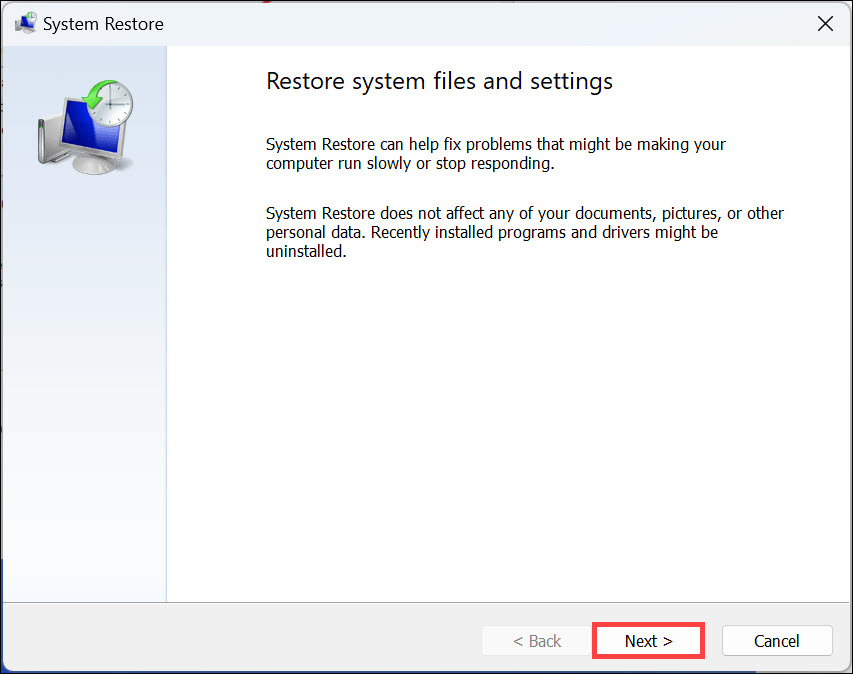
1. Press Windows + R to launch the “Windows Run Command.”
2. Type this command to open the “System Restore” Window: rstrui

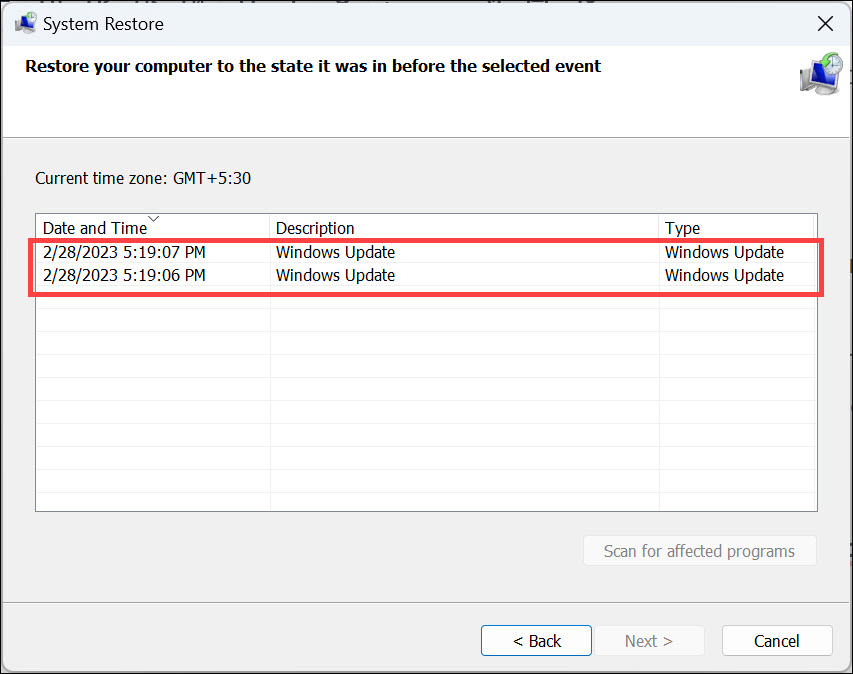
3. Under the “System Restore” window, click Next.
4. Select an appropriate system restore point from the list where Realtek audio was working fine and click Next.
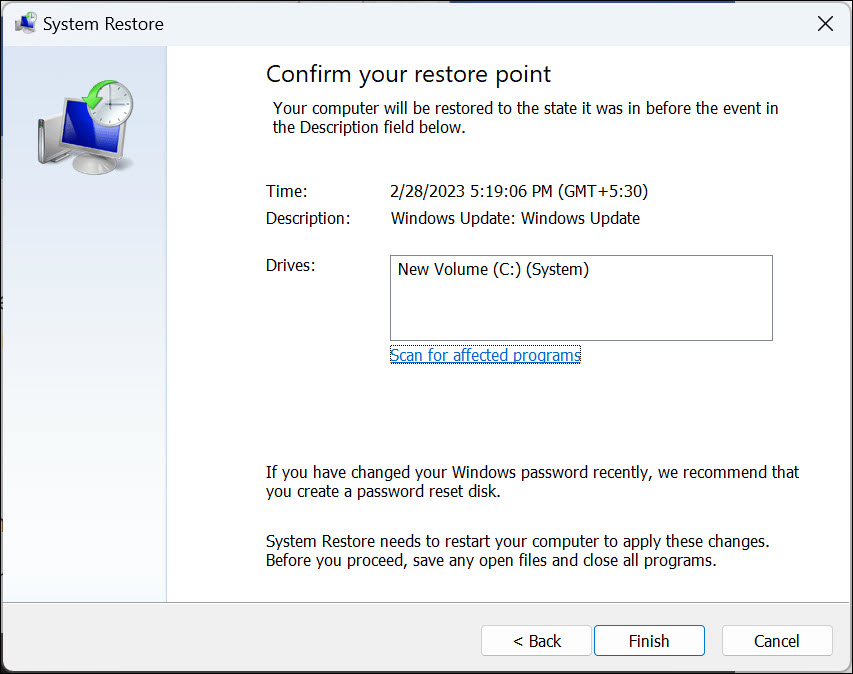
5. Finally, click Finish to restore the system to its previous state.
9. Update Windows 11
Finally, if none of the above methods have helped you fix the Realtek audio not working issue, try updating your computer. It might be possible that the Realtek audio driver is incompatible with the current version of Windows.
Updating Windows 11 to the latest version can help fix most of the sound-related issues on your device. You can check for any available updates and install them using Windows Settings. Here is how to do that:
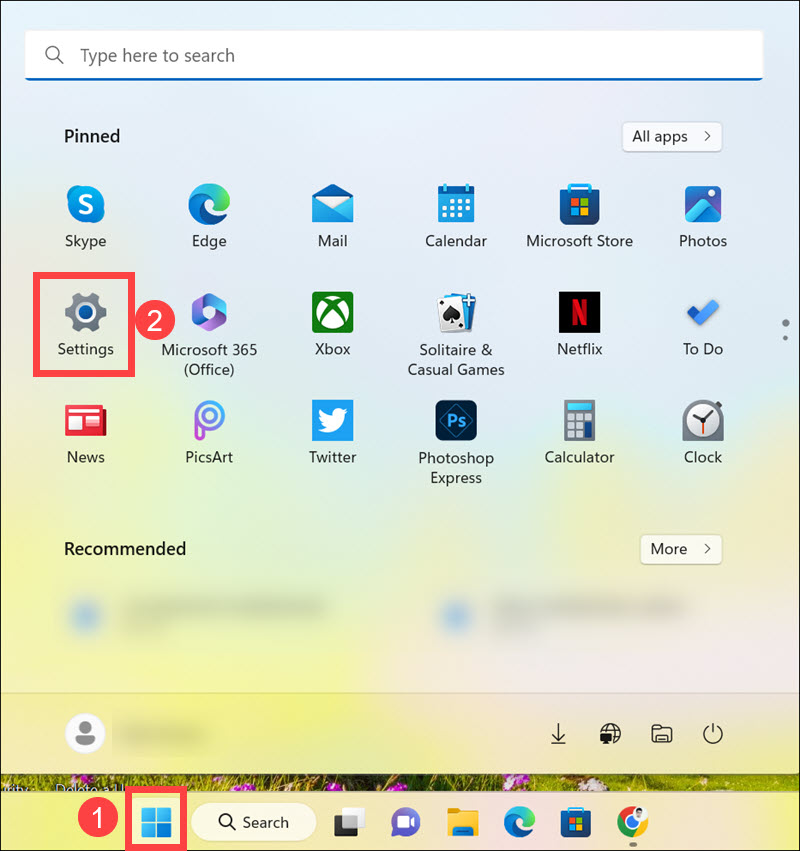
1. Click the Start button and launch Settings from the Start menu.
2. Switch to the Windows Update tab on the left, and on the right, click on Check for Updates.
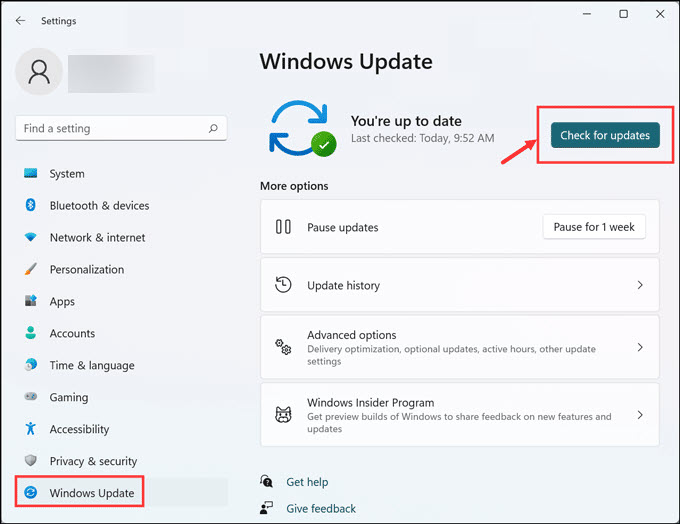
3. Windows will now check for available updates and download them.
4. Finally, click on the Install all button to install all the available updates.
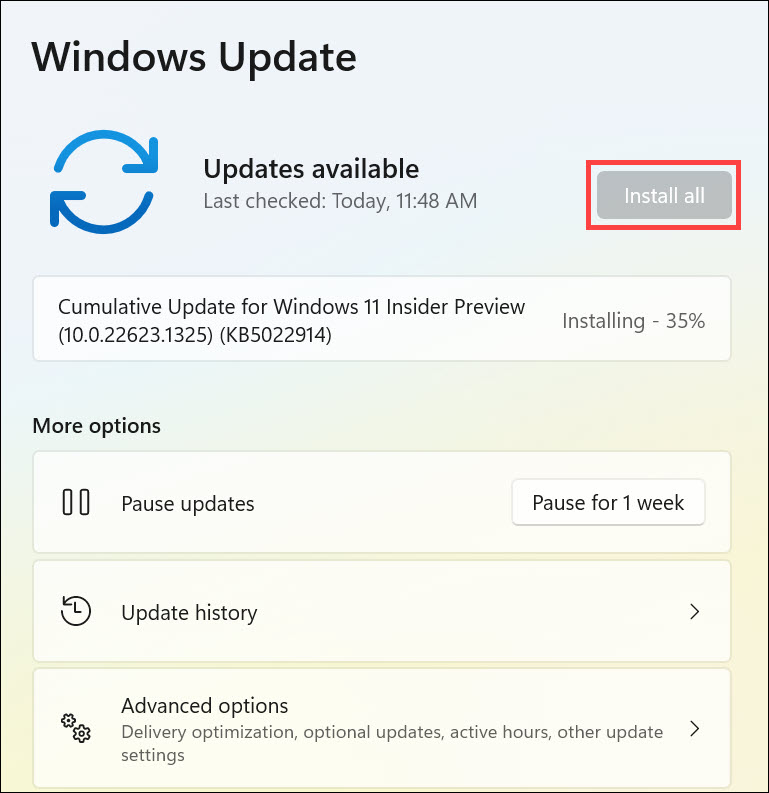
Restart the system and check if the problem is solved.
Summing Up
Realtek audio not working can be frustrating, but luckily you can usually fix it easily. In this article, we have discussed 9 solutions that you can use to fix the Realtek audio not working issue on your device. We hope these steps have helped you resolve any conflicts or incorrect settings causing the Realtek audio not working problem.
We have listed some of the most effective methods to resolve this issue; still, if none of these methods help, we suggest you contact customer support for further assistance with this problem.
Windows 11 was released in October 2021 worldwide with a lot of bugs and errors. This is most evident with the new OS, especially the drivers who are still in the testing phase. Recently many users have been complaining about Realtek audio console not enhancing audio in Windows 11 like headphone virtualization, loudness equalization, etc. for headphones, speakers, and other such devices. So, today we bring a perfect guide that will help you to fix Realtek audio console not working in Windows 11.

Table of Contents
Realtek Audio console not working issue have risen after people upgraded to Windows 11 and weren’t there in Windows 10. Though Microsoft has been constantly working on improving Windows 11 and the recent version has attained much stability as compared to initial versions. However, you may still face the said issue. There can be a lot of reasons which can lead to problems with the Realtek audio console, a handful of such reasons are listed down as follows for you to get an idea about the scenario;
- Damaged peripherals or outdated devices
- Connectivity issues with the device, damaged cable wires
- Drivers corrupt or outdated for the specific device
- Mismanaged audio settings or disruption in driver installation due to the presence of an unwanted application interfering with the background process
- Loose connection at the cabinet end of the system failing to complete the circuit.
- Wrongly inserted cables to incorrect ports
Usually, one of these reasons may be causing Realtek audio console not working on Windows 11 properly problem. To rectify these, let’s move forward with the methods
Method 1: Basic Hardware Troubleshooting
To start from the very basic, check the connectivity of the devices you’ve plugged in. Follow the given points to do so.
- Go to the cabinet of your system or the dock board and check if the connections are done properly.
- Untangle and reconnect the wire if so, might be straining the cables.
- Also, check your system in case of muted or low leveled audio which is done by some applications to optimize the system for comfortable hearing experiences.
- Plugging out and reconnecting the device should also be performed to verify.
This method could fix the basic issues with the connectivity of the peripherals, but if this wasn’t the case, proceed to the next method.
Method 2: Run Playing Audio Troubleshooter
Troubleshooting the audio might sometimes fix all the persistent problems with the audio on the system. To try them out, follow these steps:
1. Click on the Search icon, type troubleshoot settings, and click on Open.

2. Here, click on Other troubleshooters under the Troubleshooting options.

3. Locate Playing Audio and click on Run on the right to start the troubleshooter.

4. Now, select the Realtek audio device and click on the Next button.

5. Wait for the troubleshooter to detect the problems.
6. Apply the fix if there are any issues as instructed by the troubleshooter.
7. Restart the PC after making changes.
Open your audio console and choose your settings to check the audio whether the issue of Realtek audio console is not working got fixed.
Also Read: Fix Low Microphone Volume in Windows 11
Method 3: Set Default Audio Device
Multiple audio devices can sometimes lead to misbehavior, thus might lead to Realtek audio console not enhancing audio. Follow these steps to set your specific audio input/output as a default device for your system.
1. Right-click on the speaker icon in the Taskbar overflow section and select Sound settings, as illustrated below.
2. Click on More sound settings under Advanced section.

3. Click on the Playback tab on the Sound window.

4. Locate Realtek audio device in the list, click on it and choose Set default options below.

5. Click on Apply > OK to save changes and close the window.
Open the console, set your desired settings, and check the audio too if this fixed Realtek audio console not enhancing audio. If this didn’t solve, proceed to the next method.
Method 4: Verify the Audio Output
This can sound silly but confirming the correct audio output can be equally important in case you’ve multiple audio outputs connected. Sometimes repeated failed attempts of optimizing the audio device by overlooking these little details keep you struck for hours not leading you to the desired audio outputs. To verify this,
1. Click on the search icon, type Realtek audio console, and click on Open.

2. On the left pane, click on Realtek HD Audio output from the listed devices.

3. Now make the desired audio changes for the device and close the application.
4. Then, play any random music after choosing your desired settings in the console and check if still the issue remains. If this didn’t work, proceed with the next method.
Also Read: How to Turn Off Windows 11 Camera and Microphone Using Keyboard Shortcut
Method 5: Change Realtek Audio Device Format
Improving the sound quality for the audio output can be advised by choosing the best studio quality available in Windows to cure this problem. To do so, follow these simple steps:
1. Navigate to Sound settings > More sound settings > Sound window as shown in Method 3.
2. Right-click on Realtek audio device and select Properties.

3. Click on the Advanced tab and select the drop-down menu under the Default format.

4. Then, select the 2 channel, 24 bit, 192000 Hz (Studio Quality) from the dropdown options.

5. Click on Apply > OK to save changes.
Check the settings on the audio console and play any audio to check if Realtek audio console not enhancing audio is fixed.
Method 6: Reinstall Audio Service
Here are the steps to reinstall audio service to fix Realtek audio console not enhancing audio on Windows 11 problem.
1. Click on the Search icon, type services, and click on Open.

2. On the Services window, scroll down the list in front to locate the Windows Audio service and check its Status tab.
3A. If the Status tab says Stopped, then click on the Start option on the Windows Audio section.
3B. If the Status tab says Running, click on the Restart option as highlighted in the given pic below.

4. Now, restart the following services too by repeating the above steps.
- Windows Audio Endpoint Builder
- Remote Procedure Call
Also Read: 3 Ways to Stop Spotify From Opening on Startup in Windows 11
Method 7: Update Audio Driver
A pending update for the audio driver would restrict further work by other applications related to it. To check this, follow these steps:
1. Click on the Search icon, type device manager, and click on Open.

2. Double click on Audio inputs and outputs to expand and view the installed drivers.

3. Right-click on your audio driver and select the Update driver option.

4. Click on Search automatically for drivers to download and update the driver automatically.

5A. If any updates are available, then Windows will download and install them.
5B. If your driver is updated then, you will receive the message The best drivers for your device are already installed. Click on the search for updated drivers on Windows Update option.

6. Then, select Advanced options in the right pane of the Windows Update menu.

7. Click on the Optional updates option under Additional options.

8. If there are any updates available then, they will be listed here. Find the audio driver update and check the box next to it.
9. Then, click on Download & install.

10. Finally, restart your PC after installing the updates.
Method 8: Reinstall Audio Driver
If all these methods didn’t work, the installed drivers might be the problem, and reinstalling would fix Realtek audio console not enhancing audio in Windows 11 problem. To do this, follow these steps:
1. Click on the Search icon, type device manager and click Open.
2. In the device manager window, double click on Audio inputs and outputs to expand it.
3. Right-click on audio driver and click on Uninstall device from the context menu.

4. In the Uninstall Device confirmation prompt, click on Uninstall.
5. Then, restart your PC.
6. Download the latest Realtek audio driver from the official website.
Note: You can also select the compatible driver for your system from the Intel Driver and Support Assistant page.

7. Go to the location where you downloaded the driver setup file.
8A. In case the downloaded file is executable, double click on .exe file and follow the on-screen instructions to install Realtek audio driver on Windows 11.
8B. If the downloaded file is in formats like .zip or .rar, use an archive extraction application like 7Zip or WinRAR. After extracting the contents of the archive, double-click on the executable setup file and install the driver.
Now, check Realtek audio console is working or not.
Also Read: How to Fix Windows 11 Webcam Not Working
Method 9: Perform System Restore
If none of the above methods fix Realtek audio console not working on Windows 11 problem. Then, you should restore your system back to when the issue did not exist. Follow these steps to perform a System resote.
1. Click on the Search icon, type Control Panel and click on Open.

2. Set View by: > Large icons and click on the Recovery option, as depicted.

3. Then, click on Open System Restore.

4A. Now, choose Recommended restore and select Next in the System Restore window. And, click on Next.

4B. Alternatively, you can manually Choose a different restore point. Then, select latest restore point to restore your computer to the point when you were not facing the issue. Click on Next.
Note: You can click on Scan for affected programs to see the list of applications that will be affected by restoring the computer to the previously set restore point. Click on Close to close the newly opened window.

5. Finally, click on Finish to start the System Restore.

Recommended:
- How to Fix Firefox Not Loading Pages
- How to Find Someone’s Amazon Wish List
- How to Fix Audio Buzzing in Windows 11
- How to Create Restore Point Context Menu in Windows 11
With this article, we hope you were able to fix Realtek audio console not working in Windows 11. A couple of these methods are feasible for the issue, tell us in the comment section below which of these methods work for you and if there are further queries.